

Page 1
MODIFIED AUGUST 2008
Vaxcare:
AUST: 1300 36 4040
NZ: 0800 800 900
www.vax.com.au
Instruction Manual
Please read carefully before using the cleaner.
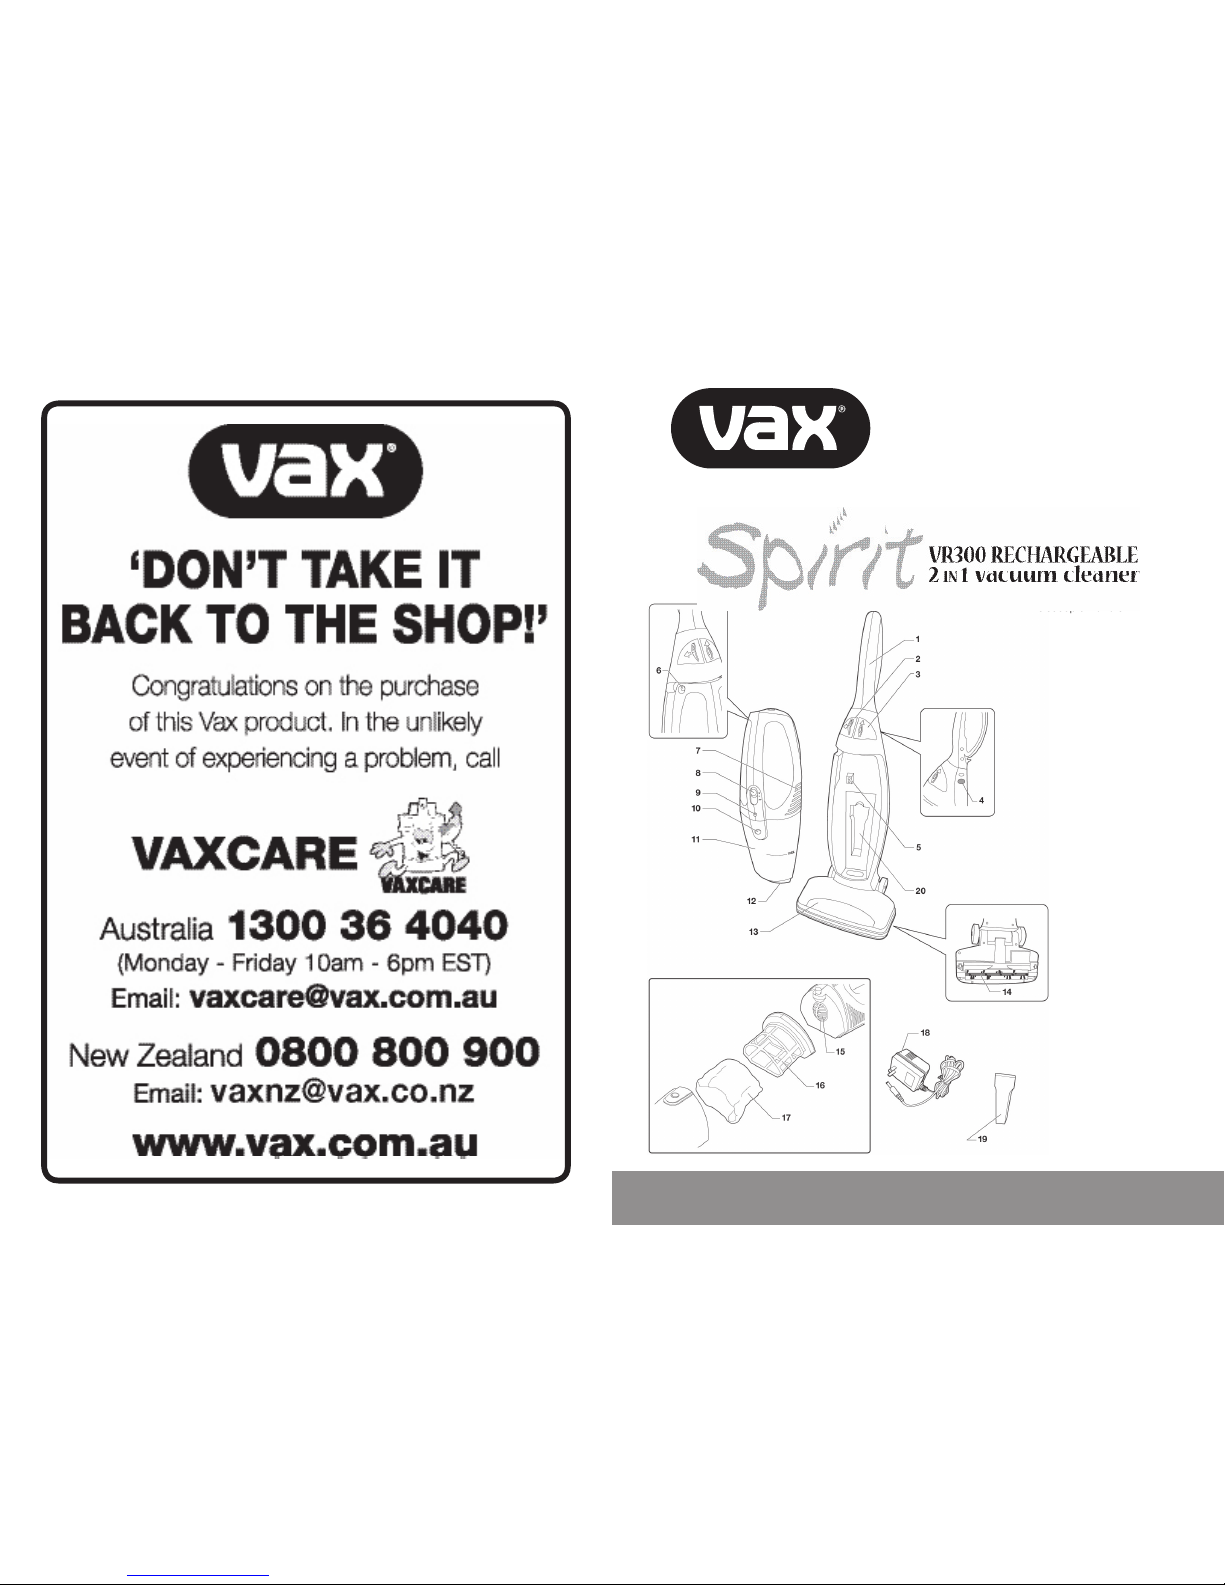
1. Telescopic Handle
2. Power Unit/Hand Vac Release
Button
3. Telescopic Handle Release Button
4. Handle Removal Button
5. Power Terminals
6. Charging Jack
7. Grill
8. On/Off Power Switch
9. Charging Light
10. Dust Cup Release Button
11. Dust Cup (container)
12. Suction Inlet
13. Brush Bar W indow
14. Brush Bar
15. Motor Fan Grill
16. Filter Adapter
17. Dust Cup Filter
18. Transformer
19. Crevice Tool
20. Crevice Tool Storage Compartment
*Illustrations may differ
from actual product
NOTE: Your cordless
vacuum is supplied with the
batteries uncharged.
Charge the unit for 20 hours
prior to first use is required.
Page 2

1. Important Safeguards
When using this electrical appliance, basic
precautions should always be observed,
including the following:
READ ALL INSTRUCTIONS BEFORE USING
THIS APPLIANCE
WARNING: To reduce the risk of fire,
electrical shock, or injury:
1. Do not charge this unit outdoors.
2. Do not use outdoors or on wet surfaces.
3. This appliance is not intended for use
by young or infirm persons unless they
have been adequately supervised by a
responsible person to ensure that they
can use the appliance safely.
Young children should be supervised
to ensure that they do not play with the
appliance.
4. Use only as described in this manual.
Use only manufacturer’s recommended
attachments.
5. Do not use charger if power cord has
been damaged. Do not use cordless hand
vacuum or charger if it has been dropped,
damaged, left outdoors, or dropped in
water. Return it to an Authorised Vax
Service Agent for examination, repair or
adjustment.
6. Do not abuse the charger cord. Never
carry the charger by the cord or yank to
disconnect from an outlet; instead grasp
the plug and pull to disconnect.
7. Keep charger cord away from heated
surfaces.
8. This product includes rechargeable nickel
cadmium batteries. Batteries must be
recycled or disposed of properly.
Do not
incinerate batteries or expose to high
temperatures, as they may explode.
9. Do not handle plug or appliance with wet
hands.
10. Do not put any object into openings. Do
not use with any opening blocked; keep
free of dust, lint, hair and anything that
may reduce air flow.
11. Keep hair, loose clothing, fingers, and all
parts of body away from openings and
moving parts.
12. Do not pick up anything that is burning or
smoking, such as cigarettes, matches, or
hot ashes.
13. Turn off all controls before unplugging.
14. Do not attempt to change accessories
while unit is running.
15. Use extra care when cleaning on stairs.
16. Do not use to pick up flammable or
combustible liquids such as gasoline or
use in areas where they may be present.
17. Do not use charger with an extension cord.
Plug charger directly into an electrical
outlet. Use charger only in a standard
(220-240V/50Hz) electrical outlet.
18. Do not use the hand vacuum cleaner
without dust cup filter in place.
19. Store the cordless vacuum indoors. Put
the cordless vacuum away after use to
prevent accidents.
20. Leaks from battery cells can occur under
extreme conditions. If the liquid, which is
20-35% solution of potassium hydroxide,
gets on the skin - wash immediately with
soap and water or neutralize with a mild
acid such as lemon juice or vinegar. If the
liquid gets into the eyes, flush immediately
with clean water for a minimum of 10
minutes and seek medical attention.
21. Use only on dry, indoor surfaces.
22. Do not use for any purpose other than
described in this user’s guide.
23. Do not attempt to use the charger with
any other product nor attempt to charge
this product with another charger.
Use
only the charger supplied with this
appliance.
WARNING: Do not use to charge non-
rechargeable batteries.
24. The battery must be removed from the
appliance before it is discarded.
25. The battery is to be recycled or disposed
of safely.
26. The appliance must be disconnected from
the supply when removing the battery.
27. Turn off all controls before unplugging.
SAVE THESE INSTRUCTIONS
For Household Use Only
2
8. Troubleshooting
PROBLEM: Hand vacuum will not operate
Cause: Batteries discharged.
Solution: Charge unit.
Cause: Dead battery (battery won’t hold charge).
Solution: Replace battery pack.
Cause: No power in electrical outlet supplying transformer.
Solution: Check fuse or breaker. Replace fuse/reset breaker
PROBLEM: Motorised brush will not work
Cause: The agitator is blocked with debris or string.
Solution: Remove debris from agitator. If there is string or thread wrapped around the brush
bar, carefully cut with scissors.
Cause: The belt is broken.
Solution: Call VAXCARE or take to an Authorised Vax Service Agent.
Cause: Power unit/hand vac is not seated correctly.
Solution: Seat the power unit/hand vac correctly.
PROBLEM: Hand vacuum will not pick-up or suction power is weak
Cause: Dust cup container is full.
Solution: Empty dust cup container.
Cause: Dust cup filter needs cleaning or replacement.
Solution: Remove dust cup filter and check for object(s) in air duct and remove.
Clean or replace dust cup filter.
Cause: Unit needs recharging.
Solution: Charge unit.
PROBLEM: Dust escaping from hand vacuum
Cause: Dust cup container is full.
Solution: Empty dust cup container.
Cause: Dust cup filter is not installed correctly.
Solution: Review dust cup filter installation instructions.
Cause: Puncture/hole in dust cup filter.
Solution: Replace dust cup filter.
PROBLEM: Battery will not hold charge
Cause: Battery has reached the end of its service life.
Solution: Call VAXCARE or take unit to an Authorised Vax Service Agent.
Review battery removal and disposal section.
Please Note: The Dust Cup Filter is washable. It should, however, be replaced every three
(3) to six (6) months depending on usage to ensure peak performance of your vacuum.
Important: Make sure that Dust Cup Filter has completely air dried before re-installing back
in the hand vacuum.
Warning:
Always remove the hand vacuum from the power unit before cleaning the power brush.
7
Page 3

6. Battery Removal & Disposal
The cordless hand/stick vacuum is powered
by Nickel-Cadmium (Ni-Cd) batteries, which
must be recycled or disposed in accordance
with local requirements. The battery pack
used in this model is replaceable, however
care should be taken when doing so. Follow
these steps when replacement is required:
1. Remove the dust container by pressing
the dust cup release button.
2. Turn the handheld on its side with the four
screws facing towards you.
3. Using a phillips head screwdriver, remove
all four screws and separate the two
halves of the motor cover.
4. The battery is now accessible, and is
comprised of two parts, linked together
by a connecting wire. Be careful not to
move any other components.
5. Disconnect the two battery clips from the
battery terminals.
6. Remove the battery assembly from its
locating compartment.
7. Fit the new battery into the battery
compartment.
8. Reconnect the battery clips to the battery
terminal.
9. Replace the outer cover and ensure that
the two cover halves fit together properly.
10. Screw in the four screws removed earlier.
11. Charge the battery for a minimum of 20
hours before use.
Call your nearest recycling centre
or local authority for information on
the recycling and disposal of Ni-Cd
batteries. Do NOT replace the batteries
used in this product with any other type of
battery.
CAUTION:
• Use only with the battery pack supplied
with the unit.
• Do not attempt to remove the battery pack
from the unit to charge it.
• Never throw the battery pack or unit into a
fire or incinerate.
• Do not attempt to remove or damage the
battery casing.
• Battery must be recycled or disposed of
properly at the end of its service life.
7. Technical Specifications
Model Name: Spirit
Model Number: VR-380
Part Number: 55000
Charger Supply Voltage: 220-240V/50Hz
Battery: 14.4 V Ni-Cd
Dust Capacity: 600ml
Filter: Cage and Filter
Weight: 3kg
Subject to technical change without notice
VAXCARE Service & Help
AUSTRALIA 1300 36 4040
NEW ZEALAND 0800 800 900
If you have any queries or concerns about
using your Vax, call VAXCARE.
Please make a note of the serial number
and model number of the appliance before
calling.
(Aust only: Mon-Fri. 10.00am to 6.00pm. EST)
Calls are charged at the local rate.
An answerphone is available outside of these
hours.
There are over 300 approved Vax Service
Agents in Australia and New Zealand. For the
nearest Service Agent, please call VAXCARE
or visit www.vax.com.au
6
2.Assembly
NOTE: Ensure that the unit is not connected
to the charger before assembling the handle.
1. Align the
t e l e s c o p ic
tube on the
handle with
the opening
on the power
unit housing
(Fig/2.1).
2. Slide the
telescopic tube into the opening until it is
seated firmly into position.
3. Push on the telescopic handle release
button to adjust the height of the handle.
3. Charging Your
Vacuum Cleaner
Before using the vacuum, charge the vacuum
cleaner for a minimum of 20 hours.
NOTE: Ensure that the On/Off switch
on the hand vac is in the “Off” position
before charging.
NOTE: The power unit/hand vac does
not have to be in the power unit/hand vac
receptacle to charge the battery.
1. Place the vacuum near an electrical power
outlet (220-240V/50Hz) and plug in the
charger.
2. Connect the
charger to the
charging jack
(Fig/3.1).
The red charging
indicator light will
illuminate when
the vacuum
cleaner is being
charged.
3. The vacuum cleaner will run for maximum
operational time only if it has been fully
charged. The normal full charging time for
this vacuum is 20 hours. To fully charge
the unit, run the vacuum cleaner until it
stops, then fully recharge the battery.
NOTE: Peak performance may only be
attained after the unit has been charged and
discharged two (2) or three (3) times.
To Maximize the Life of your Ni-Cd
Batteries
1. Charge for a minimum of 20 hours before
initial use. Failure to do so will significantly
reduce the battery life.
2. Do not store the unit with the charging
adaptor attached and plugged in.
3. Only recharge when the batteries are fully
discharged (or as close to fully discharged
as possible).
4. Do not store in areas of high temperature
or humidity.
5. NOTE: Fully discharge, then completely
re-charge the unit at least once a month.
6. After three (3) months of storage, the
appliance should be fully discharged
and then recharged to maximize battery
power.
7. Only use the charger supplied. If other
chargers are used, damage to the battery,
appliance or personal property could be
caused.
8. Ni-Cd batteries have a long useful life but at
some time they will need to be replaced.
NOTE:
1. The on/off switch must be in the “OFF”
position in order to charge the unit.
2. If the appliance has never been used or
has been stored for an extended period
of time without use - it will take several
complete charge and discharge cycles
to fully charge the batteries for maximum
performance.
3
Charging
Jack
Fig/3.1
Page 4

Using the Crevice Tool
The crevice tool can be used by attaching it
directly to the power unit/hand vac.
To attach crevice tool to the power unit/
hand vac:
1. Remove the power unit/hand vac from the
main unit.
2. Attach the crevice tool directly into the
suction nozzle of the power unit/hand vac
(Fig/5.2).
6. Changing & Cleaning
the Dust Cup Filter
Note: Ensure that the unit is not
connected to the charger before fitting
or cleaning the dust cup (container).
To achieve the best performance, empty
the dust cup container and clean the
dust cup filter after each use.
1. Remove the power unit/hand vac from the
power unit/hand vac receptacle.
2. To remove the dust cup container, press
down on the dust cup release button and
pull off the dust cup container.
3. Pull out the dust cup filter and empty the
dust from the dust cup container (Fig/6.1).
4. Assembly of Dust Cup
Note: Ensure that the unit is not
connected to the charger before fitting
or cleaning the dust cup (container).
1. To open the dust cup compartment, push
the dust cup release button and remove
the dust cup container (Fig/4.1).
2. Ensure that the dust cup filter is inside,
then re-attach the dust cup container to
the hand vacuum (Fig/4.2).
Detaching the Power Unit/Hand Vac
from the Power Unit Housing
NOTE: The floor brush will not function
without the power unit/hand vac in place
and fully charged.
1. To remove the
power unit/hand vac
from the power unit
housing, depress
the power unit/hand
vac release button
(Fig/4.3).
2. Grasp the handle of
the power unit/hand
vac and pull out.
3. To replace the power
unit/hand vac into the
power unit/hand vac
receptacle, place the
bottom of the power
unit/hand vac into
the receptacle first,
then tilt towards the power unit housing
until it audibly clicks into place.
5. Using the Vacuum
NOTE: The floor brush will not function
without the power unit/hand vac in place
and fully charged.
The vacuum is ideal for cleaning stairs and
awkward areas.
1. Ensure that the power unit/hand vac is in
position on the power unit housing.
Extending the Telescopic Handle
The vacuum is equipped with a telescopic
handle to increase the reach when
vacuuming.
1. To extend the
handle, depress
the telescopic
handle release
button (Fig/5.1).
2. Hold down
telescopic handle
release button
while pulling the
handle up until it
clicks into place.
3. To decrease the length of the handle,
depress the telescopic handle release
button and push the handle in until it clicks
into place.
4. Rinse the dust cup filter in cold water.
Wait until it air dries completely before
replacing it back into the dust cup
container.
Do not machine wash to clean the dust
cup filter. Do not use a hair dryer to dry it.
Air dry only.
5. Replace the dust cup filter carefully into
the dust cup container.
NEVER operate vacuum cleaner without
dust cup filter in place.
6. Attach the dust cup container to the power
unit/hand vac.
CAUTION: The suction nozzle must be
open and free of any obstruction at all times
to prevent the motor overheating which could
cause damage.
NOTE: To ensure peak performance, it is
recommended that the dust cup filter be
replaced every three (3) to six (6) months
depending on usage.
Replacement Dust Cup Filters
Replacement dust cup filters are available
from your Vax stockist or Vax direct. Phone
Vaxcare or visit: www.vax.com.au
4 5
Telescopic
Handle
Release
Button
Fig/4.2Fig/4.1
Fig/5.1
Fig/5.2
Fig/6.1
 Loading...