

Page 1

SteamFresh
COMBI
VERSATILE CLEANING FOR
ALL AROUND THE HOME
LET’S GET STARTED.
S86-SF-C
Page 2

Let’s talk safety
Basic
safety
precautions
Don’ts
This steam cleaner is intended for household use only and
NOT for commercial or industrial use.
WARNING: Danger of scalding
• Only use the steam mop indoors and keep the area you’re
cleaning well lit.
• Keep ngers, hair and loose clothing from moving parts
and openings whilst using the steam mop.
• This appliance can be used by persons with reduced physical,
sensory or mental capabilities or lack of experience and
knowledge if they have been given supervision or instruction
• Don’t touch any hot areas/accessories on your steam mop.
It’s normal for the steam mop and accessories to heat up during
use, always allow them to cool down before handling.
• Don’t use the steam mop if it has been dropped, if there are visible
signs of damage or if it is leaking, if it has been immersed in
water or left outdoors.
• Don’t handle the plug or use the steam mop with wet hands.
• Don’t pull or carry this steam mop by the power cord.
• Don’t leave this steam mop unattended while it is connected to
the supply mains.
• Don’t aim the steam mop at people, animals, plants and electrical
Do’s
• Always make sure the concentration nozzle and accessories are
securely connected to the handheld before use.
• Always ll the clean water tank with water only, never add
perfume, stain remover or products containing alcohol.
Filling the clean water tank with hot or boiling water will
damage the machine and invalidate your guarantee.
• Always make sure tanks are tted correctly before using
the steam mop.
• Always vacuum your carpets thoroughly and ensure hard oor
areas are free from grit and debris before using the steam mop.
• Always carry the steam mop by the handle.
• Always unplug the steam mop before carrying out any
maintenance or when unattended.
• Take extra care when cleaning on stairs.
Page 3

concerning use of the appliance in a safe way and understand the hazards
involved. Children shall not play with the appliance.
• Please refer to oor manufacturers care recommendations before use, and test
your ooring/carpet/rugs by running the steam mop over a small hidden area,
if no pile distortion or no damage occurs continue cleaning. Not suitable for use
on wax polished oors or furniture, acrylic surfaces and synthetic, velvet or
steam/water sensitive materials.
• This steam mop should not be used to clean electrical appliances such
as microwaves, oven, televisions and electrical heating systems etc.
• Only Vax recommend cloths and detergent should be used with this steam
mop. Using other detergents will invalidate the guarantee.
components such as interior of ovens or wires. Never touch the steam burst
or oorhead from a short distance (there is a risk of scalding).
• Don’t use the power cord as a handle, pull the power cord around corners
or sharp edges or close a door over the power cord.
• Don’t attempt to remove blockages with sharp objects as this may cause
damage to the steam mop, remove blockages only as instructed in this guide.
• Don’t unplug steam mop by pulling on the power cord or run over the power
cord. If the power cord or plug is damaged please contact out Customer Care
Line on 0330 026 8455 (Mon-Fri 8:30am to 6:30pm, Sat 9:00am to 5:00pm)
• Don’t use the steam mop with incorrect voltage as this may result in damage
or injury to the user. The correct voltage is listed on the ratings label.
• Turn o all controls on the steam mop before disconnecting or connecting
the power cord, after use always wrap the power cord around the cord
clips provided.
• Always replace the fuse in the plug with a British 13amp fuse.
• Always protect the power cable from heated surfaces or near open ames.
• Use only CE approved 13amp extension cords, non-approved extension cords
may overheat.
• Care should be taken to arrange the extension cord as it could be a trip hazard.
• Store the steam mop in a cool, dry area away from children.
• Before storing the steam mop please ensure all water/detergents tanks and hard
water lter are thoroughly clean and dry.
• Keep the appliance out of reach of children when it is energised or cooling down.
PLEASE KEEP INSTRUCTIONS FOR FURTHER USE AND USE ONLY
AS INSTRUCTED IN THIS GUIDE.
Page 4

Thank you for buying this Steam Fresh Combi
Taking care of your sealed hard oors and surfaces
The Steam Fresh Combi is designed to make steam cleaning your hard oors and surfaces
regularly, as eective and ecient as possible, and this user guide will help you get the most
out of your machine.
Maintaining your hard oors and surfaces with the Steam Fresh Combi will ensure they keep
looking beautiful, smell fresh and are hygienically clean.
Taking care of your Steam Fresh Combi
Also inside this guide are instructions on maintaining your new machine, so that it’s always ready
when you are to tackle your hard oors and surfaces.
Taking care of you
We’re here if you need us. Instead of taking me back
to the shop, simply visit:
vax.co.uk/support or call:
(UK) 0330 026 8455 (ROI) 1-800 928 308
Monday-Friday 8:30am to 6:30pm, Saturday 9:00am to 5:00pm
Calls are charged at the UK local rate. Please make a note of the serial number and model number
of the product before calling.
Alternatively, you can write to us at:
Vax Ltd., Plot 302, Stonebridge Cross Business Park, Hampton Lovett, Droitwich,
Worcestershire, WR9 0LW, UK
This user guide can be found online at: vax.co.uk/support
Let us know what you think @VaxUK
Page 5

Contents
Steam Fresh Combi
Let’s talk safety
Getting to know your machine
Getting started
Using your machine
Taking care of your machine
What to do if it goes wrong
Getting in touch
Using your accessories
Included with
your machine
2x Microbre
Cleaning Pads
Carpet Glider
Hose
Metal Brush
Small Plastic Brush
Large Plastic Brush
Window Tool
Window Tool Cloth
Accessories
Notes
Scraper Nozzle
Concentration Nozzle
Grout Brush
Detail Nozzle
Accessory Bag
250ml Detergent
Page 6
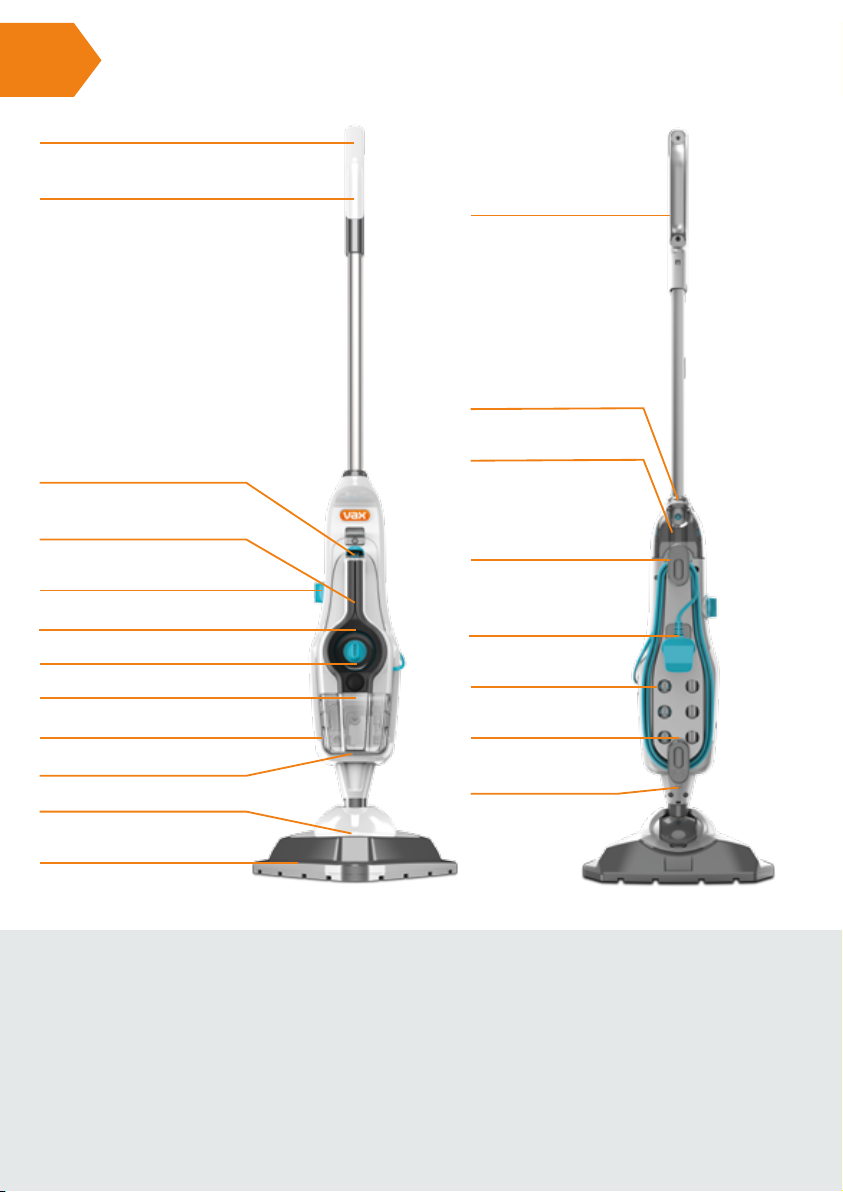
Handle
Getting to know your machine
Detergent trigger (hidden)
Handheld release button
Handheld steam trigger
Detergent control dial
Steam ready indicator
Steam control dial
On/O switch
Water tank
Hard water lter (hidden)
Compact scrub brush
Concentration
nozzle storage
Handle release button
Detergent tank
Quick cord
release hook
Plug storage
Tool storage
Quick cord
release hook
Floorhead
release button
Floorhead
Technical Specication
Name Stream Fresh Combi
Voltage 220-240
Wattage 1400-1600w
Cord length 8m
Weight 3.7kg
Subject to technical change without notice.
Accessories & Consumables*
Microbre Cleaning Pads
(Type 1)
1-1-131448
Pro Cleaning Pads (Type 6)
1-1-132319
Coral Cleaning Pads (Type 3)
1-1-131643
*To purchase consumables and accessories, please visit vax.co.uk
Carpet Glider (Type 3)
1-1-133527
Flat Upholstery Tool
1-1-131394
Hard Water Filter (Type 1)
1-1-133327
Page 7
PLEASE READ ‘LET’S TALK SAFETY’ AT THE BEGINNING BEFORE USE
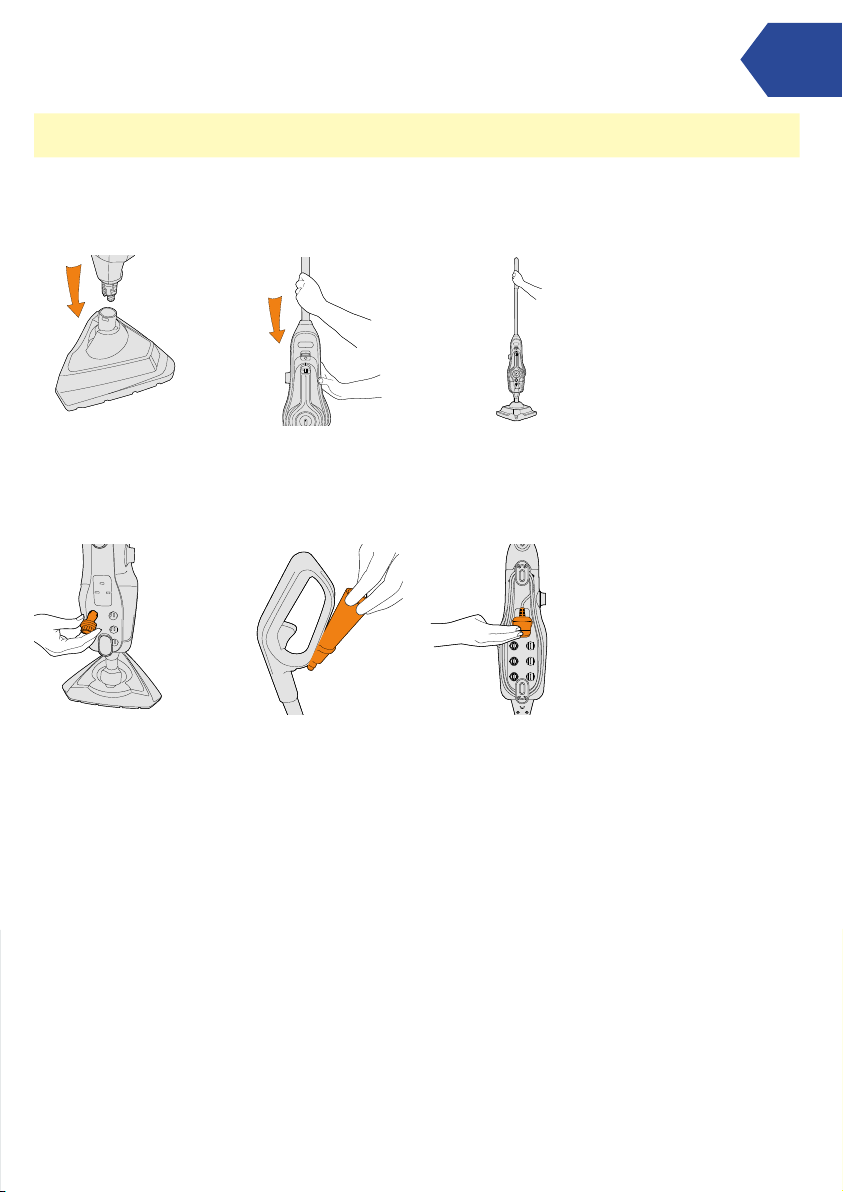
Assembling your steam mop
Getting started
Push the main body down
into the oorhead until
it clicks into place.
Insert tools into the back
of the steam mop.
Push the handle into main
body until it clicks into place.
Insert concentration nozzle
into the storage hook on the
back of handle.
To stand the steam mop
upright push handle until
clicks into place.
Wrap the power cord around
the quick cord release hooks
and insert the plug into the
plug storage.
Page 8
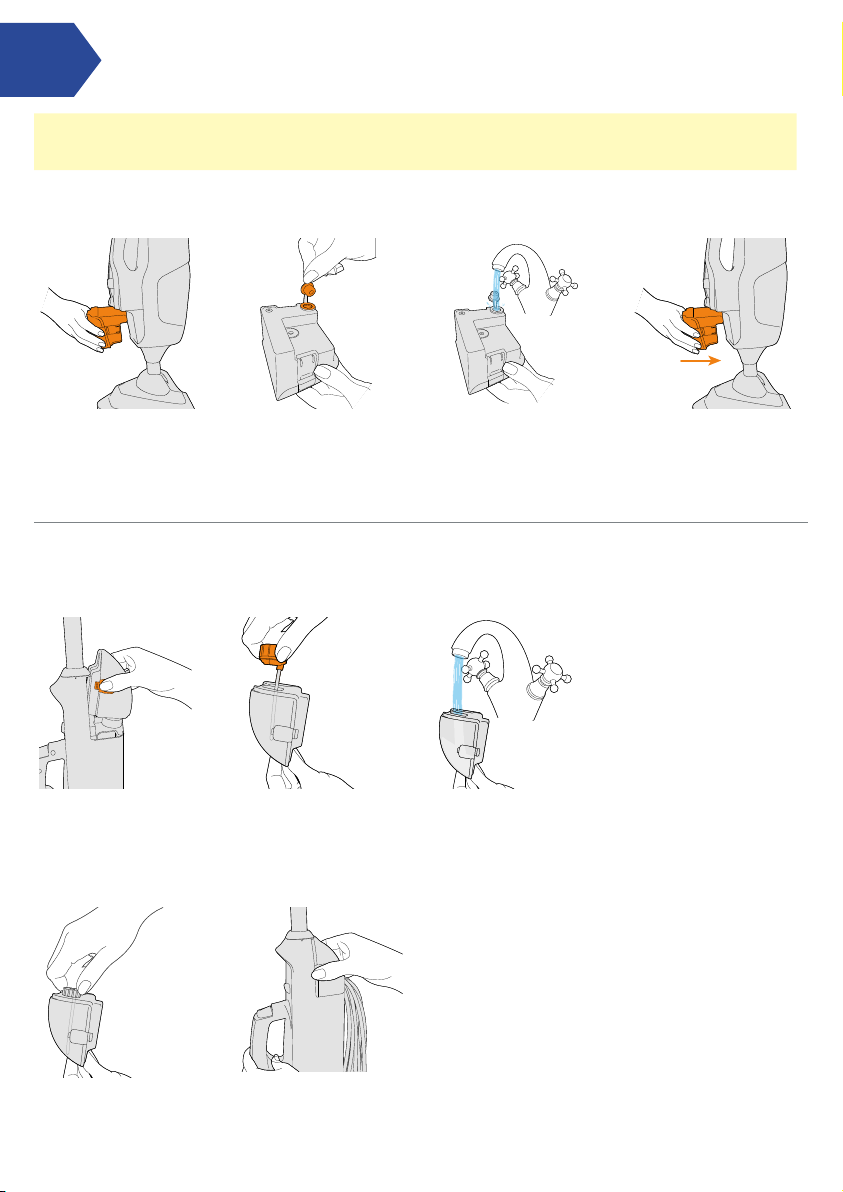
Using your machine
Filling water tank
IMPORTANT: If you don’t want to use detergent on your ooring, turn detergent dial to OFF position.
Always test on an inconspicuous area of ooring rst before using detergent.
Press the water tank
release buttons and pull
the water tank to remove.
Filling detergent tank
To remove the detergent
tank press both release
buttons and pull to release.
Pull the tab on the water
tank cap to open.
Twist the detergent tank
cap anti-clockwise
and lift to remove.
Fill the water tank with
260ml of water, replace the
cap and push rmly to close.
Pour 50ml of Vax detergent
and 150ml of water into the
detergent tank.
Slide the water tank back into
the machine until it clicks
into place.
Replace the detergent tank cap
and twist clockwise to close.
Insert the detergent tank back
into the machine until it clicks
into place.
Page 9

Using your machine
IMPORTANT:
• The steam mop and accessories get very hot during use, always allow them to cool down before handling.
• Always unplug and switch o the steam mop when assembling.
• Always switch o the steam mop before emptying the water tank or changing the cleaning pads/accessories.
• IMPORTANT: Please refer to oor manufacturer’s care recommendations before use and test the steam mop
on a discrete area of ooring to begin with.
• When using the steam mop, basic safety precautions should always be observed.
• Don’t aim the steam mop at people, animals, plants and electrical components such as interior of ovens or wires.
Never touch the steam burst or oorhead from a short distance. (There is a risk of scalding).
• The steam mop is equipped with a thermostat and a thermal cut-out. If for any reason the steam mop overheats it
will switch o. If this happens turn o and unplug the steam mop, allow to cool for a least 2 to 4 hours and re-start.
Using the steam mop
Place the microbre pad on
the oor, white side facing up.
Place steam mop onto pad
making sure the entire pad
covers the oorhead.
To recline the steam mop
place foot on oorhead and
pull handle backwards.
Plug into mains and press the
power button to switch on.
The blue light will illuminate
to show power on. The green
light will illuminate to show the
steam mop is ready to use.
Push On/O switch to
turn machine on.
Hold corner of pad down
with foot and lift steam
mop to peel away.
Adjust the steam dial to
desired setting.
To produce steam squeeze
the trigger in short bursts.
Don’t hold the trigger
continuously to prevent
over wetting oors.
To steam your oors with
detergent turn the dial to ON
and without detergent turn
the dial to OFF.
Move the steam mop slowly
backwards and forwards
across the oor paying
particular attention to high
trac areas. Squeeze/release
trigger as required.
Page 10

Using your machine
IMPORTANT: When using on carpets, always make sure the microbre cleaning pad is used and covers the oorhead entirely
before using the carpet glider. Only use the carpet glider when refreshing carpets and turn the detergent dial to OFF.
Refreshing carpets
Place the microbre pad on
the oor white side facing up.
Place steam mop onto pad
making sure the entire pad
covers the oorhead.
To recline the steam mop
place foot on oorhead and
pull handle backwards.
With microbre pad attached,
hook the steam mop into the
front of the carpet glider and
push to clip into place. Carpet
glider should only be used
when refreshing carpets.
To produce steam squeeze
the trigger. To prevent
over wetting the carpet,
avoid holding the
trigger continuously.
Using compact scrub brush
Turn the detergent dial to OFF
when refreshing carpets.
Move the steam mop slowly
backwards and forwards
across the carpet paying
particular attention to high
trac areas.
Push On/O button
to switch on.
To release the carpet glider,
place foot on clip and push
down. Lift steam mop to
unhook and remove.
Place foot on outer oorhead
and gently pull away steam
mop to release the compact
scrub brush.
Move steam mop back and
forwards across the oor,
getting into corners and
awkward places.
IMPORTANT: Always switch o the steam mop before attaching or removing the oorhead.
Page 11

Using your machine
WARNING: Always switch o the handheld steamer before attaching the concentration nozzle and accessories.
Using the handheld steamer
Lift the handheld release
button and gently pull the
handheld to release from
the steam mop.
Adjust the dial on the front of the handheld to desired
steam setting and push On/O button to switch on.
Remove water tank
and rell before use.
When using the handheld always attach the concentration
nozzle or hose. Push the concentration nozzle/hose onto
the handheld nozzle and twist clockwise to lock into position.
Insert the handheld back into the machine until it clicks
into place.
Using small accessories Using large accessories
Small tools can be attached via concentration nozzle,
twist clockwise until locked into position and secure.
To remove concentration nozzle, turn anticlockwise.
Larger accessories can be attached using the concentration
nozzle or hose. To attach the hose twist clockwise
until locked into position and secure. To remove hose,
turn anti-clockwise.
Page 12

Taking care of your machine
IMPORTANT: Allow the steam mop to fully cool down before performing any maintenance or troubleshooting checks. Don’t leave
water or detergent in the tanks between uses, as this can eect the machines performance, the water/detergent tanks need to be
emptied and rinsed after each use.
Emptying the water tank
Press the water tank
release button and lift the
water tank by the handle.
Pull the tab on the
water tank to open.
Emptying the detergent tank
Push both detergent tank
release buttons and lift
to remove.
Twist detergent tank cap
anti-clockwise and lift
to remove.
Removing cleaning pads
Empty any excess
water into the sink.
Empty any excess detergent
over the sink.
Rinse water tank with
water and replace water
tank tab, push rmly to close
before replacing back onto
the machine.
Rinse detergent tank with
water and replace detergent
tank cap, turn clockwise to
tighten before replacing back
onto the machine.
Hold corner of pad down
with foot and lift steam
mop to peel away.
Max 40°C
All cleaning pads are machine
washable (Max 40°C). Allow
to fully dry before use.
Page 13

Taking care of your machine
IMPORTANT: Don’t operate the steam mop without the hard water lter in place. The condition of the lter aects the performance
of your machine, check and change the lter periodically. If you live in an area of hard water the lter will discolour or darken over time.
Depending on water hardness and frequency of use, the lter should be changed every 3 to 6 months or if the lter has discoloured.
Replacing the hard water lter
3-6 Months
Remove the water tank
to access the hard
water lter.
IMPORTANT: Ensure machine is unplugged before carrying out maintenance
Pull to remove the
hard water lter.
Hard water lter should
be replaced every 3 to 6
months or if discoloured.
Removing blockages
If there is an obstruction
to the steam ow through
the machine, steam may
be released through the
bleed valve located on
the side of the handheld.
To remove the oorhead from
main body push the oorhead
release button and lift.
After oorhead is removed,
using a thin object such as
a paper-clip (in the area
shown), insert to remove
the blockage.
Insert new lter, new lter
looks beige/cream in colour.
With the pad removed from
the oorhead, insert
a small thin object such
as a paper-clip in to the steam
holes to remove a blockage.
Page 14

Using your Accessories
Using the accessory tools
Concentration Nozzle
A concentrated ow of steam
to lift grime. Use on any sealed
surface in the home or car to tackle
stubborn stains. The nozzle allows
a powerful jet of steam to remove
dirt even in hard to reach places.
Upholstery Tool
Attach the cloth to the Window Tool
for use on upholstery and clothes.
Brushes
A hard–wearing brush for use
on sealed surfaces. Always test
a hidden area before use.
Grout Brush
A wide straight brush to tackle
grout on tiled oors and surfaces.
This lifts embedded dirt from
in between tiles and grouting.
Squeegee Tool Window/Shower Tool
Clean your windows and mirrors
quickly and easily. The Squeegee
Tool disperses Steam evenly to any
glass surface, including shower doors,
ovens glass and in your car. You can
then swipe dry to avoid streaks.
Carpet Glider
A detachable Carpet Glider
accessory which adapts the
oorhead and enables you to make
a seamless transition between
cleaning hard oors and carpets.
This can be used on all carpeted
areas around the home.
Detail Nozzle
For those hard to reach
places all around the home.
This super-concentrated steam
nozzle ts in small crevices at
a 45° degree angle for easy access.
Use to clean taps, under rails
and radiators quickly and thoroughly.
Scraper Tool
Perfect for shifting dried on
or stubborn residue from ovens,
work surfaces, bathroom surfaces
and even pots and pans.
Metal Brush
Strong metal bristles to lift resilient
grime from tough surfaces. Use
when deep cleaning your oven, wire
racks or BBQ to make light work of
dicult cleaning tasks. Not for use
on soft or delicate surfaces such as
material or upholstery.
Page 15

Also available 360° Steam Tools
Order at: www.vax.co.uk/spares-and-solutions
Conversion starter kit (Type 1) – 1-1-137249
Our 360° Connector enables you to access all areas with steam. It twists, so that you don’t have
to - making steam cleaning easier on the wrist! Your 360° tools attach to this connector,
so keep it safe. The 360° Tool Adapter attaches to your Steam Fresh Combi so you can
then attach your 360° Connector.
Clean & Scrub Kit (Type 1) – 1-1-137101
All you need to clean and scrub at all angles. 360° Steam Tools provide full rotational cleaning.
This kit includes: 1 x Pro Clean Pad and 1 x Microbre Pad for general cleaning, 1 x Deep Scrub
Brush, 1 x Soft Scrub Brush and 1 x Grout Brush for cleaning tough stains around the home.
A free accessory bag is also included.
*Must purchase Conversion Starter Kit, in order for the Clean and Scrub Kit to t.
Multi-Surface Kit (Type 1) – 1-1-137102
All you need to tackle awkward crevices and a multitude of surfaces around the home.
360° Steam Tools provide full rotational for cleaning at all angles. The kit includes: 1 x Window Tool
and Pad (for glass, mirrored or shiny surfaces), 1 x Deep Scrub Brush and 1 x Grout Brush,
1 x Extension Hose (for extra exible reach) and 1 x Flexi-Tool with 2 x Microbre Socks
(for tackling a multitude of surfaces and awkward nooks and crannies). A free accessory bag
is also included.
*Must purchase Conversion Starter Kit, in order for the Multi-Surface Kit to t.
Consumables
360° Window Pads – 1-1-137252
Contains 4 x replacement Window Pads for your 360° Window Tool. Pads are machine washable.
360° Scrub Pads – 1-1-137251
Contains 4 x replacement Microbre Pads and 4 x replacement Pro Cleaning Pads. Pads are
machine washable.
360° Flexi-Tool Socks – 1-1-137250
Contains 2 x replacement Microbre Socks for your 360° Flexi-Tool. Socks are machine washable.
PLEASE NOTE: Actual colours of accessories may vary.
Page 16

Accessories
Also available 360° Steam Tools for your handheld steamer
Order at: www.vax.co.uk/spares-and-solutions
360° Steam Tools provide everything you need to clean a multitude of surfaces – rotating at 4 angles through 360°,
they do the twisting so you don’t have to.
Below is a selection of other 360° Steam Tools for you to enhance your steam cleaning experience. We have also
put together some handy tool kits on the previous pages. The Conversion Starter Kit is required in order to connect
the 360° Steam Tools to your Steam Fresh Combi.
Using the 360° steam tools
Precision Tool
Ideal for hard to access areas such as corners or around taps. The concentrated jet
of steam penetrates heavily soiled areas removing soap scum in baths and shower
enclosures and blasting away grease and grime from hobs and cookers.
Soft Scrub Brush
Agitates dried on grease and grime and removes build up of dirt. Perfect for use on
cookers and hobs, sinks, taps, worktops and more with minimal eort. The soft bristles
tackle dirt and are ideal for more delicate surfaces. The integrated scraper edge helps
remove stubborn dried on stains without having to change the tool.
The Pads
Tackle everyday surfaces easily with the 360° cleaning pads. Both are easy to attach and detach, and machine-washable
for re-use.
Microbre Pad
The Microbre Pad captures dirty water and spills, and is ideal for cleaning
a variety of surfaces.
Uses: worktops, sinks, cupboards, tables, doors, shelves and much more.
Pro Cleaning Pad
The Pro Cleaning Pad has a textured surface to tackle stuck-on dirt, and is ideal
for those grimier jobs.
Uses: oven doors, hobs, tiles, baths, child seats, work surfaces and much more.
Page 17

Accessories
The Brushes
The 360° steam brushes help you tackle dirt and grime. They are easy to attach and detach, with a rounded bristle head
that makes reaching awkward angles and small crevices even easier.
Deep Scrub Brush
The Deep Scrub Brush has tough, strong bristles that help tackle more stubborn dirt
and grime. The specially designed ‘scraper edge’ helps you to remove stuck-on dirt
without changing tools.
Uses: oven doors and hobs, grills, taps, work surfaces and much more.
Grout Brush
The Grout Brush is the tool you need for tackling dirt, mould and mildew on tile grout.
The slim bristle head design means you can target the grout line with ease.
Uses: tile grout in all areas.
The Window Tool
The Window Tool is perfect for cleaning glass and other mirrored
surfaces. It is designed to give edge to edge steam distribution,
for a more even steam clean. Use with the squeegee side rst
to clean and wipe away excess water, and then rotate to use
the window pad to dry the surface. The pad is easy to attach
and detach, and machine-washable for re-use.
Uses: windows, shower screens, tiles, mirrors and other similar surfaces.
The Flexi-Tool
The Flexi-Tool is our ultimate steam cleaning tool for a multitude of tasks.
The long, thin, exible design helps to reach into crevices or tackle large
at surfaces quickly. It comes with 2 coloured Microbre Socks (one
for upholstery/fabrics and one for hard surfaces), allowing you to easily
switch between cleaning tasks.
Uses: between blinds, kitchen appliances and cupboard door handles,
as well as worktops, cupboards, curved shower screens, curtains,
car seats and much more.
IMPORTANT: Always support the handheld by the handle when using the hose.
The Flexible Extension Hose
The Flexible Extension Hose attaches to your handheld to provide some extra cleaning
reach. Use with the 360° connector and Steam Tools for high or hard to reach areas.
Page 18

Using your Conversion Starter Kit with the
Steam Fresh Combi Handheld
Using the 360� connector with cleaning tools
To attach cleaning tools to the 360⁰ connector, line
up the edge of the tool with the 360⁰ connector and
in a hinge like manner rotate the tool until it clicks
securely in place.
To remove the tool from the 360⁰ connector,
push the release tab at the front of the tool.
1 2 3 4
Slide the rotation collar forward and rotate the 360⁰ connector to the most suited cleaning position.
Page 19

With the adaptor and cleaning tool attached to the
360⁰ connector, insert it into the handheld.
Twist the adaptor clockwise and listen for the
locking click.
To remove the 360⁰ connector, slide the release
button forward and un-twist the adaptor.
Attaching and detaching the hose
Push the end of the hose into the
adaptor. Then insert the hose and
adaptor into the handheld nozzle,
until it clicks into place. Make sure
the locking clip on the exi-hose is
securely attached by gently pulling
the exi-hose.
Push and attach the 360⁰ connector
with tool attached into the other end
of the exi-hose until it clicks into
place. Make sure the locking clip is
securely attached by gently pulling
the 360⁰ connector.
Then grip the adaptor and pull it away from
the handheld.
Press the unlocking button on the
exi-hose and pull to remove the
hose from handheld.
Page 20

What to do if it goes wrong
There is an
accessory missing
The steam mop
won’t turn on
Why is the steam mop
not producing
steam/detergent?
SolutionProblem
• Check the ‘This pack contains’ panel on the box to make sure the part
is included with your machine.
• Check the On/O switch is in the On position.
• The plug may not be fully pushed into the electrical socket.
• Check the fuse in the plug if this needs replacing, always replace
with a British 13amp fuse.
• There may be no water in water tank.
• Check the water tank is securely tted and the hard water lter is in place.
• Hard water lter may be blocked and need to be replaced.
• Steam path may be blocked. Go to ‘Let’s talk technical’.
• Check correct setting has been selected.
• Check the detergent has been diluted to correct strength.
• The cleaning pad may already be saturated or dirty, wash the cleaning
pad. Go to ‘Taking care of your machine’.
Why won’t the cleaning
pad pick up dirt?
• Steam coming from the side of the machine may indicate a blockage within
the machine. To clear any blockages go to ‘Taking care of your machine’.
Why is steam coming
from the side of
the steam mop?
Warning: Always unplug the steam mop before performing maintenance/troubleshooting checks.
Page 21

Getting in touch
† Registration required. Terms and conditions apply, see vax.co.uk for details.
* Calls are charged at the UK local rate. Please make a note of the serial number and model number of the product before calling.
Page 22

Accessories
Don’t forget your accessories!
Order at: www.vax.co.uk/spares-and-solutions
2x Mircrobre Cleaning Pads (Type 1)
1-1-131448
Microbre Cleaning Pads, ideal to remove dirt
and grime. These cleaning pads attach to the base
of the steam mop.
S4 Series Steam Accessory Tool Kit (Type 3)
1-1-132732
Tools ideal to use on tiles, grout and BBQ to remove
stubborn stains, grease and grime.
Pro Cleaning Pads (Type 6)
1-1-132319
3x Pro Cleaning Pads. Ideal for stubborn stain
removal throughout your home. These cleaning
pads attach to the base of the steam mop.
Steam Mop Cleaning Pads
(1-1-131864
2x Microbre Cleaning Pads, ideal to
remove dirt and grime.
2x Coral Cleaning Pads for your steam mop cleaner.
Super absorbent and ideal for removing stubborn stains.
Total Home Microbre Cleaning Pads
1-1-132528
8x Microbre Cleaning Pads. Avoid cross
contamination between dierent areas of your
home with this Total Home Cleaning Kit. Kit
contains 8 x coloured Microbre Cleaning Pads
for all areas of your home. Kit also contains a free
wash bag worth £9.99.
Page 23

Hard Water Filter (Type 4)
1-1-133719
3x Hard Water Filters to prevent the build-up of lime
scale deposits in hard water areas.
Steam Detergent Spring Fresh
1-9-132807
Vax Spring Fresh Steam Detergent cuts through grease and grime, neutralises
odours, eliminates 99.9% of harmful bacteria and continues to eliminate bacteria
for up to 7 days. Leaves your oors smelling spring fresh.
Steam Detergent Pet
1-9-132813
Vax Pet Steam Detergent cuts through grease and grime, neutralises pet
odours, eliminates 99.9% of harmful bacteria and continues to eliminate
bacteria for up to 7 days. Leaves your oors smelling of apple blossom.
Accessories
Steam Detergent Citrus Fresh
1-9-132666
Vax Citrus Burst steam detergent cuts through grease and grime, helps
neutralise odours, kills 99.9% of harmful bacteria* and continues to eliminate
bacteria for up to 7 days after use** leaving oors smelling fresh.
* Tests to the BS EN 1276 standard.
** Tested on ceramic oor tiles with 4 bacteria types per
BS EN 1276 and BS EN 13697.
Page 24

GET IN TOUCH
0330 026 8455 VaxVacu umsinfo@vax.co.uk vax.co.uk @Vax UK
EEC Statement of Compliance: Manufacturer/EEC importer: Vax Limited, hereby on our own responsibility, declare that the
S86-SF-C manufactured in compliance with the following Directives: Safety: 2006/95/EC Low Voltage Directive.
EMC: 2004/108/EC Electromagnetic Compatibility Directive.
Waste electrical products should not be disposed of with household waste. Please recycle where facilities exist. Check with
your Local Authority or retailer for recycling advice.
© 2016 Vax Limited. All rights reserved. The VAX trade mark and Vax lozenge is the property of Techtronic Floor Care
Technology Ltd and is registered in the EU and may be pending or registered in other countries.
 Loading...