

Page 1

Instruction Manual
BAGLESS UPRIGHT VACUUM CLEANER
Vax Model Number: V-046
www.vax.co.uk
Vax Careline:
0870 6061248
Please read carefully before using
the cleaner. Always fully extend the
mains cable before use.
Page 2

2
Parts Overview
1. Diagram
1 Handle grip
2 Cord clip
3 Dirt container release button
4 On/off switch
5 Carry handle
6 Dirt container lid
7 Filter
8 Dirt container
9 Vacuuming head
10 Telescopic handle
11 Telescopic handle release button
12 Upper cord wrap with quick cord
release
13 Power cord
14 Lower cord wrap with quick cord
release
15 Wheels
16 Lower hose/inspection tube
Fig.1/1
1
10
11
12
13
14
15
15
16
2
3
4
5
7
8
9
6
Page 3
3
Safety Information/Use & Function
FOR HOUSEHOLD USE ONLY
When using the vacuum cleaner, basic safety
precautions should always be observed, including
the following:
1. Only use the vacuum cleaner indoors on dry surfaces.
2. Turn off the vacuum cleaner controls before
connecting to or disconnecting from the mains supply.
3. Always unplug the vacuum cleaner before connecting
or disconnecting the vacuum hose.
4. Use only as described in this manual.
5. Do not use the vacuum cleaner with a damaged cord
or plug. Do not use the vacuum cleaner if it has been
dropped, damaged, left outdoors or dropped into
water. Return the vacuum cleaner to a Vax Authorised
Service Agent or suitably qualified person for
examination, repair or adjustment.
6. Do not pull or carry by the cord. Do not use the cord
as a handle, close a door on the cord or pull the cord
around sharp edges or corners. Do not run the
vacuum cleaner over the cord. Keep the cord away
from heated surfaces.
7. Do not handle the plug or vacuum cleaner with wet
hands. Do not use outdoors or on wet surfaces.
8. Do not put any objects into openings. Do not use with
any openings blocked and do not restrict air flow.
Keep all openings free of dust, lint, hair or anything
that may reduce airflow.
9. Keep hair, loose clothing, fingers and all parts of body
away from openings and moving parts.
10. Do not pick up hot coals, cigarette butts, matches or
any hot, smoking or burning objects.
11. Do not pick up flammable or combustible materials
(lighter fluid, petrol, kerosene, etc) or use in the
presence of explosive liquids or vapours.
12. Do not vacuum up harmful or toxic material (chlorine
bleach, ammonia, drain cleaner, etc).
13. Do not vacuum up hard or sharp objects such as
glass, nails, screws, coins, etc.
14. Do not use without the filters in place.
15. Use extra care when vacuuming on stairs.
16. Keep vacuuming area well lit.
17. Store the vacuum indoors in a cool, dry area.
18. Turn off the switch before unplugging.
WARNING:
Always switch off and unplug the vacuum cleaner
from electrical outlet before assembling, opening or
emptying the dust container, or
connecting/disconnecting the attachments.
CAUTION:
The vacuum cleaner is a very powerful unit. Before
plugging cord into outlet, make sure the switch is in
the ‘off’ position. Hold the vacuum cleaner firmly
when starting and in use.
IMPORTANT:
If the vacuum inlet is blocked, switch off the
vacuum cleaner and remove the blockage(s) before
re-starting the vacuum cleaner.
IMPORTANT:
Washing filters improves vacuum performance.
Make sure all filters are completely dry before
inserting back in the vacuum cleaner.
This vacuum cleaner is intended for household use
only and not for commercial or industrial use.
PLEASE KEEP THESE INSTRUCTIONS FOR
FURTHER USE.
2. Safety Information
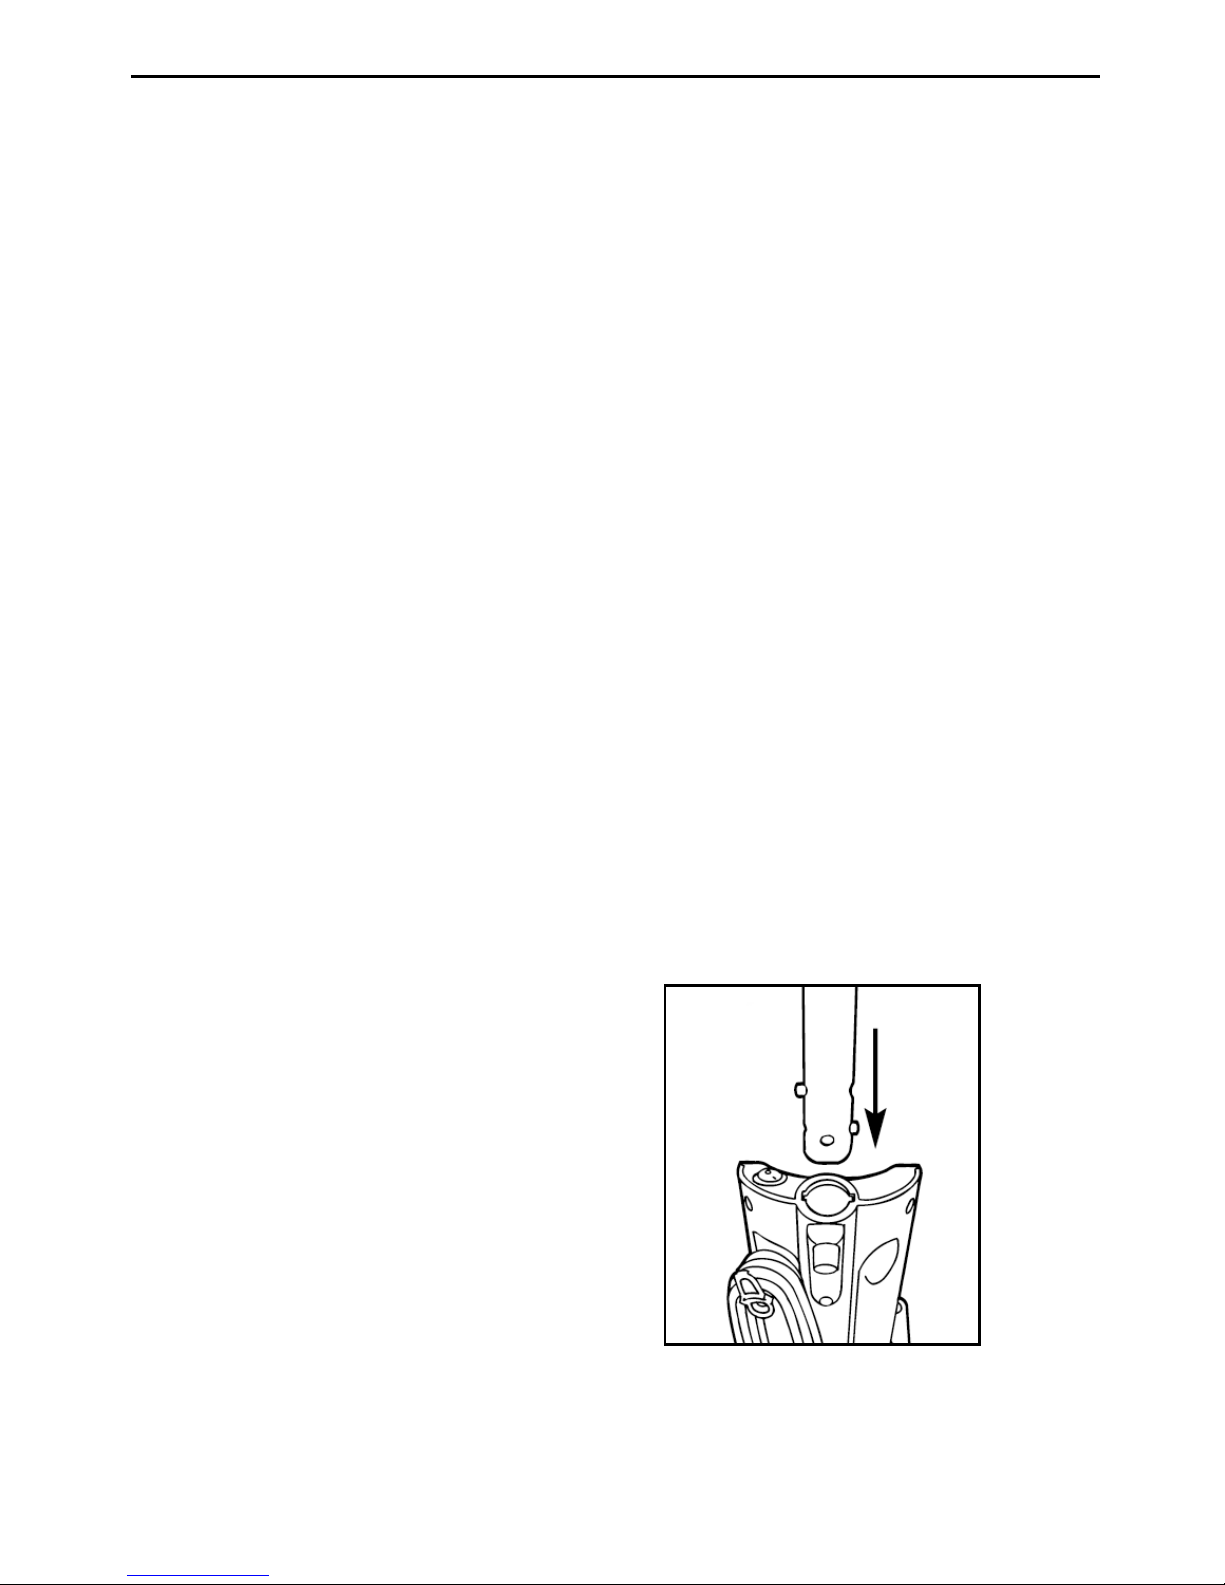
Insert handle into body of cleaner (Fig.3/1).
Fig.3/1
3. Use & Function
Page 4
4
Use & Function/How to Operate
Storing the Cleaner
Preparing the Vacuum
4. How To Operate
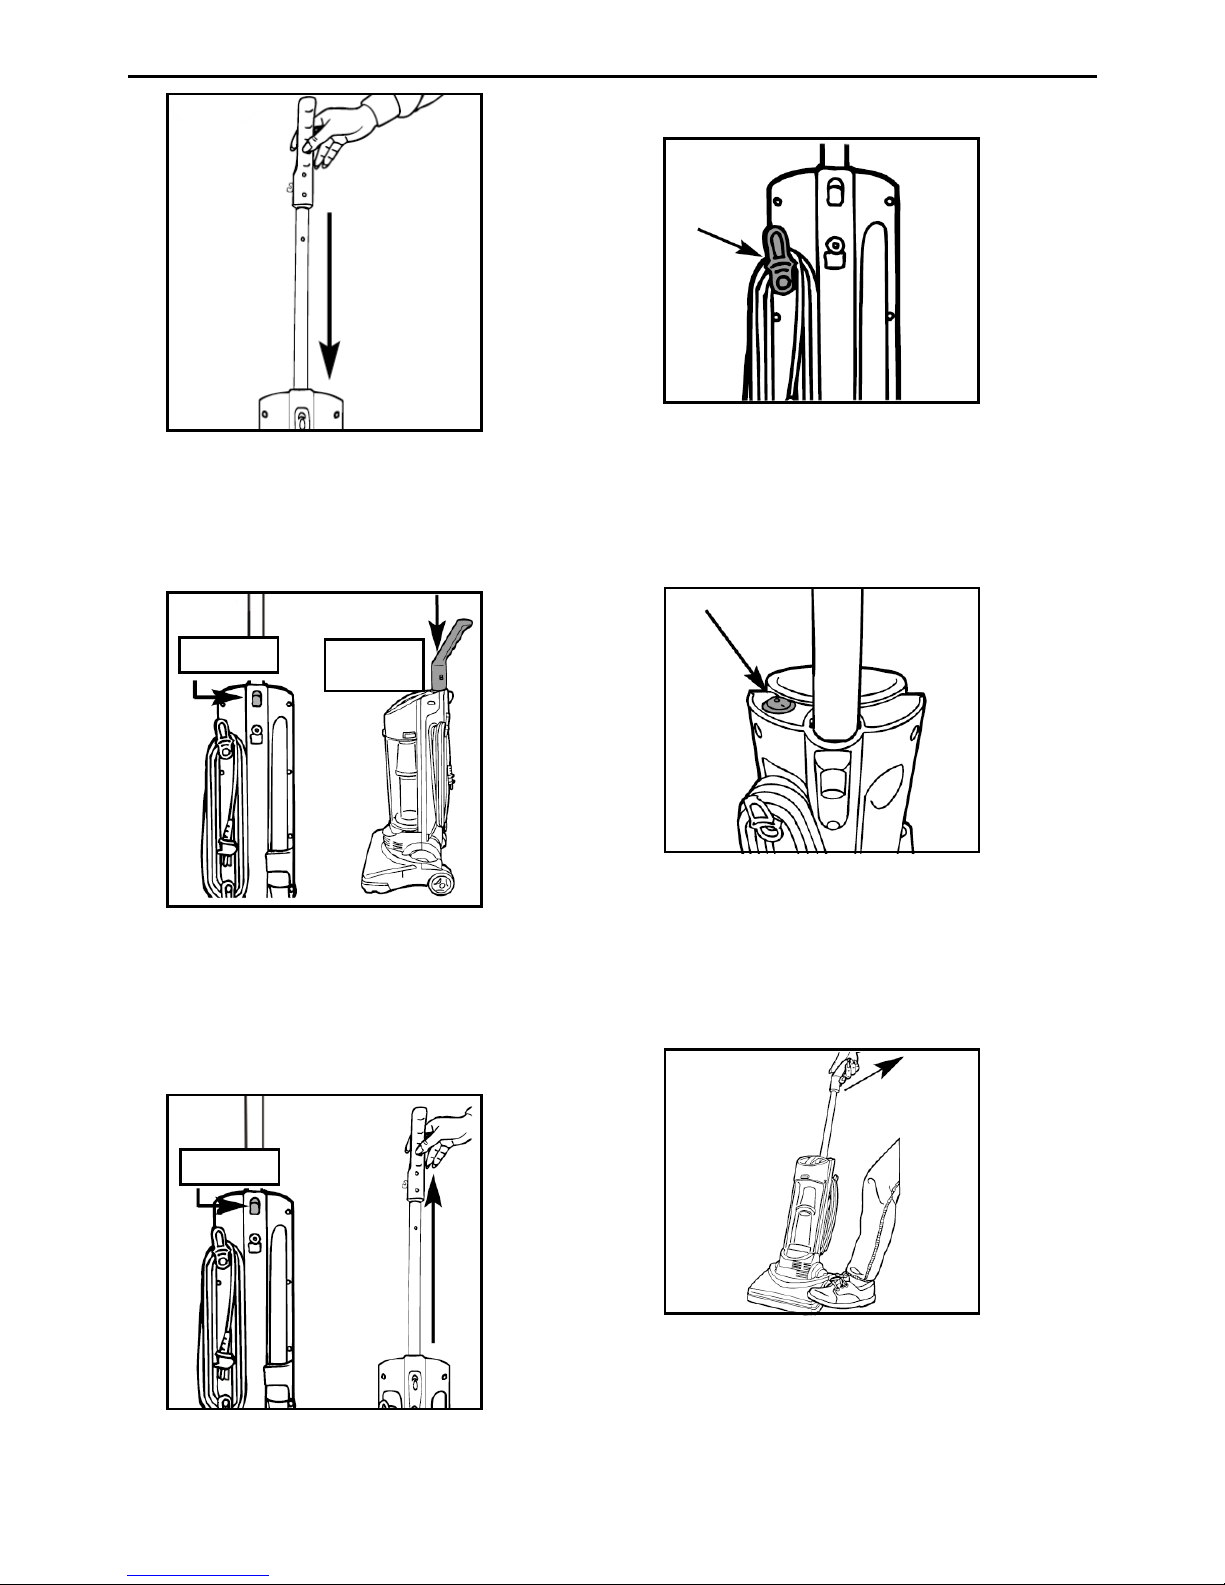
Cord Release
Turn the quick cord release for easy cord removal.
Secure cord in cord clip to keep out of the way
while vacuuming (
Fig.4/1).
Handle Release
Pull back handle to tilt back. Press on the front of
vacuuming head if needed (Fig.4/3).
On/off Switch
Plug cord into electrical outlet. Turn cleaner on by
pressing the on/off switch located on the top of unit
(
Fig.4/2).
Press the telescopic handle release button on the
back of the cleaner and push handle down
(
Fig.3/3).
Push the telescopic handle release button and pull
handle up until it locks in to place (
Fig.3/4).
Fig.3/3
Fig.3/4
Fig.3/2
Push down firmly until handle locks into place
(Fig.3/2).
Fig.4/1
Fig.4/2
Fig.4/3
Button
Button
Handle
down
Page 5

5
How to Operate/Dirt Container & Filter: Removal & Replacement
Floor/Carpet Cleaning
Move the handle and adjust it to the desired
position for (a) operating the cleaner, and (b)
lowering handle to clean under furniture (
Fig.4/4).
Carry Handle
Use the carry handle located on the top of the dirt
container lid to move the cleaner from room to
room (
Fig.4/5).
5. Dirt Container & Filter: Removal &
Replacement
Remove by grasping handle on dirt container lid
and turn counter clockwise (
Fig.5/2).
Depress button on top of dirt container lid to
remove dirt container (
Fig.5/1).
Fig.4/4
Fig.4/5
Fig.5/1
Fig.5/2
Fig.5/3
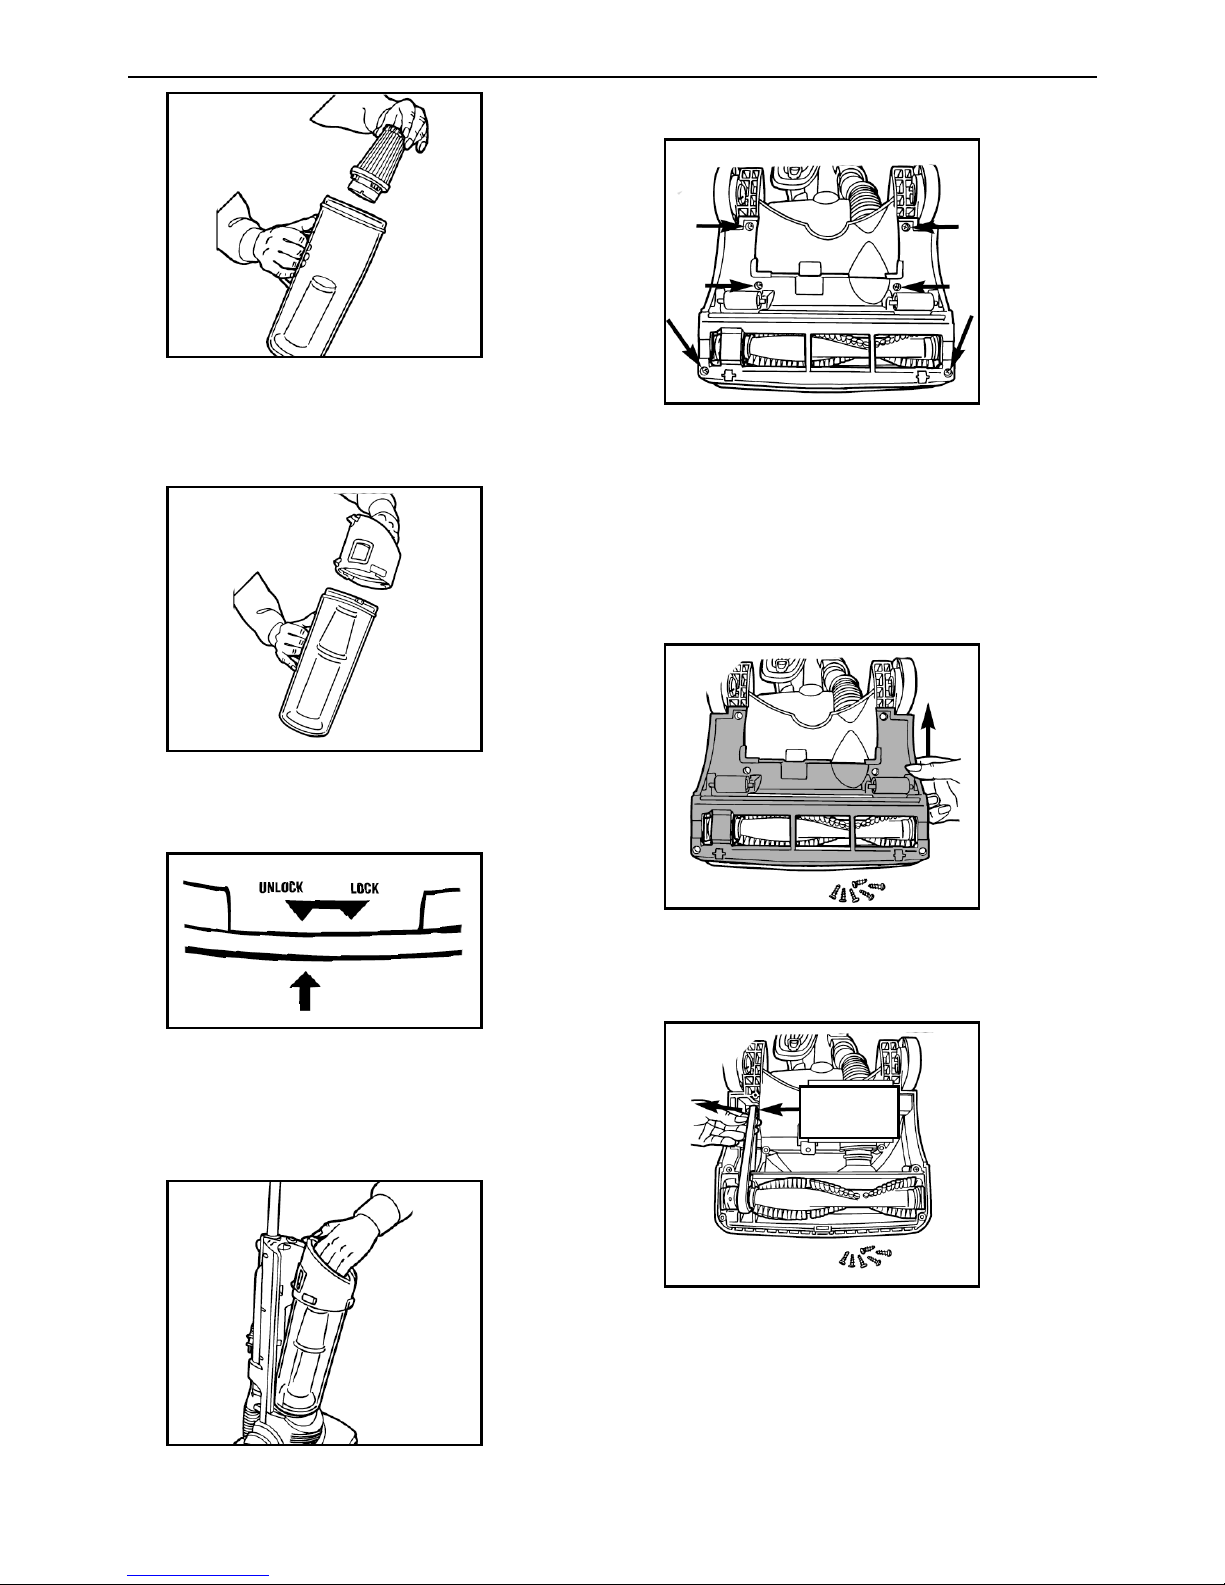
Hold the dirt container and grasp the top of the filter
(
Fig.5/3).
Fig.5/4
Fig.5/5
Twist the filter counter clockwise to unlock. Pull the
filter up and out (Fig.5/4).
Clean filter and empty dirt container completely.
(
Fig.5/5).
Unlock
Page 6
Return filter to dirt container. Twist filter clockwise
to lock into position (Fig.5/6).
6
Return dirt container to base of unit and ensure it
clicks securely in to place (Fig.5/9).
Fig.5/6
Fig.5/9
Fig.5/7
Fig.6/1
Fig.5/8
Return lid to dirt container (Fig.5/7).
Line up arrow on dirt container with unlock/lock
arrows on dirt container lid for proper alignment.
Turn clockwise to lock lid in place (Fig.5/8).
Dirt Container & Filter: Removal & Replacement/Belt Replacement
6. To Remove Belt
Switch off and remove the plug from mains supply.
Lay cleaner flat and flip cleaner to expose base of
vacuuming head. Base should lay flat and face up.
To remove vacuuming head guard, use a Phillips
screwdriver to remove the six (6) screws. Arrows
show the location of screws (Fig.6/1).
Lift vacuuming head guard off (Fig.6/1).
Slide belt off motor shaft (Fig.6/3).
Fig.6/2
Fig.6/3
Motor
shaft
Page 7
7
Belt Replacement
Fig.6/4
Fig.6/7
Fig.6/8
Fig.6/9
Fig.6/5
Fig.6/6
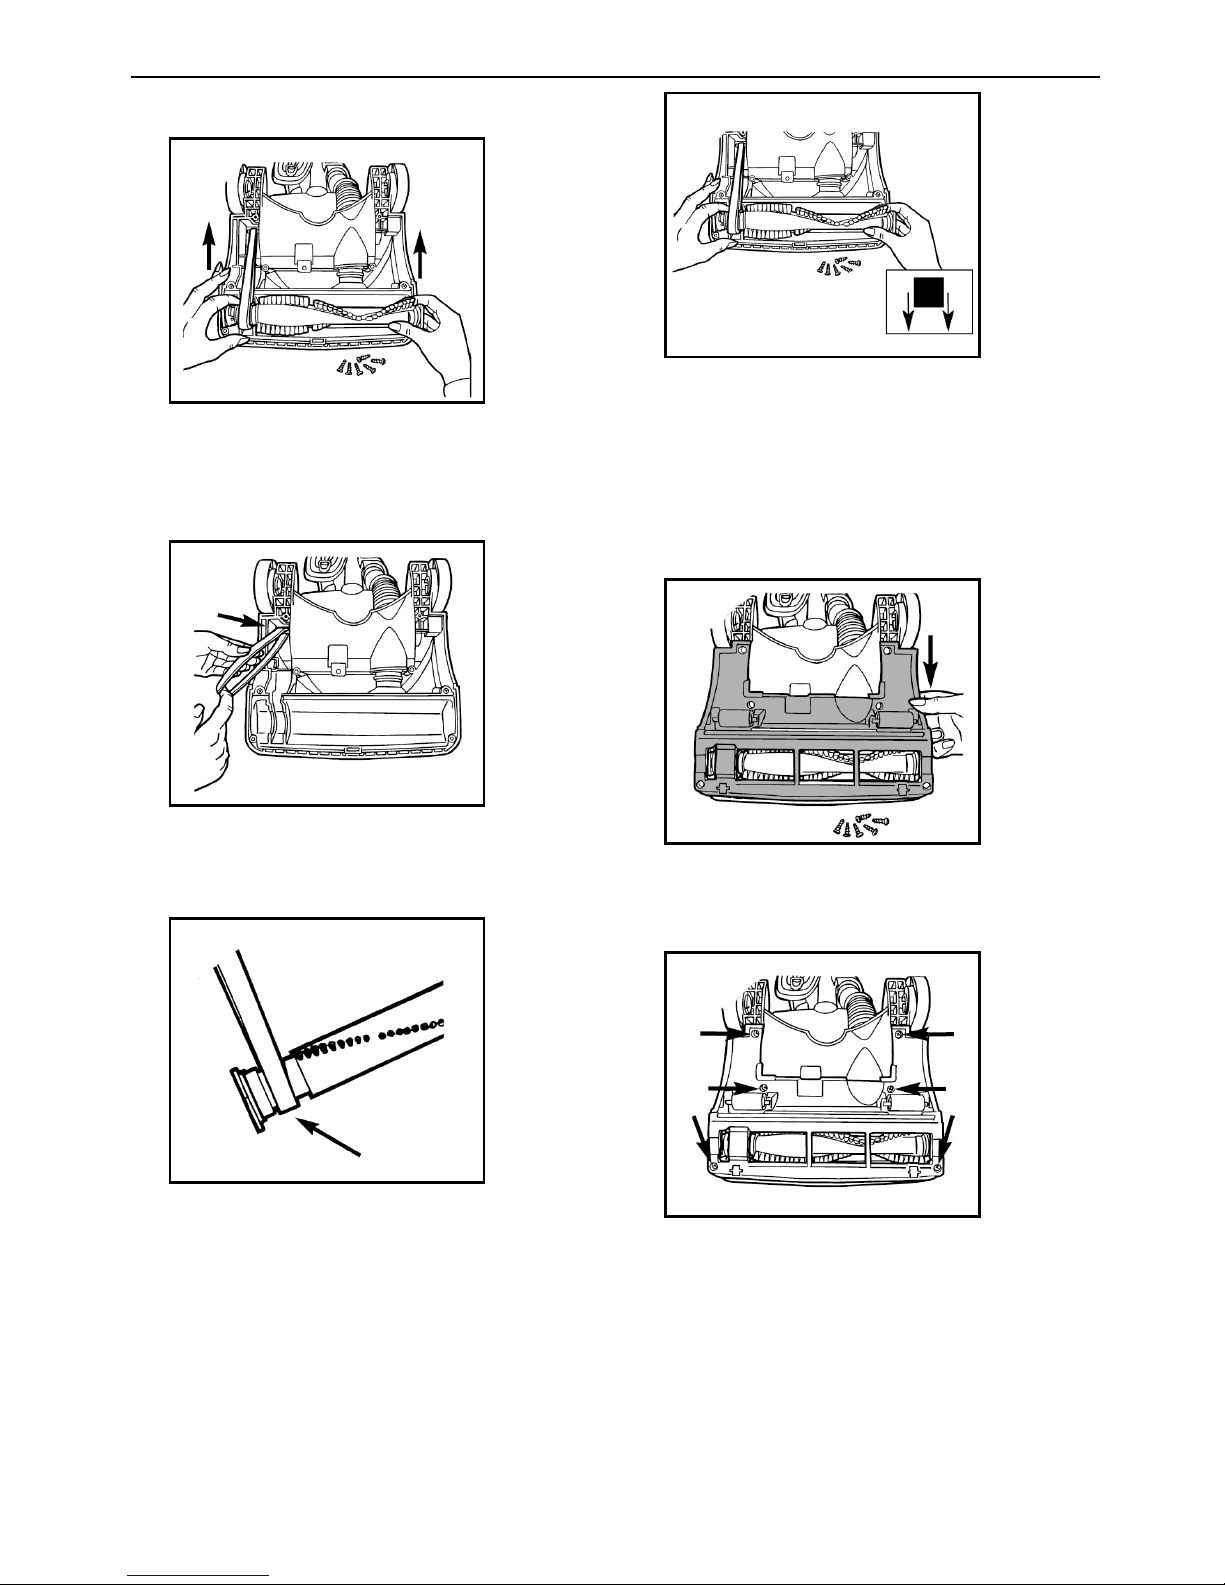
To Replace Belt or Brushbar
Lift and remove brushbar. Dispose of old belt
(
Fig.6/4).
Slide belt onto motor shaft (Fig.6/5).
Place new belt in area of brushbar without bristles
(
Fig.6/6).
With new belt in place, pull and slide brushbar
into vacuuming head making sure that the
brushbar end caps are in the correct
orientation. Rotate brushbar manually to make
sure belt is properly aligned (
Fig.6/7).
Be sure to replace all six (6) screws (Fig.6/9).
Re-attach vacuuming head guard (Fig.6/8).
Page 8

8
7. Clearing a Blockage
Locate lower hose/inspection tube (Fig.7/1).
Remove one (1) screw and pull lower hose down
and away from cleaner. Remove obstruction
(
Fig.7/2).
Replace lower hose and replace one (1) screw
(
Fig.7/3).
Clearing a Blockage/Troubleshooting/UK Service & Help
Problem: Vacuum cleaner won't run.
Cause:
Power cord not firmly pushed into mains socket.
Solution: Plug the cord in firmly to the power outlet.
Cause: Blown fuse or tripped circuit breaker.
Solution: Check fuse/breaker. Replace fuse or reset
breaker.
Cause: Thermal cut-out operates.
Solution: Switch off vacuum cleaner and unplug from
mains socket. Leave vacuum cleaner for at least
1 hour and clean filters and empty dust
container in the meantime.
PROBLEM: Vacuum cleaner won't pick up/loss of
suction.
Cause:
Dirt container not installed correctly.
Solution: Review dirt container removal and replacement.
Cause: Dirt container full.
Solution: Empty dirt container.
Cause: Brushbar worn.
Solution: Replace brushbar.
Cause: Broken or worn belt.
Solution: Replace belt.
Cause: Clogged filter.
Solution: Remove filter and clean.
Cause: Vacuuming head/brushbar blocked.
Solution: Check vacuuming head/brushbar - Remove
obstruction/blockage.
Cause: Lower hose blocked.
Solution: Remove lower hose/clear blockage. See section 7
PROBLEM: Dust escaping from vacuum cleaner.
Cause:
Dirt container full.
Solution: Empty dirt container.
Cause: Dirt container not installed correctly.
Solution: Review dirt container removal and replacement.
Cause: Hose not installed correctly.
Solution: Review hose installation.
Cause: Filter not installed completely.
Solution: Review filter removal and replacement.
9. UK Service & Help
Vax Care 0870 6061248
Monday-Friday. 9.00am to 5.00pm.
An answerphone is available out of these hours.
Any queries or concerns about using the Vax, call
the Vax Careline. Calls are charged at the UK
national rate. Please make a note of the serial
number and model number of the carpet cleaner
before calling. There are over 400 approved Vax
Service Agents in the UK. For the nearest Service
Agent, please call the Vax Careline. www.vax.co.uk
8. Troubleshooting
Fig.7/1
Fig.7/2
Fig.7/3
Page 9
9
10. Technical Specification
Voltage: 220-240V ~50Hz
Wattage: 850W
Capacity: 2.3 litres max
Filters: Fibre pre-motor filter
Pleated paper main filter
Cord length: 6.4 metres
Weight: 4.5 kg
Subject to technical change without notice.
Technical Specification
Page 10

10
This page has been left intentionally blank.
Page 11

11
This page has been left intentionally blank.
Page 12

EEC STATEMENT OF COMPLIANCE
Manufacturer/EEC importer: Vax Limited, hereby on our own responsibility, declare that the product
V-046 Quicklite Compact is manufactured in compliance with the following:
Safety: 73/23/EEC Low Voltage Directive, as modified by 93/68/EEC
EMC: 89/336/EEC Electromagnetic Compatibility Directive, as modified by 93/68/EEC
Waste electrical products should not be disposed of with household waste. Please recycle where
facilities exist. Check with your Local Authority or retailer for recycling advice.
Vax Ltd., Kingswood Road, Hampton Lovett, Droitwich, Worcestershire WR9 0QH, UK
email: enquiry@vax.co.uk - website: www.vax.co.uk
Version 1
 Loading...