

Page 1

Vaxcare:
AUST: 1300 36 4040
NZ: 0800 800 900
www.vax.com.au
Instruction Manual
Please read carefully before using this cleaner.
Retain for future reference.
• NSW/ACT
Unit 2, 30 Heathcote Road,
Moorebank, NSW 2170
Telephone: (02) 9602 6800
Facsimile: (02) 9602 6900
• VICTORIA/TASMANIA
Unit 3, 46 Burgess Road,
Bayswater North, VIC 3153
Telephone: (03) 9761 7160
Facsimile: (03) 9761 7175
• SOUTH AUSTRALIA/
NORTHERN TERRITORY
Unit 3, 75-77 Grange Road,
Welland, SA 5007
Telephone: (08) 8340 2222
Facsimile: (08) 8346 7933
• QUEENSLAND
186 Kerry Road,
Archerfield, QLD 4108
Telephone: (07) 3216 7350
Facsimile: (07) 3216 7375
• WESTERN AUSTRALIA
296 Victoria Road,
Malaga, WA 6090
Telephone: (08) 9247 8100
Facsimile: (08) 9247 8192
• VAX APPLIANCES
NEW ZEALAND
27 Clemow Drive
Mt Wellington, Auckland
Telephone: (09) 5736220
Facsimile: (09) 5736224
Email: vaxnz@vax.co.nz
AUST. & NZ BRANCHES
Please register your warranty. Send in your completed Warranty Card.
If you require further assistance or advice about any
VAX please call VAXCARE on
1300 36 4040 (Australia - cost of a local call)
and 0800 800 900 (NZ)
VAX Appliances (Australia) Pty Ltd
A.C.N. 009099736
296 Victoria Road Malaga Western Australia 6090.
EMAIL: vaxcare@vax.com.au
WEBSITE: www.vax.com.au
VAXCARE
MODIFIED OCTOBER 2007 / P/N 54410
Vax model number:
K-020
Page 2

2 7
1. Safety Instructions
For Household Use Only
When using the vacuum cleaner, basic safety
precautions should always be observed,
including the following:
1. Only use the vacuum cleaner indoors on
dry surfaces.
2. Turn off the vacuum cleaner controls
before connecting or disconnecting from
the mains supply.
3. Close attention is necessary when used
by or near children. Do not allow children
to use as a toy.
4. This appliance is not intended for use
by young or infirm persons unless they
have been adequately supervised by a
responsible person to ensure that they
can use the appliance safely.
Young children should be supervised
to ensure that they do not play with the
appliance.
5. Use only as described in this manual.
6. Do not use the vacuum cleaner if it has
been dropped, damaged, left outdoors
or dropped into water. Do not use the
vacuum cleaner with a damaged cord or
plug. If the adaptor is damaged, return
the vacuum cleaner to a Vax Authorised
Service Agent for examination, repair or
adjustment.
7. Do not pull or carry the adaptor by the
cord. Do not use the cord as a handle,
close a door on the cord or pull the cord
around sharp edges or corners. Do not run
the vacuum cleaner over the cord. Keep
the cord away from heated surfaces.
8. Do not handle the adaptor or vacuum
cleaner with wet hands. Do not use
outdoors or on wet surfaces.
9. Do not put any objects into openings. Do
not use with any openings blocked and
do not restrict air flow. Keep all openings
free of dust, lint, hair or anything that may
reduce airflow.
10. Keep hair, loose clothing, fingers and all
parts of the body away from openings
and moving parts.
11. Do not pick up hot coals, cigarette butts,
matches or any hot, smoking or burning
objects.
12. Do not pick up flammable or combustible
materials (lighter fluid, petrol, kerosene,
etc) or use in the presence of explosive
liquids or vapours.
13. Do not vacuum up harmful or toxic
material (chlorine bleach, ammonia, drain
cleaner, etc).
14. Do not vacuum up hard or sharp objects
such as glass, nails, screws, coins, etc.
15. Do not use without the filters in place.
16. Take extra care when vacuuming on
stairs.
17. Keep vacuuming area well lit.
18. Store the vacuum cleaner indoors in a
cool, dry area.
This vacuum cleaner is intended for household
use only and not for commercial or industrial
use.
PLEASE KEEP THESE INSTRUCTIONS
FOR FURTHER USE.
Battery Disposal
CAUTION:
• Use only with the battery pack supplied
with the unit.
• Do not attempt to remove the battery pack
from the unit to charge it.
• Never throw the battery pack or unit into a
fire or incinerate.
• Do not attempt to remove or damage the
battery casing.
• Battery must be recycled or disposed of
properly at the end of its service life.
• Refer to your local council or recycle centre
for disposal information.
CAUTION: NEVER use the unit without the
battery compartment cover in place.
8. VAXCARE Service & Help:
AUSTRALIA 1300 36 4040
NEW ZEALAND 0800 800 900
If you have any queries or concerns about
using your Vax, call VAXCARE. Please make
a note of the model number and model name
of the appliance before calling.
(Aust only: Mon-Fri. 10.00am to 6.00pm. EST)
Calls are charged at the local rate.
An answerphone is available outside of
these hours. We will return your call the next
working day.
There are over 300 approved Vax Service Agents
in Australia and New Zealand. For the nearest
Service Agent, please refer to your Vax warranty
or call VAXCARE or visit www.vax.com.au
9. Technical Specification
Charge Supply Voltage: 220-240V~50Hz
Battery: 12.0 Volt Ni-Cd
Filters: Replacement filter
Model No: K-020
Model Name: Kruz
Colour: Silver
Weight: 2kg
Part No.: 54000
Subject to technical change without notice.
CAUTION: NEVER use the unit without the
battery compartment cover in place.
7. Troubleshooting
WARNING: To reduce the risk of personal
injury, unplug the vacuum cleaner before
performing maintenance or troubleshooting
checks.
PROBLEM: Vacuum cleaner won’t run
Cause: Battery not charged.
Solution: Charge battery. For first use,
charge for at least 24 hours.
Cause: Battery dead - won’t hold a charge.
Solution: Contact an authorised VAXCARE
service agent.
Cause: Needs service.
Solution: Contact an authorised VAXCARE
service agent.
PROBLEM: Cleaner won’t pick up or
low suction
Cause: Dirt container not installed correctly.
Solution: Review dirt container removal &
replacement.
Cause: Dirt container full.
Solution: Empty dirt container.
Cause: Battery charge is getting weak.
Solution: Charge battery.
Cause: Filter is dirty.
Solution: Clean or replace filter.
Cause: Clogged filter.
Solution: Remove filter and clean.
Cause: Nozzle / dirt passage clogged.
Solution: Disconnect nozzle and remove
obstruction.
PROBLEM: Dust escaping from cleaner
Cause: Dirt container is full.
Solution: Empty dirt container.
Cause: Dirt container not installed correctly.
Solution: Review dirt container removal &
replacement.
Cause: Filter is not installed correctly.
Solution: Review dirt container removal &
replacement.
Page 3
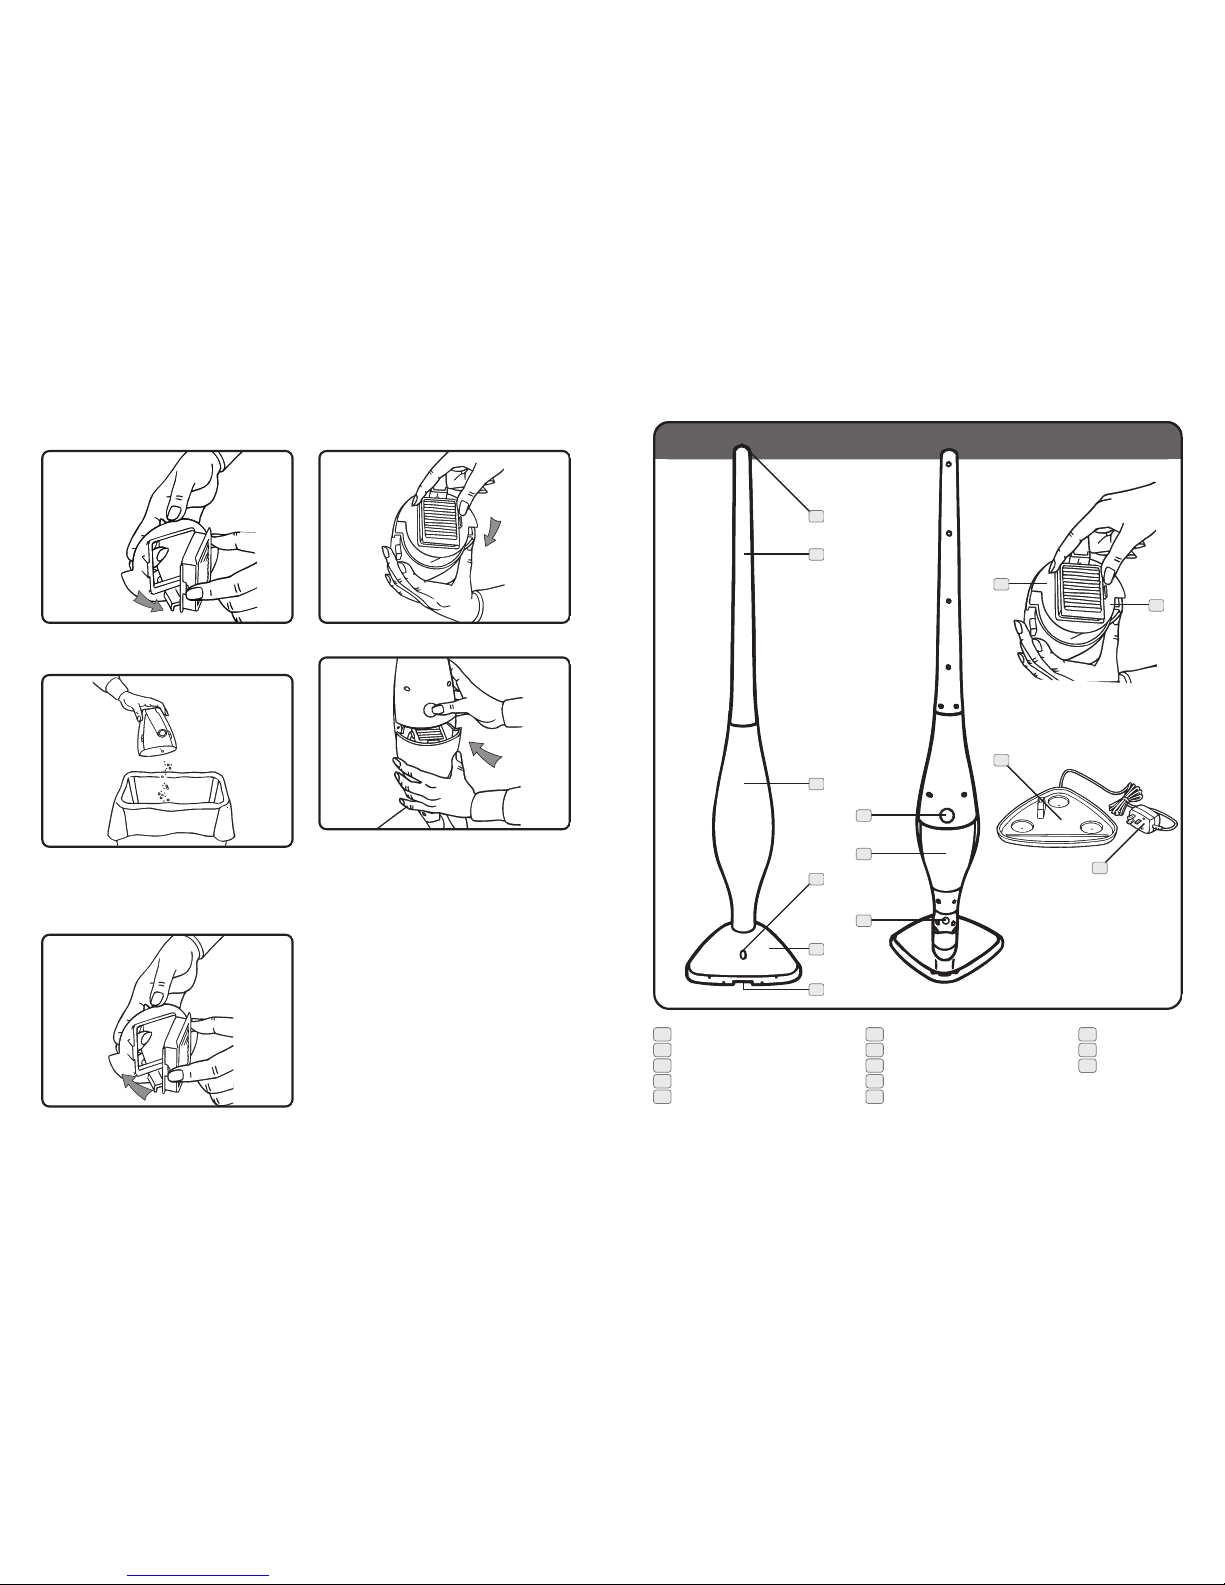
Fig.6/3
Fig.6/4
Fig.6/5
36
K-020
TER
1
2
3
7
5
4
Fig.2/1
1 Power button
2 Upper handle
3 Main body
4 Charging light
5 Nozzle
6 Large debris opening
7 Dirt cup release button
8 Dirt cup
9 Nozzle release button
10 Filter
11 Filter adaptor
12 Charger base
13 Electrical cord
6
8
9
10
12
13
11
2. Parts Overview
Return the dirt cup to the body of the unit by
pushing firmly until release button clicks into
place (Fig.6/6).
Squeeze latch and pivot filter away from filter
adaptor (Fig.6/3). Tap filter on the inside of a
trash can to remove debris.
Fig.6/6
Fig.6/7
Gently tap dirt cup on the inside of a trash
can to empty contents(Fig.6/4).
Replacement
Align tab on filter with opening on filter
adaptor. Pivot into place and release latch to
secure (Fig.6/5).
Return filter adaptor to dirt cup (Fig.6/7).
Replacement Filters
Replacement filters are available from your
Vax stockist or Vax direct. Phone VAXCARE
or visit www.vax.com.au
NOTE: Please recycle or dispose of
expired 12 volt Ni-Cd battery pack
properly.
Page 4

3. How to Assemble
Line up nozzle with main body and firmly push
nozzle onto body of unit until nozzle locks into
place (Fig.3/1).
NOTE: To remove, push release button
and pull the nozzle away from the body
of the unit.
4 5
6. Dirt Container & Filter:
Removal & Replacement
IMPORTANT: For best results,
clean after each use.
NOTE: For best results replace the filter
at least every six months.
Dirt Container Removal
Depress the dirt cup release button located
above the dirt cup and pull away from the
body of the unit (Fig.6/1).
4. Charging
NOTE: Use only the charger supplied by
the manufacturer to recharge.
CHARGE 24 HOURS BEFORE FIRST USE.
For best results, return the Stick Vac to
the charging base after every use.
Connect wall charger to the outlet (Fig.4/1).
Fig.4/1
Fig.4/2
Place Stick Vac on the charger base. The
indicator light will come on to indicate that the
Stick Vac is charging. Unit will be charged in
16- 24 hours. The light will not change colour
or shut off when the unit is fully charged
(Fig.4/2).
NOTE: The power button must be in the
off position for the Stick Vac to charge.
5. How to Operate
Push the button on the top of the upper handle
to turn the cleaner on and off (Fig.5/1).
Grasp filter adaptor and pull out of dirt cup
(Fig.6/2).
Fig.3/1
ASSEMBLY
Fig.3/2
Fasten three (3)
secure the upper
Fig.3/3
Nozzle
release
button
Fig.5/1
Fig.5/2
Fig.5/3
Fig.6/1
TER
Fig.6/2
Slide upper handle onto post on main body
(Fig.3/2).
NOTE: If unit turns on when assembling
handle to unit, depress power button &
continue assembly.
Fasten three (3) screws to secure the upper
handle to the main body (Fig.3/3).
The main body of the cleaner can rotate at
the nozzle offering greater manoeuvrability
(Fig.5/2).
In addition to a front to back motion, the
cleaner can also vacuum side to side
(Fig.5/3).
NOTE: This can be used for effective
edge cleaning.
NOTE: This filter is NOT washable.
 Loading...