

Page 1
Veh i c le fe atur es
Vivaro
Quick Reference Guide
Refer to Owner’s Manual for detailed information. Note: some items described may be optional 3.
Instruments and controls
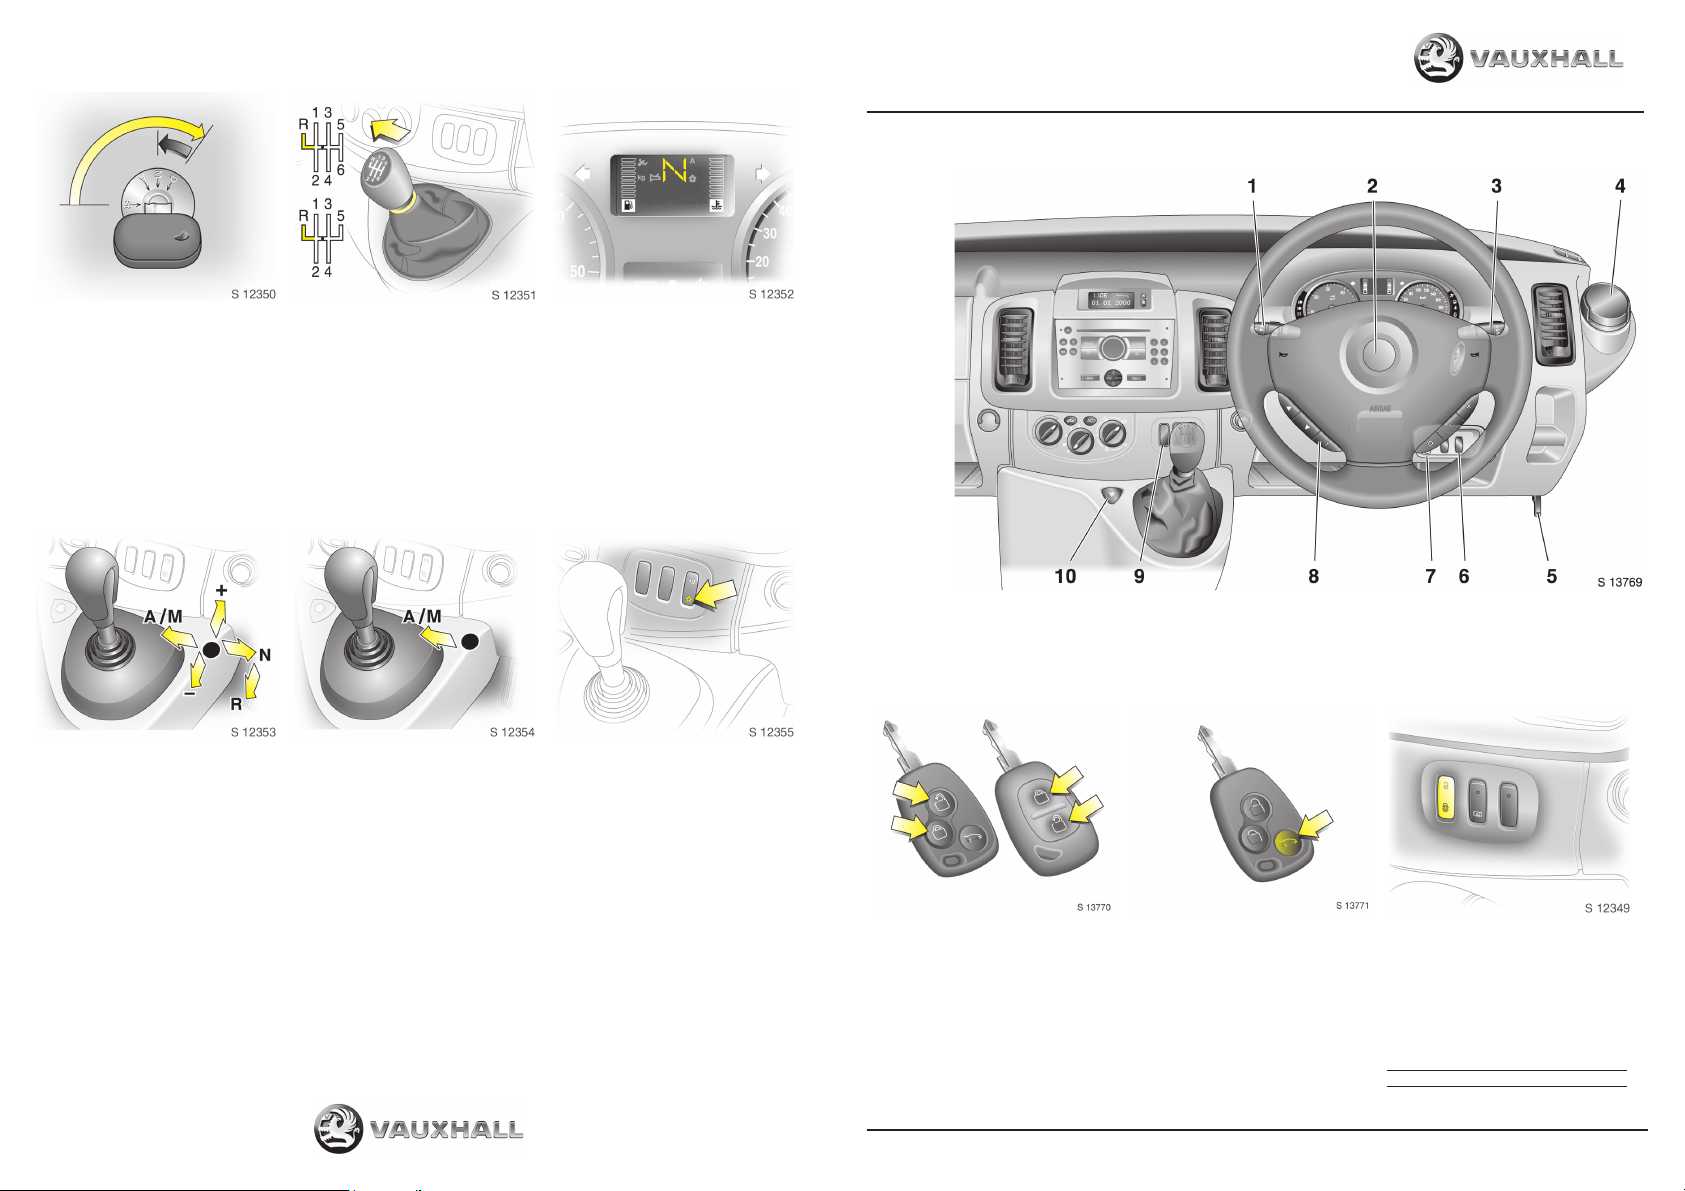
Starting the engine:
z Transmission in neutral, depress
clutch, do not accelerate
z With diesel engines, turn key to M
and allow preheating control
indicator D to go out
z Tur n ke y to D
Tecshift 3:
N = Neutral
o = Centre position
- = Shift to lower gear
+ = Shift to higher gear
A = Switch between automatic or
manual mode
R = Reverse
Move the selector lever to the
appropriate position and release. The
selector lever will return to the centre
position.
The current gear will be displayed in the
transmission display.
Transmission fault
W illuminates in transmission
Indicator
display.
Manual transmission:
Reverse gear: with vehicle stationary,
pull up collar and move gearshift lever
against resistance to engage reverse
gear.
Tecshift automatic drive mode:
When the engine is started, Tecshift is in
automatic mode, “A” is shown in the
transmission display.
To engage 1st gear depress footbrake
and move selector lever toward +.
The vehicle will begin to creep when the
foot brake is released without
accelerating.
Tecshift manual drive mode:
+ shift to higher gear
- shift to lower gear
Move the selector lever to the
appropriate position and release.
The current gear will be displayed in the
transmission display.
Tecshift transmission 3:
Transmission display
Shows the mode, programme and
current gear
Depress the foot brake, turn on the
ignition. If T is shown in the
transmission display, the foot brake has
not been depressed. When N is
displayed the engine can be started.
If a gear other than N is selected there
will be a short delay whilst the
transmission shifts automatically into
neutral.
Tecshift (continued)
Winter programme V
For starting-off on slippery surfaces:
Press button V - indicator illuminates in
the transmission display, vehicle pulls
away in a suitable gear.
Press button again to switch off.
Laden programme kg
For optimized gear selection when
vehicle has increased payload:
Press button kg - indicator illuminates in
the instrument panel.
Press button again to switch off.
.
1. Stalk for lighting and turn signals
2. Driver’s airbag 3 / horn
3. Stalk for Windscreen wiper
and wash
4. Ashtray
Vehicle security
Unlocking with two function remote or
selective door locking (three function)
remote:
Press button c to unlock on remote
control, within a range of 3 metres 3
- or - turn key in driver’s door lock to
unlock vehicle.
Press button G on the selective door
locking remote to unlock side and rear
loading doors.
5. Bonnet release lever
6. Park Pilot 3
7. Headlight range adjustment
8. Radio / infotainment controls 3
Door locking with two function remote
or selective door locking (three
function) remote:
Press button e to lock on remote control,
within a range of 3 metres 3
- or - turn key in driver’s door lock to lock
vehicle.
Press button G on the selective door
locking remote to lock side and rear
loading doors.
9. Switches for heated rear windows 3,
central locking and Winter and
Laden programmes for Tecshift 3
10. Hazard warning switch
Central locking switch:
Locks or unlocks all doors from inside the
vehicle. Press bottom of switch to lock or
top of switch to unlock
Engine immobiliser
z Deactivated when key is in ignition
z Activated when key is removed
Engine cannot be started in any other
way so keep spare key in a safe place!
TS 1546-B-07
January 2007
Page 2
Veh i c le fe atur es
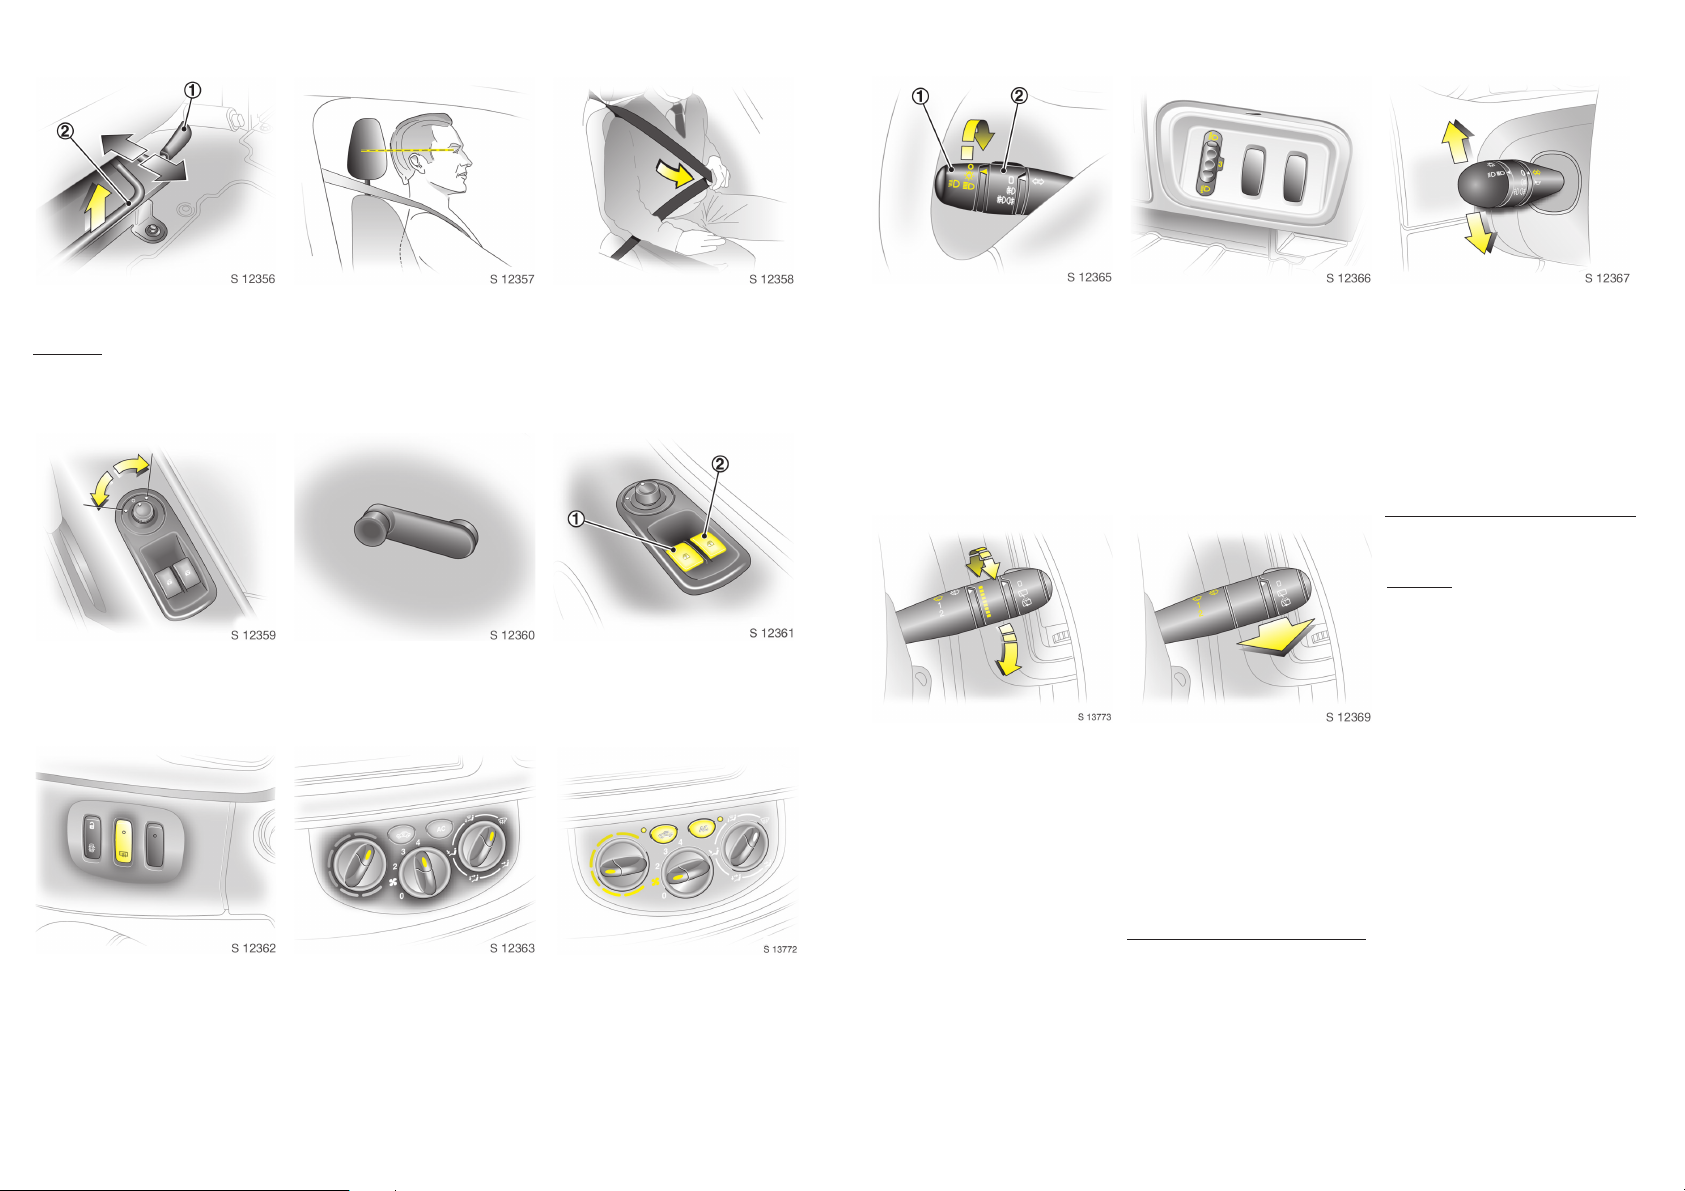
Seat position adjustment:
1. Seat height 2.Seat position
Important:
inches (25 cm) from the steering wheel to
permit safe airbag deployment.
Electrically adjustable
exterior mirrors 3:
Turn switch to left or right to adjust the
appropriate mirror.
Lower aspherical mirrors must be
adjusted manually.
Heated rear windows:
Operate only with engine running.
Pushbutton Ü on instrument panel.
Press Ü = on
Press Ü again = off
Control indicator in instrument panel
illuminates.
Turn off as soon as rear vision is clear.
The heated rear windows switch off
automatically after 10 minutes.
Do not sit nearer than 10
Head restraint position
The centre of the head restraint should
be at eye level. Adjust to highest position
if this is not possible for extremely tall
people, and adjust to lowest position for
extremely small people.
Door windows:
The door windows can be operated with
the crank.
Demisting the windscreen:
Set the heater controls as shown above.
Do not drive the vehicle until the
windscreen is clear.
Fitting the seat belt:
Draw smoothly from inertia reel, guide
over shoulder and engage in buckle.
The belt must not be twisted at any
point. The lap belt must fit snugly across
the body.
To release belt, press red button on belt
buckle.
Electrically operated door windows 3:
To open window, push top of switch. To
close pull top of switch. Window stops
when switch is released.
1. Passenger door
2. Driver’s door
Air conditioning 3:
Press AC button = on
Press AC button again = off
Once activated the air conditioning
system is operated via the normal
heating and ventilation controls.
In very hot temperatures, before starting
the engine, allow hot air to escape from
the vehicle by opening the windows.
Lighting switch:
1. Headlights, side lights
2. Fog lights 3
Pull stalk toward steering wheel to
change between main and dipped
beam.
Headlight flash:
Pull stalk towards steering wheel.
Windscreen wiper and wash with rain
sensor 3:
Windscreen wiper:
Move stalk downwards to operate wiper.
Pull stalk towards steering wheel to
operate wash.
K = Timed interval wipe or
automatic wiping with rain sensor, to
change the sensitivity of the system
adjust the rotating column, less sensitive
rotate down, more sensitive rotate up
1=Slow
2=Fast
Rear window wiper:
Wash fluid is sprayed onto the window
when the stalk is moved to the second
position.
The switch is spring loaded and will
return to the ’on’ position when
released.
Headlight range adjustment 3:
Reduces dazzle for oncoming traffic.
With dipped beam on, adjust the
headlight range to suit the vehicle load:
No load = 0
Max. load = 4
Operating windscreen wash:
Short pull
The wiper operates for one cycle.
Long pull
Wash fluid is sprayed onto the
windscreen, at the same time the wiper is
operated for four cycles.
Warning:
In freezing conditions, wiper blades can
freeze to windscreen. Release blades
from the ice before starting the vehicle
to prevent wiper motor damage.
Refuelling:
z Turn filler cap anti-clockwise to
release.
z Fuel tank capacity = 90 litres.
Operating turn signal lights:
Stalk in rest position
Right turn = Upwards
Left turn = Downwards
When the steering wheel is turned back,
the stalk automatically returns to its
original position.
This will not happen when making a
minor steering manoeuvre such as
changing lanes.
When lane changing, move stalk to
resistance point.
When released, stalk will spring back.
Engine oil:
Check every 300 miles and prior to long
journeys.
Important
to maintain the correct level of an
appropriate quality oil in the engine.
For engine lubrication, we recommend in
particular Vauxhall brand oils
ACEA A3/B4: SAE 10W-40 (without DPF):
AECA C3: SAE 10W-40 (with DPF):
–
ACEA A3/B4: SAE 5W-40 (without DPF):
AECA C3: SAE 5W -40 (with DPF):
for petrol and diesel engines.
A higher quality than specified can
always be used.
When using commercially available
engine oils, the following are
appropriate for diesel engines:
only oil bearing the classification
ACEA B4/C3 is to be used.
: it is the owner’s respo nsibility
or –
Tyre pressures
(psi) - Full load
Tyres Front Rear
195/65 R 16 50 54
195/75 R 16 55 61
205/65 R 16 55 61
215/65 R 16 45 50
 Loading...