

Vauxhall TIGRA, Tigra 2007 Owner's Manual
TIGRA
Operation, Safety and Maintenance
Owner’s Manual

VA UXH A LL T i gra
Operation, Safety, Maintenance

Data spe cific to yo ur v eh icle
Please enter your vehicle’s data here to keep it easily accessible.
This information is available under the section "Technical data" as well as on th e identification plate and in the Service Booklet.
Fuel
Designation
Engine oil
Grade
Viscosity
Tyre pressure
Tyre size for load with 1 person and
light luggage
with full loa d
Summer tyres Front Rear Front Rear
Winter tyres Front Rear Front Rear
Weights
Permissible gross vehicle weight
– EC kerb weight
=Loading

Your Tigra
is an intelligent combin ation of forwardlooking technology, impressive safety,
environmental friendliness a nd economy.
The Retractable s teel roof also gives you
the opportunity to enjoy your Tigra as a
coupe or aconvertible .
It no w li es with you t o drive y o ur vehicl e
safely an d ensur e that it performs
perfectly. This Owner’s Manual provides
you with all the necessary information to
that end.
Make sure your passengers are aware
ofthe possible risk of accident and injury
whic h m ay result from improper use of the
vehicle.
You must always comply with the specific
laws of the co untry that you are travelling
through. These laws m ay differ from the
information in this Owner’s Manual.
When this Manual refers to a wo rkshop
visit, we recommend your V auxhall
Authorised Repairer.
A ll Vauxhall Authorised Repairers provide
first class se rvice at reaso nable prices.
You will receive quick, reliable and
in dividual service.
Experienced mechanics, trained by
Vauxhall, work according to specific
Vauxhall instru ctions.
T he Owner’s Manual should always be kept
in the vehicl e: Rea dy to hand in the glove
compartment.
Make use of the Owner’s Manual:
z The "In Br ief" se ction will give you an
initial overview.
z The table of cont ents at t he beginning
of the owner’s manual and within the
individual chapters will sho w y ou where
everything is.
z Its index will help you find what you
want.
z It will familiarise you with the
sophisticated technology.
z It will increase your pleasure in your
vehicle.
z It will help yo u to handle yo ur vehicle
expertly.
The Owner’s Manual is des igne d to be
clearly laid out and easily understood.
This symbol signif ies:
6 Continue read ing on next page.
3 Items marked with an asterisk are not
fitted to all ve hicl es (model variants,
engine options, models s pecific to one
country, optional equipm ent, Genui ne
Vauxhal l Parts a nd Accessories).
Yellow arrows in the illustrations serve as
points of re ference or indicate some action
to be performed.
Black arrows in the illustrations indicate
a reaction or a second action to be
per f ormed.
Directional data, e.g. left or right, or front
or back, in the descriptions always relate to
the direction of travel.
Thank you for choosing a Vauxhall. We
wish you many hours of p leasurabl e
driving.
Your Vauxhall Team
9 Wa r n ing
Text marked 9 Warning provides
in formation on risk of acciden t or injury.
Disregard of the instructions may lead to
injuries or endanger life.
Inf orm your pass engers accordingly.

Contents
Comm itment to c ustomer
satisf action:
Our aim: to keep you happy with your
vehicle. All Vauxhall Authorised Repairers
offer first-c lass service at competitive
prices. Experienced, factory-trained
technicians work according to factory
in structions. Yo ur Author ised Repair er can
supply you with GENUINE VAUXHALL-
A PPROVED PARTS, which have undergone
stringent quality and precision checks, and
of course useful and a ttractive
VAUXHALL-APPROVED ACCESSORIES.
Our name is your guarantee!
For details of th e
Vauxhall Authoris ed Repairer Network,
please ring this number; 0845 090 2044
In Brief ....................................................... 2
Keys, doors, windows,
Retractable steel roof ........................ 20
Seats, Interior .......................................... 46
Instruments, Controls ............................ 68
L igh ting ..... .... ..... .... .... ......... ..... .... ..... .... .. 8 8
Infotainment system ............................. 92
Climate control ...................................... 94
Driving and Operation ........................ 102
Self-help, vehicle care .......................... 132
Technical data .................................... 162
Service, Maintenance .......................... 175
Index ...................................................... 190
2In Brief
In B rief
To unlock and open driv er’s door:
Pres s bu tton q,
pull d oor ha ndle
6 Door locks, child safety locks – see
page 22,
key – see page20,
electr onic immobilizer – s ee page 21,
ra dio remote contro l 3 – see page22,
central locking 3 – see page 24,
V auxhall alarm sy stem 3 – see page31.
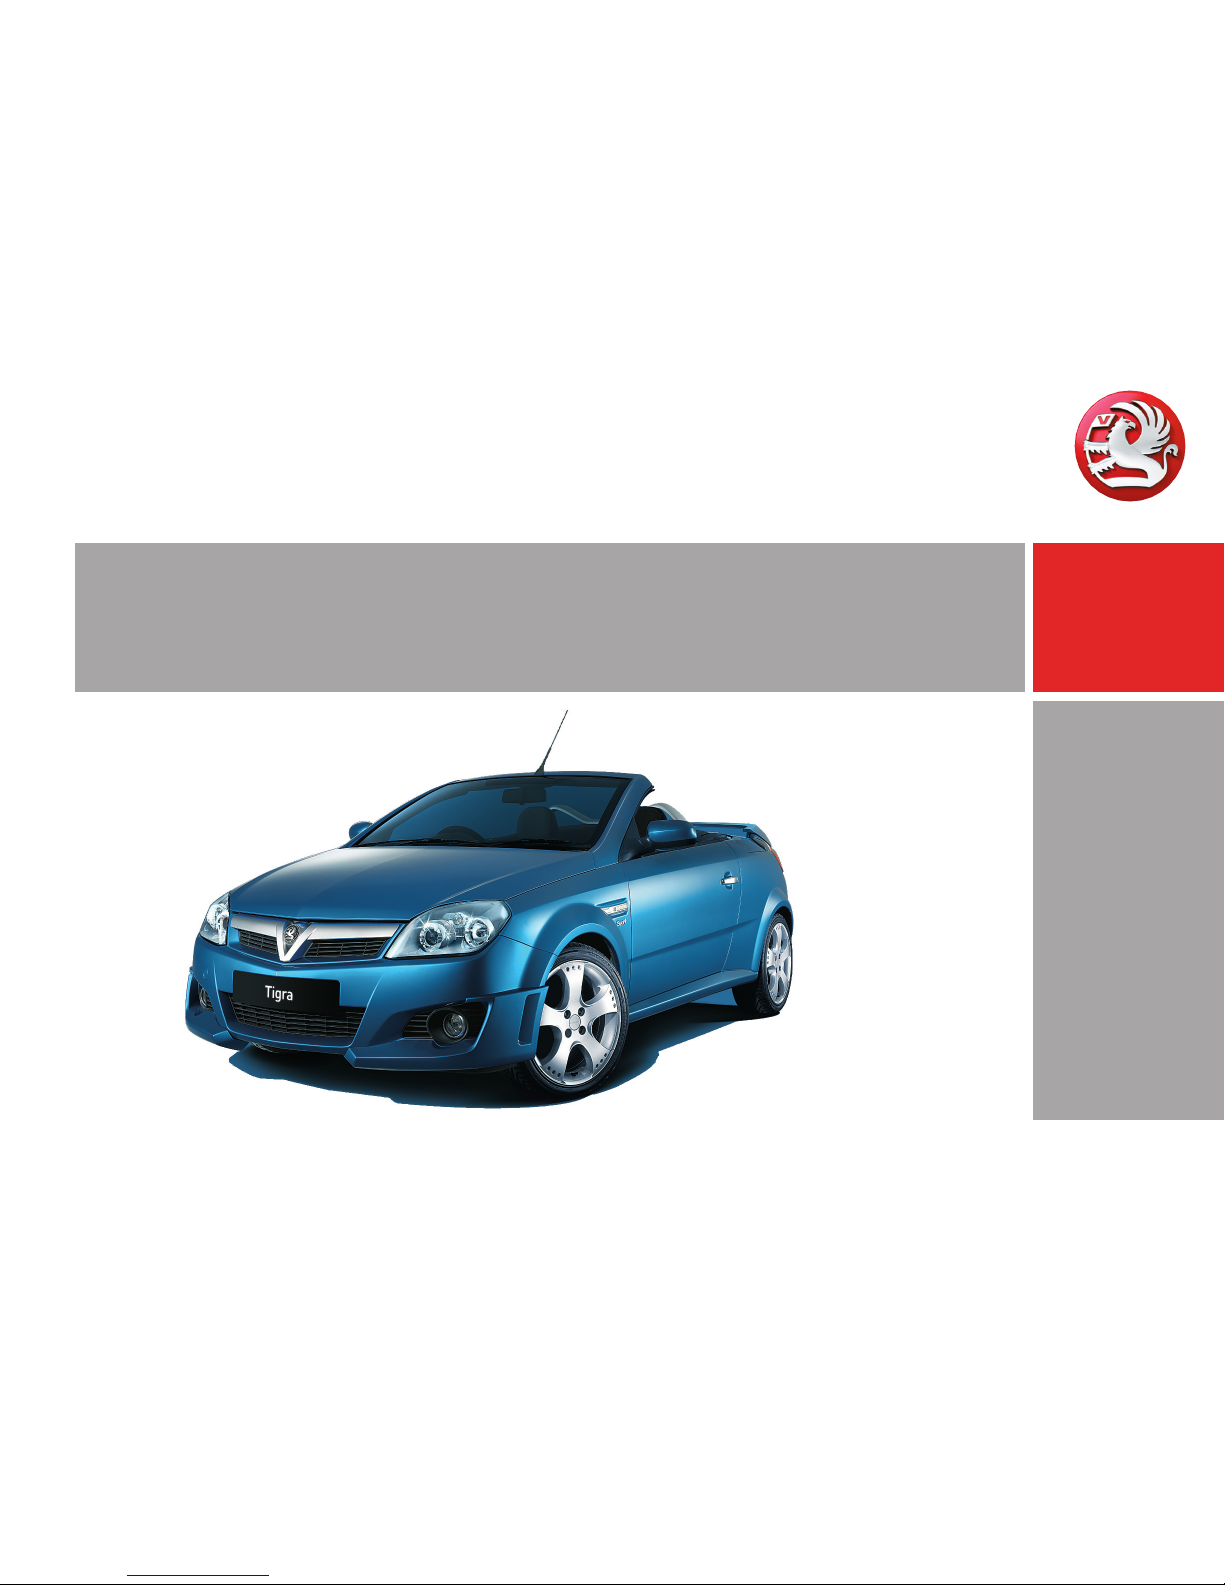
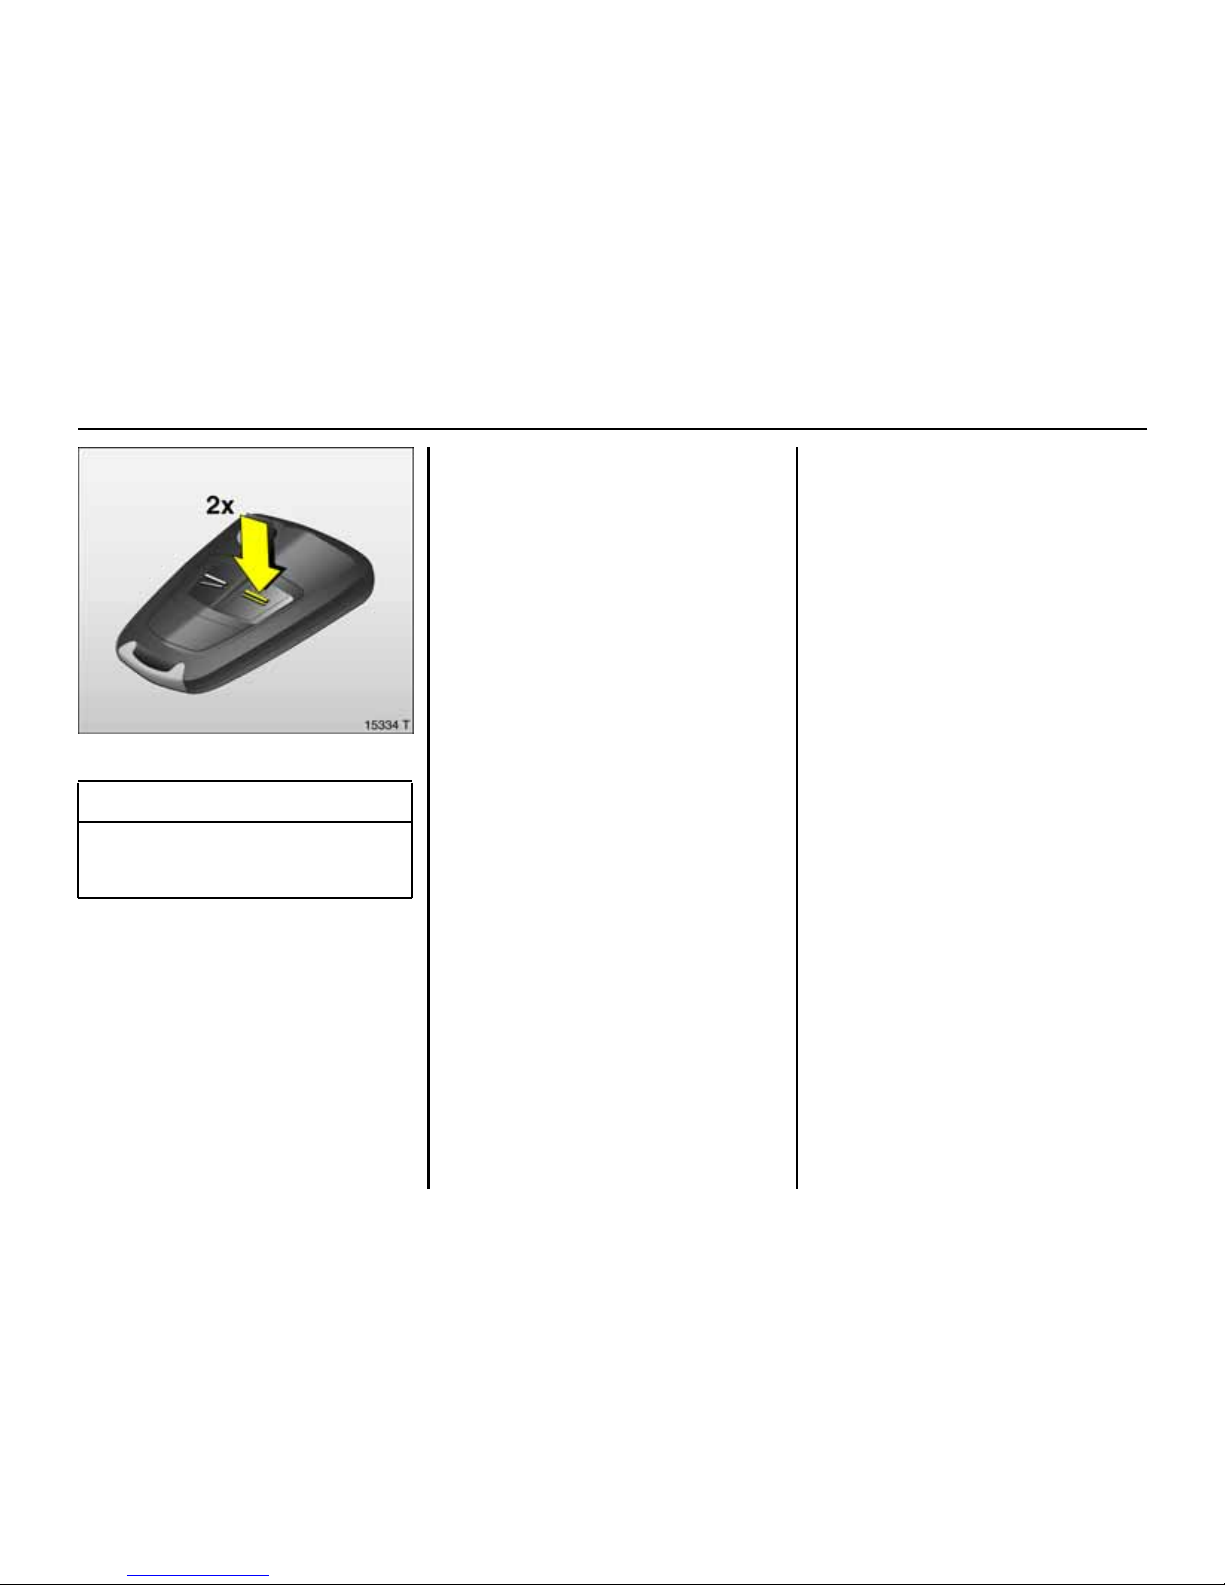
To unlock and open luggage
compartme nt:
Press button q
of remote control twice ,
press but ton be n e ath th e bo ot l id
The vehicle is unlocked and the luggage
compartment opens automatically.
To unlock with but ton on driver’s door:
With veh icle unlocked, ignition on and
hand brake applied, briefly pull button R.
6 Luggag e comp ar tm ent – se e page 27,
radio remote control – see page 22.
3In Brie f
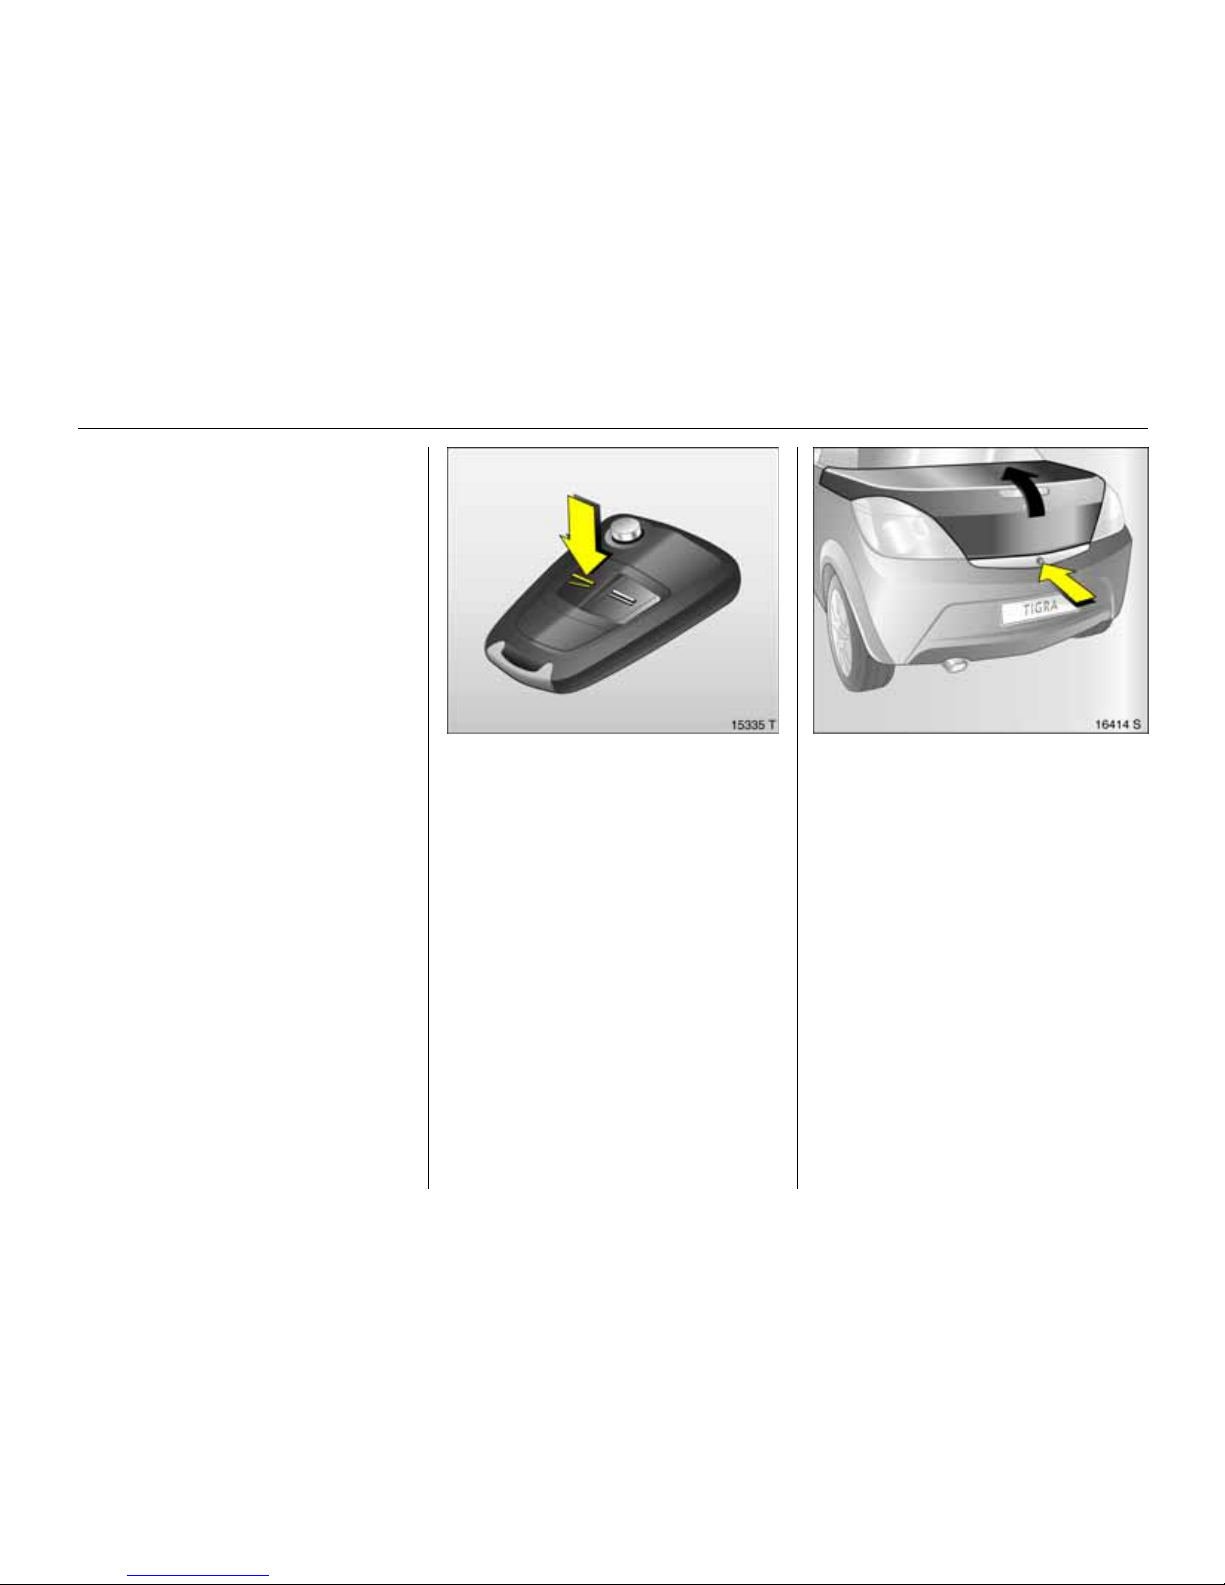
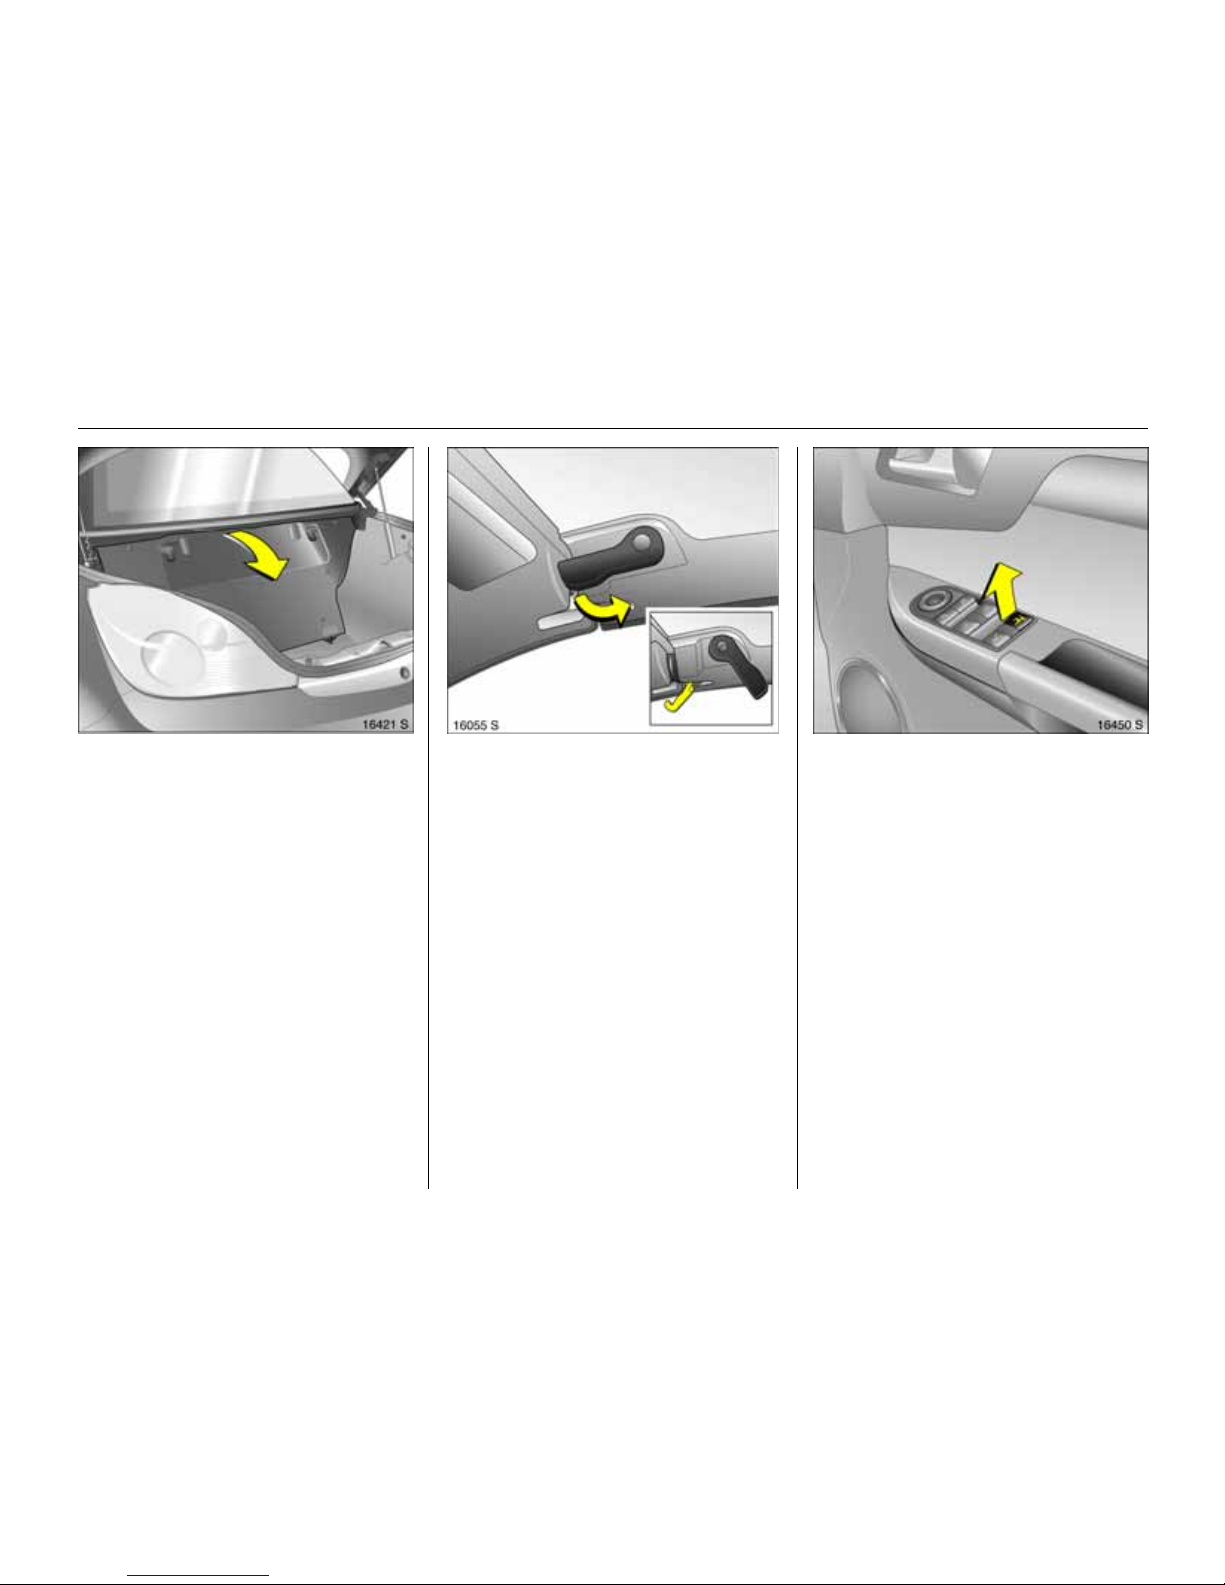
To adjust seat:
Pull han dle,
slide seat,
release handle
6 Seats – se e page 46,
seat position – see page 47.
Adjusting seat b ack rest:
Turn handwheel
Move s eat backrest to su it seating position.
Do not lean on seat backrest whilst
adjusting it.
6 Seats – see page46,
seat position – see page 4 7.
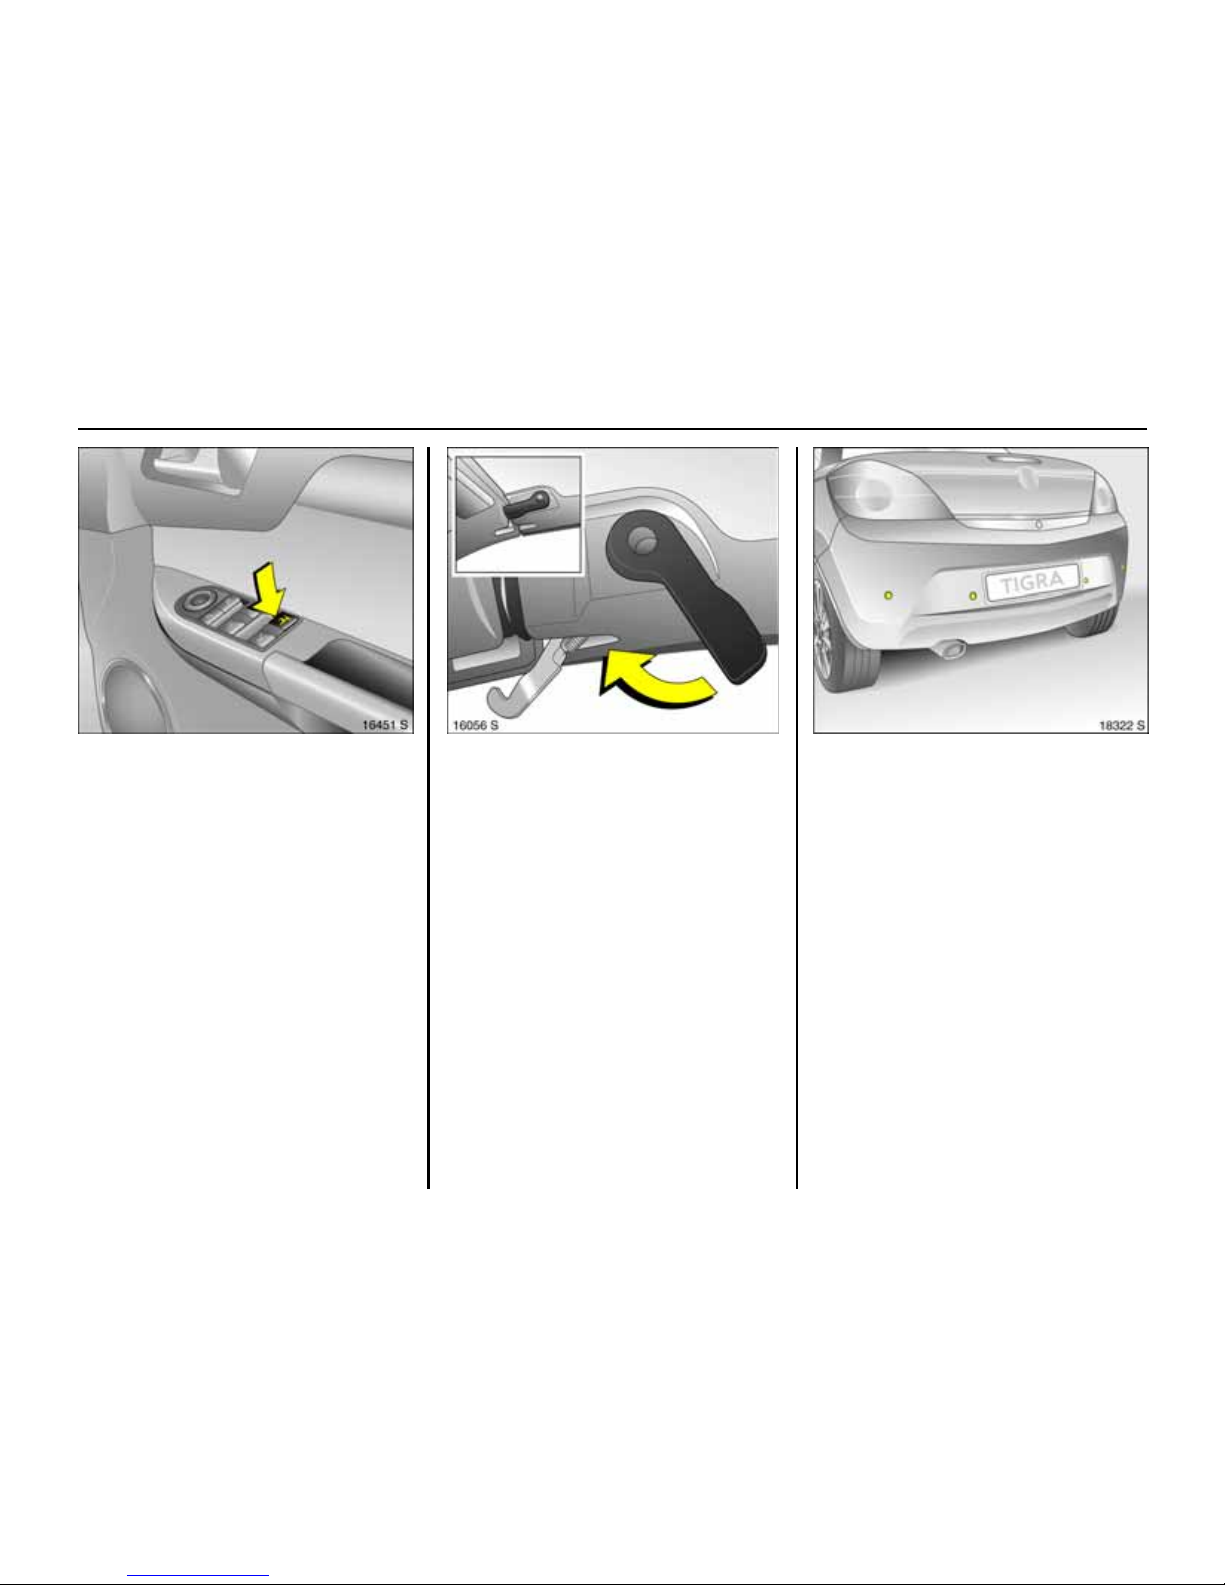
T o adj u st seat heig h t :
Pull fro nt lev er at sid e
Lift l ever and relieve some weight from seat
to raise it or press down on seat with body
weight to lower it.
6 Seats – see page 46,
seat position – see page 47.
9 Wa r n i n g
Important: Do not sit nearer than 10
inches (25 cm) from the steering wheel, to
permit safe airbag deployment.
4In Brief
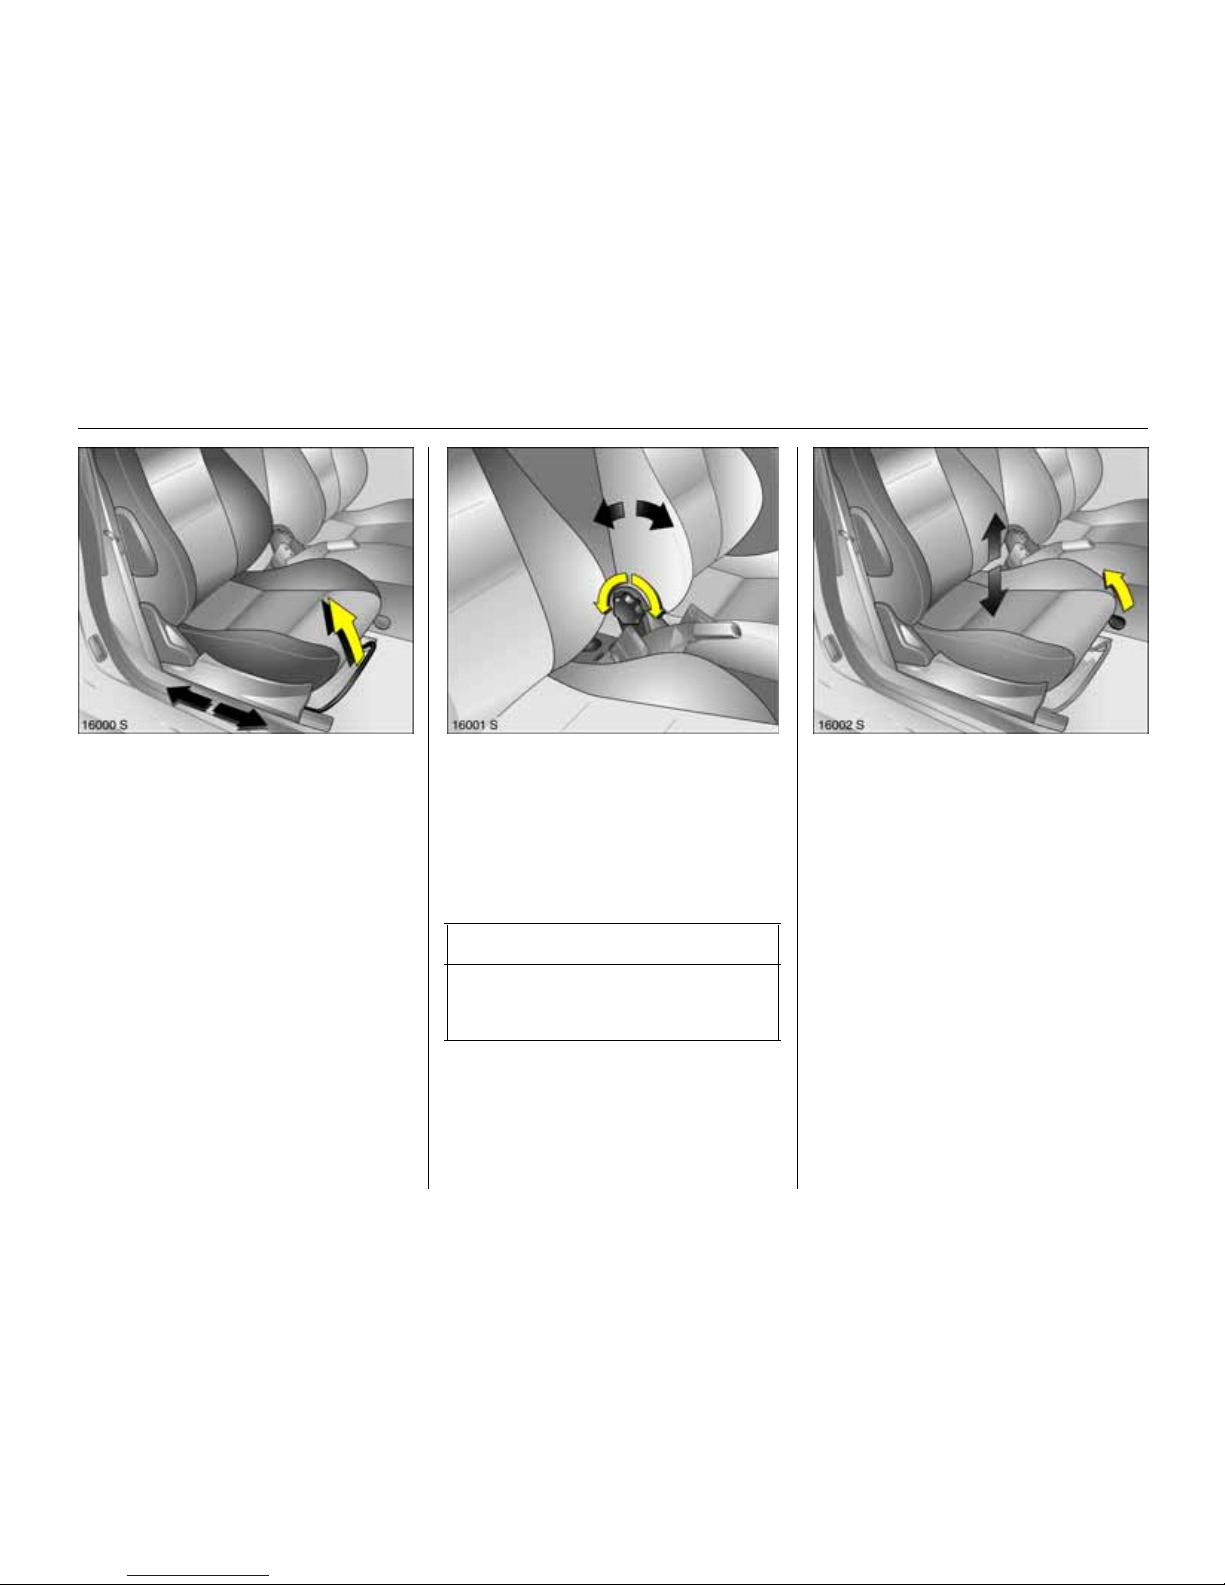
F old in g dow n t he se at backr e st s :
Rai se release lever
To access the stowage compart ment
behind the se ats, fold the front seat
backr ests fo rward.
6 Seats – se e page 46,
seat position – see page 47.
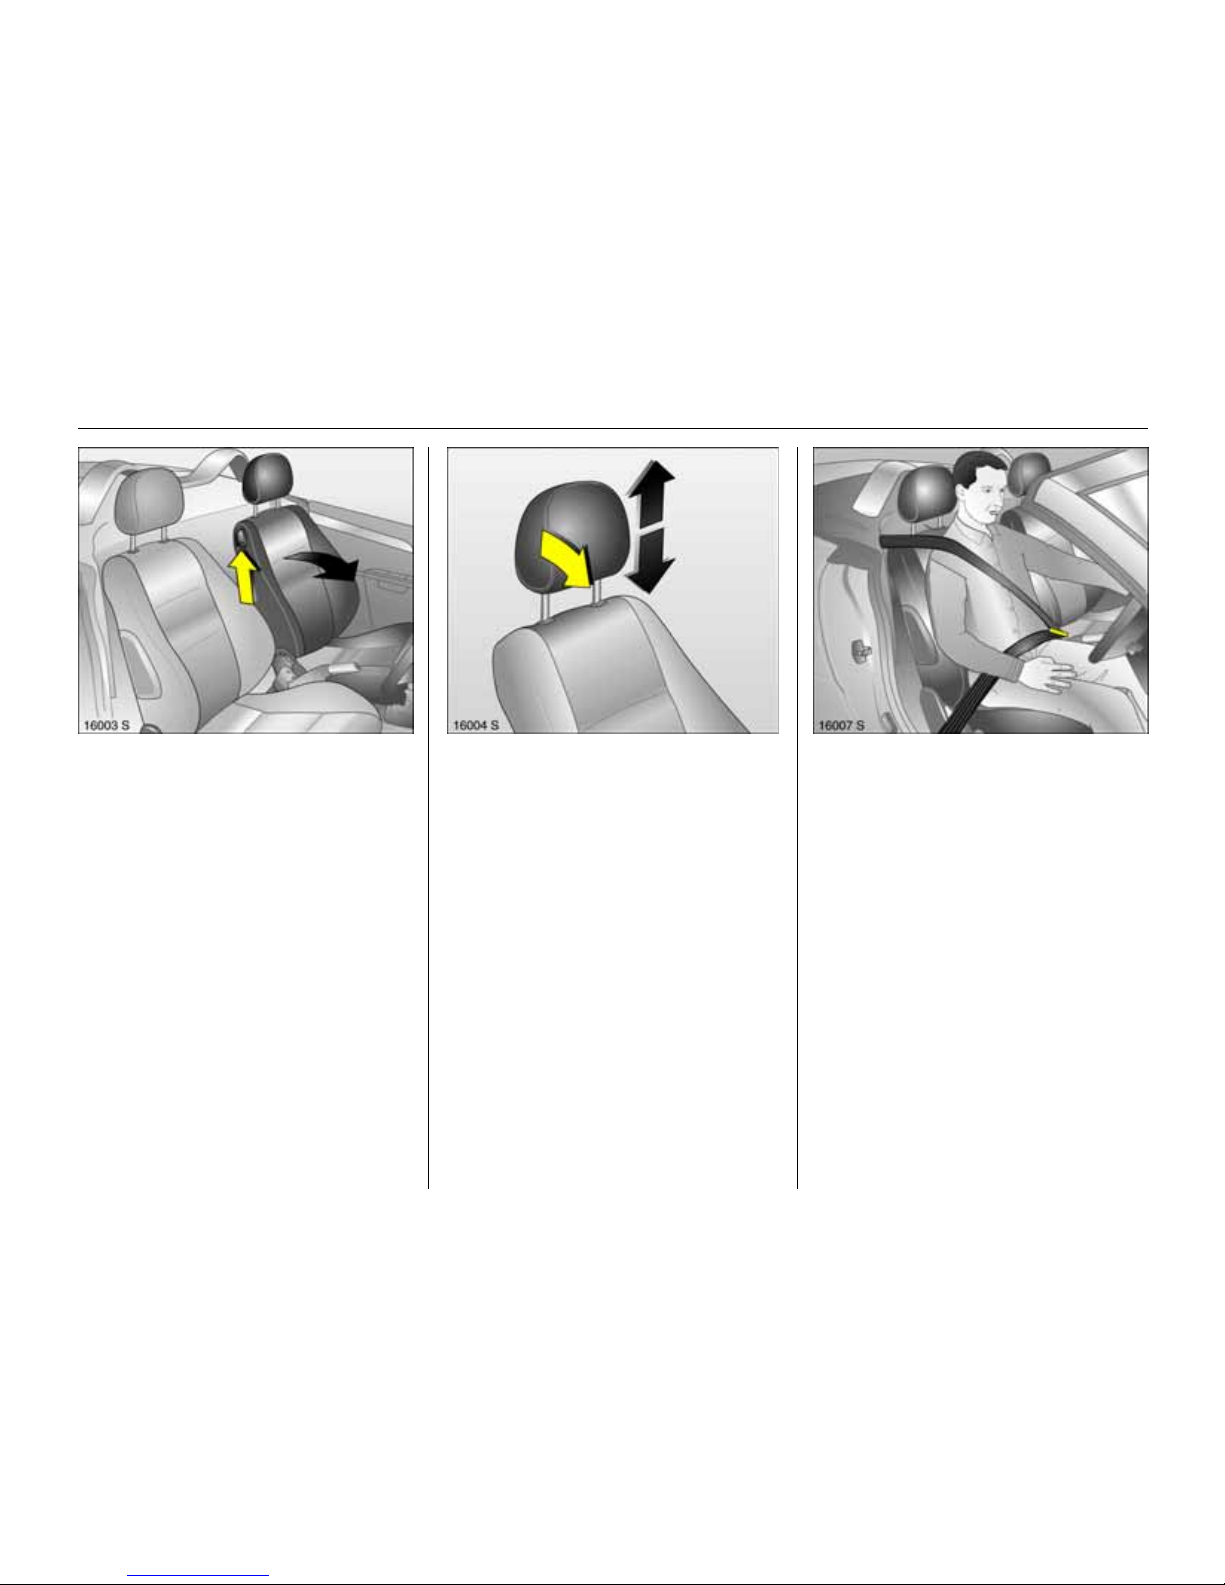
To ad j u s t head r e s t rai nt height :
To re lease catch gr ip head
restra i nt at si d es,
ti lt forward,
hold and adjust height,
engage
6 Head restraints – page 48,
h ead res traint position – page 48,
h ead restraint removal – page 48.
To fit sea t be lt:
Draw seat belt smoothly
frominerti a reel,
gui de over should er
a n d e n ga ge i n bu ckle
The seat belt must not be twisted at any
point. The lap belt must lie snugly against
the body. The backrests must not be tilted
back too far (recommended tilting angle
approx. 25°).
To rel ease belt, press red button on belt
buckle.
6 Three-point safety belts – see p age50,
airbag system – see page 56,
seat position – see page 47.
5In Brie f
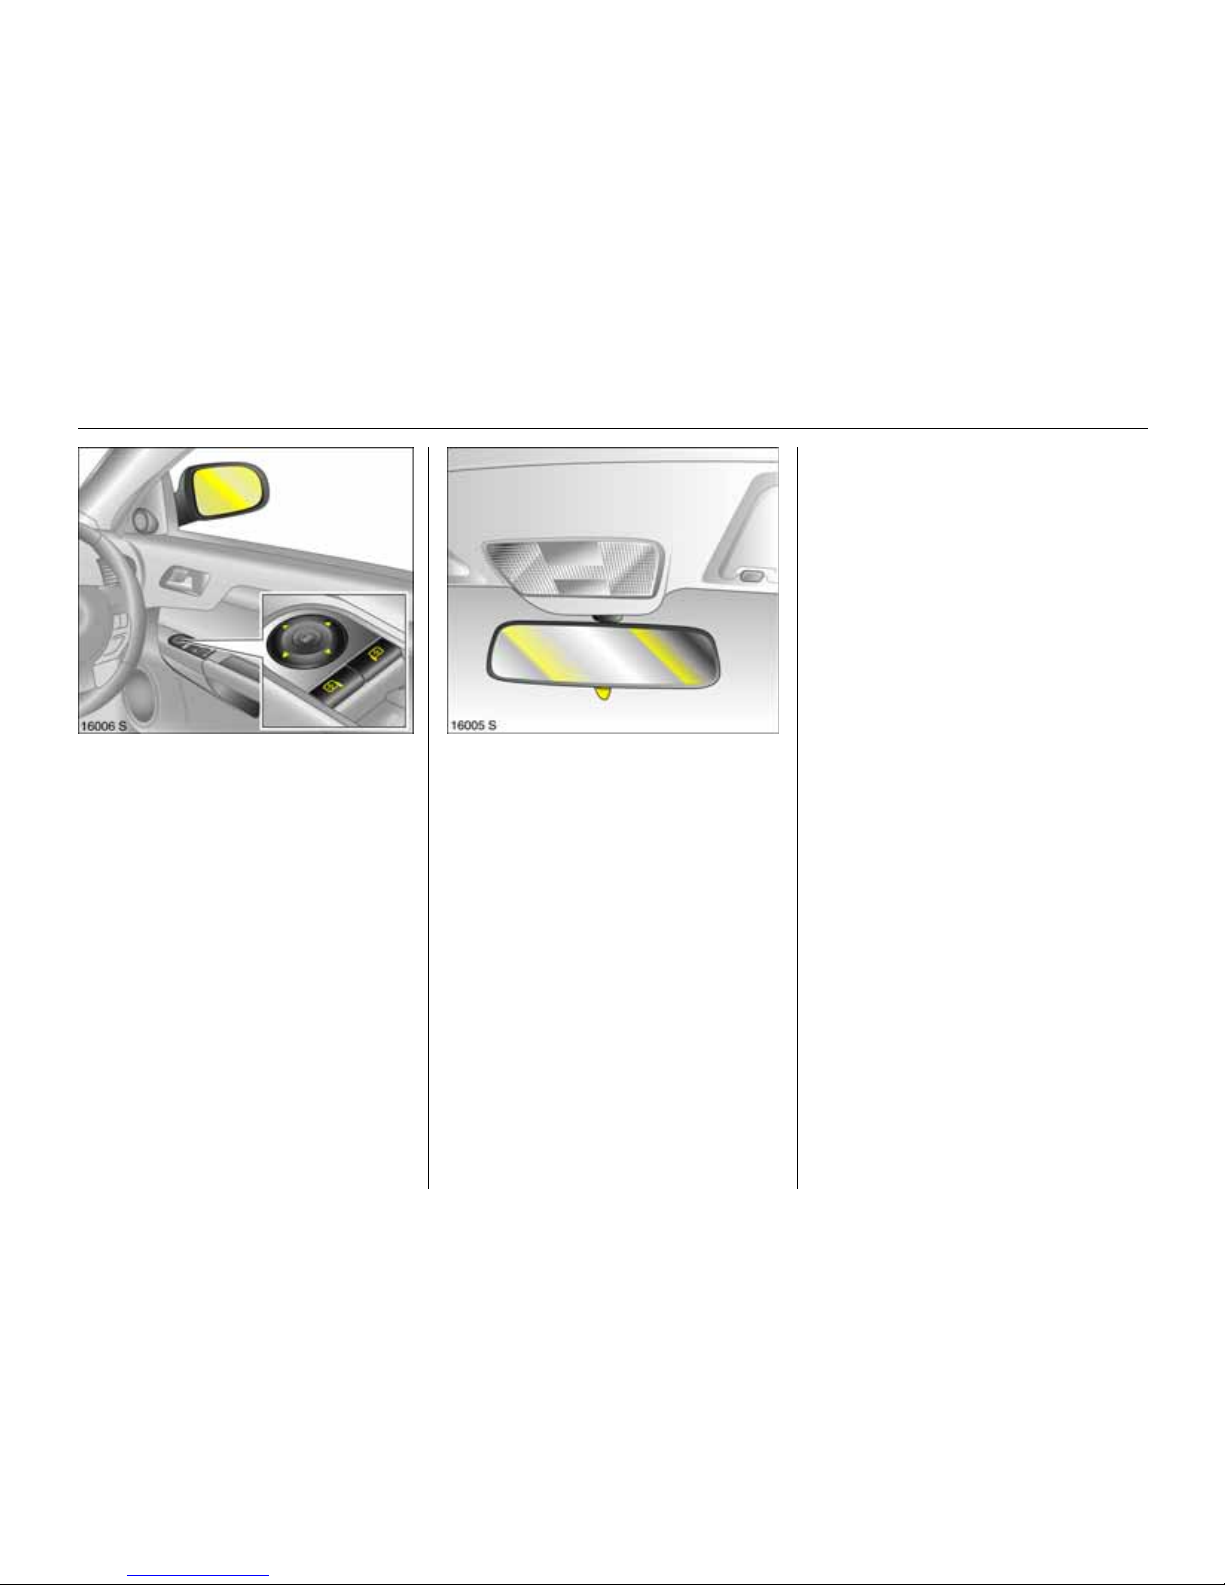
To adjust exterior mirrors:
Four-wa y swi tch on driv er’s d oor
Press mirror switch right or left : Four-way
switch adjusts corresponding mirror.
6 Mir rors – page 34,
aspherical exterior mir ror – page 34,
heated exterior mi rror – pages 12, 95.
Adjusting interior mirror:
Swivel mirror hous ing
Swivel lever on unde r side of mir r o r housing
to reduce dazzle at night.
6 Mir rors – page 34.
6In Brief

7In Brie f
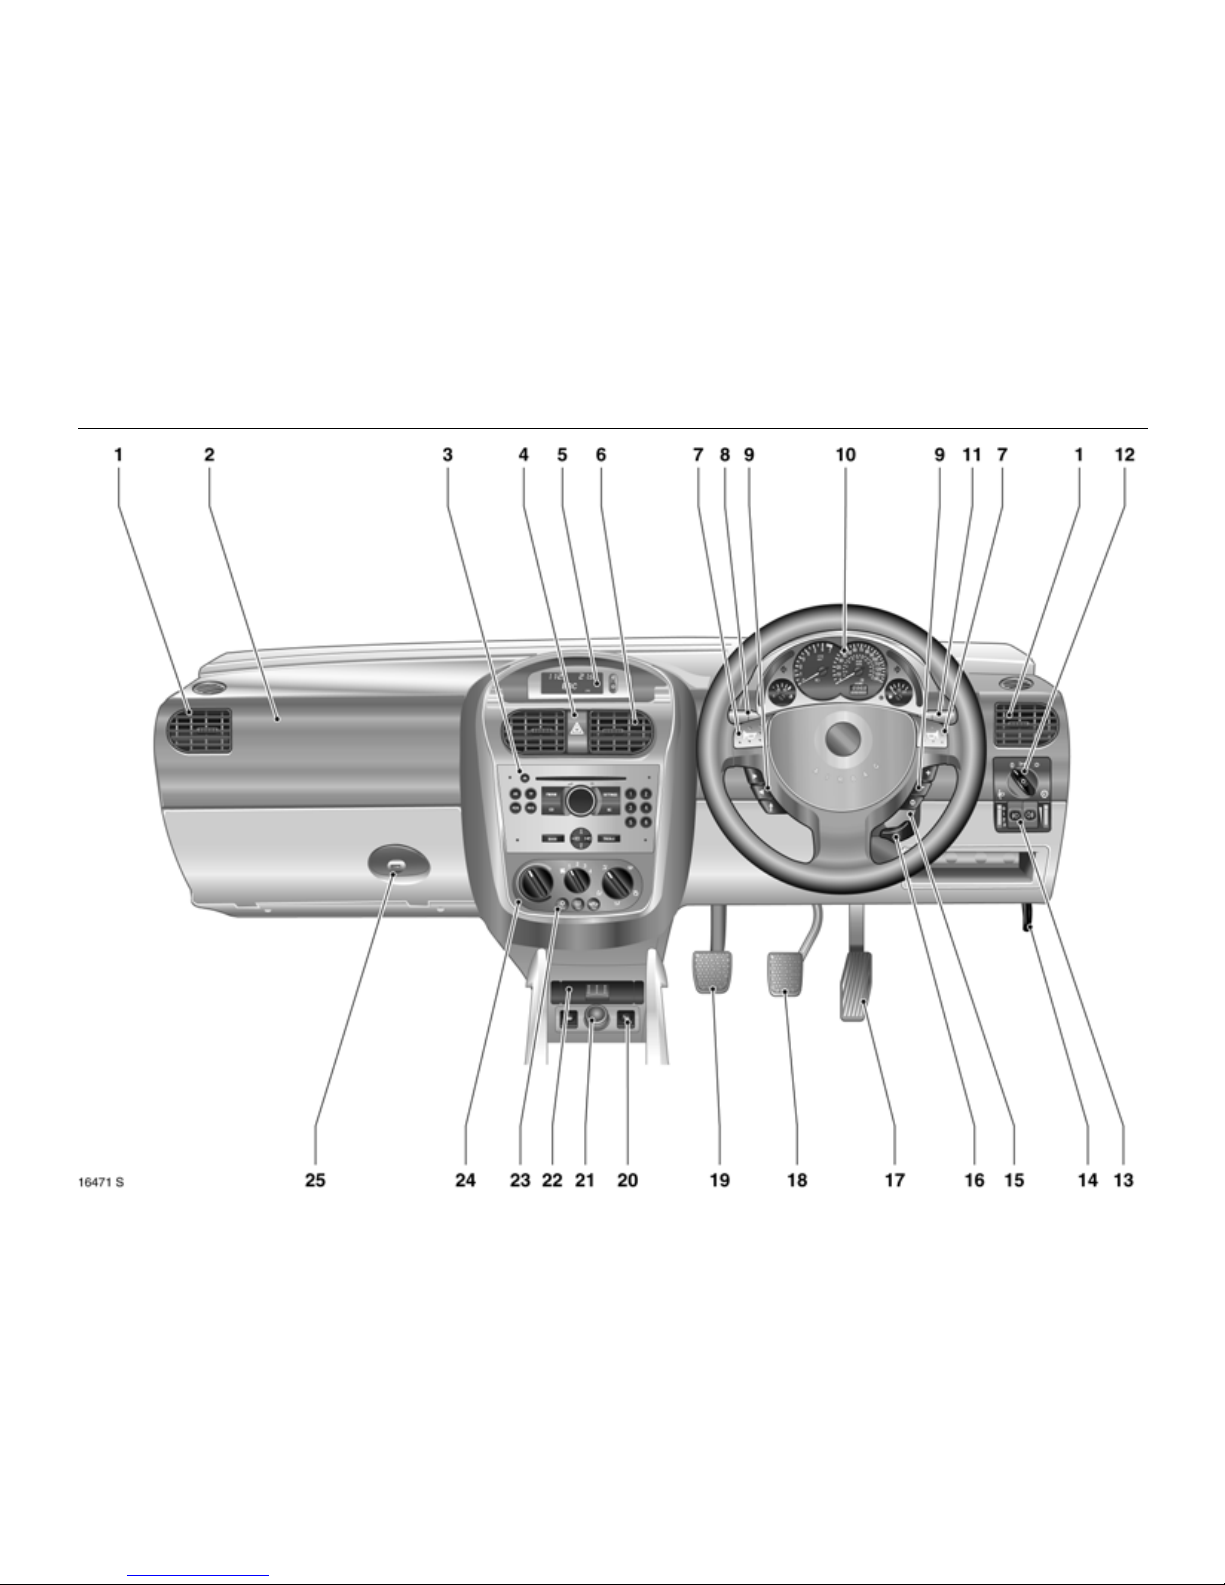
Page
1 Side air vents ................................... 94
2 Fr ont passenger airbag .................. 56
3 In fotainme n t system 3 . ........ .... 76, 93
4 Hazard warning lights .............. 10, 90
LED for anti-theft alarm sys tem 3...32
5 Inform ation display
for time, date,
outside temperature,
Infotainment System 3 . .... ............. . 7 6
Trip computer 3 ... .... ..... ........ ..... .... . 8 3
6 Centre air vents ................................94
7 Horn ...................... ......... ........ ...........11
Dr ive r’ s Airb ag ..... .... ..... .... .... .......... 5 6
8 Tu rn sign al li gh ts ,.. .... ..... ........ ..... 10 , 8 9
hea d lig ht flas h, ........ ..... .... .... ..... 10, 89
Dipped beam, high beam ........... 9, 89
Door-to-door light function 3......... 90
Cruise control3 .... ......... .... .... ..... .... 120
9 Remote c ontrol on
steering whe el 3 ............................ . 92
10 Instruments................................. 68, 74
Pa ge
11 Windscreen wiper ..................... 11, 87
Windscreen wash system ..........11, 87
12 Pa rking lights, dipped beam ...... 9, 8 8
13 Headlight range adjustment .......... 90
Fog tail light ..................................... 89
Fog lights 3 ...................................... 89
Instrument illumination ................... 91
14 Bonn et rele a se lev er . ............. .... .... 1 32
15 S ta rter switch with steeri ng
wh ee l loc k ... ..... .... ......... .... ..... .... ..... ... 9
16 Steering wheel adjustment 3 ... ..... ... 9
17 Ac cel e ra t or p edal .... .... .... ..... 10 8, 1 10
Page
18 Brake pedal ..................... 72, 108, 123
19 Clutch pedal 3 ... ..... .... ..... ......... .... 10 8
20 Heated seats 3 .. ..... .... ..... .... ..... .... .. 9 5
21 Accessory socket or
cigarette lighter .............................. 65
22 Ashtray 3 ......................................... 66
23 Air conditioning system 3 ... ..... ...... 98
Heated rear w indow .................. 12, 95
Air recir cula ti on system 3............... 99
24 Climate c ontrol ............................... 94
25 Glove compartment ........................ 67

8In Brief
Control indicators
X
Seat belt3 ,
see pages 68, 50.
>
Fog lights 3,
see pages 68, 89.
A
Engine electronics,
Immobilizer,3,
Easytronic3,
Fault,
see pages 21, 6 9,102, 114.
Z
Exhaust emission 3,
see pages 69, 114.
v
A irbag system s,
Be lt tensio ne rs,
see pages 52, 60.
I
Engine oi l pressure,
see page 70.
O
Turn signal lights,
see pages 10, 71, 89.
C
Main bea m,
see pages 9, 7 1,89.
!
Glow plugs 3,
see page 70.
j
Easytronic3,
Start engine 3,
see pages 71, 103.
T
Easytronic 3,
Winter progr amme,
see page 105.
r
Fog tail light,
see pages 71, 89.
p
Alternator,
see page 71.
R
Brake system,
Clutch system,
see pages 72,183.
u
Anti-lock Brake System3 ,
see page 125.
S
Engin e o il l evel 3,
see pages 72,179.
EPS
Electric power steering3,
see page 72.
v
Electronic Stability Program
(ESP®
Plus
) 3,
see pages 73,118.
Y
Fuel level,
see pages 73,113.
y
Seat occupancy recognition 3,
see pages 73, 61 .
9In Brie f
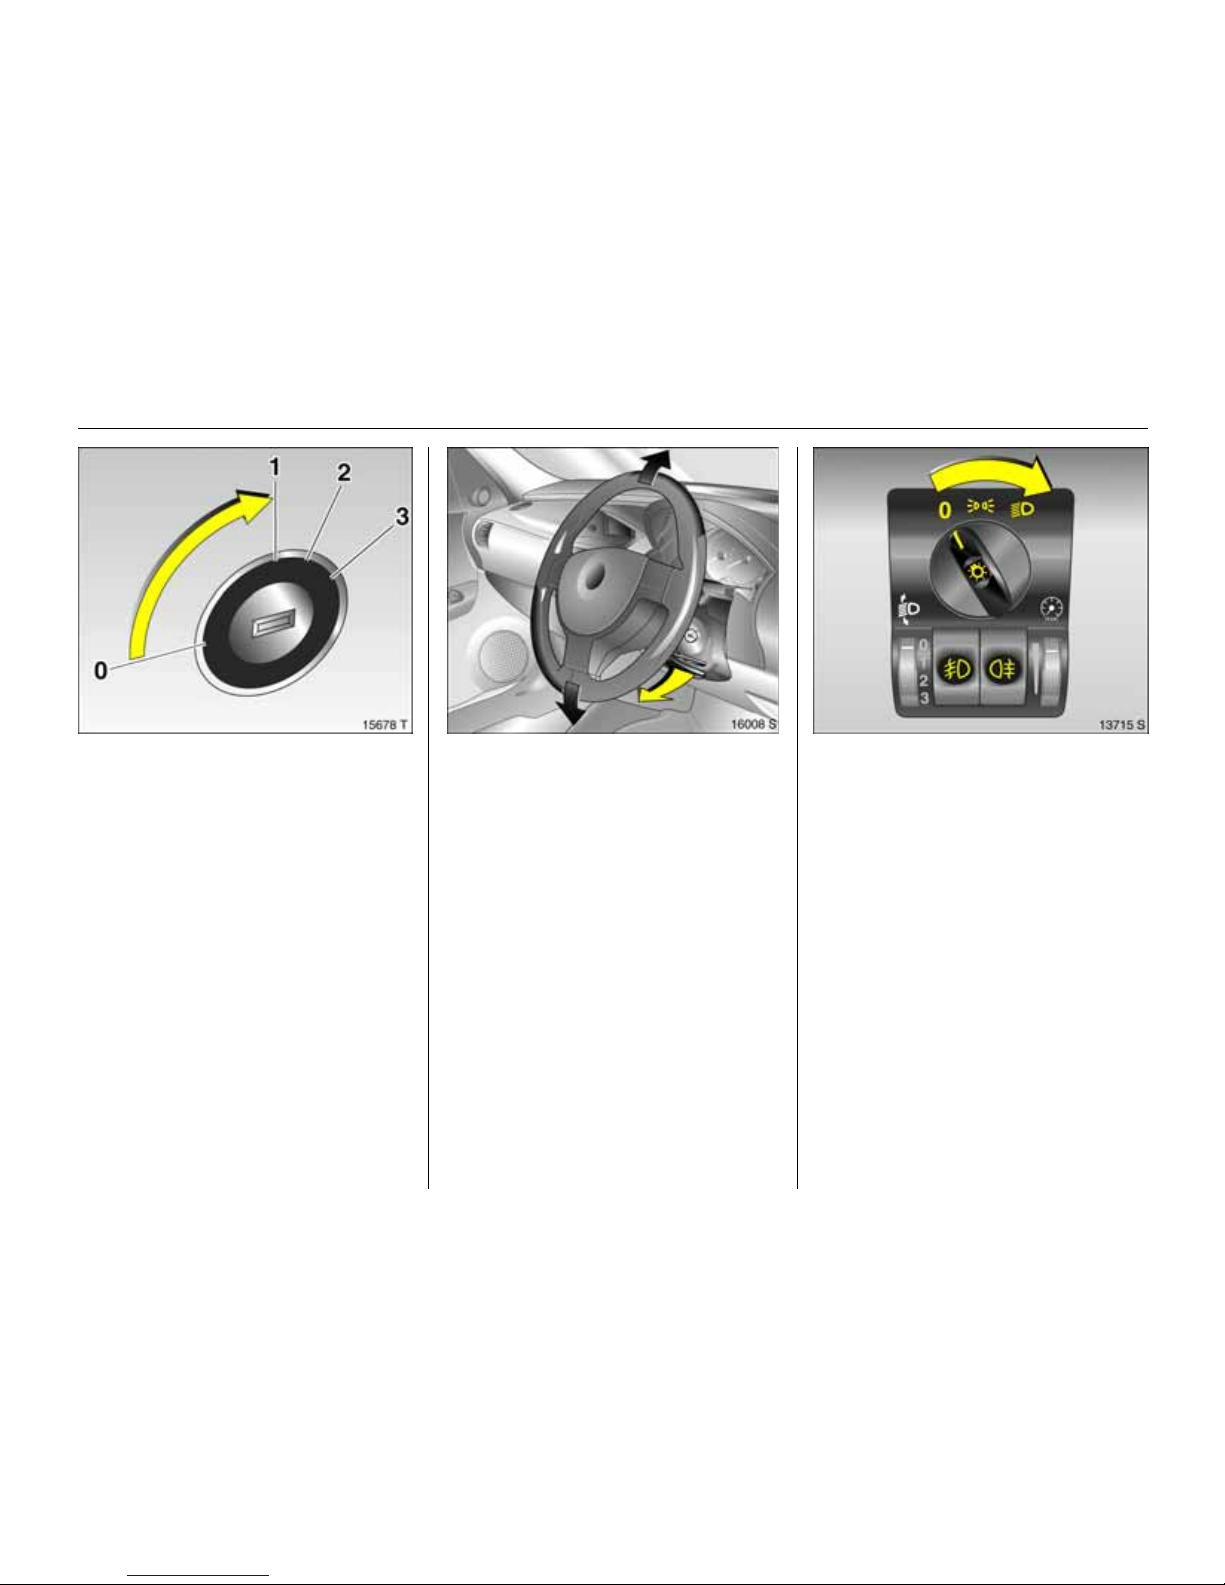
St eering wheel lock and ignit ion:
Turn key to position 1
M ove stee r ing whee l s om e wh at
to release loc k
Positions:
To lock the steering wheel, switch ignition
off, remo ve ke y and engage s teering wheel.
6 Startin g – page 13,
ele ctro nic immobilize r – pag e 21 ,
parking the vehicle – page 14.
Steering wheel adjustment 3:
Swivel leve r d o wn,
adjust hei g ht,
s wiv el lever up,
engage
Adjust steering wheel only when vehicle is
stationary and steering column lock is
relea sed.
6 Airbag systems – page 56.
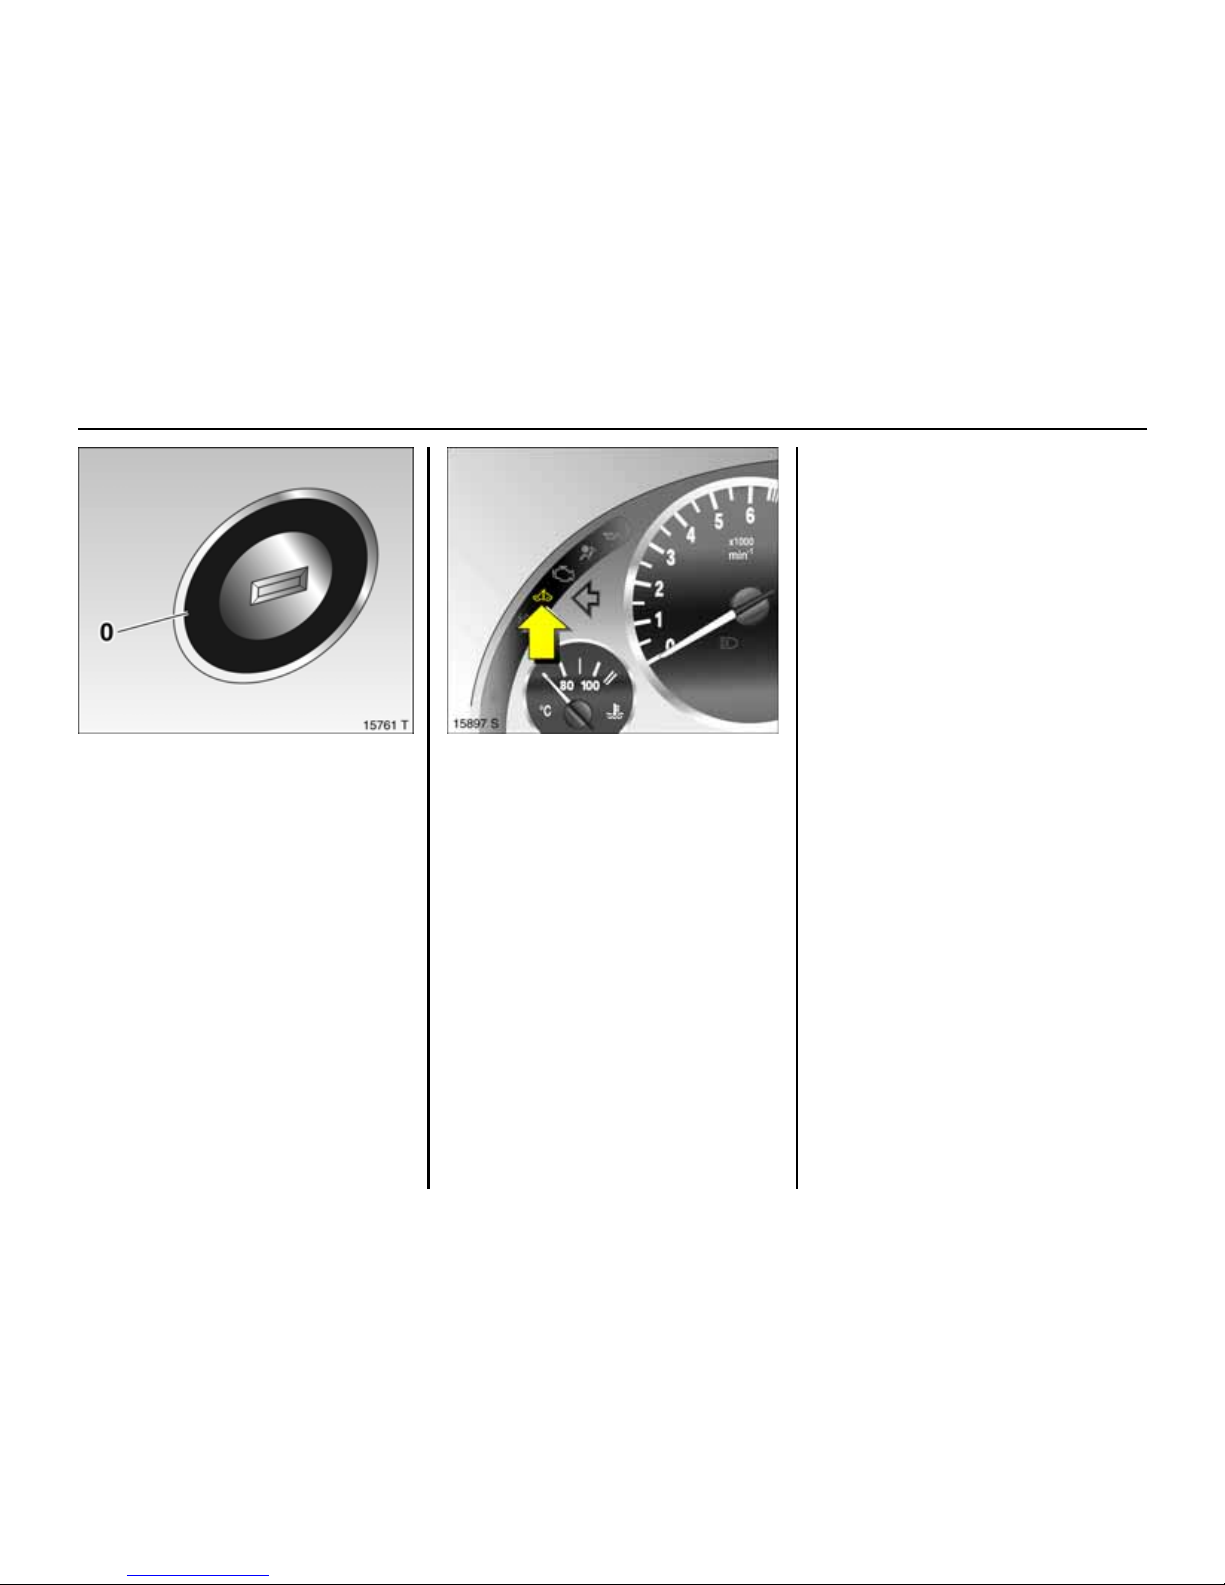
Light switch
Press button:
6 Lighting – page 88,
headlight control indicator – pages 14, 86.
0=Ignitionoff
1 = Steering free, ignition off
2=Ignition on,
for diesel engine: preheat
3=Starting
7 =Off
8 = Par k ing li ght s
9 = Di ppe d be am
or main beam
> =Fog lights3
r = Fog tail light
0 = Cou rt esy light
10 In Brie f
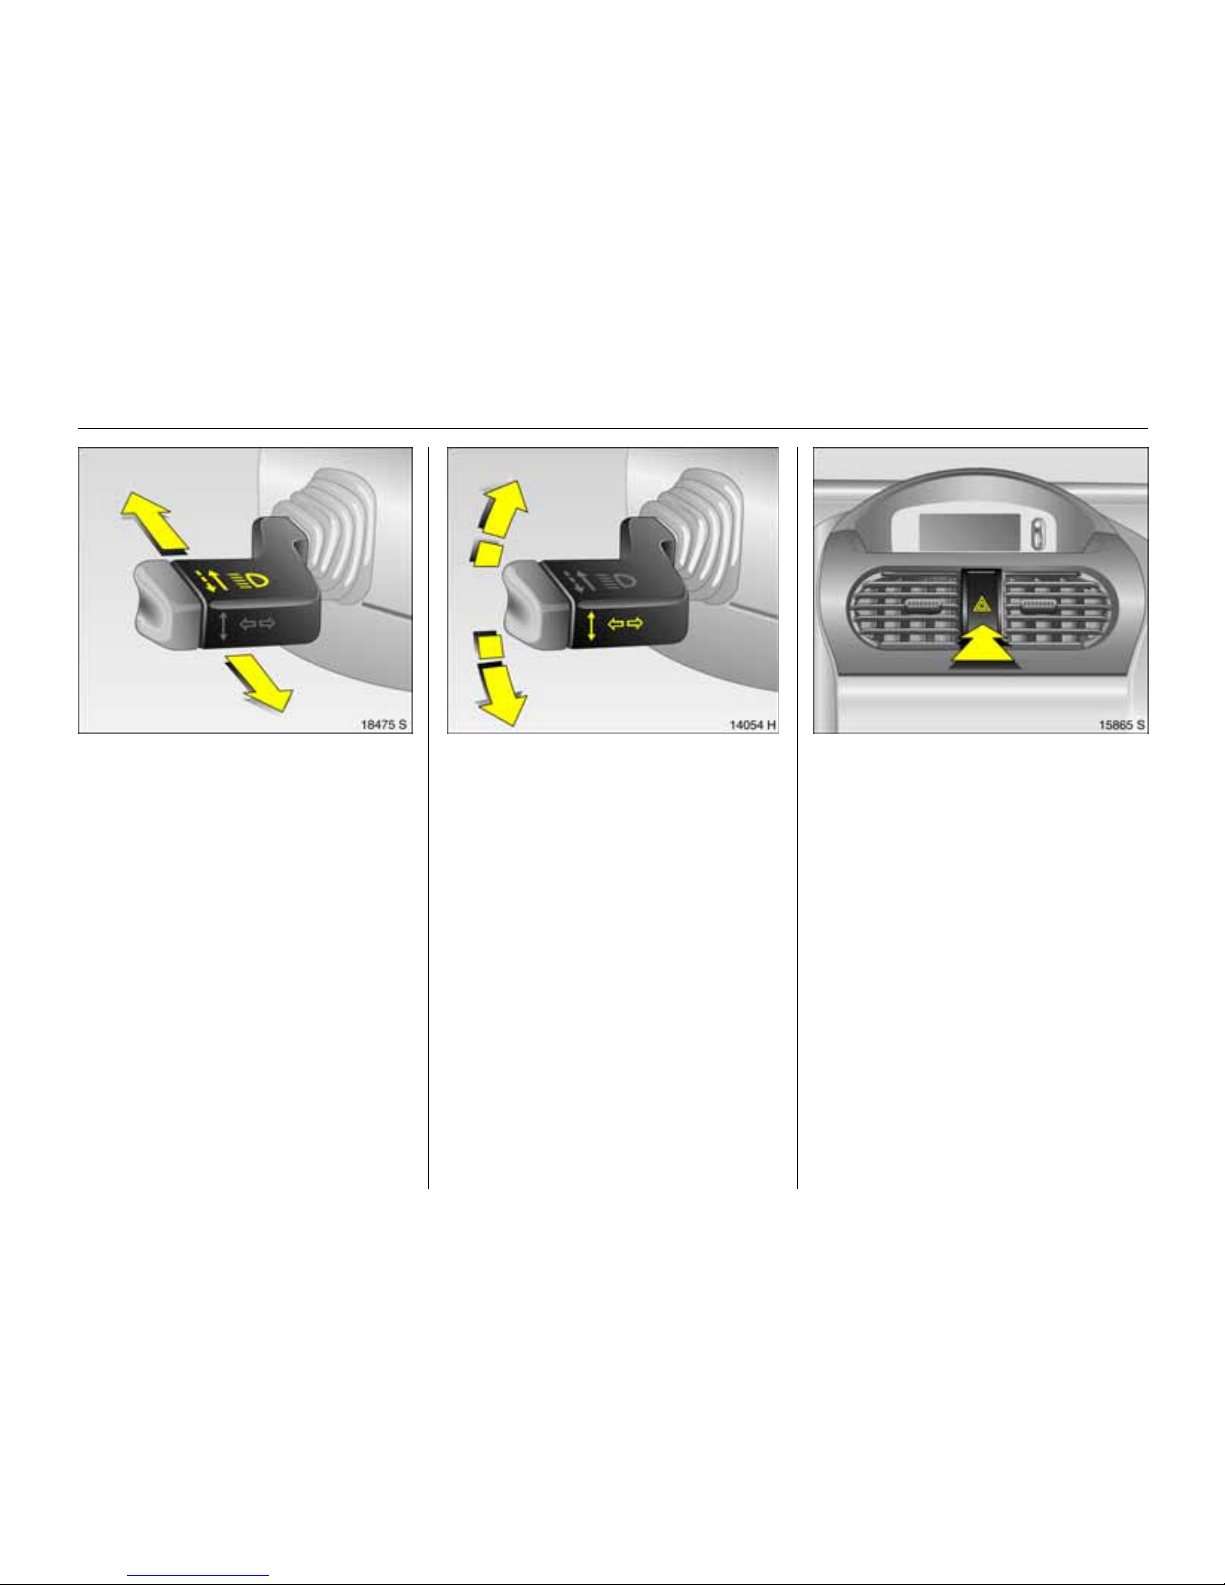
Headlight flash, main beam and
dipped beam :
Main beam, h eadlight flash – page 89.
S w it ch o n tu r n signal light s:
6 Turn signal lights – page 89.
Hazard warning li ghts:
6 Hazard warning lig hts – page 90.
Headlight
fla sh
= pu ll stalk
towards
s t eering wheel
M ai n beam = st a lk for war ds
Di ppe d be am = stalk for w ar ds
again
right = stalk up
left = stalk down
on = press ¨
off = press ¨ again

11In Brief
O per at e h o rn:
j press right or left
6 A irbag system – page 56,
remote control on steering wheel 3 –
page 92.
Wiper:
Move stalk up
6 wiper – page 87,
adjustable timed inte rval wipe 3 –
page 87,
further notes – pages 160, 185.
Operating windscreen system:
Move stalk to wa rd steer in g w heel
The wiper will s wipe for a few strokes.
6 Screen wash system – page 87,
further notes – page s 160, 185.
§
=off
$
= adjustable tim ed interval
wipe
%
=slow
&
=fast
12 In Brie f
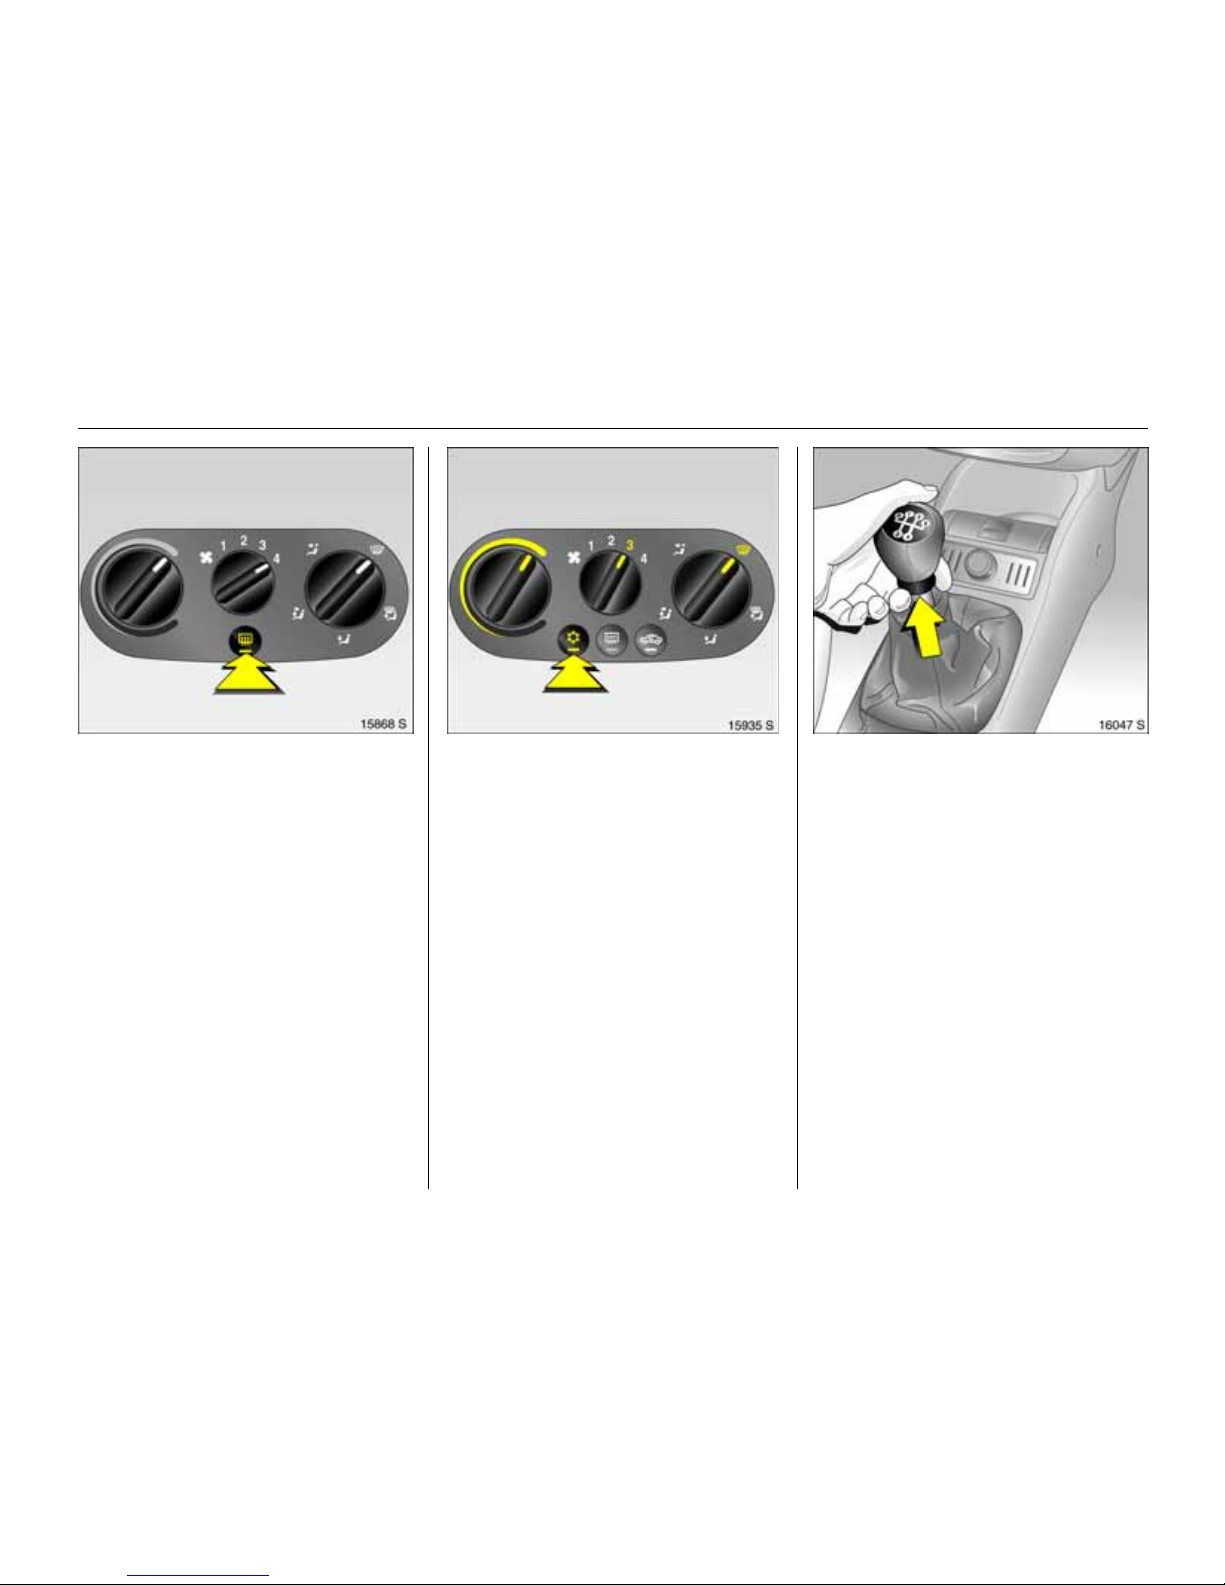
Heated rear window,
heat ed exterior mirrors :
6 A ir conditioning – page94,
heated rear window – page 95.
To c lea r misted or icy wind ow s:
Turn rot ar y switch for
temperatu re and air flow
clockwise,
set air distr ibution to V;
Air conditi oning system 3:
A l so press bu t tonn
6 Cl imate control system 3 – page 94.
Man ual transmission:
Reverse gear: with vehicle stationary, three
seconds after de-clutching pull the ring up
and engage gear.
If the gear does not engage, set the l ever
in neutral, release the clutch pedal and
depress again; then repeat gear selection .
on = press Ü
off = pre ss Ü again
13In Brief
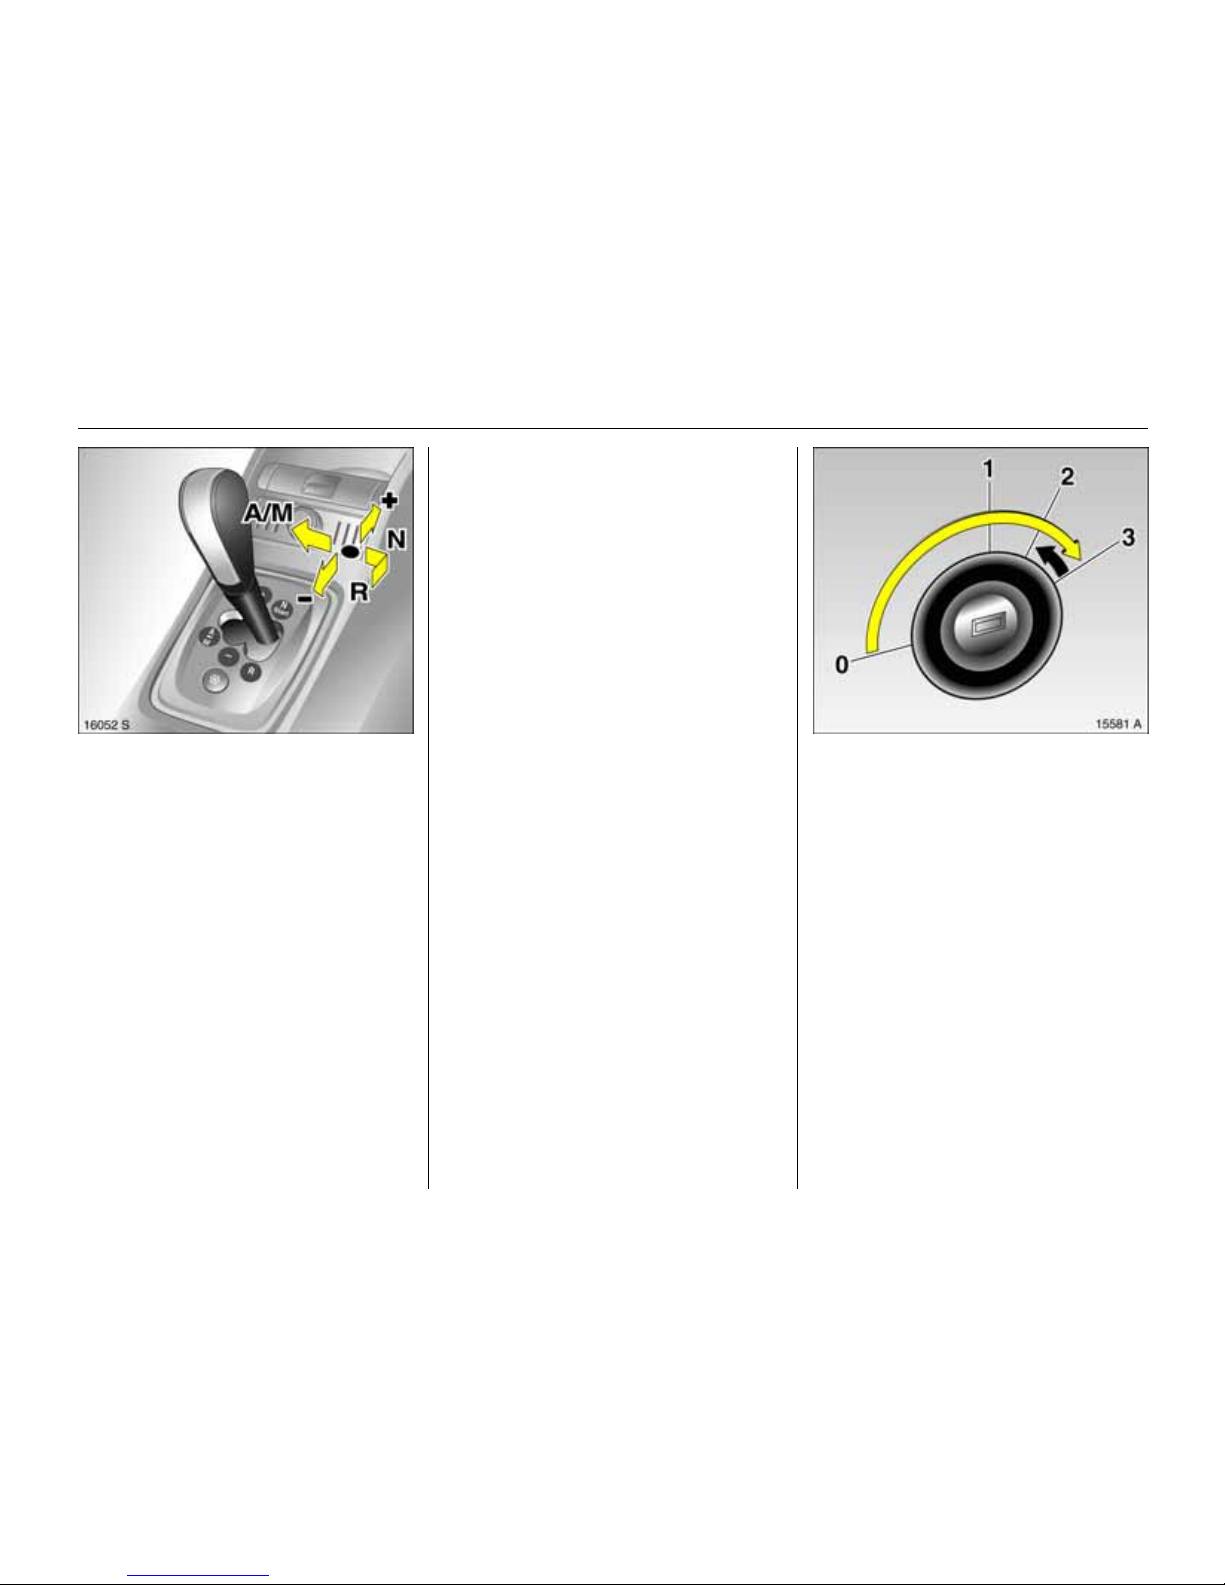
Easytronic 3:
To move the selector lever from N to R
press the button on the lever .
Only start in N with foot brake applied.
6 Easytronic 3 – page 102.
Before starting off, check :
z Tyre pressure and tyre c ondition, se e
pages 126,170.
z Engine oil level and fluid levels in engine
compartment, see pages 179 to 185.
z All windows, mirrors, exterior lighting
and number plates are free from dirt,
snow and ice and operational.
z Do not place any objects in fr ont of the
rear wi ndow, on the ins trument panel or
in the area in which the airbags infl ate.
z Seats, seat belts and mirrors are
correctly adjusted.
z Check br ake s.
To start eng ine:
Operate clutch and brake,
Easytronic 3 in N,
do not accelerate,
petrol engine: key to 3 ;
diesel engine: key to 2, when
con t rol ind i cator ! goes ou t1),
key to 3;
relea se key once engine is
running
Before restarting or switching off the
engine, turn key b ack to 0.
To switch on the ignitio n, only tu rn the key
to 2 .
6 Electronic immobilizer – Page 21,
Diesel fuel system – Page 132.
N = Idle/start position
o
=Drive position
(centre position)
+ = Higher gear
-=Lower gear
A/ M = S w i t ch be t w een
Auto m at i c an d
Manua l mode.
R = Re vers e gear
(withselecto r lever lock)
1)
Preheating system switches on only if outside
temperature is low.
14 In Brie f
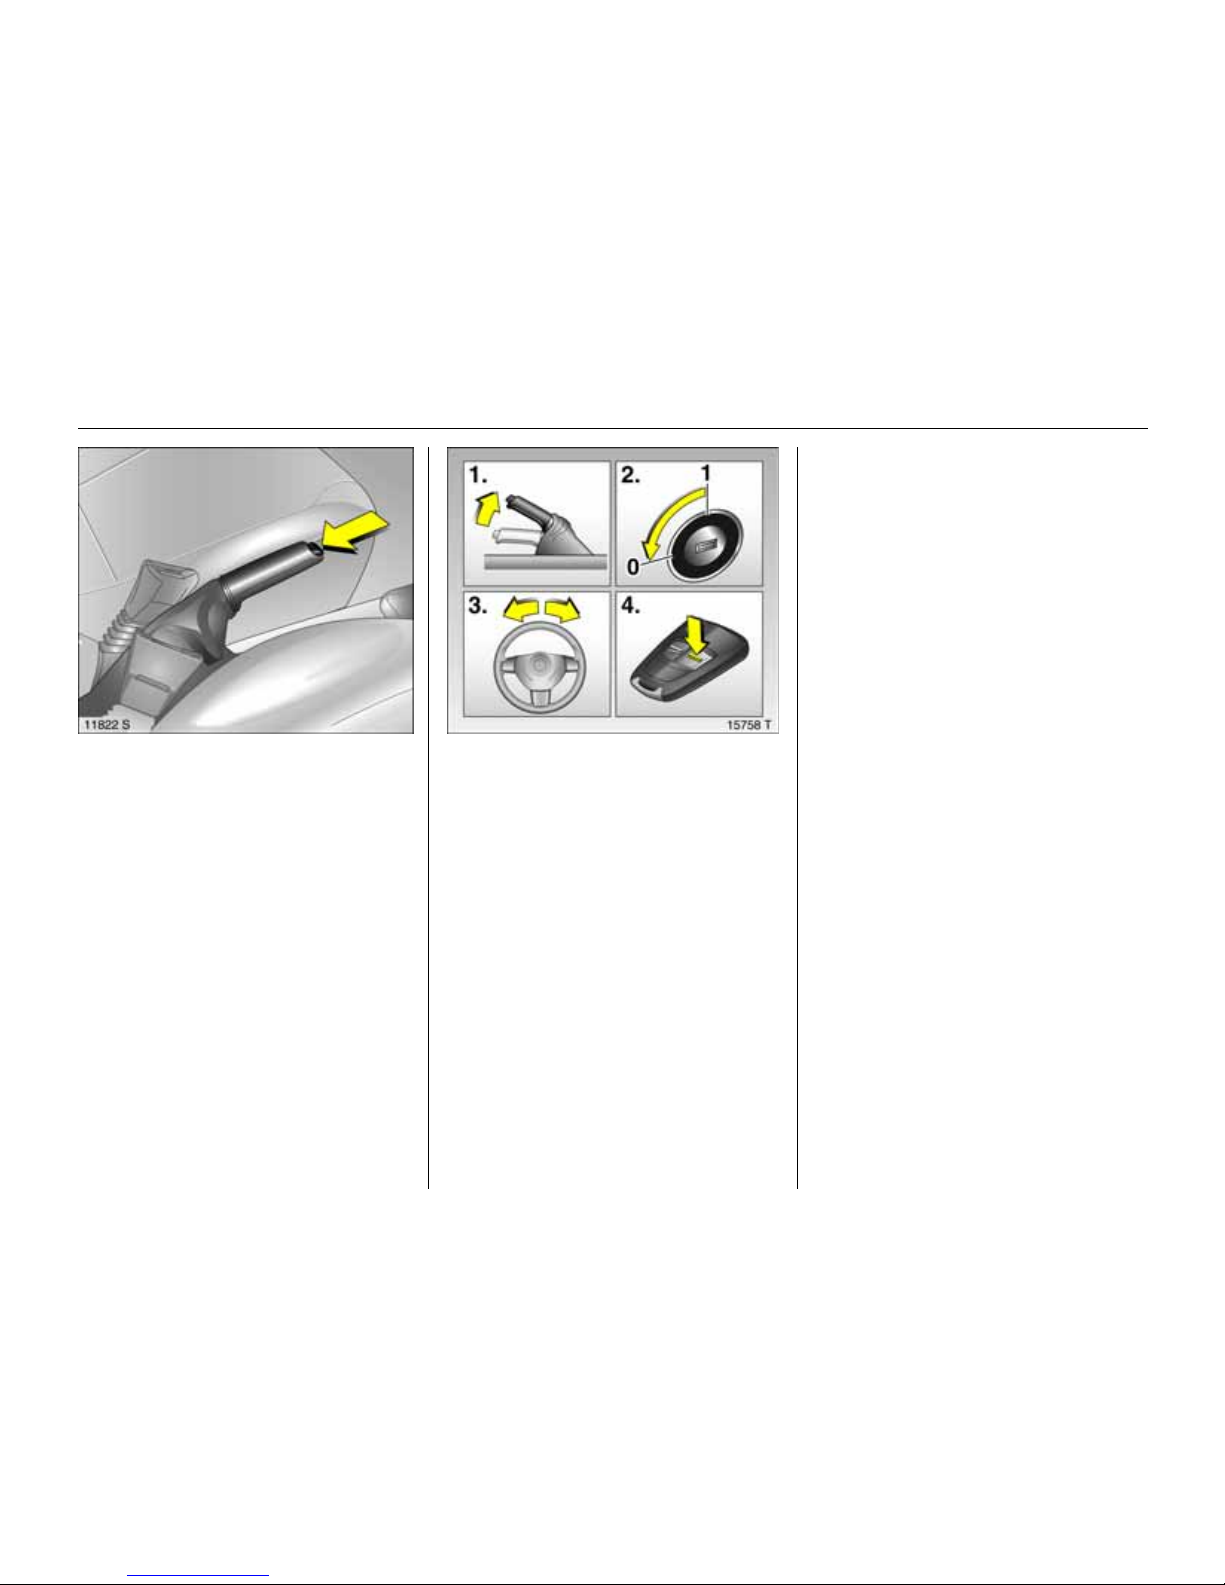
Releasing the hand brake:
Rai se lever slightly ,
press lock button,
l o wer leve r fully
6 Hand brake – page 124.
Parking the vehicle:
Apply hand br ake firmly,
engine off,
remove key,
loc k steering wheel,
lo ck v e hic le
To lock and activate the Vauxhall alarm
system 3, p res s but ton p. To acti vate the
anti-theft lock ing sy ste m 3 and Vauxhall
alarm system 3, press button p twice.
6 F urther info rmation – see p ages 21, 108,
radio remote control – see page 22,
central locking system – see page 24,
V auxhall alarm sy stem 3 – see page31,
vehicle deco mmissionin g – se e page 187.
Advice when parking:
z Do not park the vehicle on flammable
ground as combustion could occur due
to th e high exhaus t temper atures.
z Always apply the hand brake firmly.
Apply the hand brake as firmly as
possible on uphill or downhill slopes.
To reduce operating forces, depres s
foot brake at the same time.
z Close wi ndows and Retrac tab le steel
roof.

15In Brief
z With manua l tran smission, select first
gear or reverse gear, with Easytronic 3
move selector lever to centre position
before switching ignition o ff.
z On vehicles with Easytronic 3 co nt rol
indica tor R flashes for a few seconds
after the ignition is switched off if the
hand brake has not b een appl ied– s ee
page 106.
z Turn steering wheel until lock is felt to
engage (anti-t he ft pr otectio n) afte r f irst
withdraw ing the ignit ion key.
z The engine cooling fan s may run afte r
the engine has been swit ched off, see
page 178.
6 Further information – see pages186,187 .
That was the most important
information for your firs t d rive
inyour Tigra in brief.
Th e ot h e r p age s o f thi s ch ap t e r
contain a description of some
interesting function s in your
vehicle.
T h e remainin g ch a pters
of the Owner’s M a nual
co ntain im p or t ant in form a t ion
on op era tion, sa fety and
ma intenance as well as
a com plete index .
9 Wa r n i n g
Carry out regularly the checks
recommended in the in dividual sections
of this Owner’s Manual.
Ensure that your vehicle is serviced at the
service intervals specif ied in the Service
Booklet. We recommend that you entrust
this wor k to your Vauxhall Authorised
Repairer.
Have faults re m edie d without del a y!
Co nsult a wo rkshop. We recomm end y o ur
Vauxhall Authorised Repairer. If
ne cessary, interrupt your journey.
6 Maintenance – see page 162.
16 In Brie f
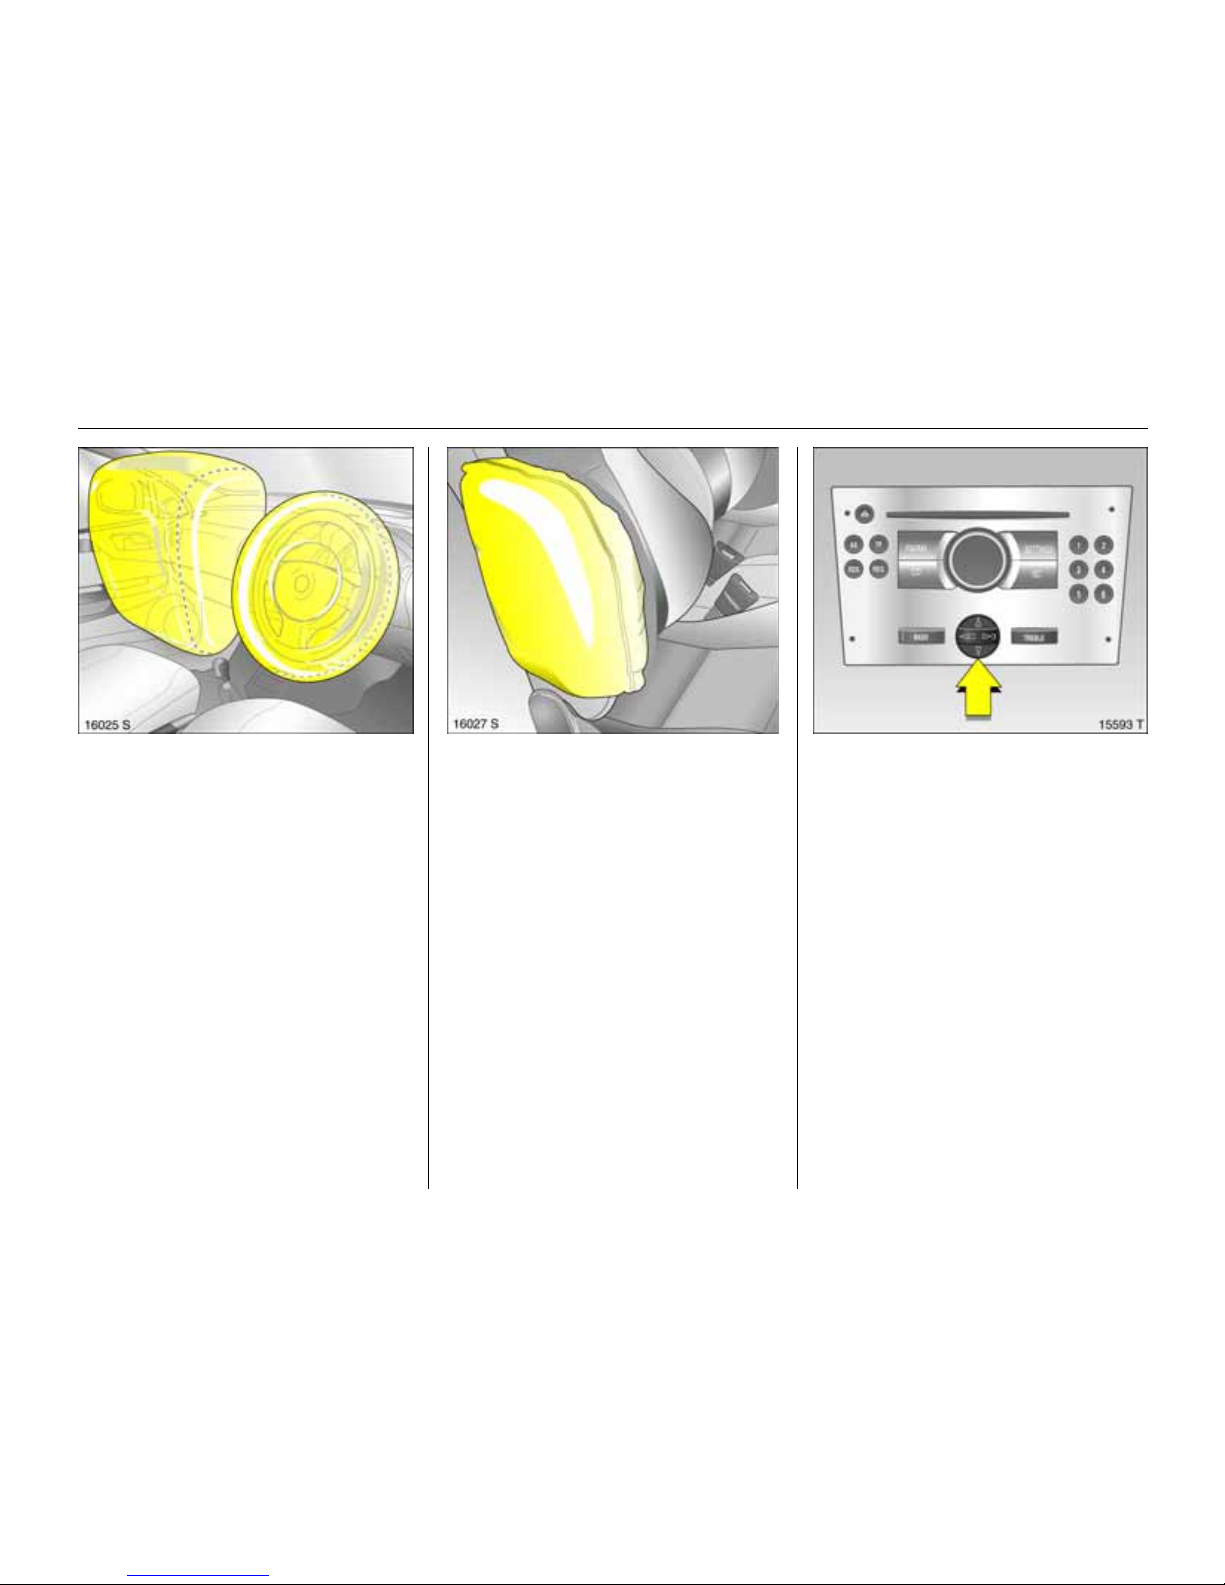
Airbag System
The airbag system consists of several
separate systems.
Front airbag system
The front airbag system will be triggered
in the event of a serious accident involving
a frontal impact and forms safety cushions
for the driver and front passenger. The
forward movement of the driver and front
passenger is checked and the risk of
injuries to the uppe r body a nd head
thereby substantially reduced.
Side airbag sys tem
The side airbag is triggered in the event of
a side-on collision to form a safety cushion
for the driver or front passenger in the
respectiv e door area. This substantially
reduces the ri sk of injury to the upper body
and pelvis.
6 Airbag systems – page 56.
Oper ati ng menusi n
t h e info rmat io n d i spla y 3
Menu o ptions are selected using menus and
using the buttons /four-way button or the
multi-function button of the Infotainment
system 3 or the buttons3 on the steering
wheel. The respective menu options are
sh own on the display.
Selection using four-way button:
press four-way button at top, bottom, left
or right.
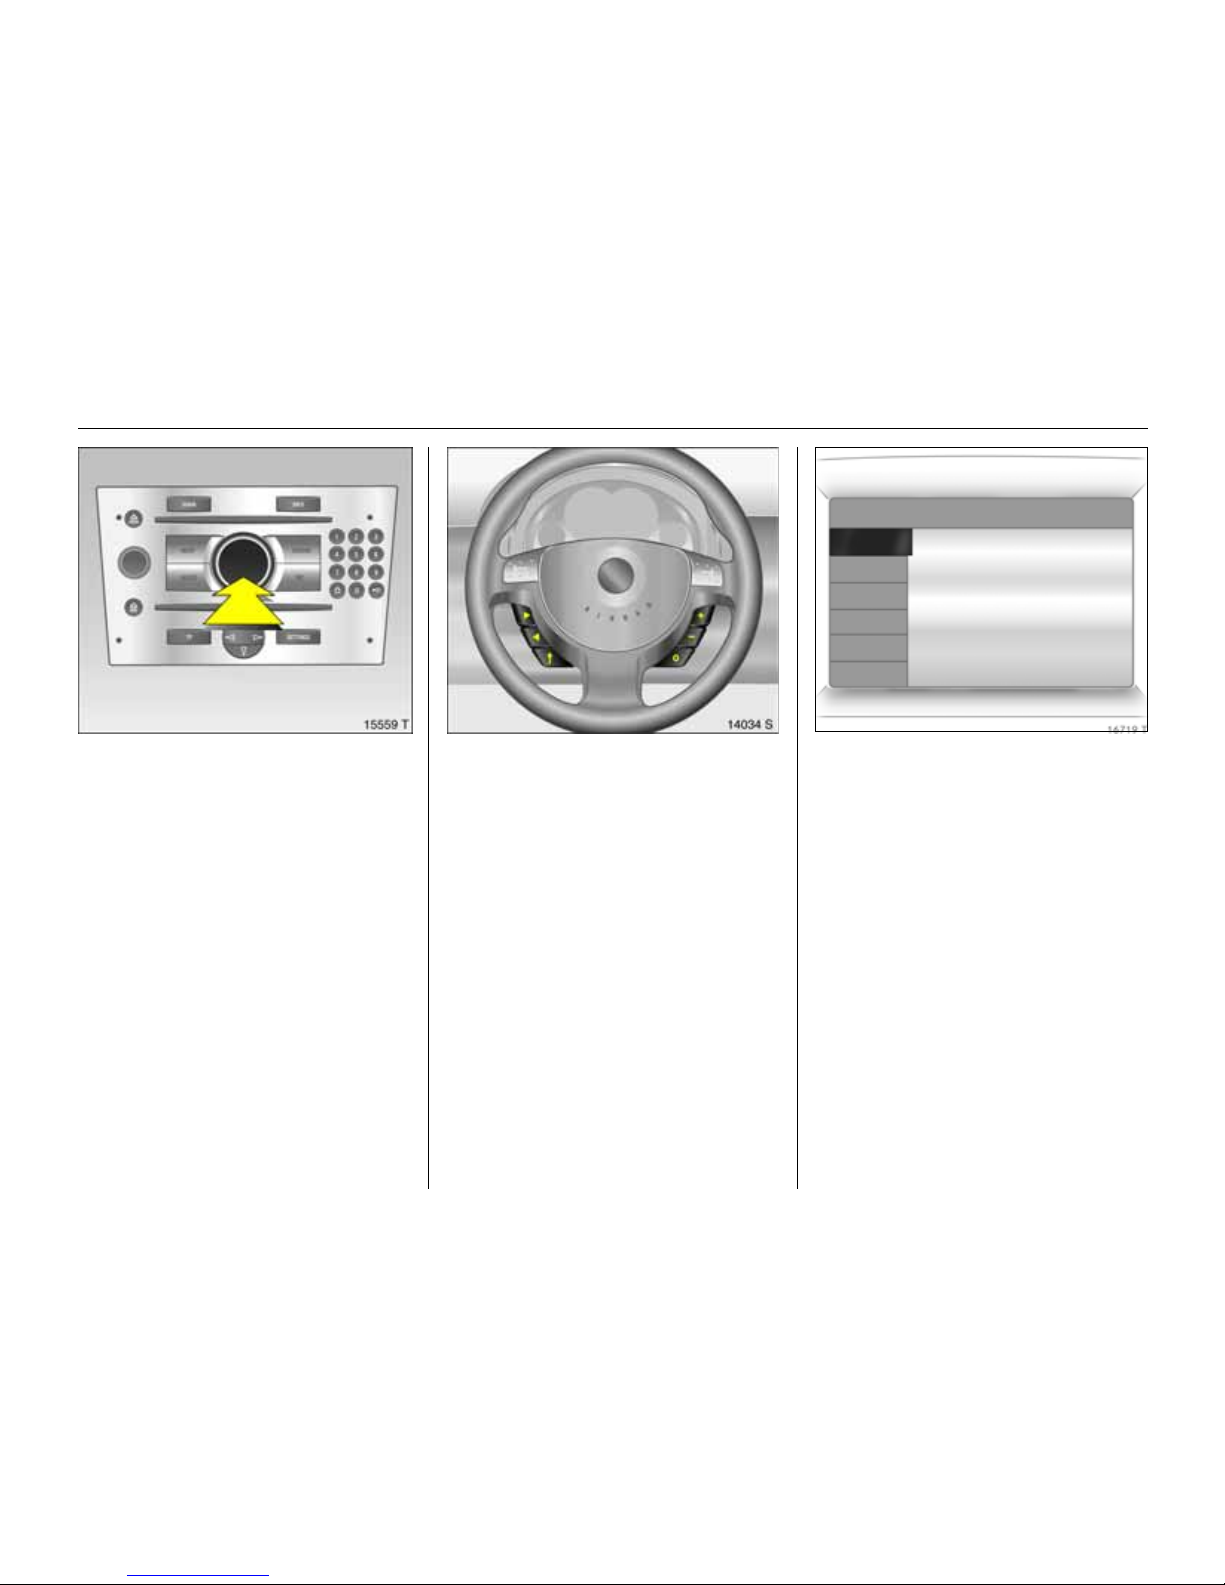
17In Brief
Selection using mu lti-fu nctio n button 3:
rotate and press multi-function butto n.
To exit a menu, turn the multi-function
button le f t or rightto Return or Main
and select.
To select wi th steering wheel buttons 3
Select menu options via the menus and
the buttons.
6 Information Display – page 76.
Trip computer 3
The trip computers provide informati on on
driving data, which is continually recorded
and evaluated electronically.
Functions:
z Range
z Instanta neous consumpti o n
z Distance travelled
z Average speed
z Effective consumptio n
z Average consu mption
z Stop watch
6 Board computer – see page 83 .
Ü Board Computer 19,5° 19:36
BC 1 All values
BC 2
257.0 miles
Timer
Ø40mph
6.0 ga ls
Ø 7.0 miles/gal
1
8
18 In Brie f
Opening Retractable steel roof
Only with vehicle stationary.
z Engage hand brake.
z Engage the luggage compartment
partit ion in the rear position.
z P lace no object s in front of the rear
wind ow or in fron t of the lugg age
compartment partition.
z Clo se t he bo ot lid .
z Rele ase the locking levers on upper right
and left of the window frames, pulling
both le vers all the way down. The
retai ni ng hook must unhook.
z Switch on ignition.
z Pull S until the roof is completely open
and the boot lid is closed.
An aco ustic signal so u nds at t h e
beginning and end o f the procedure.
If the hand brake is not engaged, the
roof lock is not released or the luggage
compartme nt part ition is not folded back
when button S is actuated, a warning
buzzer soun ds and the roof does not
open .
6 Retractable steel roof – see page 37.
19In Brief
Closing Retractable steel roof
Only with stationary vehicle and closed
boot l id.
The luggage compartme nt partition must
be engaged in its rear position. Do not
place any objects in front of the luggage
compartment partition.
z Engage hand brake.
z Switch on ignition.
z Press S until the r oof and boot lid are
co mpletely closed.
An aco ustic signal so u nds at t h e
beginning and end of the procedure.
If button S is actuated when the ha nd
brake is not engaged, a warning buzzer
sounds and the r oof r emains open.
z Move the locking levers on right and left
of the window frames al l the way up.
Each retaining hook must engage and
the roof mu st lock securely .
6 Retractable steel roof – see page 37.
Parking dista nce s ensor 3
Whe n reverse gear is selected, the Parking
distance sensor switches itself on
automatically.
If the vehicle approaches an obstacle when
reversing, a series of signals can be he ard in
the vehicle interior. The interval between
the signals becomes shorter as the distance
is redu ced. If the distance is less than 30 cm,
the signal will be continuous.
6 P arking di stance s ensor3 – page 122.
20 Keys, doors, windows, Retractable steel roof
Keys, doors,
windows, Retractable
steel roof
Replacement key s
The key number i s specified in the vehicle
documents and in the Car Pass 3.
The key is a constituent of the electronic
immobilizer. Ordering keys from a Vauxhall
A uthorised Repairer guarantees problemfree op eration of the electronic
immobilizer.
Keep the spare key in a safe spot.
Lock s, see page160.
C ar Pass
The Car Pass contains all of the vehi cle’s
data and should therefore not be kept in
th e vehicle.
Have your Car Pass on hand whe n
consulting a Vauxhall Authorised Repairer.
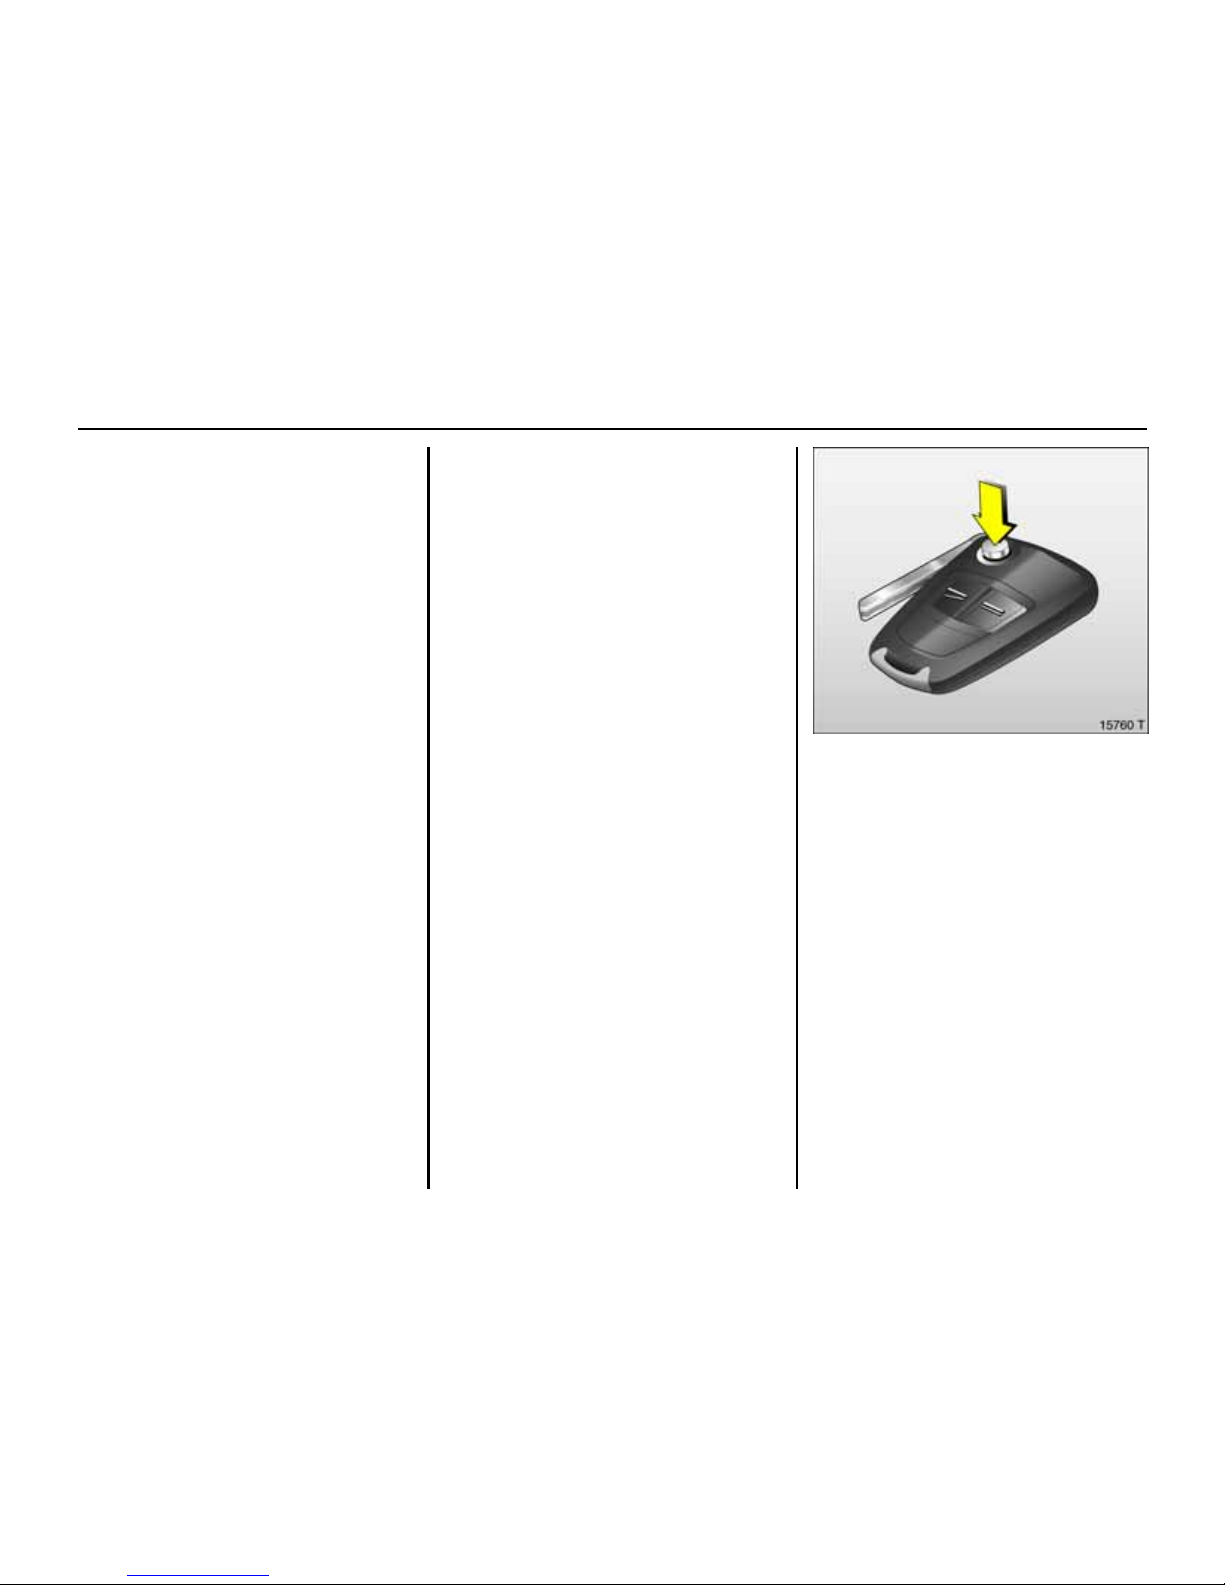
Key with retractable key blade 3
Press button to extend. Press button to
retract; key section engages audibly.
Replacement keys ............................... 20
Ca r Pass ... .... .... ..... ......... .... ..... .... .... ...... 2 0
Key with retractable key blade 3 ...... 20
Electronic immobilizer ......................... 21
Radio remote control .......................... 22
Central locking system ........................ 24
Ope rating central lo cking system with
key in driver’s door lock.................... 27
Lug gage compartment ....................... 27
Vauxhall al arm system 3.................... 31
Exterior mirrors..................................... 34
Interior mirror....................................... 34
Electric windows................................... 35
Retractable steel roof.......................... 37
Wind deflector3.................................. 45
21Keys, do ors, windows, R etractab le steel roof
Electronic immo bili zer
Using a tra nspon d er housed in the key, the
system checks whether the vehicl e may be
starte d using the key that has been
inserted. If the key is recognis ed as
"authorised" the engine ca n be started.
The electronic immobilizer a c tivates
automatically whe n the k ey is remove d
from the starter switch.
The c ode number of the electronic
immobilizer is given in the Car Pass.
Control indicator for im m obilizer A
Con trol ind ica tor A illuminates briefly
when the ignition is switched on.
If the control indicator flashes when the
ign ition is on, there is a fault in the system;
the engine canno t be started. Switch off
th e ignition and then repeat the start
attempt.
If the control indicator A continues to
flash, try to start the engine using the
second key and contact a workshop for
assistance.
If co ntrol indicator A illuminates a fte r
the engine is started, there is a fault in
the engine electronics or transmission
electronics 3 (s ee pages69,107, 115)
orthere is water in the d iesel fuel fil ter 3,
see page 1 81.
Note
The immobilizer does not lock the doors.
Therefore, always lock vehicle before
leaving unattended a nd enable Vauxhall
alarm system 3 see p age 24.
22 Keys, doors, windows, Retractable steel roof
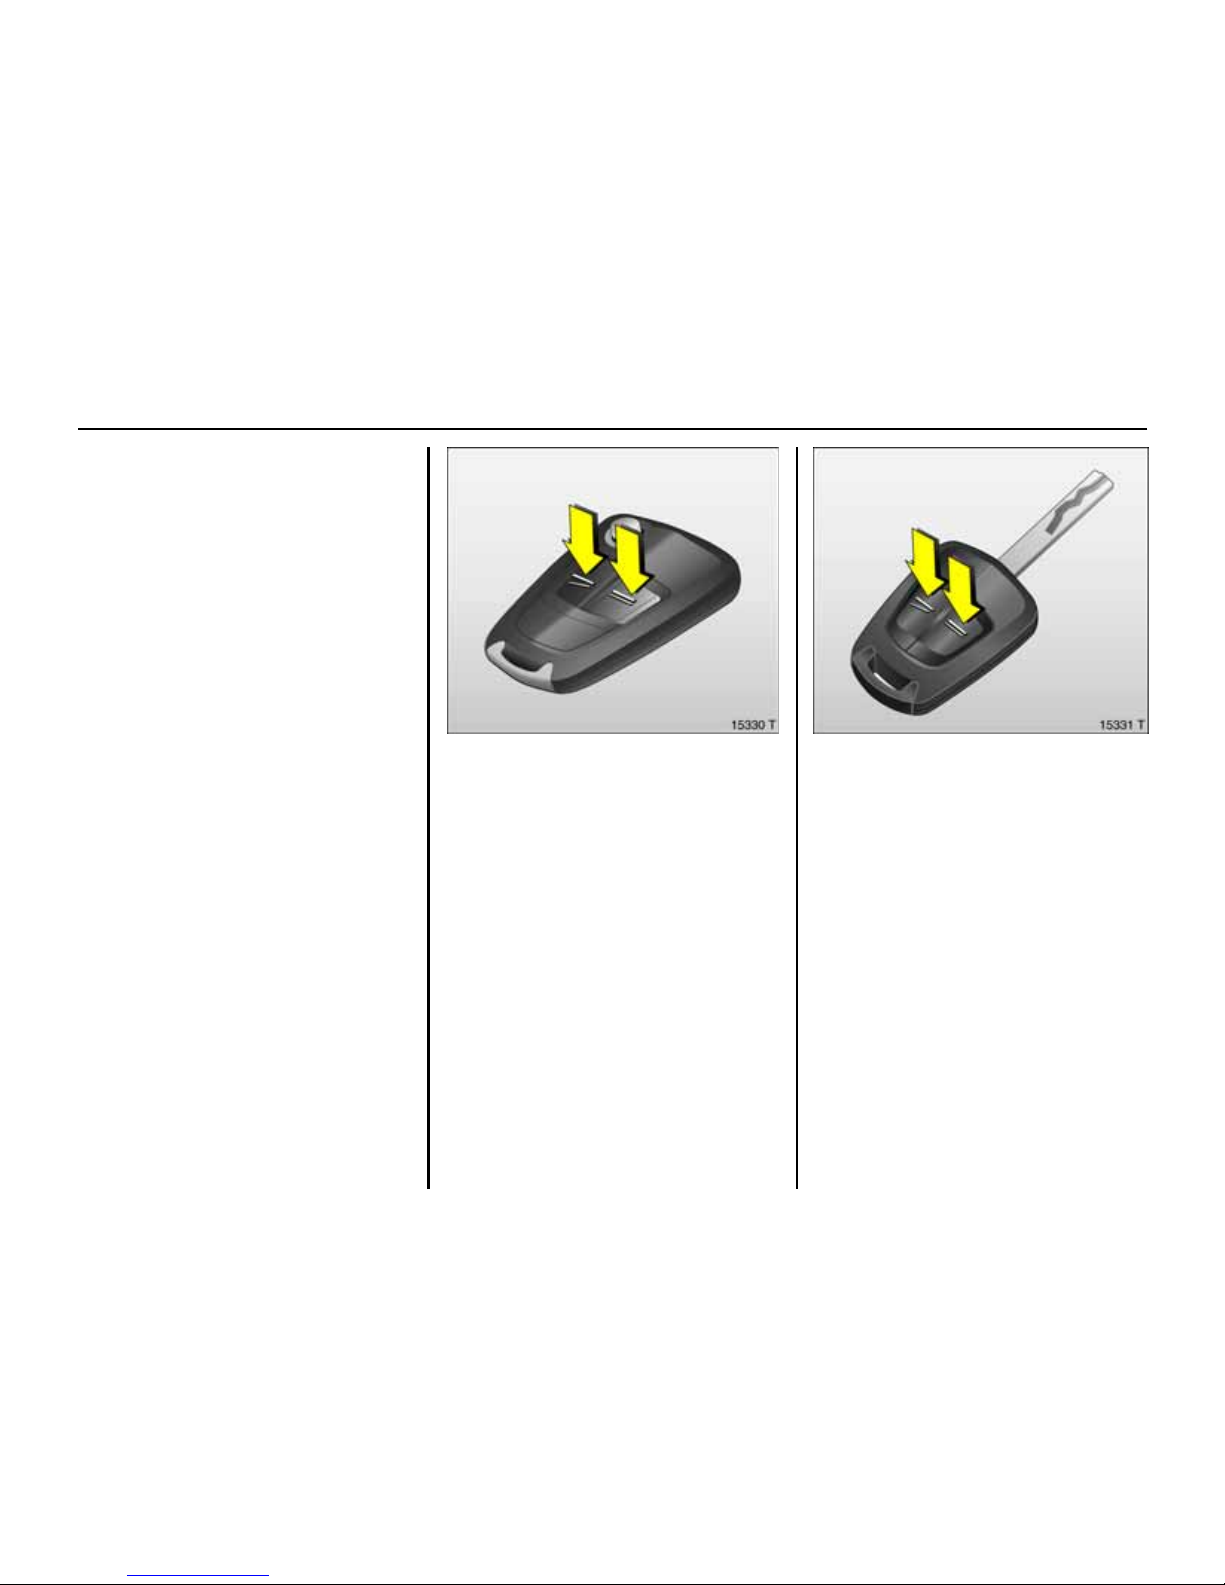
Ra di o remo te co ntr ol
Depen ding on equipment level, the vehicle
comes equipped with one of the remote
controls depicted on this page.
The radio re mote control is integrated in
the key.
Us ed to op er at e :
z central locking system,
z mechanical anti-theft locking system 3,
z Va uxhall alarm system 3.
The w indows can also be closed using the
radio remote control.
The radio remote c ontrol has a range
o f approx. 5 metres. This range can be
affected by outside influences. Aim the
remote control at the vehicle to operate.
Handle the radio remote control with
care , prot ect it from moisture and high
temperatures and avoid unnecessary
op eration.
The hazard warning li ghts come on
to indicate that the remote control is
operational.
Central locking system,
see page 24.
Me chanical anti-theft locki ng system 3,
see page 25.
Vauxhall alarm sys tem 3,
see page 31.
Electric windows,
see page 35.
23Keys, do ors, windows, R etractab le steel roof
Fault
If the central locking system canno t be
operated with the r adio remote control,
it may be due to the followin g:
z The range of the radio remote control
has been exceeded.
z Radio remote con trol battery voltage is
too low.
z Frequent, repeated operati on of
the radio remote control outside the
reception range of the vehicl e (e.g. too
far from vehicle, remote control is then
n o longer recognised). See remote
control synchronisati o n.
z If the central locking system is
o verloaded as a result of repeated
o peration at short intervals. The power
s upply is cut off for a brief peri od .
z Interference from higher-power radio
waves from other sourc es.
To elimi nate the ca use of a fault, we
recommend contacting a workshop
for assistance.
Ope n driver’s door with key – see page 27.
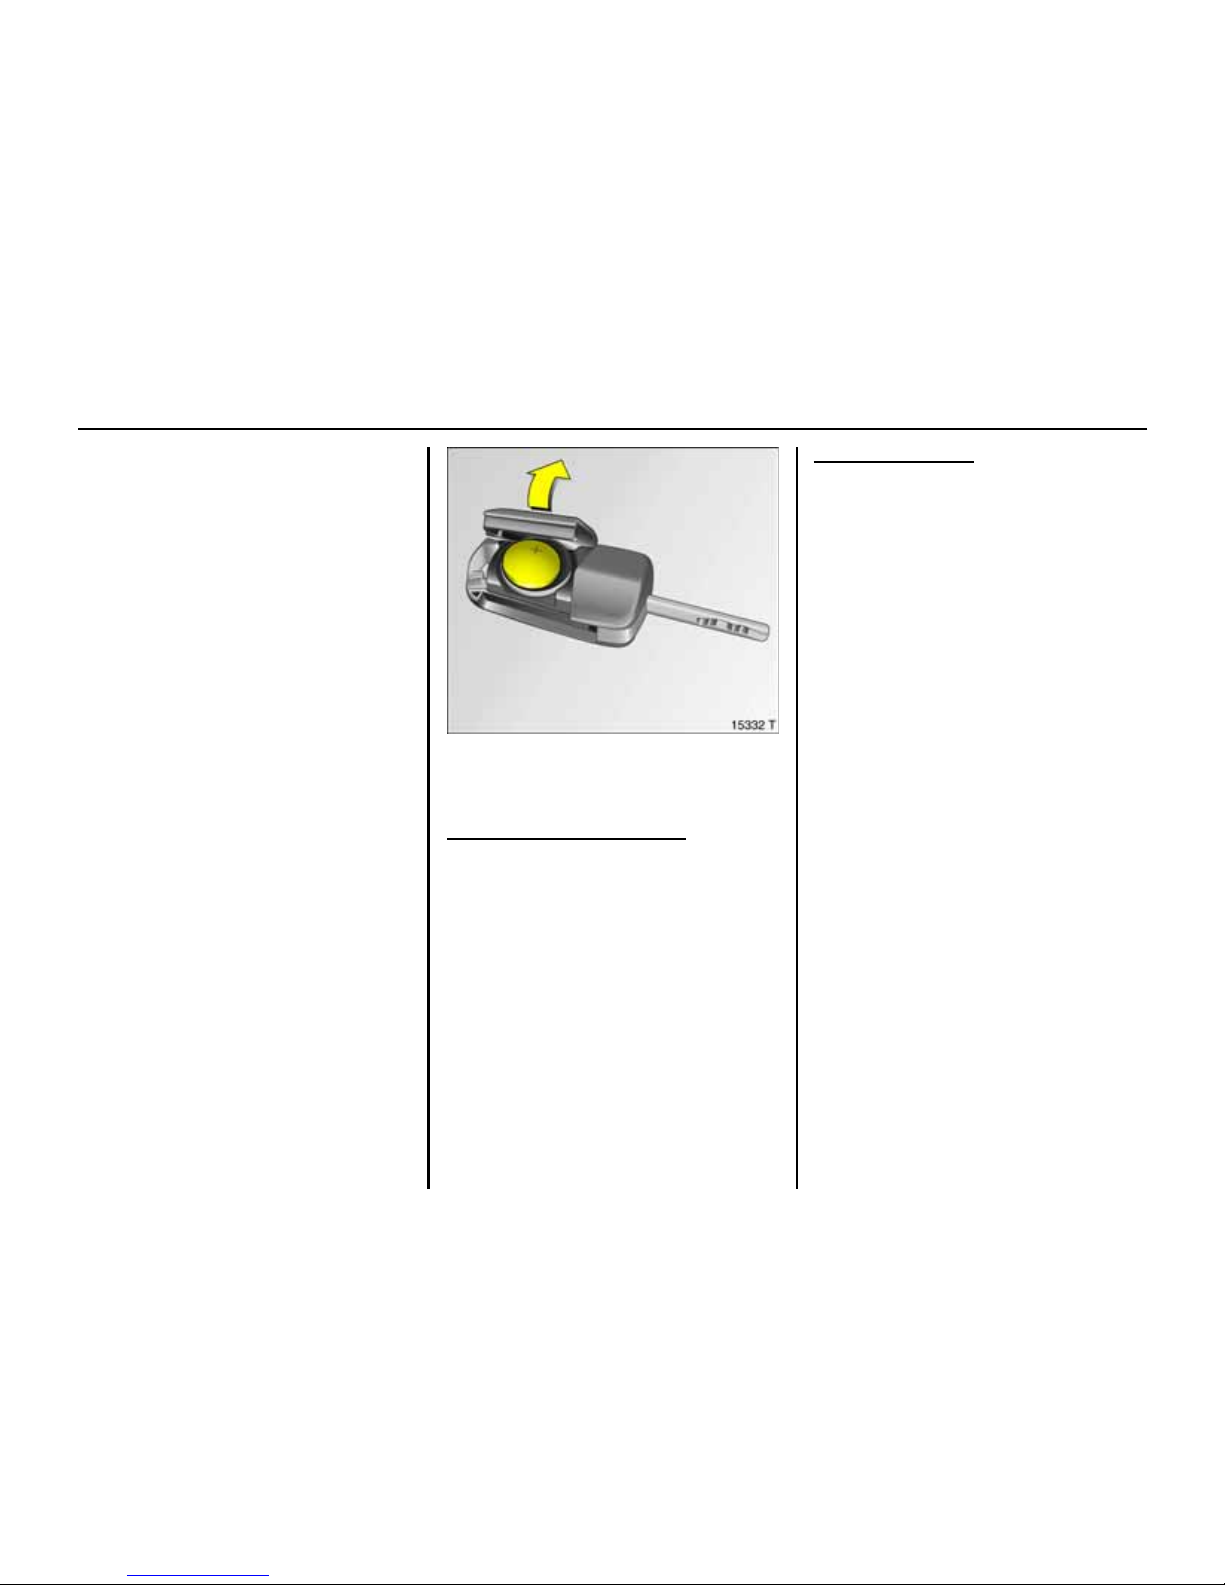
Remote control battery replacement
Replace the battery as s oon as the range of
the radio remote control begins to shrink.
Ke y with retrac ta ble k ey blade ,
seeFig. 15330 T on previou s page.
Extend key, see page20. Open radio
re mote contro l. Replace battery (battery
type, see page 172) noting installation
position. Close radio remote control.
Mak e sur e that y ou d ispose of ol d bat teries
in accordan ce with enviro nmental
prote ction regulatio ns.
K ey with fix ed blade, see Fig. 15331 T on
previous page.
Have the workshop change the battery.
In the ev ent o f a function ali ty problem
or battery replacement, synchronize the
radio re mote control.
After changing the battery, unlock the
door using the key in the lock, see overleaf.
The radio remote c ontrol is synchronized
by inserting the key in the ignition lock.
24 Keys, doors, windows, Retractable steel roof
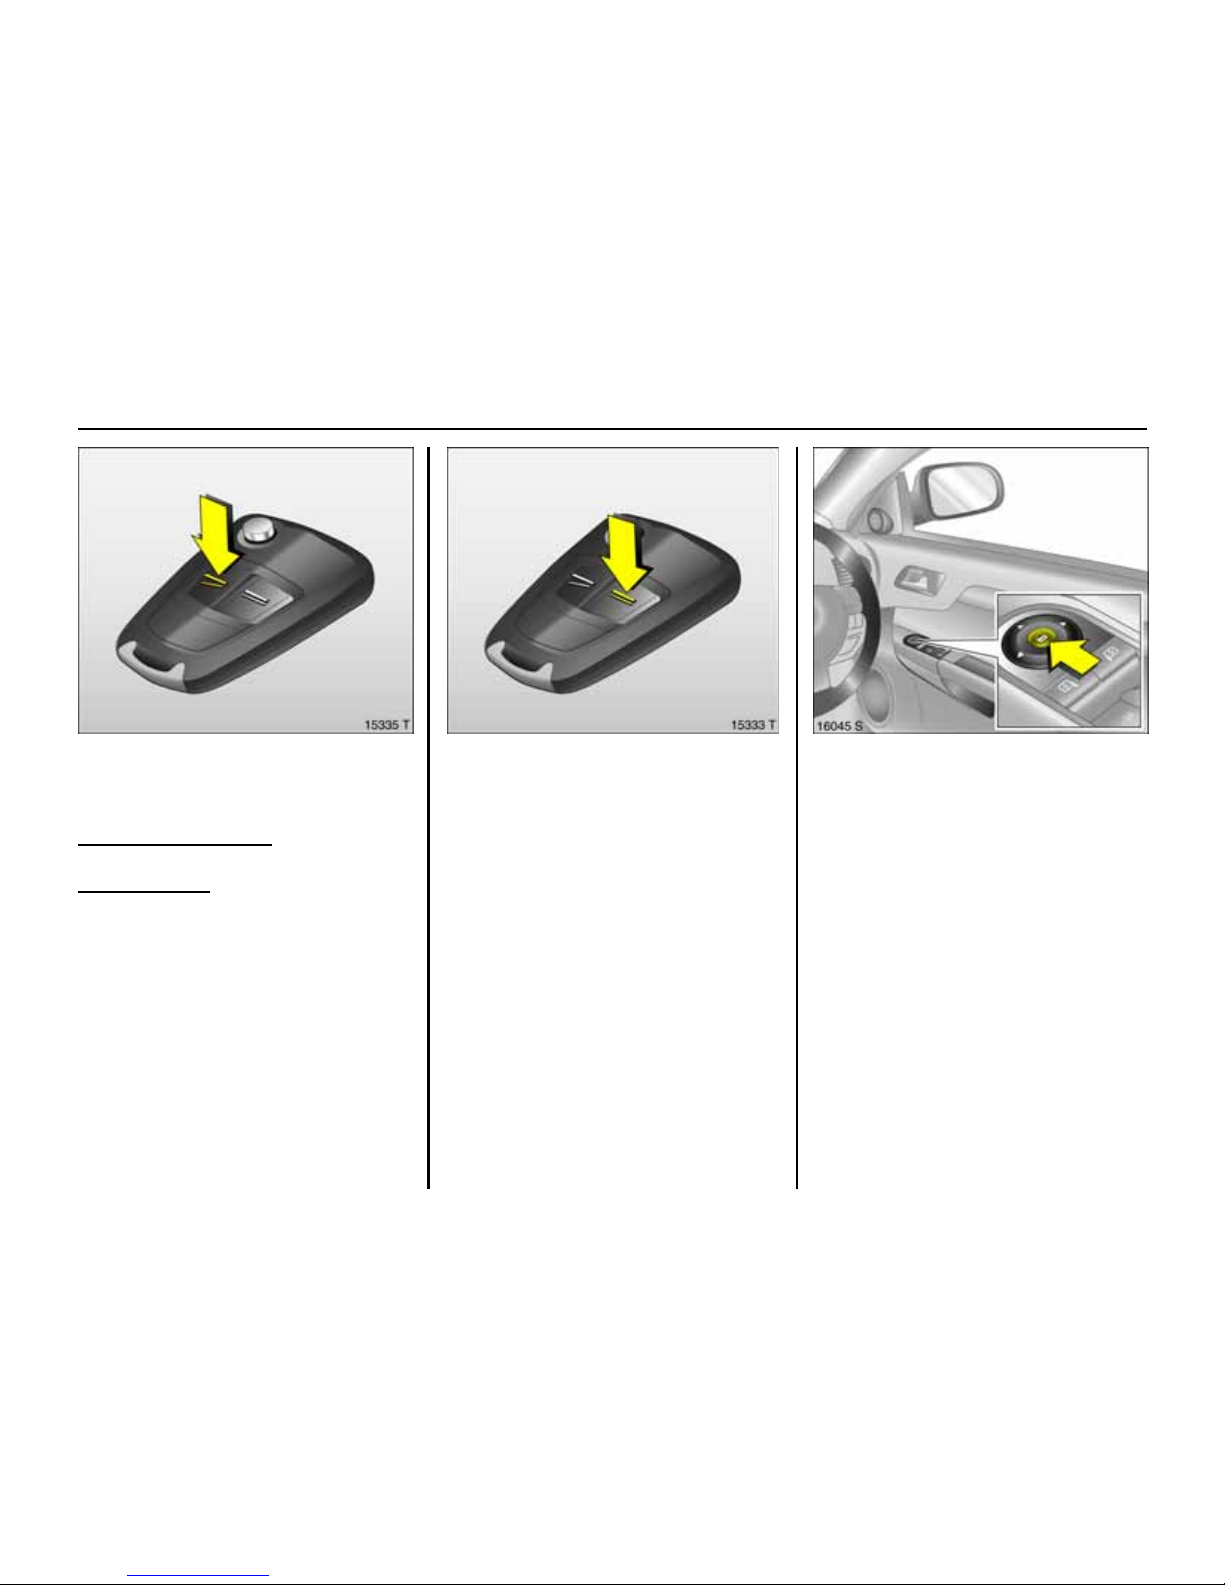
Cen tra l locking system
For doors, boot lid/tailgate and tank flap.
To unlock
Unlock driver’s door only
Press button q on remote control once.
Unlock entire car
Press button q on remote control twice.
The veh icle can also be unlocked by pulling
the do or handles if the anti-theft locking
sy stem is disabled.
To lo c k
Close doors, luggage compartment and
tank flap.
Press button p on radio remote control.
– or f r om the inside –
Press but ton m in the door.
The vehicle can be locked even if the driver’s
door i s open . Risk of being locked out.
25Keys, do ors, windows, R etractab le steel roof
Mechanical anti-theft locking sy stem 3,
All doors must be c lose d. No more tha n
10 secon ds after locking, press button p
on the r adio remote con trol again.
Lock buttons on all doors a r e positioned
such that doors cannot be opened .
If the ignition was on, the driver’s door
must be opened and closed once so that
the vehicle can be secured.
Note
z 30 seco nds after unlocking using the
radio remote control the doors lock
again automatical ly if no door is
opened.
z To lock the doors f r om inside (e.g. to
prevent unwanted entry from outside),
pre ss central lock ing switch m in the
door tr im.
z The vehicle can be locked without the
n eed for the key. With the driver’s door
open, press central locking switch m in
the door trim and then close the dr iver’s
door . Note that unintentional actuation
could cause one to be locked out.
z Locked doors and luggage compartment
u nlock a utomatical ly in the eve nt of an
accident of a certain severity (to permit
outside assistance). Prerequisite: Ignition
must not be switched off.
9 War n ing
Do not use the system i f there are p eople
in the vehic le! The do ors cann ot be
u nlocked from inside.
26 Keys, doors, windows, Retractable steel roof
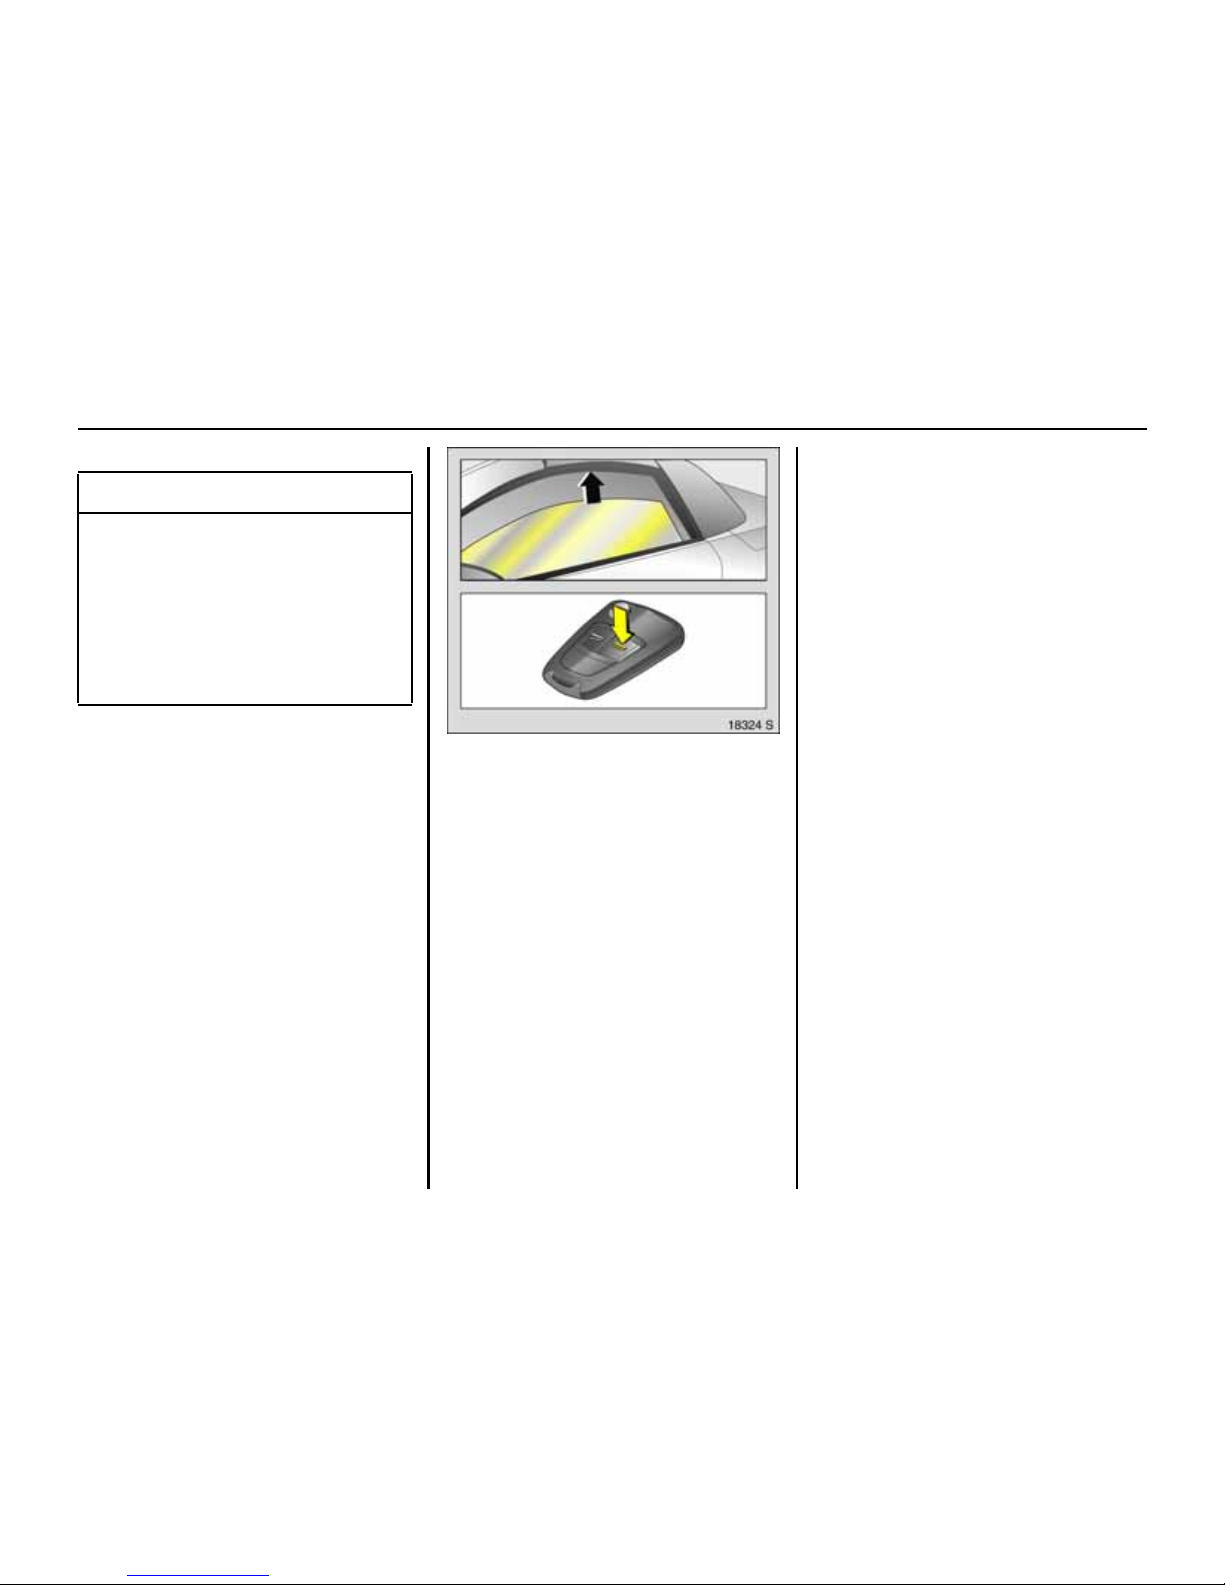
Closing windows from outside
The windows can be closed from outside :
hold button p on the remote control
depresse d until the windows are
completely closed.
Further information on electric windows,
see page 35.
Fault
If the central locking cannot be operated,
this can be for one of the following r easons:
z If the central locking system is
overloaded as a res ult of repeated
operation at short intervals. The power
supply is cut off for a brief perio d.
z Defective fuse in fuse b ox, see page 148.
To eliminate the cause of a fault, we
recommend contac ting a works ho p for
assistance.
Operate driver’s door with key, see overleaf.
9 War n ing
Exercise c are w hen op erat ing electr ic
wind ows. Risk of in jury, especially for
children.
Vehicle pa ssengers should be inf o rme d
according ly.
Keep a close watch on the windows
when closing them. Ensure tha t nothing
becomes trapped in them as they move.
 Loading...