

Page 1

Vauxhall Crossland X
Infotainment System
Page 2

Page 3

Contents
Navi 5.0 IntelliLink .......................... 5
R 4.0 IntelliLink ............................ 55
R 4.0 ............................................ 97
Page 4

Page 5

Navi 5.0 IntelliLink
Introduction .................................... 6
Basic operation ............................ 14
Radio ........................................... 21
CD Player .................................... 25
External devices .......................... 26
Navigation .................................... 30
Speech recognition ...................... 41
Phone .......................................... 44
Index ............................................ 52
Page 6

6 Introduction
Introduction
General information ....................... 6
Control elements overview ............ 8
Usage .......................................... 10
General information
The Infotainment system provides
you with state-of-the-art in-car
infotainment.
Using the FM, AM or DAB radio
functions, you may register up to
15 stations.
The CD player will entertain you with
audio CDs and MP3/WMA CDs.
You can connect external data
storage devices to the Infotainment
system as further audio sources;
either via a cable or via Bluetooth®.
The navigation system with dynamic
route planning will reliably guide you
to your destination, and, if desired,
automatically avoid traffic jams or
other traffic problems.
In addition, the Infotainment system is
equipped with a Phone portal that
allows comfortable and safe use of
your mobile phone in the vehicle.
Using the phone projection function,
you can operate specific applications
on your smartphone via the
Infotainment system.
Optionally, the Infotainment system
can be operated using controls on the
steering wheel or via the speech
recognition system.
The well-thought-out design of the
control elements, the touch screen
and the clear displays enable you to
control the system easily and
intuitively.
Notice
This manual describes all options
and features available for the
various Infotainment systems.
Certain descriptions, including those
for display and menu functions, may
not apply to your vehicle due to
model variant, country
specifications, special equipment or
accessories.
Notice
The Navi 5.0 IntelliLink system
includes certain third party software.
For the associated notices, licenses
and any other information regarding
this software see
http://www.oss.gm.com/GME/7E1/
navi5intellilink/.
Page 7

Introduction 7
Important information on operation and traffic safety
9 Warning
Drive safely at all times. Only
operate the Infotainment system if
the traffic conditions allow a safe
usage.
In the interest of safety, it might be
appropriate to stop the vehicle
before operating the Infotainment
system (e.g. for entries of
addresses).
9 Warning
The usage of the navigation
system does not release the driver
from the responsibility for a
correct, vigilant attitude in road
traffic. Always follow the
applicable traffic rules.
9 Warning
In some areas one-way streets
and other roads and entrances
(e.g. pedestrian zones) that you
are not allowed to turn into are not
marked on the map. In such areas
the Infotainment system may
issue a warning that must be
accepted. Here you must pay
particular attention to one-way
streets, roads and entrances that
you are not allowed to drive into.
Radio reception
Radio reception may be disrupted by
static, noise, distortion or loss of
reception due to:
● changes in distance from the
transmitter
● multi-path reception due to
reflection
● shadowing
Page 8
8 Introduction
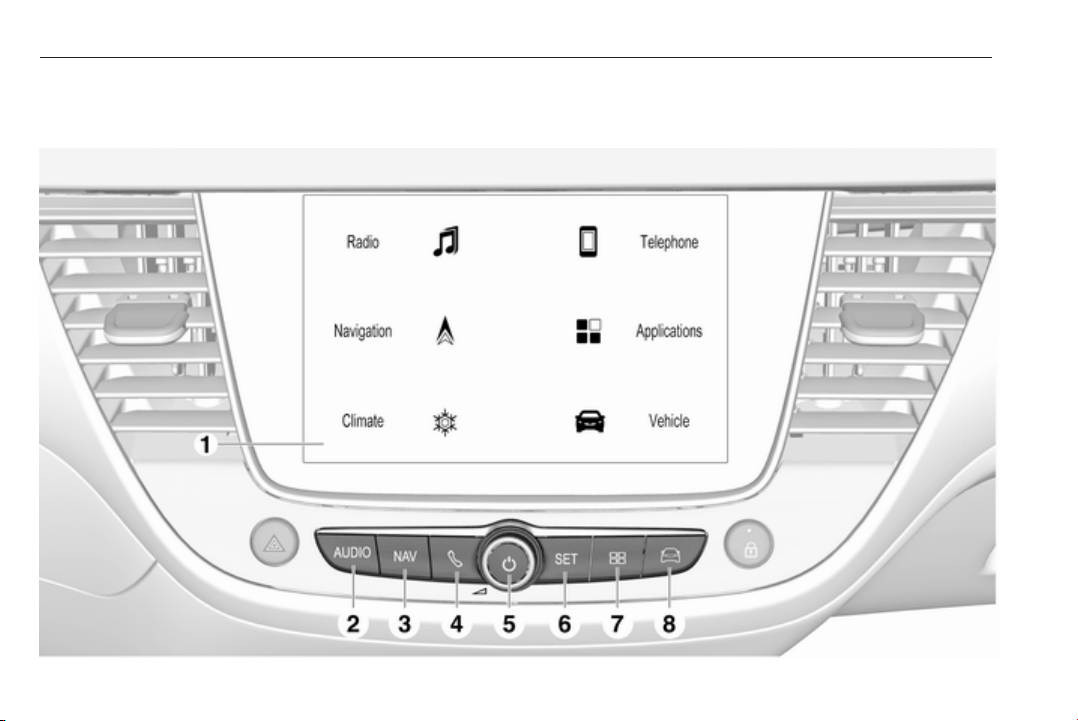
Control elements overview
Centre display with controls
Page 9

Introduction 9
1 Display/touch screen with
Home menu (Home menu
only visible after 3-finger
touch on screen) ................... 14
2 AUDIO
Open audio menu:
Radio ..................................... 21
CD player .............................. 25
External devices (USB,
Bluetooth) .............................. 26
3 NAV
Display navigation map ........ 31
4 v
Open phone menu ................ 47
5 X ........................................... 10
If switched off: switch
power on/off
If switched on: mute system
Turn: adjust volume
6 SET
Open settings menu .............. 14
7 Ì
Open apps menu .................. 29
8 Í
Open vehicle settings
menu, see Owner's Manual
Steering wheel controls
1 SRC (Source)
Select audio source,
confirm selection with G ....... 10
Long press: mute system
2 ä / å
Select next/previous
preset radio station when
radio active ............................ 21
or select next/previous
track/picture when
external devices active ......... 26
Page 10

10 Introduction
or select next/previous
entry in station list, media
list, call/contacts list when
operation started via
steering wheel controls
Confirm selection with G
3 G
Confirm selected item
or open station list, media list
4 x
Activate/deactivate mute
function ................................. 10
5 À / Á
Turn upwards/
downwards: increase/
decrease volume
6 v
Short press: accept
incoming call; long press:
reject incoming call, hang
up call .................................... 47
or open call/contacts list ....... 47
If phone call active: open
call in progress menu
7 w
Short press: activate
embedded speech
recognition; long press:
activate speech
recognition in Apple
CarPlay™ or Android™
Auto if phone connected
via USB port .......................... 42
Usage
Control elements
The Infotainment system is operated
via function buttons, a touch screen
and menus that are shown on the
display.
Inputs are made optionally via:
● the central control unit in the
control panel 3 8
● the touch screen 3 14
● audio controls on the steering
wheel 3 8
● the speech recognition 3 41
Switching the Infotainment system on or off
Press X. After switching on, the last
selected Infotainment source
becomes active.
Notice
Some functions of the Infotainment
system are only available if ignition
is switched on or engine is running.
Page 11
Introduction 11
Automatic switch-off
If the Infotainment system has been
switched on pressing X while the
ignition is switched off, it will switch off
again automatically when the ECO
mode becomes active.
Setting the volume
Turn X. The current setting is shown
on the display.
When the Infotainment system is
switched on, the last selected volume
is set.
Speed compensated volume
When the speed compensated
volume is activated 3 18, the
volume is adapted automatically to
make up for the road and wind noise
as you drive.
Mute
Press X to mute the Infotainment
system.
To cancel the mute function: press
X again. The last selected volume is
set again.
Modes of operation
Audio-Media
Press AUDIO to display the main
menu of the last selected audio mode.
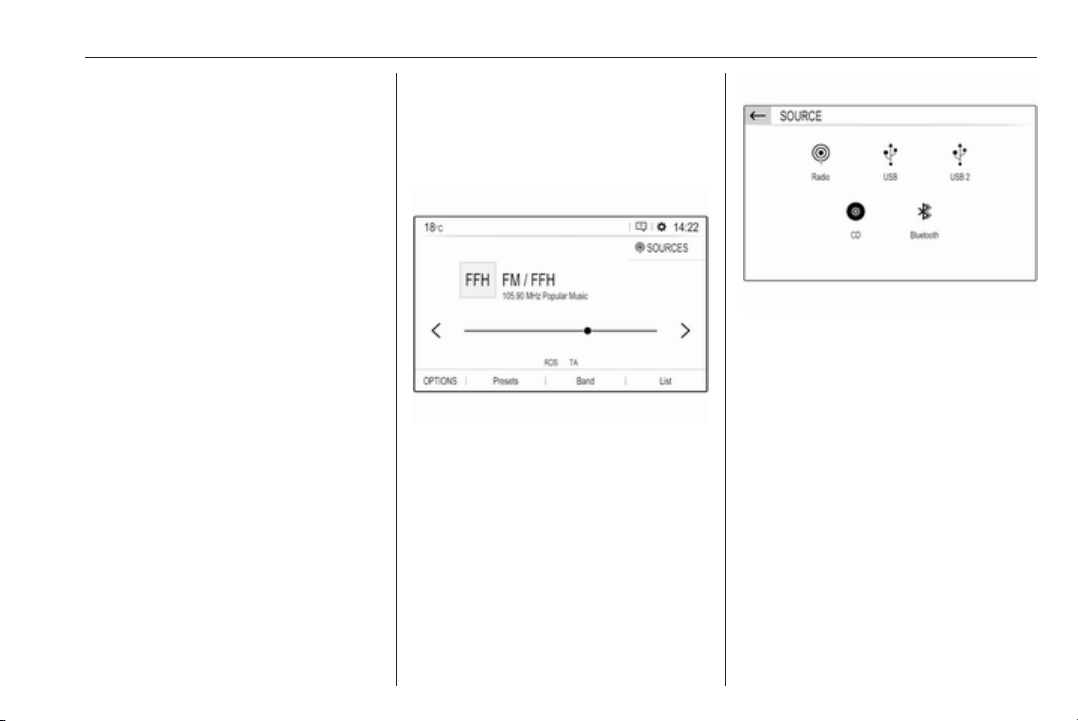
Changing the media source
Select SOURCES to display the
menu for media source selection.
Notice
For a detailed description of menu
operation via touch screen 3 14.
Select the desired media source.
For a detailed description of:
● Radio functions 3 21
● CD player 3 25
● External devices (USB,
Bluetooth) 3 27
Navigation
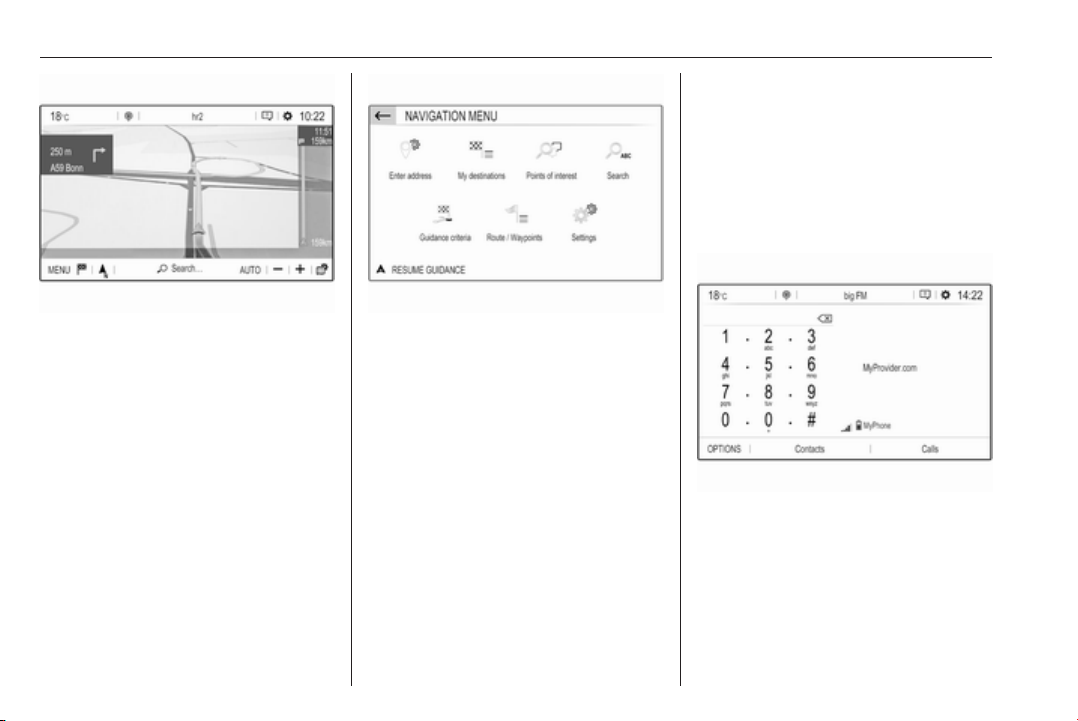
Press NAV to display the navigation
map showing the area around the
current location.
Page 12
12 Introduction
For a detailed description of
preparing and establishing a
Bluetooth connection between the
Infotainment system and a mobile
phone 3 44.
If the mobile phone is connected,
press v to display the main menu of
the phone portal.
For a detailed description of basic
functions of the navigation system
3 31.
Navigation menu
Select MENU to display the
navigation menu.
The navigation menu serves as
central entry point for:
● Address search and input
3 34
● Defining trips with several
waypoints 3 34
● Defining criteria for route
guidance 3 38
● Cancelling and resuming route
guidance 3 38
Phone
Before the phone portal can be used,
a connection has to be established
between the Infotainment system and
the mobile phone.
For a detailed description of mobile
phone operation via the Infotainment
system 3 47.
Apps
To show specific apps of your
smartphone on the display of the
Infotainment system, connect your
smartphone.
Page 13
Press Ì to display the main menu of
the apps mode.
Touch CarPlay or Android Auto. A
menu with different selectable apps is
displayed.
For a detailed description 3 29.
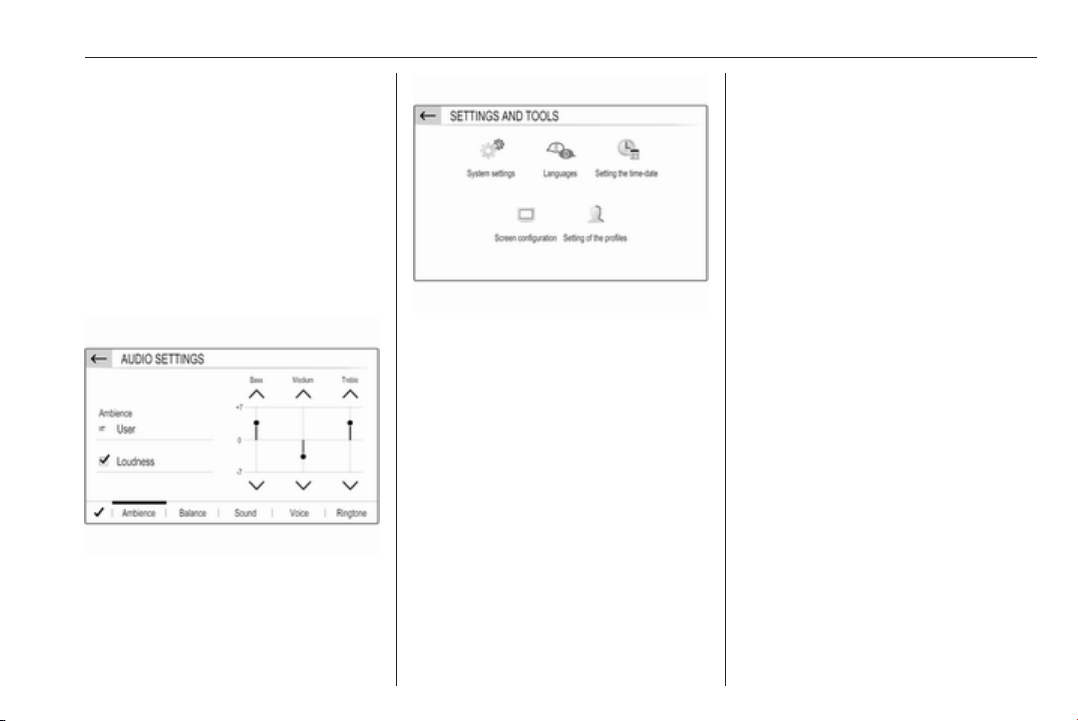
Settings
Press SET and then select Audio
settings to display the respective
menu.
For a detailed description 3 14.
Press SET and then OPTIONS to
display a menu for various systemrelated settings.
Introduction 13
For a detailed description 3 14.
Vehicle settings
Select Í to open a menu for various
vehicle-related settings.
Vehicle settings are described in the
Owner's Manual.
Page 14
14 Basic operation
Basic operation
Basic operation ............................ 14
Tone settings ............................... 17
Volume settings ........................... 18
System settings ........................... 18
Basic operation
The Infotainment system display has
a touch-sensitive surface that allows
direct interaction with the displayed
menu controls.
Caution
Do not use pointed or hard items
like ballpoint pens, pencils or
similar for touch screen operation.
Menu operation
Selecting or activating a screen button or menu item
Touch a screen button or menu item.
Notice
Most icons displayed in a menu, like
e or d in the illustrated example,
serve as screen buttons that initiate
certain actions if you touch them.
The corresponding system function is
activated, a message is shown, or a
submenu with further options is
displayed.
Notice
In subsequent chapters, the
operating steps for selecting and
activating a screen button or menu
item via the touch screen will be
described as "...select <button
name>/<item name>/<icon>".
Page 15
Basic operation 15
Ù and G screen buttons
When operating the menus, touch
Ù in the respective submenu to
return to the next higher menu level.
When no Ù screen button is
displayed, you are on the top level of
the respective menu.
After selecting menu items or
performing settings in a menu, touch
G to confirm your settings. Otherwise
all performed selections or settings
will be lost.
Shortcuts to important menus
The texts and icons displayed in the
top line of, e.g., the navigation main
menu, serve as shortcuts to some
important menus. For example, touch
the station name to open the station
list menu.
Scrolling a list
If there are more items available than
presentable on the screen, the list
must be scrolled.
To scroll through a list of menu items,
you may optionally:
● Place your finger anywhere on
the screen and move it upwards
or downwards.
Notice
Constant pressure must be applied
and the finger must be moved at a
constant speed.
● Touch H or I at the top or
bottom of the scroll bar.
Page 16
16 Basic operation
● Touch anywhere on the guiding
line of the scroll bar.
● Move the slider of the scroll bar
up and down with your finger.
Updating a list
Touch Ü (see image above) to
manually update, e.g., station lists,
contacts lists or destination lists.
Input fields and keyboards
Input fields are indicated by
Touch the input field to open a
keyboard for text or number input.
o.
Depending on the application or
function currently active, different
keyboards are displayed.
Keyboards for text input
Keyboards for text input may contain
several input fields. To enable a field
for text input, touch it.
To enter a character, touch the
respective screen button. The
character is entered upon release.
Touch and hold a letter screen button
to display associated letters in a letter
pop-up menu. Release and then
select the desired letter.
To switch to the symbol keyboard,
touch 0..#.
To switch back to the letter keyboard
or to switch between capital and small
letters, touch Aa.
To switch the letter keyboard
between normal order and
alphabetical order, touch ç.
To delete the most recently entered
character or symbol, touch k.
To delete a character or symbol at
any point of your input: touch at the
desired point to place a blinking
cursor, then touch k.
Keyboards for number input
Page 17
Basic operation 17
Keyboards for number input may
contain several input fields. In the
illustrated example, you first need to
touch the input field behind the
decimal point, before you can enter
the decimal digits.
Notice
In subsequent chapters, the
operating steps for touching an input
field and entering texts or numbers
via a keyboard will be described as
"...select <field name> and enter...".
Adjusting a setting
To adjust a setting like the illustrated
example, you may optionally:
● Touch < or >.
● Touch anywhere on the line.
● Move the slider with your finger.
Notice
In subsequent chapters the
operating steps for adjusting a
setting via the touchscreen will be
described as "...adjust <setting
name>.
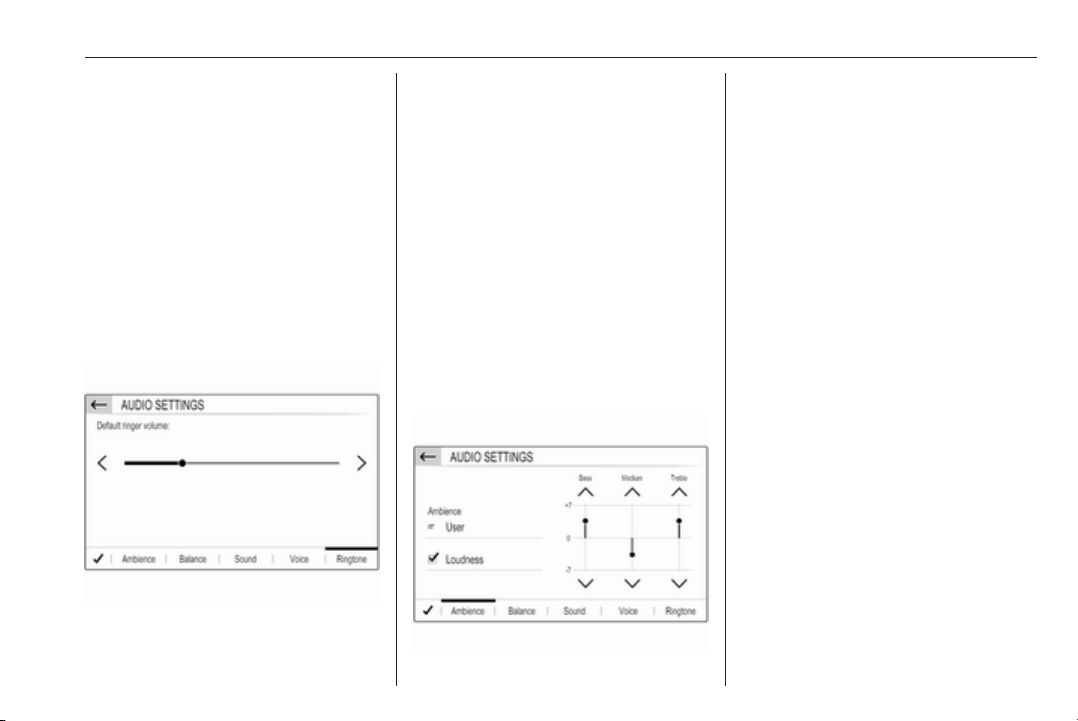
Tone settings
Press SET, select Audio settings and
then select the Ambience tab.
Several predefined settings are
available to optimise the tone for a
specific style of music (e.g. PopRock or Classical).
To adjust the tone individually, select
User. Change the settings as desired
and then confirm your settings.
Notice
If you change the settings of a
predefined setting, e.g. Pop-Rock,
this settings will be applied to the
User setting.
Activating the Loudness function may
optimise the tone at low volume
levels.
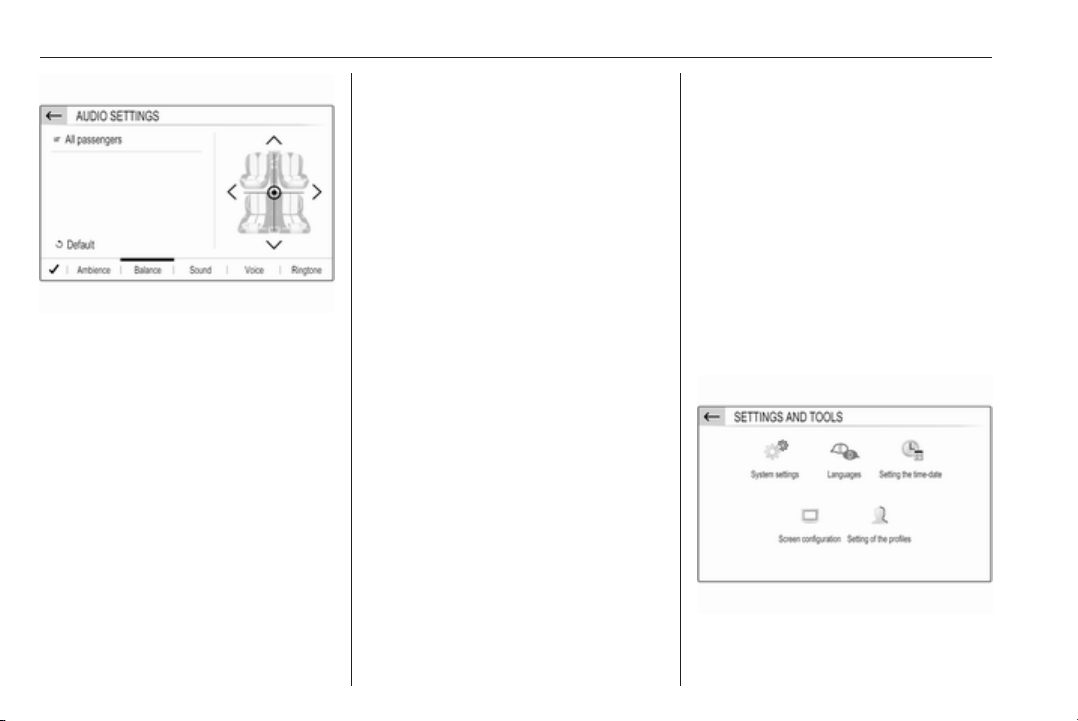
Balance and fader
Select the Balance tab.
Page 18
18 Basic operation
Several predefined settings are
available to adjust the volume
distribution inside the vehicle (e.g. All
passengers or Front only).
To change the current setting, e.g. All
passengers, select that setting and
then select the desired new setting
from the displayed list.
You may individually adjust the
predefined settings.
To define the point in the passenger
compartment where the volume is at
its highest level, move the cursor in
the illustration on the right side of the
screen to the desired point.
To return to the default factory
settings, select Default.
Volume settings
Press SET, select Audio settings and
then select the Sound tab.
Audible touch feedback
If the audible touch feedback function
is activated, each touch of a screen
button or menu item is indicated by a
beeping sound.
To adjust the touch beep volume,
activate Touch tones and then adjust
the setting.
Speed compensated volume
Activate or deactivate Volume linked
to speed.
If activated, the volume of the
Infotainment system is adapted
automatically to make up for the road
and wind noise as you drive.
Speech output
Select the Voice tab.
Adjust the volume for all speech
outputs of the system, e.g. traffic
announcements, navigation
messages etc.
Ringtone
Select the Ringtone tab.
Adjust the ringtone volume of
incoming calls.
System settings
Press SET and then select
OPTIONS.
Page 19
Basic operation 19
Configuring the system
Select System settings to perform
some basic system configurations,
e.g.:
● Adjust the display of units for
temperature or fuel consumption.
● Reset the system configuration to
factory defaults.
● Update the installed software
version.
Changing display language
To adjust the language for the menu
texts, select Languages and then
select the desired language.
Notice
If the selected display language is
supported by the embedded speech
recognition, the language of the
speech recognition will be changed
accordingly; if not, embedded
speech recognition will be not
available.
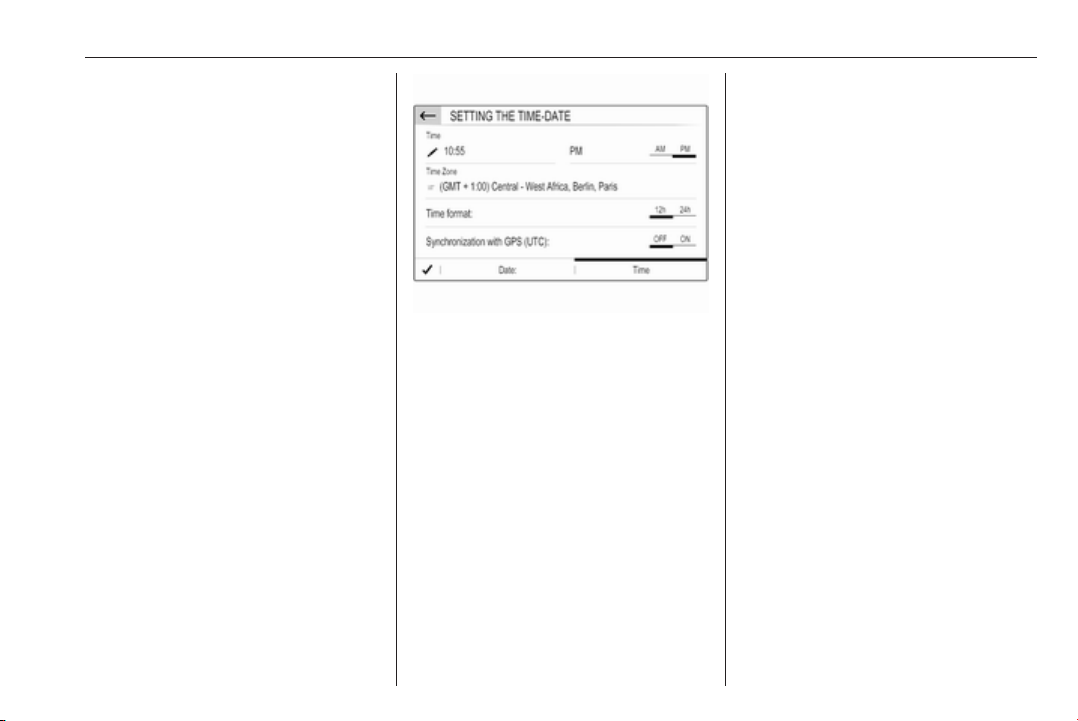
Adjusting time and date
Select Setting the time-date.
Changing time and date formats
To change the time and date formats,
select the respective tabs and then
select the desired formats.
Setting time and date
By default the displayed time and
date is automatically adjusted by the
system.
To manually adjust the displayed time
and date:
Select the Time tab.
Set Synchronization with GPS
(UTC): to OFF and then select the
Time field to set the desired time.
Select the Date tab and then select
the Date: field to set the desired date.
Adjusting the screen
Select Screen configuration.
Text scroll function
Select the Animation tab.
If long texts on the screen should be
scrolled automatically, activate
Automatic scrolling.
If Automatic scrolling is deactivated,
long texts are truncated.
Adjusting the brightness
Select Brightness and set the
brightness of the screen to the
desired level.
Storing your personal settings
Select Setting of the profiles.
Page 20

20 Basic operation
You can store a multitude of settings
in a personal profile. For example, all
current tone settings, all radio
presets, one phone book, the map
settings and your preferred
addresses.
In case you share the vehicle with
other people, this enables you to
restore your personal settings from
your profile at any time.
A maximum of three personal profiles
may be stored.
Additionally, a Common profile is
available. All settings done at any
time are automatically stored in that
profile. If no personal profile is
activated, the Common profile is
active.
Storing your personal profile
After performing all your personal
settings:
Select one of the personal profile
tabs.
Select the input field o and enter the
desired name of your personal profile.
If you want to add a photo to the
profile:
Connect a USB device with the
desired photo stored on it to the USB
port 3 26, touch the photo frame
and then select the desired photo.
Confirm your selection to download
the selected photo to the system.
Finally, confirm your inputs to store
them in your personal profile.
Activating your personal profile
Press SET and then select the tab
with the name of your personal
profile.
Activating the Common profile
If a personal profile is currently active:
Press SET and then select
Deactivate profile.
Resetting a personal profile
You can at any time reset a personal
profile to restore the default factory
settings on that profile.
Select the respective profile and then
select Reset profile.
Resetting the Common profile
You can at any time reset the
Common profile to restore the default
factory settings on that profile.
Select Common profile and then
select Reset common profile.
Page 21
Radio 21
Radio
Usage .......................................... 21
Radio data system (RDS) ............ 23
Digital audio broadcasting ........... 23
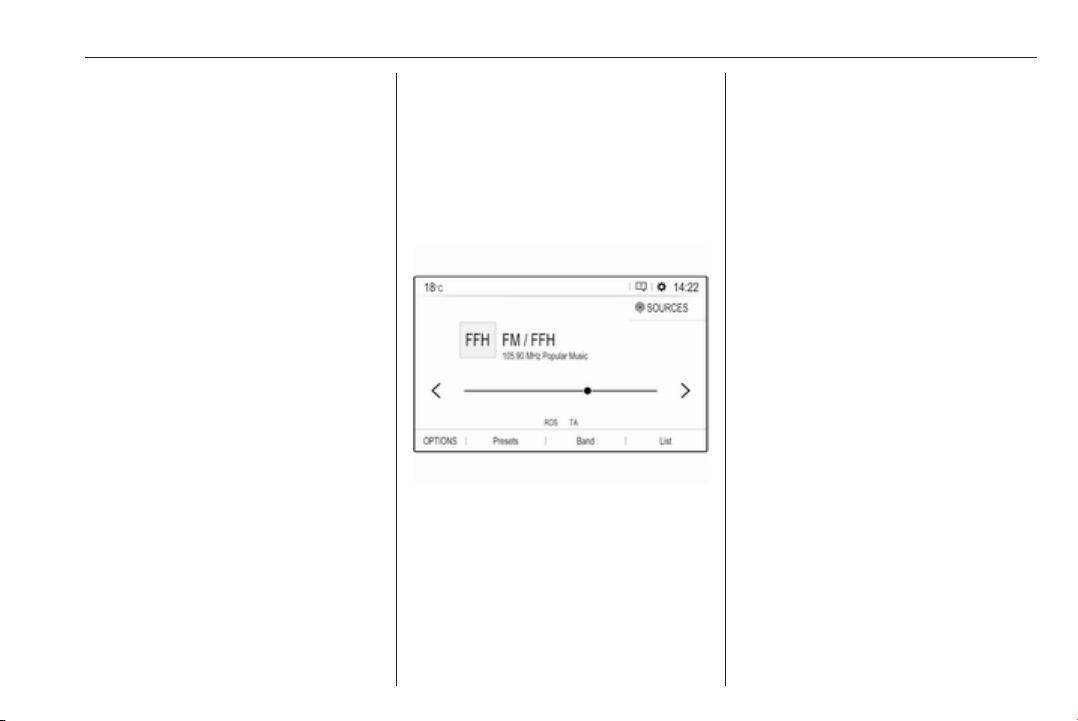
Usage
Activating the radio
Press AUDIO. The audio main menu
last selected is displayed.
If radio main menu not active, select
SOURCES and then select Radio.
The station last played will be
received.
Selecting a waveband
Repeatedly select Band to toggle
between the different wavebands.
Searching for stations
Automatic station search
Briefly touch < or > to play the
previous or next receivable station.
Manual station search
Press and hold < or >. Release when
the required frequency has almost
been reached.
A search is made for the next station
that can be received and it is played
automatically.
Station tuning
If you exactly know the reception
frequency of a radio station, you may
enter that frequency manually.
Select OPTIONS, select Radio
stations and then select the desired
waveband.
Select Freq., enter the reception
frequency and confirm your input.
If a station is receivable on that
frequency, the respective station is
played.
Page 22
22 Radio
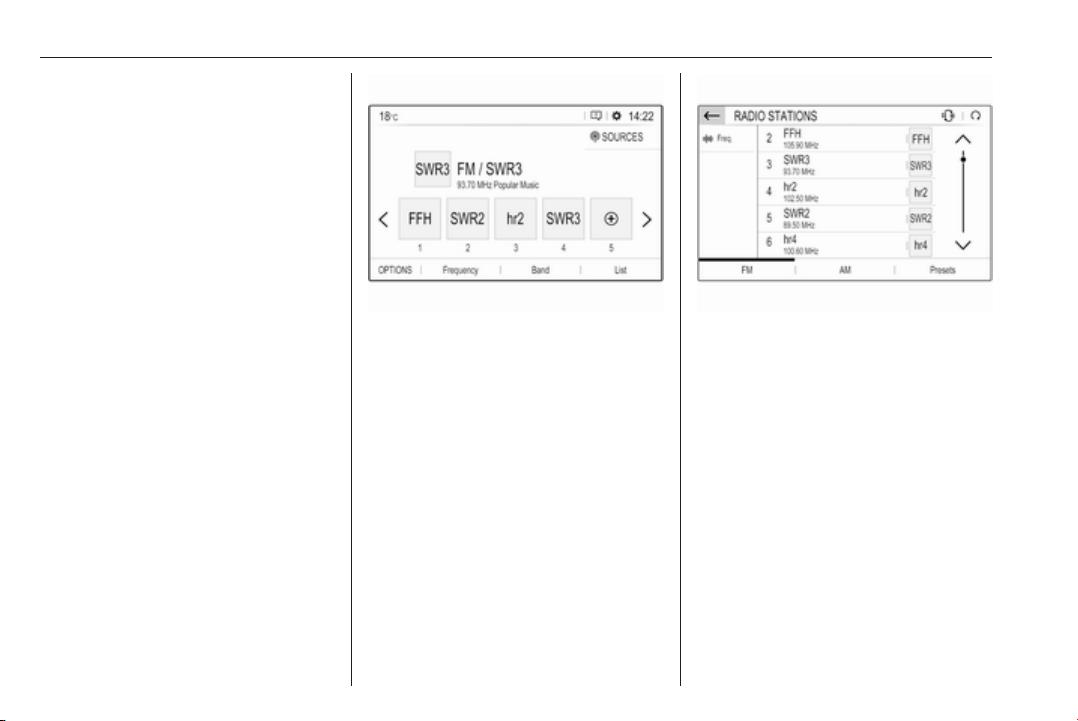
Station lists
In the station lists, all receivable radio
stations within the current reception
area are available for selection.
To display the station list of the
waveband currently active, select
List.
Select the desired station.
Update station lists
If the stations stored in the wavebandspecific station list can no longer be
received, the AM and the DAB station
lists must be updated. The FM station
list is updated automatically.
Select OPTIONS, select Radio
stations and then select the desired
waveband.
To start an update for the selected
waveband, select Ü.
Storing favourite stations
Up to 15 radio stations of all
wavebands can be stored as
favourites in the Presets list.
Select Presets to display the preset
buttons.
Storing the currently active station
Touch and hold the desired button for
a few seconds. The respective
frequency or station name is
displayed on the button.
If a station is already stored on a
preset button, that station will be
overwritten by the new one.
Storing a station from a station list
Select OPTIONS, select Radio
stations and then select the desired
waveband.
Briefly touch the button next to the
desired station. Alternatively, select
Û to switch to the tiled view. Then
briefly touch † on the tile of the
desired station.
Select Add to favourites and then
touch and hold for a few seconds on
the list row where you want to store
the station.
If a station is already stored on a list
row, that station will be overwritten by
the new one.
Retrieving stations
In the radio main menu select
Presets and then briefly touch the
preset button of the desired station.
Page 23

Radio 23
Radio data system (RDS)
RDS is a service of FM stations that
considerably facilitates the finding of
the desired station and its fault-free
reception.
Advantages of RDS
● On the display, the programme
name of the station appears
instead of its frequency.
● During a station search, the
Infotainment system tunes in to
RDS stations only.
● The Infotainment system always
tunes into the best receivable
broadcasting frequency of the set
station by means of AF
(alternative frequency).
● Depending on the station that is
received, the Infotainment
system displays radio text that
can contain e.g. information on
the current programme.
RDS configuration
In the radio main menu select
OPTIONS and then select Radio
settings to open the menu for RDS
configuration.
Activating RDS
Select General and then activate
Station follow.
If Alternative frequency is activated,
RDS is displayed in the bottom line of
the radio main menu.
Radio text
If RDS is activated, information on the
radio programme currently active or
the music track currently playing are
displayed below the programme
name.
To show or hide the information,
activate or deactivate Display radio
text.
Traffic announcements
Many RDS stations broadcast traffic
news. If the traffic announcements
function is activated, radio or media
playback is interrupted for the
duration of a traffic announcement.
Select Announcements and then
activate or deactivate Traffic
announcement.
If Traffic announcement is activated,
TA is displayed in the bottom line of
the radio main menu.
Digital audio broadcasting
DAB broadcasts radio stations
digitally.
DAB stations are indicated by the
programme name instead of the
broadcasting frequency.
General information
● With DAB, several radio
programmes (services) can be
broadcast on a single ensemble.
● Besides high-quality digital audio
services, DAB is also able to
transmit programme-associated
data and a multitude of other data
services including travel and
traffic information.
Page 24

24 Radio
● As long as a given DAB receiver
can pick up the signal sent out by
a broadcasting station (even if
the signal is very weak), sound
reproduction is ensured.
● In the event of poor reception, the
volume is reduced automatically
to avoid the output of
disagreeable noises.
If the DAB signal is too weak to
be picked up by the receiver,
reception is interrupted
completely. This incident can be
avoided by activating DAB-FM
auto tracking, see below.
● Interference caused by stations
that are on nearby frequencies (a
phenomenon that is typical of AM
and FM reception) does not
occur with DAB.
● If the DAB signal is reflected by
natural obstacles or buildings,
the reception quality of DAB is
improved, whereas AM or FM
reception is considerably
impaired in such cases.
● When DAB reception is enabled,
the FM tuner of the Infotainment
system remains active in the
background and continually
searches for the best receivable
FM stations. If Traffic
announcement 3 23 is activated,
traffic announcements of the FM
station with the best reception
are issued. Deactivate Traffic
announcement if DAB reception
should not be interrupted by FM
traffic announcements.
DAB Announcements
Besides their music programmes, a
lot of DAB stations also broadcast
announcements of various
categories. If you activate some or all
categories, the currently received
DAB service is interrupted when an
announcement of these categories is
made.
In the radio main menu select
OPTIONS, select Radio settings and
then select Announcements.
Activate the desired announcement
categories, e.g., News or Weather.
Different announcement categories
can be selected at the same time.
DAB-FM auto tracking
If this function is activated, the device
switches over to a corresponding FM
station of the active DAB service (if
available) when the DAB signal is too
weak to be picked up by the receiver.
Activate or deactivate FM/DAB
station track:.
Page 25
CD Player 25
CD Player
General information ..................... 25
Usage .......................................... 25
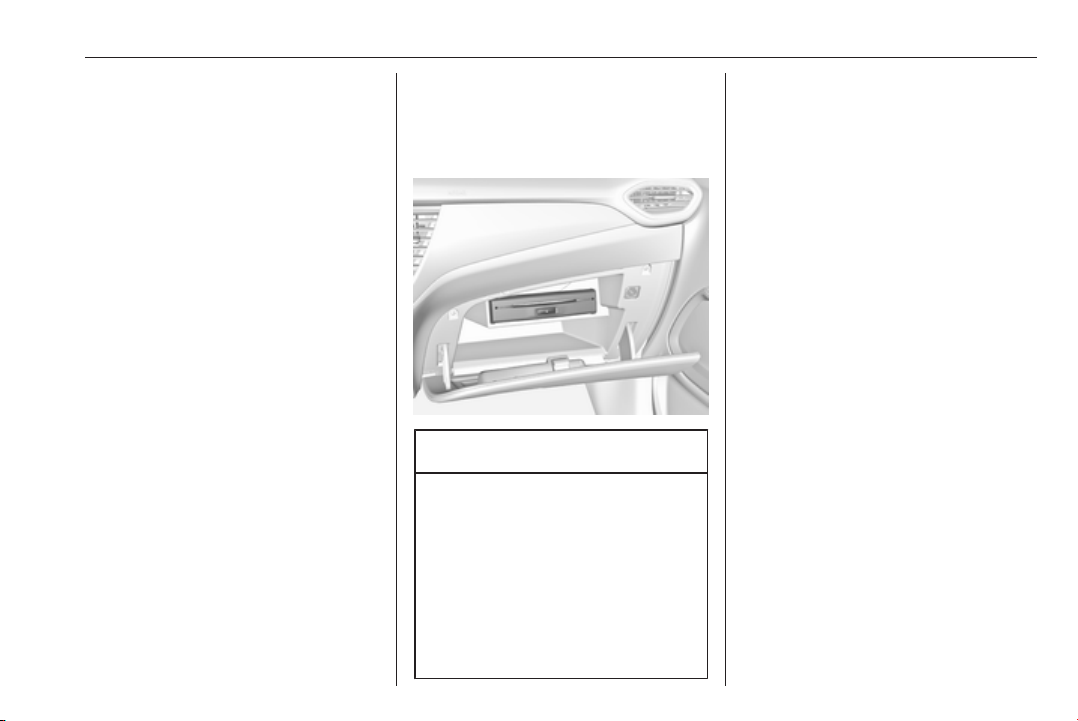
General information
A CD player for the playback of audio
CDs and MP3 CDs is located in the
glovebox.
Caution
Under no circumstances place
DVDs, single-CDs with a diameter
of 8 cm or shaped CDs in the audio
player.
You must not put any stickers on
CDs. These discs can get jammed
in the CD drive and ruin the player.
Replacement of the device will
then be necessary.
Usage
Starting CD playback
Push an audio or MP3 CD with the
labelled side facing upwards into the
CD slot until it is pulled in.
CD playback starts automatically and
the CD main menu is displayed.
If a CD is already inserted, but the CD
main menu is not active:
Press AUDIO, select SOURCES and
then select CD.
CD playback is started.
Operation
For a detailed description of playback
functions for music tracks 3 27.
Removing a CD
Press R. The CD is pushed out of the
CD slot.
If the CD is not removed after
ejection, it will be drawn back in after
a few seconds.
Page 26
26 External devices
External devices
General information ..................... 26
Playing audio ............................... 27
Displaying pictures ....................... 28
Using smartphone applications ...29
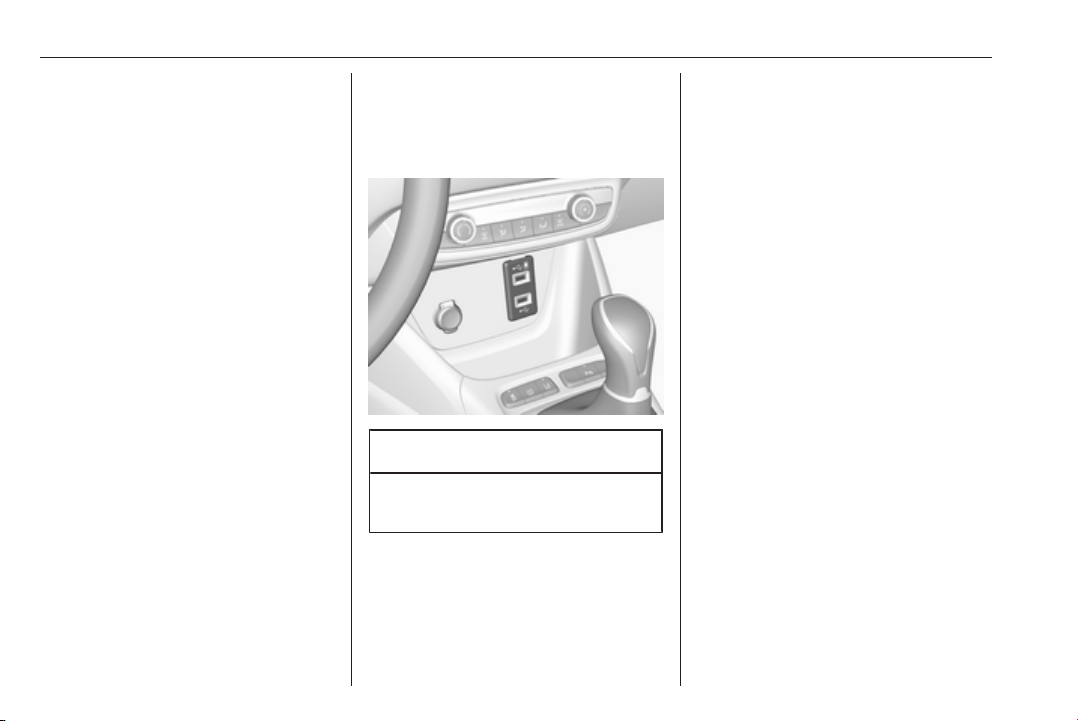
General information
Two USB ports for the connection of
external devices are located in the
centre console.
Caution
To protect the system, do not use
a USB hub.
Notice
The USB ports must always be kept
clean and dry.
USB ports
An MP3 player, USB device, SD card
(via USB connector/adapter) or
smartphone can be connected to
each USB port.
The Infotainment system can play
audio files or show picture files
contained in USB storage devices.
When connected to the USB port,
various functions of the devices
mentioned above can be operated via
the controls and menus of the
Infotainment system.
Notice
Not all auxiliary devices are
supported by the Infotainment
system.
Notice
If two USB ports available: To use
the phone projection feature 3 29
of the Infotainment system, you
need to connect your smartphone to
the USB port labelled with Ç.
Page 27
External devices 27
Connecting/disconnecting a device
Connect one of the devices
mentioned above to the USB port. If
required, use the appropriate
connection cable. The music function
starts automatically.
Notice
If a non-readable USB device is
connected, a corresponding error
message appears and the
Infotainment system automatically
switches to the previous function.
To disconnect the USB device, select
another function and then remove the
USB storage device.
Caution
Avoid disconnecting the device
during playback. This may
damage the device or the
Infotainment system.
Bluetooth audio streaming
Streaming allows you to listen to
music from your smartphone.
For a detailed description on how to
establish a Bluetooth connection
3 45.
If audio playback does not start
automatically, it may be necessary to
start the playback on the smartphone.
First adjust the volume on your
smartphone (to a high level). Then
adjust the volume of Infotainment
system.
File formats
The audio equipment supports
different file formats.
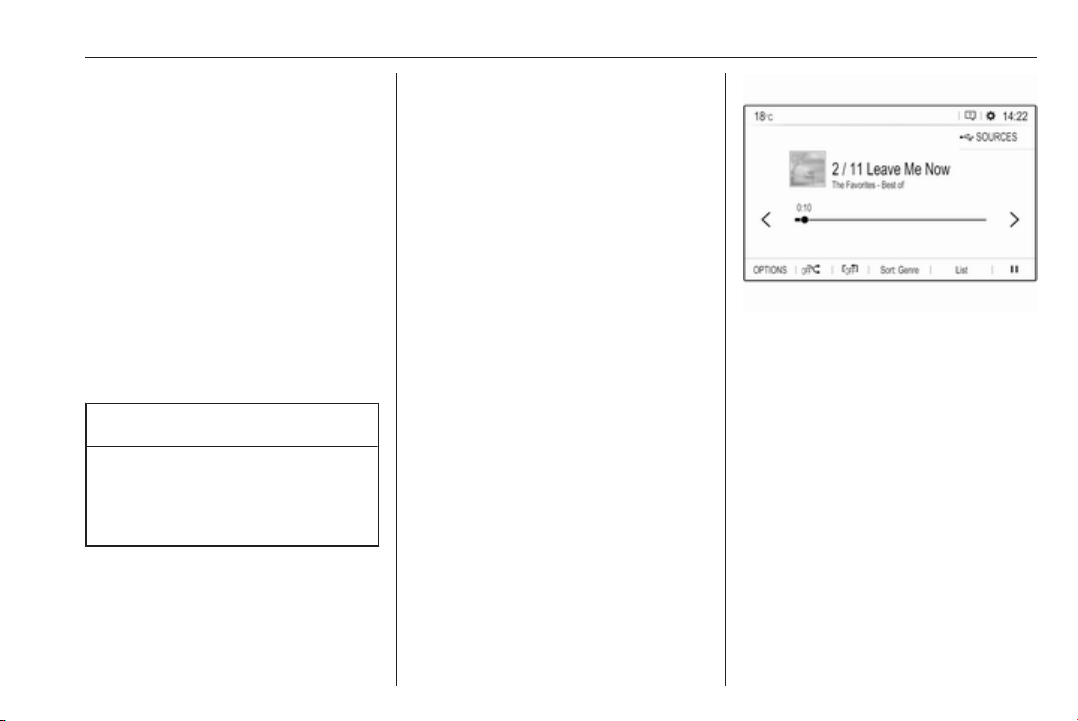
Playing audio
Activating the music function
Connecting the USB or Bluetooth
device 3 26.
If device already connected, but
playback of stored music files not
active:
Press AUDIO, select SOURCES and
then select the respective source.
Playback of the audio tracks starts
automatically.
Playback functions
Interrupting and resuming playback
Touch = to interrupt playback. The
screen button changes to l.
Touch l to resume playback.
Playing the previous or next track
Touch < or >.
Fast forwarding and rewinding
Touch and hold < or >. Release to
return to normal playback mode.
Alternatively, you can move the slider
showing the current track position to
the left or right.
Page 28

28 External devices
Playing tracks randomly
Touch button repeatedly to toggle
between the available random
modes.
”: play tracks of currently selected
list (album, artist, etc.) in random
order.
æ: play all tracks stored on
connected device in random order.
Ý: play tracks of currently selected
list (album, artist, etc.) in normal
playback mode.
Repeating tracks
Touch button repeatedly to switch
repeat mode on or off.
–: repeat tracks of currently selected
list (album, artist, etc.).
Þ: play tracks of currently selected
list (album, artist, etc.) in normal
playback mode.
Browse music functions
(only available for devices connected
via USB)
You can have your music files sorted
according to different criteria. Two
options are available for browsing the
music files stored on the connected
USB device.
Browsing via main menu
If you want to change the currently
active USB source, select
SOURCES and then select the
desired source. The respective main
menu is displayed.
Select the button showing the
currently selected sorting criteria, e.g.
Sort: Album or Sort: Artist, and then
select the desired new sorting criteria.
A sorting process is performed.
Select List and then select the desired
track.
Playback of the selected track is
started.
Browsing via device menu
Select OPTIONS and then select
Music files.
If you want to change the currently
active USB source, select Other.
Select the desired sorting criteria, e.g.
Albums or Artists, and then select the
desired track.
Playback of the selected track is
started.
Displaying pictures
You can view pictures stored on a
USB device.
Activating the picture viewer
Connecting the USB device 3 26.
If device already connected, but
picture viewer not active:
Press AUDIO, select OPTIONS and
then select Managing photos.
Select the desired picture.
A slide show of all stored picture files
starts automatically.
Page 29

External devices 29
Touch the screen to display the menu
bar.
Function buttons
Viewing the previous or next picture
Touch l or m.
Starting or stopping a slide show
Select l to view the pictures stored
on the USB device in a slide show.
Touch / to end the slide show.
Using smartphone applications
Phone projection
The phone projection applications
Apple CarPlay and Android Auto
display selected apps from your
smartphone on the Infotainment
screen and allow their operation
directly via the Infotainment controls.
Check with the device's manufacturer
if this function is compatible with your
smartphone and if this application is
available in the country you are in.
Preparing the smartphone
iPhone®: Make sure Siri® is activated
on your phone.
Android phone: Download the
Android Auto app to your phone from
the Google Play™ Store.
Connecting the smartphone
iPhone
Connect the phone to the USB port
3 26.
If the phone is already connected via
Bluetooth, upon connecting to the
USB port and launching Apple
CarPlay, the Bluetooth connection
will disconnect.
Android phone
Connect the phone via Bluetooth
3 45 and then connect the phone to
the USB port 3 26.
Starting phone projection
Press Ì and then touch CarPlay or
AndroidAuto.
The phone projection screen
displayed depends on your
smartphone and software version.
Returning to the Infotainment screen
Press, e.g., the AUDIO button on the
control panel.
Page 30

30 Navigation
Navigation
General information ..................... 30
Usage .......................................... 31
Destination input .......................... 34
Guidance ..................................... 38
General information
The navigation system will reliably
guide you to your destination.
The current traffic situation is taken
into account in the route calculation.
For this purpose, the Infotainment
system receives traffic
announcements in the current
reception area via RDS-TMC.
The navigation system cannot,
however, take into account traffic
incidents, traffic regulations changed
at short notice and hazards or
problems that arise suddenly (e.g.
road works).
Caution
The usage of the navigation
system does not release the driver
from the responsibility for a
correct, vigilant attitude in road
traffic. The relevant traffic
regulations must always be
followed. If a navigation instruction
contradicts traffic regulations, the
traffic regulations always apply.
Functioning of the navigation system
The position and movement of the
vehicle are detected by the navigation
system using sensors. The travelled
distance is determined by the
vehicle's speedometer signal, turning
movements on bends by a sensor.
The position is determined by the
GPS (Global Positioning System)
satellites.
By comparing the sensor signals with
the digital maps, it is possible to
determine the position with an
accuracy of approx. 10 metres.
The system will also work with poor
GPS reception. However, the
accuracy of the determination of the
position will be reduced.
After the entry of the destination
address or point of interest (nearest
petrol station, hotel, etc.), the route is
calculated from the current location to
the destination selected.
Route guidance is provided by voice
output and an arrow, as well as with
the aid of a multi-colour map display.
Page 31

Navigation 31
Important information
TMC traffic information system and dynamic route guidance
The TMC traffic information system
receives all current traffic information
from TMC radio stations. This
information is included in the
calculation of the overall route. During
this process, the route is planned so
that traffic problems related to preselected criteria are avoided.
To be able to use TMC traffic
information, the system must receive
TMC stations in the relevant region.
Map data
All required map data is stored within
the Infotainment system.
To update the navigation map data,
we recommend to contact your Opel
Service Partner.
Usage
Information on the map display
Press NAV to display the navigation
map showing the area around the
current location.
Route guidance not active
● The map view is displayed.
● The current location is indicated
by an arrow.
● The name of the street you are
currently in is displayed at the
bottom left of the map view.
Route guidance active
● The map view is displayed.
● The active route is indicated by a
coloured line.
● The moving vehicle is marked by
an arrow pointing into the
direction of travel.
● The next turning manoeuvre is
shown in a separate field at the
top left of the map view.
Depending on the situation
information on lane guidance or
the second next turning
Page 32

32 Navigation
manoeuvre may be displayed
additionally.
● The arrival time and the
remaining distance to the
destination is shown at the top
right of the map view.
Customise the map display
Map views
Three different map views are
available: North orientation, Vehicle
orientation and Perspective view.
Repeatedly touch û to toggle
between these map views.
Map colours
Depending on the external lighting
conditions, the colouring of the map
screen (light colours for the day and
dark colours for the night) can be
adapted.
Touch ø to display a menu on the
right side of the screen.
Select Map colour repeatedly to
toggle between light and dark
colours.
POI (Points of Interest) icons on the map
POIs are points of general interest,
e.g. gas stations or car parks.
The display of POI categories shown
on the map may be personally
adapted.
Activate the desired POI categories.
The map view changes accordingly.
Alternatively, select POI on map to
display a menu with a multitude of
POI categories and subcategories to
choose from. Activate the desired
POI categories.
Traffic events
Traffic events may be indicated on the
map. Additionally, information on
these events may be displayed in a
list.
Select Consult map to switch to an
alternative map display with new
menu options.
The map view is switched to North
orientation mode and and may
display a greater part of the route.
Page 33

Navigation 33
Touch the traffic jam icon to show
traffic events on the map. Touch Ï to
show a list with information on these
traffic events.
If you want to display a different map
section:
Touch õ to show the area around the
current location.
Touch ö to show the entire route.
Touch ÷ to show the area around the
destination.
To return to the default navigation
view, touch Ù.
Autozoom function
If the autozoom function is activated
(AUTO is displayed below the map
view), the zoom level changes
automatically when approaching a
turning manoeuvre during active
route guidance. This way, you always
get a good overview of the respective
manoeuvre.
If the autozoom function is
deactivated, the selected zoom level
remains the same during the whole
route guidance process.
To activate or deactivate the function:
Select MENU, select Settings and
then select the Aspect tab.
Activate or deactivate Automatic
zoom setting.
Map manipulation
Moving visible map section
Place your finger anywhere on the
screen and move it in the desired
direction.
The map moves accordingly,
displaying a new section. A new
button bar is shown.
ñ: show area around current location
again.
ò: show area around home address.
ó: show area around destination.
To return to the default navigation
view, select Ù.
Centring visible map section
Touch the desired location on the
screen to centre the map around this
location.
A red d is displayed at the respective
location and the corresponding
address is shown on a label.
Page 34

34 Navigation
Manual zooming
To zoom in on a selected map
location, place two fingers on the
screen and move them away from
each other.
Alternatively, touch < below the map
view.
To zoom out and display a larger area
around the selected location, place
two fingers on the screen and move
them towards each other.
Alternatively, touch ] below the map
view.
Showing an overview of the route
Touch ø, select Consult map and
then touch ö.
The map view is switched to North
orientation and shows an overview of
the current route.
To return to the default navigation
view, touch Ù.
Voice guidance
The route guidance process can be
supported by voice prompts given out
by the system.
To activate or deactivate the function:
Select MENU in the navigation main
menu, select Settings and then select
the Vocal tab.
Activate or deactivate Activate
navigation messages.
Navigation settings
Select MENU in the navigation main
menu, and then select Settings to
display the respective menu with a
variety of navigation related settings.
Please explore the different settings.
Some have already been described
above, others are described in the
following sections.
Destination input
The navigation system provides
various options to set a destination for
route guidance.
Page 35

Navigation 35
Press NAV to display the navigation
main menu.
Selecting an address from the map
Touch the desired location on the
map. The map centres around this
location.
A red d is displayed at the respective
location and the corresponding
address is shown on a label.
To start route guidance, select û.
For a detailed description on route
guidance 3 38.
Quick address or POI search
Select Search…. A menu with a list of
recent destinations and a keyboard is
displayed.
To refine the area for your address or
POI search, select × and then select
the desired option.
To hide the keyboard and show the
entire list, select ù. To show the
keyboard again, select ú.
If you want to search for POIs (Points
of Interest) only, select the POI tab.
Enter an address or search term. As
soon as characters are entered an
address search is performed and the
list of found addresses is updated
continuously.
Select the desired list item.
Depending on the current situation
and your selection, the navigation
system may react differently:
● If the selected list item is a valid
destination address and route
guidance is currently not active:
The navigation main menu is
displayed again and route
guidance is started.
For a detailed description on
route guidance 3 38.
● If the selected list item is a valid
destination address but route
guidance is already active:
A message is displayed and you
need to decide first if the old
destination should be replaced,
or if you want to add the selected
address as an intermediate
destination to a waypoint trip.
Detailed description on waypoint
trips, see below.
Page 36

36 Navigation
Select the desired option.
● If the navigation system needs
more detailed information for
route calculation:
Enter a further search term to
refine your search.
Detailed address entry
Select MENU and then select Enter
address to display a keyboard for
address entry.
As soon as characters are entered,
an address search is started. Every
additional character is considered in
the matching process and a list of
matching addresses is displayed.
Select the desired address or change
your input to initiate a new search.
Continue with the address entry until
the entire address you are searching
for is found.
To start route guidance to the
respective address, confirm your
input.
For a detailed description on route
guidance 3 38.
Storing your favourite addresses
If you want to store the entered
address, select ü.
You may store the address as, e.g.,
your Home address or your Work
address.
Select the desired option, confirm
your selection and then enter a name
for the address.
The stored address can then be
easily selected as destination
address via the destination lists
Preferred or Contacts, see below.
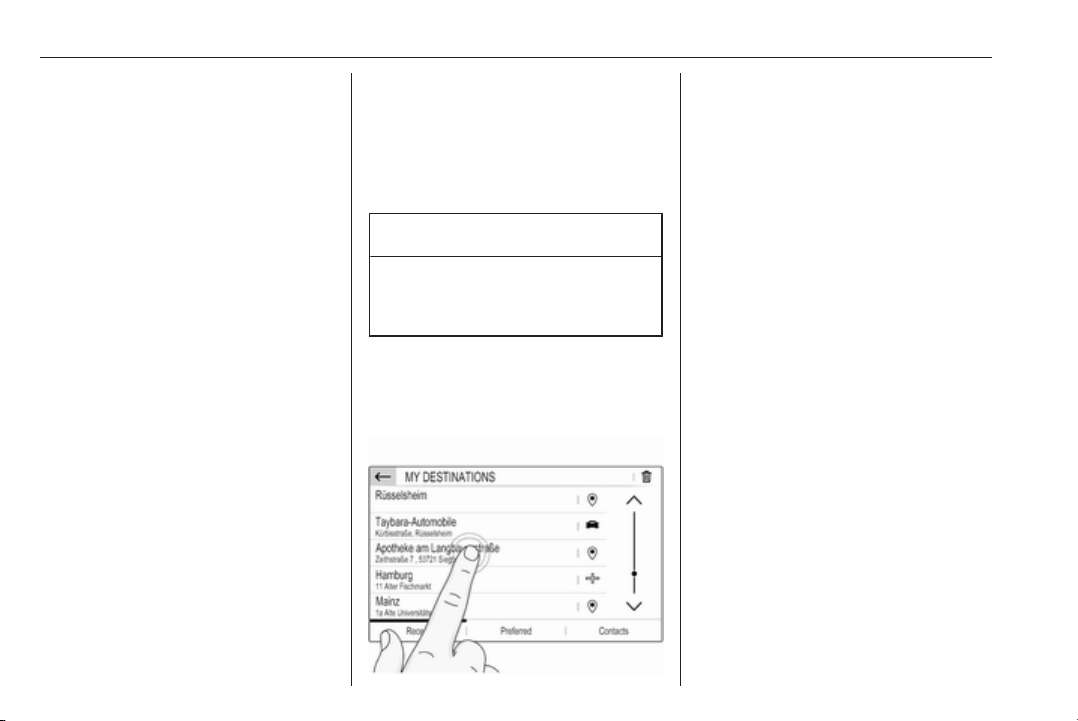
Destination lists
Select MENU and then select My
destinations.
Select Recent to display a list of all
recently entered destinations.
Page 37

Navigation 37
Select Preferred to display all
destinations which were stored
before as home address, work
address or preferred address.
Select Contacts to display a list with
contact names and all related
addresses stored before as personal
contacts.
To start route guidance to the
respective address, select a list entry.
For a detailed description on route
guidance 3 38.
Points of interest
A point of interest (POI) is a specific
location that might be of general
interest, e.g. a petrol station, a
parking area or a restaurant.
The data stored within the navigation
system contains a great number of
predefined POIs, which are indicated
on the map (if activated, 3 31).
Selecting a POI from the map
Touch the desired POI icon on the
map. The map centres around this
location.
Touch the icon again.
A red d is displayed at the respective
location and the corresponding
address is shown on a label.
To start route guidance, select û.
For a detailed description on route
guidance 3 38.
Showing a list of POIs around a location
Touch the desired location on the
map. The map centres around this
location.
A red d is displayed at the respective
location and the corresponding
address is shown on a label.
Touch and hold d.
A list of POIs around the location is
displayed.
Select the desired POI to start route
guidance.
For a detailed description on route
guidance 3 38.
Searching for POIs via categories
Select MENU and then select Points
of interest.
Select a POI main category, e.g.,
Travel and then select a subcategory,
e.g. Airport. A new menu is displayed.
Select a search area, e.g., Around the
vehicle to refine the search.
After the POI search is performed,
select the desired POI.
To search for POIs at another
location, select Address.
To search for POIs via keyword (see
below), select Search.
Page 38

38 Navigation
Searching via keyword
Select MENU, select Search, enter a
keyword, e.g., "Station", enter or
select a city name and confirm your
input.
After the POI search is performed,
select the desired POI.
Waypoint trips
A waypoint is an intermediate
destination that is considered in the
calculation of a route to its final
destination. To create a waypoint trip,
you may add one or several
waypoints.
Enter or select the final destination of
your waypoint trip and start route
guidance.
While under active route guidance,
select MENU and then select Route /
Waypoints.
Select Add waypoint and then select
an option for address entry, e.g. Find
POI.
Enter or select a new address. The
address is inserted into the list of
waypoints.
If desired, enter further waypoints as
described above.
If you want to change the order of the
waypoints:
Touch Ú and then touch the displayed
arrows to move the list entries up or
down.
Select Calculate to recalculate the
route according to the changed order.
To return to the navigation main
menu, select Finish.
To display a detailed route list of the
waypoint trip, select the Route tab.
Guidance
Route guidance is provided by the
navigation system through visual
instructions and voice prompts (voice
guidance).
Visual instructions
Visual instructions are provided on
the display.
Page 39

Navigation 39
Notice
When route guidance is active and
you are not within the navigation
application, turning manoeuvres are
shown on the instrument cluster
display.
Voice guidance
Navigation voice prompts announce
which direction to follow, when
approaching an intersection at which
you need to turn.
To activate or deactivate the voice
prompts function select MENU in the
navigation main menu, select
Settings, select the Vocal tab and
then activate or deactivate Activate
navigation messages.
If voice prompts are activated you can
additionally specify whether street
names should be spoken or not.
To replay the last voice guidance
instruction, touch the turn arrow on
the left side of the screen.
Settings for route guidance
Select MENU in the navigation main
menu and then select Guidance
criteria to display the respective
menu.
When the menu is opened, several
optional routes are automatically
calculated by the navigation system,
e.g. the fastest route or the most
ecological route.
To show the different optional routes
on a map, select See on map.
If you want, e.g., avoid motorways on
your route, set the respective option
to OFF.
Take account of traffic
Traffic events are taken into
consideration when the system
determines a route to a destination.
During active route guidance, the
route can be modified according to
incoming traffic messages.
Three options are available for Take
account of traffic:
If you want the system to
automatically modify the route
according to new traffic messages,
select Automatic.
If you want to be consulted when a
route is modified, select Manual.
If you do not want routes to be
modified, select None.
Page 40

40 Navigation
Starting, cancelling, resuming route guidance
To start route guidance, enter or
select a destination address 3 34.
Depending on the situation, route
guidance may start automatically, or
you may have to follow some
instructions on the screen.
To cancel route guidance, select
MENU in the navigation main menu
and then select STOP NAVIGATION.
To resume a cancelled route
guidance, select MENU in the
navigation main menu and then
select RESUME GUIDANCE.
Turn list
The next turning manoeuvre is
displayed on the left side of the
screen.
To display a list of all upcoming turns
on the active route, select MENU in
the navigation main menu, select
Route / Waypoints and then select the
Route tab.
To display the previous or next
turning manoeuvre on the map, touch
< or >.
To avoid the route section currently
displayed on the map, touch þ.
If desired, further route sections may
be selected to be avoided.
Confirm your selection(s).
To display a turning manoeuvre on
the map, touch the turn arrow icon
next to the desired list entry. The map
jumps to the respective location on
the map.
Page 41

Speech recognition 41
Speech recognition
General information ..................... 41
Usage .......................................... 42
General information
Embedded speech recognition
The embedded speech recognition of
the Infotainment system enables you
to operate various functions of the
Infotainment system via voice input. It
recognises commands and numeric
sequences independently of the
relevant speaker. The commands
and numeric sequences can be
spoken without a voice pause
between the individual words.
In the event of incorrect operation or
commands, the speech recognition
gives visual and/or acoustic feedback
and requests you to re-enter the
desired command. Apart from this,
the speech recognition
acknowledges important commands
and will enquire if necessary.
In general, there are different ways to
speak commands for performing the
desired actions.
Notice
To ensure that conversations inside
the vehicle do not lead to
unintentional triggering of the
system functions, the speech
recognition does not start until it has
been activated.
Important information
Language support
● Not all languages available for
the display of the Infotainment
system are also available for the
speech recognition.
● If the display language currently
selected is not supported by the
speech recognition, speech
recognition is not available.
In such a case, you need to select
another language for the display
if you want to control the
Infotainment system via voice
input. To change the display
language 3 18.
Address input of destinations in
foreign countries
In case you want to enter the address
of a destination located in a foreign
country via voice input, you need to
change the language of the InfoDisplay to the language of the foreign
country.
Page 42

42 Speech recognition
E.g., if the display is currently set to
English and you want to enter the
name of a city located in France, you
need to change the display language
to French.
For changing the display language,
see "Language" in chapter "System
settings" 3 18.
Input order for destination addresses
The order in which the parts of an
address need to be entered using the
speech recognition system is
dependent on the country where the
destination is located.
If the speech recognition system
rejects your address entry, repeat the
command with a different order of the
address parts.
Voice pass-thru application
The voice pass-thru application of the
Infotainment system allows access to
the speech recognition commands on
your smartphone.
Voice pass-through is available via
the phone projection applications
Apple CarPlay and Android Auto
3 29.
Usage
Embedded speech recognition
Activating speech recognition
Notice
Speech recognition is not available
during an active phone call.
Activation via the w button on the
steering wheel
Press w on the steering wheel.
The audio system mutes, a voice
output message prompts you to say a
command, and help menus with the
most important commands currently
available are shown on the display.
As soon as the speech recognition is
ready for voice input, a beep is heard.
You can now say a voice command to
initiate a system function (e.g. playing
a preset radio station).
Adjusting the volume of voice prompts
Press volume button on the steering
wheel upwards (increase volume)
À or downwards (decrease volume)
Á.
Interrupting a voice prompt
As an experienced user, you can
interrupt a voice prompt by briefly
pressing w on the steering wheel.
Alternatively you can say "Set
dialogue mode as expert".
A beep is heard immediately, and a
command can be stated without
having to wait.
Cancelling a dialogue sequence
To cancel a dialogue sequence and
to deactivate the speech recognition,
press v on the steering wheel.
If you do not say any command for a
certain period of time, or if you say
commands that are not recognised by
the system, a dialogue sequence is
automatically cancelled.
Operation via speech commands
Follow the instructions given by voice
output and shown on the display.
Page 43

For best results:
● Listen for the voice prompt and
wait for the beep before saying a
command or replying.
● Say "Help" or read the example
commands on the screen.
● The voice prompt can be
interrupted by pressing w again.
● Wait for the beep and then speak
the command naturally, not too
fast, not too slow.
Voice pass-thru application
Activating speech recognition
Press and hold s on the steering
wheel until a speech recognition
session is started.
Adjusting the volume of voice prompts
Turn m on the control panel or press
volume button on the steering wheel
upwards (increase volume) À or
downwards (decrease volume) Á.
Deactivating speech recognition
Press v on the steering wheel. The
speech recognition session is ended.
Speech recognition 43
Page 44

44 Phone
Phone
General information ..................... 44
Bluetooth connection ................... 45
Emergency call ............................ 46
Operation ..................................... 47
Mobile phones and CB radio
equipment .................................... 50
General information
The Phone portal provides you with
the possibility of having mobile phone
conversations via a vehicle
microphone and the vehicle
loudspeakers as well as operating the
most important mobile phone
functions via the Infotainment system
in the vehicle. To be able to use the
Phone portal, the mobile phone must
be connected to the Infotainment
system via Bluetooth.
Not all Phone functions are supported
by every mobile phone. The usable
phone functions depend on the
relevant mobile phone and network
provider. You can find further
information on this in the operating
instructions for your mobile phone, or
you can enquire about them with your
network provider.
Important information for operation and traffic safety
9 Warning
Mobile phones have effects on
your environment. For this reason
safety regulations and directions
have been prepared. You should
be familiar with the related
directions before you use the
telephone function.
9 Warning
Use of the hands-free facility while
driving can be dangerous because
your concentration is reduced
when telephoning. Park your
vehicle before you use the handsfree facility. Follow the stipulations
of the country in which you find
yourself at present.
Do not forget to follow the special
regulations that apply in specific
areas and always switch off the
mobile phone if the use of mobile
phones is prohibited, if
Page 45

Phone 45
interference is caused by the
mobile phone or if dangerous
situations can occur.
Bluetooth
The Phone portal is certified by the
Bluetooth Special Interest Group
(SIG).
You can find further information about
the specification on the internet at
http://www.bluetooth.com.
Bluetooth connection
Bluetooth is a radio standard for the
wireless connection of e.g. mobile
phones, smartphones or other
devices.
Pairing a device
During the pairing process, PIN code
exchange between the Bluetooth
device and the Infotainment system
and connection of the Bluetooth
devices to the Infotainment system
are carried out.
Important information
● Two paired Bluetooth devices
can be connected to the
Infotainment system at the same
time. One device in hands-free
mode, the other in audio
streaming mode, see description
on Bluetooth profile settings
below.
However, two devices cannot be
used in hands-free mode at the
same time.
● Pairing only needs to be carried
out once, unless the device is
deleted from the list of paired
devices. If the device has been
connected previously, the
Infotainment system establishes
the connection automatically.
● Bluetooth operation considerably
drains the device's battery.
Therefore, connect the device to
the USB port for charging.
Pairing a new device
1. Activate the Bluetooth function of
the Bluetooth device. For further
information, see the operating
instructions for the Bluetooth
device.
2. If another Bluetooth device is
already connected:
Press v, select OPTIONS, select
Bluetooth connection and then
touch o Search.
If no Bluetooth device is currently
connected:
Press v and then touch Bluetooth
search.
A search for all Bluetooth devices
in the near environment is
performed.
3. Select the Bluetooth device you
wish to pair from the displayed list.
4. Confirm the pairing procedure:
● If SSP (secure simple
pairing) is supported:
Page 46

46 Phone
Confirm the messages on the
Infotainment system and the
Bluetooth device.
● If SSP (secure simple
pairing) is not supported:
On the Infotainment system:
a message is displayed
asking you to enter a PIN
code on your Bluetooth
device.
On the Bluetooth device:
enter the PIN code and
confirm your input.
5. Activate the functions you want
the paired smartphone to perform
and confirm your settings. You
can change these Bluetooth
profile settings at any time, see
below.
The Infotainment system and the
device are paired.
6. The phone book is downloaded
automatically to the Infotainment
system. Depending on the phone,
the Infotainment system must be
allowed access to the phone
book. If required, confirm the
messages displayed on the
Bluetooth device.
If this function is not supported by
the Bluetooth device, a
corresponding message is
displayed.
Operations on paired devices
Press v, select OPTIONS and then
select Bluetooth connection.
A list of all paired devices is
displayed.
Changing the Bluetooth profile settings
Touch † next to the desired paired
device.
Activate or deactivate the profile
settings as desired and confirm your
settings.
Connecting a paired device
Devices which are paired but not
connected are identified by —.
Select the desired device to connect
it.
Disconnecting a device
The currently connected device is
identified by “.
Select the device to disconnect it.
Deleting a paired device
Touch e in the upper left corner of the
screen to display e icons next to each
paired device.
Touch e next to the Bluetooth device
you want to delete and confirm the
displayed message.
Emergency call
9 Warning
Connection setup cannot be
guaranteed in all situations.For
this reason you should not rely
exclusively on a mobile phone
Page 47

Phone 47
when a vitally important
communication (e.g. a medical
emergency) is concerned.
In some networks it may be
necessary for a valid SIM card to
be properly inserted in the mobile
phone.
9 Warning
Bear in mind that you can make
and receive calls with the mobile
phone if it is in a service area with
a sufficiently strong signal. Under
certain circumstances,
emergency calls cannot be made
on all mobile phone networks; it is
possible that they cannot be made
when certain network services
and/or telephone functions are
active. You can enquire about this
with the local network operators.
The emergency call number can
differ depending on the region and
country. Please enquire
beforehand about the correct
emergency call number for the
relevant region.
Making an emergency call
Dial the emergency call number (e.g.
112).
The telephone connection to the
emergency call centre is set up.
Answer when the service personnel
questions you about the emergency.
9 Warning
Do not end the call until you are
requested to do so by the
emergency call centre.
Operation
As soon as a connection via
Bluetooth has been set up between
your mobile phone and the
Infotainment system, you can operate
many functions of your mobile phone
via the Infotainment system.
Notice
In the hands-free mode, mobile
phone operation is still possible, e.g.
taking a call or adjusting the volume.
After setup of a connection between
the mobile phone and the
Infotainment system, mobile phone
data is transmitted to the Infotainment
system. This can take some time
depending on the mobile phone and
the amount of data to be transferred.
During this period, operation of the
mobile phone via the Infotainment
system is possible only to a limited
extent.
Notice
Not every mobile phone supports all
functions of the phone portal.
Therefore, deviations from the range
of functions described below are
possible.
Phone main menu
Press v to display the phone main
menu.
Page 48

48 Phone
Notice
The phone main menu is only
available if a mobile phone is
connected to the Infotainment
system via Bluetooth. For a detailed
description 3 45.
Many functions of the mobile phone
can now be controlled via the phone
main menu (and associated
submenus), and via the phonespecific controls on the steering
wheel.
Initiating a phone call
Entering a phone number
Enter a phone number using the
keypad in the phone main menu.
As soon as figures are entered,
matching entries from the contacts list
are displayed in alphabetical order.
Touch the desired list entry to initiate
a phone call.
Using the contacts list
The contacts list contains all phone
book entries from the connected
Bluetooth device and all contacts
from the navigation system.
Select Contacts and then select the
desired list type.
Searching for a contact
To switch between <ordered by first
name> and <ordered by surname>,
touch ï.
To scroll through the list, touch a letter
from the scroll bar, H or I.
To search for a contact via keyboard,
touch Search.
Modifying or deleting a contact
Select ð next to the contact and then
select the desired option.
If you want to add a photo to the
contact:
Page 49

Connect a USB device with the
desired photo stored on it to the USB
port 3 26, touch the photo frame and
then select the desired photo.
Confirm your selection to download
the selected photo to the system.
Using the call history
All incoming, outgoing, or missed
calls are registered.
Select Calls and then select the
desired list.
Select the desired list entry to initiate
a call.
Incoming phone call
If an audio mode, e.g. the radio or
USB mode, is active at the moment a
call comes in, the audio source is
muted and stays muted until the call
ends.
A message with the caller's phone
number or name is displayed.
To answer the call, touch v.
To reject the call, touch @.
To put the call on hold, touch /. To
resume to the call, touch l.
During the ongoing call, the following
menu is displayed.
Phone 49
To mute the microphone of the
Infotainment system, touch Micro
OFF.
To continue conversation via the
mobile phone (private mode), touch
ý Private. To reactivate the
conversation via the Infotainment
system, touch ÿ Private.
Notice
If you leave the vehicle and lock it
while you are still in a private mode
phone conversation, the
Infotainment system may remain
switched on until you leave the
Bluetooth reception area of the
Infotainment system.
Page 50

50 Phone
Put incoming calls always on hold
For safety reasons the phone portal
can put all incoming calls on hold by
default.
To activate this function, select
OPTIONS, select Security and then
select Put incoming calls on hold.
Mobile phones and CB radio equipment
Installation instructions and operating guidelines
The vehicle specific installation
instructions and the operating
guidelines of the mobile phone and
hands-free manufacturer must be
observed when installing and
operating a mobile telephone. Failure
to do so could invalidate the vehicle
type approval (EU directive 95/54/
EC).
Recommendations for fault-free
operation:
● Professionally installed exterior
antenna to obtain the maximum
range possible
● Maximum transmission power
10 watts
● Installation of the phone in a
suitable spot, consider relevant
Note in the Owner's Manual,
section Airbag system.
Seek advice on predetermined
installation points for the external
antenna or equipment holder and
ways of using devices with a
transmission power exceeding
10 watts.
Use of a hands-free attachment
without external antenna with mobile
telephone standards GSM
900/1800/1900 and UMTS is only
permitted if the maximum
transmission power of the mobile
telephone is 2 watts for GSM 900 or
1 watt for the other types.
For reasons of safety, do not use the
phone while driving. Even use of a
hands-free set can be a distraction
while driving.
9 Warning
Operation of radio equipment and
mobile telephones which fail to
meet above mentioned mobile
telephone standards is only
permitted using an antenna
located outside of the vehicle.
Caution
Mobile telephones and radio
equipment may lead to
malfunctions in the vehicle
electronics when operated inside
the vehicle with no exterior
antenna, unless the above
mentioned regulations are
observed.
Page 51

Phone 51
Page 52

52
Index
A
Activating Bluetooth music........... 27
Activating CD player..................... 25
Activating phone........................... 47
Activating radio............................. 21
Activating the navigation system..31
Activating USB audio.................... 27
Activating USB picture.................. 28
Address book................................ 34
Adjust time and date..................... 18
Audio files..................................... 26
Auto volume.................................. 18
B
Balance......................................... 17
Basic operation............................. 14
Bluetooth
Bluetooth connection................ 45
Bluetooth music menu.............. 27
Connecting device.................... 26
General information................... 26
Pairing....................................... 45
Phone........................................ 47
Bluetooth connection.................... 45
C
Call
Functions during a call.............. 47
Incoming call............................. 47
Initiating a phone call................ 47
Ring tone................................... 47
Call history.................................... 47
CD player...................................... 25
Change display language............. 18
Contacts................................. 34, 47
Control elements
Infotainment system.................... 8
Steering wheel............................ 8
Control elements overview............. 8
D
DAB.............................................. 23
Date
adjust......................................... 18
Destination input .......................... 34
Digital audio broadcasting............ 23
Display
adjust brightness....................... 18
change language...................... 18
Displaying pictures....................... 28
Display settings............................ 28
E
Emergency call............................. 46
Equaliser....................................... 17
F
Factory default settings................ 18
Fader............................................ 17
File formats................................... 26
Audio files.................................. 26
Picture files................................ 26
Page 53

53
G
General information 25, 26, 30, 41, 44
Bluetooth................................... 26
DAB........................................... 23
Infotainment system.................... 6
Navigation................................. 30
Phone........................................ 44
Smartphone applications.......... 26
USB........................................... 26
Guidance ..................................... 38
I
Infotainment control panel.............. 8
Intellitext....................................... 23
M
Maps............................................. 31
Menu operation............................. 14
Mobile phones and CB radio
equipment ................................ 50
Mute.............................................. 10
N
Navigation
Contacts.................................... 34
Current location......................... 31
Destination input....................... 34
Map display............................... 31
Map manipulation...................... 31
Map update............................... 30
Recent destinations.................. 34
Route guidance......................... 38
TMC stations....................... 30, 38
Traffic incidents......................... 38
Turn list..................................... 38
Waypoint trip............................. 34
O
Operation...................................... 47
CD............................................. 25
External devices........................ 26
Menu......................................... 14
Navigation system..................... 31
Phone........................................ 47
Radio......................................... 21
P
Pairing.......................................... 45
Personal settings.......................... 18
Phone
Bluetooth................................... 44
Bluetooth connection................ 45
Call history................................ 47
Contacts.................................... 47
Emergency calls........................ 46
Entering a number.................... 47
Functions during a call.............. 47
General information................... 44
Incoming call............................. 47
Phone book............................... 47
Phone main menu..................... 47
Phone book.................................. 47
Phone projection.......................... 29
Picture files................................... 26
Playing audio................................ 27
POIs.............................................. 34
Presets
Retrieving stations..................... 21
Storing stations......................... 21
Profile settings.............................. 18
R
Radio
Activating................................... 21
Configuring DAB....................... 23
Configuring RDS....................... 23
DAB announcements................ 23
Digital audio broadcasting
(DAB)........................................ 23
Intellitext.................................... 23
Presets...................................... 21
Radio data system (RDS)......... 23
Regional.................................... 23
Regionalisation......................... 23
Retrieving stations..................... 21
Selecting the waveband............ 21
Station search........................... 21
Station tuning............................ 21
Storing stations......................... 21
Usage........................................ 21
Radio data system (RDS) ............ 23
RDS.............................................. 23
Page 54

54
Regional....................................... 23
Regionalisation............................. 23
Retrieving stations........................ 21
Ring tone...................................... 47
Ring tone volume...................... 18
Route guidance............................ 38
S
Smartphone.................................. 26
Phone projection....................... 29
Speech output volume.................. 18
Speech recognition....................... 41
Storing stations............................. 21
Switching the Infotainment
system on.................................. 10
System settings............................ 18
T
Time
adjust......................................... 18
TMC stations................................ 30
Tone settings................................ 17
Touch beep volume...................... 18
Traffic incidents............................ 38
Turn list......................................... 38
U
Update software........................... 18
Usage................... 10, 21, 25, 31, 42
Bluetooth................................... 26
CD............................................. 25
Menu......................................... 14
Navigation system..................... 31
Phone........................................ 47
Radio......................................... 21
USB........................................... 26
USB
Connecting device.................... 26
General information................... 26
USB audio menu....................... 27
USB picture menu..................... 28
Using smartphone applications.... 29
V
Voice guidance............................. 31
Voice recognition.......................... 41
Volume
Auto volume.............................. 18
Mute function............................. 10
Ring tone volume...................... 18
Setting the volume.................... 10
Speech output........................... 18
Speed compensated volume.... 18
Touch beep volume.................. 18
Volume settings............................ 18
W
Waveband selection..................... 21
Waypoint trip................................. 34
Page 55

R 4.0 IntelliLink
Introduction .................................. 56
Basic operation ............................ 64
Radio ........................................... 70
External devices .......................... 76
Speech recognition ...................... 83
Phone .......................................... 84
Index ............................................ 94
Page 56

56 Introduction
Introduction
General information ..................... 56
Theft-deterrent feature ................. 57
Control elements overview .......... 58
Usage .......................................... 61
General information
The Infotainment system provides
you with state-of-the-art in-car
infotainment.
Using radio tuner functions, you may
register up to 25 stations on five
favourites pages.
You can connect external data
storage devices to the Infotainment
system as further audio sources,
either via cable or via Bluetooth®.
In addition, the Infotainment allows
comfortable and safe use of your
mobile phone in the vehicle.
You can also operate specific
smartphone applications via the
Infotainment system.
Optionally, the Infotainment system
can be operated using the touch
screen and buttons on the control
panel, the controls on the steering
wheel, or - if provided by your mobile
phone - via speech recognition.
The well-thought-out design of the
control elements, the touch screen
and the clear displays enable you to
control the system easily and
intuitively.
Notice
This manual describes all options
and features available for the
various Infotainment systems.
Certain descriptions, including those
for display and menu functions, may
not apply to your vehicle due to
model variant, country
specifications, special equipment or
accessories.
Important information on operation and traffic safety
9 Warning
The Infotainment system must be
used so that the vehicle can be
driven safely at all times. If in
doubt, stop the vehicle and
operate the Infotainment system
while the vehicle is stationary.
Page 57

Radio reception
Radio reception may be disrupted by
static, noise, distortion or loss of
reception due to:
● changes in distance from the
transmitter
● multipath reception due to
reflection
● shadowing
Theft-deterrent feature
The Infotainment system is equipped
with an electronic security system for
the purpose of theft deterrence.
The Infotainment system therefore
functions only in your vehicle and is
worthless to a thief.
Introduction 57
Page 58

58 Introduction
Control elements overview
Control panel
Page 59

Introduction 59
1 Display / touch screen ........... 64
2 Home menu .......................... 64
Screen buttons for access to:
Audio: audio functions
Gallery: picture and movie
functions
Phone: mobile phone functions
Projection: phone projection
Settings: system settings
3 Time, date and
temperature indicators .......... 68
4 g
Short press: open phone
menu ..................................... 88
or open phone projection
function (if activated) ............. 81
Long press: activate
speech recognition ................ 83
5 v
Short press: skip to next
station when radio active ...... 70
or skip to next track when
external devices active ......... 78
Long press: seek up when
radio active ............................ 70
or fast forward when
external devices active ......... 78
6 m
Short press: switch on
Infotainment system if
turned off ............................... 61
or mute system if turned on . 61
Long press: switch off
Infotainment system .............. 61
Turn: adjust volume .............. 61
7 t
Short press: skip to
previous station when
radio active ............................ 70
or skip to previous track
when external devices
active ..................................... 78
Long press: seek down
when radio active .................. 70
or fast rewind when
external devices active ......... 78
8 ;
Short press: open home
menu ..................................... 61
Long press: open phone
projection function (if
activated) .............................. 81
Page 60

60 Introduction
Steering wheel controls
1 SRC (Source)
Select audio source .............. 61
2 ä / å
Select next/previous
preset radio station when
radio active ............................ 70
or select next/previous
track/picture when
external devices active ......... 76
or select next/previous
entry in call/contacts list
when phone portal active
and call/contact list open ......88
3 G
Short press: show Home menu
Long press: if Apple
CarPlay™ or Android™
Auto activated, show the
respective menu .................... 81
4 x
Activate/deactivate mute
function ................................. 61
5 À / Á
Turn upwards/
downwards: increase/
decrease volume
6 v
Take phone call .................... 88
or open call/contacts list ....... 88
or switch between calls
when calls are waiting ........... 88
7 w
Activate speech recognition ..83
Page 61

Introduction 61
Usage
Control elements
The Infotainment system is operated
via function buttons, a touch screen
and menus that are shown on the
display.
Inputs are made optionally via:
● the central control unit in the
control panel 3 58
● the touch screen 3 64
● audio controls on the steering
wheel 3 58
● the speech recognition 3 83
Switching the Infotainment system on or off
Short press X to switch the system
on. After switching on, the last
selected Infotainment source
becomes active.
Notice
Some functions of the Infotainment
system are only available if ignition
is switched on or engine is running.
Long press X to switch the system
off.
Automatic switch-off
If the Infotainment system has been
switched on by pressing X while the
ignition is switched off, it will switch off
again automatically 10 minutes.
Setting the volume
Turn X. The current setting is shown
on the display.
When the Infotainment system is
switched on, the last selected volume
is set, provided that it is lower than the
maximum start-up volume. For a
detailed description 3 67.
Speed compensated volume
When the speed compensated
volume is activated 3 67, the
volume is adapted automatically to
make up for the road and wind noise
as you drive.
Mute
Press X to mute the Infotainment
system.
To cancel the mute function: press
X again. The last selected volume is
set again.
Modes of operation
Press ; to display the home menu.
Notice
For a detailed description of menu
operation via touch screen 3 64.
Audio
Select Audio to open the main menu
of the last selected audio mode.
Select Source on the screen to
display the interaction selector bar.
Page 62

62 Introduction
To change to another audio mode:
touch one of the items in the
interaction selector bar.
For a detailed description of:
● Radio functions 3 70
● External devices (USB,
Bluetooth) 3 78
Notice
To easily return to the audio screen
currently active, touch A in the top
line of any screen.
Gallery
Select Gallery to open the picture and
movie menu for files stored on an
external device, e.g. USB device or
smartphone.
Select l or m to display the picture or
movie menu. Select the desired
picture or movie file to show the
respective item on the display.
For a detailed description of:
● Picture functions 3 79
● Movie functions 3 80
Phone
Before the phone function can be
used, a connection has to be
established between the Infotainment
system and the mobile phone.
For a detailed description of
preparing and establishing a
Bluetooth connection between the
Infotainment system and a mobile
phone 3 84.
If the mobile phone is connected,
select Phone to display the main
menu.
For a detailed description of mobile
phone operation via the Infotainment
system 3 88.
Projection
To show specific apps of your
smartphone displayed on the
Infotainment system, connect your
smartphone.
Select Projection to start the
projection function.
Page 63

Depending on the smartphone
connected, a main menu with
different selectable apps is displayed.
For a detailed description 3 81.
Settings
Select Settings to open a menu for
various system related settings, e.g.
deactivating Audible Touch
Feedback.
Introduction 63
Page 64

64 Basic operation
Basic operation
Basic operation ............................ 64
Tone settings ............................... 66
Volume settings ........................... 67
System settings ........................... 68
Basic operation
The display of the Infotainment
system has a touch-sensitive surface
that allows direct interaction with the
displayed menu controls.
Caution
Do not use pointed or hard items
like ballpoint pens, pencils or
similar for touch screen operation.
9 screen button
When operating the menus, press 9
in the respective submenu to return to
the next higher menu level.
When no 9 screen button is
displayed, you are on the top level of
the respective menu. Press ; to
display the home screen.
Selecting or activating a screen button or menu item
Touch a screen button or menu item.
The corresponding system function is
activated, a message is shown, or a
submenu with further options is
displayed.
Page 65

Basic operation 65
Notice
In subsequent chapters, the
operating steps for selecting and
activating a screen button or menu
item via the touch screen will be
described as "...select <button
name>/<item name>".
Moving items on the home menu
Touch and hold the element you wish
to move until red boxes appear
around the icons. Move your finger to
the desired location and release the
element.
Notice
Constant pressure must be applied
and the finger must be moved at
constant speed.
All other items are rearranged.
Press one of the buttons on the
control panel to exit edit mode.
Notice
Edit mode exits automatically after
30 seconds of inactivity.
Scrolling lists
If there are more items available than
presentable on the screen, the list
must be scrolled.
To scroll through a list of menu items,
you may optionally:
● Place your finger anywhere on
the screen and move it upwards
or downwards.
Notice
Constant pressure must be applied
and the finger must be moved at
constant speed.
● Touch S or R at the top or
bottom of the scroll bar.
● Move the slider of the scroll bar
up and down with your finger.
To return to the top of the list, touch
the list title.
Notice
In subsequent chapters, the
operating steps for scrolling to a list
item via the touch screen will be
described as "...scroll to <item
name>".
Page 66

66 Basic operation
Scrolling pages
Notice
Pages are only scrollable if there is
more than one page available.
To scroll from one page to another:
● Place your finger anywhere on
the screen and move it left to
scroll to the next page or right to
scroll to the previous page.
Notice
Constant pressure must be applied
and the finger must be moved at
constant speed.
● Touch q or p on the screen.
Notice
In subsequent chapters, the
operating steps for scrolling pages
via the touch screen will be
described as "...scroll to...page...".
Tone settings
In the tone settings menu, the tone
characteristics can be set. The menu
may be accessed from each audio
main menu.
To open the tone settings menu,
select Menu in the bottom line of the
respective audio main menu. If
necessary, scroll through the list of
menu items and select Tone
Settings. The respective menu is
displayed.
Equaliser mode
Use this setting to optimise the tone
for the style of music, e.g. Rock or
Classical.
Select the desired sound style in the
interaction selector bar at the bottom
of the screen. If you choose Custom,
you can manually adjust the following
settings.
Bass
Use this setting to enhance or
attenuate the deep frequencies of the
audio sources.
Touch + or - to adjust the setting.
Page 67

Basic operation 67
Midrange
Use this setting to enhance or
attenuate the midrange frequencies
of the audio source.
Touch + or - to adjust the setting.
Treble
Use this setting to enhance or
attenuate the high frequencies of the
audio sources.
Touch + or - to adjust the setting.
Setting balance and fader
Use the illustration at the right side of
the menu to adjust balance and fader.
To define the point in the passenger
compartment where the sound is at its
highest level, touch the
corresponding point in the illustration.
Alternatively, you can move the red
marker to the desired point.
Notice
The balance and fader settings are
valid for all audio sources. They
cannot be adjusted individually for
each audio source.
Volume settings
Adjusting the maximum startup volume
Press ; and then select Settings.
Select Radio, scroll through the list
and then select Max Startup Volume.
Touch + or - to adjust the setting.
Adjusting the speed compensated volume
Press ; and then select Settings.
Select Radio, scroll through the list
and then select Auto Volume.
To adjust the degree of volume
adaptation, select one of the options
in the list.
Off: no enhancement of volume with
increasing vehicle speed.
High: maximum enhancement of
volume with increasing vehicle
speed.
Activating or deactivating the audible touch feedback function
If the audible touch feedback function
is activated, each touch of a screen
button or menu item is indicated by a
beeping sound.
Press ; and then select Settings.
Select Radio and then scroll through
the list to Audible Touch Feedback.
Touch the screen button next to
Audible Touch Feedback to activate
or deactivate the function.
Page 68

68 Basic operation
Volume of traffic announcements
To adjust the volume of traffic
announcements, set the desired
volume while a traffic announcement
is given out by the system. The
respective setting is then stored by
the system.
System settings
The following settings concern the
whole system. All other settings are
described in the respective chapters
of this manual.
Time and date settings
Press ; and then select Settings.
Select Time and Date to display the
respective submenu.
Set Time Format
To select the desired time format,
touch the screen buttons 12 h or 24 h.
Set Date Format
To select the desired date format,
select Set Date Format and choose
between the available options in the
submenu.
Auto Set
To choose whether time and date are
to be set automatically or manually,
select Auto Set.
For time and date to be set
automatically, select On - RDS.
For time and date to be set manually,
select Off - Manual. If Auto Set is set
to Off - Manual, the submenu items
Set Time and Set Date become
available.
Set time and date
To adjust the time and date settings,
select Set Time or Set Date.
Touch + and - to adjust the settings.
Language settings
Press ; and then select Settings.
Select Language to display the
respective menu.
To adjust the language for the menu
texts: touch the desired language.
Text scroll function
If long text is displayed on the screen
e.g. song titles or station names, the
text may either be scrolled continually
or it may be scrolled once and
displayed in truncated form.
Press ; and then select Settings.
Select Radio.
Page 69

Basic operation 69
If you wish the text to be scrolled
continually, activate Text Scroll.
If you wish the text to be scrolled in
blocks, deactivate the setting.
Black display function
If you do not want to see the
illuminated display, e.g. during night
time, you can turn the display off.
Press ; and then select Settings.
Scroll through the list and select Turn
Display Off. The display is turned off.
The audio functions remain active.
To turn the display on again, touch the
screen or press a button.
Factory defaults
Press ; and then select Settings.
Scroll through the list and select
Return to Factory Settings.
To restore all vehicle personalisation
settings, select Restore Vehicle
Settings.
To delete the paired Bluetooth
devices, the contacts list and the
voice mail numbers stored, select
Clear All Private Data.
To reset tone and volume settings,
delete all favourites, and erase the
ringtone selection, select Restore
Radio Settings.
In each case, a warning message is
displayed. Select Continue to reset
the settings.
System version
Press ; and then select Settings.
Scroll through the list and select
Software Information.
If a USB device is connected, you
may save the vehicle information to
this USB device.
Select System Update and then Save
Vehicle Info to USB.
For a system update, contact your
workshop.
Vehicle settings
Vehicle settings are described in the
Owner's Manual.
Page 70

70 Radio
Radio
Usage .......................................... 70
Station search .............................. 70
Favourite lists ............................... 72
Radio data system (RDS) ............ 72
Digital audio broadcasting ........... 74
Usage
Activating radio
Press ; and then select Audio. The
audio main menu last selected is
displayed.
Select Source in the bottom line of the
active radio main menu to open the
interaction selector bar.
Select the desired waveband.
The station last played in the selected
waveband will be received.
Station search
Automatic station search
Briefly press or touch t or v on the
control panel or on the screen to play
the previous or next station in the
station memory.
Manual station search
Press and hold t or v on the
control panel. Release when the
required frequency has almost been
reached.
A search is made for the next station
that can be received and it is played
automatically.
Page 71

Radio 71
Notice
FM waveband: when the RDS
function is activated, only RDS
stations 3 72 are searched for, and
when the radio traffic service (TP) is
activated, only traffic service
stations 3 72 are searched for.
Station tuning
Touch B on the screen. The Direct
tune display is shown.
Enter the desired frequency. Use r
to delete digits entered. If necessary,
touch d or c to subsequently adjust
the input.
Confirm the input to play the station.
Station lists
Select Menu in the bottom line of the
active radio main menu to open the
corresponding waveband-specific
submenu.
Select Station List. All receivable
stations of the relevant waveband
and in the current reception area are
displayed.
Select the desired station.
Notice
The currently received radio station
is indicated by the l symbol next to
the station name.
Category lists
Numerous radio stations broadcast a
PTY code, which specifies the type of
programme transmitted (e.g. news).
Some stations also change the PTY
code depending on the content which
is currently transmitted.
The Infotainment system stores these
stations, sorted by programme type in
the corresponding category list.
Notice
The Categories list item is only
available for the FM and the DAB
wavebands.
To search for a programme type
determined by the stations, select
Categories.
A list of programme types currently
available is displayed.
Select the desired programme type. A
list of stations is displayed
transmitting a programme of the
selected type.
Select the desired station.
Notice
The currently received radio station
is indicated by the l symbol next to
the station name.
Update station lists
If the stations stored in the wavebandspecific station list can no longer be
received, the AM and the DAB station
lists must be updated.
Notice
The FM station list is updated
automatically.
Page 72

72 Radio
Select Menu in the bottom line of the
active radio main menu and then
select Update Station List.
Notice
If a waveband-specific station list is
updated, the corresponding
category list is also updated.
A station search is started and a
corresponding message is displayed.
Once the search is finished, the
respective station list is displayed.
Notice
The currently received radio station
is indicated by the l symbol next to
the station name.
Favourite lists
Stations of all wavebands can be
stored manually in the favourite lists.
Five favourite lists are available, in
each of which five stations may be
stored.
Notice
The currently received station is
highlighted.
Storing a station
If required, touch < or > to scroll
through the favourite pages.
To store the currently active radio
station to a preset screen button:
touch and hold the desired screen
button for a few seconds. The
corresponding frequency or station
name is displayed on the screen
button.
Retrieving stations
If required, touch < or > to scroll to
the desired favourite page.
Select the preset screen button on
which the desired radio station is
stored.
Defining the number of available favourites pages
To define the number of favourites
pages displayed for selection,
press ; and then select Settings on
the screen.
Select Radio and then Manage
Favourites to display the respective
submenu.
Depending on which favourites pages
you want to be displayed, activate or
deactivate the pages.
Radio data system (RDS)
RDS is a service of FM stations that
considerably facilitates the finding of
the desired station and its fault-free
reception.
Page 73

Radio 73
Advantages of RDS
● On the display, the programme
name of the station appears
instead of its frequency.
● During a station search, the
Infotainment system tunes in to
RDS stations only.
● The Infotainment system always
tunes into the best receivable
broadcasting frequency of the set
station by means of AF
(alternative frequency).
● Depending on the station that is
received, the Infotainment
system displays radio text that
can contain e.g. information on
the current programme.
RDS configuration
Touch Menu in the bottom line of the
FM radio main menu to open the
corresponding waveband-specific
submenu.
Scroll to RDS.
Activate or deactivate RDS.
Traffic Programme
Radio traffic service stations are RDS
stations that broadcast traffic news. If
the traffic service is switched on, the
current audio source is interrupted for
the duration of the traffic
announcement.
Activating the traffic programme function
Select Menu in the bottom line of the
FM radio main menu to open the
corresponding waveband-specific
submenu.
Touch the screen button next to
Traffic Programme to activate or
deactivate the function.
Notice
In the station list, TP is displayed
next to the stations providing a traffic
programme.
If the radio traffic service is activated,
[TP] is shown in the top line of all main
menus. If the current station is not a
radio traffic service station, TP is
greyed-out and a search is started
automatically for the next radio traffic
service station. As soon as a radio
traffic service station is found, TP is
highlighted. If no radio traffic service
station is found, TP remains greyedout.
If a traffic announcement is
broadcasted on the respective
station, a message is displayed.
To interrupt the announcement and
return to the function previously
activated, touch the screen or press
m.
Regionalisation
Sometimes RDS stations broadcast
regionally different programmes on
different frequencies.
Select Menu in the bottom line of the
FM radio main menu to open the
corresponding waveband-specific
submenu and scroll to Region.
Activate or deactivate Region.
If regionalisation is activated,
alternative frequencies with the same
regional programmes are selected
where necessary. If regionalisation is
switched off, alternative frequencies
of the stations are selected without
regard to regional programmes.
Page 74

74 Radio
Digital audio broadcasting
DAB broadcasts radio stations
digitally.
DAB stations are indicated by the
programme name instead of the
broadcasting frequency.
General information
● With DAB, several radio
programmes (services) can be
broadcast on a single ensemble.
● Besides high-quality digital audio
services, DAB is also able to
transmit programme-associated
data and a multitude of other data
services including travel and
traffic information.
● As long as a given DAB receiver
can pick up the signal sent out by
a broadcasting station (even if
the signal is very weak), sound
reproduction is ensured.
● In the event of poor reception, the
volume is reduced automatically
to avoid the output of
disagreeable noises.
If the DAB signal is too weak to
be picked up by the receiver,
reception is interrupted
completely. This incident can be
avoided by activating DAB-DAB
Linking and/or DAB-FM Linking
in the DAB menu (see below).
● Interference caused by stations
that are on nearby frequencies (a
phenomenon that is typical of AM
and FM reception) does not
occur with DAB.
● If the DAB signal is reflected by
natural obstacles or buildings,
the reception quality of DAB is
improved, whereas AM or FM
reception is considerably
impaired in such cases.
● When DAB reception is enabled,
the FM tuner of the Infotainment
system remains active in the
background and continually
searches for the FM stations with
the best reception. If TP 3 72 is
activated, traffic announcements
of the FM station with the best
reception are issued. Deactivate
TP if DAB reception should not
be interrupted by FM traffic
announcements.
DAB Announcements
Besides their music programmes, a
lot of DAB stations also broadcast
announcements of various
categories. If you activate some or all
categories, the currently received
DAB service is interrupted when an
announcement of these categories is
made.
Select Menu in the bottom line of the
DAB radio main menu to open the
corresponding waveband-specific
submenu.
Scroll through the list and select DAB
Announcements to display a list of the
categories available.
Activate all or just the desired
announcement categories. Different
announcement categories can be
selected at the same time.
DAB-DAB Linking
If this function is activated, the device
switches over to the same service
(programme) on another DAB
ensemble (if available) when the DAB
signal is too weak to be picked up by
the receiver.
Page 75

Radio 75
Select Menu in the bottom line of the
DAB radio main menu to open the
corresponding waveband-specific
submenu.
Scroll through the list and activate or
deactivate DAB-DAB Linking.
DAB-FM Linking
If this function is activated, the device
switches over to a corresponding FM
station of the active DAB service (if
available) when the DAB signal is too
weak to be picked up by the receiver.
Scroll through the list and activate or
deactivate DAB-FM Linking.
L Band
With this function, you may define
which DAB wavebands are to be
received by the Infotainment system.
L Band (earth and satellite radio) is
another radio band that can be
received additionally.
Select Menu in the bottom line of the
DAB radio main menu to open the
corresponding waveband-specific
submenu.
Scroll through the list and activate or
deactivate L Band.
Intellitext
The Intellitext function allows the
reception of additional information
such as financial information, sports,
news etc.
Notice
The content available depends on
the station and region.
Select Menu in the bottom line of the
DAB radio main menu to open the
corresponding waveband-specific
submenu.
Scroll through the list and select
Intellitext.
Select one of the categories and
choose a specific item to display
detailed information.
EPG
The Electronic Programme Guide
provides information on the current
and upcoming programme of the
respective DAB station.
Select Menu in the bottom line of the
DAB radio main menu and then select
Station List.
To display the programme of the
desired station, touch the icon next to
the station.
Page 76

76 External devices
External devices
General information ..................... 76
Playing audio ............................... 78
Displaying pictures ....................... 79
Playing movies ............................. 80
Using smartphone applications ...81
General information
A USB port for the connection of
external devices is located in the
centre console.
Notice
The USB port must always be kept
clean and dry.
USB port
An MP3 player, USB drive, SD card
(via USB connector/adapter) or
smartphone can be connected to the
USB port.
Up to two USB devices can be
connected to the Infotainment system
at a time.
Notice
For the connection of two USB
devices, an external USB hub is
required.
The Infotainment system can play
audio files, show picture files or play
movie files contained in USB storage
devices.
When connected to the USB port,
various functions of the devices
mentioned above can be operated via
the controls and menus of the
Infotainment system.
Notice
Not all auxiliary devices are
supported by the Infotainment
system. Check the compatibility list
on our website.
Connecting / disconnecting a device
Connect one of the devices
mentioned above to the USB port. If
required, use the appropriate
connection cable. The music function
starts automatically.
Notice
If a non-readable USB device is
connected, a corresponding error
message appears and the
Infotainment system automatically
switches to the previous function.
To disconnect the USB device, select
another function and then remove the
USB storage device.
Page 77

External devices 77
Caution
Avoid disconnecting the device
during playback. This may
damage the device or the
Infotainment system.
USB Auto Launch
By default, the USB audio menu is
displayed automatically as soon as a
USB device is connected.
If desired, this function can be
deactivated.
Press ; and then select Settings to
open the settings menu.
Select Radio, scroll to USB Auto
Launch and touch the screen button
next to the function.
To reactivate the function, touch the
screen button again.
Bluetooth
Devices which support the Bluetooth
music profiles A2DP and AVRCP can
be connected wirelessly to the
Infotainment system. The
Infotainment system can play music
files contained in these devices.
Connecting a device
For a detailed description on how to
establish a Bluetooth connection
3 85.
File formats and folders
The maximum capacity of a device
supported by the Infotainment system
amounts to 2500 music files,
2500 picture files, 250 movie files,
2500 folders and 10 stages of folder
structure. Only devices formatted in
the FAT16 / FAT32 file system are
supported.
If there are images included in the
audio metadata, these images are
displayed on the screen.
Notice
Some files may not be played
properly. This may be due to a
different recording format or the
condition of the file.
Files from online shops to which
Digital Rights Management (DRM)
has been applied cannot be played.
The Infotainment system can play the
following audio, picture and movie
files stored on external devices.
Audio files
The playable audio file formats are
MP3 (MPEG-1 Layer 3, MPEG-2
Layer 3), WMA, AAC, AAC+, ALAC
OGG WAF (PCM), AIFF, 3GPP
(audio only), Audio Books and LPCM.
iPod® and iPhone® devices play
ALAC, AIFF, Audio Books and LPCM.
When playing a file with ID3 tag
information, the Infotainment system
can display information, e.g. on the
track title and artist.
Picture files
The displayable picture file formats
are JPG, JPEG, BMP, PNG and GIF.
JPG files must be 64 to 5000 pixels in
width and 64 to 5000 pixels in height.
BMP, PNG and GIF files must be 64
to 1024 pixels in width and 64 to
1024 pixels in height.
The pictures should not exceed a file
size of 1MB.
Movie files
The playable movie file formats are
AVI and MP4.
Page 78

78 External devices
The maximum resolution is 1280 x
720 pixels. The frame rate must be
less than 30 fps.
The usable codec is H.264/MPEG-4
AVC.
The playable audio formats are MP3,
AC3, AAC and WMA.
The displayable subtitle format is
SMI.
Playing audio
Activating the music function
If the device is not yet connected to
the Infotainment system, connect the
device 3 76.
Usually, the respective audio main
menu is displayed automatically.
If playback is not started
automatically, e.g. if USB Auto
Launch is deactivated 3 76, take the
following steps:
Press ; and then select Audio to
open the audio main menu last
selected.
Select Source in the interaction
selector bar and then select the
desired audio source to open the
respective audio main menu.
Playback of the audio tracks starts
automatically.
Function buttons
Interrupting and resuming playback
Touch = to interrupt playback. The
screen button changes to l.
Touch l to resume playback.
Playing the next or previous track
Touch v to play the next track.
Touch t within the first two seconds
of the track playing to return to the
previous track.
Returning to the beginning of the current track
Touch t after two seconds of the
track playing.
Fast forwarding and rewinding
Touch and hold t or v. Release to
return to normal playback mode.
Alternatively, you can move the slider
showing the current track position to
the left or right.
Playing tracks randomly
Touch n to play the tracks in random
order. The screen button changes to
o.
Touch o again to deactivate the
shuffle function and go back to the
normal playback mode.
Browse Music function
To display the browse screen, touch
the screen. Alternatively, select
Menu in the bottom line of the audio
Page 79

External devices 79
main screen to display the respective
audio menu and then select Browse
Music.
Different categories, in which the
tracks are sorted, are displayed, e.g.
Playlists, Artists, or Albums.
Select the desired category,
subcategory (if available) and then
choose a track.
Select the track to start playback.
Displaying pictures
You can view pictures from a USB
device connected to the USB port.
Notice
For your safety, some features are
disabled while driving.
Activating the picture function
If the device is not yet connected to
the Infotainment system, connect the
device 3 76.
Press ; and then select Gallery to
open the media main menu.
Touch l to open the picture main
menu to display a list of items stored
on the USB device. Select the desired
picture.
Touch the screen to hide the menu
bar. Touch the screen again to
redisplay the menu bar.
Function buttons
Full screen mode
Select x to display the picture in full
screen mode. Touch the screen to
exit full screen mode.
Viewing the next or previous picture
Touch j or swipe to the left to view the
next picture.
Touch i or swipe to the right to view
the previous picture.
Rotating a picture
Select v to rotate the picture.
Zoom in on a picture
Touch w once or several times to
zoom in on a picture or to return to its
original size.
Viewing a slide show
Select t to view the pictures stored
on the USB device in a slide show.
Touch the screen to end the slide
show.
Page 80

80 External devices
Picture menu
Select Menu in the bottom line of the
screen to display the Picture Menu.
Slide show time
Select Slide Show Time to display a
list of possible time sequences.
Activate the desired time sequence in
which one picture is to be displayed in
a slide show.
Clock and temperature display
To display time and temperature in
full screen mode, activate Clock.
Temp. Display.
Display settings
Select Display Settings to open a
submenu for the adjustment of
brightness and contrast.
Touch + or - to adjust the settings.
Playing movies
You can view movies from a USB
device connected to the USB port.
Notice
For your safety, the movie function is
not available while driving.
Activating the movie function
If the device is not yet connected to
the Infotainment system, connect the
device 3 76.
Press ; and then select Gallery to
open the media main menu.
Touch m to open the movie main
menu and then select the desired
folder and/or movie.
The movie is shown.
Function buttons
Full screen
Select x to display the movie in full
screen mode. Touch the screen to
exit full screen mode.
Interrupting and resuming playback
Touch = to interrupt playback. The
screen button changes to l.
Touch l to resume playback.
Playing the next or previous track
Touch c to play the next movie file.
Touch d within the first five seconds
of the movie playing to return to the
previous movie file.
Page 81

External devices 81
Returning to the beginning of the current movie
Touch d after five seconds of the
movie playing.
Fast forwarding and rewinding
Touch and hold d or c. Release to
return to normal playback mode.
Movie menu
Select Menu in the bottom line of the
screen to display the Movie Menu.
Clock and temperature display
To display time and temperature in
full screen mode, activate Clock.
Temp. Display.
Display settings
Select Display Settings to open a
submenu for adjustment of brightness
and contrast.
Touch + and - to adjust the settings.
Using smartphone applications
Phone projection
The phone projection applications
Apple CarPlay and Android Auto
display selected apps from your
smartphone on the Infotainment
screen and allow their operation
directly via the Infotainment controls.
Check with the device's manufacturer
if this function is compatible with your
smartphone and if this application is
available in the country you are in.
Preparing the smartphone
Android phone: Download the
Android Auto app to your smartphone
from the Google Play™ Store.
iPhone: Make sure Siri® is activated
on your smartphone.
Activating phone projection in the settings menu
Press ; to display the home screen
and then select Settings.
Scroll through the list to
Apple CarPlay or Android Auto.
Make sure the respective application
is activated.
Connecting the mobile phone
Connect the smartphone to the USB
port 3 76.
Starting phone projection
To start the phone projection function,
press ; and then select Projection.
Notice
If the application is recognised by
the Infotainment system, the
application icon may change to
Apple CarPlay or Android Auto.
To start the function, you can
alternatively press and hold ; for a
few seconds.
The phone projection screen
displayed depends on your
smartphone and software version.
Page 82

82 External devices
Returning to the Infotainment screen
Press ;.
Page 83

Speech recognition 83
Speech recognition
General information ..................... 83
Usage .......................................... 83
General information
The voice pass-thru application of the
Infotainment system allows access to
the speech recognition commands on
your smartphone. See your
smartphone manufacturer's
operating instructions to find out
whether your smartphone supports
this feature.
In order to use the voice pass-thru
application, the smartphone must be
connected to the Infotainment system
via USB cable 3 76 or via Bluetooth
3 85.
Usage
Activating speech recognition
Press and hold g on the control panel
or w on the steering wheel to start a
speech recognition session. A voice
command message is displayed on
the screen.
As soon as a beep is heard, you can
say a command. For information on
the commands supported, see the
operating instructions for your
smartphone.
Adjusting the volume of voice prompts
Turn m on the control panel or press
+ / - on the right side of the steering
wheel to increase or decrease the
volume of voice prompts.
Deactivating speech recognition
Press g on the steering wheel. The
voice command message disappears
and the speech recognition session is
ended.
Page 84

84 Phone
Phone
General information ..................... 84
Bluetooth connection ................... 85
Emergency call ............................ 87
Operation ..................................... 88
Mobile phones and CB radio
equipment .................................... 91
General information
The phone function provides you with
the possibility of having mobile phone
conversations via a vehicle
microphone and the vehicle
loudspeakers as well as operating the
most important mobile phone
functions via the Infotainment system
in the vehicle. To be able to use the
phone function, the mobile phone
must be connected to the
Infotainment system via Bluetooth.
Not all phone functions are supported
by every mobile phone. The usable
phone functions depend on the
relevant mobile phone and network
provider. You can find further
information on this in the operating
instructions for your mobile phone, or
you can enquire about them with your
network provider.
Important information for operation and traffic safety
9 Warning
Mobile phones have effects on
your environment. For this reason
safety regulations and directions
have been prepared. You should
be familiar with the related
directions before you use the
telephone function.
9 Warning
Use of the hands-free facility while
driving can be dangerous because
your concentration is reduced
when telephoning. Park your
vehicle before you use the handsfree facility. Follow the stipulations
of the country in which you find
yourself at present.
Do not forget to follow the special
regulations that apply in specific
areas and always switch off the
mobile phone if the use of mobile
phones is prohibited, if
Page 85

Phone 85
interference is caused by the
mobile phone or if dangerous
situations can occur.
Bluetooth
The phone function is certified by the
Bluetooth Special Interest Group
(SIG).
You can find further information about
the specification on the internet at
http://www.bluetooth.com
Bluetooth connection
Bluetooth is a radio standard for the
wireless connection of e.g. mobile
phones, smartphones or other
devices.
The pairing (PIN code exchange
between Bluetooth device and
Infotainment system) and connecting
of the Bluetooth devices to the
Infotainment system are carried out
via the Bluetooth menu.
Bluetooth menu
Press ; and then select Settings.
Select Bluetooth to display the
Bluetooth menu.
Pairing a device
Important information
● Up to ten devices can be paired
to the system.
● Only one paired device can be
connected to the Infotainment
system at a time.
● Pairing only needs to be carried
out once, unless the device is
deleted from the list of paired
devices. If the device has been
connected previously, the
Infotainment system establishes
the connection automatically.
● Bluetooth operation considerably
drains the device's battery.
Therefore, connect the device to
the USB port for charging.
Pairing a new device
1. Activate the Bluetooth function of
the Bluetooth device. For further
information, see the operating
instructions for the Bluetooth
device.
2. Press ; and then select
Settings on the Info-Display.
Select Bluetooth and then Device
Management to display the
respective menu.
Page 86

86 Phone
Notice
If no phone is connected, the Device
Management menu can also be
accessed via the phone menu:
Press ; and then select Phone.
3. Touch Search Device. All
discoverable Bluetooth devices in
the environment are displayed in
a new search list.
4. Touch the Bluetooth device you
wish to pair.
5. Confirm the pairing procedure:
● If SSP (secure simple
pairing) is supported:
Confirm the messages on the
Infotainment system and the
Bluetooth device.
● If SSP (secure simple
pairing) is not supported:
On the Infotainment system:
an Info message is displayed
asking you to enter a PIN
code on your Bluetooth
device.
On the Bluetooth device:
enter the PIN code and
confirm your input.
6. The Infotainment system and the
device are paired.
Notice
If the Bluetooth device is
successfully paired, h next to the
Bluetooth device indicates that the
phone function is enabled and y
indicates that the Bluetooth music
function is enabled.
7. The phone book is downloaded
automatically to the Infotainment
system. Depending on the phone,
the Infotainment system must be
allowed access to the phone
book. If required, confirm the
messages displayed on the
Bluetooth device.
If this function is not supported by
the Bluetooth device, a
corresponding message is
displayed.
Changing the Bluetooth PIN code
Press ; and then select Settings.
Select Bluetooth and then Change
Pairing PIN to display the respective
submenu. A keypad is displayed.
Enter the desired four-digit PIN code.
To delete an entered number, select
⇦.
Confirm your input by selecting Enter.
Connecting a paired device
Press ; and then select Settings.
Select Bluetooth and then Device
Management to display the
respective menu.
Select the Bluetooth device you wish
to connect. The device is connected.
Notice
The connected device and the
available options are highlighted.
Page 87

Phone 87
Disconnecting a device
Press ; and then select Settings.
Select Bluetooth and then Device
Management to display the
respective menu.
Select the Bluetooth device currently
connected. You are prompted with a
message.
Select Yes to disconnect the device.
Deleting a device
Press ; and then select Settings.
Select Bluetooth and then Device
Management to display the
respective menu.
Select DEL next to the Bluetooth
device. You are prompted with a
message.
Select Yes to delete the device.
Device info
Press ; and then select Settings.
Select Bluetooth and then Device
Information to display the respective
menu.
The information displayed includes
Device Name, Address, and PIN
Code.
Emergency call
9 Warning
Connection setup cannot be
guaranteed in all situations.For
this reason you should not rely
exclusively on a mobile phone
when a vitally important
communication (e.g. a medical
emergency) is concerned.
In some networks it may be
necessary for a valid SIM card to
be properly inserted in the mobile
phone.
9 Warning
Bear in mind that you can make
and receive calls with the mobile
phone if it is in a service area with
a sufficiently strong signal. Under
certain circumstances,
emergency calls cannot be made
on all mobile phone networks; it is
possible that they cannot be made
when certain network services
and/or telephone functions are
active. You can enquire about this
with the local network operators.
The emergency call number can
differ depending on the region and
country. Please enquire
beforehand about the correct
emergency call number for the
relevant region.
Making an emergency call
Dial the emergency call number (e.g.
112).
The telephone connection to the
emergency call centre is set up.
Answer when the service personnel
questions you about the emergency.
9 Warning
Do not end the call until you are
requested to do so by the
emergency call centre.
Page 88

88 Phone
Operation
As soon as a connection via
Bluetooth has been set up between
your mobile phone and the
Infotainment system, you can operate
many functions of your mobile phone
via the Infotainment system.
Notice
In the hands-free mode, mobile
phone operation continues to be
possible, e.g. taking a call or
adjusting the volume.
After setup of a connection between
the mobile phone and the
Infotainment system, mobile phone
data is transmitted to the Infotainment
system. This can take some time
depending on the mobile phone and
the amount of data to be transferred.
During this period, operation of the
mobile phone via the Infotainment
system is possible only to a limited
extent.
Notice
Not every mobile phone fully
supports the phone function.
Therefore, deviations from the range
of functions described below are
possible.
Phone main menu
Press ; and then select Phone to
display the respective menu.
Notice
The Phone main menu is only
available if a mobile phone is
connected to the Infotainment
system via Bluetooth. For a detailed
description 3 85.
Many functions of the mobile phone
can now be controlled via the phone
main menu (and associated
submenus), and via the phonespecific controls on the steering
wheel.
Initiating a phone call
Entering a phone number
Press ; and then select Phone.
Enter a telephone number using the
keypad in the phone main menu.
To delete one or more entered
characters, touch or touch and hold
⇦.
Touch v to start dialling.
Using the phone book
Notice
When pairing a mobile phone with
the Infotainment system via
Bluetooth, the phone book of the
mobile phone is downloaded
automatically 3 85.
Press ; and then select Phone.
Select Contacts in the phone main
menu.
Page 89

Phone 89
Quick search
1. Select u to display a list of all
contacts.
2. Scroll through the list of contacts
entries.
3. Touch the contact you wish to call.
A menu with all phone numbers
stored for the selected contact is
displayed.
4. Select the desired phone number
to initiate the call.
Search menu
If the phone book contains a large
number of entries, you can search for
the desired contact via the search
menu.
Select o in the Contacts menu to
display the search tab.
The letters are organised in
alphabetical groups on the screen
buttons: abc, def, ghi, jkl, mno, pqrs,
tuv, and wxyz.
Use ⇦ to delete an entered group of
letters.
1. Select the button containing the
first letter of the contact you wish
to search for.
For example: If the contact you
wish to search for starts with 'g'
select the ghi screen button.
All contacts containing one of the
letters on this button, in the
example 'g', 'h', and 'i', are
displayed.
2. Select the button containing the
second letter of the contact you
wish to search for.
3. Continue to enter more letters of
the contact you wish to search for
until the desired contact is
displayed.
4. Touch the contact you wish to call.
A menu with all phone numbers
stored for the selected contact is
displayed.
5. Select the desired phone number
to initiate the call. The following
display is shown.
Page 90

90 Phone
Contacts settings
The contacts list can be sorted by last
name or first name.
Press ; and then select Settings to
display the respective menu.
Select Bluetooth and then Sort
Order. Activate the desired option.
Using the call history
All incoming, outgoing, or missed
calls are registered.
Press ; and then select Phone.
Select Call History in the phone main
menu.
Select q for outgoing calls, r for
missed calls, s for incoming calls
and p for all calls. The respective call
list is displayed.
Select the desired entry to initiate a
call.
Redialling a number
The last dialled phone number can be
redialled.
Press ;, select Phone and then
select v.
Using speed dial numbers
Speed dial numbers that are stored
on the mobile phone can also be
dialled using the keypad of the phone
main menu.
Press ; and then select Phone.
Touch and hold the respective digit on
the keypad to initiate the call.
Incoming phone call
Taking a call
If an audio mode, e.g. the radio or
USB mode, is active at the moment a
call comes in, the audio source is
muted and stays muted until the call
ends.
A message with the caller's phone
number or name (if available) is
displayed.
To answer the call, select
Rejecting a call
To reject the call, select J.
v.
Page 91

Phone 91
Changing the ring tone
Press ; and then select Settings.
Select Bluetooth and then select
Ringtones to display the respective
menu. A list of all devices paired is
displayed.
Select the desired device. A list of all
ringtones available for this device is
displayed.
Select one of the ringtones.
Functions during a call
During an ongoing phone call the
phone main menu is displayed.
Deactivating the hands-free mode temporarily
To continue the conversation via the
mobile phone, activate m.
To return to the hands-free mode,
deactivate m.
Deactivating the microphone temporarily
To mute the microphone, activate n.
To reactivate the microphone,
deactivate n.
Ending a phone call
To end the call, select J.
Voice mail box
You may operate your voice mail box
via the Infotainment system.
Voice mail number
Press ; and then select Settings.
Select Bluetooth. Scroll through the
list and select Voice Mail Numbers.
A list of all paired devices is
displayed.
Select the respective phone. A
keypad is displayed.
Enter the voice mail number for the
respective phone.
Calling the voice mail box
Press ; and then select Phone.
Select t on the screen. The mail
box is called.
Alternatively, enter the voice mail
number via the phone keypad.
Mobile phones and CB radio equipment
Installation instructions and operating guidelines
The vehicle specific installation
instructions and the operating
guidelines of the mobile phone and
hands-free manufacturer must be
observed when installing and
operating a mobile telephone. Failure
to do so could invalidate the vehicle
type approval (EU directive 95/54/
EC).
Page 92

92 Phone
Recommendations for fault-free
operation:
● Professionally installed exterior
antenna to obtain the maximum
range possible
● Maximum transmission power
10 watts
● Installation of the phone in a
suitable spot, consider relevant
Note in the Owner's Manual,
section Airbag system.
Seek advice on predetermined
installation points for the external
antenna or equipment holder and
ways of using devices with a
transmission power exceeding
10 watts.
Use of a hands-free attachment
without external antenna with mobile
telephone standards GSM
900/1800/1900 and UMTS is only
permitted if the maximum
transmission power of the mobile
telephone is 2 watts for GSM 900 or
1 watt for the other types.
For reasons of safety, do not use the
phone while driving. Even use of a
hands-free set can be a distraction
while driving.
9 Warning
Operation of radio equipment and
mobile telephones which fail to
meet above mentioned mobile
telephone standards is only
permitted using an antenna
located outside of the vehicle.
Caution
Mobile telephones and radio
equipment may lead to
malfunctions in the vehicle
electronics when operated inside
the vehicle with no exterior
antenna, unless the above
mentioned regulations are
observed.
Page 93

Phone 93
Page 94

94
Index
A
Activating Bluetooth music........... 78
Activating phone........................... 88
Activating radio............................. 70
Activating USB audio.................... 78
Activating USB movie................... 80
Activating USB picture.................. 79
Audio files..................................... 76
Auto volume.................................. 67
B
Basic operation............................. 64
Bluetooth
Bluetooth connection................ 85
Bluetooth music menu.............. 78
Connecting device.................... 76
General information................... 76
Pairing....................................... 85
Phone........................................ 88
Bluetooth connection.................... 85
C
Call
Functions during a call.............. 88
Incoming call............................. 88
Initiating a phone call................ 88
Ring tone................................... 88
Call history.................................... 88
Control elements
Infotainment system.................. 58
Steering wheel.......................... 58
Control elements overview........... 58
D
DAB.............................................. 74
Digital audio broadcasting............ 74
Displaying pictures....................... 79
Display settings...................... 79, 80
E
Emergency call............................. 87
F
Favourite lists............................... 72
Retrieving stations..................... 72
Storing stations......................... 72
File formats
Audio files.................................. 76
Movie files................................. 76
Picture files................................ 76
G
General information.......... 76, 83, 84
Bluetooth................................... 76
DAB........................................... 74
Infotainment system.................. 56
Phone........................................ 84
Smartphone applications.......... 76
USB........................................... 76
Page 95

95
H
Home menu.................................. 64
I
Infotainment control panel............ 58
Intellitext....................................... 74
M
Maximum startup volume............. 67
Menu operation............................. 64
Mobile phones and CB radio
equipment ................................ 91
Movie files..................................... 76
Mute.............................................. 61
O
Operation...................................... 88
External devices........................ 76
Menu......................................... 64
Phone........................................ 88
Radio......................................... 70
P
Pairing.......................................... 85
Phone
Bluetooth................................... 84
Bluetooth connection................ 85
Call history................................ 88
Emergency calls........................ 87
Entering a number.................... 88
Functions during a call.............. 88
General information................... 84
Incoming call............................. 88
Phone book............................... 88
Phone main menu..................... 88
Selecting the ring tone.............. 88
Speed dial number.................... 88
Phone book.................................. 88
Phone projection.......................... 81
Picture files................................... 76
Playing audio................................ 78
Playing movies............................. 80
R
Radio
Activating................................... 70
Configuring DAB....................... 74
Configuring RDS....................... 72
DAB announcements................ 74
Digital audio broadcasting
(DAB)........................................ 74
Favourite lists............................ 72
Intellitext.................................... 74
Radio data system (RDS)......... 72
Regional.................................... 72
Regionalisation......................... 72
Retrieving stations..................... 72
Selecting the waveband............ 70
Station search........................... 70
Station tuning............................ 70
Storing stations......................... 72
Usage........................................ 70
Radio data system (RDS) ............ 72
RDS.............................................. 72
Regional....................................... 72
Regionalisation............................. 72
Retrieving stations........................ 72
Ring tone
Changing the ring tone.............. 88
Ring tone volume...................... 67
S
Smartphone.................................. 76
Phone projection....................... 81
Speech recognition....................... 83
Speed dial numbers..................... 88
Station search............................... 70
Steering wheel audio controls...... 58
Storing stations............................. 72
Switching the Infotainment
system on.................................. 61
System settings............................ 68
T
Theft-deterrent feature ................. 57
Tone settings................................ 66
Touch beep volume...................... 67
TP volume.................................... 67
Page 96

96
U
Usage............................... 61, 70, 83
Bluetooth................................... 76
Menu......................................... 64
Phone........................................ 88
Radio......................................... 70
USB........................................... 76
USB
Connecting device.................... 76
General information................... 76
USB audio menu....................... 78
USB movie menu...................... 80
USB picture menu..................... 79
Using smartphone applications.... 81
V
Voice recognition.......................... 83
Volume
Auto volume.............................. 67
Maximum startup volume.......... 67
Mute function............................. 61
Ring tone volume...................... 67
Setting the volume.................... 61
Speed compensated volume.... 67
Touch beep volume.................. 67
TP volume................................. 67
Volume limitation at high
temperatures............................. 61
Volume settings............................ 67
W
Waveband selection..................... 70
Page 97

R 4.0
Introduction .................................. 98
Basic operation .......................... 104
Radio ......................................... 108
USB port .................................... 112
Bluetooth music ......................... 114
Speech recognition .................... 116
Phone ........................................ 117
Index .......................................... 124
Page 98

98 Introduction
Introduction
General information ..................... 98
Control elements overview .......... 99
Usage ........................................ 102
General information
The Infotainment system provides
you with state-of-the-art in-car
infotainment.
Using the FM, AM or DAB radio
functions, you can play a great
number of different radio stations. If
desired, you can register stations on
radio preset buttons.
You can connect external data
storage devices to the Infotainment
system as further audio sources,
either via a cable or via Bluetooth®.
In addition, the Infotainment system is
equipped with a Phone function that
allows comfortable and safe use of
your mobile phone in the vehicle.
The Infotainment system can be
operated using the control panel or
the controls on the steering wheel.
Notice
This manual describes all options
and features available for the
various Infotainment systems.
Certain descriptions, including those
for display and menu functions, may
not apply to your vehicle due to
model variant, country
specifications, special equipment or
accessories.
Important information on operation and traffic safety
9 Warning
Drive safely at all times when
using the Infotainment system.
If in doubt, stop the vehicle before
operating the Infotainment
system.
Radio reception
Radio reception may be disrupted by
static, noise, distortion or loss of
reception due to:
● changes in distance from the
transmitter
● multi-path reception due to
reflection
● shadowing
Page 99

Control elements overview
Control panel
Introduction 99
Page 100

100 Introduction
1 X
If switched off: short press:
switch power on .................. 102
If switched on: short press:
mute system; long press:
switch power off .................. 102
Turn: adjust volume ............ 102
2 Preset buttons
Short press: select
favourites ............................ 108
Long press: save radio
stations as favourites .......... 108
3 AUDIO
Short press: open menu
for tone and volume
settings ................................ 105
4 Î
Short press: toggle
through the different
display modes ..................... 102
Long press: turn display off
(while the sound remains
active) ................................. 102
5 Q / P
Radio: short press:
manual station search ......... 108
Media: short press: select
next or previous folder,
genre, artist or playlist;
long press: scroll in a list ..... 112
N / O
Radio: short press:
automatic station search
for the previous or next
station; long press: seek
up or down .......................... 108
Media: short press: select
previous or next track; long
press: fast forward or
rewind ................................. 112
6 OK
Short press: confirm a
setting or open a submenu . 104
7 MENU
Short press: display home
page .................................... 104
8 BAND
Short press: toggle
between the wavebands ..... 108
9 Display
10 TA
Short press: activate or
deactivate traffic
announcements .................. 109
Long press: open the TA
settings ................................ 110
11 LIST
Radio: short press: display
stations list; long press:
update stations list .............. 108
Media: short press: display
folders list; long press:
display the track listing
options ................................ 112
12 BACK
Menu: one level back .......... 104
Input: delete last character
or entire entry ...................... 120
 Loading...