

Vauxhall KTA-2677/11-VX-en, Touch R700, Navi 900, R300 Color, R400 Color Infotainment Manual

0 - 1Infotainment Manual Model Year 2014.5 Edition: January 2014 KTA-2677/11-VX-en
VAUXHALL Insignia
Infotainment Manual
Model Year 2014.5
Edition: January 2014
KTA-2677/11-VX-en

Touch R700 / Navi 900 .................. 3
R300 Color / R400 Color ........... 101
Contents


Introduction .................................... 4
Basic operation ............................ 12
Radio ........................................... 45
CD Player .................................... 50
External devices .......................... 53
Navigation .................................... 60
Speech recognition ...................... 78
Phone .......................................... 84
Frequently asked questions ......... 93
Index ............................................ 96
Touch R700 / Navi 900

4 Introduction
Introduction
General information ....................... 4
Theft-deterrent feature ................... 5
Control elements overview ............ 6
Usage .......................................... 10
General information
The Infotainment system provides
you with state-of-the-art in-car
infotainment.
Using the FM, AM or DAB radio
functions, you can register a great
number of stations on various
favourites pages.
You can even register music tracks,
telephone numbers, destination
addresses or tone settings on the
favourites pages.
You can connect external data
storage devices, e.g. iPod, USB
devices, or other auxiliary devices to
the Infotainment system as further
audio sources; either via a cable or
via Bluetooth.
The navigation system with dynamic
route planning will reliably guide you
to your destination, and, if desired,
automatically avoid traffic jams or
other traffic problems.
In addition, the Infotainment system is
equipped with a Phone portal that
allows comfortable and safe use of
your mobile phone in the vehicle.
Optionally, the Infotainment system
can be operated using controls on the
steering wheel, a touch pad between
the front seats, or via the speech
recognition system.
The well-thought-out design of the
control elements, the touch screen
and the clear displays enable you to
control the system easily and
intuitively.
Note
This manual describes all options
and features available for the
various Infotainment systems.
Certain descriptions, including those
for display and menu functions, may
not apply to your vehicle due to
model variant, country
specifications, special equipment or
accessories.
Introduction 5
Important information on
operation and traffic safety
9 Warning
Drive safely at all times when
using the Infotainment system.
If in doubt, stop the vehicle before
operating the Infotainment
system.
9 Warning
The usage of the navigation
system does not release the driver
from the responsibility for a
correct, vigilant attitude in road
traffic. The related traffic
regulations must always be
followed.
Only make entries (e.g.
addresses) with the vehicle
stationary.
If a navigation instruction
contradicts traffic regulations, the
traffic regulations always apply.
9
Warning
In some areas one-way streets
and other roads and entrances
(e.g. pedestrian zones) that you
are not allowed to turn into are not
marked on the map. In such areas
the Infotainment system may
issue a warning that must be
accepted. Here you must pay
particular attention to one-way
streets, roads and entrances that
you are not allowed to drive into.
Radio reception
Radio reception may be disrupted by
static, noise, distortion or loss of
reception due to:
■ changes in distance from the
transmitter,
■ multi-path reception due to
reflection,
■ shadowing.
Theft-deterrent feature
The Infotainment system is equipped
with an electronic security system for
the purpose of theft deterrence.
The Infotainment system therefore
functions only in your vehicle and is
worthless to a thief.
6 Introduction
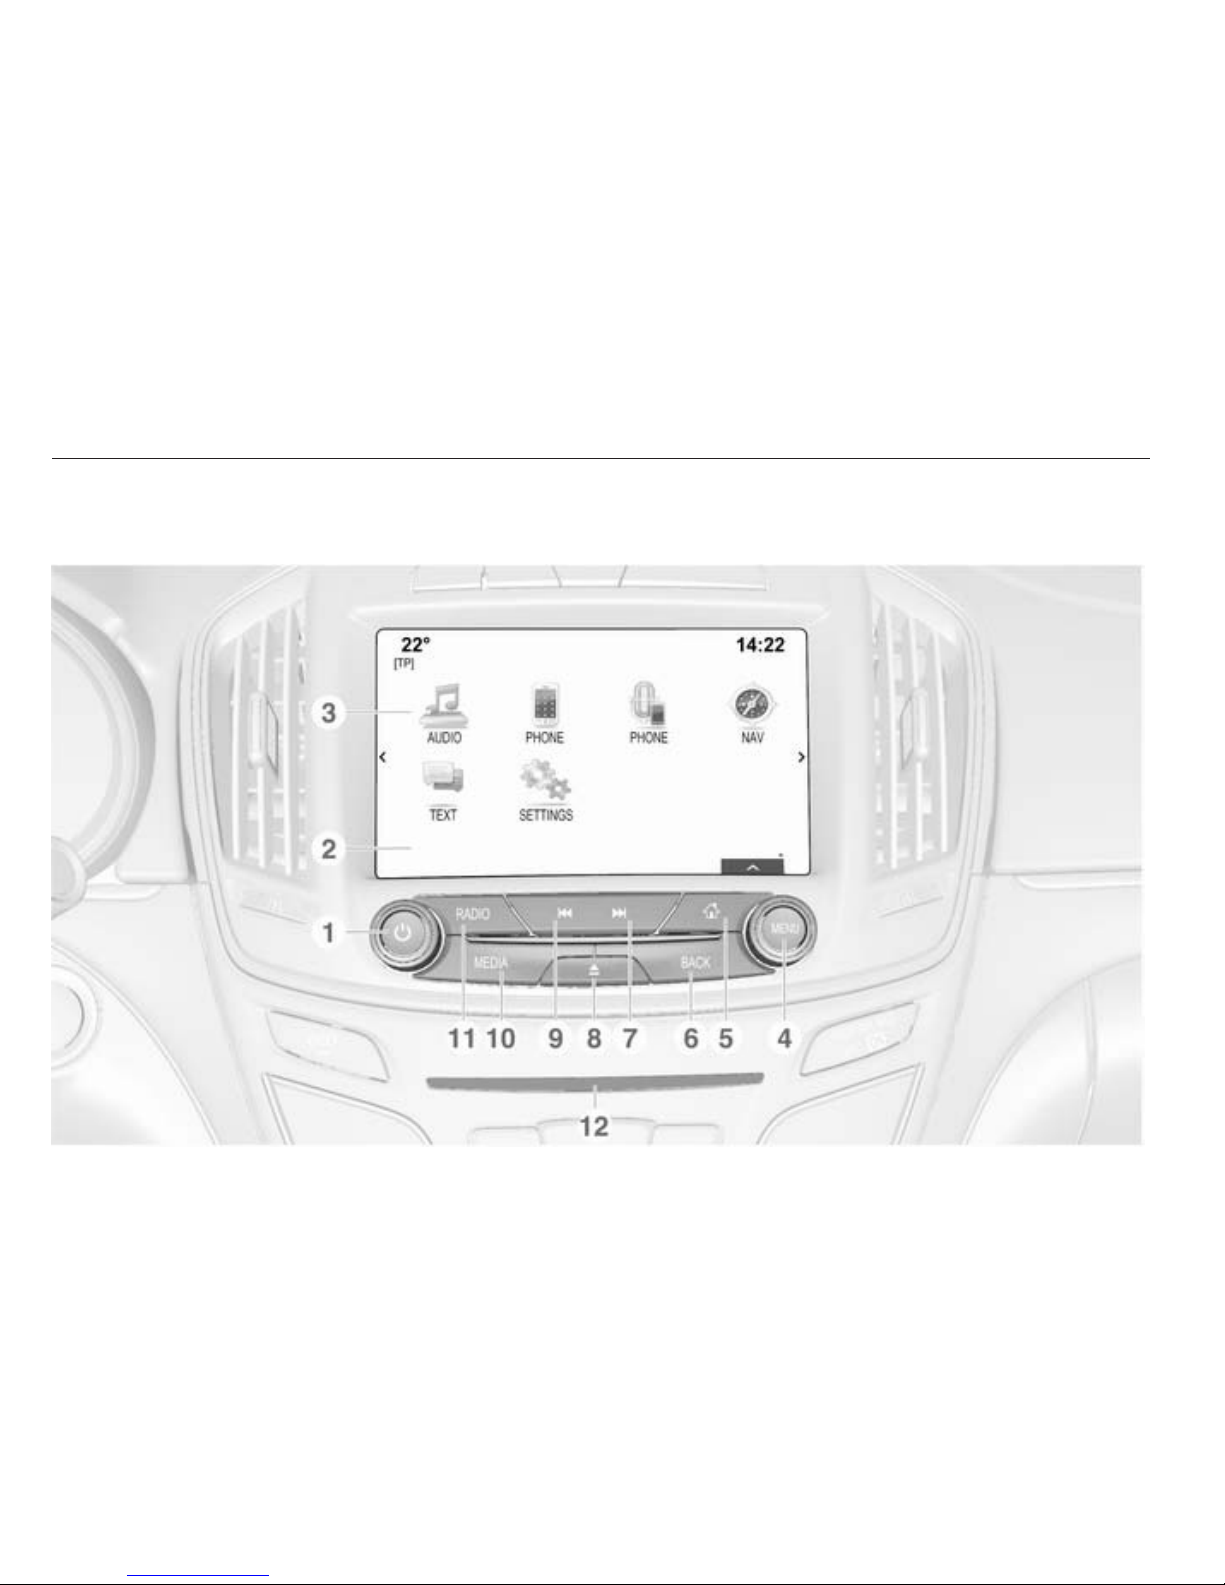
Control elements overview
Centre display with controls

Introduction 7
1 X knob .................................. 10
If switched off: short press:
switch power on
If switched on: short press:
mute system; long press:
switch power off
Turn: adjust volume
2 Display/touch screen ............. 12
3 Home screen
(configurable) ........................ 19
4 MENU knob ........................... 13
Turn: mark screen buttons
or menu items; set
numeric values
Press: select/activate a
marked screen button or
menu item; confirm set
value; switch to different
setting option; open
application-specific menu
(if available)
5 ; button ............................... 13
Press: display Home screen
6 BACK button ......................... 13
Press: return to previous
screen/menu
7 v button
Radio: short press: skip to
next station; long press:
seek up ................................. 45
CD player / External
devices: short press: skip
to next track; long press:
fast forward ........................... 51
8 d button (if CD player equipped)
Press: eject disc .................... 51
TONE button (if no CD
player equipped)
Press: display tone
settings menu ........................ 39
9 t button
Radio: short press: skip to
previous station; long
press: seek down .................. 45
CD player / External
devices: short press: skip
to previous track; long
press: fast rewind .................. 51
10 MEDIA button ........................ 10
Press: activate CD player
or external device
11 RADIO button ........................ 45
Press: activate radio or
change waveband
12 CD slot .................................. 51
8 Introduction
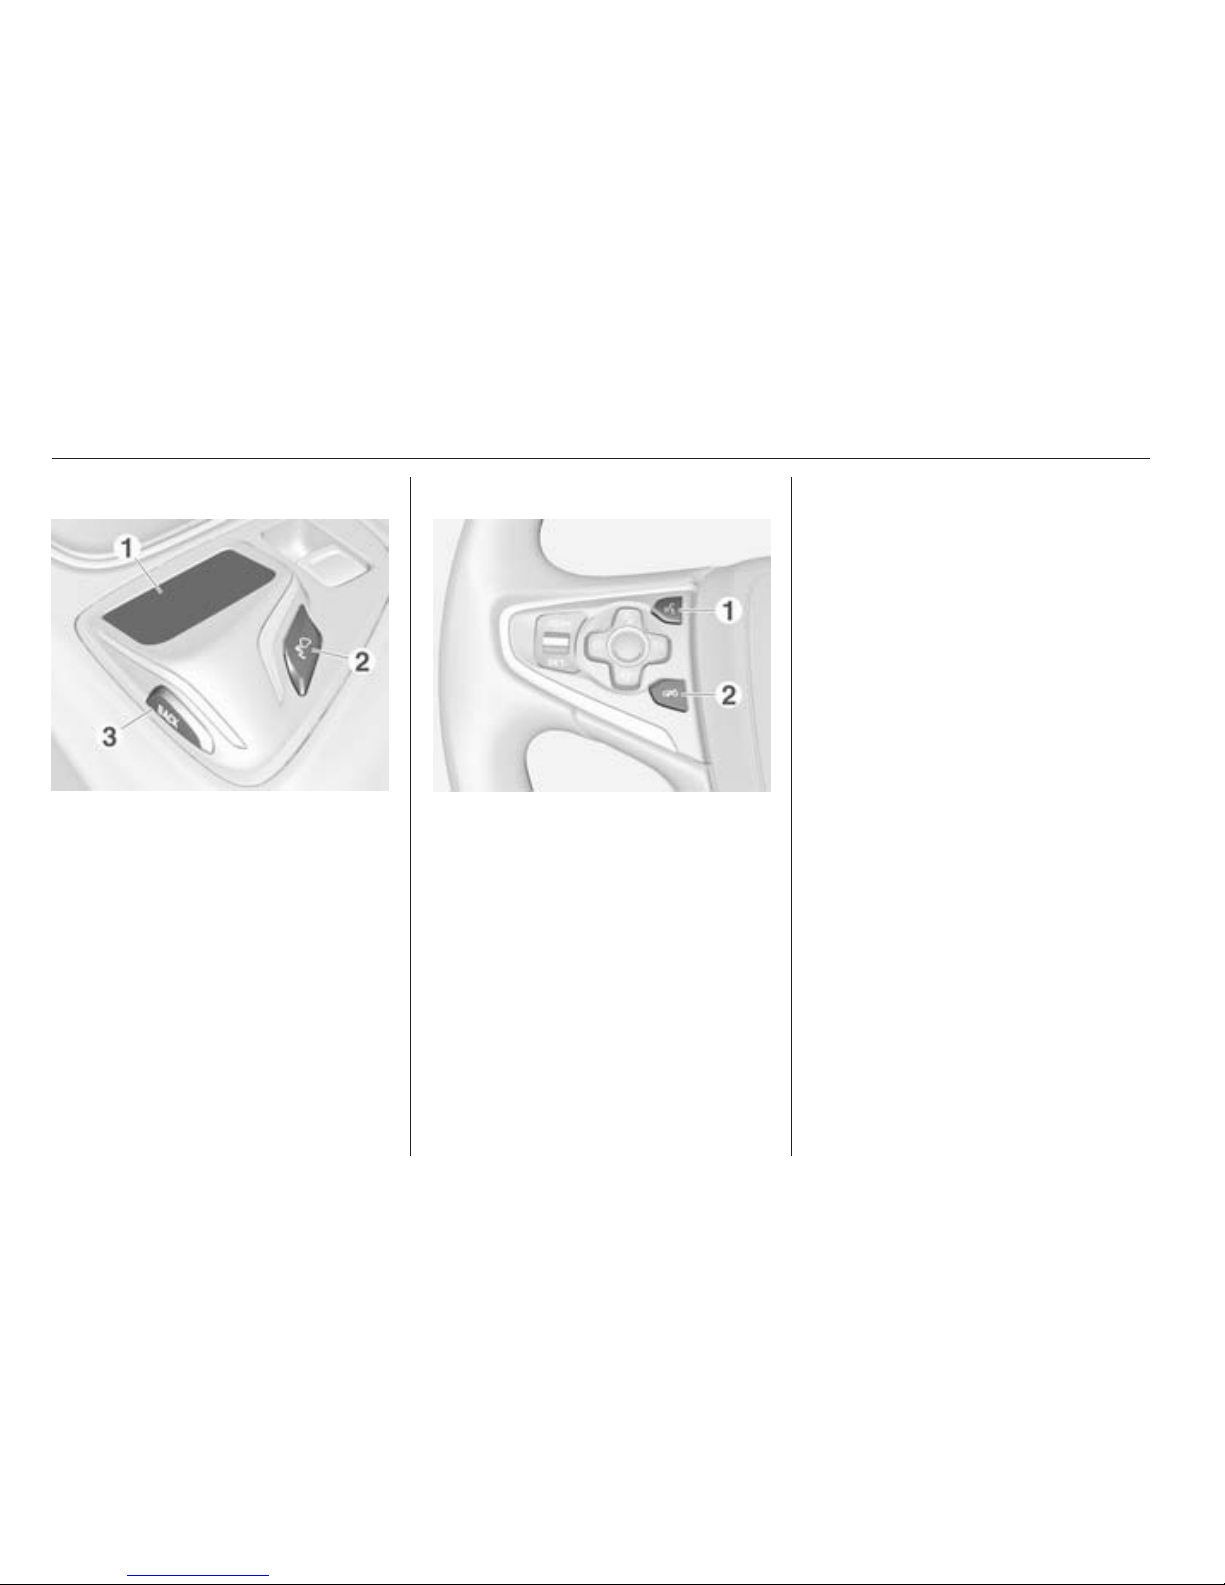
Touch pad
1 Touch sensitive area
Operate the menus on the
centre display using multi-
touch gestures ...................... 13
2 h button
Press: activate/deactivate
character recognition ............ 22
3 BACK button ......................... 19
Press: return to previous
screen/menu
Long press: return to
Home screen
Left-hand steering wheel control
1 s button
Press: take phone call .......... 88
or activate speech
recognition ............................ 78
or interrupt a prompt and
speak directly ........................ 78
2 n button
Press: end/decline call .......... 88
or deactivate speech
recognition ............................ 78
or activate/deactivate
mute function ........................ 10

Introduction 9
For a description of all other controls,
see Owner's manual.
Right-hand steering wheel
control
1 Five-way controller ................ 13
Press buttons: operate
menus in the Driver
Information Centre (see
images below)
N button - display menu for
application selection;
return to next higher menu level
j button - display
application-specific main menu
P / Q buttons - select
menu item
9 button - confirm selection
2 ! / # button .......................... 10
Press upwards: increase volume
Press downwards:
decrease volume
3 k / l buttons
Radio: press to select
next / previous favourite ........ 26
Media: press to select
next / previous track .............. 55
Driver Information Centre
(uplevel)
The uplevel Driver Information Centre
enables switching between two
different display modes (themes),
Touring and Sport.
The image above shows the Touring
theme (for changing the display
theme, see Owner's manual).
The menus in the Driver Information
Centre are operated via the five-way
controller on the right-hand side of the
steering wheel.
10 Introduction
The Driver Information Centre has
three separate zones:
■ Left zone - displays menu for
application selection
■ Centre zone - displays Infotainment
information and vehicle-specific
information (see Owner's manual)
■ Right zone - displays applicationspecific menus.
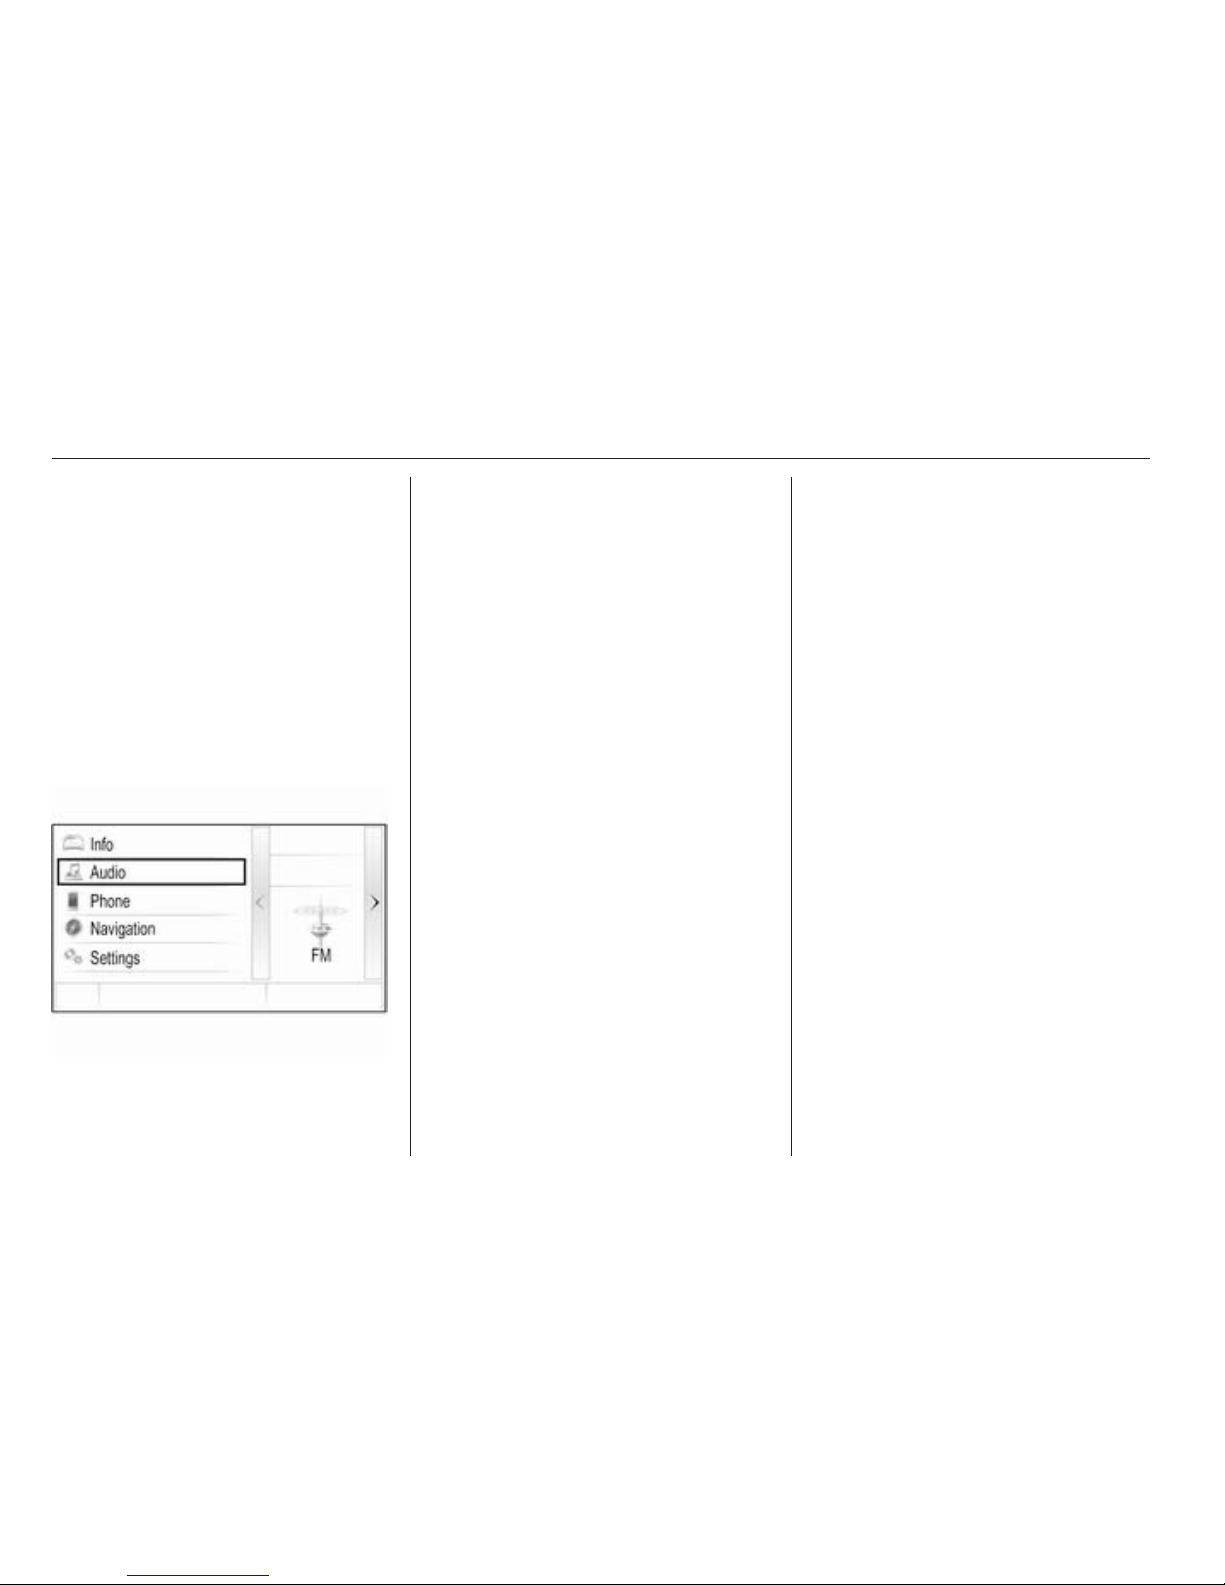
Driver Information Centre
(midlevel)
In the Driver Information Centre,
Infotainment related information and
menus are shown.
The menus on the Driver Information
Centre are operated via the five-way
controller on the right-hand side of the
steering wheel.
Usage
Switching Infotainment system
on/off
Press the X button briefly. After
switching on, the last selected
Infotainment source becomes active.
Automatic switch-off
If the Infotainment system is switched
on using the X button while the
ignition is switched off, it switches off
again automatically after 1 hour.
Setting the volume
Turn the X knob.
The current setting is shown on the
display.
When the Infotainment system is
switched on, the last selected volume
is set, provided that the volume is
lower than the maximum start-up
volume 3 40.
Auto volume
When Auto volume is activated
3 40, the volume is adapted
automatically to compensate for the
road and wind noise while driving.
Mute
Briefly press the X knob to mute the
audio sources.
To cancel mute again: turn the X
knob.
Modes of operation
Radio
Repeatedly press the RADIO button
to activate the radio mode or to
change between the different
wavebands.
Find a detailed description of the
radio functions 3 45.
CD player
Repeatedly press the MEDIA button
to activate the CD player.
Find a detailed description of the CD
player functions 3 50.

Introduction 11
External devices
Repeatedly press the MEDIA button
to activate the playback mode for a
connected external device (e.g. USB
device, iPod or smartphone).
Find a detailed description on
connecting and operating external
devices 3 53.
Navigation
Press the ; button to display the
Home screen.
Tap on the NAV icon to display the
navigation map showing the area
around the current location.
Find a detailed description of the
navigation functions 3 60.
Phone
Press the ; button to display the
Home screen.
Select the PHONE icon.
If a connection to a paired mobile
phone can be established, the main
menu of the phone mode is displayed.
Find a detailed description of mobile
phone operation via the Infotainment
system 3 88.
If no connection can be established,
a corresponding message is
displayed. For a detailed description
of preparing and establishing a
Bluetooth connection between the
Infotainment system and a mobile
phone 3 85.
12 Basic operation
Basic operation
Displays ....................................... 12
Controls ....................................... 13
Menu operation ............................ 19
Keyboards .................................... 22
Favourites .................................... 26
Contacts ....................................... 30
Touch operation overview ........... 35
Tone settings ............................... 39
Volume settings ........................... 40
System settings ........................... 41
Displays
Infotainment and vehicle information
are shown on two separate displays.
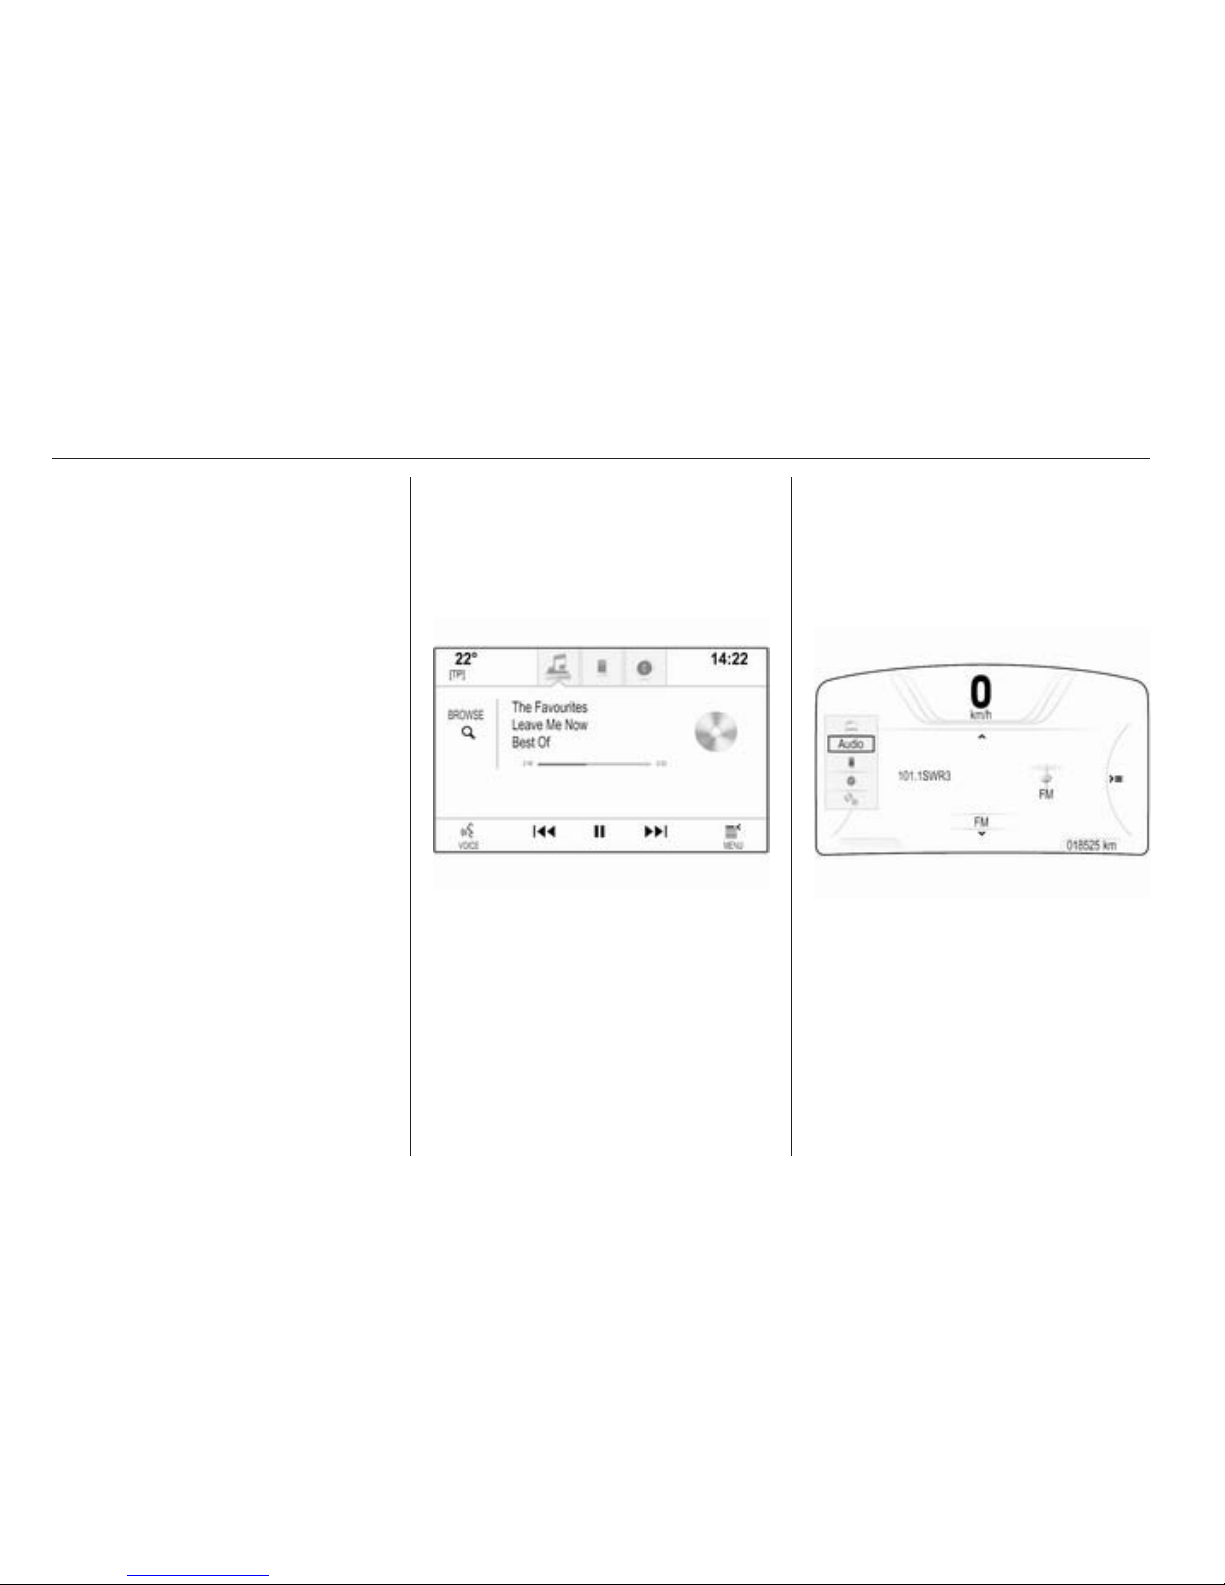
Centre display
The centre display is located in the
middle of the instrument panel. It
serves as the main information and
control centre of the Infotainment
system.
Inputs can be optionally made via
buttons on the instrument panel, the
touch screen or the touch pad.
For detailed descriptions, see
chapters "Control elements overview"
3 6 and "Controls" 3 13.
Driver Information Centre
Uplevel, Touring theme:
Uplevel, Sport theme:
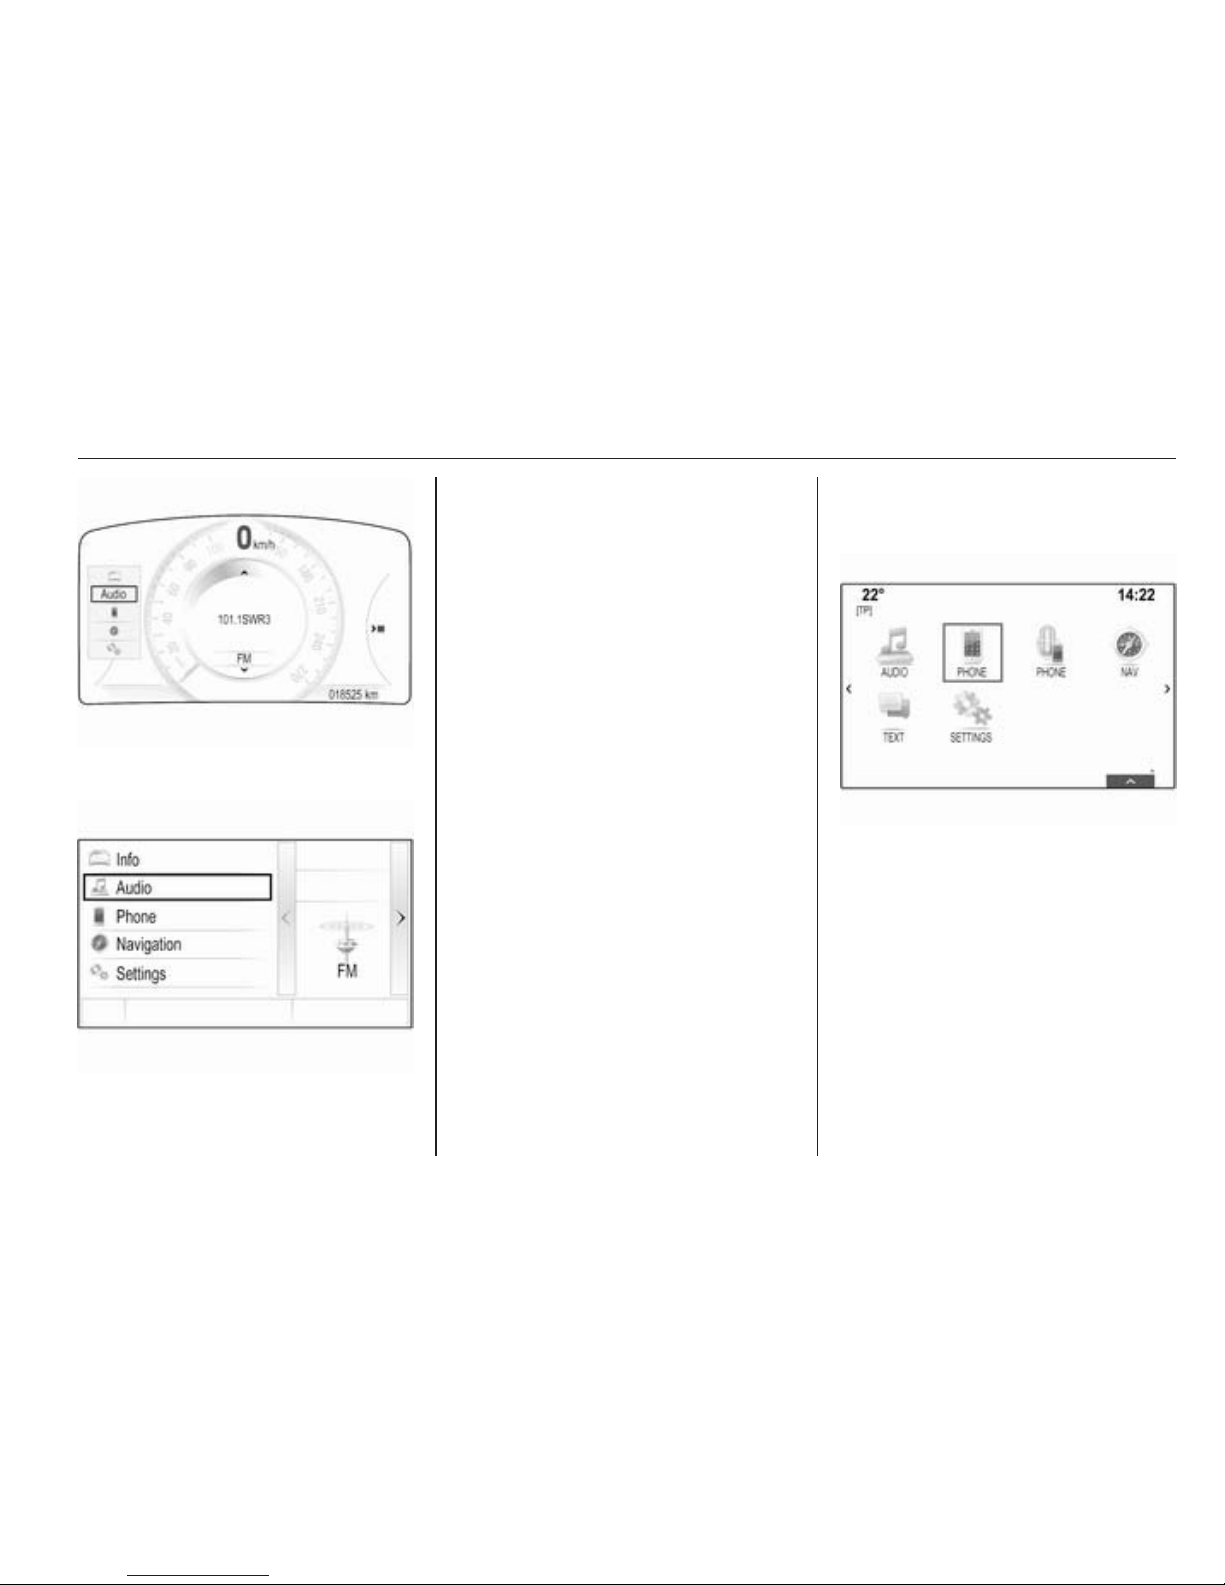
Basic operation 13
Midlevel:
The Driver Information Centre is part
of the instrument cluster and shows
Infotainment information as well as
vehicle-specific information (see
Owner's manual).
The Driver Information Centre serves
as an additional information and
control centre for a selection of
important Infotainment functions.
Inputs are made via the five-way
controller on the right-hand side of the
steering wheel.
Find detailed descriptions in "Control
elements overview" 3 6 and
"Controls" 3 13.
Controls
Instrument panel
Find an overview of all instrument
panel controls in "Control elements
overview" 3 6.
MENU knob
The MENU knob is one of the central
control elements for the menus.
Turn:
■ To select a screen button or menu
item.
■ To scroll through a list of menu
items.

14 Basic operation
■ To change a setting value.
Note
The selected item is highlighted by a
red box.
Press:
■ To activate a selected screen
button or menu item.
■ To confirm a changed settings
value.
■ To switch to a different settings
option.
■ To display the application-specific
submenu.
Note
In any but the AUDIO application,
when being on a screen, where
turning the MENU knob does not
execute an application-related
function, the MENU knob may be
used to adjust the frequency (AM or
FM waveband) or skip to the
previous or next station (DAB
waveband).
Home button
Press the ; button on the instrument
panel to access the Home screen.
BACK button
When operating the menus, press the
BACK button to return to the next
higher menu level.
Touch screen
The centre display has a touchsensitive surface that allows direct
interaction with the screen.
m screen button
To return to the next higher menu
level, select the m screen button.
Exit screen button
To leave the menu currently active,
select the Exit screen button.
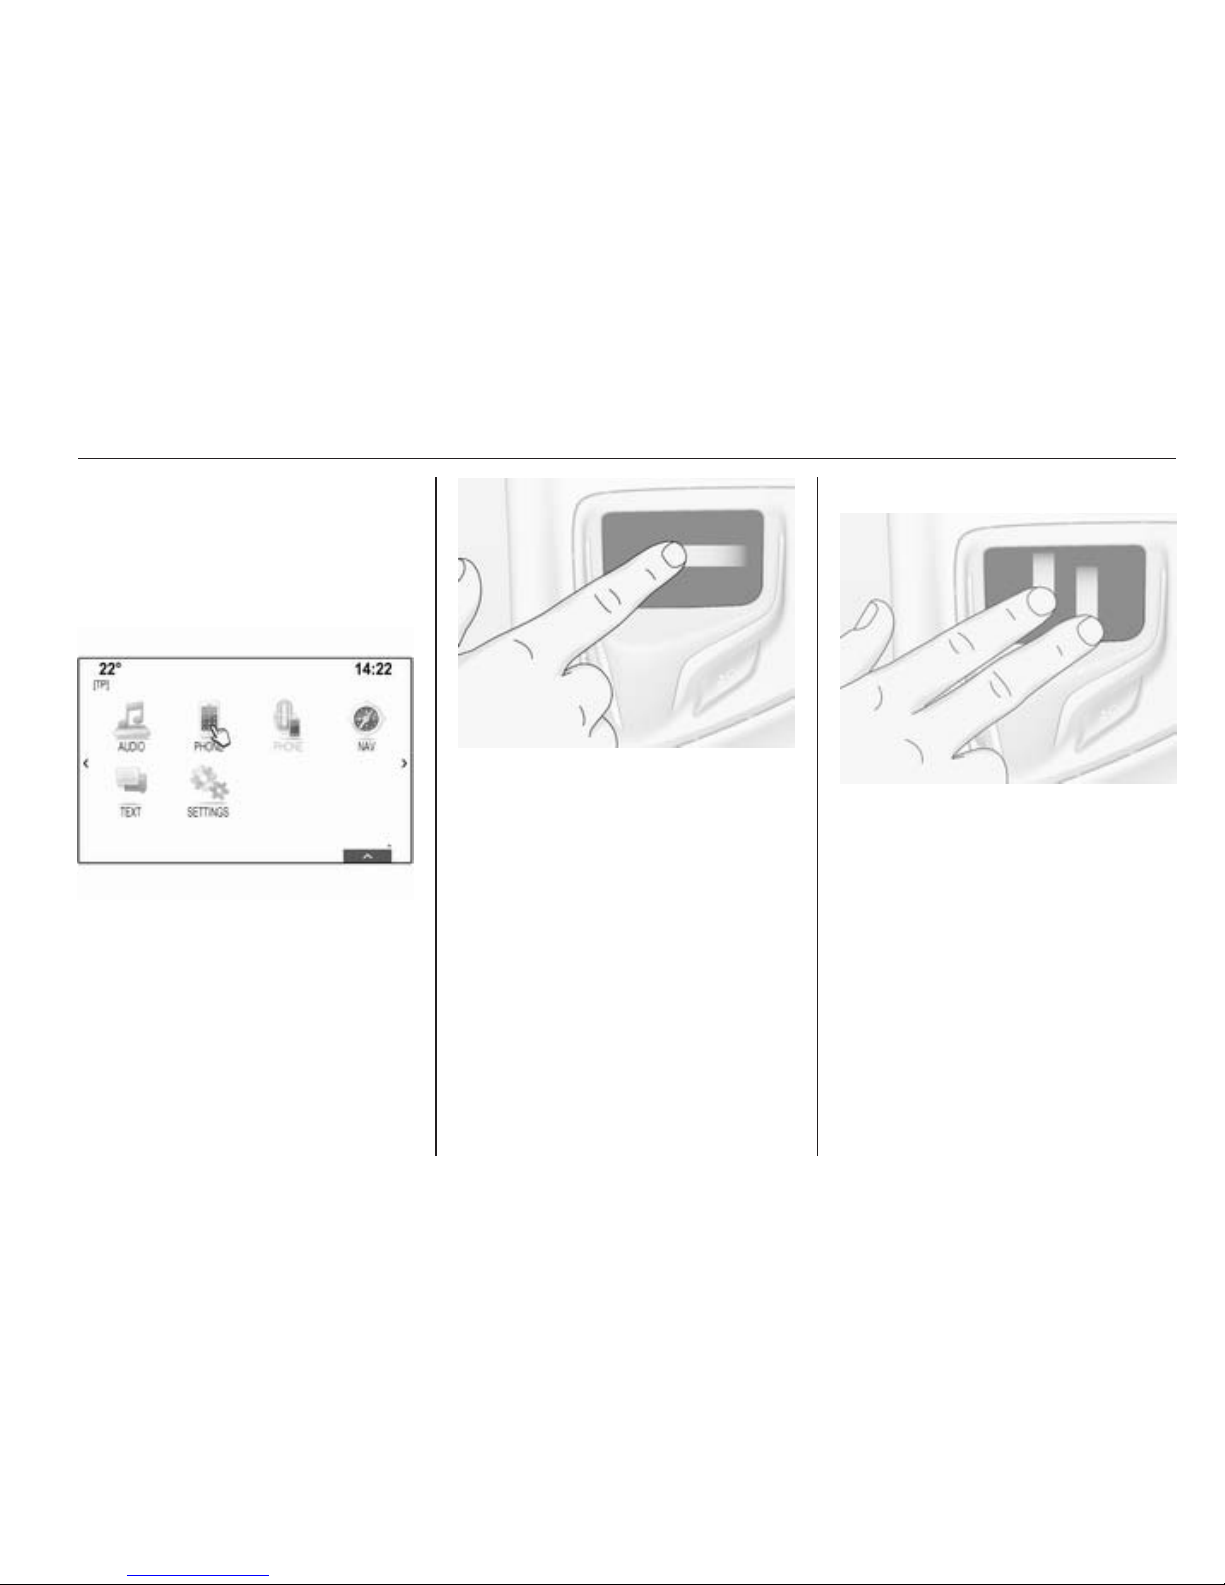
Selecting or activating a screen
button or menu item
Tap on a screen button or menu item.
The corresponding system function is
activated, a message is shown, or a
submenu with further options is
displayed.
Note
In subsequent chapters the
operating steps for selecting and
activating a screen button or menu
Basic operation 15
item via the touch screen will be
described as "...select the...screen
button..." or "...select the...menu
item...".
Moving items
Tap on and hold the element you wish
to move until frame marks appear
around the icons.
Move your finger across the screen.
The element appears as a ghosted
image.
Note
Constant pressure must be applied
and the finger must be moved at
constant speed.
The item previously stored in that
location, and all other items before or
respectively after, shift left or right to
create a gap at the position the new
icon was dragged to. Release the
element in the desired location.
Press one of the buttons on the
instrument panel to exit edit mode.
Note
In subsequent chapters the
operating steps for moving a screen
element via the touch screen will be
described as "...drag the...icon to..."
or "...drag the...menu item to...".
Scrolling lists
If there are more items available than
presentable on the screen, the list has
to be scrolled.
To scroll through a list of menu items,
you may optionally:
■ Place your finger anywhere on the
screen and move it upwards or
downwards.
Note
Constant pressure must be applied
and the finger must be moved at
constant speed.
■ Tap on the o or n screen
buttons at the top and at the bottom
of the scroll bar.
■ Move the slider of the scroll bar with
your finger up and down.
■ In alphabetically ordered lists, tap
on the respective letter in the
vertical keyboard. The list jumps to
the corresponding location within
the list.
To return to the top of the list, tap on
the list title.
16 Basic operation
Note
In subsequent chapters the
operating steps for scrolling a list via
the touch screen will be described as
"...scroll to...list item...".
Scrolling pages
If the available items are organised on
more than one page, e.g. on the
Home screen, the pages have to be
scrolled.
Note
Pages are only scrollable if there is
more than one page set up.
To scroll from one page to another:
■ Place your finger anywhere on the
screen and move it left to scroll to
the previous page or right to scroll
to the next page.
Note
Constant pressure must be applied
and the finger must be moved at
constant speed.
■ If available, tap on the q or p screen
buttons at the left and right side of
the screen.
Note
In subsequent chapters the
operating steps for scrolling pages
via the touch screen will be
described as "...scroll to...page...".
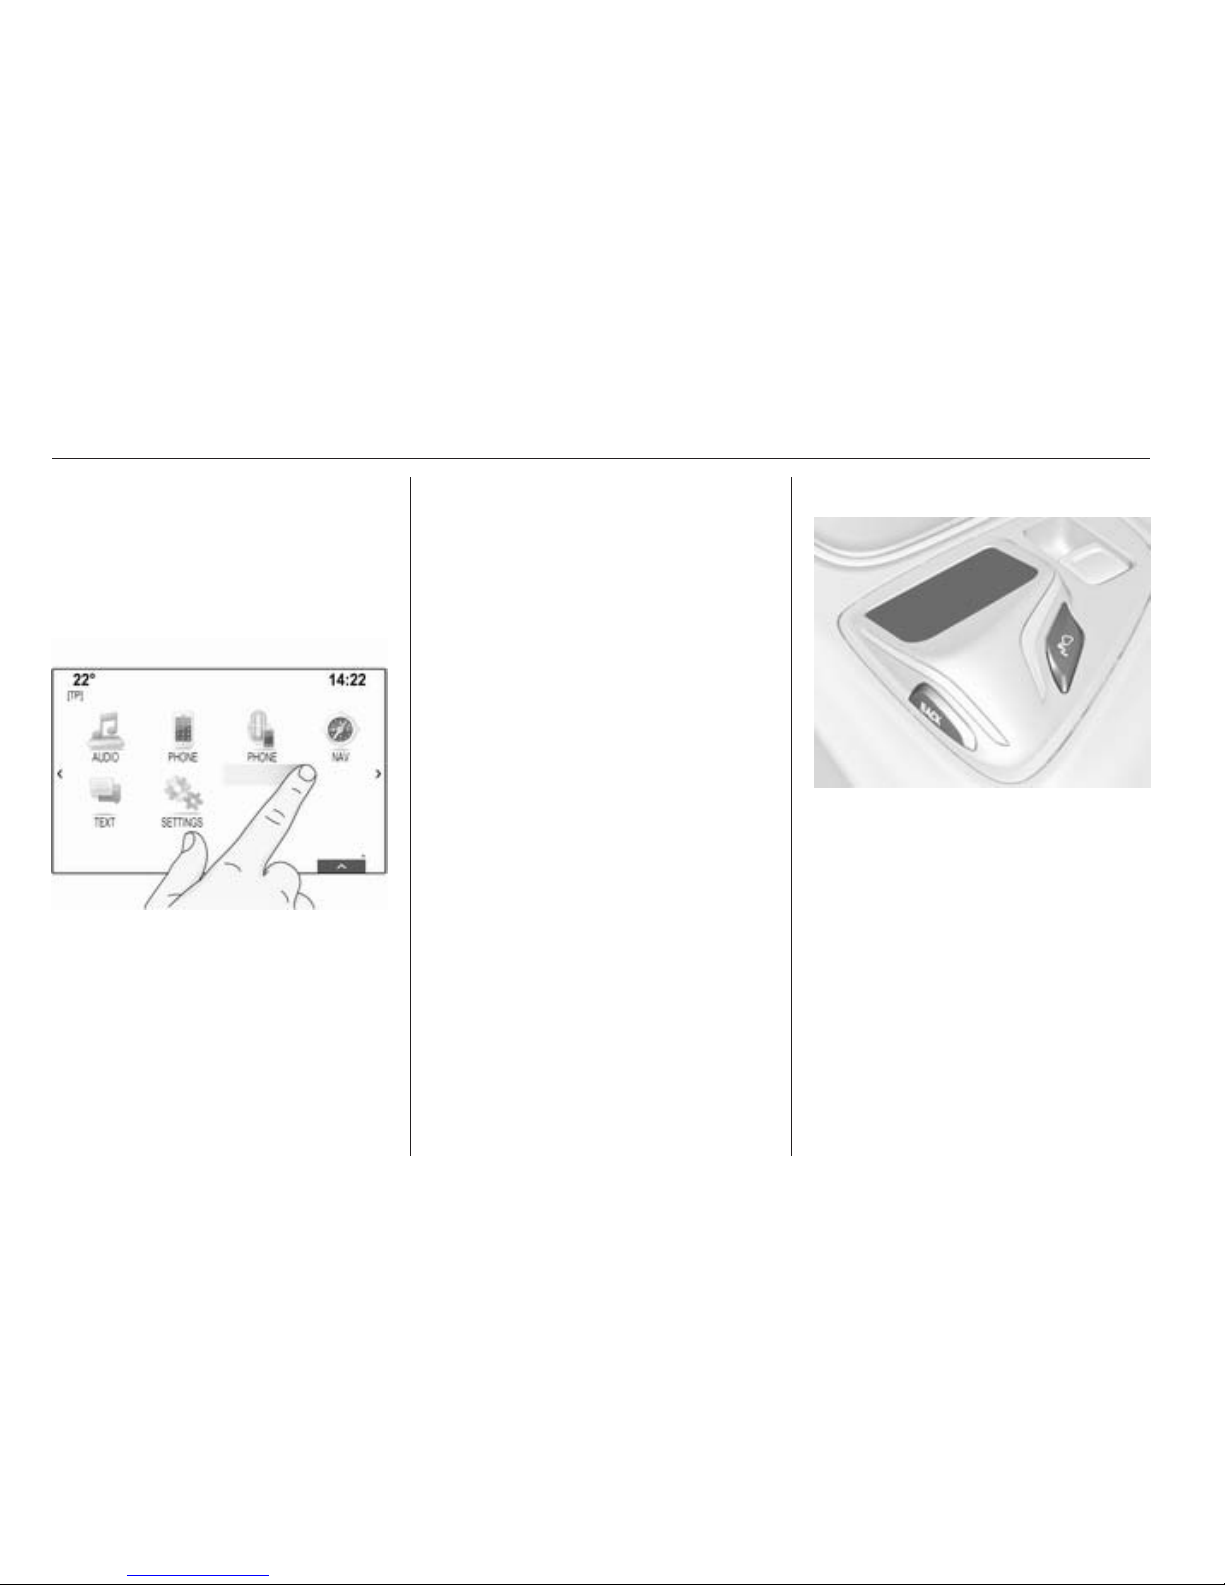
Touch pad
The touch pad has a touch-sensitive
surface that allows additional
functions for menu control on the
centre display. It is located behind the
gearshift lever.
Note
The touch pad provides haptic
(tactile) feedback while it is
operated.
BACK button
Press the BACK button to return to
the previous screen.
Press and hold the BACK button to
return to the Home screen.
Basic operation 17
h button
Press the h button to enter or exit the
character recognition function 3 22.
Selecting a screen button or menu
item
Place your finger on the pad. A hand
cursor appears on the screen.
Depending on the position of your
finger, the system may highlight an
element on the screen.
Note
The cursor disappears after a
certain timeout period.
Move your finger in the direction of the
element you wish to select. The hand
cursor moves from one selectable
screen element to the next.
When the desired element is
highlighted, stop moving.
Press down on the pad to select the
respective element.
Note
In subsequent chapters the
operating steps for selecting and
activating a screen button or menu
item via the touch pad will be
described as "...select the...screen
button..." or "...select the...menu
item...".
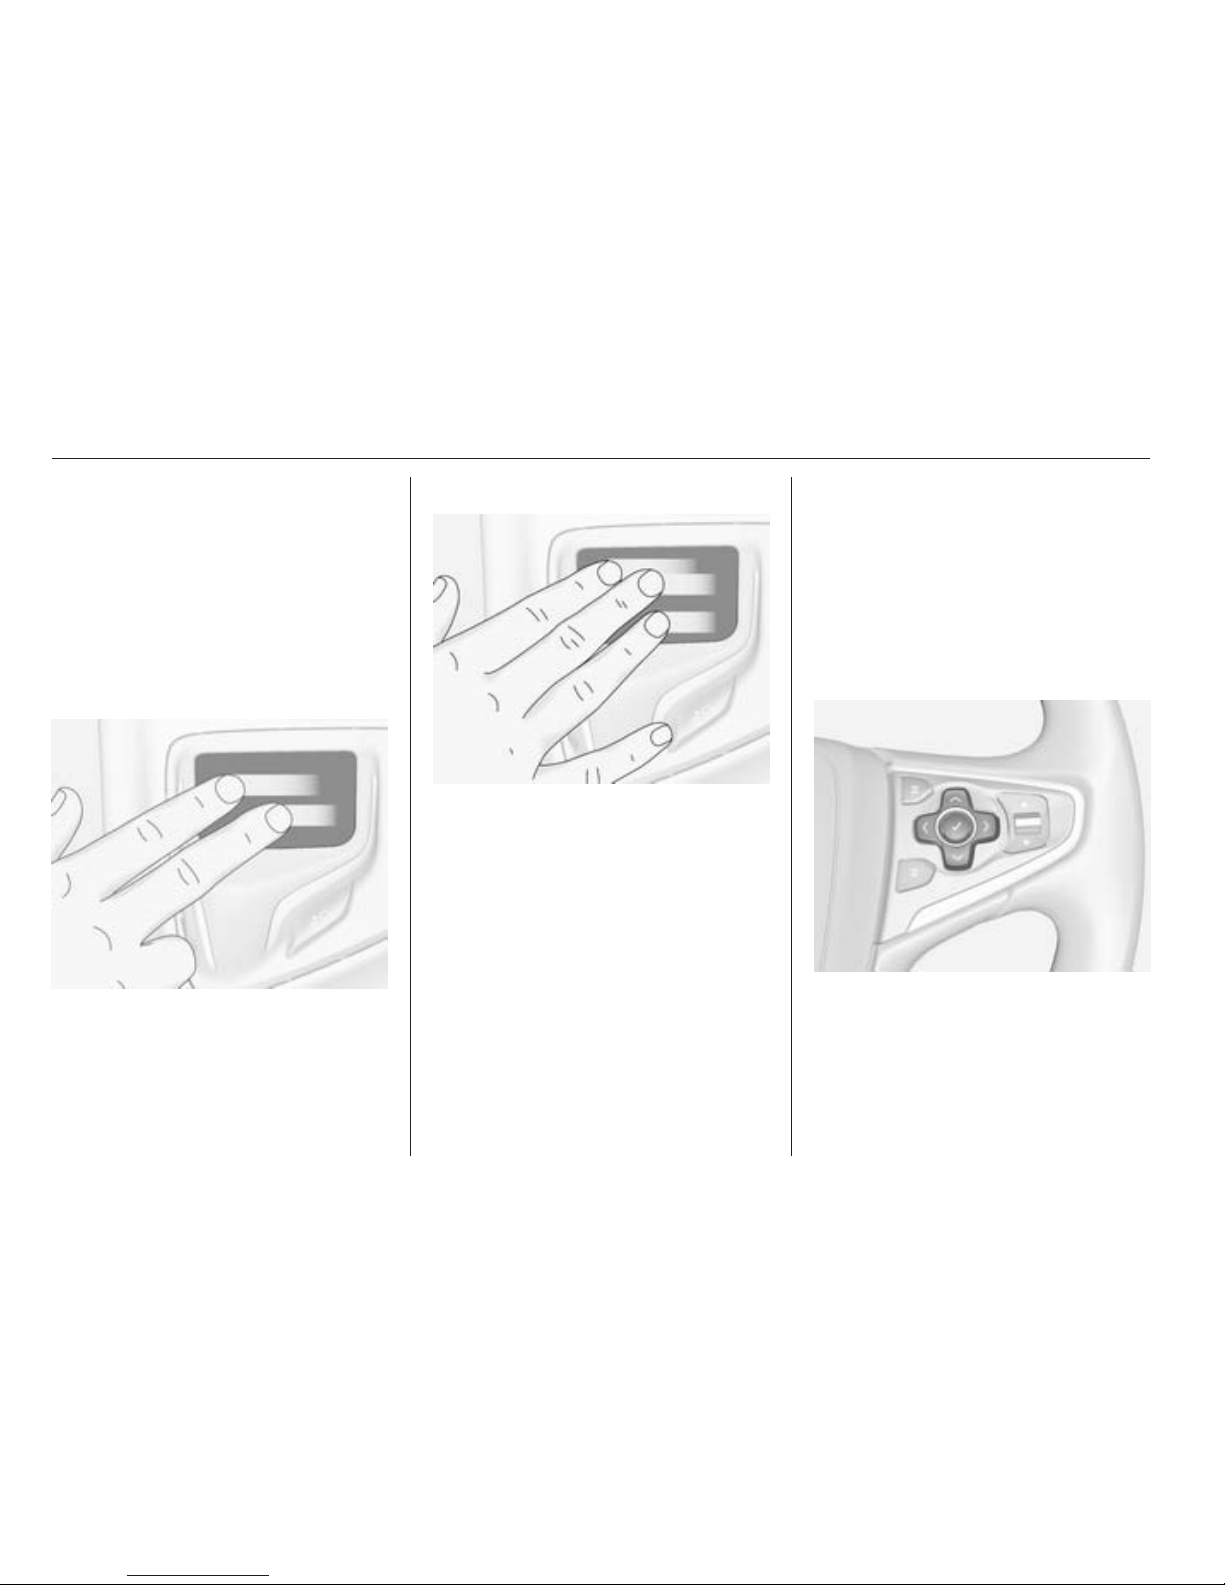
Scrolling lists
If there are more items available than
presentable on the screen, the list has
to be scrolled.
To scroll through a list of menu items:
Place two fingers on the pad and
simultaneously move them upwards
or downwards.
Note
In subsequent chapters the
operating steps for scrolling a list via
the touch pad will be described as
"...scroll to...list item...".
18 Basic operation
Scrolling pages
If the available items are organised on
more than one page, e.g. on the
Home screen, the pages have to be
scrolled.
Note
Pages are only scrollable if there is
more than one page set up.
Scrolling Home screen pages
To scroll from one page to another:
Place two fingers on the pad and
simultaneously move them left to
scroll to the next page or right to scroll
to the previous page.
Scrolling favourites pages
To scroll from one favourites page to
another:
Place three fingers on the pad and
simultaneously move them left to
scroll to the next pages or right to
scroll to the previous pages.
Note
In subsequent chapters the
operating steps for scrolling pages
via the touch pad will be described
as "...scroll to...page...".
Steering wheel controls
Find an overview of all relevant
steering wheel controls in "Control
elements overview" 3 6.
Five-way controller
The five-way controller is used to
operate the menus in the Driver
Information Centre.
The five-way controller consists of
four directional buttons and a
confirmation button (9).
Basic operation 19
i (back) button
When operating the submenus in the
Driver Information Centre, the i
button serves as back button.
Press the i button to return to the next
higher menu level.
Selecting an application
To display the menu for application
selection, press the i button.
Repeatedly press the P or Q
buttons to select a menu item.
Press the 9 button to confirm your
selection. The respective application
is activated.
Selecting an application-specific
function
To display the main menu of the
application currently active, press the
j button.
Repeatedly press the P or Q
buttons to select a menu item.
Press the 9 button to confirm your
selection. A submenu with further
options is displayed or the selected
function is activated.
Note
If you are requested to confirm a
function or message in the Driver
Information Centre by pressing SEL
(Select), press the 9 button.
Speech recognition system
Find a detailed description of the
speech recognition system in
"Speech recognition" 3 78.
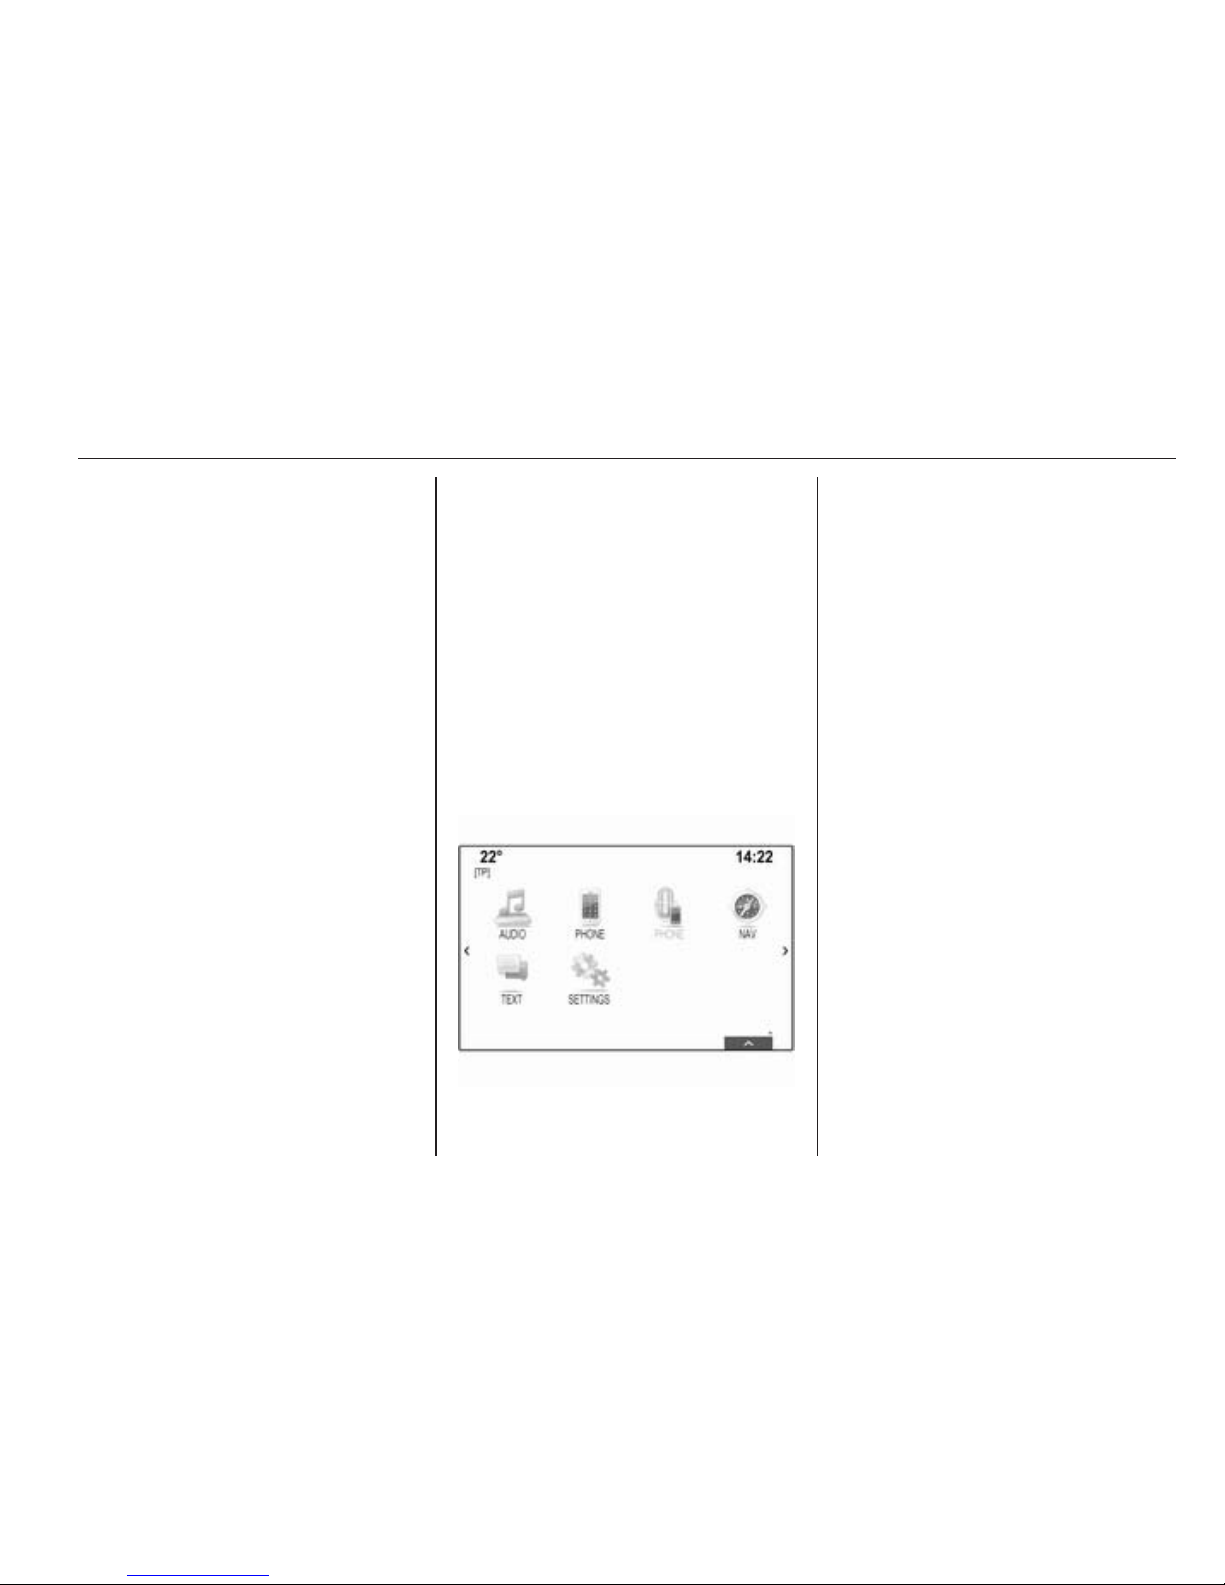
Menu operation
Home screen
The Home screen is shown on the
centre display.
All applications installed may be
accessed from the Home screen.
The Home screen comprises up to
five pages with up to eight
applications on each page.
Home button
Press the ; button on the instrument
panel to access the Home screen.
If you press the ; button while
already being on the Home screen,
you are returned to the first page.
Activating an application
Select the respective application icon
to launch the application and enter
the application main menu.
The radio and media functions are
selected via the respective buttons.
Note
The icons of unavailable
applications are greyed out.
20 Basic operation
Scrolling pages
To scroll from one page to another:
■ Place your finger anywhere on the
screen and move it left to scroll to
the previous page or right to scroll
to the next page.
■ Tap on the p or q screen buttons at
the left and right side of the screen.
■ Place two fingers anywhere on the
touch pad and move them left to
scroll to the previous page or right
to scroll to the next page.
Find a detailed description 3 13.
Note
At the bottom right of the screen,
indication marks designate how
many Home screen pages may be
accessed and which page is
currently displayed.
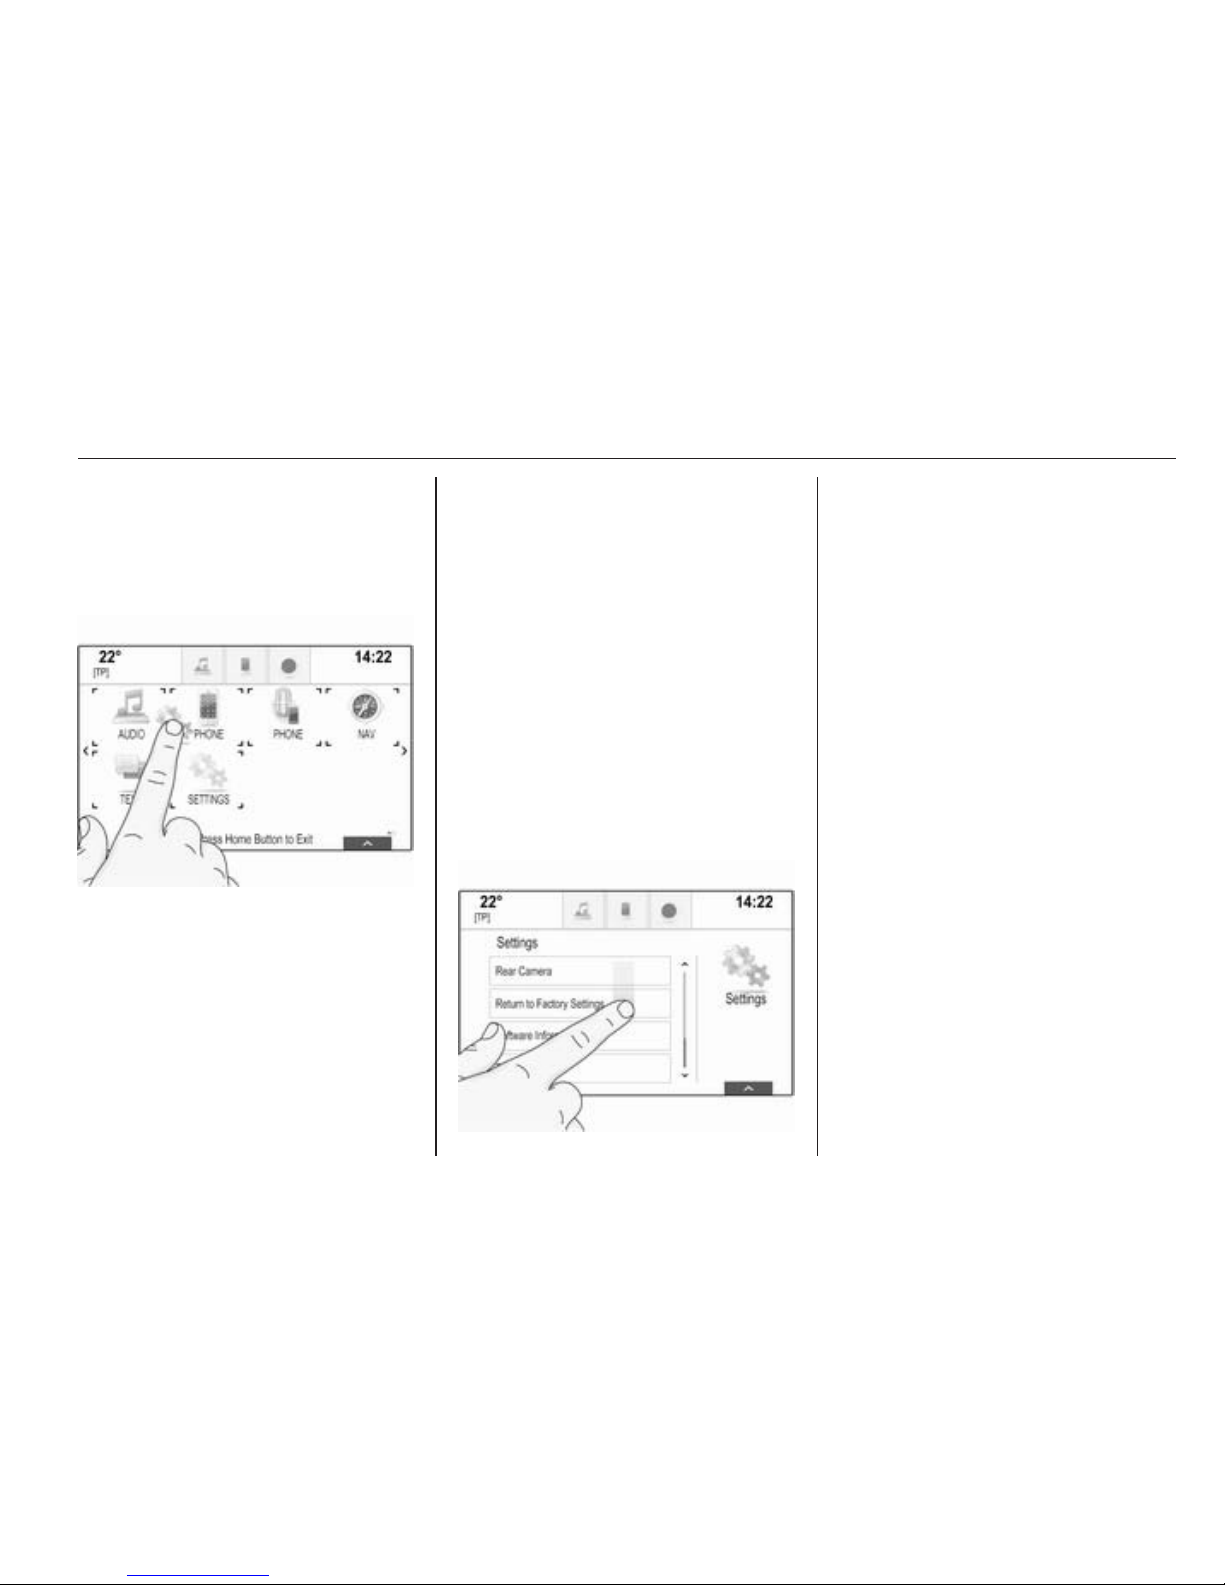
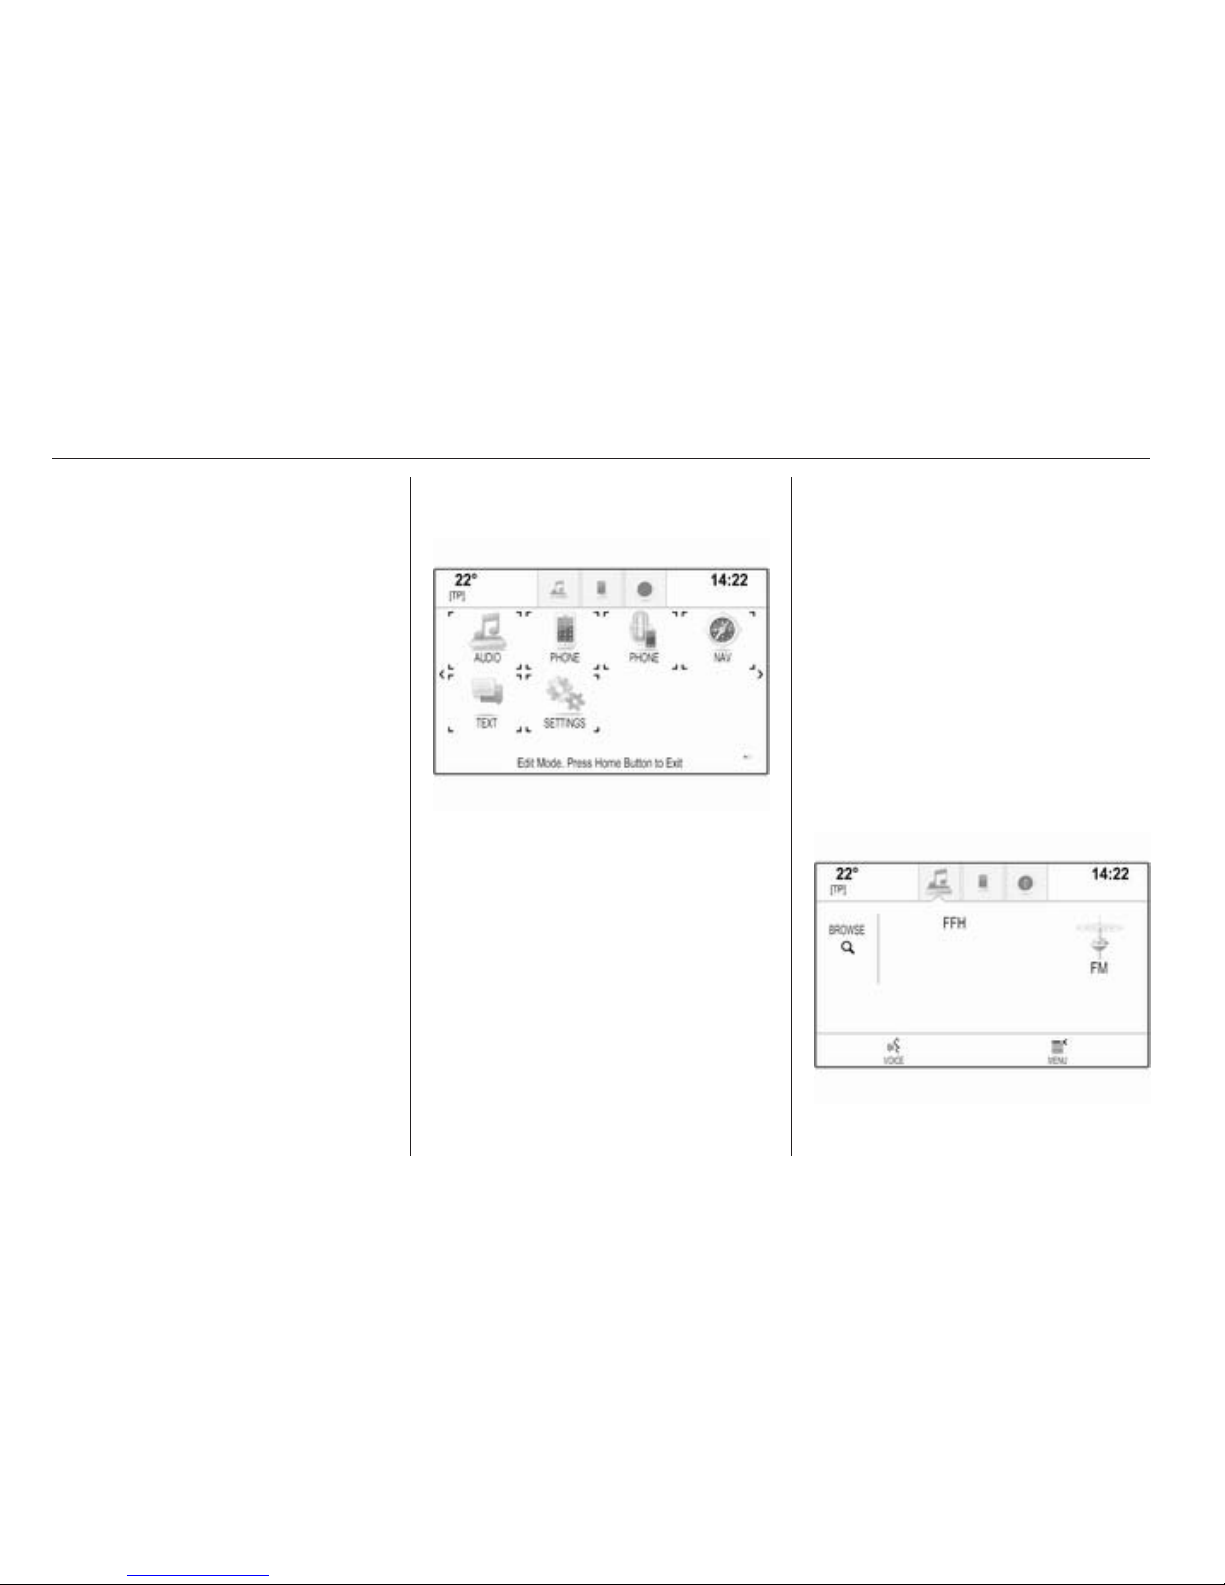
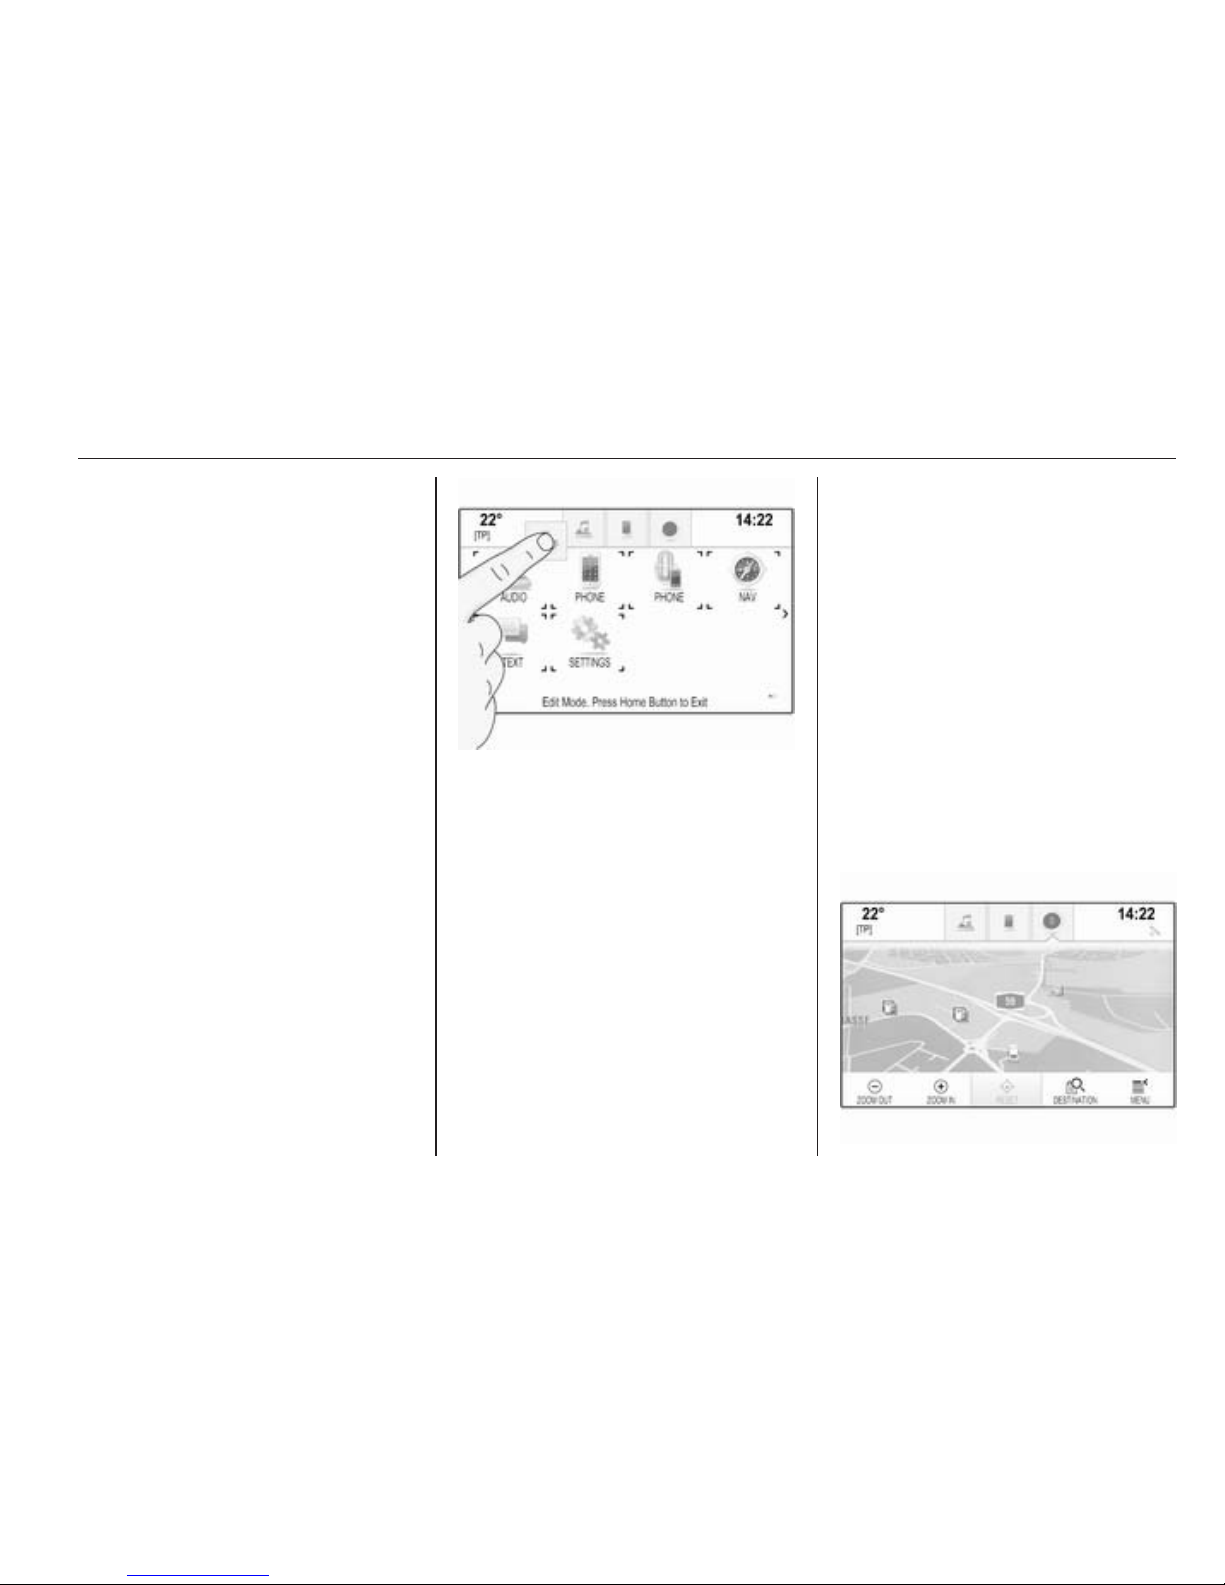
Personalising the Home screen
Entering edit mode
Tap and hold an application icon for a
few seconds. The screen changes as
you enter edit mode:
■ Frame marks are displayed around
all application icons indicating that
they might be moved to a new
position.
■ The application tray (see below) is
displayed.
■ When scrolling, a blank home
screen page appears in the rightmost page position for a new page
to be arranged.
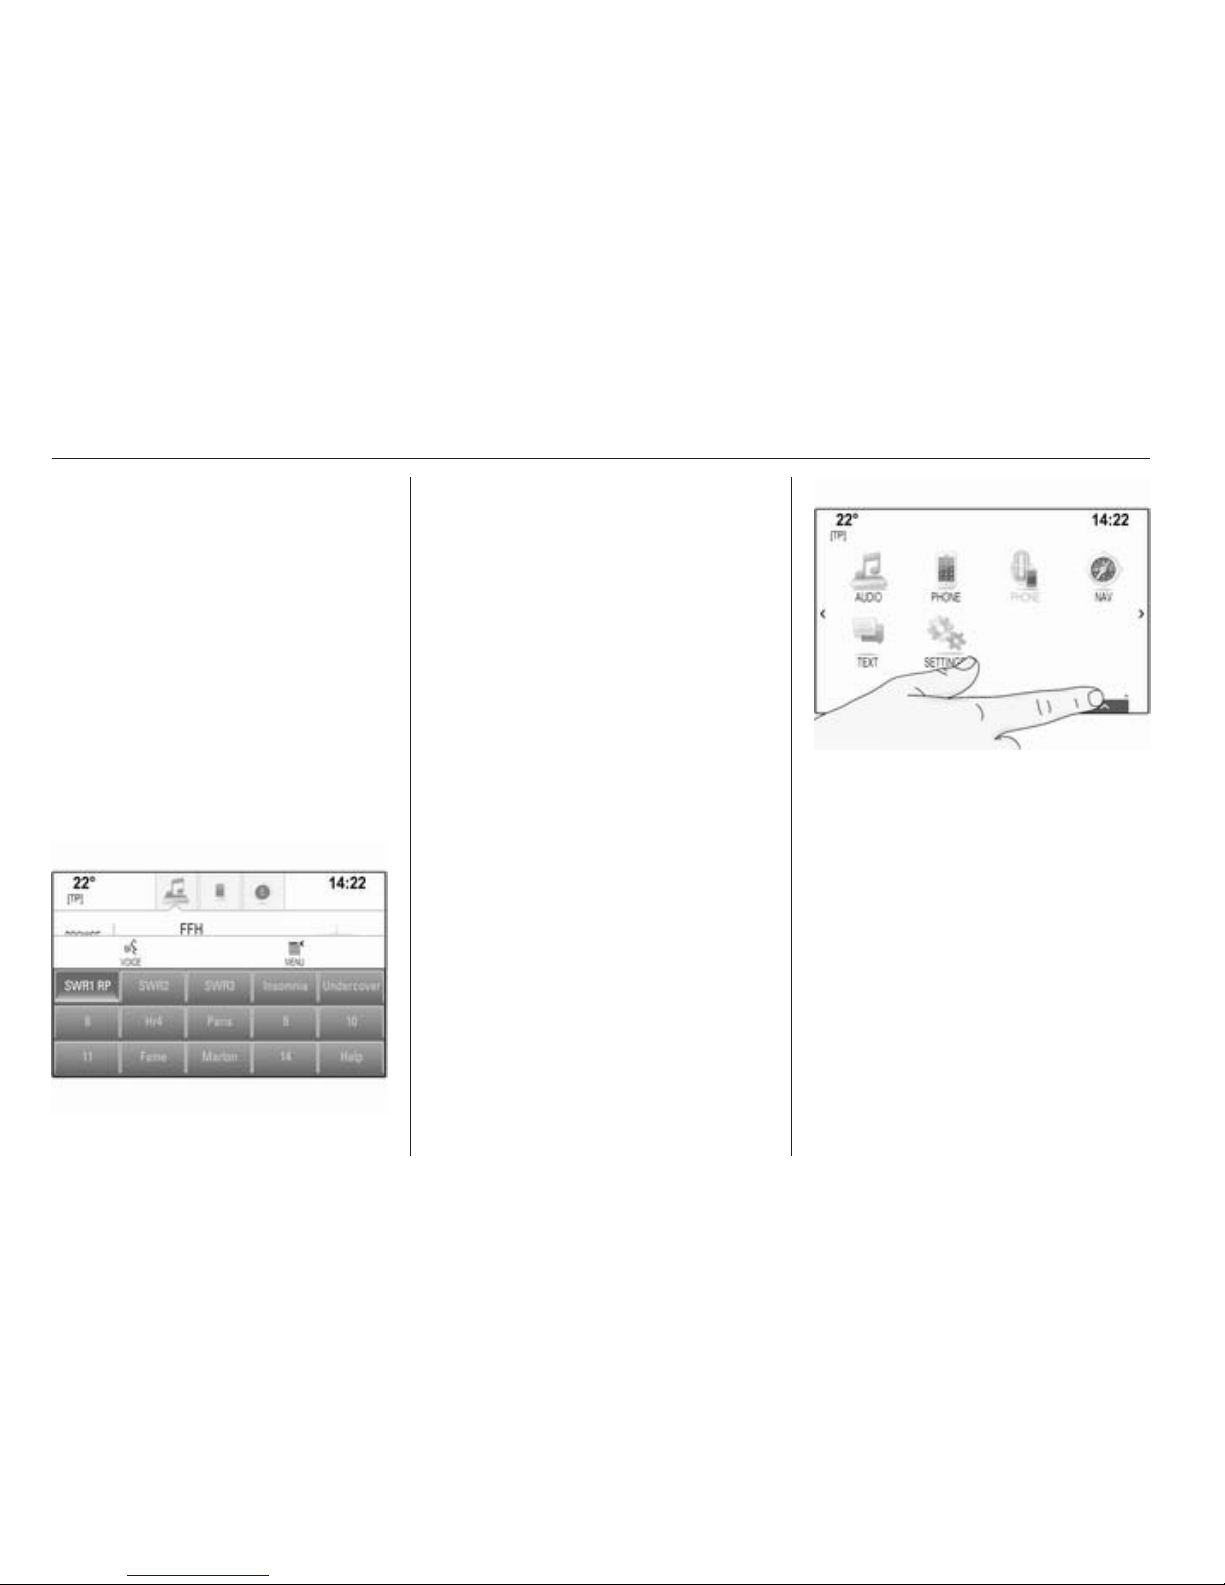
Exiting edit mode
The system automatically exits edit
mode after a few seconds of
inactivity.
To exit edit mode immediately, press
the ; button on the instrument panel.
Moving icons
To enter edit mode, see "Entering edit
mode" above.
Drag the icon you wish to move to its
new position. Release the icon to
drop it in the respective location.
Application tray
Basic operation 21
The application tray is located in the
top centre of the screen and
accessible from all main menus.
Three to five application icons may be
stored in the application tray.
Some application icons dynamically
adapt to the current situation, e.g.
indicating that you missed a phone
call.
Activating an application
Select the respective application icon
to launch the application and enter
the application main menu.
Note
The icons of unavailable
applications are greyed out.
Personalising the application tray
Adding icons to the application tray
To enter edit mode, see "Entering edit
mode" above.
Drag the icon of the desired
application into the application tray.
The Home screen icon changes to a
small application tray icon.
Release the icon to drop it in the
respective location.
If there are five icons in the
application tray already and a new
icon is added, one of the existing
icons is replaced.
Drag the new icon to the position of
the existing icon you wish to replace.
The existing icon appears greyed out
to indicate that it is removed.
Release the new icon to store it in the
respective location.
Removing icons from the application
tray
To enter edit mode, see "Entering edit
mode" above.
Drag the respective application icon
out of the application tray and release
it anywhere on the screen. The
application is removed from the
application tray.
Interaction selector bar
The interaction selector bar is located
at the bottom of the screen and
accessible from all main menus.
22 Basic operation
Via the interaction selector bar, you
may change the different views within
one application or perform
application-specific actions, e.g. start
a speech recognition session.
Activating another tab
Select the respective screen button
on the interaction selector bar to
switch to another view or perform an
action.
Note
If a function is currently not available
in a menu, the respective icon on the
interaction selector bar is greyed
out.
Displaying the interaction selector bar
When interacting with the screen
buttons in the main menu, the
interaction selector bar is often
minimised.
To display the interaction selector
bar, select the n screen button at
the bottom of the screen.
Messages
In the case of a system event, before
the execution of a system function, or
due to an outside trigger, e.g.
incoming phone call, you may be
prompted with a message.
Select one of the available options.
If ignored, most of the messages are
dismissed automatically after a
certain period of time. Alerts that are
not dismissed automatically remain
on the screen until they are
acknowledged or the trigger becomes
invalid.
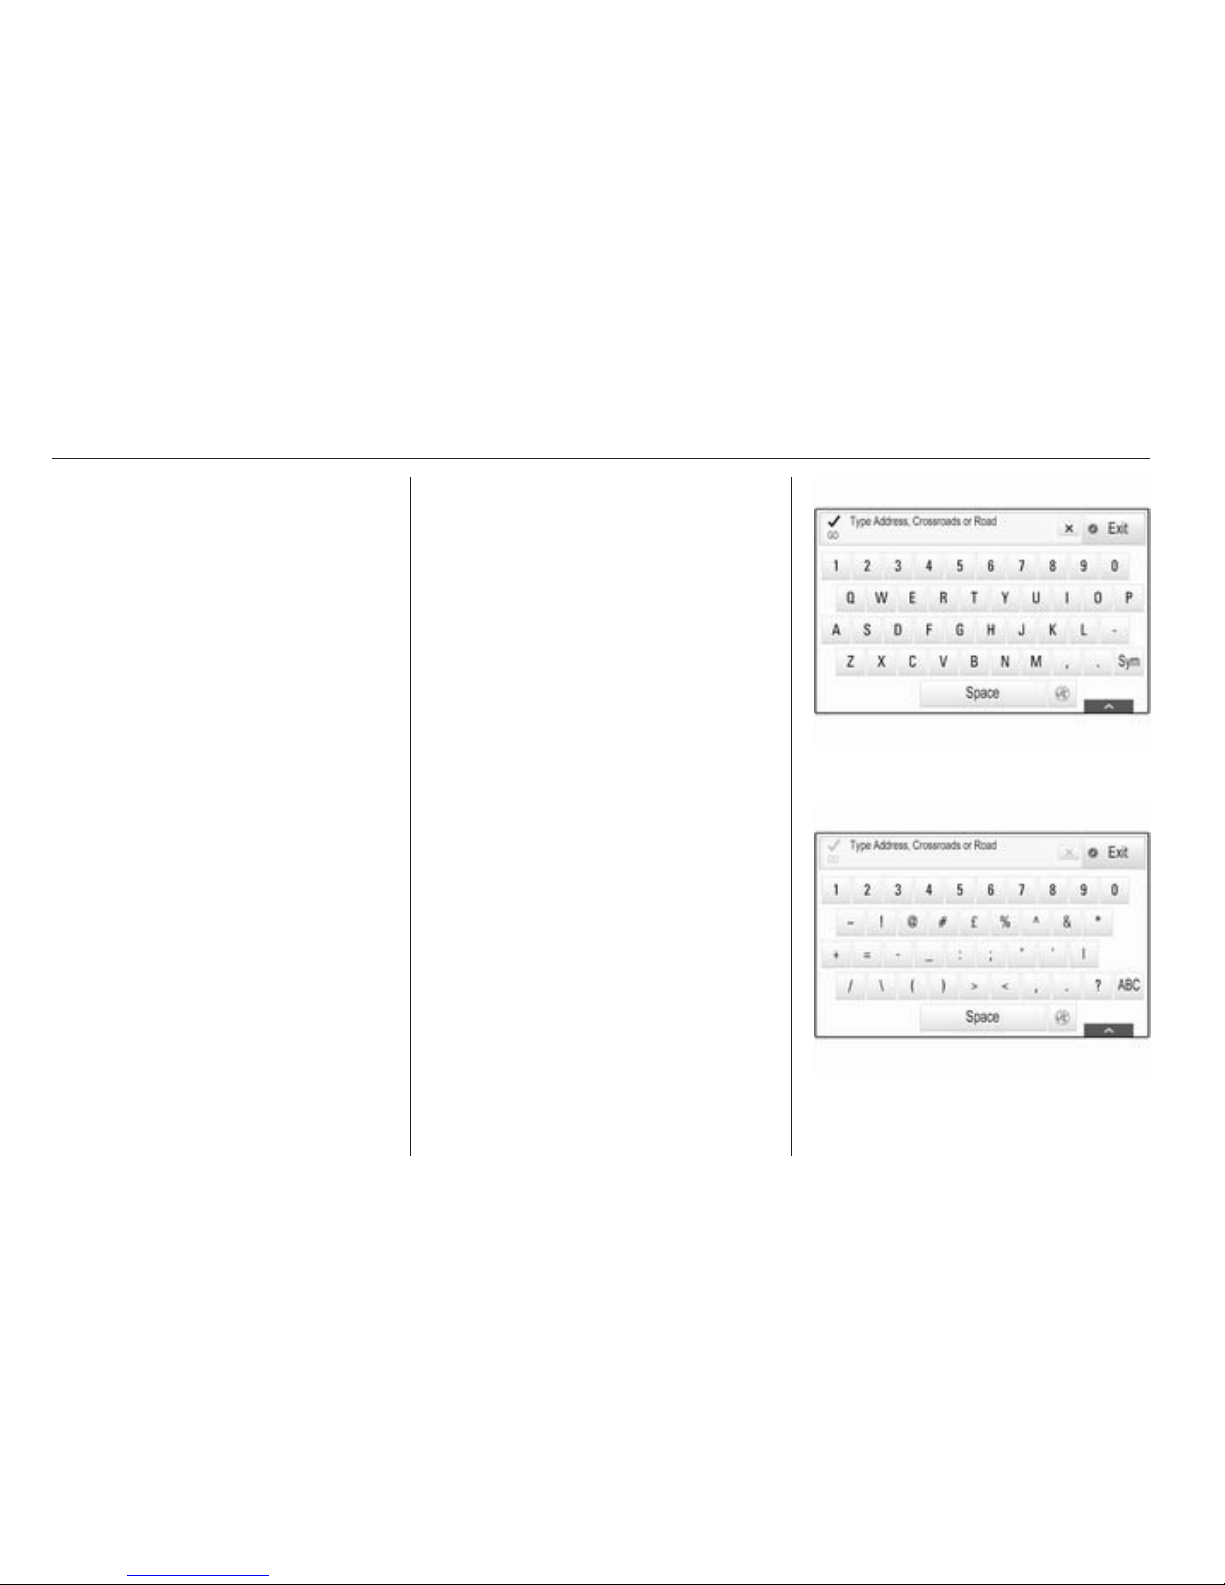
Keyboards
Keyboard
Letter keyboard:
Symbol keyboard:

Basic operation 23
Depending on the application or
function currently active, the
keyboard menu is displayed
differently.
To switch to the symbol keyboard,
select the Sym screen button.
To switch to the letter keyboard,
select the ABC screen button.
Entering characters
To enter a character, tap on the
respective screen button. The
character is entered on release.
If you accidently tapped on the wrong
screen button, slide across the
screen to the desired character and
release.
Tap on and hold a letter screen button
to display associated letters in a letter
pop-up menu. Slide to the desired
letter and release.
To confirm the input, select the
respective confirmation button.
Autocomplete function
If a character sequence has been
entered once, it is stored within the
system and may be recalled by the
autocomplete function.
As soon as one character (letter or
digit) is entered, the autocomplete
function becomes active. Every
additional character entered is
considered in the matching process,
reducing the list of autocomplete
matches.
Select the o screen button next to
the characters entered to display a list
of all autocomplete matches.
Note
Above the o screen button, the
number of available options is
displayed. It changes according to
the number of matches found.
Select the respective list item. The
keyboard is redisplayed with the
respective list entry shown in the
entry field.
Editing text
To place the cursor, tap at the
respective position within the text.
Enter your changes.
Depending on the application, select
the ╳ or r screen button to delete
one entered character. Tap and hold
the ╳ or r screen button to delete all
characters.
Select the respective confirmation
screen button to confirm an input.
Mixed case characters
In most cases, only capital letters may
be entered.
24 Basic operation
If mixed case character recognition is
available, additional Caps and Shift
screen buttons are displayed.
To activate the caps lock function and
capitalise all letters, select the Caps
screen button.
To deactivate the caps lock function,
the Caps screen button has to be
selected again.
To activate the shift function and
capitalise just one letter, select the
Shift screen button.
The function is automatically
deactivated after one letter has been
entered.
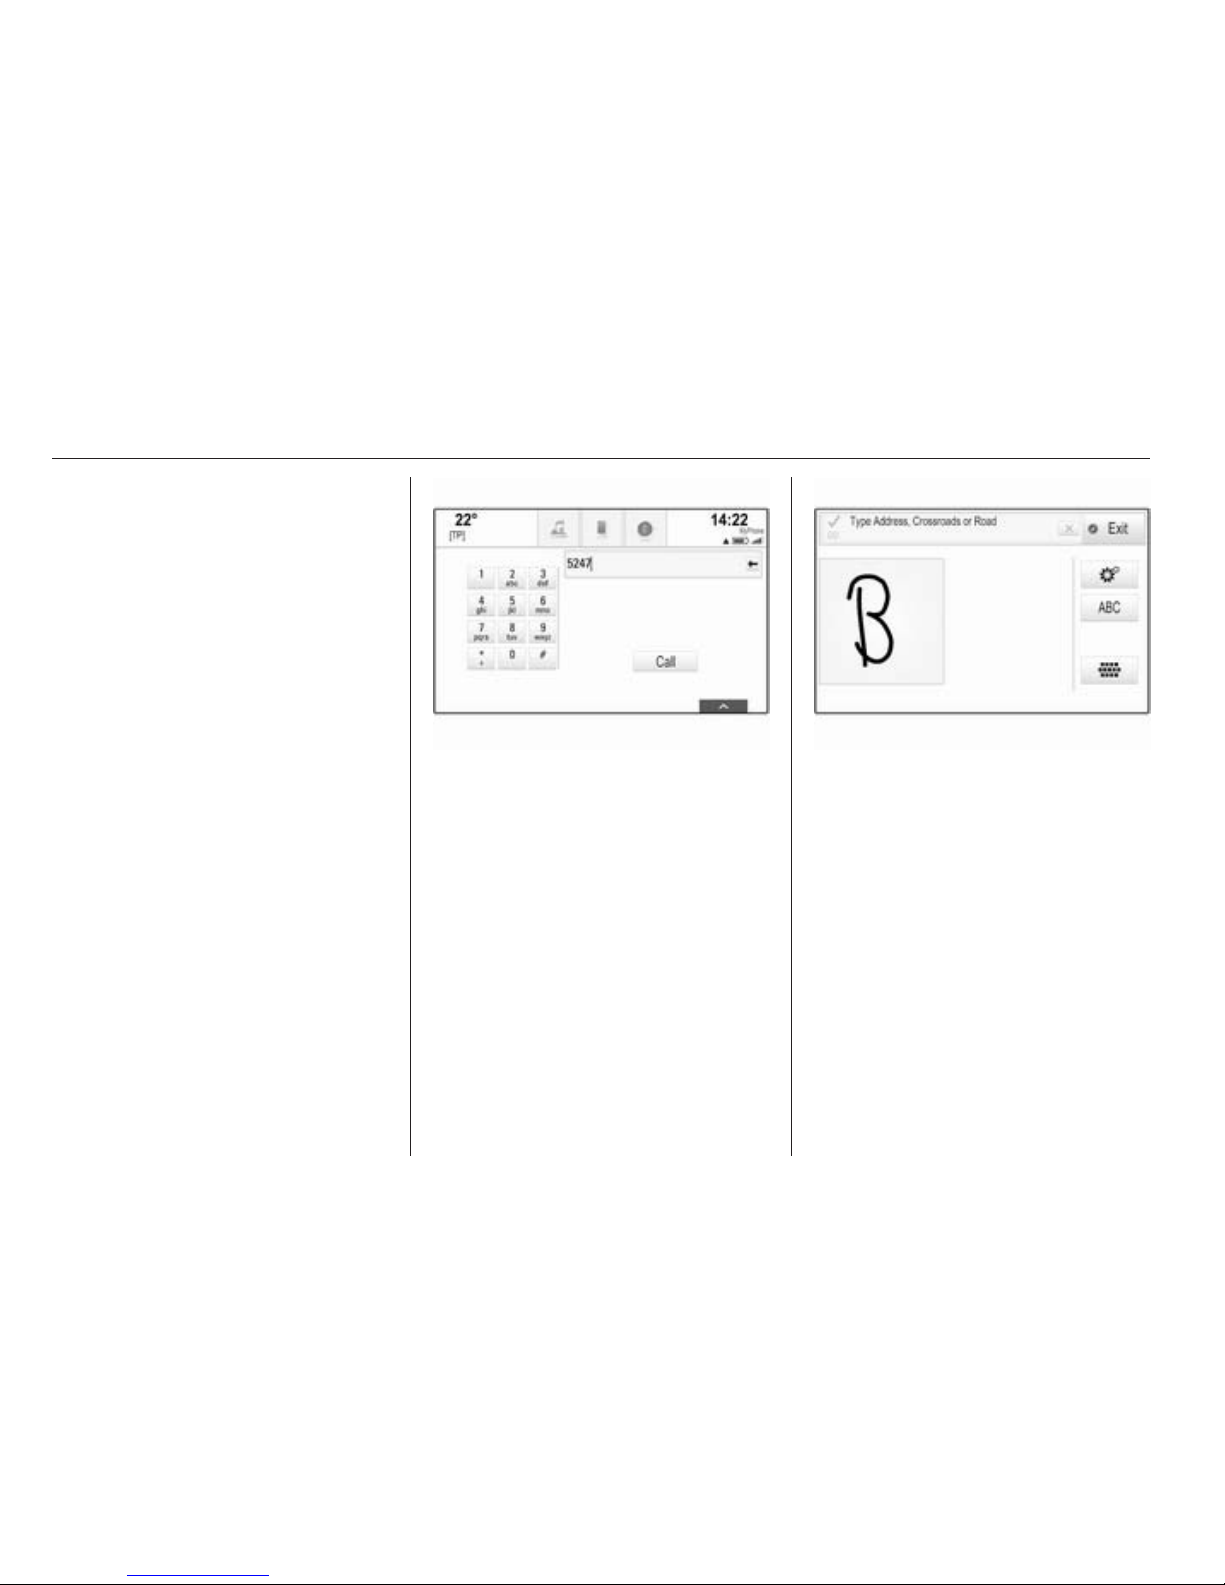
Keypad
If only a number or PIN code have to
be entered, a keypad is displayed.
Depending on the application or
function currently active, the keypad
menu is displayed differently.
For a detailed description of how to
enter characters and change entered
text, see above.
Character recognition
Activating character recognition
Press the h button on the touch pad.
If you are already in a keyboard
menu, select the s screen button.
Entering characters
Draw the desired character (digit or
uppercase letter) on the touch pad. It
appears within the character
recognition pane.
The system tries to guess which
character you wish to enter and
displays its guesses in a list placing
its best guess first. The best guess is
announced audibly.

Basic operation 25
Select the desired character.
To scroll through the list (if
necessary), you may optionally:
■ On the touch pad: Place two fingers
on the touch pad and
simultaneously move them
upwards or downwards.
■ On the touch screen: Tap on the
o or n screen buttons at the top
and at the bottom of the scroll bar,
move the slider of the scroll bar with
your finger up and down or place
your finger on the screen and move
it upwards or downwards.
The character selected is entered in
the edit field.
If the best guess of the system was
right, drawing a new character also
serves as confirmation.
To close the character recognition
menu, press two fingers on the pad.
Character modifiers
To draw character modifiers, use the
following gestures. The dot
represents the starting point of the
movement.
Space ― Swipe from left to right:
Delete ― Swipe from right to left:
Settings menu
Tap on the t screen button to display
the character recognition settings
menu.
In this menu, you may define the
speed of the character recognition
workflow (Draw Speed and Character
Selection Speed). Set the respective
speed to Default, Faster or Slower.
Set Audio Feedback to ON or OFF.
26 Basic operation
Favourites
A range of different information may
be stored as favourites, e.g.:
■ Radio stations
■ Music tracks
■ Albums or artists
■ Telephone numbers
■ Destinations and routes
■ POIs
■ Contact entries
■ Tone settings
■ Home screen applications.
60 individual favourite locations are
available, displayed as five favourites
per row.
They can be displayed in a one-row
view or in a three-row view.
If a favourite location is occupied, the
favourite screen button displays the
label text of the respective favourite.
If a favourite location is empty, the
position number of the favourite
location (1 to 60) is indicated.
Displaying favourites
The favourites list is accessible from
all menus.
To display one row of favourites when
the n screen button is shown on the
screen:
Select the n screen button.
To display three rows of favourites,
see below.
To display one row of favourites when
an interaction selector bar is shown
on the screen:
■ On the touch screen: Place your
finger on the interaction selector
bar and move it upwards until one
row of favourites becomes visible.
Note
Constant pressure must be applied
and the finger must be moved at
constant speed.
Basic operation 27
■ On the touch pad: Place three
fingers on the pad and move them
upwards until one row of favourites
becomes visible.
To display three rows of favourites,
use one or respectively three fingers
and drag the favourites list up further.
Scrolling through favourites
pages
The favourites page is visible in the
one row or the three row view. To
scroll through the favourites pages,
you may optionally:
■ On the touch screen: Place your
finger anywhere on the favourites
page and move it left or right. The
next or previous page of favourites
is displayed.
Note
Constant pressure must be applied
and the finger must be moved at
constant speed.
■ On the touch pad: Place three
fingers on the touch pad and move
them left or right. The next or
previous page of favourites is
displayed.
When reaching the beginning or the
end of the favourites pages, the whole
list is wrapped.
Note
At the bottom of the screen,
indication marks designate how
many favourites pages may be
accessed and which page is
currently displayed. The number of
indication marks adapts to the view
chosen (more pages in one-row
view, less pages in three-row view).
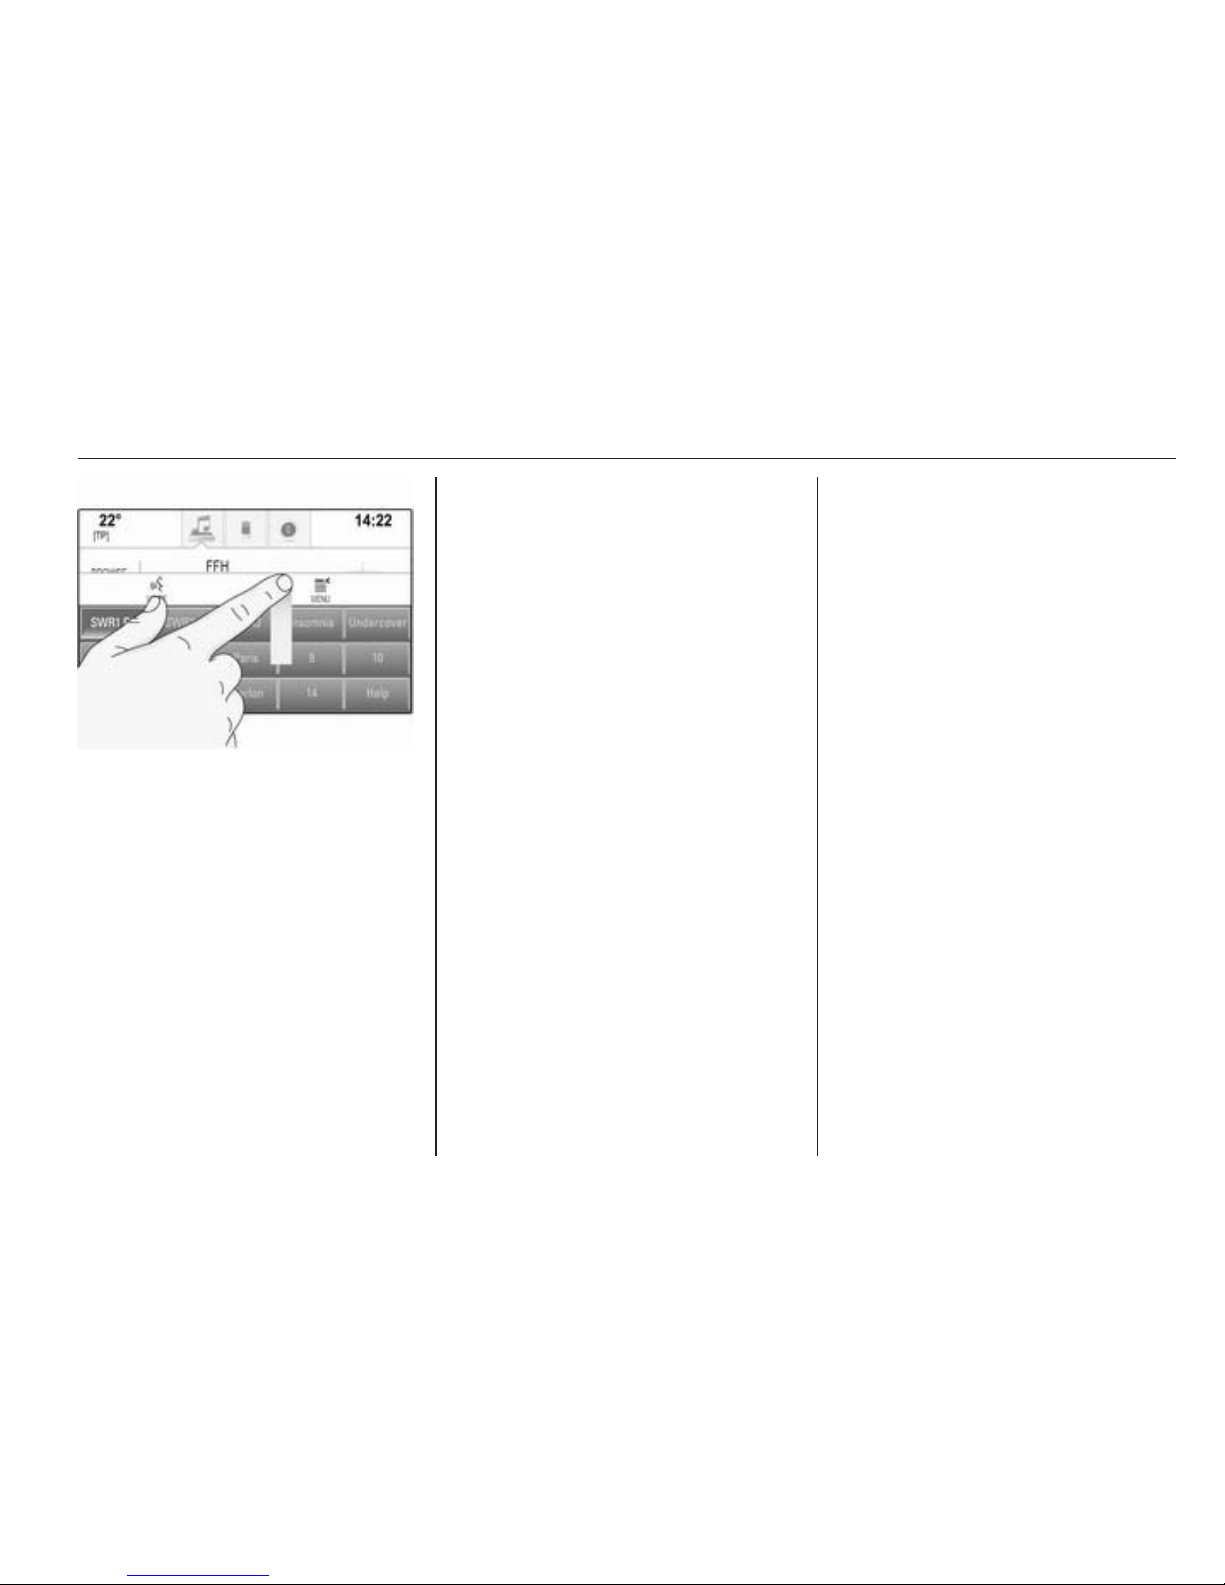
Storing favourites
Favourites may be stored from the
Home screen, the audio application,
the navigation application or the
phone application.
There are two different basic
situations:
■ only one storable item on the
screen
■ more than one storable item on the
screen.
Reveal the favourites list and scroll to
the respective favourites page.
Tap and hold the respective favourite
screen button.
If there is only one storable item on
the screen, a beeping sound is given
out and the station is stored to the
respective screen button.
If there is more than one storable item
on the screen, the favourites page is
minimised and the previously shown
menu is redisplayed. Select the item
you wish to store as a favourite. A
beeping sound is given out and the
station is stored to the respective
screen button.

28 Basic operation
A few examples for storing favourites
are given below.
Example: Radio station
Repeatedly press the RADIO button
to activate the radio function and the
desired waveband.
Seek for the station you wish to store
as a favourite 3 45.
To store this station as a favourite,
reveal the favourites list and scroll to
the respective favourites page.
Tap and hold the respective favourite
screen button. The station is stored
as a favourite.
Example: Album
Repeatedly press the MEDIA button
and select the desired audio source.
Select the BROWSE screen button to
activate the browse menu and then
select the ALBUMS tab 3 55.
To store one of the albums as a
favourite, reveal the favourites list
and scroll to the respective favourites
page.
Tap and hold the respective favourite
screen button. The favourites page is
minimised and the list of albums is
redisplayed.
Select the album you wish to store as
a favourite. The selected album is
stored as a favourite.
Example: Destination
Press the ; button to display the
Home screen and then select the
NAV icon.
Select DESTINATION in the
interaction selector bar and then
select the RECENT tab 3 68.
To store one of the addresses in the
recent destinations list as a favourite,
reveal the favourites list and scroll to
the respective favourites page.
Tap and hold the respective favourite
screen button. The favourites page is
minimised and the recent
destinations menu is redisplayed.
Select the address you wish to store
as a favourite. The selected address
is stored as a favourite.
Example: Telephone number
Press the ; button to display the
Home screen and then select the
PHONE icon.
Select the KEYPAD tab and enter the
number you wish to call 3 88.
To store this number as a favourite,
reveal the favourites list and scroll to
the respective favourites page.
Tap and hold the respective favourite
screen button. The number is stored
as a favourite.
Retrieving favourites
Display a favourites page (see above)
and scroll to the respective favourites
page (if necessary).
Note
Unavailable favourites are greyed
out.
Select the desired favourite screen
button. Depending on the kind of
favourite selected, a radio station or
track is played, a phone call is
initiated, a route is calculated or an
application is started.
Basic operation 29
Note
The active favourite is highlighted.
Using the right-hand steering wheel
remote control
Repeatedly press the k or l buttons
to select the desired audio favourite.
Alternatively, using the five-way
controller: Press the i button to
display the cluster menu for
application selection. Select the
Audio list item and then Favourites.
Select the desired favourite.
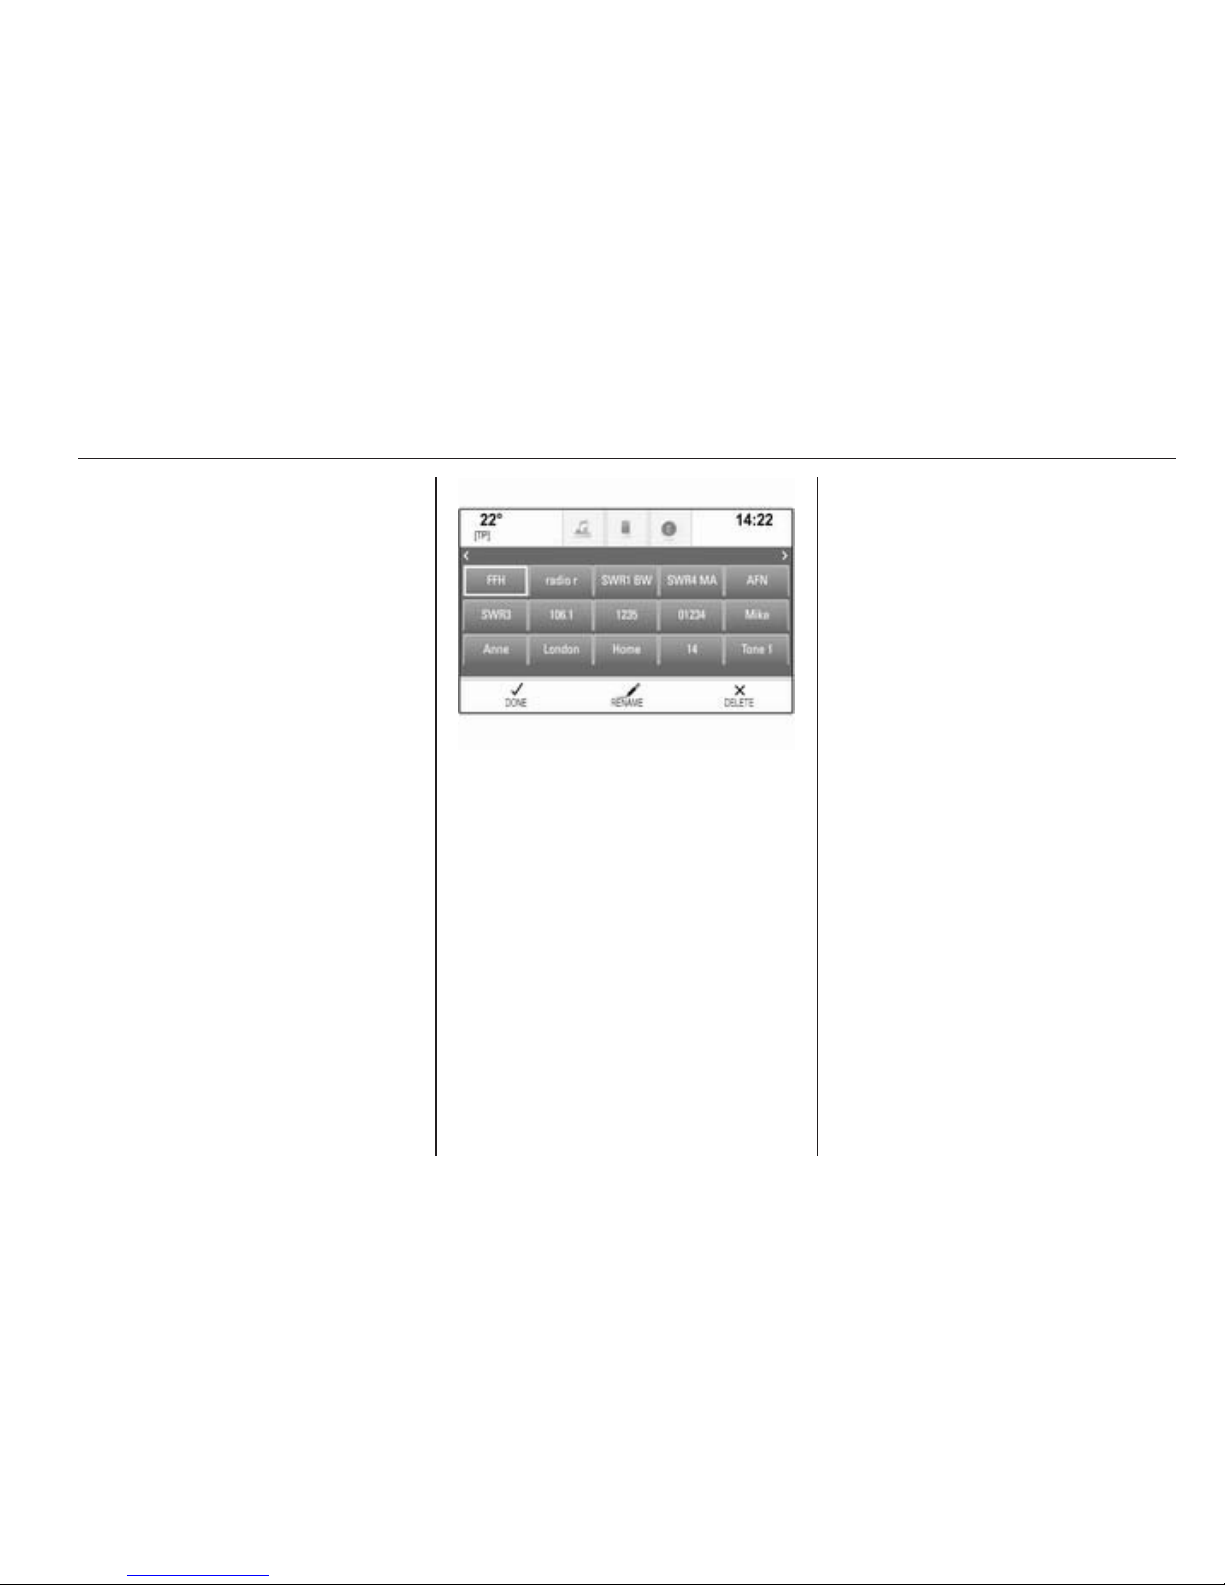
Editing favourites
Select the SETTINGS icon on the
Home screen, the Radio list item and
then Manage Favourites. A three-row
view of the favourites list is displayed
with the editing options shown in the
interaction selector bar.
Renaming favourites
If necessary, scroll to the respective
favourites page.
Select the favourite you wish to edit.
Select the RENAME screen button.
A keyboard opens up with the current
favourite label text displayed in the
entry field as well as in the label
preview area.
Enter the new label text and select the
Label screen button. You are
returned to the favourites page.
Select the o screen button at the
bottom of the screen to reveal the
interaction selector bar and then
select the DONE screen button to
return to the settings menu.
Deleting favourites
If necessary, scroll to the respective
favourites page.
Select the favourite you wish to
delete.
Select the DELETE screen button.
The favourite and all associated data
are deleted.
Select the DONE screen button to
return to the settings menu.
Moving favourites
If necessary, scroll to the respective
favourites page.
Drag the favourite you wish to move
to its new position.
To store a favourite in a location
beyond the favourites page currently
visible, drag it to the p or q symbols
on top of the favourites page. The list
 Loading...