

Vauxhall Insignia Navi 900 IntelliLink, Insignia R 4.0 IntelliLink Owner's Manual


Contents
Navi 900 IntelliLink ......................... 5
R 4.0 IntelliLink ............................ 85


Navi 900 IntelliLink
Introduction .................................... 6
Basic operation ............................ 14
Radio ........................................... 31
External devices .......................... 36
Navigation .................................... 42
Speech recognition ...................... 61
Phone .......................................... 66
Frequently asked questions ......... 77
Index ............................................ 80

6 Introduction
Introduction
General information ....................... 6
Theft-deterrent feature ................... 7
Control elements overview ............ 8
Usage .......................................... 11
General information
The Infotainment system provides
you with state-of-the-art in-car
infotainment.
Using the FM, AM or DAB radio
functions, you can register a great
number of stations on various
favourites pages.
You can even register music tracks,
telephone numbers, destination
addresses or tone settings on the
favourites pages.
You can connect external data
storage devices to the Infotainment
system as further audio sources;
either via a cable or via Bluetooth®.
The navigation system with dynamic
route planning will reliably guide you
to your destination, and, if desired,
automatically avoid traffic jams or
other traffic problems.
In addition, the Infotainment system is
equipped with a Phone portal that
allows comfortable and safe use of
your mobile phone in the vehicle.
Using the phone projection function,
you can operate specific applications
on your smartphone via the
Infotainment system.
Via the shop application, you may
download additional apps to the
Infotainment system.
Optionally, the Infotainment system
can be operated using controls on the
steering wheel or via the speech
recognition system.
The well-thought-out design of the
control elements, the touch screen
and the clear displays enable you to
control the system easily and
intuitively.
Notice
This manual describes all options
and features available for the
various Infotainment systems.
Certain descriptions, including those
for display and menu functions, may
not apply to your vehicle due to
model variant, country
specifications, special equipment or
accessories.
Introduction 7
Important information on operation and traffic safety
9 Warning
Drive safely at all times. Only
operate the Infotainment system if
the traffic conditions allow a safe
usage.
In the interest of safety, it might be
appropriate to stop the vehicle
before operating the Infotainment
system (e.g. for entries of
addresses).
9 Warning
The usage of the navigation
system does not release the driver
from the responsibility for a
correct, vigilant attitude in road
traffic. Always follow the
applicable traffic rules.
9 Warning
In some areas one-way streets
and other roads and entrances
(e.g. pedestrian zones) that you
are not allowed to turn into are not
marked on the map. In such areas
the Infotainment system may
issue a warning that must be
accepted. Here you must pay
particular attention to one-way
streets, roads and entrances that
you are not allowed to drive into.
Radio reception
Radio reception may be disrupted by
static, noise, distortion or loss of
reception due to:
● changes in distance from the
transmitter
● multi-path reception due to
reflection
● shadowing
Theft-deterrent feature
The Infotainment system is equipped
with an electronic security system for
the purpose of theft deterrence.
The Infotainment system therefore
functions only in your vehicle and is
worthless to a thief.
8 Introduction
Control elements overview
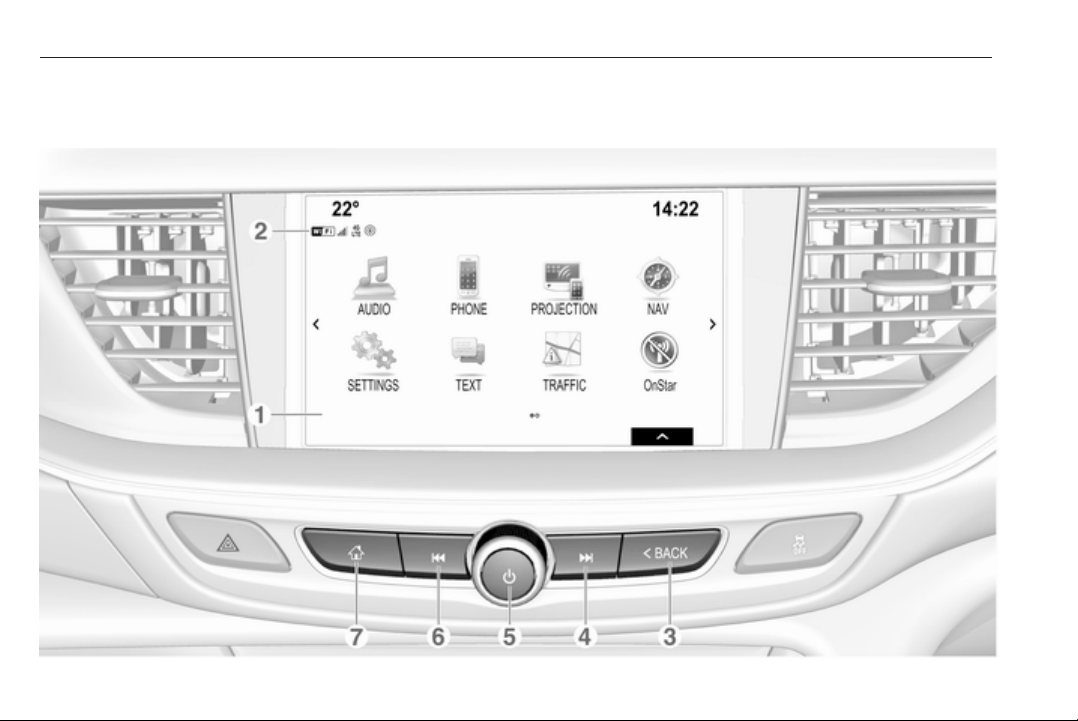
Centre display with controls

Introduction 9
1 Display/touch screen ............. 14
2 Information on the OnStar
module with Wi-Fi
connectivity and on the
hotspot connection to
another device ...................... 11
3 BACK
Press: return to previous
screen/menu
4 v
Radio: short press: skip to
next station; long press:
seek up ................................. 31
External devices: short
press: skip to next track;
long press: fast forward ......... 37
5 X
If switched off: short press:
switch power on .................... 11
If switched on: short press:
mute system; long press:
switch power off .................... 11
Turn: adjust volume .............. 11
6 t
Radio: short press: skip to
previous station; long
press: seek down .................. 31
External devices: short
press: skip to previous
track; long press: fast
rewind ................................... 37
7 ;
Short press: display home screen
Long press: start phone
projection
Steering wheel controls
1 s
Short press: take phone call . 69
or activate speech
recognition ............................ 61
or interrupt a prompt and
speak directly ........................ 61
Long press: activate voice
pass-thru (if supported by
phone) ................................... 61
2 n
Press: end/decline call .......... 69
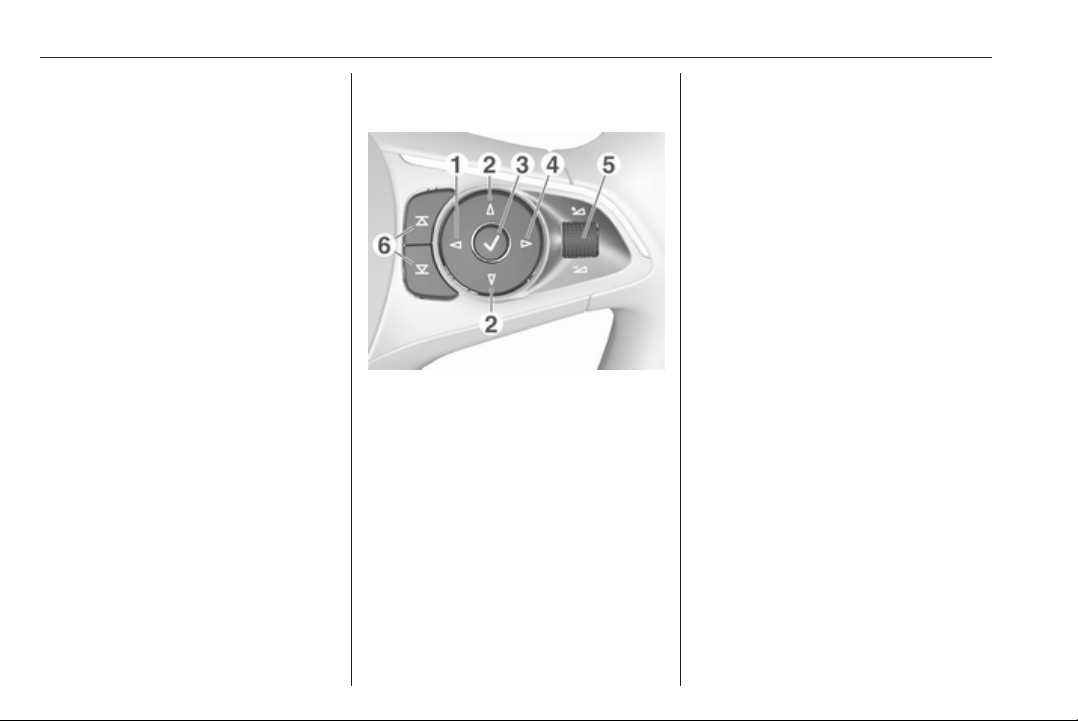
10 Introduction
or deactivate speech
recognition ............................ 61
or activate/deactivate
mute function ........................ 11
For a description of all other controls,
see Owner's Manual.
1 m
Press: display menu for
application selection;
return to next higher menu
level on the Driver
Information Centre (see
images below)
2 d / c
Short press: select menu
item on the Driver
Information Centre
Long press: fast-scroll
through a long contacts list
on the Driver Information Centre
3 9
Press: confirm selection
on the Driver Information Centre
4 n
Press: display applicationspecific main menu on the
Driver Information Centre
5 À / Á ............................... 11
Press upwards: increase volume
Press downwards:
decrease volume
Introduction 11
6 k / l
Radio: press to select
next / previous favourite on
the Driver Information
Centre ................................... 18
Media: press to select
next / previous track on the
Driver Information Centre ...... 37
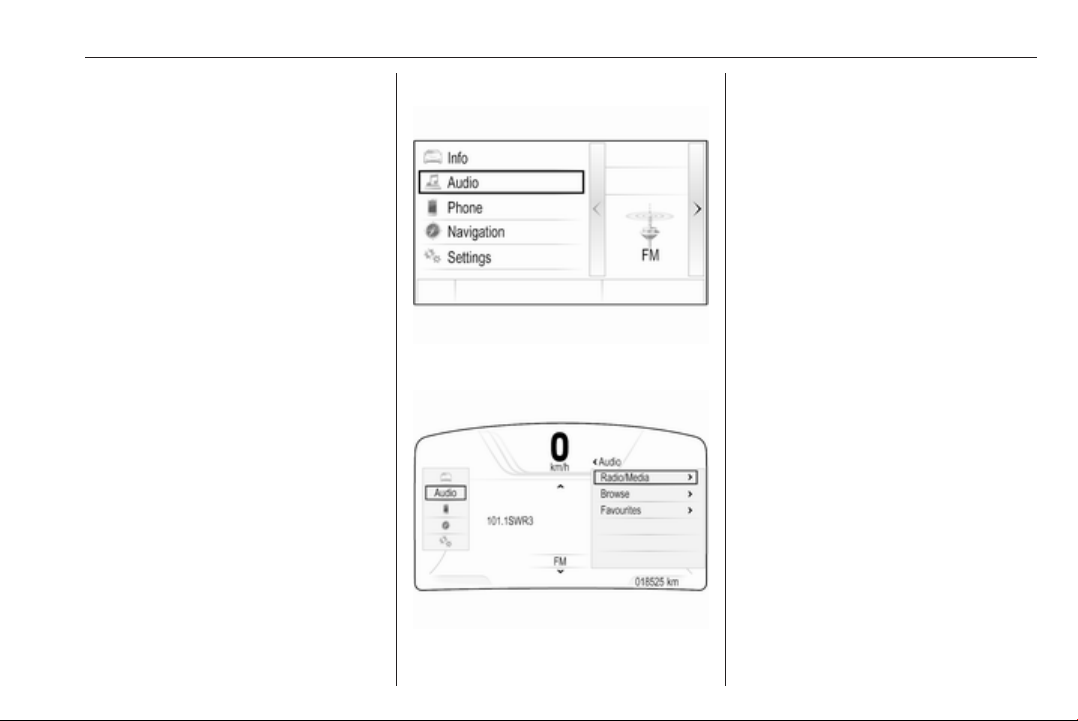
Driver Information Centre (midlevel):
Driver Information Centre (uplevel):
The uplevel Driver Information Centre
enables switching between two
different display modes (themes),
Tour and Sport.
The image above shows the Tour
theme (for changing the display
theme, see Owner's Manual).
Usage
Switching Infotainment system on/off
Press X briefly. After switching on,
the last selected Infotainment source
becomes active.
Automatic switch-off
If the Infotainment system is switched
on by pressing X while the ignition is
switched off, it switches off again
automatically after 10 minutes.
Setting the volume
Turn X.
The current setting is shown on the
display.

12 Introduction
When the Infotainment system is
switched on, the last selected volume
is set, provided that the volume is
lower than the maximum start-up
volume 3 26.
Auto volume
When Auto volume is activated
3 26, the volume is adapted
automatically to compensate for the
road and wind noise while driving.
Mute
Briefly press X to mute the audio
sources.
To cancel mute again: turn X or press
it briefly.
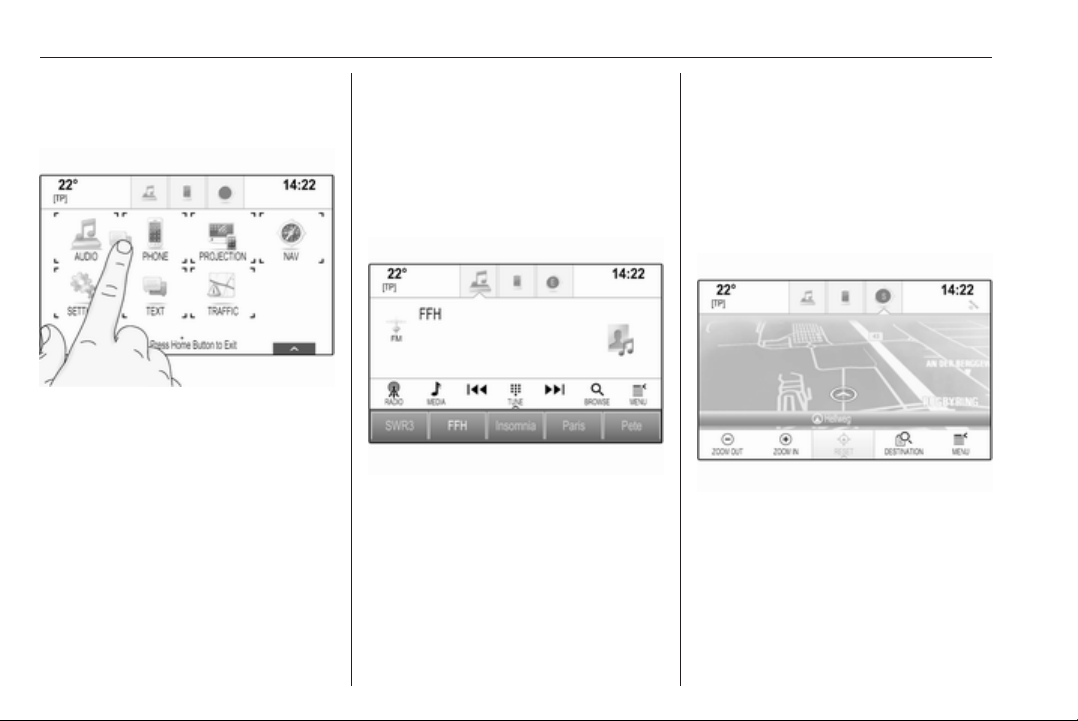
Modes of operation
Radio
Press ; and select AUDIO on the
home screen. Select RADIO in the
interaction selector bar.
For a detailed description of the radio
functions 3 31.
External devices
Press ; and select AUDIO on the
home screen. Repeatedly select
MEDIA in the interaction selector bar.
For a detailed description on
connecting and operating external
devices 3 36.
Navigation
Press ; and select NAV on the home
screen.
The navigation map showing the area
around the current location is
displayed.
For a detailed description of the
navigation functions 3 42.
Phone
Before the phone portal can be used,
a connection has to be established
between the Infotainment system and
the mobile phone.
For a detailed description of
preparing and establishing a
Bluetooth connection between the
Infotainment system and a mobile
phone 3 66.
If the mobile phone is connected,
press ; and then select PHONE on
the home screen.
The main menu of the phone portal is
displayed.
For a detailed description of mobile
phone operation via the Infotainment
system 3 69.
Phone projection
To show specific apps of your
smartphone on the Infotainment
system, connect your smartphone.
Press ; and then select
PROJECTION on the home screen.
Depending on the smartphone
connected, a main menu with
different selectable apps is displayed.
For a detailed description 3 39.
App shop
To download additional apps to the
Infotainment system, select SHOP.
For a detailed description 3 39.
OnStar
To display a menu with the OnStar
Wi-Fi settings, select OnStar.

For a detailed description, see
Owner's Manual.
Introduction 13
14 Basic operation
Basic operation
Basic operation ............................ 14
Menu operation ............................ 16
Keyboards .................................... 17
Favourites .................................... 18
Contacts ....................................... 22
Tone settings ............................... 26
Volume settings ........................... 26
System settings ........................... 27
Basic operation
The centre display has a touchsensitive surface that allows direct
interaction with the screen.
m screen button
To return to the next higher menu
level, select m.
Exit screen button
To leave the menu currently active,
select Exit.
Selecting or activating a screen button or menu item
Touch a screen button or menu item.
The corresponding system function is
activated, a message is shown, or a
submenu with further options is
displayed.
Notice
In subsequent chapters, the
operating steps for selecting and
activating a screen button or menu
item via the touch screen will be
described as "...select <button
name>/<item name>".
Moving items
Basic operation 15
Touch and hold the element you wish
to move until frame marks appear
around the icons. Move your finger to
the desired location and release the
element.
Notice
Constant pressure must be applied
and the finger must be moved at a
constant speed.
All other items are rearranged.
Press ; on the control panel to exit
edit mode.
Notice
In subsequent chapters, the
operating steps for moving a screen
element via the touch screen will be
described as "...drag the...icon to..."
or "...drag the...menu item to...".
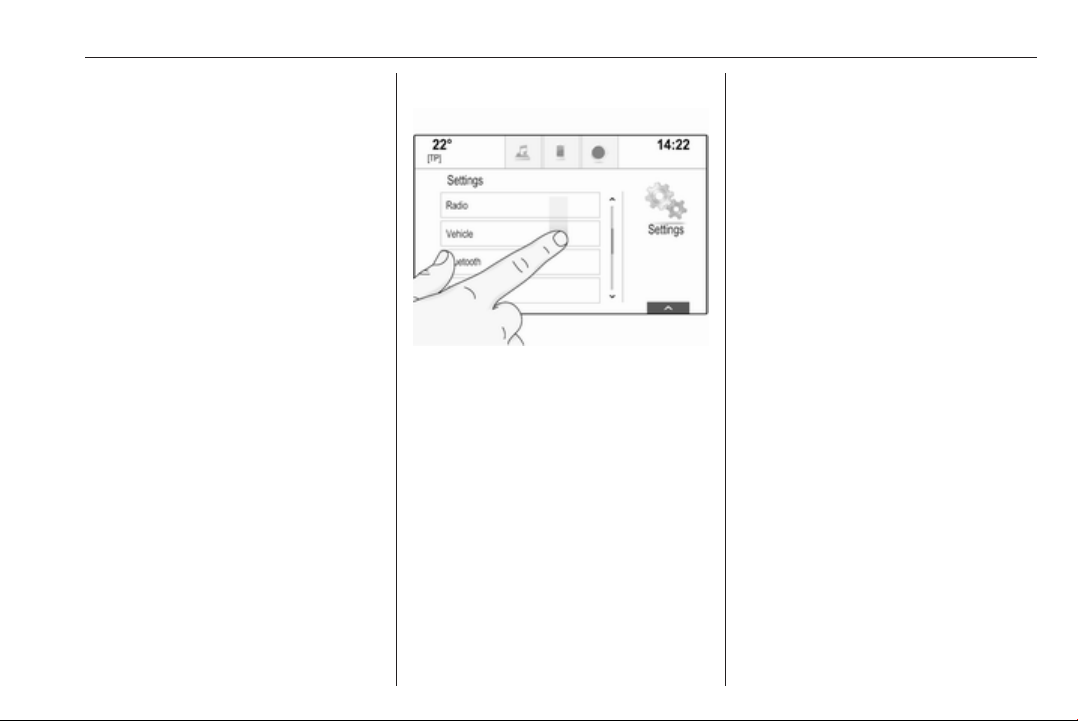
Scrolling lists
If there are more items available than
presentable on the screen, the list
must be scrolled.
To scroll through a list of menu items,
you may optionally:
● Place your finger anywhere on
the screen and move it upwards
or downwards.
Notice
Constant pressure must be applied
and the finger must be moved at a
constant speed.
● Touch o or n at the top or
bottom of the scroll bar.
● Move the slider of the scroll bar
up and down with your finger.
● In alphabetically ordered lists,
touch the respective letter in the
vertical keyboard. The list jumps
to the corresponding location
within the list.
To return to the top of the list, touch
the list title.
Notice
In subsequent chapters, the
operating steps for scrolling to a list
item via the touch screen will be
described as "...scroll to <item
name>".
16 Basic operation
Menu operation
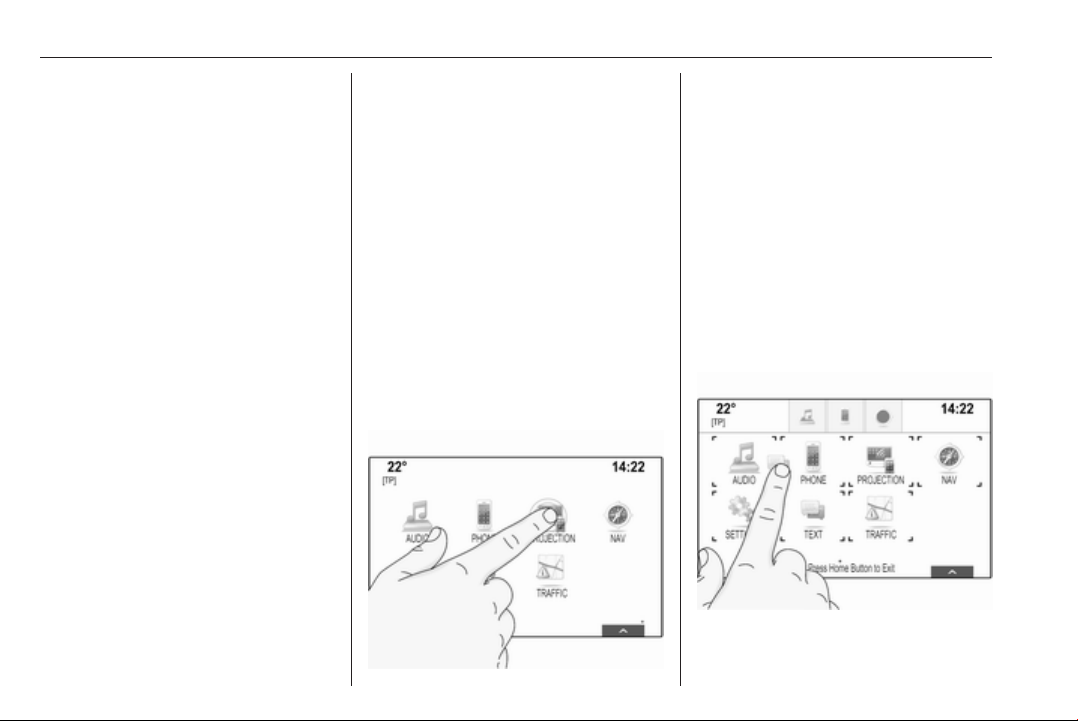
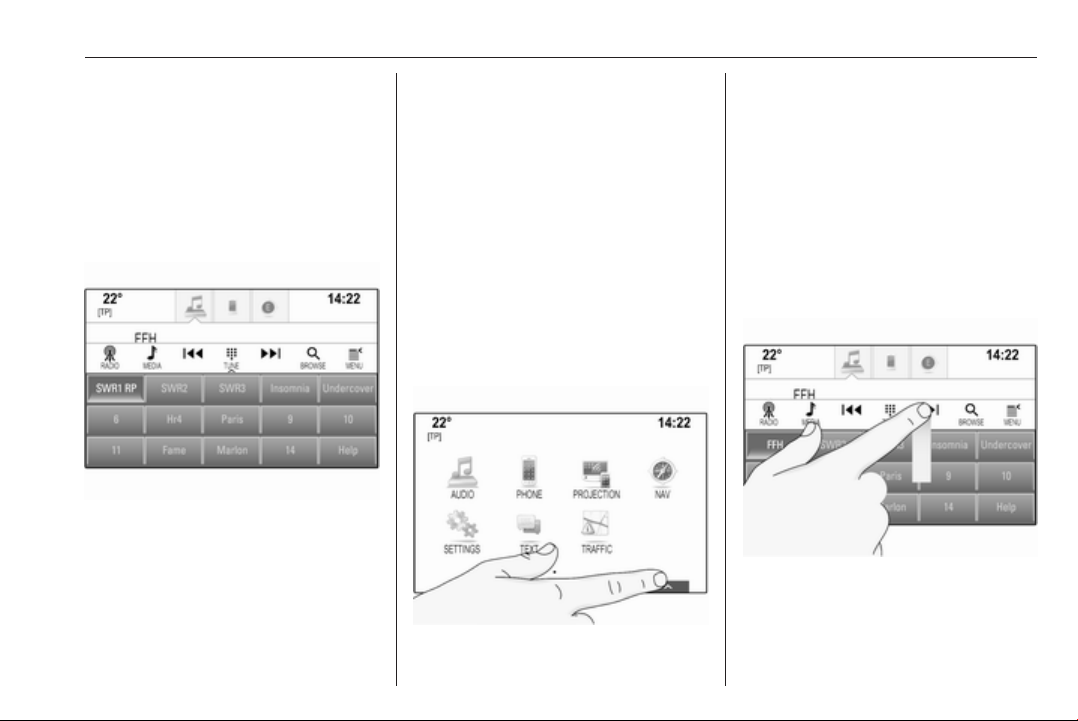
Home screen
The home screen is shown on the
centre display.
All applications installed may be
accessed from the home screen.
To personalise the home screen,
drag the icon you wish to move to its
new position. Release the icon to
drop it in the respective location.
Press ; on the control panel to exit
edit mode.
Notice
If there is a second home page
available, the icons can be placed on
both pages. Drag the icon to the right
edge of the display to scroll to the
next page.
Application tray
The application tray is located in the
top centre of the screen and is
accessible from all main menus.
Three to five application icons may be
stored in the application tray.
Some application icons dynamically
adapt to the current situation, e.g.
indicating that you missed a phone
call.
The application tray can be
personalised by moving items into
and out of the application tray area.
Interaction selector bar
The interaction selector bar is located
at the bottom of the screen and is
accessible from all main menus.
Using the interaction selector bar, you
may change the different views within
one application or perform
application-specific actions, e.g. start
a speech recognition session.
To display the interaction selector bar
when it is not shown on the display,
select n at the bottom of the screen.
Basic operation 17
Messages
In the case of a system event, before
the execution of a system function, or
due to an outside trigger, e.g.
incoming phone call, you may be
prompted with a message.
Select one of the available options.
If ignored, most of the messages are
dismissed automatically after a
certain period of time. Alerts that are
not dismissed automatically remain
on the screen until they are
acknowledged or the trigger becomes
invalid.
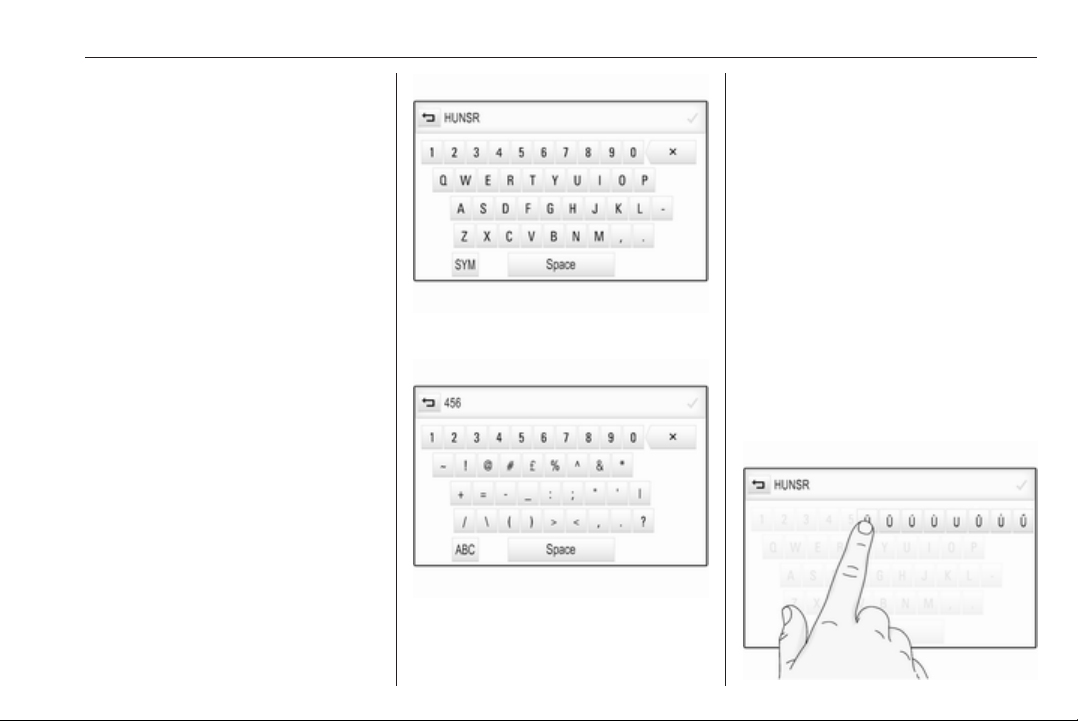
Keyboards
Keyboard
Letter keyboard:
Symbol keyboard:
Depending on the application or
function currently active, the
keyboard menu is displayed
differently.
To switch to the symbol keyboard,
select Sym.
To switch to the letter keyboard,
select ABC.
Entering characters
To enter a character, touch the
respective screen button. The
character is entered upon release.
Touch and hold a letter screen button
to display associated letters in a letter
pop-up menu. Release and then
select the desired letter.
18 Basic operation
To confirm your input, select the
respective confirmation screen
button.
Autocomplete function
If a character sequence has been
entered once, it is stored within the
system and may be recalled by the
autocomplete function.
As soon as one character (letter or
digit) is entered, the autocomplete
function becomes active. Every
additional character entered is
considered in the matching process,
reducing the list of autocomplete
matches.
Select o next to the characters
entered to display a list of all
autocomplete matches.
Notice
Above the o screen button, the
number of available options is
displayed. It changes according to
the number of matches found.
Select the respective list item. The
keyboard is redisplayed with the
respective list entry shown in the
entry field.
Editing text
To place the cursor, touch the
respective position within the text.
Enter your changes.
Depending on the application, select
╳ to delete one entered character.
Touch and hold ╳ to delete all
characters.
Select the respective confirmation
screen button to confirm an input.
Mixed case characters
In most cases, only capital letters may
be entered.
If mixed case character recognition is
available, an additional Shift screen
button is displayed.
To activate the shift function and
capitalise one letter, select Shift.
The function is automatically
deactivated after one letter has been
entered.
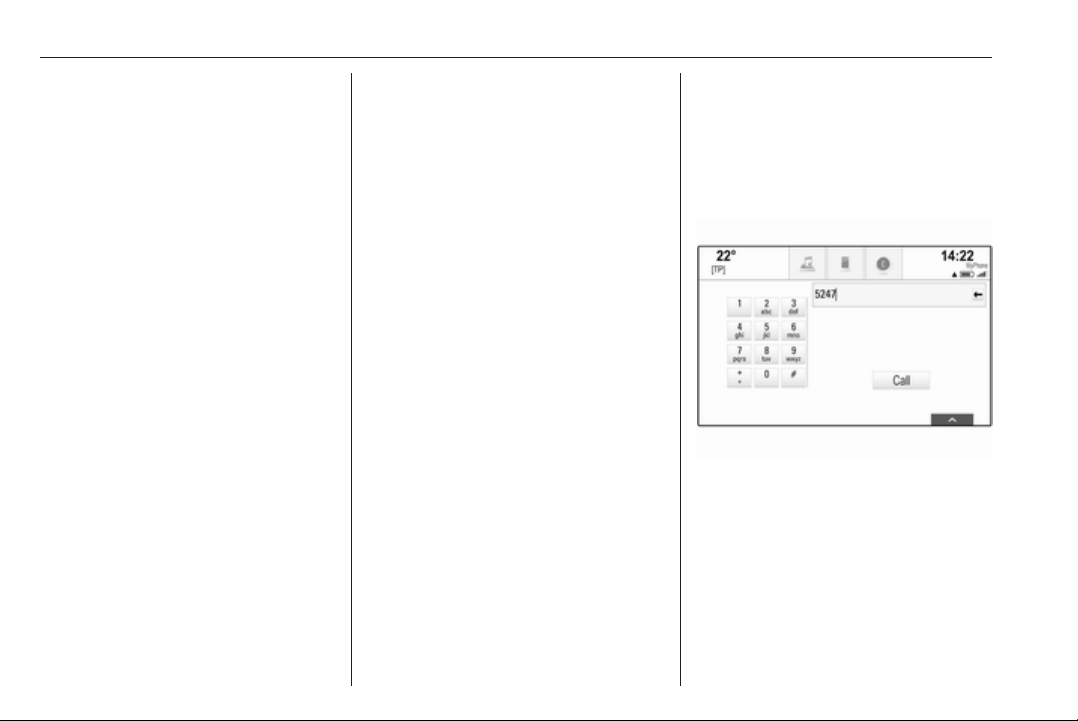
Keypad
If only a number or PIN code have to
be entered, a keypad is displayed.
Depending on the application or
function currently active, the keypad
menu is displayed differently.
For a detailed description of how to
enter characters and change entered
text, see above.
Favourites
A range of different information may
be stored as favourites, e.g.:
● radio stations
● music tracks
Basic operation 19
● albums or artists
● telephone numbers
● destinations and routes
● POIs
● contact entries
● tone settings
● home screen applications
60 individual favourite locations are
available, displayed as five favourites
per row.
They can be displayed in a one-row
view or in a three-row view.
If a favourite location is occupied, the
favourite screen button displays the
label text of the respective favourite.
If a favourite location is empty, the
position number of the favourite
location (1 to 60) is indicated.
Displaying favourites
The favourites list is accessible from
all menus.
To display one row of favourites when
no interaction selector bar is shown at
the bottom of the screen:
Select n.
To display one row of favourites when
an interaction selector bar is shown
on the screen:
Place your finger on the interaction
selector bar and move it upwards until
one row of favourites becomes
visible.
Notice
Constant pressure must be applied
and the finger must be moved at
constant speed.
To display three rows of favourites,
drag the favourites list up further.

20 Basic operation
Scrolling through favourites pages
The favourites page is visible in the
one row or the three row view. To
scroll through the favourites pages,
place your finger anywhere on the
favourites page and move it left or
right.
The next or previous page of
favourites is displayed.
Notice
Constant pressure must be applied
and the finger must be moved at
constant speed.
When reaching the beginning or the
end of the favourites pages, the whole
list is wrapped.
Notice
At the bottom of the screen,
indication marks designate how
many favourites pages may be
accessed and which page is
currently displayed. The number of
indication marks adapts to the view
chosen (more pages in one-row
view, less pages in three-row view).
Storing favourites
Favourites may be stored from the
home screen, the audio application,
the navigation application or the
phone application.
Reveal the favourites list and scroll to
the respective favourites page.
Touch and hold the respective
favourite screen button.
If there is only one storable item on
the screen, a beeping sound is given
out and the item is stored to the
respective screen button.
If there is more than one storable item
on the screen, the favourites page is
minimised and the previously shown
menu is redisplayed. Select the item
you wish to store as a favourite. A
beeping sound is given out and the
item is stored to the respective screen
button.
A few examples for storing favourites
are given below.
Example: Radio station
Press ; and select AUDIO on the
home screen.
To activate the desired waveband,
repeatedly select RADIO in the
interaction selector bar.
Seek for the station you wish to store
as a favourite 3 31.
To store this station as a favourite,
reveal the favourites list and scroll to
the respective favourites page.
Touch and hold the respective
favourite screen button until a beep
sounds. The station is stored as a
favourite.
Example: Album
Press ; and select AUDIO on the
home screen. Repeatedly select
MEDIA in the interaction selector bar
until the desired audio source is
active.
Select BROWSE to activate the
browse menu and then select
ALBUMS 3 37.
To store one of the albums as a
favourite, reveal the favourites list
and scroll to the respective favourites
page.
Basic operation 21
Touch and hold the respective
favourite screen button. The
favourites page is minimised and the
list of albums is redisplayed.
Select the album you wish to store as
a favourite. The selected album is
stored as a favourite.
Example: Destination
Press ; and select NAV on the home
screen.
Select DESTINATION, select
RECENT in the interaction selector
bar and then touch the desired
destination from the list 3 49.
To store the address as a favourite,
reveal the favourites list and scroll to
the respective favourites page.
Touch and hold the respective
favourite screen button. The selected
address is stored as a favourite.
Example: Telephone number
Press ; and select PHONE on the
home screen.
Select KEYPAD and enter the
number you wish to call 3 69.
To store this number as a favourite,
reveal the favourites list and scroll to
the respective favourites page.
Touch and hold the respective
favourite screen button. The number
is stored as a favourite.
Retrieving favourites
Display a favourites page (see above)
and scroll to the desired favourites
page (if necessary).
Notice
Unavailable favourites are greyed
out.
Select the respective favourite screen
button. Depending on the kind of
favourite selected, a radio station or
track is played, a phone call is
initiated, a route is calculated or an
application is started.
Notice
The active favourite is highlighted.
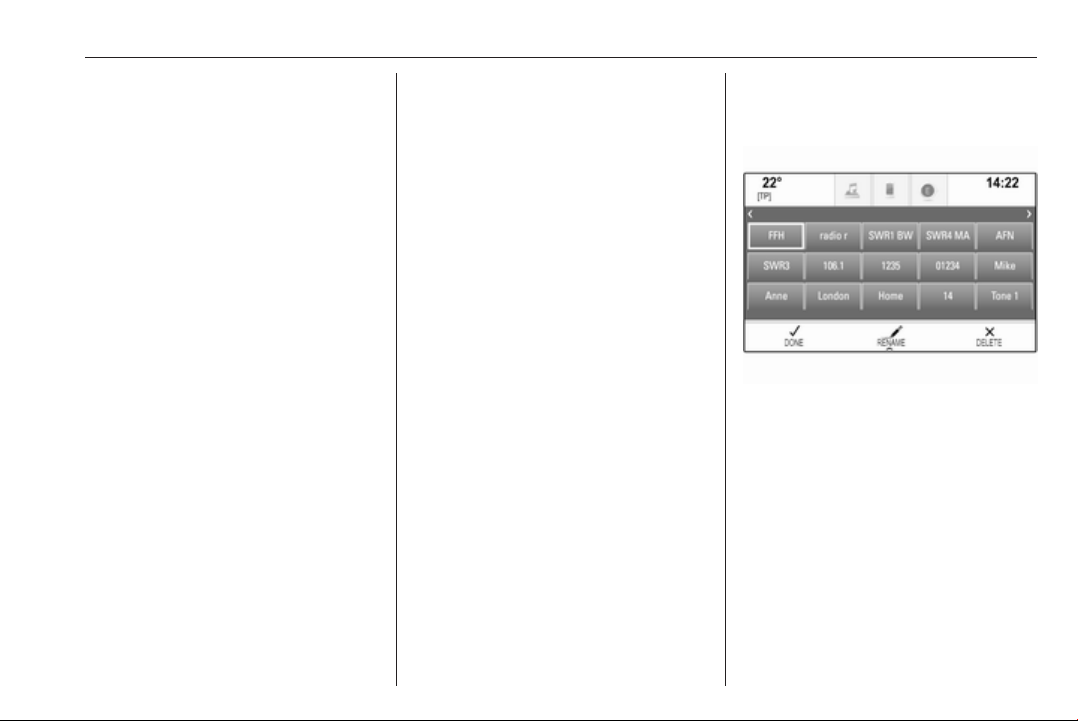
Editing favourites
Select SETTINGS on the home
screen, Radio and then Manage
Favourites. A three-row view of the
favourites list is displayed with the
editing options shown in the
interaction selector bar.
Renaming favourites
Scroll to the respective favourites
page.
Select the favourite you wish to edit.
Select RENAME.
A keyboard opens up with the current
favourite label text displayed in the
entry field as well as in the label
preview area.
Enter the new label text and select
Save. You are returned to the
favourites page.

22 Basic operation
Select H at the bottom of the screen
to reveal the interaction selector bar
and then select DONE to return to the
settings menu.
Deleting favourites
Scroll to the respective favourites
page.
Select the favourite you wish to
delete.
Select DELETE. The favourite and all
associated data are deleted.
Select DONE to return to the settings
menu.
Moving favourites
Scroll to the respective favourites
page.
Drag the favourite you wish to move
to its new position.
To store a favourite in a location
beyond the favourites page currently
visible, drag it to the p or q symbols
on top of the favourites page. The list
starts scrolling. To stop scrolling,
navigate back to the favourites page
area.
Select DONE to confirm the action
and return to the settings menu.
Defining the number of favourites shown
Press ; and select SETTINGS on
the home screen. Select Radio and
then Number of Favourites Shown.
Activate the desired number of
favourites to be displayed.
Notice
If the number of favourites stored
exceeds the number of favourites
activated in the settings menu, the
additionally stored favourites are not
deleted but just hidden from the
view. They may be reactivated by
increasing the number of viewable
favourites.
Contacts
Two different types of contacts lists
may be accessed from the
Infotainment system:
● contacts lists downloaded from
Bluetooth devices or other
external sources
● vehicle contacts list
Notice
A maximum of 1000 contacts may
be stored in the vehicle contacts list.
There is no limit for downloaded
contacts lists.
The contacts list displayed upon first
access differs depending on the
application active and the devices
connected.
Changing the source
To display a contacts list, press ;,
activate the phone or navigation
application and then select
CONTACTS in the interaction
selector bar.
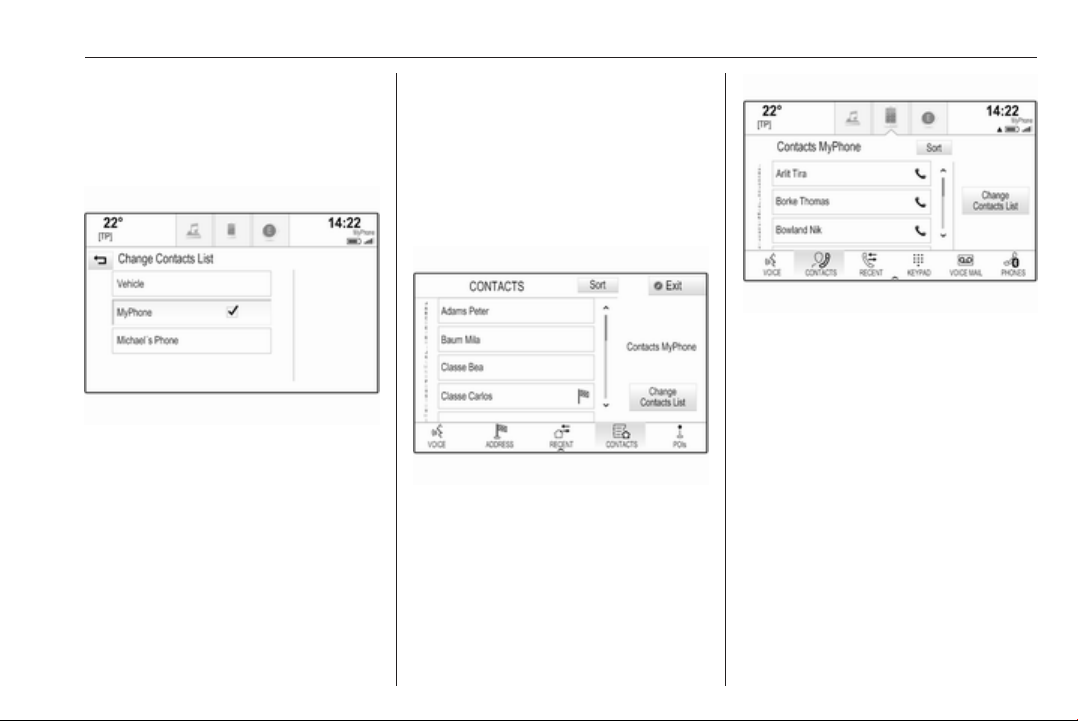
Basic operation 23
Select Change Contacts List on the
right side of the screen. A list of all
contact sources available is
displayed. The currently active
contacts list is marked with 9.
Select the desired contacts list. The
respective list is displayed.
Notice
The system remembers a list chosen
within an application. When reentering the contacts list from this
application, the list previously
selected is redisplayed.
Using the contacts list
To display a contacts list, press ;,
activate the phone or navigation
application and then select
CONTACTS in the interaction
selector bar.
Navigation application:
Phone application:
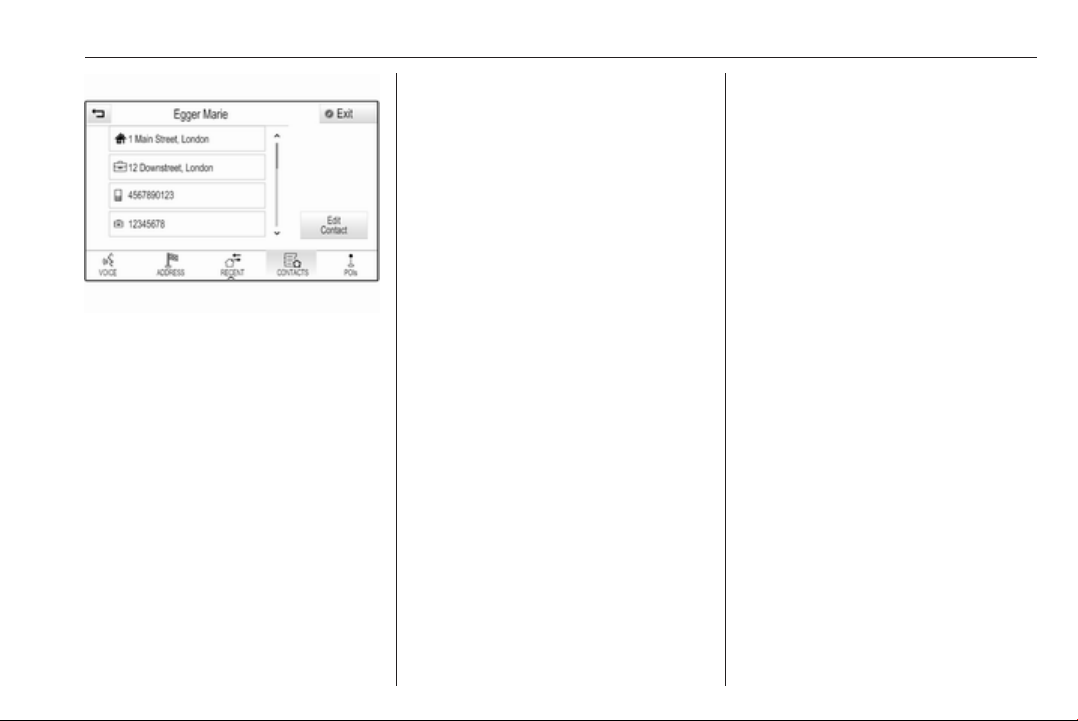
To display the contact details view,
select one of the entries from the list.
The contact details view may
comprise:
● first name and last name
● several phone numbers
● several email addresses
● several addresses (e.g. home
and work)
● in the vehicle contacts list:
category entry
24 Basic operation
● in the vehicle contacts list: notes
field
● for POI entries: information on
business hours, menu (e.g.
restaurant), prices etc.
Notice
The data is ordered depending on
the application active, e.g. in the
phone application, the phone
numbers are displayed first.
Select the desired entry.
Adding new contacts
To add information from the
application menus to the vehicle
contacts list, open the respective
application.
Navigation application: Select or
enter a destination 3 49. The
destination details view is displayed.
Select Save. A menu is displayed.
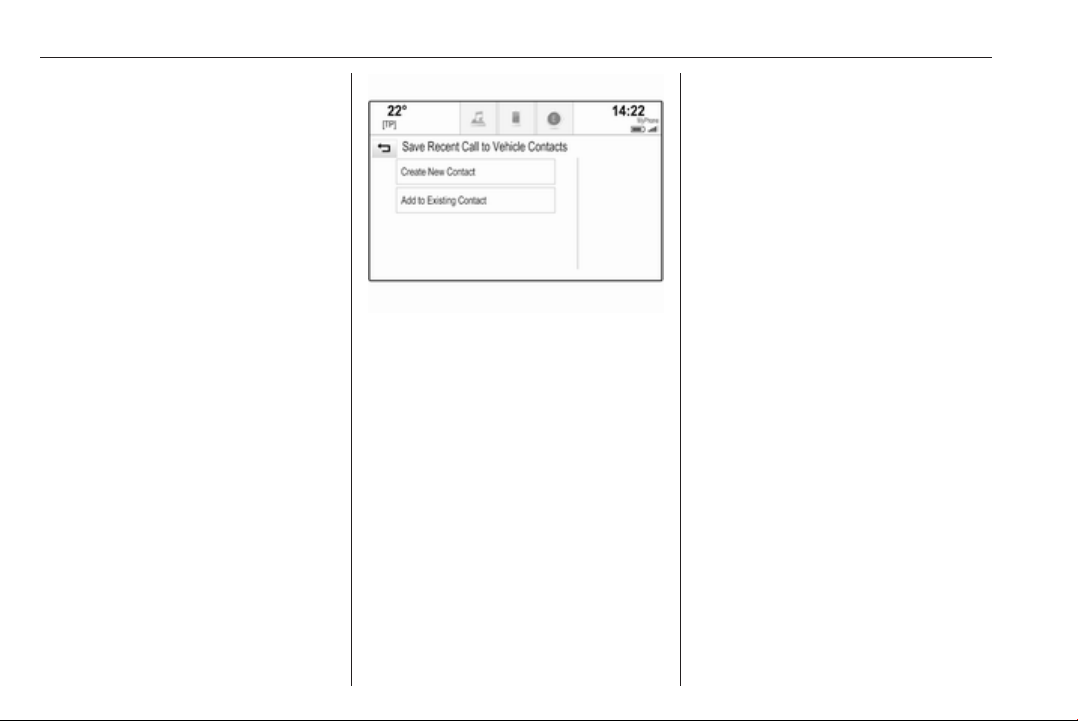
Phone application: Select RECENT.
Select w beside the phone number
you wish to add to the contacts list. A
menu is displayed.
Select one of the options.
Create New Contact
A data category selection menu is
displayed.
Select the respective data category
for the information you wish to store,
e.g. work address or mobile phone.
The contact details view is displayed.
Notice
The data categories presented in the
new menu correspond to the
information you wish to store, e.g. if
the information to be stored is an
address, only address types are
presented in the list.
Complete the entry and select Save
to save the contact.
Add to Existing Contact
The vehicle contacts list is displayed.
Select the desired contact.
The contact details view is displayed
with the information to be added
shown separately on the right side of
the screen.
Select the respective data category
for the information you wish to store,
e.g. work address or mobile phone.
If you choose an existing data
category, the existing information is
overwritten.
Select Save to save the new
information.
Editing contacts
To edit a contact, open the vehicle
contacts list. Select the desired
contact entry in the vehicle contacts
list.
Select Edit Contact on the right side
of the screen.
Basic operation 25
The editing view is displayed.
Modifying information
Select the field you wish to modify.
Depending on the field selected, the
keyboard or keypad is displayed.
Enter your changes 3 17.
Select Save in the contact details
view to save your changes.
Adding new information
Select the field where you wish to
enter additional information.
If you wish to create a new field for a
data category already existing, e.g. a
second mobile phone number, select
w in the respective data field.
Notice
The w screen button is only
displayed if it is possible to add more
information for that data category.
Depending on the field selected, the
keyboard or keypad is displayed
3 17.
Enter the new data and select the
screen button in front of the entry
field.
Select Save in the contact details
view to save your changes.
Deleting contacts
Deleting a single contact
To delete a single contact, open the
vehicle contacts list. Select the
desired contact entry in the vehicle
contacts list.
Select Edit Contact on the right side
of the screen.
To delete the contact entry and all
associated information, select
Delete. A confirmation message is
displayed.
Confirm the message. The entry is
deleted.
Delete the whole vehicle contacts list
To delete the whole vehicle contacts
list, open the vehicle contacts list.
Select Change Contacts List on the
right side of the screen. A list of all
available contacts sources is
displayed. The currently active
contacts list is marked with 9.
Select the ─ screen button next to
Vehicle. A confirmation message is
displayed.
Confirm the message to delete the
list.
Sorting the contacts lists
By default, the lists are ordered
alphabetically by first name. If there is
no first name available, the last name
is taken instead. If there is no first or
last name, one of the first characters
entered is used as sorting criteria.
The sorting order may be changed if
first name and last name are stored in
two different fields.
To change the sorting order, select
Sort.
Choose the desired sorting order.
The list is resorted accordingly.
26 Basic operation
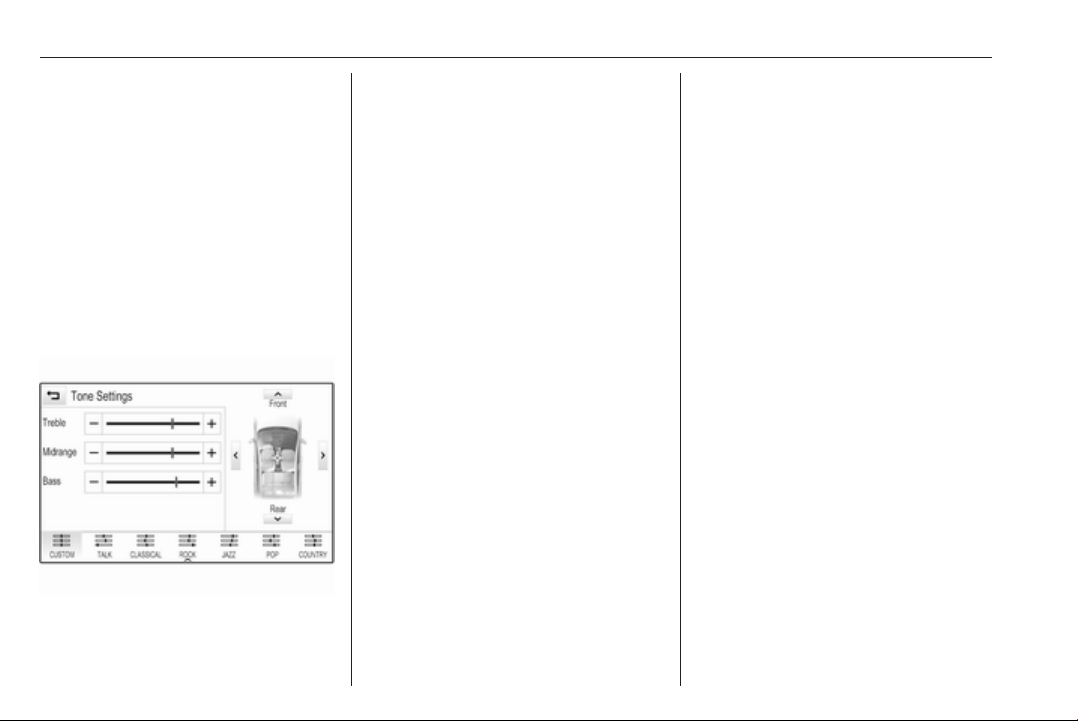
Tone settings
In the tone settings menu, the tone
characteristics can be set. The menu
may be accessed from each audio
main menu.
Notice
A customised set of tone settings
may be stored as a favourite. For a
detailed description 3 18.
To open the tone settings menu,
select MENU in the respective audio
main menu. Select Tone Settings.
Treble
Use this setting to enhance or
attenuate the high frequencies of the
audio sources.
Adjust the setting by repeatedly
touching ─ or w.
Alternatively, move the slider on the
settings bar.
Midrange
Use this setting to enhance or
attenuate the midrange frequencies
of the audio source.
Adjust the settings by repeatedly
touching ─ or w.
Alternatively, move the slider on the
settings bar.
Bass
Use this setting to enhance or
attenuate the deep frequencies of the
audio sources.
Adjust the settings by repeatedly
touching ─ or w.
Alternatively, move the slider on the
settings bar.
Balance and fader
In the illustration at the right side of
the menu, define the point within the
passenger compartment which is to
have the best sound.
To adjust the settings, touch n, o,
p and q.
To quickly change between the front
and rear speakers, select Front or
Rear at the top and bottom of the
vehicle diagram.
Equalizer modes
Select one of the screen buttons in
the interaction selector bar to
optimise the tone for the specific
styles of music.
Select CUSTOM if you wish to define
the tone settings yourself.
Volume settings
Maximum startup volume
Press ; and select SETTINGS on
the home screen.
Basic operation 27
Scroll through the list and select
Radio and then Maximum Start-Up
Volume.
Touch ─ or w to set the desired
volume.
Automatic volume adjustment
Press ; and select SETTINGS on
the home screen.
Scroll through the list and select
Radio and then Auto Volume.
To adjust the degree of volume
adaptation, set Auto Volume to one of
the available options.
Off: no enhancement of volume with
increasing vehicle speed.
High: maximum enhancement of
volume with increasing vehicle
speed.
Volume of traffic announcements
To adjust the volume of traffic
announcements, set the desired
volume while a traffic announcement
is given out by the system. The
respective setting is then stored by
the system.
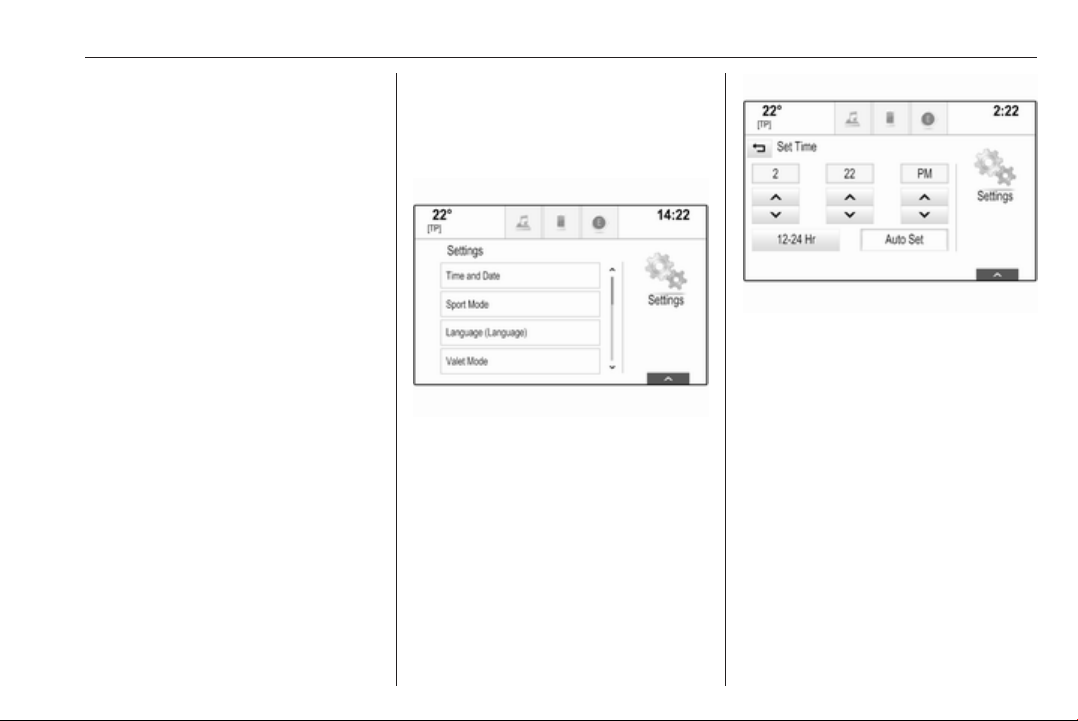
System settings
Various settings and adaptions for the
Infotainment system can be made via
the SETTINGS application.
Time and Date
Press ; and select SETTINGS on
the home screen.
Select Time and Date.
Set time
Select Set Time to enter the
respective submenu.
Select Auto Set at the bottom of the
screen. Activate either On - RDS or
Off - Manual.
If Off - Manual is selected, adjust
hours and minutes by touching n or
o.
Touch 12-24 Hr on the right side of the
screen to select a time mode.
If 12-hour mode is selected, a third
column for AM and PM setting is
displayed. Select the desired option.
Set date
Select Set Date to enter the
respective submenu.
28 Basic operation
Notice
If date information is automatically
provided, this menu item is not
available.
Select Auto Set at the bottom of the
screen. Activate either On - RDS or
Off - Manual.
If Off - Manual is selected, adjust the
date by touching n or o.
Clock display
Select Clock Display to enter the
respective submenu.
To turn off the digital clock display in
the menus, select Off.
Language
Press ; and select SETTINGS on
the home screen.
Scroll through the list and select
Language.
Notice
The language currently active is
marked with 9.
Scroll through the list and select the
desired language.
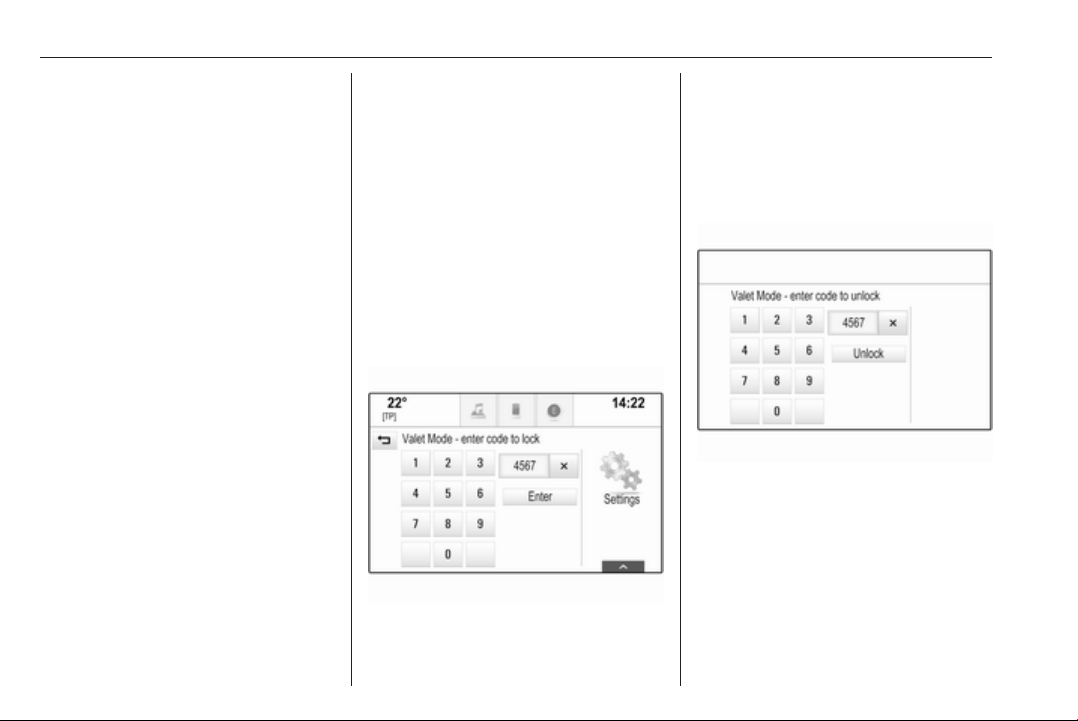
Valet mode
If valet mode is activated, all vehicle
displays are locked and no changes
may be performed within the system.
Notice
Vehicle-related messages and the
rear view camera remain enabled.
Locking the system
Press ; and select SETTINGS on
the home screen.
Scroll through the list and select Valet
Mode. A keypad is displayed.
Enter a four-digit code and select
Enter. The keypad is redisplayed.
To confirm the first input, re-enter the
four-digit code and select Lock. The
system is locked.
Unlocking the system
Turn the Infotainment system on. A
keypad is displayed.
Enter the respective four-digit code
and select Unlock. The system is
unlocked.
Forgotten PIN Code
To reset the PIN code to the default
setting, contact your workshop.
Basic operation 29
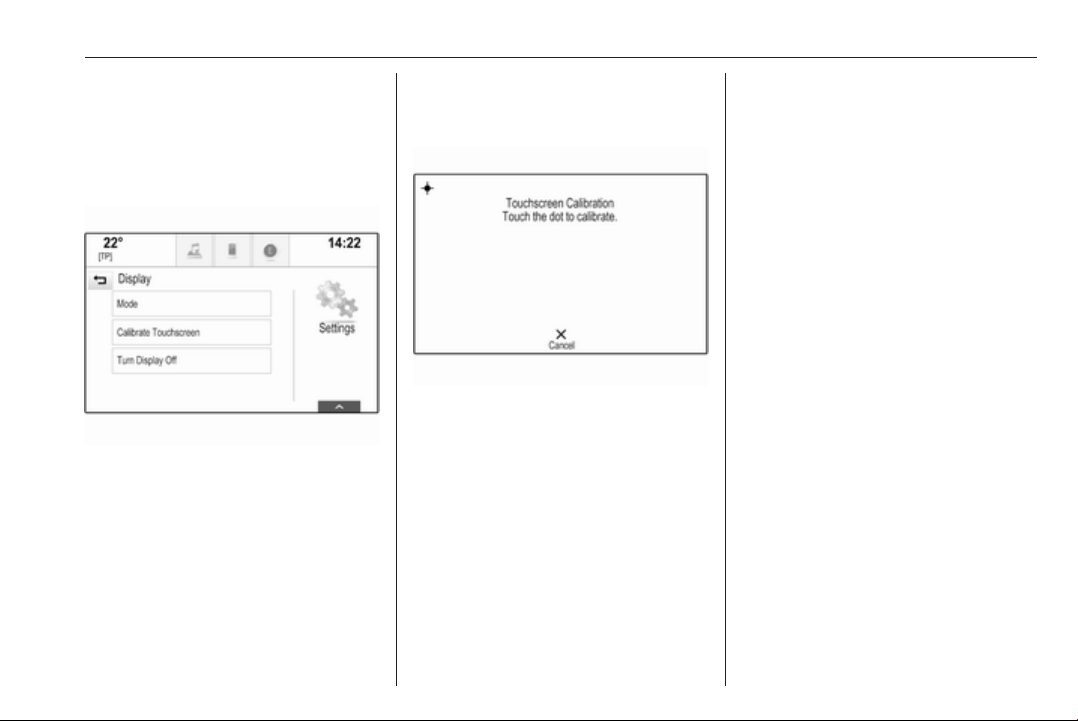
Display
Press ; and select SETTINGS on
the home screen.
Scroll through the list and select
Display.
Mode
Select Mode to enter the respective
submenu.
Depending on the external lighting
conditions, select Day or Night.
If you select Auto, the system
automatically adjusts the display.
Calibrate Touchscreen
Select Calibrate Touchscreen to
enter the respective submenu.
Follow the instructions on the screen,
touching the respective points
indicated. The touch screen is
calibrated.
Turn Display Off
Select Turn Display Off to turn off the
display.
To turn the display back on, touch the
touch screen or press a button on the
control panel.
Return to Factory Settings
Press ; and select SETTINGS on
the home screen.
Scroll through the list and select
Return to Factory Settings.
Restore Vehicle Settings
Select Restore Vehicle Settings to
restore all vehicle personalisation
settings. A warning message is
displayed.
Select Restore. The settings are
reset.
Clear All Private Data
Select Clear All Private Data to delete
the following data:
● paired Bluetooth devices
● stored phone books
● vehicle contacts list
● destination lists
● favourites
A warning message is displayed.
Select Delete. The data is deleted.
30 Basic operation
Restore Radio Settings
Select Restore Radio Settings to
reset the following data:
● tone settings
● volume settings
● speech settings
● application tray
● contacts sources
A warning message is displayed.
Select Restore. The settings are
reset.
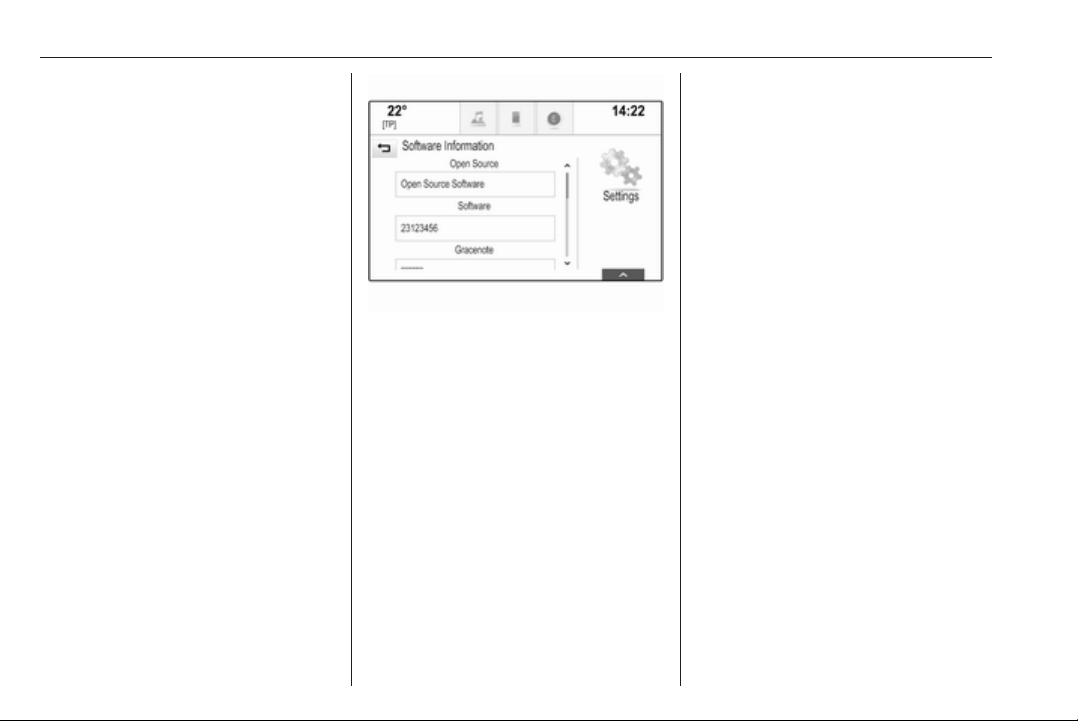
Software Information
Press ; and select SETTINGS on
the home screen.
Scroll through the list and select
Software Information.
A list of version numbers of all items
loaded to the system is displayed.
System update
To update your system software,
contact your workshop.
 Loading...