

Vauxhall Ampera Owner's Manual

Infotainment Manual
Model Year 2013
Edition: June 2012
TS 1711-A-13
0 - 1Infotainment Manual Model Year 2013 Edition: June 2012 TS 1711-A-13
VAUXHALL Ampera

Contents
Introduction .................................... 2
Radio ........................................... 19
Audio players ............................... 28
Navigation .................................... 50
Voice recognition ......................... 75
Phone .......................................... 81
Index ............................................ 92

2 Introduction
Introduction
Introduction .................................... 2
Theft-deterrent feature ................... 2
Control elements overview ............ 2
Usage ............................................ 8
Tone settings ............................... 16
Volume settings ........................... 17
Introduction
The information in this manual
supplements the Owner's Manual.
This manual describes features that
may or may not be on your specific
vehicle either because they are
optional or due to changes
subsequent to the printing of this
manual. Please refer to the purchase
documentation to confirm each of the
features found on the vehicle.
Certain descriptions, including those
for display and menu functions, may
not apply to your vehicle due to model
variant, country specifications,
special equipment, or accessories.
This manual depicts left-hand drive
vehicles. Operation is similar for righthand drive vehicles.
Keep this manual with the Owner's
Manual in the vehicle, so it will be
there if it is needed. If the vehicle is
sold, leave this manual in the vehicle.
Theft-deterrent feature
The theft-deterrent feature works by
learning a portion of the Vehicle
Identification Number (VIN) to the
infotainment system. The
infotainment system does not operate
if it is stolen or moved to a different
vehicle.
Control elements overview
Control elements overview (with navigation)
See "Navigation buttons" under
"Using the navigation system"
3 50 for more information.
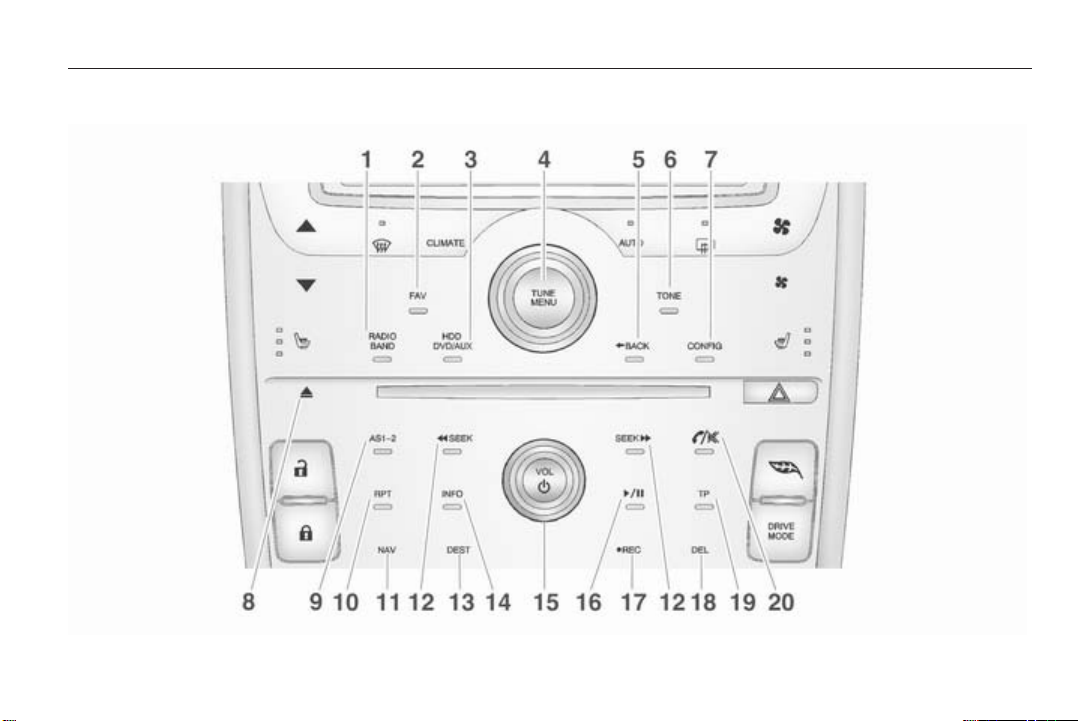
Control elements overview
Introduction 3

4 Introduction
1. RADIO BAND (AM or FM) ....19
2. FAV (Favourites) ................... 19
Press to display the
current page number
above the preset buttons.
The stored stations for
each list are displayed on
the touch-sensitive preset
buttons at the bottom of
the screen.
3. HDD/DVD/AUX (Source) ......19
Press to change audio
sources, e.g. AM-FM
radio, CD/DVD, USB and AUX.
4. TUNE/MENU ......................... 19
Turn to highlight a feature.
Press to activate the
highlighted feature.
Turn to manually select a
radio station.
5. 9BACK ................................. 50
Press to return to the
previous screen in a menu.
If on a page accessed
directly by a faceplate
button or Home page
screen button, press 9
BACK to return to previous
menu.
6. TONE .................................... 16
Press to access the sound
menu screen to adjust
bass, midrange and treble.
7. CONFIG (Configure) ............. 70
Press to adjust features for
radio, display, phone,
vehicle and time.
8. R (Eject) ............................... 28
Press to eject a disc from
the CD player
9. AS 1–2 (Autostore) ................ 19
Autostore pages
10. RPT (Repeat) ........................ 50
Press to repeat the last
voice guidance prompt.
11. NAV (Navigation) .................. 50
Press to view the
navigation map screen or
to change between a map/
audio split view or a full
map view.
12. ]SEEK or SEEK[ (Seek
Down/Seek Up) ..................... 19
Press to seek the
previous/next track.
Press and hold to quickly
reverse/fast forward
through a track. Release
the button to return to
playing speed.
For AM or FM, press to
seek the previous/next
strong station ........................ 19

Introduction 5
13. DEST (Destination) ............... 50
Press to plan a route. If
route guidance is active,
press to access the Route menu.
14. INFO (Information) ................ 50
15. VOL/m (Volume/Power) ........ 19
Press to switch the
Infotainment system on and off.
Turn to adjust the volume.
16. r (Play/Pause) ................. 28
Press to start, pause and
resume playback.
17.
oREC .................................... 37
Press to record a song or
all songs to the hard drive.
18. DEL (Delete) ......................... 37
Press to delete a song or a
list from the hard drive.
19. TP (Traffic Programme) .......50
Press to access the Traffic
Programme.
20. :(Phone/Mute) ................ 81
Bluetooth
Control elements overview (without navigation)
Infotainment system overview
The infotainment system in the
vehicle is controlled by using the
TUNE/MENU knob, preset buttons
and other buttons on the faceplate.
The TUNE/MENU knob can be turned
and then pressed to complete any of
the highlighted screen functions.
The preset buttons can be pressed to
select the appropriate screen button
function as shown on the display.
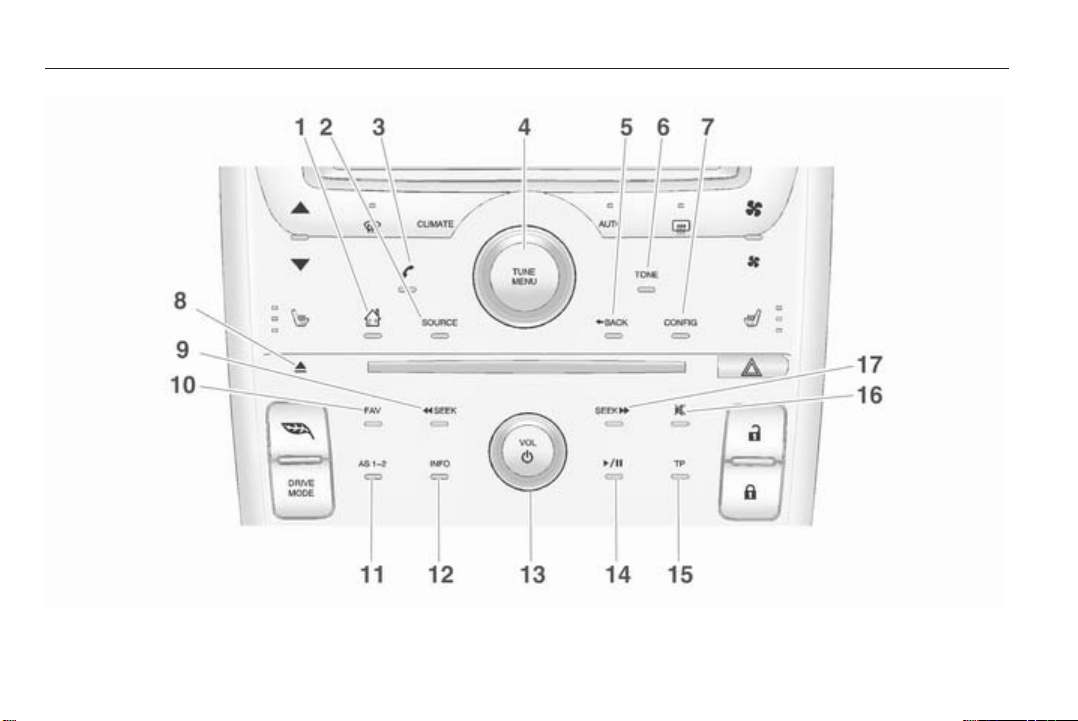
6 Introduction

Introduction 7
1. ; (Home Page) ...................... 8
2. SOURCE ............................... 19
Press to change audio
sources, e.g. AM-FM
radio, CD and AUX.
3. ( (Phone) ............................. 81
Bluetooth
4. TUNE/MENU ......................... 19
Turn to highlight a feature.
Press to activate the
highlighted feature.
Turn to manually select a
radio station.
5. 9BACK ................................. 50
Press to return to the
previous screen in a menu.
If on a page accessed
directly by a faceplate
button or Home page
screen button, press 9
BACK to return to previous
menu.
6. TONE .................................... 16
Press to access the sound
menu screen to adjust
bass, midrange and treble.
7. CONFIG (Configure): ............ 70
Press to adjust features for
radio, display, phone,
vehicle and time.
8. R (Eject) ............................... 28
Press to eject a disc from
the CD player
9. ]SEEK (Seek Down) ........... 28
Press to seek the previous
track.
Press and hold to quickly
reverse forward through a
track. Release the button
to return to playing speed.
For AM or FM, press to
seek the previous strong
station ................................... 19
10. FAV (Favourite Pages 1-6): ..19
Press to display the
current page number
above the preset buttons.
The stored stations for
each list are displayed on
the touch-sensitive preset
buttons at the bottom of
the screen.
11. AS 1–2 .................................. 19
Autostore pages
12. INFO (Information) ................ 19
Press to toggle through an
audio information screen.
13. VOL/m (Volume/Power) ........ 19
Press to switch the
Infotainment system on and off.
Turn to adjust the volume.
14. r (Play/Pause) ................. 28
Press to start, pause and
resume playback.
8 Introduction
15. TP (Traffic Programme) .......50
Press to access the Traffic
Programme.
16. : (Mute) .................................. 8
17. SEEK[ (Seek Up) ................ 28
Press to seek the next track.
Press and hold to quickly
fast forward through a
track. Release the button
to return to playing speed.
For AM or FM, press to
seek the next strong station ..19
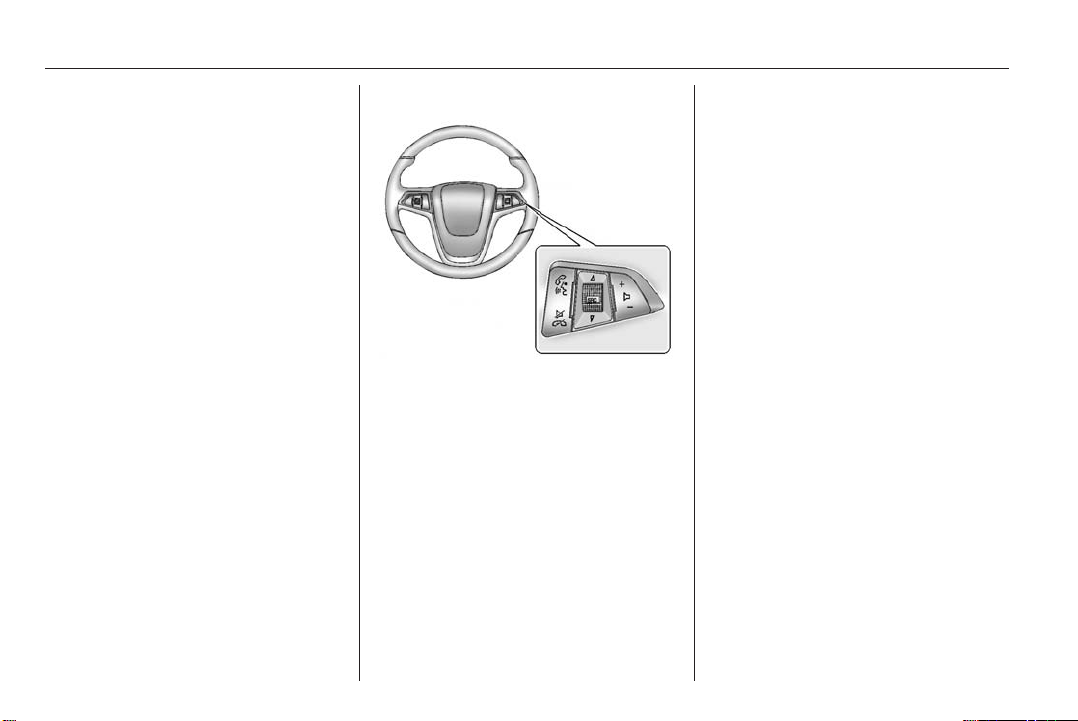
Steering wheel controls
For vehicles with audio steering
wheel controls, some audio controls
can be adjusted at the steering wheel.
3 (Push to talk): For vehicles with
Bluetooth or navigation system, press
to interact with those systems.
Bluetooth 3 81.
4 (End call/mute): Press to
silence the vehicle speakers only.
Press again to turn the sound on. For
vehicles with the Bluetooth system,
press to reject an incoming call or end
a current call.
d SRCc (Rotary control): press d or
c to select a radio band or audio
source.
Turn d or c to select the next or
previous Favourite radio station, CD
track, DVD track/chapter or MP3
track.
Press SRC to change between radio
and CD or DVD.
+ X − (Volume): Press + to increase
the volume. Press − to decrease the
volume.
Usage
Overview (with navigation)
Read this manual thoroughly to
become familiar with how the
navigation system operates.
The navigation system includes
navigation and audio functions.
Introduction 9
9 Warning
The usage of the navigation
system does not release the driver
from responsibility for a correct,
vigilant attitude in road traffic. The
related traffic regulations must
always be followed.
Only make entries (e.g.,
addresses) with the vehicle
stationary.
If a navigation instruction
contradicts traffic regulations, the
traffic regulations always apply.
Keeping the eyes on the road and the
mind on the drive is important for safe
driving. The navigation system has
built-in features intended to help with
this by disabling some features when
driving. A grayed-out function is not
available when the vehicle is moving.
All functions are available when the
vehicle is parked. Do the following
before driving:
■ Become familiar with the navigation
system operation, buttons on the
faceplate and touch-sensitive
screen buttons.
■ Set up the audio by presetting
favourite stations, setting the tone
and adjusting the speakers.
■ Set up the navigation features,
such as entering an address or a
preset destination.
■ Set up phone numbers in advance
so they can be called easily by
pressing a single button or a single
voice command for navigation
systems equipped with phone
capability.
9 Warning
The infotainment system has to be
used so that the vehicle can be
driven safely at all times. If in doubt
stop your vehicle and operate the
infotainment system while the
vehicle is stationary.
Use the navigation system to:
■ Plan a route.
■ Select a destination using the
various methods and choices.
■ Follow navigation route and map
guidance with voice prompts, only
if permitted by traffic laws, controls
and conditions.
■ Receive RDS broadcast
announcements.
9 Warning
In some areas one-way streets
and other roads and entrances
(e.g. pedestrian zones) that you
are not allowed to turn into are not
marked on the map. In such areas
the infotainment system will issue
a warning that must be accepted.
Here you must pay particular
10 Introduction
attention to one-way streets,
roads, and entrances that you are
not allowed to drive into.
Always be alert and obey traffic and
roadway laws and instructions,
regardless of the guidance from the
navigation system. Because the
navigation system uses street map
information that does not include all
traffic restrictions or the latest road
changes, it may suggest using a road
that is now closed for construction or
a turn that is prohibited by signs at the
intersection. Always evaluate
whether following the system's
directions is safe and legal for the
current conditions.
When the navigation system is turned
on, a screen may appear with
information that must be read and
acknowledged before accessing
some navigation features.
After acknowledging the start up
information, the NAV (Navigation)
and DEST (Destination) functions are
accessible. Information can now be
entered or deleted and other
functions accessed. See instructions
later in this section.
Every 50 times the vehicle is started
and the navigation system is turned
on, the Attention! screen appears.
After reading the caution, select Ok to
load the map DVD information. If Ok
is not selected, all control buttons
except for NAV (Navigation) and
DEST (Destination) can be accessed.
When getting started, set preferences
or delete information in the navigation
system using various options.
NAV (navigation) menu
Use the navigation menu screen to
access the navigation system
settings 3 50.
■ Press the NAV button to view the
navigation map screen. The map
and the current vehicle location
display.
■ Press the NAV button to change
between a map/audio split view or
a full map view.
Config Menu

Introduction 11
Press the CONFIG button to display
the Config Menu. The Config Menu is
used for changing the settings for the
audio, navigation display, phone,
vehicle configuration and time
features.
Turn the TUNE/MENU knob to scroll
through the available setup features.
Once the desired feature displays,
press the TUNE/MENU knob or press
the desired feature on the screen, to
display more options within that
feature.
Languages
To change the display language, see
“Vehicle personalisation” in the
vehicle Owner's Manual.
The vehicle supports English, French,
Spanish, German, Italian, Swedish,
Dutch, Polish, Hungarian, Czech,
Slovak, Danish, Portuguese,
Norwegian, Finnish and Turkish. The
default language is English.
English and metric unit conversion
To change the display readings
between English and metric units,
see “Driver Information Centre (DIC)”
in the Owner's manual.
Deleting personal information
The navigation system can record
and store destinations and personal
information such as names and
addresses.
It is recommended that this
information be deleted when selling
or disposing of the vehicle:
■ Last destinations
■ Address book, Favourite route,
Preset Destinations and HDD
Music Files
Storing radio station presets
Up to 36 preset stations can be
stored.
1. Press VOL/m to turn the system
on.
If viewing a map screen, press the
RADIO BAND button.
2. Select the band.
3. Seek or tune to the desired station
to select it.
4. Press and hold one of the preset
screen buttons for more than two
seconds.
5. Repeat the steps for each preset.
To change the number of preset
pages, see “Mixed-band presets”
under AM-FM radio 3 19.
Entering an address and point of interest and storing preset destinations
The vehicle must be in P (Park) to
perform these operations.
Entering an address
To more easily find a city or a street
name:
■ Enter the street name first instead
of the city name or vice versa.
■ Enter more characters or reduce
the number of characters to reduce
or expand the available options.

12 Introduction
To set a destination by entering a
street name:
1. Press the DEST button.
2. Press the Enter address button on
the touch screen.
3. Select the street name field. Enter
the street name. Do not enter
directional information or street
type. Use the space T screen
button between street and city
names. Use the backspace _
screen button to delete an
incorrect character.
A list displays if four or fewer
names are available. If there are
more than four, there is a match
counter with a number of available
streets. Press the List button to
view the list and select the street.
4. Press the country name field on
the touch screen to change it. The
last country name is automatically
recalled.
5. Select the city from the list or enter
the city name.
6. Enter the house number. This
field is automatically selected.
7. Press the Ok screen button. The
address information screen
displays the address entered.
8. Press the Start screen button if
correct. The route will calculate.
9. Select the route preference for
Fast, Short or Easy. The system
highlights the route.
10. Press the Start screen button and
the route is calculated.
“Address entry” under Destination
3 61.
Entering a point of interest (POI)
To set a destination by entering a
point of interest (POI):
1. Press VOL/m to turn the system
on.
2. A caution could appear. Press
Ok to proceed.
3. Press the DEST button.
4. Press the Points of Interest
screen button.
5. Enter the specific title of the POI
in the POI name space. If four or
fewer names are available, a list
displays.
If more than four are available,
there is a match counter with a
number in it, representing the
number of available POI names.
Press the List screen button to
view the list. Select the POI.
6. Press the Start screen button. The
system calculates the route.
7. Select the route preference for
Fast, Short or Easy. The system
highlights the route.
8. Press the Start screen button. The
route is now ready to be started.
Destination 3 61.
Storing preset destinations
1. Press VOL/m to turn the system
on.
2. If a caution appears, press the
Ok screen button to proceed.
3. Press the DEST button.
4. Enter a destination. Destination
3 61.
5. Press Save from the map screen
to add the current final destination
to the address book.

Introduction 13
6. Press the Edit screen button and
then press the Change name field
on the screen. An alpha-keyboard
displays. Enter the name.
7. Press and hold one of the screen
buttons at the bottom of the
screen until the text in the button
changes.
The address book entry name
appears in that preset destination
screen button and is now
available to select from the Enter
destination screen. See “Using
the stored preset destinations”
next in this section to select it as a
destination.
“Preset destination” under
Destination 3 61.
Using the stored preset destinations
These destinations are available for
selection while driving.
1. Press VOL/m to turn the system
on.
2. A caution could appear. Press the
Ok screen button to proceed.
3. Press the DEST button.
4. Press one of the available preset
destination screen buttons. The
system calculates the route.
5. Select the route preference for
Fast, Short or Easy. The system
highlights the route.
6. Press the Start screen button. The
route is now ready to be started.
“Preset destination” under
Destination 3 61.
Cancelling guidance
Guidance is cancelled at the final
destination. To cancel guidance prior
to reaching the final destination:
1. Press the DEST button.
2. Press the Cancel guidance
screen button.
3. Press the Yes screen button to
confirm cancellation.
Voice guidance
To adjust the volume of voice
guidance prompts:
1. Press the CONFIG button to enter
the menu features.
2. Turn the TUNE/MENU knob until
Nav displays.
3. Press the TUNE/MENU knob to
select Nav or press the Nav
screen button to display more
options within that feature.
4. Press Voice prompt.
5. Press Voice volume.
6. Press + or – screen buttons to
increase or to decrease the
volume of the voice prompts.
Usage 3 50.
Cleaning the display
Note
Using abrasive cleaners when
cleaning glass surfaces, could
scratch the glass. When cleaning
the glass, use only a soft cloth and
do not spray cleaner directly on the
system.
Do not wipe the centre stack with a
hard cloth or use a volatile liquid; it
could scratch the surface or erase the
characters on the buttons.
14 Introduction
Overview (without navigation)
Keeping the eyes on the road and the
mind on the drive is important for safe
driving. The infotainment system has
built-in features intended to help with
this by disabling some features when
driving. A greyed-out function is not
available when the vehicle is moving.
All functions are available when the
vehicle is parked. Do the following
before driving:
■ Become familiar with the
infotainment system operation,
buttons on the faceplate and touchsensitive screen buttons.
■ Set up the audio by presetting
favourite stations, setting the tone
and adjusting the speakers.
■ Set up phone numbers in advance
so they can be called easily by
pressing a single button or a single
voice command for vehicles
equipped with phone capability.
9 Warning
Taking your eyes off the road too
long or too often while using the
navigation system could cause a
crash and you or others could be
injured or killed. Focus your
attention on driving and limit
glances at the moving map on the
navigation screen. Use voice
guidance whenever possible.
Infotainment control buttons
The buttons on the faceplate are used
to start primary functions while using
the Infotainment system 3 2.
Touch screen buttons
Touch screen buttons are on the
screen and highlighted when a
feature is available. Some toggle
screen buttons highlight when active
and gray out when inactive.
Home page features
Various functions are disabled when
the vehicle is moving.
Press the screen button for Now
Playing to display the active source
page. The sources available are AM,
FM, CD, USB/iPod and AUX.
Press the Phone screen button to
display the Phone main page.
Bluetooth 3 81.
Press the screen button for Config to
display the Config main page. From
this display, you can adjust features
such as time and date, radio, phone,
vehicle and display.
Press the Tone screen button to
display the Tone main page. Adjust
the tone and speakers by pressing
the screen buttons to change the
levels of sound for treble, midrange,
bass, fade and balance. Tone
settings 3 16.

Introduction 15
Press the FM screen button to display
the FM main page and play the
current or last tuned FM station. AMFM radio 3 19.
Press the AM screen button to display
the AM main page and play the
current or last tuned AM station. AMFM radio 3 19.
Press the CD screen button to display
the CD main page and play the
current or last CD track selected. CD
player 3 28.
Press the USB screen button to
display the USB main page and play
the current or last track selected
3 45.
Press the AUX screen button to
access any connected auxiliary
device. Auxiliary devices 3 45.
Time and Date Settings
From the screen button for Time &
Date Settings, press to display the
menu for Time & Date Settings.
Set Time: Press the up or down
arrows to increase or decrease the
hours and minutes displayed on the
clock.
Set Date: Press the up or down
arrows to increase or decrease the
day.
Set Time Format: Press the 12
hours screen button for standard
time; press the 24 hours screen
button for military time.
Set Date Format: Depending on the
region, the following date formats
may be available: MM/DD/ YYYY,
DD.MM.YYYY or YYYY/ MM/DD.
Display Digital Clock: Press Display
to turn the display of the clock on the
screen On or Off.
Radio Setting
Press the button for Config on the
Home page or the CONFIG button on
the faceplate to enter the menu
options. Turn the TUNE/MENU knob
or touch-tap the scroll bar to scroll
through the available options. Press
the TUNE/MENU knob or press
Radio Setting to display the radio
settings menu. Press this feature to
make changes for radio information
displayed, preset pages and Radio
Setting.
The Radio Setting are:
Speed dependent volume 3 17.
Startup Volume: Press to set the
maximum volume level for startup
that will be used even if a higher
volume had been set when the radio
was turned off.
Radio Favourites: Press to select the
Number of radio FAV pages to be
used in the system.
Phone settings
Bluetooth 3 81.
Vehicle settings
See “Vehicle Personalisation” in the
vehicle Owner's Manual for more
information.
Display settings
Press the Config button on the Home
page or the CONFIG button on the
faceplate, then select Display
Setting from the list.
The following options may display:

16 Introduction
Display options: Press to change the
screen background. The Automatic
setting adjusts the screen
background automatically depending
on the exterior lighting conditions.
To change the overall brightness
setting for the display, use the vehicle
interior lighting instrument panel
illumination control.
Languages
The vehicle supports the following
languages:
■ English
■ Spanish
■ French
■ German
■ Italian
■ Swedish
■ Dutch
■ Polish
■ Hungarian
■ Czech
■ Slovak
■ Danish
■ Portuguese
■ Norwegian
■ Finnish
■ Turkish
Turn the TUNE/MENU to highlight the
language. Press TUNE/MENU to
change the display language. The
default language is English.
To change the display language, see
“Vehicle Personalisation” in the
vehicle Owner's Manual for more
information.
English and metric unit conversion
To change the display readings
between English and metric units,
see “Driver Information Centre (DIC)”
in the vehicle Owner's Manual for
more information.
Tone settings
Navigation audio system
Sound settings menu
To access the Sound settings menu,
press the TONE button.
Use the Sound settings menu to
adjust the following features:
■ Setting the tone
■ Adjusting the speakers
Setting the tone
To adjust the tone using the Sound
settings menu:
■ Bass: Press + or − to change the
level.
■ Middle (Midrange): Press + or − to
change the level.
■ Treble: Press + or − to change the
level.
Adjusting the speakers
To adjust the speaker balance using
the Sound settings menu:
Press and hold ] for more sound from
the left speakers or [ for more sound
from the right speakers. The middle
position balances the sound between
the left and right speakers.
To adjust the speaker fade:
Introduction 17
Press and hold { for more sound
from the front speakers and } for
more sound from the rear speakers.
The middle position balances the
sound between the front and rear
speakers.
EQ settings
EQ settings (Equalization): The EQ
settings are selected through the
Sound settings menu. If the vehicle is
equipped with the Bose® Energy
Efficient Series sound system, EQ
provides a choice of Manual or Talk
settings.
Volume settings
Different volume settings are
available in the Radio menu
There are two ways to access the
Radio menu:
■ Press the CONFIG button, then
press the Radio screen button.
■ Turn the TUNE/MENU knob until
Radio displays. Press the TUNE/
MENU knob to select Radio or
press the Radio screen button to
display more options within that
feature.
Audio Cue Options
This menu allows changes to the
audio cue features.
Audio Cue Options are used to
welcome the driver to the car as well
as indicate when the vehicle is ready
to drive.
18 Introduction
Audio Cue Volume: Press the + or −
screen buttons to adjust the audio cue
volume. The Audio Cue Volume has
a minimum volume. A Limit reached
pop-up will display when the volume
has been changed to less than the
minimum volume.
Press the Audio Cue Volume screen
button to hear the selected sound
level.
The Audio Cues can also be changed
by adjusting the TUNE/MENU knob.
Audio Cues: Press to turn the Audio
Cues on or off. A checkmark indicates
the Audio Cues are on.
Speed dependent volume
Select Off, Low, Medium or High
sensitivity to automatically adjust the
volume to minimize the effects of
unwanted background noise that can
result from changing road surfaces,
driving speeds or open windows. This
feature works best at lower volume
settings where background noise is
typically louder than the sound
system volume.
Startup Volume
Press to set the maximum volume
level for startup that will be used even
if a higher volume had been set when
the radio was turned off.

Radio 19
Radio
AM-FM radio ................................ 19
Radio reception ............................ 27
Multi-band antenna ...................... 27
AM-FM radio
AM-FM radio (with navigation)
Playing the radio
Audio source menu
VOL/m (volume/power):
1. Press to turn the radio on or off.
2. Turn to increase or decrease the
volume. The volume is adjusted
for the current audio source,
active navigation voice guidance,
voice prompts or audio cues.
The steering wheel controls can also
be used to adjust the volume.
Steering wheel controls 3 2 for more
information.
TUNE/MENU: Turn this knob to
change the radio station. See
“Finding a station” following for more
information.
RADIO/BAND: Press to select the
AM, FM or DAB (Digital Audio
Broadcasting).
The audio sources can also be
changed by using the steering wheel
controls. Steering wheel controls 3 2
for more information.
HDD/DVD/AUX: Press until the
desired source is selected.
TP (Traffic programme): Press TP to
change the setting of the radio traffic
service.
If the audio source is on while viewing
a map screen, a source indicator
button displays at the top of the map
screen.
20 Radio
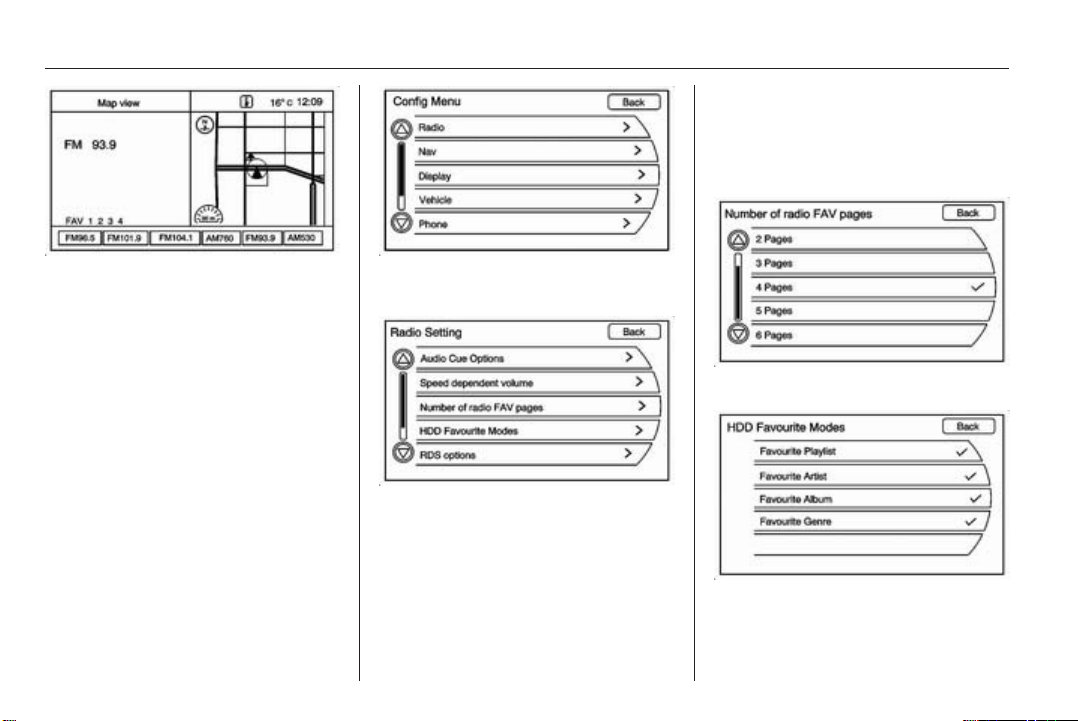
Number of radio FAV pages
Change the number of mixed-band
preset pages when using the FAV
button. Press 1 through 6 to select the
number of preset lists.
Press the source indicator button to
display the current audio source
screen. The display shows a split
screen with the audio source screen
on the left side and the map or
guidance screen on the right side.
Press the Map view screen button to
exit the split view screen.
Radio menu
There are two ways to access the
Radio menu:
■ Press the CONFIG button, then
press the Radio screen button.
HDD Favourite Modes
■ Turn the TUNE/MENU knob until
Radio displays. Press the TUNE/
MENU knob to select Radio or
press the Radio screen button to
display more options within that
feature.
Radio 21
Select the categories such as
Favourite Playlist, Favourite Artist,
Favourite Album and Favourite
Genre to be used as a favourite
category during HDD mode.
DivX® VOD
1. Press the DivX(R) VOD screen
button to display the DivX(R)
Video on Demand menu.
2. Press the Registration code
screen button to display the
Registration code information.
3. Press the Deactivation Option to
unregister this device.
RDS options
Selects the RDS options for the FM
tuner.
Finding a station
To select the band, see “Audio source
menu” in this section.
Turn the TUNE/MENU knob to find a
radio station. To select a preset
station, press the corresponding
preset button.
See “Mixed-band presets” following
for more information.
Seeking a station
Press ] SEEK or SEEK [ to search
for a station.
Local station list search
To find a list of local stations in the
current band, press TUNE/MENU.
The radio performs a search for
available stations.
Mixed-band presets
Up to 36 preset stations can be
stored. Each page can store six
preset stations. The presets within a
page can be from different radio
bands.
To scroll through the pages, press the
FAV button. The current page
number displays above the preset
buttons. The stored stations for each
list display on the preset buttons at
the bottom of the screen. The number
of preset FAV lists can be changed.

22 Radio
To store a radio station to a mixedband preset list:
1. Press the RADIO BAND button,
then press AM, FM or DAB to
select the desired band.
2. Tune to the station.
3. Press the FAV button to scroll to
the list.
4. Press and hold one of the preset
buttons for more than two
seconds. The station frequency
appears on the preset button at
the bottom of the display.
5. Repeat the steps for each preset
in each page.
To recall a preset station from a FAV
page:
1. Press the FAV button to scroll to
the page.
2. Press the preset button. The
stored preset station is recalled.
Timeshift
The timeshift feature automatically
begins recording the audio when
listening to the radio.
The recording allows playback of
content that was missed.
Timeshift stores up to 20 minutes of
content. After 20 minutes, it removes
the oldest content and continues
recording new content.
While listening to the radio, press
r (Play/Pause) to stop hearing the
information through the speaker.
During this paused time, timeshift
keeps recording. A status bar
displays the length of the recording.
To resume listening to the broadcast
at the point left off, press r again.
Timeshift stops recording and erases
the buffer when the vehicle is turned
off or the station or source is changed.
Before turning the vehicle off, press
r so that timeshift keeps recording
for 20 minutes. If the vehicle is still off
after 20 minutes, the system stops
recording and all information is lost. If
a low 12-volt battery condition occurs,
timeshift stops recording and all
information is erased.
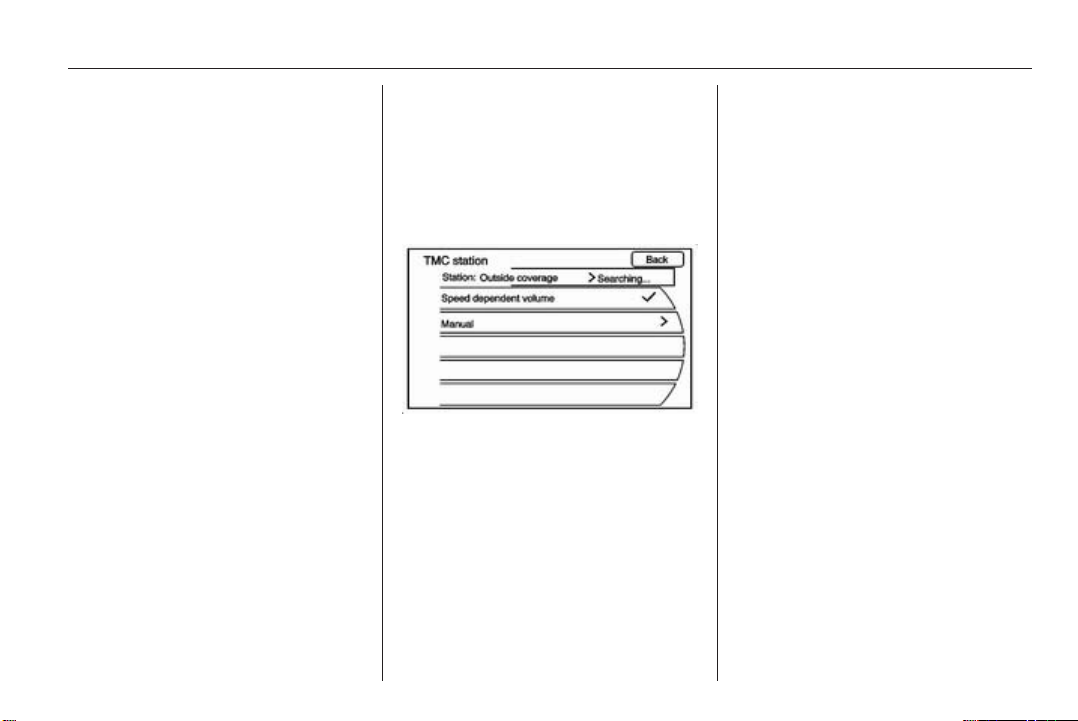
Radio data system (RDS)
TP (Traffic programme): Radio traffic
service stations are RDS stations that
broadcast traffic news.
Switching the radio traffic service on
and off
To switch the traffic announcement
standby facility of the Infotainment
system on and off:
■ Press the TP button. If the radio
traffic service is switched on, TP is
illuminated on the display.
■ Only radio traffic service stations
are received.
■ If the current station is not a radio
traffic service station, a search is
started automatically for the next
radio traffic service station.
■ If a radio traffic service station has
been found, TP is illuminated on the
display.
Radio 23
■ Traffic announcements are played
at the set voice volume by pressing
the CONFIG button and selecting
the Nav screen button and then the
Voice prompt screen button.
■ If the radio traffic service is
switched on, the replay of CDs/
DVDs and of external sources is
interrupted for the duration of the
traffic announcement.
Listening to traffic announcements
only
Switch on the radio traffic service and
turn down fully the volume of the
Infotainment system.
EON (enhanced other networks)
With EON you can listen to radio
traffic announcements even if the
station you have set does not
broadcast its own radio traffic service.
If such a station is set, it is displayed
as TP.
Radio data system (RDS)
Radio data system (RDS) is a service
of the FM stations that helps to find
the desired station and its fault-free
reception. RDS stations are
recognised by the programme names
rather than the transmission
frequency.
Configuring RDS
To open the menu for the RDS
configuration:
1. Press the CONFIG button.
2. Select Radio and then RDS
options.
Switching RDS on and off
Set RDS to On or Off. The following
advantages result through activating
RDS:
■ On the display the programme
name of the set station appears
instead of its frequency.
■ The Infotainment system always
tunes into the best receivable
broadcasting frequency of the set
station by means of AF (Alternative
Frequency).
■ Depending on the station that is
received, the Infotainment system
displays radio text that can contain,
for example, information about the
current programme.
Switching regionalisation on and off
RDS must be activated for
regionalisation. At certain times some
RDS stations broadcast regionally
different programmes on different
frequencies.
1. Set Regional to On or Off. Only
alternative frequencies (AF) with
the same regional programmes
are selected.
2. If regionalisation is switched off,
alternative frequencies of the
stations are selected without
regard to regional programmes.

24 Radio
RDS scrolling text
Some RDS stations use the lines for
indicating the name of the
programme to indicate additional
information. During this process the
programme name is hidden. To block
out the display of the additional
information, set text scroll freeze to
On.
DAB
The digital radio system DAB (digital
audio broadcasting) is a universal
broadcast system.
DAB stations are indicated by the
programme name instead of the
broadcasting frequency.
General information
■ With DAB, several radio
programmes (services) can be
broadcast on a single frequency.
■ Besides high-quality digital audio
services, DAB is also able to
transmit programme-associated
data and a multitude of other data
services including travel and traffic
information.
■ As long as a given DAB receiver
can pick up the signal sent out by a
broadcasting station (even if the
signal is very weak), sound
reproduction is ensured.
■ There is no fading (weakening of
the sound) that is typical of AM or
FM reception; the DAB signal is
reproduced at a constant volume.
■ If the DAB signal is too vague to be
interpreted by the receiver,
reception is interrupted completely.
This incident can be avoided by
activating Auto ensemble linking
and/or Auto linking DAB-FM. See
“Configuring DAB” below.
■ Interference caused by stations on
nearby frequencies (typical of AM
and FM reception) does not occur
in connection with DAB.
■ If the DAB signal is reflected by
natural obstacles or buildings, the
reception quality of DAB is
improved, whereas AM or FM
reception is considerably worsened
in such cases.
■ The radio is also capable of
reveicing DAB+ and DMB-Audio.
Configuring DAB
1. Press the CONFIG button.
2. Select Radio and then DAB.
The following options are available for
selection in the configuration menu:
■ Auto ensemble linking: with this
function activated, the device
switches over to another service of
the active DAB ensemble (if
available) when the DAB signal is
too vague to be interpreted by the
receiver.
■ Auto linking DAB-FM: with this
function activated, the device
switches over to a corresponding
FM station of the active DAB
service (if available) when the DAB
signal is too vague to be interpreted
by the receiver.
■ Dynamic audio adaptation: with this
function activated, the dynamic
range of the DAB signal is reduced.
That means the level of the loud
sounds is reduced, but not the level
of the quiet sounds. Therefore the
volume of the Infotainment system

Radio 25
can be raised to a point where the
quiet sounds are audible, without
the loud sounds being too loud.
■ Frequency band: after selection of
this option, DAB wavebands to be
received by the Infotainment
system can be defined.
DAB announcements
Besides their music programmes,
numerous DAB stations broadcast
various announcement categories.
Radio or CD/MP3 playing is
interrupted when any
announcements are pending.
To select several announcement
categories at the same time:
1. Select DAB announcements.
2. Activate the desired
announcement categories.
AM-FM radio (without navigation)
Playing the radio
Audio source
VOL/m (volume/power):
1. Press to turn the radio on or off.
2. Turn to increase or decrease the
volume of the active source (i.e.,
current audio source, active
navigation voice guidance or
traffic prompts).
The steering wheel controls can also
be used to adjust the volume.
Steering wheel controls 3 2.
To access the radio main page, press
the SOURCE button on the faceplate,
the Now Playing screen button or one
of the audio screen buttons on the
Home page.
While on the audio main page, press
the Source button repeatedly to
display and cycle through the
available sources (AM, FM, CD, USB/
iPod and AUX).
Finding a station
To select the band, see “Audio
source” earlier in this section.
Turn the TUNE/MENU knob to find a
radio station. To select a preset
station, touch the FAV button and
choose a preset button.
Seeking a station
Press t or v to search for a station.
AM
1. Press the AM screen button on
the Home page or select AM from
the source pop-up to display the
AM main page.
2. From the AM screen, press the
Menu screen button to display the
AM stations.
3. Select the desired option. To
update the station list, touch
Refresh.
FM
1. Press the FM screen button on the
Home page or select FM from the
source pop-up to display the FM
main page.

26 Radio
2. From the FM screen, select the
Menu screen button to display the
FM stations.
3. Select the desired option. To
update the station list, touch
Refresh.
Changing the sources
To change audio sources from any of
the audio main pages (AM, FM, CD,
USB/iPod or AUX), press the
SOURCE button on the faceplate or
the Source screen button to display a
pop-up of available audio sources.
Press the SOURCE button on the
faceplate repeatedly to change the
desired source.
Storing radio station presets
There are a few ways to store presets.
Up to 36 preset stations can be
stored. AM and FM can be mixed.
1. From the AM or FM main page,
select by turning the TUNE/
MENU knob, then press and hold
the knob on one of the preset
screen buttons located at the
bottom of the screen. After a few
seconds, a beep will be heard and
the new preset information will
display on that screen button.
2. Select and hold a preset button to
store the currently active station.
After a few seconds, a beep will be
heard and the new preset
information will display on a small
pop-up display at the bottom of
the screen.
3. Repeat the steps for each preset.
To change the number of preset
pages, see “Mixed-Band Presets”
following for more information.
Recalling a preset station
To recall a preset station from a FAV
page, do the following:
■ Press the FAV button on the
faceplate to display the FAV popup. Select the desired preset from
the pop-up.
■ Press the FAV screen button at the
top bar to display the preset pop-up
that appears at the bottom of the
page. Press one of the preset
screen buttons to go to the selected
preset station.
■ In the AM or FM main page, select
one of the preset screen buttons to
go to the selected preset station.
Mixed-Band Presets
Each page can store six preset
stations. The presets within a page
can be from different radio bands.
To scroll through the pages, press the
FAV button located on the faceplate
or select the FAV screen button on
the top bar. The current page number
displays above the preset buttons.
The stored stations for each FAV
page display on the preset buttons at
the bottom of the screen. The number
of FAV pages displayed can be
changed in the Radio Setting in the
Config Menu.
Digital Audio Broadcasting (DAB)
DAB is available on some stations
and is indicated when the station
name is displayed and not the
frequency.

Radio 27
Traffic Programme (TP)
Traffic programming stations are
RDS stations that broadcast traffic
news. To access, press the TP
button.
Radio reception
Frequency interference and static can
occur during normal radio reception if
items such as mobile phone
chargers, vehicle convenience
accessories and external electronic
devices are plugged into the
accessory power outlet. If there is
interference or static, unplug the item
from the accessory power outlet.
FM
FM signals only reach about 10 to
40 miles. Although the radio has a
built-in electronic circuit that
automatically works to reduce
interference, some static can occur,
especially around tall buildings or
hills, causing the sound to fade in and
out.
AM
The range for most AM stations is
greater than for FM, especially at
night. The longer range can cause
station frequencies to interfere with
each other. Static can occur when
things like storms and power lines
interfere with radio reception. When
this happens, try reducing the treble
on the radio.
Mobile phone usage
Mobile phone usage can cause
interference with the vehicle's radio.
Multi-band antenna
The multi-band antenna is located on
the roof of the vehicle. The antenna is
used for the AM/FM radio and GPS
(Global positioning system); if the
vehicle has these features. Keep the
antenna clear of obstructions for clear
reception. If the vehicle has a sunroof
and it is open, the performance of the
AM/ FM radio and GPS can be
affected.
Diversity antenna system
The FM antenna is a hidden selftuning system. It optimizes the FM
signals relative to the vehicle's
position and radio station source. No
maintenance or adjustments are
needed.

28 Audio players
Audio players
CD player ..................................... 28
CD/DVD player ............................ 30
MP3 ............................................. 34
Hard drive device ......................... 37
Auxiliary devices .......................... 45
CD player
The player can be used for CD and
MP3s.
With the ignition on, insert a CD into
the slot, label side up. The player pulls
it in and begins playing.
The vehicle must be in P (Park) for
video to display.
The system is capable of playing:
■ Most audio CDs
■ CD-R
■ CD-RW
■ MP3 or unprotected WMA formats
When playing any compatible
recordable disc, the sound quality can
be reduced due to disc quality, the
method of recording, the quality of the
music or video that has been
recorded or the way the disc has been
handled.
To avoid damage to the CD player:
■ Do not use scratched or damaged
discs.
■ Do not apply labels to discs. The
labels could get caught in the
player.
■ Insert only one disc at a time.
■ Keep the loading slot free of foreign
materials, liquids and debris.
If a description label is needed, try
labelling the top of the disc using a
marking pen.
Loading and ejecting discs
To load a disc:
1. Turn the ignition on.
2. Insert a disc into the slot. The
player pulls it in the rest of the
way. If the disc is damaged or
improperly loaded, there is an
error and the disc ejects.
The disc automatically plays once
loaded.
 Loading...