

Page 1
Vehicle features
Adam
Quick Reference Guide
Refer to Owner’s Manual for detailed information.
Illustrations may depict left-hand drive vehicles.
Operation is similar for right-hand drive vehicles.
Depending on the model variant, special equipment
and accessories, the scope of equipment on your
vehicle may differ from the descriptions in this guide.
KTA 2746 October 2012
*KTA-2746*
Vehicle features Vehicle features
Unlocking the vehicle:
Press button c on remote control
- or - turn key in driver’s door lock
towards the front of the vehicle to
unlock the doors, load
compartment and fuel filler flap.
Locking the vehicle:
Close doors, load compartment
and fuel filler flap.
Press button
e on remote control
- or - turn key in driver’s door lock
towards the rear to lock the vehicle.
Anti-theft alarm system:
The anti-theft alarm system is
combined with the central locking
system and monitors doors,
tailgate, bonnet and ignition.
Anti-theft locking system:
Press button
e twice on remote
control within 15 seconds to
deadlock all doors.
Do not use the system if there are
people in the vehicle! The doors
cannot be unlocked from the
inside.
Electronic immobiliser:
Activated automatically when key
is removed from ignition switch.
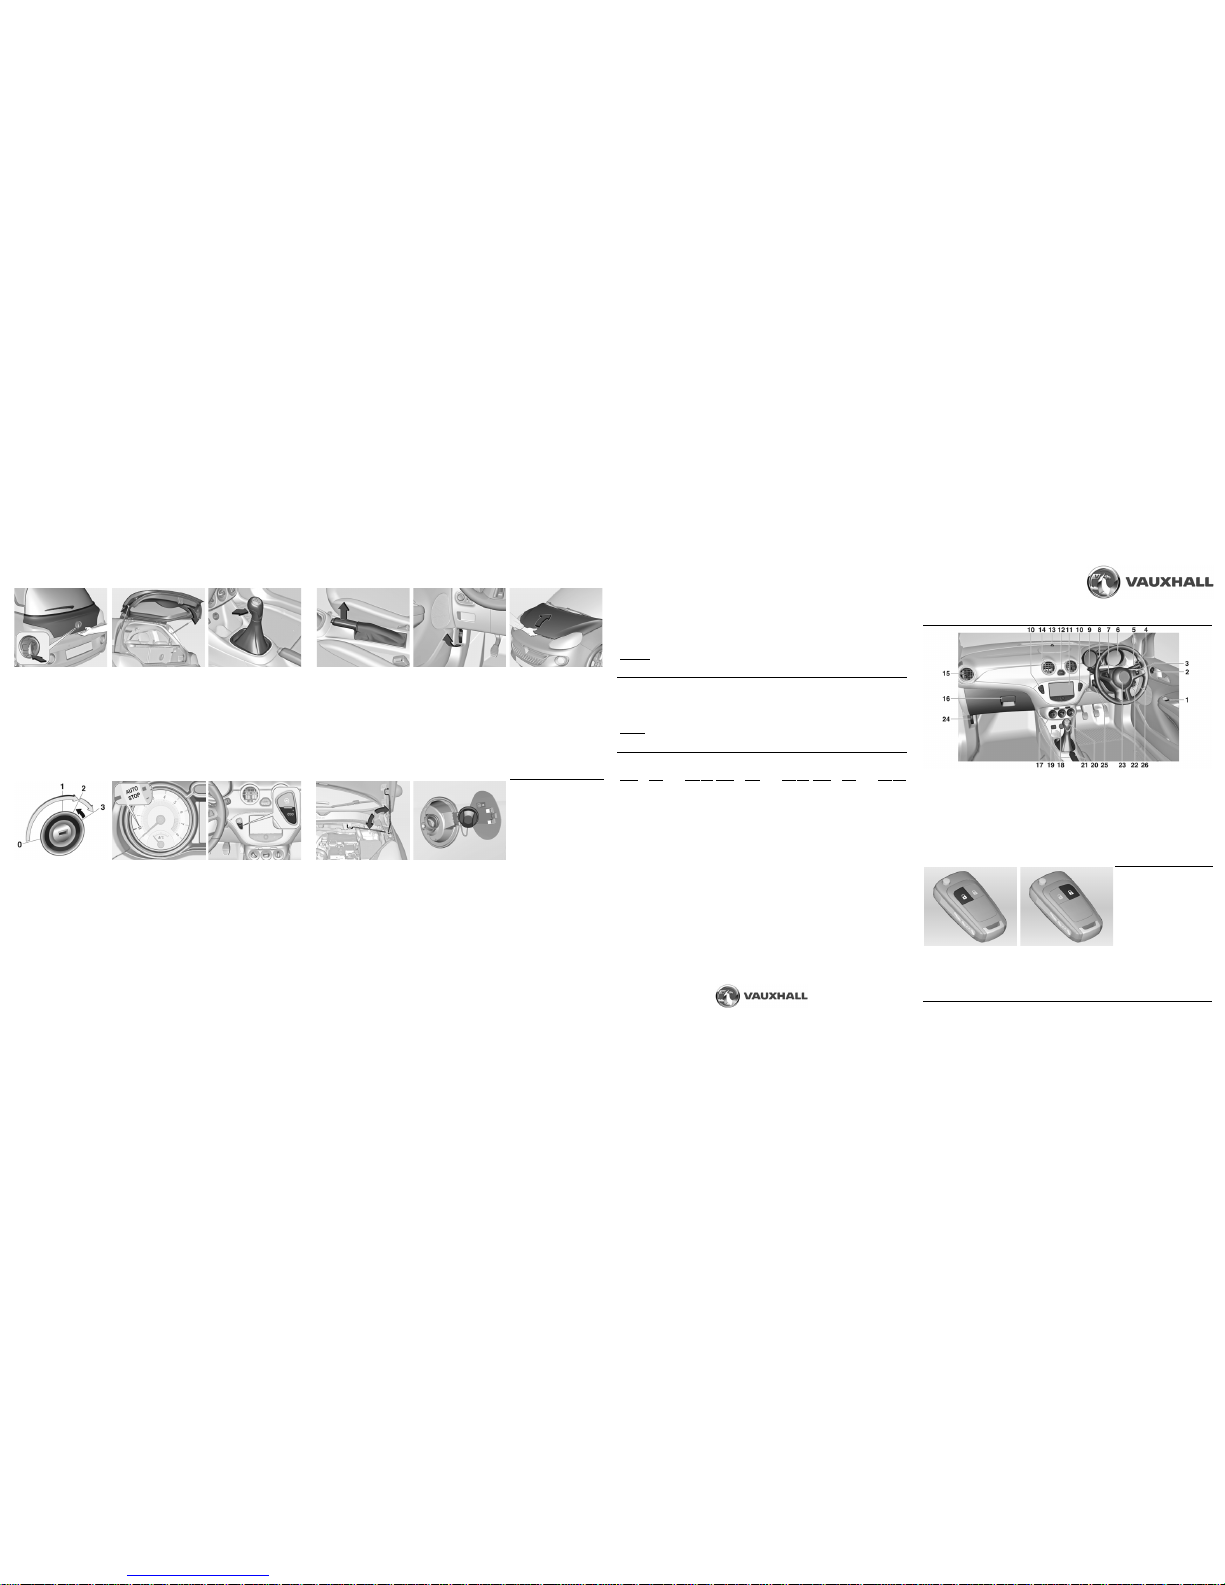
1. Power windows
2. Exterior mirrors
3. Cruise control, speed limiter
4. Side air vents
5. Turn and lane-change signals,
headlight flash,
low beam, high beam,
exit lighting, parking lights,
Driver Information Centre
buttons
6. Instruments
7. Steering wheel controls
8. Driver Information Centre
9. Wipers and washers
10. Central locking system,
fuel selector, seat heating,
heated steering wheel,
parking assist, Eco button for
stop-start system
11. Info-Display
12. Hazard warning flashers,
control indicators for airbag
deactivation and front
passenger seat belt
13. Anti-theft alarm system LED
14. Centre air vents
15. Side air vents (passenger side)
16. Glovebox, fusebox
17. Climate control system
18. Power outlet
19. AUX input, USB input
20. Selector lever
21. Parking brake
22. Ignition switch
with steering wheel lock
23. Horn, driver airbag
24. Bonnet release lever
25. Steering wheel adjustment
26. Light switch,
headlight range adjustment,
rear fog light,
instrument illumination
Unlocking and opening the load
compartment:
Press button c on remote control
once or twice (depending on
setting) to unlock the load
compartment.
Press the bottom half of the brand
emblem to unlock and open the
tailgate.
Closing and locking the load
compartment:
Use interior handle to close
tailgate.
Do not push the brand emblem on
the tailgate whilst closing as this
will unlock the tailgate again.
Press button
e on remote control to
lock vehicle.
Manual transmission:
Reverse gear:
With vehicle stationary, wait
3 seconds after depressing clutch
pedal, press release button on the
selector lever and engage gear.
If the gear does not engage, set the
lever to neutral, release the clutch
pedal and depress again; then
repeat gear selection.
Do not grind the clutch
unnecessarily.
When operating, depress clutch
pedal fully. Do not use the pedal as
a foot rest.
Starting the engine:
Turn key to position 1
Move steering wheel slightly to
release steering wheel lock
Depress clutch pedal
Do not accelerate
Turn key to position 3 and
release
An automatic procedure operates
the starter after a brief delay, until
the engine is running.
Before restarting, or to switch off
the engine, turn the key back to
position 0.
During an Autostop, the engine
can be restarted by depressing the
clutch pedal.
Stop-Start system:
When conditions allow, the system
switches off the engine to save fuel
and reduce exhaust emissions if the
vehicle is at a low speed or at a
standstill, e.g. at traffic lights or in a
traffic jam. It restarts the engine
when the clutch pedal is depressed.
To activate an Autostop:
Depress clutch pedal
Shift selector lever to neutral
Release the clutch pedal
An Autostop is indicated by the
needle at the AUTOSTOP position
in the tachometer.
To restart engine, select neutral
then depress the clutch pedal.
Deactivate the Stop-Start system
manually by pressing the eco
button in the centre console.
The LED in the button extinguishes
to confirm deactivation.
To open completely, push the
safety catch to the right and open
the bonnet.
Parking brake:
To release parking brake, raise
lever slightly, press release button
and lower lever fully.
Always apply parking brake firmly
without operating the release
button and apply as firmly as
possible on an uphill or downhill
slope.
To reduce the operating forces of
the parking brake, depress the
brake pedal at the same time.
Opening the bonnet:
To open the bonnet, pull the
release lever located below the
instrument panel on the driver’s
side.
The bonnet will then be unlocked
and will partially open. Return
release lever to its original position.
Pull up bonnet support rod from its
holder and secure it in the hook on
the underside of the bonnet, on the
right-hand side.
If the bonnet is opened during an
Autostop, the engine will be
restarted automatically for safety
reasons.
Closing the bonnet:
Replace the bonnet support rod in
its holder.
Lower the bonnet and allow it to
drop into the catch.
Check that the bonnet is engaged.
Refuelling:
Before refuelling, switch off engine.
Switch off any mobile phones.
Fuel filler flap is located at right
rear side of vehicle.
The fuel filler flap can only be
opened when the vehicle is
unlocked.
Release the fuel filler flap by
pushing the flap, then open.
Turn fuel filler cap slowly
anticlockwise and remove.
The fuel filler cap can be retained in
the bracket on the fuel filler flap.
For refuelling, fully insert the pump
nozzle and switch it on.
After the automatic cut-off, it can
be topped-up with a maximum two
doses of fuel.
Wipe off any overflowing fuel
immediately.
To close, replace fuel filler cap and
turn clockwise until it clicks.
Close the fuel filler flap and
engage.
Fuel for petrol engines:
Use unleaded fuel meeting
specifications of DIN EN 228 or
E DIN 51626-1.
Fuel tank capacity
(all petrol models) - 35 litres.
Engine oil:
Check engine oil level manually on a regular basis to prevent damage to engine. Ensure that the cor rect
specification of oil is used.
Check with vehicle on a level surface. Engine must be at operating temperature and switched off for at least
5 minutes.
Pull out dipstick, wipe clean, insert to stop on the handle, pull out and read engine oil level.
When the engine oil level has dropped to the MIN mark, top up engine oil.
Insert dipstick to stop on handle and make half a turn.
Important:
It is the owner’s responsibility to maintain the correct level of an appropriate quality oil in the engine.
Do not allow the engine oil level to drop below the minimum level!
Tyre pressure (psi)
Comfort setting for upto
3 people:
Engine
Tyres FrontRear
A12XEL 175/70 R14 29 26
185/65 R15 29 26
195/55 R16 29 26
215/45 R17 29 26
225/35 R18 29 26
A14XEL 175/70 R14 32 29
185/65 R15 32 29
195/55 R16 32 29
215/45 R17 32 29
225/35 R18 32 29
A14XER 175/70 R14 32 29
185/65 R15 32 29
195/55 R16 32 29
215/45 R17 32 29
225/35 R18 32 29
Tyre pressure (psi)
with Full load:
Engine
Tyres FrontRear
A12XEL 175/70 R14 38 46
185/65 R15 38 46
195/55 R16 38 46
215/45 R17 38 46
225/35 R18 38 46
A14XEL 175/70 R14 38 46
185/65 R15 38 46
195/55 R16 38 46
215/45 R17 38 46
225/35 R18 38 46
A14XER 175/70 R14 38 46
185/65 R15 38 46
195/55 R16 38 46
215/45 R17 38 46
225/35 R18 38 46
Tyre pressure (psi)
ECO setting for upto
3 people:
Engine
Tyres FrontRear
A12XEL 175/70 R14 42 39
185/65 R15 39 36
195/55 R16 42 42
215/45 R17 39 36
225/35 R18 39 36
A14XEL 175/70 R14 42 39
185/65 R15 39 36
195/55 R16 42 42
215/45 R17 39 36
225/35 R18 39 36
A14XER 175/70 R14 42 39
185/65 R15 39 36
195/55 R16 42 42
215/45 R17 39 36
225/35 R18 39 36
Tyre pressure:
Check tyre pressures, including the spare, every 14 days and prior to any long journey; tyres should be
checked when cold. The tyre pressure data refers to cold tyres. It applies to summer and winter tyres.
Always inflate the spare tyre to the value specified for full load.
Incorrect tyre pressures will impair safety, vehicle handling, comfort and fuel economy and in crease tyre
wear.
Warning:
If the pressure is too low, this can result in considerable tyre warm-up and internal damage, leading to tread
separation and even to tyre blow-out at high speeds.
Page 2
Vehicle features Vehicle featuresVehicle features
Vehicle features
Longitudinal seat adjustment:
Pull handle, slide seat, release
handle.
Danger
:
Do not sit nearer than 25 cm from
steering wheel, to permit safe
airbag deployment.
Seat backrests:
Turn handwheel to adjust
inclination. Do not lean on backrest
when adjusting.
Do not angle the backrest too far
back. We recommend a maximum
rake of approx. 25
o
.
Seat height:
Lever pumping motion.
up = seat higher
down = seat lower
Seat position:
Sit with buttocks are as far back
against backrest as possible.
Adjust distance between seat and
pedals so that your legs are slightly
angled when depressing pedals.
Slide the front passenger seat as
far back as possible.
Seat folding:
Pull release lever and fold backrest
forwards. Slide seat forwards to the
stop.
To restore, slide seat backwards to
the stop, then raise backrest to
upright position without operating
release lever. Do not adjust
backrest during seat folding.
Head restraint adjustment:
Press the release button, adjust
height and engage.
The upper edge of the head
restraint should be at upper head
level.
Steering wheel adjustment:
Unlock the lever, adjust the
steering wheel, then engage lever
and ensure it is fully locked.
Do not adjust the steering wheel
unless the vehicle is stationary and
the steering wheel lock has been
released.
Fitting seat belts:
Withdraw seat belt from retractor,
guide it untwisted across the body
and insert latch plate in belt buckle.
Tighten the lap belt regularly whilst
driving by pulling the shoulder belt.
Loose or bulky clothing prevents
the belt from fitting snugly. Do not
place objects such as handbags or
mobile phones between the belt
and your body.
Warning:
The best must not rest against hard
or fragile objects in the pockets of
your clothing.
To release belt, press red button on
belt buckle.
Fasten seat belt before each trip.
In the event of an accident, people
not wearing seat belts endanger
their fellow vehicle occupants and
themselves.
Manual interior mirror:
Swivel mirror housing.
To reduce dazzle, adjust the lever
on the underside of the mirror
housing.
Automatic anti-dazzle interior
mirror:
Dazzle from following vehicles at
night is automatically reduced.
The lever on the underside of the
mirror housing will not be present.
Adjusting electric exterior mirrors:
Select the relevant exterior mirror
by turning the control to left (L)
or right (R).
Swivel the control to adjust the
mirror.
In position 0, no mirror is selected.
Operating windows from outside:
The windows can be operated
remotely from outside the vehicle.
Press and hold the
c button to
open windows.
Press and hold the
e button to
close windows.
Release button to stop window
movement.
If the windows are fully opened or
closed, the hazard warning lights
will flash twice.
Folding exterior mirrors:
For pedestrian safety, exterior
mirrors will swing out of their
normal mounting position if they
are struck with sufficient force.
Reposition the mirror before driving
by applying slight pressure to the
mirror housing.
Parking position:
The exterior mirrors can be folded
in by pressing gently on the outer
edge of the mirror housing, e.g.
when in a confined parking space.
Power windows:
With the ignition on, power
windows are operated via the
switches in the door.
Push switch = Open window
Pull switch = Close window
Push or pull switch gently to the first
detent position: Window moves up
or down as long as the switch is
operated.
Push or pull switch to the second
detent position and then release:
Window opens or closes
automatically. To stop window
movement, operate the switch
again in the same direction.
If the window glass encounters
resistance above the middle of the
window during automatic closing,
it is immediately stopped and
opened again.
Retained power off:
Power windows can be operated
for upto 10 minutes after the
ignition is switched off or until the
driver’s door is opened.
Light switch:
Turn light switch:
§ =Lights off
8 = Sidelights
9 = Headlights
Tail lights:
Tail lights are illuminated together
with the headlights and sidelights.
Reversing lights:
The reversing lights come on when
the ignition is switched on and
reverse gear is selected.
Automatic light control:
When the automatic light control
function is switched on and the
engine is running, the system
switches automatically between
daytime running light and
headlights, depending on external
lighting conditions and information
from the rain sensor system.
Daytime running light:
Increases visibility of the vehicle
during daylight.
Automatic headlight activation:
During poor lighting conditions the
headlights are switched on.
Headlights are also switched on
when windscreen wipers have been
activated for several swipes.
Rear fog light:
Operated with the
r button.
Light switch in position AUTO:
Switching on rear fog light will
switch on headlights automatically.
Press the button again to turn the
rear fog light off.
Headlight range adjustment:
Adapt headlight range to suit the
vehicle load to prevent dazzling of
other road users.
Turn thumb wheel q to required
position:
Front seats occupied = 0
All seats occupied = 1
All seats occupied and
load compartment laden = 2
Driver’s seat occupied and
load compartment laden = 3
Turn and lane-change signals:
Lever up = Right turn signal
Lever down = Left turn signal
If the lever is moved past the
resistance point, the turn signal is
switched on constantly. When the
steering wheel is moved back, the
turn signal is automatically
deactivated.
For three flashes, e.g. when
changing lanes, press the lever until
resistance is felt and then release.
Switch the turn signal off manually
by moving the lever to its original
position.
Operating headlight flash, high
beam and low beam:
Headlight flash = Pull lever
towards
steering wheel
High beam = Push lever
forwards
Low beam = Push lever again
or pull lever
towards steering
wheel
Windscreen wiper:
2 = Fast
1 = Slow
P = Intermittent wiping - or -
automatic wiping with
rain sensor
§ = Off
For a single wipe when the
windscreen wiper is off, move the
lever down.
Do not use wiper if the windscreen
is frozen.
Switch wiper off in car washes.
Adjustable wiper interval:
With wiper lever in position P,
turn adjuster wheel on lever
upwards for shorter wiper intervals
and downwards for longer wiper
intervals.
Windscreen washer:
Pull lever towards steering wheel.
Washer fluid is sprayed onto the
windscreen and the wiper swipes
for a few strokes.
Rear window wiper/washer:
Press the rocker switch to activate
the rear window wiper.
Upper position = Continuous
operation
Lower position = Intermittent
operation
Middle position= Off
Push lever forwards to activate rear
window washer. Washer fluid is
sprayed onto the rear window and
the wiper swipes for a few strokes.
The rear window wiper comes on
automatically when the windscreen
wiper is switched on and reverse
gear is engaged.
Do not use wiper if the rear window
is frozen.
Switch wiper off in car washes.
Hazard warning flashers:
Operated with the
¨ button.
In the event of an accident where
the airbags are deployed the
hazard warning flashers are
activated automatically.
Heated rear window,
heated exterior mirrors Ü:
The heating is operated by
pressing the
Ü button.
Heating works with the engine
running and switches off
automatically after a short time.
Demisting and defrosting
windows:
Set the temperature control to
the highest level.
Set fan speed to highest level.
Set air distribution control to l.
Switch cooling n on.
Switch heated rear window Ü
on.
Open side air vents and direct
them towards the door windows.
For simultaneous warming of the
foot well, set air distribution
control to J.
 Loading...