

Vauxhall KTA-2725/4-VX-en, 2014 Ampera Infotainment System Infotainment Manual

0 - 1Infotainment Manual Model Year 2014 Edition: June 2013 KTA-2725/4-VX-en
VAUXHALL Ampera
Infotainment Manual
Model Year 2014
Edition: June 2013
KTA-2725/4-VX-en

Introduction .................................... 2
Radio ........................................... 15
CD Player .................................... 22
External devices .......................... 24
Navigation .................................... 35
Voice recognition ......................... 56
Phone .......................................... 62
Index ............................................ 72
Contents

2 Introduction
Introduction
Introduction .................................... 2
Theft-deterrent feature ................... 3
Control elements overview ............ 3
Usage ............................................ 9
Tone settings ............................... 14
Introduction
The information in this manual
supplements the Owner's Manual.
This manual describes features that
may or may not be on your specific
vehicle either because they are
optional or due to changes
subsequent to the printing of this
manual. Please refer to the purchase
documentation to confirm each of the
features found on the vehicle.
Certain descriptions, including those
for display and menu functions, may
not apply to your vehicle due to model
variant, country specifications,
special equipment, or accessories.
This manual depicts left-hand drive
vehicles. Operation is similar for righthand drive vehicles.
Keep this manual with the Owner's
Manual in the vehicle, so it will be
there if it is needed. If the vehicle is
sold, leave this manual in the vehicle.
Some functions of the Infotainment
system are disabled during driving, to
minimise driver distraction. A grayedout function is not available when the
vehicle is moving.
All functions are available when the
vehicle is parked.
Before driving:
■ Become familiar with the
Infotainment system operation,
buttons on the faceplate, and
touch-sensitive screen buttons.
■ Set up the audio by presetting
favourite stations, setting the tone,
and adjusting the speakers.
■ Set up phone numbers in advance
so they can be dialled easily by
pressing a single button or by
making a single voice command for
vehicles equipped with phone
capability.
Note
This manual describes all options
and features available for the
various Infotainment systems.
Certain descriptions, including those
for display and menu functions, may

Introduction 3
not apply to your vehicle due to
model variant, country
specifications, special equipment or
accessories.
Theft-deterrent feature
The theft-deterrent feature works by
learning a portion of the Vehicle
Identification Number (VIN) to the
Infotainment system. The
Infotainment system does not operate
if it is stolen or moved to a different
vehicle.
Control elements overview
The Infotainment system is controlled
by using the buttons, touch screen,
steering wheel controls, and voice
recognition.
Usage 3 9.
4 Introduction
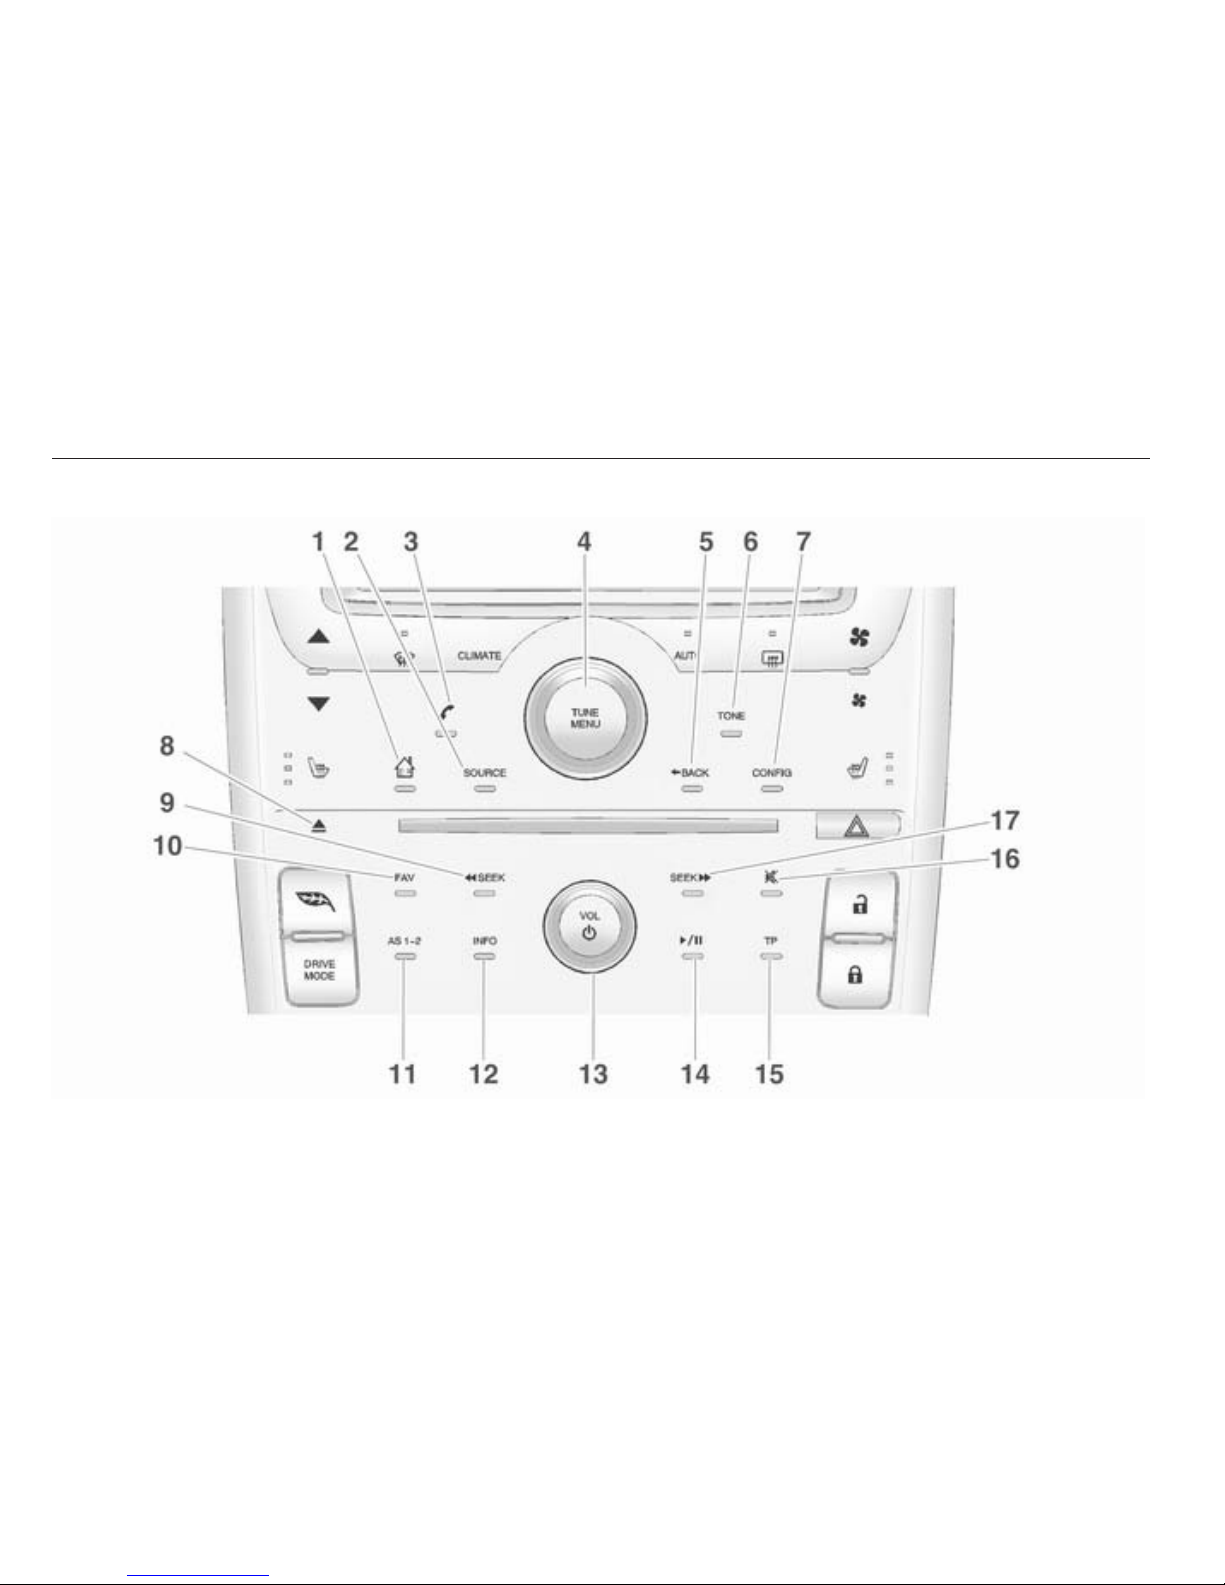
Control elements overview (without navigation)

Introduction 5
1. ; (Home page) ...................... 9
2. SOURCE ............................... 15
Press to change audio
sources, e.g. AM-FM
radio, CD and AUX.
3. ( (Phone menu) ................... 62
Press to enter the phone
main screen.
Press and hold to mute or
unmute the Infotainment system.
4. TUNE/MENU ......................... 15
Turn to highlight a feature.
Press to activate the
highlighted feature.
Turn to manually select a
radio station.
5. 9BACK ................................. 35
Press to return to the
previous screen in a menu.
6. TONE .................................... 14
Press to access the sound
menu screen to adjust the
settings, e.g. for bass,
midrange and treble.
7. CONFIG (Configuration
menu) .................................... 50
Press to adjust features for
radio, display, phone,
vehicle and time.
8. R (Eject) ............................... 22
Press to eject a disc from
the CD player
9. ]SEEK (Seek down) ............ 22
Press to seek the previous
track.
Press and hold to quickly
reverse forward through a
track. Release the button
to return to playing speed.
For AM or FM, press to
seek the previous strong
station ................................... 15
10. FAV (Favourite pages 1-6): ... 15
Press to display the
current page number
above the preset buttons.
The stored stations for
each list are displayed on
the touch-sensitive preset
buttons at the bottom of
the screen.
11. AS 1–2 (Autostore) ................ 15
Press to alternate between
the Autostore stations and
favourites.
12. INFO (Information) ................ 35
13. VOL/m (Volume/power) ........ 15
Press to switch the
Infotainment system on and off.
Turn to adjust the volume.
14. r (Play/pause) ................. 22
Press to start, pause and
resume playback.
15. TP (Traffic Programme) ....... 17
Press to access the Traffic
Programme.

6 Introduction
16. : (Mute) .................................. 9
17. SEEK[ (Seek up) ................ 22
Press to seek the next track.
Press and hold to quickly
fast forward through a
track. Release the button
to return to playing speed.
For AM or FM, press to
seek the next strong station ..15
Introduction 7
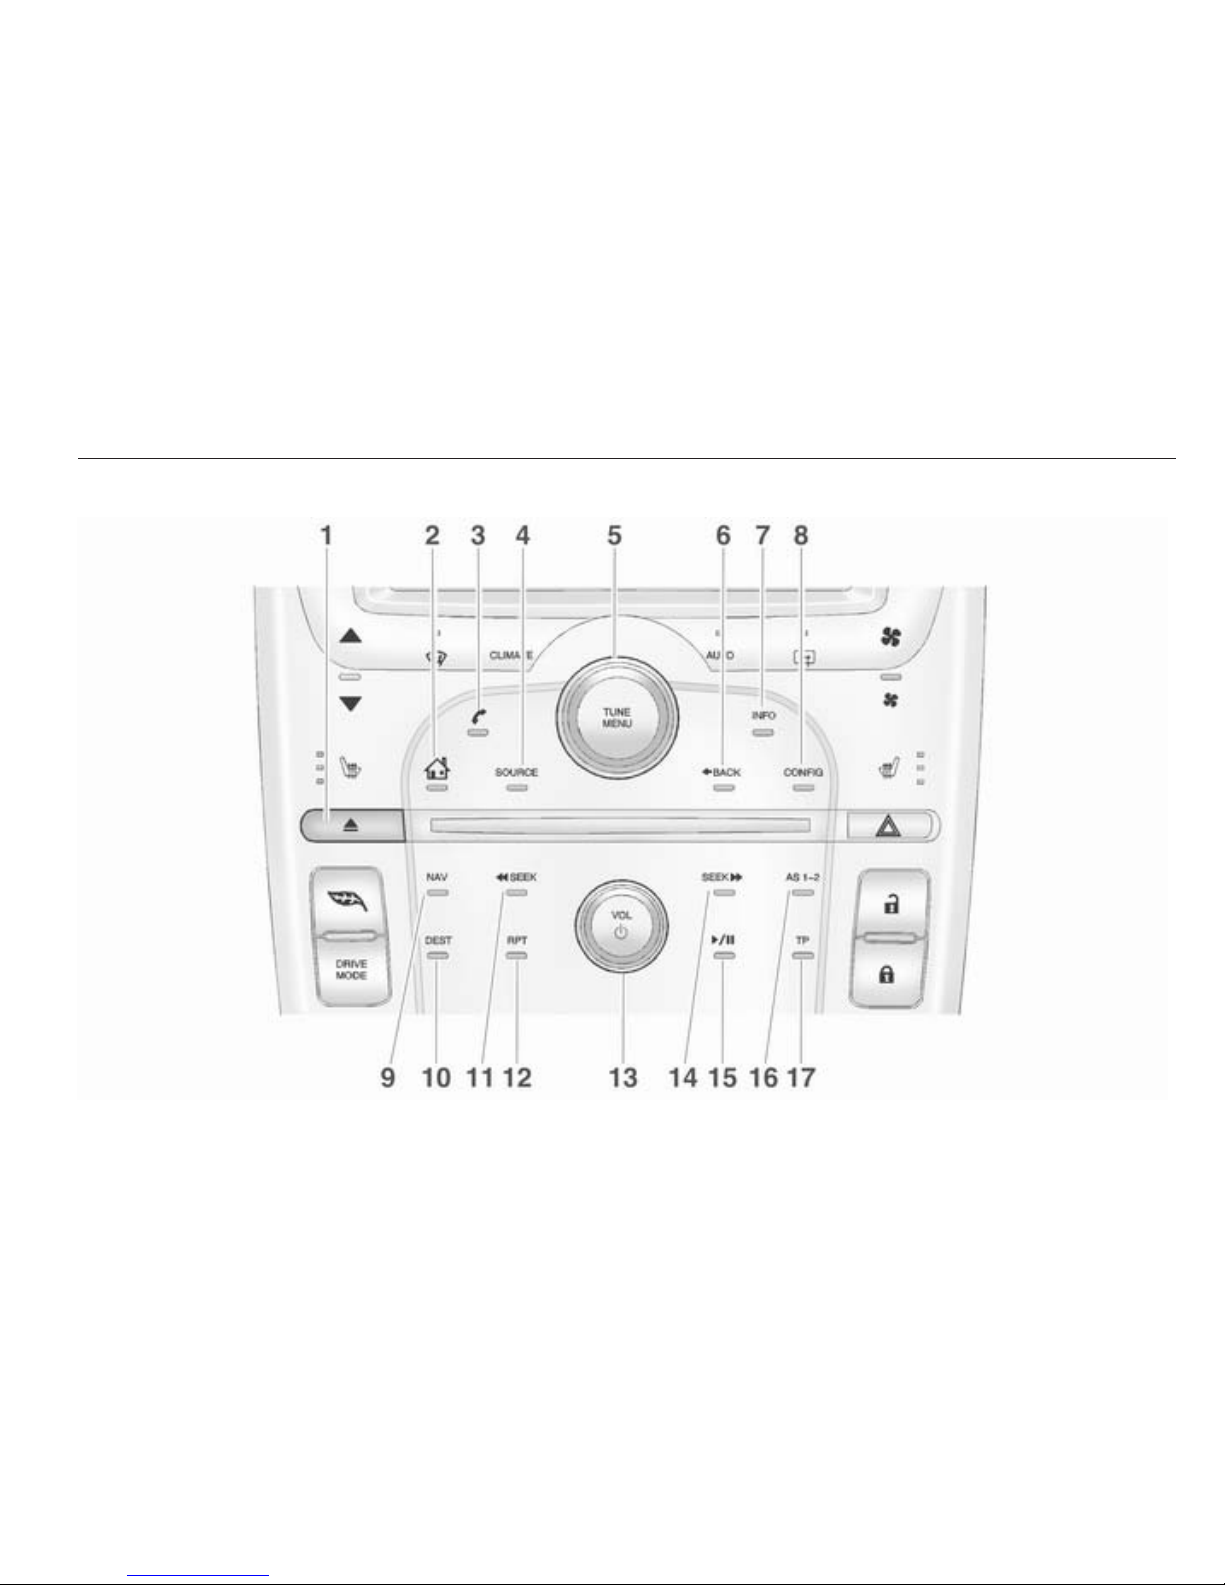
Control elements overview (with navigation)

8 Introduction
1. R (Eject) ............................... 22
Press to eject a disc from
the CD player
2. ; (Home page) ...................... 9
3. ( (Phone) ............................. 62
Bluetooth
4. SOURCE ............................... 15
Press to change audio
sources, e.g. AM-FM
radio, CD and AUX.
5. TUNE/MENU ......................... 15
Turn to highlight a feature.
Press to activate the
highlighted feature.
Turn to manually select a
radio station.
6. 9BACK ................................. 35
Press to return to the
previous screen in a menu.
If on a page accessed
directly by a faceplate
button or Home page
screen button, press 9
BACK to return to previous
menu.
7. INFO (Information) ................ 15
Press to toggle through an
audio information screen.
8. CONFIG (Configuration
menu): ................................... 50
Press to adjust features for
radio, display, phone,
vehicle and time.
9. NAV (Navigation) .................. 35
Press to view the
navigation map screen or
to change between a map/
audio split view or a full
map view.
10. DEST (Destination) ............... 35
Press to plan a route. If
route guidance is active,
press to access the Route menu.
11. ]SEEK (Seek down) ............ 22
Press to seek the previous
track.
Press and hold to quickly
reverse forward through a
track. Release the button
to return to playing speed.
For AM or FM, press to
seek the previous strong
station ................................... 15
12. RPT (Repeat) ........................ 35
Press to repeat the last
voice guidance prompt
13. VOL/m (Volume/power) ........ 15
Press to switch the
Infotainment system on and off.
Turn to adjust the volume.
14. SEEK[ (Seek up) ................ 22
Press to seek the next track.

Introduction 9
Press and hold to quickly
fast forward through a
track. Release the button
to return to playing speed.
For AM or FM, press to
seek the next strong station ..15
15. r (Play/pause) ................. 22
Press to start, pause and
resume playback.
16. AS 1–2 .................................. 15
Press to alternate between
the Autostore stations and
favourites.
17. TP (Traffic Programme) ....... 17
Press to access the Traffic
Programme.
Steering wheel controls
3 (Push to talk): Press to interact
with Bluetooth or voice recognition.
Bluetooth 3 62.
4 (End call/mute): Press to
decline an incoming call or to end a
current call. Press to silence the
vehicle speakers while using the
Infotainment system. Press again to
turn the sound on. Press to cancel
voice recognition.
d SRCc (Thumbwheel control): Press
to select a radio band or audio source.
Use the thumbwheel to select the
next or previous favourite radio
station, CD/MP3 track, USB and
Bluetooth audio.
Use d SRC to skip to the next song or
show using Stitcher.
+ X − (Volume): Press + to increase
the volume. Press − to decrease the
volume.
Usage
The Infotainment system is controlled
by touching the screen, and by using
the knobs and other buttons.
Voice recognition, through the
steering wheel controls, can be used
to control the Infotainment features.
Press q/w on the steering wheel
controls to begin voice recognition.
Voice recognition 3 56.
9 Warning
The Infotainment system must be
used so that the vehicle can be
driven safely at all times. If in
10 Introduction
doubt, stop your vehicle and
operate the Infotainment system
while the vehicle is stationary.
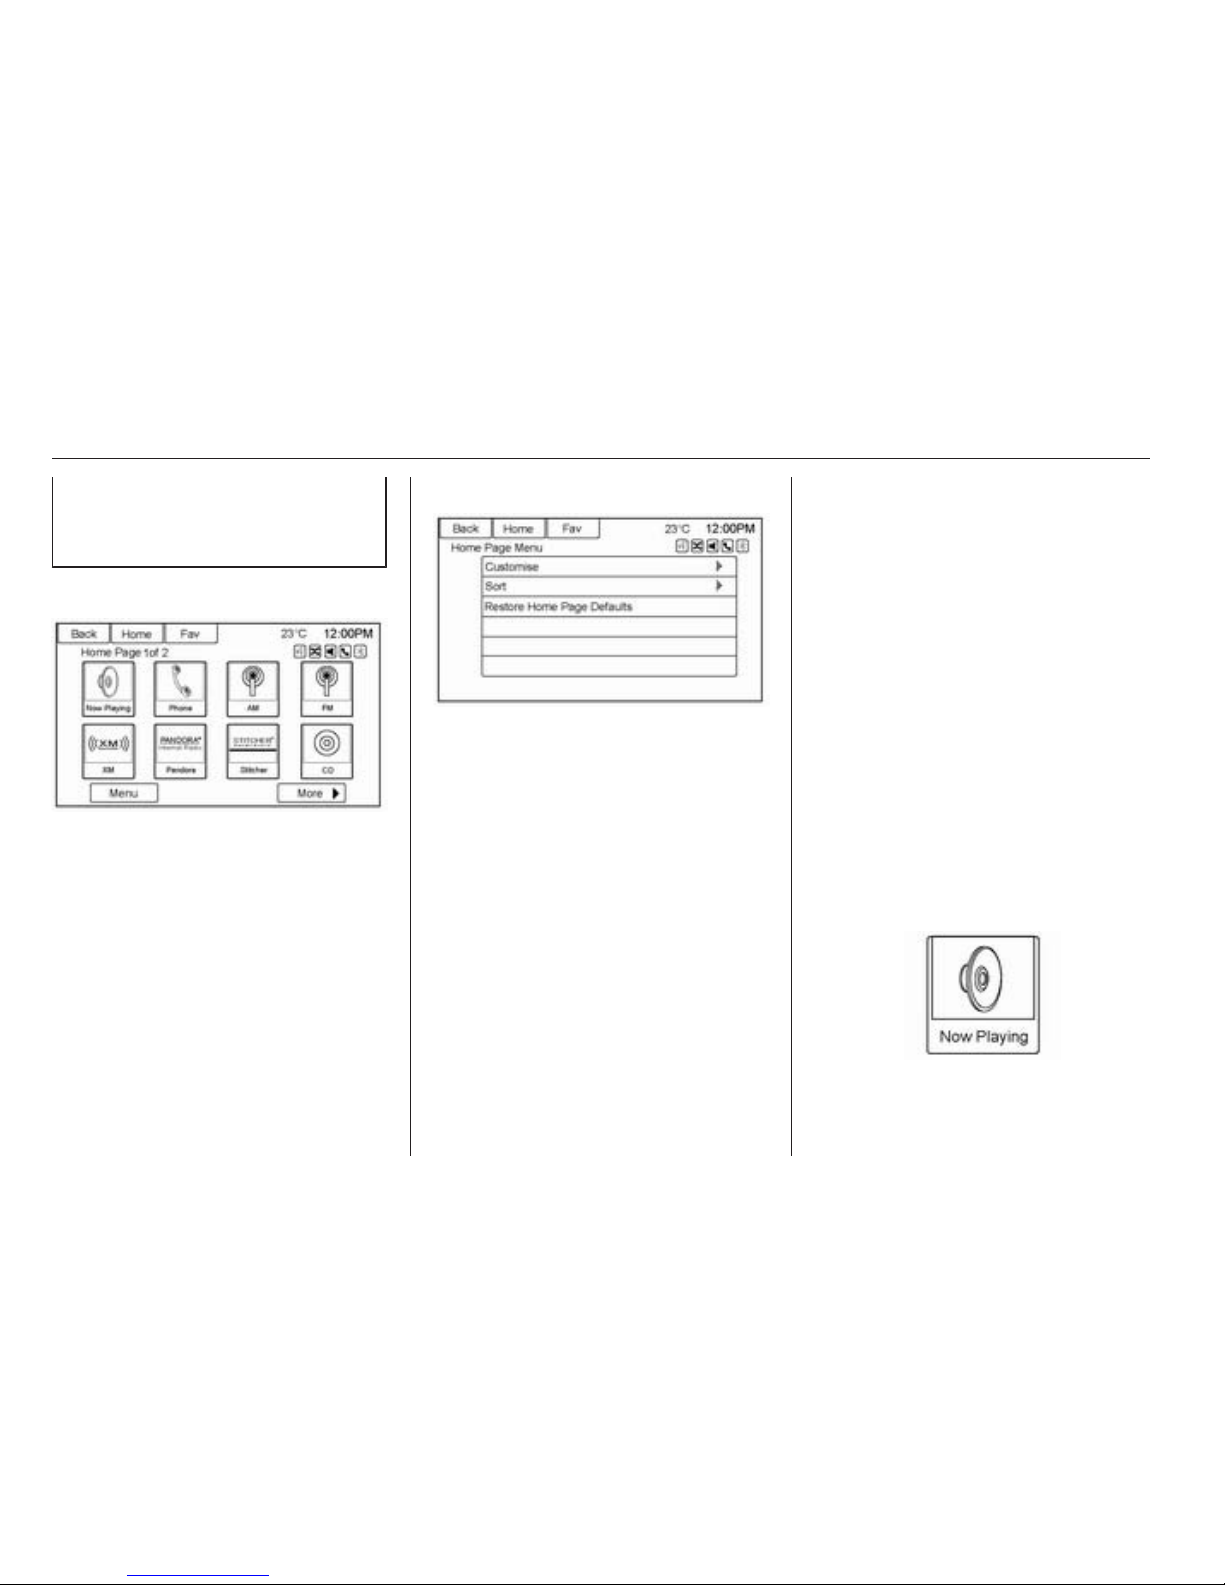
Home Page
Touch screen buttons
The Home Page allows access to
many of the features.
Back: Press to return to the previous
page.
Home: Press to go back to the Home
Page.
Fav: Press to display a page of stored
favourites AM or FM stations. Keep
pressing Fav to scroll through the
favourite pages.
More 6: Press to go to the next page.
Home Page customisation
The first Home Page can be
customised.
To add screen buttons:
1. Press Menu.
2. Press Customise.
3. Press a screen button to add or
remove from the first Home Page.
A H indicates it will be displayed.
The maximum number of buttons
on Home Page 1 is eight.
4. Press Done.
To move screen buttons:
1. Press Sort.
2. Press an icon to switch with
another icon on the first Home
Page only.
3. Press Done.
To restore Home Page 1 defaults:
1. Press Menu.
2. Press Restore Home Page
Defaults.
3. Press Yes or Cancel.
Home Page features
Touch screen buttons are highlighted
when a feature is available.
Various functions are disabled when
the vehicle is moving.

Introduction 11
Press the Now Playing screen button
to display the active source page. The
sources available are AM, FM, CD,
USB/iPod, Stitcher, and AUX.
AM-FM Radio 3 15, CD Player
3 22, and Auxiliary devices 3 27.
Press the Navigation screen button to
display a map of your current vehicle
position. Using the Navigation system
3 35, Maps 3 37, Symbols
overview 3 38, and Configure menu
3 50.
Press the Destination screen button
to display the Destination Entry home
page or the Destination Menu.
The available screen buttons provide
easy access to a variety of ways to
enter a destination.
Destination 3 41.
Press the Phone screen button to
display the Phone main page.
Bluetooth 3 62.
Press the Config screen button to
display the Config main page. From
this display, adjust features, e.g. time
and date, radio, phone, navigation,
vehicle, and display.
Configure menu 3 50.
Press the Tone screen button to
display the Tone main page. Adjust
the tone and speakers by pressing
the screen buttons to change the
levels of sound for treble, midrange,
bass, fade, and balance. Tone
settings 3 14.
Press the Pictures screen button to
view pictures on your USB drive or SD
card. Pictures on the SD card can
only be viewed through a USB
adapter.
Displaying pictures 3 32.
12 Introduction
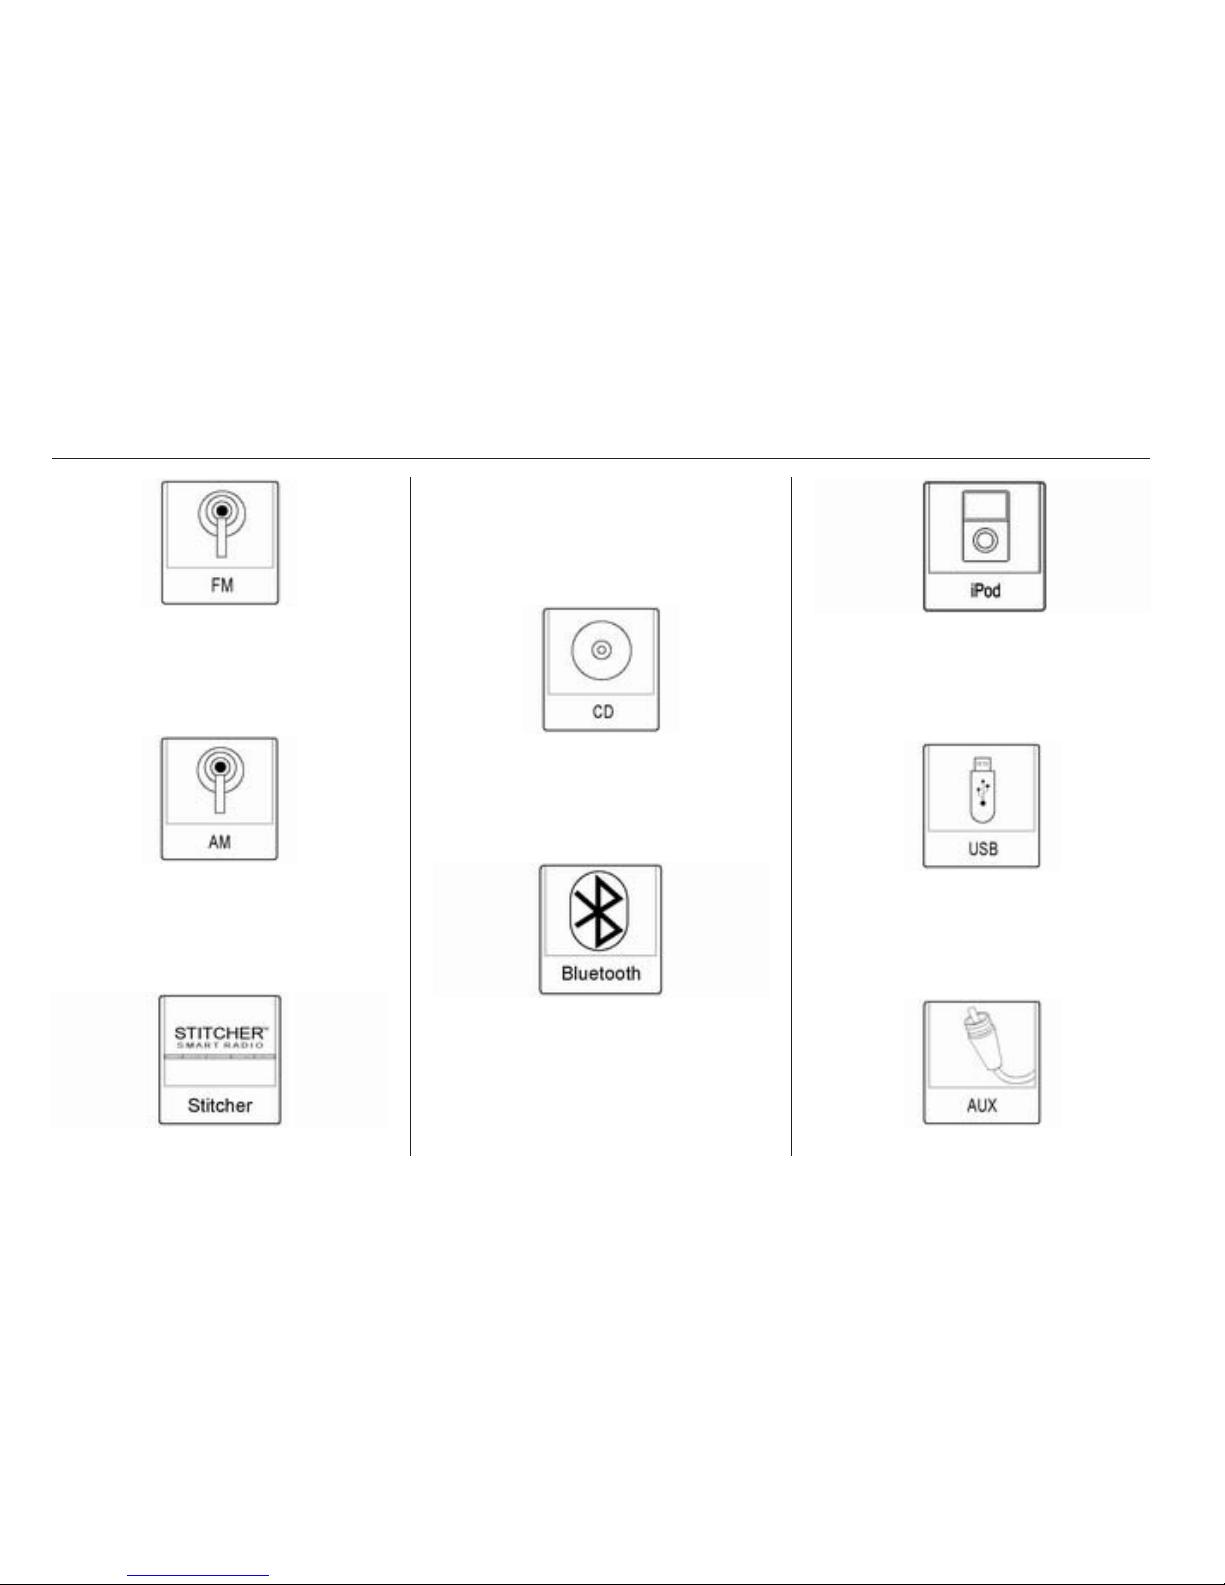
Press the FM screen button to display
the FM main page and play the
current or last tuned FM station.
AM-FM Radio 3 15.
Press the AM screen button to display
the AM main page and play the
current or last tuned AM station.
AM-FM Radio 3 15.
Press the Stitcher screen button (if
equipped) to display the Stitcher
home page and streams news,
sports, and entertainment shows
through the audio system.
Press the CD screen button to display
the CD main page and play the
current or last CD track selected.
CD player 3 22.
Press the S Bluetooth screen button
to display the Bluetooth Audio main
page to play music through a
Bluetooth device.
Bluetooth audio 3 27.
Press the iPod screen button to
display the iPod main page and play
the current or last track selected.
Auxiliary devices 3 27.
Press the USB screen button to
display the USB main page and play
the current or last track selected.
Auxiliary devices 3 27.
Introduction 13
Press the AUX screen button to
access any connected auxiliary
device.
Auxiliary devices 3 27.
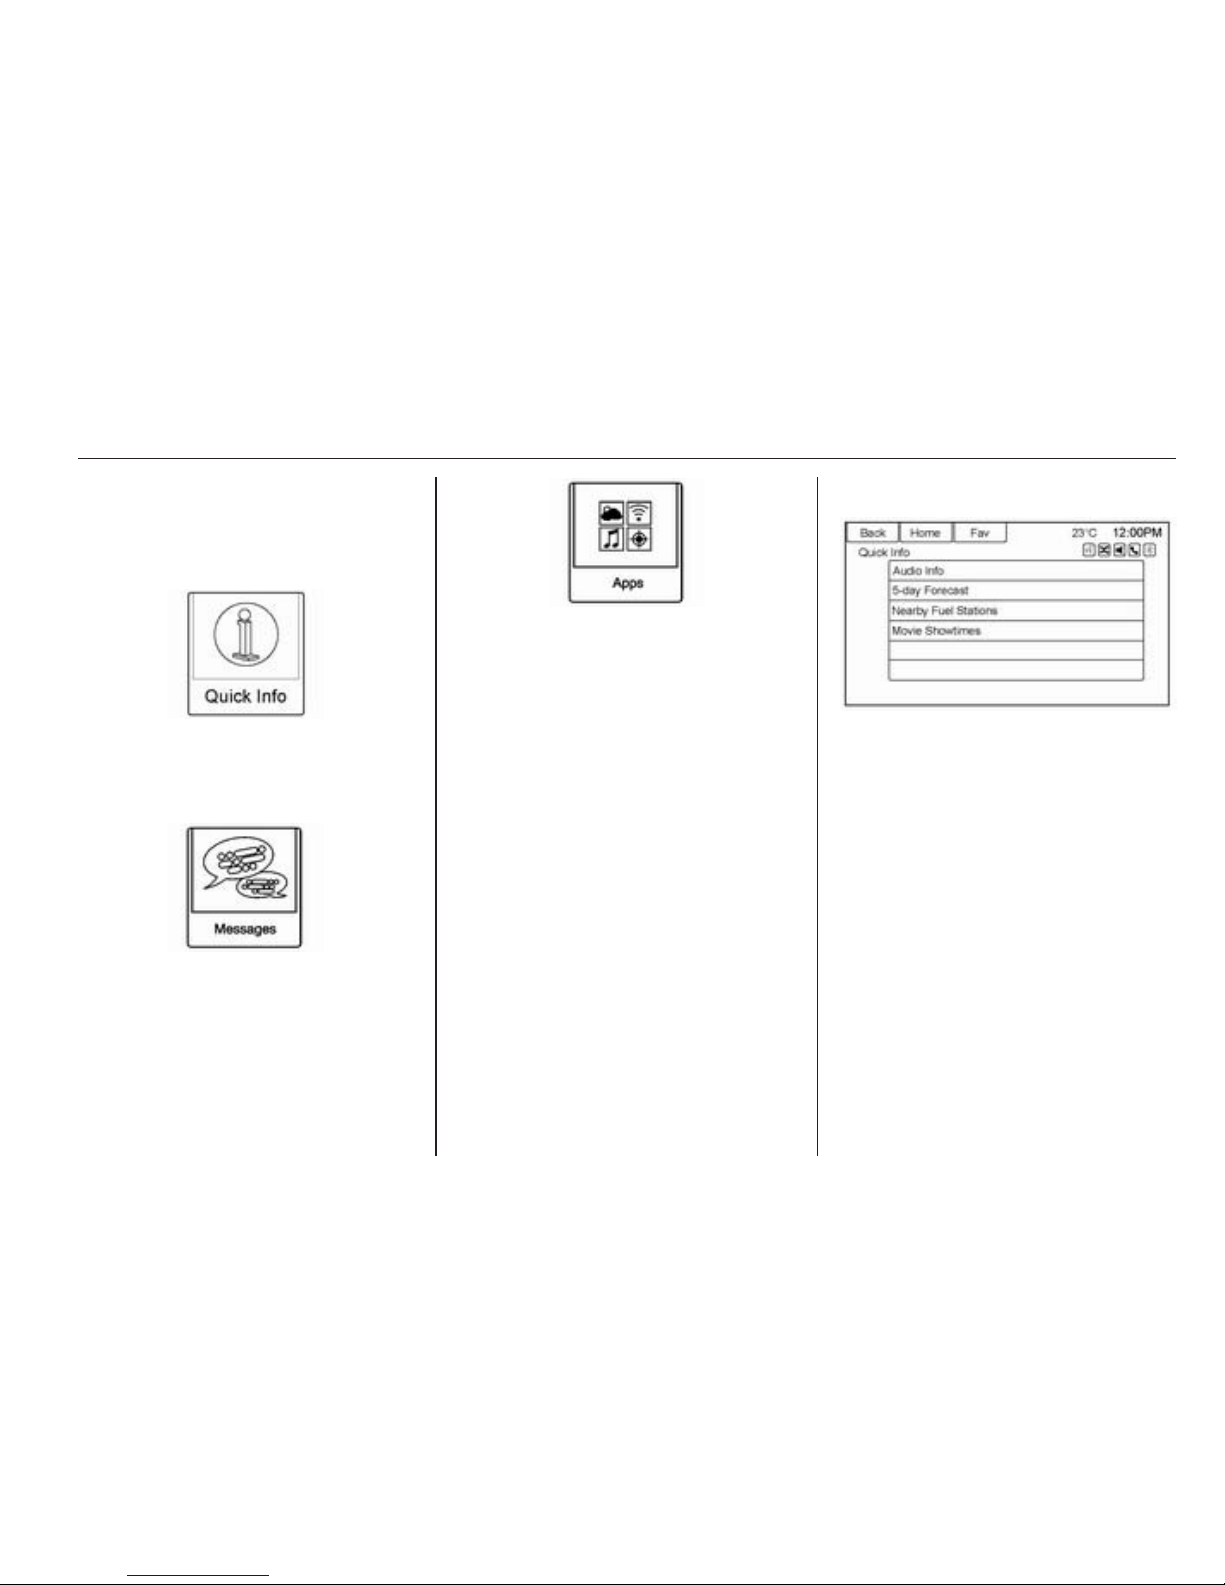
Press the Quick Info screen button to
access information on audio playing.
Quick Info see below.
Press the Messages screen button (if
equipped) to display the text
message Inbox.
Text Messages 3 69.
If equipped, this feature is available
through the Apps icon on the
Infotainment system Home Page.
Downloading and using Apps
requires a Wi-Fi Internet connection
as part of a smartphone or other
mobile device data service plan. On
most smartphones, activation is in the
settings menu under Mobile Network
Sharing, Personal Hotspot, Mobile
Hotspot, Wi-Fi Hotspot, or similar.
After activation of Wi-Fi on the
smartphone, press the Apps icon on
the Home Page. Follow the prompts
to configure the Internet connection
and set up an account.
Quick Info
Quick Info gives access to quick
information on audio playing.
To access, press Quick Info on the
Home Page or the INFO button on the
faceplate. Depending on the system
and if the options are available for that
region, some options may be grayed
out.
Audio Info: Displays information on
current item playing.
Cleaning the display
To remove dirt that could scratch the
surface, use a soft bristle brush. Use
a microfiber cloth to wipe high gloss
surfaces or vehicle displays.

14 Introduction
Never use window cleaners or
solvents.
Note
Using abrasive cleaners when
cleaning glass surfaces could
scratch the glass. When cleaning
the glass, use only a soft cloth and
do not spray cleaner directly on the
Infotainment system.
Note
Do not attach a device with a suction
cup to the display.
Do not wipe the centre console with a
hard cloth or use a volatile liquid; it
could scratch the surface or erase the
characters on the buttons.
Tone settings
To access the Tone Settings menu,
press the TONE button or use the
Tone Settings button on the Home
Page. Tone settings are specific to
each source.
To adjust the settings:
■ Bass: Press + or − to change the
level.
■ Mid (Midrange): Press + or − to
change the level.
■ Treble: Press + or − to change the
level.
■ EQ Settings: Press or turn the
TUNE/ MENU knob to cycle
through the preset EQ options.
■ Fade: Press the F or R button for
more sound from the front or rear
speakers. The middle position
balances the sound between the
front and rear speakers.
■ Balance: Press the L or R button for
more sound from the left or right
speakers. The middle position
balances the sound between the
left and right speakers.
Radio 15
Radio
AM-FM radio ................................ 15
Radio data system (RDS) ............ 17
Radio reception ............................ 20
Multi-band antenna ...................... 20
AM-FM radio
Playing the radio
VOL/m (volume/power):
■ Press to turn the radio on or off.
■ Turn to increase or decrease the
volume. The volume is adjusted for
the current audio source, active
navigation voice guidance, voice
prompts or audio cues.
The steering wheel controls can also
be used to adjust the volume.
Steering wheel controls 3 3.
Radio operation
The radio will work when the key is in
ON/RUN or ACC/ACCESSORY.
When the key is turned from ON/RUN
to LOCK/OFF, the radio will continue
to work for 10 minutes or until the
driver's door is opened.
The radio can be turned on by
pressing the power button on the
Infotainment system and will stay on
for 10 minutes. Opening the driver'
door will not turn the radio off when
pressing the power button.
Some radios may stay on longer and
reset the time for 10 minutes if there
are any additional presses of any
Infotainment system button.
The radio can be turned off at any
time by pressing the power button.
Audio Source
Press SOURCE or SRC on the
steering wheel controls to display and
scroll through the available sources
AM, FM, Stitcher, CD, USB, AUX, and
Bluetooth audio.
Finding a station
Press SOURCE or SRC on the
steering wheel controls to select AM,
FM, Stitcher, CD, USB, AUX, and
Bluetooth audio.
Turn the TUNE/MENU knob to find a
radio station. To select a preset
station, press Fav to scroll through

16 Radio
the favourite pages and then press a
preset button on the radio or the
screen button.
Seeking a station
Press ] or [ to search for a station.
AM
1. Press the AM screen button on
the Home Page or select AM by
pressing SOURCE or SRC on the
steering wheel controls, or say
“Tune AM” or “AM” through voice
recognition.
2. Press the Menu screen button to
display the AM stations or
categories.
3. Press to select an option. To
update the station list, press
Refresh.
FM
1. Press the FM screen button on the
Home Page or select FM by
pressing SOURCE or SRC on the
steering wheel controls, or say
“Tune FM” or “FM” through voice
recognition.
2. Press the Menu screen button to
display the FM stations or
categories.
3. Press to select an option. To
update the station list, press
Refresh.
Storing radio station presets
Up to 36 preset stations can be
stored. AM and FM can be mixed.
1. From the AM or FM main page,
press and hold any of the 1−6
buttons or one of the preset
screen buttons at the bottom of
the screen. After a few seconds, a
beep will be heard and the new
preset information will display on
that screen button.
2. Repeat the steps for each preset.
Autostore
To use autostore:
1. Press SOURCE to select FM or
AM.
2. Press the AS 1-2 button for
two seconds.
3. The radio searches and
automatically stores the six
strongest stations.
Press the AS 1-2 button to alternate
between the autostore stations and
favourites.
Autostore does not delete previously
stored favourite stations.

Radio 17
Mixed-band presets
Each favourite page can store six
preset stations. The presets within a
page can be from different radio
bands.
To scroll through the pages, press the
FAV button located on the faceplate
or select the Fav screen button on the
top bar. The current page number
displays above the preset buttons.
The stored stations for each Fav page
display on the preset buttons.
To change the number of Fav pages
displayed:
1. Press Config on the Home Page.
2. Press Radio Settings.
3. Press Number of Favourite
Pages.
Recalling a preset station
To recall a preset station from a Fav
page, do one of the following:
■ Press the FAV button on the
faceplate to display the preset popup. Press one of the preset screen
buttons to go to the selected preset
station.
■ In the AM or FM main page, select
one of the preset screen buttons to
go to the selected preset station.
Radio data system (RDS)
Radio data system (RDS) is a service
of the FM stations that helps to find
the desired station and its fault-free
reception. RDS stations are
recognised by the programme names
rather than the transmission
frequency.
TP (Traffic Program): Radio traffic
service stations are RDS stations that
broadcast traffic news.
Switching the radio traffic
service on and off
To switch the traffic announcement
standby facility of the infotainment
system on and off:
■ Press the TP button. If the radio
traffic service is switched on, [TP] is
illuminated on the display.
■ Only radio traffic service stations
are received.
■ If the current station is not a radio
traffic service station, a search is
started automatically for the next
radio traffic service station.
■ If a radio traffic service station has
been found, [TP] is illuminated on
the display.
■ Traffic announcements are played
at the set voice volume by pressing
the CONFIG button and selecting

18 Radio
the Navigation Settings screen
button and then the Voice Prompt
screen button.
■ If the radio traffic service is
switched on, the replay of CDs/
DVDs and of external sources is
interrupted for the duration of the
traffic announcement.
Listening to traffic
announcements only
Switch on the radio traffic service and
turn down fully the volume of the
Infotainment system.
EON (Enhanced Other
Networks)
With EON you can listen to radio
traffic announcements even if the
station you have set does not
broadcast its own radio traffic service.
If such a station is set, it is displayed
as TP.
Configuring RDS
To open the menu for the RDS
configuration:
1. Press the CONFIG button.
2. Select Radio and then RDS
Options.
Switching RDS on and off
Set RDS to On or Off. The following
advantages result through activating
RDS:
■ On the display the programme
name of the set station appears
instead of its frequency.
■ The Infotainment system always
tunes into the best receivable
broadcasting frequency of the set
station by means of AF (Alternative
Frequency).
■ Depending on the station that is
received, the Infotainment system
displays radio text that can contain,
e.g. information about the current
programme.
Switching regionalisation on
and off
RDS must be activated for
regionalisation. At certain times some
RDS stations broadcast regionally
different programmes on different
frequencies.
1. Set Regional to On or Off. Only
alternative frequencies (AF) with
the same regional programmes
are selected.
2. If regionalisation is switched off,
alternative frequencies of the
stations are selected without
regard to regional programmes.
RDS scrolling text
Some RDS stations use the lines for
indicating the name of the
programme to indicate additional
information. During this process the
programme name is hidden. To block
out the display of the additional
information, set text scroll freeze to
On.

Radio 19
DAB
The digital radio system DAB (Digital
Audio Broadcasting) is a universal
broadcast system.
DAB stations are indicated by the
programme name instead of the
broadcasting frequency.
General information
■ With DAB, several radio
programmes (services) can be
broadcast on a single frequency.
■ Besides high-quality digital audio
services, DAB is also able to
transmit programme-associated
data and a multitude of other data
services including travel and traffic
information.
■ As long as a given DAB receiver
can pick up the signal sent out by a
broadcasting station (even if the
signal is very weak), sound
reproduction is ensured.
■ There is no fading (weakening of
the sound) that is typical of AM or
FM reception; the DAB signal is
reproduced at a constant volume.
■ If the DAB signal is too vague to be
interpreted by the receiver,
reception is interrupted completely.
This incident can be avoided by
activating DAB to DAB Service
Following and/or DAB to FM
Service Linking. See “Configuring
DAB” below.
■ Interference caused by stations on
nearby frequencies (typical of AM
and FM reception) does not occur
in connection with DAB.
■ If the DAB signal is reflected by
natural obstacles or buildings, the
reception quality of DAB is
improved, whereas AM or FM
reception is considerably
weakened in such cases.
■ The radio is also capable of
receiving DAB+ and DMB-Audio.
Configuring DAB
1. Press the CONFIG button.
2. Select Radio and then DAB.
The following options are available for
selection in the configuration menu:
■ DAB to DAB Service Following:
with this function activated, the
device switches over to another
service of the active DAB ensemble
(if available) when the DAB signal
is too vague to be interpreted by the
receiver.
■ DAB to FM Service Linking: with
this function activated, the device
switches over to a corresponding
FM station of the active DAB
service (if available) when the DAB
signal is too vague to be interpreted
by the receiver.
■ Dynamic Range Control: with this
function activated, the dynamic
range of the DAB signal is reduced.
This means the level of the loud
sounds is reduced, but not the level
of the quiet sounds. Therefore the
volume of the Infotainment system

20 Radio
can be raised to a point where the
quiet sounds are audible, without
the loud sounds being too loud.
■ Band Selection: after selection of
this option, DAB wavebands to be
received by the Infotainment
system can be defined.
DAB Announcements
Besides their music programmes,
numerous DAB stations broadcast
various announcement categories.
Radio or CD/MP3 playing is
interrupted when any
announcements are pending.
To select several announcement
categories at the same time:
1. Select DAB Announcements.
2. Activate the desired
announcement categories.
Radio reception
Frequency interference and static can
occur during normal radio reception if
items such as mobile phone
chargers, vehicle convenience
accessories and external electronic
devices are plugged into the
accessory power outlet. If there is
interference or static, unplug the item
from the accessory power outlet.
FM
FM signals only reach about 10 to
40 miles. Although the radio has a
built-in electronic circuit that
automatically works to reduce
interference, some static can occur,
especially around tall buildings or
hills, causing the sound to fade in and
out.
AM
The range for most AM stations is
greater than for FM, especially at
night. The longer range can cause
station frequencies to interfere with
each other. Static can occur when
things like storms and power lines
interfere with radio reception. When
this happens, try reducing the treble
on the radio.
Mobile phone usage
Mobile phone usage can cause
interference with the vehicle's radio.
Multi-band antenna
The multi-band antenna is located on
the roof of the vehicle. The antenna is
used for the AM/FM radio and GPS
(Global Positioning System); if the
vehicle has these features. Keep the
antenna clear of obstructions for clear
reception. If the vehicle has a sunroof
and it is open, the performance of the
AM/FM radio and GPS can be
affected.

Radio 21
Diversity antenna system
The FM antenna is a hidden selftuning system. It optimizes the FM
signals relative to the vehicle's
position and radio station source. No
maintenance or adjustments are
needed.

22 CD Player
CD Player
Playing an audio CD .................... 22
Playing an audio CD
The system is capable of playing:
■ Most audio CDs
■ CD-R
■ CD-RW
■ MP3 or unprotected WMA and AAC
formats
When playing any compatible
recordable disc, the sound quality can
be reduced due to disc quality, the
method of recording, the quality of the
music recorded or how the disc has
been handled.
There may be increased skipping,
difficulty reading recorded tracks,
finding tracks, and/or loading and
ejecting. If these problems occur,
check the disc for damage or try a
known good disc.
To avoid damage to the CD player:
■ Do not use scratched or damaged
discs.
■ Do not apply labels to discs. The
labels could get caught in the
player.
■ Insert only one disc at a time.
■ Keep the loading slot free of foreign
materials, liquids and debris.
■ Use a marker pen to label the top of
the disc.
Loading and ejecting discs
To load a disc:
1. Turn the ignition on.
2. Insert a disc into the slot, right side
up. The player pulls it in the rest of
the way. If the disc is damaged or
improperly loaded, there is an
error and the disc ejects.
The disc automatically plays once
loaded.
Press R to eject a disc from the CD
player. If the disc is not removed
within a short period of time, it is
automatically pulled back into the
player.
 Loading...