

Vauxhall Vivaro 2008.5, 2008 Vivaro Owner's Manual

VAUXHALL Vivaro
Operation, Safety, Maintenance
Owner’s Manual
Model Year 2008.5
Edition: January 2008
TS 1545-B-08
Ofrecido por www.electromanuales.com

-2
Vehicle specific data
Please enter your vehicle ’s data here to ke ep it ea sily acces sible.
This information is available under the section "Technical da ta" as well as on the identification plate and in the Service Booklet.
Fuel
Designati on
Engine oil
Grade
Viscosity
Tyre pressure
Ty re size wi th full load
Summer tyre s Front Rear
Winter tyres Front Rear
Weights
Permissible Gross Vehicle Weight
– EC kerbweight
= Pay load
Ofrecido por www.electromanuales.com

-1
Your Vivaro
is an intelligent combination of forwardlooking technology, impressive safety,
environmental friendliness and economy.
It now lies with you to drive your vehicle
safely and ensure that it performs
perfectly. This Owner’s Manual prov ides
you with all the necessary information to
that end.
Make sure your passengers are aware of
the p o ss ible risk of acc ident a nd injury
which may result from improper use of the
vehicle.
You must always comply with the specific
laws of the country that you are travelling
th rough. These la ws may d iffe r fr om the
information in this Owner’s Manual.
When instructed to co n sult a workshop, w e
r e c om m e nd t h at y ou c o n su l t y o ur Va ux ha ll
Authorised Repairer.
All Vauxhall Authorised Repairers provide
first-c lass service at reasonable prices.
You will receive quick, reliable and
individual service.
Experienced mecha nics, trained by
Vauxhall, work according to specific
Vauxhall instructions.
The Owner’s Manual should always be kep t
in the vehicle: Ready to hand in the glove
compartment.
Make use of the Owner’s Manual:
z Its "In brief" se ction will give you an initial
overview.
z The table of contents at the beginning of
the Owner’s Manual and within the
individ ual chapters will show you where
everything is.
z Its index will help you find what you
want.
z It will familiarise you with the
sophisticated technology.
z It will increase your pleasure in your
vehicle.
z It will help you to handle your v ehicle
expertly.
The Owner’s Ma nual is designed to be
clearly laid-out and e asily understood.
This symbol signifies:
6 Continue reading on next page .
3 Items marked with an asterisk are not
fitted to all vehicles (model variants,
engine options, models specific to one
country, optional eq uipment, Vauxhall
genuine parts and acce ssories).
Yellow arrows in the illustrations serve as
points of reference or indicate some action
to be performed.
Bla ck arrows in the illustrations indicate a
reaction or a second a ction to b e
performed.
Directional data, e.g. left or right, or front
or back, in the descriptions always relates
to th e d i rec tio n of t r ave l.
Thank you for choosing a V auxhall.
We wish you many hours of pleasurable
driv ing.
Your Vauxhall Team
9 Warning
Text marked 9 Warning provides
information on risk of accident or injury.
Disregard of the instructions may lead to
injuries or endanger life. Inform your
passengers accordingly.
Ofrecido por www.electromanuales.com

0
Ofrecido por www.electromanuales.com

Contents
In brief ........ ......... ........ ......... ......... ......... ..... 2
Locks, doo rs, windows ........ ..... ......... ...... 1 7
Seats, interio r.......... .... ..... ......... ......... ...... 3 0
Instrum ents, controls .. ......... ......... ......... .. 59
Lighting ............... .... ......... ......... ......... ...... 76
Infotainment system .. ......... ......... ......... .. 81
Climate control ... ........ ......... ......... ......... .. 83
Driving and operatio n ........ ......... ......... . 91
Dropside b od y............ ..... ......... ......... .... 121
Self-help, vehicle care .................. ..... ... 125
Service, mainte na nce . ..... ......... ......... .... 147
Te chnical data ................ .... ..... .... ........ 162
Index...... ..... ......... ........ ......... ......... ......... 174
Commitment to customer
satisfaction:
Our aim: t o ke ep y ou ha pp y w ith y our
vehicle. All Vauxhall Authorised Repairers
offer first class service at competitive
prices. Experienced, factory-trained
technicians work ac cord ing to factory
instructions. Your Authorised Repairer can
supply you with GENUINE VAUXHALL-
APPROVED PARTS, which have undergone
stringent quality and precision checks, and
of course useful and attractive
VAUXHALL-APPROVED ACCESSORIES.
Our name is y our guarantee!
For details of the
Vaux hall Auth oris ed Repa irer Ne twork
please ring this number; 0845 090 2044
Ofrecido por www.electromanuales.com

In b rief2
In brief
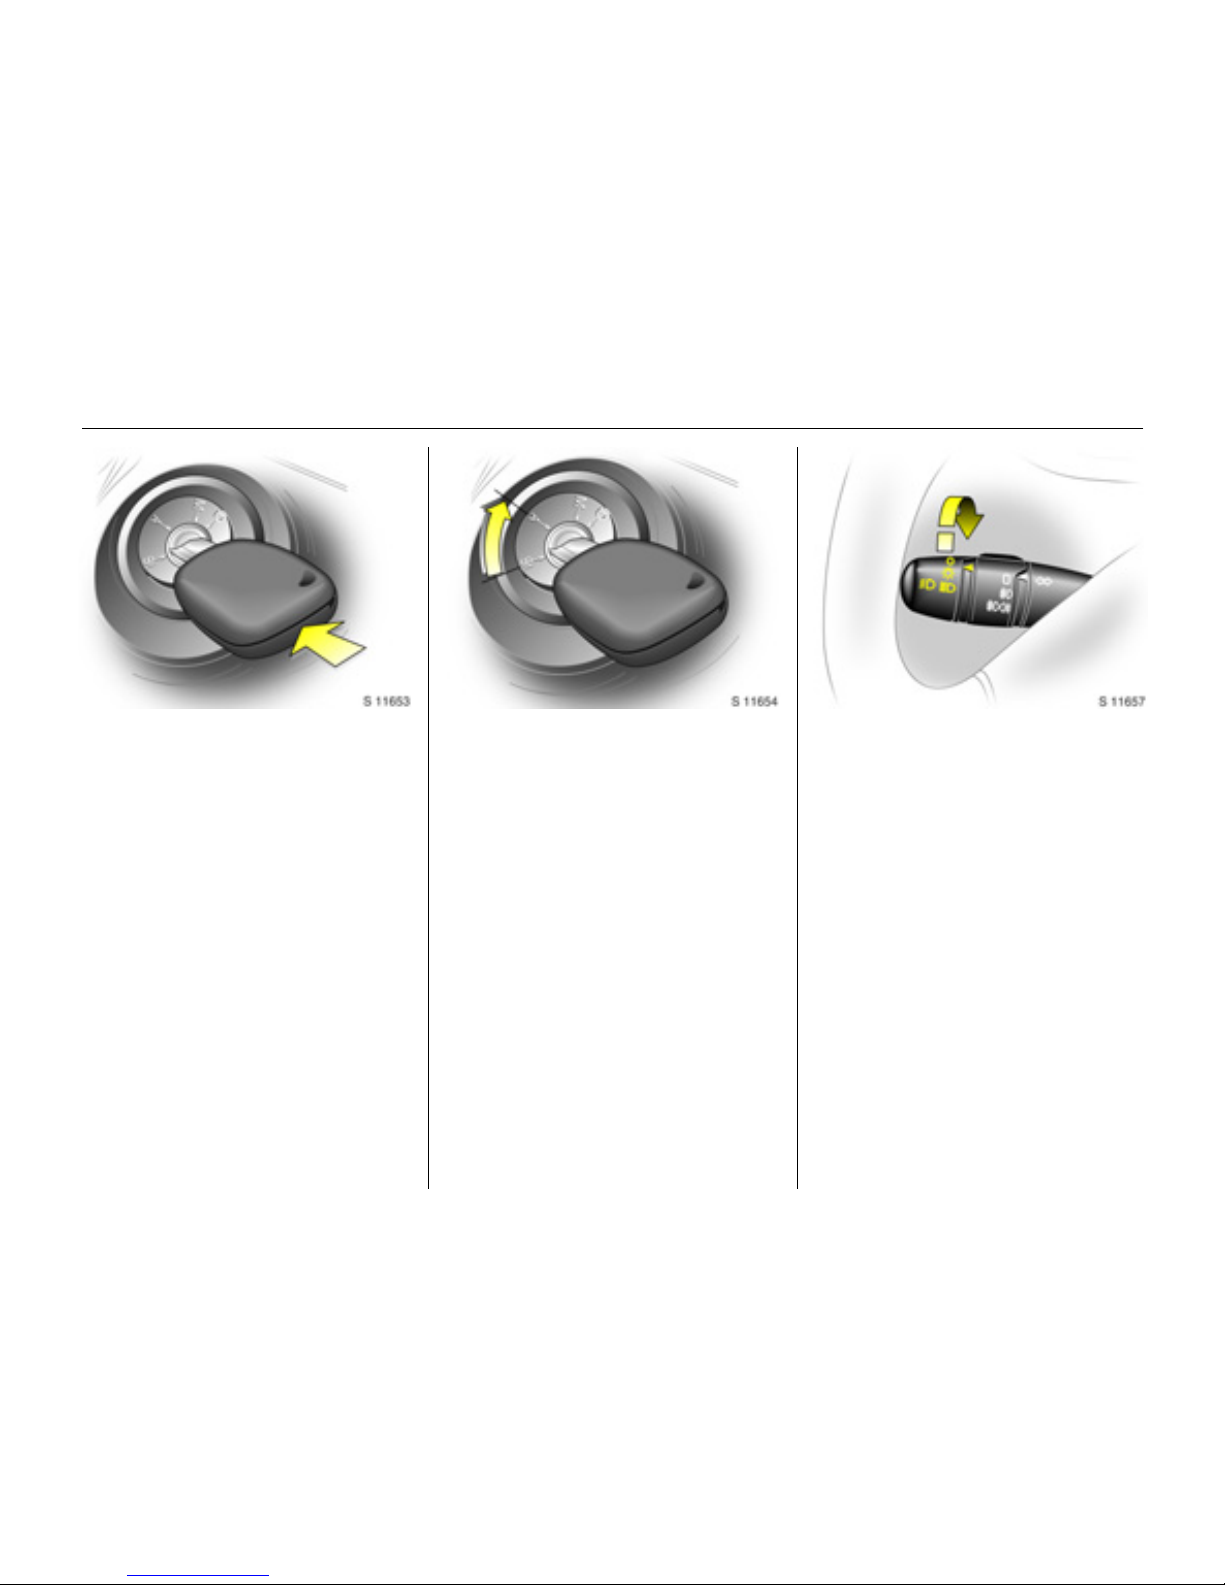
Unlocking the vehicle:
Direct remote control unit 3
towards vehicle, press button c,
pull door handle
The doors are unlocked.
To unlock mechanically: insert key and turn
in driver’s door lock, pull door handle.
To lock doors from inside, press central
locking switch 3 located on the lower part
of the instrument panel.
6 Door locking and unlocking see page 17,
child safety locks - see page 18,
electronic im mobiliser - see page 18,
radio frequency rem ote control 3 see page 19,
central locking system 3 - see page 21,
mechanical a nti-theft locking system -
see page 23,
Vauxhall alarm system 3 - see page 24.
Seat adjustment:
Pull handle, slide seat,
relea se hand le, allow sea t to
audibly latch into position
Never a djust the driver’s seat while driving.
It could move in an uncontrolled manner
when the handle has been pulled.
6 Seat position – see page 32.
9 Warning
Important: Do not sit nearer tha n
10 in ches (25 cm) from the s teering
wheel, to permit safe airbag deployment.
Ofrecido por www.electromanuales.com
In brief 3
A djusting the sea t b ack rest:
Pull release lever
Move seat back rest to suit seating position,
it will lock in position when the lever is
released.
6 Seat position – see page 32.
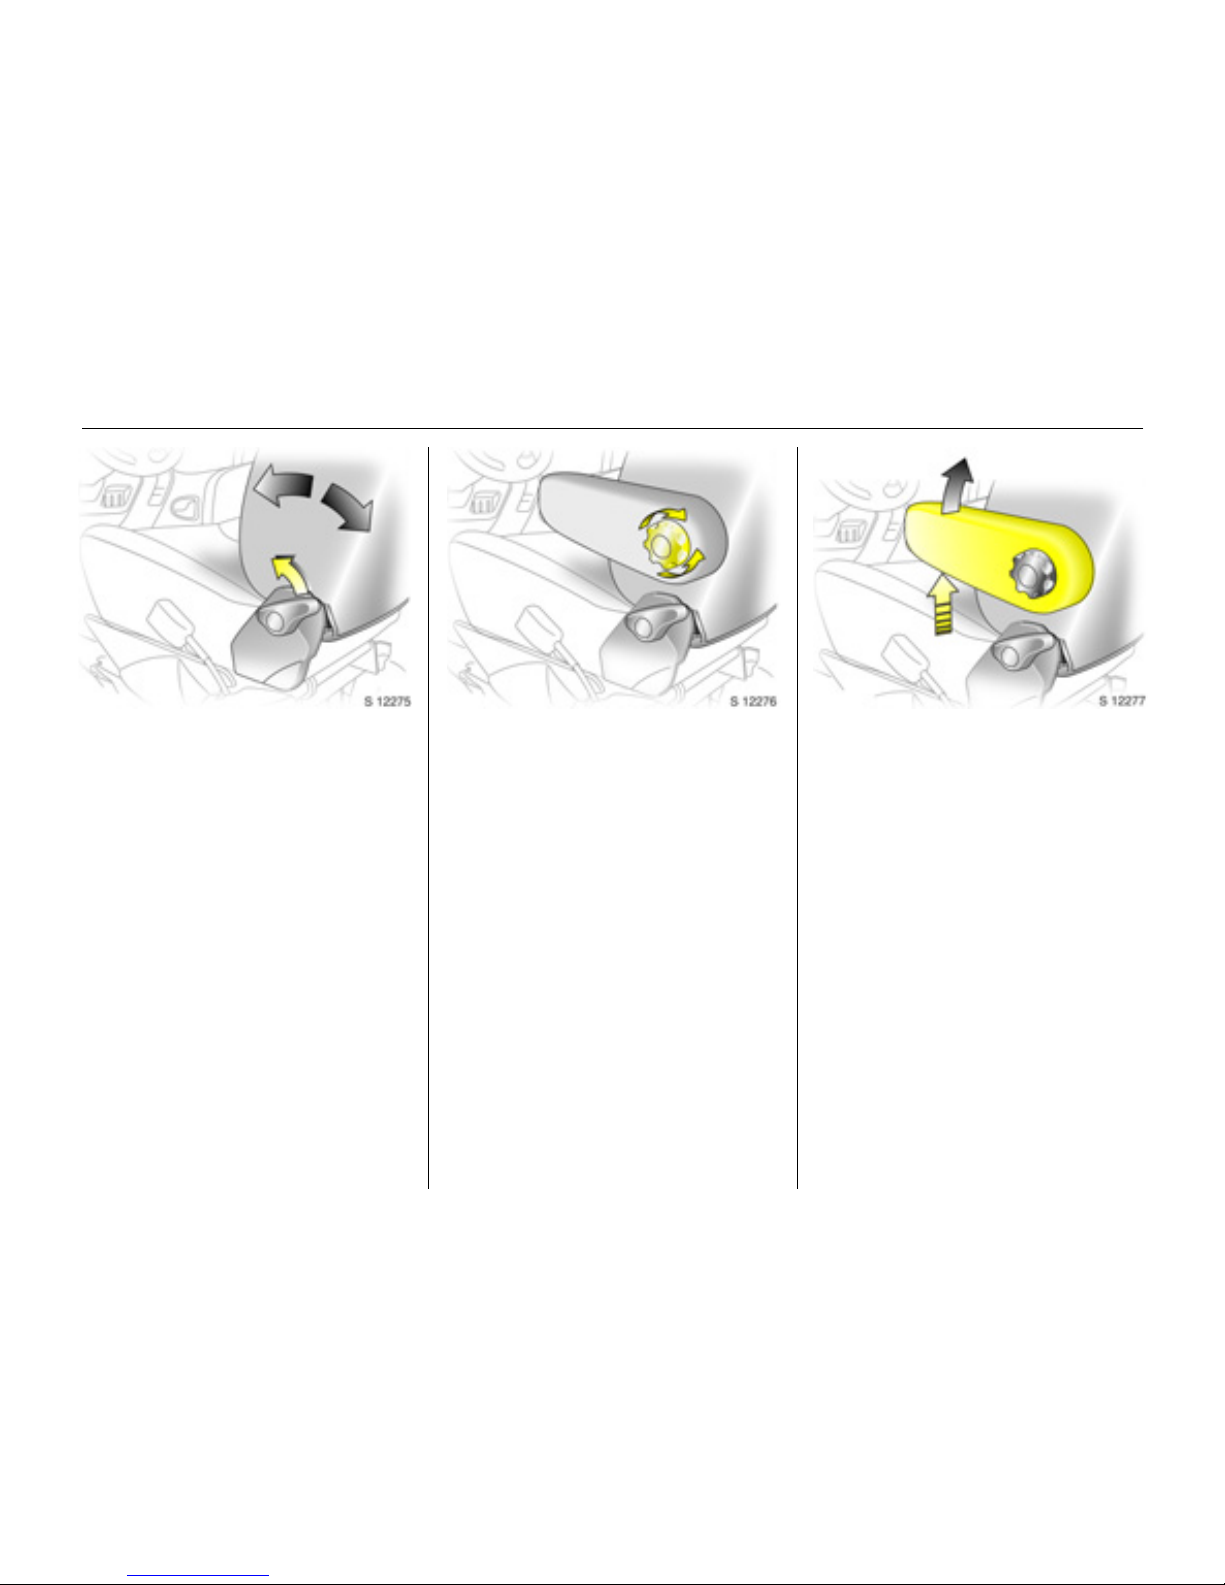
Adjusting the lumbar support 3:
Turn handwheel
Adjust lumbar support to suit personal
re q u ir em e n ts.
Do not lean on seat backrest whilst
adjusting it.
Adjusting armrest support 3:
Adjust armrest support to suit personal
requirements.
z Raise armrest in increments to desired
he ig ht .
z To reposition, fully ra ise armrest before
lowering.
Ofrecido por www.electromanuales.com
In b rief4
Adjusting seat height:
Pull lever at side of seat
Pull lever and remove body weight from
seat to raise it or press down on seat with
body weight to lower it.
6 Seat position – see page 32.
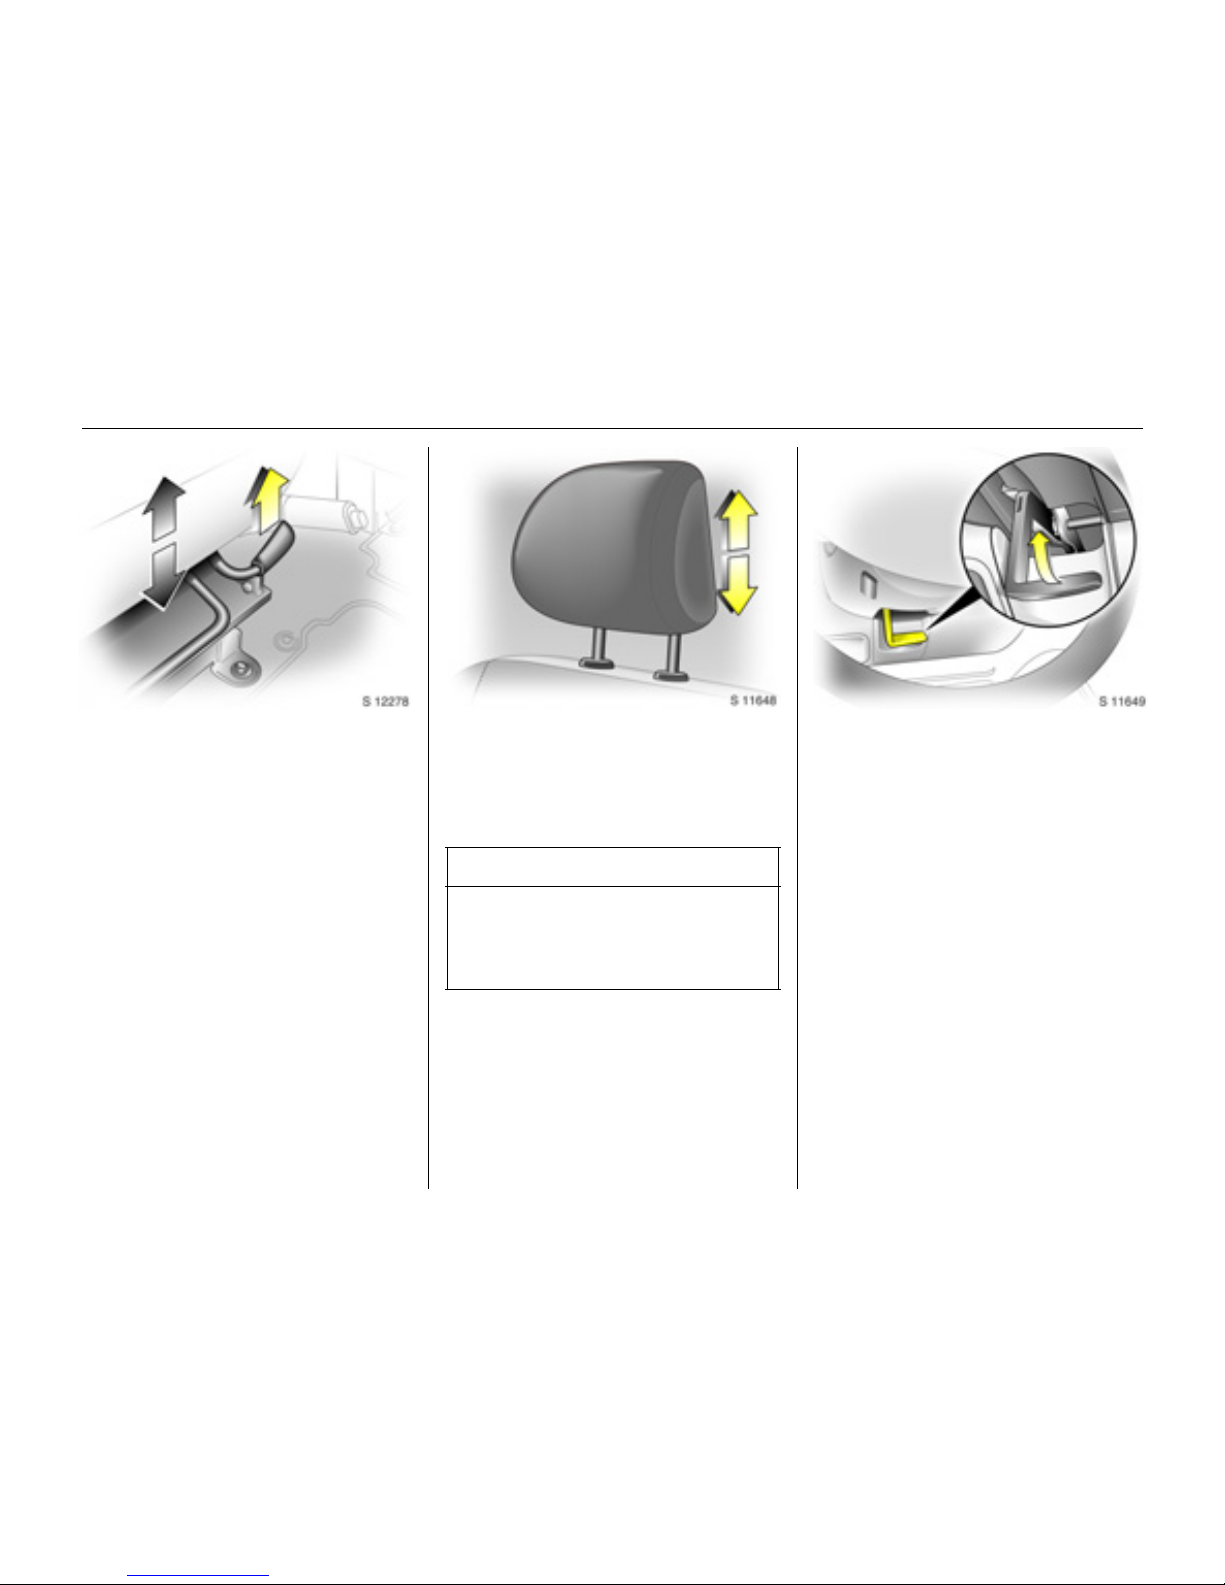
Adjusting head restraint height:
Hold firmly and adjust height,
then release
6 Head restraint position – see page 32,
further information, removal – see page 33.
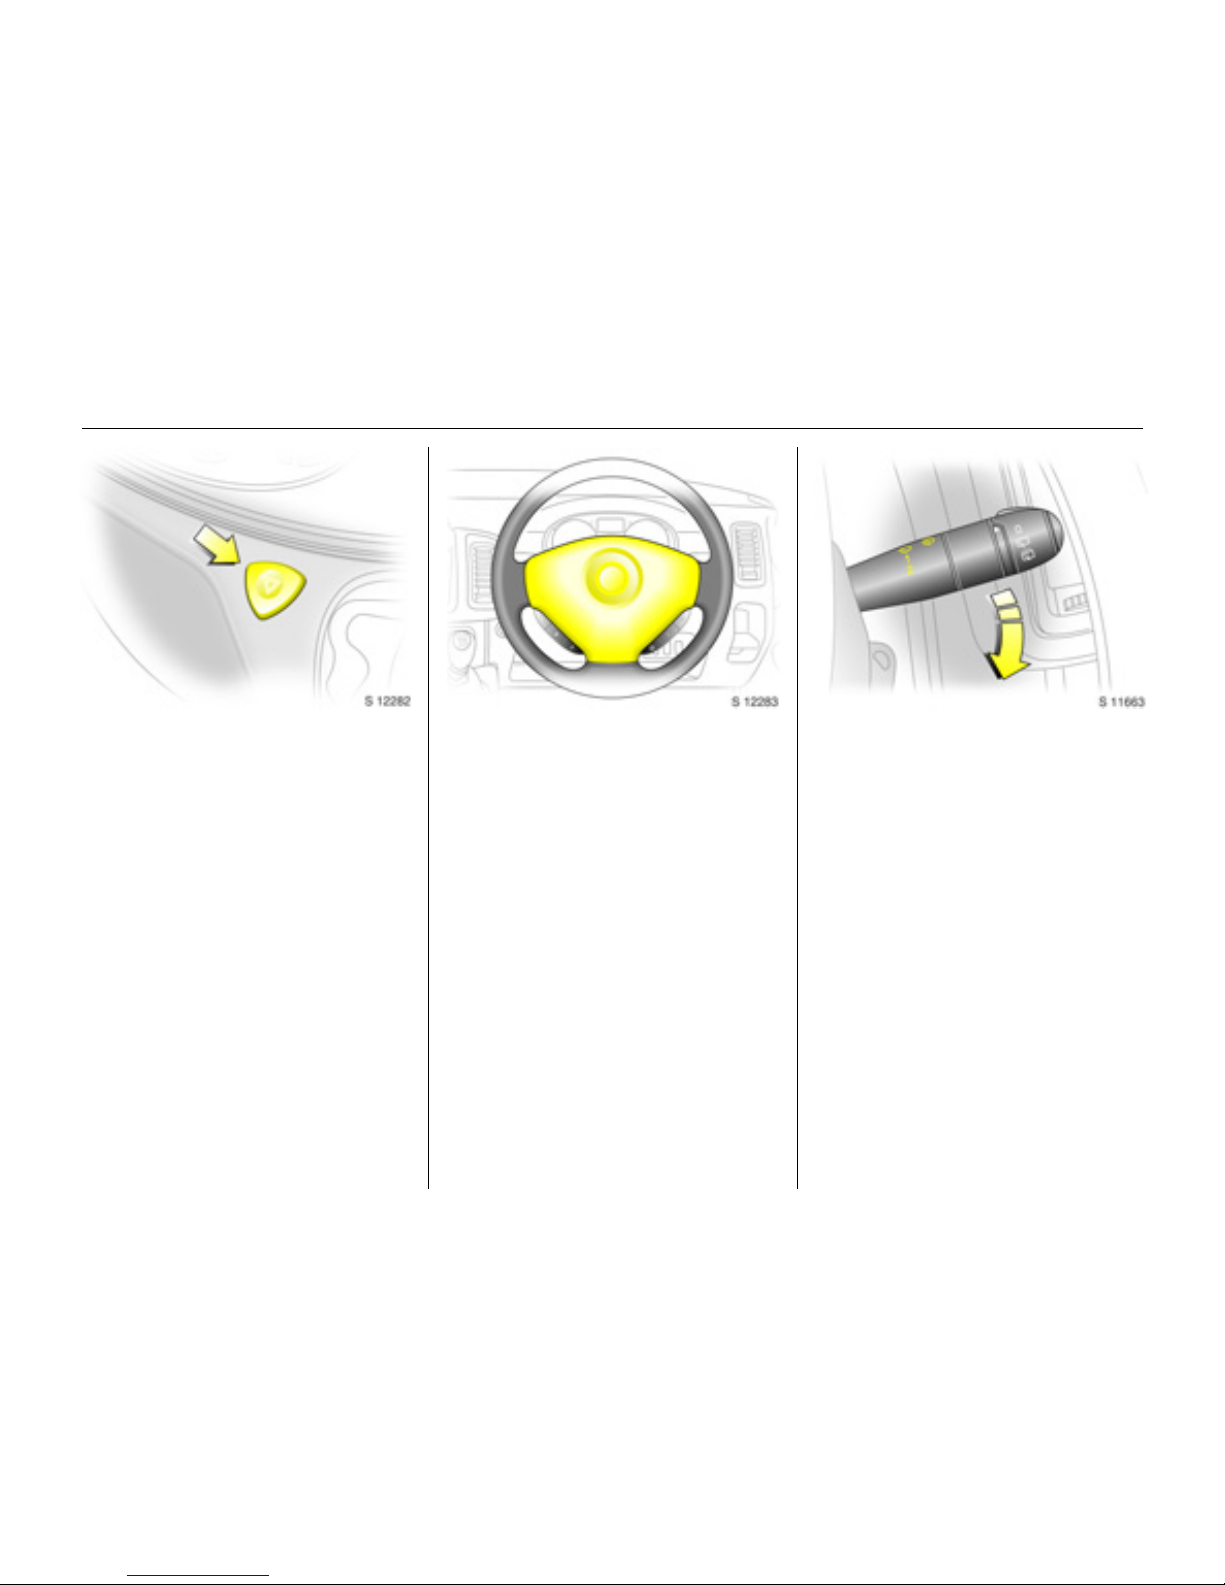
Steering wheel adjustment:
Adjust position
Adjust the steering wheel only when the
vehicle is stationary.
Move the unlocking lever upwards, adjust
the wheel to the desired position, then
release the lever.
Push the lever firmly downwards to ensure
that the steering wheel is locked in position.
6 Airbag systems - see page 47.
9 Warning
Disregard of these instructions m ay lead
to injuries or endanger life. Vehicle
passengers must be informed
accordingly.
Ofrecido por www.electromanuales.com
In brief 5
Fitting seat belt:
Draw sea t belt smoothly from
inertia reel, guide o ver shoulder
and engage in buckle
The belt must not be twisted at any point.
The lap belt must lie snugly against the
body. The backrest must not be tilted back
too far (recommended max imum tilting
angle approx. 25°).
To release belt, press red button on belt
buckle.
6 Seat belts – see pages 36 to 40,
airbag systems – see page 47,
seat position – see page 32.
Adjust inte rior 3 and exterior
mirrors:
Swivel to appropriate position
Move lever on underside of interior mirror
housing to reduce dazz le at night.
6 Mirrors - see page 26.
Electrically adjustable exterior
mirrors 3:
Four-way switch in door panel
Tu rn switch to left or right: four-way switch
operates corresponding mirror.
6 Mirrors - see page 26.
Ofrecido por www.electromanuales.com
6In brief
Ofrecido por www.electromanuales.com

In brief 7
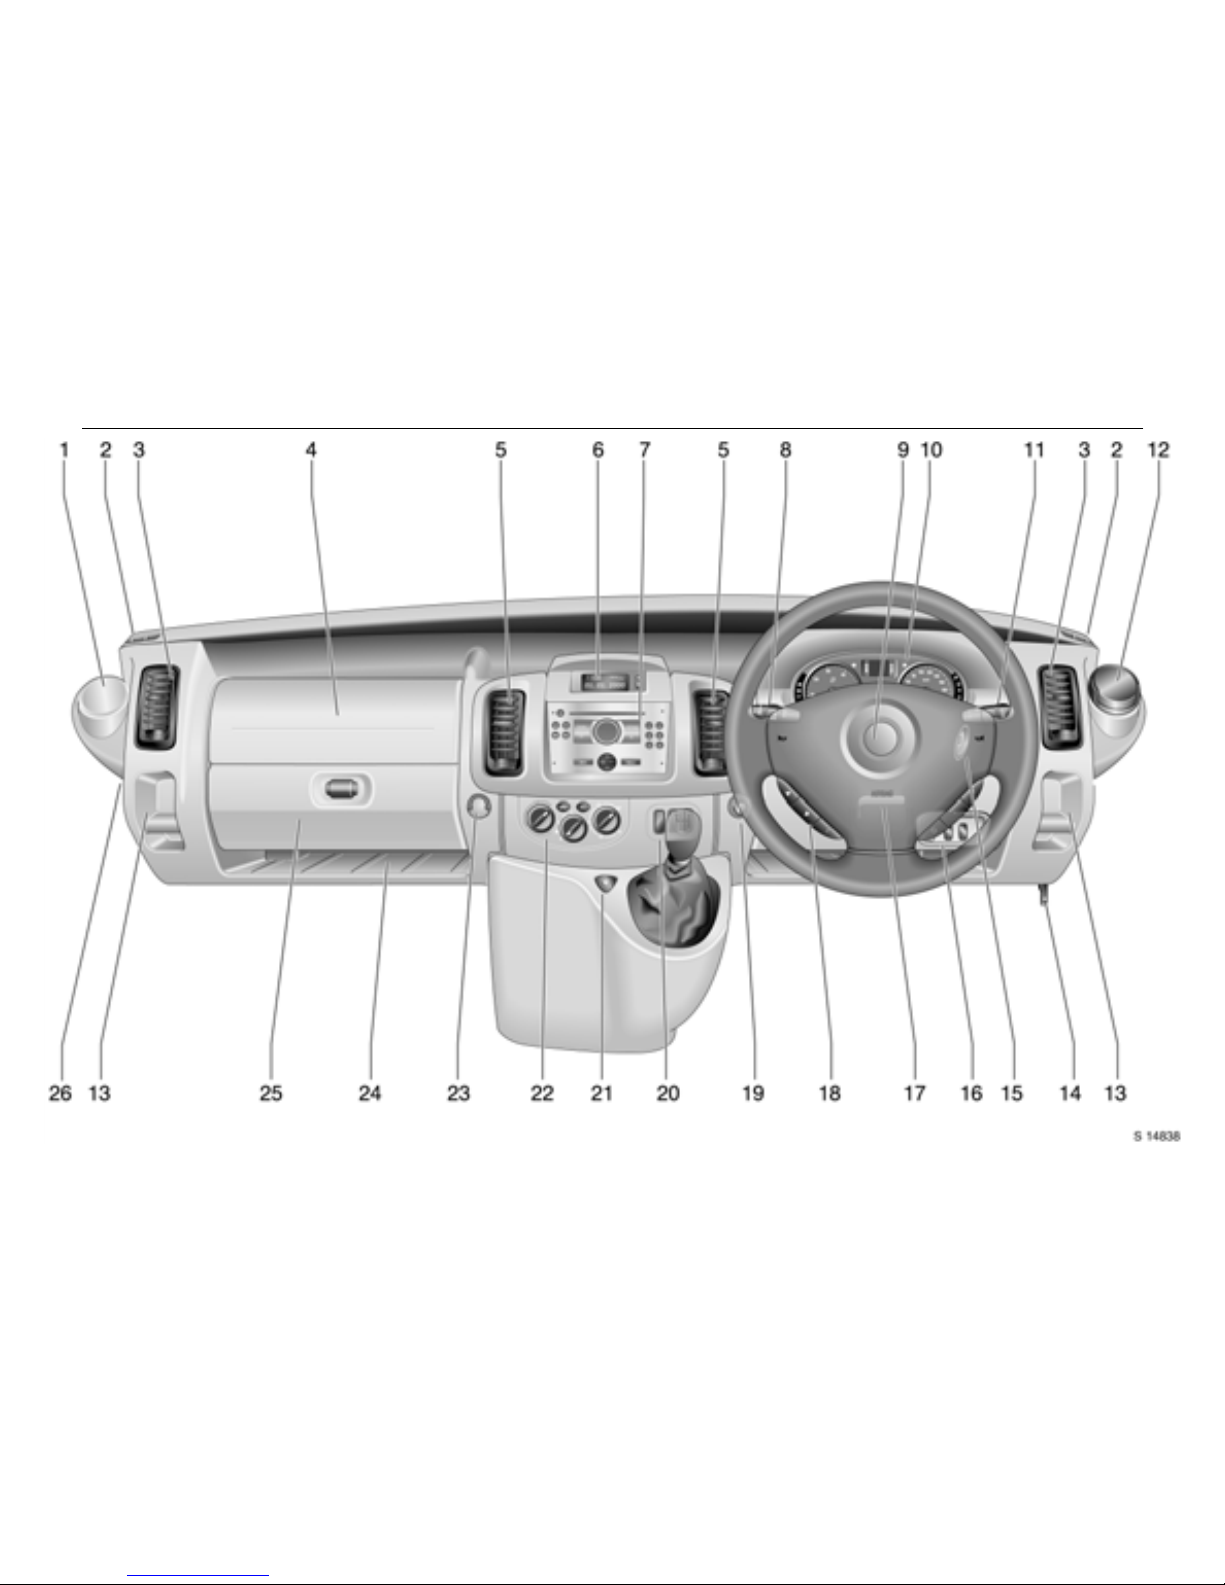
Page
1 Drink holder ...... ......... ......... ......... ...... 57
2 Door window de fros ter v ent.. ......... ..8 4
3 Side air v ents .................. .... ......... ...... 84
4 Front pa ssenger’s airbag 3 .. ..... 47, 51
5 Centre air v ents ......... ..... ........ ......... ..8 3
6 Triple Information Display 3 ...... ...... 68
Colour Information Display 3 .... ...... 70
7 Infotainment system 3.. .... ......... ...... 81
Electronic tachograph 3 ... ......... .... ..8 2
8 Parking lights, headlight flash,
front fog lig hts, fog tail light,
dipped and main beam ......76, 77, 7 8
Turn signal lights ... .... ......... ......... ......78
Pa ge
9 Driv er’s airbag ......... .... ......... ......... .. 47
Horn ............. ..... ......... ........ ..... ......... .. 11
10 Instruments.. ..... .... ......... ......... ......... .. 59
11 Win dscree n wiper
and wash sy ste m .................. .... . 74, 75
Rear door a nd tailgate window
wiper and wash system 3 ......... ..... .. 7 5
Trip computer 3............ .... ..... ......... .. 65
12 Ashtray ... .... ..... ......... ........ ......... ....... 5 7
13 Coin tray
14 Bonnet release ..... ..... .... ......... ......... 126
15 Starter switch ....... ..... .... ......... ......... .... 9
16 Head lig ht range adjustment .... ....... 79
ESP®
Plus
3
(Electronic S tab ility P rogramme) ..108
Parking distance sensors 3... ......... 1 09
17 Steering wheel adjustm ent ... .... ......... 4
Page
18 Steering wheel mounted
remote control 3 ..... .... .................. ... 81
19 Cigarette lighter.. ..... .... ..................... 58
20 Central locking 3 ..... ......... ......... ....... 22
Heated rear w indows 3,
heated exterior mirrors 3 ..... ......... ... 89
Easytronic w inter and laden
programm es 3 ......... .... ......... ...... 93, 94
21 Haz ard warning....... .... ......... ...... 23, 78
22 Heating and v entilation system ..... 84
Air conditioning system 3......... .... ... 87
Rear air conditioning system 3 ....... 88
23 Utility hook
24 Storage tray
25 Glove compartment
26 Fusebox .. ......... ......... .... ......... ......... . 13 7
Ofrecido por www.electromanuales.com

In b rief8
Control indicators
Ü Not used
9 Headlight dipped b ea m:
see pages 10, 59, 76.
P Hea dligh t main be am ,
head light flash:
see pages 10, 59, 76.
r Fog t ail lig ht:
see pages 10, 59, 78.
> Front fog lights 3 :
see pages 10, 59, 78.
u Anti-lock Brake System (ABS):
see pages 59, 112.
8 Di esel par ticle filt er 3:
see pages 60, 106.
F Not used
v
ESP®
Pl u s
(Electron ic S tabil ity
Pro g r amm e) 3:
see pages 60, 108.
F
Engine oil life m onitor 3 :
see pages 60, 68, 107.
O Turn signal lights:
see pages 10, 60, 78.
C Stop e ngin e:
see page 60.
o Electronic im mobiliser:
see pages 18, 60.
A Service / Engine electronics 3:
see page 60.
D
Preheating / Fuel filter / Engine
electronics 3:
see pages 14, 60.
Y
Fuel level:
see pages 61, 102, 164, 170.
E Engine stop:
see page 61.
p Alternator:
see page 61.
I Engine oil press ure:
see page 61.
R Brake system:
see page s 61, 111, 156.
v
Airbag systems, b elt tensioners:
see pages 37, 47, 61.
H
Front passenger airbag
deactivation 3:
see pages 51, 61.
X
Not used
U
Door open 3:
see page 62.
U Not used
Z Exhaust emissions 3:
see page s 62, 104.
B
Not used
Easytronic 3
kg
Lade n programme:
see pages 60, 94.
T Footb rake ap plication:
see pages 60, 91.
W Transmission electronics:
see pages 60, 96.
A Automat ic mode:
see pages 60, 92.
V Wi nter prog ra m me :
see pages 60, 93.
Ofrecido por www.electromanuales.com
In brief 9
Starter switch:
Diesel engines
Petrol engines
6 Starting - see page 14,
ele ctronic immobiliser - see page 18,
parking the vehicle - see page 16.
Releasing steering column lock:
Move steering wheel slightly and
turn key to position ‘A’
6 Starting - see page 14,
electronic im mobiliser - see page 18,
parking the vehicle - see page 16.
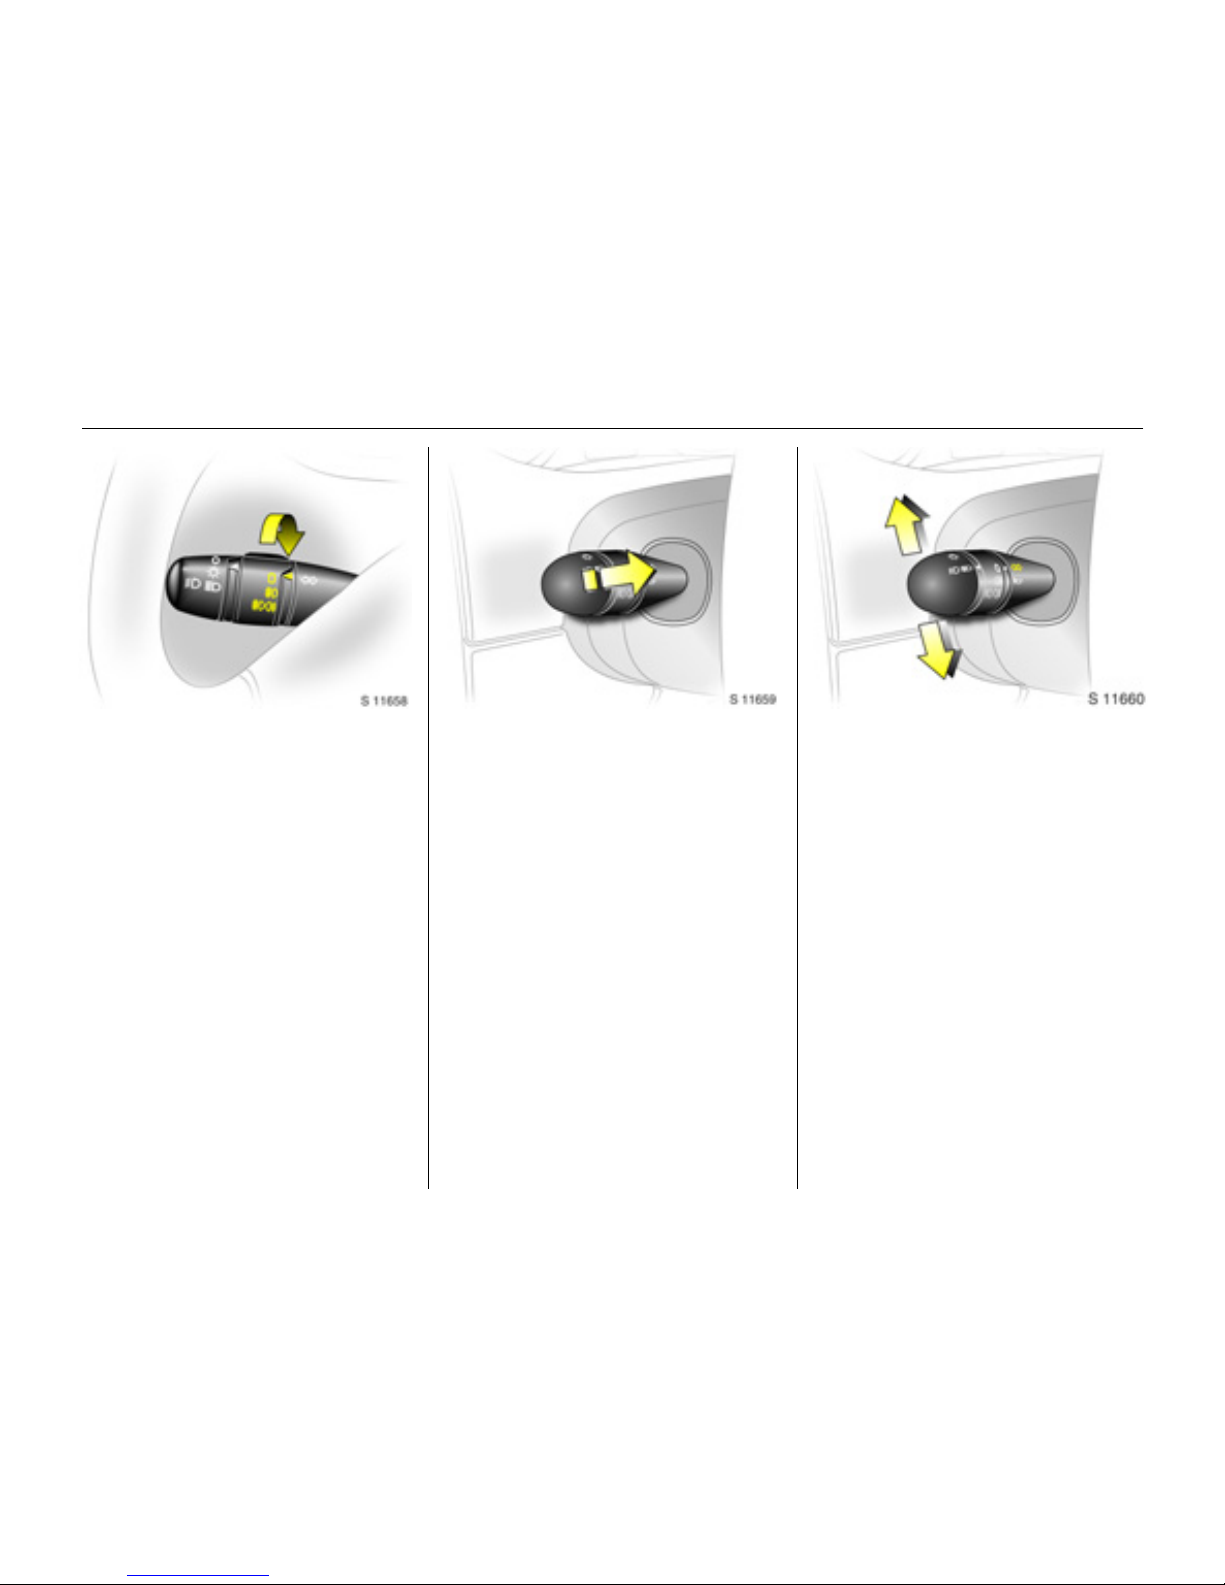
Light switch:
6 Headlight warning device - see pag e 74,
further information - see page 76,
automatic dip ped beam activation 3 see page 77,
hea dlight ra nge adjus tment - s e e pag e 79,
headlights when driving abroad -
see page 80,
daytime running lights 3 - see page 76.
St = Ignition off
A = Steering unlocked, ignition off
M = Ignition on: preheating
(see page 1 4)
D = Start (transmission in neutral)
St = Ignition off
A = Steering unlocked, ignition off
M = Ignition on
D = St a r t (tra n sm iss io n in ne u tra l)
7 =Off
0
=Parking lights
9 P = Dipped or main
beam
Ofrecido por www.electromanuales.com
In b rief10
Fog lights:
6 Fog tail light, front fog lights see page 78.
Headlight flash, main beam and
dipp ed beam:
Pull stalk towards steering wheel
6 Further information - see pag e 77.
Turn sign al lights:
Stalk in rest pos ition
6 For ope ration of the turn signal lights
when tow ing - see pages 60, 118,
turn signal lig hts - see page 78.
7 =Off
> =On
(front fog lig hts 3
only)
>r =On
(front fog lig hts 3
and fog tail light)
Upwards = Right turn
Do wn wards = L e ft turn
Ofrecido por www.electromanuales.com
In brief 11
Hazard warning lights:
6 Further information - see pages 23, 78.
Horn:
Pre ss an y pa rt of the steering wheel centre
to activate the horn.
6 Airbag systems – see page 47,
steering wheel mounted remote control 3 -
see page 81.
Windscreen wiper:
Move stalk downwards
Return the stalk to its original position to
turn off.
6 Further information - see pages 74, 15 7,
143.
On = Press button ¨
Off = Press button ¨ again
KKKK =Timed interval wipe
1 =Slow
2 =Fast
Ofrecido por www.electromanuales.com
In b rief12
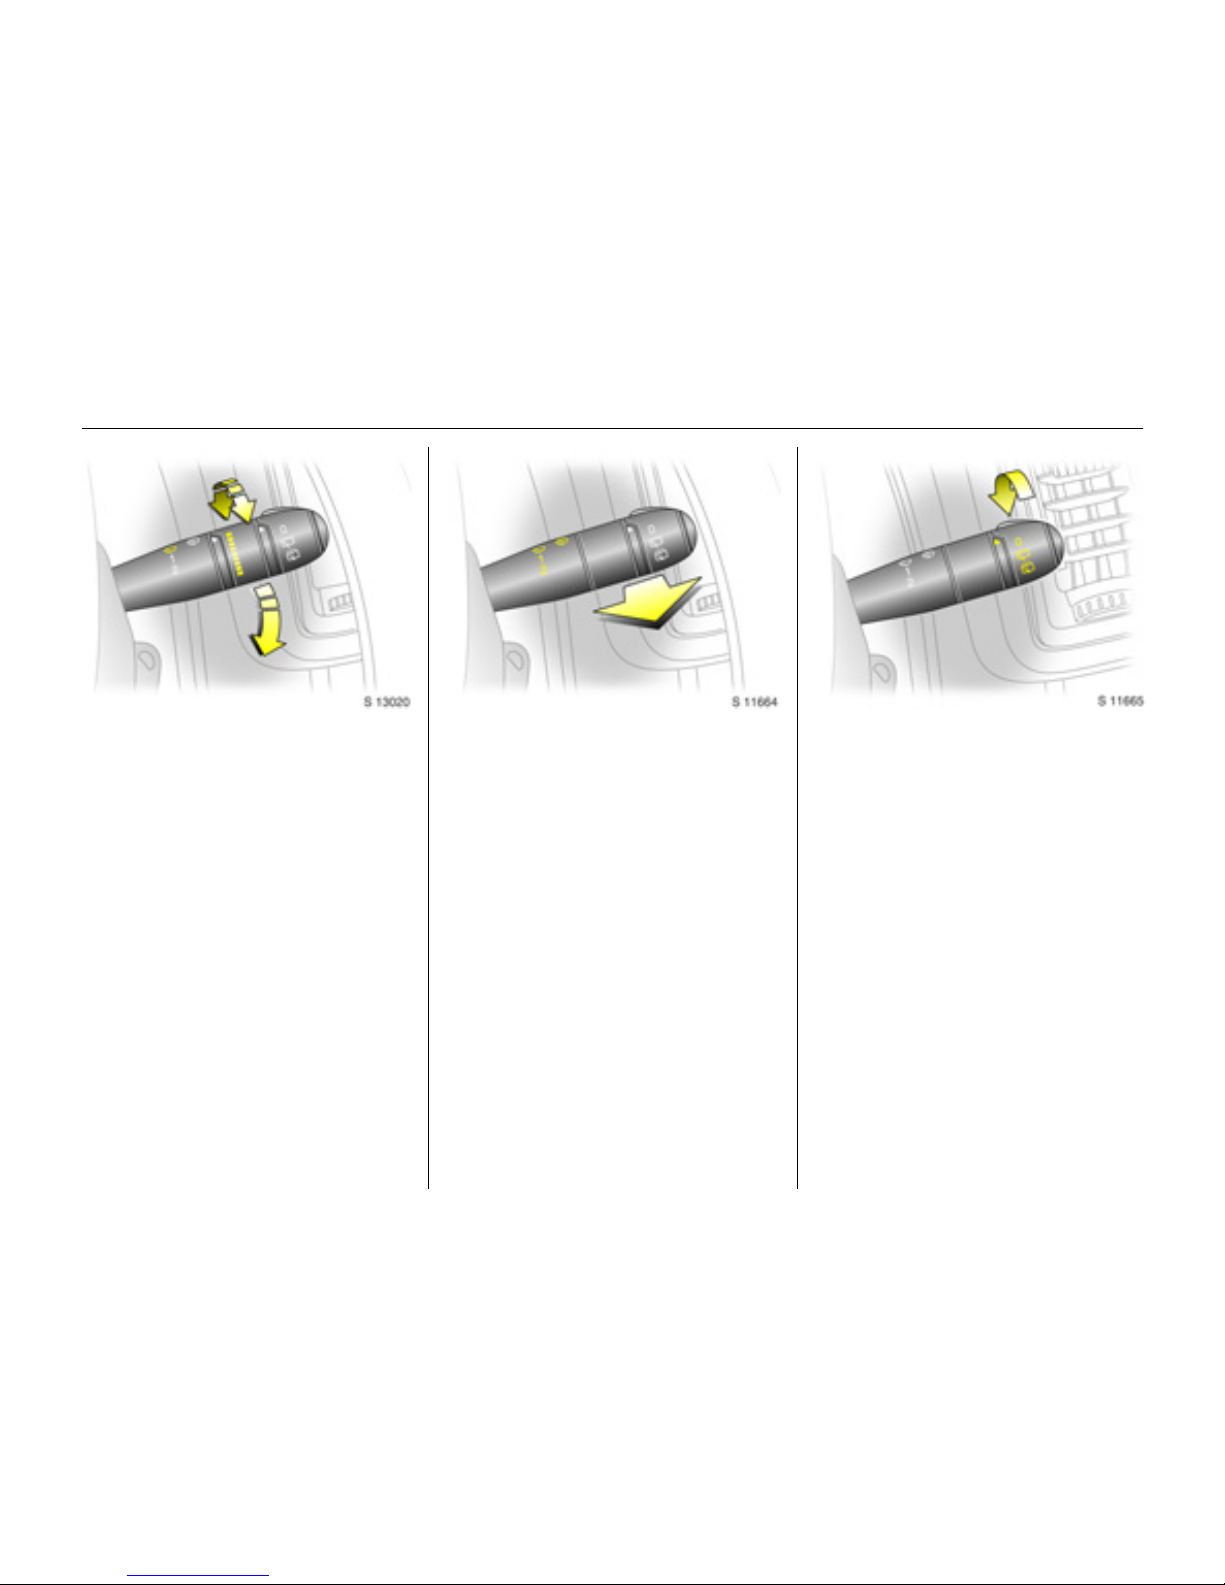
Automatic wiping with
rain sensor 3:
Move stalk downwards
Adjust sensitivity:
Rotate a djuster ring
The rain sensor detects the amount of
water on the win dscre en and automatically
regulates the windscreen wiper frequency.
6 Further information - see pages 75, 14 3,
158.
Windscreen wash system:
Pull stalk towards steering wheel
Short pull
The wiper operates for one cycle.
Long p ull
Wash fluid is sprayed onto the windscreen,
at the same time the wiper is operated for
four cy cles.
6 Further information - see pag es 75, 159.
Rear door and tailgate window
wash wipe system 3:
Rotate switch
6 Further information - see pages 75, 158,
159.
KKKK = Autom atic wiping
with rain sensor
Less sensitive = Rotate adjuster
forwa rds
More sensitive = Rotate adjuster
backwards
0=Off
e =Wiper
f =Wash
Ofrecido por www.electromanuales.com
In brief 13
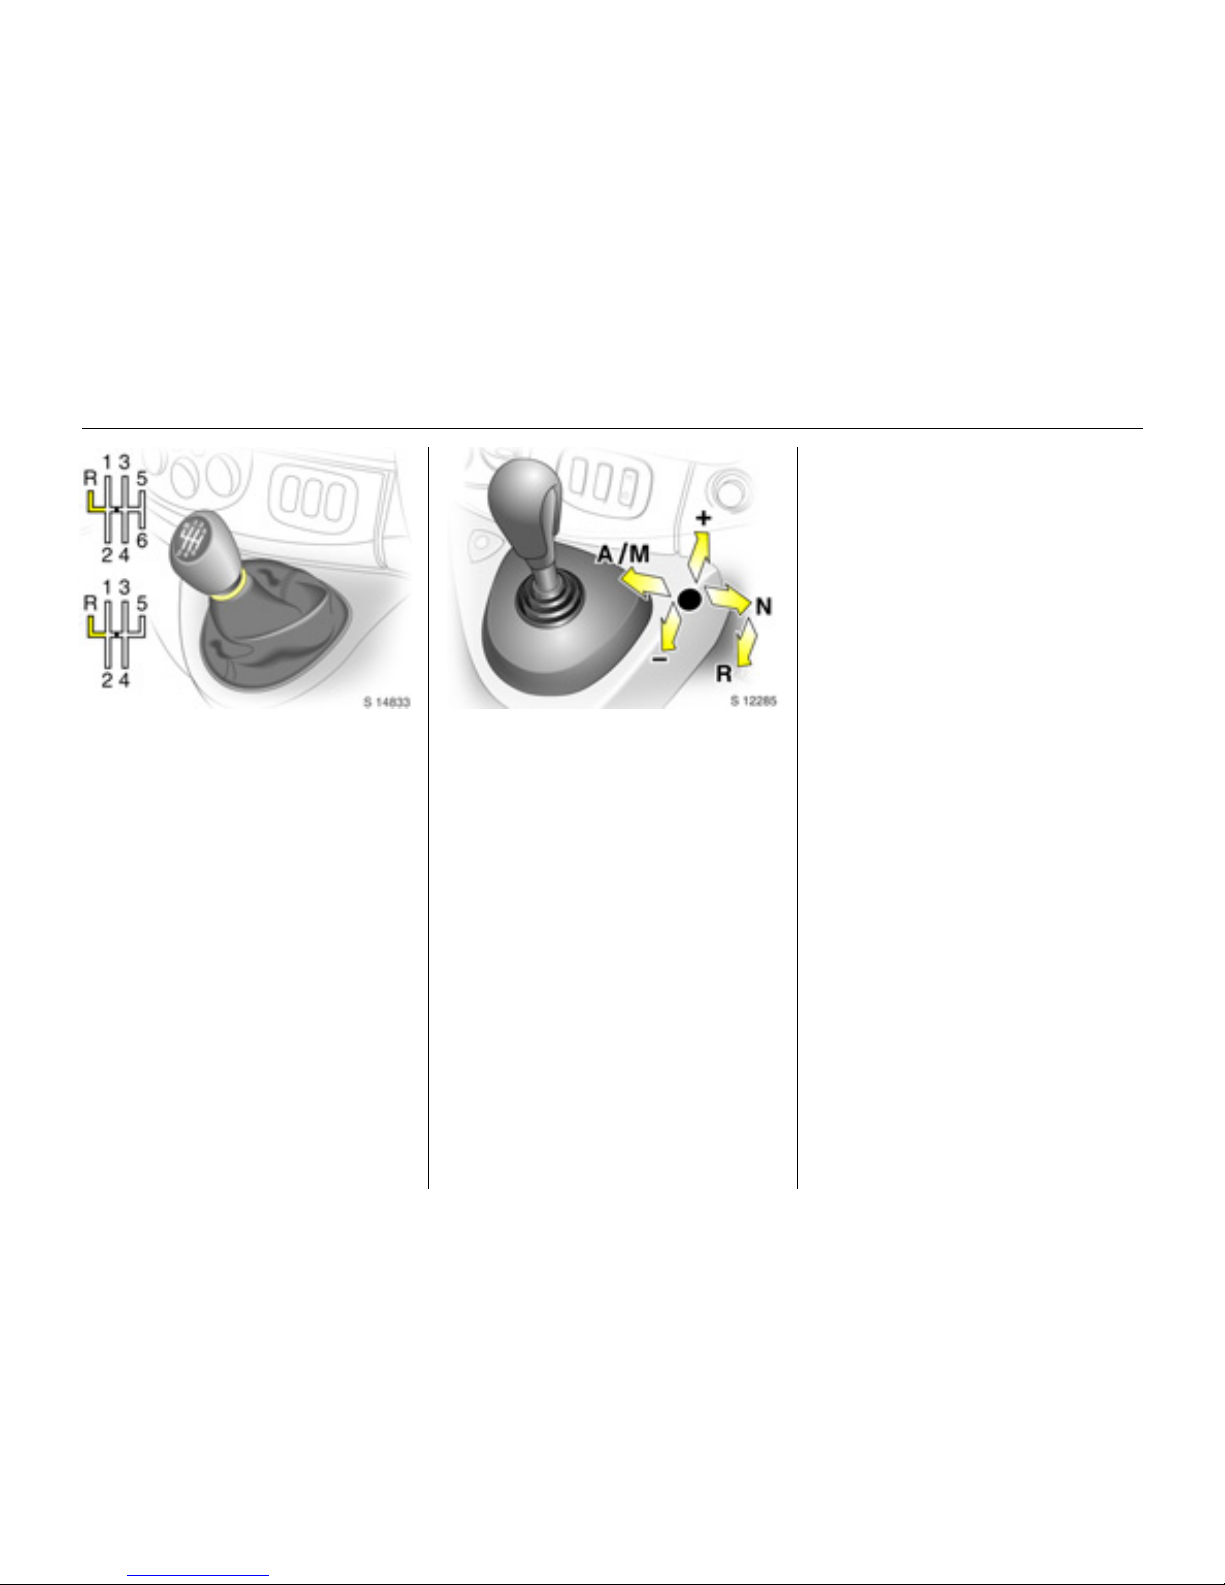
Manual transmission:
When shifting up from 4th to 5th gear,
pressure must be exerted towards the right
at the beg inning of the shift operation.
When shifting from 5th to 4th gear, do not
exert any force towards the left.
Reverse gear: with vehicle sta tionary,
depress clutch pedal, pull up collar and
move gearshift lever to the left against
resistance.
If the gear does not engage: with lever in
neutral, release clutch pedal and depress
again, then repeat gear selection.
Easy tronic 3:
The selector lever must be moved in the
appropriate direction as far as it will go.
Upon relea se, it automatically returns to
the centre position. Pay heed to the
gear / mode indicator in the transmission
display.
6 Further information - see pag e 91.
Before starting-off, check:
z Tyre pressures and condition.
z Engine oil level and fluid levels in engine
compartment (see pages 150 to 153).
z All windows, mirrors, exterior lig hting
and number plates are free from dirt,
snow and ice a nd are operational.
z Objects are securely located and will not
be thrown forwards in the event of
sudden braking.
z Seats, seat belts and mirrors are
correctly a djusted.
z Brake operation.
o =Neutral
1 to 5/6 = 1st to 5th or 6th 3
gear
R=Reverse gear
N=Neutral
o = Centre position
- = Shift to lower gear
+ = Shift to high er gear
A/M = Switch between
Automatic and
Manual m ode
R=Reverse
Ofrecido por www.electromanuales.com
In b rief14
Exhaust gases are poisonous
Exhaust gases c ontain carbon monoxide,
which is extremely poisonous but has no
odour or colour.
Therefore, never inha le exhaust gases, and
never run the engine in an enclosed space.
You should also avoid driving with the
doors open, as exhaust gases could enter
the passenger compartment.
6 Exhaust gases - see page 107.
Starting, petrol engines:
Transmission in neutral,
depress clutch peda l 3,
do not accelerate,
turn key to position D
The increased engine speed automatically
returns to normal idling speed as the
engine temperature rises.
6 Electronic immobiliser - see page 18,
further information - see pages 97, 99, 101.
Starting, diesel engines:
Tran smi s sion in n e utral ,
depress clutch pedal 3,
do not accelerate,
turn key to position M,
wait until preheating control
indicator D extinguishes1),
turn key to position D
6 Electronic im mobiliser - see page 18,
engine preheating 3 - see page 60,
diesel fuel system 3 - see page 125,
further information - see pages 97, 99, 101.
1)
Preh eating system switches on only if outside
temperature is low.
Ofrecido por www.electromanuales.com
In brief 15
Drying misted-up or iced-up
windows:
Set temperature rotary knob
to red,
set fan to position 4,
set air di stribution to V
Close centre air vents; open side air vents
and dire ct them to wards the do or windows.
6 Heating and ventilation system see page 84,
air conditioning system 3 - see page 87.
Heated rear windows 3,
heated exterior mirrors 3
6 Further information - see pag e 89.
To release the handbrake:
Raise lever slightly,
press release button,
lower lever fully
6 Handbrake - see page 112.
Press Ü =On
Press Ü again = Off
Ofrecido por www.electromanuales.com

In b rief16
Parking the vehicle:
z Apply handbrake firmly without pressing
the release button, and a pply as firmly
as possible on slopes.
z Switch engine off by turning ignition key
to p o sitio n "St ". Rem ove ignition key and
turn steering wheel until lock is felt to
engage (anti-theft protection).
z If the vehicle is parked on a flat surface
or an uphill incline, with manual
transmission engage first gear or with
Eas ytro nic 3 mov e the selector lever to
the centre position before switching off
the ignition. On an uphill incline, also
tu rn the front wh eels away from the kerb.
z If the vehicle is parked on a downhill
incline, with manual transmission or
Eas ytro nic 3 engage reverse gear before
switching off the ignition. Also turn the
front wheels towards the kerb.
z Lock doors and load compartment with
key in lock or button e or G on remote
control 3.
z To arm the Vauxhall alarm sy stem 3 ,
press button e once, a nd to activ ate the
mechanical anti-theft locking system,
press b utton e twic e.
Advice when parkin g:
z Do not park vehicle on easily ignitable
surfaces as the hot exhaust system
temperatures could cause the surface to
ignite.
z Close windows.
z The engine cooling fans may run after
th e engine has been switched off –
see page 97.
6 Further information - see pages 18, 97,
radio frequency rem ote control 3 -
see page 19,
central locking system 3 - see page 21,
Vauxhall alarm system 3 - see page 24.
That was a brief overview of the
most imp o r t ant in forma tion f or
your first drive in your Vivaro.
Your vehicle has still more
instrum ents and controls,
possibly also optional
equipment.
The rema in ing ch apt er s of the
Owner’s Manual contain
important information on
operation, safety and
maintenance as well as a
complete index.
Ofrecido por www.electromanuales.com

Locks, doors, windows 17
Locks, doors, windows
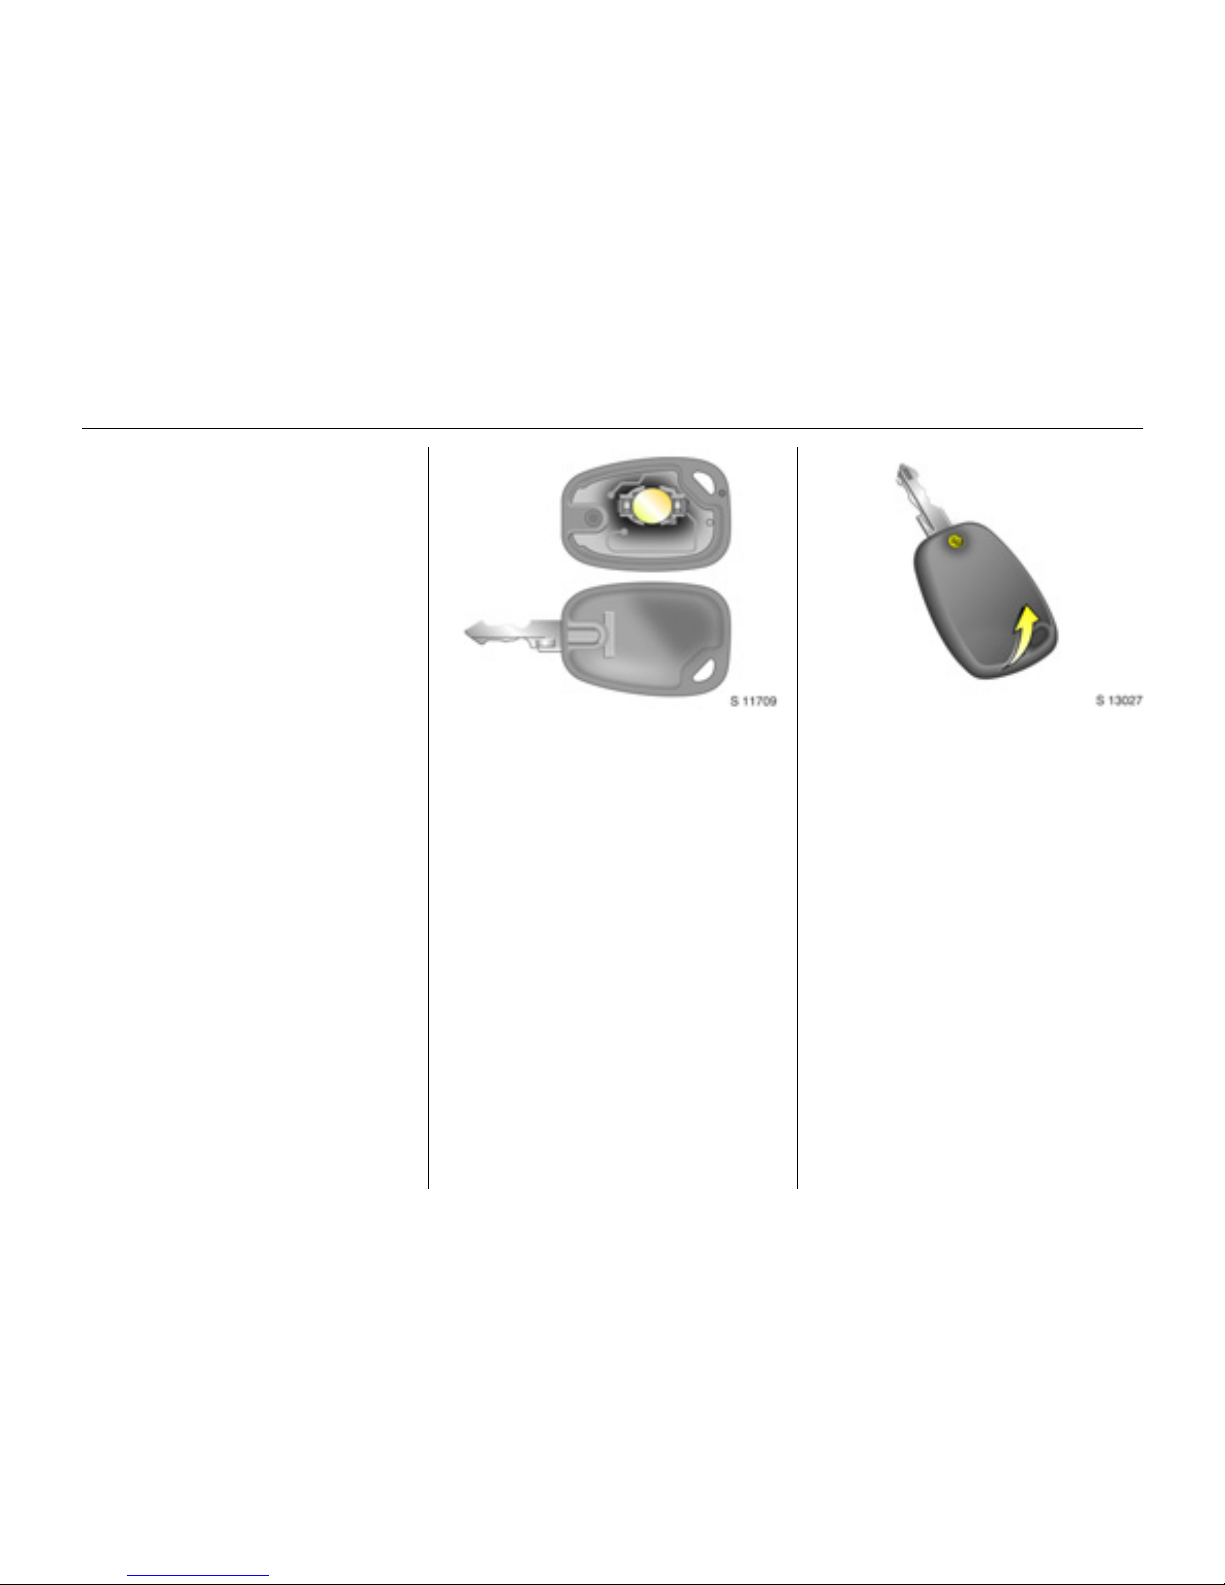
Replacement keys
The key is a constituent of the electronic
immobiliser. Ordering keys f rom a Vau xhall
Authorised Repairer guarantees problemfree operation of the electronic
immobiliser. Keep spare key accessible in a
safe place.
Locks - see page 146.
Door locking and unlocking
From outside:
Pull outside handle to open the front door.
Radio frequency remote control 3 -
see page 19,
central locking system 3 - see page 21,
mechanical a nti-theft locking system see page 23.
Fro m ins ide :
Pull the inside lever to ope n the front door.
The door can be locked or unlocked by
pushing / pulling t he interior lock button 3
or using the central locking switch 3 -
see p age 22.
To prevent the driver from being
inad vertently locked out, the front doors
cannot be locked when they are open.
The tailgate can be opened by pushing
down the tailgate interior release 3.
Lock cylinders
Designed to free-wheel if they are
forcefully rotated without the correct ke y or
if the correct key is not fully inserted.
To reset, turn cylinder with the correct key
unt il its s lot is v ertical, remove key a nd then
re-insert it. If the cylind er still free-whe els,
turn the key through 180° and repeat
operation.
Car Pass 3
Th e Car P ass contains all o f the vehicle’s
data and should therefore not be kept in
the vehicle.
Hav e your Car Pas s to ha nd when
consulting a Vauxhall Authorised Repairer.
Re placem ent keys ... ......... ......... ......... 17
Door locking and unlocking.. ........ ..... 17
Lock cylinders ...... .... ......... ......... ......... 17
Ca r Pass 3... .... ..... .... .................. .... ..... 17
Child s afe ty lock .. .... ......... ......... ......... 18
Electronic immobiliser....... ..... ........ ..... 18
Radio frequency remote control 3.... 19
Central locking system 3.......... .... ..... 21
Mechanical anti-theft locking system 23
Vauxhall alarm system 3.......... .... ..... 24
Sliding side doors 3. .................. .... ..... 25
Rear doors 3... ..... .... ......... .................. 25
Tailgate 3 ............ .... ..... ......... ........ ..... 26
Mirrors...... ........ ......... ......... ......... ......... 26
Window s.. .... .... ..... .................. .... .... ..... 28
Sun visors.. .... ......... ......... ......... ........ ..... 29
Ofrecido por www.electromanuales.com

Locks, doors, windows18
C hil d saf ety lo ck
The child safety lock for the sliding side
door 3 is located on its rearward fa cing
edge.
To engage, turn knob from the vertical
position: anticlockwise for right-hand side
door or clockwise for left-hand side door.
Door cannot then be opened from inside.
Electronic immobiliser
The system ch ecks wh ether the v ehicle may
be started using the key that has been
inserted. If the key is recognised as
"authorised" the vehicle can be started.
The check is carried out via a transponder
hous ed in th e ke y.
The electronic immobiliser is automatically
activated when the key is removed from
the starter switch.
The electronic immobiliser is automatically
activated when the key is removed from
the starter switch and also if the key is left
in the starter switch wh en th e engine is
turned off. Reinsert the key to start the
engine.
C ontrol indic ator for im mobiliser
The control indicator illuminates when the
ignition is switched on then extinguishes.
If the control indicator flashes rapidly after
the ignition is switched on, there is a fault in
the immobiliser system.
z Turn ignition off and remove key,
z wait approx. 2 seconds,
z then repeat starting procedure.
If the control indicator fails to extinguish,
try to start the engine using the spare key.
Obtain assistance from a workshop.
Not e
The immobiliser does not lock the doors.
Therefore, after leaving the vehicle, always
lock it and switch on the Vauxhall alarm
system 3.
9 Wa rning
Use the child safety lock whenever
children are occupying the rear seats 3.
Disregard may lead to injuries or
endanger life. Vehicle passengers must
be informed accordingly.
Ofrecido por www.electromanuales.com
Locks, doors, windows 19
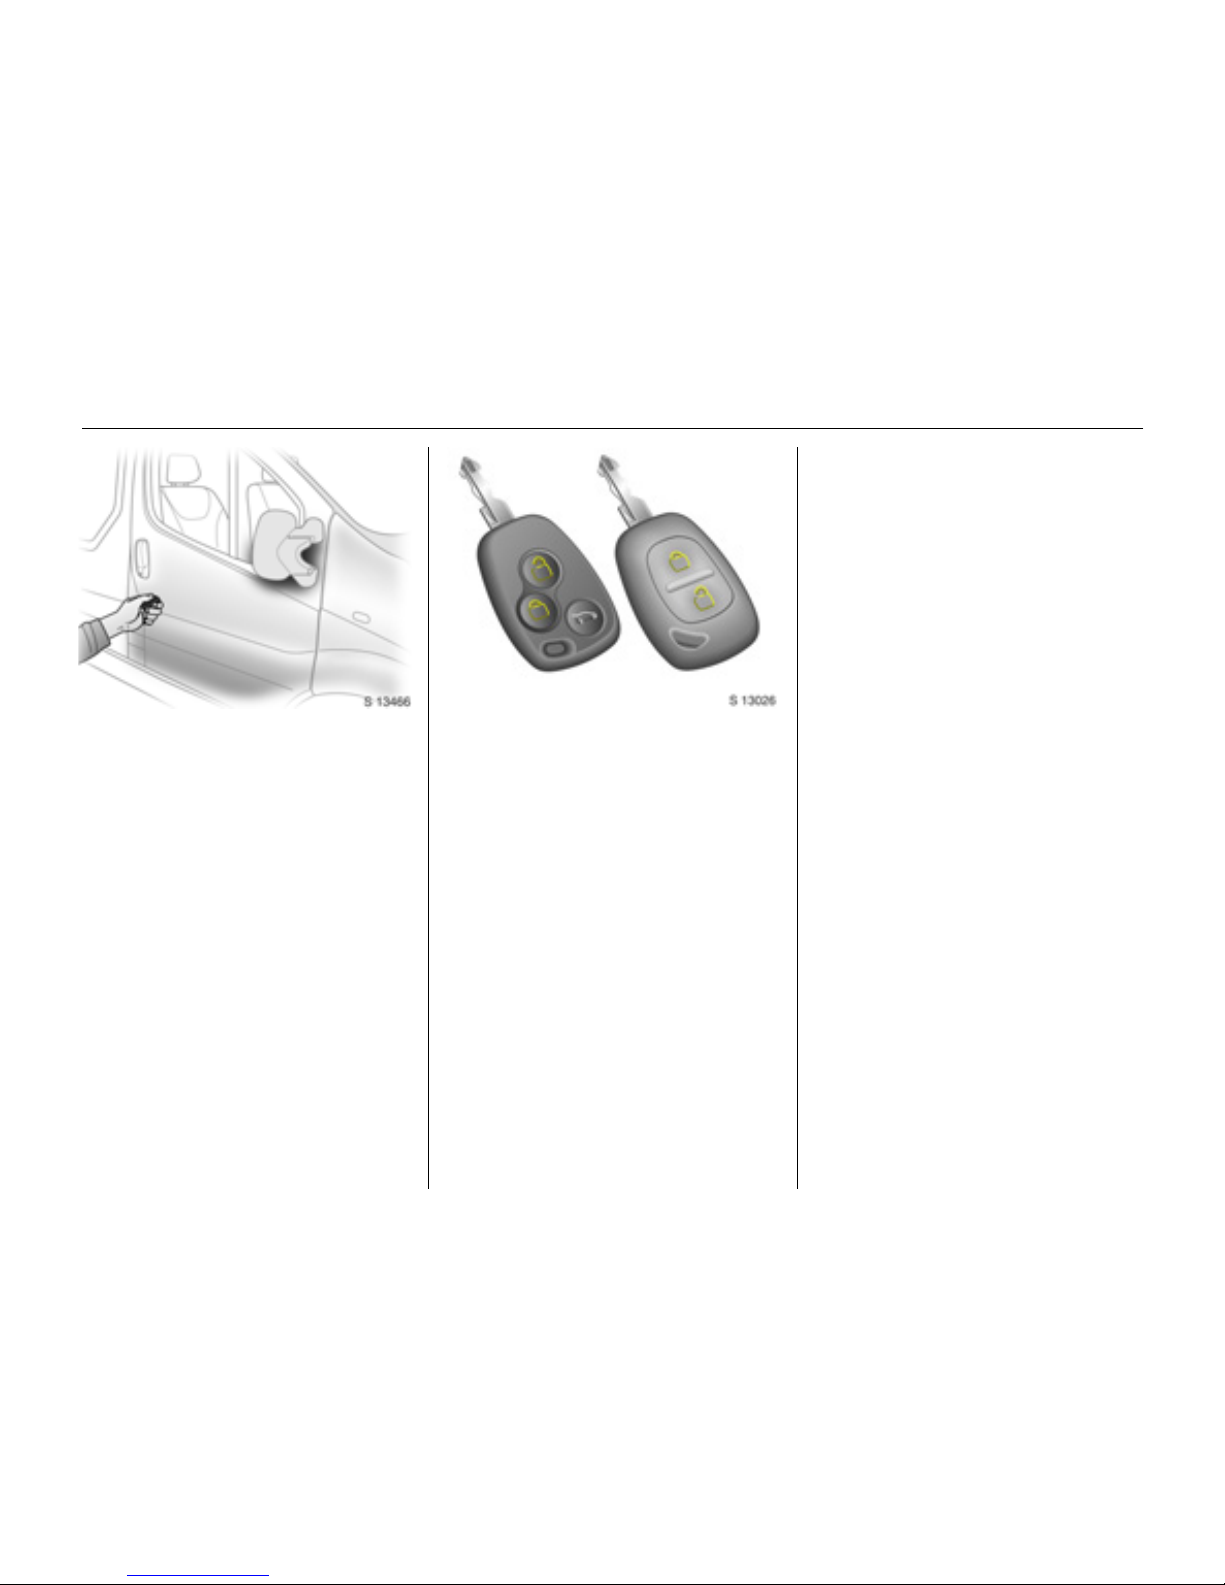
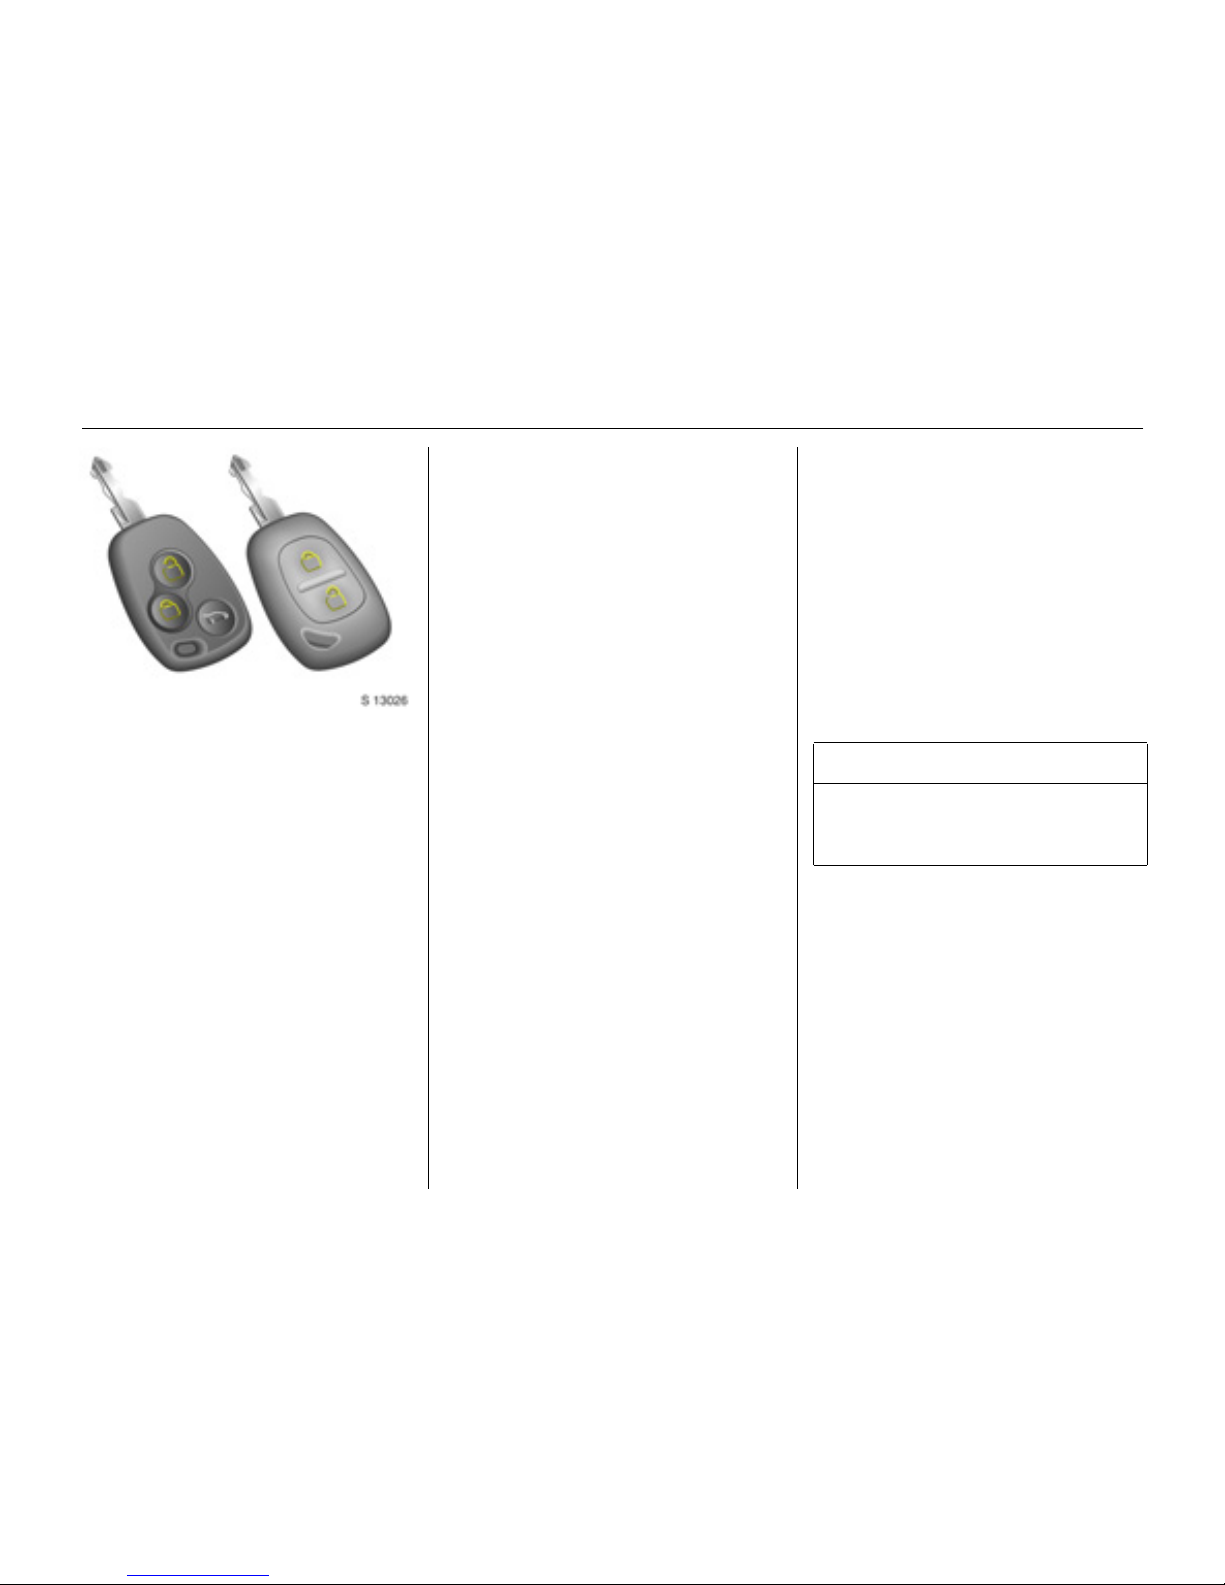
Radio frequen cy remote control 3
The remote control is used to operate the
central locking system 3.
Dep ending on model, the vehicle may use
a remote control with two or three buttons
(selective door locking).
The remote control has a range of approx.
5 metres. This range can be affected by
outside influences. Aim the remote control
at the vehicle to operate.
For your convenience, we recommend that
the central locking system is alway s
operated using the remote control unit.
Treat the remote control unit with care; it
should be protected against moisture and
should not be operated unnecessarily.
C entra l locking s yste m 3
see page 21.
Mechanic al anti -theft locking system
see page 23.
Vauxhall alarm system 3
see page 24.
Ofrecido por www.electromanuales.com
Locks, doors, windows20
Note
If the central locking system 3 cannot be
operated with the remote control, this may
be due to the following reasons:
z The remote control is out of range.
z The battery voltage of the remote
control is too low. Change the battery in
the remote control unit.
z The remote control has been operated
too many time s in succe ssi o n outsid e the
vehicle’s reception range (e.g. at too
great a distance from the vehicle).
The remote control must be
reprogrammed, we recommend you
consult a workshop.
z Inte rference fro m high er p ow er radio
waves from other sources.
Loc k or unlock the doors manually using
the key or central locking switch 3.
Manual locking does not operate the
central locking system. Have cause of fault
remedied by a workshop.
Changing the battery in re mote control
uni t
Replace the battery in a ccordance with the
Service Booklet or when the range of the
remote control starts to become reduced.
Tw o function remote control unit:
Open the battery compartment by
inserting a coin into the slot and twisting.
Ensure the new battery is installed
correctly.
Replace the cover and press until it is fully
engaged.
Sele cti ve door lock ing rem ote co nt rol u nit :
Open the battery compartment by
removing the screw on the rear cover, then
inserting a coin into the slot and twisting.
Ensure the new battery is installed
correctly.
Replace the cover and press until it is fully
engaged, then replace and secure screw.
Make sure that you dispose of old batteries
in accordance with environmental
protection regulations.
Ofrecido por www.electromanuales.com
Locks, doors, windows 21
Central locking system 3
For front, side and rear doors 3, tailgate 3
and tank flap 3.
With selective door locking 3 , the
passenger com partment a nd rear load
compartment are locked and unlocked
separately.
To unlock - two function remote control:
Press button c on remote control unit:
z Haz ard warning lights flash once.
z Doors are unlocked.
To unl oc k - selectiv e d oor locking :
Press button c on remote control unit:
z Haz ard warning lights flash once.
z Doors of the passenger com partment
only are unlocked.
To lock - tw o func tion remote control:
Press button e on remote control unit:
z Hazard warning lights flash twice.
z Doors are locked .
To lock - s elective door l ocking:
Press button e on remote control unit:
z Hazard warning lights flash twice.
z Passenger compartment doors only are
locked.
Always ensure that the side door 3,
tailgate 3 or rear doors 3 are properly
closed before lock ing the vehicle w ith the
remote control.
Manually lock ing or unlocking a door with
the key does not operate the central
locking system.
For manual operation of the tank flap -
see page 103.
9 Warning
For safety reasons, the vehicle cannot be
locked if the ignition key is in the starter
swi tch.
Ofrecido por www.electromanuales.com
Locks, doors, windows22
Rear load compa rtme nt doors / tailg ate selective door locking
To unlock:
Press button G on remote control unit.
The rear load compartment doors /
tailgate are unlocked.
If no door is opened within approx.
30 seco nd s afte r th e v ehicle has been
unlocked via the remote control, the vehicle
is relocked automatically.
To lock:
Press button G on remote control unit.
The rear load compartment doors /
tailgate are locked.
Cen tral l oc king sw itch 3
Use the c entral locking switch to lock or
unlock the doors from inside the vehicle.
Pre ss e on the switch to lock or U on the
switch to unlock.
Autom atic locking 3
The central locking system can be
activated to automatically lock the doors
as soon as a speed of approx.
4 mph (6 km/h) is reached.
To activate
With the ignition switched on, press e on
the central locking switch and hold for
approx. 5 seconds, until audible
confirmation is heard.
To deactivate
With the ignition switched on, press U on
the central locking switch and hold for
approx. 5 seconds, until audible
confirmation is heard.
Unlock ing the doo r
The doors are unlocked by ope ning any
door from inside the vehicle or by
operating the ce ntral locking switch.
9 Warning
If a rear door is opened, it will
automatically be relocked when the
vehicle reaches a speed of approx.
4 mph (6 km/ h).
Ofrecido por www.electromanuales.com

Locks, doors, windows 23
Fault
In the event of a fault, e.g. automatic
locking doesn’t take place, ensure all the
doors have be en proper ly closed . Ch eck to
ensure that the automatic locking function
has not been deactivated inadvertently. If
this is the case, switch the ignition off and
on again and reactivate the system as
described previously.
If the automat ic loc king f unction still fails to
operate, we recommend that you seek the
assistance of a workshop.
Slam door locks 3
For certain Van m odels1) th e s lid ing si d e
door and rear door lock s are isolated for
added security.
Whilst the front doors are locked and
unlocked using the remote control key in
the normal way, the sliding side door and
re ar d oor c a n on ly be op en ed b y m an ua l
operation of the vehicle key.
Mechanical anti-theft locking
system
To lock:
All doors must be closed; press button e on
the remote control unit 3 again within
10 seconds after locking. Hazard warning
lights flash 5 times.
-orTurn k ey in driver's door lock towards front
of vehicle again within 10 seconds after
locking, then turn it back to the vertica l
position a nd remove.
Interior lock buttons 3 on all doors are
positioned such that doors cannot be
opened.
Importa nt:
When the hazard warning lights or parking
lights are on, the mechanical anti-theft
locking system will not be activated.
9 Wa rning
If you decide on having the system active
(with the doors closed) while driving, it
may become difficult for those assisting
you in gaining access to your vehicle in
the ev ent of an emerge ncy.
1)
Not available w ith m echanical anti-theft
locking system.
9 Warning
Do not use the system if there are people
in the vehicle! The doors cannot b e
unlocked from inside.
Ofrecido por www.electromanuales.com
Locks, doors, windows24
To unlock:
Press button c on remote control unit 3.
Hazard warning lights flash once.
-orTurn key in driver's door lock towa rds rear
of vehicle, then turn it back to the vertical
position and remove.
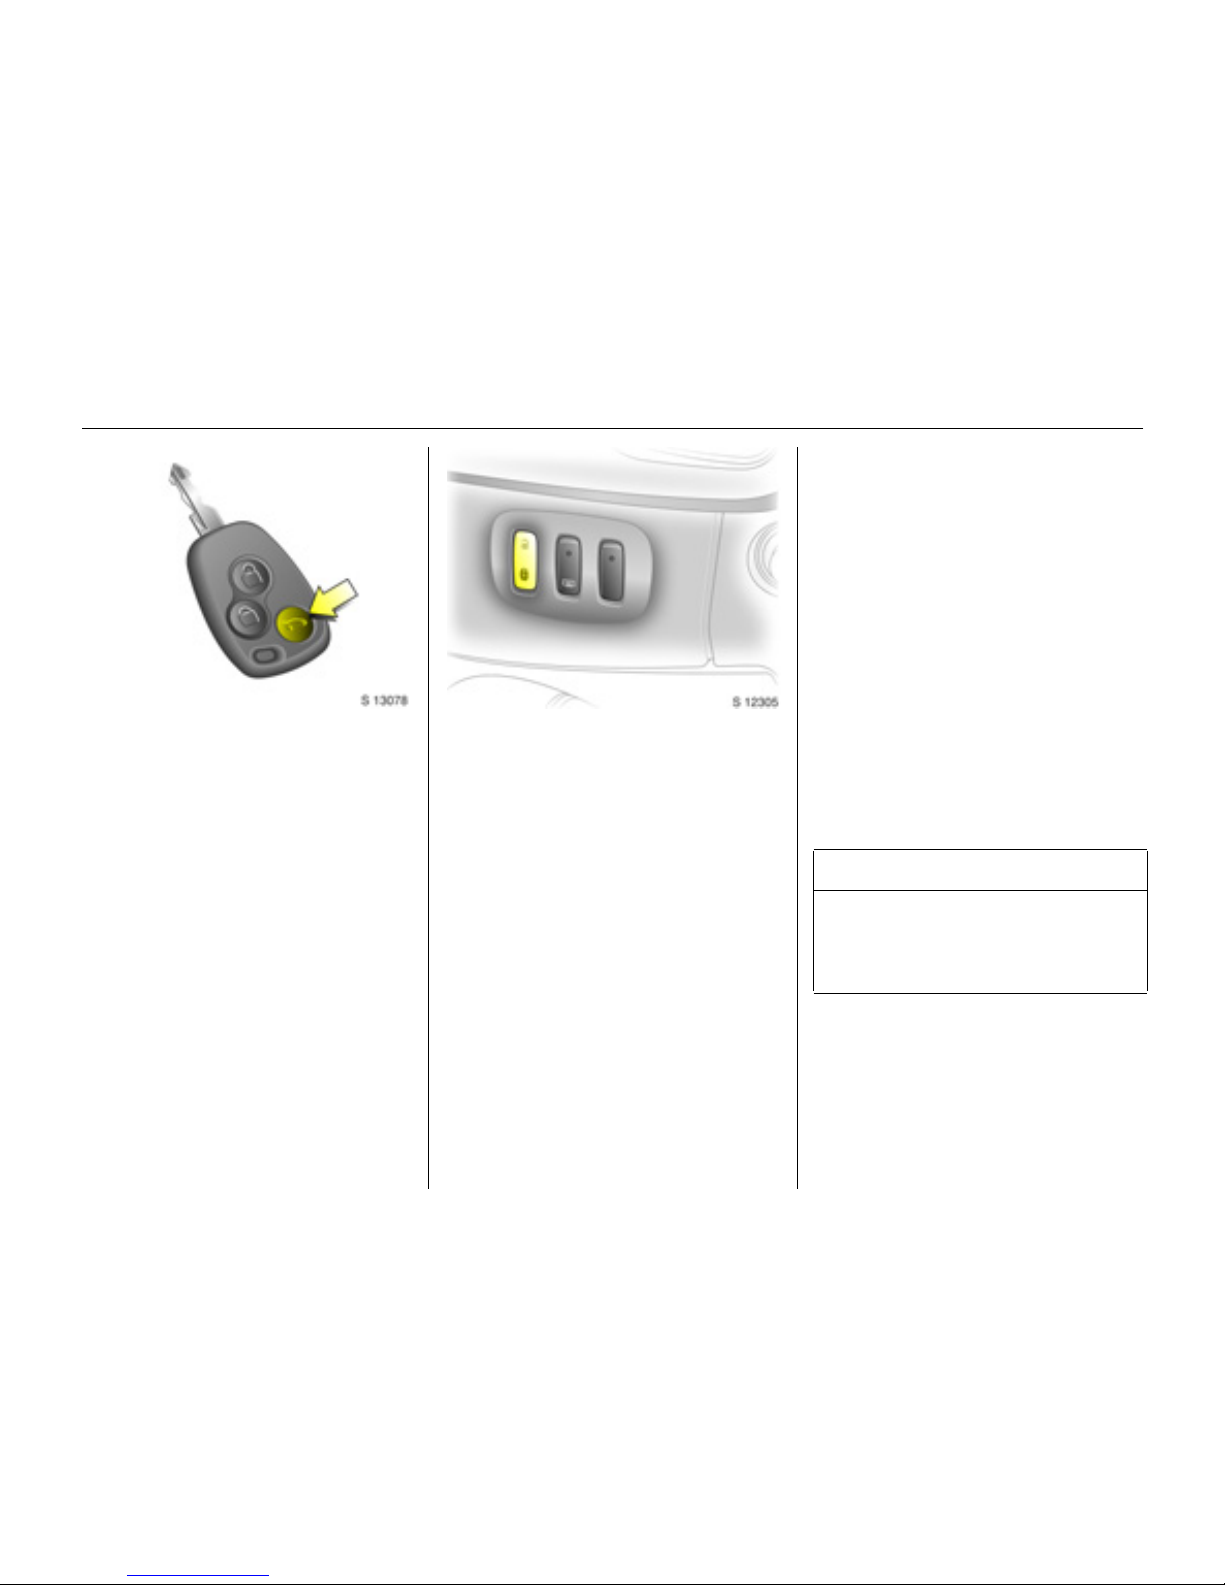
Vauxhall alarm system 3
The system monitors:
z Front and side doors.
z Rear doors or tailgate 3, bonnet.
z Passenger compartment.
z Starter switc h.
z Siren power supply 3.
The remote control unit 3 is use d to
operate the anti-theft alarm system.
To activate
All doors must be fully closed:
Press button e on the remote control;
the turn signal lights flash twice.
If the turn signal lights do not flash on
activation, this may indicate that a door or
the bonnet is not fully closed.
To deactivate
Press button c on the remote control;
the turn signal lights flash once.
If the alarm has been triggered, the turn
signal lights will not flash upon
deactivation.
When un locking the v ehicle using the key,
the alarm will sound: to deactivate, insert
the key and switch on the ignition.
Not e
The anti-theft alarm system cannot be
deactivated in any other way, so keep a
spare key in a safe place.
Alarm
During a switch-on phase, the sensors can
trigger a maximum of 10 times1).
The alarm takes the form of:
z an acoustic signal
(horn, 25 seconds)
and
z a visual sig nal1)
(turn signal lights, 25 seconds).
9 Wa rning
Unlocking is not possible in any other
way, so ke ep spare key to hand in a safe
place!
1)
Varies from c oun try to country on a ccount of
national regu lation s.
Ofrecido por www.electromanuales.com
Locks, doors, windows 25
Passenger compartment monitoring
When the anti-theft alarm is activated, the
system automatically monitors the inside
of the v ehicle fo r m ovem ent.
To disable the passenger compartment
monitoring, (for example if an animal is to
be left in the vehicle):
z Press and hold button e on the remote
control.
z An a udible beep will sound to confirm
that the passenger com partment
monit oring func tio n is dis abled .
The disable monitoring function will remain
until the alarm is deactivated or the doors
unlocked.
Alar m bac k-up system 3
The alarm system has a battery back-up
siren unit which, in the event of its power
supply being disconnected or
disconnection of the vehicle battery, will
sound for approx. 5 minutes on its internal
batteries.
If the vehicle battery has to be
disconnected it will be necessary to
deactivate the alarm system.
To stop the siren if activated, reconnect the
vehic le ba ttery and press button c on
remote control unit.
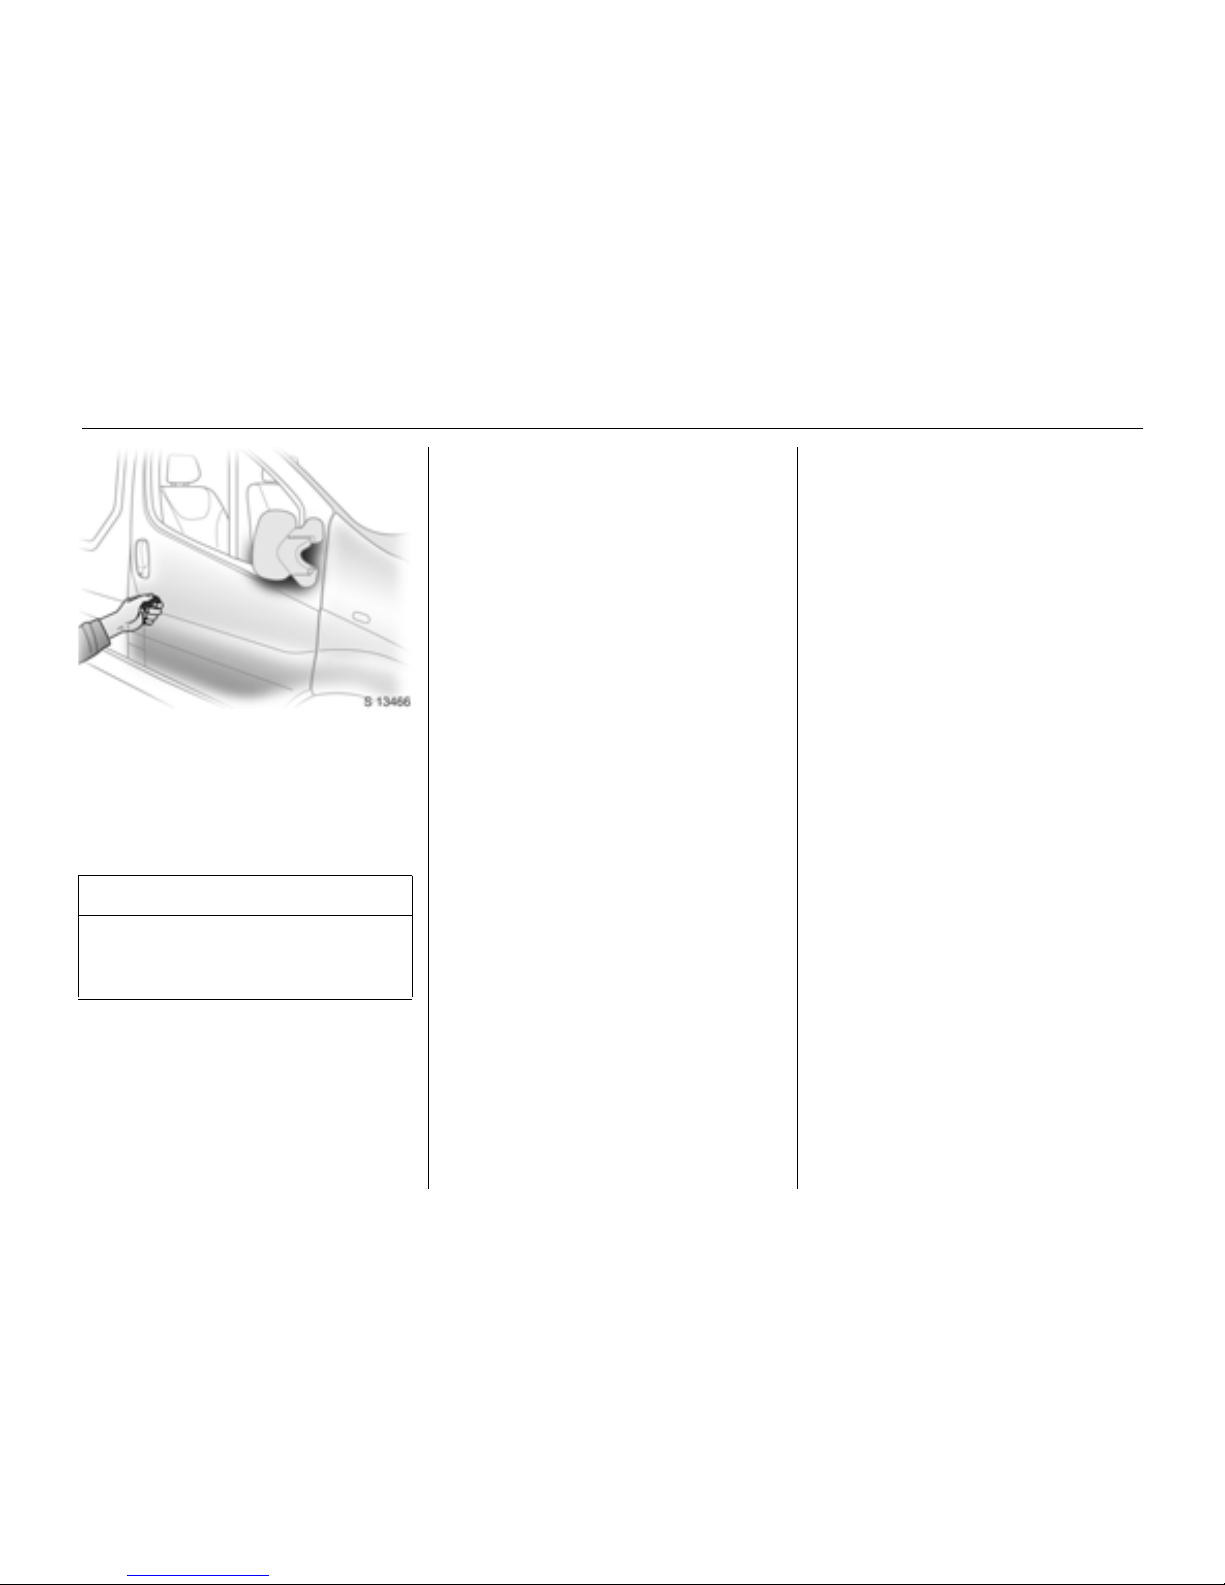
Sl iding s ide doo r s 3
Open the door by pulling the outside
handle, or by pulling the interior lever to
the rear, then sliding the door backwards.
To close the door, slide it fully forwards and
ensure it is fully closed.
The door can be locked or unlocked with
the remote control 3, the central locking
swi tch 3 or by the interior lock switch.
Ensure the side door is closed before
driving the vehicle.
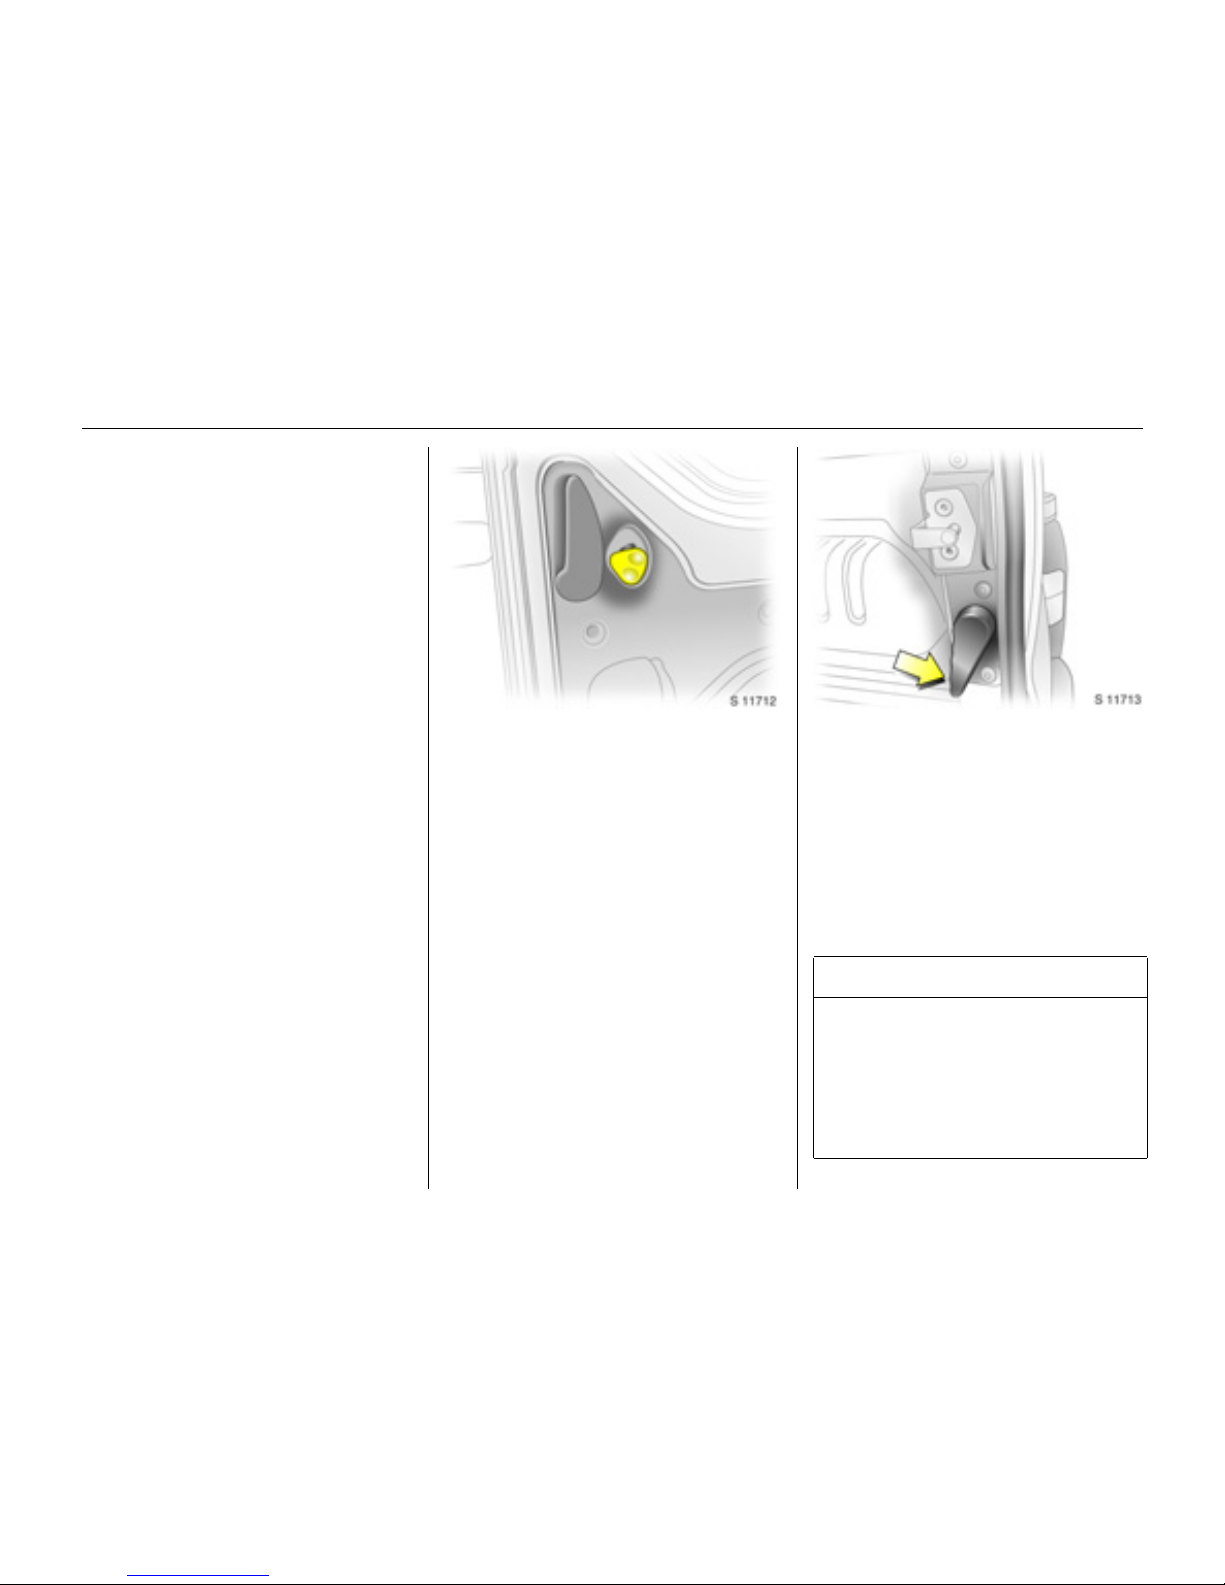
Rear doors 3
The doors can be locked or unlocked with
the remote control 3, the central locking
switch 3, or the key 3 .
To open the le ft-hand rear door, pull the
outside handle. The door is opened from
insid e the vehicle by pulling the interior
handle.
The right-hand rear door is released using
the lever (arrowed).
9 Warning
The rear lights may be obscured if the
rear doors are open and the vehic le is
parked on the roadside. You should
make other road users aware of your
vehicle, by using a warning triangle or
other eq uipm ent specif ied by yo ur
country’s road traffic regulations.
Ofrecido por www.electromanuales.com
Locks, doors, windows26
Th e doors are retained in the 90º pos ition
by locking stays.
To op en the doors to 180º or further 3, pull
the door release handles and swing open
to the desired position.
Always close the right-hand door before
the left-hand door.
Tailgate 3
To open: press button and lift tailgate to
fully op en pos i t i on .
In very cold climate s, the op ening
assistance provided by the tailga te
hydraulic struts may be reduced.
The tailgate can be locked or unlocked
with the remote control 3 or the central
locking switch 3.
Close tailgate using the interior strap.
Ensure tailgate is fully closed.
Mirrors
Interior 3 and exterior mirrors
To adjust mirrors, swivel to appropriate
position.
Move lever on underside of interior mirror
housing to reduce dazzle at night.
Take care when driving with interior mirror
adjusted for night vision. Rear v iew may be
slightly distorted in this position.
9 Wa rning
Ensure ex tended open ing doo rs 3 are
secured when fully opened.
Opened doors may slam closed due to
the force of the wind!
9 Warning
Ensur e there is adeq uate clearan ce both
above (at le ast 2.15 m ) and behind when
opening tailga te.
Ofrecido por www.electromanuales.com
 Loading...