

Page 1

Page 2
Page 3
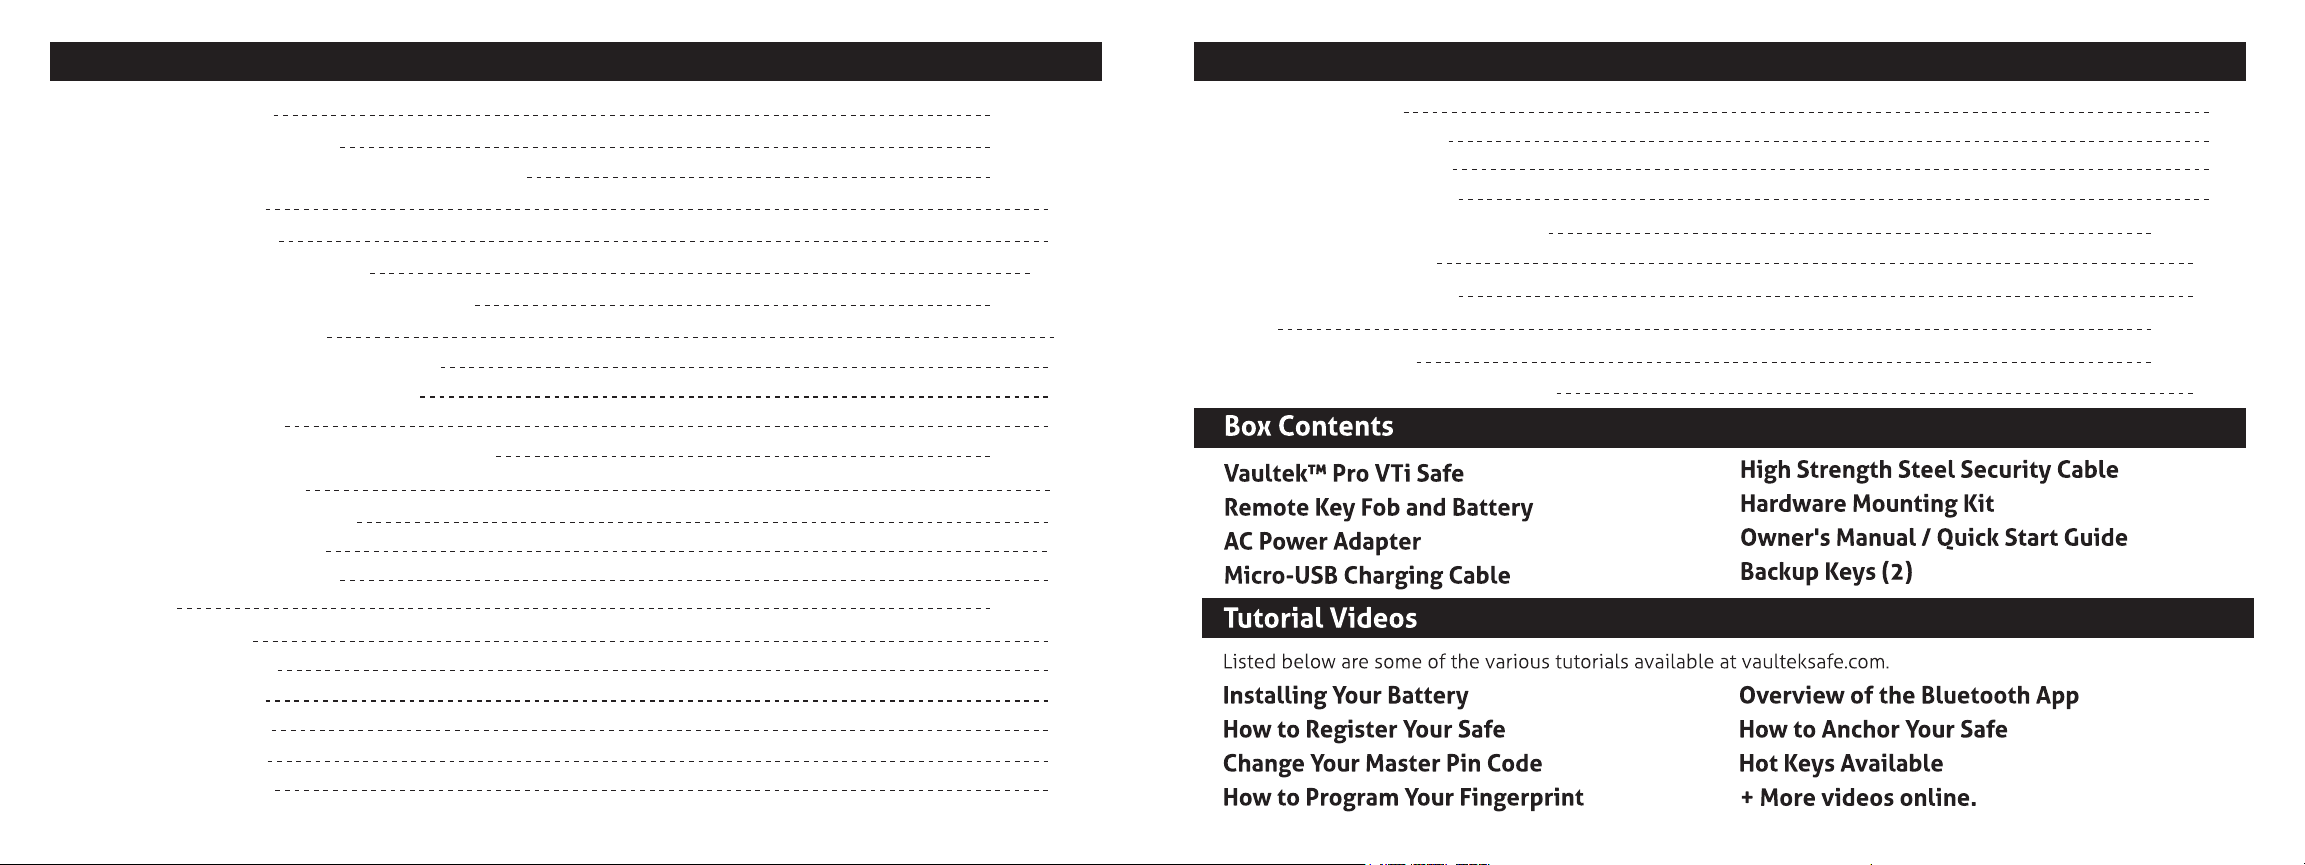
Table of Contents
Product Overview 01 / 02
Introduction / Warnings 03 / 04
Battery Operation / Battery Maintenance 05 / 07
Battery Installation 05
Charging the Battery 06
Master Code Programming 08
Smart Align Biometric Programming 09 / 12
Helpful Programming TIPS 09
Programming 1st and 2nd Fingerprints 10
Programming Additional Fingerprints 11
Deleting Fingerprints 12
Remote Key Fob Operation / Warnings 13 / 16
Remote Key Fob Pairing 13
Toggle Key Fob Access Modes 14
To Unpair Remote Key Fob 14
Multiple Safe Management 15
Hot Keys 16 / 18
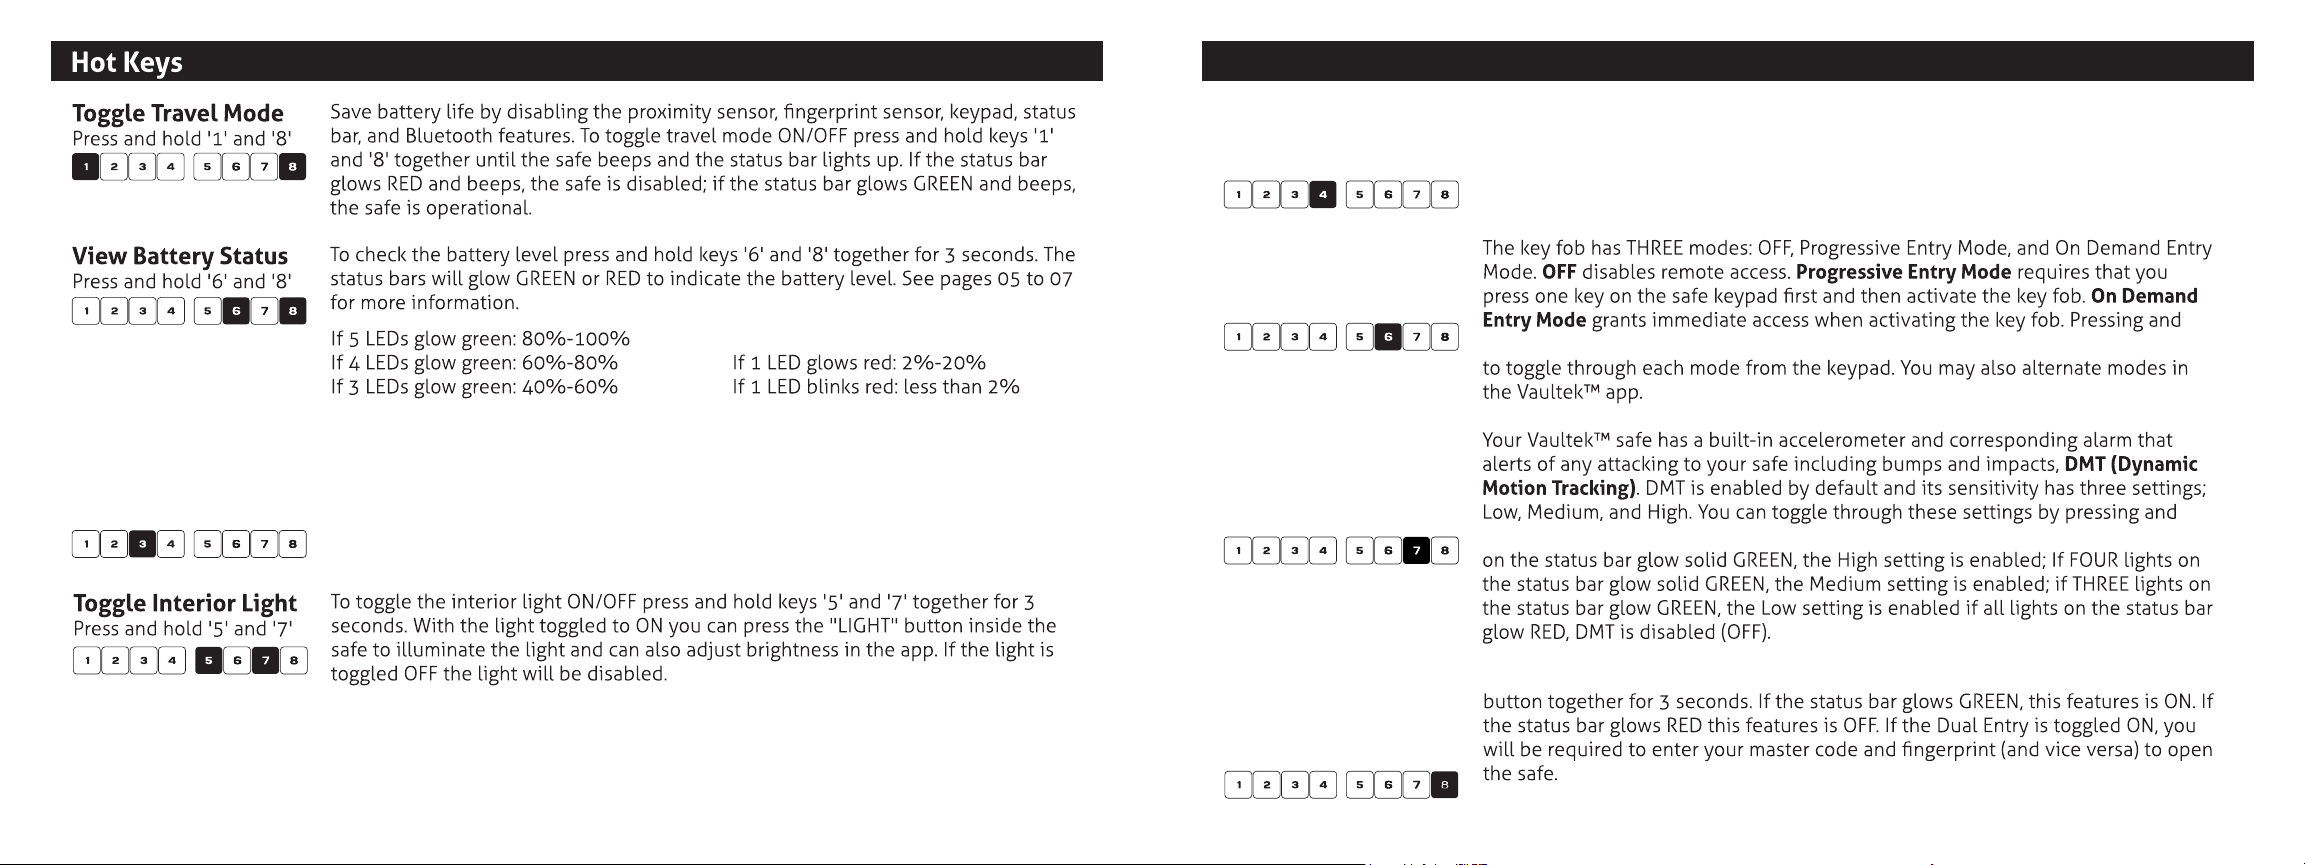
Tamper Detection 16
Toggle Stealth Mode 16
Toggle Travel Mode 17
View Battery Status 17
Delete Fingerprints 17
Toggle Interior Light 17
Toggle Bluetooth 18
Toggle Key Fob Modes 18
Toggle DMT Sensitivity 18
Toggle Dual Entry Mode 18
Vaultek™ App / App Features 19 / 20
Securing Your Safe 21
Product Registration 22
FAQ 23 / 24
Troubleshooting 25 / 26
Customer Support / Warranty 27
Page 4
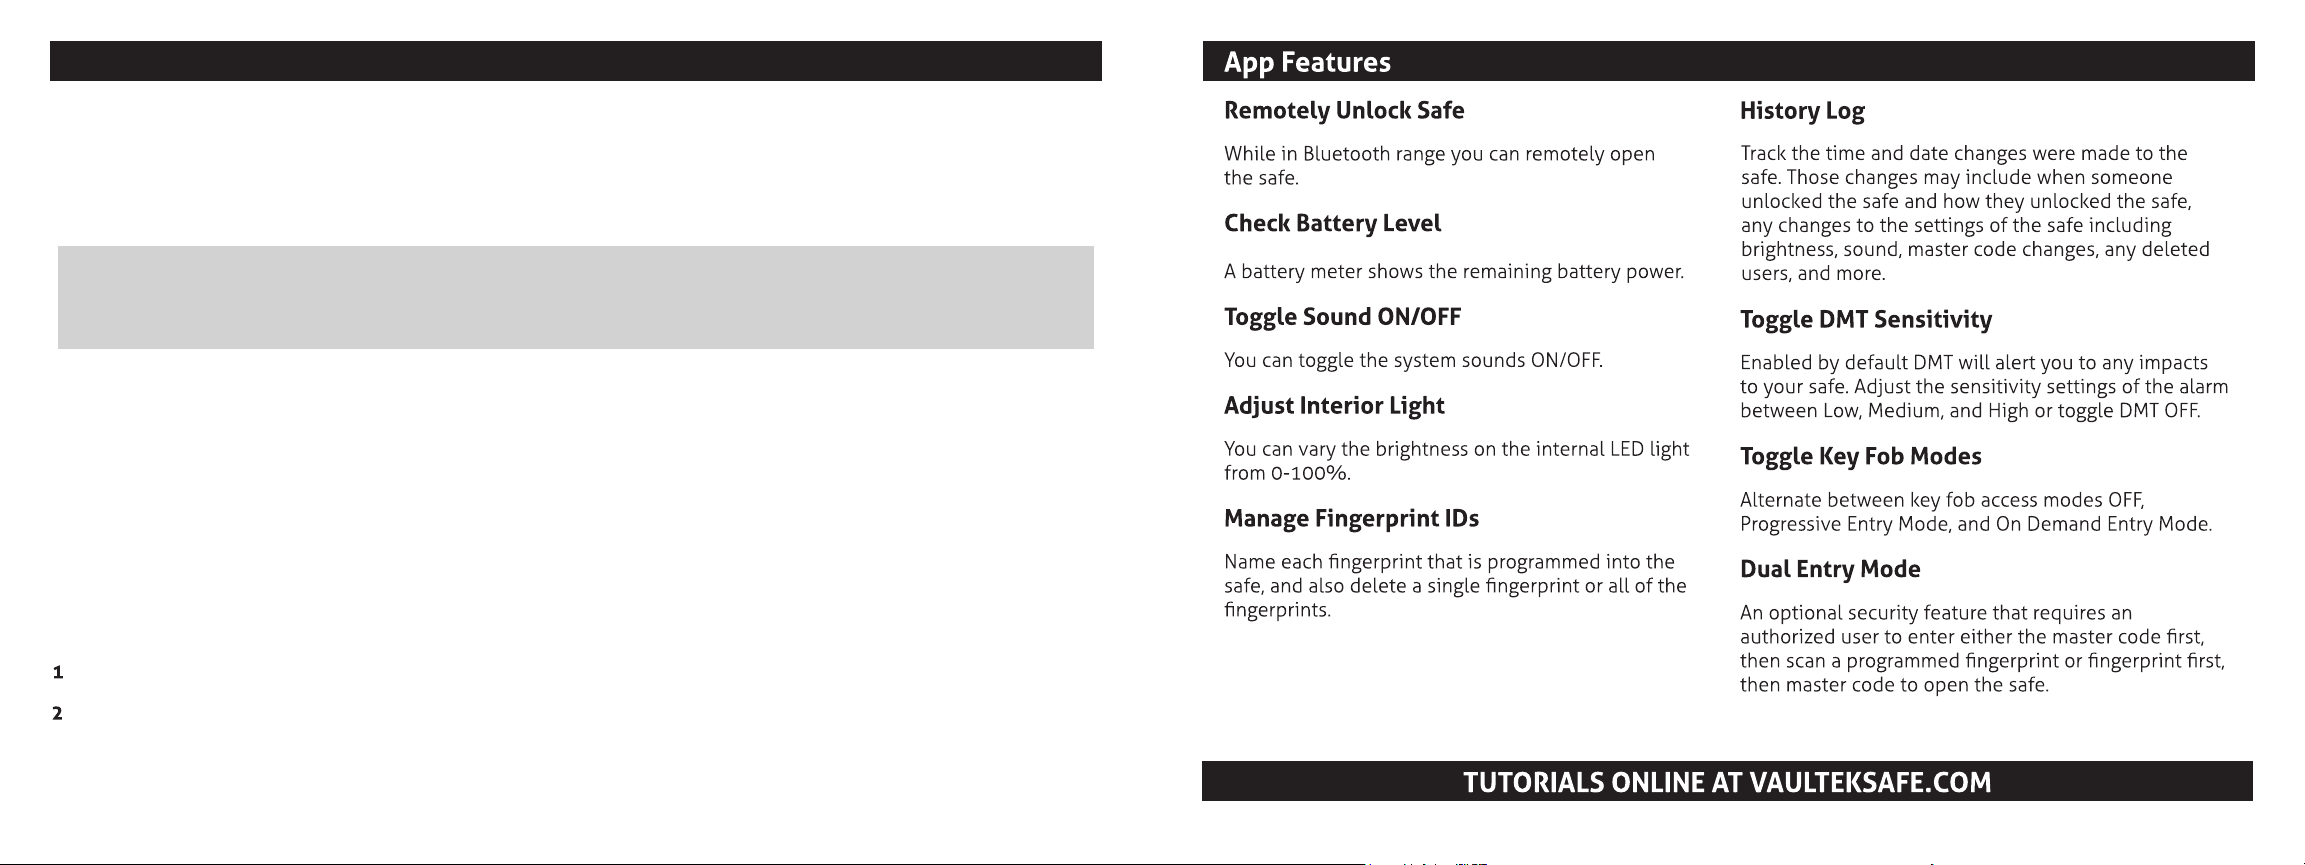
The Vaultek™ app is available for Android and iOS devices. The app allows you to remotely unlock safe, check
battery level, toggle sound ON/OFF, adjust the interior light, name ngerprint IDs, plus much more. See pages 19
to 20 for more information.
Page 5
The Vaultek™ Pro VTi is a biometric, PIN access / Bluetooth access safe. Its solid structure and penetration
resistant design makes it ideal for storing valuables such as rearms, jewelry, cash, and other personal items.
Powered by a rechargeable lithium-ion battery, the safe combines high security with complete access control.
Smart Align Biometric Scanner: Personalized access for up to 20 unique ngerprint. See pages 09 to 12 for
more information.
Key Fob: Remote for on demand access. See page 13 and 16 for more information.
Vaultek™ App: Open the safe with the Bluetooth app. See pages 19 and 20 for more information.
CONSEQUENTIAL, ARISING OUT OF THE USE OF, OR THE INABILITY TO USE THE VAULTEK™ SAFE.
IMPORTANT Check page 16 for remote key fob warnings.
DMT (Dynamic Motion Tracking): Motion activated alarm can be disabled or enabled with three levels of
sensitivity (Low, Medium, and High) using the Vaultek™ app or hot key functions. See page 18 for information.
Page 6
Battery Operation
Your safe uses a 3.7V 18650 rechargeable lithium-ion with a at
top. A minimum 2000 mAh capacity is required, however 2200
mAh or higher can be used to increase operation time.
Battery Installation
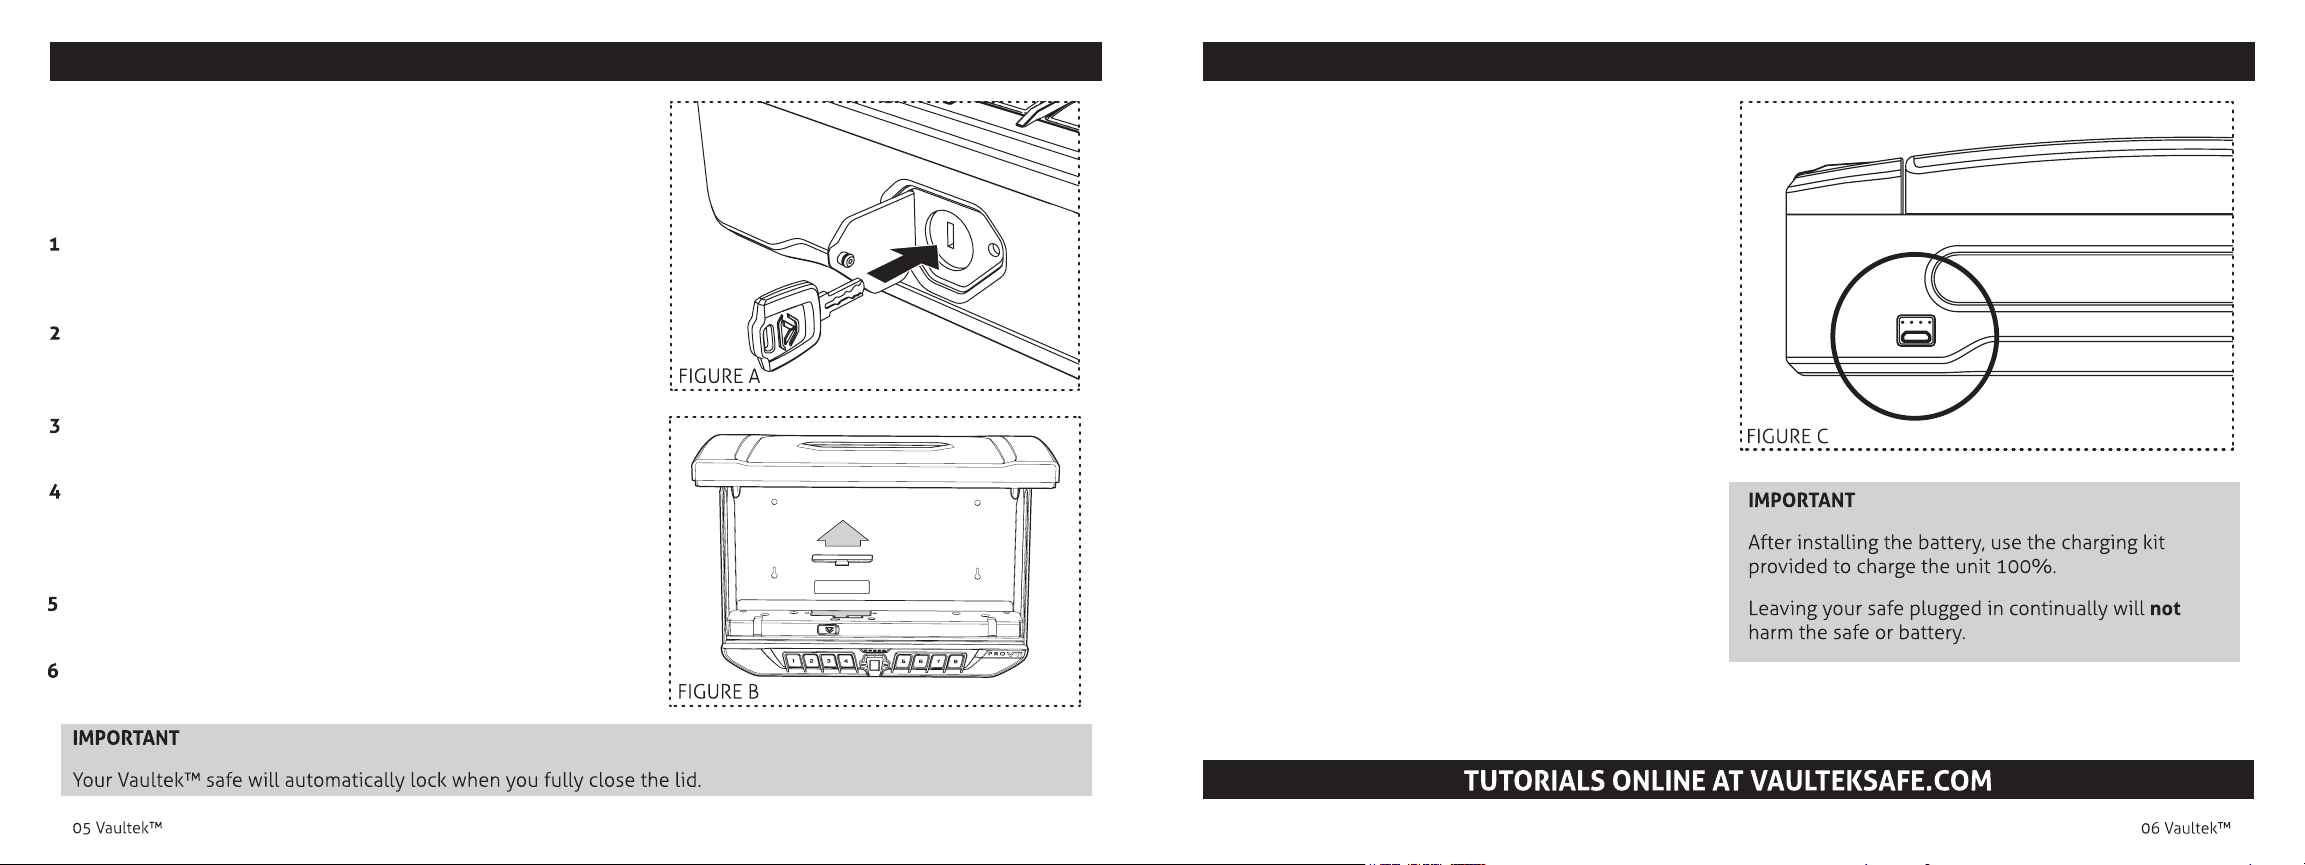
To get started, insert one of your backup keys into the keyhole
at the front of the safe (see Figure A). Push key in and rotate the
key 90 degrees clockwise to open the safe.
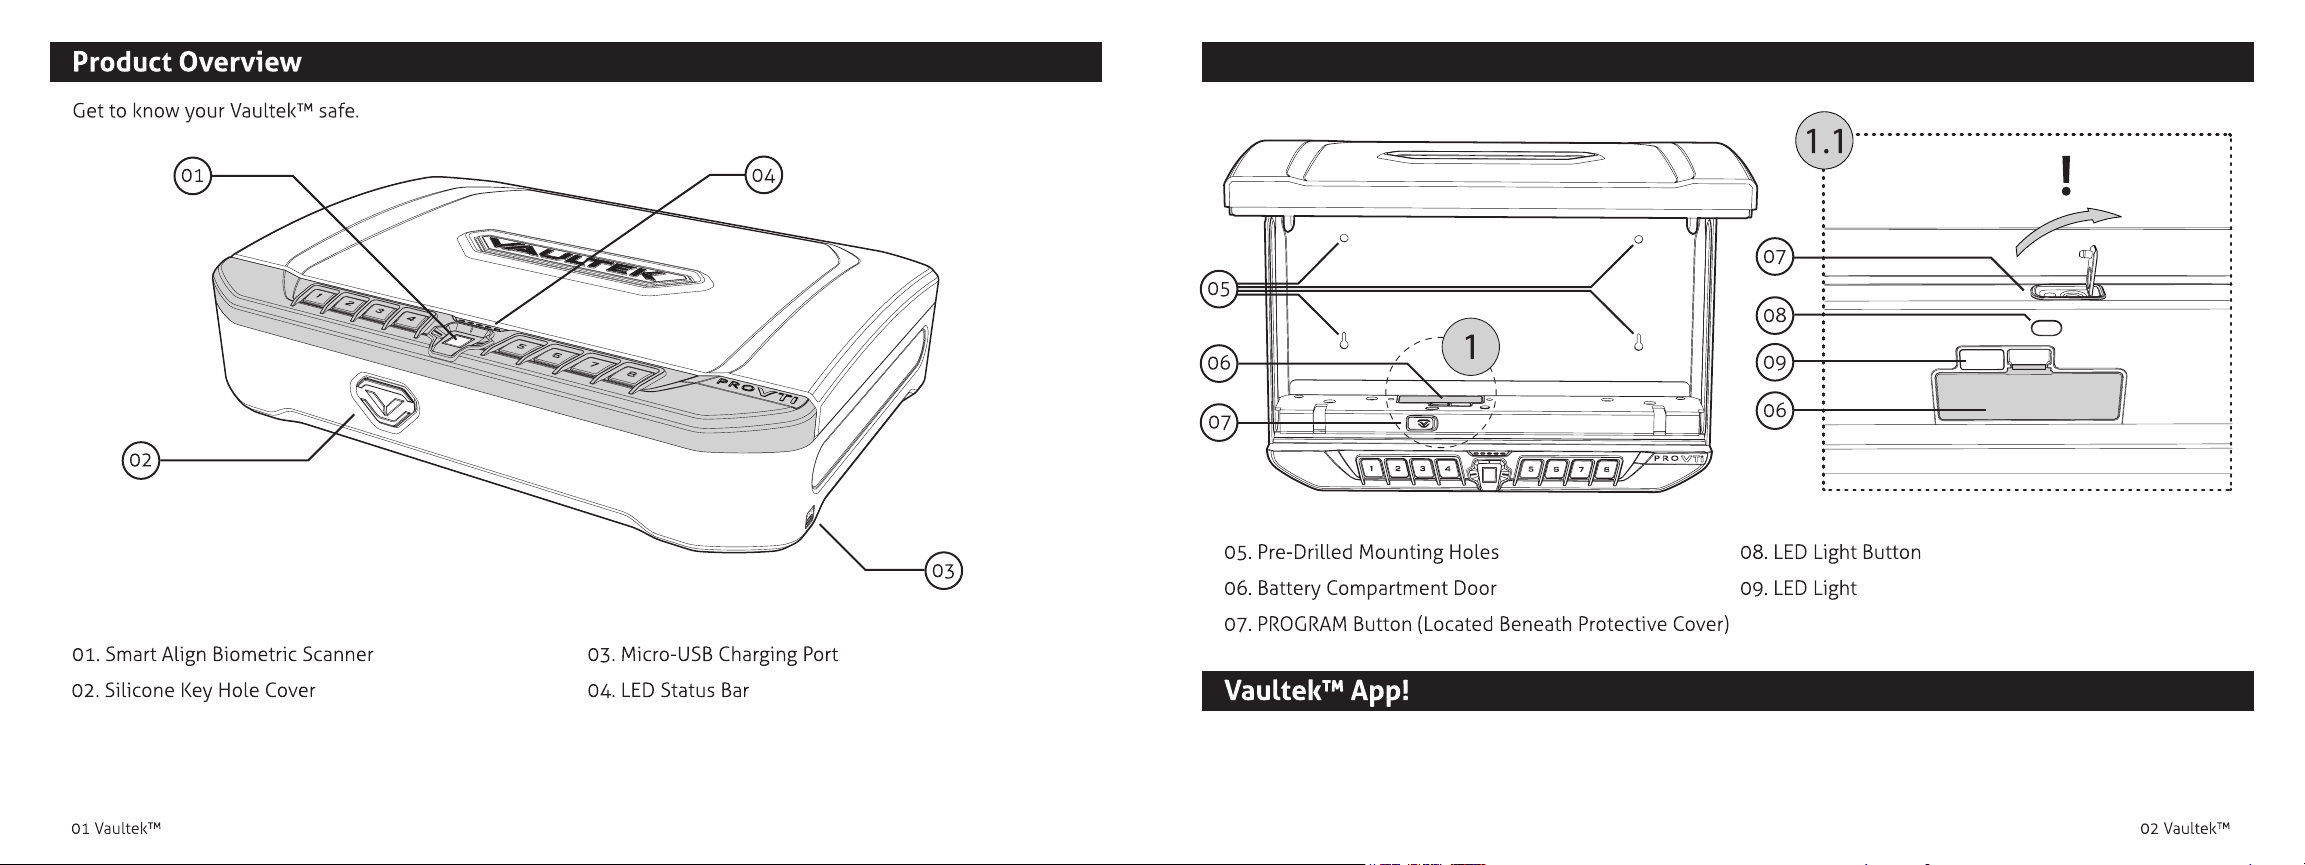
Remove the interior padding. Locate the battery compartment
door on the inside of the safe directly behind the '4' key on the
keypad (see Figure B).
Remove the battery cover by pressing down on the tab near the
top of the cover.
Insert the 18650 rechargeable lithium-ion battery (included in
accessory box) into the battery compartment. Note that your
Vaultek™ safe automatically detects the polarity of the battery
and can be installed in either direction.
When the battery is inserted you will hear a short welcome tone
and the keypad will light up.
Once you hear the tone and see the keypad light up, replace the
battery cover. You are now ready to program your safe.
Continue on next page for more information about the battery.
Charging the Battery
Your Vaultek™ safe is powered by a rechargeable
lithium-ion battery and comes with a charging kit
which includes an AC power adapter (suitable for 120
volt power outlets) and a micro-USB cable. Safe and
micro-USB cable can be used with all international
power adapters.
Under normal usage, a fully charged battery can
last at least 3 months. To recharge the safe, plug the
micro-USB cable into the micro-USB receiving jack
located on the lower right side of the safe (Figure C)
and connect to a standard USB port or wall outlet using
the AC power adapter. Approximate recharge time is
2.5 hours. During recharging, the white LEDs above the
micro-USB jack (Figure C) indicate the battery capacity
as below:
4 lights glow: Fully recharged
3 lights glow, 1 light blinks: 80%~100%
2 lights glow, 1 light blinks: 60%~80%
1 light glows, 1 light blinks: 40%~60%
1 light blinks, less than 20%
The charging kit can also function as an external power
supply, which means you can open your safe when the
battery is depleted.
Page 7
Low Battery
If the rst LED on the status bar blinks RED several
times and you hear several rapid beeps when opening
the safe, your battery level is critically low and your
safe needs to be charged immediately.
TIP
In the event the battery dies or a soft reset is performed (battery removal and installation) the safe will restore
default settings for DMT, interior light, sound, and the remote key fob. These settings will need to be readjusted,
however ngerprint IDs and master code will not be aected.
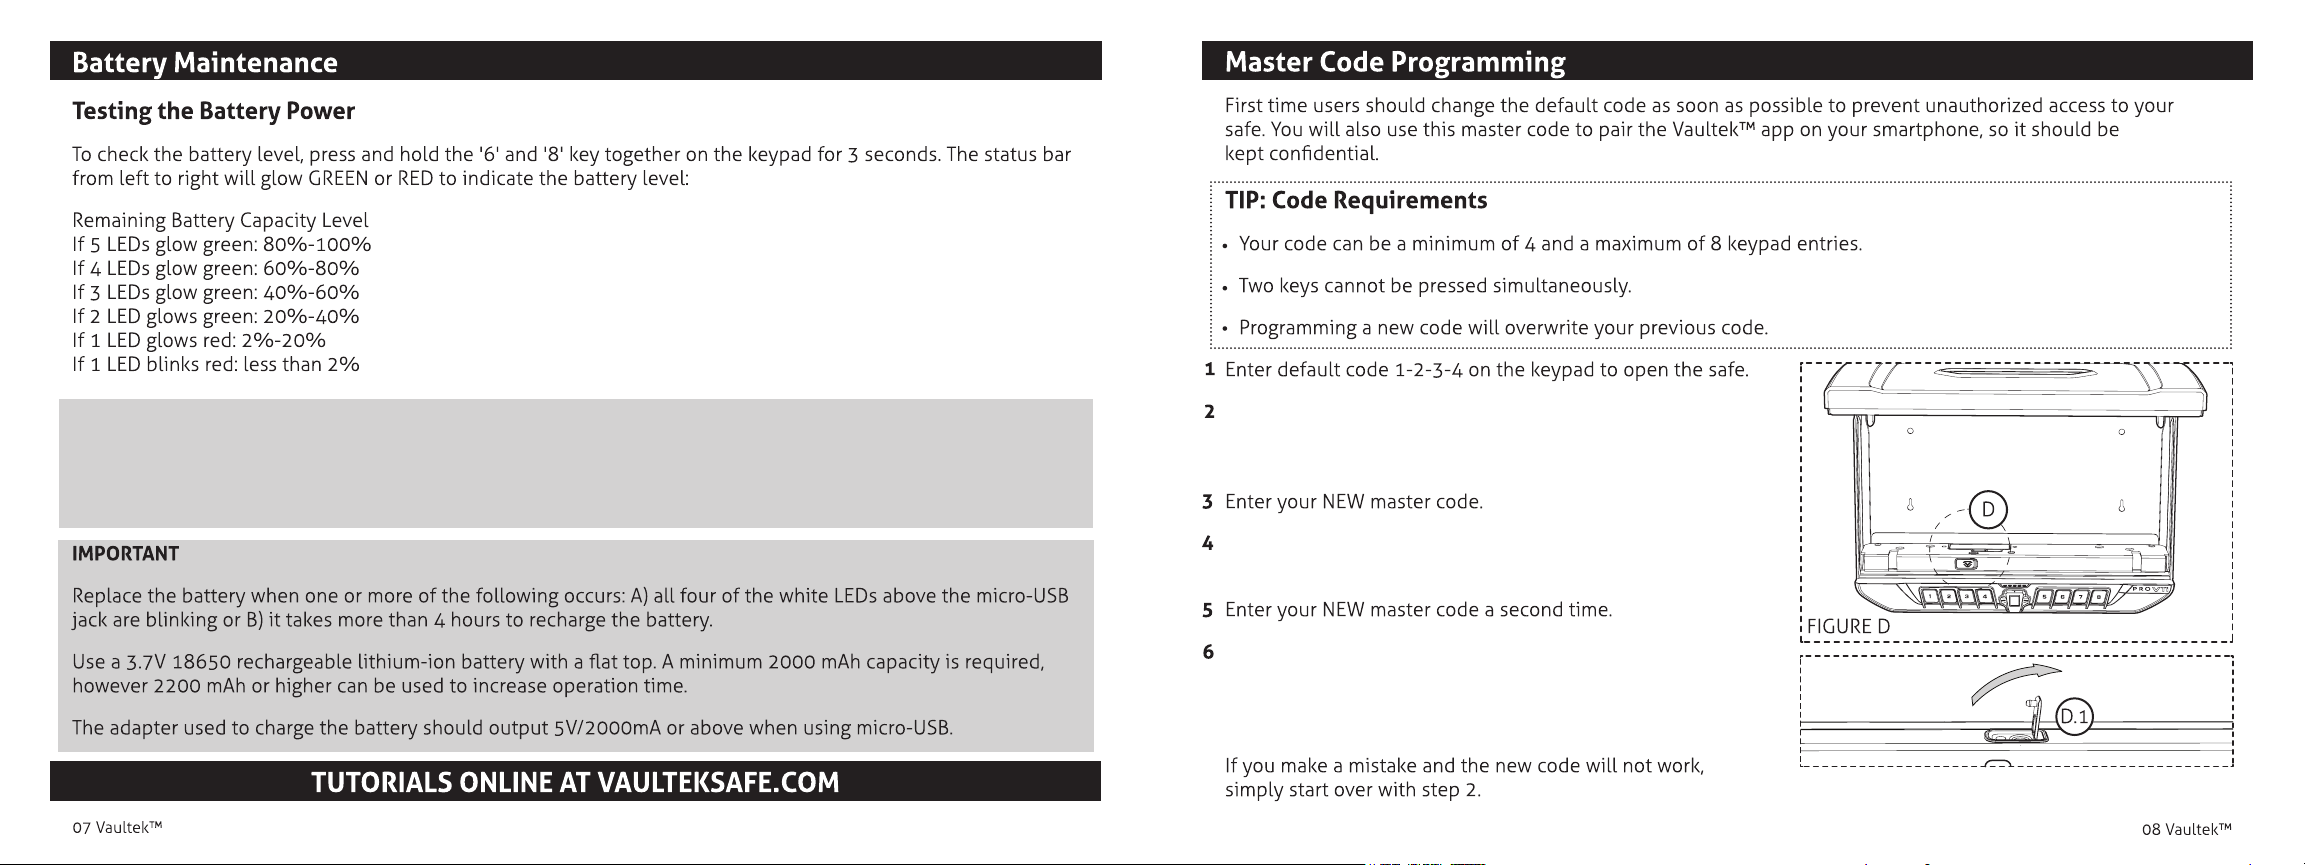
With the safe open, press and hold the '1' key then the
"PROGRAM" button together (3 seconds)(Figure D) until all
status bar LEDs turn RED and let go.
Press and hold the '1' key then the "PROGRAM" button together
again (3 seconds) until all status bar LEDs turn RED and let go.
Press and hold the '1' key then the "PROGRAM" button together
a third time (3 seconds) until the safe beeps and all status bar
LEDs turn GREEN and let go. This tone conrms that the master
code has been reset.
Page 8
Continue on next page for more information about the ngerprint scanner.
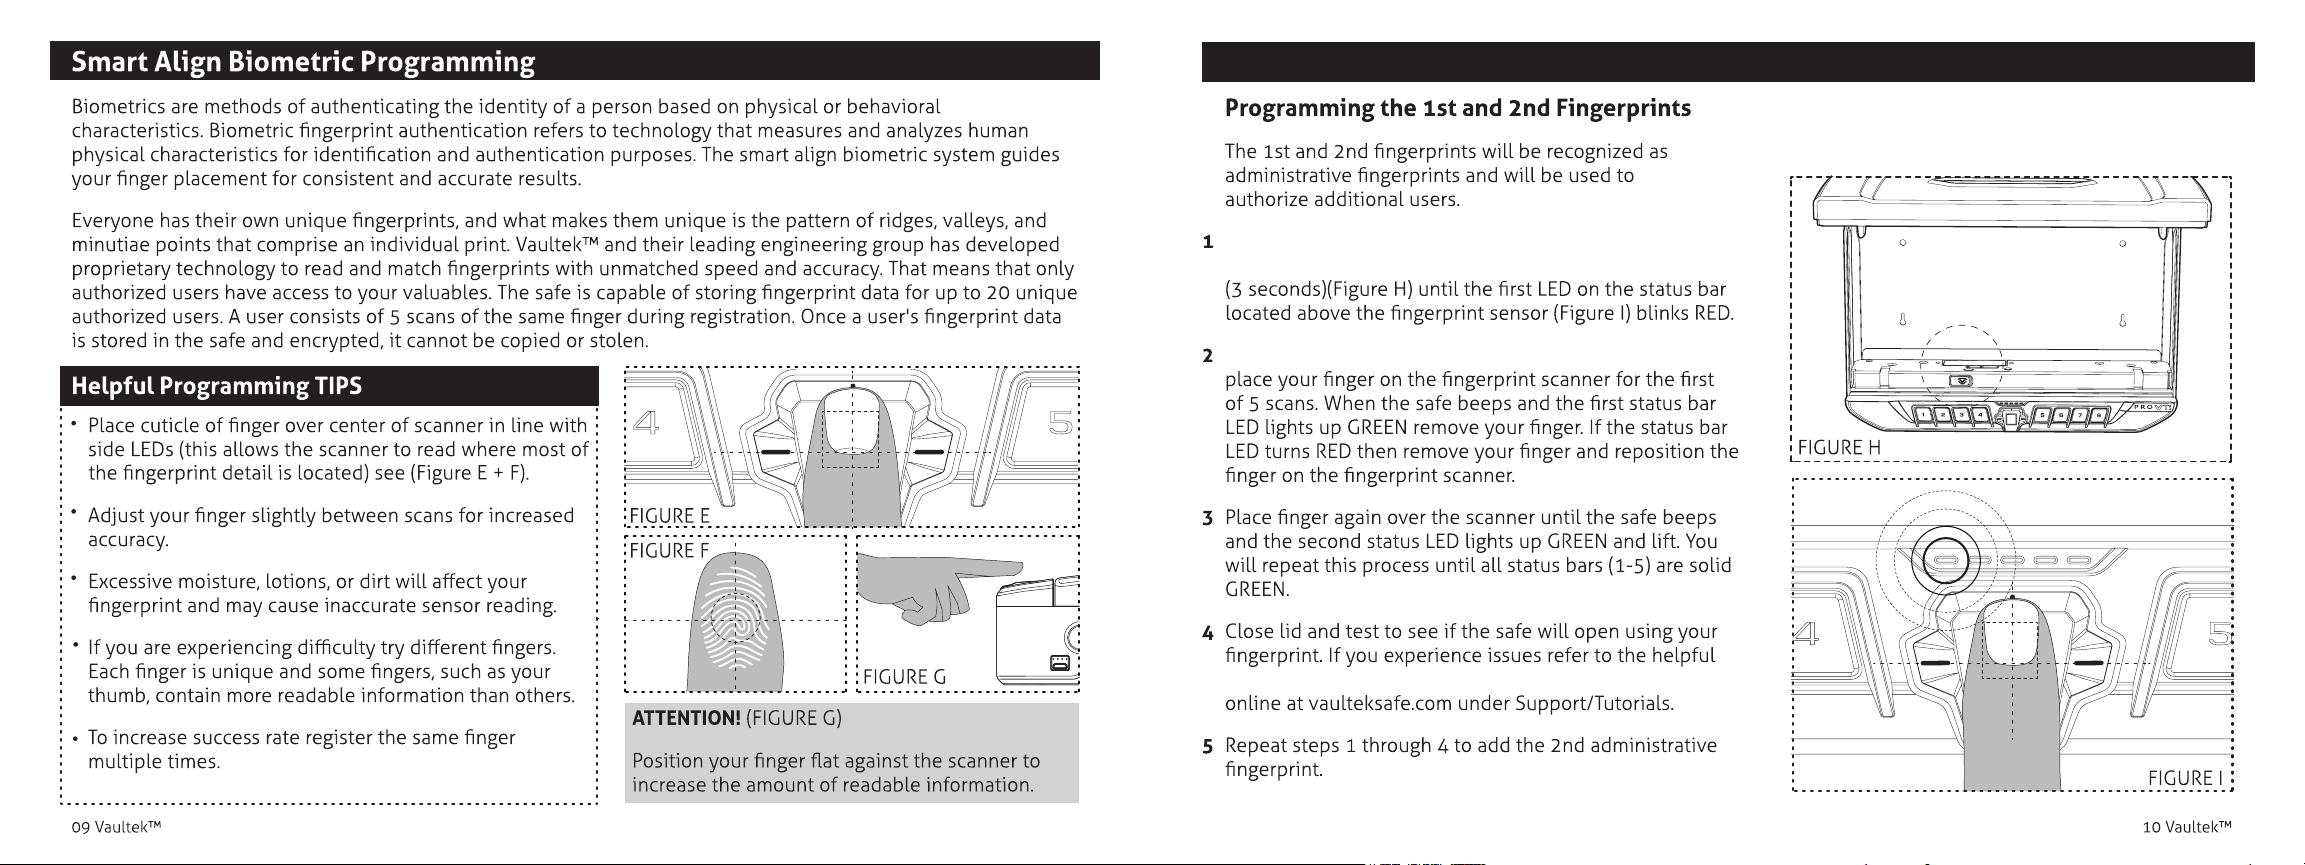
Open the safe. Program 1st ngerprint by pressing and
holding the '2' key then the "PROGRAM" button together
Using the helpful programming tips provided on page 09
programming tips listed on page 09 or check our tutorials
Page 9
Open the safe. Program additional ngerprints by pressing and holding the '2' then "PROGRAM" button together
(3 seconds)(Figure H on page 10). The entire status bar will blink RED prompting you to scan one of the
administrative ngerprints.
Using the helpful programming tips provided on page 09 place the NEW nger on the scanner. When the safe
beeps and the rst LED in the status lights up GREEN remove your nger.
Press and hold the '3' key then the "PROGRAM" button together until all the status bar LEDs light up RED and
let go.
Page 10
Remote Key Fob Operation
Continue on next page for more information about the remote key fob.
Your Vaultek™ safe supports quick access with the included remote key fob. Take caution when using this
feature and be responsible. Security can be compromised in the event the key fob is lost or stolen. Only pair
the key fob after thoroughly understanding the inherent risks.
IMPORTANT
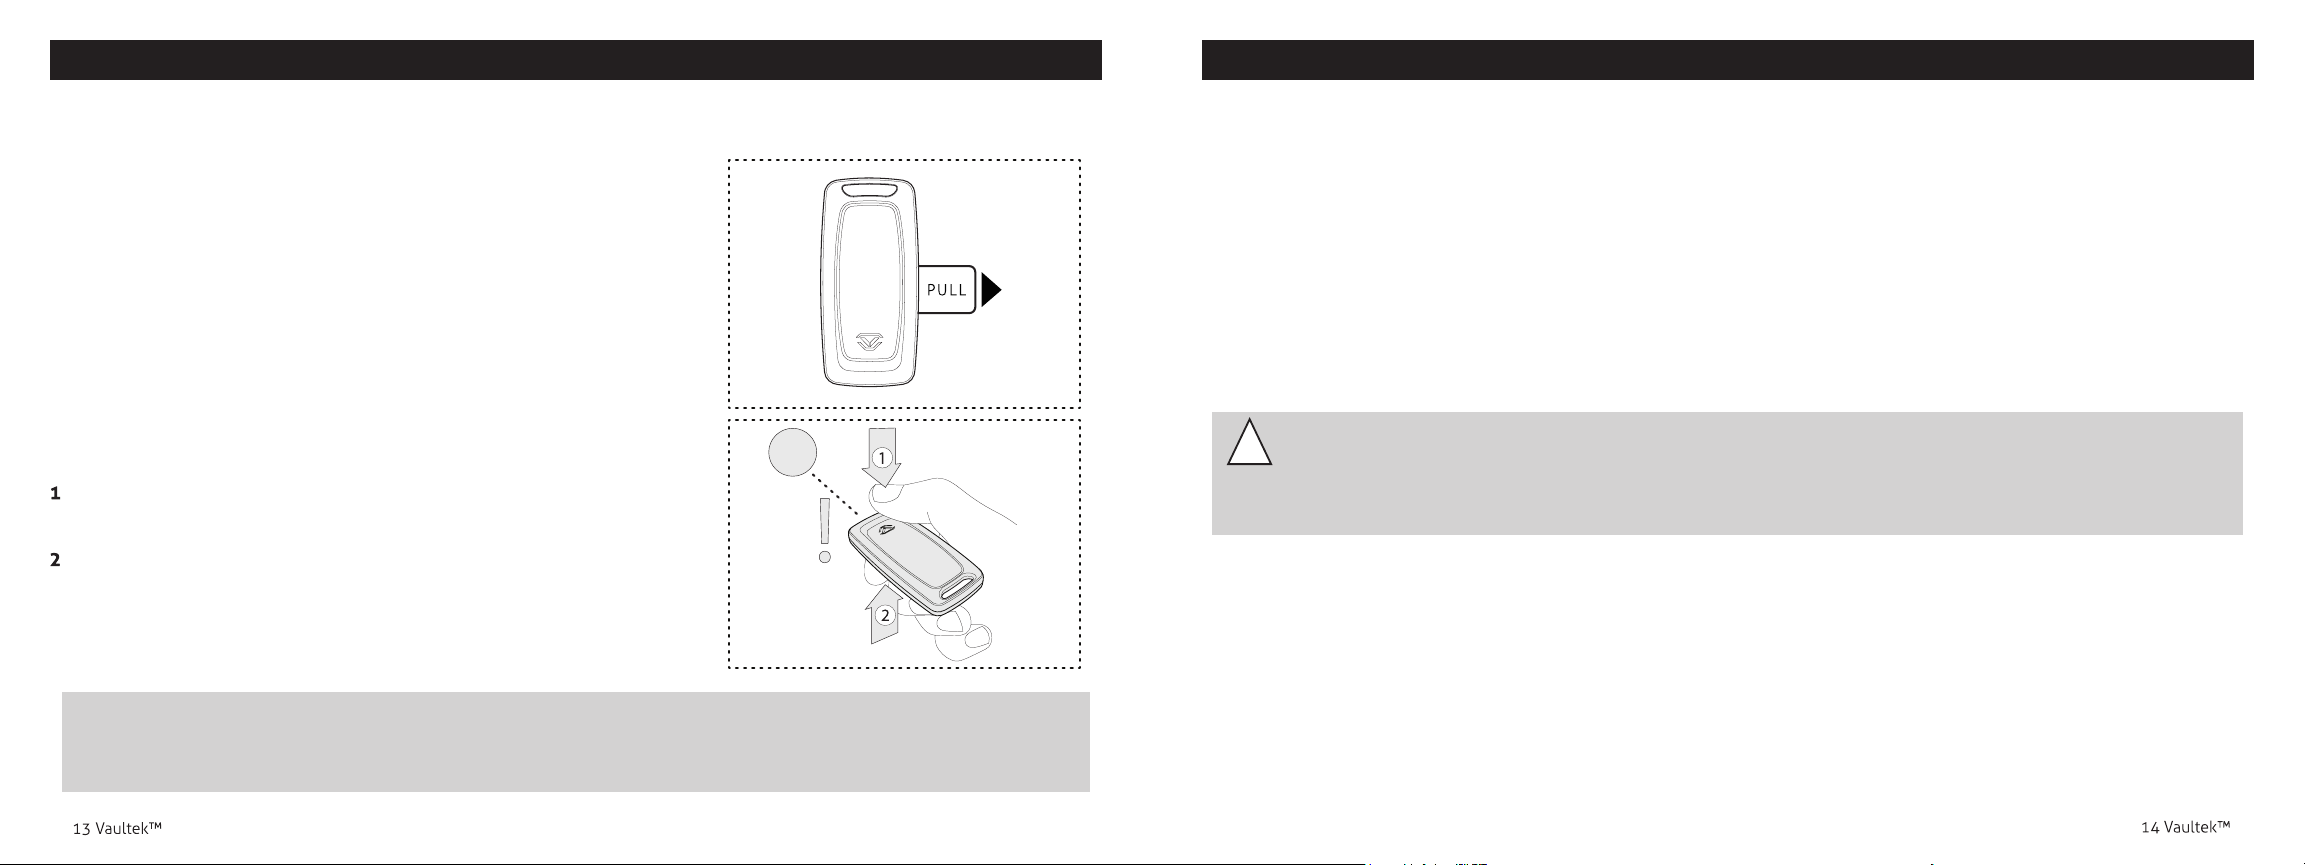
Before you can pair the key fob to your safe connect the pre-installed
battery by removing the pull tab from the side of the key fob (Figure J).
Remote Key Fob Pairing
Note: As a security measure to prevent accidental access, you must
press both sides of the fob simultaneously to activate referred to as
a dual press. This dual press is required for the pairing process as well
as anytime the key fob is used to open the safe. Following this
procedure will pair the key fob to your safe.
Press and hold the '5' key then "PROGRAM" button together (3 seconds)
until all status bar LEDs blink GREEN.
Aim the fob toward the safe and press both sides of the fob together
(Figure K). If all the lights on the status bar glow GREEN, the fob is
paired successfully; if all lights on the status bar blink RED, the fob
failed to pair. In this case, simply start over with step one.
IMPORTANT
The key fob functions in close proximity to safe and has a short range of approximately 5 feet (Figure K).
After pairing the key fob will be immediately active to test functionality and then turn o. Key fob will need to be
set to either On Demand or Progressive mode see page 14 for more information.
FIGURE J
5FT
FIGURE K
Toggle Key Fob Access Modes
After pairing you can toggle between access modes from the keypad or Bluetooth app. To toggle from the keypad
press and hold the '6' key then "PROGRAM" button together. The status bar will communicate as directed below.
OFF - Status Bar LEDs Turn Solid RED
Progressive Entry Mode - Status Bar LEDs Blink GREEN
Safe goes into sleep mode and will require you to wake up the safe before using key fob. You can wake up the
safe by pressing any key or brushing your hand across the keypad of the safe (backlit keys will turn RED).
On Demand Entry Mode - Status Bar LEDs Solid GREEN
This mode grants immediate access to your safe without having to wake it up.
Warning: On Demand Entry Mode can open a safe in another room and/or out of sight. To reduce risk of
!
an unattended open safe we recommend using Progressive Entry Mode.
On Demand Entry Mode requires signicant power usage and can greatly reduce operation time. We
suggest setting the key fob to Progressive Entry Mode to conserve battery.
To Unpair Remote Key Fob
NOTE: Disabling the remote key fob function from the app or keypad will NOT delete a paired fob from the safe's
memory. In the event a key fob is lost or stolen, you can delete the lost fob from the safe's memory by using a
couple dierent methods:
Press and hold '5' key then "PROGRAM" button together (3 seconds) until all status bar LEDs blink GREEN. This is
A
the same sequence used when initially pairing. After the status bar LEDs blink GREEN for 6 seconds the safe will
delete a paired key fob from memory.
B
Anytime a new key fob is paired with the safe, the previous fob will be erased from the safe's memory.
Page 11
Remote Key Fob Operation Continued
!
Multiple Safe Management
A
Multiple safes can pair with the same key fob but multiple key fobs can not pair with one safe.
Recommended setting when using the key fob is Progressive Entry Mode.
B
C
Additionally you can manage multiple safes through the Vaultek™ app.
CAUTION when managing multiple safes in On Demand Entry Mode there is a chance you can open all safes
within range.
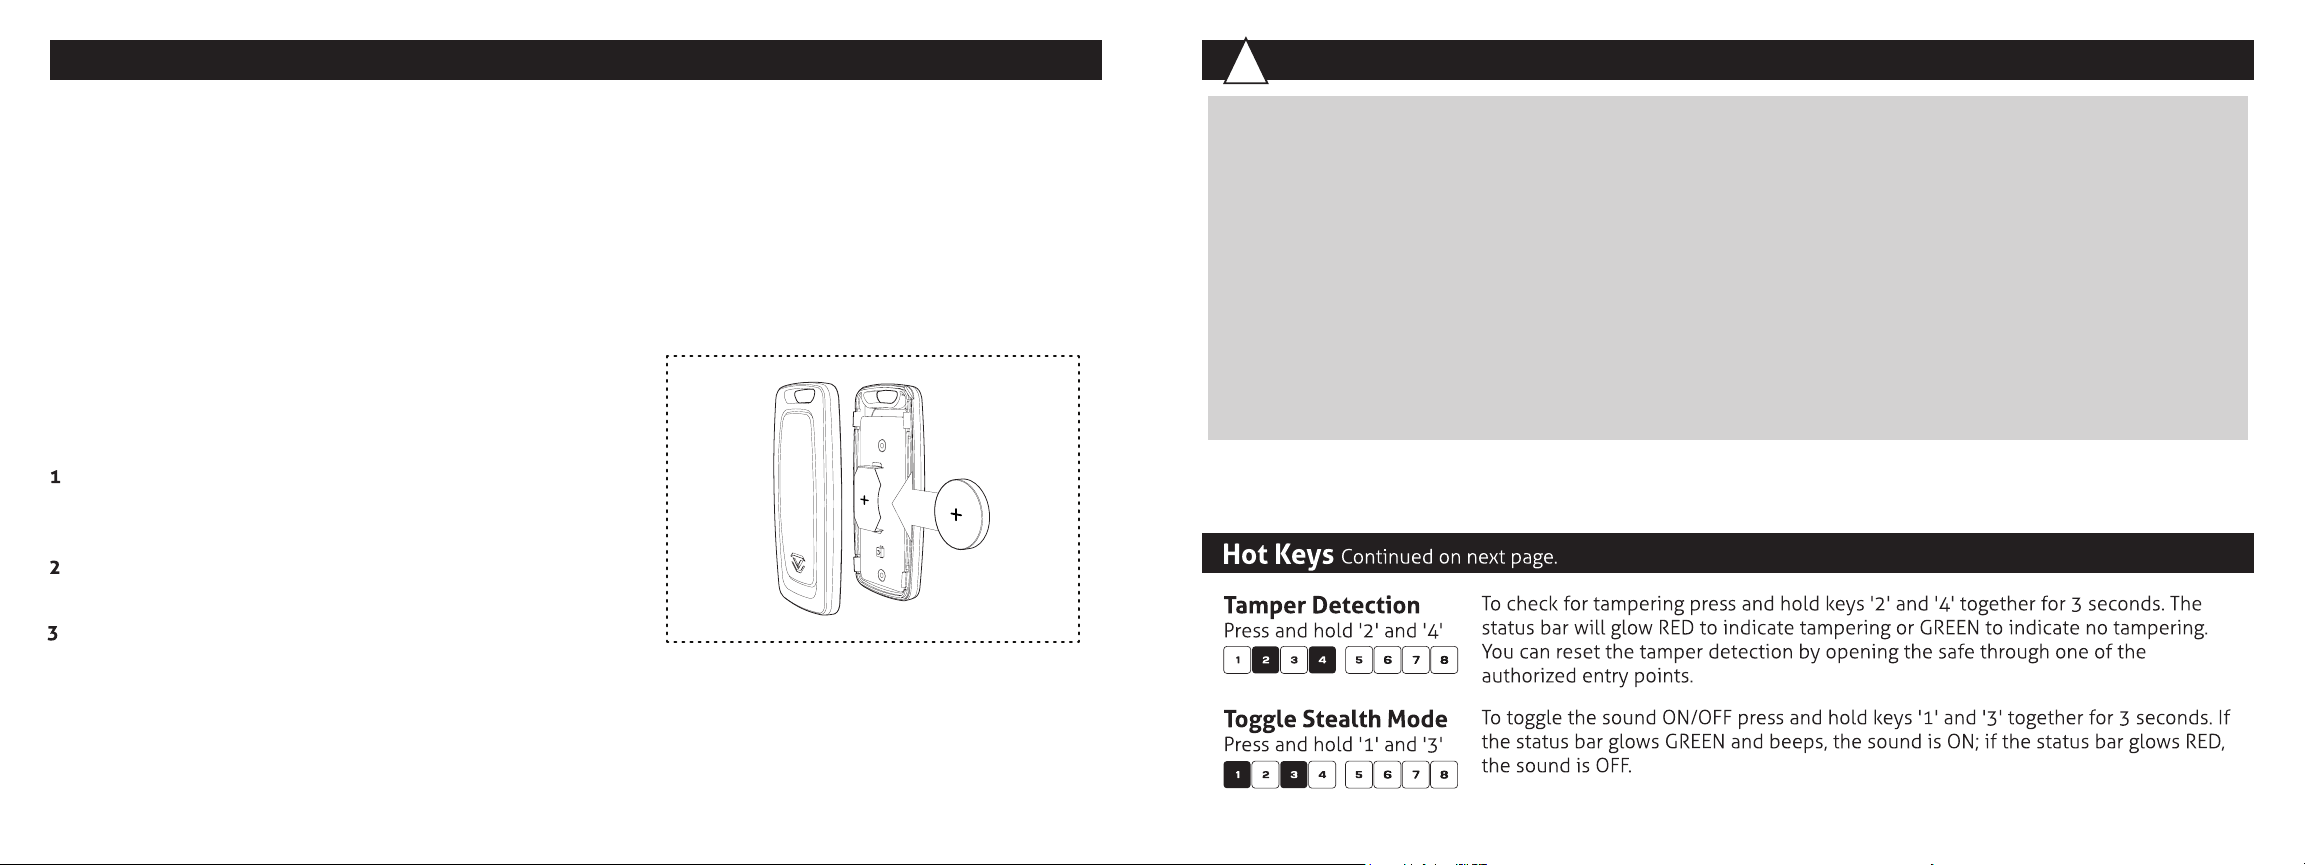
Battery Replacement
The pre-installed battery will last approximately two years
before requiring replacement. When needed follow the steps
below to complete replacement.
Carefully separate the remote body with a small coin or
your hand starting near the top of the remote at the
designated coin slot.
Remove old battery and install a new model CR2032
battery (Figure L).
Assemble remote back together.
FIGURE L
Key Fob Warnings
Take caution when using this feature and be responsible. Security can be compromised in the event the key
fob is lost or stolen. Only pair the key fob after thoroughly understanding the inherent risks.
WARNING anyone including children can access the safe via key fob.
ALWAYS unpair the key fob in the event it is lost or stolen.
WARNING On Demand Entry Mode can open a safe in another room and/or out of sight. To reduce risk of an
unattended open safe we recommend using Progressive Entry Mode.
IMPORTANT On Demand Entry Mode requires signicant power usage and can greatly reduce operation time
on a single charge. We suggest keeping the safe in Progressive Entry Mode. If using On Demand Entry Mode try
keeping the safe plugged in.
15 Vaultek™
16 Vaultek™
Page 12
Toggle Bluetooth
Press and hold '4' then
"PROGRAM" button
Toggle Key Fob
Modes Press and hold '6'
then "PROGRAM" button
To toggle the Bluetooth ON/OFF press and hold the '4' key then "PROGRAM" button
together for 3 seconds. If the status bar glows GREEN Bluetooth is ON. If the status
bar glows RED Bluetooth is OFF. If Bluetooth is toggled OFF all app functions will be
disabled and your safe is undiscoverable.
Delete Fingerprints
Press and hold '3' then
"PROGRAM" button then
enter master code
17 Vaultek™
If 2 LEDs glow green: 20%-40%
To delete ngerprints press and hold the '3' key then "PROGRAM" button together
until all status bar LEDs light up RED then enter your master code. This will remove
all the ngerprints. You can delete individual ngerprints in the Vaulteke™ app.
Toggle DMT
Sensitivity Press and
hold '7' then "PROGRAM"
button
Toggle Dual
Entry Mode
Press and hold '8' then
"PROGRAM" button
holding the '6' key then "PROGRAM" button together for 3 seconds will allow you
holding the '7' key then "PROGRAM" button together for 3 seconds. If all FIVE lights
To toggle the Dual Entry ON/OFF press and hold the '8' key then "PROGRAM"
18 Vaultek™
Page 13
Vaultek™ App
The Vaultek™ app lets you get the most out of your Vaultek™ safe. Using the app gives you access and control
over features that are not possible using the keypad interface alone.
Get the App
Download and install the Vaultek™ app for free from the Google Play Store, or Apple Store.
IMPORTANT
You must be within Bluetooth range and connected to your Vaultek™ safe before any of the features
will function.
Pattern Lock
The pattern lock is an added layer of protection to safeguard your safe and prevent unauthorized access in the
event your phone is misplaced. To create a pattern lock, simply drag your nger along the screen to connect at
least 4 circles. This unique pattern will be required when opening the app.
Pair with Your Vaultek™ Safe
Be sure to pair your safe to your smartphone as soon as possible to sync the systems. Once paired you will gain
access to the safes settings to adjust, toggle, and track any changes made to the safe. Note, any changes made
prior to the safe connecting to the app will reect the time stamp from the safes default clock, and may not
match your phones clock.
From the device, make sure Bluetooth is ON and discoverable by other devices.
Open the app, and follow the steps to pair your safe.
20 Vaultek™19 Vaultek™
Page 14
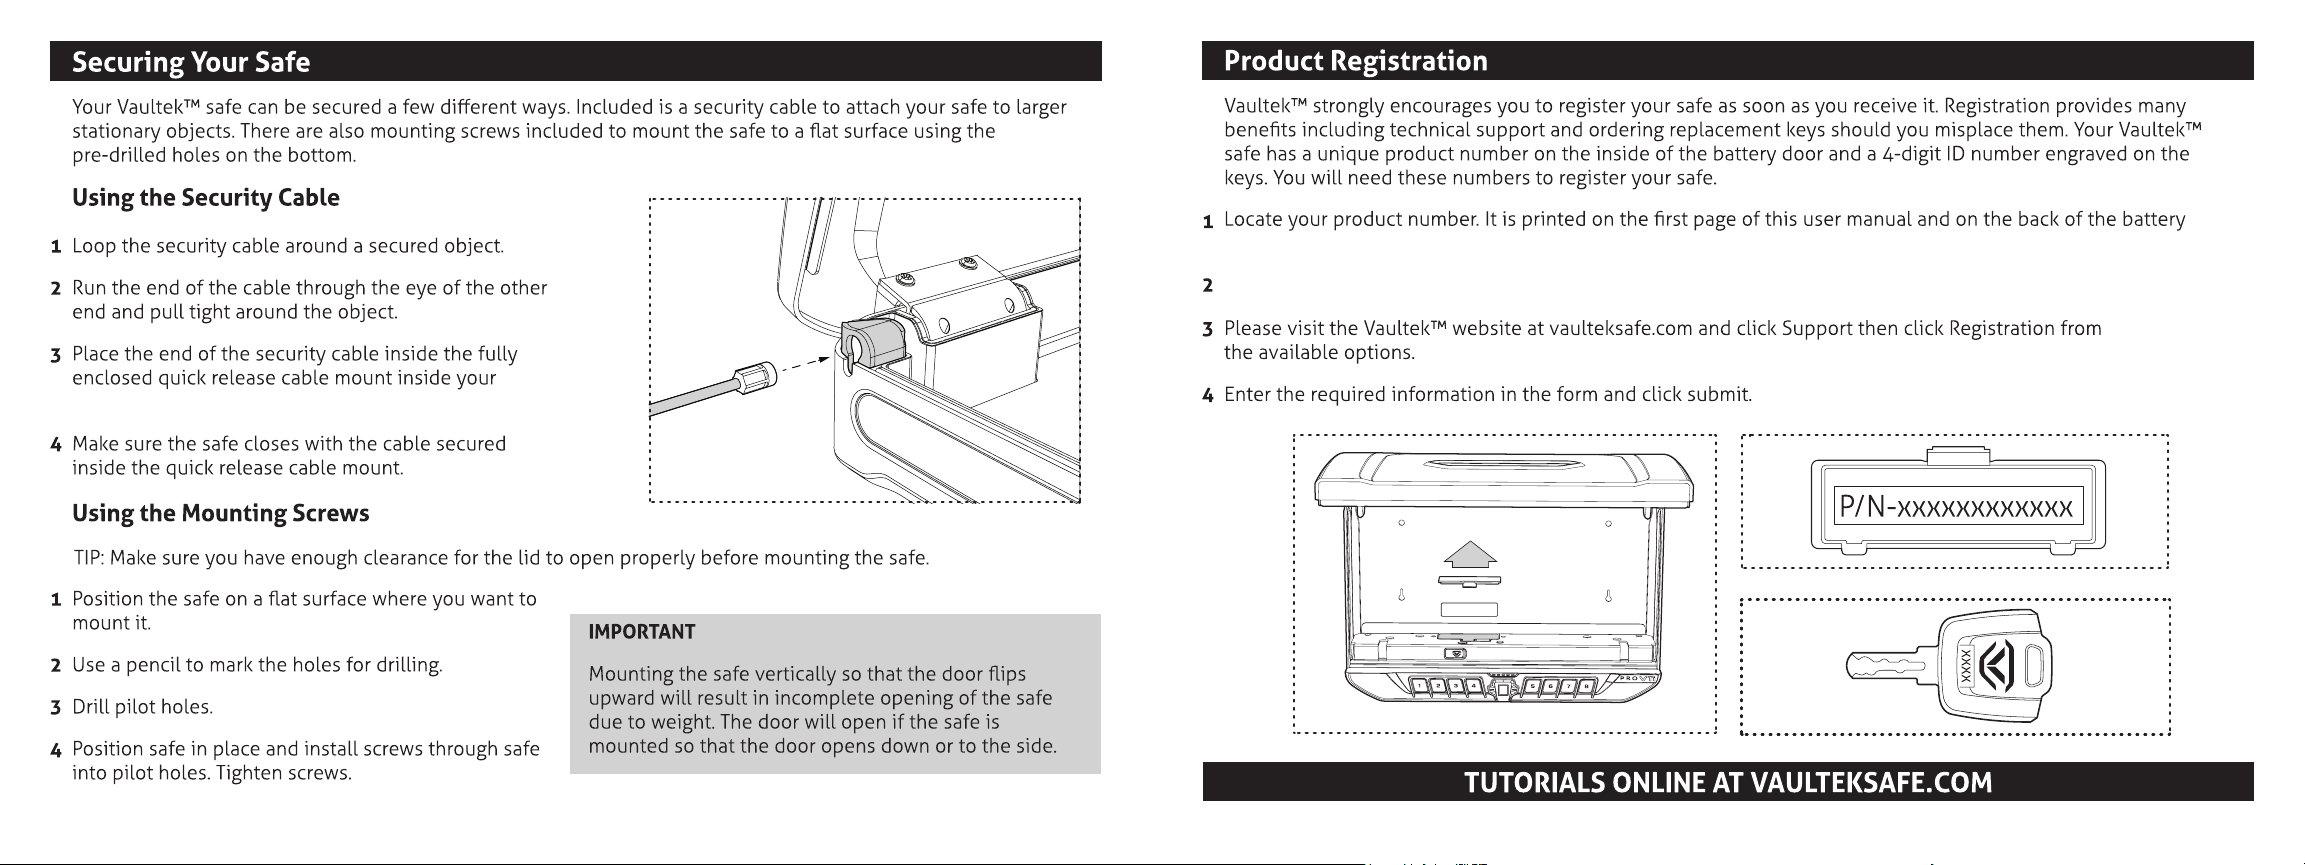
Vaultek™ safe as shown in (Figure M).
door (Figure N/O).
Find your 4-digit ID number engraved on the keys (Figure P).
FIGURE O
FIGURE M
21 Vaultek™
FIGURE N
FIGURE P
22 Vaultek™
Page 15
Q: How do I secure the app?
A: The app has a built in security pattern lock feature to prevent someone from opening your phone and
accessing the safe. Refer to page 19 for more information.
Q: How do I improve ngerprint success rate?
A: Refer to page 09 for tips.
23 Vaultek™
24 Vaultek™
Page 16
Fingerprint scanner works sometimes and not others.
A: We have a few suggestions to help improve the success rate on page 09.
A. Remove the battery and reinstall. This is a soft reset for the safe. See if you are able to open the safe using the
default code 1-2-3-4 or even reprogram the safe's master code. If you are still experiencing issues contact us at
[email protected]
contact us at [email protected].
See page 07 for more details.
25 Vaultek™
26 Vaultek™
Page 17
27 Vaultek™ REV061317-007
Page 18

 Loading...