

Page 1
Page 2
a
The distance between user and products should be no less than 20cm
Page 3

b
NOT FOLLOWING ALL INSTRUCTIONS IN THIS USER MANUAL WILL VOID
MANUFACTURER’S ORIGINAL PRODUCT WARRANTY:
I. SAFETY & PRECAUTION ……………………………………………………………………. i
II. WARNING ……………………………………………………………………………………….. ii
III. IMPORTANT INFORMATION …………………………………………………………… iii
IV. POSITIONING TV SET ……………………………………………………………………… iv
V. TABLE OF CONTENTS ………………………………………………………………………. v
TV Model:_______________________
Date of Purchase:_________________
Page 4

i
I. SAFETY & PRECAUTION
1. Read these instructions.
2. Keep these instructions.
3. Heed all warnings.
4. Follow all instructions.
5. This apparatus with CLASS II construction.
6. Do not use this apparatus near water. The apparatus shall not be
exposed to dripping or splashing of liquids, and no objects filled with
liquid, such as vases, shall be placed on the apparatus.
7. Clean only with dry cloth.
8. Do not install this apparatus in windtight places such as the wall-unit.
9. Do not block any ventilation openings.
10. Do not install near any heat sources such as radiators, heat
registers, stoves, or other apparatus (including amplifiers) that produce
heat.
11. Do not defeat the safety purpose of the polarized or grounding-type
plug.
12. A polarized plug has two blades with one wider than the other. A
grounding type plug has two blades and a third grounding prong. The
wide blade or the third prong are provided for your safety. If the provided
plug does not fit into your outlet, consult an electrician for replacement of
the obsolete outlet.
13. Protect the power cord from being walked on or pinched particularly
at plugs, convenience receptacles, and the point where they exit from the
apparatus.
14. Only use attachments/accessories specified by the manufacturer.
Use only with the cart, stand, tripod, bracket, or table specified by the
manufacturer, or sold with the apparatus. When a cart is used, use
caution when moving the car/apparatus combination to avoid injury from
tip-over. Unplug this apparatus during lightning storms or when unused
for long periods of time.
15. Refer all servicing to qualified service personnel. Servicing is
required when the apparatus has been damaged in any way, such as
power-supply cord or plug is damaged, Iiquid has been spilled on the
equipment/parts, objects have fallen into the apparatus, TV/equipment
has been exposed to rain or moisture, does not operate normally, or has
been dropped causing internal/external damage to its parts.
Page 5
ii
II. WARNING
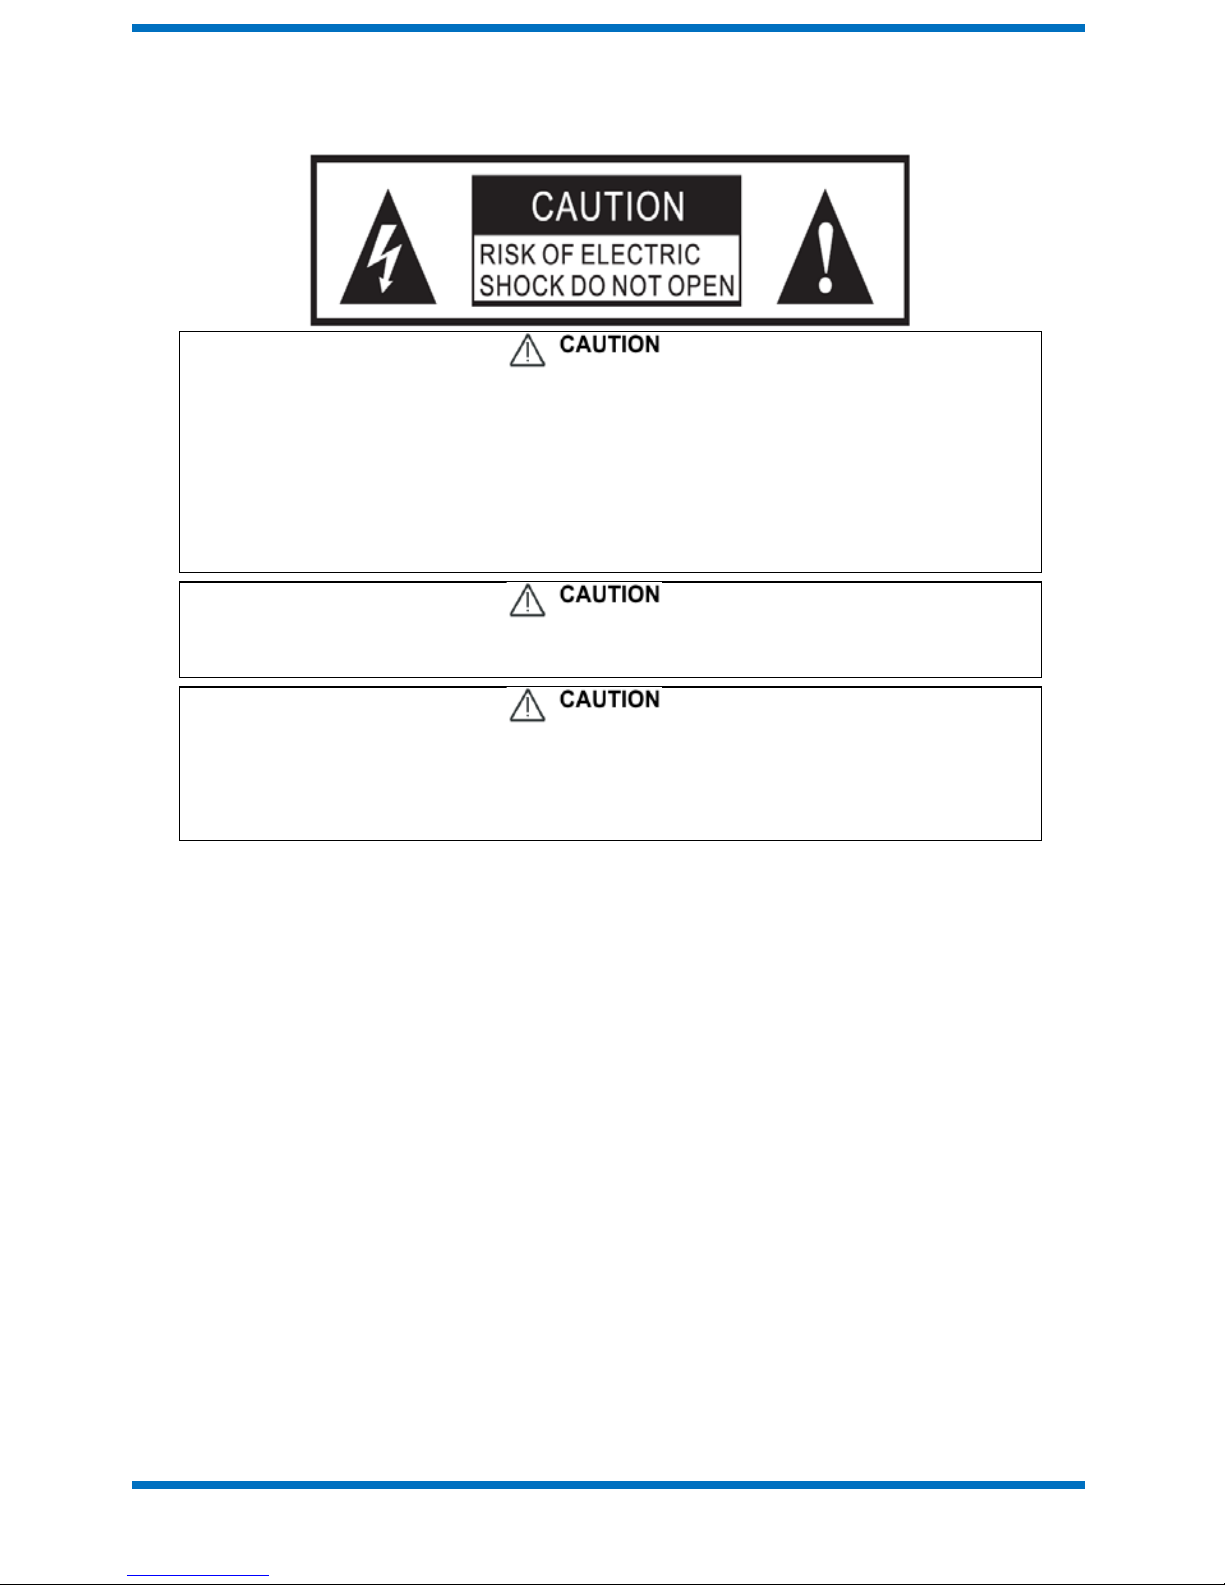
To reduce the risk of electric shock, do not remove cover or back p anel. There
are no user serviceable parts inside. Refer to qualified service personnel.
Danger of explosion if battery is incorrectly replaced. Replace only with
the same or equivalent type.
Batteries shall not be exposed to excessive heat such as sunshine, fire, or
the like.
Used batteries should not be thrown into the garbage can, please leave
them
at an appropriate depot.
Where the MAINS plug or an appliance coupler is used as the disconnect
device, the disconnect device shall remain readily operable.
These servicing instructions are for use by qualified service personnel
only. To reduce the risk of electric shock, do not perform any servicing
other than that contained in the operating instructions unless you are
qualified to do so.
Attention:
Motionless picture might cause permanent damage to the display.
• Be sure not to display motionless pictur e on the LED TV for more than 2
hours, because it would cause picture rem nants to appear, which is called
"screen burns". To avoid such picture remnants, please decr ease the “contrast”
and “brightness” of the display when displaying motionless picture.
• While watching TV prog ram in 4:3 size mode for a long time, there would be
traces on the edge of the screen's left, right and center parts because of different
transmission of the light on the screen. Similar impact on the screen will occur
when playing DVD or connecting games control. Products damaged by these
reasons cannot be guaranteed for maintenance.
• It might cause picture remnants to displ ay electronic games and motionless
picture of PC more than a period of time. To avoid such effect, please decrease
the “contrast” and “brightness” when displaying motionless
picture.
Page 6

iii
III. IMPORTANT INFORMATION
If a television is not positioned in a sufficiently stable location, it can be
potentially hazardous due to falling. Many injuries, particularly to children,
can be avoided by taking simple precautions such as:
•
Using cabinets or stands recommended by the manufacturer of the
television or television stands.
•
Only using furniture that can safely support the television.
•
Ensuring the television is not overhanging the edge of the supporting
furniture.
•
Not placing the television on tall furniture (for example, cupboards or
bookcases) without anchoring both the furniture and the television to a
suitable support.
•
Not standing the televisions on cloth or other materials placed between
the television and supporting furniture.
•
Educating children about the dangers of climbing on furniture to reach
the television or its controls.
•
Each USB terminal should be loaded with 0.5A under normal operation.
•
Do not attach candle to accessible opening area, to avoid flammable
foreign material from entering the TV.
•
Allow minimum distances around the apparatus for sufficient ventilation.
•
The ventilation should not be impeded by covering the ventilation
openings with items, such as newspapers, tablecloths, curtains, etc.
•
No naked flame sources, such as lighted candles, should be placed on
the apparatus.
•
Attention should be drawn to the environmental aspects of battery disposal.
•
The use of apparatus in tropical and/or moderate climates.
•
To avoid damage, put the TV in the environment of moderate
temperature and be careful not to place it beside an air conditioner
outlet or a stove.
•
Use both hands when carrying TV to exert balanced and stable force
from its exterior.
Page 7
iv
IV. POSITIONING TV SET
•
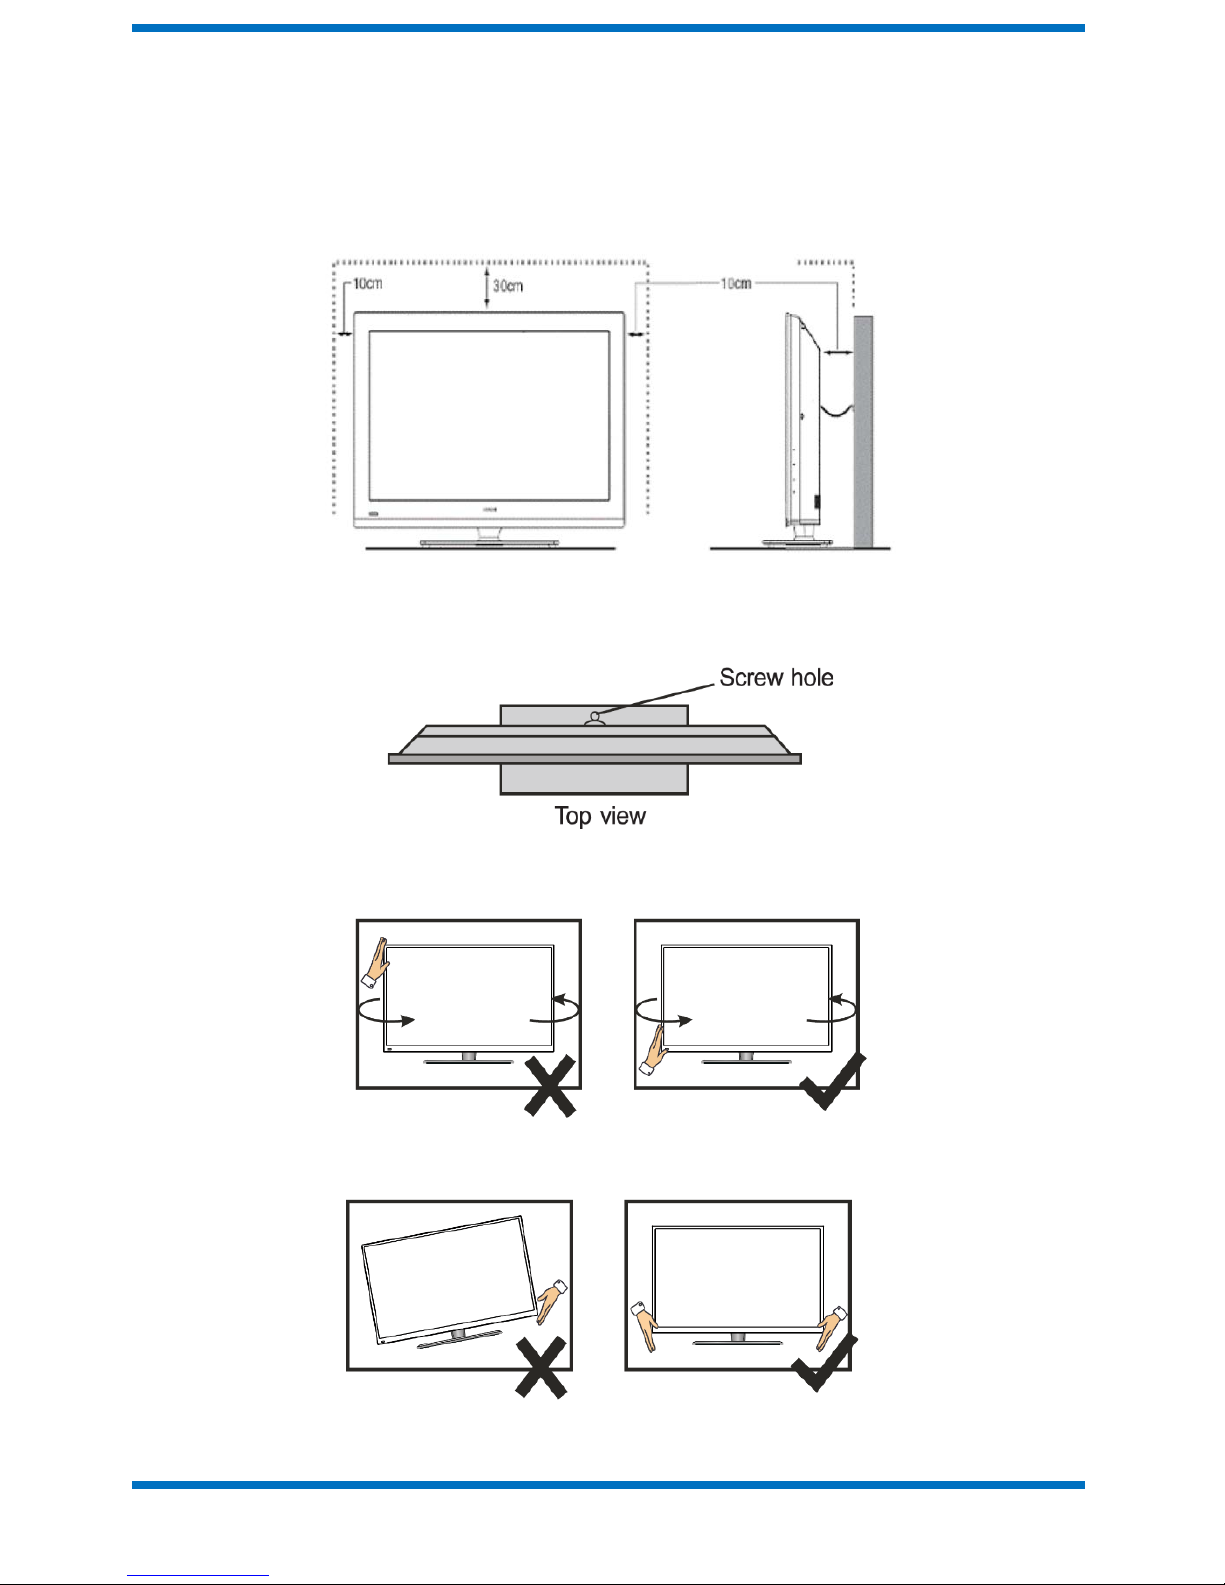
Place the TV on a firm and fiat surface, leaving s space of at least 10cm
around the set and 30cm from the top of tile set to the wall or cabinet.
Ensure the TV is positioned close to the wall to avoid it from falling when
pushed.
•
To avoid the TV overturning, when installed, screw through screw hole on
the base for fixing TV on the desk.
•
When turning the TV set, hold the bottom side. Do not hold the top side
of the TV.
•
When lifting the TV set, lift the TV set by two hands. Do not use one
hand to handle it.
Page 8

v
V. TABLE OF CONTENTS
1. Connection and Preparation of TV 1
1.1. Accessories 1
1.2. Installation and Stand 1
1.3. Installation of Wall Mount Kit (Optional) 1
1.4. Keys and Interfaces 2
1.5. TV Specifications 4
1.6. Installation of Batteries 6
1.7. Remote Control Key Functions 6
2. Basic Operation 7
2.1. Setting of Standby Mode 7
2.2. Selection of Input Mode 7
2.3. Menu Option Adj us t ment 7
2.4. Android 8
2.4.1. Add Application 8
2.4.2. Media Function 8
2.4.3. System Setting 8
3. Technical Specification 9
4. Supported Signal Modes 10
5. Simple Troublesho ot ing 11
6. Reordering Parts 12
Page 9
1
1. Connection and Preparation of TV
1.1. Accessories
1.1.1. User Manual x 1
1.1.2. Remote Control x 1
1.1.3. Battery (AAA) x 2 (Optional)
1.1.4. Stand x 1 (Included screws x4)
1.1.5. Wall Mount K i t x 1 (Not included)
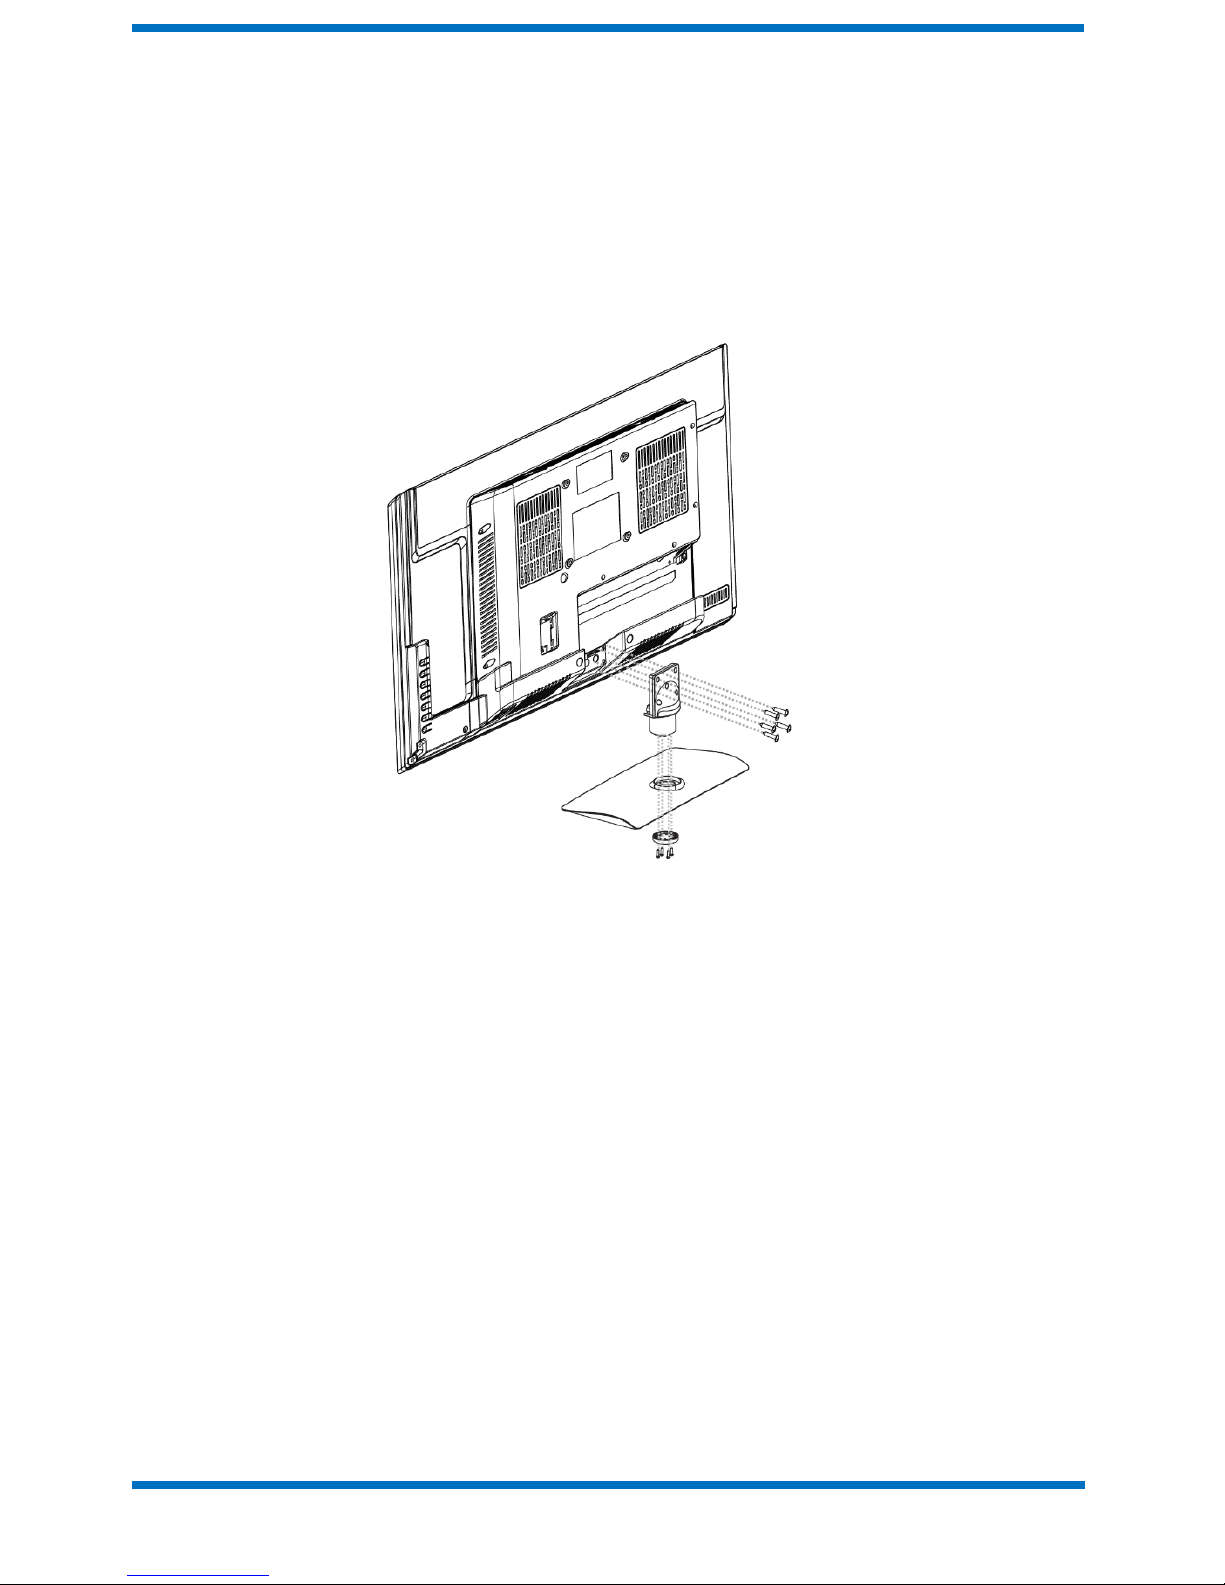
1.2. Installation of Stand
Note: The pattern for
Reference only
1.2.1. Place the TV with the f ront panel facing downwards on the soft
cloth or soft pads on a desk.
1.2.2. Please put the PVC sticker on t he turning axle first.
1.2.3. Insert the stand into the bottom socket of the TV.
1.2.4. Insert the screws into the sockets and lighten them.
1.3 Installation of Wall Mount Kit (Optional)
1.3.1. The Wall Mount Kit can help install the TV on the wall.
For more information about wall mounting, please refer to the
instructions provided along with the wall mount kit.
1.3.2. When wall mounting the product, contacting q ualified personnel
is highly recommended to avoid an injur y or damaging the TV set.
1.3.3. If users choose to install the TV on their own, the
manufacturer(s) will not be held responsible or liable for any possible
damages caused either to the product or to persons.
Page 10
2
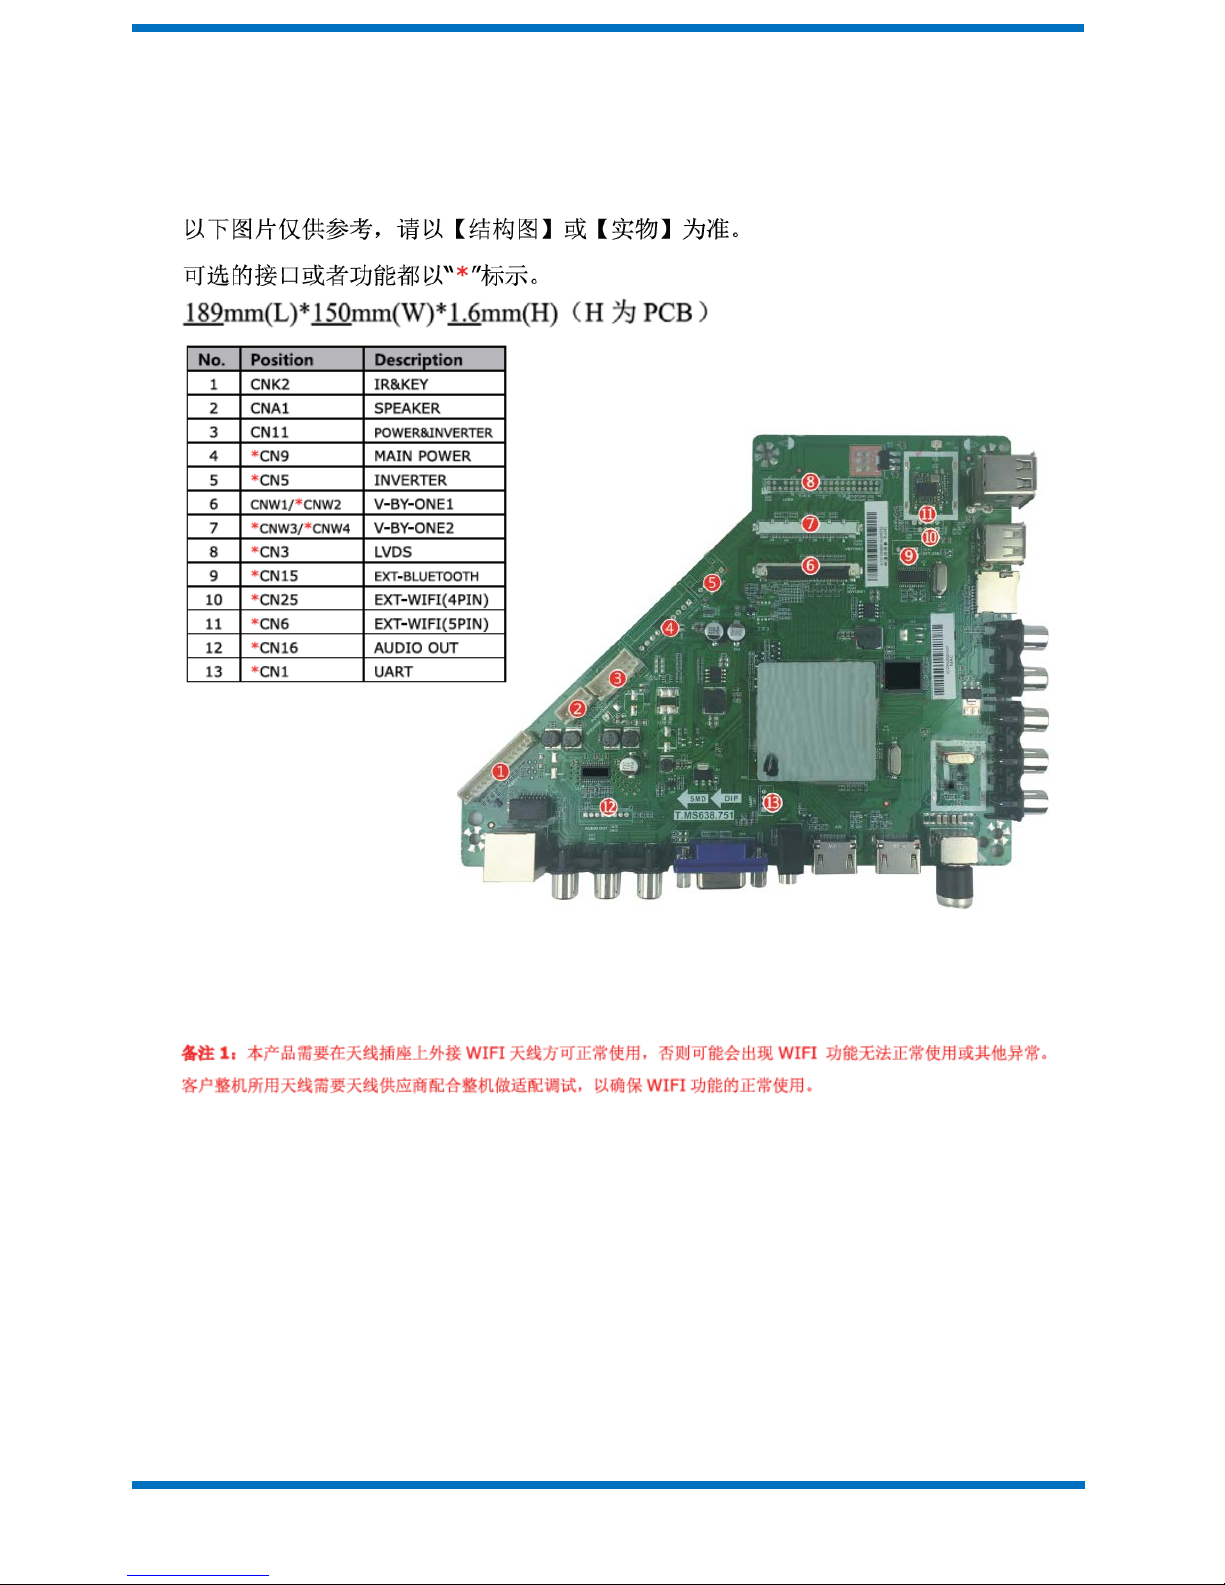
1.4. Keys and Interfaces
1.4.1. Board Picture
Pictures are for reference only, specific to the TV model.
The optional connectors and functions are marked with “*”.
Notes 1: To ensure the normal use of the pr oduct, connect external WIFI antenna
with the antenna connector; otherwise, the WIFI may not work properly. Consult the
WIFI antenna supplier to ens ure normal use of the WIFI function.
Note 2: This product meets GB8898-2011 requirements of the insulation re sistance
between the tuner and PGND . Please do not connect RF with m etal IO sheet or the
GND of the main board when assembling this TV set for use.
Page 11
3
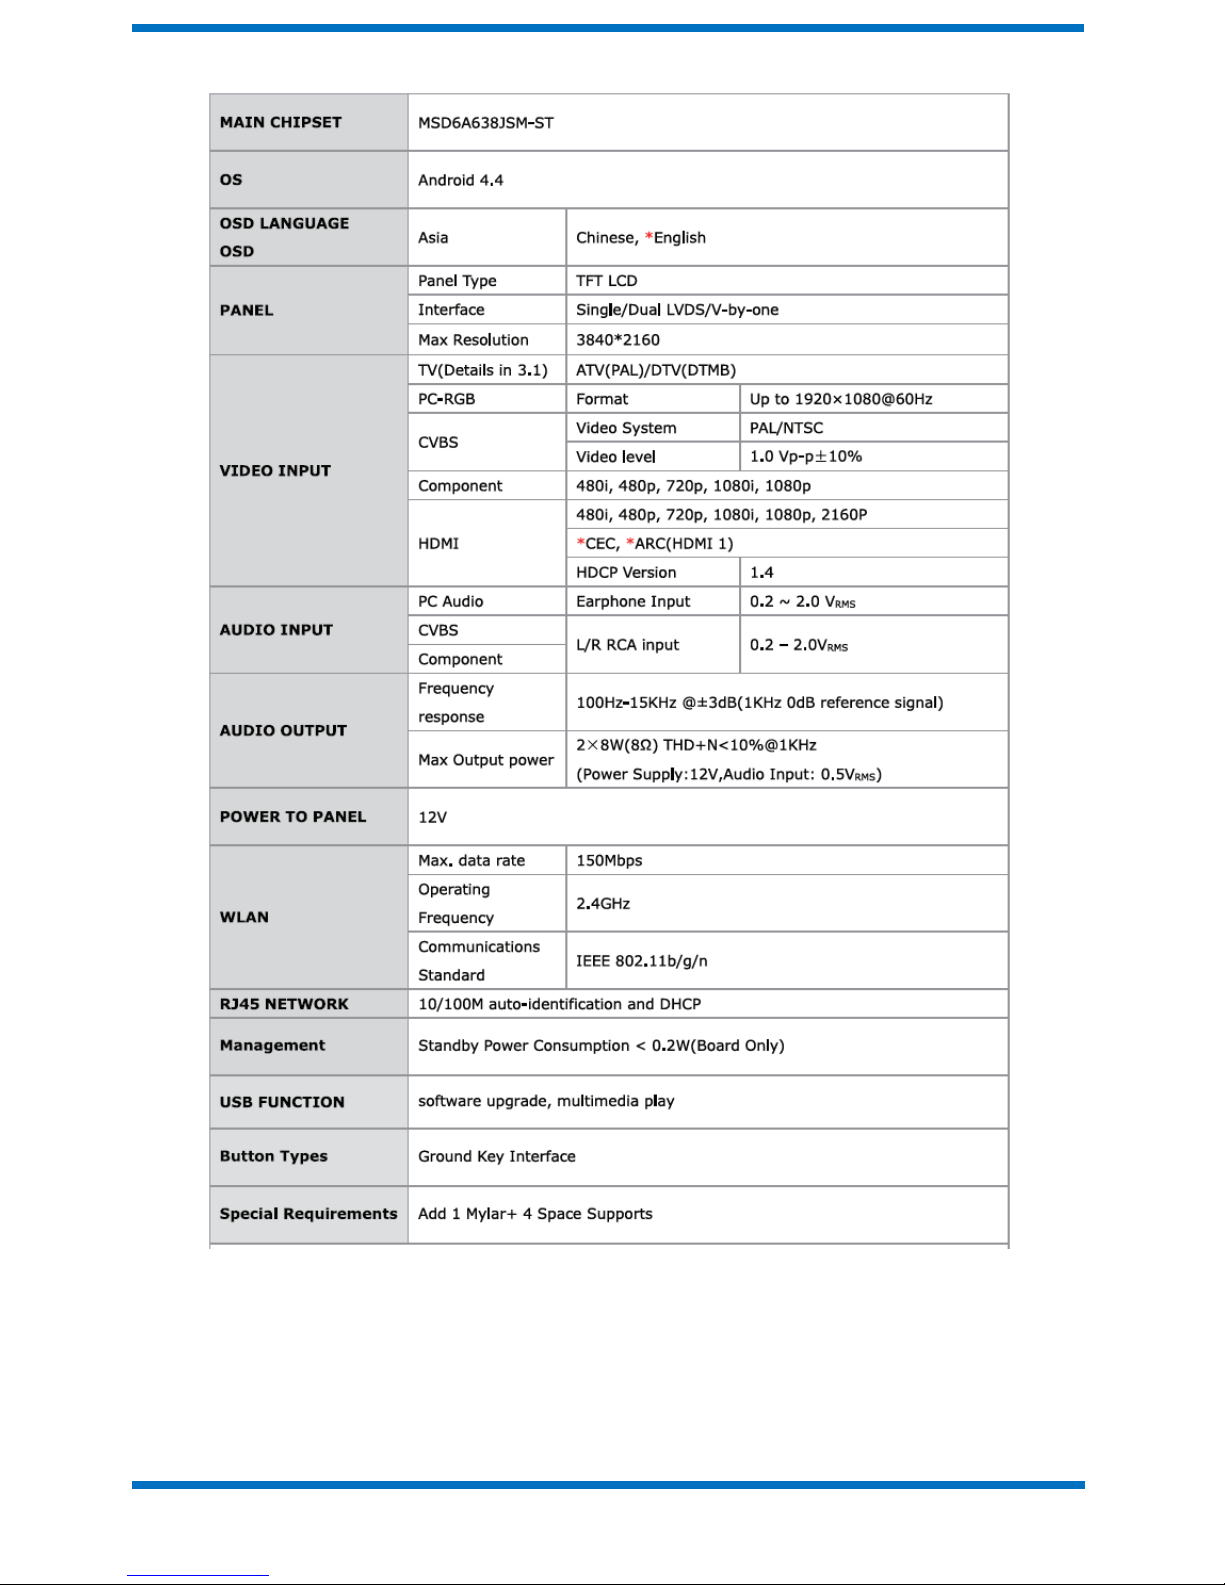
1.4.2. TV Features
Note: 1. Licenses involved in specifications above are supposed to be obtained by
customers themselves.
2. When 3.3V panel Irush ≥ 1000mA, Inormal ≥ 600mA, please contact CVTE engineers
to confirm 3.3V panel power supply component selection.
3. Max current of USB2.0: 500mA. Large impact current of USB device (exceeds
500mA) may lead to board working abnormally.
4. The normal operating current of 5V panel ≤ 1500mA.
Page 12
4
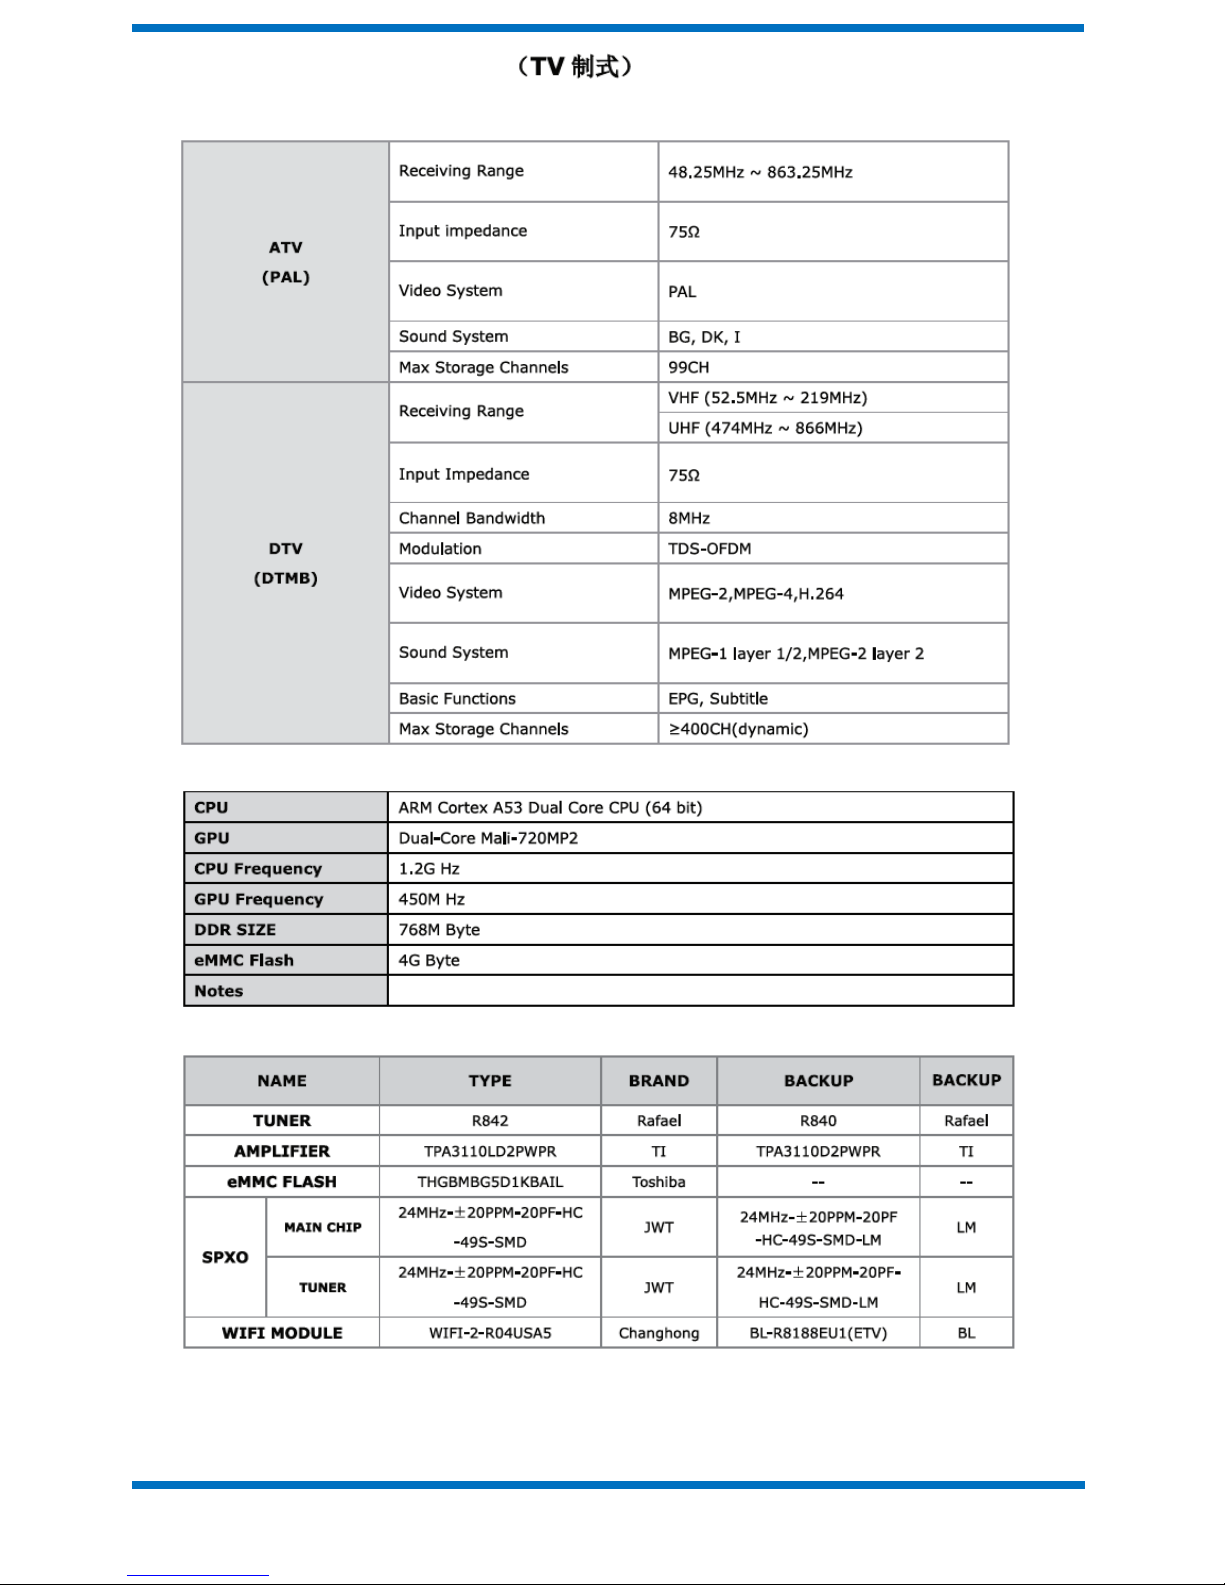
1.5. TV Specifications
1.5.1. TV System
1.5.2. TV Hardware Configuration
1.5.3. Critical Materials of TV Parts
Page 13
5
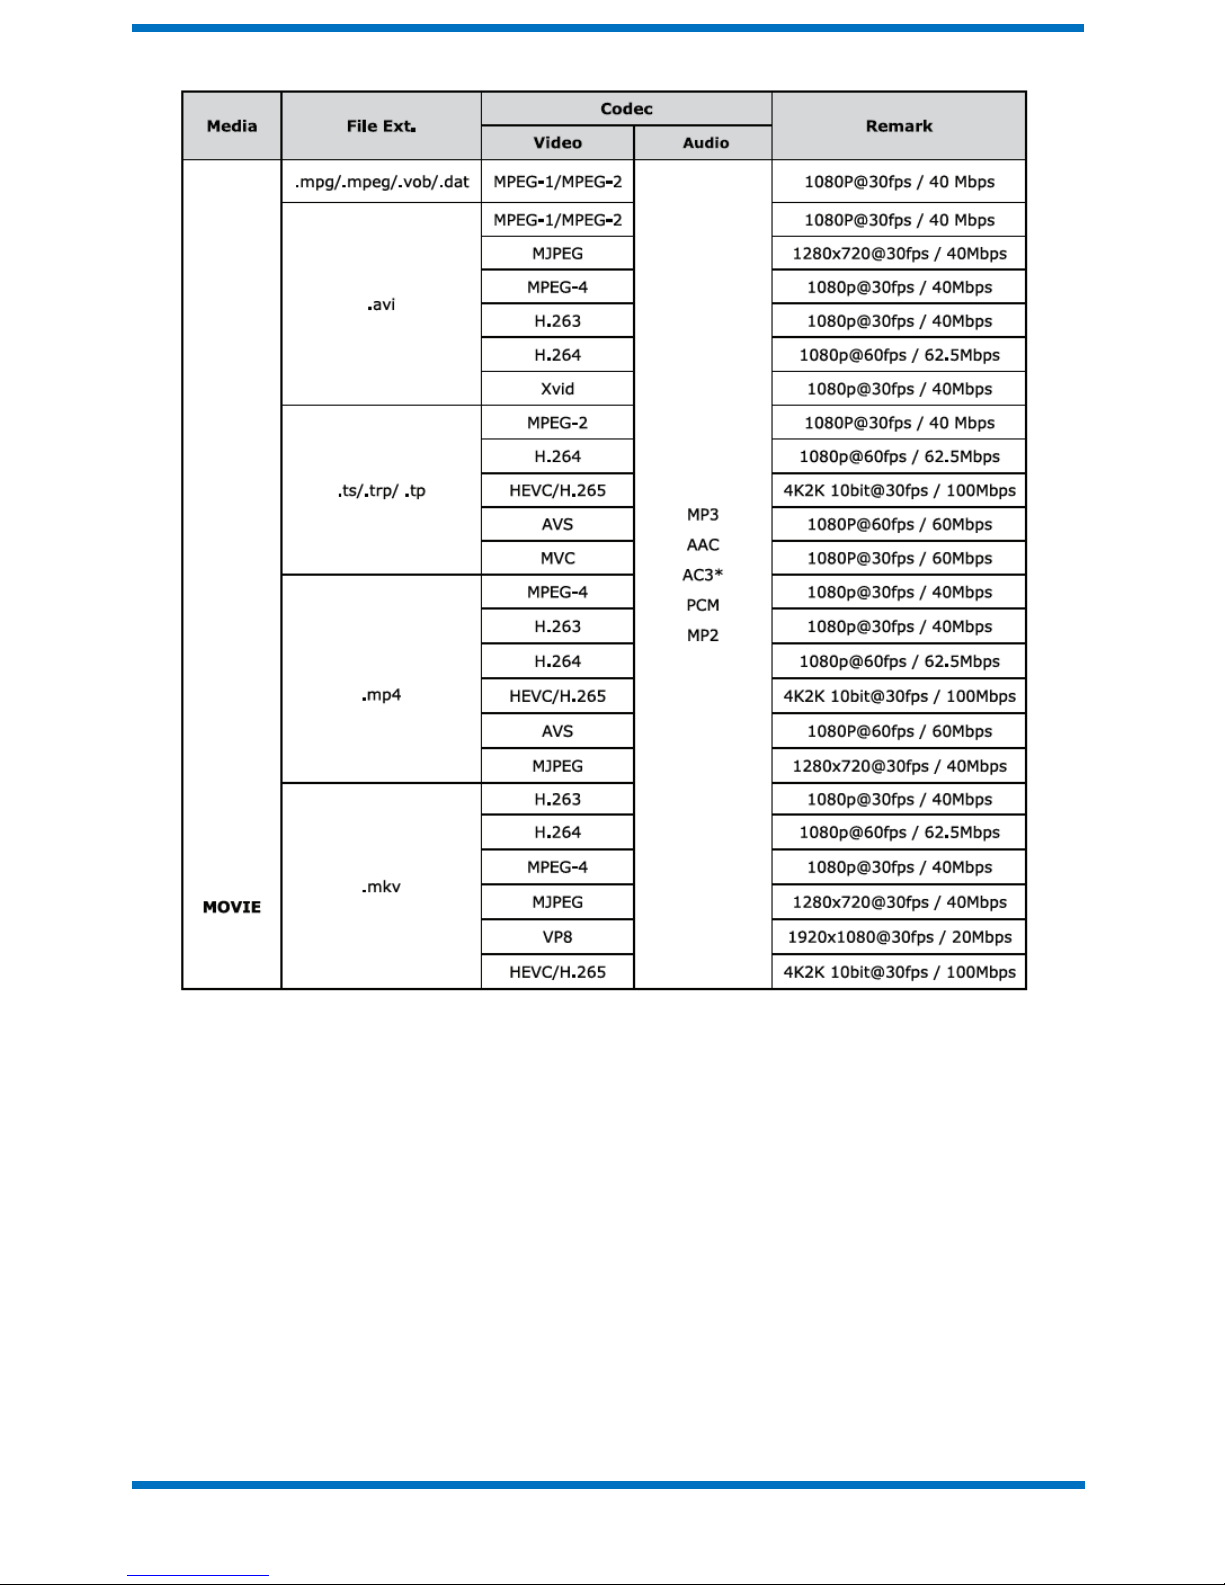
1.5.4. Multimedia Playback Format
Page 14
6
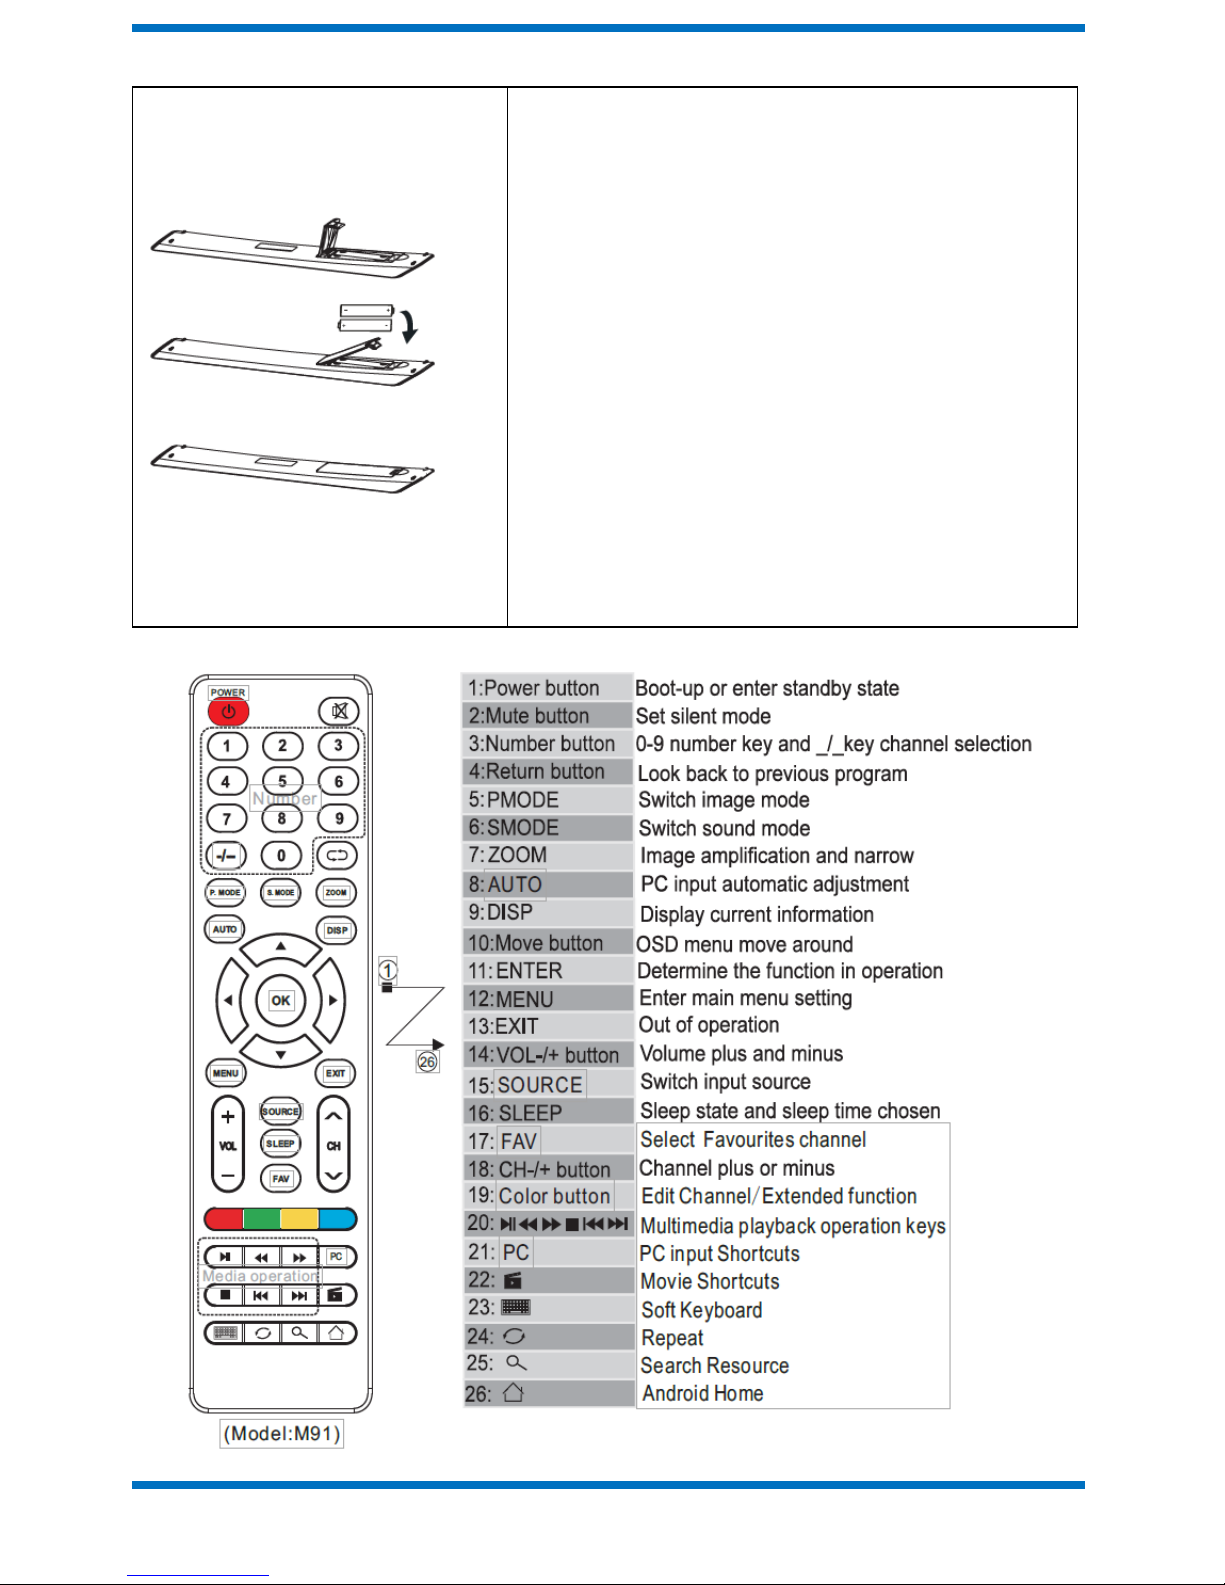
1.6. Installation of Batteries
1. Open the back lid of the remote control.
2. Install two 7#(AAA) 1.5V b atteries. Ensure
the correct polarity of the b atteries.
3. Cover the back lid.
Please take out the batteries from the remote
control during a prolonged period of no use.
If the remote control does not work properly,
please do the following to troubleshoot:
- Check the TV is turned on.
- Check the polarity of the batteries are correct.
- Check the batteries are not drained
- Check the power supply is norm al or the
power cord is correctly connected.
- Check there are no special fluorescent
light or neon light around.
1.7. Remote Control Key Functions
Page 15
7
2. Basic Operation
2.1. Setting of Standby Mode
• Connect the power cord to the AC input source. Insert the power cord into
the appropriate socket on the TV set.
• Press button to turn on the unit.
• Press button again to return the display to standby mode. The power
indicator turns red.
• Be sure not to set your TV i n st andby mode for a long period of time.
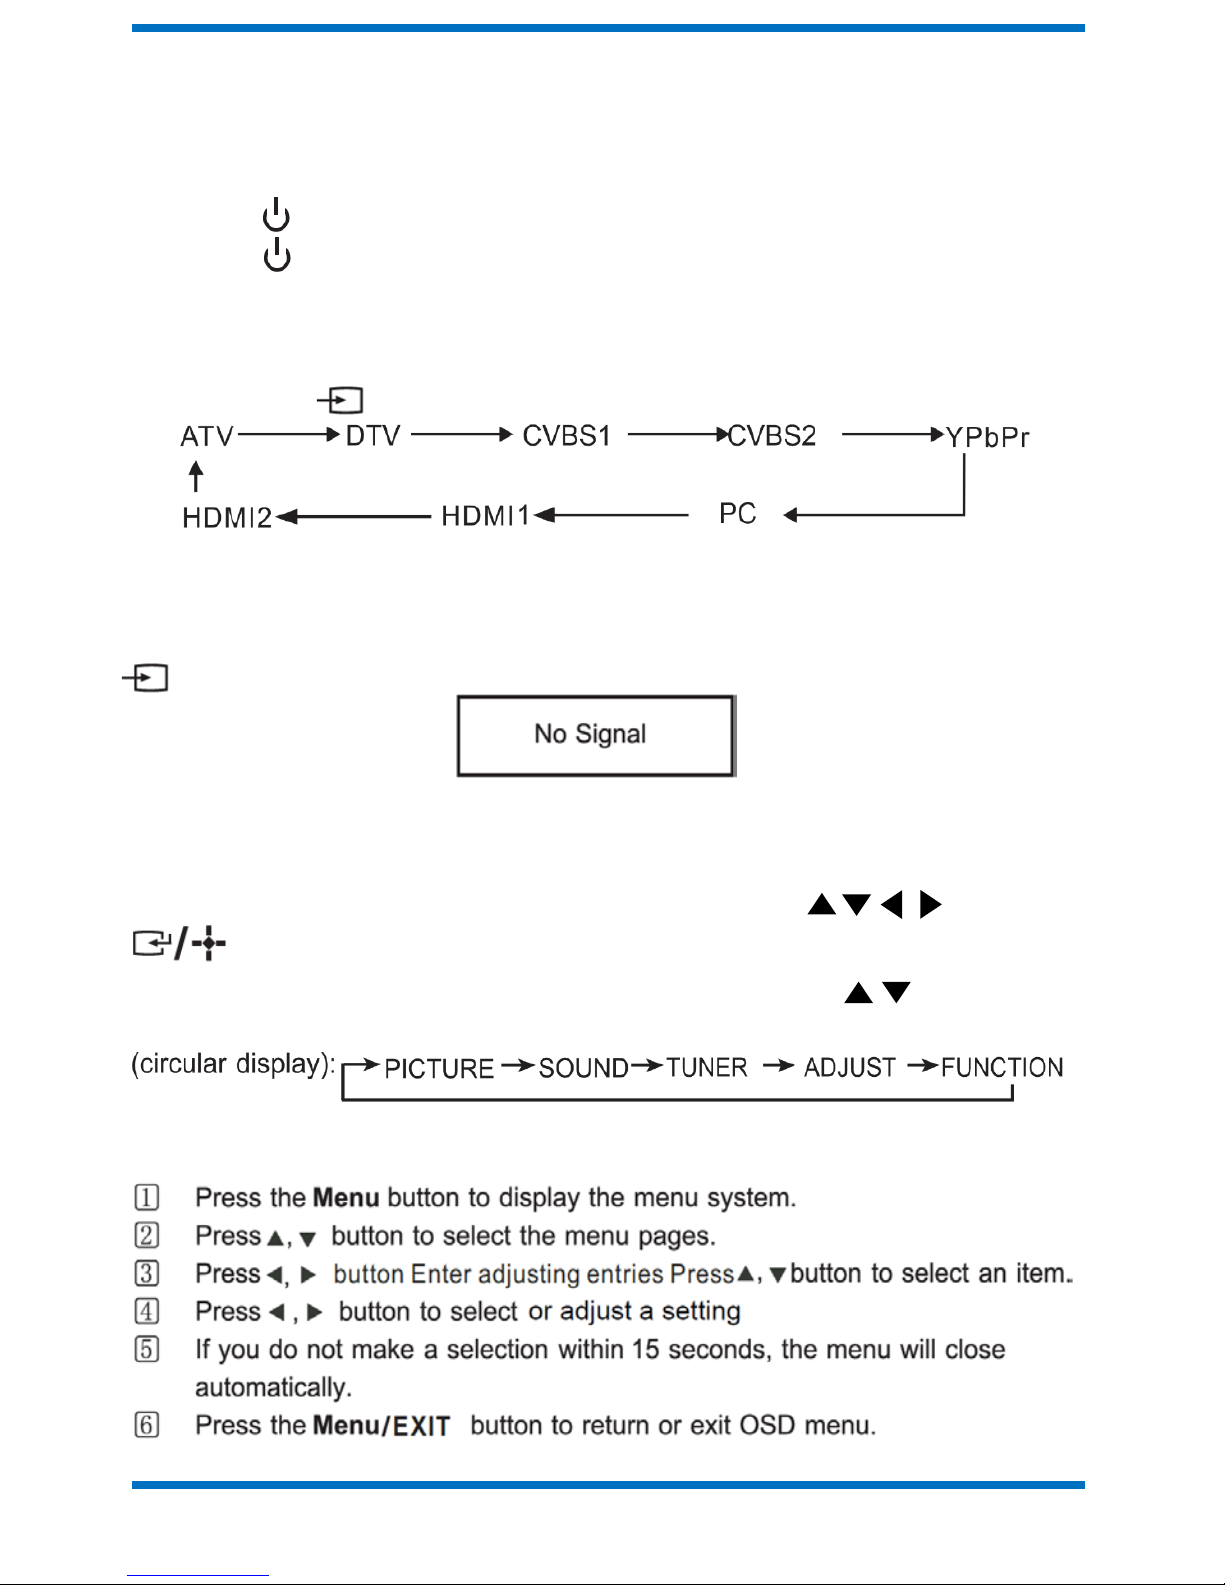
2.2. Selection of Input Mode
• Press the input/Source button to select a signal so urc e.
When selecting the signal source, the screen will display the informati on. When
there is no signal from the selected source, the warning message will be
displayed as per illustration. Eit her cha nge t he channel in TV mode or press
Input/Source button to change source.
2.3. Menu Option Adjustment
After you have installed the batteries into the remote control, you will need to s et
some preferences on the LED TV, using the menu system.
- The buttons for menu option adjustment include: Menu, , , ,
buttons.
- Press the Menu button to open the OSD Menu, then press , button to
select the pages. The p ages are displayed in the following sequence
Note: "CHANNEL" is only for TV.
Page 16
8
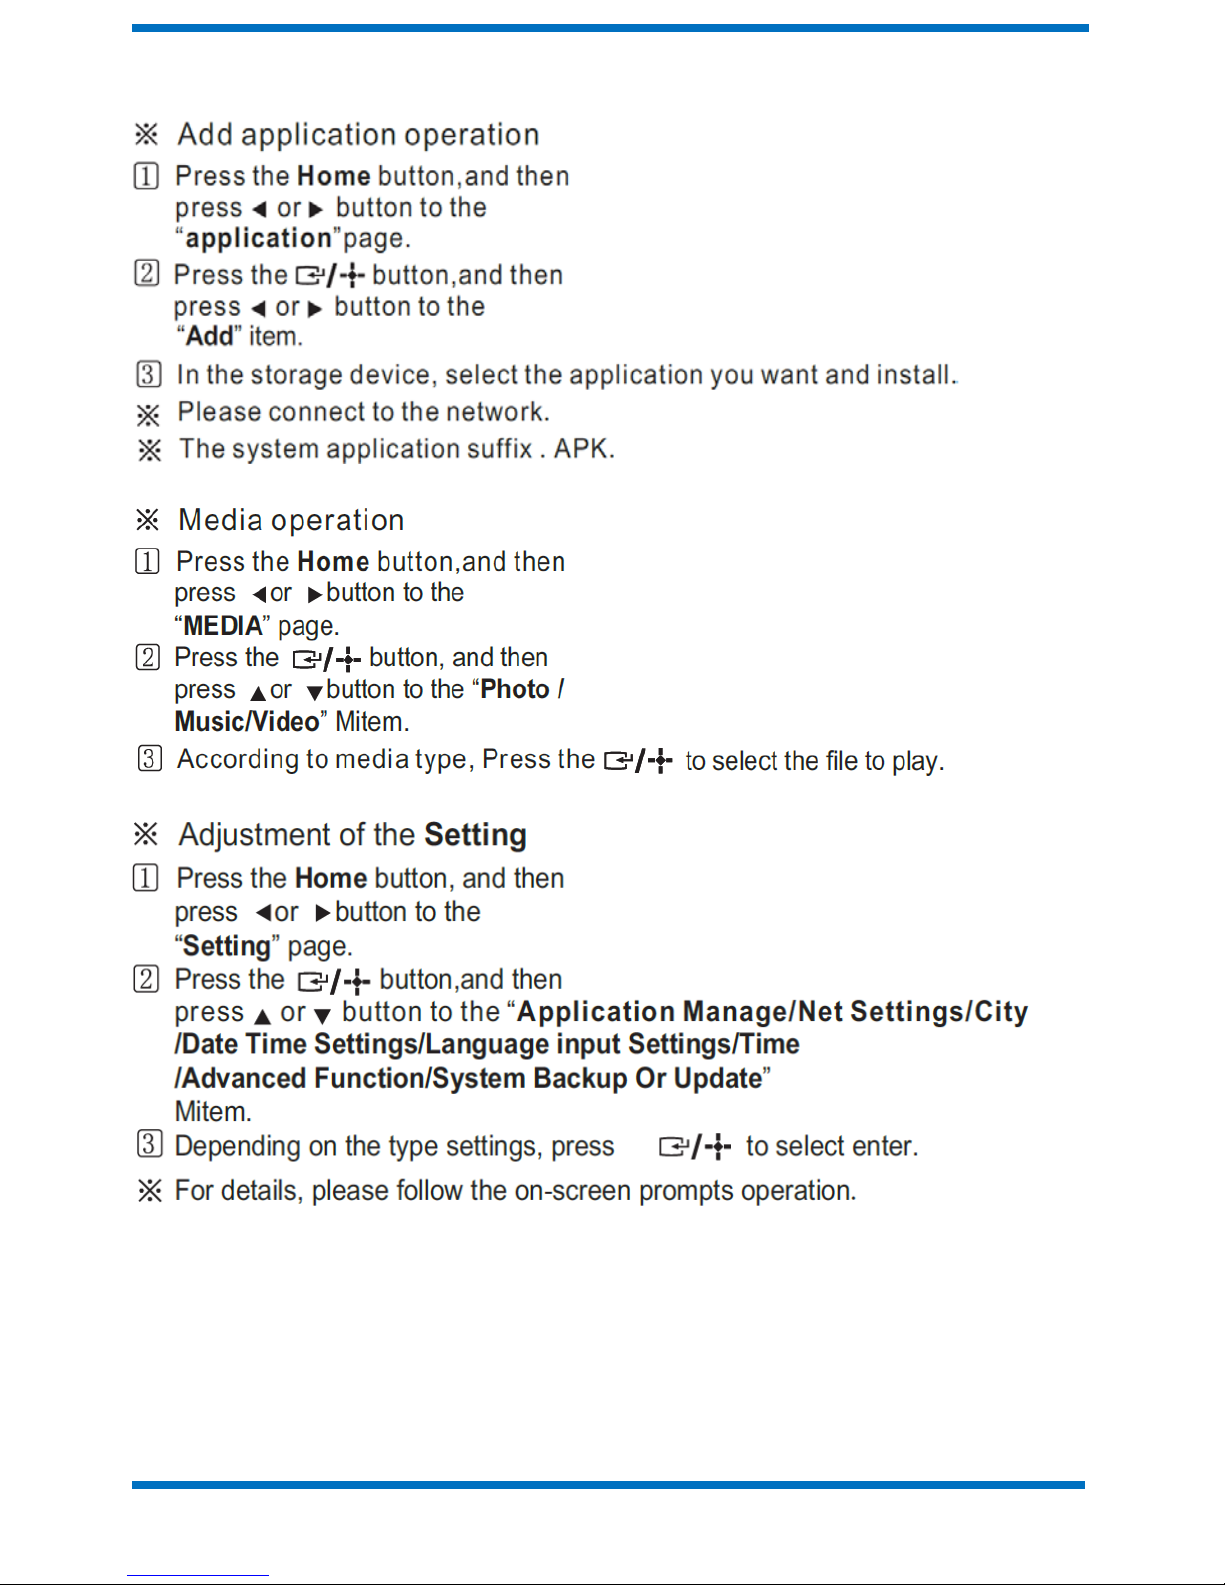
2.4. Android
2.4.1. Applications
2.4.2. Media
2.4.3. System Setting
Page 17
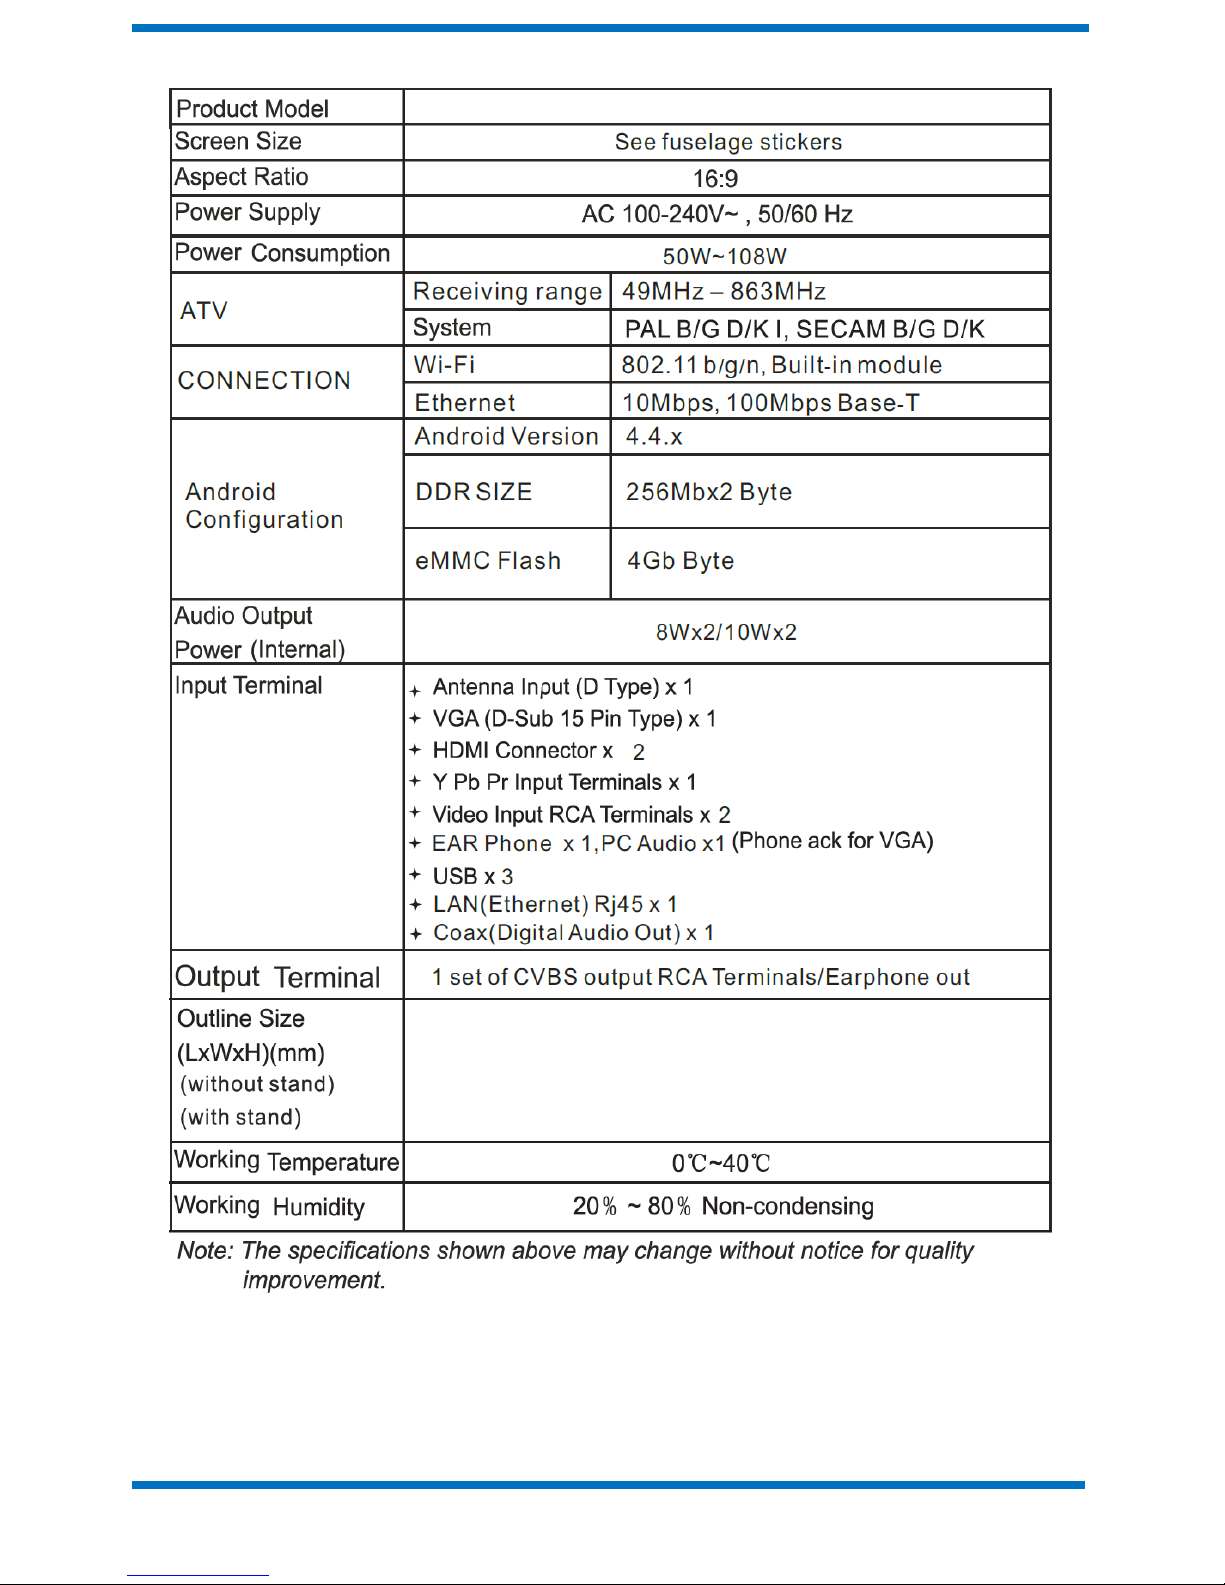
9
3. Technical Specification
Page 18
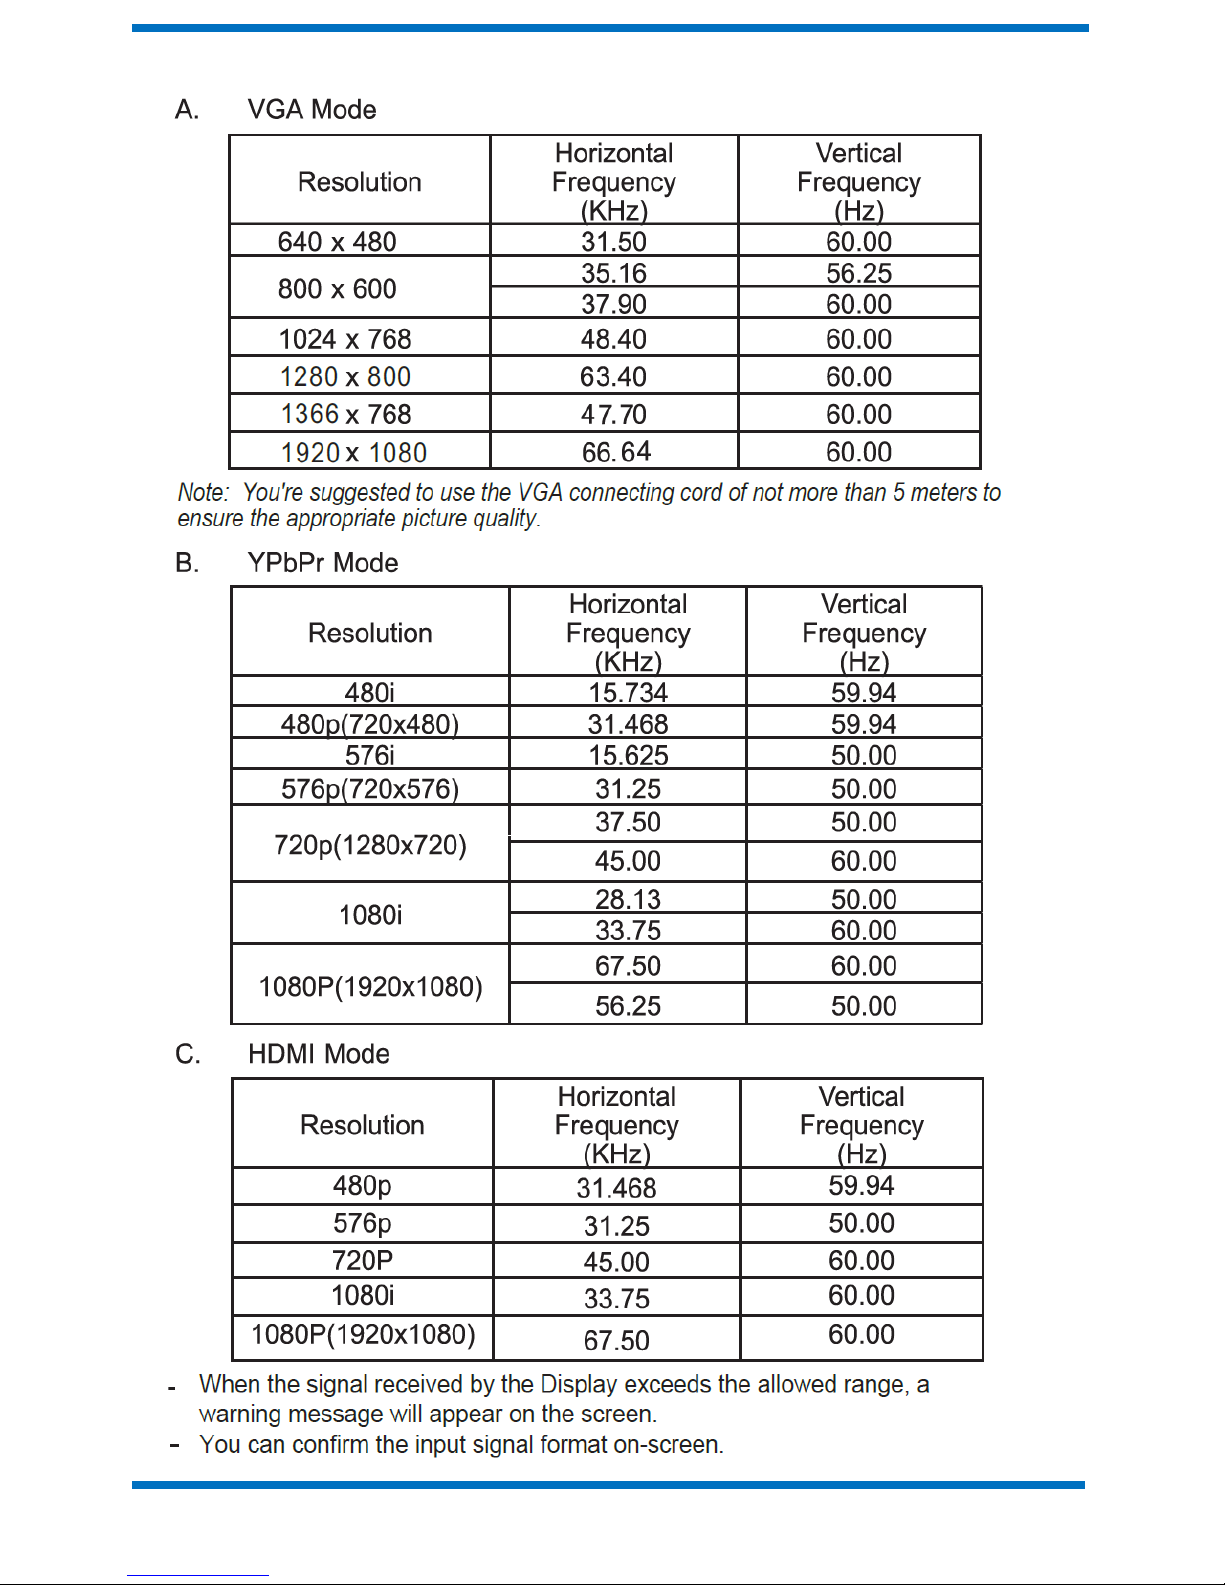
10
4. SUPPORTED SIGNAL MODES
Page 19
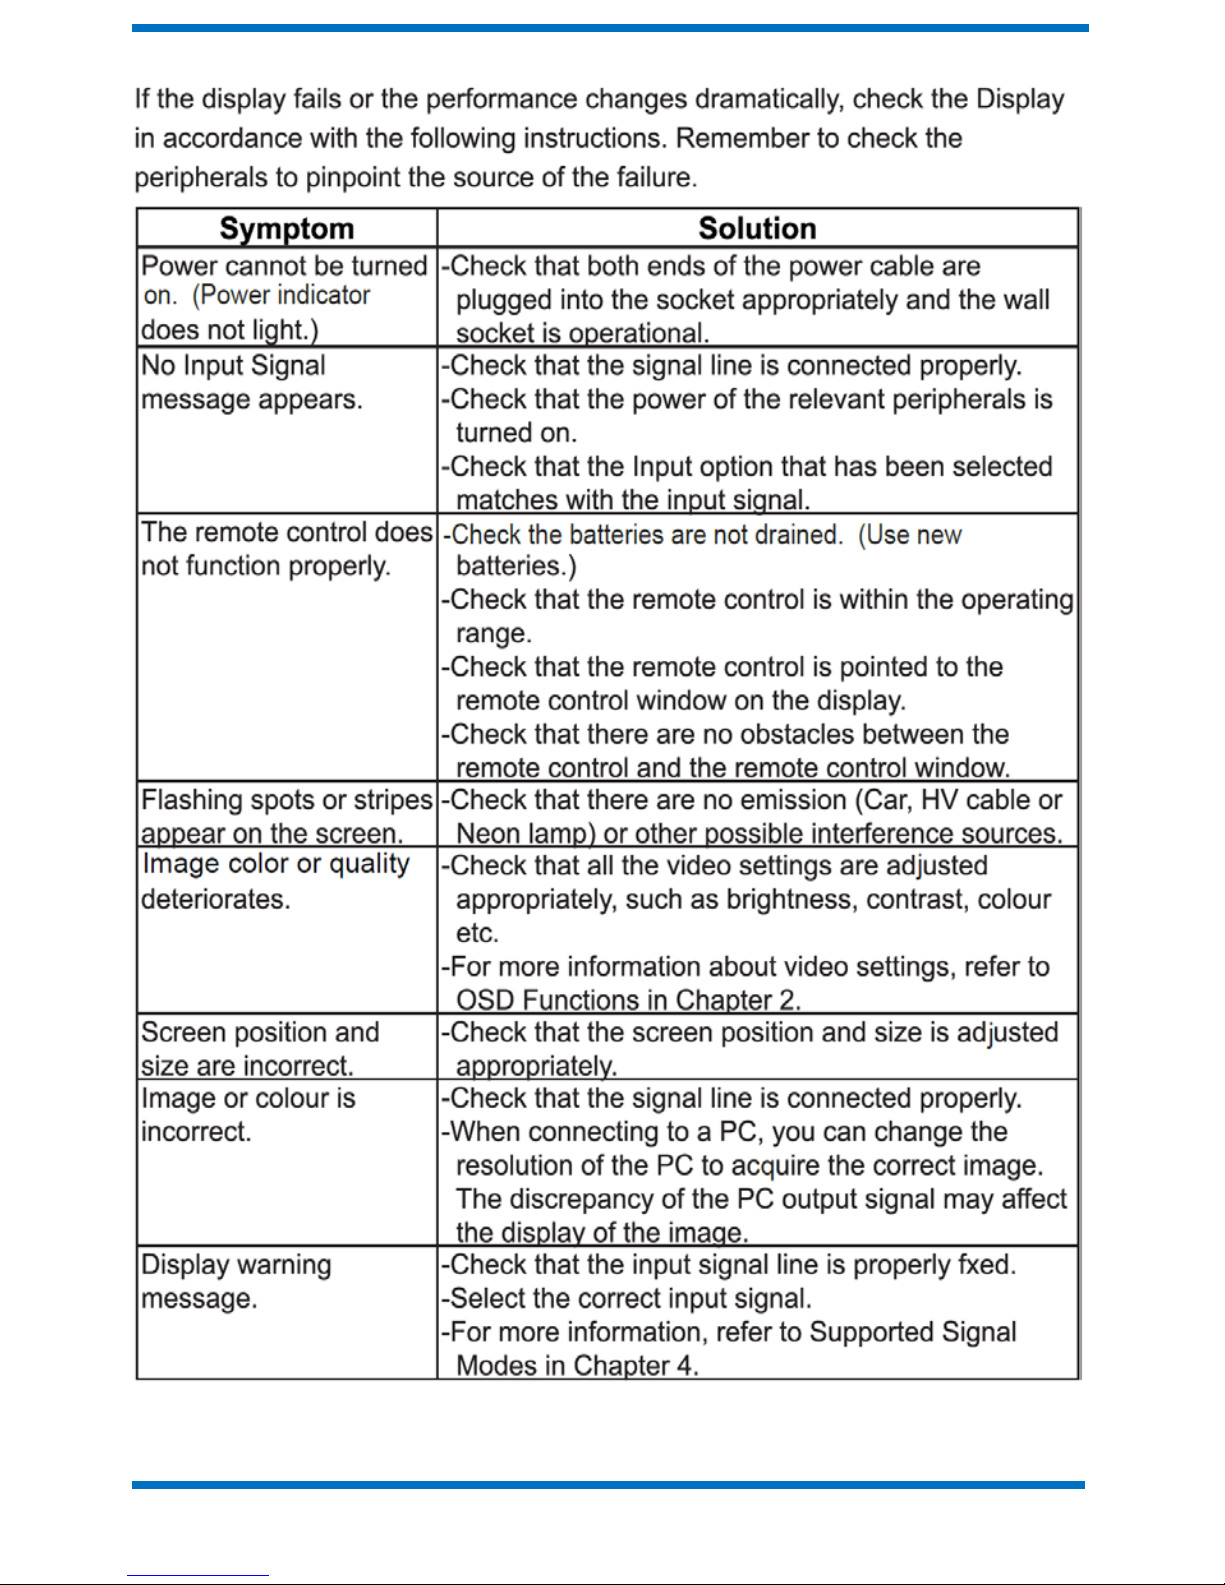
11
5. SIMPLE TROUBLESHOOTING
Page 20

12
6. REORDERING PARTS
To reorder replacement remotes and user manuals, go to Vastopia LLC’s
official website, www.vastopia.com
:
TV Part
Part Number (P/N)
Vastopia Spectrum Series 1 Remote Control
VSP20171125RM
Vastopia Spectrum Series 1 User Manual
“4K SMART LED TV: Safety and Reference”
VSP20171125UG
Page 21

I
 Loading...