

VASTEX E-100-2128, E-100-2331, E-100, E-1000, E-1-4731 Assembly And Operation Instructions Manual
...
Doc. # 01-04-021E
Year of Manufacture: 20____
Fluorescent Exposing Units
Original Instructions
E-100 & E-1000
Assembly and Operation Instructions
E100-2128
E1-4731
E100-2331
Vastex International, Inc.
1032 N. Irving St.
Allentown, Pa. 18109 USA
Phone# 610 434-6004 Fax# 610 434-6607
Contents Pg. #
Introduction, Machine Specifications 2
Safety Information 3
Assembly Instructions 4-5
Operating Instructions 6
Troubleshooting 7
Maintenance 8-9
Emulsion Tip 10-11
01-00-005/015 Warranty/Terms and Conditions 12
Electrical Drawing #: Revision:
Serial Number: VTX
(Please log your machine's serial number and date of purchase for future reference.)
Date: / /
Web Site www.vastex.com
Authorized Representative in Europe:
Certification Experts BV
Nieuwstad 100 1381 CE Weesp,
The Netherlands
Tel : + 31 (0) 294 – 48 33 55
Fax : + 31 (0) 294 – 41 46 87
Vastex E-mail assistance
Purchasing & Product Info:
sales@vastex.com
Electrical Support:
stech@vastex.com
Tech Support, Mechanical Setup, and Operation:
techsupport@vastex.com
Screen Printing Issues & Support:
printech@vastex.com

Doc. # 01-04-021E
Pg. 2
Introduction
Vastex Exposing Units
(Ultraviolet Exposure Systems)
Thank you for purchasing your printing equipment form Vastex International Inc.
Vastex has been designing and building printing equipment since 1960. We have knowledge and
experience, and are proud to supply the printing industry with quality equipment at an affordable price. You
can be confident your purchase will give you years of trouble free service.
Machine Specifications & Part Numbers
Overall Size (lid closed)
Depth x Width x Height
Weight
Screen Capacity
Power Requirements
Vacuum Pump
Vacuum Timer
Exposure Timer
Glass Reorder Numbers
Light Source
Vacuum Blanket
Lid Seal
E100-2128 E100-2331 E1-4731
32.75” x 37.75” x 14”
(83 x 88 x 36 cm)
151 lbs. (68.5kg) 174 lbs. (78.9kg) 273 lbs. (123.8kg)
21" x 28" 23” x 31” (2) 23" x 31" or a 31" x 47"
120v: 60Hz @ 3.5 Amps
240v: 50/60Hz @ 2 Amps
1/16 HP Diaphragm Pump
(120V P/N: 04-02-040)
(240V P/N: 04-02-041)
Analog P/N 04-01-085 Analog P/N 04-01-085 Analog P/N 04-01-085
Analog P/N 04-01-085 Analog P/N 04-01-085 Digital P/N: 04-01-083
P/N: 04-08-060 P/N: 04-08-048 P/N: 04-08-049
(4) 24" Black UV Bulbs
P/N: 04-08-006
P/N: EUB-2128 P/N: EUB-2331 P/N: EUB-4731
P/N: 04-08-039 P/N: 04-08-039 P/N: 04-08-039
36.5” x 41.75” x 14”
(93 x 106 x 36 cm)
120v: 60Hz @ 3.5 Amps
240v: 50/60Hz @ 2 Amps
1/16 HP Diaphragm Pump
(120V P/N: 04-02-040)
(240V P/N: 04-02-041)
(6) 28" Black HO UV Bulbs
P/N: 04-08-050
(106.7 x 132.1 x 114.3 cm)
240v: 50/60Hz @ 4 Amps
(120/240V—P/N: 04-02-060)
(12) 28" Black HO UV Bulbs
42” x 52” x 45”
120v: 60Hz @ 5 Amps
1/4 HP Rocking Piston
Pump
P/N: 04-08-050
Floor Model/Tabletop
Warranty
Table Top, optional stand
1 Year; Manufacturer
Essential Characteristics of tools which may be fitted to this machinery: This equipment is
not designed to be used with any additional attachments or tools, other than as specifically listed
available
defects
Table Top, optional stand
available
3 Years; Manufacturer
Defects
Floor model only
3 Years; Manufacturer
Defects

Doc. # 01-04-021E
Pg. 3
Safety
Intended Use:
This equipment is intended for the purpose of exposing screens and films with UV light in conjunction with
UV sensitive emulsions.
Safety:
The operator should read and understand this manual before operating this equipment. Store manual
and safety information near equipment for easy
access to operators.
Never leave equipment unattended while in operation.
Children and pets must be kept clear of the work area.
Do not store any objects on top of the exposing unit.
Unplug power cord before removing glass or entering control box.
Do not operate if any guard or cover has been removed.
Do not operate if power cord is damaged.
Safe Operating Temperature (Ambient): 55°F-100°F (13°C-38°C)
Do not attempt to defeat safety interlocks.
Noise and Vibration: This noise level produced by this equipment does not exceed 70 dB(A).
** WARNING HANDLE GLASS WITH CARE **
Wear gloves when handling the glass
Lay glass only on a flat protected surface
Tempered glass, although strong, can shatter if the edges are subject to an impact
General Information
Exposing Unit must be on a flat surface to
eliminate stress on the glass.
Caution! Screens must be free of sharp edges.
All surfaces coming in contact with vacuum
blanket should be rounded and smooth.
If installing onto the Vastex utility cart, see the
utility cart manual for
attachment procedure. (E-1000 Only)
Black UV light bulbs are used in Vastex exposing
units. Ultraviolet output of bulbs will lessen over
time. Replacing of bulbs is recommended if
longer exposure times are noticed. Changing
bulbs every 1 to 2 years is recommended. See
the Lamp Maintenance section of this manual for
details.
Keep the lid in the raised position when not in
use. It will increase the life of lifting cylinders
and the rubber blanket.
Tools Required
Philips Head Screw Driver
7/16”, 1/2”, 9/16" & 5/8” Wrenches
OR METRIC: 11mm, 13mm, 15mm, 16mm
Doc. # 01-04-021E
Pg. 4
Assembly
Getting started:
Your Exposing Unit has been fully assembled and tested in our factory. Both lid lifting
cylinders have been removed from their upper mounting stud and secured to the side of the
cabinet. Follow the steps in this manual to reattach them. Be careful not to damage the
rubber vacuum blanket when removing the Exposing Unit from it's crating.
It is best to keep the lid locked closed when lifting the exposing unit. Carefully remove the
unit from its crate and place it on a suitable surface. It is important that the surface be flat, an
uneven surface can put stress on the glass causing it to crack.
Placing the equipment into service and operating the equipment:
To place equipment into service, follow steps 1-4 (if applicable to your unit) and 5 on page 5.
To operate your exposure unit, follow the instructions on page 6 and the troubleshooting and maintenance
instructions on pages 7-9.
Stability during use, transportation, assembling, dismantling when out of service, testing, and
foresee able breakdowns:
This equipment is designed to be stable under all foreseeable conditions if the instructions provided
herein are followed. Do not place the units into positions not shown in this manual (e.g., on their sides) and
do not operate with any parts removed unless necessary for troubleshooting.
Safe transport, handling, storage: when the equipment is transported, it should moved by two or more
people. No other special precautions are required. Refer to page 2 for unit masses.
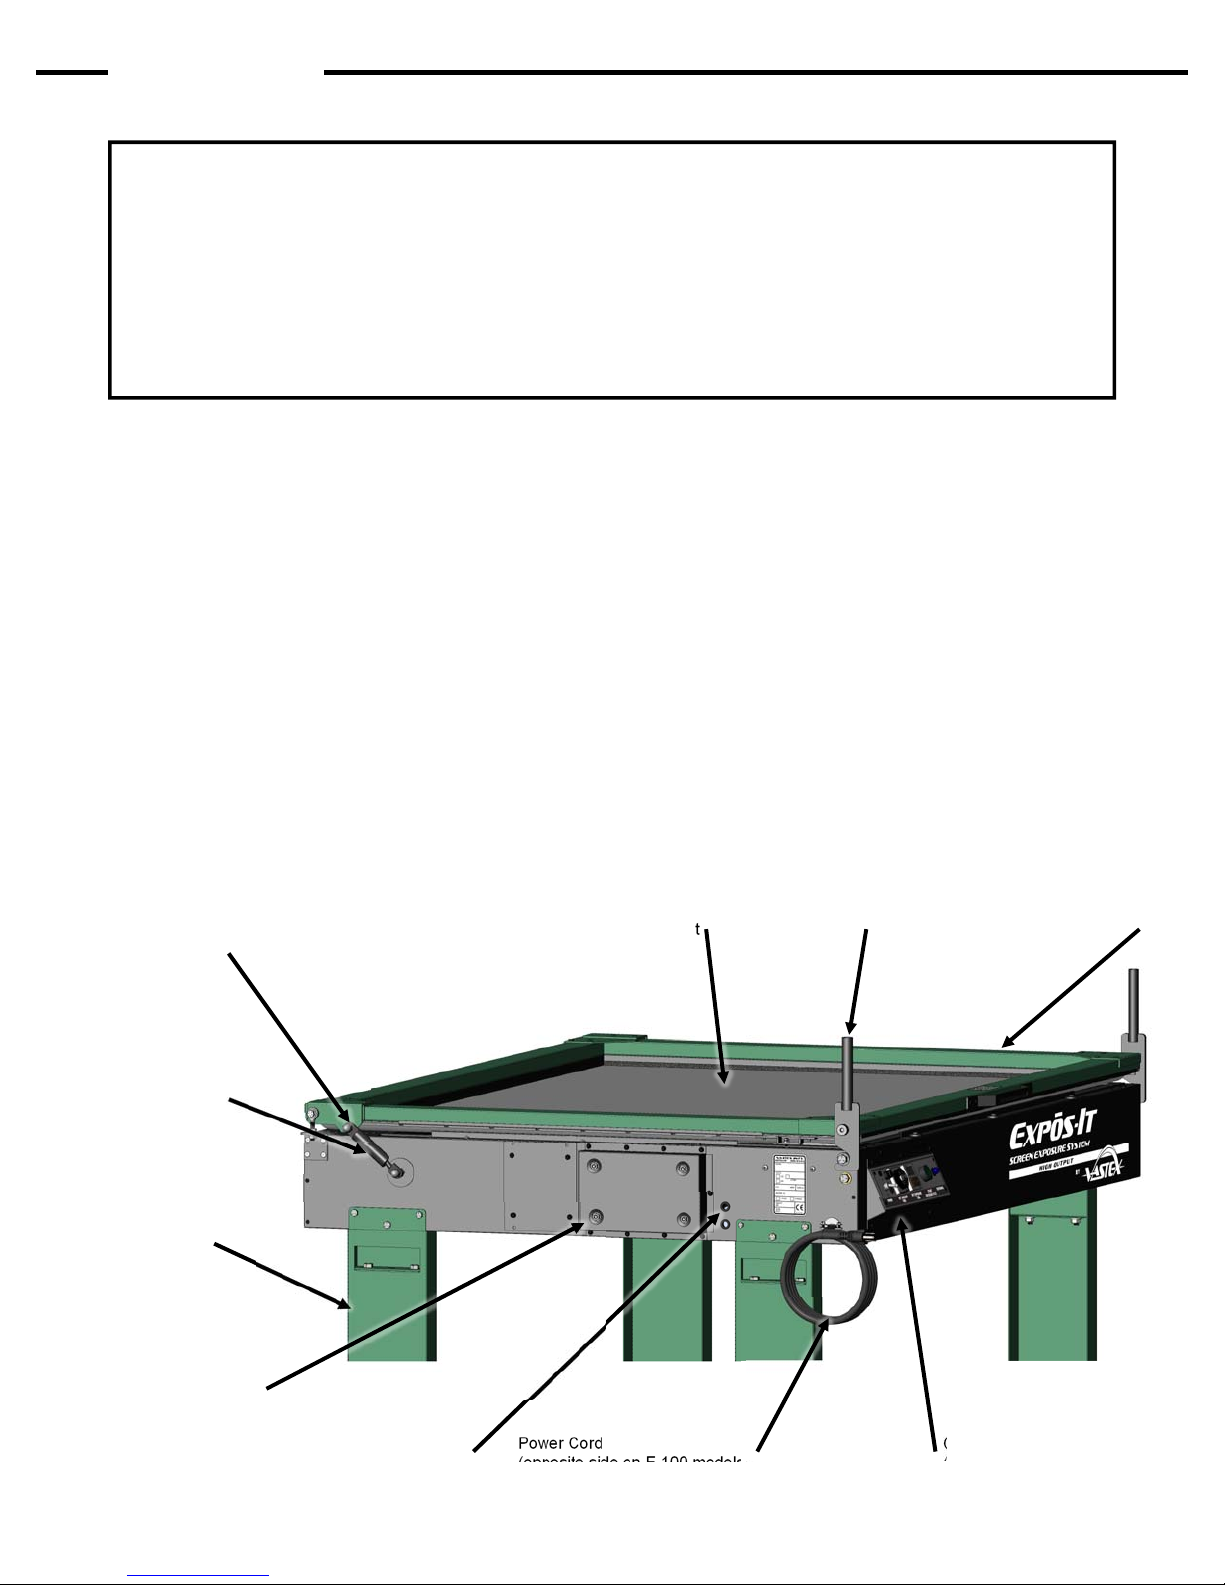
Acorn Nut & Upper
Cylinder Mounting Stud
(2) Lid Lifting Cylinders
(one on each side)
(2) Leg Assembly
(E1-4731 Only)
(2) Lid Locking HandleRubber Vacuum Blanket
Lid
Vacuum Pump Access Panel
(E1-4731Only)
Pump Exhaust
(opposite side on E-100 models)
Power Cord
(opposite side on E-100 models)
Control Panel
(opposite side on E-100 models)
 Loading...