


Vasco Traveler 5”
USER MANUAL
ENGLISH

Copyright © 2018 Vasco Electronics LLC
www.vasco-electronics.com

Table of contents
1. Operation of the device 4
1.1 Function keys 5
1.2 Battery charging 6
1.3 Memory card 6
1.4 In-built SIM card 6
1.4.1 Top-up 7
1.4.2 Account balance 7
1.4.3 SIM card costs 7
1.4.4 SIM card expiration 7
1.4.5 Telephone number 7
1.5 Own SIM card 8
1.6 First start-up 8
2. Vasco Settings 9
2.1 Networks 9
2.1.1 WiFi settings 9
2.1.2 Change the network operator manually 10
2.2 Device 10
2.2.1 Application language 10
2.2.2 Brightness 11
2.2.3 Auto-rotate screen 11
2.2.4 Automatic unattended updates 11
2.2.5 Check for updates 11
2.2.6 About 11
3. Advanced settings 11
3.1 Mobile network settings 12
Specication 15
4
1. Operation of the device
5
6
3 7 4
1 2
1
2
10 11
9
88
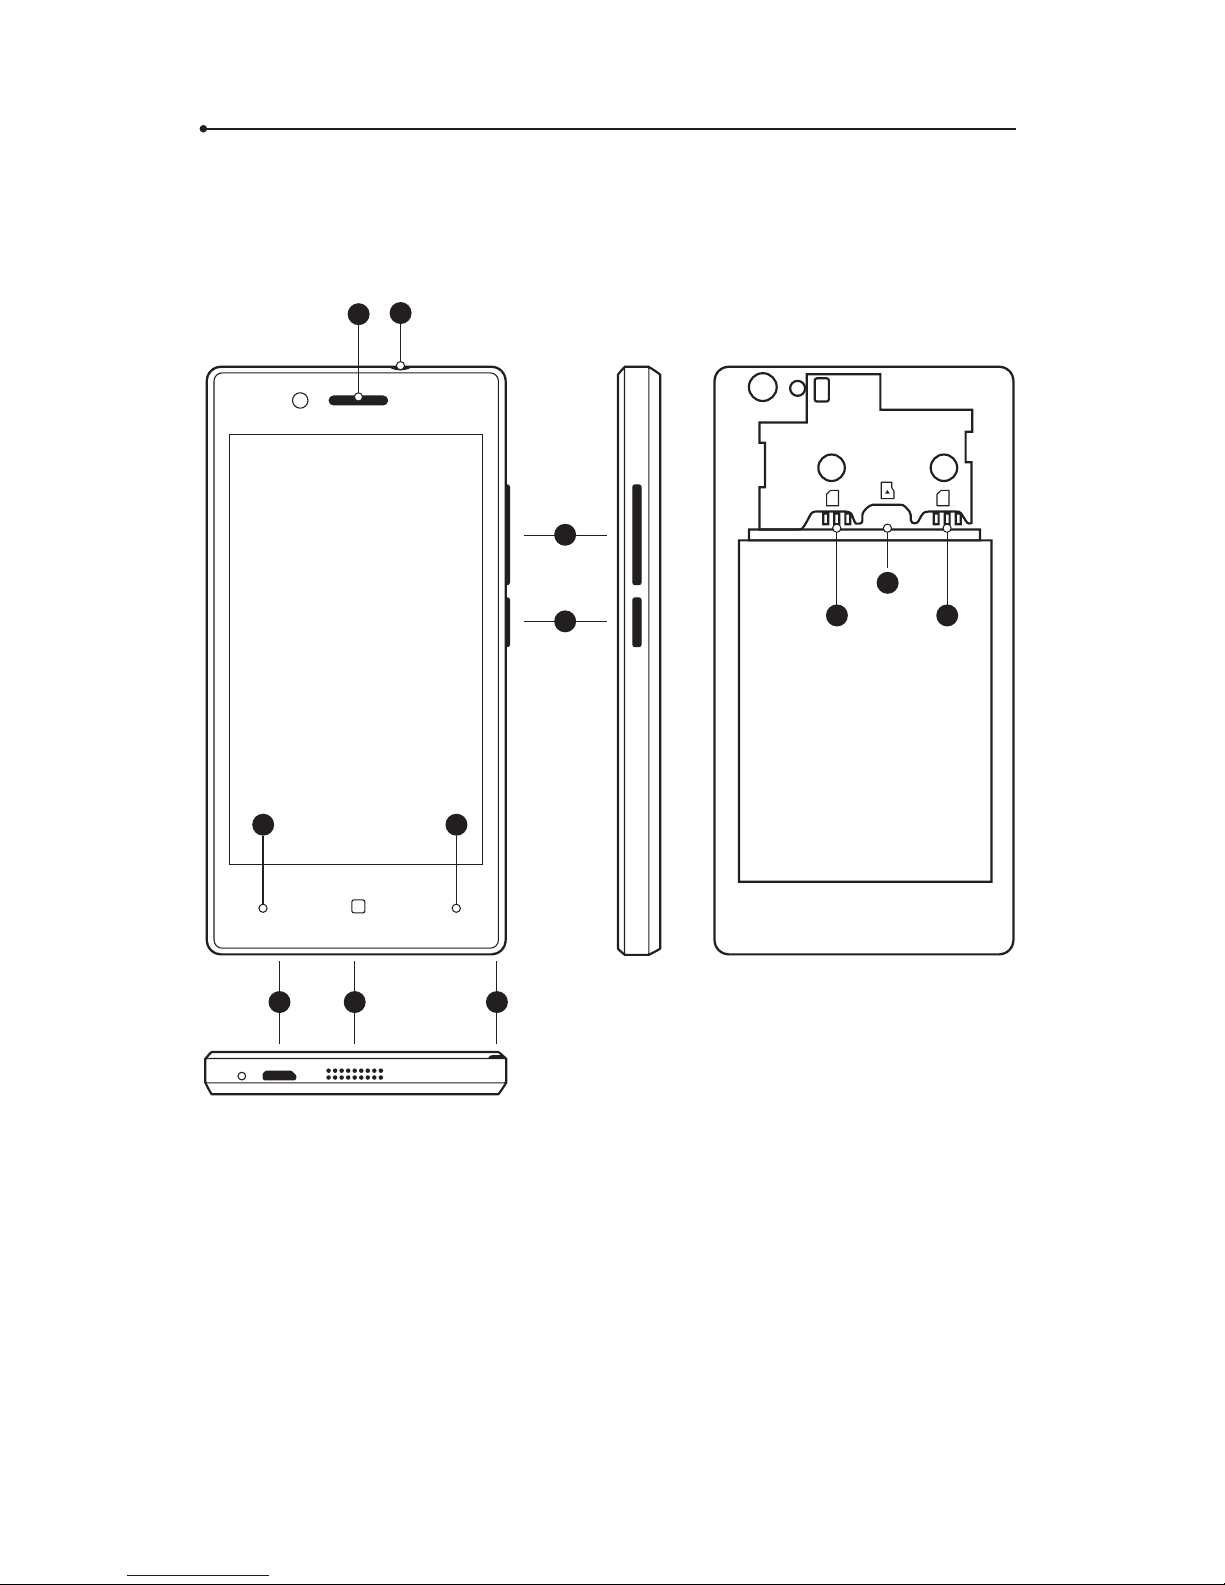
1. Loudspeaker 7. Loudspeaker
2. Earphone input 8. SIM card
3. USB 9. SD card
4. Cover lift 10. Menu
5. Volume 11. Back
6. Power ON/OFF
5
1.1 Function keys
Power
• Device turned o: hold this key for 5 seconds to turn on the
device
• Working device:
• push this key to block the screen, push again to unblock
• push and hold the key for 2 seconds and tap “Power o” to
turn the device o
• push and hold the key for 2 seconds and tap “Reboot” to
reboot the device
• push and hold the key for 2 seconds and tap “airplane mode”
to activate ight mode; ight mode disconnects GSM, WiFi
and GPS; repeat these steps to deactivate ight mode
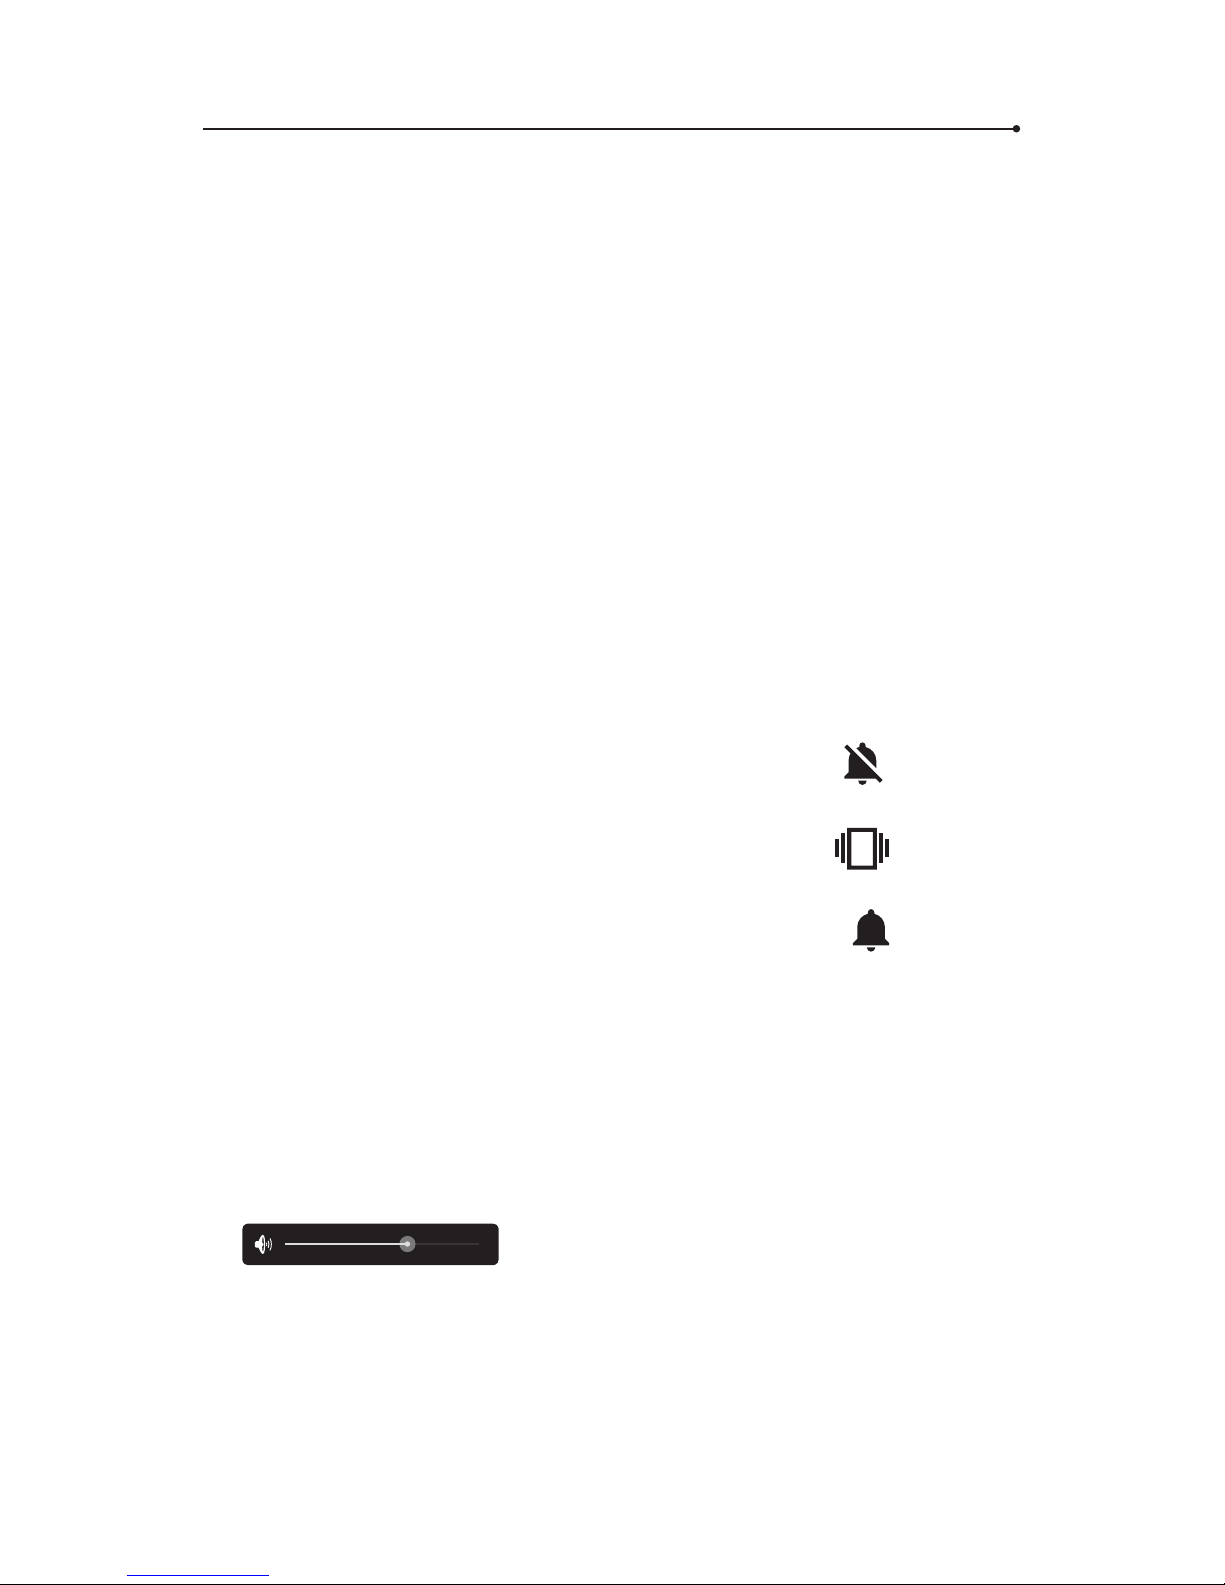
• push and hold the key for 2 seconds and tap
to activate
silent mode, all the sounds will be turned o
• push and hold the key for 2 seconds and tap
to turn o
the sound but turn on vibration
• push and hold the key for 2 seconds and tap
to turn all
the sounds on
Volume
• Working device: push up or down to increase or decrease the
volume.
• You will see the following icon. Tap and hold the blue dot
and swipe left to decrease and right to increase the volume:
Menu
The menu button is located in the left bottom corner of the
application. Tap it to see the menu of the device.

6
Back
The back button is located in the right bottom corner of the device.
Tap it to get back to the previous screen.
1.2 Battery charging
• Plug the charger into an electric socket and the USB cable into
the device in order to charge the battery.
• The battery indicator moves to charging mode.
• The battery is fully charged after about 4 hours.
• After the battery is charged, remove the charger and the USB
cable.
WARNING: Charge the battery in a well-ventilated area between
14°F and 95°F (-10C to +35C). To charge the battery use the charger provided by the manufacturer. Using any other charger may
damage the device.
1.3 Memory card
The device is provided with a memory card. Removing and/or damaging the card may cause incorrect functioning of the device. In the
event of damaging the card, contact the seller.
1.4 In-built SIM card
The device is equipped with an in-built, international SIM card that
allows you to answer free incoming calls in over 160 countries. To
check the current list of the countries and available services, visit:
www.vasco-electronics.com. The in-built SIM card is a pre-paid card.
It does not require any contract.

7
1.4.1 Top-up
The card is active and topped-up with $10. To top up your card, visit:
www.vasco-sim.com. The top-up expires after 24 months.
1.4.2 Account balance
To check your account balance, nd “Account balance” in the main
menu and tap it.
You can also check your account balance by making a call. Just dial
the number and you will receive information about your balance.
Account balance information can be checked by dialling 099.
1.4.3 SIM card costs
To check rates and coverage, visit: vasco-electronics.com. The cost
may vary depending on the country.
The caller will pay according to the price list of his/her operator.
The call is treated as a call to the European Union.
1.4.4 SIM card expiration
The SIM card expires 2 years after the last operation. In order to prolong the expiry date, use the device (make a call, send SMS or use
data transfer). The top-up expires after 24 months.
1.4.5 Telephone number
Your telephone number starts with +372 or 00372. The complete
number is under the cover of the battery, on the protective case or
on the inner side of the box.
WARNING! Do not bend or scratch the SIM card. The SIM card
should not be exposed to water, dust, or electricity.

8
1.5 Own SIM card
The device is equipped with two SIM card slots. One is used by
the in-built SIM card. The second slot can be used for your own
SIM card.
WARNING! Using your own SIM card may incur additional
costs in roaming by your operator. Before inserting your own
SIM card, please contact your carrier and consult the costs. The
seller does not take any responsibility for costs incurred by
using your own SIM card.
After inserting your own SIM card, go to the settings and choose
“SIM cars”. You can set default cards for actions such as audio calls,
SMS, data transfer, etc.
1.6 First start-up
When turning on the device for the rst time, choose the language
and read the terms and conditions. Conrm that you understand
and accept.
The default language changes the regional settings of the device –
the language of the menu and the keyboard.
The main screen of the device shows available functions and
applications. Slide up or down in order to move between the
functions and applications. Tap the name of the application to run it.
Swipe left or right to see other applications and those recommended
by our team. In order to install the recommended applications, tap
its name and follow the instructions. Please note that you need
a Google account to install these applications.

9
The device is equipped with Play Store that allows you to search for,
download and install any application. Play Store requires a Google
account.
2. Vasco Settings
Vasco Settings help you quickly adjust the most important settings
such as menu language, WiFi conguration and updates.
2.1 Networks
2.1.1 WiFi settings
Go to Vasco Settings and choose “WiFi conguration”. You can
manage your WiFi networks here. If you see “WiFi is o”, tap the WiFi
icon at the bottom of the screen. The device will search for available
wireless networks.
In order to connect to an available WiFi, just tap its name.
If the network is secured with a password, you will see a padlock
icon next to it. If you have the password, tap the network name and
type it in. If you don’t have the password, choose another network.
After typing the password, the padlock icon doesn’t disappear.
Range – the more green lines the icon shows, the more stable the
network is.
ATTENTION! If the device is within range of an open WiFi
network, it will connect to it automatically.
Please note that some open networks may need additional
actions to be taken, such as logging in with a Facebook
account or accepting the terms and conditions.

10
2.1.2 Change the network operator manually
WARNING! This function is not visible if the device does not
recognise the SIM card.
This function allows you to connect to a chosen GSM network operator in the country you’re in.
• Make sure you have a WiFi or GSM connection.
• Choose the continent you’re in, e.g., Europe.
• Choose the country, you’re in, e.g., France.
• You will see the list of the preferred operators in this country.
• Tap “Network operators”, read the information and conrm by
tapping “Yes”.
• On the next screen, tap “Select manually”.
• Read the information and conrm that you understand.
• The device will look for available GSM networks. Choose the one
you saw on the list and tap its name in order to connect to it.
• The device will register in the chosen network.
Done. You can now use the device.
WARNING! If the device goes out of range of the preferred
operator, it will not connect to any other network
automatically. Repeat the steps and tap “Select automatically”
in order to get back to the previous settings.
2.2 Device
2.2.1 Application language
Change the language of the menu. This will also change the regional
settings such as the language of the keyboard and the default
languages.

11
2.2.2
Brightness - Adjust the screen brightness manually or
automatically.
2.2.3
Auto-rotate screen - Turn on/o screen autorotation.
2.2.4
Automatic unattended updates - Turn on/o automatic
background updates.
2.2.5
Check for updates -
If a new version of the software is
available, you will see information about it after tapping “Check
for updates”. In order to update the device, download and install
the application, tap “OK” and reboot the device. If there are no new
updates you will see “No new updates”. If you see “Device not registered”, please contact the seller.
WARNING: You need a WiFi connection in order to download
system updates.
2.2.6
About -
information about the software. You can see the ver-
sion of the device and read the terms and conditions.
3. Advanced settings
Advanced settings allow you to change the following options:
• SIM cards – settings of SIM card and data connection. If you want
to use your own SIM card you need to adjust the settings here. To
get all the details, contact your SIM card provider.
• WiFi
• Bluetooth
• Data usage
• More…
• Airplane mode

12
• VPN – Virtual Private Network (for advanced users)
• Tethering & portable hotspot (for advanced users)
• Cellular networks: data connection, 3G, APN, select network
operator
• Display: Lock screen, theme, wallpaper, brightness, daydream,
font size, sleep
• Sound & notication
• Storage: Phone storage, SD card
• Battery – shows the detailed use of the battery
• Apps (for advanced users)
• Location
• Security
• Accounts
• Language & Input
• Backup & Reset (Warning! Factory reset will cause the
malfunctioning of the device!)
• Date & Time
• Scheduled power on & o
• Accessibility
• Printing
3.1 Mobile network settings
Vasco Traveler is equipped with an in-built SIM card that enables it
to connect to the Internet all over the world. If the device is within
range of a GSM network, it will connect to it automatically without
any need for conguration.
If the translator does not work and you see “network error”, make
sure that the SIM cards is inserted in the device and properly
installed. If yes, go to “Settings” and:

13
• Find “SIM cards” and turn *the *3G modem on by swiping the bar
right.
• Cellular data eld should say EE EMT.
• Now go back and choose “More…”.
• Tap “Cellular networks” and “Access Point Names”.
• Choose “EMT Internet” and “APN”, and delete whatever is written
in this eld. Type *“send.ee” instead.
• Type in your telephone number to the “Username” eld. Start
with 00372.
• Now tap “Data roaming” and swipe the bar right. Data roaming
should be turned on.

14
Vasco Traveler should now work properly. If it still doesn’t work,
please check your account balance or contact the seller.

15
Specication
Display IPS G+F 5”, HD 1280*720 px
Processor CPU: 64-bit QuadCore CPU
MediaTek MTK6735P 1.0GHz
RAM 1 GB, LPDDR3
ROM 8 GB
3G modem Yes
Wi-Fi 802.11 b/g/n
Battery 2200 mAh
Size 2.83 x 5.69 x 0.32 in
(71.7 x 144.3 x 8.0 mm)
Weight 0.32 lb (143 g)
Earphone input Mini Jack (3.5 mm)
USB Micro USB
SD card slot Micro SD (up to 32GB)
Camera Rear: 5.0 MP, Front: 2.0 MP

VTVSIS180111
 Loading...