

Page 1
VZ-M5 HDMI Field Monitor – 5” Class HD LCD
The VZ-M5 HDMI monitor provides sharp, accurate images for improved framing and focus assist on any camera equipped with an
HDMI output. Utilizing top-quality Grade A+ LCD panels and image processing, the M5 offers picture quality and a feature set normally
found only on more expensive monitors. Included with the basic M5 kit: monitor, HDMI cable and AC power adapter. A number of
optional accessories designed specifically for the M5 are available through VariZoom.
Warnings:
Do not use the monitor in extremely hot and humid environments.
Never open the monitor case or attempt repair – this will void the warranty.
Use only a soft cloth and no chemicals to clean the LCD screen.
DO NOT USE THE AC ADAPTER AND BATTERY AT THE SAME TIME. UNPLUG AC ADAPTER WHEN USING BATTERY
POWER.
The monitor can only handle 6.5-36VDC with CORRECT polarity.
Do not plug anything into the micro USB port on the underside of the monitor (factory use only).
Do not plug anything into the “Zoom” port on the monitor other than the optional zoom/peaking trigger remote (NEVER plug a
camera zoom control into this port).
Features:
Accepts all HD signals up to 1080p
HDMI In / Out (loop through)
DSLR Scaling to allow full-screen viewing of image from cameras such as Canon 5D
Auto Aspect Ratio Detection
Monochrome (B&W) mode
Image Flip for inverted mounting (1/4”-20 mounts on top and bottom of monitor)
Safety Area markers (5 levels), Centerline Marker, 4:3 area markers
Underscan and Overscan modes
Color Temperature Presets (D65 and D93 standards), or user-defined through RGB settings
Brightness, Contrast, Saturation, Sharpness adjustments
Customizable Menu Options for menu duration, position, text color and language
Headphone jack for audio monitoring
Page 2
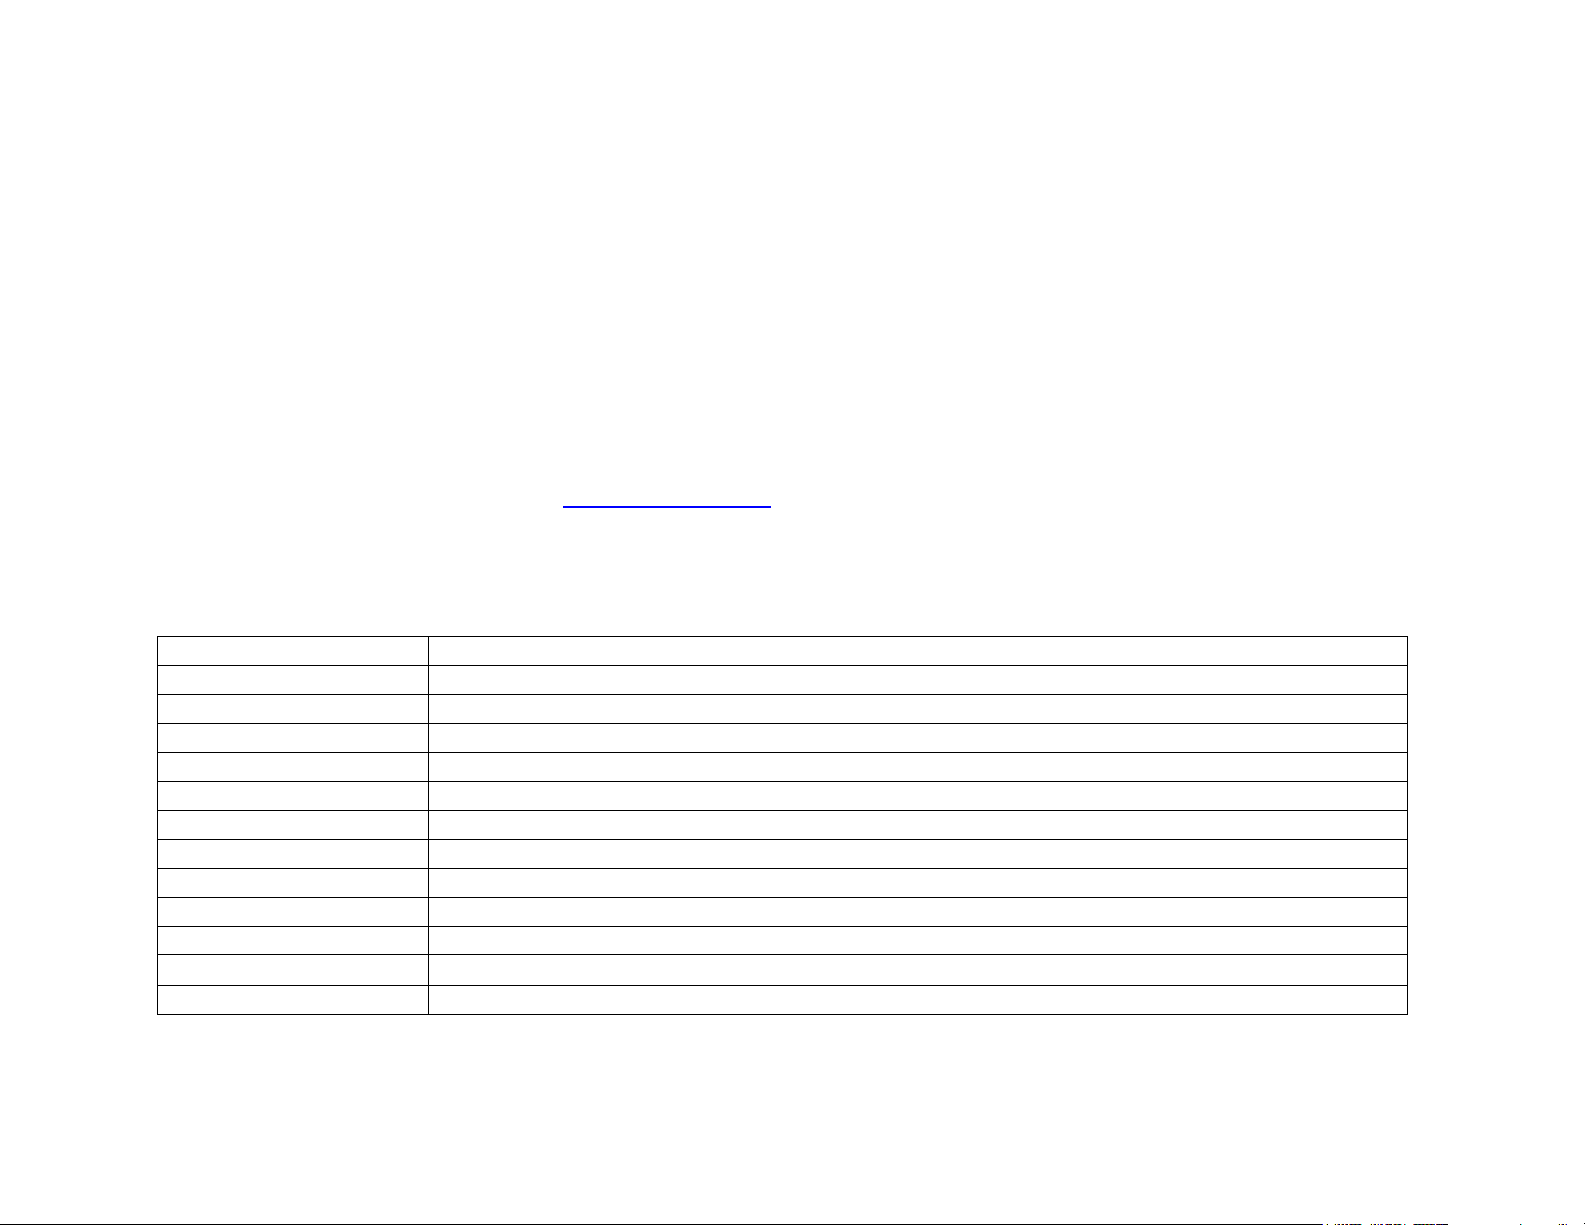
Screen Size
4-7/8” diagonal
Native Resolution
800 x 480
Brightness
500 cd/m2
Contrast
800:1
Video Formats
1080 – 24p/24psf/25p/30p/50i/60i/50p/60p; 720 - 50p/60p; 480i; 480p; 576i; 576p
Response Time
10ms
Viewing Angle
L80° / R80° / U80° / D80°
Input Voltage
12VDC nominal (6.5 – 36VDC max range)
Mount Type
¼”-20 female (2) top and bottom
Inputs/Outputs
HDMI (in), HDMI (out), Headphone 3.5mm (out), “Zoom” (in) 3.5mm
Size
5.8” x 3.96” x 1.22”
Weight
0.74 lb
Power consumption
≤ 7.5W
Optional Accessories:
Zoom/Peaking Trigger Remote for pixel-to-pixel zoom mode and peaking mode to assist in focusing
HDMI Cable locks to prevent cable from loosening or falling out
Hard sunhood / screen protector shades screen for outdoor viewing and folds to protect screen during transport
Battery plates for Sony, Canon, JVC, Panasonic mount to back of monitor and allow use of existing batteries
Battery kits with charger, battery, plate
Shock-absorbing rubber case protector sleeve
Hard carrying case
Soft carrying case
Hot-shoe mount for mounting monitor on top of camera
Go to www.varizoom.com for more information on accessories
Specs
Page 3

At the right you’ll see a mechanical drawing of the M5 monitor. Note
that items 11 (HDMI Plug Lock) and 16 (7.2V battery plate) are
optional accessories (not included in this kit).
Using the Monitor for the First Time
Although this is essentially a plug-and-play type monitor, there are a
few things to note before you begin using it.
o -There is a sheet of protective film covering the screen –
remove this before using the monitor.
o -Do not block the air vents on the monitor
o -Do not plug anything into the “Zoom” port other than the
special Zoom/Peaking Trigger Remote accessory (NOTE:
Never plug a camera zoom control into this port).
o -Never use the AC adapter and battery at the same time –
only use one power source at a time.
Connect the AC power supply to the monitor (14) and power up
your camera.
Connect the HDMI cable to your camera and the monitor. If you
need the HDMI signal to go to another monitor or location, use the
“HDMI OUT” (13).
Turn on the power switch located at the back of the monitor (15).
Page 4

Basic Picture Settings
Aspect Ratio - The monitor should automatically detect and display the correct aspect ratio, however, you are able to manually select
the aspect ratio mode by pressing the 4:3 / 16:9 button.
Color / B&W - You can also switch to monochrome mode (black & white) by pressing the B/W button. Some users find this mode useful
for critical focusing.
DSLR Scaling - If you are using a DSLR camera like the Canon 5D and the image doesn’t fill the monitor screen, you can press the
▼/Camera button to turn DSLR scaling “ON” to fill the screen. Otherwise, leave this setting “OFF.” NOTE: With Canon 5D Mark III,
you may have to press the camera’s “INFO” button a few times until the image fills the screen of the M5 monitor.
Picture Settings - To change the picture settings (brightness, contract, saturation, sharpness), first hit the side arrow buttons (◄/Vol- &
►/Vol+) to enter adjustment mode, then hit the up/down arrow buttons (▲/Scale & ▼/Camera) to scroll through the setting categories.
Once you’ve reached the picture setting you want to adjust, use the side arrow buttons (◄/Vol- & ►/Vol+) to make the adjustment. All
other picture, display and system settings are changed through the menu system.
Advanced Menu Settings
Press “Menu” and then the up/down arrows (▲/Scale or ▼/Camera) to find the submenu you wish to enter, then press “Menu” to enter
that submenu.
Once in the submenu, use the up/down arrows (▲/Scale or ▼/Camera) to select the setting you wish to change and then press
“Menu” to activate the desired setting.
A diagram of the menu settings on the next page maps out all the features and settings available through the menu.
The VZ-M5 monitor is covered by a limited one-year warranty for parts & labor. This warranty does not cover failures caused by
damage or abuse (e.g., plugging incorrect power into monitor, cracked screens cause by impact) www.varizoom.com
Page 5

Page 6

Optional Folding
Sunhood/Screen protector
Optional Rubber Case
Protector
Optional HDMI Cable
Locks
Optional Zoom / Peaking
Trigger Remote
Go to www.varizoom.com for accessory info
 Loading...