

Page 1
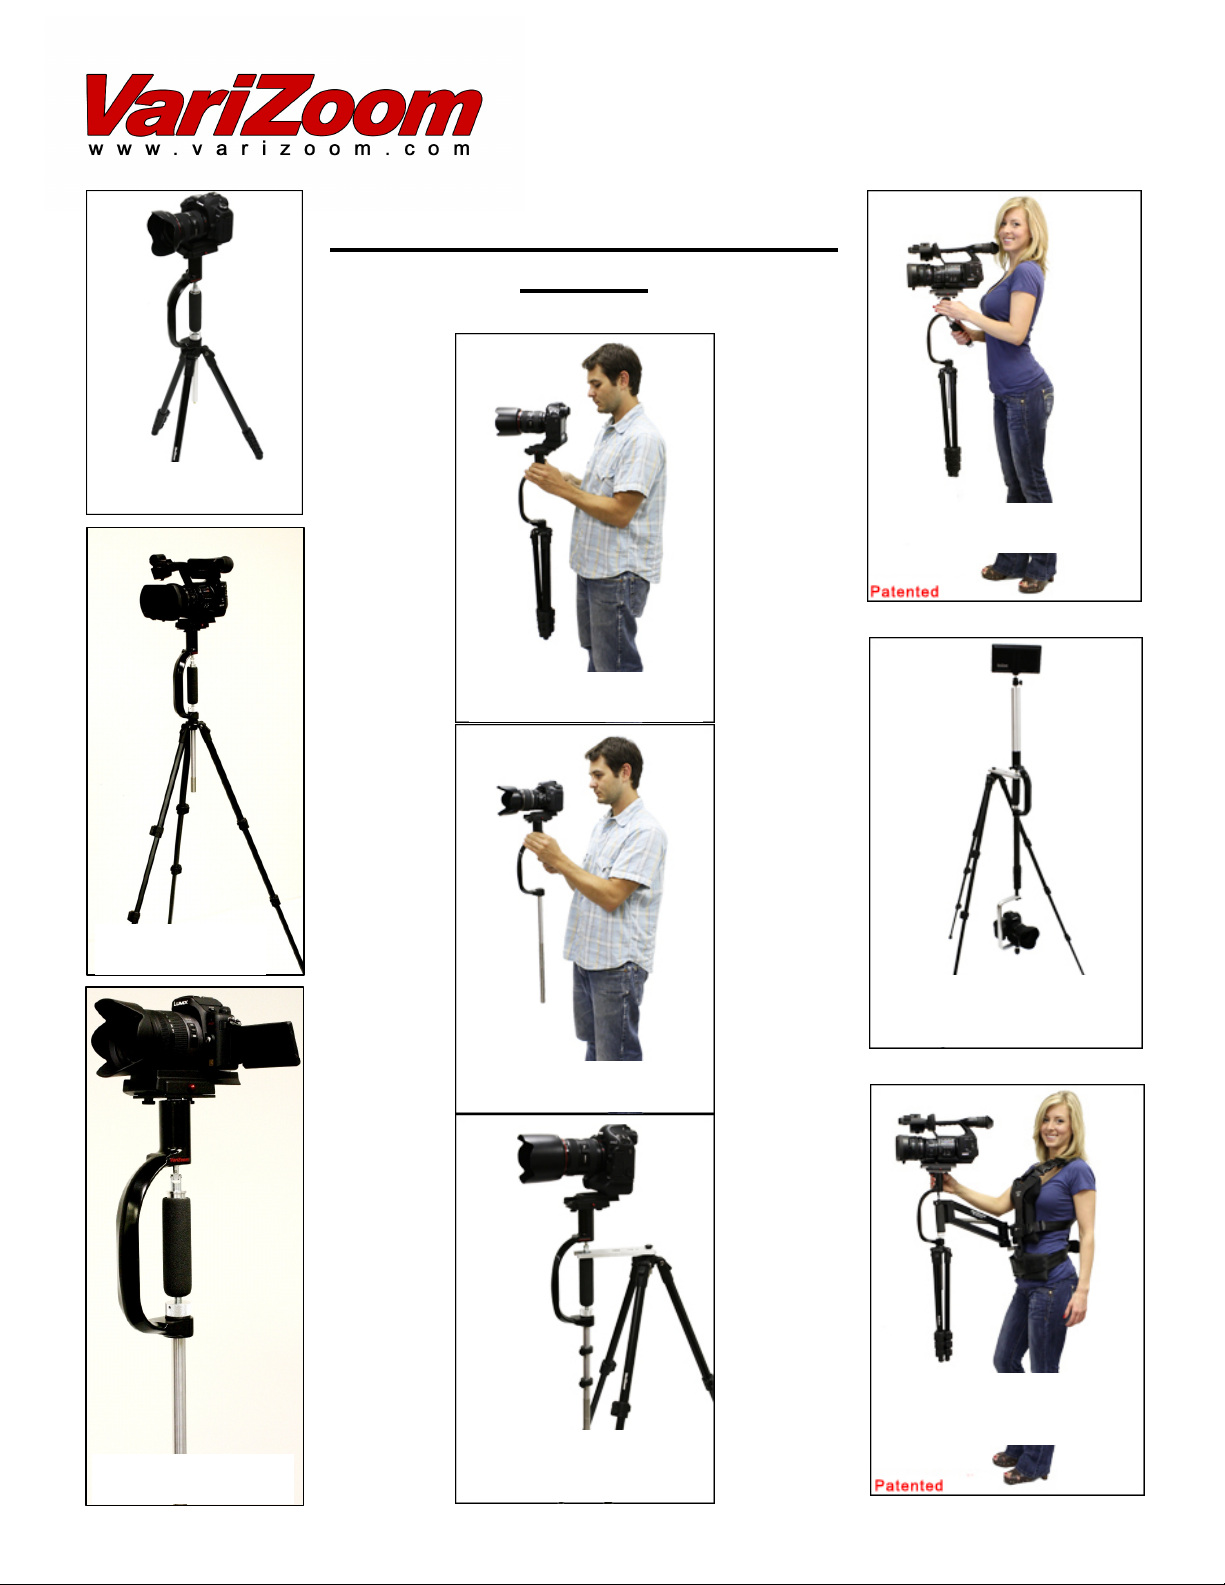
CrossFire FP
I
R
y
Multimode Stabilizer & Tripod
Tripod/Stabilizer Mode
w/ Canon 5D Mark I
System
PATENTED
Full Range Stabilizer Mode
w/ Canon 1D Mark IV
Full Range Stabilizer
Mode w/ Son
PMW-EX1
Lite Stabilizer Mode w/
Panasonic Lumix DSL
OPTIONAL LOW MODE on
Docking/Balancing Stand w/
Canon 5D Mark II
Lite Stabilizer Mode w/
Canon 7D
OPTIONAL DV SPORTSTER
Arm/Vest Upgrade w/ Sony
PWM-EX1
Lite Stabilizer Mode on
Docking/Balancing Stand w/
Canon 1D Mark IV
Page 2
CrossFire FP Manual
Thank you for purchasing the versatile CrossFire FP, our patented stabilizer/tripod based on the bestselling FlowPod. The CrossFire FP offers several shooting options that will help to improve and
distinguish your productions. The CrossFire FP comes supplied with the following: Dockable
Lightweight Handheld Stabilizer, Removable 3-stage Tripod Legs, balancing plate (VZ-FPB), and
quick-release camera plate.
The CrossFire FP can be used in at least 6 distinct operating modes: 1) Lightweight, compact,
dockable handheld stabilizer for small cameras & DSLRs, 2) Full-range handheld stabilizer for larger
cameras, 3) Tripod Mode, 4) Low Flow Mode for moving low-level shots (w/ optional XFLF kit), 5)
Fixed Low Mode on Docking Stand for static low-angle shots, 6) Professional Arm & Vest Supported
Stabilizer (w/ optional DV Sportster or Navigator system). Since the CrossFire was designed with
versatility in mind, you may discover other creative ways to use it, but read this first.
WARNINGS:
- We do not suggest running at full speed with this unit
- Do not use it in stabilizer mode w/ legs fully extended.
- Do not overload the CrossFire FP or lean on it
- Do not over-tighten the grip/gimbal assembly – DAMAGE may
result
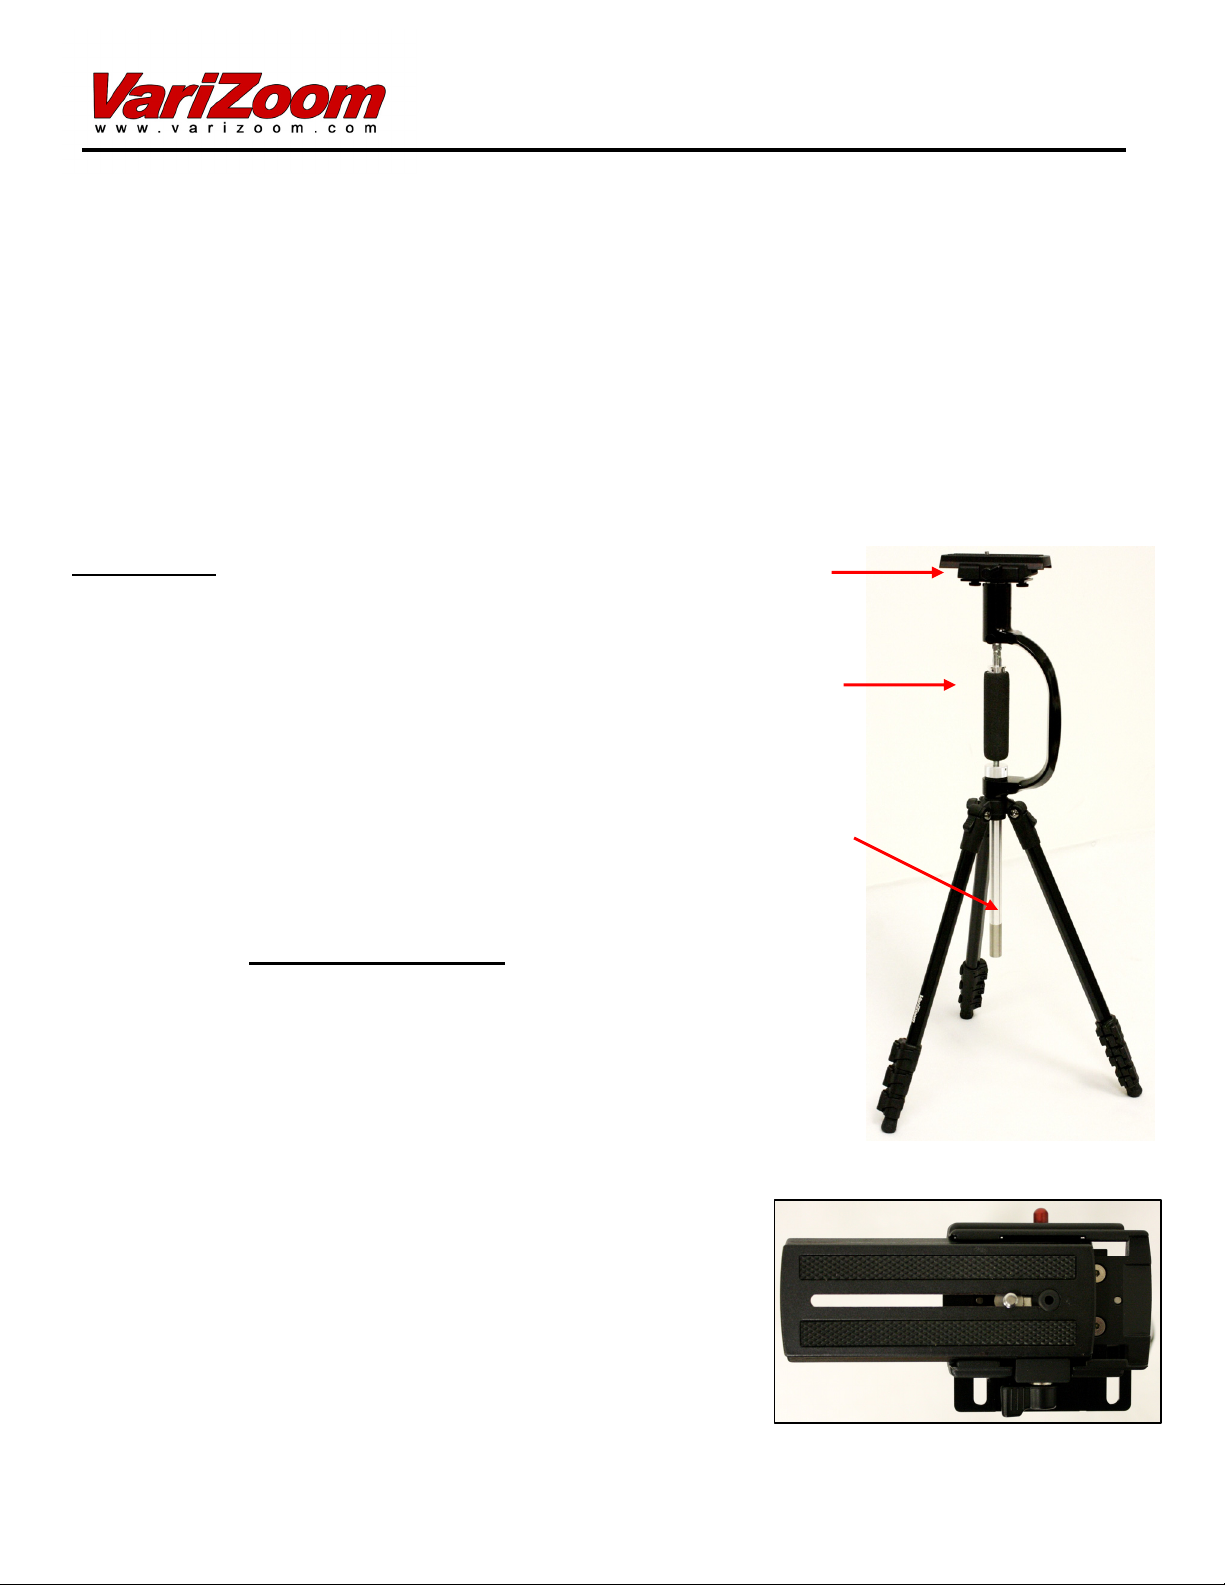
X-Y Plate
Gimbal / Grip
It may take a little while to learn how to use the
CrossFire FP properly, so please read the instructions
thoroughly before attempting to use it. As packed, the
unit is configured for basic stabilizer mode, and you will
have to complete a few steps before you’ll be ready to
Counterweight
Adjustment/Elevation
Shaft
shoot.
STABILIZER MODE
Attachment and Balancing
1. The first step is to attach the camera to the quick release plate (the
long top plate). Detach the quick release plate by loosening the
locking lever and depressing the red release button on the opposite
side.
Find the lengthwise center of gravity of your camera. Do this
by balancing the camera on top of a pen or pencil oriented
perpendicular to the camera’s length (‘sideways’). The spot
where the camera balances best is the lengthwise center of
gravity.
Position the center of gravity at the center of the mounting
plate and fix the camera to the plate using the appropriate
size screw. Put the mounting plate back onto the X-Y
assembly and tighten the locking lever. Now you are ready to start balancing the unit.
3-stage Tripod
2
Page 3
On stabilizer balancing
The basic idea of stabilization is to enable the operator to keep the camera level and to move it fluidly. This is achieved
through careful counterbalancing and a low-friction pivot point (the gimbal). In practice, this means you want the section
of the CrossFire FP below the gimbal to be effectively ‘heavier’ than the upper section (vertical balance), and you want the
camera’s mass to be centered on the pan axis of the gimbal to keep the camera level (horizontal balance). Vertical
balance is adjusted by adjusting the position of the tripod and/or adding weights to the counterweight shaft, while
horizontal balance is adjusted by positioning the X-Y plate side-to-side and front-to-back.
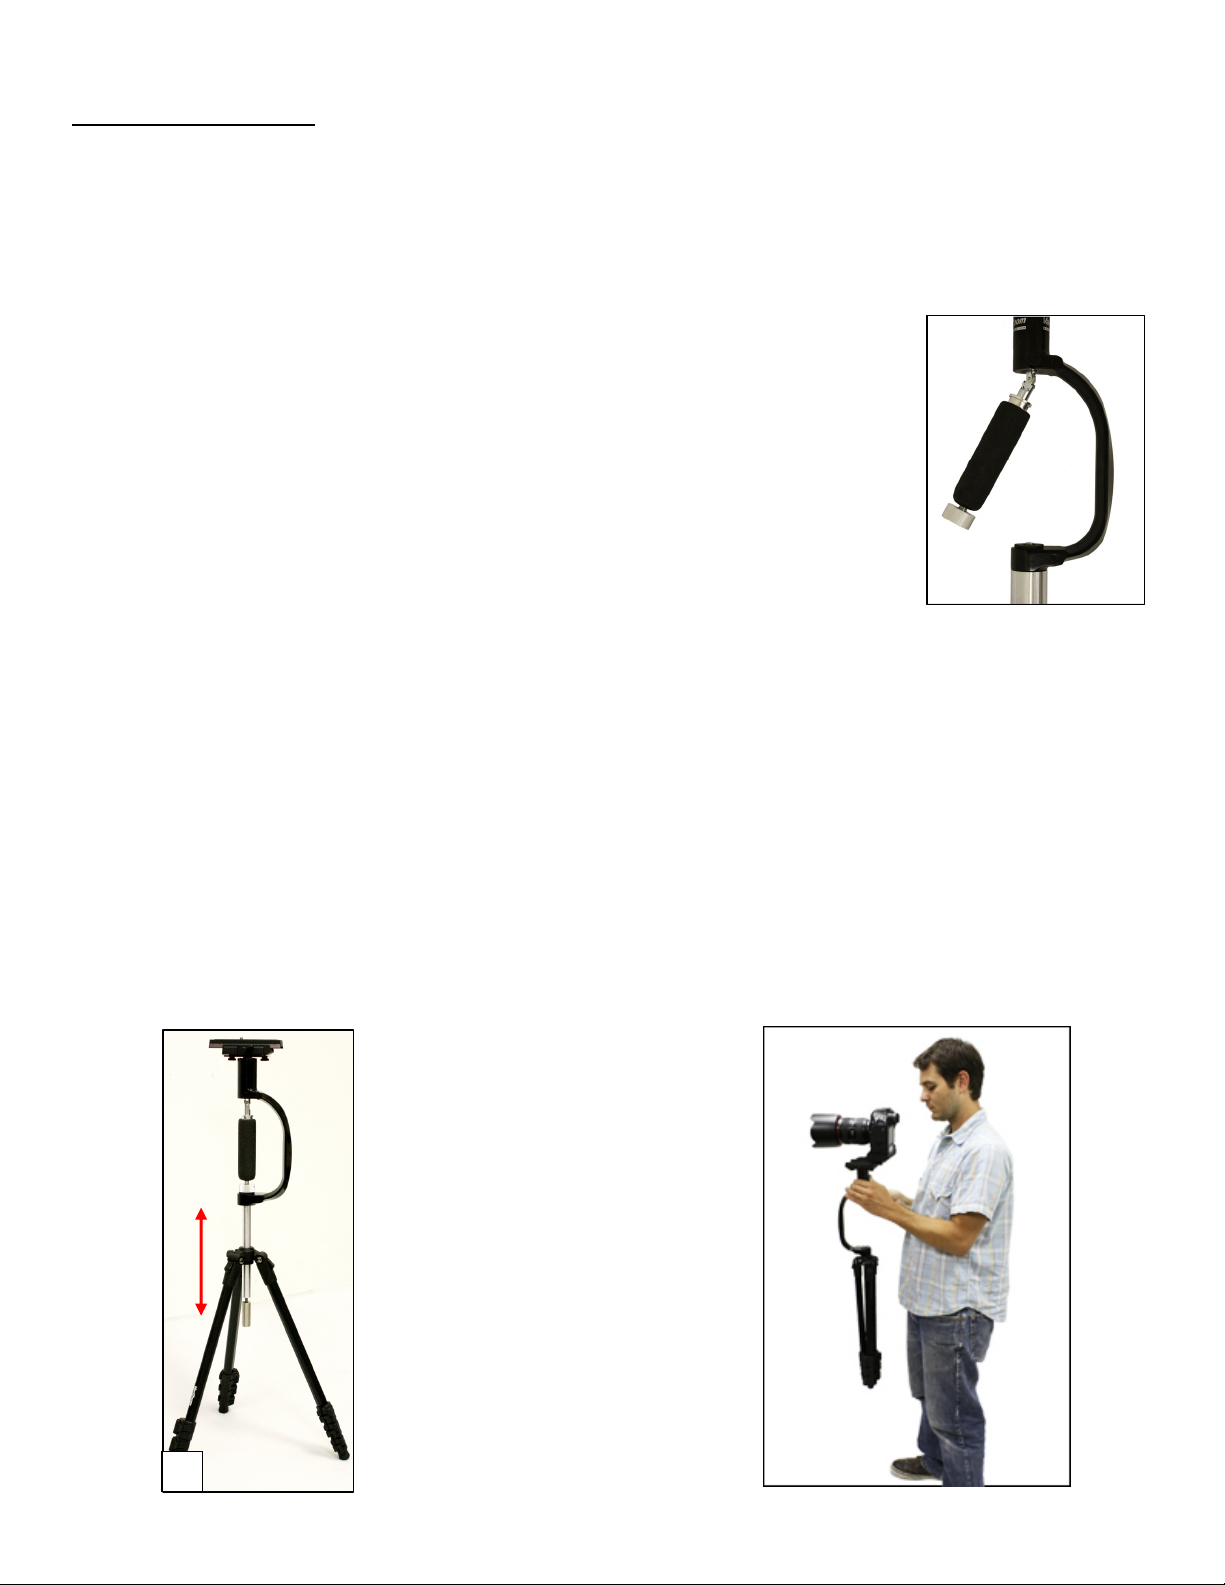
2. In order to center and balance the camcorder you’ll have to unlock the
gimbal/grip assembly. It locks inline using a threaded knob that extends
downward from the grip and butts up against the base. To unlock the
assembly, you must thread the knob back into the grip. To do this, start by
loosening the black ‘brake’ knob above the gimbal, and then twist the
handle clockwise while turning the knob counter-clockwise.
Thread the knob into the grip until it is flush. Now the grip should move
freely at the gimbal mount. Notice the fluid motion of the gimbal and the
wide range of available motion. Also note that the knob below the grip may
strike the C-handle if the grip is released. Although this will not cause any
mechanical damage, the knob could scratch the body, so be advised.
3. Now that the grip is free, you can begin balancing. In order to balance the unit properly, you need
to have the camera set up exactly as it will be used. For example, you should remove the lens
cap, flip out and position the LCD monitor, and add on any accessories prior to balancing the unit.
The smallest change to the weight distribution on the camera can significantly affect the balance
of the CrossFire FP.
4. Operating Weight Range –
A) Full Range Mode (w/ tripod): The CrossFire FP can be operated in stabilizer mode with the
tripod attached when used with cameras weighing above 5 lbs. If the camera weighs less than 5
lbs., the only way to operate with the tripod attached and still achieve vertical balance is by adding
weight above the gimbal (such as a camera weight plate or our FP1 weights) or using a riser
below the camera.
A
3
Page 4

B) Lite Mode (w/o tripod): Cameras under 5 lbs can also be used in lite mode by removing the
tripod entirely. As equipped, the lite mode will work with cameras up to about 1.8 lbs. The added
advantage of the Lite Mode is that when the stabilizer isn’t being used, it can be docked on the
tripod portion. To use the lite mode with heavier cameras, purchase the deluxe counterweight kit
(VZ-XFFP-WK).
5. Horizontal Balance - Adjust the X-Y assembly (pictured below) so your camera’s mass is
centered on the pan axis (the centerline of the CrossFire FP gimbal). Loosen the locking lever on
the side & round thumbscrews underneath, then adjust the X-Y assembly front-to-back and sideto-side until the camera is level, then tighten the lever & thumbscrews.
6. Vertical Balance - Now you can check the vertical balance of the CrossFire FP to see if you need
to add, remove, or adjust the position of the counterweights. Use as few weights as possible, and
start with the weights at the top of the shaft. When vertically balanced, the CrossFire FP should
not lean or sway when moved around.
4
Page 5

“The Drop Test”
(FlowPod shown for illustration - same concept applies to CrossFire FP)
To test the vertical balance, hold the unlocked grip straight up
and turn the CrossFire FP on its side to a horizontal position
(picture below), then let it fall back to the vertical position (the
“Drop Test”). It should fall gradually, taking 2-3 seconds to go
from horizontal to vertical. Note that it will swing past the
Start = 0 Seconds
vertical position – you are only counting the time it takes to go
Counting . . .
90 degrees (from horizontal to vertical).
If it does not swing down, adjust the
position of the tripod on the counterweight
adjustment shaft and or add/remove
weights from the shaft. If that doesn’t help,
add another weight and retest. If the
CrossFire FP swings down too fast, you
. . .still counting
should remove weights or adjust the shaft
position upward, as necessary.
Vertical Balance should be fine-tuned
until the CrossFire FP stays completely
vertical when you move it around
without any significant swaying, so your
drop time may vary slightly depending
on how you fine-tune.
Finish =
2-3 seconds
Add or
remove
stainless
weights
NOTES:
-With some very small cameras, you may need to add a weight above the gimbal to achieve a
good balance (attach weights to the ‘neck’).
–With some heavier cameras (over 5 lbs or so) you may need more than 3 counterweights on
the counterweight shaft. The XFFP extra weight kit is available for a nominal charge.
7. After setting your counterweight, you may want to fine-tune the X-Y adjustments. Once you’ve
achieved a good balance, you are ready to begin practicing with the CrossFire FP. There are
two important things to keep in mind at this point: (1) The CrossFire FP is designed to be
operated with two hands and (2) it requires practice to master (but it only gets easier with time).
5
Page 6

8. You can adjust the drag on left-right movement by slightly tightening the round thumbscrew brake
just above the handle, or you can leave it completely loose and steer with your free hand. Keep
the handle unlocked for operation, and we recommend using your free hand to steer and aid in
stabilizing the unit. Using your thumb and forefinger, lightly grasp the ‘neck’ of the CrossFire FP
body (next to the brake) to control the left-right movement. Practice walking with the unit and try
to hold it close to your body. Move deliberately and carefully – the CrossFire FP cannot
compensate for drastic movements.
Spend some time practicing to determine what works best for you. Operator skill is critical for
success with a handheld stabilizer. We recommend shooting at the widest angle possible, and you
may find that a wide-angle lens adapter adds to the overall effect. You will also probably want to
shoot at a fixed focus point (manual focus) to prevent the ‘hunting effect’ caused by autofocus
constantly adjusting on a mobile camera.
TRIPOD MODE
1. To use the CrossFire FP in tripod mode, you should lock the handle
in place and tighten the brake. This will improve stability and
handling.
2. To extend the leg sections of the tripod pull out on the hinges and
slide each section out, then lock the hinges back in place.
Specifications
Weight
Min Length (folded)
Min/Max Tripod Mode Height
Counter Weights
Camera Weight Range
Construction
Warranty
The VZ-FP has a 2-year factory warranty. Please retain your sales receipt for warranty verification. www.varizoom.com
512-219-7722.
Lite Mode = 3 lbs / Full Mode = 5.5 lbs
Lite Mode = 24” / Full Mode = 31”
20” / 69”
Inline Wts 2 x 0.22 lbs each / Collar Wts 2 x 0.14 lbs each
1-9 lbs (Lite Mode = 0.35-1.8 lbs as equipped or 0.35-5 lbs w/ optional XFWK kit /
Full Mode = 5-9 lbs as equipped or 2-9 lbs w/ optional weight plate)
Aluminum
2 year parts/labor
/
6
Page 7

Optional Accessories and Upgrades
VZ-XFFP-WK – Additional weight kit for CrossFire FP. Especially useful for Lite Stabilizer Mode –
includes 3 sliding weights, 2 stainless inline weights (different sizes), additional microweights.
VZ-DVSPORTSTER – Lightweight, compact Arm/Vest System
upgrade (cameras up to 7lbs)
VZ-NAVIGATOR – Professional Heavy-Duty Arm/Vest
System upgrade (cameras up to 10lbs)
VZ-XFLF
bracket, telescoping lower extension, fixed upper extension w/ swivel
mount (for optional monitor – VZ-XFLF kit DOES NOT INCLUDE
MONITOR)
– Low Mode Kit for CrossFire FP. Includes low mode
7
Page 8

Balancing/Docking Plate and Stand for the
CrossFire FP
The VZ-FPB consists of the mounting plate and cclamp
Using the VZ-FPB is simple. The
CrossFire FP grip handle has a machined
groove near its top that enables you to slip
the handle into the u-shaped slot of the
VZ-FPB plate, securing the CrossFire FP
for the balancing procedure.
First you must secure the FPB to a sturdy, flat, level surface (e.g., table
or workbench) with the supplied clamp. Note that the top of the plate
has a recessed circle to accommodate the fixed contact pad of the cclamp. See the picture above.
Once you have secured the FPB, slide the
CrossFire FP handle into the u-shaped slot
of the plate. The handle should drop into
the sunken round section at the back of
the slot, locking the CrossFire FP into
position. Make sure your CrossFire FP
handle is unlocked and adjust the X-Y
assembly so the camera becomes level
(horizontal balance).
For vertical balancing, the FPB is a good
place to attach and adjust your weights.
You can do the ‘drop test’ from the FPB,
but the range of motion will be limited and
you should exercise caution so neither
CrossFire FP nor camera strike the table.
For final testing, you’ll need to be holding the CrossFire FP to check the side-to-side stability, so plan
on approximating the vertical balance on the FPB and doing the final tweak after the handheld test.
You may find that you’ll want to tweak the overall balance after handling the unit for a few minutes.
Although the simple guidelines in the instructions explain how to balance the unit, the art of balancing
the CrossFire FP is really in acquiring a feel for correct balance. After balancing your camera
properly one time, it’s a simple matter to do it again.
The FPB is a major help in balancing, but it will also provide a docking stand to hold the CrossFire FP
while you’re not using it. www.varizoom.com
8
 Loading...