

Page 1
Thanks for purchasing a Solo Jib from
VariZoom. This lightweight telescoping jib is very
easy to set up and use, but because it’s a
counterweighted system that elevates your
camera, you must exercise caution when
operating the Solo Jib. Without proper setup and
operation, damage to the equipment and/or
injury to the user and people around the
equipment may occur.
Included items: Solo Jib, mounting stud & hand
knob for bowl-mount tripods, 5.5 lbs counter
weight (“2.5kg”), bar fitting and nut/spacers for
mounting counterweight, carrying bag.
Watch the video:
http://www.youtube.com/watch?v=M6dRv1vBr7g#t=52
1) Never remove the camera or counterweights without the appropriate support to
prevent the jib from swinging up or down.
2) Do not extend the telescoping sections of the jib while the camera is mounted. The
weight of the camera might cause a section to slide suddenly and pinch your hands
or even damage the camera.
3) Make absolutely certain that the jib is securely mounted to the tripod and leveled so
no slipping or loosening can occur. Also make sure the tripod is adequately level and
stable relative to the ground.
4) Tighten all joints thoroughly to prevent unwanted extension/contraction.
5) Never swing the jib around in a crowd of people.
6) Set up your camera and jib exactly as you intend to use it before going out on a
shoot. The main factor to dial in is the amount of counterweight needed. Unless your
camera is very small, to use the jib at its longest extension, you will need additional
weights. Likewise, using the jib at its shortest may require smaller weights. Standard
barbell plates with a 1” hole can be purchased at sporting goods stores. We
recommend buying one each 1.25, 2.5, 5 and 12.5 lbs plate for maximum flexibility. For
the maximum 7lbs load at the camera platform at full extension, you’ll need about 19
lbs total.
This manual covers both the aluminum and carbon fiber versions of the Solo Jib. Setup
and Operation for both are identical, with the only substantial difference being the lighter
weight of the carbon fiber version. If you have any questions or concerns about using
your Solo Jib, please contact us info@varizoom.com or call 512-219-7722.
Page 2
Step 1 – Setting up the Tripod
The Solo Jib can be mounted to nearly any type of industry-standard tripod, including
65mm & 75mm bowl-mount, flat base w/ 3/8”-16 stud, and 100mm bowl-mount (with
purchase of optional adapter). However, if you are using a tripod from another
manufacturer, please make sure it is capable of handling the load of the jib,
counterweights, and camera, and that it’s sufficiently stable to handle the operational
demands of the jib. It may be a good idea to sandbag or counterweight your tripod to
add stability and prevent tipping over, and always make sure the leg sections are
properly tightened to prevent sliding and toppling of the entire assembly.
When setting up the tripod, make sure you have an adequate radius of clearance to
operate the jib. You should have at least an arm-span of clearance all the way around
the tripod to be safe. Set the tripod height and level the legs as best possible. Lock the
legs and secure the tripod. Next you will mount the jib to the tripod.
Step 2 – Attaching the Solo Jib to the Tripod
We recommend tightening the tilt brake and pan brake before attaching the Solo Jib to
your tripod.
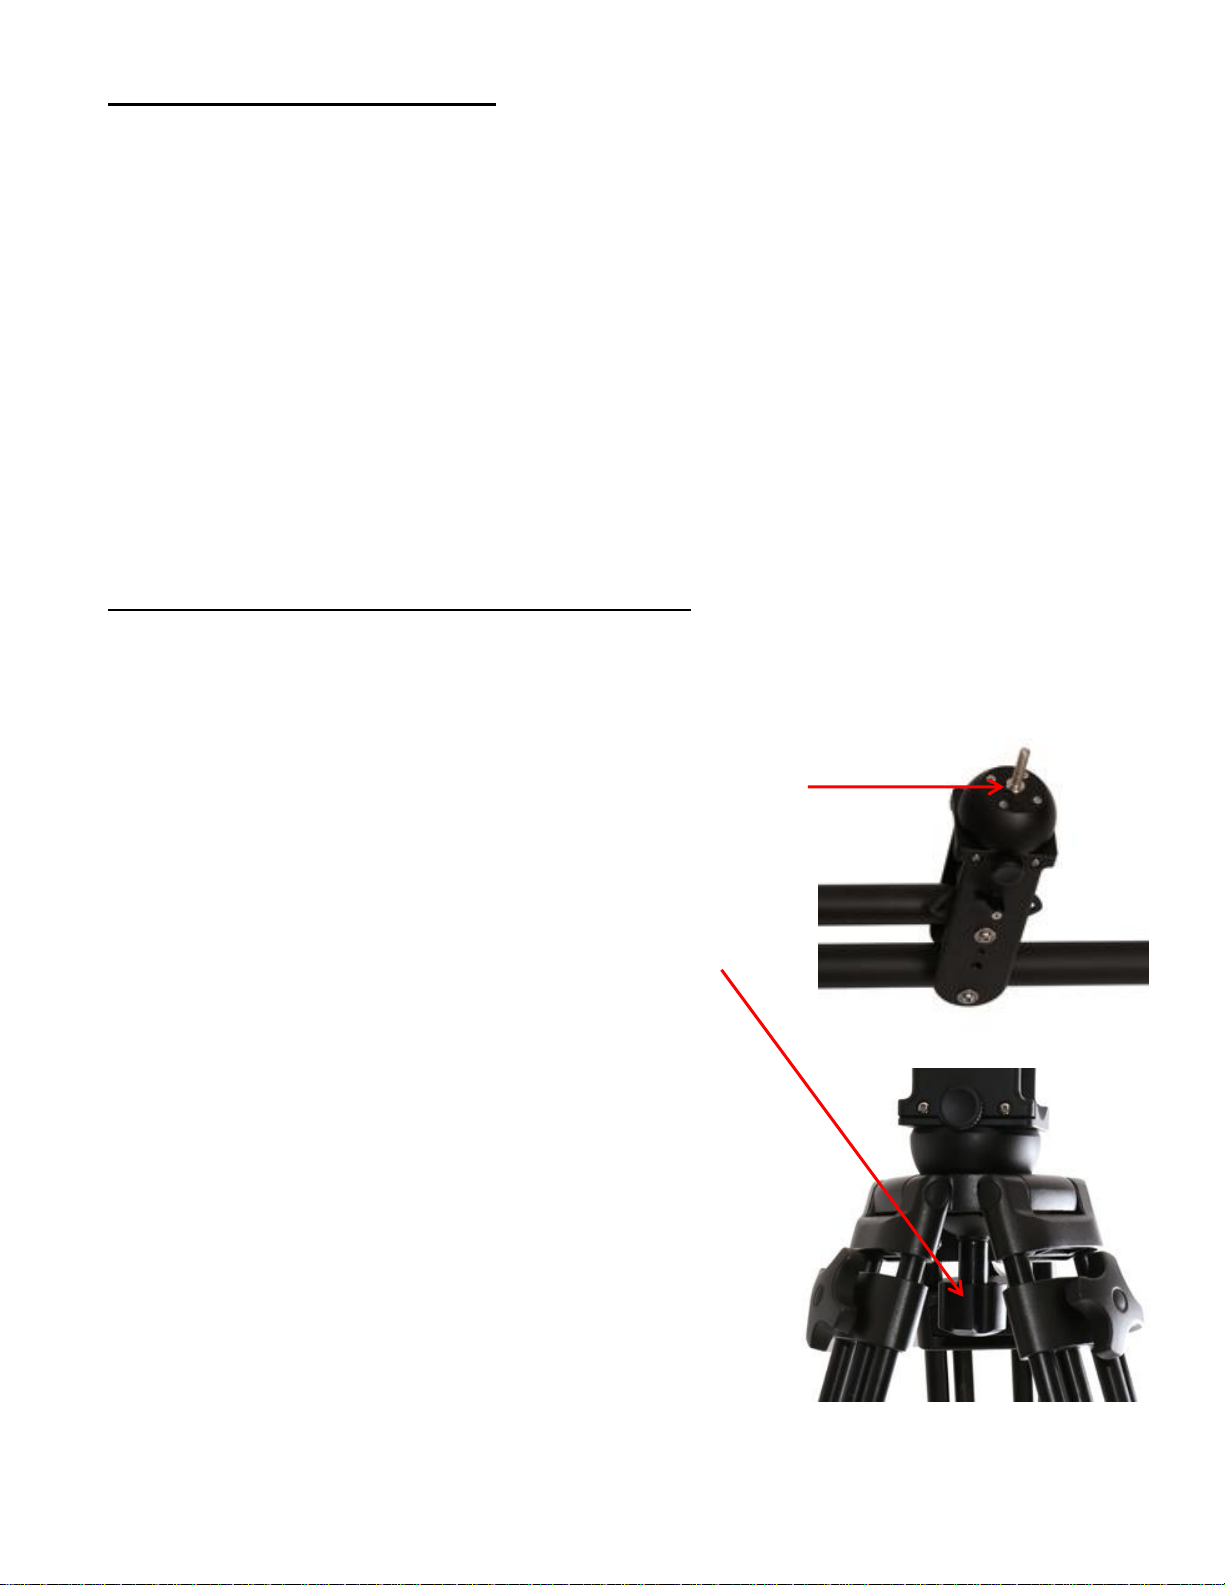
Option A (75mm or 65mm tripod) - If you’re mounting to a
75mm or 65mm tripod (like the VariZoom VZTK75A), you will
need to attach the supplied mounting stud to the jib base.
Tighten the stud thoroughly, then fit the jib base into the
bowl mount of the tripod and use the supplied hand knob
to tighten and level the jib base. To prevent the jib from
shifting, make sure you tighten the knob thoroughly.
Page 3
Option B (flat-base tripod with 3/8”-16 stud) - If
you’re mounting to a flat-base tripod with 3/8”-16
stud, the jib base will thread directly onto that stud.
Use the set screws on the flat base to prevent
loosening.
Option C (100mm tripod) – If you want to mount the
jib to a 100mm tripod, you will need the optional adapter plate (VZBR10075, not pictured).
Then the tightening will work
Once you have attached the jib to your tripod, level it and lock it in place. It is very
important that you secure the tripod and jib so nothing can slip, fall over, or collide with
people or surrounding objects.
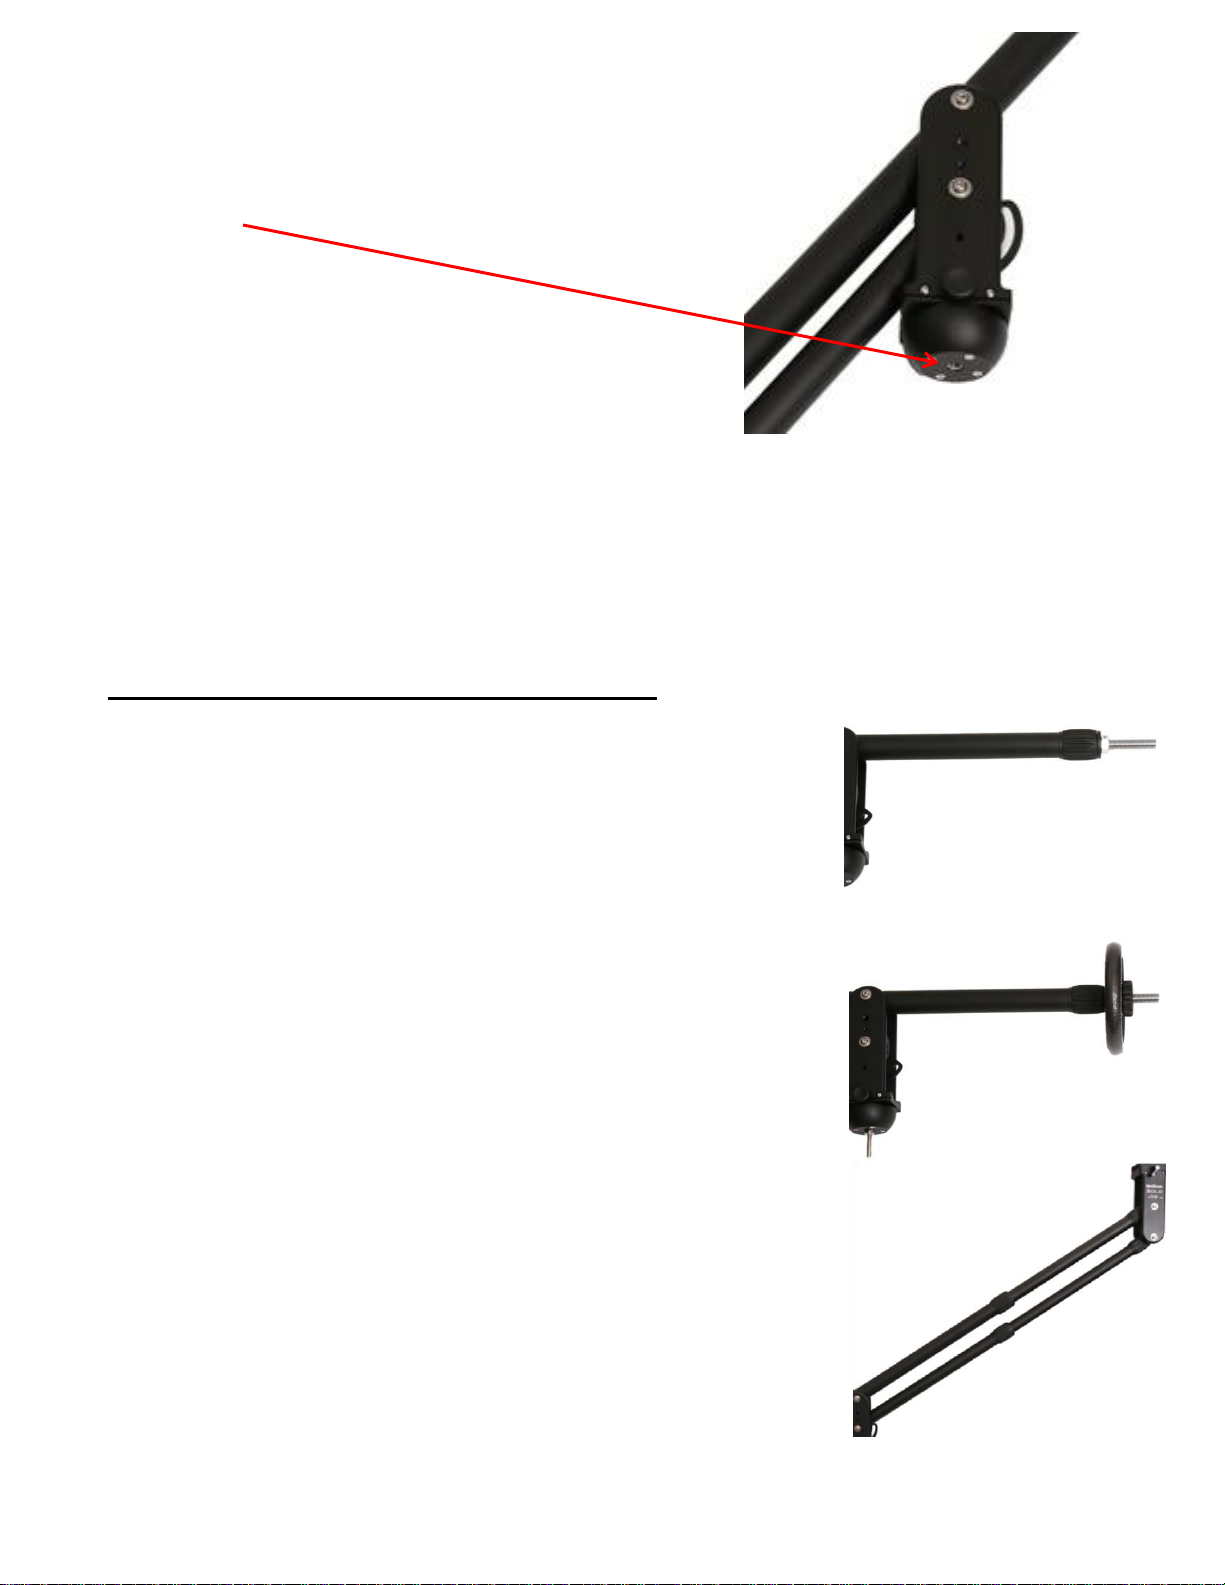
Step 3 – Setting the Length of the Solo Jib
The Solo Jib has a 2-stage telescoping arm and singletelescoping tail design that allows a balance of maximum
extension with good rigidity. The longer the arm (front of jib) is
extended, the more you will have to extend the tail (back of
jib). The jib will operate well at the shortest and longest
configurations as long as it’s properly set up and used within
the specifications.
Start by adding the supplied counterweight to the tail of the
jib. Before you can add the counterweight, you must attach
the bar fitting to the tail, then add the weight itself. You can
use the second spacer/nut if you add more than one weight.
The jib will start a little tail-heavy, but as you extend the jib it
will balance out. Decide how long you want to extend the
jib, then start by extending the first stage.
Loosen the first set of twist locks (the larger set closest to the
tripod), grab the camera platform (front end w/ “Solo Jib”
printed) and pull out the first stage to the desired length. Note
the bubble level on the camera platform (under the camera
plate). Use the bubble level to even the tube lengths until the
camera platform is level. You may also have to slightly twist
the camera platform side-to-side to get the bubble centered and the platform exactly
level. Tighten the twist locks.
Page 4

If you need to make the jib longer than the
max extension of the first stage, then you’ll
have to extend the second stage. Using the
second set of twist locks, repeat the same
process as before, extending the second
stage and making sure to level the platform
and tighten the twist locks.
If the jib is front heavy, you’ll want to extend
the tail by loosening the twist lock and pulling
the tube out slowly until the jib stays level. The
twist lock for the tail may seem jammed on
first use – do not worry, it requires more force
and you won’t damage it. If the twist lock
initially turns a small amount but then seems
stuck, you have not yet released the locking
mechanism. Go ahead and give it a hard twist and it will break loose, then you will feel it
unthreading. After extending the tail to the desired length, tighten the twist lock on the
tail. Next you’ll be mounting your camera, so we recommending using a table or stand to
support the jib to prevent it from falling down.
Step 4 – Setting up your Camera on the Solo Jib
Before attaching the camera, it’s a good idea to
have some sense of the amount of counterweight
needed to balance the jib. Make sure the jib is level,
too. You may need to support the front of the jib
(e.g., a chair or lightstand) while attaching the
camera. Make sure all the twist locks are tightened
before attaching the camera. Use the appropriate
screw to fix the camera plate to your camera, then
slide the plate w/ camera attached back into the
receiver on the camera platform. Tighten the slide
plate lock.
Counterweighting guide
Because the arm and tail length can be adjusted continuously, giving a precise figure for
“Camera X requires Z lbs of weight” is not really possible. Instead, we’ll offer some
examples. At the maximum load of 7lbs (e.g., Sony PMW-EX3) with the jib fully extended,
the jib can be counterbalanced using 19.25 lbs (weights: 1.25 + 5.5 + 12.5) and the tail just
an inch short of full extension. So here’s a quick guide along those lines (numbers are not
exact, for comparison only). Use the second spacer/nut when adding extra weights:
Page 5

Fully-Extended Jib
Camera 3 lbs requires 9.25 lbs counterweight w/ tail extended almost fully
Camera 4 lbs requires 13.75 lbs counterweight w/ tail extended almost fully
Camera 7 lbs requires 19.25 lbs counterweight w/ tail extended almost fully
Half-Extended Jib
Camera 3 lbs requires 6.75 lbs counterweight w/ tail extended almost fully
Camera 4 lbs requires 9.25 lbs counterweight w/ tail extended almost fully
Camera 7 lbs requires 13.75 lbs counterweight w/ tail extended almost fully
Compact Jib (not extended at all)
Camera 3 lbs requires 6.75 lbs counterweight w/ tail NOT extended OR 3.75 lbs
counterweight w/ tail extended almost fully
Camera 4 lbs requires 9.25 lbs counterweight w/ tail NOT extended OR 5.5 lbs w/ tail
almost fully extended
Camera 7 lbs requires 13.75 lbs counterweight w/
tail NOT extended OR 8lbs counterweight w/ tail
extended almost fully
Attach the counterweights using the supplied
hardware. Once the camera is attached and the
counterweights are added, fine-tune the
balance by sliding the tail section in or out. When
the jib is level (parallel to the ground), it should
float in place once the balance has been
perfectly set. Note: at full extension, you may
notice the jib wants to move when tilted all the
way up or down – tighten the tilt brake slightly to
hold position.
Adding a fluid head
You can attach a flat-base fluid head to the camera platform of the Solo Jib (the
ChickenHead from VariZoom is an example). Use the larger screw (3/8”-16) supplied with
the slide plate to attach the fluid head and then reinsert the slide plate and lock it. The
only difference in adding a fluid head to your setup is that more counterweight will be
required and the maximum camera capacity will be reduced by how much the fluid
head weighs. Make sure to fully tighten the fluid head to the slide plate to prevent
loosening during operation.
Page 6

Step 6 – Operating the Solo Jib
Warnings: 1) Never remove the camera
while the jib is counterweighted without
proper support and assistance, otherwise
the jib might catapult and cause injury or
damage. 2) Never swing the jib around
carelessly or in a crowd. 3) Do not
operate the jib on sloping ground. 4)
Never leave the jib unattended. 4) Do not
adjust the forward telescoping section of
the jib arm with the camera mounted, or if
you do, use great caution and grasp the
camera platform, as the weight of the
camera may cause the camera platform
to flip down and pinch your hands severely.
The jib will only be as steady as the tripod on which it is
mounted, so use a sturdy tripod, and when possible,
add sandbags or other stabilizing mass to prevent the
tripod from moving and flexing.
You can attach video monitors to the jib’s pan/tilt
base using an articulated arm threaded into the ¼”20 or 3/8”-16 holes on the vertical support plates.
You can achieve smooth sweeping shots from left-toright, arcing elevation shots, and floating perspective
shots from a variety of angles. We recommend
shooting some practice footage before taking the jib
on a live shoot to ensure your comfort and familiarity
with the unit.
Essentially, using the Solo Jib is a fairly intuitive
process. Because the Solo Jib is so lightweight, in
order to achieve smooth moves, you need to
operate the jib with a soft touch. If you make sudden
moves, it will show in your images, so it’s important to
start and stop gradually to achieve smooth results.
This becomes more important the longer the jib is
extended, as any bumps or unwanted movement will
be exaggerated.
Page 7

If you keep your hands on the jib, you
may be able to operate it without the
tilt or pan brakes tightened. If you need
to take your hands off the jib, you may
want to tighten the tilt and/or pan
brakes to hold position. These brakes
are not hard-stop mechanisms, they are
soft-stops that can be pushed-through.
The most important thing to always remember when operating the jib is safety. Make sure
all camera, jib and tripod mounting and adjustment points are tightened. Do not swing
the jib over the heads of people or through crowds. If you have any questions, contact
us. Thanks!
www.varizoom.com
Accessories for the Solo Jib
SOLOGRIP – accessory grip for tail of Solo
Jibs, also allows mounting lens controller
VZ-TK75A - tripod
SOLOSLIDERDOLLY – track dolly system
VZ-M7 – monitor
VZ-MICROARM – articulated mounting arm
CHICKENHEAD – fluid pan/tilt head
Optional Solo Slider Dolly and VZ-TK75A
shown to right
Watch the Video Here: http://www.youtube.com/watch?v=M6dRv1vBr7g#t=52
 Loading...