

Page 1
StealthyPro Instructions
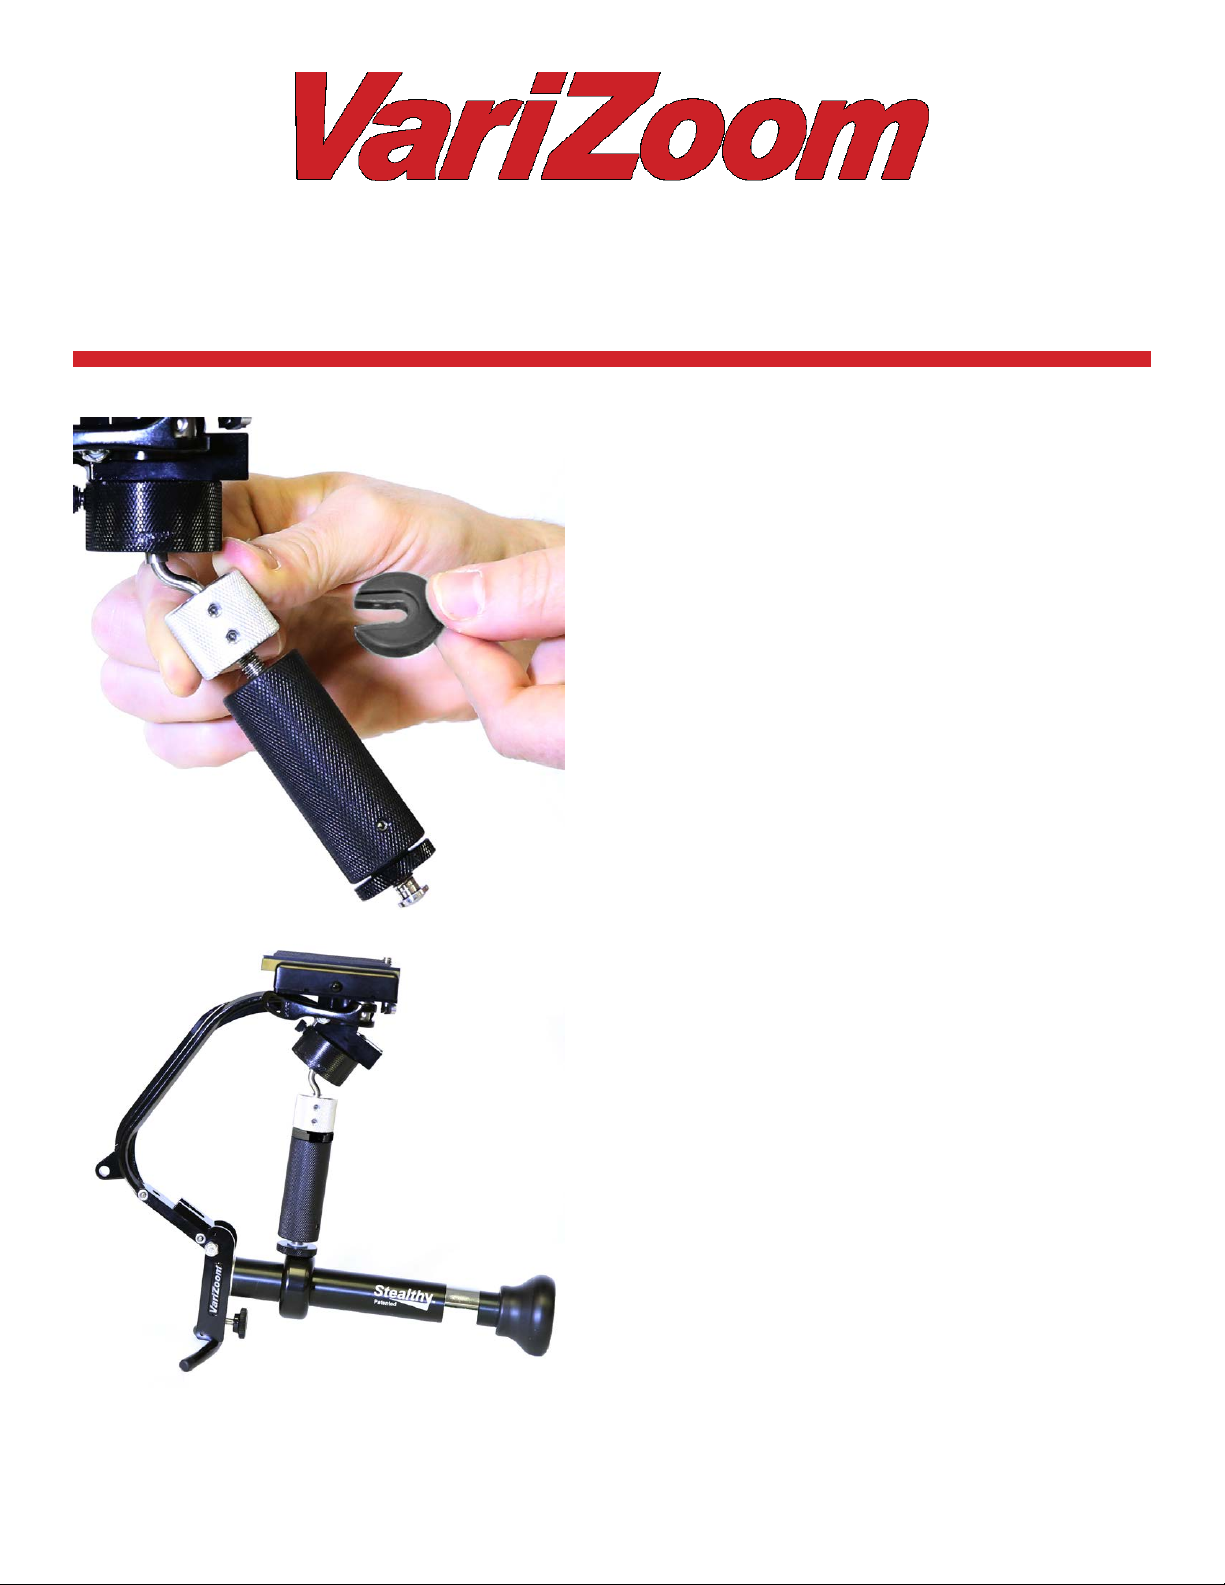
3-point Shooter Mode / Handheld
Mode / Monopod Mode
Place the black piece between the handle and
the silver ring (as pictured).
Page 2
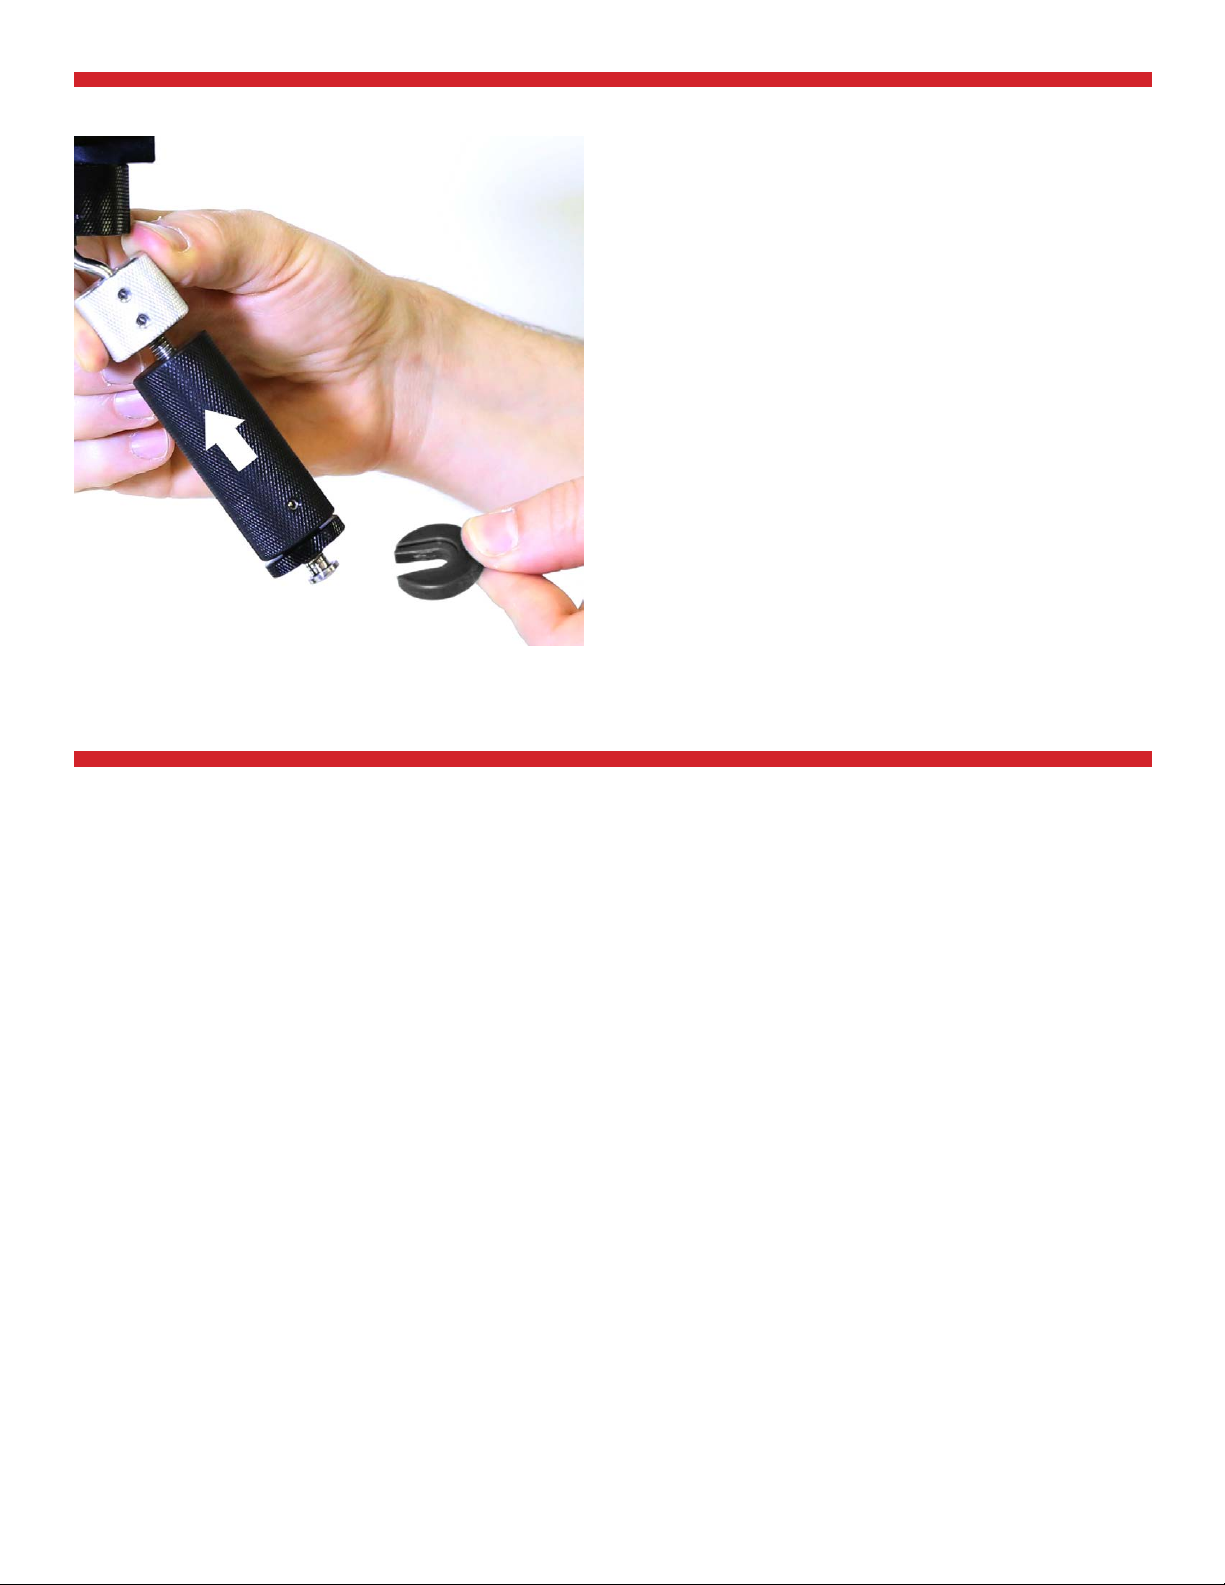
Stabilizer Mode
In stabilizer mode, thread the handle up (arrow shown in picture). This way, the handle will
clear the base of the StealthyPro. Then place
the black piece below the handle. On earlier
versions of the StealthyPro, the piece must be
inserted with the depression facing upward (as
shown). On newer versions of the StealthyPro,
it must be inserted with the depression facing
downward. In other words, insert the piece how-
ever it ts best.
For further instructions, see the Stealthy instruction manual below.
Page 3

2013 Triple Award Winner!
Instruction Manual
Thank you for purchasing the VariZoom Stealthy.
The Stealthy is a unique piece of hardware that was engineered over a long period of time and will
last a lifetime with proper use and care. The Stealthy has more handy useful modes than any other
camera accessory. You now have in your possession a device that can hang from your hip with camera, be quickly drawn when needed in single handheld mode, in seconds can be changed to either a
monopod or 3-point shooter or table top tripod or a gimbaled stabilizer.
Although it takes a few minutes, it is VERY important you familiarize yourself with adjustments in
order to change from one mode to another. Once you do understand the adjustments you will be
amazed, as will anyone watching you, when you transform your Stealthy from one useful mode to
another.
The VariZoom Stealthy has won 3 prominent Awards including The 2013 “Black Diamond Award” TV
Technologies 2013 “Superior Technology Award” as well as Videomaker’s “Best Accessory” for 2013.
Page 4
Page 5

Getting familiar with adjustments on Your Stealthy
1. Caution: Always use ngers and thumbs to adjust. Never should you need to
tighten with a hand grip. Finger strength only is required. Never turn the handle
of stealthy when the bottom of handle is engaged with another part of Stealthy
body. The handle is meant to turn freely but only when A. it is unattached at the bottom B. when the gimbal unlocked. C. When the Stealthy is in Stabilizer mode.
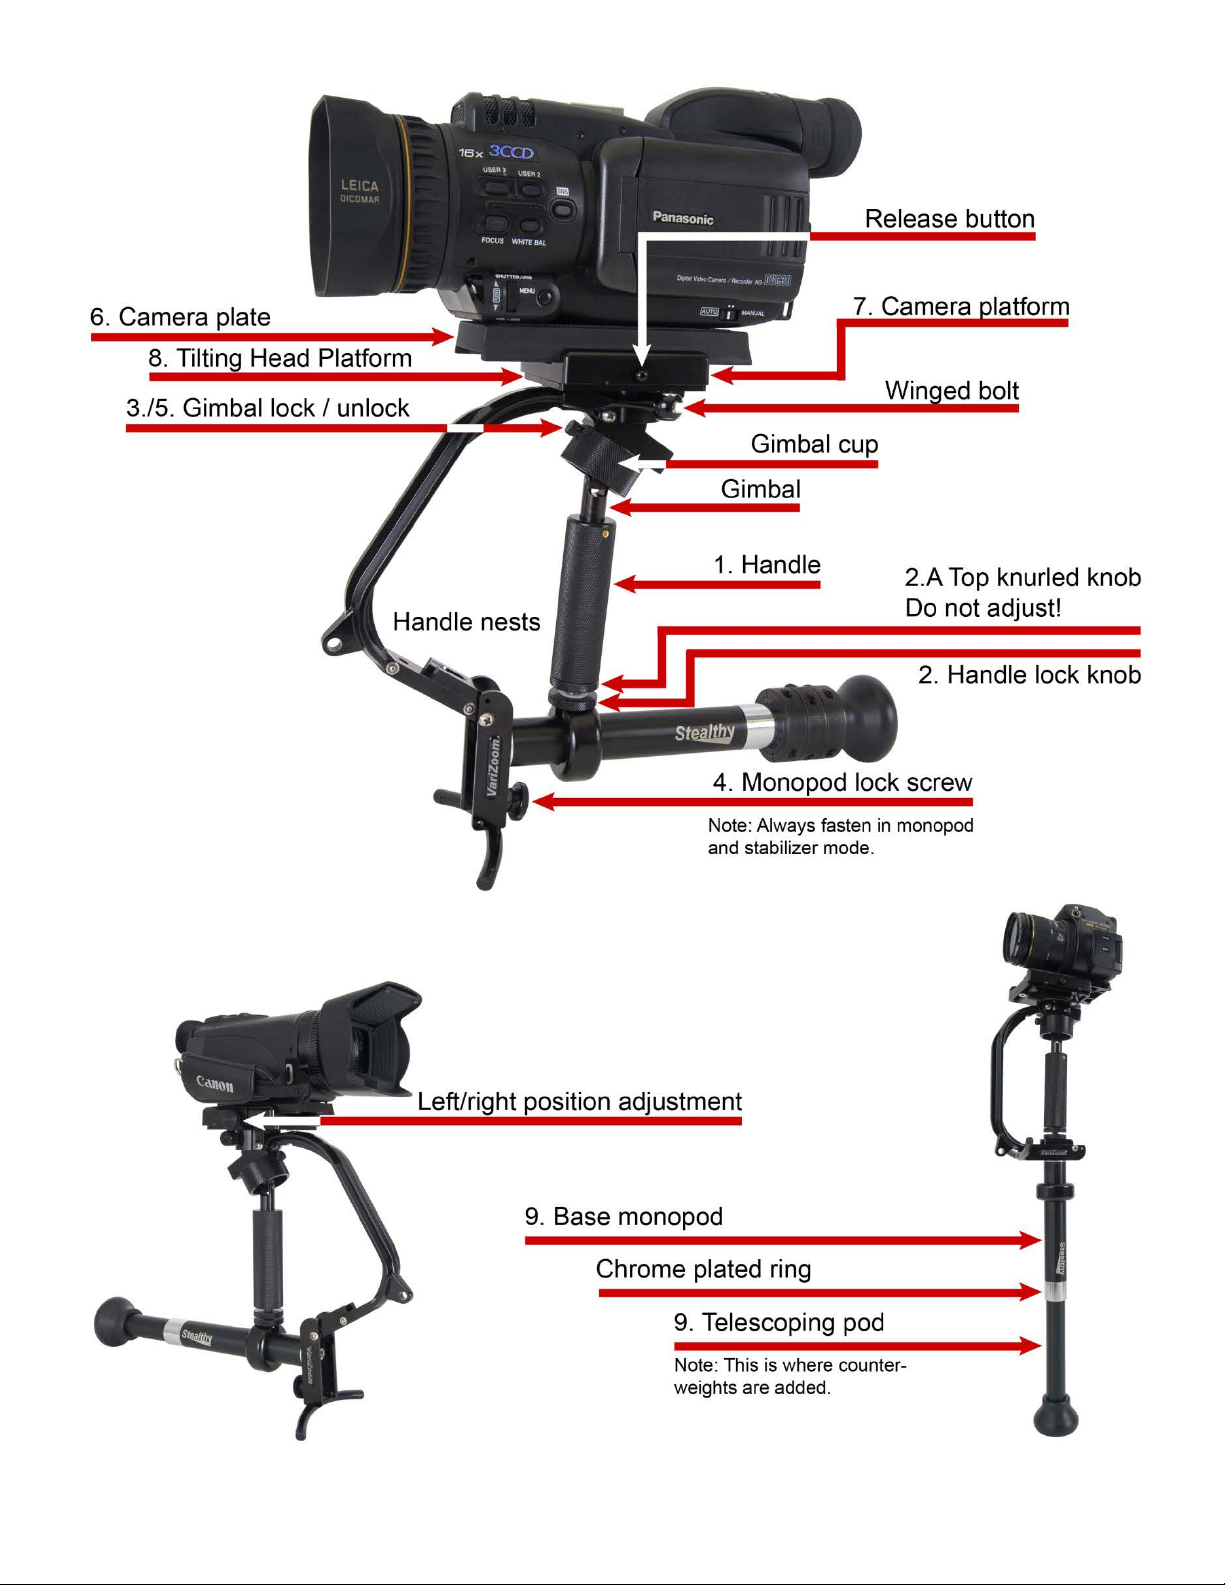
2. Handle Lock Knob: Notice at the bottom of black knurled handle there is two
narrow knurled round knobs. Only the one closest to bottom of handle is meant to
be turned by operator with thumb and index nger and should never be over tightened. This knurled knob is to capture the handle to the body of Stealthy when in
monopod mode and when in 3-point shooter mode. (note when in either of these
modes the gimbal at top of handle should never be unlocked!)
2. A. The second knob above is for factory adjustment and is thread locked as well it
has a small set screw to keep it locked. Do not adjust.
3. Gimbal lock: The gimbal should remain locked at all times unless in stabilizer
mode. Above the knurled handle is a wider knurled cup, the gimbal cup. The gimbal
cup shields the gimbal and also has a small adjustment screw.
on the gimbal that should be directly aligned under gimbal lock screw when locking and
or unlocking the gimbal. (unlocking gimbal will be covered under stabilizer mode)
4. Monopod lock screw. This screw must be tightened after unfolding the Stealthy
device for monopod and or stabilizer mode. The monopod lock screw is found under
the handle and in front of the monopod tube of the Stealthy. (Note this screw must be
kept locked in when in monopod or Stabilizer mode. If not device could fold while using
and cause injury or disrupt shot)
There is a white label
5. Unlocking the gimbal lock: This adjustment screw adjustment is a very important
part that locks and unlocks the gimbal. You should keep the gimbal locked at all times
except when using the stabilizer mode of Stealthy. The handle may have a little movement in all modes and that is normal. If ever handle feels too loose then check the
gimbal lock screw and make sure that it is aligned with lock sticker below and that the
Page 6

screw is not loose.
(Note: You should never unlock the gimbal when the bottom of handle is
engaged. If you do the handle will turn and can cause damage to device if operator
continuously turns handle while engaged.)
6. Camera plate: The camera plate is slid into and removed from the captive re-
ceiving platform. The camera plate is very low prole and has a threaded bolt that is
used for attaching to your camera. Simply use a coin to tighten bolt in to your camera to fasten the two together. The position of your camera on plate depends on
your preference when using in the different modes.
7. Camera platform: That platform has two adjustments that affect the camera
plate. One is a winged stainless steel bolt that is for tightening the plate in place the
other is the release button on side that must be pushed to release plate once the
winged bolt is loosened.
8. Tilting Head Platform: There are two adjustments on the platform one is for adjusting the right and left positioning of camera for camera balance (stabilization) the
other is a cam lever for locking the position of the entire tilting platform assembly we
refer to as the “head”.
9. Short Monopod: In the monopod / stabilizer mode there is a telescoping pod
that may be removed, loosened and or tightened by turning the base monopod to
the right to tighten and to the left to loosen and or remove. If you were to remove
the monopod you would see an expanding part that by friction catches the sides
of outer tube to loosen and tighten. This monopod has several purposes including
adjusting height in monopod mode adjust balancing weight in stabilizer mode and
setting the distance of camera from operator in the 3-point shooter mode.
Page 7

Stealthy Modes:
10. Handheld mode / Holster mode / table rest mode: (see diagrams) These
modes are all basically the same conguration but used and applied differently. The
Stealthy in this mode is folded up. On the monopod there is a chrome plated ring
that should rest in half round arc of Stealthy main body. In this position the Stealthy
may be A. Set on a table with camera attached where it rests on 3 points. B. Handheld mode Stealthy is in hand with hand clasping around both handle and monopod
together so together they make one handle. C. Holding in “Handheld mode” operator may invert Stealthy turn sideways so camera is pointing behind back behind
operator and gently set over hook through the hole located at the pointed tip of
Stealthy.
11. Monopod mode: (see diagram) In this mode Stealthy is unfolded and #4. (Mo-
nopod lock screw) is fastened to secure in this position the top of handle is locked in
place with the #3. (Gimbal lock) and the bottom of handle is fastened in to handle nest..
Next you will unlock the #8. (Tilting sub platform) pulling the lever out you will now
have platform unlocked and will tilt platform and camera together up so it will be at a
right angle to monopod.
Page 8

You are now in monopod mode and may adjust the height of monopod by using the
#9. (Short monopod) adjustment to raise and lower the height by adjusting telescoping
tube.
11. A. Long monopod accessory: If you have the long monopod accessory you can
add this long attachment by simply sticking the threaded end of long monopod accessory in to the hole at bottom of Stealthy short monopod until is it meets the threaded
hole inside then you can turn clockwise until the long monopod is securely attached.
Page 9

12. 3-point Shooter / Tripod mode: To adjust from monopod mode in to 3-point
shooter mode you will need to do 3 things: A. #2. Handle Lock Knob is loosened with
thumb and index nger while handle is held and base of monopod rests on lap of oper-
ator or a table type surface. Once it is loosened the handle will slide forward and away
from handle nest. Next step
B. Hold handle of Stealthy and then go to #4. (monopod lock screw) and unscrew just
enough that they are no longer xed together and you can fold Stealthy. (note do not
remove this screw it is designed to unthread but remain attached to folding part) now
fold Stealth to the point where the bottom of handle will slide in and nest in to the ring
found around short monopod. Once it is slid in pull handle away so there is no slack
and then turn #2. handle lock knob downward until tight and handle has no slop. Handle is now secure for 3- point shooting. C. Once you are in this secured position you
may use Stealthy as either a 3 point shooter or a table top tripod. But you will now
need to go to #8. (Tilting Head Platform) adjustment. Now you will need to unlatch this
lever and adjust the head all the way forward for 3-point shooter or somewhere in between for desired position for using as a tripod.
Page 10

13. Stabilizer mode: This mode is the toughest to describe and best demonstrated by video which can be found online at www.Stealthy.TV or at www.VariZoom.com/
Stealthy.
Page 11

Please watch video and have all weights and allen wrench that was included with
Stealthy. The video will show you how to balance the device quickly and how to begin
using the camera stabilizer mode.
Stealthy includes: belt hook, 3 ring weights, and allen wrench.
Optional accessories (not included): Long monopod, Weights for cameras over 2
3/4 lbs.
 Loading...