

Page 1

Laminating & Mounting System
A Brady Business
USER’S GUIDE
Technology
us 5,580,417 us5,584962 Other Patents Pending
Product Feet
No. Description Applications Per Roll
14554-00 Mounting Adhesive Paste-ups, comps, storyboards 300
Application – High Tack & presentations on foam core
14556-00 Mounting Adhesive Paste-ups, comps, storyboards 300
Application – Low Tack & presentations on foam core
14553-01 Dual-Sided Lamination Posters, inkjet & thermal 300
Direct Thermal Compatible prints & banners
14557-01 1 Side Laminate/1 Side Mounting Paste-ups, comps, storyboards & 300
Adhesive – High Tack presentations on foam core,
Direct Thermal Compatible provides protection to top surface
14558-01 1 Side Laminate/1 Side Mounting Paste-ups, comps, storyboards & 300
Adhesive – Low Tack presentations on foam core,
Direct Thermal Compatible provides protection to top surface
Replacement Cartridges
Please follow the attached directions carefully.
The ProFinish™ System is an economical and easy to use document finishing system.
This versatile and non-electric system has been designed to laminate or apply
mounting adhesive to a variety of media. The same system is capable of laminating,
selectively applying adhesive or laminating and applying adhesive at the same time.
With the ProFinish™ System, documents are easily laminated or can be transformed
into signs, stickers or labels instantly. The machine and supplies are compatible with all
types of computer-printed media including laser, inkjet, color and thermal in a wide
range of material sizes and thickness.
Technology
us 5,580,417 us5,584962 Other Patents Pending
Page 2

Upper Idle Bar
Lower Idle Bar
Paddle
Used to
lock document
in place
Feed Tray
Used to guide and
align documents
into the machine
Top Cover
Removes to
install/remove
supplies
Crank Handle
Used to advance
documents and film
thru machine
Lower Cut
Guide
Rubber Rollers
Lower Supply Roll
Upper Supply Roll
Lower
Access Door
Open to install
and remove
supplies
Slots for
Supply
Installation
Cut Blade
Used to trim output as it
exits –
the machine will
cut when moved to
either direction
Upper
Cut Bar
Understanding the ProFinish™ System
Parts and Functions
Page 3

Remove the machine from the packaging
and place on a level surface. Locate
the crank handle which is
taped to the bottom
inside of the machine.
Install the crank
handle by carefully
threading clockwise
(direction of the arrows)
into the lower rubber roller.
Cut the tie wraps holding
the upper cut bar and lower
guide together.
Step 1:
•
Remove the top cover of the machine
by lifting upward.
•
Grasp the handle on the lower
access door; pull to open.
Step 2:
•
Match the colored dots on the end of
each supply roll with the corresponding
dots on the side of the machine.
Note which roll is identified as
“top” and “bottom”.
•
Slide the supply rolls into the
grooves in the sides of the machine,
making certain that the roll is
inserted completely.
Setting Up
Loading Supply Rolls
Page 4
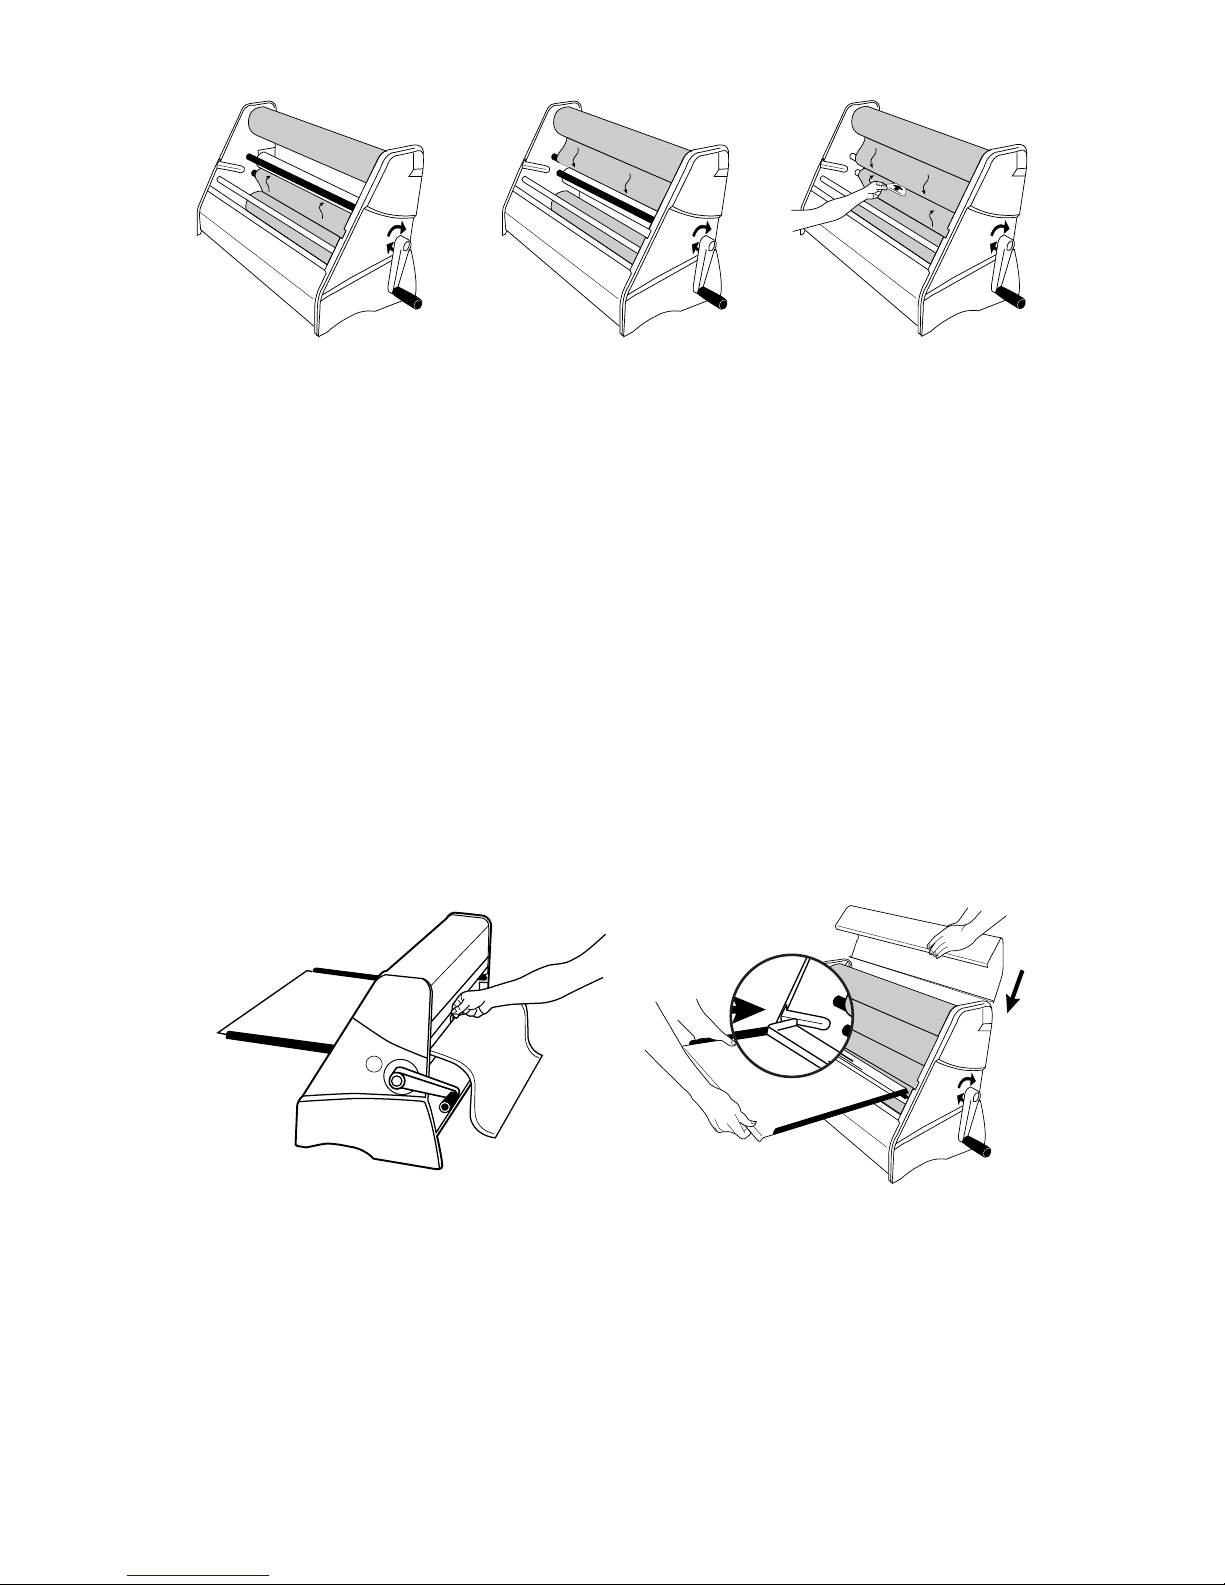
Step 3:
•
On the bottom
supply roll, grasp
the laminated starter
section by the leading
edge film.
•
Route over the bottom
idler bar adjacent to
the lower rubber roller.
•
Make sure the film
is inserted squarely.
Rotate the handle 1/4
turn in the direction of
the arrows.
Step 4:
•
Make certain the
lower film is tight.
If necessary, rotate
the supply roll in the
direction of the arrows
until the film is taut.
•
Grasp the film from
the upper supply roll
and adhere it to the
film on the lower
supply roll.
By carefully aligning the
edges, keeping the
film tight and avoiding
wrinkles, film waste will be
minimized.
Step 5:
•
Rotate the handle to
pull the supplies
through the machine.
•
Ensure that the film
exits between the
blade bars.
•
Just before the top film
becomes tight again,
insert a small piece of
cardstock between the
rubber rollers. This will
help to minimize waste
and ensure the film
exits between the
upper cut bar and
lower guide.
Step 6:
•
Continue to crank film through
machine until it is aligned and
wrinkle-free.
•
Trim off excess film by pressing down
on the blade holder and sliding in
either direction.
Step 7:
•
Replace the top cover.
•
Close the lower access door.
•
Install feed tray completely by aligning
the support posts in the grooves
located in the sides of the machine.
When done correctly, the film layers should be aligned and wrinkle-free after 18"
(45cm) of material has exited the machine.
Page 5
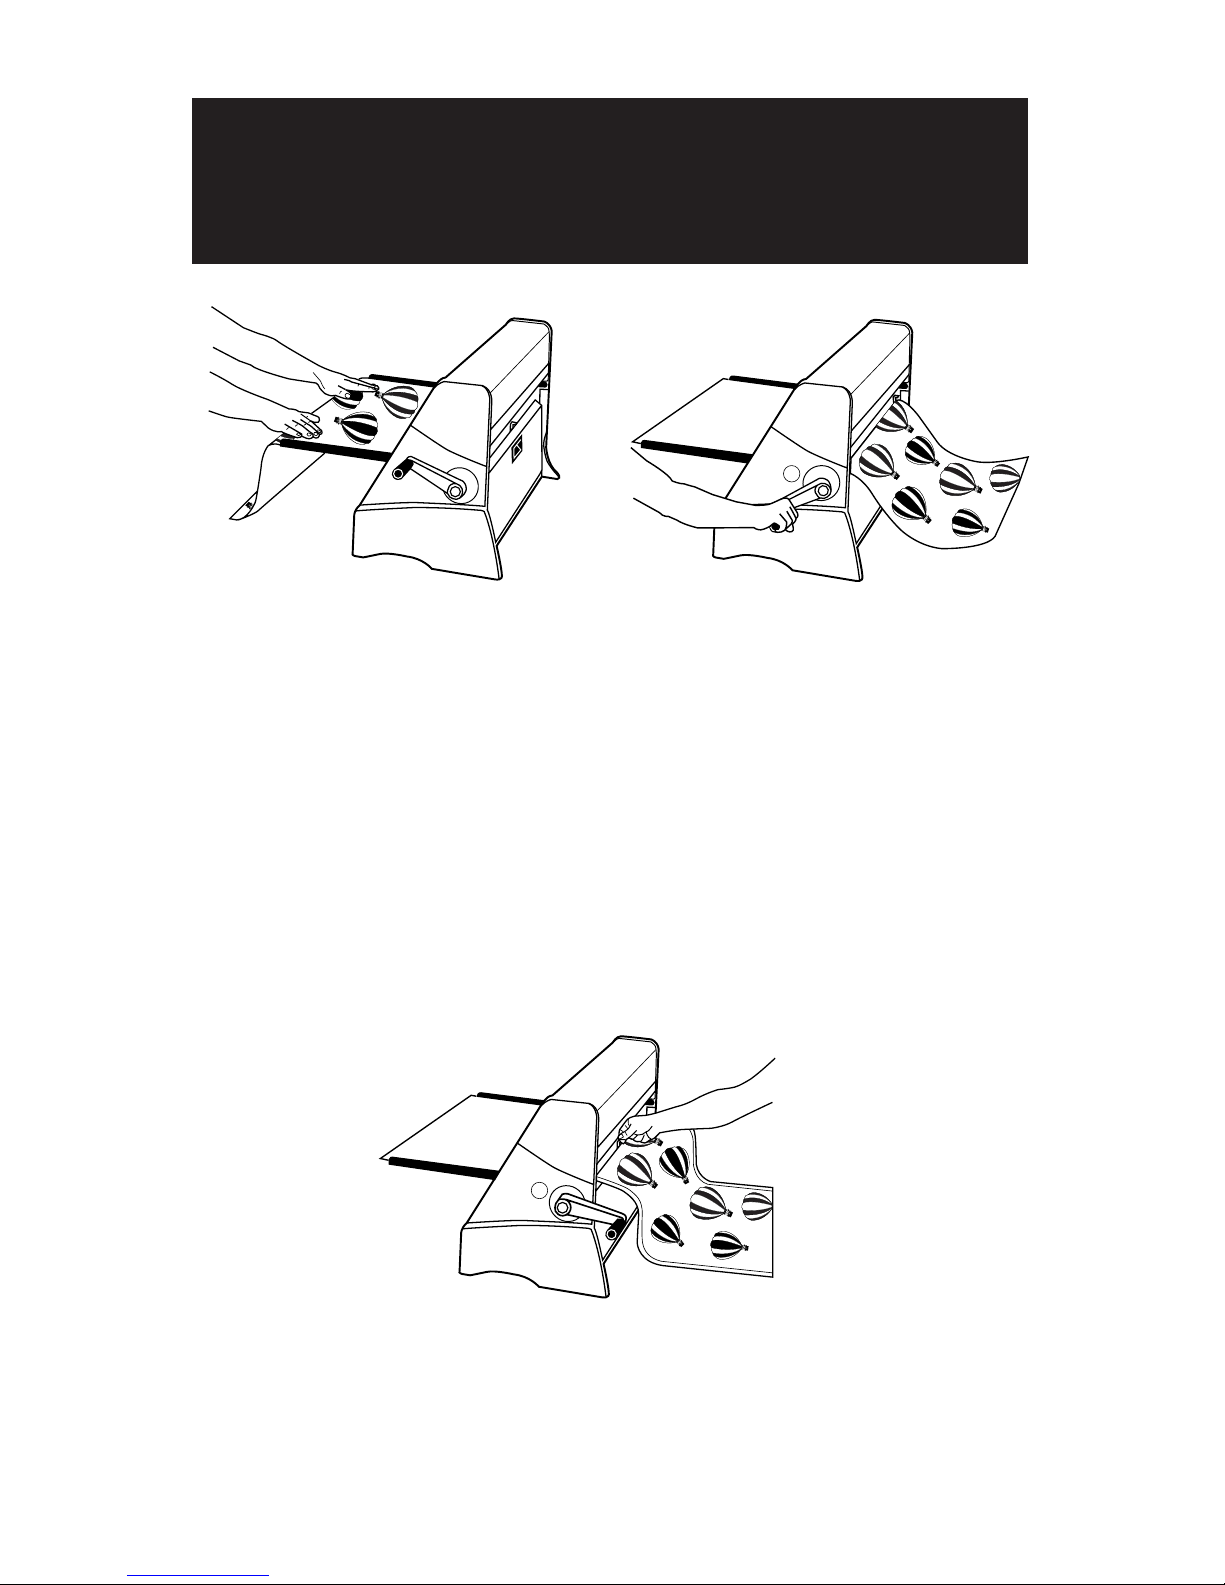
Step 3:
•
Trim the document by pressing down on the
blade holder and sliding it in either direction.
Note: As the document exits the machine, you may
wish to trim the leading edge. This will avoid a later
trimming operation.
Step 1:
•
Pull back on the paddle so that it is in
the “up” position.
•
Insert a document so the leading edge
is under the paddle. The document
should extend past the edge of the
paddle 1-2 inches (2.5-5cm).
Note: The side of the document which is face
down will have adhesive applied when using
1 Side Laminate/1 Side Mounting Adhesive.
•
Align the document parallel to the
edge of the feeder tray.
Step 2:
•
Push forward on the paddle to lock the
document in place.
•
Ensure that the leading edge of the
document is adhered down evenly.
If necessary slide your fingers across
the leading edge to secure it in place.
•
Turn the handle clockwise to advance
the document through the machine.
How to apply Dual Sided Lamination or
1 Side Laminate/1 Side Mounting
Adhesive
Page 6
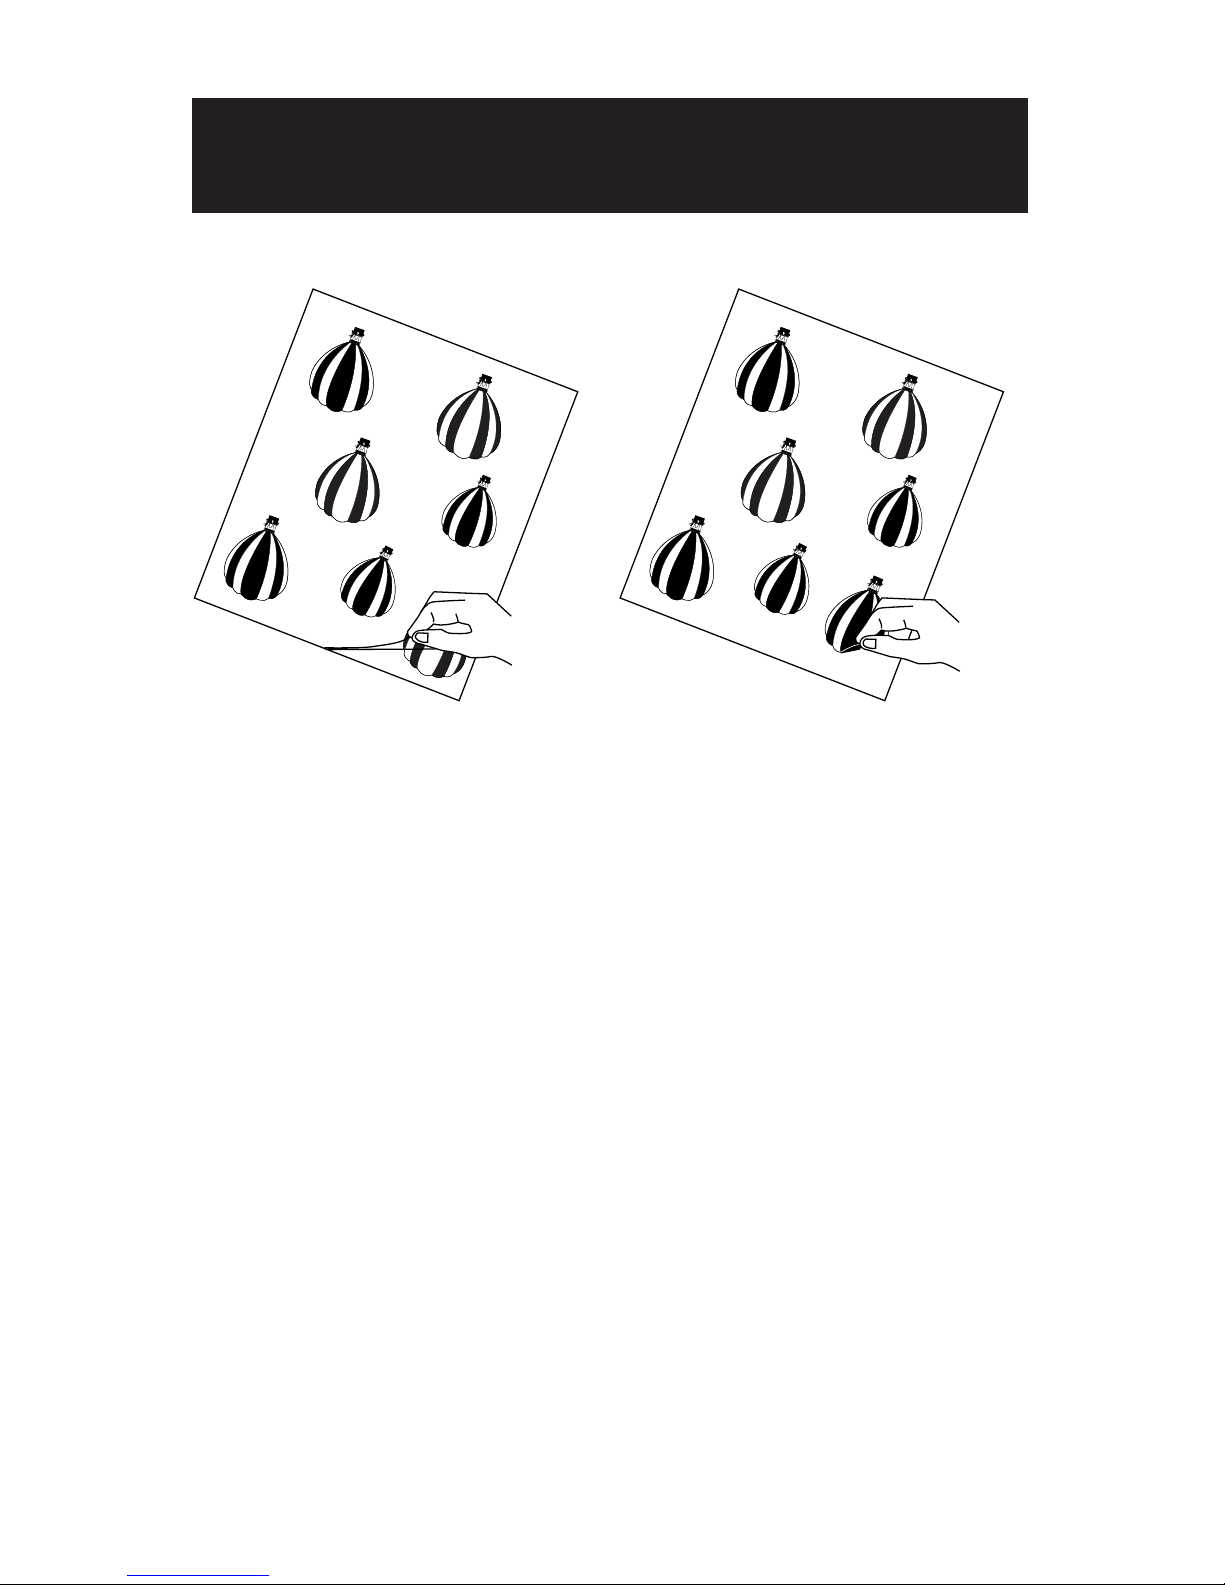
•
Steps 1, 2 and 3... same as above.
•
Remove the protective clear mask
layer and discard.
•
This process removes excess adhesive
from everywhere except the back of
the item run through the machine.
•
Remove the document from the white
release liner when you’re ready to
mount it.
How to apply Back-Side Permanent
Adhesive Transfer
©2000 Varitronic Systems, Inc. All Rights Reserved www.varitronicsystems.com 14537-01 2/2000
Varitronic Systems, Inc. warrants the equipment and accessories comprising the
ProFinish™ Laminating and Mounting System will be free of defects in material and
workmanship under normal use for one (1) year from the date of customer purchase
and that supplies for the system will be free of defects in materials and workmanship
for one (1) year from the date of customer purchase.
Varitronics
®
will, at its option, repair, replace, or refund the purchase price of any
accessories, supplies, or equipment found to be defective under this warranty. THIS
WARRANTY IS EXPRESSLY IN LIEU OF ALL OTHER WARRANTIES, INCLUDING BUT
NOT LIMITED TO ANY IMPLIED WARRANTY OF MERCHANTABILITY OR WARRANTY
OR FITNESS FOR A PARTICULAR PURPOSE.
In the event of breach of this express warranty, or any other warranty, whether
expressed or implied Varitronics
®
liability shall be limited to the remedy provided by
the preceding paragraph. IN NO EVENT WILL VARITRONICS
®
EVER BE LIABLE FOR
ANY DIRECT, INCIDENTAL, OR CONSEQUENTIAL, WHETHER EXPRESS OR IMPLIED,
INCLUDING ANY IMPLIED WARRANTY OR THE MERCHANTABILITY OR FITNESS, IN
AN AMOUNT GREATER THAN THE PURCHASE PRICE OF THE PRODUCTS
DESCRIBED BY THIS EXPRESS WARRANTY. No agent, distributor, salesperson,
wholesale or retail dealer has authority to bind Varitronics
®
to any other affirmation,
representation or warranty concerning these goods.
Page 7
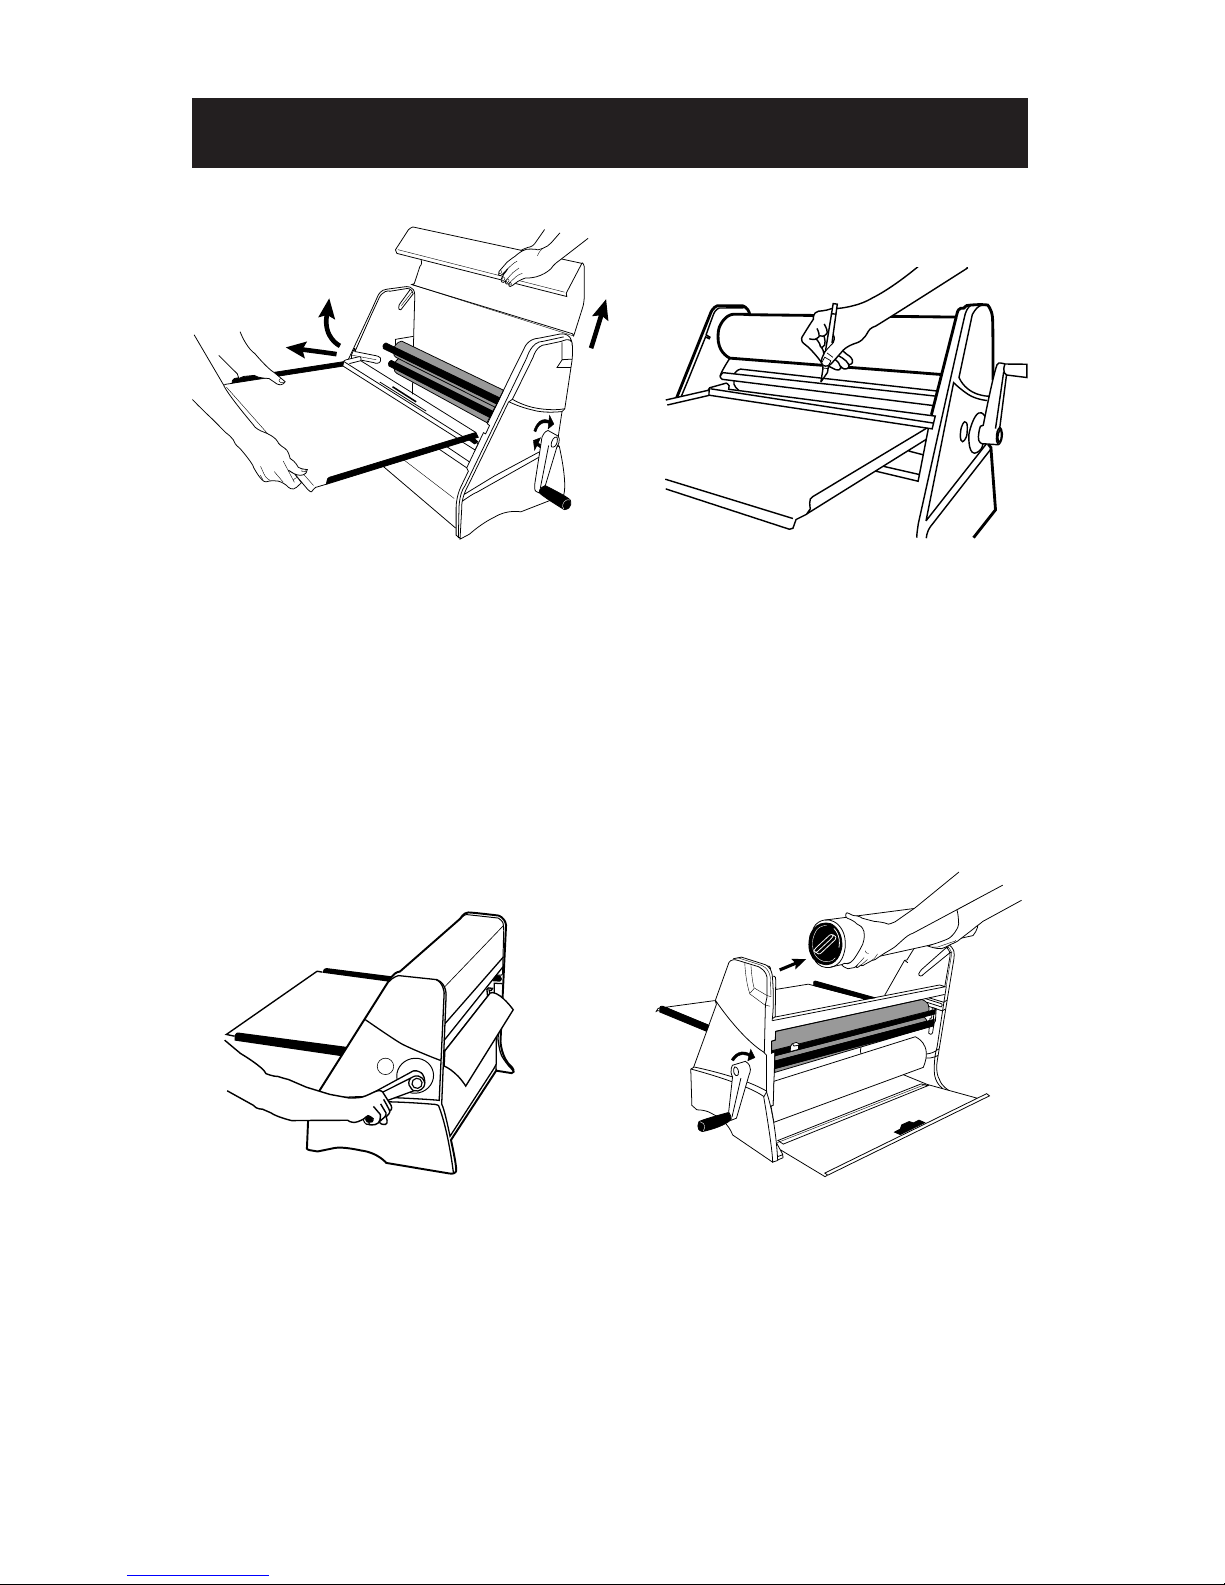
Step 1:
•
Remove the top cover by lifting
upward.
•
Remove the feed tray by lifting and
pulling away from the machine.
Step 2:
•
Make a small hole with a knife about
one inch (2.54cm) from the left edge
of the film.
•
Slide the knife towards the right
edge of the film and stop about
one inch (2.54cm) from the edge.
Use caution to avoid cutting into
the rubber rollers.
Step 3:
•
Turn the handle 1/2 turn maximum
in the direction of the arrows. This
step will cause the uncut film at the
edges to break, creating a laminated
leader for easy installation at a
later time.
Step 4:
•
Remove the supply rolls from the
machine. Varitronics®recommends
that supplies are stored laying flat in
a cool, dry place using the original
packaging.
Supply Roll Removal
Page 8

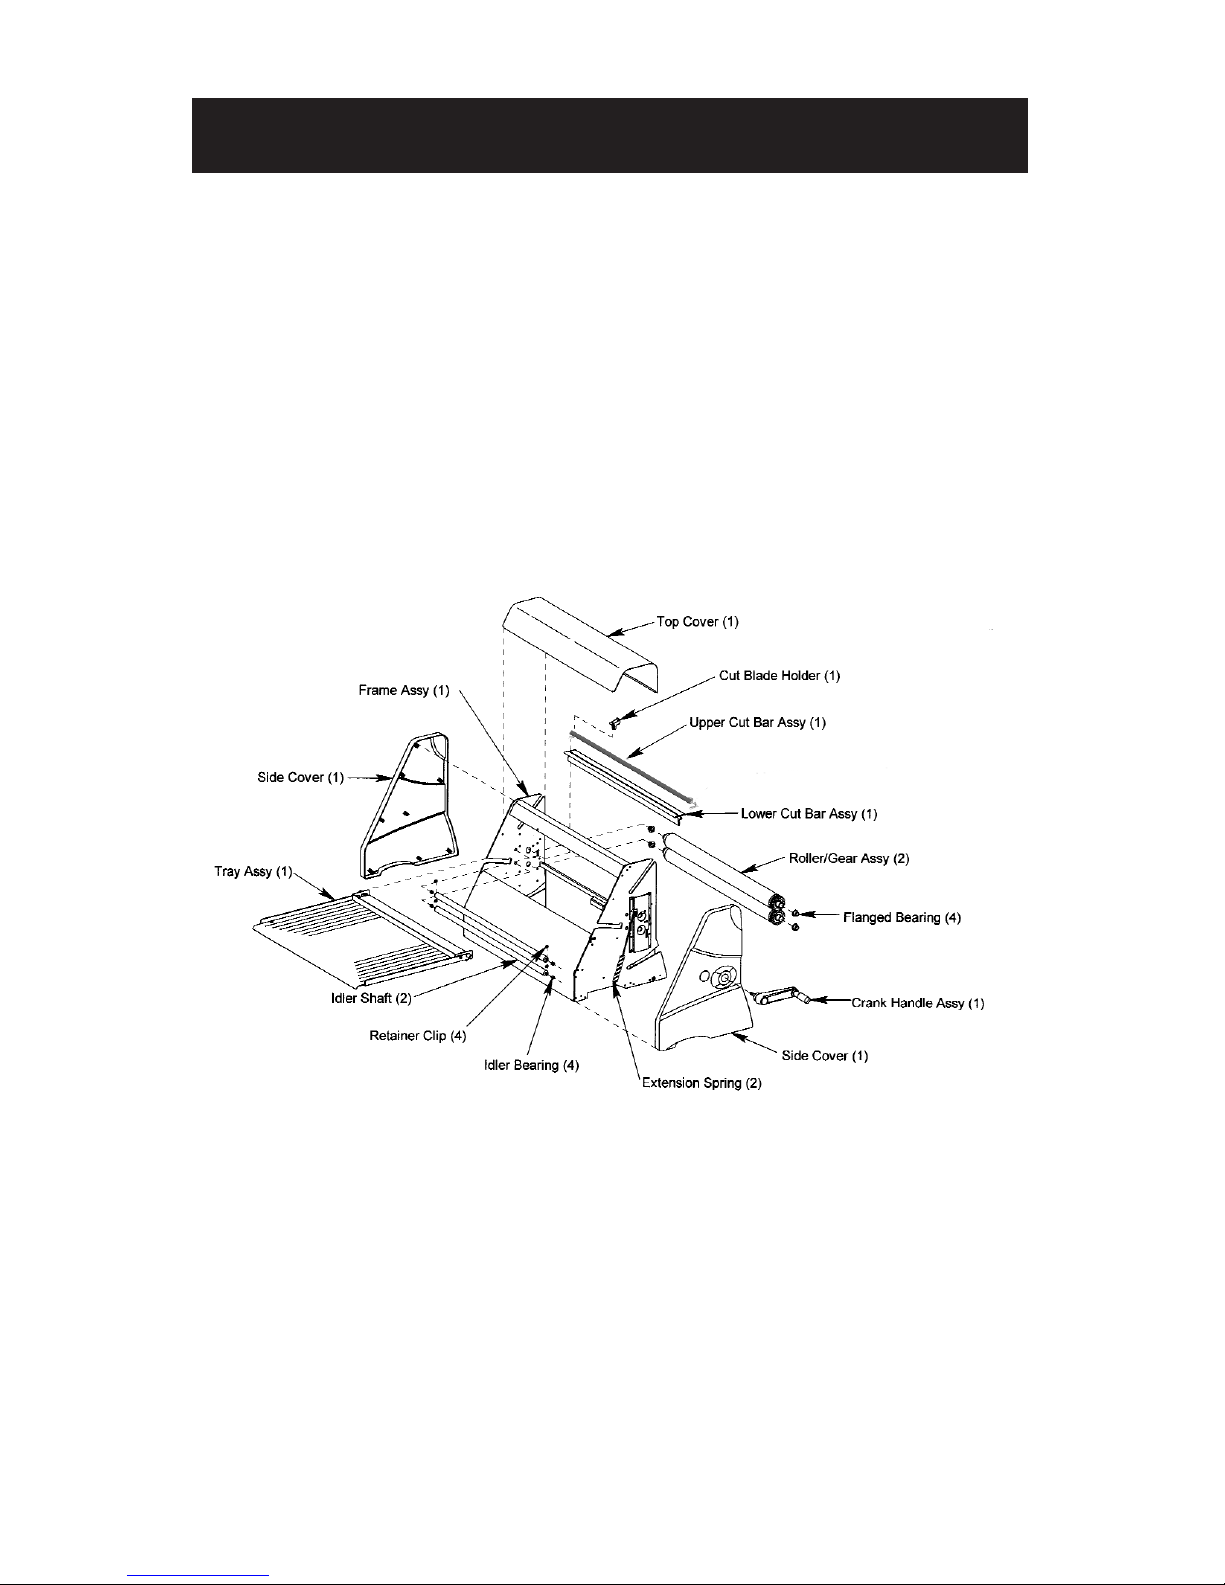
When properly used, the ProFinish™ System is relatively maintenance-free. Listed
below are safeguards and tips that will produce better results. Refer to the exploded
view diagram for part descriptions.
Importance of a clean document:
For best results when laminating, it is highly recommended that the document be
cleaned with a soft, lint-free cloth immediately prior to lamination. Small dust or lint
particles may cause the laminate to “tent”, producing an appearance similar to a
small air bubble.
Cut blade replacement and cleaning:
The cut blade may accumulate adhesive over time. Cleaning the blade must be
done with great care to avoid personal injury. To remove the blade, remove upper
cut bar assembly and gently tap or wiggle a plastic end piece off. Carefully slide
the orange blade holder off cut bar. Replace or clean with light solvent such as isopropyl alcohol. Carefully slide on new or cleaned blade holder and gently tap the
plastic end piece on and replace cut bar assembly.
Use after storage:
For applications where the appearance of your laminated document is critical, it is
highly recommended that the ProFinish™ System be used and stored in a clean,
dust-free environment. Airborne dust particles and lint will tend to adhere to the bare
adhesive inside the supply roll. If the machine has not been used for several days or
was subject to a dusty environment, it is recommended that four inches (10cm) of
material be advanced and discarded before inserting your document. It is also
recommended that the feed tray is cleaned with a lint-free cloth.
Cleaning adhesive from the nip rollers:
The nip rollers are designed to be self-cleaning under normal use. If adhesive does
accumulate, it can normally be removed by first removing the supply films from
between the nip rollers and advancing a scrap piece of regular bond paper through
the machine. The bare adhesive will tend to attach to the paper. If this method of
cleaning does not work, the nip rollers can be cleaned with a light solvent such as
isopropyl alcohol. Take care not to scratch, cut or chip the rollers. For best results
when laminating, it is critical that the lower idler bar be kept clean of adhesive build-up.
Maintenance, Safeguards & Tips
Page 9

Long documents (such as
banners) are not aligned
with film layers after
laminating.
Cut Blade does not slide
smoothly.
Film does not exit machine
between Upper and Lower
Blade Bars.
Cut Blade does not
cut well.
Thin and/or wide
documents tend to wrinkle
during lamination.
Document difficult to load.
Film wrinkles don’t go
away as crank is turned
clockwise.
Film does not lay flat, curls
and/or wrinkles.
Feed Tray not installed
correctly or supply roll not
seated at base of groove
in side plate(s).
Upper Blade Bar sticking in
side plate groove or blade
sticking on Blade Bar.
Material is curled or
adhesive has been
transferred to the Nip Roller
causing the film to stick.
Blade has accumulated
adhesive buildup or
is dull.
Paddle not operated
correctly, or tray and/or
paddle are not flat
Paddle not pulled back
to load position or
has adhesive buildup
on underside.
Upper and/or lower supply
roll(s) are not firmly seated in
grooves within side plate(s).
Adhesive buildup on lower
idle bar.
Verify tray is completely
installed such that it is
approximately level and
square. Also, verify supply
rolls are completely seated
at base of grooves in
side plate(s).
Apply silicon lubricant to all
surfaces of top blade bar.
Reposition material between
upper cut bar and lower
guide. Clean adhesive from
nip rollers if necessary.
Clean adhesive buildup
from blade using isopropyl
alcohol. Replace blade if
necessary.
Ensure paddle is pushed
forward completely after
document is loaded and
aligned. Ensure document
is extended approximately
1-2" (16mm) past edge of
paddle before pushing
paddle forward. Also, check
that the leading edge of
document is evenly adhered
(“locked”) to lower supply
film by temporarily pulling
paddle back after it has
been completely pushed
forward. Check paddle
and tray for flatness.
Prior to loading document,
pull paddle back to “load”
position. Ensure underside
of paddle is clear of any
obstruction or adhesive
buildup.
Verify supply rolls are firmly
seated at base of grooves
in side plates.
Clean adhesive buildup
from idler roller using
isopropyl alcohol.
Troubleshooting
Symptom Cause Solution
Page 10
Mechanical Manual crank driven cold lamination
Supplies Replaceable supply roll sets
Document size 24 in. (62.5cm) wide x length of supply
(maximum) 300 ft. (91.4m)
Document thickness 0.0 to 0.10 in. (2.54mm) Up to 3⁄16" (4.76mm)
range foam core mounting board with tray removed
Machine size/ (W) 31.5 in. x (L) 28.25 in. x (H) 18.5 in.
dimensions (W) 80cm x (L) 72cm x (H) 47cm
Footprint (L) 15 in. x (W) 27.75 in. (L) 38cm x (W) 71cm
Machine weight Approx. 90 lb. (40.8Kg)
Notice
The information in this manual is subject to change without notice. Varitronics®shall not be
liable for errors contained herein or for incidental or consequential damages in connection
with the furnishing, performance or use of this material.
The purchase or acquisition of this product does not confer the right or license to use the
machine and cartridges in the retroreflective field or to make or sell machines or cartridges
for use in the retroreflective field.
www.varitronicsystems.com
Technical Specifications
 Loading...