

Varedan Technologies LA-840, LA-800, LA-835, LA-1535, LA-1545 Technical Reference Manual
...Page 1

代理商:北京慧摩森 电子系统技术有限公司
地址:北京市海淀区学院路7号弘彧大厦1510
电话:010-62311872
传真:010-62316782
E-mail:sales@bjsm.com.cn www.bjsm.com.cn
varedan中文网址:www.varedan.net
LA Series Linear Servo Amplifier
LA-800 Series
LA-1500 Series
Technical Reference Manual
Manual Revision: D
3870 Del Amo Blvd. Suite 503, Torrance CA, 90503
www.varedan.com
Page 2

LA Series Linear Servo Amplifier Technical Reference Manual
Original Manual Revision December 5, 2011
Copyright 2011 Varedan Technologies
Corporate Office:
Varedan Technologies
3870 Del Amo Blvd., Suite 503
Torrance, CA 90503
Phone: 310-542-2320
Fax: 310-542-2344
Eastern Region Sales & Support
Phone: 860-295-0048
www.varedan.com
This document contains proprietary and confidential information of Varedan Technologies, LLC
and is protected under Federal copyright law.
The information in this document is subject to change without notice. No part of this document
may be reproduced or transmitted in any form without the express written consent of Varedan
Technologies, LLC.
Document Change History
Revision Description
A Original for new board design from LA manual rev G.
B Add part numbers for LA1500 and VMC-3000
C Transconductance table for different models, Revise mechanical dimensions
D Correct ABSI time in jumper description.
2
Page 3

!
LA Series Linear Servo Amplifier Technical Reference Manual
CAUTION! READ THIS SECTION BEFORE PROCEEDING.
Warning! Potentially lethal voltages exist within the amplifier when power is
applied. Never attempt to handle or probe the amplifier with power applied.
This product contains static sensitive devices and requires proper handling with
ESD protection.
These amplifiers are capable of producing large amounts of energy. Serious
injury or death can result from improper motor or load movement. The amplifier
requires an external controller for Sinusoidal mode operation to commutate the
motor properly. In Trapezoidal mode operation, the amplifier requires properly
phased Hall sensors for commutation. Verify proper Hall sensor phasing and
motor direction before connecting any load to a motor.
Do not connect the motor to the system load during initial testing and installation.
These amplifiers require customer supplied airflow for proper operation.
Operation of the amplifier without proper cooling will void the warranty. Contact
the factory for information on adequate airflow for your application.
Be sure power is off when inserting or removing connectors or connections.
For motors with a phase to phase inductance of less than 250uH, please consult
the factory. A special set of current loop bandwidth components will need to be
installed for safe operation of the amplifier.
3
Page 4

LA Series Linear Servo Amplifier Technical Reference Manual
Contents
1 INTRODUCTION ...................................................................................................................................7
1.1
SAFE OPERATING AREA ....................................................................................................................7
2 SPECIFICATIONS.................................................................................................................................8
3 MODEL NUMBERING ...........................................................................................................................9
4 PROTECTIVE FEATURES .................................................................................................................10
5 OPERATIONAL DESCRIPTION .........................................................................................................11
6 JUMPER SETTINGS ...........................................................................................................................11
6.1 LA-800 SERIES JUMPER SETTINGS
6.2 LA-1500 SERIES JUMPER SETTINGS
6.3 JUMPER DESCRIPTIONS
7 CONNECTOR CONFIGURATIONS....................................................................................................15
7.1 J1 SIGNAL CONNECTOR
7.2 J2 BIAS POWER CONNECTOR
..............................................................................................................14
..............................................................................................................15
..........................................................................................12
........................................................................................13
....................................................................................................15
7.3 J3 MOTOR FEEDBACK CONNECTOR
7.4 J4 BUS POWER CONNECTOR
7.5 J5 MOTOR CONNECTOR
7.6 J6 INTERFACE P-BOARD CONNECTOR
7.7 J7 INTERFACE P-BOARD CONNECTOR
7.8 J8 STATUS OUTPUT CONNECTOR
7.9 J9 MOTOR TEMPERATURE SWITCH CONNECTOR
7.10
J10 SERIAL COMMUNICATION CONNECTOR
7.11 CONNECTOR PART NUMBERS
8 USER INTERFACES ...........................................................................................................................19
8.1 PUSH BUTTON
8.2 LED DISPLAY
................................................................................................................................19
...................................................................................................................................19
....................................................................................................16
..............................................................................................................16
..................................................................................................18
.......................................................................................15
...................................................................................16
...................................................................................16
............................................................................................17
..............................................................17
........................................................................17
8.3 SOFTWARE VERSION DISPLAY
.................................................................................................19
4
Page 5

LA Series Linear Servo Amplifier Technical Reference Manual
8.4 L.E.D. ERROR CODES AND MEANING
......................................................................................20
8.5 STATUS INDICATOR/REMOTE DISPLAY PORT
8.6 SERIAL PORT
8.6.1
SERIAL COMMANDS..................................................................................................................23
8.6.2
SERIAL PARAMETER SETTINGS .............................................................................................25
8.6.2.1 SOFTWARE PARAMETER SETTING TABLE SUMMARY ........................................................26
9 BALANCING ........................................................................................................................................27
9.1 AUTOBALANCE
9.2 MANUAL BALANCE
10 TEST POINTS .....................................................................................................................................29
APPENDIX A. SERIAL COMMUNICATION MESSAGES...........................................................................37
10.1 SIGN ON MESSAGE
10.2 ALARM MESSAGES
10.3 AUTOBALANCE MESSAGES
...................................................................................................................................22
...............................................................................................................................27
.........................................................................................................................28
......................................................................................................................38
.......................................................................................................................38
.......................................................................................................38
......................................................................22
10.4 ENABLE STATUS MESSAGES
10.5 FACTORY DEFAULT MESSAGE
10.6 HELP MESSAGES
10.7 LIST MESSAGES
..........................................................................................................................39
............................................................................................................................40
10.8 MODE COMMAND MESSAGES
10.9 SAVE PARAMETERS MESSAGE
10.10 FAULT HISTORY MESSAGES
....................................................................................................39
.................................................................................................39
..................................................................................................40
................................................................................................40
..............................................................................................41
10.11 CLEAR FAULT HISTORY MESSAGE
10.12 SOA FAULT HISTORY MESSAGES
..................................................................................41
....................................................................................42
5
Page 6

LA Series Linear Servo Amplifier Technical Reference Manual
List of Figures
Figure 1. Jumper Locations...................................................................................................... 12
Figure 2. Jumper Locations...................................................................................................... 13
Figure 3 – Location of Jumpers, Balance Potentiometers and Test Points ............................... 30
Figure 4. Functional Block Diagram – All Models ..................................................................... 31
Figure 5. Installation Drawing Details ....................................................................................... 32
Figure 6. Typical Connections Single-Phase Models with “S” suffix.......................................... 33
Figure 7. Typical Connections Three-Phase Models with “T” suffix .......................................... 33
Figure 7. Typical Connections Three-Phase Models with “T” suffix .......................................... 34
Figure 8. LA-800 Series Mechanical Dimensions ..................................................................... 35
Figure 9. LA-1500 Series Mechanical Dimensions ................................................................... 36
6
Page 7

LA Series Linear Servo Amplifier Technical Reference Manual
1 Introduction
The LA series of Linear Amplifiers are the perfect choice for systems requiring low
radiated noise and zero distortion from the drive electronics. These high power current mode
linear amplifiers are well suited to drive low inductance/resistance loads such as brushless and
brush servo motors or voice coils. Commutation options include externally commutated 2-phase
sine input, trapezoidal commutation using motor mounted hall sensors, or single-phase control.
With their true class AB linear output stage, their design features pure analog control
from input to output. The on-board DSP only provides monitoring functions and does not get
involved in the current control of the output stage.
The LA amplifiers are both extremely quiet and provide the ultimate in zero cross-over
distortion for smooth output positioning. The design of these amplifiers includes an on board
high speed DSP which monitors all key system functions in real time and provides protection for
the outputs by only allowing output power within the “Safe Operating Area” of the output
transistors. An intelligent user interface allows setup and storage of all system parameters via
the serial interface. Non-volatile memory provides storage of the parameters during power off
conditions.
1.1
Safe Operating Area
The LA amplifiers include a sophisticated algorithm that protects the outputs from over
power conditions. This algorithm is matched to the power characteristics of the output
transistors in each amplifier model. With linear servo amplifiers (as opposed to PWM amplifiers),
it is very important to provide over-power protection (rather than simple over-current protection)
due to the linear nature of the output control. In the case of PWM amplifiers, only over-current
protection is required since the outputs are operating in saturation mode or “full on mode”. This
mode provides very little voltage drop across the output transistors, so simple current monitoring
is sufficient to provide protection of the outputs.
With linear servo amplifiers, the outputs are operating in their linear region, so the
voltage across the output transistors can be a substantial contribution to the total power
dissipated by the device. To properly protect the amplifier from damage, the amplifier must
provide protection by monitoring the power (voltage * current) in the output devices. To put this
in perspective, the outputs used in our LA-415 (5A continuous, 15A peak) can handle 60A under
the proper conditions! It’s the power that has to be kept under control.
The DSP in the LA series amplifiers monitors the power of each output device in real
time as the device is switched on by the control circuitry. This instantaneous power
measurement is compared with the transistor manufactures recommended “safe operating area”
curve (published in all transistor specifications) stored in the DSP memory. The amplifier is shut
down in the event the measured power exceeds the recommended ratings of the output
devices.
Our Safe Operating Area (SOA) algorithm has proven to be very effective in protecting
the amplifier from damage due to over power conditions. While the user may experience
“nuisance” tripping of the SOA protective function during system development and testing, be
aware that the conditions that caused the “nuisance” trip may have very well have destroyed an
amplifier without this SOA protection.
7
Page 8

LA Series Linear Servo Amplifier Technical Reference Manual
2 Specifications
2.1
LA-800 Series
Peak Output Current 30A 35A 40A
Continuous Output Current 15A 18A 20A
Peak Output Power (25°C) 3000W 4500W 6000W
Continuous Power Dissipation (25°C) 800W 800W 800W
Size - Length x Width x Height 8.00 in. x 8.16 in. x 4.8
Motor Bus Voltage – Bipolar +/-12 to +/-150VDC
Bias Supply Voltage - Bipolar +/-14.5 to +/-16.0V (@300mA each)
Max. Heat Sink Temperature 70°C
Current Loop Bandwidth* up to 10kHz
Operating Modes 2-Phase Sine, Trapezoidal, Single-Phase
Absolute Overcurrent Trip Time 50ms
Hall Sensor Supply (+5 Ext.) +5V @ 100mA max.
Command Signal (A and B inputs) +/-10V Single-Ended, +/-20V Differential
2.2
LA-1500 Series
Peak Output Current 35A 45A 55A
Continuous Output Current 20A 25A 30A
Peak Output Power (25°C) 3000W 4500W 6000W
Continuous Power Dissipation (25°C) 1500W 1500W 1500W
Size - Length x Width 8.00 in. x 8.16 in. x 5.75
Motor Bus Voltage – Bipolar +/-12 to +/-150VDC
Bias Supply Voltage - Bipolar +/-14.5 to +/-16.0V (@300mA each)
Max. Heat Sink Temperature 70°C
Current Loop Bandwidth* up to 10kHz
Operating Modes 2-Phase Sine, Trapezoidal, Single-Phase
Absolute Overcurrent Trip Time 50ms
Hall Sensor Supply (+5 Ext.) +5V @ 100mA max.
Command Signal (A and B inputs) +/-10V Single-Ended, +/-20V Differential
*This setting can be customized. Please contact the factory for details.
LA-830 LA-835 LA-840
LA-1535 LA-1545 LA-1555
8
Page 9

LA Series Linear Servo Amplifier Technical Reference Manual
3 Model Numbering
3.1
Amplifier Module
The LA Series Linear Amplifier modules are available in various power options and in either
single-phase or 3-phase models.
800 Series
Model Number Breakdown: LA-830-T
Linear Amplifier
Power Level (see table)
S=Single Phase, T= 3 phase
1500 Series
Model Number Breakdown: LA-1530-T
Linear Amplifier
Power Level (see table)
S=Single Phase, T= 3 phase
3.2
Motion Controller Module
The LA series is designed to accept our VMC-3000 plug-in motion controller module that
transforms the amplifier into a complete single-axis motion controller. For brushless 3-phase
motors, this module provides commutation from a motor-mounted encoder and can perform
position, velocity or torque mode control. For brush motors, this module provides position and
velocity modes using a motor-mounted encoder for position information. Please refer to the
VMC-3000 Technical Reference Manual for more information.
The VMC-3000 option adds a “1” to the part number as shown below:
800 Series Motion Controller
Model Number Breakdown: LA-8130-T
Linear Amplifier
VMC-3000 motion controller
Power Level (see table)
S=Single Phase, T= 3 phase
1500 Series Motion Controller
Model Number Breakdown: LA-15130-T
Linear Amplifier
VMC-3000 motion controller
Power Level (see table)
S=Single Phase, T= 3 phase
9
Page 10

LA Series Linear Servo Amplifier Technical Reference Manual
4 Protective Features
DSP Fault – Set when the internal DSP checksum fails following reset
NVM Fault – Set when NVM checksum fails following reset. Parameter defaults set.
External +5V – Set when on board +5V supply for Halls is out of range
Autobalance Fault – Set when autobalance can’t balance amplifier outputs
ABS Overcurrent – Set when instantaneous overcurrent condition is detected
SOA – Set when Safe Operating Area protection detects an over power condition
5 VDC Reference error – Set when internal +5 reference supply is out of range
Bus Over Voltage – Set when Bus voltage is greater than maximum allowed (75 Vdc)
Hall Error – Set when hall sequence is invalid (0 or 7 value is read on hall inputs)
Fatal Error – Set if the DSP encounters an unidentified problem.
Amplifier Over Temp – Set when amplifier heat sink temperature exceeds 70 C.
Motor Over Temp – Set when motor temperature input is open
Overcurrent – Set when amplifier detects an overcurrent condition
Bus Under Voltage – Set when Bus voltage is less than the minimum allowed (10 Vdc)
Bias error – Set when Bias voltage input +/-15 is outside allowable range
2.5V Reference error – Set when internal 2.5V supply is out of range.
10
Page 11

LA Series Linear Servo Amplifier Technical Reference Manual
5 Operational Description
Upon power up of the +/- 15V bias supply, the amplifier derives all the necessary internal
voltages for operation related to the logic and output drivers. Once the proper levels are
achieved, the DSP is released from reset and begins operation. A series of internal checks are
done to insure the DSP is operating correctly. The I/O is initialized for operation if these checks
pass. The NVM is then read and the stored checksum is verified. If the system is setup to use
jumpers, the jumpers are read; otherwise the parameter information from NVM is used. The
analog balance network is set to the stored balance values. The version and revision number
for the software is flashed on the display and the serial sign on message is sent.
The state of the Enable input is read to determine whether the hardware enable input or
the software serial enable command should be used to enable the drive. If the hardware Enable
input is open (high) the system allows software to control the Enable operation via the E
command. If at anytime during operation the Enable input goes low, the software mode is
cancelled and the hardware Enable input is used for control. The initialization process is now
complete and the software enters main loop processing.
During main loop processing, the software runs in an endless loop performing the tasks
necessary for drive operation. Once per pass in the main loop, the 7-segment LED and status
port are updated, the inputs are scanned and the protective algorithm calculations are
performed. In addition to the main loop processing, interrupts are enabled to handle such
actions as Limit input processing for Hall mode, A/D processing for all system voltages and
currents, and serial communication if used.
If at anytime during operation a fault occurs, the drive will immediately disable the motor
windings, set the Fault output active and display the fault code on the LED display. A message
will also be sent over the serial interface annunciating the fault. The “A” command can also be
used to obtain fault information.
Note that bias power (+/-15V) is always required for the drive to operate. Bus power is
only required if a motor is to be used. This allows the drive to be set up away from the actual
system using only the bias supply.
6 Jumper Settings
The next few pages define the jumper settings for each model amplifier. The settings for the
over current trip levels are different for each model, depending on the number of outputs and
the heatsink configuration. All other settings are identical for each model.
Jumper settings are only updated following a reset or POR of the drive.
If no jumpers are installed on JP1, JP2 and JP3, the parameters will be set via software.
Note 1: If using jumpers in Sine Mode with minimum settings (no jumpers), install a jumper on
JP1-G to force the drive to use the jumper settings. This prevents the drive from using software
settings as described in Note 2.
Note 2: JP1H and JP2-A are not used in single-phase mode models.
Before applying power to the amplifier be sure to read all sections in this document.
11
Page 12

LA Series Linear Servo Amplifier Technical Reference Manual
6.1 LA-800 Series Jumper Settings
JP1 JP2
JP3
Figure 1. Jumper Locations
JP1
Continuous Overcurrent
Trip Level Amps (model specific)
LA-830 LA-835 LA-840 JP1-A JP1-B
5 5 5 Open Open
8 10 10 In Open
12 15 15 Open In
15 18 20 In In
Overcurrent Trip Time
Trip Time JP1-C JP1-D
1.25 Sec Open Open
2.5 Sec In Open
5 Sec Open In
10 Sec In In
Absolute Overcurrent
Trip Level Amps (model specific)
LA-830 LA-835 LA-840 JP1-E JP1-F
10 20 25 Open Open
15 25 30 In Open
25 30 35 Open In
30 35 40 In In
JP1-G, Normally Not Used. See Note 1
Motor Reverse Selection (Hall Mode)
Mode JP1-H
Normal Open
Reverse In
A B C D E F G H A B C D E F
A B
JP2
Sine/Hall Mode Selection*
Mode JP2-A
Sine Mode Open
Hall Mode In
*See Notes 1&2
Input Filter Setting
Filter JP2-B JP2-C
500 Hz Open Open
800 Hz In Open
15 kHz Open In
32 kHz In In
Transconductance Ratio Setting (Amps/Volt)
LA-830 LA-835 LA-840 JP2-D JP2-E
2.0 2.0 2.0 Open Open
3.0 3.0 3.0 In Open
4.0 4.0 4.0 Open In
5.0 5.0 5.0 In In
Input DAC Selection
DAC Input JP2-F
Differential (Bipolar) Open
Single Ended (Unipolar) In
JP3
Current Loop Bandwidth Setting
Bandwidth JP3-A JP3-B
Contact Open Open
Factory In Open
For Open In
Settings In In
12
Page 13

LA Series Linear Servo Amplifier Technical Reference Manual
6.2 LA-1500 Series Jumper Settings
JP1 JP2
JP3
Figure 2. Jumper Locations
JP1
Continuous Overcurrent
Trip Level Amps (model specific)
LA-1535 LA-1545 LA-1555 JP1-A JP1-B
5 10 15 Open Open
10 15 25 In Open
15 20 25 Open In
20 25 30 In In
Overcurrent Trip Time
Trip Time JP1-C JP1-D
1.25 Sec Open Open
2.5 Sec In Open
5 Sec Open In
10 Sec In In
Absolute Overcurrent
Trip Level Amps (model specific)
LA-1535 LA-1545 LA-1555 JP1-D JP1-E
10 15 25 Open Open
15 25 35 In Open
25 35 45 Open In
35 45 55 In In
JP1-G, Normally Not Used. See Note 1
Motor Reverse Selection (Hall Mode)
Mode JP1-H
Normal Open
Reverse In
A B C D E F G H A B C D E F
A B
JP2
Sine/Hall Mode Selection*
Mode JP2-A
Sine Mode Open
Hall Mode In
*See Notes 1&2
Input Filter Setting
Filter JP2-B JP2-C
500 Hz Open Open
800 Hz In Open
15 kHz Open In
32 kHz In In
Transconductance Ratio Setting (Amps/Volt)
LA-1535 LA-1545 LA-1555 JP2-D JP2-E
2.0 2.0 2.0 Open Open
3.0 3.0 3.0 In Open
4.0 4.0 4.0 Open In
5.0 5.0 5.0 In In
Input DAC Selection
DAC Input JP2-F
Differential (Bipolar) Open
Single Ended (Unipolar) In
JP3
Current Loop Bandwidth Setting
Bandwidth JP3-A JP3-B
Contact Open Open
Factory In Open
For Open In
Settings In In
13
Page 14

LA Series Linear Servo Amplifier Technical Reference Manual
6.3 Jumper Descriptions
JP1-A, B – Continuous Overcurrent Level – This setting determines the continuous level of current allowed
by the amplifier. Any phase current value above this setting causes an internal timer to run. If the timer
reaches the set value for Overcurrent Trip Time, the drive disables and the “L” error is displayed. The
decimal point on the LED display is lit when any phase current is above the Overcurrent setting. The
Overcurrent Timer accumulates time for any value of phase current that exceeds the Overcurrent threshold
value. The Overcurrent Timer is decremented for any phase current value less than the Overcurrent
threshold value. The decay rate of the timer is 2x the attack rate. This means that if the timer has
accumulated for 2 seconds, it takes 1 second for the timer to return back to 0.
JP1-C, D – Continuous Overcurrent Trip Time – This setting establishes the time that any phase current is
allowed to be above the Overcurrent setting. When the Overcurrent time is exceeded, the drive disables
and the Overcurrent error is reported (“L” on the display). The timer decays at a rate of 2x the attack rate.
JP1-E, F – Absolute Overcurrent – This setting establishes the maximum allowable current. If the current
exceeds the set value, the drive disables and the error is reported (“5”on the display). The amplifier is
designed to trip within 50mS of detecting the event.
JP1- G – Not used. Install this jumper if the desired amplifier setup requires no other jumpers. This will
prevent the software from using the stored NVM settings.
JP1-H – Motor Reverse – When this jumper is installed, the motor rotation in Hall mode is reversed for a
given input signal.
JP2- A – This jumper establishes the mode of operation for commutation, either Sine or Hall. In Sine
mode, the user must provide 2 analog input signals 120° out of phase, representing motor currents for
Phase A and Phase B. The amplifier internally derives the current for Phase C based on these inputs. In
Hall mode, the user provides a current reference command on Phase A input only. External Hall sensors
must be connected for motor commutation. The amplifier drives current to two of the three phases
depending on the Hall sequence input on the J3 Motor Feedback connector.
JP2- B, C – These jumpers establish the Input Filter setting. The cutoff frequency for low pass filtering of
the analog input command signals is set according to the values shown above.
JP2-D, E – Transconductance Ratio – These jumpers determine the amount of output current, in amps, for
a given input voltage, in volts, on the reference input(s) Command A and Command B. (Volts to amps
ratio).
JP2 – F – Input DAC Selection – This setting establishes the voltage configuration for the Command A and
Command B input signal reference. In Single Ended mode, the Command+ inputs accept a +/-10vdc input
with respect to ground (common). In Differential mode, the Command +/-inputs accept a +/-20vdc signal
terminal-to-terminal, non-grounded.
JP3 – A,B - Current Loop Bandwidth – This setting establishes the current loop bandwidth setting. Use
caution when changing from one setting to the next. The user does not normally set these jumpers. Please
contact the factory for details before changing these settings.
14
Page 15

LA Series Linear Servo Amplifier Technical Reference Manual
7 Connector Configurations
7.1 J1 Signal Connector
Pin Function
1
DAC Phase A+
2
DAC Phase A-
3
DAC Phase B+
4
DAC Phase B-
5
I Out –
6
Common (Ground)
7
Limit+ -
8
Common (Ground)
9
Limit – -
10
Common (Ground)
11
Enable –
12
Common (Ground)
13
Fault –
14
Common (Ground)
15
Reset –
16
Common (Ground)
Output voltage representing 1V=6.6A Output Current. See note in Test Points section.
Active high input, Internally pulled high (3.3V), set low to enable travel. Not used in Sine Mode.
Active high input, Internally pulled high (3.3V), set low to enable travel. Not used in Sine Mode.
Ground to enable amplifier. Internally pulled high (3.3V). See Operation Description.
High output indicates fault, low normally (no fault). Internally pulled high (5V)
Ground input to reset drive. Internally pulled high (3.3V)
Note: Inputs with 3.3V pull ups are 5V input compatible
7.2 J2 Bias Power Connector
Pin Function
1 +15 Volts DC in
2 Common (Ground)
3 Common (Ground)
4 –15 Volts DC in
7.3 J3 Motor Feedback Connector
Pin Function
1 No Connect
2 No Connect
3 Common (Ground)
4 Hall C Input
5 Hall A Input
6 Hall B Input
7 +5 Volts DC Output (100mA max)
8 No Connect
9 Common (Ground)
10 No Connect
Input Used in both Single Ended and Differential modes
Input Used only in Differential mode
Input Used in both Single Ended and Differential modes. Not used in Hall Mode.
Input Used only in Differential mode. Not used in Hall Mode.
.
.
15
Page 16

1
1
LA Series Linear Servo Amplifier Technical Reference Manual
7.4 J4 Bus Power Connector
Pin Function
1 +Bus Power
2 Bus Common (Ground)
3 –Bus Power
7.5 J5 Motor Connector
Pin Function
1 Phase A Output
2 Phase B Output. Note: For Single-phase operation, use Phases B and C.
3 Phase C Output
4 Motor Ground (for cable shield and/or FG connection if used)
(J5 pin 4 is internally connected to amplifier common or ground)
7.6 J6 Interface P-Board Connector
Pin Function
1 N/C
2 N/C
3 Common (Ground)
4 Common (Ground)
5 N/C
6 Command A
7 Command B
8 N/C
9 +3.3Vdc
10 Command Select 2
11 Command Select 1
12 Common (Ground)
7.7 J7 Interface P-Board Connector
Pin Function
1 N/C
2 N/C
3 N/C
4 N/C
5 N/C
6 N/C
7 N/C
8 +5Vdc
9 Common (Ground)
10 –15Vdc
11 Common (Ground)
12 +15Vdc
16
Page 17

LA Series Linear Servo Amplifier Technical Reference Manual
7.8 J8 Status Output Connector
Pin Function
1 7 Segment display – A
2 7 Segment display – B
3 7 Segment display – C
4 7 Segment display – D
5 7 Segment display – E
6 7 Segment display – F
7 7 Segment display – G
8 7 Segment display – DP
9 +5 Volts DC
10 Common (Ground)
7.9 J9 Motor Temperature Switch Connector
Pin Function
1 Motor Temperature switch +. Normally Closed to enable amplifier.
Internally pulled up to 5vdc. Jumper J9 pins 1-2 if input is not used.
2 Motor Temperature switch common. (Internally connected to Common)
7.10 J10 Serial Communication Connector
Pin Function
1 Receive (RxD)
2 Transmit (TxD)
3 Common (Ground)
4 Do Not Connect
17
Page 18

LA Series Linear Servo Amplifier Technical Reference Manual
7.11 Connector Part Numbers
Connector Manufacturer P/N Mate P/N Digi-Key #
J1 3M 3408-1302 3452-7600 MSD16K-ND
J2 Phoenix 17-59-03-3 17-57-035 277-1013-ND
J3 3M 3793-1302 3473-7600 MSD10K-ND
J4 Thomas & Betts 4PCR-03-008 N/A
J5 Thomas & Betts 4PCR-04-008 N/A
J6 Molex 90147-1212 Contact Factory
J7 Molex 90147-1212 Contact Factory
J8 3M 30310-6002HB 3473-7600 MSD10K-ND
J9 Molex 22-05-3021 *22-01-3027 WM2000-ND
J10 Molex 22-05-3041 22-01-3047 WM2002-ND
*Note: J9 can be shorted with a standard 0.100” jumper if motor temp switch not used.
18
Page 19

LA Series Linear Servo Amplifier Technical Reference Manual
8 User Interfaces
8.1 Push Button
The push button is used for both the Reset and Autobalance functions. The DSP measures the amount
of time the button is active (pressed). If the button is active for less than 1 second, the drive is reset upon
release of the button. If the button is active for more than 1 second, the drive enters Autobalance mode.
The switch is debounced to prevent multiple entries into the Autobalance routines if the switch is held
down for longer than 1 second.
Pushbutton
> 1 Second = Autobalance
< 1 Second = Drive Reset
The push button can also be used during a power-on-reset to display the full part number of the software.
To use this feature, hold the push button in while applying bias power. The display will begin flashing the
full part number. Release the button before the part number display completes. See the section on
Software Version Display below.
8.2 LED Display
The LED Display indicates the status of the drive. Following a reset or POR, the LED will flash all
segments as a check to make sure they are working. The software version and revision are shown next.
The display will blank briefly (1/2 sec.) and the drive status or a system fault will be indicated. The drive is
fully functioning when the status is shown (“C” or “0”). When a fault is shown, the drive is disabled and
cannot be enabled until the fault is cleared. For most faults, a reset or AR 1 command is needed to reset
the fault. A Bus Undervoltage (U) fault will be automatically cleared when the bus is at the proper operating
voltage. A Fatal Error (F) can only be cleared by a power on reset of the amplifier.
8.3 Software Version Display
The software version is shown only following a power-on-reset (not after a pushbutton reset). The version
information is presented as follows:
Example: Display shows 2.1.0-4
“2” = Upper level part number designator
“1” = Major Software Version
“0” = Minor Software Version
“4” = Number of current loop bandwidth settings
The full part number of the software can be displayed during power-on-reset by holding in the push button
and applying bias power. The part number will be displayed in the following format:
Example: 4002-12.2.0-2
“4002”= Varedan Technologies product code
“12” = Upper level part number designator
(“10”=LA-400, “11”=LA-525,“12”=LA4-07,13”=LA-200 )
“2” = Major Software Version
“0” = Minor Software Version
“2” = Number of current loop bandwidth settings
.
19
Page 20

LA Series Linear Servo Amplifier Technical Reference Manual
8.4 L.E.D. Error Codes and Meaning
The following table lists the L.E.D. error codes and their meaning. If multiple errors are present, the
display will cycle through all the error codes, displaying each for ½ second.
DSP Fault – Set when the internal DSP checksum fails following reset
NVM Fault – Set when NVM checksum fails following reset. Parameter
defaults are set.
Autobalance Fault – Set when autobalance can’t balance amplifier outputs.
ABS Overcurrent – Set when instantaneous overcurrent condition is detected
SOA – Set when Safe Operating Area protection detects an over power
condition.
5 VDC Reference error – Set when internal +5 reference supply is out of range
Bus Over Voltage – Set when Bus voltage is greater than +/-75 Vdc. `
(Note: Each leg (+ and -) is checked against this value.)
Amp ok, not enabled (Output is Clamped off). This is the normal display when
the amplifier is not enabled.
Amp ok, motor current enabled. This is the “normal” display when enabled.
Hall Supply +5vdc – Set when on board +5v supply for Halls is out of range
2.5 Vdc Reference error – Set when internal 2.5vdc supply is out of range.
20
Page 21

LA Series Linear Servo Amplifier Technical Reference Manual
Hall Error – Set when hall sequence is invalid (hall inputs are all 1’s or all 0’s)
Overcurrent – Set when amplifier detects an overcurrent condition
(“L”ow speed circuit breaker)
Bus Under Voltage – Set when the Bus voltage is less than +/-10 Vdc.
(Note: Each leg (+ and -) is checked against this value.)
Bias error – Set when Bias voltage input +/-15 is outside allowable range.
Note: The tolerance of this supply must be within +1.00vdc and –0.50vdc on
each side of the input (+14.50 to 16vdc and –14.50 to –16vdc)
(Decimal point on) Indicates an Overcurrent trip pending
Upper bar (segment a) indicates +Limit is active (Only valid in Hall mode).
Lower bar (segment d) indicates –Limit is active (Only valid in Hall mode).
Fatal Error – Set if the DSP encounters an unidentified problem.
Amplifier Over Temp – Set when the heat sink temperature is above 70 C.
Motor Over Temp – Set when motor temperature input is open
21
Page 22

LA Series Linear Servo Amplifier Technical Reference Manual
8.5 Status indicator/Remote Display Port
Connector J8 can be used to monitor system status via a parallel bus or remote display. The data written
to this port is the same data used to drive the 7-segment display. An “on” segment results in the
corresponding J8 pin to be at +5 volts. The bits are defined as follows
J8 Pin LED segment
1 a
2 b
3 c
4 d
5 e
6 f
7 g
8 dp
9 +5 vdc External (100mA Maximum)
10 Gnd
8.6 Serial Port
J10 is the RS232 communication port. A built in operating system in the DSP allows setting and viewing of
all parameters and switch settings via a dumb terminal interface such as Windows Hyper Terminal. An on
board NVM chip stores the serial parameter settings for recall on next power up of following a reset.
The communication settings are 19.2 Kbaud, 8 data, 1 stop, no parity, no handshake. The pin out for the
cable to connect to a standard PC serial port as a DTE device is as follows.
J10 Pin DB9-F Pin
1 3 Rxd
2 2 Txd
3 5 Common (Ground)
4 No Connect (Ground only for programming cable)
:
22
Page 23

LA Series Linear Servo Amplifier Technical Reference Manual
8.6.1 Serial Commands
The following commands are supported over the serial port communications interface.
A – Alarm Reset
This command allows viewing or resetting the alarm status. “A” with no parameter is used to read the alarm
status. “A 1” is used to reset the alarm status. Note: W hen an alarm is detected by the system, the drive is
immediately disabled
B – AutoBalance
This command is used to invoke the autobalance algorithm. During autobalance the display will indicate “-“
(middle bar).
E – Enable Status
This command is used to set/view the enable state of the drive. Note: When an alarm is detected by the
system, the drive is immediately disabled.
There are two modes of Enable operation, Software and Hardware. In Hardware mode, the drive enable is
controlled by the hardware Enable input on J1. A low on this input Enables the drive. A high or open on this input
disables the drive. The E command only allows viewing the enable state when in “hardware” enable mode.
Software enable mode is configured following a reset and BEFORE the hardware input is used. The drive will
come up disabled and the E command can be used to enable (E1) or disable (E0) the drive. If at any time during
software mode operation, the hardware input goes low, the drive reverts to hardware mode as described above
.
.
F – Factory Defaults
This command is used to set all the parameters to the factory defaults. Use the “S” command to save the
settings to NVM following the F command. By not automatically saving the defaults, the user can choose to go
back to the original settings (that were in the drive before the F command was used) by resetting the drive
.
H – Help
This command lists a summary of commands and their function.
L – List all parameters
This command lists all the user settable parameters and system readings to the display. The enable and alarm
status are also shown.
M – Mode
This command is used to view or set the commutation mode of the drive. M0 sets trapezoidal commutation, M1
sets Sinusoidal 2 phase input commutation. The “M command can only be used to view the commutation setting
if jumpers are installed.
R – Reset
This command causes the drive to perform a power on reset
S – Save Parameters
This command saves the user selectable parameters to NVM.
.
23
Page 24

LA Series Linear Servo Amplifier Technical Reference Manual
Y – Display Fault History
The last 8 errors from the fault history buffer are displayed. If a fault occurs while the drive is enabled, the fault
is saved into the fault history buffer. The last 8 errors are saved in NVM and recalled for display when this
command is issued. Only errors that occur while the drive is enabled are stored. This prevents nuisance errors
that commonly occur during startup/shutdown to be ignored.
YC – Clear Fault History
This command clears the fault history buffer in NVM. This command is useful after setting up a new system in
production to be sure any setup errors are cleared.
YS – Display SOA Fault History
This command displays the last saved SOA trip information from NVM. In the event of an SOA trip, all the
system parameters related to the trip are stored. This information is useful to the factory for troubleshooting SOA
events.
24
Page 25

LA Series Linear Servo Amplifier Technical Reference Manual
8.6.2 Serial Parameter Settings
The user parameter settings are configured either by jumpers or via the serial interface. When jumpers are
used, the serial interface can only be used to read the jumper settings. If no jumpers are installed, the software
settings are used. If the configuration when using jumpers results in no jumpers being installed (Sine Mode with
all minimum values), place a jumper on JP1-G. This will force the drive to read and use the jumper settings. The
use of this jumper in Sine mode will not affect operation.
When no jumpers are installed, the settings are controlled from software using P values as shown below. To
use the serial interface to configure the settings, remove all jumpers and use the values as described below for
the Pn locations. Note that if any jumper is installed, all jumper settings will be read and used for setting the
parameters.
P – Parameter Command
This command is used to view or set the user parameters and RAM locations in the drive. The following list
shows software variables and their corresponding “P” access number. Be VERY careful when changing these
values, as the software does not provide for protection from improper settings. Adverse settings may cause
“undesirable” effects on the system.
The values for P0-P6 reflect the jumper settings as described above when jumpers are installed and cannot be
changed from the serial interface. When no jumpers are installed, these values can be modified using the serial
interface by changing the appropriate Pn value to configure the drive as if jumpers were present.
P0 Transconductance setting
P1 Absolute Overcurrent Trip setting
P2 Overcurrent Trip setting
P3 Overcurrent Trip Time setting
P4 Input Filter setting
P5 Sine/ Hall mode setting
P6 Current Loop Bandwidth setting
P7 Motor Reverse setting
To set a parameter value, type P followed by the address (0-6) followed by a space followed by the value
followed by <Enter> (Cr Lf). Refer to the next page for the P values and their settings.
Example: Set P1 Absolute Overcurrent Trip to 15.0 Amps.
Type: P1 1<Enter>
Drive response: 1
To view a parameter setting, type P followed by the address (0-6) followed by Enter.
Example: View the Overcurrent Trip setting:
Type: P2 <Enter>
Drive response: 1 (or whatever the present value is)
Note: P8-P255 are system values that should not be changed by the user.
25
Page 26

ls
LA Series Linear Servo Amplifier Technical Reference Manual
8.6.2.1 Software Parameter Setting Table Summary
P0 – Transconductance switch value
P0 Value Transconductance Ratio DAC Single End/Differential
0 0.8 Differential (Bipolar)
1 1.0 Differential (Bipolar)
2 1.2 Differential (Bipolar)
3 1.5 Differential (Bipolar)
4 0.8 Single Ended (Unipolar)
5 1.0 Single Ended (Unipolar)
6 1.2 Single Ended (Unipolar)
7 1.5 Single Ended (Unipolar
P1 – Absolute Overcurrent Level
P1 Value Trip Level (See JP1-A JP1-B)
0 same as open open
1 same as in open
2 same as open in
3 same as in in
P2 – Overcurrent Trip Level
P2 Value Trip Level (See JP1-E JP1-F)
0 same as open open
1 same as in open
2 same as open in
3 same as in in
P3 – Overcurrent Trip Time
P3 Value Trip Time
0 1.25 Sec
1 2.5 Sec
2 5.0 Sec
3 10.0 Sec
P4 – Input Filter Setting
P4 Value Input Filter Setting
0 500 Hz
1 2,500 Hz
2 10,000 Hz
3 20,000 Hz
P5 – Sine Hall Mode Setting
P5 Value Sine Hall Setting
0 Sine
1 Hall
P6 – Open Loop Gain Setting (fixed configuration in some versions)
P6 Value Current Loop Bandwidth
0 Contact
1 Factory
2 For
3 Settings
P7 – Motor Reverse Setting
Value Motor Reverse Setting
0 Normal Direction for Hal
1
Reverse direction
26
Page 27

LA Series Linear Servo Amplifier Technical Reference Manual
9 Balancing
Motor phase balancing is performed to minimize torque ripple in the motor caused by impedance variations in
the motor windings and to compensate for component tolerance variations in the amplifier drive circuits. The
intent of this adjustment is to get the three motor voltages approximately equal taking into account polarity. Once
the drive is balanced, the setting should not need to be changed as long as the drive operates with the same
motor and at the same baseplate temperature as when the balance was performed
NOTE: Be sure the amplifier is at operating temperature when performing any balancing procedures. To achieve
operating temperature, enable the amplifier with the motor load connected and monitor the baseplate
temperature, either at TP2 (10°C/Volt) or using the “L” serial command.
There are two methods that can be used to balance the output phases, Autobalance and Manual Balance. For
most cases, the Autobalance feature will balance the phases to an acceptable level. For other cases where the
motor resistance may be very high, or exact phase balance must be obtained, the manual method should be
used after the Autobalance to further “tweak” the offsets.
9.1 Autobalance
The drive has the ability to autobalance the phase offsets using an internal algorithm. The algorithm is initiated
by holding the push button for longer than 1 second. The “B” command can also be used from the serial
interface. Once started, the algorithm will display a “-“ middle bar on the LED display. Depending on the amount
of offset, the phase voltage and the load resistance, the amount of time spent in the Autobalance routine varies
from about 5 seconds to about 30 seconds.
If the drive is unable to balance the phases, the routine exits and reports and Autobalance Fault (4) on
the LED display.
Note: Be sure the motion controller is set to output 0vdc to the command input(s) and the motion controller is set
for open loop mode (no feedback loop). This is very important, as the motor will not be able to move during this
procedure.
The procedure for using the Autobalance feature:
1) Connect the motor in the normal manner.
2) Apply power to the system (Bias and Bus).
3) Set the motion controller to open loop mode (no feedback loop)
4) Set the motor so no motion is possible (lock down the stage).
5) Set the command input(s) to 0 volts and Enable the amplifier.
6) Press the Reset button S1 and hold for greater than 1 second. Confirm the middle bar on the LED
display is showing. Release the button.
7) Once the procedure completes, the display will either show Enabled (0) or Autobalance Fault (4). If the
drive is Enabled, the process has completed successfully. If a fault is shown, the phases will have to be
balanced manually.
Note: The Autobalance function is typically able to balance a load with a resistance that falls within the range of 1
ohm to 10 ohms. The Autobalance function may not consistently balance loads outside this range. This does not
indicate a problem with the amplifier. It means the load may need to be manually balanced. This is especially
true if the manual balance pots have been moved from their factory center position. Once the load has been
manually balanced and the pots re-centered, the Autobalance function will most likely work.
27
Page 28

LA Series Linear Servo Amplifier Technical Reference Manual
9.2 Manual Balance
The procedure to manually balance the phases is shown below. A voltmeter is required to measure the phase
voltages. Refer to Figure 2 on the next page for the location of the balance pots.
The procedure to manually balance the phases:
1) With power off, connect the Phase A motor lead to J5-1. Connect Phase B motor lead to J5-4
(Common). Leave Phase C motor lead disconnected.
2) Apply power to the system.
3) Set the motor so no motion is possible (lock down or tape stage).
4) Set the command input to 0 volts and Enable the amplifier.
5) With a multi-meter set on the 2 VDC range, measure across the load (J5-1 to J5-4). Adjust
potentiometer RV6, BAL A, until the meter reads 0.00 VDC.
6) Move the Phase A lead to J5-2 (Phase B). This puts the load from Phase B to common.
7) With a multi-meter set on the 2 VDC range, measure across the load (J5-2 to J5-4). Adjust
potentiometer RV5, BAL B, until the meter reads 0.00 VDC.
8) Reconnect the motor leads normally: Phase A motor lead to J5-1, Phase B motor lead to J5-2, Phase C
motor lead to J5-3.
9) With a multi-meter set on the 2 VDC range, measure across Phase C to common (J5-3 to J5-4). Adjust
potentiometer RV5, BAL C, until the meter reads 0.00 VDC.
28
Page 29

LA Series Linear Servo Amplifier Technical Reference Manual
10 Test Points
Five user test points are provided on the amplifier, TP1-TP5. They are located at the top of the amplifier,
between JP2 and the Pushbutton switch.
TP1 – I Out – This test point provides an analog voltage proportional to the current output of the amplifier. The
scaling for this output is 6.6 amps per volt. Note that this value is the absolute value of instantaneous current
from the phase with the highest magnitude of current. This is the same signal that is output on J1 pin 5.
TP2 – Heatsink Temperature – This test point provides an analog voltage proportional to the heatsink
temperature, measured in the middle of the heatsink. This output is scaled at 10°C per volt.
TP3 – Common – This test point provides convenient access to amplifier common (ground).
TP4 – Command Phase A – This test point is connected to user Command Phase A voltage. The voltage at this
pin is scaled to ¼ of the Command Phase A input voltage.
TP5 - Command Phase B– This test point is connected to user Command Phase B voltage. The voltage at this
pin is scaled to ¼ of the Command Phase B input voltage.
29
Page 30

Autobalance
LA Series Linear Servo Amplifier Technical Reference Manual
Figure 3 – Location of Jumpers, Balance Potentiometers and Test Points
J10 Serial
Connector
Jumpers
Test Points
Reset &
J1 Main
Signal
Connector
30
Page 31

LA Series Linear Servo Amplifier Technical Reference Manual
Figure 4. Functional Block Diagram – All Models
31
Page 32

Autobalance
LA Series Linear Servo Amplifier Technical Reference Manual
Figure 5. Installation Drawing Details
Bus +
Common
Bus –
Motor A
Motor B
Motor C
Common
J8
7-Segment
Display
J10
JP1
JP2
JP3 Test Points Balance Pots
S1 Reset &
1
J1 Signal
1
J3 Halls
J9 Motor Temp.
2
1
J2 Bias Power
+15VDC
1
Common
2
Common
3
4
-15VDC
32
Page 33

LA Series Linear Servo Amplifier Technical Reference Manual
Figure 6. Typical Connections Single-Phase Models with “S” suffix
33
Page 34

LA Series Linear Servo Amplifier Technical Reference Manual
Figure 7. Typical Connections Three-Phase Models with “T” suffix
34
Page 35
LA Series Linear Servo Amplifier Technical Reference Manual
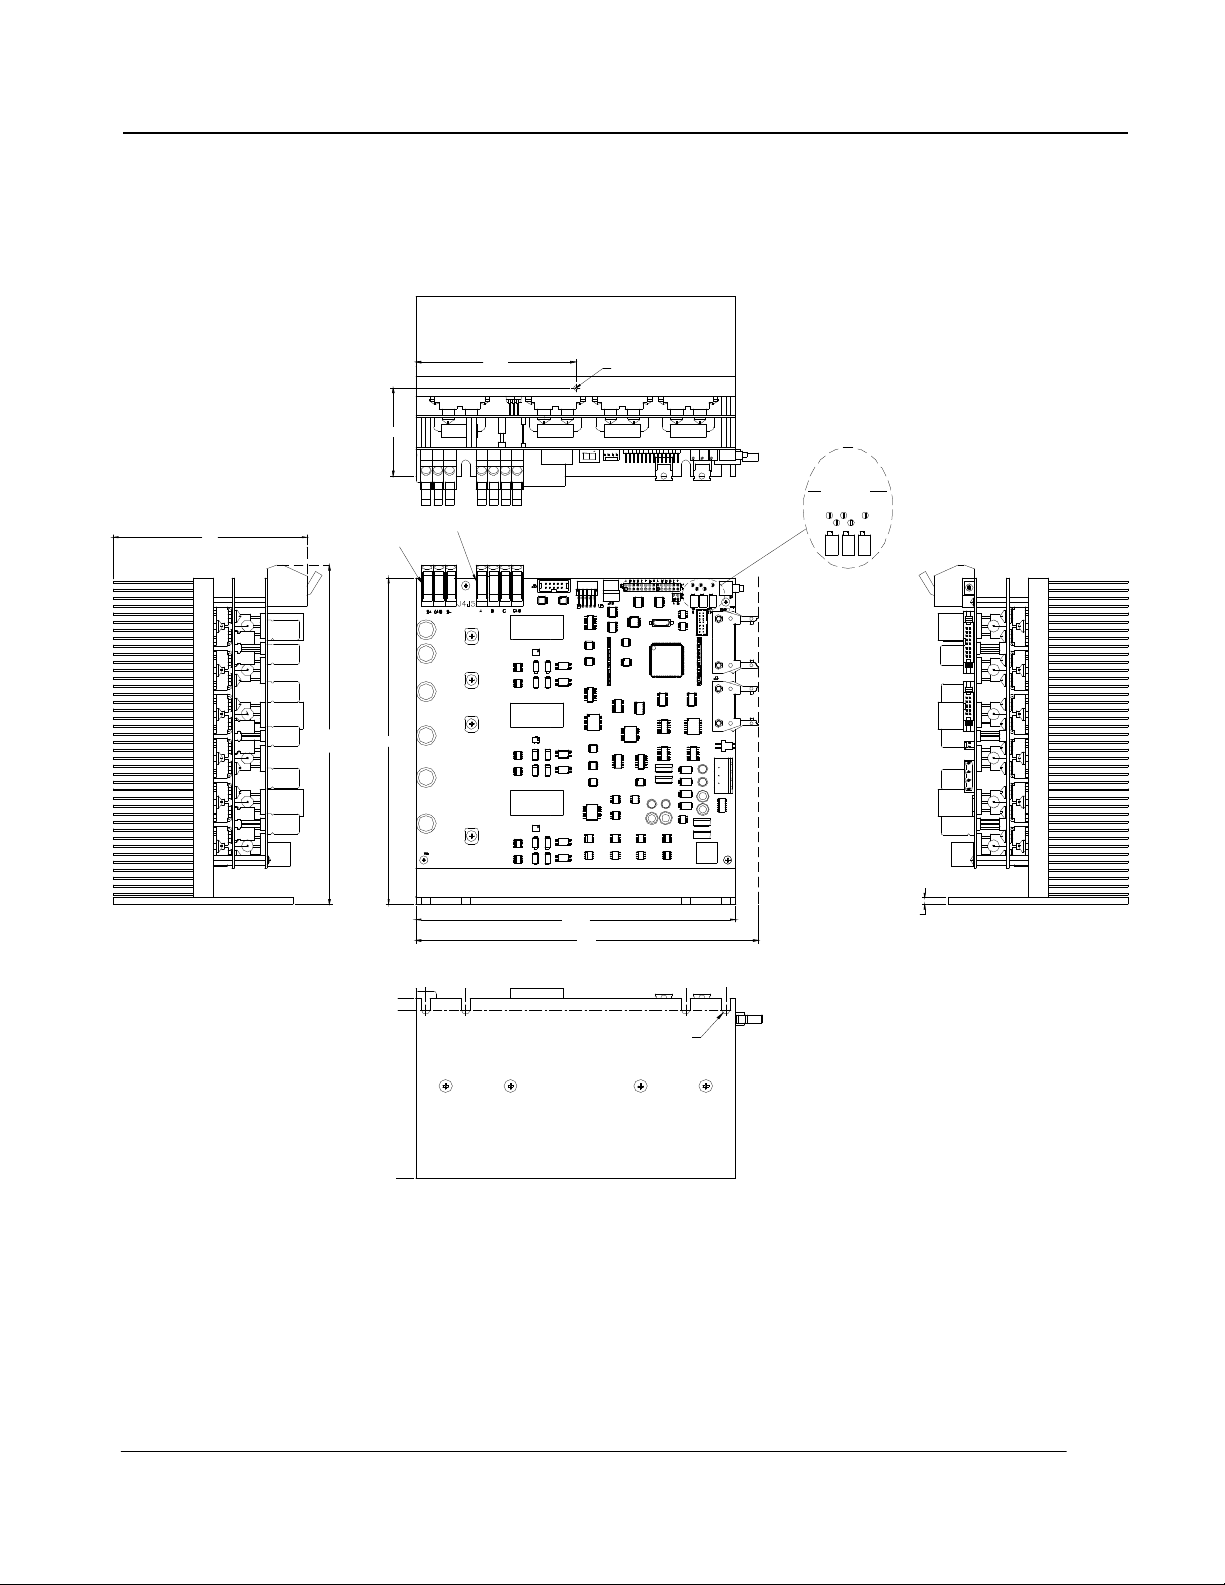
Figure 8. LA-800 Series Mechanical Dimensions
LEFT VIEW
REF.
4.000
2.206
4.8
8.48
8.160
REF.
0.00
0.30
Note 2
Note 2
BUS -
GND
BUS +
PHASE A
PHASE B
GND
PHASE C
0.25
0.00
1.25
STATUS
FAULT
8.000
TOP VIEW
DISPLAY
STATUS
8.56
REF.
FRONT VIEW
6-32
SERIAL
PORT
SLOT 0.200 WIDE
(4 PLACES)
DETAIL - TE ST POINTS AND
BALANCE POTENTIOMETERS
COMMON
I RMS OUT
TEMP
CMD A
CMD B
BAL C
BAL A
JUMPER
SETT INGS
6.75
7.75
+15V
COM
COM
-15V
RESET /
AUTOBALANCE
MAIN
SIGNAL
MOTOR
FEEDBACK
MOTOR
OVERTEMP
BIAS POWER
BAL B
RIGHT VIEW
0.160
4.500
BOTTOM VIEW
35
Page 36

LA Series Linear Servo Amplifier Technical Reference Manual
Figure 9. LA-1500 Series Mechanical Dimensions
36
Page 37

LA Series Linear Servo Amplifier Technical Reference Manual
Appendix A. Serial Communication Messages
This section describes the details of the serial communication messages. The only white space
character used in this protocol is the Space (ASCII 0x20). All lines are terminated with a Carriage
Return and Line Feed (cr/lf) followed by a “>” prompt (ASCII 0x3E). The prompt is sent following any
message by the amplifier. The prompt line has no termination in order to allow a dumb terminal cursor
to remain on the prompt line. This provides a clear indication for the user when the amplifier is ready
for a new command when using a dump terminal interface.
Some common characters used in this section are:
cr = Carriage Return, ASCII 0x0D
lf = Line Feed, ASCII 0x0A
> = Greater Sign (used as the prompt), ASCII 0x3E
When the amplifier is first powered up, the user must wait until the sign on message and the prompt
are sent before normal communication can begin. The sending of the first prompt from the amplifier
means it is ready for operation. If a fault alarm is present on power up, the fault message will be
shown followed by a prompt.
All command sent to the unit must be in upper-case characters. Messages that the amplifier sends for
a particular command or condition are a fixed length. Messages are padded with the space (ASCII
0x20) to achieve the desired length. As an example, all alarm messages are 14 characters in length.
All messages from the amplifier are shown in quotes to allow the programmer to determine the
character count for each message. The quotes are not part of the message. Any blank lines sent by
the amplifier are shown by the cr/lf sequence in the text shown below.
37
Page 38

LA Series Linear Servo Amplifier Technical Reference Manual
10.1 Sign on Message
Upon power up or following a reset, the amplifier sends the following message.
“Varedan Technologies, (c) 2007 Ver 4002-11-2.3.0-2”
“>”
In addition, if any faults are present, the fault status is show following the above message.
“Alarm = BUS UV”
“>”
10.2 Alarm Messages
Sent in response to “A” command or upon detection of alarm condition. 16 possible responses, 14
characters in length.
"Alarm = DSP "
"Alarm = NVM "
"Alarm = HALLS "
"Alarm = AMP OT"
"Alarm = MOT OT"
"Alarm = ABS OC"
"Alarm = RMS OC"
"Alarm = BUS OV"
"Alarm = BUS UV"
"Alarm = 5V REF"
"Alarm = 15VREF"
"Alarm = 2.5REF"
"Alarm = 5V EXT"
"Alarm = AUTOBL"
"Alarm = SOA "
"Alarm = FATAL "
“>”
10.3 Autobalance Messages
In response to the “B” command:
If Autobalance can’t run:
“Drive Must Be Enabled to use this command”
“>”
While Autobalance is active:
“-“
(Prompt is sent upon completion of Autobalance)
“>”
38
Page 39

LA Series Linear Servo Amplifier Technical Reference Manual
10.4 Enable Status Messages
In response to the “E” command:
If disabled with alarm:
“DISABLED”
cr/lf
“Alarm = BUS UV”
“>”
If disabled without alarm:
“DISABLED”
“>”
If enabled:
“ENABLED”
“>”
10.5 Factory Default Message
In response to the “F” command:
"Loading Default Parameters"
“>”
10.6 Help Messages
In response to the “H” command:
“Command List”
“A<n> = Show/Reset Alarm Status”
“E<n>= Set/View Enable Status Enable=1 Disable=0”
“F = Load Factory Defaults”
“H = Help”
“L = List Parameters”
“M = View Mode”
“P Addr <data> = Set/View Parameter”
“R = Reset Drive”
“S = Save setting to NVM”
“T = SOA Trip Data”
“Y = Show Alarm History”
“YC = Clear Alarm History”
“YS = Show Saved SOA Fault Data”
cr/lf
“>”
39
Page 40

LA Series Linear Servo Amplifier Technical Reference Manual
10.7 List Messages
In response to the “L” command:
“Bus+= 0 V”
“Bus-=-0 V”
“Vpha= 0 V”
“Vphb= 0 V”
“Vphc= 0 V”
“Ipha= 0.0 A”
“Iphb= 0.0 A”
“Iphc= 0.0 A”
“+15 = 15.2 V”
“-15 =-15.2 V”
“+5 = 4.9 V”
“+5Ex= 4.9 V”
“+2.5= 2.50 V”
“-2.5=-2.50 V”
“Temp= 23 C”
cr/lf
“RMS Overcurrent,JP1-A,B (Amps): Off Off”
“RMS Trip Time, JP1-C,D (Sec): On Off ”
“Absolute Overcurrent, JP1-E,F (Amps): Off On ”
“Motor Direction Setting, JP1-H: Normal”
“Sine or Hall Mode, JP2-A: Sine”
“Input Filter Setting, JP2-B,C (kHz): On On ”
“Transconductance Ratio, JP2-D,E: Off Off”
“Input Differential or Single Ended, JP2-F : Diff”
cr/lf
“DISABLED”
cr/lf
“Alarm = BUS UV”
“>”
Note that this is an example message. The actual message data depends on the values and status of
the amplifier. If the amplifier is enabled, “ENABLED” is shown instead of “DISABLED”. The alarm
message follows the alarm message formats as described earlier.
10.8 Mode Command Messages
In response to the “M” command, the amplifier responds with the following, depending on the jumper
settings or the user setting for mode:
“Sine Current Mode”
“>”
“Trap Current Mode”
“>”
10.9 Save Parameters Message
In response to the “S” command:
“Saving Parameter”
“>”
40
Page 41

LA Series Linear Servo Amplifier Technical Reference Manual
10.10 Fault History Messages
In response to the “Y” command:
cr/lf
“Alarm History (Last to First)”
cr/lf
“Alarm = BUS UV”
cr/lf
“Alarm = 15VREF”
cr/lf
“Alarm = 15VREF”
cr/lf
“Alarm = BUS UV”
cr/lf
“Alarm = 15VREF”
cr/lf
“Alarm = ABS OC”
cr/lf
“Alarm = BUS UV”
cr/lf
“Alarm = BUS UV”
cr/lf
“>”
Note that this is just an example fault history. Actual results may vary, but all messages follow the
format for the Alarm messages described earlier. If no history is stored, the amplifier responds with just
a prompt.
10.11 Clear Fault History Message
In response to the “YC” command:
cr/lf
Alarm History Cleared
cr/lf
“>”
41
Page 42

LA Series Linear Servo Amplifier Technical Reference Manual
10.12 SOA Fault History Messages
In response to the “YS” command:
cr/lf
“Saved SOA History”
cr/lf
“Cnts= 0”
“MaxP= 0 W”
“ActP= 0 W”
“Bus+= 0.0 V”
“Bus-=-0.0 V”
“Vpha= 0.0 V”
“Vphb= 0.0 V”
“Vphc= 0.0 V”
“Ipha= 0.0 A”
“Iphb= 0.0 A”
“Iphc= 0.0 A”
“Temp= 0 C”
cr/lf
“>”
Note that this is an example message. Actual results will be displayed in the event of an actual SOA
trip.
42
 Loading...