

Page 1
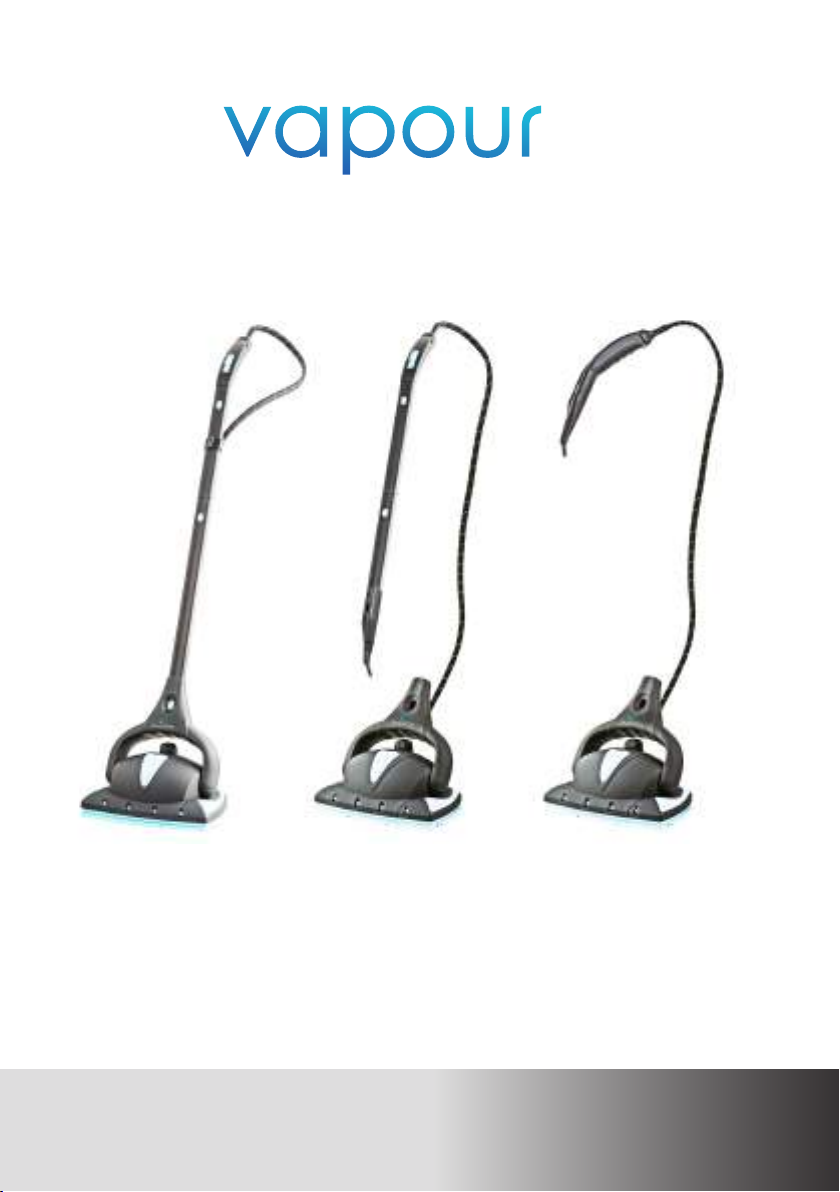
HYBRID STEAM CLEANER
M4S
All in One Steam Cleaner
INSTRUCTION MANUAL
Before using this product, please read the instructions and keep it for future references.
Page 2

IMPORTANT SAF ETY INSTRUCTION
When using an electrical appliance, basic safety
precautions should always be observed, including the
following: Read all instructions before using this appliance.
WARNING! To reduce the risk of re, electrical shock,
or injury:
1. This steam cleaner is authorized for household/
domestic use only.
2. Do not use outdoors in raining conditions or on wet
surfaces. Do not immerse the steam cleaner in water
or other liquids.
3. Do not allow steam cleaner to be used as a toy. Close
attention is necessary when used by or near children.
Do not leave steam cleaner unattended. Always
unplug product when not in use.
4. Use only as described and for the uses described
in this manual. Use only manufacturer’s approved
and supplied parts and accessories. Use of other
accessories is not recommended and will void the
warranty.
5. Always make sure the Handle Assembly is in the upright
position before plugging in or unplugging. Keep cord
away from heated surfaces (e.g., cooking surfaces)
and sharp edges and corners.
6. Do not use if power cord or plug has been damaged,
or if any part of steam cleaner has been dropped,
damaged, left outdoors, or dropped in water. Do
not attempt to disassemble or repair steam cleaner.
Return it to manufacturer or an authorized service
center for examination or repair.
7. Do not wrap cord too tightly around cord winders.
Never carry by the cord or yank to disconnect from an
outlet. To unplug, always grasp plug to remove from
outlet – do not pull on cord.
8. Do not handle the cord or the steam cleaner with wet
hands or bare feet.
2
Safety Instruction
Page 3
.
9. Look closely at steam cleaner and follow all labels
and marking instructions.
10. Do not put any objects into openings. Do not use with any
opening blocked.
11. Keep hair, loose clothing, ngers and all parts of body
away from openings and moving parts.
12. Before lling with water or emptying, always place
Handle Assembly in upright position, unplug the steam
cleaner and allow it to briey cool down. Always turn
the Boiler Cap slowly to open the water tank – this will
allow any remaining steam to escape gradually.
13. Use caution while emptying the steam cleaner.
Contact with hot water or steam may cause burns.
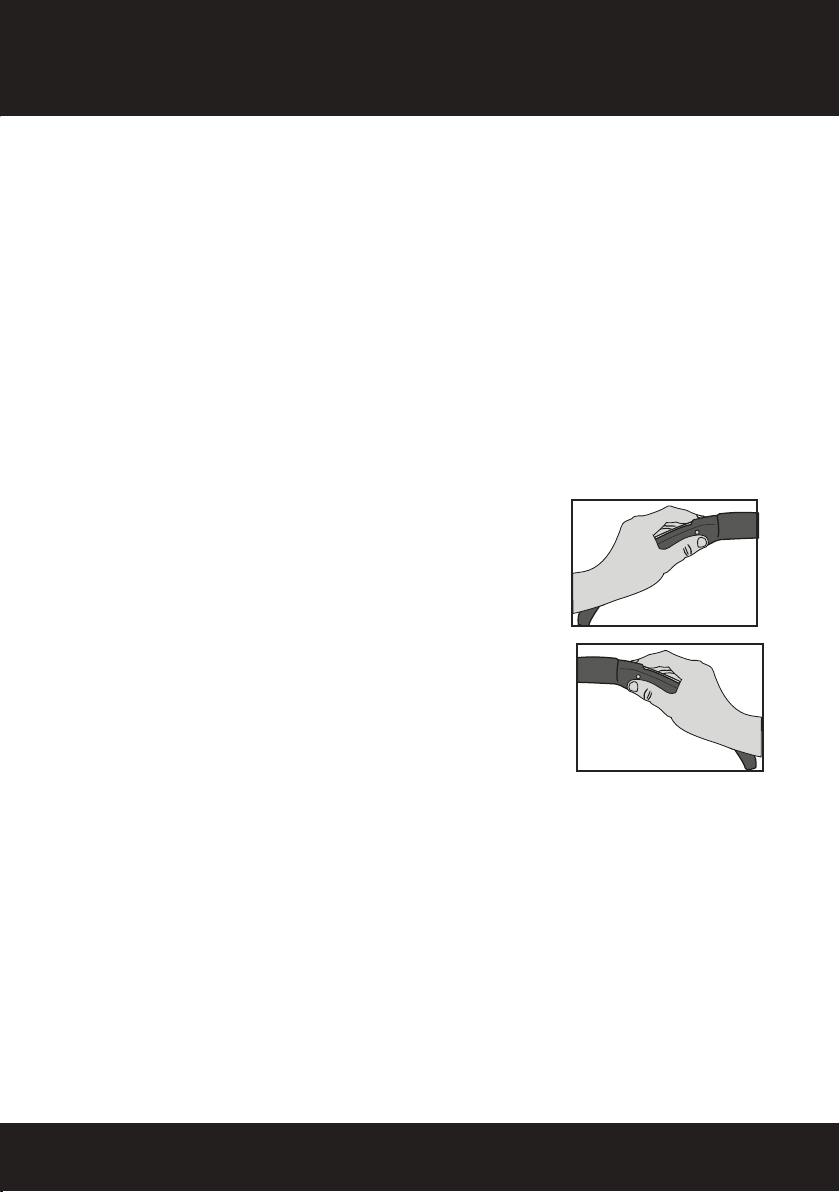
14. To unlock the steam handle,
press the safety button on the
right side (1).
(1)
At the end of use it is
recommended to lock the steam
handle by pressing the button on
the left side (2).
15. Never use cleaning solutions, perfumes, oils or other
chemical substances other than tap or distilled/
demineralized water in the steam cleaner. Use of
chemicals may damage steam cleaner and will void
the warranty.
16. Be sure Boiler Cap is (and remains) closed during use.
17. When in use, never turn the steam cleaner on its
side. Do not direct steam at people, animals or other
electrical equipment (i.e, inside an oven).
18. Do not operate around ammable or combustible
liquids such as gasoline or in areas where fumes may
be present.
Safety Instruction
(2)
3
Page 4
IMPORTANT SAF ETY INSTRUCTION
19. The steam cleaner is not intended for space heating
purposes.
20. To reduce the likelihood of circuit overload, do
not operate another high wattage appliance on
the same circuit. Plug in to a standard (220-240V,
50/60Hz) electrical outlet.
ATTENTION! This product is equipped with a 3-prong
grounded power cord. Insert only into a 3-prong
grounded electrical outlet. Do not try to remove the
contacts of the grounded connection.
21. Do not use extension cords or outlets that are
damaged or with inadequate voltage. Use only
heavy duty, high-rated extensions cords.
22. Store the steam cleaner indoors in a cool, dry place.
23. If steam cleaner is damaged, it must be repaired by
manufacturer in order to avoid safety issues to the
operator.
24. This steam cleaner is not intended for use by persons
(including children) with reduced physical, sensory
or mental capabilities, or lack of experience and
knowledge, unless they have been given supervision
or instruction concerning use of this product by a
person responsible for their safety.
25. Read and follow all important notices in this guide.
CAUTIONS
• Extreme care should be taken when opening the
Boiler Cap as it may become hot during use and
escaping steam can cause scalding.
4
Safety Instruction
Page 5
.
CAUTIONS
•Do not use your steam cleaner without a Hard Surface
Pad or Carpet Glide & Pad attached to the system.
•Never leave your steam cleaner in one spot on any
surface for any period of time. Make sure that the
steam cleaner Handle Assembly is in the full “UPRIGHT
POSITION” when not in use.
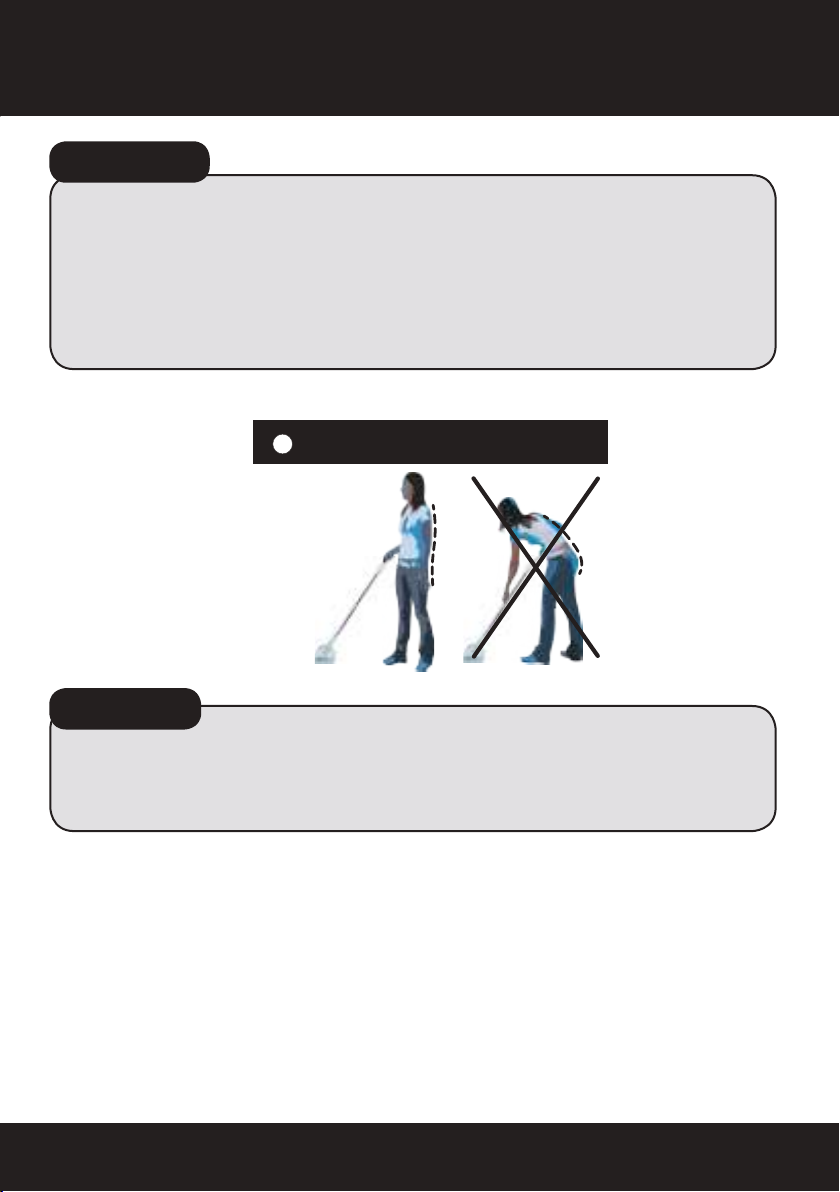
Save your back
No need
to press hard
The steam
cleaner does
the work
for you
*IMPORTANT*
Please read all of the instructions for use and Important Safety
Instructions carefully. Remove and discard all packaging
materials and keep them out of the reach of children.
Euroex relieves itself of any liability for damages that shall be
the result of improper use of the appliance, not in conformity
with what’s written in this instruction manual.
Attention: the photographs and/or drawings in this document are for illustrative
purposes only. Actual steam cleaner and the accessories may vary due to product
enhancement.
Safety Informations in Digital Format: www.plastecs.it/warning
Safety Instruction
5
Page 6
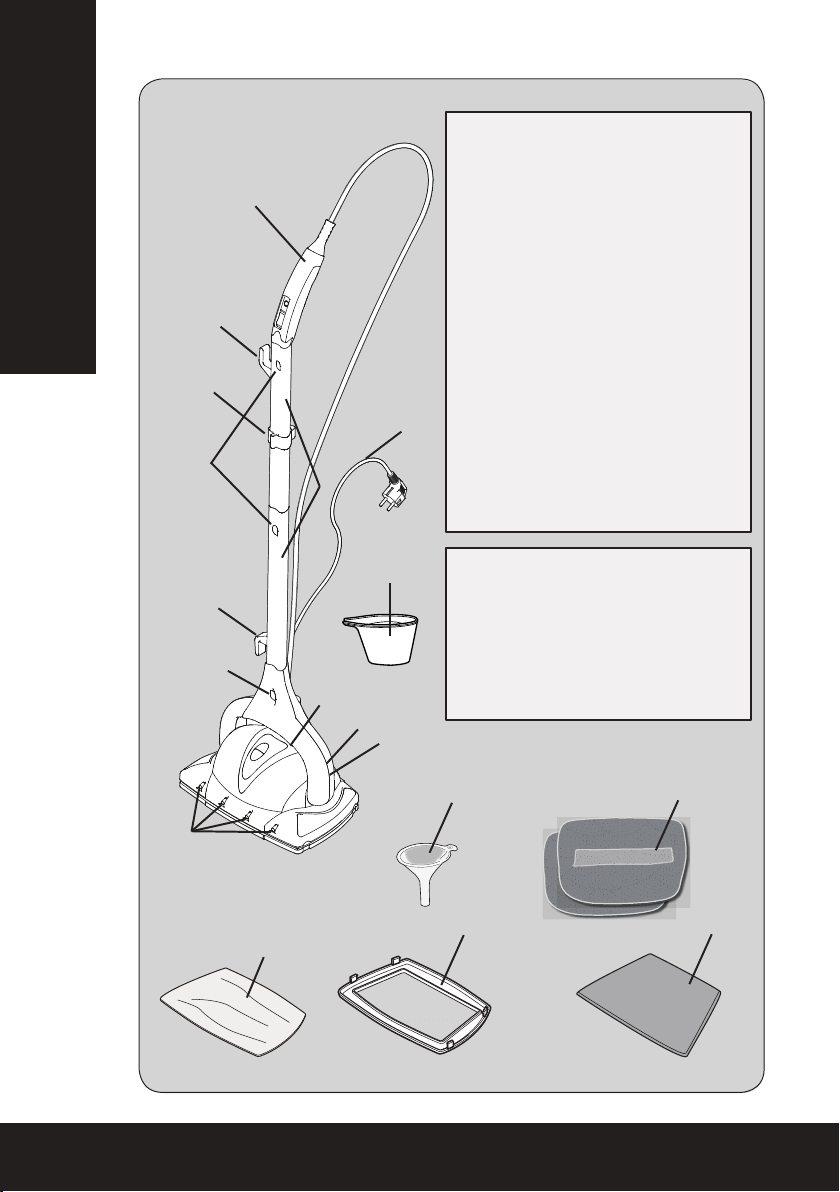
PARKING PAD
1
Product Description
3
4
2
11
1 - Steam Handle with Switch
2 - Locking Buttons
3 - Cord Winders
4 - Cleaning Hose Clamp
5 - Measuring Cup (pre-marked)
6 - Boiler Cap
7 - Steam Ready Indicator Light
(green)
8 - Power Indicator Light
(orange)
9 - Power Cord
10 - Steam Nozzles
11 - Extension Tube
9
12 - Funnel
13 - Carpet Glide Microber Pad
14 - Carpet Glide
15 - Microber Floor Pads
16 - Parking Pad
5
3
2
6
Technical Data
Adapter Input: 220-240V~50/60Hz
Cord Length: 7 meters/23 feet
Power: 1200 watts
Boiler: Stainless Steel
Boiler Capacity: 0.6 liter/20 ounces
7
8
12
15
10
14
16
13
6
Product Description
Page 7
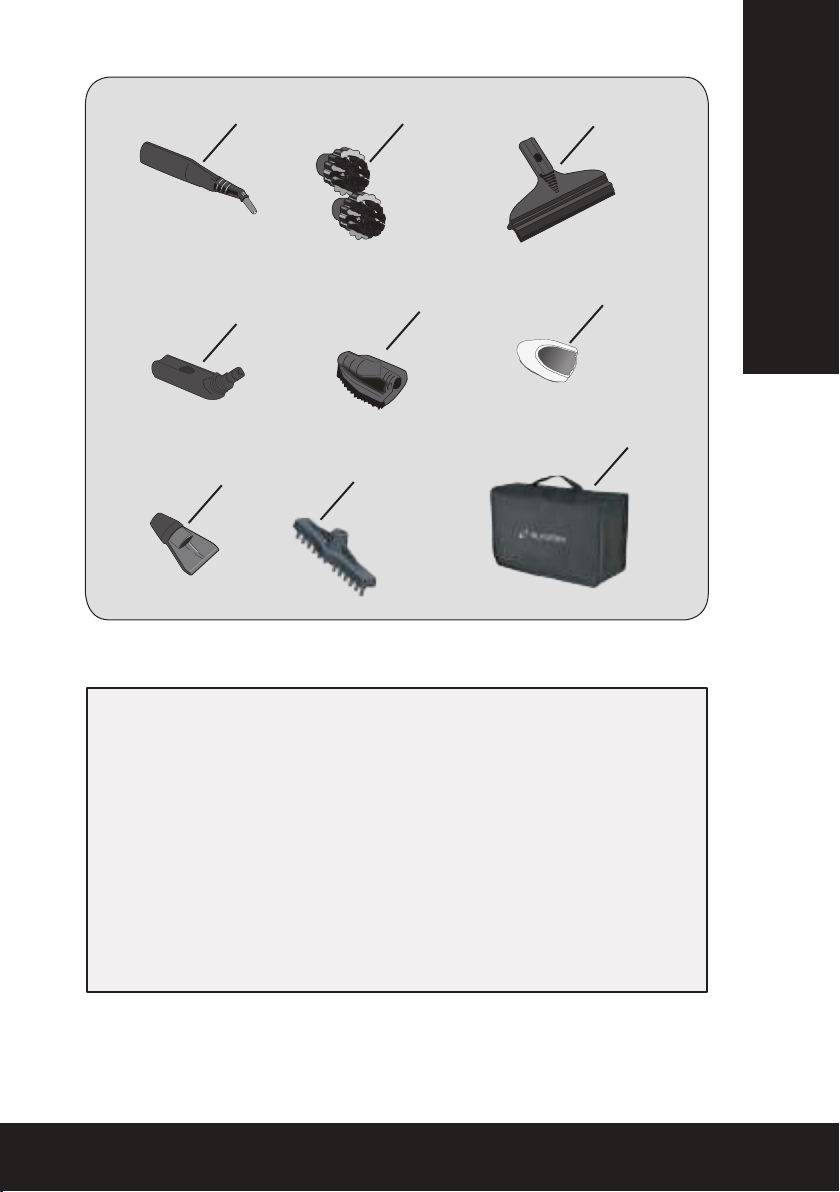
Product Description
1
4
7
2
5
8
3
6
9
ACCESSORIES
1 - Detail Nozzle
2 - Nylon Small Brushes
3 - Window Cleaner
4 - Small Brush Adapter
5 - Small Brush
6 - Fitted Microber Pad for Small Brush
7 - Scraper
8 - Grout Brush
9 - Accessory Bag
Product Description
7
Page 8
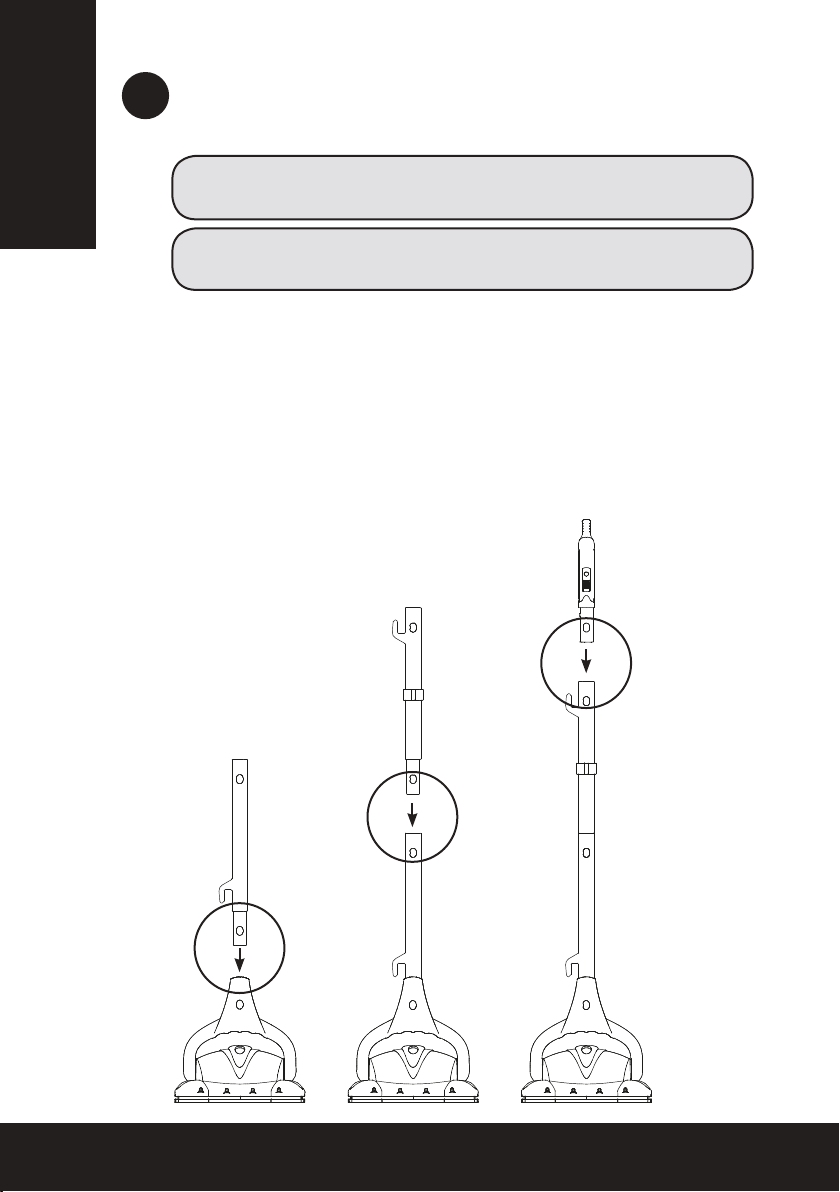
1 FLOOR STEAM CLEANING MODE
Assembly of Parts & Preparation of Steam Cleaner
Make sure all parts are in the box (see pg 6-7).
Before Use
IMPORTANT! FOLLOW THESE INSTRUCTIONS CAREFULLY.
WARNING! Always ensure steam handle is not steaming
when attaching an accessory to the steam cleaner.
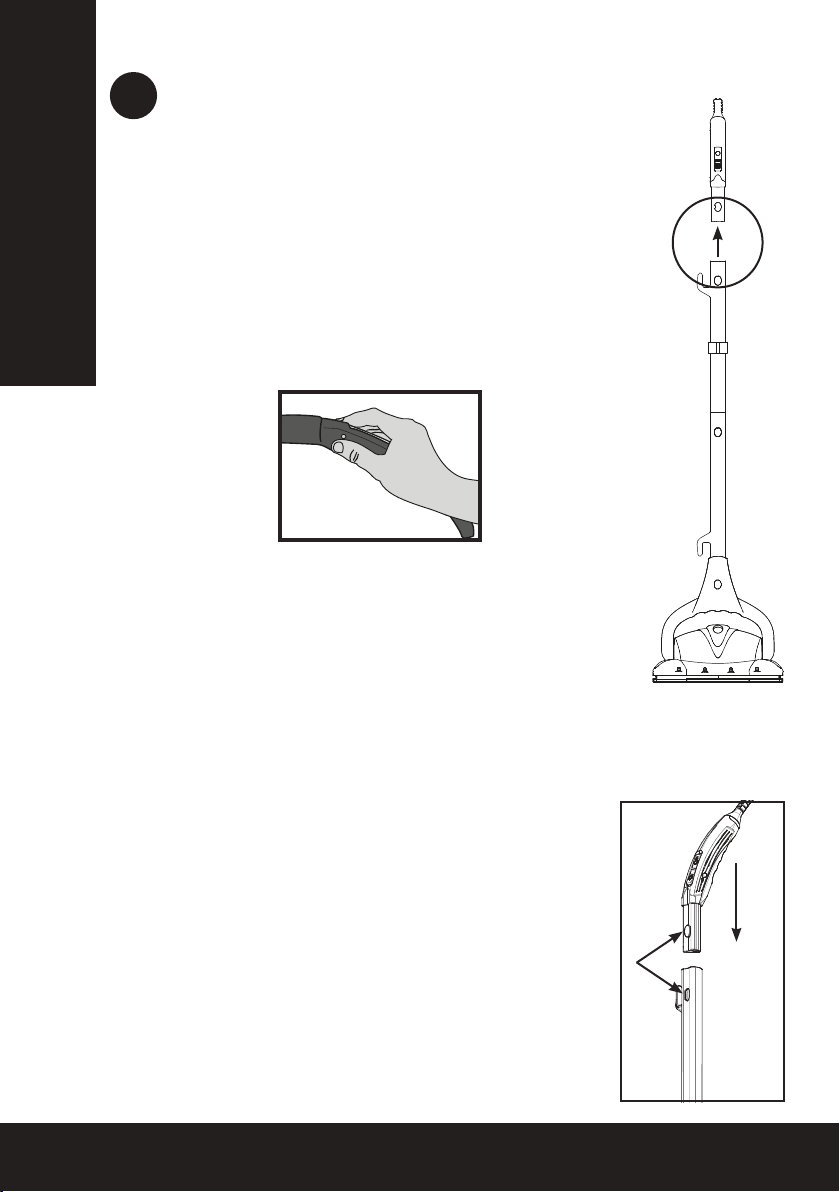
A. Attach Steam Handle to Steam Cleaner
Attention! The lower Extension Tube has the cord support pointing down.
The upper Extension Tube has the cord support pointing upwards.
• Insert the lower Extension Tube into the steam cleaner
base and press rmly in place (as shown in Fig. A).
• Insert the upper Extension Tube into the lower extension
tube and press rmly in place (as shown in Fig. B).
• Insert the Steam Handle into the upper extension tube
and press rmly in place (as shown in Fig. C).
Fig. A Fig. B Fig. C
8
Before Use
Page 9
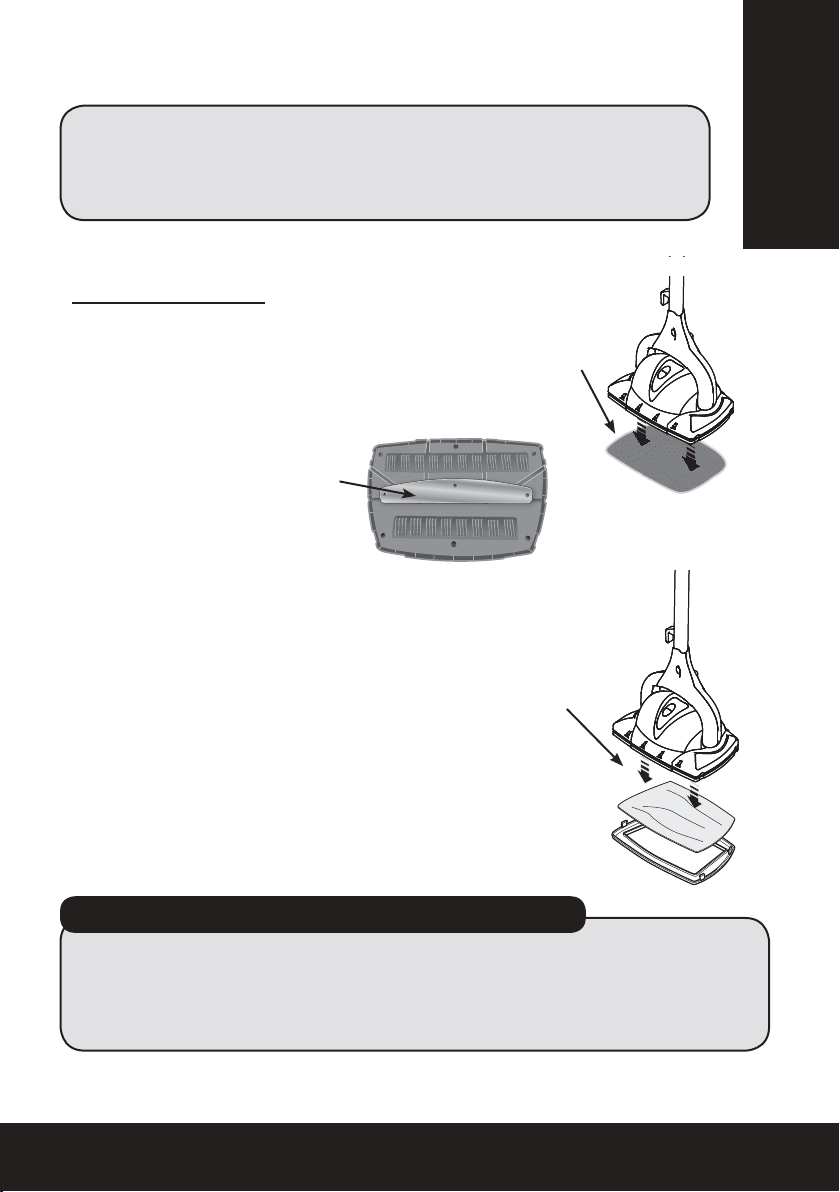
B. Attach Cleaning Pads to Steam Cleaner
A
Before Use
WARNING! To prevent oor damage, ALWAYS attach either the
Microber Floor Pad or the Carpet Glide Accessory with Carpet
Pad when using the steam cleaner. NEVER USE WITHOUT EITHER
OF THESE ATTACHMENTS AFFIXED TO THE BASE.
ATTACHING SCRUBBING FLOOR PAD
Scrubbing Floor Pad – Place Microber Floor Pad
face down on the oor, wide side forward, with
center Scrub Strip facing down (and positioned to
match metal heat plate on bottom of Base-see “A”).
Hold steam cleaner about 2” above Pad and gently
place steam cleaner on the Pad. Firmly press down
to ensure Pad is adhered to the steam cleaner.
-
Heat Plate on
bottom of Base
boosts the cleaning
performance.
ATTACHING CARPET GLIDE WITH CARPET PAD
Place carpet glide face up on oor. Center and
place carpet pad on top of carpet glide. Hold
steam cleaner over carpet glide and gently lower
the steam cleaner onto the glide. Make sure the 4
clips on glide are around the outside of the steam
cleaner base and using hands, attach the 4 clips of
the carpet glide to the base.
USE ON HARDWOOD FLOORS – For timber oors, use
only on “sealed” timber surfaces.
Move steam cleaner forward and backward while
cleaning, carefully observing the amount of steam
used, as too much water could cause damage.
*IMPORTANT NOTE ABOUT LINOLEUM FLOORING*
Steam can cause wax to be stripped from, and consequently damage, some
varieties of linoleum ooring. ALWAYS test a small, inconspicuous portion of the
oor BEFORE using steam to ensure that your linoleum oor does not have this
issue. For some varieties of linoleum or vinyl oors the steam cleaner is harder to
push forward and back.
NOTE: See “Maintenance & Cleaning” for care and cleaning instructions for
Microber Pads.
Before Use
9
Page 10
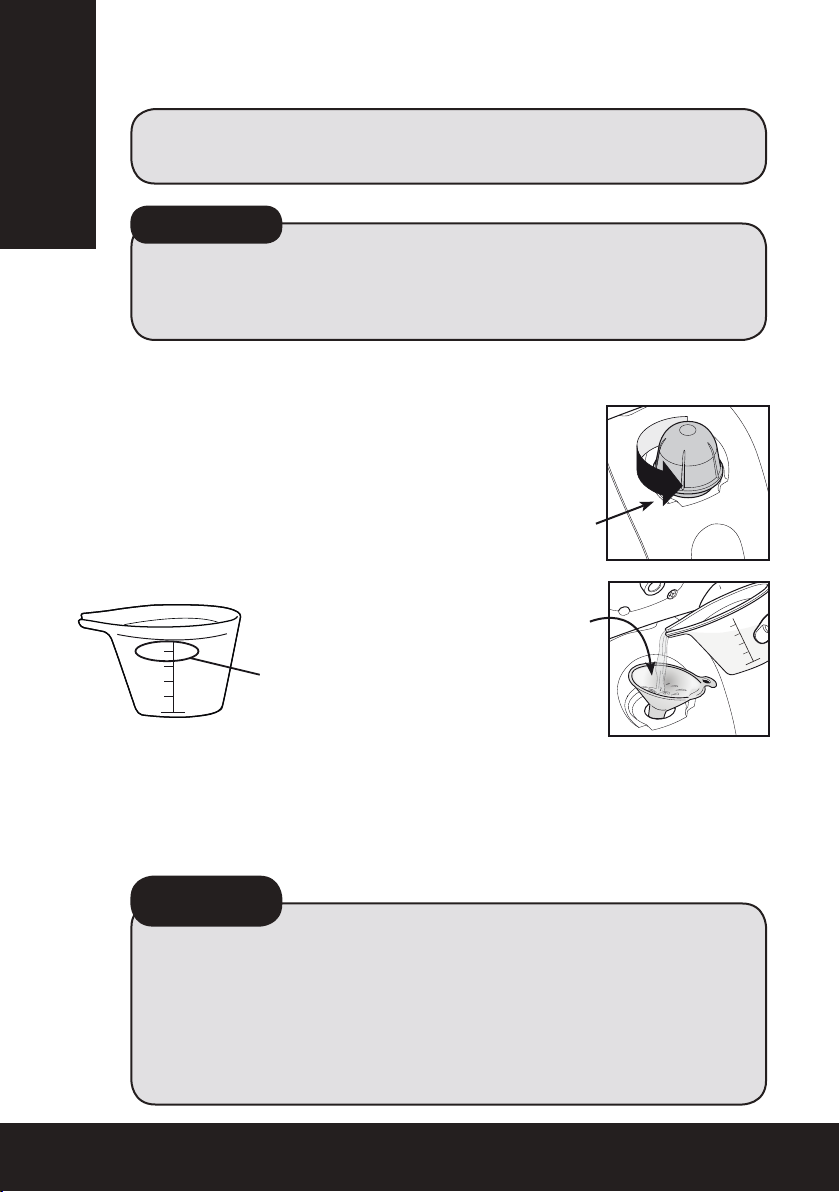
C. Filling Water when Boiler is Cold
WARNINGS:
• Carefully read all instructions before removing Boiler Cap.
• Always unplug appliance before lling the Boiler.
Before Use
*IMPORTANT*
Use ordinary tap water. Distilled or demineralized water is recommended
if tap water is too hard. DO NOT add detergents, perfumes, oils, or other
chemical substances to the Boiler. The product warranty will be null and
void if anything other than water is added to the Boiler.
Follow these instructions to avoid overlling the Boiler:
• Be sure steam cleaner is unplugged from
the electrical power outlet, and the boiler
has not been heated.
• Make sure Handle Assembly is in the
horizontal position. Remove Boiler Cap by
turning it counterclockwise.
200 ml
A
100 ml
N
B
I
T
(
x
M
a
• Pour in 600 mls of water using
the Measuring Cup and Filler
Funnel provided – ll cup to the
“200 ml” marking three times.
K
A
)
Be careful not to overll the
Boiler. Please note that excess
200 ml
T
N
A
x
a
M
(
100 ml
water will be ushed out during
use if the Boiler is overlled,
resulting in wet oors.
10
• Replace Boiler Cap by turning it clockwise. Do not tighten
Boiler Cap too much – nger tightening is sufcient to lock the
steam in the Boiler. If using cold water, heating time is about
3-5 minutes. If using warm water, heating time is reduced.
*IMPORTANT*
• Do not overll the Boiler as excess water will be ushed out
of the Boiler before dry steam will emit.
• If re-lling the Boiler while steam cleaner has been in use, be
sure to allow boiler to cool for at least 5 minutes and loosen
Boiler Cap slowly to allow any excess steam to escape
before completely removing Cap. (See part E, “Relling
Water when Boiler is Hot” for detailed instructions.)
Before Use
Page 11
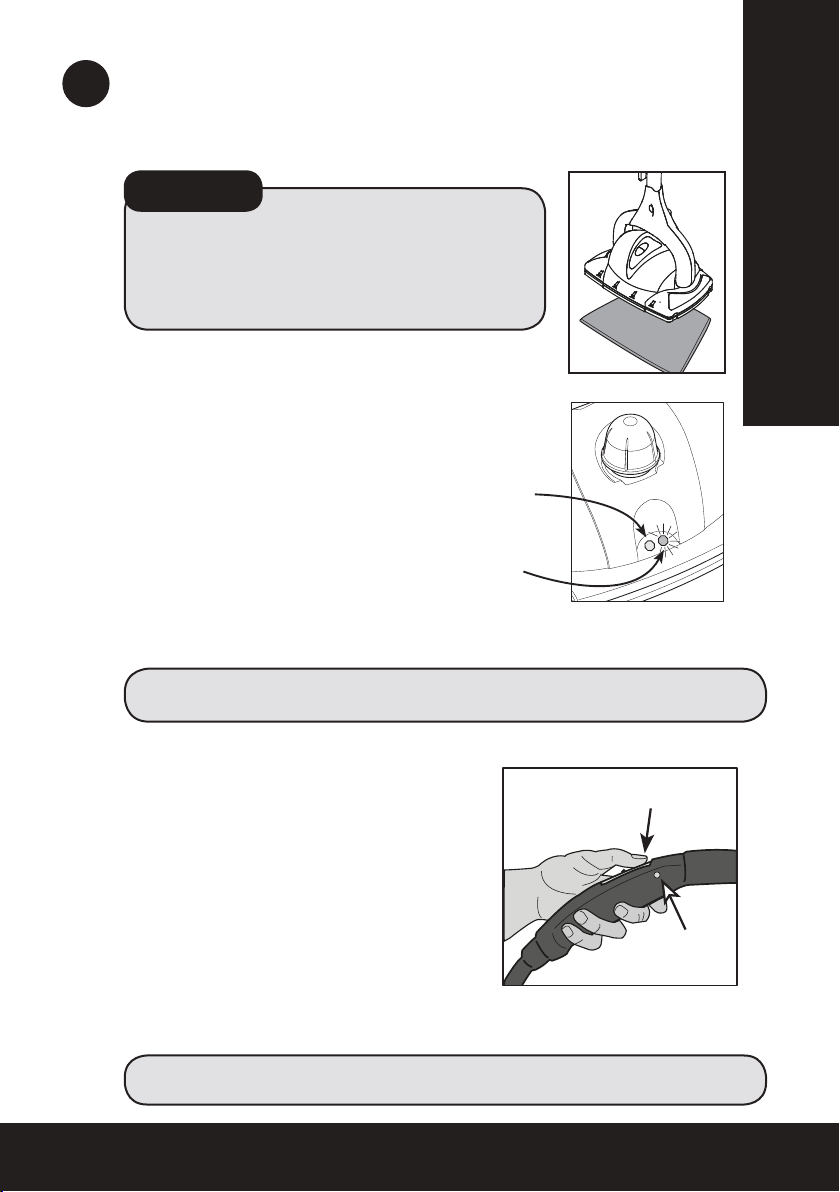
2 Using the Steam Cleaner to Wash Floors
PARKING PAD
A. Using the Parking Pad
You can use the Parking Pad if the steam cleaner is warm or hot.
CAUTIONS
The Parking Pad is provided to prevent oor
damage that can result from leaving a hot steam
cleaner resting on the same spot for too long.
ALWAYS place steam cleaner on the Parking Pad
when not in use, or while it is cooling before storage.
B. Starting the Steam Cleaner
• Be sure Boiler is lled with water and
Boiler Cap is securely in place.
• Insert the plug into a-3 prong grounded
electrical outlet (orange Power
Indicator Light will illuminate).
• Keeping the handle in the upright position,
wait until the (green) Steam Ready
Indicator Light illuminates.
Once Boiler is lled and the green Steam Ready Indicator Light
glows, steam cleaner is ready to clean the oors.
Using the Steam Cleaner
PLEASE NOTE: The green Steam Ready Indicator Light will turn on and off during
C. Releasing Steam
• Press the button on the right side
use. This is normal and not a fault.
FRONT
of the steam handle to unlock
the steam cleaner.
• To emit steam from the underside
of the steam cleaner, press the
FRONT part of the button on the
steam handle.
IMPORTANT: during oor cleaning the front part of the button should
be pressed for most of the time for maximum cleaning performance.
NOTE: Some recondensed water may be emitted when the handle is rst pulled
down after lling. This is normal.
Using the Steam Cleaner
RIGHT
BUTTON
11
Page 12
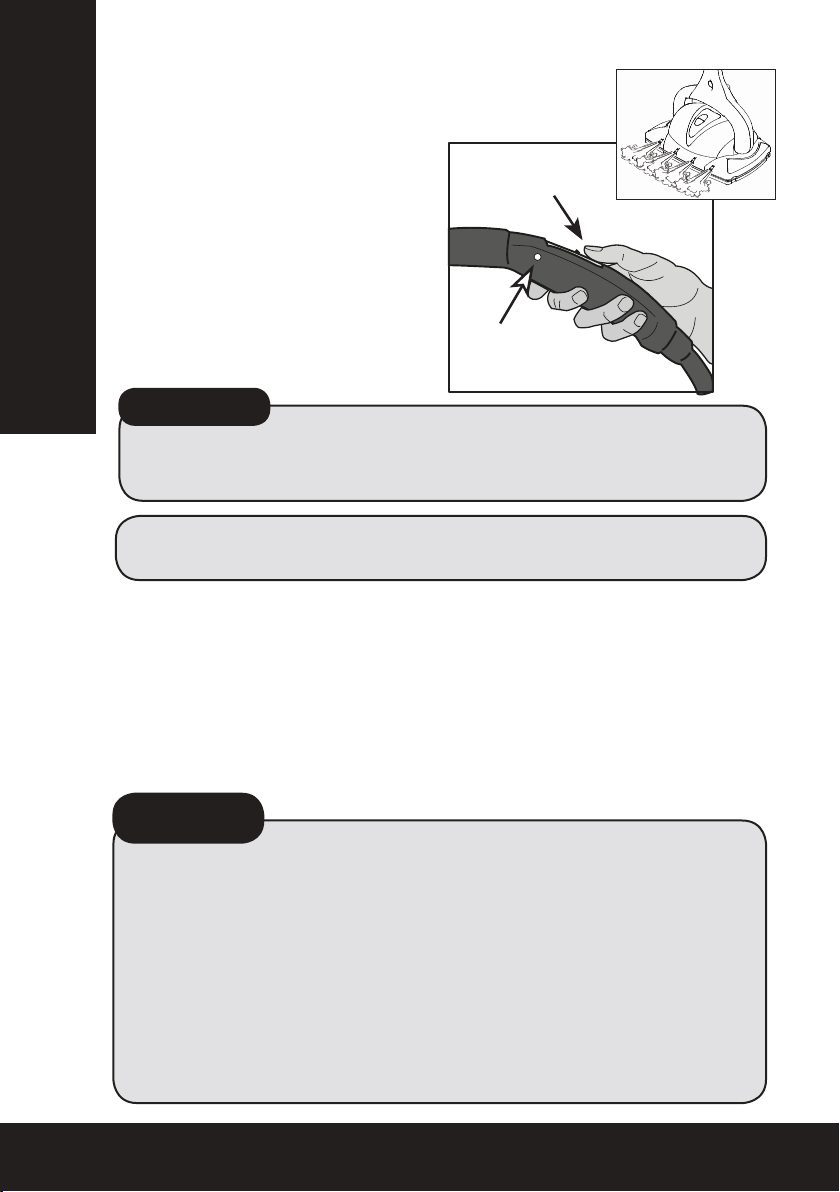
D. Releasing Steam (continued)
• To emit steam from the 4
front nozzles, press the REAR
part of the button on the
handle.
REAR
• IMPORTANT: at the end of
the cleaning task, press the
button on the left side of
the steam handle to lock
the steam cleaner in safety
mode.
LEFT
BUTTON
Using the Steam Cleaner
*IMPORTANT*
The 4 front Nozzles are meant to be used in steam “bursts” and should never be used
on a sustained basis. The front Nozzles will help loosen difcult dirt and will assist in
cleaning hard to reach areas such as oor edges.
NOTE: The Steam Cleaner will not need relling for about 20-25
minutes of usage.
The Steam Cleaner will stop producing steam when the Boiler is
empty. When this happens unplug and store the steam cleaner or
rell with water per instructions (below).
NOTE: If the Floor or Carpet Pad becomes too wet or too dirty,
replace with a clean, dry Pad and continue cleaning.
E. Relling Water when Boiler is Hot
When the Steam Cleaner has run out of water, there will be no more
steam coming out. At this stage it is time to rell the Boiler.
Follow the relling instructions below.
12
*IMPORTANT*
The Steam Cleaner has a Boiler that should not be overlled. To avoid the potential
for overlling, only rell the Boiler when it is completely run out of water and only
add 600ml. Always follow the practice of using the Steam Cleaner until it has run
out of water and then rell 600ml only.
If oor cleaning is completed and water remains in the Boiler, the Steam Cleaner
can be stored with the remaining water in the Boiler, there will be no harm done
to the product. At the next cleaning session simply heat up the steam cleaner and
use the water already in the Boiler, then rell when empty.
Or alternatively at the next cleaning session, open the Boiler Cap when the product
is still cold and pour out the water and then rell (if this alternative method is used,
it is recommended that only 500ml of water is added, because the product will
not completely drain when the water is poured out from the Boiler).
Using the Steam Cleaner
Page 13
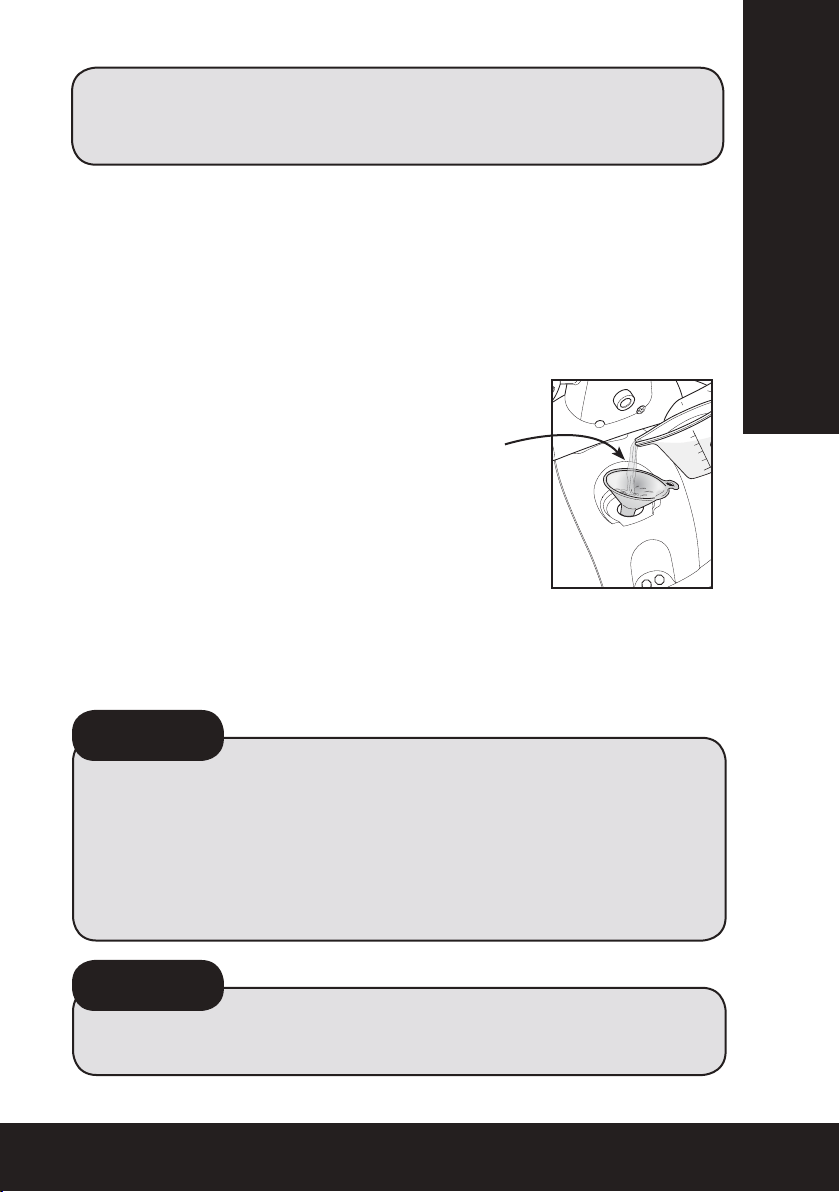
WARNING: Let steam cleaner cool 5 minutes before opening Boiler Cap.
M
a
x
Use care when opening Boiler Cap as it may still be hot and steam may
escape, causing burns. If Boiler is still hot, water may spurt out during
relling which can also cause burns.
• Unplug the steam cleaner from the electrical power outlet. This will
stop the boiler from continuing to heat up.
• Slowly turn the Boiler Cap counterclockwise, ensuring that no
steam is present.
• Be sure steam cleaner has cooled 5 minutes before relling with
water.
The product warranty will be null and void if
anything other than water is added to the
Boiler.
• Pour in 600 mls of water using the Measuring
Cup and Filler Funnel provided – ll the
200 ml
T
N
A
(
00 ml
1
Measuring Cup to the 200 ml marking 3
times. Be careful not to overll the Boiler.
• Replace Boiler Cap by turning it clockwise.
Do not tighten Boiler Cap too much – nger
tightening is sufcient to lock the steam in
the Boiler.
• Insert plug into 3-prong electrical outlet. Wait for green Steam
Ready Indicator Light to turn on. Steam Cleaner is ready to use
once again.
Using the Steam Cleaner
REMINDERS
• Always use ordinary tap water.
• If tap water is too hard, use distilled or demineralized water to avoid
the risk of mineral deposits and sediment from forming.
• Do not add detergents, perfumes, oils or other chemical substances to
the Boiler. This will damage the steam cleaner and void the warranty.
• The green Steam Ready Indicator Light may turn on and off during use.
This is normal and not a fault.
*IMPORTANT*
Do not overll the Boiler as excess water will be ushed out of the Boiler
before dry steam will emit.
Using the Steam Cleaner
13
Page 14
3 PORTABLE STEAM CLEANER MODE
Multipurpose Portable Steam Cleaner
The Hybrid Steam Cleaner is a 2 in 1 model
that converts into a multipurpose portable
steam cleaner with just one click. The
portable steam cleaner features include:
1. Lightweight and portable unit.
2. Ergonomic steam handle for easy of use.
Cleaner Accessories
3. Versatile and quick change accessories.
4. On/off control.
5. Security locking button.
6. Cleans many areas such as bathrooms,
kitchens, pet areas and more.
14
Accessories - Attachment & Descriptions
A. Always use the Parking Pad when resting the steam
cleaner on a surface
B. Attach Steam Handle to Steam Cleaner
To use: Hold down the locking button on the
Steam handle while sliding it in an Extension
Tube. Be sure the locking button lines up with
the hole on the Extension Tube and button
locks in place.
To attach Extension Tubes together: Press
down the locking button while sliding Tubes
together. Be sure button and hole line up
and button locks in place.
To disconnect Extension Tubes: Press the
locking button and pull the two sections
apart.
Cleaner Accessories
Page 15
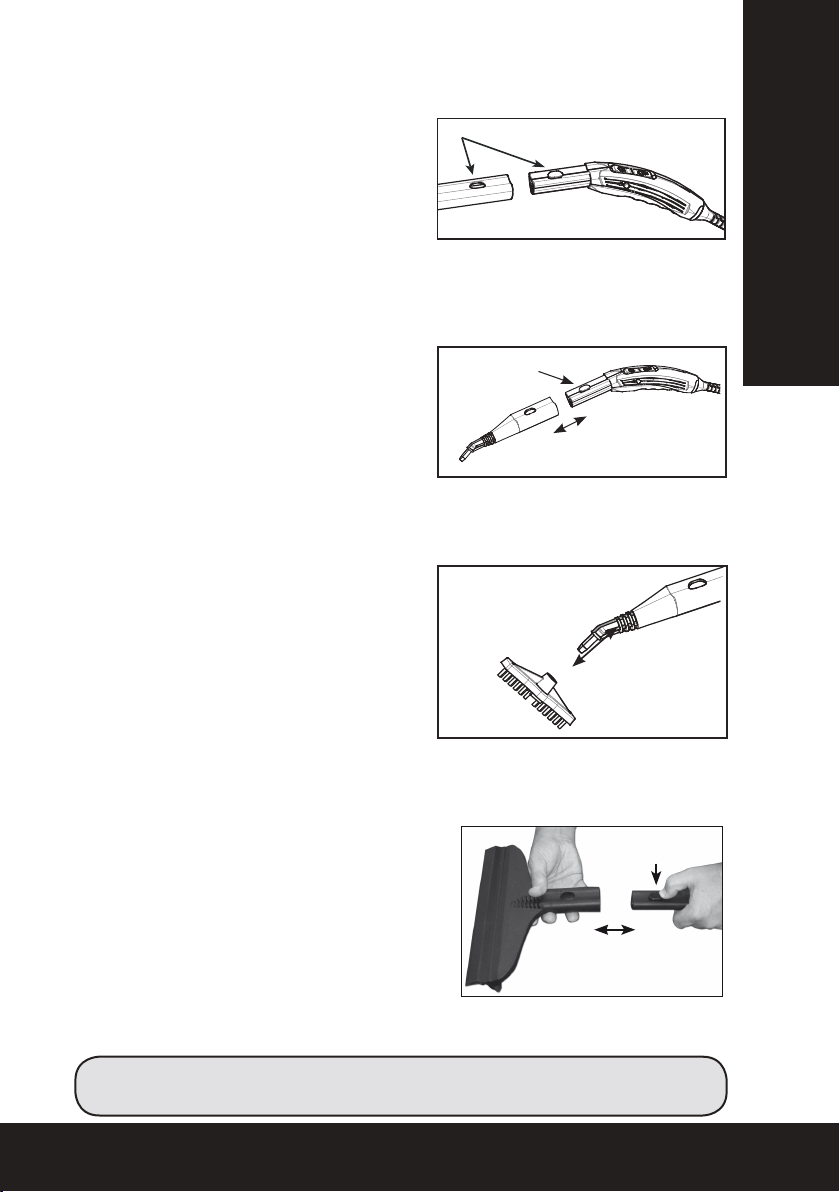
C. Attach Extension Tube or Steam Handle to Brush Adapter
Once the small Brush is attached to
the Brush Adapter, press the locking
button on the Extension Tube or
Steam Handle while sliding the Tube
or handle in the Brush Adapter.
Ensure the locking button and the
hole on the Brush Adapter line up.
D. Attach Extension Tube or Steam Handle to Detail Nozzle
The Detail Nozzle provides a powerful
steam jet very useful for cleaning hard
to reach areas. It is ideal for blasting
dirt out of tight areas, cleaning door
and window tracks, shutters and
sanitary xtures.
To use: Slide and lock Detail Nozzle on
the Steam Handle or Extension Tube.
E. Attach Grout Brush to Detail Nozzle
The Grout Brush is designed to clean
the grout in between tiles. Use on oor
grout, backsplashes and in showers.
To use: Push the Grout Brush on the
end of the Detail Nozzle.
(Detail Nozzle should be connected to
the Steam Handle or Extension Tubes.)
Press Button
Cleaner Accessories
F. Attach Extension Tube or Steam Handle to Window Cleaner
The Window Cleaner is very useful for
cleaning large windows and glass.
To use: Connect Window Cleaner to
Steam Handle or Extension Tube(s) for
hard to reach windows. Apply steam
liberally, rub with soft spongy edge,
then remove excess water and dirt
with Window Cleaner Blade. Wipe dirt
from Window Cleaner blade.
CAUTION: When cleaning windows, always avoid any sudden changes
in temperature to prevent glass breakage or cracks.
Press button
Cleaner Accessories
15
Page 16
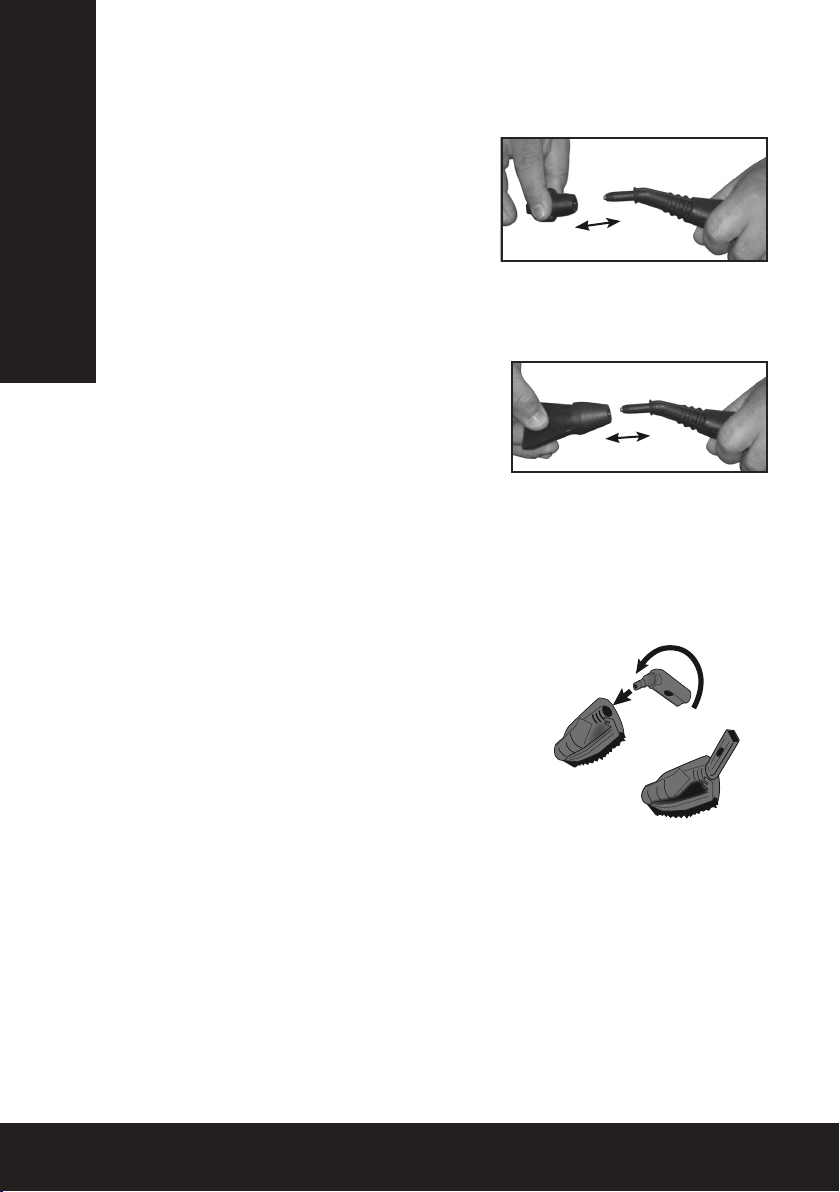
G. Attach Nylon Small Brush to Detail Nozzle
°
The Nylon Brush is used to help scrub
particularly tough dirt.
To use: Push the Nylon Brush on the
end of the Detail Nozzle. (Detail
Nozzle should be connected to the
Steam Handle or Extension Tubes.
H . Attach Scraper to Detail Nozzle
Cleaner Accessories
The Scraper is best for removing
small amounts of wallpaper and
also anything that can be scraped
from a at surface, e.g., grease
deposits in an oven. It is also useful
when defrosting freezers.
To use: Push the Scraper on the end of the Detail Nozzle. (Detail
Nozzle should be connected to the Steam Handle or Extension
Tubes.)
*CLICK
*CLICK
16
I. Connecting Brush Adapter to Small Brush
The Small Brush attaches either to
the extension tube(s) or the Steam
Handle and is used to clean smaller
areas that the Steam Cleaner
cannot easily reach, such as corners
of oors, stairs and around furniture
legs.
To use: Attach Small Brush to Small Brush Adapter. Attach Extension
Tube or Steam Handle to Adapter by pressing the locking button
while sliding Tube or handle into Brush Adapter. Be sure button and
hole line up (see parts “B” and “C” above) and button locks in place.
180
Cleaner Accessories
Page 17
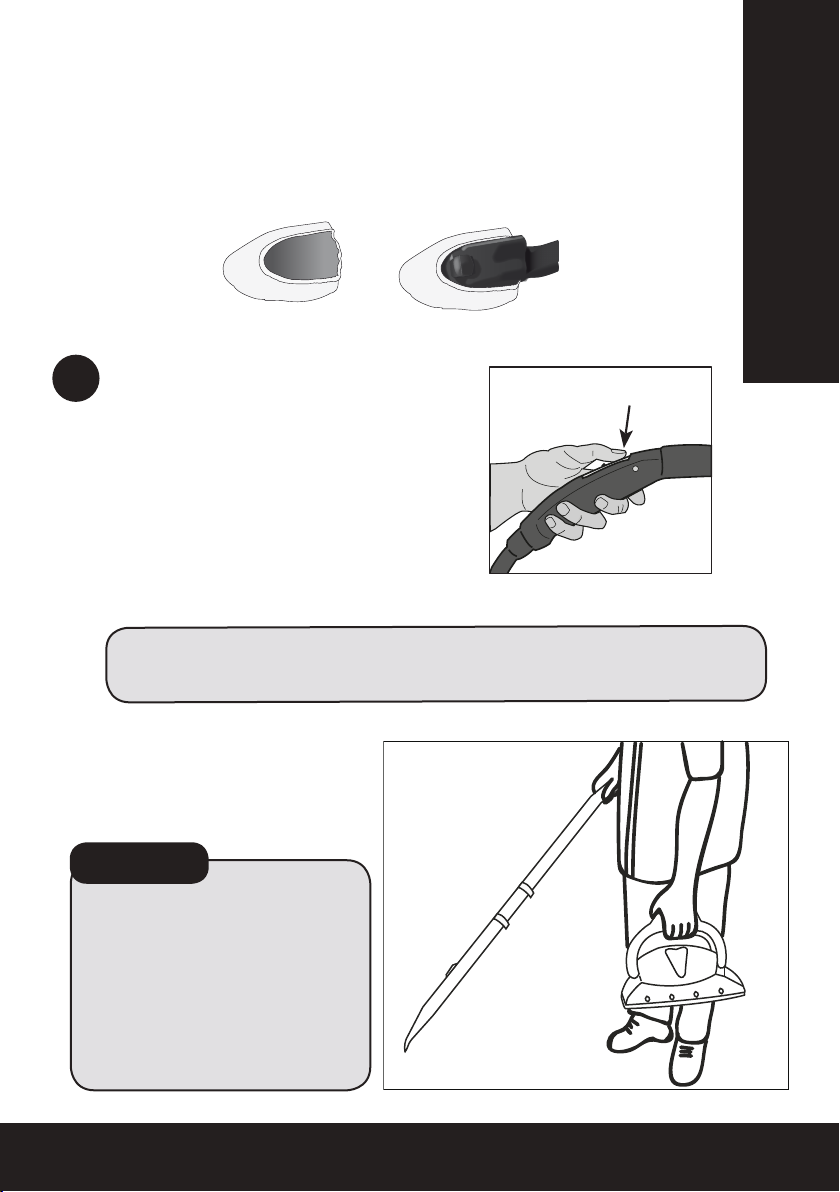
J. Attaching Microber Pad to Small Brush
A tted Microber Pad should be placed over the bristles of the
Small Brush to clean smooth surfaces such as kitchen cupboards,
splash backs, countertops, etc. Fit the Small Microber Pad over
the Small Brush as shown below.
Steam Release
4
To release steam from the Steam
Handle, press the button on FRONT
FRONT
part of the button.
Steam will continue to be released
while the button is pressed.
To stop the steam, stop pressing the
button.
IMPORTANT: When the Steam Cleaner has run out of water, steam
output will cease. Follow rell instructions (page 12) to use
your Steam Cleaner again.
Cleaner Accessories
To move the steam cleaner
around simply grab the
base at the top of the arch
as shown in the image.
WARNING
While using the product as
a portable steam cleaner,
keep the arch perpendicular
(upright) to the body of the
steam cleaner to avoid the
ejection of steam from the
front nozzles.
Cleaner Accessories
17
Page 18
5
Turning Steam Cleaner Off
• To turn Steam Cleaner off, unplug the electrical cord from
the power outlet.
• Any remaining water can be left in the unit.
REMINDERS
• We recommend distilled or demineralised water as the best
way to care for and utilize your Steam Cleaner.
Using the Steam Cleaner
• If tap water is too hard, use distilled or demineralized water to
avoid the risk of oor streaking.
• Do not add detergents, perfumes, oils or other chemical
substances.
6
Cleaning the Steam Cleaner
We recommend you periodically clean the Steam Cleaner to
prevent the accumulation of calcium, mineral deposits and other
sediment caused by the use of tap water. After every 10-15 rells,
ll the Boiler three-quarters full of hot tap water, shake several
times and empty out the water into a sink.
Repeat several times to ensure that the Boiler is ushed of any
calcium or mineral deposits. Wipe the Steam Cleaner with a
damp cloth and dry.
NEVER HOLD THE STEAM CLEANER UNDER THE TAP TO FILL.
Use the lling cup provided to ll the Boiler.
Maintenance & Cleaning
If distilled or demineralised water is regularly used in the Steam
Cleaner, cleaning of the Boiler can be done less frequently.
In some areas tap water is very hard, it is recommended that
the Boiler is cleaned more frequently if hard water is used.
18
Using the Steam Cleaner - Maintenance & Cleaning
Page 19
The cleaning of the Boiler and Steam Cleaner is the sole
responsibility of the owner. Calcium, mineral deposits and other
sediments left to build up in the Steam Cleaner causing it to
fail and/or the steam pathways in the Steam Cleaner to block,
is not covered by the product warranty. Users must follow the
cleaning instructions above.
If the Steam Cleaner and Boiler is not cleaned according to
the instructions above and the product fails and/or the steam
pathways are blocked, the owner should send the product for
servicing by contacting the Customer Support Line.
The Steam Cleaner is intended for domestic household use
only. It is not intended for commercial use. Any use other
than for domestic household purposes will void the product
warranty.
7
Replacement of Brushes, Microber Pads
and Accessories
Maintenance & Cleaning
The Nylon Brushes and the tted Microber Pad for the Small
Brush provided with the Steam Cleaner are to get you started
using your Steam Cleaner. As these brushes and microber
pads become dirty or wear out, replacement brushes and
microber pads can be purchased from the retailer from
which you purchased your Steam Cleaner and/or from most
other electrical appliance retail outlets.
It is normal to have replacements of the brushes and microber
pads close at hand when cleaning as the brushes wear out or
the microber pads become dirty.
Any of the other accessory tools are replaceable by
contacting the Customer Support Line.
Maintenance & Cleaning
19
Page 20

8
Steam Cleaner Tips & Reminders
Steam cleaning allows the user to clean chemical-free by using
the power of steam, in place of harsh chemical-based cleaners.
The heat from the steam softens and loosens dirt on surfaces,
while the steam pressure lifts the dirt away. All that is left to do
is to wipe the surface to remove the dirt and moisture using a
cloth (preferably with a microber cloth).
Tips & Reminders
TIP: to get the best cleaning results use a microber cloth to
wipe the dirt and moisture from the surface being cleaned.
Microber is designed to pick up and hold dirt, a great aid
in lifting and removing the dirt that the steam cleaner has
softened and loosened. Also, Microber requires moisture to
glide over surfaces, the steam cleaner provides moisture that
the Microber needs to glide. Microber and Steam, a great
cleaning combination!
Making Contact with Surfaces
The steam is at its hottest just as it leaves the nozzle/accessory.
This is the area of the steam output that should be used to
clean to achieve maximum performance. All accessories
should make direct contact with the surfaces being cleaned
to transfer the heat from the Steam Cleaner to the surface in
order to soften and loosen dirt. If the accessory being used
does not make contact with the surface, the desired results
may not be achieved. If assistance is required contact our
Customer Support Line.
TIP: steam will clean hard, sealed, non-porous surfaces in
place of harsh chemical-based cleaners and detergents.
For soft furnishings such as carpets, rugs, lounges, children’s
toys etc, steam will refresh and deodorise the bres. Steam is
not used to clean carpets, other than to spot clean. To clean
carpets proper carpet cleaning equipment should be used.
20
Tips & Reminders
Page 21

Water
Use ordinary tap water for all cleaning. In hard water areas,
we recommend distilled or demineralised water to reduce the
formation of calcium and other mineral deposits in the Steam
Cleaner. Use distilled or demineralised water in the boiler to
eliminate the possibility of oors streaking.
IMPORTANT: Do not add cleaning solutions, perfumes, oils or
any other chemicals to the water used in the Boiler.
Temperature
The temperature in the stainless steel Boiler reaches about 130°C.
The steam temperature just outside the tip of the nozzle/accessory
is between 105°C and 115°C. The temperature of the steam falls
to 38°C at a distance of 25cm from nozzle. This Steam Cleaner
produces a drier steam which cools very rapidly to avoid burns
and injuries. Steam must make direct contact with surfaces for it
to clean effectively.
TIP: the hot steam can be used to kill dust mites in soft furnishings
and mattresses. The Steam Cleaner is ideal for asthma sufferers,
persons with skin sensitivities and anyone with chemical
sensitivities.
Tips & Reminders
Tips & Reminders
21
Page 22
9
Microber Pad Care & Cleaning
Your oor Microber Pads are designed for hundreds of uses.
Clean Pads regularly, either by hand washing (using mild soap
and warm water) or in your clothes washer on a delicate
cycle, cool water. Never use fabric softener or bleach. We
recommend letting Pads air dry to maintain maximum long
term effectiveness.
Replacement pads are available at most retail outlets or on
our website at www.euroex.com.au.
Microber washing instructions – ULTRA MICROFIBER
Maintenance & Cleaning
MICROFIBER FLOOR PAD
50% Polyester / 50% Polyamide
Hand wash only
Tumble dry low or air dry
No bleach / No fabric soener
CARPET PAD
80% Polyester / 20% Polyamide
Hand wash only
Tumble dry low or air dry
No bleach / No fabric soener
22
Maintenance & Cleaning
Page 23
Troubleshooting
10
ISSUES POSSIBLE CAUSES SOLUTIONS
Steam is not coming out of
the 4 front Nozzles
The Microber Floor Pad
is not adhering to Steam
Cleaner
The Microber Floor Pads
are geng soaked (too
wet). Why?
The steam seems to be
making my oor too wet
Improper Handle Assembly Call Customer Service to receive instrucons to correct
Not enough pressure was
applied when aaching Pad
Floor Pad requires replacing
due to age of the Floor Pad
Boiler is overlled Let Steam Cleaner run unl excess water ceases. -OR-
Green “Steam Ready Indicator Light” is not illuminated
Front nozzles are being used
too frequently
The Microber Floor Pad
is too wet (saturated with
moisture)
the problem
Posion Steam Cleaner about 2” above Pad and FIRMLY
press it down onto the Pad
Replacement Floor Pads can be purchased at most
electrical appliance retail outlets
Remove some water from Boiler once the Boiler has
cooled down completely
Wait for green “Steam Ready Indicator Light” to
illuminate
Only use Front nozzles in short bursts for cleaning
tougher dirt or to clean hard to reach areas
Replace the wet Pad with a dry, clean Pad and connue
cleaning
IMPORTANT QUESTION:
Q: Do I always need to use a Microber Pad when cleaning with
my Steam Cleaner?
A. YES! It is critically important to ALWAYS use your Microber Pads.
When in use the Steam Clenaer should NEVER be used without
either a Microber Floor Pad or Carpet Glide with Carpet Pad.
Q: Why is my Vapour-M4S Hybrid Steam Cleaner hard to push on
my oors?
A. A possible reason is the microbre oor pad does not have
sufcient moisture. Ensure the front part of the steam release
button is pressed down for most of the time while cleaning. This
will replenish the moisture in the pad allowing the microbre to
glide easier and equally as important, it will keep the pad hot to
soften the dirt so that the microbre pad can easily remove the
dirt. The microbre pad needs moisture and heat to achieve the
best cleaning results.
Troubleshooting
Troubleshooting
23
Page 24

Customer Support
Customers needing assistance with their Steam Cleaner can call the Customer Support Line
on the phone numbers listed below. Customers should also call the Customer Support Line if
they require product warranty repair or post-warranty product servicing.Our friendly Customer
Service Team can assist you with getting the best cleaning results from your Steam Cleaner, they
are full of helpful steam cleaning tips, too.
Customer Support Line
AUSTRALIA 1800 663 866
NEW ZEALAND 0800 666 783
Euroflex Australia Pty Ltd
79 Furniss Road
DARCH WA 6065
AUSTRALIA
TEL: 08 9302 2526
Email: [email protected]
Website: www.euroflex.com.au
Euroflex New Zealand Ltd
c/- Dubins
137 Glenfield Road
Birkenhead Auckland 0626
NEW ZEALAND
TEL: 0800 666 783
Email: [email protected]
Website: www.euroflex.com.au
Plastecs SRL
Via dei Colli, 59
31058 Susegana (TV)
ITALY
Tel: +39 0438 453334
Email: [email protected]
Website: www.euroflex-appliances.com
SC1M1 03/2020
 Loading...