

Page 1
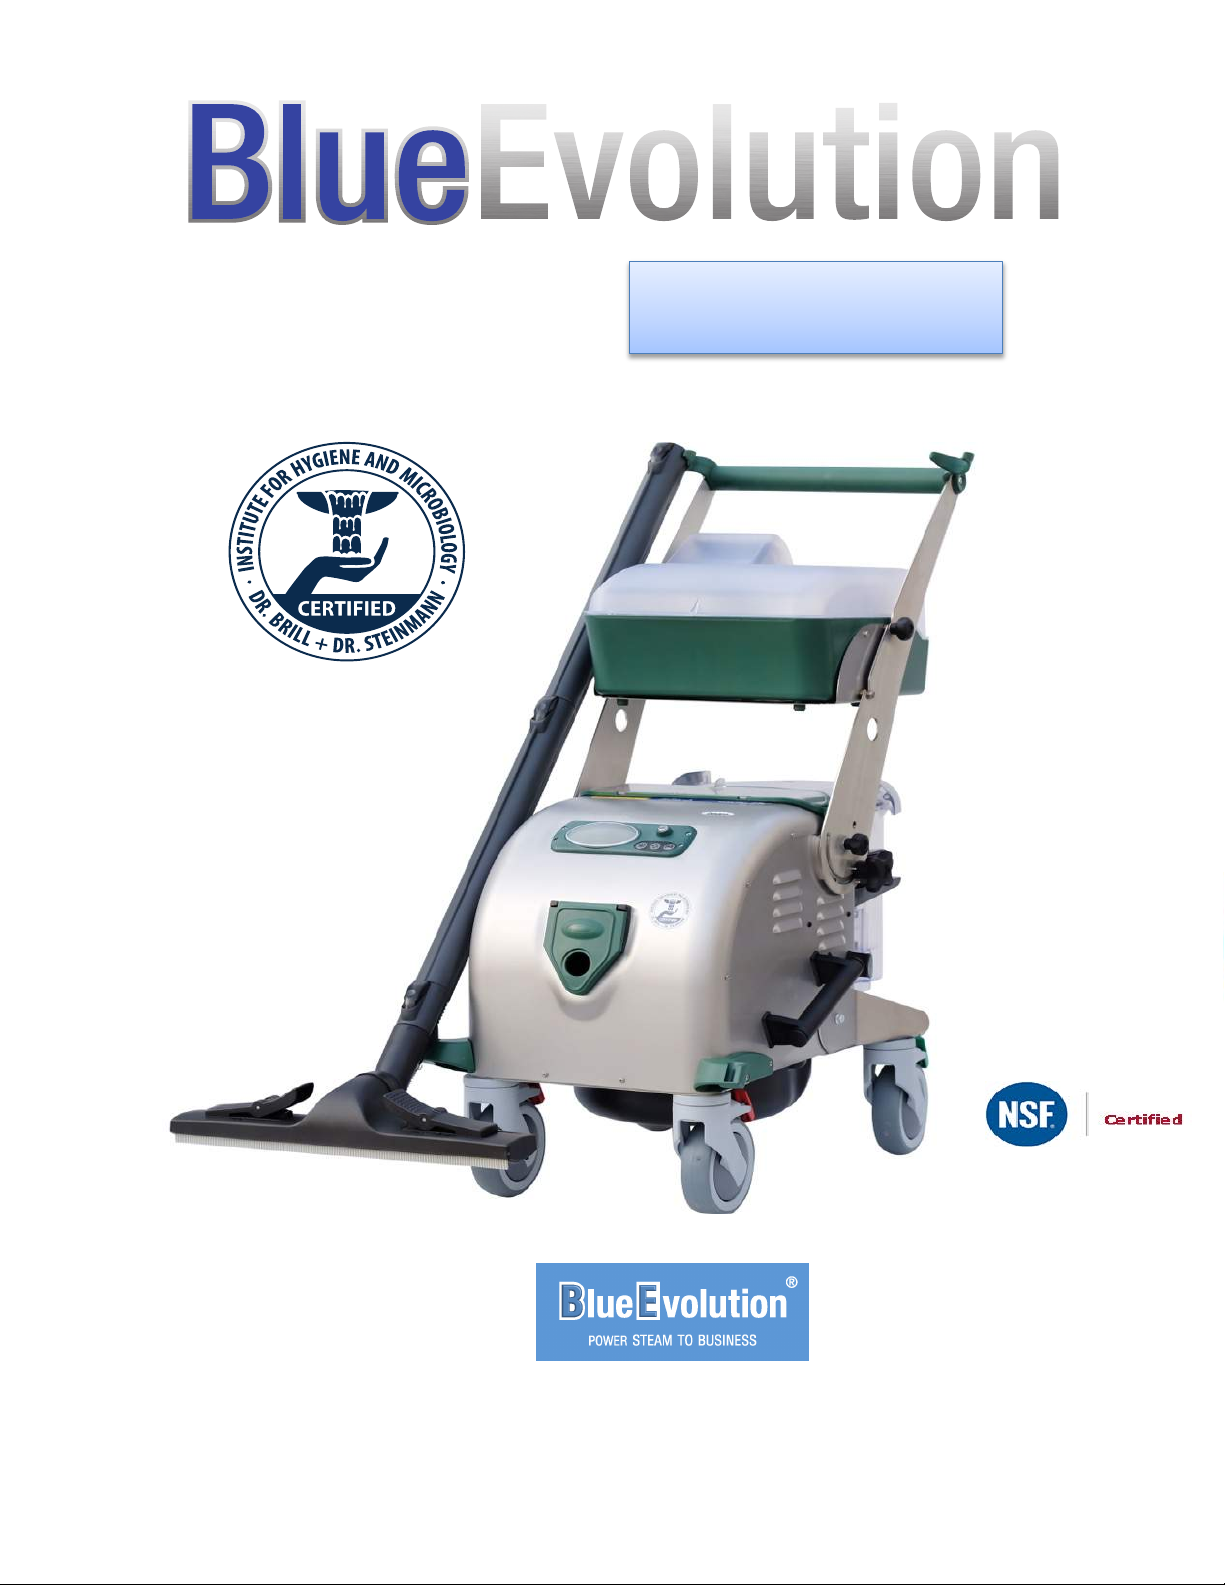
User Manual
1781 Anchor Avenue
Petersburg, VA 23803
(800) 758-3141
1"
Page 2

2"
Page 3
Table of Contents
Quick Start _______________________________________________________ 5
Function
Steam ________________________________________________________ 6
Vacuum _______________________________________________________ 6
Extraction _____________________________________________________ 7
Shut Down ____________________________________________________ 7
Assembly (Collection Tank, Handle, and Tool Box) ________________________ 8
Tools & Accessories _______________________________________________ 9
Maintenance _____________________________________________________ 10
Trouble Shooting __________________________________________________ 11
Error Codes ______________________________________________________ 11
Descaling ________________________________________________________ 13
Notices __________________________________________________________ 16
Warranty & Repair _________________________________________________ 17
WARNING
STEAM GENERATED BY THE BLUE EVOLUTION IS EXTREMLY HOT AND
MAY CAUSE INJURY IF THE STEAM COMES IN DIRECT CONTACT WITH
THE SKIN OR EYES. USE AS ONLY AS DIRECTED BY THE MANUAL AND
ONLY AIM THE STEAM HANDLE AT THE CLEANING AREA.
Technical Data
Steam Max pressure
Boiler Max temperature
Dimensions (in)
Weight
Power cord Length
Hose Length
Tank Capacities
Steam reservoir tank: ½ gal
Extraction reservoir tank: ½ gal
Vacuum collection tank .8 gal
117 PSI
338°F
15 x 28 x 37
(W x L x H)
61 Pounds
10 ft.
10 ft.
Voltage 120V 60Hz
AMPS: 13.5
Maximum power 1800W
Max Boiler Powder 1000 + 700W
AISI 304 stainless steel boiler
Vacuum motor power 1200W max
Vacuum Water Lift 83 inches
Vacuum Air flow 47CFM
3"
Page 4

Look foward to it.
D
D
Boiler Cap
Water Reservoir Tanks
Console
Hose Connection
Cleaning Accessories
Collection Tank
Exhaust Cover
Drain Plugs
Iron (not included)
Steam Pressure
Boiler
Temperature
LED Colors:
Green = Low Vacuum
Orange = Medium Vacuum
Red = High Vacuum
Boiler Heating
(Flashing when heating)
ON/OFF VACUUM EXTRACTION
Low Water
Descaling
Extraction
Steam
4"
Page 5
Look foward to it.
Assembly / preparation
Filling the filter bowl
Your appliance is fitted with a hygienic water filter.You must
fill the filter bowl with water before starting, in order to bind
the extracted dirt in the water and to clean the suctioned air
in the water bath as well.
• Loosen the clips on the right and left of the filter bowl and
remove from its slot.
• Re-insert the filter bowl, ensuring the switch cam on the
cover is in the correct position.
WARNING:
The appliance can suck in up to approx. 1.5 litres of liquid.
If you exceed this amount, the fill level sensor will stop suc-
Look foward to it.
• Re-insert the filter bowl, ensuring the switch cam on the
cover is in the correct position.
WARNING:
The appliance can suck in up to approx. 1.5 litres of liquid.
If you exceed this amount, the fill level sensor will stop suc-
tion automatically and LED
D
(page 2) on the display will
flash.
INFO:
If you only wish to suction liquid, such as accidental water
spills, it is not necessary to fill the appliance's filter bowl with
water.
When sucking liquids, the MAX. capacity in the container is
approx. 4 litres.
Inserting the steam suction hose
• Insert the connector of the steam suction hose into the
socket until you hear the click of the safety hook.
• To remove the hose from the appliance, press release but-
ton
A
and pull on the connector.
A
Quick Start-Up
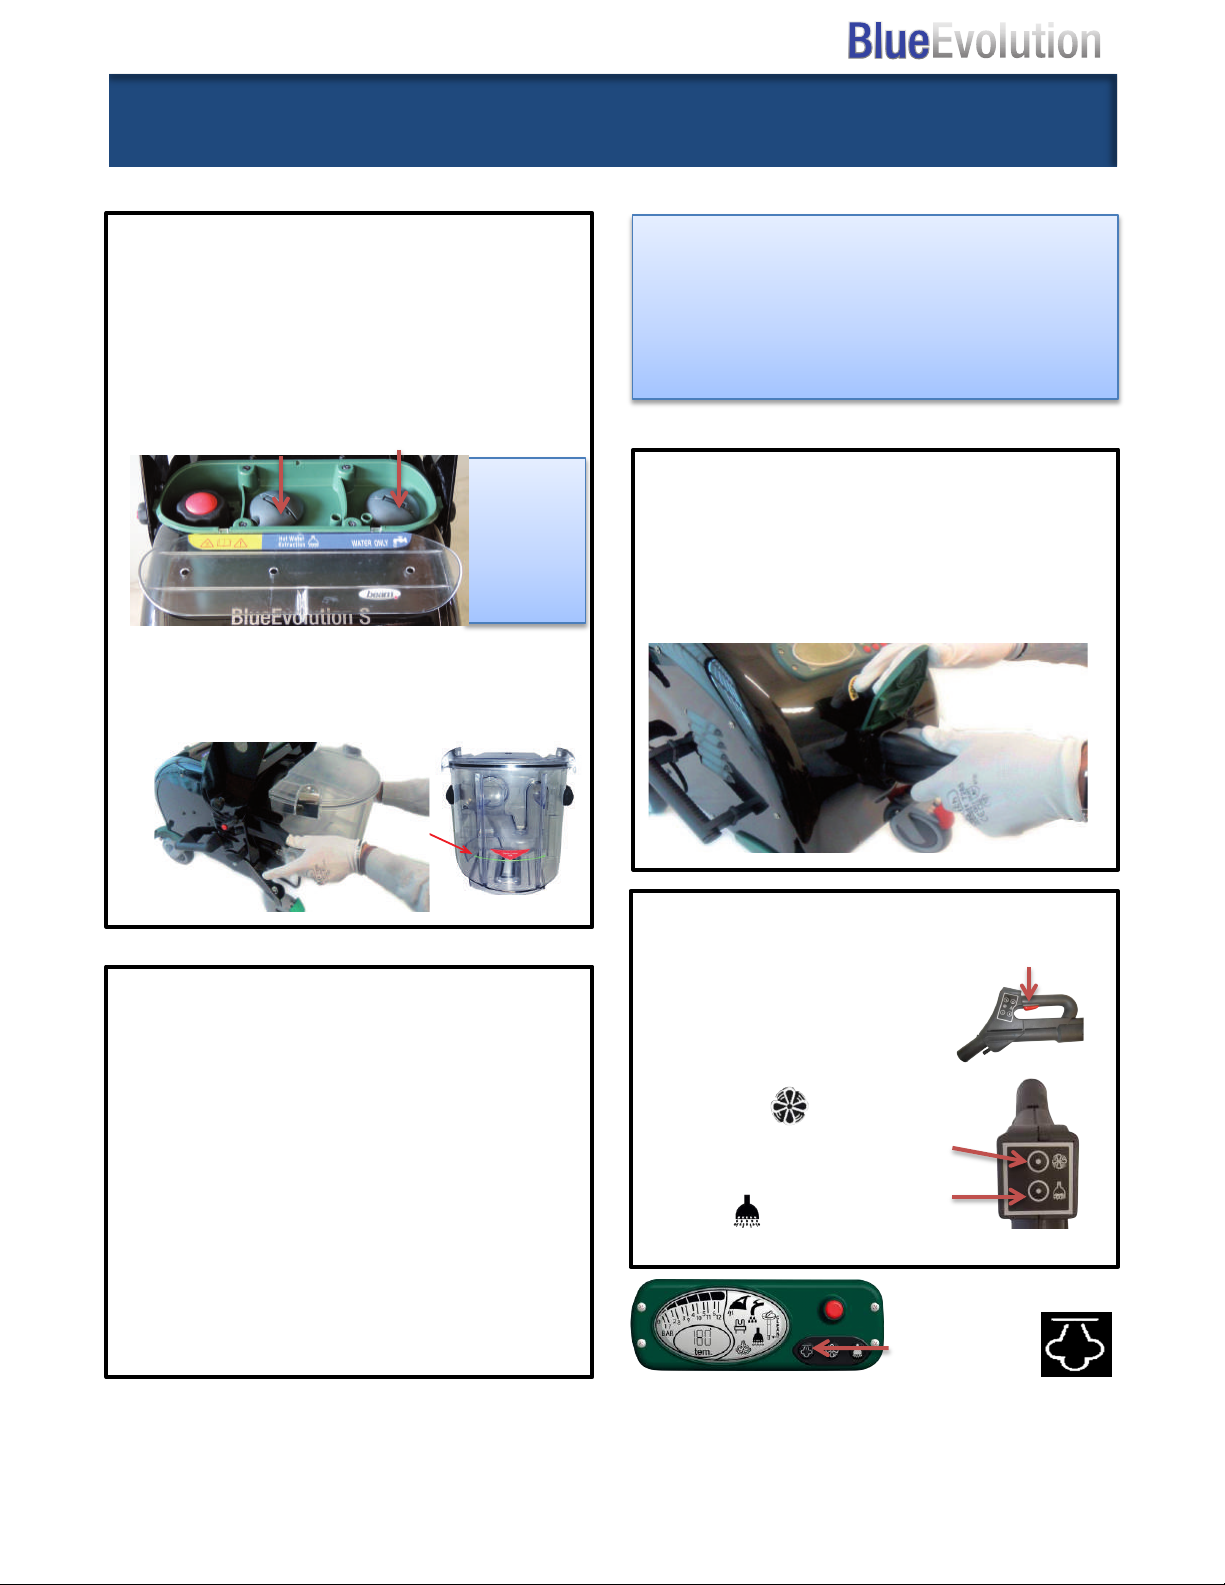
Add Water
Before turning ON the Blue Evolution
Ø Remove tank caps and add water to
the steam and extraction tanks.
Ø Replace tank caps.
Extraction Steam
½ gallon
capacity
for each
tank
Ø Add water to the vacuum collection
tank to the fill line and re-attach.
(See page 8)
Blue Evolution is Ready when:
Ø Temperature ≥ 330 ℉
Ø It will take 10 minutes for the steamer
to heat and reach working
temperature.
Insert Hose & Select Cleaning
Attachment
Ø Lock front wheels.
Ø Insert the hose and press until you
hear it click.
Plug into Electrical Outlet
Ø The Blue Evolution should be the
only appliance plugged into the
electrical outlet.
Ø If an extension cord is required:
Ø The Blue Evolution will power up
Ø Push the ON/OFF Button to turn-on.
Ø Use only a 12 gauge / 15AMP rated or
higher extension cord.
Ø 50ft maximum length
and then turn OFF. This is normal.
Cleaning Functions
Steam (page 6)
Ø Squeeze the RED trigger
to release steam.
Vacuum (page 6)
Ø Push the button on the
handle.
Extraction (page 7)
Ø Push button on hose
handle.
ON/OFF
5"
Page 6

Steam Vacuum
Look foward to it.
D
Ø The steam symbol will illuminate
on the console signaling the Blue
Evolution is in Steam Mode.
Ø This symbol will start flashing,
signaling the boiler is heating.
Blue Evolution is Ready when:
Ø Temperature ≥330 ℉
Ø It will take 10 minutes for the
steamer to heat and reach working
temperature
Ø Squeeze the RED trigger on the hose
handle to release steam.
Ø Steam Pressure can be increased (+)
or decreased (-) on the side of hose
handle.
Steam Trigger
The wet/dry vacuum on the Blue
Evolution can be used independently or
with the Steam and Extraction. Utilize
the vacuum to reduce surface moisture
while cleaning.
Ø Fill the collection tank with water
before using the vacuum (see page 8).
Ø Do not exceed the GREEN max fill
line on the tank.
Ø Activate the Vacuum by
pushing the symbol on
the hose handle
Green = Low Suction
Orange = Medium Suction
Red = High Suction
Steam Pressure
Adjustment
Steam Pressure Setting:
Ø 3 – Heavy soil or grease
Ø 2 – Recommend for most cleaning
Ø 1 – Light soil / Delicate surfaces
This symbol will flash during
3
2$
1
Steam Pressure
setting
operation indicating the Blue Evolution
is reheating.
Ø The vacuum has three suction
settings indicated by the color of the
LED light on the console.
Ø Suction can be increased (+) or
decreased (-) on the side of hose
handle.
The Blue Evolution vacuum tank can
hold ½ gallon of water. If you exceed
this amount the suction will stop and the
LED will blink.
WARNING: STEAM GENERATED BY THE BLUE EVOLUTION IS EXTREMLY HOT AND MAY
CAUSE INJURY IF THE STEAM COMES IN DIRECT CONTACT WITH THE SKIN OR EYES. USE
AS ONLY AS DIRECTED BY THE THIS MANUAL AND ONLY AIM THE STEAM HANDLE AT THE
CLEANING AREA.
6"
Page 7
Extraction Shut Down
The Blue Evolution’s Extraction feature
allows the user to clean with hot water.
Extraction increases cleaning
performance, and when used with the
Vacuum, leaves a relatively dry surface.
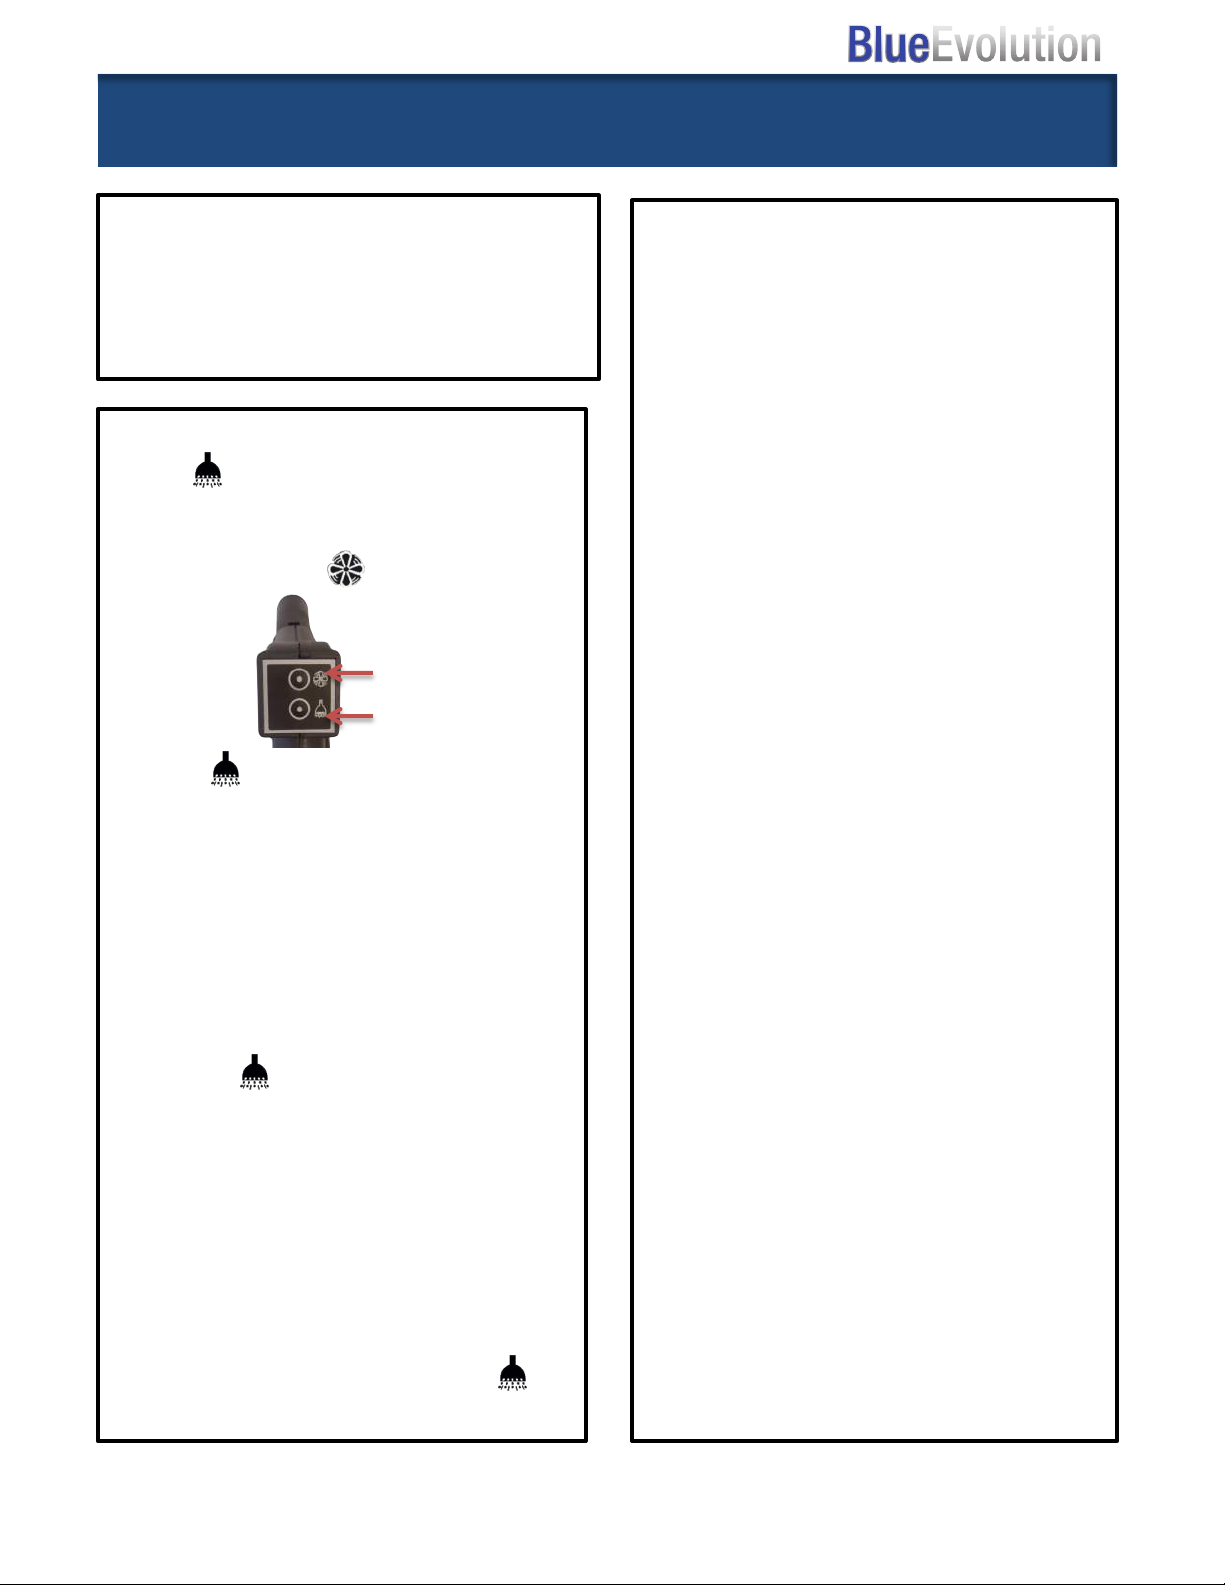
Ø Activate the Extraction by pushing
the button on the hose handle.
Ø Turn ON the Vacuum by pushing
vacuum symbol on the hose
handle.
Vacuum
Extraction
Ø The symbol will illuminate on
the display while the Blue Evolution
is in Extraction mode.
After Each Use:
It is important to clean accessories and
brushes.
Ø Run the vacuum for 30 seconds to
remove any water from the hose.
Ø Use hot soapy and water to clean
brushes and nozzles.
Ø Empty and use hot soapy water to
clean the collection tank and
remove all debris.
Ø If using the Blue Evolution on an
extremely dirty or greasy surface,
clean hose after use by activating
the vacuum mode and suck water
through the hose on low suction.
Ø If working in a healthcare
environment, the hose can be
cleaned with a disinfection
solutions.
Ø You will hear the pump when
activated.
Ø Extraction spray can be increased or
decreased in 10% increments by
pushing button on the console.
Ø Default Setting: 60%
Ø 010 - Lowest Setting minimum
amount of water
Ø 100 - Highest Setting Maximum
amount of water
Ø To turn OFF the Extraction and
return to Steam only, push the
button on the hose handle.
Every 3 Months
Ø Check Boiler cap and descale (see
Page 13).
Ø Descale the reservoir tanks and
boiler. (see page 12).
Ø Check HEPA filter clean or replace.
(see page 10).
Ø Check O-Rings on hose and
extension wands. If damaged,
replace.
Every Year
Ø Replace HEPA filter
Ø Change the O-Rings on the hose
and extension wands (page 10)
7"
Page 8
Assembly
Look foward to it.
• Re-insert the filter bowl, ensuring the switch cam on the
cover is in the correct position.
WARNING:
The appliance can suck in up to approx. 1.5 litres of liquid.
If you exceed this amount, the fill level sensor will stop suc-
tion automatically and LED
D
(page 2) on the display will
flash.
INFO:
If you only wish to suction liquid, such as accidental water
spills, it is not necessary to fill the appliance's filter bowl with
water.
When sucking liquids, the MAX. capacity in the container is
approx. 4 litres.
Inserting the steam suction hose
• Insert the connector of the steam suction hose into the
socket until you hear the click of the safety hook.
• To remove the hose from the appliance, press release but-
ton
A
and pull on the connector.
A
Assembly
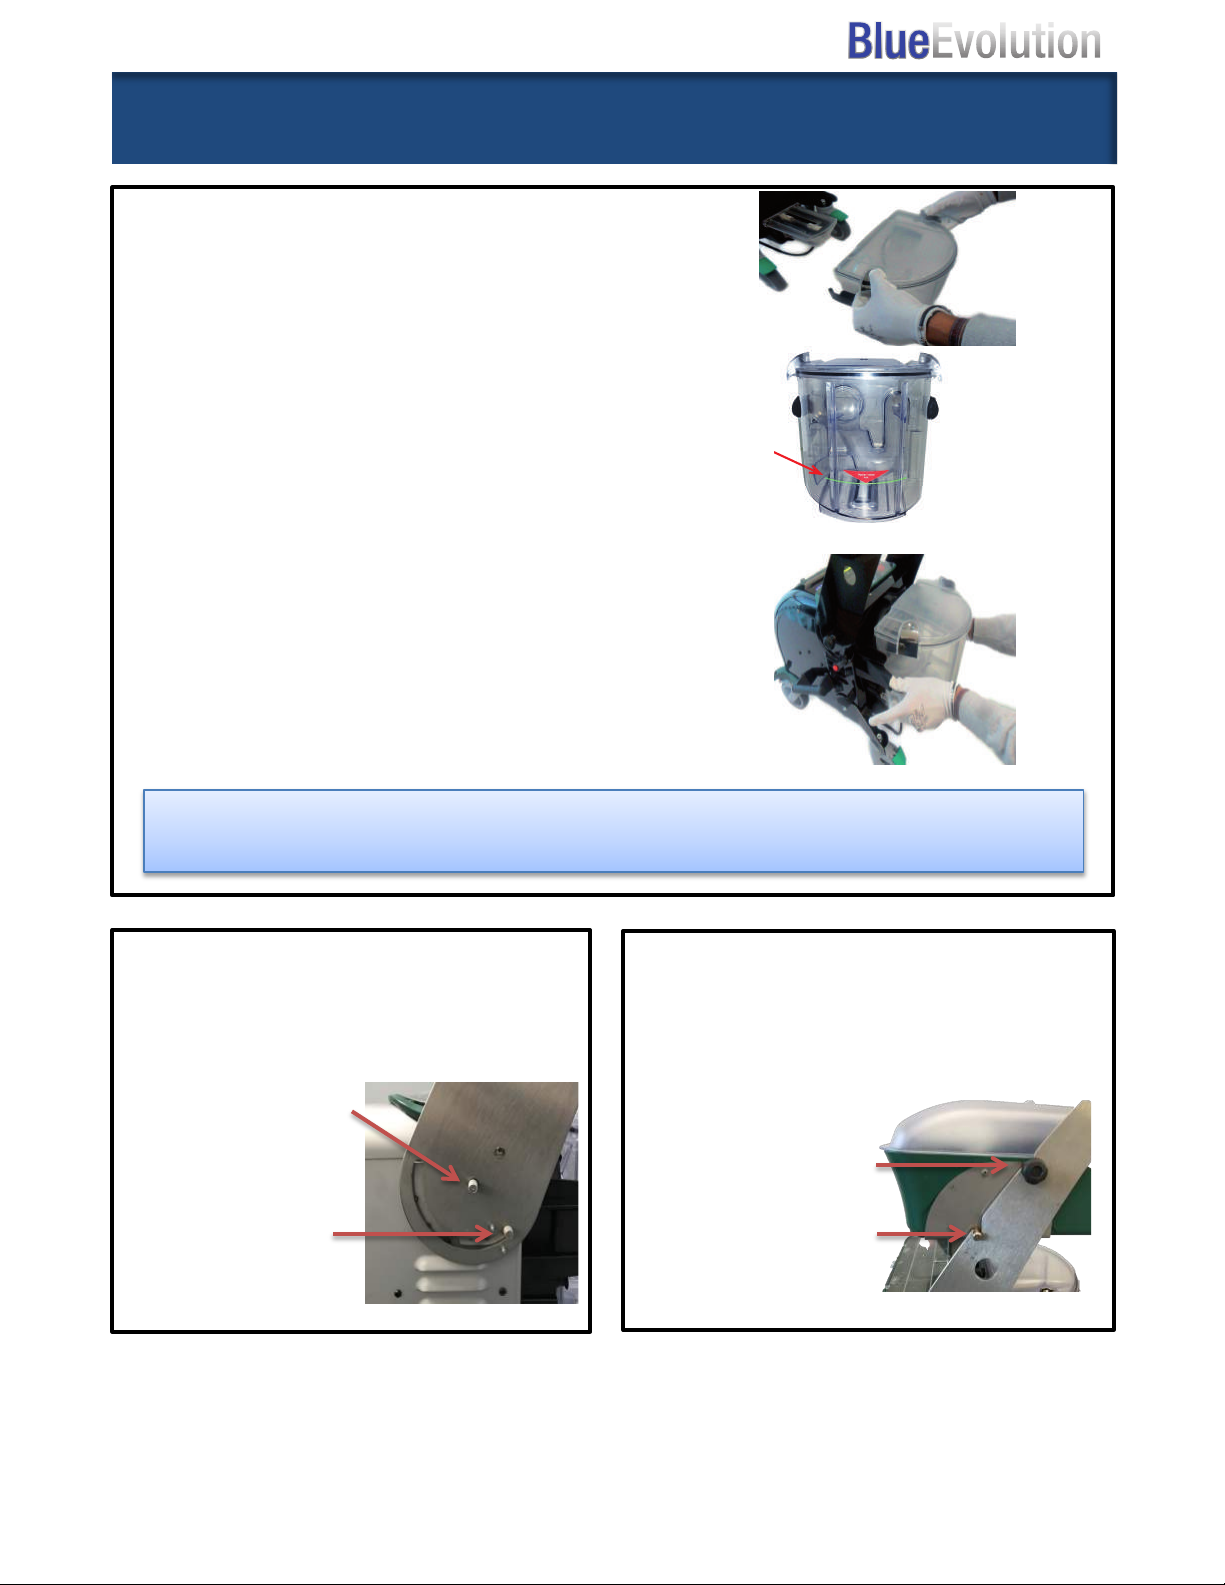
Collection Tank
Ø Remove by pulling latches out, located on
the sides of the tank, and slide off.
Ø Remove the lid and fill the tank with water to the
GREEN fill line.
Ø Secure the lid to the tank before re-installing.
Ø To install the tank, pull out the latches and slide
tank onto the back of the Blue Evolution.
Ø Use the latches to lock tank in place. It should
slide smoothly and fit tightly.
The collection tank can hold ½ gallon of water. If you exceed this amount, the
fill level sensor will stop suction and the warning display will flash.
Push Handle
Ø Attach by placing over fixed screw studs
located on each side and secure with the 2
Accessory Box
The accessory box fits securely on the
handle using two fixed knobs. Tighten
small knobs. Use the washers with small
knobs.
Ø Secure handle
with the larger
knobs, by turning
clockwise until
tight.
by turning knobs clockwise.
Ø Attach screw knobs
located on each side
Ø Sits in groove on
handle
8"
Page 9
Accessories
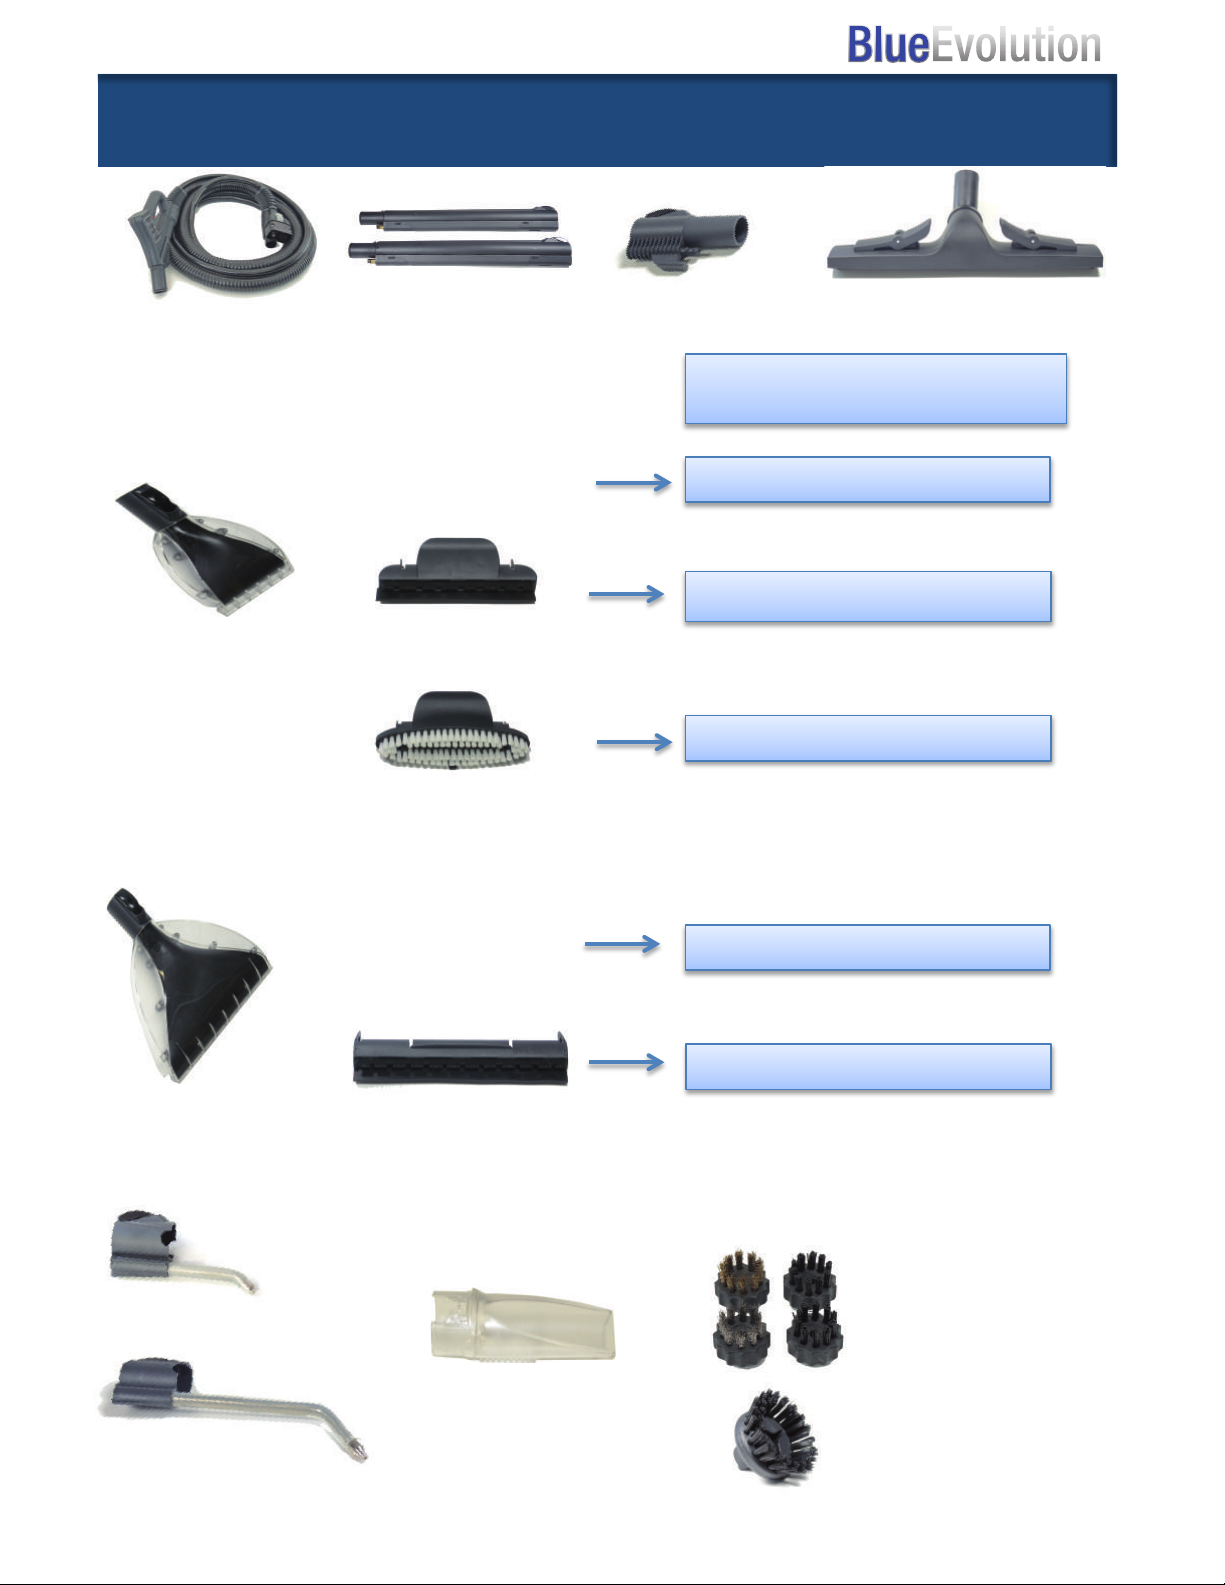
Hose
Part # 9618
Extension Wands
Part # 9615
Adaptor
Part # 802210
Adaptor must be used to connect the
extension wands to the floor brush
Floor Brush
Part # 8022
______________________________________________________"
Small Extraction
Nozzle
Part # 9621
No brush
Rubber tip with brush
Part # 802102
Nylon Brush
Part # 802015
Carpet, Upholstery, and mattress
Glass, windows, and mirrors
Pre-Cleaning in heavy soiled area
_______________________________________________________"
No Brush
Large Extraction
Nozzle
Part # 9620
_______________________________________________________"
Rubber tip with brush
Part # 80202
Carpet, upholstery, and mattress
All Hard surfaces, tile, and wood
-_______"
1” Nylon / Part # G0018
Short Spot-Jet Nozzle
Part # 9612
Suction Nozzle
Part # 8010
Long Spot-Jet Nozzle
Part # 9613
1” Brass / Part # G0126
1” Steel / Part # G0125
3” Round Brush
Part # 7109
9"
Page 10
Maintenance
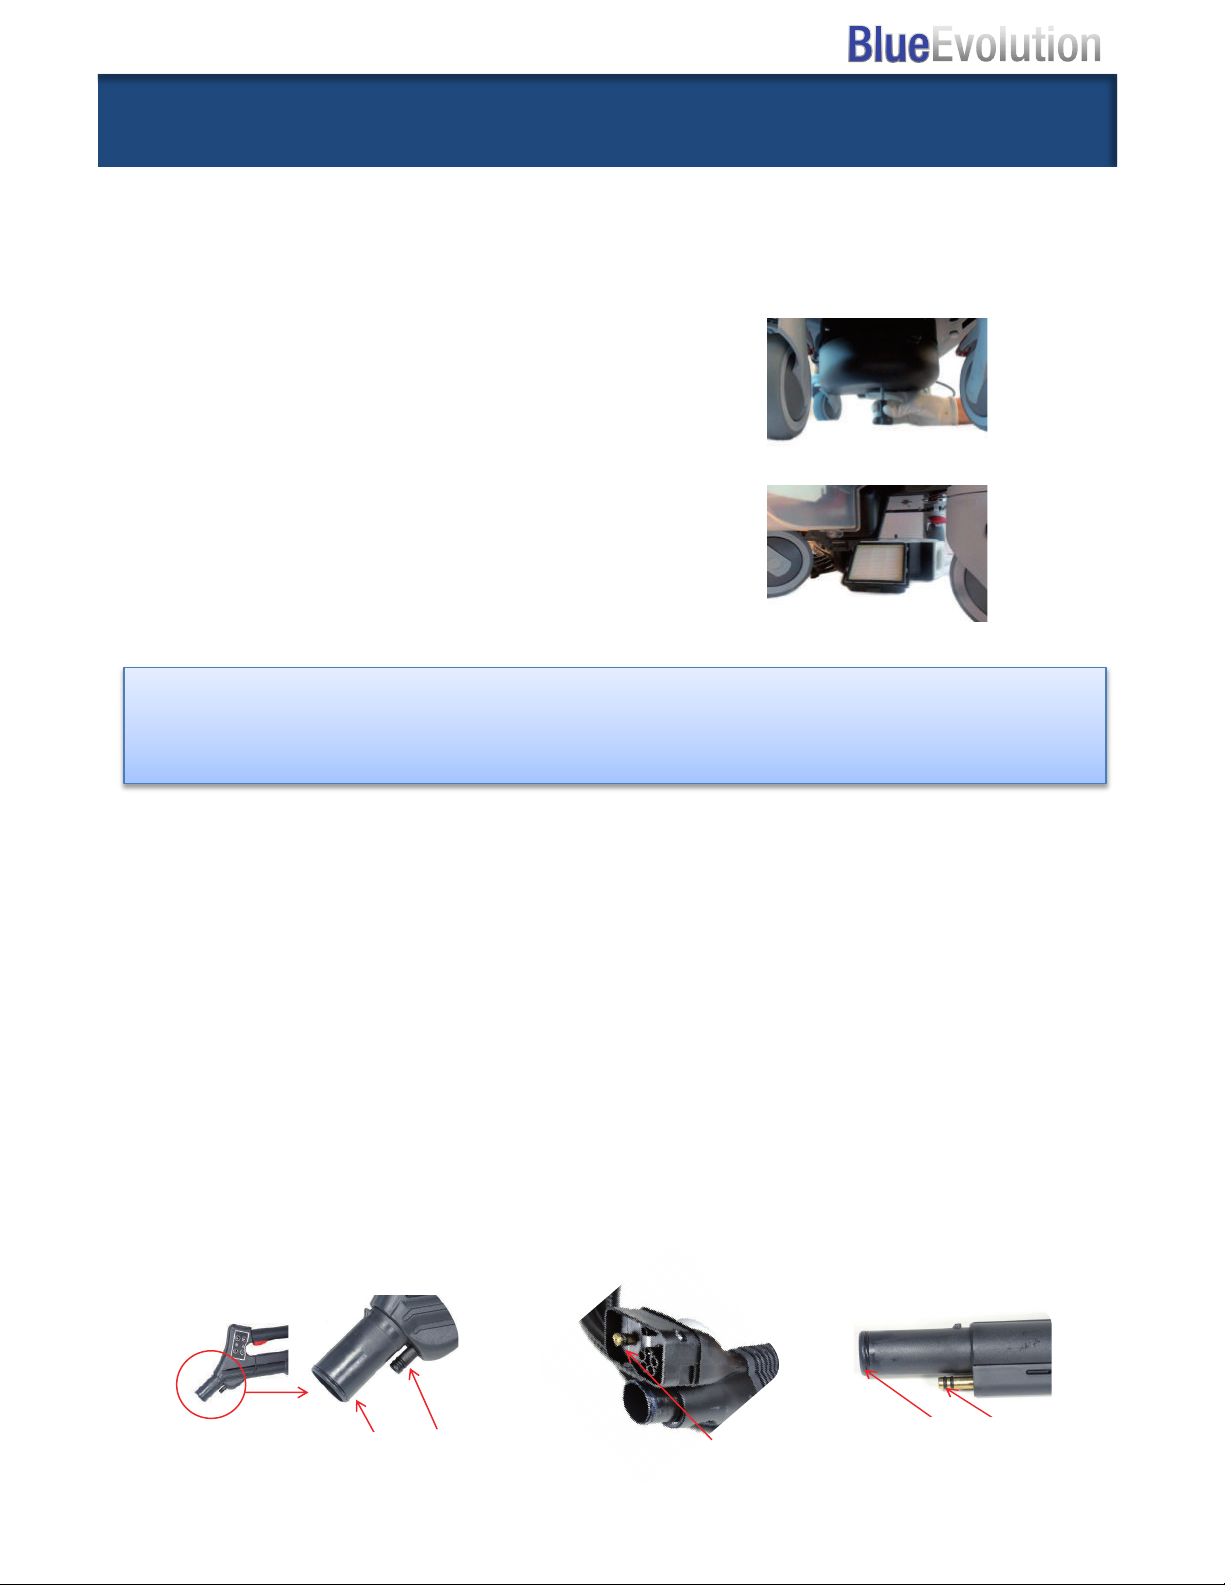
Pos.(3)
Check the O-rings on the safety handle for damage:
Pos.(1): 1 O-ring on the suction pipe
Pos.(2): 2 O-rings on the steam spout
Check the O-rings on the connector for damage:
Pos(3): 2 O-rings on the brass spout
Check the O-rings on all extension pipes for damage:
Pos.(4): 1: O-ring on the suction pipe
Pos.(1) Pos.(2)
Look foward to it.
Pos.(3)
Check the O-rings on the safety handle for damage:
Pos.(1): 1 O-ring on the suction pipe
Pos.(2): 2 O-rings on the steam spout
Check the O-rings on the connector for damage:
Pos(3): 2 O-rings on the brass spout
Checking O-rings on the extension pipes
Check the O-rings on all extension pipes for damage:
Pos.(4): 1: O-ring on the suction pipe
Pos.(5): 2 O-rings on the steam spout
Cleaning, care and maintenance of accessories
Pos.(1) Pos.(2)
You can order a suitable set of O-rings from our online shop at
Look foward to it.
Entkalkungsanleitung B
Care of accessories
It is essential to clean accessory parts after use to maintain the performance and functionality of the
appliance. Te connections on the extension pipes and the safety handle can be sprayed with a
suitable lubricant or silicone spray as required. This will make it easier to change accessory parts.
Checking the O-rings
To avoid damage to the appliance or accessories, the O-rings on the safety handle and the extension
pipes must be checked regularly for damage. The O-rings will last longer if they are coated regularly
with a lubricant/ silicone spray or a non-acidic grease.
Checking the O-rings
Check the O-rings on the safety handle for damage:
Pos.(1): 1 O-ring on the suction pipe
Pos.(2): 2 O-rings on the steam spout
Cleaning, care and maintenance of accessories
HEPA Air Filter
We recommend the HEPA filter be cleaned monthly or when there is a noticeable drop
in vacuum suction. The filter should be replaced at least once per year.
To clean or replace the HEPA filter:
Ø Remove the exhaust cover on underside
of the Blue Evolution by loosening the
center screw.
Ø The HEPA filter is located on the back of
the exhaust cover.
Ø Clean by using air hose to blow out dirt
and dust. Make sure to clean both sides of
the filter.
Warning
Do not tilt or lay the Blue Evolution on its back or side. Doing so could cause
damage and void the warranty.
Accessory Cleaning
It is important to clean accessories and brushes after each use to maintain cleaning
performance.
Ø Use hot soapy and water to clean brushes and nozzles.
Ø Rinse hose with water after each use by activating the vacuum and sucking
water through the hose.
Ø Empty and use hot soapy water to clean the collection tank and remove all
O-Rings
O-Rings must be checked regularly for damage. If O-rings are damaged or missing,
please call US Steam to purchase replacement rings. (817) 297-7745.
debris. Rise with water removing all soap.
Hose Handle Hose Extension Wands
10"
Page 11

Trouble Shooting
PROBLEM SOLUTION
Ø The Blue Evolution should be the ONLY appliance plugged into the
The Blue Evolution does
not turn on.
electrical outlet.
Ø Check the fuse box for tripped circuit breaker.
Ø If using an extension cord it must meet the following requirements:
Ø Use only a 12 gauge / 15AMP rated or higher extension cord.
Ø 25 ft. max length
The Blue Evolution powers ON
after plugging into the electrical
outlet and then turns OFF.
During the warm-up phase the
Blue Evolution’s alarm goes off.
No Vacuum Suction
Warning alarm goes off
No Vacuum Suction
No warning signals
Ø This is normal.
Ø Push the ON/OFF Button on the console to power ON the Blue
Evolution.
Ø The boiler pulled all the water from the steam reservoir tank
Ø Refill the steam reservoir tank
Ø Push the ON/OF button on the"console to reset.
Ø Empty and clean the collection tank.
Ø Refill with water to the green fill line.
Ø Collection tank lid is not attached correctly.
Ø Lid must sit flush on the and locked into position.
Ø It’s helpful to attach the lid to the tank before installing.
Ø Check hose for foreign objects or dirt.
Ø Check and replace the HEPA filter as needed.
01 – Refill Steam tank
06 – Replace UVC lamp
Error Codes
Will show on console screen
02 – Refill Extraction tank
03 – Boiler did not refill
04 – Collection tank is full
05 - Descale boiler
07 - High steam temperature
08 - Replace anti-scaling filter
09 – High motor temperature
10 – Service required
11"
Page 12

12"
Page 13
Descaling
Look foward to it.
D
Hard water will cause limescale to build up in the
boiler. Limescale can damage the boiler if not
removed by descaling. We recommend descaling
the tanks in the Blue Evolution every 60 days or
earlier if the warning indicator light starts flashing.
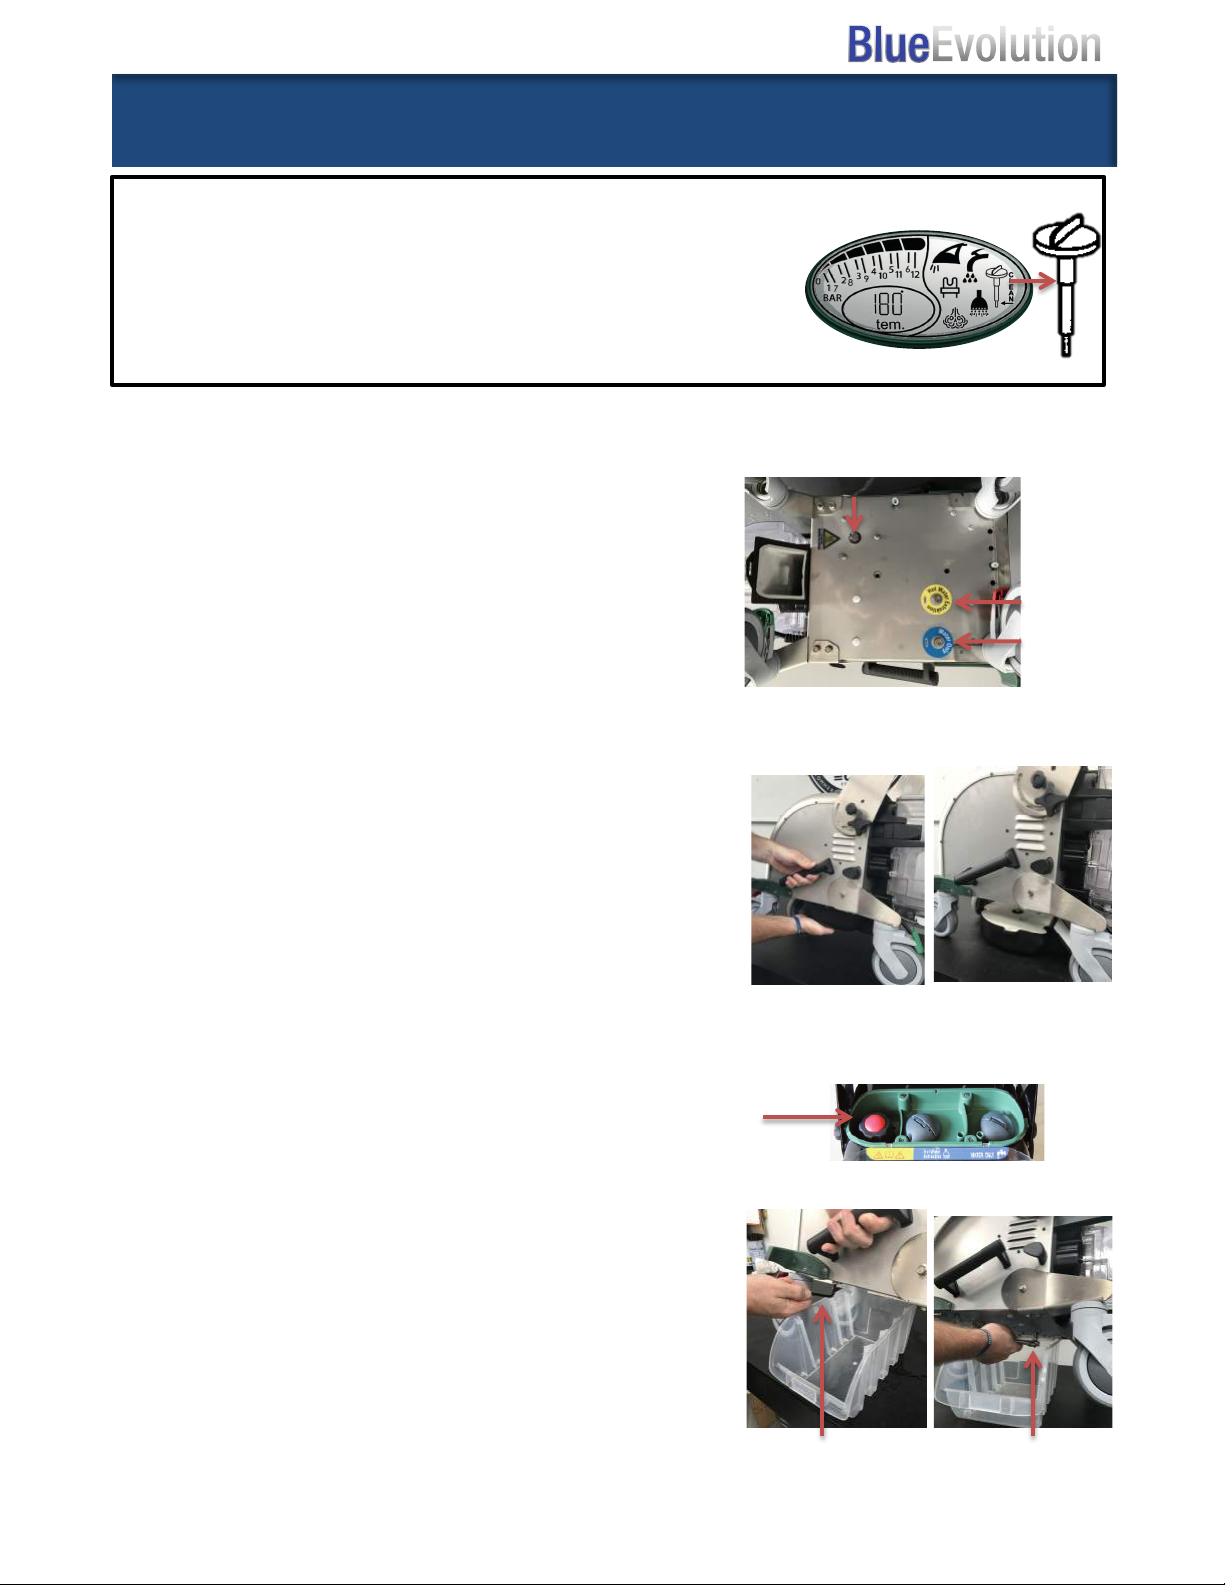
Step 1: Drain the Steam, Extraction, and
Boiler Tanks.
Drain plugs are located on the bottom of the Blue
Evolution. The exhaust cover must be removed to
access the drain plugs. DO NOT PLACE THE
BLUE EVOUTION IN ITS SIDE TO DESCALE.
Tools Required:
Ø 5mm allen wrench
Ø 13mm socket wrench
Ø Catch container
Ø 1 gallon container for descaling solution.
Boiler Tank Drain Plug (13mm)
Extraction
Steam
Figure 1: Remove Exhaust Cover
① The Blue Evolution must be cool and at room
temperature before descaling.
② Place the Blue Evolution on a flat surface and lock
all 4 wheels.
③ Tilt the Blue Evolution and remove the exhaust
cover (see figure 1).
④ Remove the boiler cap pressing down and turning
counter-clockwise (figure 2)
⑤ Tilt the Blue Evolution to expose the boiler tank
plug. Use a 13mm wrench to remove. Place a
catch pan to collect draining water.
⑥ Using 5mm allen wrench, remove the water tank
plug (blue) and extraction tank plug (yellow).
⑦ Replace all drain plugs.
Ø Boiler plug is tight when it stops turning.
Ø The (blue) steam and extraction (yellow) tank
plug have a snug fit and will NOT stop turning.
DO NOT OVERTIGHTEN.
⑧ The boiler tank is now ready for descaling.
Figure 2:Remove boiler cap
Figure 3: Remove drain plug
5mm Allen
13mm socket
13"
Page 14
Descaling
Look foward to it.
Warning:
Before starting, disconnect from the main power by pulling out oft he plug.
Remove the sound-proofing casing on the underside
of the appliance. To remove, loosen the middle fixing
screw by hand, which will enable you to fold down,
detach and remove the sound-proofing casing.
Place a suitable container under the appliance and
open the drain plug by turning it to the left with the
included Inbus key (label blue ring “Water Only”).
Drain the reservoir and then screw the drain plug back
in and tighten slightly.
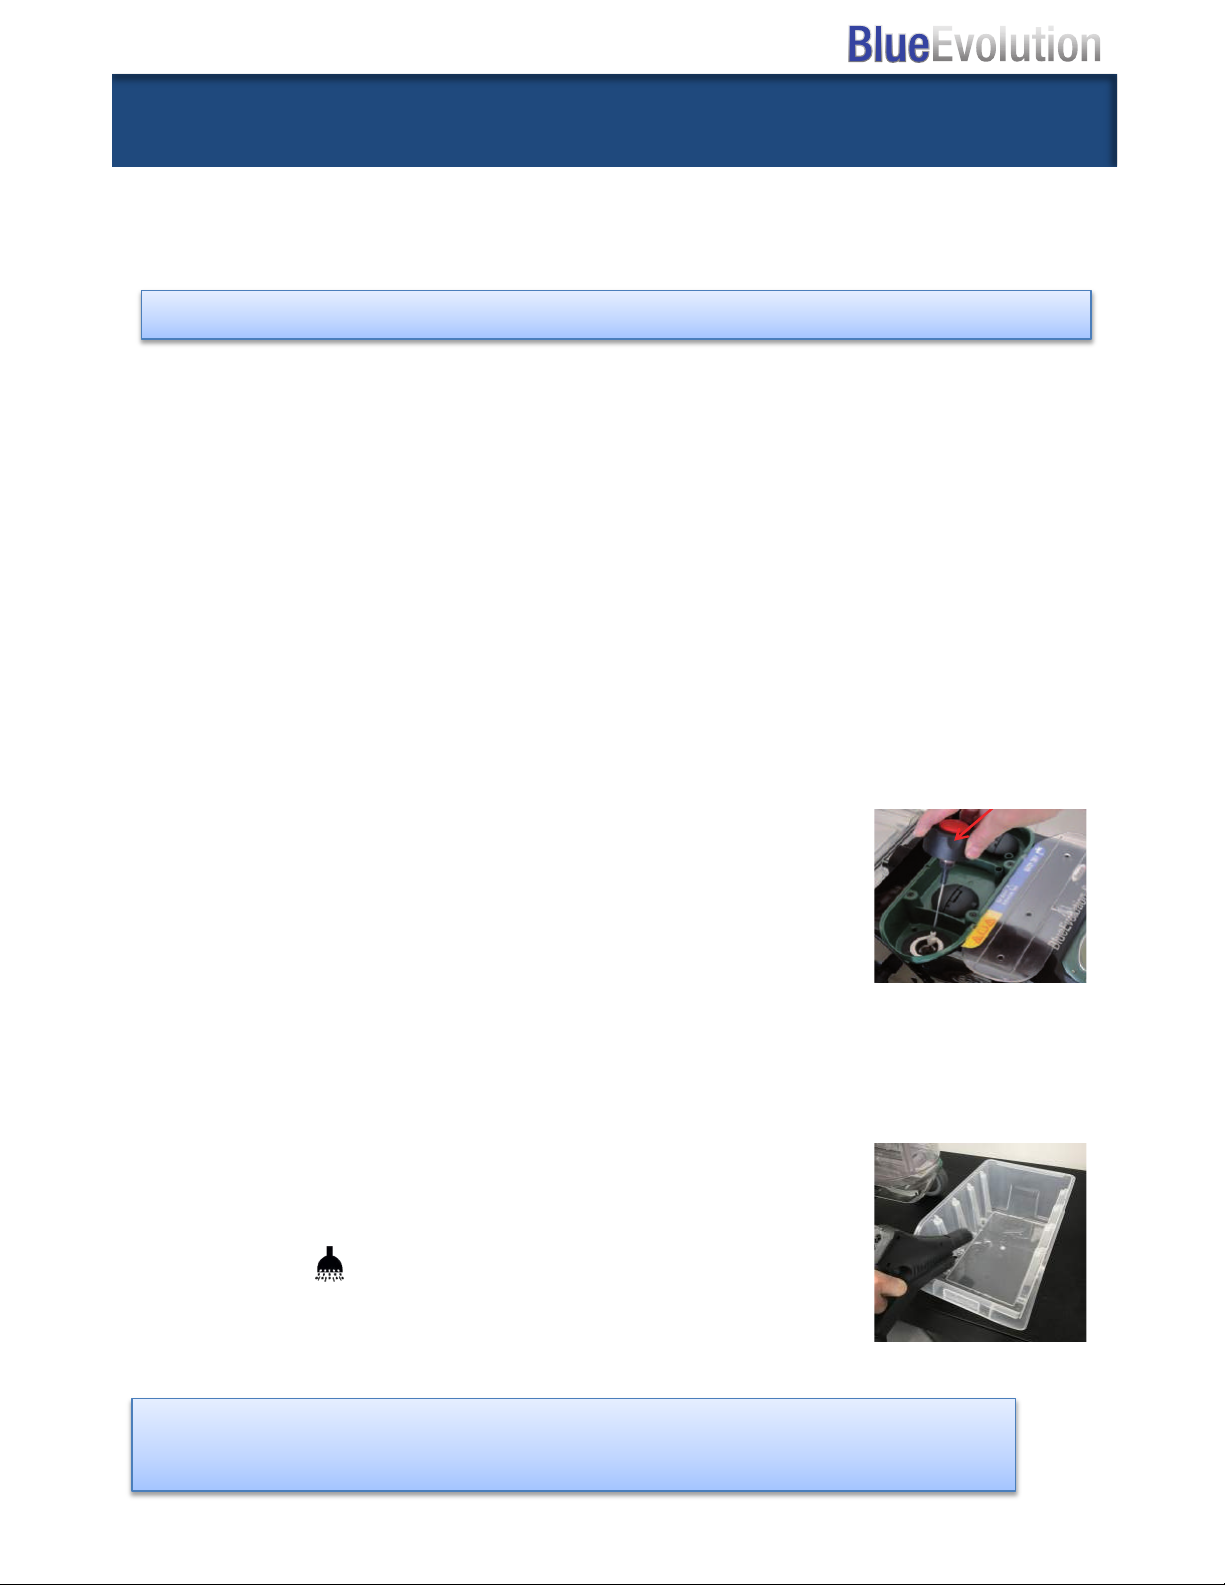
Unscrew the probe cap (1) by pressing down and turning
to the left at the same time.
For thorough cleaning and descaling of the probe cap we
recommend: 0.1 litres of beam descaler and 0.5 litres
water (total 0.6 litres of descaling mixture).
Pour the descaling mixture into a suitable container and
put the probe cap into the mixture.
Boiler descaling / step 1
Probe cap (1)
b)
a)
c)
Step 2: Descaling the Steam and Boiler Tanks
Descaling Solution is a mixture of ½ gallon of vinegar and ½ gallon of tap water.
① Pour 1/4th of the descaling solution into the steam tank.
② Pour 1/4
③ Pour 1/4
th
of the descaling solution in the extraction tank.
th
of the descaling solution directly into the boiler tank.
Ø Water may drain from the overflow hose.
Ø Do not replace the boiler cap until completely finished descaling.
⑤ Turn ON the Blue Evolution to pump the descaling solution into the boiler. It
should take 1 minute before you hear the alarm.
⑥ When you hear the low water alarm, push the OFF button. The descaling solution
should remain in the boiler tank for at 15 minutes.
Step 3: Clean the Descaling Sensor.
Attached to the boiler cap is the water fill sensor. The sensor must
be cleaned each time the Blue Evolution is descaled.
① Remove the sensor and soak in remaining descaling solution
until all minerals are removed.
② Rinse sensor with tap water and replace cap and tighten by
pushing down and turning clockwise.
Step 4: Descale the Extraction Tank.
① Attach the hose to the Blue Evolution.
② Turn ON the Extraction function on the hose handle by
pushing the button on the hose handle.
③ Allow the descaling solution to pass through the hose for 1
minute. Use a catch pan to collect the descaling solution as
it exits the hose handle.
The low water alarm will sound while descaling the hose and
extraction tank.
14"
Page 15

Descaling
Step 5: Drain Tanks (See Step 1 instructions for draining tanks.)
Step 6: Rinse Tanks
The descaling solution must be removed from the tanks before using. Two rinse
cycles may be required.
① Fill the Steam and Extraction tanks with ¼ gallon of tap water.
② Fill the boiler tank with ¼ gallon of tap water and replace cap.
③ Turn ON the Blue Evolution allowing the water to be pulled into the boiler tank.
④ When you hear the low water alarm, turn OFF.
⑤ Remove all drain plugs, emptying the water in the tanks.
⑥ Replace drain plugs.
Ø Boiler plug is tight when stops turning.
Ø The (blue) steam and (yellow) extraction tank plug will have a snug fit and NOT
stop turning.
⑤ Replace exhaust cover.
⑥ Refill the extraction and steam tanks with tap water
⑦ Blue Evolution is ready for use.
15"
Page 16

Notices
Read all instructions before using this steam cleaner.
WARNING: STEAM GENERATED BY THE BLUE EVOLUTION IS EXTREMLY HOT AND
MAY CAUSE INJURY IF THE STEAM COMES IN DIRECT CONTACT WITH THE SKIN
OR EYES. USE AS ONLY AS DIRECTED BY THIS MANUAL AND ONLY AIM THE
STEAM HANDLE AT THE CLEANING AREA.
WARNINGS
Ø DO NOT leave the steam cleaner unattended while plugged in. Turn off all controls and unplug the
electrical cord when not in use, when moving to another location and before servicing.
Ø DO NOT use with a damaged cord or plug. If the steam cleaner is not working as it should, has
been dropped, damaged, left outdoors or dropped into water, call for service before using.
Ø NEVER attempt to disassemble this product in a way not instructed in this manual.
Ø DO NOT handle the electrical plug with wet hands.
Ø DO NOT use near children.
Ø DO NOT pull or carry by cord. Keep cord away from heated surfaces.
Ø Keep body, hands, and feet away from nozzle or brush steam. Steam can cause burns.
Ø ALWAYS set safety switch on hose handle into the locked position when not in use.
Ø Not setting safety switch to locked position could result in an injury.
Ø ALWAYS test a small area before cleaning a large area on any type of surface to make sure no
damage will occur.
Ø DO NOT expose machine to freezing temperatures while not in use.
Ø DO NOT store gasoline or other flammable vapors and liquids in the vicinity of this or any other
appliance.
ELECTRICAL CONNECTIONS
The steam cleaner uses 110 Volts and will pull 13.1 Amps. It should be the only appliance plugged
into an outlet.
Ø Use only a 12 gauge / 15AMP rated or higher extension cord.
Ø Any alteration of electrical cord supply on this steam cleaner will void all warranties.
Ø Once electrical hook-up meets requirements, make sure all switches on front of unit are in the off
position before plugging unit into electrical outlet. For circuit breaker protection, if possible plug the
unit into an outlet isolated from other equipment, or turn the other equipment off while using the
steam cleaner — the combined electrical amperage of other equipment and the steam cleaner
together may cause a circuit breaker to trip.
Ø Always press the power button to OFF before you unplug the unit.
Ø Removing the ground prongs from the power cord will void any and all warranties and can cause
risk of shock or injury
KEEP FOR YOUR RECORDS. THIS MANUAL MUST BE RETAINED FOR FUTURE
REFERENCE. PLEASE READ, UNDERSTAND AND FOLLOW THE INSTRUCTIONS AND
WARNINGS CONTAINED IN THIS MANUAL BEFORE USING THIS VAPOR STEAM
CLEANER.
In order to reduce the risk of fire, electric shock, personal injury or damage to property, follow these
instructions carefully. When using electrical appliances, basic safety precautions should be followed.
16"
Page 17

Warranty
Your steamer comes with a one year limited warranty which becomes effective on the date of shipment from
and is granted to the initial customer and is nontransferable. Any claims under this warranty must be made
before the end of the applicable warranty period. During such period if it is determined that a part or system
is defective in material or workmanship, the distributor, at its option, will provide you with a repaired
part or replace any part that is covered by the limited warranty. The distributor reserves the right to
substitute functionally equivalent new or serviceable reconditioned parts or systems. The
distributor’s responsibility is limited to repair, replacement, credit or refund, any of which may be selected by
at its sole discretion. The Warranty does not cover defects or damage arising from the disassembly or
attempted disassembly of your steamer.
The limited warranty covers only defects arising from normal use and does not include malfunctions or failures
arising from: misuse, abuse, neglect, alteration, usage not in accordance with user manual and instructions,
depletion of consumables, acts of nature or damage caused by repairs where such repairs were made without
express approval.
Use of any replacement parts other than authorized parts voids all warranties and can cause bodily injury to
the operator and damage equipment. Service performed by anyone other than factory authorized personnel
will void warranty.
SERVICE AND SUPPORT
Before you ship your steam cleaner for service, you must call (800) 758-3141 (M-F 9am-4:00pm Eastern
Time) or contact us through the web at our customer service representative will explain how you must package
and ship your Steamer to prevent further damage
RETURN PROCEDURES
Prior to returning the product(s) you must obtain a Return Merchandise Authorization (RMA) by calling (800)
758-3141. No returns will be accepted without RMA #. When packing the Steamer, you must use the
original packing material to prevent damage in shipping. Make sure you include all items and accessories. You
will be responsible for all shipping cost.
LIMITATIONS
EXCEPT AS SET FORTH HEREIN, US STEAM MAKES NO WARRANTIES, EXPRESSED OR IMPLIED,
AND DISCLAIM AND NEGATE ALL OTHER WARRANTIES, INCLUDING WITHOUT LIMITATIONS,
IMPLIED WARRANTIES OF MERCHANTABILITY, FITNESS FOR THE PARTICULAR PURPOSE AND
CONFORMITY TO MODELS OR SAMPLES. SOME JURISDICTIONS DO NOT ALLOW LIMITATIONS
ON IMPLIED WARRANTIES, SO THESE LIMITATIONS MAY NOT APPLY TO YOU.
GOVERNING LAW, JURISDICTION AND COSTS
THESE LIMITED WARRANTIES ARE INCORPORATED INTO AND ARE ESSENTIAL AND
MATERIAL PROVISIONS OF THE TERMS AND CONDITIONS OF SALE OR SELLER PRODUCTS TO
YOU. ALL DISPUTES ARISING OUT OF OR RELATED TO THE LIMITED WARRANTY SET FORTH
HEREIN (CUSTOMER DISPUTES) SHALL BE GOVERNED BY THE LAWS OF THE STATE OF TEXAS.
THE CUSTOMER HEREBY CONSENTS TO THE JURISDICTION AND VENUE OF THE STATE
COURTS OF TEXAS TO RESOLVE ANY AND ALL CUSTOMERS DISPUTES WITH BOSTON GREEN
GOODS, INC., AND THE CUSTOMER WAIVES ALL DEFENSES TO SUCH JURISDICITON AND
VENUE INCLUDING, BUT NOT LIMITED TO, ANY DEFENSE BASED ON INCONVENIENT FORUM.
IN THE EVENT THE CUSTOMER AND BOSTON GREEN GOODS, INC. ARE UNABLE TO RESOLVE
ANY CUSTOMER DISPUTE, AND ANY COLLECTION ACTION, SUIT OR OTHER JUDICIAL
PROCEEDING IS COMMENCED; THE PREVAILING PARTY IN ANY SUCH ACTION, SUIT OR
PROCEEDING SHALL BE ENTITLED TO RECOVER ITS COSTS AND REASONABLE ATTORNEY’S
FEES INCURRED.
17"
Page 18
Restaurant
Floors, Kitchen, Grills, & Bathrooms
The Blue Evolution will clean every area of your restaurant without chemicals.
Hospital
Grocery
Office
School$
Gym
Day$Care ""
Automo=ve
Patient Beds, Wheel Chairs, & Curtains
Steam is a proven killer of virus and infection causing germs. UV-C
reduces airborne bacteria.
Deli’s, Freezers & Butcher
Chemical free cleaning in areas of food storage and preparation.
Desk, Tables, & Partitions
Blue Evolution guarantees a clean, germ-free work environment increasing
productivity and reducing sick days.
Lockers, Mats, & Gym Equipment
Steam kills mold and germs caused by sweaty athletes.
Equipment, Lockers, and Saunas
Kills viruses and germs found on workout equipment and gym floors.
Toys, Playgrounds, & Beds
The Blue Evolution can clean all areas where kids pass germs. Extreme
cleaning can reduce sick days for kids and employees.
Seats and Floors
The Blue Evolution combines steam and extraction into one system for more
efficient detailing.
A Better Way to Clean
7940 Rodeo Trail, Ste 360
Mansfield, Texas 76063
(817) 297-7745
 Loading...