

Page 1

BOX MOD KIT
SWITCHER
Bedienungsanleitung | Manuel d’utilisation | User Manual
Page 2

VAPANION
SWITCHER
SPRACHEN / LANGUES / LANGUAGES
Deutsch . . . . . . . . . . . . . . . . . . . . . . . . . . . . . . . . . . . . . . . . . . . . . . . . . . . . . . . . . . . . . . . . . . . . 01
Français . . . . . . . . . . . . . . . . . . . . . . . . . . . . . . . . . . . . . . . . . . . . . . . . . . . . . . . . . . . . . . . . . . . . 31
English . . . . . . . . . . . . . . . . . . . . . . . . . . . . . . . . . . . . . . . . . . . . . . . . . . . . . . . . . . . . . . . . . . . . . 60
3
Page 3

DAMPFEN MIT BIS ZU 220 WATT UND 315 °C
VAPANION
SWITCHER
Nutzerinformationen
Vielen Dank, dass Sie sich für ein Produkt von Vapanion – eine Marke von InnoCigs – entschieden haben!
Bei unserem gesamten Sortiment legen wir großen Wert auf hohe Qualitäts- und Sicherheitsansprüche.
Wir wünschen Ihnen viel Spaß beim Dampfen mit Ihrem neuen E-Zigaretten-Produkt!
Bitte lesen Sie die Bedienungsanleitung vor Gebrauch sorgsam durch, um eine korrekte Nutzung des
E-Zigaretten-Produkts von InnoCigs zu gewährleisten. Verwenden Sie in Kombination mit diesem Produkt
bitte nur originale bzw. empfohlene Produkte. Der Hersteller gewährleistet keinen Service und/oder Garantie
bei der Nutzung mit nicht empfohlenen Produkten.
Sollten Sie Fragen rund um Ihr E-Zigaretten-Produkt haben oder weitere Informationen benötigen,
kontaktieren Sie bitte Ihren Fachhändler oder besuchen Sie unsere Website www.innocigs.com.
01
Page 4

VAPANION
SWITCHER
Hinweise & Vorsichtsmaßnahmen . . . . . . . . . . . . . . . . . . . . . . . . . . . . . . . . . . . . . . . . . . . . . . . . . . . . . . . . . . . . . . 03
Lieferumfang . . . . . . . . . . . . . . . . . . . . . . . . . . . . . . . . . . . . . . . . . . . . . . . . . . . . . . . . . . . . . . . . . . . . . . . . . . . . . . . . 08
Aufbau des Geräts . . . . . . . . . . . . . . . . . . . . . . . . . . . . . . . . . . . . . . . . . . . . . . . . . . . . . . . . . . . . . . . . . . . . . . . . . . . 09
Bedienung des Geräts . . . . . . . . . . . . . . . . . . . . . . . . . . . . . . . . . . . . . . . . . . . . . . . . . . . . . . . . . . . . . . . . . . . . . . . . 10
Eckdaten & Leistungsmerkmale . . . . . . . . . . . . . . . . . . . . . . . . . . . . . . . . . . . . . . . . . . . . . . . . . . . . . . . . . . . . . . . . 15
Regelung der Leistungs- und Temperaturabgabe . . . . . . . . . . . . . . . . . . . . . . . . . . . . . . . . . . . . . . . . . . . . . . . . . 16
Bedienung & Wechsel der Betriebsmodi . . . . . . . . . . . . . . . . . . . . . . . . . . . . . . . . . . . . . . . . . . . . . . . . . . . . . . . . . 17
Schutzfunktionen . . . . . . . . . . . . . . . . . . . . . . . . . . . . . . . . . . . . . . . . . . . . . . . . . . . . . . . . . . . . . . . . . . . . . . . . . . . . 25
Garantieleistungen & Reparaturen . . . . . . . . . . . . . . . . . . . . . . . . . . . . . . . . . . . . . . . . . . . . . . . . . . . . . . . . . . . . . . 26
Garantie & Service . . . . . . . . . . . . . . . . . . . . . . . . . . . . . . . . . . . . . . . . . . . . . . . . . . . . . . . . . . . . . . . . . . . . . . . . . . . 28
Kontakt . . . . . . . . . . . . . . . . . . . . . . . . . . . . . . . . . . . . . . . . . . . . . . . . . . . . . . . . . . . . . . . . . . . . . . . . . . . . . . . . . . . . . 29
INHALTSVERZEICHNIS
02
Page 5

HINWEISE & VORSICHTSMASSNAHMEN
Personen unter 18 Jahren, Schwangere, stillende Mütter und Menschen mit Herz-Kreislauf-Erkrankungen dürfen dieses
Produkt nicht verwenden. Nicht empfohlen für Nichtraucher. Das E-Zigaretten-Produkt darf nicht in die Hände von Kindern und
Jugendlichen gelangen.
Dieses Produkt darf
nicht von Minderjährigen
verwendet werden.
Dieses Produkt muss für Kinder
und Jugendliche unzugänglich
aufbewahrt werden.
Dieses Produkt darf nicht von
Schwangeren oder stillenden
Müttern genutzt werden.
Dieses Produkt entspricht den innerhalb der EU
gültigen Bestimmungen für technische Geräte und
darf in den Ländern der EU vertrieben werden.
Dieses Produkt besteht teils aus wiederverwertbaren
Gütern, die recycelt werden können.
Alte Elektrogeräte oder verbrauchte Akkus gehören nicht in den
Hausmüll! Bitte entsorgen Sie Altbatterien und - geräte – wie
vom Gesetzgeber vorgeschrieben – an einer kommunalen
Sammelstelle oder geben Sie sie im Handel vor Ort kostenlos
ab, damit Rohstoffe und mögliche Schadstoffe gezielt verwertet
werden können.
VAPANION
SWITCHER
03
03
Page 6

VAPANION
SWITCHER
Benutzerhinweise
1. Sollte Ihnen das Gerät heruntergefallen sein, überprüfen Sie bitte, ob sich keine Komponenten gelockert haben, ob
kein Liquid austritt und ob kein Defekt an Ihrem Mundstück vorliegt. Sofern nach visueller Prüfung des Produkts keine
Anzeichen einer Beschädigung vorliegen, können Sie das Gerät weiter benutzen. Bitte wischen Sie Ihr Mundstück
zuvor aus hygienischen Gründen mit einem Tuch ab.
2. Das Gerät sollte nicht benutzt werden, wenn sich Risse oder Deformationen im Material zeigen oder ein defektes Teil
ausgetauscht werden sollte. Versuchen Sie bei einem Defekt niemals, das Gerät selbst zu reparieren.
3. Das Gerät sollte nicht benutzt werden, wenn das Liquid in Ihrem Clearomizertank verbraucht oder fast verbraucht ist.
Gleiches gilt für den Fall, dass Sie eine Veränderung des Geschmacks wahrnehmen. Bitte befüllen Sie den Clearomizertank mit frischem Liquid und tauschen Sie Ihren Verdampferkopf durch einen neuen aus, bevor Sie Ihre E-Zigarette weiterbenutzen. Da es sich bei Verdampferköpfen um Verschleißteile handelt, müssen sie regelmäßig gewechselt werden.
4. Lagern Sie das Gerät nie in Räumen mit sehr hohen Temperaturen oder mit besonders hoher Luftfeuchtigkeit.
Vermeiden Sie längere direkte Sonneneinstrahlung.
5. Die geeignete Temperatur für das Aufladen des Akkus liegt bei 5°C bis 45°C und für den Gebrauch bei -10°C bis 60°C.
HINWEISE & VORSICHTSMASSNAHMEN
04
Page 7

HINWEISE & VORSICHTSMASSNAHMEN
6. Wenn Liquid mit Ihrer Haut in Berührung kommt, wischen Sie es schnellstmöglich ab und reinigen Sie die Stelle anschließend gründlich mit klarem Wasser.
7. Wenn Sie versehentlich Liquid verschlucken, wenden Sie sich bitte an eine Vergiftungszentrale. Unter der Telefonnummer
+49 (0)30 - 19 240 erreichen Sie Tag und Nacht den Giftnotruf der Charité Universitätsmedizin Berlin. In Österreich steht
der 24-Stunden-Notruf der Wiener Vergiftungsinformationszentrale unter +43 (0)1 - 406 43 43 zur Verfügung. In Frankreich
wenden Sie sich bitte an eine der lokalen Vergiftungszentralen. Verständigen Sie in Notfällen bitte umgehend den Notruf.
8. Das Inhalieren nikotinhaltigen Liquids kann die Herzfrequenz und/oder den Blutdruck erhöhen. Nikotin kann Übelkeit,
Schwindel und/oder Magenschmerzen verursachen. Wenn Sie an sich oder Menschen in Ihrer Umgebung unerwünschte
Wirkungen feststellen, verwenden Sie dieses Produkt bitte nicht weiter und konsultieren Sie einen Arzt.
9. Beachten Sie bei der Nutzung von E-Zigaretten lokale Gesetze.
10. Das Produkt darf nicht in die Hände von Kindern und Jugendlichen gelangen.
Warnhinweis
Dieses E-Zigaretten-Produkt kann mit nikotinhaltigem Liquid verwendet werden. Nikotin ist ein Stoff, der sehr
stark abhängig macht.
VAPANION
SWITCHER
05
Page 8

VAPANION
SWITCHER
Allgemeine Informationen zu Zugtechniken beim Dampfen
Beim Dampfen wird zwischen zwei Zugtechniken unterschieden:
Moderates Dampfen (Mund-zu-Lunge)
Der Dampf einer E-Zigarette wird während der gesamten Zugdauer zunächst im Mundraum gesammelt und
anschließend in die Lunge inhaliert. Diese Zugtechnik wird als moderates Dampfen von Mund-zu-Lunge
bezeichnet und ist genauso wie beim Rauchen einer Tabak-Zigarette. Voraussetzung ist ein spürbarer
Widerstand beim Zug an der E-Zigarette. Verdampferköpfe, die diese Zugtechnik im moderaten Bereich
(Widerstand i.d.R. > 1 Ohm) unterstützen, werden häug als MTL-Head gekennzeichnet, wobei MTL für das
Englische “Mouth to Lung” steht. (weitere Abkürzungen: ML, M2L)
06
HINWEISE & VORSICHTSMASSNAHMEN
Page 9

HINWEISE & VORSICHTSMASSNAHMEN
Subohm-Dampfen (Direkte Lungeninhalation)
Der Dampf einer E-Zigarette wird während des Zuges direkt in die Lunge inhaliert. Diese Zugtechnik wird als
subohmes Dampfen mit direkter Lungeninhalation bezeichnet. Voraussetzung ist ein geringer Zugwiderstand und eine hohe Luftzufuhr zum Verdampferkopf. Beides wirkt sich positiv auf die Produktion großer
Dampfmengen aus. Verdampferköpfe, die diese Zugtechnik im Subohm-Bereich (Widerstand i.d.R.
< 1 Ohm) unterstützen, werden häug als DL-Head gekennzeichnet, wobei DL für das Englische “Direct
Lung” steht. (weitere Abkürzungen: DTL, D2L).
VAPANION
SWITCHER
07
Page 10

VAPANION
SWITCHER
Lieferumfang Vapanion Switcher
1x Switcher Akkuträger (ohne 18650er Akkus)
1x Micro-USB-Ladekabel
1x Bedienungsanleitung
08
LIEFERUMFANG
Page 11

Feuertaste
VAPANION
SWITCHER
OLED-Display
Minus-Taste
Modus-Taste
Akkuabdeckung
Austauschbares Gehäuse
Plus-Taste
Micro-USB-Anschluss
09
Page 12

VAPANION
SWITCHER
Hinweise zur Inbetriebnahme
Bitte laden Sie die beiden benötigten wechselbaren 18650er Akkus vor der ersten Inbetriebnahme vollständig
auf. Bitte beachten Sie die Kennzeichnung der Plus- und Minus-Pole im Akkufach. Achten Sie unbedingt darauf,
dass die Oberfläche der Akku-Zellen keine Beschädigung aufweist. Das Gerät verfügt über einen 510er Anschluss
mit gefedertem Verbindungsstück, wodurch es zu einer Vielzahl an subohm-fähigen Clearomizern passt.
Hinweis zur Reinigung
Verwenden Sie zur Reinigung des Geräts ein trockenes Tuch oder ein Wattestäbchen.
Power On/Off
Drücken Sie die Feuertaste innerhalb von 2 Sekunden 5-mal schnell hintereinander, um das Gerät einzuschalten.
Das Ausschalten funktioniert auf gleiche Weise durch 5-maliges schnelles Betätigen der Feuertaste. Wir
empfehlen Ihnen, das Gerät während des Transports und bei längerer Nichtbenutzung auszuschalten.
Dampfen
Während Sie die Feuertaste des Geräts gedrückt halten, inhalieren Sie den Dampf langsam und kontinuierlich
über das Mundstück Ihres Clearomizers. Lassen Sie die Feuertaste beim Ausatmen des Dampfes los.
BEDIENUNG DES GERÄTS
10
Page 13

BEDIENUNG DES GERÄTS
Display-Anzeige
Nach Einschalten des Gerätes werden auf dem OLED-Display Spannung, Widerstandswert, Batteriestand,
Temperatur und Ausgangsleistung angezeigt. Wird das Gerät 10 Sekunden lang nicht genutzt, wird Ihnen mit
der Real Time Clock die Uhrzeit angezeigt. Wird das Gerät weitere 15 Minuten nicht genutzt, erlischt auch die
Zeitanzeige. Durch einmaliges Drücken der Modus-Taste oder Betätigen der Minus- bzw. Plus-Taste können Sie
die Zeitanzeige wieder aktivieren. Drücken Sie eine dieser Tasten noch einmal, wird Ihnen wieder das Hauptmenü angezeigt. Drücken Sie die Feuertaste, um das Display wieder zu aktivieren und direkt zur Hauptanzeige
zurück zu gelangen.
Im Modus-Menü haben Sie nach dreimaligem Drücken der Modus-Taste unter “System Set” die Möglichkeit,
Ihre Einstellungen für die Display-Anzeige zu verändern. Die einzelnen Zeit-Einstellungen von 3 Sekunden bis
60 Minuten werden mit den Plus- und Minus-Tasten angesteuert und geregelt. Durch Drücken der Modus-Taste
werden sie bestätigt und gespeichert.
Exklusiv-Funktion beim Switcher LE
Wenn Sie unter “System Set” mittels der Plus- und Minus-Tasten das Untermenü “Light” auswählen, haben Sie
die Möglichkeit, die LED-Beleuchtung des Gehäuses anzupassen.
VAPANION
SWITCHER
11
Page 14

VAPANION
SWITCHER
Automatische Erkennung des Widerstandes
Sobald das Gerät die Verbindung mit einem Verdampferkopf erkannt hat, wird der Widerstand der Wicklung
automatisch ermittelt. Bei der Verwendung von Kanthaldraht wechselt das Gerät automatisch vom VT- in den
Watt-Modus.
Sperren/Entsperren der Plus/Minus-Tasten
Zum Sperren und Entsperren der Plus- und Minus-Tasten betätigen Sie bitte die Feuertaste dreimal. Dass die
Plus- und Minus-Tasten gesperrt sind, erkennen Sie an der Displayanzeige beim Drücken der Tasten und am
verriegelten Schlosssymbol im Hauptmenü.
12
BEDIENUNG DES GERÄTS
Page 15

BEDIENUNG DES GERÄTS
Aufladen und Updaten des Geräts
Bitte beachten Sie, dass Sie hochstromfeste 18650er-Zellen verwenden, deren konstanter Entladestrom ≥ 25 A beträgt. Verwenden Sie bitte zwei baugleiche Akkuzellen des gleichen Markenherstellers. Verbinden Sie das Gerät zum Aufladen bzw. für ein Software-Update via Micro-USB-Ladekabel mit
einem internetfähigen Computer. Zum Aufladen mit bis zu 2,5 A kann das Micro-USB Kabel außerdem
mit einem Netzstecker-Adapter mit USB-Buchse verbunden werden. Während des Ladevorganges
erscheint auf dem OLED-Display der aktuelle Ladestand (0%, 20%, 50%, 80%, 100%) und das Display
des Gerätes bleibt beleuchtet. Wir empfehlen Ihnen, die 18650er Akkus mit einem externen Ladegerät
aufzuladen, weil der Ladevorgang dadurch weiter optimiert und beschleunigt.
VAPANION
SWITCHER
13
Page 16

VAPANION
SWITCHER
Wechsel des Gehäuses
1. Öffnen Sie das Gerät an der Unterseite, indem Sie die Akkuabdeckung wie abgebildet nach vorn schieben
(Abb. 1).
2. Klappen Sie die Abdeckung nach außen und schieben Sie das wechselbare Gehäuse wie abgebildet nach
unten bis es nicht mehr mit dem Akkuträger verbunden ist (Abb. 2 und 3).
3. Schieben Sie das neue Gehäuse auf den Akkuträger (Abb. 4)
4. Schließen Sie die Akkuabdeckung, indem Sie die Abdeckung einklappen und nach hinten schieben, während
Sie sie auf den Akkuträger drücken, um das neue Gehäuse zu xieren (Abb. 5).
1 2 3 4 5
BEDIENUNG DES GERÄTS
14
Page 17

ECKDATEN & LEISTUNGSMERKMALE
Eckdaten Switcher Akkuträger
Ausgabemodi Smart VW (H/N/S) | VT (Ni, Ti, SS316) | TCR (M1, M2) | CCW | CCT | Bypass
Ausgangsleistung 5 bis 220 Watt
Temperaturbereich 100°C bis 315°C | 200°F bis 600°F
Widerstandsbereich 0,05 bis 5 Ohm
Ausgangsspannung max. 8,5 Volt
Ladespannung < 6,5 Volt (Schnellladefunktion mit max. 2,5A)
geeignete Akkuzelle hochstromfeste 18650er Akkus (≥ 25A)
Maße 89 mm x 53 mm x 31 mm
Gewindetyp 510
Zum Laden Ihrer Akkus wird ein externes Ladegerät empfohlen.
VAPANION
SWITCHER
15
Page 18

VAPANION
SWITCHER
Allgemeine Bedienung zur Regelung der Leistungs- und Temperaturabgabe
Die Leistung des Geräts kann 5 Watt bis hin zu 220 Watt betragen. Eine Änderung der Wattzahl verändert
auch den Geschmack und das Dampfverhalten. Je höher die eingestellte Wattzahl ist, desto intensiver die
Dampfentwicklung. Ähnlich verhält es sich mit der Temperature Control: Je höher die Temperatur, desto größer
ist die Dampfentwicklung. Halten Sie die Plus- oder die Minus-Taste gedrückt, um eine automatisch fortlaufende
Steigerung oder Minderung der Wattzahl bzw. der Temperatur durchzuführen.
Wechsel zwischen °C und °F
Wenn Sie bei der Anzeige von 315°C noch einmal die Plus-Taste drücken, wechseln Sie automatisch zum
geringsten Fahrenheitwert (200°F). Genauso wechseln Sie automatisch zum höchsten Fahrenheitwert (600°F),
wenn Sie durch erneutes Drücken der Minus-Taste unter die Minimaltemperatur in Grad Celsius (100°C)
reduzieren.
REGELUNG DER LEISTUNGS- & TEMPERATURABGABE
16
Page 19

BEDIENUNG & WECHSEL DER BETRIEBSMODI
Wählen des Betriebsmodus
Betätigen Sie die Modus-Taste beim entsperrten Gerät drei Mal hintereinander.
Navigieren Sie mit der Minus- oder Plus-Taste durch das Menü, um zwischen den Modi
Smart VW (High/Normal/Soft), CCW, VT (Ni 200, TI, SS), TCR (M1, M2) und BYPASS zu
wechseln. Bestätigen Sie Ihre Auswahl durch Drücken der Modus-Taste und nehmen
Sie Ihre Einstellungen vor.
Einstellen des Smart VW-Modus (Variable Wattage)
Im Smart VW-Modus schlägt Ihnen das Gerät eine Leistungsspanne
passend zum Widerstand des Verdampferkopfes, den es automatisch
erkennt, vor. Sie haben die Wahl aus N (Normal), S (Soft) und H (High).
Als Standard ist N eingestellt. Im VW-Modus ist das Gerät mit Wicklungen mit einem Widerstand von 0,05 bis 5 Ohm kompatibel.
VAPANION
SWITCHER
17
Page 20

VAPANION
SWITCHER
Der automatische Smart VW-Modus lässt sich über die Systemeinstellungen (“System Set”) deaktivieren.
Die Systemeinstellungen werden nach dreimaligem Drücken der Modustaste per Plus- und Minus-Tasten
angewählt. Die Auswahl wird durch einmaliges Drücken der Modus-Taste bestätigt. Auf diese Weise kann
im Untermenü “4) Smart On/Off” ausgewählt und deaktiviert bzw. aktiviert werden. Die zuvor automatisch
getroffene Einstellungen (H/N/S) bleibt beim Deaktivieren des Modus ohne manuelle Veränderung der
H/N/S-Auswahl bestehen.
Im VW-Modus können Sie sich die Dauer der letzten 10 Züge anzeigen lassen. Verdampferköpfe mit
Widerstand über 1,0 Ohm werden durch die “High Power Protection”-Funktion geschützt.
BEDIENUNG & WECHSEL DER BETRIEBSMODI
18
Page 21

BEDIENUNG & WECHSEL DER BETRIEBSMODI
Einstellen des CCW-Modus (Customized Curve of Wattage)
Im CCW-Modus bestimmen Sie die Leistungskurve des Akkuträgers beim wattgeregelten Dampfen. Sie können hier die gewünschte Leistung zum Vorheizen des
Verdampfers in den ersten Sekunden individuell einstellen.
Drücken Sie dreimal hintereinander die Modus-Taste, um CCW auszuwählen.
Betätigen Sie die Plus- oder Minus-Taste, um die Leistung in Watt einzustellen.
Betätigen Sie die Feuer-Taste, um zur nächsten Einstellung zu wechseln. Wenn
alle Modikationen fertig sind, betätigen Sie die Modus-Taste zum Speichern und
Beenden.
VAPANION
SWITCHER
19
Page 22

VAPANION
SWITCHER
Einstellen der Modi VT-Ni/VT-Ti/VT-SS (Temperature Control) und TCR (M1, M2)
(Temperature Coefcient of Resistance)
1. In den Modi VT-Ni, VT-Ti, VT-SS und TCR (M1, M2) ist das Gerät mit Wicklungen aus Nickel 200, Titan
oder Edelstahl 316 nutzbar. Im variablen Temperatur-Modus können Sie den Temperaturwert ganz
nach persönlicher Vorliebe einstellen. Durch das Einstellen des TCR wird der Temperaturwert mit
dem Widerstand Ihrer Verdampferkopfwicklung in Beziehung gesetzt. Dabei ist das Gerät in der
Lage, verschiedene Temperaturregelwicklungen in diversen TCR-Wertebereichen zu unterstützen. Sie
gelangen in das TCR-Einstellungs-Menü, indem Sie im VT-Ni-, VT-Ti-, VT-SS- oder TCR (M1, M2) Modus
das Untermenü “TCR Set” wählen und mit der Modus-Taste bestätigen.
Über das Untermenü “Power Set” können Sie den Ausgangswattwert für die
Temperatur-Modi anpassen, die Standardeinstellung ist 75 Watt.
BEDIENUNG & WECHSEL DER BETRIEBSMODI
POWER SET
200W
[MODE]
OK
20
OK
Page 23

BEDIENUNG & WECHSEL DER BETRIEBSMODI
a. Betätigen die Plus- oder Minus-Taste, um den TCR-Wert in Bezug zum Material Ihrer verwendeten
Verdampferkopfwicklung einzustellen.
b. TCR-Wertebereich für unterschiedliche Materialien:
Material Nickel
TCR Wertebereich
Hinweise:
Der TCR-Wert in der Tabelle entspricht dem tatsächlichen TCR-Wert mit 105 multipliziert.
Der TCR-Wertebereich für das Gerät ist 1 bis 1000.
600–700 300–400 300–400 80–200
NiFe Titan SS (303, 304, 316, 317)
VAPANION
SWITCHER
21
Page 24

VAPANION
SWITCHER
2. Einstellen der Temperatur: In den Modi VT-Ni/VT-Ti/VT-SS/TCR kann die Temperatur im Hauptinterface
durch Betätigen der Plus- und Minus-Taste eingestellt werden. Sie haben die Wahl zwischen den Bereichen
100 °C bis 315 °C und 200°C bis 600 °F. Beim jeweiligen Drücken der Plus- oder Minus-Taste wird die
Temperatur um 5 °C bzw. 10 °F erhöht oder verringert. Halten Sie die jeweilige Taste länger gedrückt, um
die gewünschte Temperatur mit höherer Geschwindigkeit einzustellen.
3. Automatische Erkennung neuer Verdampferköpfe: Um das präzise Arbeiten der Temperature Control
beim Einsetzen eines neuen Verdampferkopfes zu gewährleisten, erscheint auf dem Display die Anzeige
“OLD LOAD: -, NEW LOAD: +”. Sollte der Verdampferkopf vom zuvor verwendeten abweichen, wählen Sie die
Plus-Taste und der Widerstand wird neu ausgelesen. Wählen Sie die Minus-Taste, um den voreingestellten
Widerstand bestehen zu lassen.
4. Sperren/Entsperren des Widerstands: In den Modi VT-Ni, VT-Ti, VT-SS und TCR sperren oder entsperren
Sie den Widerstand, indem Sie im durch die Modus-Taste angesteuerten Untermenü mittels der Minusoder Plus-Taste “4) Lock/Unlock” auswählen. Nach einem weiteren Drücken der Modus-Taste können Sie
hier mit den “Plus”- und “Minus-Tasten” zwischen “locked” (gesperrt) und “unlocked” (ungesperrt) wählen.
Auf dem Display erscheint die Anzeige eines Schlosses (
wird der eingestellte Widerstand nicht zurückgesetzt.
BEDIENUNG & WECHSEL DER BETRIEBSMODI
). Durch den Austausch des Verdampferkopfes
22
Page 25

BEDIENUNG & WECHSEL DER BETRIEBSMODI
Einstellen des CCT-Modus (Customized Curve of Temperature)
Betätigen Sie im jeweiligen VT-Modus dreimal hintereinander die Modus-Taste, um in das Untermenü zu
gelangen. Nach weiterem Drücken der Modus-Taste können Sie mittels der “Plus”- und “Minus”-Tasten
“3) CCT” ansteuern und mit der Modus-Taste auswählen. Betätigen Sie die Plus- oder Minus-Taste, um die
Temperatur einzustellen. Betätigen Sie die Feuer-Taste, um den nächsten Temperaturwert einzustellen.
Wenn alle Modikationen fertig sind, betätigen Sie die Modus-Taste zum Speichern und Beenden.
Einstellen des Bypass-Modus
Die Ausgangsspannung wird im Bypass-Modus eingestellt und reguliert. Je höher der Ladezustand des
Akkus ist, desto höher fällt die Ausgangsspannung aus. In diesem Modus kann das Gerät Wicklungen
mit einem Widerstand im Bereich von 0,05 Ohm bis 5 Ohm versorgen. Sie stellen den Bypass Modus ein,
indem Sie die Modus-Taste dreimal hintereinander betätigen und dann mit der Plus- oder Minus-Taste den
Bypass Modus im Hauptmenü auswählen. Mit einem weiteren Druck auf die Modus-Taste bestätigen Sie
die Auswahl des Modus.
VAPANION
SWITCHER
23
Page 26

VAPANION
SWITCHER
Systemeinstellungen | Einstellungen zurücksetzen
Indem Sie nach dreimaligem Betätigen der Modustaste mit den Plus- und Minus-Tasten zu “System Set” navigieren, gelangen Sie in die Systemeinstellungen. Alle Einstellungen lassen sich durch die Plus- und Minus-Tasten
ansteuern und werden durch Drücken der Modus-Taste bestätigt und gespeichert.
Auf diese Weise können Sie unter “1) Time Set” Uhrzeit und Datum einstellen, unter “2) Brightness” die Helligkeit
des Displays, unter “3) Puff Counter” die Anzahl der Züge zählen lassen, unter “4) Smart On/Off” den VW-Smart
Modus wie oben beschrieben an- und ausschalten, unter “5) Screen Timeout” das Aufleuchten des Displays wie
oben beschrieben zeitlich steuern und unter “6) Version” die Software Version anzeigen lassen.
Unter “7) Default” können Sie alle individuellen Einstellungen zurücksetzen, indem Sie mittels der Plus- oder
Minus-Taste “Yes” auswählen und mit der Modus-Taste bestätigen.
BEDIENUNG & WECHSEL DER BETRIEBSMODI
24
Page 27

SCHUTZFUNKTIONEN
SCHUTZFUNKTIONEN
USB Input Schutz
Ausbalanciertes Ladesystem
Niederspannungsschutz
Kurzschlussschutz
Schutz vor zu geringem Widerstand
Schutz vor Überlastung bei zu hohem Widerstand
Überhitzungsschutz
Überstromschutz
Überlastungsschutz
Überladungsschutz
VAPANION
SWITCHER
25
Page 28

VAPANION
SWITCHER
Garantiebedingungen
Alle Produkte von InnoCigs unterliegen einer strengen Qualitätskontrolle. Sie erhalten zusätzlich zu der
gesetzlichen Gewährleistungspflicht eine 6-monatige Garantie auf alle InnoCigs-Produkte. Die Garantiezeit von 6
Monaten gilt ab Kaufdatum beim Fachhändler. Das Datum auf Ihrem Kaufbeleg ist ausschlaggebend. Während
der Garantiezeit werden Geräte, die Defekte aufweisen, von der Firma InnoCigs repariert oder ersetzt.
Verschleißteile wie Mundstücke und Verdampferköpfe sind von der Garantie ausgenommen.
Ersetzte Geräte oder Einzelteile gehen in das Eigentum von InnoCigs über. Die Garantieleistungen bewirken weder
eine Verlängerung der Garantiezeit, noch setzen sie eine neue Garantie in Gang.
GARANTIELEISTUNGEN & REPARATUREN
26
Page 29

GARANTIELEISTUNGEN & REPARATUREN
Garantieansprüche sind ausgeschlossen bei Schäden durch:
• missbräuchliche oder unsachgemäße Behandlung
• Umwelteinflüsse (z. B. Feuchtigkeit, Hitze, Staub etc.)
• Nichtbeachtung der für das Gerät geltenden Sicherheitshinweise
• Nichtbeachtung der Bedienungsanleitung
• Gewaltanwendung (z. B. Schlag, Stoß, Fall)
• Eingriffe, die nicht durch die von InnoCigs autorisierten Serviceadressen vorgenommen wurden
• eigenmächtige Reparaturversuche
• Einsendung in nicht transportsicherer Verpackung
InnoCigs behält sich bei allen Garantiefällen das Recht einer genauen Prüfung bis zur endgültigen Entscheidung vor. InnoCigs behält sich das Recht vor, die Gewährleistungsbedingungen zu überarbeiten.
VAPANION
SWITCHER
27
Page 30

VAPANION
SWITCHER
GARANTIE & SERVICE
Garantie, Gewährleistung & Service
Sollte das Produkt nicht funktionieren oder in irgendeiner Weise defekt sein, so wenden Sie sich zunächst
bitte direkt an den Fachhändler, von dem Sie das Produkt erworben haben.
Sollte die Geltendmachung einer Garantie erforderlich sein, gehen Sie bitte wie folgt vor: Bitte setzen Sie
sich mit dem InnoCigs Kundenservice per E-Mail, Fax oder Telefon in Verbindung. Alternativ können Sie den
Austausch-Service auf unserer Webseite www.innocigs.com nutzen.
Bei Fragen rund um die Bedienung und Verwendung wenden Sie sich gerne an unseren Kundenservice.
28
Page 31

KONTAKT
Kontakt zu InnoCigs
InnoCigs GmbH & Co. KG
Stahltwiete 23
22761 Hamburg | GERMANY
Telefon: +49 (0) 40 – 22 86 729 0
Fax: +49 (0) 40 – 22 86 729 99
E-Mail: [email protected]
VAPANION
SWITCHER
29
Page 32

VAPANION
SWITCHER
Informations préalables
Nous vous remercions d‘avoir choisi Vapanion, une marque d‘InnoCigs ! Pour toute notre gamme,
nous accordons une grande importante aux normes de qualité et de sécurité. Nous vous souhaitons
beaucoup de plaisir en vapotant avec votre nouvelle cigarette électronique !
Veuillez lire attentivement le mode d'emploi avant usage an de garantir une utilisation correcte de le
produit e-cigarette.
En combinaison avec ce produit, utilisez exclusivement des produits originaux et recommandés.
Le fabricant ne garantit aucun service après-vente ni aucune garantie en cas d‘utilisation de produits
non recommandés.
Si vous avez des questions concernant votre produit ou si vous avez besoin d’autres informations,
merci de contacter votre revendeur spécialisé ou de vous rendre sur notre site Internet
www.innocigs.com.
VAPEUR AVEC JUSQU'À 220 WATTS ET 315 °C
30
Page 33

TABLE DES MATIÈRES
Indications et mesures de précaution . . . . . . . . . . . . . . . . . . . . . . . . . . . . . . . . . . . . . . . . . . . . . . . . . . . . . . . . . . . 32
Contenu de la livraison . . . . . . . . . . . . . . . . . . . . . . . . . . . . . . . . . . . . . . . . . . . . . . . . . . . . . . . . . . . . . . . . . . . . . . . . 37
Structure de l‘appareil . . . . . . . . . . . . . . . . . . . . . . . . . . . . . . . . . . . . . . . . . . . . . . . . . . . . . . . . . . . . . . . . . . . . . . . . 38
Utilisation de l‘appareil . . . . . . . . . . . . . . . . . . . . . . . . . . . . . . . . . . . . . . . . . . . . . . . . . . . . . . . . . . . . . . . . . . . . . . . . 39
Données clés et caractéristiques de performance . . . . . . . . . . . . . . . . . . . . . . . . . . . . . . . . . . . . . . . . . . . . . . . . . 44
Réglage de la puissance et de la température . . . . . . . . . . . . . . . . . . . . . . . . . . . . . . . . . . . . . . . . . . . . . . . . . . . . 45
Utilisation et changement de mode de fonctionnement . . . . . . . . . . . . . . . . . . . . . . . . . . . . . . . . . . . . . . . . . . . . 46
Fonctions de Protection . . . . . . . . . . . . . . . . . . . . . . . . . . . . . . . . . . . . . . . . . . . . . . . . . . . . . . . . . . . . . . . . . . . . . . . 54
Services de garantie et réparations . . . . . . . . . . . . . . . . . . . . . . . . . . . . . . . . . . . . . . . . . . . . . . . . . . . . . . . . . . . . . 55
Garantie et service après-vente . . . . . . . . . . . . . . . . . . . . . . . . . . . . . . . . . . . . . . . . . . . . . . . . . . . . . . . . . . . . . . . . 57
Contact . . . . . . . . . . . . . . . . . . . . . . . . . . . . . . . . . . . . . . . . . . . . . . . . . . . . . . . . . . . . . . . . . . . . . . . . . . . . . . . . . . . . . 58
VAPANION
SWITCHER
31
Page 34

VAPANION
SWITCHER
Les personnes âgées de moins de 18 ans, les femmes enceintes, les mères allaitantes et les personnes souffrant de maladies
cardiovasculaires ne doivent pas utiliser ce produit. Déconseillé aux non-fumeurs. Tenir cet accessoire pour cigarette
électronique hors de portée des enfants et des adolescents.
INDICATIONS ET MESURES DE PRÉCAUTION
Ce produit ne doit pas être
utilisé par des personnes
mineures.
Ce produit doit être conservé hors de
portée des enfants et des adolescents.
Ce produit ne doit pas être utilisé
par des femmes enceintes ou des
mères allaitantes.
Ce produit répond aux dispositions applicables au sein de
l‘Union Européenne concernant les appareils techniques, et il
peut être vendu dans les pays de l‘Union Européenne.
Ce produit se compose en partie de matériaux recyclables.
Les vieux appareils électriques ou accus usagés ne doivent pas
être jetés aux ordures ménagères. Veuillez jeter les accus et
appareils usés auprès d‘un point de collecte - conformément aux
prescriptions légales - ou déposez-les gratuitement sur place dans
le commerce, an que les matières premières et de potentielles
substances nocives puissent être traitées de façon ciblée.
32
32
Page 35

INDICATIONS ET MESURES DE PRÉCAUTION
Recommandations d‘utilisation
1. Si vous avez fait tomber votre appareil, veuillez vérier qu'aucun composant ne se soit desserré, qu'aucun liquide ne
s'écoule et que votre embout ne présente aucun défaut. Dans la mesure où, après un contrôle visuel, le produit ne présente aucun dommage, vous pouvez continuer de l'utiliser. Veuillez tout d'abord essuyer l'embout pour des raisons d'hygiène.
2. L'appareil ne doit pas être utilisé s'il présente des fentes ou des déformations du matériel ou si une pièce défectueuse
doit être remplacée. En cas de dysfonctionnement, n'essayez en aucun cas de réparer l'appareil vous-même.
3. L'appareil ne doit pas être utilisé si le liquide du réservoir du clearomiseur est totalement ou presque totalement
consommé. Il en va de même si vous percevez une modication du goût. Veuillez remplir le réservoir du clearomiseur
avec du liquide frais et remplacez la tête de votre atomiseur par une nouvelle avant de continuer à utiliser votre cigarette
électronique. Dans la mesure où les têtes sont des pièces consommables, elles doivent régulièrement être changées.
4. Ne rangez jamais l'appareil dans une pièce à une température élevée ou présentant une humidité de l'air particulièrement
forte. Évitez de l'exposer aux rayons du soleil de manière prolongée.
5. La température adaptée va de 5 ºC à 45 ºC pour la recharge des batteries, et de - 10 ºC à 60 ºC pour l'utilisation.
6. Si du liquide entre en contact avec votre peau, essuyez-le au plus vite, puis nettoyez rigoureusement à l'eau claire.
7. Si vous avalez du liquide par mégarde, veuillez contacter un centre antipoison. Vous pouvez joindre à toute heure du
VAPANION
SWITCHER
33
Page 36

VAPANION
SWITCHER
jour et de la nuit le service d'urgence antipoison de l'hôpital universitaire de la Charité de Berlin au +49 30 - 19 240.
En Autriche, le service d'urgence 24h/24 de la centrale viennoise d'information antipoison est disponible au +43
1 - 406 43 43. En France, veuillez contacter l'un des centres locaux antipoison. En cas d'urgence, merci d'en aviser
immédiatement le service d'urgence.
8. Inhaler des produits contenant de la nicotine peut augmenter la fréquence cardiaque et/ou la pression sanguine.
La nicotine peut entraîner des nausées, des vertiges et/ou des maux d'estomac. Si vous constatez des effets
indésirables sur vous-même ou sur des personnes de votre entourage, veuillez ne plus utiliser ce produit et
consulter un médecin.
9. Respectez les législations locales relatives à l'utilisation de cigarettes électroniques.
10. Le produit doit rester hors de portée des enfants et des adolescents.
Avertissement
Cet appareil peut être utilisée avec du liquide nicotiné. La nicotine est une substance créant une très forte
dépendance.
INDICATIONS ET MESURES DE PRÉCAUTION
34
Page 37

INDICATIONS ET MESURES DE PRÉCAUTION
Informations générales sur vape et techniques de tirage
Le vapotage distingue deux techniques de tirage différentes :
Vape modérée par tirage indirect (de la bouche vers les poumons)
La vapeur d‘une cigarette électronique, durant la totalité de la durée de tirage, passe d‘abord par la bouche
pour être ensuite inhalée par les poumons. Cette technique de tirage est désignée comme vape modérée de
la bouche vers les poumons et est similaire à celle d‘une vraie cigarette. Elle implique un tirage « serré » sur
la cigarette électronique. Les têtes d’atomiseur qui permettent cette technique de tirage modérée (résistance i.d.R. > 1 Ohm) sont souvent désignées comme des têtes d‘atomiseur MTL, abréviation de l‘expression
anglaise « Mouth to lung » (autres abréviations possibles : ML, M2L).
VAPANION
SWITCHER
35
Page 38

VAPANION
SWITCHER
Vape à basse résistance en sub-ohm (inhalation directe vers les poumons)
La vapeur d‘une cigarette électronique, durant la totalité de la durée de tirage, passe
directement vers les poumons. Cette technique de tirage est désignée comme vape à basse
résistance en sub-ohm avec inhalation directe vers les poumons. Elle implique un tirage plus réduit et un
débit d‘air (airflow) plus élevé vers la tête d’atomiseur. Les deux techniques ont un impact positif sur la
production de grandes quantités de vapeur. Les têtes
d’atomiseur qui permettent cette technique de tirage (résistance i.d.R. < 1 Ohm) sont
souvent désignées comme des têtes d‘atomiseur DL, abréviation de l‘expression anglaise
« Direct lung ». (autres abréviations possibles : DTL, D2L)
INDICATIONS ET MESURES DE PRÉCAUTION
36
Page 39

CONTENU DE LA LIVRAISON
Contenu Vapanion Switcher
1x Box Switcher (sans accus 18650)
1x Câble de chargement micro-USB
1x Manuel d'utilisation
VAPANION
SWITCHER
37
Page 40
VAPANION
SWITCHER
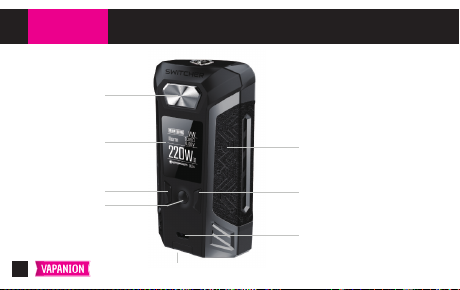
Bouton re
STRUCTURE DE L'APPAREIL
38
Écran OLED
Bouton Moins
Bouton de Mode
Étui remplaçable
Bouton Plus
Port micro USB
Couvercle de la batterie
Page 41

UTILISATION DE L'APPAREIL
Instructions de mise en marche
Chargez complètement les deux accus 18650 échangeables requis avant de procéder à la mise en
service initiale. Veuillez tenir compte du marquage des pôles Plus et Moins dans le logement à accus.
Veillez absolument à ce que la surface des accus ne présente aucune trace de détérioration. L'appareil
est doté d'un raccord 510 à connecteur à ressort lui permettant de s'adapter à un grand nombre de
clearomiseurs sub-ohm
Consignes de nettoyage
Pour nettoyer l'appareil, utilisez un chiffon sec ou un bâtonnet pour les oreilles.
Marche/Arrêt
Appuyez 5 fois rapidement pendant 2 secondes sur le bouton re pour allumer l'appareil. De la même
façon, appuyez 5 fois rapidement sur ce même bouton pour éteindre l'appareil. Nous vous conseillons
d'éteindre l'appareil quand vous le transportez ou cessez de l'utiliser pendant une longue période.
Vapotage
Pendant que vous maintenez enfoncée la touche d'allumage de votre batterie, inhalez la vapeur lentement et en continu via l'embout de votre clearomiseur.
VAPANION
SWITCHER
39
Page 42

VAPANION
SWITCHER
Afchage
L'allumage de l'appareil est suivi par l'afchage sur l'écran OLED de la tension, de la résistance, de l'état de
charge de la batterie, de la température et de la puissance de sortie. Si l'appareil n'est pas utilisé pendant 10
secondes, la Real Time Clock (horloge en temps réel) afche l'heure. Si l'appareil n'est toujours pas utilisé au
bout de 15 minutes, l'afchage de l'heure s'éteint aussi. Vous pouvez activer à nouveau l'afchage de l'heure en
appuyant une fois la touche Mode ou en appuyant la touche Moins-Plus. Appuyez une fois encore une de ces
touches et le menu principal s’afche. Appuyez la touche d’allumage pour réactiver l’afchage et pour retourner
directement à l’afchage principale.
Dans le menu Mode, vous avez la possibilité de modier vos réglages de l’afchage en appuyant trois fois la
touche Mode dans « System Set ». Vous pouvez utilisez les touches Plus et Moins pour dénir les différents
réglages de l’heure de 3 secondes à 60 minutes. Vous conrmez et sauvegardez ces réglages en appuyant sur
la touche Mode.
Fonction exclusive sur Switcher LE
Quand vous choisissez le sous-menu « Light » dans « System Set » à l’aide des touches Plus et Moins, vous
pouvez régler la luminosité du LED du boitier.
UTILISATION DE L'APPAREIL
40
Page 43

UTILISATION DE L'APPAREIL
Reconnaissance automatique de la résistance
Dès que l'appareil détecte la présence d'une tête d’atomiseur, la résistance de la bobine est automatiquement
reconnue. Lorsque l'on utilise un l résistif Kanthal, l'appareil passe automatiquement du mode VT au mode
Watt.
Verrouillage / déverrouillage des touches Plus/Moins
Veuillez appuyer la touche d'allumage trois fois pour bloquer et débloquer les touches Plus et Moins. Vous
saurez que les touches Plus et Moins sont bloquées par l’afchage : en appuyant les touches et grâce au
cadenas qui apparait dans le menu principal.
VAPANION
SWITCHER
41
Page 44

VAPANION
SWITCHER
Charger et mettre à jour l'appareil
Veuillez noter que vous utilisez des accus 18650 résistants aux courants de forte intensité dont le courant
constant de décharge est ≥ 25 A. Utilisez deux accus de même type.
Connectez l'appareil à un ordinateur pouvant se connecter à Internet au moyen d'un câble de recharge
micro-USB an de le recharger ou de mettre à jour le logiciel. Pour recharger la batterie jusqu’à 2,5 A, vous
pouvez raccorder le câble micro-USB à l’aide d’un adaptateur de prise secteur avec prise USB. Pendant
le rechargement, l'état de charge actuel s'afche sur l'écran OLED (0 %, 20 %, 50 %, 80 %, 100 %) et l'écran
de l'appareil reste allumé. Nous vous recommandons de recharger les accus 18650 à l'aide d'un chargeur
externe pour mieux optimiser et accélérer nettement la charge.
UTILISATION DE L'APPAREIL
42
Page 45
UTILISATION DE L'APPAREIL
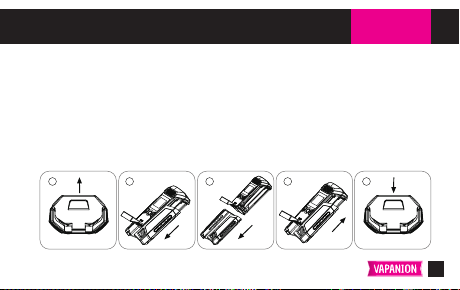
Changement du boîtier
1. Ouvrez l’appareil par le bas, en glissant vers l’avant le couvercle de la batterie comme indiqué dans
l’illustration (Fig. 1).
2. Rabattez le couvercle vers l’extérieur et glissez le boîtier amovible comme indiqué dans l’illustration
jusqu’à ce qu’il ne soit plus connecté au support de batterie (Fig. 2 et 3).
3. Poussez le nouveau boîtier sur le support de batterie (Fig. 4)
4. Fermez le couvercle de la batterie, en le rabattant et en le poussant vers l’arrière, tout en appuyant
sur le support de batterie an de xer fermement le nouveau boîtier (Fig. 5).
1 2 3 4 5
VAPANION
SWITCHER
43
Page 46

VAPANION
SWITCHER
Données box Switcher
Modes de fonctionnement Smart VW (H/N/S) | VT (Ni, Ti, SS316) | TCR (M1, M2) | CCW | CCT |
Bypass
Puissance de sortie 5 à 220 watts
Plage de températures 100 °C à 315 °C | 200 °F à 600 °F
Plage de résistance 0,05 à 5 ohms
Tension de sortie max. 8,5 volts
Tension de rechargement < 6,5 volts (Fonction de charge rapide avec max 2.5A)
Dimensions 89 mm x 53 mm x 31 mm
Type de letage 510
Recharger les accus 18650 à l'aide d'un chargeur externe !
DONNÉES CLÉS ET CARACTÉRISTIQUES DE PERFORMANCE
44
Page 47

RÉGLAGE DE LA PUISSANCE ET DE LA TEMPÉRATURE
Généralités concernant le réglage de la puissance et de la température
La puissance de l'appareil peut aller de 5 à 220 Watt. Une modication de la puissance modie le goût et
la production de vapeur. Plus la puissance est élevée, plus la quantité de vapeur produite est importante.
Il en va de même avec la commande de la température (Temperature Control) : plus la température est
élevée, plus la quantité de vapeur produite est importante. Appuyez sur le bouton de moins ou plus de
droite ou de gauche an d'augmenter ou de diminuer automatiquement la puissance ou la température
en continu.
Passer de ºC à ºF
Si vous appuyez à nouveau sur le bouton "+" lorsque vous appuyez sur 315 °C, vous passerez automatiquement à la valeur Fahrenheit la plus basse (200 °F). De même, vous passez automatiquement à la
valeur Fahrenheit la plus élevée (600 °F) en appuyant de nouveau sur la touche "-" sous la température
minimale en degrés Celsius (100 °C).
VAPANION
SWITCHER
45
Page 48

VAPANION
SWITCHER
Choix du mode de fonctionnement
Appuyez trois fois de suite sur la touche Mode lorsque l'appareil est déverrouillé.
Naviguez dans le menu avec les touches Plus ou Moins pour choisir entre les
modes Smart VW (High/Normal/Soft), CCW, VT (Ni 200, TI, SS), TCR (M1, M2) et
BYPASS. Conrmez votre sélection en appuyant la touche Mode et effectuez vos
réglages.
Réglage du mode Smart VW (Variable Wattage)
En mode VW, l'appareil vous propose une plage de puissance adaptée
à la résistance de la tête d’atomiseur qu'il reconnaît automatiquement.
Vous avez le choix entre N (Normal), S (Soft) et H (High). N est réglé
par défaut. En mode VW, l'appareil est compatible avec des bobines
ayant une résistance de 0,05 à 5 ohms.
UTILISATION ET CHANGEMENT DE MODE DE FONCTIONNEMENT
46
Page 49

UTILISATION ET CHANGEMENT DE MODE DE FONCTIONNEMENT
Le mode automatique Smart VW se désactive par le biais des réglages du système (« System Set »). Vous
choisissez les réglages du système en appuyant trois fois sur la touche Mode à l’aide des touches Plus et
Moins. Pour conrmer la sélection, appuyez une fois sur la touche Mode. Vous pouvez ainsi choisir dans le
sous menu « 4) Smart On/Off » de désactiver et d’activer. Les réglages qui ont été automatiquement dénis
antérieurement (H/N/S) sont maintenus lors de la désactivation du mode sans changement manuelle de
la sélection H/N/S.
En mode VW, vous pouvez afcher la durée des 10 dernières bouffées. Les têtes d'atomiseur avec résistance de plus de 1,0 Ohm sont protégées par la fonction « High Power Protection ».
VAPANION
SWITCHER
47
Page 50

VAPANION
SWITCHER
Réglage du mode CCW (Customized Curve of Wattage)
En mode CCW, vous déterminez la courbe de puissance du support de batterie pour le
vapotage régulé en fonction des watts. Ici, vous pouvez régler individuellement la puissance souhaitée pour le préchauffage de l'atomiseur durant les premières secondes.
En mode VW, appuyez trois fois de suite sur la touche Mode pour sélectionner le
mode CCW. Utilisez les touches Plus ou Moins pour régler la puissance en watts.
Appuyez sur le bouton re pour choisir réglage suivant. Quand vous avez terminé
toutes les modications, appuyez sur la touche Mode pour enregistrer et terminer.
UTILISATION ET CHANGEMENT DE MODE DE FONCTIONNEMENT
48
Page 51

UTILISATION ET CHANGEMENT DE MODE DE FONCTIONNEMENT
Réglage des modes VT-Ni/VT-Ti/VT-SS (Temperature Control) et TCR M1, M2
(Temperature Coefcient of Resistance)
1. En mode VT-Ni, VT-Ti, VT-SS et TCR (M1, M2), vous pouvez utiliser l'appareil avec des bobines en nickel
200, en titane ou en acier inoxydable 316. En mode de Température variable, vous pouvez régler la
température exactement comme le préférez. En réglant le TCR, la température est mise en rapport
avec la résistance de la bobine de votre tête d'atomiseur. L'appareil est en mesure de fonctionner avec
différentes bobines dans des plages de valeurs TCR variées. Vous arrivez dans le menu de réglage du
TCR en sélectionnant le sous-menu « TCR Set » en mode VT-Ni-, VT-Ti-, VT-SS- ou TCR (M1, M2), et en
appuyant sur la touche Mode.
Vous pouvez adapter la valeur de puissance de sortie via le sous-menu
« Power Set » pour les modes de la température ; la valeur par défaut est 75 watt.
VAPANION
SWITCHER
POWER SET
200W
OK
[MODE]
OK
49
Page 52

VAPANION
SWITCHER
a. Utilisez les touches plus et moins pour régler la valeur TCR en fonction du matériau de la bobine de la
tête d'atomiseur que vous employez.
b. Plage de valeurs TCR pour différents matériaux :
Matériaux Nickel
Plage de valeur
Remarques :
La valeur TCR dans le tableau correspond à la valeur TCR réelle multipliée par 105.
La plage de valeurs TCR pour cet appareil va de 1 à 1000.
UTILISATION ET CHANGEMENT DE MODE DE FONCTIONNEMENT
NiFe Titan SS (303, 304, 316, 317)
600–700 300–400 300–400 80–200
50
Page 53

UTILISATION ET CHANGEMENT DE MODE DE FONCTIONNEMENT
2. Réglage de la température : Dans les modes VT-Ni/VT-Ti/VT-SS/TCR, la température peut être réglée
en utilisant les touches plus et moins. Vous avez le choix entre les plages 100 à 315 °C et 200 à 600
°F. Une pression sur la touche plus ou sur la touche moins augmente ou respectivement abaisse la
température de 5 °C / 10 °F. En maintenant l'une de ces touches appuyée, on modie la température
plus rapidement.
3. Reconnaissance automatique des nouvelles têtes d'atomiseur : Pour assurer un fonctionnement
précis du contrôle de température lors de l'utilisation d'une nouvelle tête d'atomiseur, « OLD LOAD :
-, NEW LOAD : + » s'afche sur l'écran. Si la tête d'atomiseur devait différer de celle précédemment
utilisée, pressez la touche Plus et la résistance sera relue. Pressez la touche moins pour conrmer
la valeur de résistance déjà enregistrée.
4. Verrouillage/Déverrouillage de la résistance : Dans les modes VT-Ni, VT-Ti, VT-SS et TCR, vous
verrouillez et déverrouillez la résistance en sélectionnant "4.) Verrouiller / Déverrouiller" dans le
sous-menu contrôlé par la touche de mode à l'aide de la touche moins ou plus. Après avoir appuyé
à nouveau sur le bouton de mode, vous pouvez utiliser les boutons plus et moins pour choisir entre
« locked » (verrouillé) et « unlocked » (déverrouillé). Un cadenas s'afche sur l'écran (
de résistance n'est pas annulé par un changement de la tête d'atomiseur.
VAPANION
SWITCHER
). Le réglage
51
Page 54

VAPANION
SWITCHER
Réglages du mode CCT (Customized Curve of Temperature)
En mode VT, appuyez trois fois de suite sur la touche Mode pour arriver au sous-menu. Si vous
continuez à appuyer la touche Mode, vous pouvez régler « 3) CCT » à l’aide des touches Plus et Moins
et faire votre sélection à l’aide de la touche Mode. Utilisez les touches Plus et Moins pour régler la
température. Appuyez sur le bouton re pour choisir réglage suivant. Quand vous avez terminé toutes
les modications, appuyez sur la touche Mode pour enregistrer et terminer.
Réglages du mode Bypass
En mode Bypass, la tension de sortie est réglée et régulée. Plus l'état de charge de la batterie est élevé,
plus haute est la chute de tension de sortie. Dans ce mode, l'appareil fonctionne avec des bobines ayant
une résistance de 0,05 à 5 ohms. Vous réglez le mode Bypass en appuyant trois fois de suite la touche
Mode et ensuite à l’aide des touches Plus et Moins vous sélectionnez le mode Bypass dans le menu
principal. En appuyant une fois encore la touche Mode, vous conrmez la sélection du mode.
UTILISATION ET CHANGEMENT DE MODE DE FONCTIONNEMENT
52
Page 55

UTILISATION ET CHANGEMENT DE MODE DE FONCTIONNEMENT
Réglages du système | Réinitialiser les réglages
En appuyant trois fois de suite la touche Mode à l’aide des touches Plus et Moins, vous naviguez vers «
System Set » et vous arrivez aux réglages du système. Vous pouvez dénir tous les réglages à l’aide des
touches Plus et Moins ; vous pouvez les conrmer et les sauvegarder en appuyant la touche Mode.
Ainsi vous pouvez effectuer les réglages suivants : l’heure et la date dans
« 1) Time Set » ; la luminosité de l’afchage dans « 2) Brightness » ; le nombre de bouffées dans « 3) Puff
Counter » ; marche et arrêt du mode VW-Smart dans « 4) Smart On/Off » comme décrit ci-dessus ; illu-
miner l’afchage par intervalle dans « 5) Screen Timeout » comme décrit ci-dessus ; et afcher la version
du logiciel dans « 6) Version ». Via « 7) Default », vous pouvez réinitialiser les réglages individuels, en
choisissant « Yes » à l'aide de la touche Plus ou Moins et en conrmant avec la touche Mode.
VAPANION
SWITCHER
53
Page 56

VAPANION
SWITCHER
Fonctions de Protection
Protection entrée USB
Système de charge équilibré
Protection basse tension
Protection court-circuit
Protection contre une résistance trop basse
Protection contre la surcharge en cas de résistance
Protection anti-surchauffe
Protection surtension
Protection surcharge
Protection surcharges électriques
FONCTIONS DE PROTECTION
54
Page 57

SERVICES DE GARANTIE ET RÉPARATIONS
VAPANION
SWITCHER
Conditions de garantie
Tous les produits d‘InnoCigs sont soumis à un strict contrôle de qualité. Outre la garantie légale obligatoire,
vous bénéciez de 6 mois de garantie commerciale sur tous les produits InnoCigs. La période de garantie
de 6 mois est valable à compter de la date d‘achat chez le revendeur spécialisé. La date indiquée sur le
ticket de caisse est déterminante. Pendant la période de garantie, les appareils présentant des défauts sont
réparés ou échangés par InnoCigs.
Les consommables tels que les embouts et les têtes d‘atomiseur sont exclus de la garantie.
Les appareils ou pièces échangés deviennent la propriété d‘InnoCigs. La prestation de services de garantie
n‘entraîne ni une prolongation de la période de garantie, ni le début d‘une nouvelle garantie.
55
Page 58

VAPANION
SWITCHER
Toute réclamation au titre de la garantie est exclue en cas de dommage dû à l‘une des
causes suivantes :
• Utilisation abusive ou non conforme
• Influences extérieures (p. ex. humidité, chaleur, poussière, etc.)
• Non-respect des consignes de sécurité applicables à l‘appareil
• Non-respect du mode d‘emploi
• Usage de la force (p. ex. coup, choc, chute)
• Interventions n‘ayant pas été effectuées par des professionnels du service après-vente agréés par
InnoCigs
• Tentatives de réparation de votre propre initiative
• Expédition dans un emballage ne garantissant pas la sécurité pendant le transport
Dans tous les cas de garantie, InnoCigs se réserve le droit de procéder à un examen précis avant de
prendre la décision nale. InnoCigs se réserve le droit de réviser les conditions de garantie.
SERVICES DE GARANTIE ET RÉPARATIONS
56
Page 59

GARANTIE ET SERVICE APRÈS-VENTE
Garantie légale, garantie commerciale et service après-vente
Si le produit ne fonctionne pas ou présente un défaut de quelque nature qui soit, veuillez tout d‘abord
contacter le revendeur spécialisé auprès duquel vous avez acheté votre appareil.
S‘il est nécessaire de faire valoir une garantie, veuillez procéder comme suit : contactez le service client
d‘InnoCigs par e-mail, par fax ou par téléphone. Vous pouvez sinon également recourir au service d‘échange
sur notre site internet www.innocigs.com.
Si vous avez des questions concernant le fonctionnement et l‘utilisation, merci de contacter notre service
client.
VAPANION
SWITCHER
57
Page 60

VAPANION
SWITCHER
CONTACT
Contact d’InnoCigs
InnoCigs GmbH & Co. KG
Stahltwiete 23
22761 Hambourg - ALLEMAGNE
Téléphone : +49 (0)40 22 86 729 0
Fax: +49 (0) 40 – 22 86 729 99
E-Mail : [email protected]
58
Page 61

VAPING WITH UP TO 220 WATTS AND 315 °C
VAPANION
SWITCHER
Information for the User
Thank you for choosing Vapanion – a brand of InnoCigs! We place great value on high quality and safety
standards across our entire range. We hope you enjoy vaping with your new e-cigarette product!
Read the usage instructions carefully before use in order to ensure correct use of the device. Use only original and/or recommended products in combination with this product. The manufacturer shall not provide
any service and/or warranty when non-recommended products are used together with this product.
Should you have questions or need more information about your device, please contact your dealer or
visit our website at www.innocigs.com.
59
Page 62

VAPANION
SWITCHER
Notes & Precautions . . . . . . . . . . . . . . . . . . . . . . . . . . . . . . . . . . . . . . . . . . . . . . . . . . . . . . . . . . . . . . . . . . . . . . . . . . 61
Contents . . . . . . . . . . . . . . . . . . . . . . . . . . . . . . . . . . . . . . . . . . . . . . . . . . . . . . . . . . . . . . . . . . . . . . . . . . . . . . . . . . . . 66
Design of the Device . . . . . . . . . . . . . . . . . . . . . . . . . . . . . . . . . . . . . . . . . . . . . . . . . . . . . . . . . . . . . . . . . . . . . . . . . . 67
Using the Device . . . . . . . . . . . . . . . . . . . . . . . . . . . . . . . . . . . . . . . . . . . . . . . . . . . . . . . . . . . . . . . . . . . . . . . . . . . . . 68
Main Features & Performance . . . . . . . . . . . . . . . . . . . . . . . . . . . . . . . . . . . . . . . . . . . . . . . . . . . . . . . . . . . . . . . . . 73
Regulating the Power Output & the Temperature . . . . . . . . . . . . . . . . . . . . . . . . . . . . . . . . . . . . . . . . . . . . . . . . . 74
Operating & Changing the Vaping Modes . . . . . . . . . . . . . . . . . . . . . . . . . . . . . . . . . . . . . . . . . . . . . . . . . . . . . . . . 75
Protective Functions . . . . . . . . . . . . . . . . . . . . . . . . . . . . . . . . . . . . . . . . . . . . . . . . . . . . . . . . . . . . . . . . . . . . . . . . . 83
Warranty & Repair . . . . . . . . . . . . . . . . . . . . . . . . . . . . . . . . . . . . . . . . . . . . . . . . . . . . . . . . . . . . . . . . . . . . . . . . . . . . 84
Warranty & Service . . . . . . . . . . . . . . . . . . . . . . . . . . . . . . . . . . . . . . . . . . . . . . . . . . . . . . . . . . . . . . . . . . . . . . . . . . . 86
Contact . . . . . . . . . . . . . . . . . . . . . . . . . . . . . . . . . . . . . . . . . . . . . . . . . . . . . . . . . . . . . . . . . . . . . . . . . . . . . . . . . . . . . 87
TABLE OF CONTENTS
60
Page 63

NOTES & PRECAUTIONS
Persons under 18 years, pregnant women, nursing mothers and people with cardiovascular disease should not use this
product. Not recommended for non-smokers. Please keep out of reach of children and minors.
This product must not
be used by minors.
This product must be kept
away from children.
This Product must not be used
by pregnant or nursing women.
This product complies with EU requirements on
technical goods and may be sold throughout the
European Union.
This product is in parts made of reusable
materials that can be recycled.
Electronic goods and batteries should not be disposed
with normal household waste! Please dispose of used
electronic goods and batteries – as required by law –
at a municipal collection location, so that raw materials
and potentially harmful substances can be properly
removed and recycled.
VAPANION
SWITCHER
61
61
Page 64

VAPANION
SWITCHER
NOTES & PRECAUTIONS
User Instructions
1. If the device is dropped, you should check that there are no loose components, that there is no leakage of
e-liquid, and that your mouthpiece is not damaged. If there are no signs of damage upon visual inspection
of the product, you can continue using the device. For hygienic reasons, please wipe your mouthpiece with
a cloth before reusing.
2. The device should not be used if parts are cracked or deformed and the defective items should be
replaced. Never attempt to repair the device on your own if a defect occurs.
3. The device should not be used when the e-liquid in your clearomizer’s tank is empty or almost empty, as
well as in the event that you notice a change in taste. Please replace your atomizer coil with a new one
before you continue to use your e-cigarette. Because atomizer heads are wearing parts, they must be
changed regularly.
4. Never store the device in rooms with extremely high temperatures or in rooms with extremely high
humidity. Avoid long periods of direct sunlight.
5. The recommended temperature range for charging the device is 0°C to 45°C and -10°C to 60°C for the use.
62
Page 65

NOTES & PRECAUTIONS
6. If e-liquid comes in contact with your skin, wipe it off as soon as possible and wash the area of contact.
7. If e-liquid is swallowed, contact your local poison control center. The Poison Emergency Call of the Charité
University Hospital Berlin can be reached day and night by phone at +49 (0)30 - 19 240. In Austria, you can
reach the 24h hotline of the Vienna Poison Information Center by phone at +43 (0)1 - 406 43 43. In cases
of emergency, immediately contact local emergency ofcials.
8. Nicotine can increase the heart rate and / or blood pressure and cause nausea, dizziness, and / or abdominal pain. If you notice any undesirable effects, discontinue use and consult a physician.
9. Please comply with all local laws when using this e-cigarette product.
10. Keep product out of reach of children and minors.
Warning
This e-cigarette product can be used with nicotine-containing e-liquid. Nicotine is a highly addictive
substance.
VAPANION
SWITCHER
63
Page 66

VAPANION
SWITCHER
General Information about Pufng Techniques while Vaping
When vaping, a distinction is made between two pufng techniques:
Moderate Vaping (Mouth-to-Lung)
The vapor from an e-cigarette is rst collected in the oral cavity for the entire duration of the puff and then
inhaled into the lungs. This pufng technique is referred to as moderate, mouth-to-lung vaping and is similar
to smoking. To achieve this, there must be a noticeable resistance when pufng on the e-cigarette. Evaporator heads that support this pufng technique in the moderate range (resistance usually > 1 ohm) are often
referred to as MTL (mouth to lung) heads. (Other abbreviations include ML and M2L.)
64
NOTES & PRECAUTIONS
Page 67

NOTES & PRECAUTIONS
Sub-Ohm Vaping (Direct Lung Inhalation)
While pufng, the vapor of an e-cigarette is directly inhaled into the lungs. This pufng technique is referred
to as sub-ohm vaping with direct lung inhalation. To achieve this, there must be low pufng resistance and a
strong air supply to the evaporator head. Both have a positive effect on producing large quantities of vapor.
Evaporator heads that support this pufng technique in the sub-ohm range (resistance usually < 1 ohm) are
often referred to as DL (direct lung) heads. (other abbreviations include DTL and D2L)
VAPANION
SWITCHER
65
Page 68

VAPANION
SWITCHER
Contents Vapanion Switcher
1x Switcher Box Mod (without 18650 Batteries)
1x Micro USB Charger
1x User Manual
66
CONTENTS
Page 69
DESIGN OF THE DEVICE
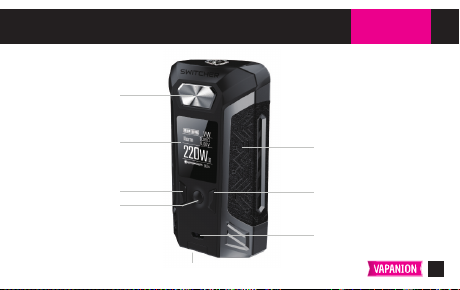
Fire Button
VAPANION
SWITCHER
OLED Display
Minus Button
Modus Button
Battery Cover
Replaceable Cover
Plus Button
Micro USB Port
67
Page 70

VAPANION
SWITCHER
Notes for Commissioning
Fully charge the required replaceable 18650 batteries before rst use. We recommend using high-drain cells with
a discharge current of ≥ 25A. Please note the positive and negative poles in the battery compartment. Ensure
that there is no visible damage to the surface of the battery cells.
The device has a 510-pin connection, making it suitable for a variety of sub-ohm-capable clearomizers.
Note for Cleaning
Use a dry cloth or cotton swab to clean the device.
Power On/Off
Press the Fire button rapidly ve times within two seconds to switch on the device. Turn the device off in the
same fashion, by pressing the Fire button quickly ve times. We recommend that you turn the device off during
transport and when the device will not be used for long periods of time.
Vaping
While holding the re button of your e-cigarette, inhale the vapor slowly and continuously through the
mouthpiece of your clearomizer. Release the re button while exhaling the vapor.
USING THE DEVICE
68
Page 71

USING THE DEVICE
Display
After switching on the device, the voltage, resistance value, battery level, temperature and power output
are displayed on the OLED display. If the device is not used for 10 seconds, the Real Time Clock will
display the time. If the device is not used for an additional 15 minutes, the time display will also go out.
You can reactivate the time display by pressing the Mode button once or by using the Minus or Plus
button. If you press any of these buttons one more time, the main menu will be displayed again. Press
the re button to reactivate the display and return to the main display straight away.
Under “System Set” in the mode menu, you can change your settings for the display by pressing the
Mode button three times. The individual time settings from 3 seconds to 60 minutes are controlled and
regulated using the Plus and Minus buttons. These settings are conrmed and saved by pressing the
Mode button.
Exclusive Feature on the Switcher LE
If you select the ‘Light’ submenu using the Plus and Minus buttons under “System Set”, you
have the option to modify the LED light on the casing.
VAPANION
SWITCHER
69
Page 72

VAPANION
SWITCHER
Automatic Resistance Detection
When the device detects a head connected to it, the coil’s resistance will be determined automatically.
When Kanthal wire is used, the device automatically switches from VT to watt mode.
Locking/Unlocking the Plus/Minus Buttons
Press the Fire button three times to lock and unlock the Plus and Minus buttons. You will know whether
the Plus and Minus buttons are locked by pressing the buttons on the display and by the locked lock
symbol in the main menu.
70
USING THE DEVICE
Page 73

USING THE DEVICE
Charging and Updating the Device
Please note that you are using high-current 18650 cells with a constant discharge current ≥ 25 A.
Please use two identical batteries. Carefully connect the device to a computer with internet access
using the micro USB cable to charge or to update software. The micro USB cable can also be
connected to a mains plug adapter with USB cable for charging with up to 2.5 A. During charging, the
current charging status (0%, 20%, 50%, 80%, 100%) appears on the OLED display; the display remains
illuminated. We recommend that you charge the 18650 batteries with an external charger because this
optimizes and accelerates the charging process.
VAPANION
SWITCHER
71
Page 74
VAPANION
SWITCHER
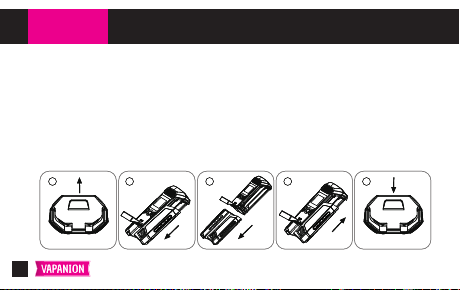
Changing the Casing
1. Open the device on the bottom by sliding the battery cover forward as displayed (Fig. 1).
2. Unfold the cover and slide the exchangeable casing down until it is no longer connected to the
battery carrier, as shown below (Fig. 2 and 3).
3. Slide the new casing onto the battery carrier (Fig. 4).
4. Close the battery cover by folding the cover inwards and sliding backwards, while pressing the
battery carrier, in order to x the new casing in place (Fig. 5).
1 2 3 4 51 2 3 4 5
USING THE DEVICE
72
Page 75

MAIN FEATURES & PERFORMANCE
Key Features of the Switcher Box Mod
Output modes Smart VW (H/N/S) | VT (Ni, Ti, SS316) | TCR (M1, M2) | CCW | CCT |
Bypass
Output power 5 to 220 watts
Temperature range 100°C to 315°C | 200°F to 600°F
Resistance range 0.05 to 5 ohms
Output voltage max 8.5 volts
Charging voltage < 6.5 volts (quick charge function with max 2.5A)
Appropriate batteries high-current 18650 batteries (≥ 25A)
Dimensions 89 mm x 53 mm x 31 mm
Thread type 510
Use an external charger to charge 18650 batteries!
VAPANION
SWITCHER
73
Page 76

VAPANION
SWITCHER
Common Procedures for Regulating the Power Output and the Temperature
The power output can be adjusted between 5 and 220 watts. A change in wattage also changes the
taste and vapor behavior. The higher the set wattage, the more intense the vapor development. The
situation is similar with temperature control: The higher the temperature, the greater the vapor development. Press or press and hold the plus or minus adjustment button to perform a continuous increase or
reduction of the wattage or temperature.
Switch between °C and °F
If you increase the temperature to 315°C and press the “+” button once again, the temperature reading
will automatically change to the lowest Fahrenheit (200°F). Equally, if the temperature is set at the
lowest Fahrenheit (200°F) and you press the “-” button once again, the temperature reading will automatically change to the highest Celsius (315 °C).
REGULATING THE POWER OUTPUT & THE TEMPERATURE
74
Page 77

OPERATING & CHANGING THE VAPING MODES
Selecting the Operation Mode
When the device is unlocked, press the Mode button three times in a row. Use the
Minus or Plus button to navigate through the menu to switch between Smart VW
(High/Normal/Soft), CCW, VT (Ni 200, TI, SS), TCR (M1, M2) and BYPASS modes.
Conrm your selection by pressing the Mode button and apply your settings.
Setting the Smart VW Mode (Variable Wattage)
In Smart VW mode, the device proposes an output range that suits the
resistance of the head, which it automatically detects. You can choose
N (normal), S (soft) and H (high). N is selected by default. In VW mode,
the device is compatible with coils with a resistance of 0.05 to 5 ohms.
VAPANION
SWITCHER
75
Page 78

VAPANION
SWITCHER
The automatic Smart VW Mode can be deactivated using the system settings (“System Set”). System
settings are selected by pressing the Plus and Minus buttons three times after pressing the Mode
button. The selection is conrmed by pressing the Mode button once. Using this method, it is possible
to deactivate and/or activate this mode in the submenu “4) Smart On/Off”. The automatically saved
(H/N/S) settings from before remain in place when this mode is deactivated, unless the H/N/S selection
is changed manually.
The duration of the last ten puffs can be displayed in VW Mode. Atomizer coils with a resistance over
1.0 ohm are protected using the “High Power Protection” feature.
OPERATING & CHANGING THE VAPING MODES
76
Page 79

OPERATING & CHANGING THE VAPING MODES
Setting the CCW Mode (Customized Curve of Wattage)
In CCW mode, you determine the battery mount’s output curve for watt-regulated
vaping. Here you can individually set the desired output for preheating the head in the
rst few seconds.
In VW mode, press the Mode button three times to select CCW. Press the Plus or
Minus button to set the output in watts. Press the Fire button to go to the next setting.
When all modications are nished, press the Mode button to save and exit.
VAPANION
SWITCHER
77
Page 80

VAPANION
SWITCHER
Setting the VT-Ni/VT-Ti/VT-SS (Temperature Control) and TCR (M1, M2) Modes
(Temperature Coefcient of Resistance)
1. In the VT-Ni, VT-Ti, VT-SS and TCR (M1, M2) modes, the device can be used with coils made of Nickel
200, titanium, or 316 stainless steel. In the variable temperature mode, you can set the temperature
value according to your personal preference. By setting the TCR, the temperature value correlates with
the resistance of your atomizer head coil. The device is capable of supporting various temperature
control coils in different TCR ranges. The TCR settings menu is accessed by selecting the “TCR Set”
submenu in VT-Ni, VT-Ti, VT-SS or TCR (M1, M2) mode and conrming with the Mode button.
You can adjust the output wattage value for the temperature mode via the
“Power Set” submenu; the standard setting is 75 watts.
OPERATING & CHANGING THE VAPING MODES
POWER SET
POWER SET
200W
200W
[MODE]
[MODE]
OK
OK
78
OK
OK
Page 81

OPERATING & CHANGING THE VAPING MODES
a. Press the Plus or Minus button to adjust the TCR value that’s relative to the material of your atomizer
head coil.
b. TCR value range for different materials:
Material Nickel
TCR Value Range
Note:
The TCR value in the table corresponds to the actual TCR value multiplied by 105.
The TCR value range for the device is 1 to 1000.
600–700 300–400 300–400 80–200
NiFe Titanium SS (303, 304, 316, 317)
VAPANION
SWITCHER
79
Page 82

VAPANION
SWITCHER
2. Setting the temperature: In the VT-Ni/VT-Ti/VT-SS/TCR modes, the temperature can be adjusted by
pressing the Plus and Minus buttons. You can choose between the ranges 100°C to 315°C and 200°F
to 600°F. When pressing the Plus or Minus button, the temperature is increased or decreased by
5°C or 10°F. Press and hold the respective button to set the desired temperature at a higher speed.
3. Automatic detection of new atomizer heads: To ensure that the temperature control will accurately
work when inserting a new head, “OLD LOAD: -, NEW LOAD: +” appears on the display. If the head
differs from the one that was previously used, select the Plus button and the resistance will be newly
selected. Select the Minus button to leave the preset resistance as is
4. Locking/Unlocking the resistance: In the VT-Ni, VT-Ti, VT-SS, and TCR modes, you can lock or unlock
the resistance by selecting "4) Lock / Unlock" in the sub-menu chosen by the mode key using the
minus or plus key. After pressing the mode button again, you can use the "plus" and "minus" buttons
to choose between "locked" and "unlocked". A lock (
atomizer head does not reset the set resistance.
OPERATING & CHANGING THE VAPING MODES
) will appear on the display. Replacing the
80
Page 83

OPERATING & CHANGING THE VAPING MODES
Setting the CCT Mode (Customized Curve of Temperature)
In the relevant VT mode, press the Mode button three times in a row to return the submenu. After pressing the Mode button again, you can use the “Plus” and “Minus” buttons to trigger “3) CCT” and select
it with the Mode button. Press the Plus or Minus button to set the temperature. Press the Fire button to
set the preheat time. When all modications are nished, press the Mode button to save and exit.
Setting the Bypass Mode
The output voltage is set and regulated in the bypass mode. The higher the charge of the battery, the
more the output voltage decreases. In this mode, the device can supply coils with a resistance in the
range of 0.05 Ohm to 5 Ohm.
Select Bypass mode by pressing the Mode button three times consecutively and then selecting Bypass
mode in the main menu using the Plus or Minus button. Press the Mode button one more time to
conrm that you have selected this mode.
VAPANION
SWITCHER
81
Page 84

VAPANION
SWITCHER
System Settings | Reset
You can reach the System settings by navigating to “System Set” with the Plus and Minus buttons after
pressing the Mode button three times. All settings can be controlled using the Plus and Minus buttons
and are conrmed and stored by pressing the Mode button.
Using this method, it is possible to set the date and time under “1) Time Set”, set the brightness of the
display under “2) Brightness”, count the number of puffs under “3) Puff Counter” switch the VW Smart
Mode on/off under “4) Smart On/Off”, control when the display lights up as described above under
“5) Screen Timeout” and display the software version under “6) Version”. You can reset all individual
settings under “7) Default” by selecting “Yes” with the Plus or Minus button and conrming with the
Mode button.
OPERATING & CHANGING THE VAPING MODES
82
Page 85

PROTECTIVE FUNCTIONS
Protective Functions
USB input protection
Equalizing charge system
Low-voltage protection
Short-circuit protection
Overcharge protection at high resistance
Low-resistance protection
Overheating protection
Overcurrent protection
Overcharging protection
Overcharging protection
VAPANION
SWITCHER
83
Page 86

VAPANION
SWITCHER
Warranty Terms
All products of InnoCigs are subject to strict quality control. You will receive, along with the legally required
warranty, a 6-month warranty on all InnoCigs products. The warranty period of 6 months applies from the
date of purchase from your dealer. The date on your sales receipt is decisive. During the warranty period,
devices that have defects will be repaired or replaced through the company InnoCigs.
Wearing parts such as mouthpieces and clearomizer heads are excluded from the guarantee.
Replaced devices or parts shall become the property of InnoCigs. The guarantee does not extend the
warranty period nor does it initiate a new warranty in transition.
WARRANTY & REPAIR
84
Page 87

WARRANTY & REPAIR
Warranty claims are excluded for damage resulting from:
• Misuse or improper handling
• Environmental factors (Ex: moisture, heat, dust, etc.)
• Failure to comply with the safety notes of the device
• Not following the instructions
• Use of force (Ex: shock, impact, case)
• Submission of claims that have not been authorized through InnoCigs service addresses
• Unauthorized repair attempts
• Sending warranty repair in unsafe packaging
InnoCigs reserves in all warranty cases, the right to scrutinize the claim until the nal decision. InnoCigs
reserves the right to revise these warranty conditions.
VAPANION
SWITCHER
85
Page 88

VAPANION
SWITCHER
Warranty & Service
If the product ceases functioning or is defective in any way, please contact the specialist retailer where you
purchased the product.
If a warranty claim is necessary, please proceed as follows: Contact the InnoCigs customer service by
e-mail, fax or phone. Alternatively, you can use the exchange service on our website www.innocigs.com.
For questions about the operation and use please feel free to contact our Customer Service.
86
WARRANTY & SERVICE
Page 89

CONTACT
Contact to InnoCigs
InnoCigs GmbH & Co. KG
Stahltwiete 23
22761 Hamburg | GERMANY
Phone: +49 (0) 40 – 22 86 729 0
Fax: +49 (0) 40 – 22 86 729 99
E-Mail: [email protected]
VAPANION
SWITCHER
87
Page 90

CLEAROMIZER KIT
NRG
Bedienungsanleitung | Manuel d’utilisation | User Manual
Page 91

VAPANION
NRG
SPRACHEN / LANGUES / LANGUAGES
Deutsch . . . . . . . . . . . . . . . . . . . . . . . . . . . . . . . . . . . . . . . . . . . . . . . . . . . . . . . . . . . . . . . 01
Français . . . . . . . . . . . . . . . . . . . . . . . . . . . . . . . . . . . . . . . . . . . . . . . . . . . . . . . . . . . . . . 18
English . . . . . . . . . . . . . . . . . . . . . . . . . . . . . . . . . . . . . . . . . . . . . . . . . . . . . . . . . . . . . . . 35
3
Page 92

SUBOHM CLEAROMIZER MIT 2 ML/5 ML TANKVOLUMEN
VAPANION
NRG
Nutzerhinweise
Vielen Dank, dass Sie sich für ein Produkt von Vapanion – eine Marke von InnoCigs – entschieden haben!
Bei unserem gesamten Sortiment legen wir großen Wert auf hohe Qualitäts- und Sicherheitsansprüche. Wir
wünschen Ihnen viel Spaß beim Dampfen mit Ihrem neuen E-Zigaretten-Produkt!
Bitte lesen Sie die Bedienungsanleitung vor Gebrauch sorgsam durch, um eine korrekte Nutzung des Geräts
zu gewährleisten. Verwenden Sie in Kombination mit diesem Produkt bitte nur originale bzw. empfohlene
Produkte. Der Hersteller gewährleistet keinen Service und/oder Garantie bei der Nutzung mit nicht
empfohlenen Produkten.
Sollten Sie Fragen rund um Ihr E-Zigaretten-Produkt haben oder weitere Informationen benötigen,
kontaktieren Sie bitte Ihren Fachhändler oder besuchen Sie unsere Website www.innocigs.com.
01
Page 93

VAPANION
NRG
Hinweise & Vorsichtsmaßnahmen . . . . . . . . . . . . . . . . . . . . . . . . . . . . . . . . . . . . . . . . . . . . . . . . . . . . . . . .03
Lieferumfang | Aufbau des Geräts. . . . . . . . . . . . . . . . . . . . . . . . . . . . . . . . . . . . . . . . . . . . . . . . . . . . . . . . .08
Bedienung des Geräts . . . . . . . . . . . . . . . . . . . . . . . . . . . . . . . . . . . . . . . . . . . . . . . . . . . . . . . . . . . . . . . . . .09
Eckdaten & Leistungsmerkmale . . . . . . . . . . . . . . . . . . . . . . . . . . . . . . . . . . . . . . . . . . . . . . . . . . . . . . . . . . 13
Garantieleistungen & Reparaturen . . . . . . . . . . . . . . . . . . . . . . . . . . . . . . . . . . . . . . . . . . . . . . . . . . . . . . . . .14
Garantie & Service . . . . . . . . . . . . . . . . . . . . . . . . . . . . . . . . . . . . . . . . . . . . . . . . . . . . . . . . . . . . . . . . . . . . . 16
Kontakt . . . . . . . . . . . . . . . . . . . . . . . . . . . . . . . . . . . . . . . . . . . . . . . . . . . . . . . . . . . . . . . . . . . . . . . . . . . . . .17
INHALTSVERZEICHNIS
02
Page 94

HINWEISE & VORSICHTSMASSNAHMEN
Personen unter 18 Jahren, Schwangere, stillende Mütter und Menschen mit Herz-Kreislauf-Erkrankungen dürfen dieses
Produkt nicht verwenden. Nicht empfohlen für Nichtraucher. Das E-Zigaretten-Produkt darf nicht in die Hände von Kindern und
Jugendlichen gelangen.
Dieses Produkt darf
nicht von Minderjährigen
verwendet werden.
Dieses Produkt muss für Kinder
und Jugendliche unzugänglich
aufbewahrt werden.
Dieses Produkt darf nicht von
Schwangeren oder stillenden
Müttern genutzt werden.
Dieses Produkt entspricht den innerhalb der EU
gültigen Bestimmungen für technische Geräte und
darf in den Ländern der EU vertrieben werden.
Alte Elektrogeräte oder verbrauchte Akkus gehören nicht in
den Hausmüll! Bitte entsorgen Sie Altbatterien und geräte – wie vom Gesetzgeber vorgeschrieben – an einer
kommunalen Sammelstelle oder geben Sie sie im Handel
vor Ort kostenlos ab, damit Rohstoffe und mögliche
Schadstoffe gezielt verwertet werden können.
VAPANION
NRG
03
03
Page 95

VAPANION
NRG
HINWEISE & VORSICHTSMASSNAHMEN
Benutzerhinweise
1. Sollte Ihnen das Gerät heruntergefallen sein, überprüfen Sie bitte, ob sich keine Komponenten gelockert
haben, ob kein Liquid austritt und ob kein Defekt an Ihrem Mundstück vorliegt. Sofern nach visueller Prüfung des Produkts keine Anzeichen einer Beschädigung vorliegen, können Sie das Gerät weiterbenutzen.
Bitte wischen Sie Ihr Mundstück zuvor aus hygienischen Gründen mit einem Tuch ab.
2. Das Gerät sollte nicht benutzt werden, wenn sich Risse oder Deformationen im Material zeigen oder ein
defektes Teil ausgetauscht werden sollte. Versuchen Sie bei einem Defekt niemals, das Gerät selbst zu
reparieren.
3. Das Gerät sollte nicht benutzt werden, wenn das Liquid in Ihrem Clearomizertank verbraucht oder fast
verbraucht ist. Gleiches gilt für den Fall, dass Sie eine Veränderung des Geschmacks wahrnehmen. Bitte
befüllen Sie den Clearomizertank mit frischem Liquid und tauschen Sie Ihren Verdampferkopf durch einen
neuen aus, bevor Sie Ihre E-Zigarette weiterbenutzen.
4. Lagern Sie das Gerät nie in Räumen mit sehr hohen Temperaturen oder mit besonders hoher Luftfeuchtig-
keit. Vermeiden Sie längere direkte Sonneneinstrahlung.
5. Die geeignete Temperatur liegt für den Gebrauch bei -10°C bis 60°C.
04
Page 96

HINWEISE & VORSICHTSMASSNAHMEN
6. Wenn Liquid mit Ihrer Haut in Berührung kommt, wischen Sie es schnellstmöglich ab und reinigen Sie die
Stelle anschließend gründlich mit klarem Wasser.
7. Wenn Sie versehentlich Liquid verschlucken, wenden Sie sich bitte an eine Vergiftungszentrale. Unter der
Telefonnummer +49 (0)30 - 19 240 erreichen Sie Tag und Nacht den Giftnotruf der Charité Universitätsmedizin Berlin. In Österreich steht der 24-Stunden-Notruf der Wiener Vergiftungsinformationszentrale unter
+43 (0)1 - 406 43 43 zur Verfügung. In Frankreich wenden Sie sich bitte an eine der lokalen Vergiftungszentralen. Verständigen Sie in Notfällen bitte umgehend den Notruf.
8. Das Inhalieren nikotinhaltigen Liquids kann die Herzfrequenz und/oder den Blutdruck erhöhen. Nikotin
kann Übelkeit, Schwindel und/oder Magenschmerzen verursachen. Wenn Sie an sich oder Menschen in
Ihrer Umgebung unerwünschte Wirkungen feststellen, verwenden Sie dieses Produkt bitte nicht weiter und
konsultieren Sie einen Arzt.
9. Beachten Sie bei der Nutzung von E-Zigaretten lokale Gesetze.
10. Das Produkt darf nicht in die Hände von Kindern und Jugendlichen gelangen.
Warnhinweis
Dieses E-Zigaretten-Produkt kann mit nikotinhaltigem Liquid verwendet werden. Nikotin ist ein Stoff, der sehr
stark abhängig macht.
VAPANION
NRG
05
Page 97

VAPANION
NRG
HINWEISE & VORSICHTSMASSNAHMEN
Allgemeine Informationen zu Zugtechniken beim Dampfen
Beim Dampfen wird zwischen zwei Zugtechniken unterschieden:
Moderates Dampfen (Mund-zu-Lunge)
Der Dampf einer E-Zigarette wird während der gesamten Zugdauer zunächst im Mundraum
gesammelt und anschließend in die Lunge inhaliert. Diese Zugtechnik wird als moderates
Dampfen von Mund-zu-Lunge bezeichnet und ist genauso wie beim Rauchen einer
Tabak-Zigarette. Voraussetzung ist ein spürbarer Widerstand beim Zug an der E-Zigarette.
Verdampferköpfe, die diese Zugtechnik im moderaten Bereich (Widerstand i.d.R. > 1 Ohm)
unterstützen, werden häug als MTL-Head gekennzeichnet, wobei MTL für das Englische
“Mouth to Lung” steht. (weitere Abkürzungen: ML, M2L)
06
Page 98

HINWEISE & VORSICHTSMASSNAHMEN
VAPANION
NRG
Subohm-Dampfen (Direkte Lungeninhalation)
Der Dampf einer E-Zigarette wird während des Zuges direkt in die Lunge inhaliert. Diese
Zugtechnik wird als subohmes Dampfen mit direkter Lungeninhalation bezeichnet. Voraussetzung ist ein geringer Zugwiderstand und eine hohe Luftzufuhr zum Verdampferkopf.
Beides wirkt sich positiv auf die Produktion großer Dampfmengen aus. Verdampferköpfe,
die diese Zugtechnik im Subohm-Bereich (Widerstand i.d.R. < 1 Ohm) unterstützen, werden
häug als DL-Head gekennzeichnet, wobei DL für das Englische “Direct Lung” steht. (weitere
Abkürzungen: DTL, D2L)
07
Page 99
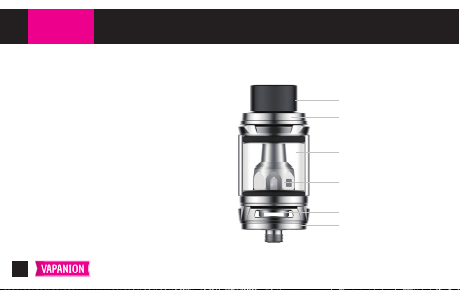
VAPANION
NRG
Inhalt des Vapanion NRG Clearomizer Sets
1x NRG Clearomizer
1x GT4 Head (vorinstalliert)
1x GT8 Head
1x Ersatz-Pyrexglastank
1x Bedienungsanleitung
1x Info Card
LIEFERUMFANG | AUFBAU DES GERÄTS
08
Mundstück
Top-Kappe mit
Kindersicherung
Pyrexglastank
GT4 Verdampferkopf
Airow-Control
Verdampferkopf-Basis
Page 100

BEDIENUNG DES GERÄTS
Hinweise zur Inbetriebnahme
Träufeln Sie vor dem ersten Gebrauch unbedingt einige Tropfen Ihres Liquids auf den Verdampferkopf
(Head) und lassen Sie ihn nach dem Installieren etwa 15 Minuten lang im mit Liquid befüllten Tank stehen,
bevor Sie dampfen. Reinigen Sie den Verdampferkopf nicht mit Wasser. Wischen Sie ihn im Bedarfsfall
lediglich mit einem trockenen Tuch ab. Da es sich bei Verdampferköpfen um Verschleißteile handelt,
müssen sie regelmäßig gewechselt werden.
Hinweis zur Reinigung
Verwenden Sie zur Reinigung des Geräts ein trockenes Tuch oder ein Wattestäbchen.
Dampfen
Während Sie die Feuertaste des Geräts gedrückt halten, inhalieren Sie den Dampf langsam und kontinuierlich über das Mundstück. Lassen Sie die Feuertaste beim Ausatmen des Dampfes los.
VAPANION
NRG
09
 Loading...