


®
INSTRUCTION GUIDE
VAPALUX 305

Trademark information
VAPALUX® and WILLIS & BATES® are registered trademarks of Vapalux Co., Ltd. Korea.
NOTICE
No part of the manuals included with this product may be reproduced, transmitted, transcribed, stored in a retrieval system, or
translated into any language in any form, by any means, without Vapalux’s prior written permission.
Vapalux reserves the right to change the specifications of the hardware described in these manuals at any time and without prior
notice.
Vapalux will not be held liable for any damages resulting from the use of this product.
For more information about VAPALUX accessories, please contact a local authorizer VAPALUX dealer.
While every effort has been made to ensure that the information in these manuals is accurate and complete,
We would appreciate it were you to bring any errors or omissions to the attention of the Vapalux representative in your area
(address provided separately).
2

PACKAGE CONTENT
305 Hurricane Lantern
VAPALUX CO., LTD.
BUCHEON KOREA
©2011 VAPALUX CO., LTD.All rights reserved.
Vapalux and WILLIS & BATES areTrademarks of VAPALUX CO., LTD.
MANTLE Ref.V42
SUPERIOR QUALITY
VAPAL UX
LAMP
FOR
®
Made inAustria
Non Radioactive
WithoutAsbestos
Nicht Radioaktiv
OhneAsbest
VAPSUQV4 2
Printed in Korea, Republic
ISO 9001:2008
VAPALUX
®
3
2 Mantles
(one fitted on the lantern)
Be sure all items listed here were included with your Lamp.
Light Shades are sold separately.
WARNING NOTICE
WHEN USING VAPALUX® LAMPS, OR ANY
OTHER KEROSINE(PARAFFIN) OPERATED
APPLIANCE, ALWAYS ENSURE THAT
THE ROOM IS REASONABLY VENTILATED.
4

Thank you for your purchase of a VAPALUX Hurricane Pressure Lamp.
Please be sure to read all instructions thoroughly to get the most from the lamp, and keep them where they will
be read by all those who use the product.
Use Only Vapalux Brand Accessories
Only Vapalux brand accessories certified by Vapalux specifically for use with
your VAPALUX Hurricane Pressure Lamp are engineered and proven to operate within its operational and safety requirements.
THE USE OF NON-VAPALUX ACCESSORIES COULD DAMAGE YOUR LAMP AND MAY VOID YOUR VAPALUX WARRANTY.
OVERVIEW
5

1 Burner Unit
2 Mantle
3 Jet Cleaner
4 Frame Base
5 Flute Filler Cap
6 Container
7 Burner Unit
8 Glass
9 Vaporiser
10 Spilit Cup
11 Handle
12 Pump Plunger
8
6
11
3
4
2
10
9
1
5
12
7
8
6
11
3
4
2
10
9
1
5
12
7
Take a few moments to familiarize yourself with Lamp. You may find it helpful to bookmark this section and refer to it as you read through the rest of the manual.
Getting to know the VAPALUX Lantern
6

To Fill Lamp
7
Unscrew filler cap (87) and fill with clean paraffin (kerosene) - never use petrol.
Capacity approx. 0.8 litre.
Do not tilt lamp when filling.
To Light Lamp
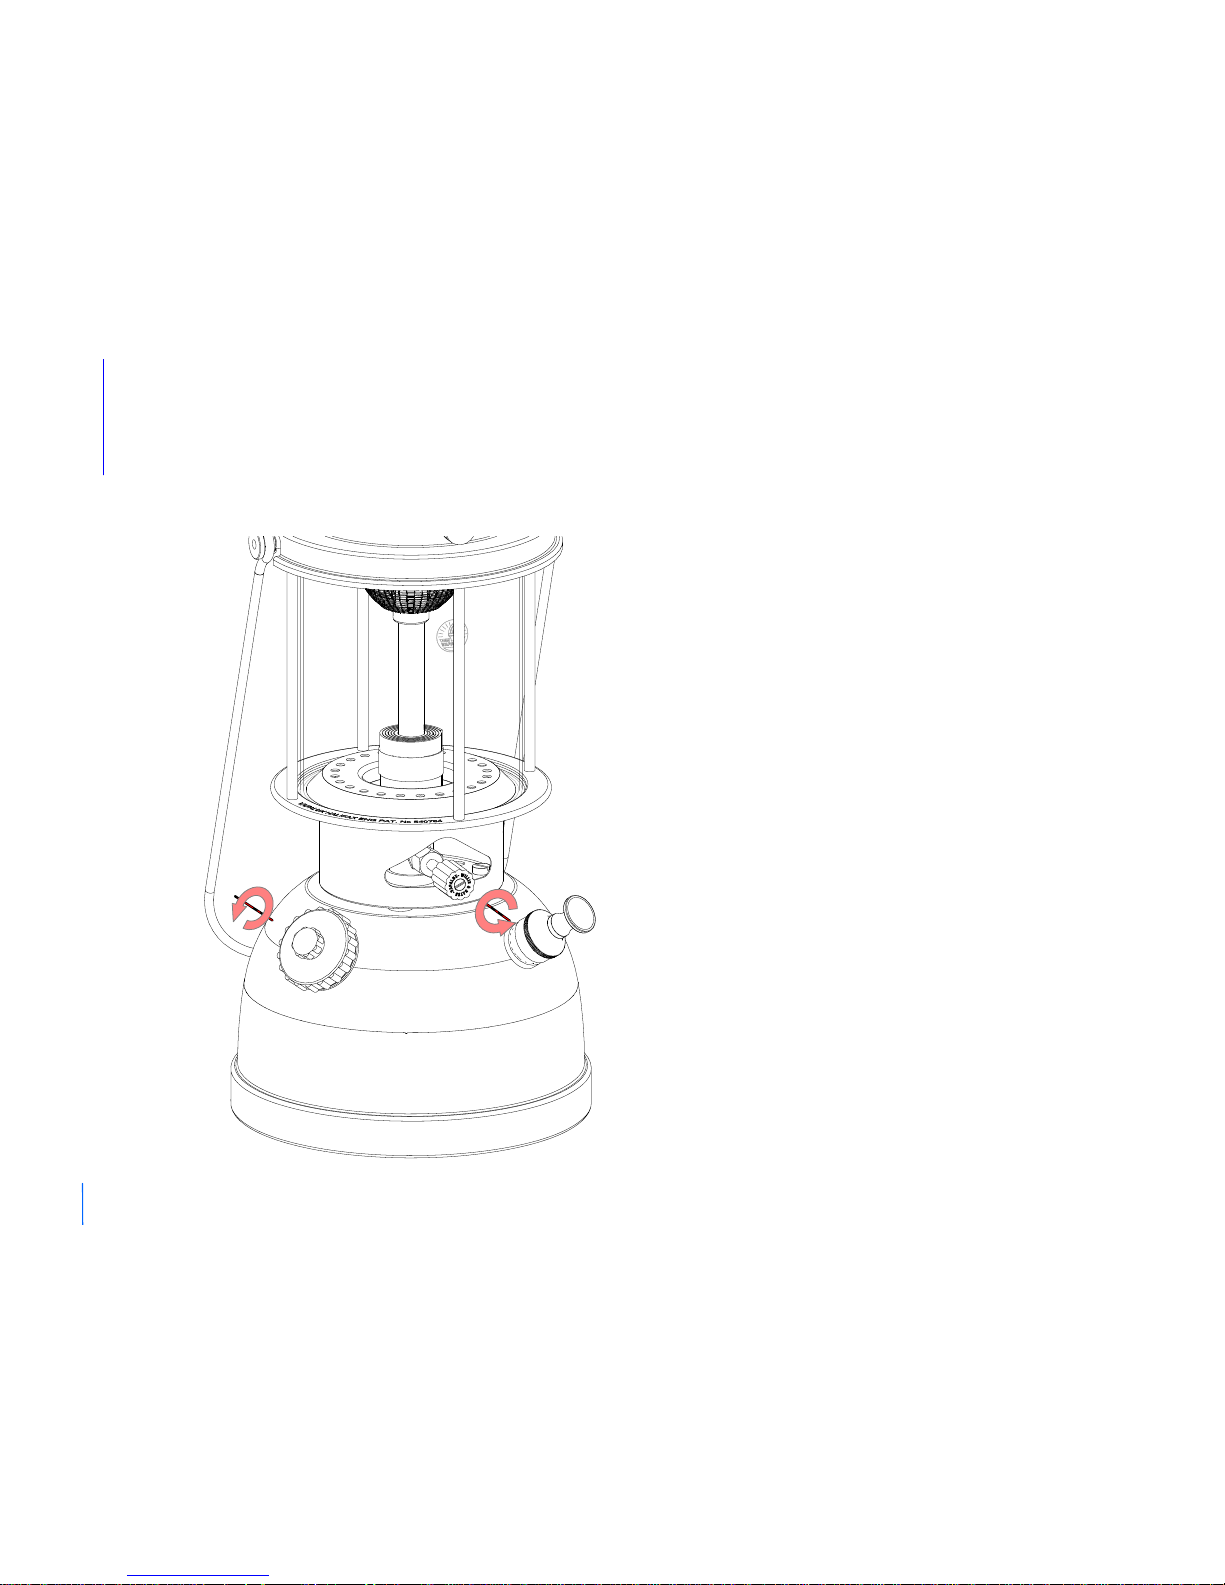
8
Slacken air-release screw (6).
Turn knob on jet cleaner (74) anti-clockwise.

9
Without removing hood, raise glass (V60).
Completely fill pre-heat cup (72) with jelly or spirit not petrol.

Allow to burn until fuel is almost consumed (about 3 minutes).
Tighten air-release screw and operate pump (16) until mantle lights
(about 12 strokes).
After mantle lights, allow to burn for half minute. Then pump to
obtain maximum light 20/30 strokes).
There is no advantage in over-pumping!!!
10

If the mantle flames on starting to pump, immediately turn knob of jet
cleaner (74) a half turn clockwise and quickly release pressure by unscrewing air release screw (6).
The reason for mantle not lighting correctly is that insufficient time has
been allows to pre-heat the vaporizer.
Repeat lighting operations as above.
11

Slacken air release screw (6) and leave it unscrewed.
12
To Extinguish Lamp

1. To fit new vaporizer
2. To fit new mantle
3. Washers
4. Spare Parts
Mintenance
13

1. Unscrew swivel pins
2. Lift up hood unit
3. Take out glass
4. Take out spirit cup
5. Unscrew vaporizer and replace it
To fit new vaporizer
14

Unscrew swivel pins.
Remove hood and burner complete. Unscrew mantle support (29).
Fit new mantle in accordance with instruction in mantle envelope.
15
To fit new mantle

FITTING INSTRUCTIONS
VAPALUX MANTLE Ref. V42.
INSTRUCTIONS FOR FITTING
Unscrew the Tubular Mantle Support “S” from the Burner
Body “B”. Pass the smaller end of support “S” through
the smaller opening in the Mantle and screw “S” into
position again. Stretch the larger opening of the Mantle
over the ridge on Burner Body “B” so that it rests in the
groove provided. Arrange the Mantle evenly and see
that it is not twisted. There is no need to burn the Mantle
off as the Mantle will automatically shape itself when
the lamp is lighted.
BS/2011/JPS/DW/EN
Place upper part of the mantle
16

Place hood
Screw Swivel Pins
17

1" Filler Cap
Washer V.811
A1202
Jet Cleaner
Washer V.23
A1046
Pump Valve
Washer(EXT.)
V.33
A1042
Vaporizer Washer
V.44
A1056
Air Release Screw
Washer V.9
A1044
JC Gland Nut
Washer V.28
A1053
Pump Valve
Washer (INT.)
V.34
A1040
Pump Leather
A1039
WASHERS
18
Large Filler Cap
Washer A1043
Jet Cleaner
Washer V.23
A1046
Pump Valve
Washer(EXT.)
V.33
A1042
Vaporizer Washer
V.44
A1056
Air Release Screw
Washer V.9
A1044
JC Gland Nut
Washer V.28
A1053
Pump Valve
Washer (INT.)
V.34
A1040
Pump Leather
A1039
1” filler cap washer set : ref. V5
Large filler cap washer set : ref. V5-1.25
Large Filler Cap Washer
Jet Cleaner Washer
Pump Valve Washer (EXT.)
Vaporizer Washer
Air Release Screw Washer
JC Gland Nut Washer
Pump Valve Washer (INT.)
Pump Leather
1” Filler Cap Washer
Jet Cleaner Washer
Pump Valve Washer (EXT.)
Vaporizer Washer
Air Release Screw Washer
JC Gland Nut Washer
Pump Valve Washer (INT.)
Pump Leather

Mantle V42
Spare Parts
1" Filler Cap
Washer V.811
A1202
Jet Cleaner
Washer V.23
A1046
Pump Valve
Washer(EXT.)
V.33
A1042
Vaporizer Washer
V.44
A1056
Air Release Screw
Washer V.9
A1044
JC Gland Nut
Washer V.28
A1053
Pump Valve
Washer (INT.)
V.34
A1040
Pump Leather
A1039
Burner Hood Burner V56
Vaporizer V40 Spirit Cup
Frame Handle V10
Glass V60 Jet Cleaner V74
Washer Set V5
Frame Base
Container Pump Plunger V16 Large Filler Cap Pump Valve V15
19
FITTING INSTRUCTIONS
VAPA LU X M ANTLE Ref. V 42.
INSTRUCTION S FOR FITTIN G
Unscrew theTubular Mantle Support“S” from the Burner
Body “B”. Pass the smaller end of support “S” through
the smaller opening in the Mantle and screw “S” into
positionagain. Stretch thelarger opening of theMantle
over the ridge on BurnerBody “B” so that it rests in the
groove provided. Arrange the Mantle evenly and see
thatit is not twisted.There is no needto burn the Mantle
off as the Mantle will automatically shape itself when
the lamp is lighted.
BS/2011/JPS/DW/EN

Fuel Funnel V3 Mantle Support V29 Pump Leather V24
20

21
Burner Hood

22
Frame

23
Container

Options
Light Shade V1 Soft Lantern Case V19
Material :
Cotton Canvas Fabric 10 (6x6)
PVC Transparent Coating (Outside)
Nylon Oxford 210D PU Coating (Inside)
Logo : Embroidered
Handle & Zipper grip : Cowhide
Insulation : PE Form 10T
Weight : approx. 720g
Material : CESP-C
Finish : Enamel or Powder
Coluor : Black/White, White, Matt Green, Ivory
Weight : Enamel approx. 610g, Powder approx. 410g
24

Specifications
Handle finish : Steel
Bowl finish : Green on Brass
Hood & Cowl : Enamel
Height : 345 mm (13.5")
Heat Output : 1 KW
Fuel capacity : 1 Litre (0.26 US gallon)
Frame finish : Brass
Country of manufacture : U.K.
Burn time : Approx. 10 hrs
Light output : 60 W (approx.)
Weight : Approx. 1.9 Kg (4.2 lb)
Specifications
25

303-207 Bucheon Techno Park
345 Seokcheon-ro Ojeong-gu
Bucheon-si Kyungki-do, 14501 Korea
© 2016 Vapalux Co., Ltd.
No reproduction in any from of this manual, in whole or in part (except for
brief quotation in critical articles or reviews), may be made without written
authorization from Vapalux Co., Ltd.
®
VAPALUX CO., LTD.
 Loading...