


1
GAS GRILL ASSEMBL Y, USE AND CARE MANUAL
GD4819S
Do not attempt to assemble and use this grill unless you read this entire manual thoroughly.
Keep it in a handy place as it has answers for questions that may occur in your future use.
NOTE: THIS APPLIANCE IS NOT INTENDED TO INSTALL IN OR ON RECREATIONAL
VEHICLES OR BOATS.
FOR OUTDOOR
USE ONLY

2
!!!WARNING!!!
1. Failure to follow all manufacturers’ instructions could result in serious body injury
and/or property damage.
2. Some parts of this grill may have sharp edges—especially as mentioned in this
manual! Wear suitable protective gloves if necessary.
3. Only to be used outdoors.
4. Read the instructions before using the appliance.
5. Warning: accessible parts may be very hot. Keep young children away.
6. Do not move the appliance during use.
7. Turn off the gas supply at the gas container after use.
8. Any modification of the appliance may be dangerous.
9. Never mount the cylinder under the BBQ on the base shelf as this will result in
serious injury to the user.
10. If the ground temperature is above 50K, the surface needs protection.
TECHNICAL DATA
Total heat input: 17.2 kW (main burner: 14.0 kW + side burner: 3.2 kW)
Gas consumption: 1252 g/h (main burners: 1019 g/h + side burner: 233 g/h)
Gas bottle: standard cylinder.
Make sure the gas cylinder is lower than the gas connection/gas inlet
Always place gas cylinder/bottle on a flat level surface DO NOT fix on trolley. Care should be taken so the gas
hose and gas cylinder do not come in contact with hot surfaces or sharp edges, and should not pass under the
barbecue
Pressure reducer: comply with EN16129 (Flow rate: max. 2.0 kg/h)
Gas hose: comply with EN standard or local market standard (max. 1.5m, max. FI 1.2m)
Gas system information:
Gas Category Category I
3+ (28~30/37)
Category I
3B/P(30)
Category I
3B/P(37)
Category I
3B/P(50)
Gas Type
Butane at (28~30)
mbar/ Propane at 37
mbar;
G30(Butane),G31
(Propane) or their
mixtures at
(28~30) mbar
G30(Butane),G31(
Propane) or their
mixtures at 37
mbar
G30(Butane),G31
(Propane) or their
mixtures at 50
mbar
Injector Size (Dia.
mm)
Grill burner: 0.91
Hotplate burner: 0.86
Grill burner: 0.91
Hotplate burner:
0.86
Grill burner: 0.87
Hotplate burner:
0.81
Grill burner: 0.80
Hotplate burner:
0.76
Destination of
Countries
BE, FR, IT, LU, LV,
IE, GB, GR, PT, ES,
CY,
CZ, LT, SK, CH, SI
LU, NL, DK, FI,
SE, CY, CZ, EE,
LT, LV, MT,
SK, SI, BG, IS,
NO, TR, HR, RO,
IT, HU
PL
AT, DE, SK, CH,
LU
This appliance has been made with regard to the Eur opean Gas Appliance Standard EN498 and EN484 and
bears the CE certification
Which gas category or gas type will be used, please check the detail information on the appliance.

3
1.Patns List
CODE PART QTY
HOOD&BODY
A1 Hood (Pre-Assembled to Body) 1
A2 Burner 4
A3 Cooking grid 1
A4 Warming rack 1
A5 Grease cup 1
A6
Drip tray
1
A7 Side burner valve/Hose Assembly 1
A8 Flame Tamer 2
A9
iron plate
1
SIDE
SHELF
B1 side shelf 1
B2 Knob 5
B3 Side shelf Knob bezel 1
B4 Side burner 1
B5 side burner shelf 1
B6 Side burner grid 1
B7 Hook 1
TROLLEY
C1 Right side trolley Assembly 1
C2 Side panel 2
C3
Door (R)
1
C4
Lock castor
2
C5
Trolley Base
1
C6
magnet
1
C7
Door handle
2
C8
castor
2
C9
Door (L)
1
C10
Left side trolley Assembly
1
C11
Upper rim
1
C12 Rear panel 1
C13 Lighting Rod Assembly 1
HARDWARE
D1
M6×12 bolt & Ø6 spring washer
15
D2 Door axe 2
D3 Ø6 washer 4
D4 M3×15 bolt 2
D5 M4×8 bolt & Ø4 spring washer 8
D6 M5×12 bolt & Ø5 spring washer 14

4
2. Parts Diagram

5
3.Hardware Reference Diagram
ASSEMBLY INSTRUCTIONS
PLEASE READ THE INSTRUCTIONS CAREFULLY AND FOLLOW STEP BY STEP.
THE GRILL SHOULD BE INSTALLED BY TWO PERSON.
TOOLS REQUIRED:
Head screwdriver & wrench (not provided).
6
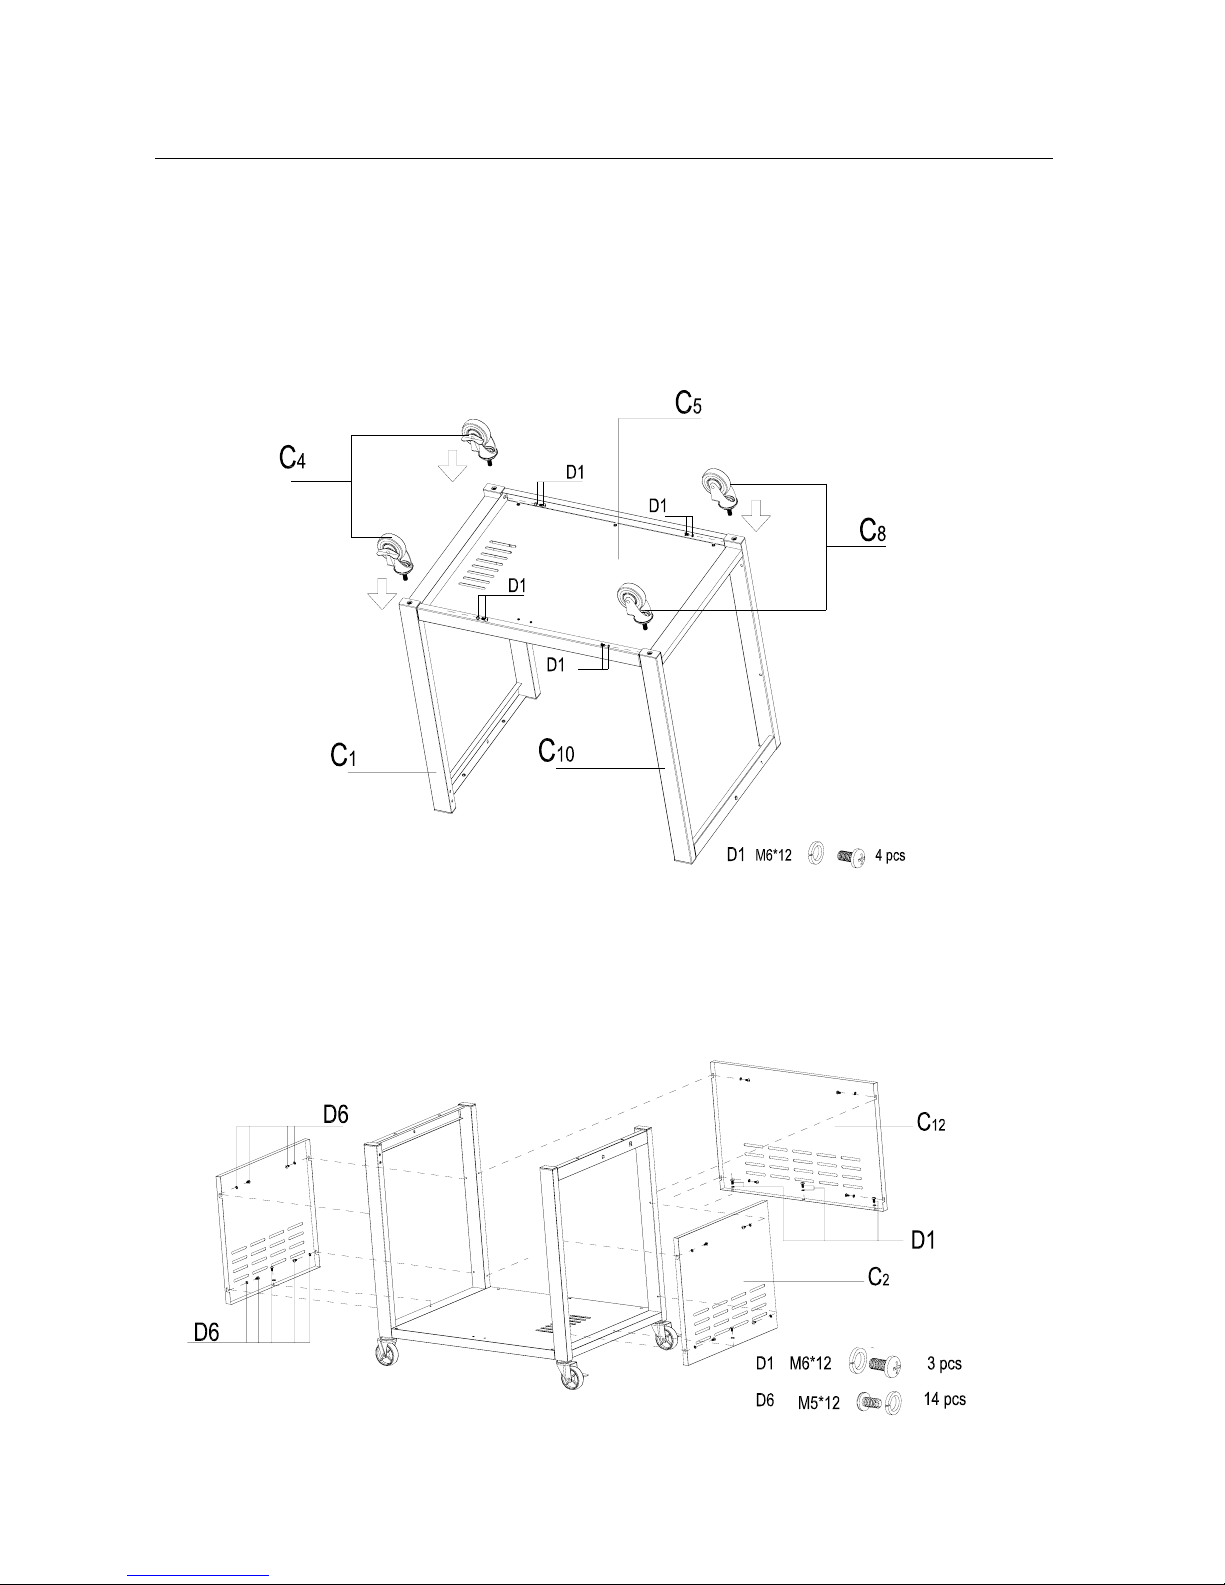
Step1: Attach the Trolley Base (C5) onto Right Side Trolley Assembly (C1) and Left Side
Trolley Assembly (C10) using M6×12 Bolt & Ø6 Spring W asher (D1) as shown.
Insert the two Lockable Castors (C4) and two standard Castors (C8) into the trolley frame
assembly as shown.
Step2: Attach the Side Panels (C2) and Rear Panel (C12) to the trolley frame using M5×12
Bolt & Ø5 Spring Washer (D6), and to the bottom panel using M6×12 Bolt & Ø6 Spring Washer
(D1) as shown.

7
Step3:
Attach the Magnet (C6) onto bottom panel using M3×15 Bolt (D4).
Attach the Door Axes (D2) to the trolley frame in the areas as shown.
Step4: Attach the Upper Body Support (C11) onto the trolley frame assembly using M6×12
Bolt & Ø6 Spring Washer (D1) as shown.

8
Step5: Attach the Door Handles (C7) onto the Left Door (C9) and Right Door (C3) using
M4×8 bolt & Ø4 spring washer as shown.
M4*8
4 pcs
C9
C3
C7
D5
D5
Step6: Fit the doors to the cabinet by placing them into the door axes and then depressing
the spring pins to insert into the upper body support.

9
Step7: Push the control knobs (B2) onto the valve stem s on the control panel .
Step8:
Carefully place the Hood and Barbecue Body (A1) onto the trolley assembly.
WARNING: DO NOT RELEASE THE BARBECUE BODY WHILE THE BARBECUE HAS
NOT BEEN PROPERLY SEATED. THIS MAY RESULT IN INJURY OR DAMAGE TO YOUR
BARBECUE.
Attach the barbecue body to the trolley assembly using the M6x12 Bolt & Ø6 Spring Washer
(D1) and Ø6 Washer (D3).

10
Step9:
Insert the Side Shelf (B1) into the two slots on the right side of the barbecu e as
shown.
Step10:
Tighten the pre-installed screws as the below picture shown.

11
Step1 1: Insert the side burner shelf (B5) into two slots of the barbecue as shown.
Step12:
Tighten the pre-installed screws as the below pictur e sho wn.

12
Step13:Secure the Side Burner Valve / Hose Assembly (A7) to the underside of the side
burner shelf, using M4x8 Bolt & Ø4 Spring Washer (D5), whilst also fixing the Side Shelf
Knob Bezel (B3) to the front of the side burner shelf, as shown.
Assemble the side burner Knob (B2) onto the side burner valve.
Step14:
Place the Side Burner (B4) through the central hole in the side burner shelf. Fit the
side burner venturi tube over the gas valve outlet. This is a loose fit and not a gas tight seal.
Secure the electrode and burner with M4x8 Bolt & Ø4 Spring Washer (D5).
Insert the ignition wire into the lower position on the side burner electrode.

13
Step15: Place the Side Burner Grid (B6) onto the side burner shelf.
Step16:
Ca refully lay the Flame Tamer (A8) into the barbecue body ensuring it lies level
within the body.

14
Step17: Put cast iron plate(A9) above burner without flame tamer(A3) as below
pictures.
Step18:
Install the Warming Rack (A4) into the holes of lid and chassis

15
Step19:
Insert the Drip Tray (A6) by sliding it underneath the barbecue body.
Insert the Grease Cup (A5) into the holder at the underside of the Drip Tray (A6), as shown.
Step20:
Place Grease cup (A5) onto the oil cup support under grease tray as below picture.

16
Step21:
Hang the lighting rod (C13) onto the hook, either on the right or left side shelf, as
shown.
GAS CONNECTION
ONLY USE THE HOSE ASSEMBLY SPECIFIED BY MANUFACTURER ON THIS GRILL.
REPLACEMENT HOSE ASSEMBLIES MUST BE THOSE SPECIFIED BY THE
MANUFACTURER.
This is a limitative configured grill. Do not attempt to use other type gas supply unless the
grill has been reconfigured for other gas use.
The installation of this appliance must conform to local codes.
Make sure that both gas cylinder and gas hose do not come in contact with high temperature
part.
The absolute necessity of not obstructing the ventilation openings of the cylinder
compartment.

17
The precautions to be taken in the case of blockage of the Venturi or Venturis.
1. Do not block Venturi or Venturis!
2. Check and make sure there is no insect net in the Vent uri or Venturis before using the
BBQ, especially for long time no use.
Regulator and Hose Requirements:
The regulator used with your grill must be CE approved, and conform to local codes. Also the
hose connect to the tank must be CE approved and conform to local codes. The length of the
hose shall be no excess 1.5m.
Hose must be changed according to expiry date or when national conditions require it. Worn or da maged
hose must be replaced.
Note: Always checks for gas leakage before use. Change old/broken hose if necessary.
Tank Requ ir ements:
The tank used with your grill must meet the following requirements:
1. Measurement: must conform to local codes.
2. Maximum Capacity: must conform to local codes.
3. Gas type:
a. I
3+
: Butane 28~30mbar
Propane 37mbar
b. I
3B/P(30)
: G30(Butane),G31(Propane) or their mixtures 28~30mbar
c. I
3B/P(50)
: G30(Butane),G31(Propane) or their mixtures 50mbar
d. I
3B/P(37)
: G30(Butane),G31(Propane) or their mixtures 37mbar
4. Constructed and marked in accordance with the specification for the limitative gas.
5. Be arranged for vapor withdrawal.
6. Has a collar to protect the tank valve.
7. No dent or rust. A dented or rusty gas tank may be hazardous.
For your safety:
Ensure that the black plastic grommets of the regulator provided are in place and that the
hose does not come into contact with the heat shield or the grill head.
Make sure hose is not subjected to twisting after installation.
The gas bottle have to be placed next to BBQ on a flat surface and away from ignition
source.
Make connection or change of the gas bottle in a ventilated area and away from flammable
source.
After each replacement of gas bottle make leakage test.
Connect the regulator to the gas tank:
VERY IMPORTANT:
a. THE REGULATOR SHALL INCORPORATE IN SUCH A LOCATION THAT IT WILL NOT
A TT AIN A TEMPERAT URE ABOVE 140℉(60℃).
b. THE REGULATOR SHALL INCORPORATE A PRESSURE RELIEF VALVE OR
OVERPRESSURE DE VICE.
18
c. THE INLET OF THE PRESSURE REGULATOR SHALL BE FITTED TO CONNECT THE
TYPE I CONNECTION OF THE TANK VALVE.
1. Make sure tank valve is in its full off position (turn clockwise to stop).
2. Check tank valve to assure it has proper external male threads.
3. Make sure all burner knobs are in their off position.
4. Remove the protective cap from the tank valve, Always use cap and strap supplied with
valve.
5. Inspect valve connection port and regulator assembly. Look f or any damage or debris.
Remove any debris. Inspect hose for damage. Never attempt to use damaged or
plugged equipment. Contact your local gas dealer for repair.
6. When connect regulator assembly to the valve, hand tighten nut clockwise to a positive
stop. Do not use a wrench to tighten. Use of a wrench may damage quick coupling nut
and result in a hazardous condition.
7. Open tank valve fully (counterclockwise). Use a soapy water solution to check all
connections for leaks before attempting to light grill. If a leak is found, turn tank valve off
and do not use grill until a local gas dealer can make repairs.
!!!WARNING!!!
1. Never insert any foreign objects into the valve outlet. It may damage the valve and
cause leak, leaking gas may result in fire, explosion, heavy body injury, or even
death.
2. Do not connect this grill to the self-contained the gas system of a motor home or
camper trailer.
3. Do not use the grill until leak tested.
4. Stop and call the fire department if any leak detected.
5. If you cannot stop a gas leak, close the gas tank valve IMMEDIATELY, call the gas
supplier or the fire department.
!!!DANGER!!!
1. NEVER store a spare gas tank under or near grill or in an enclosed area.
2. NEVER fill the tank beyond 80% full. An overfilled spare gas tank is dangerous
because surplus gas may leak from safety relief valve. The safety relief valve on a
gas tank could activate to release gas and cause a fire.
3. The spare gas tank must have safety caps installed on the gas tank outlet.
4. If any gas leak found on the spare gas tank, immediately go away from it and call
the fire department.
5. Keep the gas cylinder away from any source of ignition when changing gas
cylinder.
VERY IMPORTANT: DISCONNECTED THE TANK WHEN THIS GRILL IS NOT IN USE.
To disconnect the gas tank:
1. Turn all the knobs off.
2. Turn the tank valve off fully (turn clockwise to stop).
3. Detach the regulator assembly from tank valve by turning the quick coupling nut
counterclockwise.

19
4. Install the protective cap back gas tank valve.
LEAK TESTING
Although all gas connections on the grill are leak tested at the factory prior to
shipment, a complete gas tightness check must be performed at the installation site
due to possible mishandling in shipment, or excessive pressure unknowingly being
applied to the unit. Periodically check the whole system for leaks, or immediately
check if the smell of gas is detected.
BEFORE TEST
1. Make sure that all packing material is removed from the grill including the burner tie-down
straps.
2. Do not smoke while leak testing.
3. ALWAYS TURN OFF GAS SUPPLY IF LEAKAGE IS DETECTED
4. Never leak test with an open flame.
5. Make a soap solution with one part liquid detergent and one part water. Prepare a spray
bottle, brush, or rag to apply the solution to the connections. For the initial leak test, make
sure the cylinder is full.
5. Grill must be leak tested outdoors in well-ventilated area, away from ignition sources
such as gas fired or electrical appliances, and flammable materials.
6. K eep grill away from open flames and/or sparks while testing.
TO TEST
1. Make sure all control knobs are in the “O” position.
2. Make sure the regulator is connected to the gas tank tightly.
3. Completely open the tank valve by turning counter clockwise. If you hear a “POP” sound,
turn gas off IMMEDIATELY, it indicates a heavy leak at the connection. Call your gas
dealer or fire department.
4. Check every connection from the gas tank up to and including the connection to the
manifold pipe assembly (the pipe that goes to the burner) by brushing or spraying the
soapy solution on the connections.
5. If soap bubbles appear, there is a leak. Turn off the tank valve IMMEDIATELY and
retighten connections, Open the tank valve again, and recheck.
6. If leaks cannot be stopped, DO NOT ATTEMPT TO REP AIR. Call our service center for
help.
7. A lways close the tank valve after leak test by turning clockwise.
Only those parts recommended by the manufacturer should be used on the grill. Substitution
can void the warranty. Do not use the grill until all connections have been checked and do
not leak.
SAFETY TIPS
1. ALWAYS CHECK FOR LEAKS AFTER EVERY GAS TANK CHANGE.
2. ALWAYS CHECK FOR LEAKS OF EVERY CONNECTION BEFORE EACH USE.
3. USE LONG BBQ TOOL TO AVOID BURNS.
4. IF ANY GREASE OR HOT ITEMS FALLING FROM THE GRILL ONTO THE VALVE,
REGULATOR, HOSE, ANYTHING CONVEYING THE GAS, CLOSE THE GAS
IMMEDIATELY. CHECK THE CAUSE, AND REMOVE THE CAUSE. REPERFORM THE

20
LEAK TEST BEFORE CONTINUING.
5. DO NOT REMOVE THE GREASE TRAY IF THE GRILL HASN’T COMPLETELY
COOLED.
6. CLOSE ALL CONTROL KNOBS AND THE TANK VALVE WHEN THE GRILL IS NOT IN
USE.
7. NEVER MOVE THE GRILL WHILE IN USE OR STILL HOT.
8. P USH THE GRILL FORWARD. DO NOT PULL WHEN MOVING IT.
9. DISCONNECTED THE TANK IN STORAGE OR BEING TRANSPORTED MUST HAVE A
SAFETY CAP INSTALLED. DO NOT STORE A GAS TANK IN ENCLOSED SPACES
LIKE CARPORT, COVERED PATIO, PORCH, GARAGE OR OTHER BUILDINGS.
10. NEVER LEAVE A GAS TANK IN A RECREATIONAL VEHICLE OR BOAT WHICH MAY
BECOME OVERHEATED BY THE SUN.
11. DO NOT STORE GAS TANK IN OR NEAR AN AREA WHERE CHILDREN PLAY.
12. DISCONNECTED THE TANK AND REMOVE FROM THE GRILL IF THE GRILL IS
STORED INDOORS.
13. ANY OTHER PROBLEM, SEE “TROUBLESHOOTING” OR CONTACT OUR SERVICE
CENTER.
INSTALLER FINALCHECK LIST
At least 1m clearance maintained from combustible constructions to the sides and back
of this grill.
There is no unprotected combustible construction over the grill.
All internal packaging removed.
Burners are sitting properly on orifices.
Knobs turn freely.
Unit tested and free of leaks.
User informed of gas supply shut off valve location.
Make sure that the hose is not in contact with part s of the BBQ becoming hot and that the
hose don’t have any constraint applying on it and that it is not twisted
GRILL LIGHTING INSTRUCTIONS
WARNING: IMPORTANT!
BEFORE LIGHTING
Finally inspect the gas supply hose before turning the gas “ON”. If there is evidence of cuts,
wear, or abrasion, it must be replaced before use, the replacement hose assembly shall be
that specified by the manufacturer.
VERY IMPORTANT: ALWAYS INSPECT THE HOSE BEFORE EACH USE OF THIS
GRILL.
BEFORE IGNITING THE GRILL, UNSCREW THE BLACK ELECTRONIC IGNITION
BUTTON, AN D PLACE AN AA BA TTE RY INSIDE IT, THEN TIGHTEN IT ( REMEMBER TO
REPLACE THE BATTERY WHEN NO SPARK COMES OUT).

21
TO LIGHT MAIN AND SIDE BURNERS OF THE GRILL:
1. Read instructions before lighting.
2. Turn all knobs to “O” then open the tank valve. Always keep your face and body as far
from the grill as possible when lighting.
3. Open lid during lighting.
4. Push and hold the ignitor button, at the same time push and turn any control knob slowly
to “MAX” position. The electrode will spark simultaneously to light the burner in sequence.
Repeat the same operation when lighting each burner. Turn the control knob to “O”
position IMMEDIATELY if the burner does not light within 5 seconds, wait 5 minutes for
gas to dispel, then repeat the lighting procedure.
5. Follow match lighting instructions if burner can’t be lit after repeated 3-4 times.
TO LIGHT THE MAIN AND SIDE BURNERS BY MATCH (AS THE BELOW FIGURE
SHOWN):
If the burner will not light after several attempts then the burner can be match lit.
Tools:
Lighting rod (hanging behind the right side shelf)
Usage:
1. Read instructions before lighting.
2. Open the lid during lighting.
3. Simply place a match between the coils on the end of the lighting rod, light the match and
insert it into the hole of firebox to ignite.
4. Push and turn the knob to “MAX” position, and make sure the burner lights and stays
lighted.
5. Repeat 3~4 to light other burners.
22
Keep a spray bottle of soapy water near the gas supply valve and check
the connections before each use.
Do not light the grill if odor of gas is present.
FLAME CHARACTERISTICS
Check for proper burner flame characteristics. Each burner is adjusted prior to shipment;
however, variations in the local gas supply may take subtle necessary adjustments.
Burner flames should be blue and stable with no yellow tips, ex cessive noise, or lifting. If any
of these conditions exist call our customer service line. If the flame is yellow, it indicates
insufficient air. If the flame is noisy and tends to lift away from the burner, it indicates too
much air.
NOTE: small yellow tips are ok.
OPERATION INSTRUCTIONS
!!!CAUTION!!!
1. Often clean the grill, a grease fire that may damage the grill may occur if the grill
has not been cleaned frequently.
2. NEVER leave the grill unattended while using.
3. Do not use water to extinguish the grease fi re, it may cause bod y injury. Turn knobs
off and gas tank off in case grease fire occurs.
4. Grease fire can’t be put out by closing the lid. Turn off knobs and gas tank
IMMEDIATELY if any grease fire occurs.
!!!WARNING!!!
For you safety use of grill:
1. Keep grill area clear and free from any flammable material.
2. Never let chi ldren operate the grill or play near the grill.
3. This grill is for outdoor use ONLY. NEVER use in an enclosed area like carport,
porch, covered patio, garage, or under a surface that can catch fire.
4. Use grill at least 1m away from any wall or surface. 3m away from objects that may
spark and ignite gas i.e. live electrical appliances, pilot lights of water heaters, etc.
5. Do not use this grill on or under wood balconies.
6. This grill is designed to use onl y the limitative gas, DO NOT use lava rock, briquets,
charcoal on it.

23
7. NEVER light the burner with lid closed. Non-ignited gas accumulated inside a closed
grill may cause explosions.
8. Check the burner flames periodically.
9. Turn off the gas supply when the grill is not in use.
10. Always turn off the gas tank completely and detach from the grill before moving.

24
GENERAL USE OF THE GRILL:
The grill burners encompass the entire cooking area and are side ported to minimize
blockage from falling grease and debris. Above main burners are stainless steel radiated.
The igniter knobs are located on the valve panel. Follow the lighting instructions printed on
the control panel.
USING THE GRILL:
Grilling requires high heat for searing and proper browning. Most foods are cooked at the
“MAX” heat setting for the entire cooking time. However, when grilling large pieces of meat
or poultry, it may be necessary to turn the heat to a lower setting after the initial browning.
This cooks the food through without burning the outside. Foods cooked for a long time or
basted with a sugary marinade may need a lower heat setting near the end of the cooking
time.
Make sure the grill has been leak tested and is properly located.
Remove any packing material.
Light the grill burners using the instructions in this manual.
Turn the control knob to “MAX” and preheat the grill for 15 minutes.
Notice: The grill lid is to be closed during the appliance preheat period.
Place the food on the grill and cook to the desired doneness. Adjust heat setting, if
necessary. The control knob may be set to any position between “MAX” and “MIN”.
NOTE: The grill is designed to grill efficiently without the us e of lava rocks or briquettes of
any kind. Heat is radiated by the enameling flame tamers under the cooking grids.
NOTE: The hot grill sears the food, sealing in the juices. The longer preheat, the faster the
meat browns.
CARE & MAINTENANCE
MAINTENANCE
1. Keep the grill area clear and free from combus tible materials, gasoline and other
flammable vapors and liquids.
2. Visually check burner flames as following:
a. Remove cooking grids and flame tamers.
b. Light burners.
c. Turn knobs from MAX to MIN, Check the flame status, the flame in MIN position
should be smaller than in HI position, as figure shown below.
d. Always check flame before each use, see TROUBLESHOOTING if any

25
abnormal status found.
3. Call our after service center warranty replacement parts.
CLEANING
ENAMELING CLEANING
Always use the mildest cleaning the enameling parts.
DO NOT USE ACID DETERGENT AND/OR ANTIRUST TO CLEAN THE CONTROL
PANEL WITH PRINTING. SUCH STRONG CLEANSER MAY CLEAN OFF THE
PRINTING.
COOKING AREA CLEANING
The easiest way to clean the grill is to clean immediately after turning off the flame and
cooking is completed. Wear a barbeque mitt to protect your hand from the heat and steam.
Dip a brass bristle barbeque brush in tap water and scrub the hot grill. Dip the brush
frequently in the water. Steam, created as water contacts the hot grill, assists the cleaning
process by softening any food particles. The food particles will fall and burn. Never immerse
a hot part in water.
GRILL BURNER CLEANING
1. Be sure the tank valve and the knobs are in the “O” position. Make sure the grill is cool.
2. Clean the exterior of the burner with a wire brush. Cl ear stubborn scale with a metal
scraper. Clear any clogged ports with a straightened paper clip. Never use a wooden
toothpick as it may break off and clog the port.
3. Please note if insects or other obstructions are blocking the flow of gas through the
burner, you will need to call our customer service line.
VERY IMPORTANT: The orifice of the valve must be located in the center of burner
section after move and clean. Otherwise, it may cause serious body injury and
property damage. Swing the burner slightly after replaced to check whether it is
installed properly.
Never dismantle the setting device.
The frequency to clean the burner relies on how often you use the grill.
GREASE TRAY CLEANING
The grease tray should be emptied and wiped down periodically and washed in a mild
detergent and warm water solution. A small amount of sand or cat litter may be placed in

26
bottom of grease tray to absorb the grease.
TROUBLE SHOOTING
SPIDER AND INSECT WARNING
Spiders and insects can nest in the burners after storing, these nest can cause fires inside
the tube or beneath the grill. This is very dangerous condition. So always clean the burners
before use after storing.
WHEN TO LOOK FOR SPIDERS
Inspect the burners at least once a year or immediately in case any of the following
conditions occur:
1. Yellow flame with insects burning smell.
2. Temperature can’t rise.
3. Heats unevenly.
4. The burners make popping noises.

27
Trouble Shooting
PROBLEMS POSSIBLE CAUSE SOLUTIONS
Burner won’t light
after turn and push
the knobs
Electrode deposited with
cooking residues
Use clean swab and alcohol to
clean.
Electrode damaged Replace.
Electrode wires are loose or fall
off
Reconnect or replace with new
Electrode assembly with wires.
Orifice blocked Check the orifice for blockage.
Wire is shorting
Replace with new Electrode
assembly with wires.
Burner can’t light by
match
No gas Open the gas tank valve.
Gas flow are not smooth Clear burner tubes.
Incorrect assembly between
burner and valve
Re-assemble.
Yellow or orange
flame, with gas odor
Incomplete combustion Call our customer service center.
Low heat with knob
in “MAX” position.
Gas hose bent or kinked Smoothen it.
Burner or orifice blocked. Clear.
Low gas pressure Call the gas dealer.
Grill not preheated Preheat the grill for 15 minutes.
Flare-up
Excessive meat fat Cut off fat before grilling.
Over high temp. Adjust.
Grease deposit Clean.
Flame out Over high winds Find a less wind place.
Flame lifting Over high gas pressure Call the gas dealer.
Flashback Burner port blocked Clean.
Grease fire Grease accumulated in food
Turn off knobs, tank Valve, leave lid
open, let fire burn out. Clean the grill
after cool.

28
GRILLING TIPS
1. The doneness of meat, whether rare, medium, or well done, is affected by the thickness
to a large extent.
2. The cooking time is affected by the kind of meat, the size and shape of the cut, the
temperature of the meat when cooking begins, and the degree of doneness desired.
3. Defrost meat in the refrigerator overnight. Don’t use a microwave, this always yields a
juicier.
4. Use a spatula instead of tongs or a fork to turn the meat, as a spatula will not puncture
into the meat and let the juices come out.
5. Wear protective gloves when handling particularly hot components.
6. To get the juiciest meats, add seasoning or salt after the cooking is finished on each side
and turn the meat only once (juices are lost when the meat is turned several times). Turn
the meat just after the juices begin to bubble to the surface.
7. Cut off any excess fat from the meat before grilling.
FOOD SAFETY
Always follow the following tips to enjoy a safe and heath outdoor grilling.
1. Always use hot soapy water to wash hands, surfaces & utensils after processing raw
meat.
2. Always separate the raw meats from done foods to avoid cross contamination
3. Always use clean utensils to handle the food.
4. Always cook the meat thoroughly to k ill germs. Use a thermometer to inspect the inner
temperature of the meat, if necessary.
5. Place the done foods and leftovers promptly into refrigerator, if eat no longer at that
moment.
DO NOT LEAVE THE GRILL UNATTENDED WHILE COOKING.
PLACEMENT OF THE GRILL
1. Clean the grill.
2. Store the grill in well-ventilated dry outdoors and out of reach of children when the gas
tank is connected to the grill.
3. Store the grill in dry indoors ONLY after the gas tank is turned off and removed, the gas
tank must store outdoors, out of the reach of children, NEVER store the tank in a
building, garage or any other enclosed area.
4. Put on the vinyl cover supplied with this grill.
 Loading...