

Page 1

Vanu® CompactRAN™ CDMA/GSM
Base Station Hardware Installation
Guide
Date of Release: October 2017
Page 2

Copyright
Copyright © 2016 Vanu, Inc. and Vanu India Private Limited. All rights reserved.
This item and the information contained herein are the property of Vanu, Inc. and Vanu India Private Limited. This publication may
be used, copied, or distributed only in accordance with the terms of the license agreement. Any other use, reproduction, or
distribution may occur only upon prior written consent from Vanu, Inc. or Vanu India Private Limited.
Disclaimer and Restrictions
The material in this publication is for information only and is subject to change without notice. This material does not constitute a
commitment on the part of Vanu, Inc. or Vanu India Private Limited.
While reasonable efforts have been made in the preparation of this publication to assure its accuracy, Vanu, Inc. and Vanu India
Private Limited assume no liability resulting from technical or editorial errors or omissions, or for any damages whatsoever
(including, but not limited to, incidental, special, or consequential damages) resulting from the furnishing, performance, or use of
the information contained herein. Vanu, Inc. and Vanu India Private Limited reserve the right to revise this publication, and to make
changes on the content hereof without notice.
The information in this document may be used by customers solely for the use and understanding of Vanu, Inc. and Vanu India
Private Limited products and solutions. This document is not meant to define an interface between Vanu, Inc. or Vanu India Private
Limited products and any third party hardware or software. Vanu, Inc. and Vanu India Private Limited reserve the right to change
the design and implementation used for any of the tables, screens, field names, etc. to enhance its products as it sees fit.
Warranties
THIS INFORMATION IS PROVIDED “AS IS” WITHOUT WARRANTY OF ANY KIND, EITHER EXPRESSED OR IMPLIED,
INCLUDING, BUT NOT LIMITED TO, THE IMPLIED WARRANTIES OF MERCHANTABILITY, FITNESS FOR A PARTICULAR
PURPOSE, OR NON-INFRINGEMENT.
REFERENCES TO CORPORATIONS, THEIR SERVICES AND PRODUCTS, ARE PROVIDED “AS IS” WITHOUT WARRANTY
OF ANY KIND, EITHER EXPRESSED OR IMPLIED. IN NO EVENT SHALL VANU INC. BE LIABLE FOR ANY SPECIAL,
INCIDENTAL, INDIRECT OR CONSEQUENTIAL DAMAGES OF ANY KIND, OR ANY DAMAGES WHATSOEVER RESULTING
FROM LOSS OF USE, DATA OR PROFITS, WHETHER OR NOT ADVISED OF THE POSSIBILITY OF DAMAGE, AND ON ANY
THEORY OF LIABILITY, ARISING OUT OF OR IN CONNECTION WITH THE USE OR PERFORMANCE OF THIS
INFORMATION.
Descriptions of, or references to, products, services or publications within this documentation do not imply endorsement of that
product, service or publication. Neither Vanu Inc. nor Vanu India Private Limited make any warranty of any kind with respect to the
subject matter included herein, the products listed herein, or the completeness or accuracy of the information. Vanu, Inc. and Vanu
India Private Limited specifically disclaim all warranties, express, implied or otherwise, including without limitation, all warranties of
merchantability and fitness for a particular purpose.
THIS PUBLICATION COULD INCLUDE TECHNICAL INACCURACIES OR TYPOGRAPHICAL ERRORS. CHANGES MAY BE
PERIODICALLY MADE TO THE INFORMATION HEREIN.
Vanu and the Vanu logo are either registered trademarks or trademarks of Vanu, Inc. and Vanu India Private Limited. These
trademarks may not be used in connection with any product or service that is not a product or service of Vanu, Inc. or Vanu India
Private Limited.
All other product names mentioned herein are trademarks, service marks, registered trademarks, or registered service marks of
their respective owners.
Compliance with Applicable Laws and Export Control Laws
Use of the information in this publication is governed by applicable federal, state, and local laws, including export control laws, laws
relating to the operation of wireless transceivers, and other laws.
Vanu, Inc. and Vanu India Private Limited products and publications are commercial in nature. Use, duplication, or disclosure by
the United States Government is subject to the restrictions set forth in DFARS 252.227-7013 and FAR 52.227-19.
Trademarks
Page 3

Vanu, Inc. and Vanu India Private Limited
81 Hartwell Avenue
Lexington, MA 02421
USA
Vanu India Pvt Ltd
1st Floor, Vaswani Presidio
Panathur Main Road
Kadubeesanahalli,
Bangalore - 560103, India
Page 4

Page 5

. . . . .
. . . . . . . . . . . . . . . . . . . . . . . . . . . . . . . . . . .. . . . . . . . . . . . . . . . . . . . . . . . . . . . . . . . . . .
. . . . .
C
ONTENTS
Preface ................................................................................................... vii
Audience ....................................................................................... viii
Conventions .................................................................................. viii
Vanu Technical Support.................................................................. ix
1 Overview.............................................................................................. 1
2 Preinstallation Checklist.................................................................... 3
Technical Specifications.................................................................. 3
Hardware Packing List .................................................................... 5
Additional Equipment ...................................................................... 6
Preinstallation Requirements .......................................................... 7
3 Preparing the CompactRAN for Installation..................................... 9
Installing the ConfigureCell Tool ................................................... 10
Setting Up the CompactRAN ........................................................ 12
Changing the Password ............................................................ 16
Restrictive Password Requirements ......................................... 17
4 Installing the CompactRAN CDMA/GSM Base Station.................. 19
Regulatory Information.................................................................. 20
Installation Warnings..................................................................... 20
CompactRAN CDMA/GSM Base Station Visual Checks .............. 23
Installing the CompactRAN CDMA/GSM Base Station................. 26
Connecting to the Network............................................................ 29
CompactRAN LEDs ...................................................................... 30
5 Additional Information ..................................................................... 31
Antenna Information...................................................................... 31
Connecting the Antenna............................................................ 31
Antenna Notes........................................................................... 31
Verifying the Firmware .................................................................. 32
Disposing of Equipment ................................................................ 33
v
Page 6

vi
Vanu CompactRAN CDMA/GSM Base Station Hardware Installation Guide
Page 7

. . . . .
. . . . . . . . . . . . . . . . . . . . . . . . . . . . . . . . . . .. . . . . . . . . . . . . . . . . . . . . . . . . . . . . . . . . . .
. . . . .
P
REFACE
This document provides the information for the Vanu® CompactRAN CDMA/GSM
base station hardware installation. The following table lists the sections and topics of
this guide.
Chapter Title Description
1
Overview
Provides a brief overview of the
CompactRAN CDMA/GSM base
.
station
2
Preinstallation Checklist
Provides a list of hardware, software,
and network information needed to
install the
CompactRAN
CDMA/GSM base station.
3
Preparing the CompactRAN
for Installation
4
Installing the CompactRAN
CDMA/GSM base station
5
Additional Information
Provides information on installing the
ConfigureCell™ tool software on the
installation laptop. This software is
used to make sure the CompactRANs
are working correctly before installing
them onsite.
Provides information needed to install
CompactRAN CDMA/GSM
the
base station
wall.
Provides information on antennas,
checking the CompactRAN firmware
version, and disposing of equipment.
on the mounting pole or a
vii
Page 8

AUDIENCE
CONVENTIONS
Note: This guide is intended for operators who install, configure, and upgrade the
Vanu GSM software. You should be familiar with the following:
• Linux®
• Radio Access Networks (RAN) standards and terminology
• Networking fundamentals
• Wiring fundamentals
Notes and Cautions call attention to certain topics. To avoid loss of data or to make
most efficient use of the product, please devote special attention to these areas.
Note: This symbol calls attention to additional information that may be of practical
use in following a procedure or understanding a concept.
Caution: This symbol indicates issues or practices that could
damage the equipment or cause loss of data if you
disregard the required safety precautions.
WARNING: This symbol indicates issues or practices that could
damage the equipment or cause bodily harm or death
if you disregard the required safety precautions
viii
Vanu CompactRAN CDMA/GSM Base Station Hardware Installation Guide
Page 9

VANU TECHNICAL SUPPORT
For questions about any Vanu products, contact:
Telephone:
• US: 1.617.864.1711, option 5
VANU TECHNICAL SUPPORT
. . . . .
• India:
E-mail: [email protected]
Technical support is available for products and services provided by Vanu. If you need
assistance with any product or service not provided by Vanu, consult the respective
vendor's user manual for technical support information.
+91-80-49196868
ix
Page 10

x
Vanu CompactRAN CDMA/GSM Base Station Hardware Installation Guide
Page 11

. . . . .
. . . . . . . . . . . . . . . . . . . . . . . . . . . . . . . . . . .. . . . . . . . . . . . . . . . . . . . . . . . . . . . . . . . . . .
. . . . .
O
VERVIEW
1
The CompactRAN CDMA/GSM base station is a small, lightweight, low power
consumption outdoor base station. The Service Enclosure is a cabinet containing an
AC-powered UPS, a battery, and the CDMA baseband processor. A bracket is used for
pole-mounting or wall-mounting. The CompactRAN CDMA/GSM base station can be
installed in hard to cover outdoor areas such as rural areas, spot fill-in on highways, or
in rugged terrain areas. It can be mounted on poles or alternative structures,
eliminating the need to place equipment on the ground.
This document provides the information needed to install the CompactRAN
CDMA/GSM base station:
•
Preinstallation Checklist
•
Preparing the CompactRAN for Installation
•
Installing the CompactRAN CDMA/GSM base station
•
Additional Information
1
Page 12

CompactRAN
Service
Enclosure
Figure 1-1. CompactRAN CDMA/GSM Base Station
2 Vanu CompactRAN CDMA/GSM Base Station Hardware Installation Guide
Page 13

. . . . .
. . . . . . . . . . . . . . . . . . . . . . . . . . . . . . . . . . .. . . . . . . . . . . . . . . . . . . . . . . . . . . . . . . . . . .
. . . . .
P
REINSTALLATION
Before you physically install the CompactRAN CDMA/GSM base station, you must
make sure you have completed the following preinstallation requirements:
C
HECKLIST
2
Caution: Do NOT disassemble the CompactRAN CDMA/GSM
TECHNICAL SPECIFICATIONS
The following is a list of the technical specifications for the CompactRAN
CDMA/GSM base station:
• Output power
- One GSM TRX 5 Watts average power
- One CDMA TRX 2 Watt average power
• Input Power
- 95 -140V AC
- 60 Hz
- 3 amp Max
base station casings. Contact
for any hardware issues.
Vanu Technical Support
3
Page 14

Environmental Specifications
Table 2-1. Environmental Requirements
Environmental
Requirement
Operating Temperature -40C (-20 cold start) to 50C
Storage Temperature -40C to 70C (-40F - 158F)
Operating Humidity Maximum humidity up to 100%
Physical Specifications
Table 2-2. Physical Specifications
Attribute Description
Height 53.3 cm (21 in)
Width 58.4 cm (23 in)
Depth 25.4 cm (10 in)
Description
(-40F (-4 cold start) - 122F)
Weight 22.7 Kg (50 lbs.)
4 Vanu CompactRAN CDMA/GSM Base Station Hardware Installation Guide
Page 15
HARDWARE PACKING LIST
Unpack the following items and check for damages:
Vanu Equipment
Hardware Packing List
. . . . .
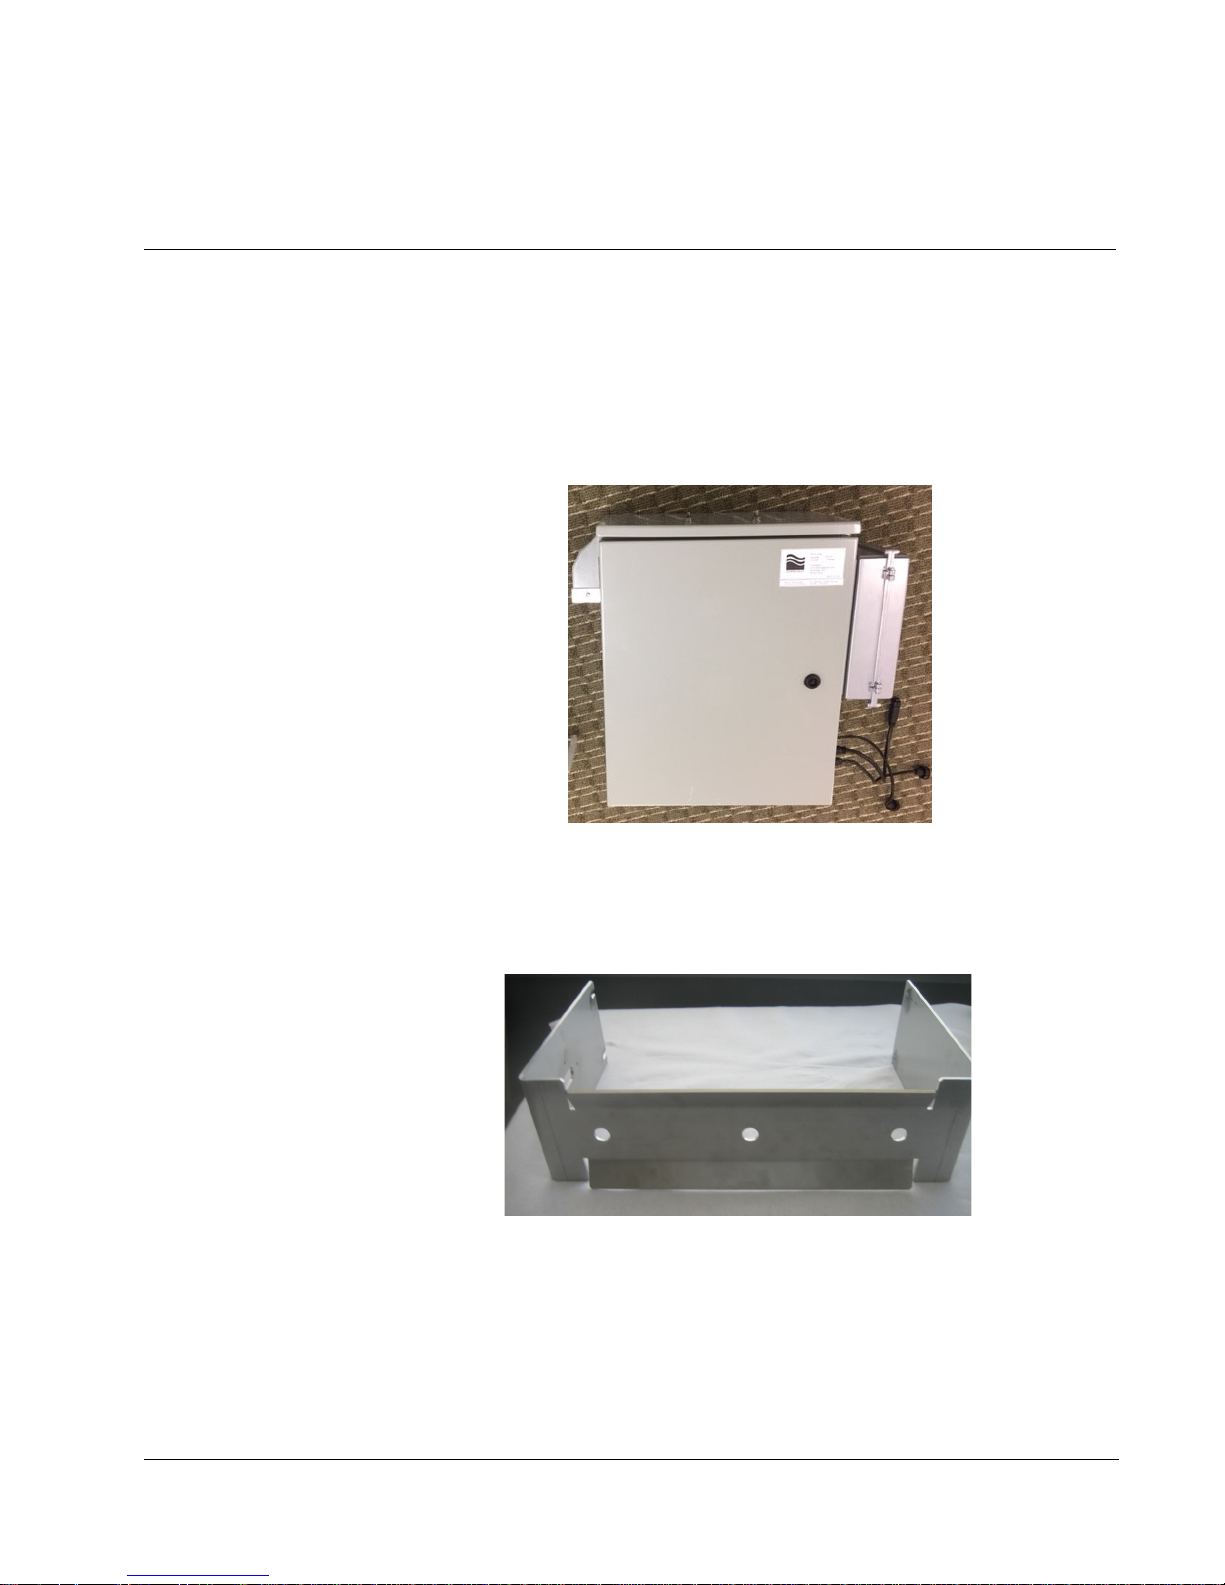
• CompactRAN CDMA/GSM base station (
Figure 2-1. CompactRAN CDMA/GSM Base Station
• Mounting bracket - 1 (
Figure 2-2
Figure 2-2. Mounting Hardware
)
Figure 2-1
).
5
Page 16

Third-Party Equipment
• Dual RX/TX antennas and cables terminated with male N-Type connectors,
recommended 8 dBi maximum gain
• GPS Antenna and cable terminated with male SMA connector - Recommended
GPS antenna is Trimble Bullet™ III 57860-20
• Lightening protection devices for outdoor antennas
• Backhaul modem for Internet connection - power is provided inside Service
Enclosure
ADDITIONAL EQUIPMENT
You also need the following to install the CompactRAN CDMA/GSM base station:
• Windows® Installer laptop, runnings Windows 7 or later
• Mobile phone for testing
• Power source
• Ethernet connection
• Phillips head screw driver
• Wrench
• 7/16 in socket to open the Service Enclosure
• Digital multi-meter
• Three Hex Head 5/8” Lag Screws, 4” long for mounting on pole or wall
6 Vanu CompactRAN CDMA/GSM Base Station Hardware Installation Guide
Page 17

PREINSTALLATION REQUIREMENTS
Before you begin installing the CompactRAN CDMA/GSM base stations, refer to the
following checklist:
• Make sure the Vanu software is installed on the servers. This software includes
ConfigCenter. Refer to the
• Obtain a site plan from the network administrator that provides the following
information:
- Physical installation location of each CompactRAN CDMA/GSM base
station.
- Power source/requirements
- Network source/requirements
- Temperature ranges
- IP addresses for each CompactRAN CDMA/GSM base station
Preinstallation Requirements
Vanu Software Installation Guide
. . . . .
.
• Install the following antennas at each site using the product-specific
documentation:
- GPS antenna
- RX antenna
- TX antenna
• For installations with a VPN:
- VPN Gateway IP address and subnet mask
- User ID and password
- IPSec PSK - PSK group and key
- IPSec Certificate - username, password CA certificate, Device certificate
Note: You can only use IPSec PSK or IPSec Certificate. You cannot use both at the
same time.
7
Page 18

8 Vanu CompactRAN CDMA/GSM Base Station Hardware Installation Guide
Page 19

P
. . . . .
. . . . . . . . . . . . . . . . . . . . . . . . . . . . . . . . . . .. . . . . . . . . . . . . . . . . . . . . . . . . . . . . . . . . . .
. . . . .
REPARING
I
NSTALLATION
THE
Note: This chapter is applicable only if you are using an open VPN.
C
OMPACT
RAN
FOR
3
This chapter provides the information needed to prepare the CompactRAN before
physically installing the CompactRAN CDMA/GSM base station. The preinstallation
procedure is divided into two stages:
• Installing the Vanu ConfigureCell Tool onto the installation laptop.
This procedure is done once. Refer to
• Network Configuration
This procedure is performed for each CompactRAN. Refer to
CompactRAN
.
Installing the ConfigureCell Tool
Setting Up the
.
9
Page 20
INSTALLING THE CONFIGURECELL TOOL
The section provides information for the installing the ConfigureCell tool. This tool is
installed on the Windows installation laptop.
Note: You need at least 23.8 MB of disk space.
1. Download the Vanu-ConfigureCell-Installer-Installer from the
Management Terminal Installer
onto the installation laptop.
2. Click Vanu-ConfigureCell-Installer.exe.
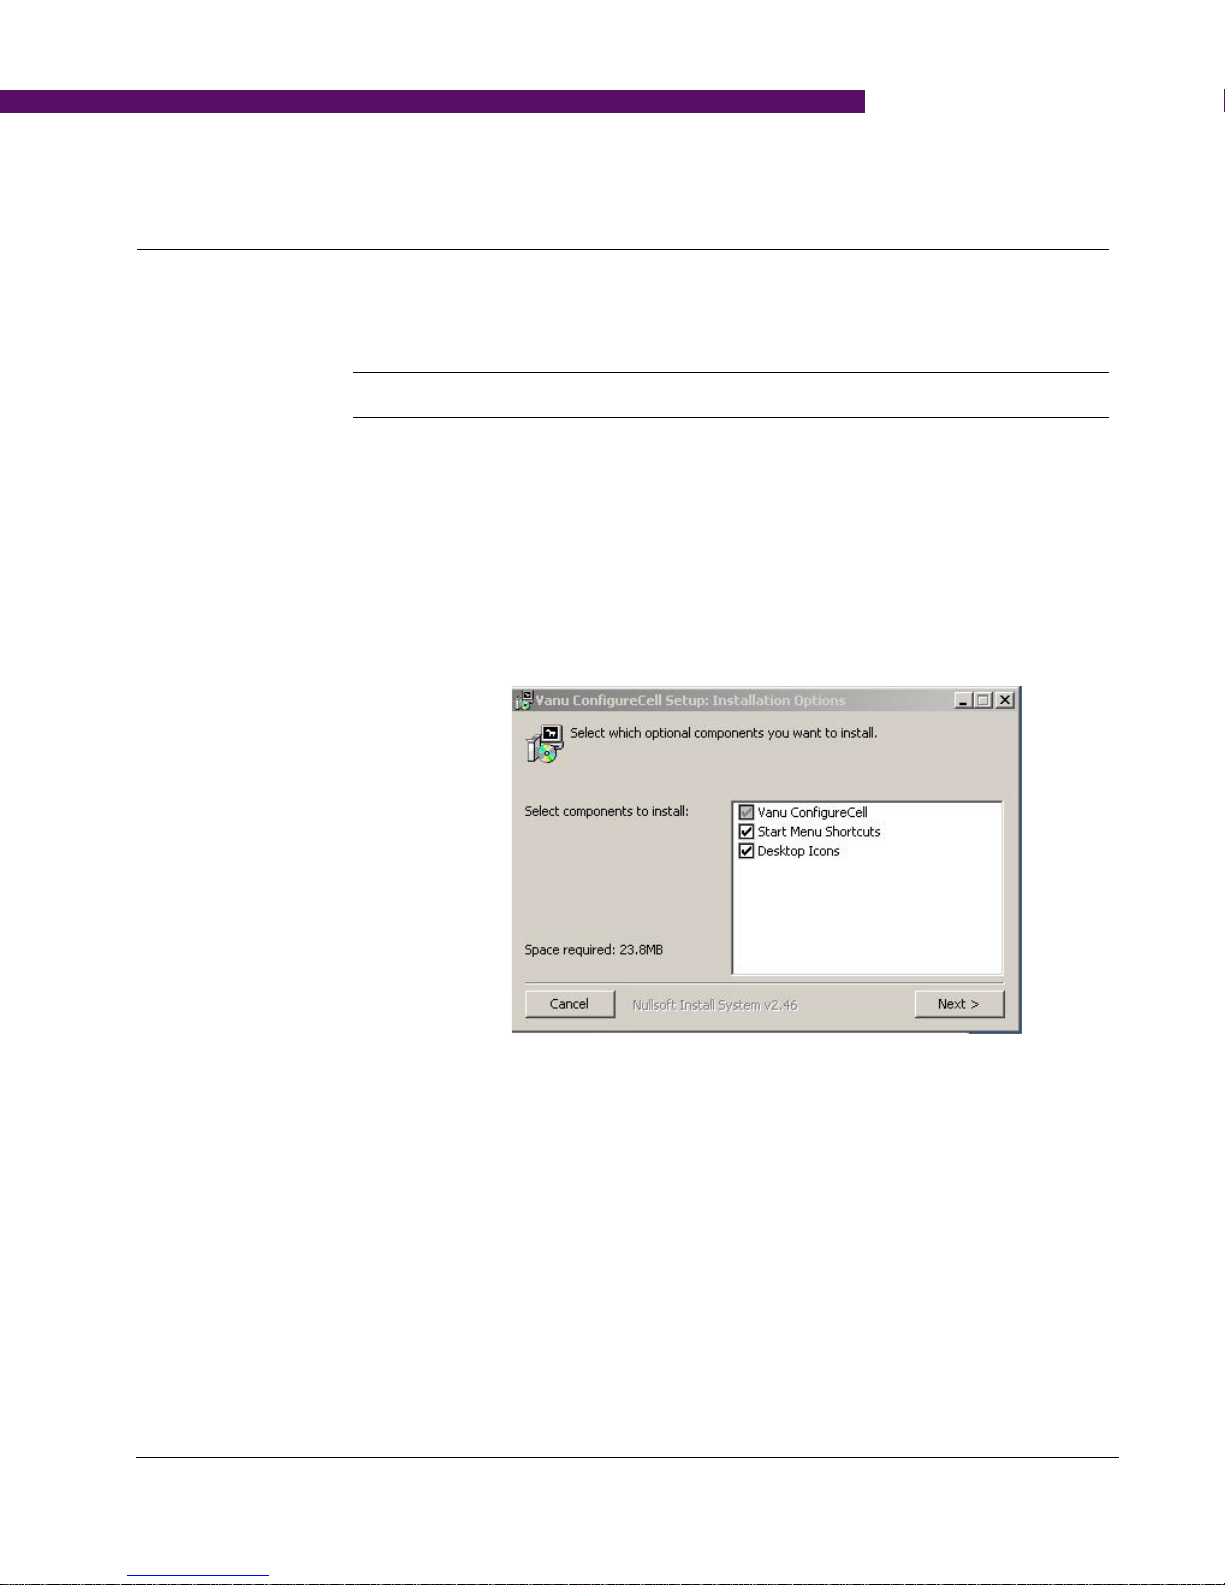
The Vanu ConfigureCell Setup Installation Options dialog box displays
Figure 3-1
(
Figure 3-1. Vanu ConfigureCell Setup Installation Options Dialog Box
):
Vanu Local
3. Make sure Vanu ConfigureCell is selected and click Next.
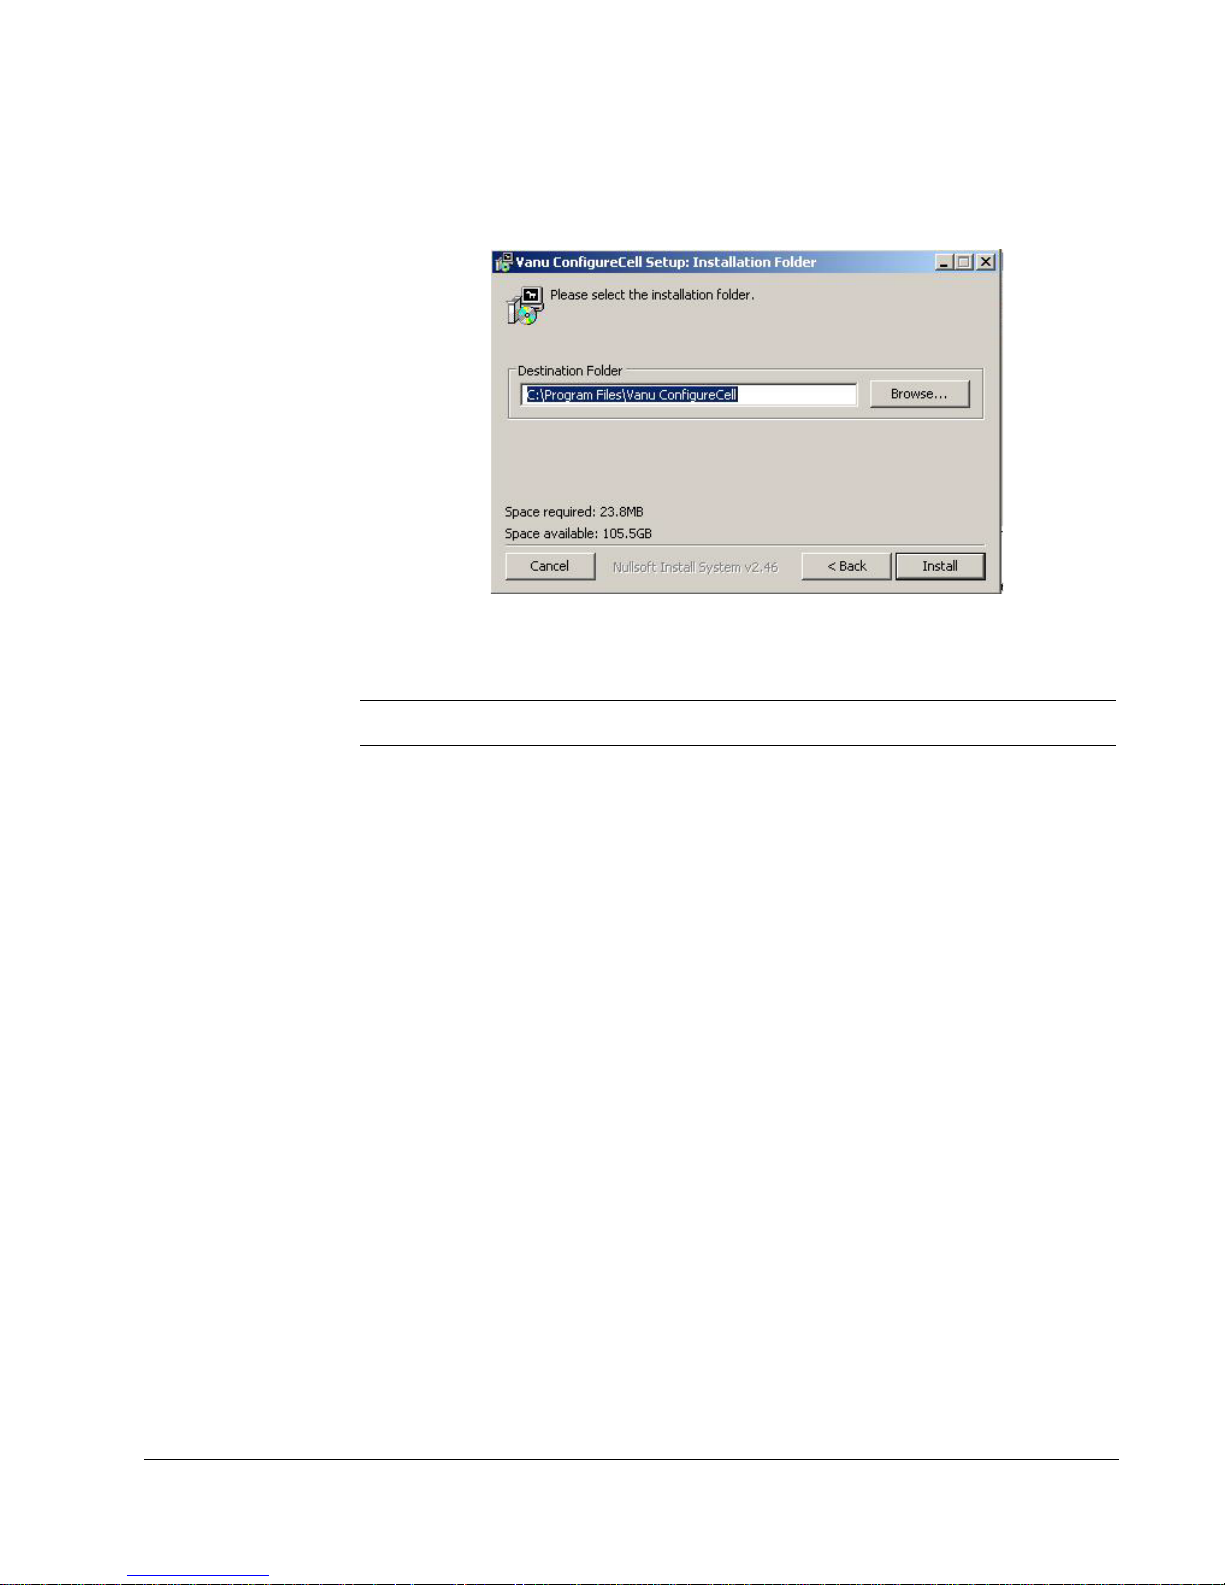
The Vanu ConfigureCell Setup Installation Folder dialog box displays
(
10 Vanu CompactRAN CDMA/GSM Base Station Hardware Installation Guide
Figure 3-2
):
Page 21
Installing the ConfigureCell Tool
Figure 3-2. Vanu ConfigureCell Setup Installation Folder Dialog Box
4. Enter the folder name for where you want to install the ConfigureCell tool.
. . . . .
Note: It is recommended that you use the default folder.
5. Click Install. The installer runs.
6. Click Close after installation completes.
11
Page 22
SETTING UP THE COMPACTRAN
Complete the following steps to set up the CompactRAN:
1. Determine the IP address, subnet masks, and gateway that is assigned to the
CompactRAN.
2. Select Start > All Programs > Vanu ConfigureCell Tool.
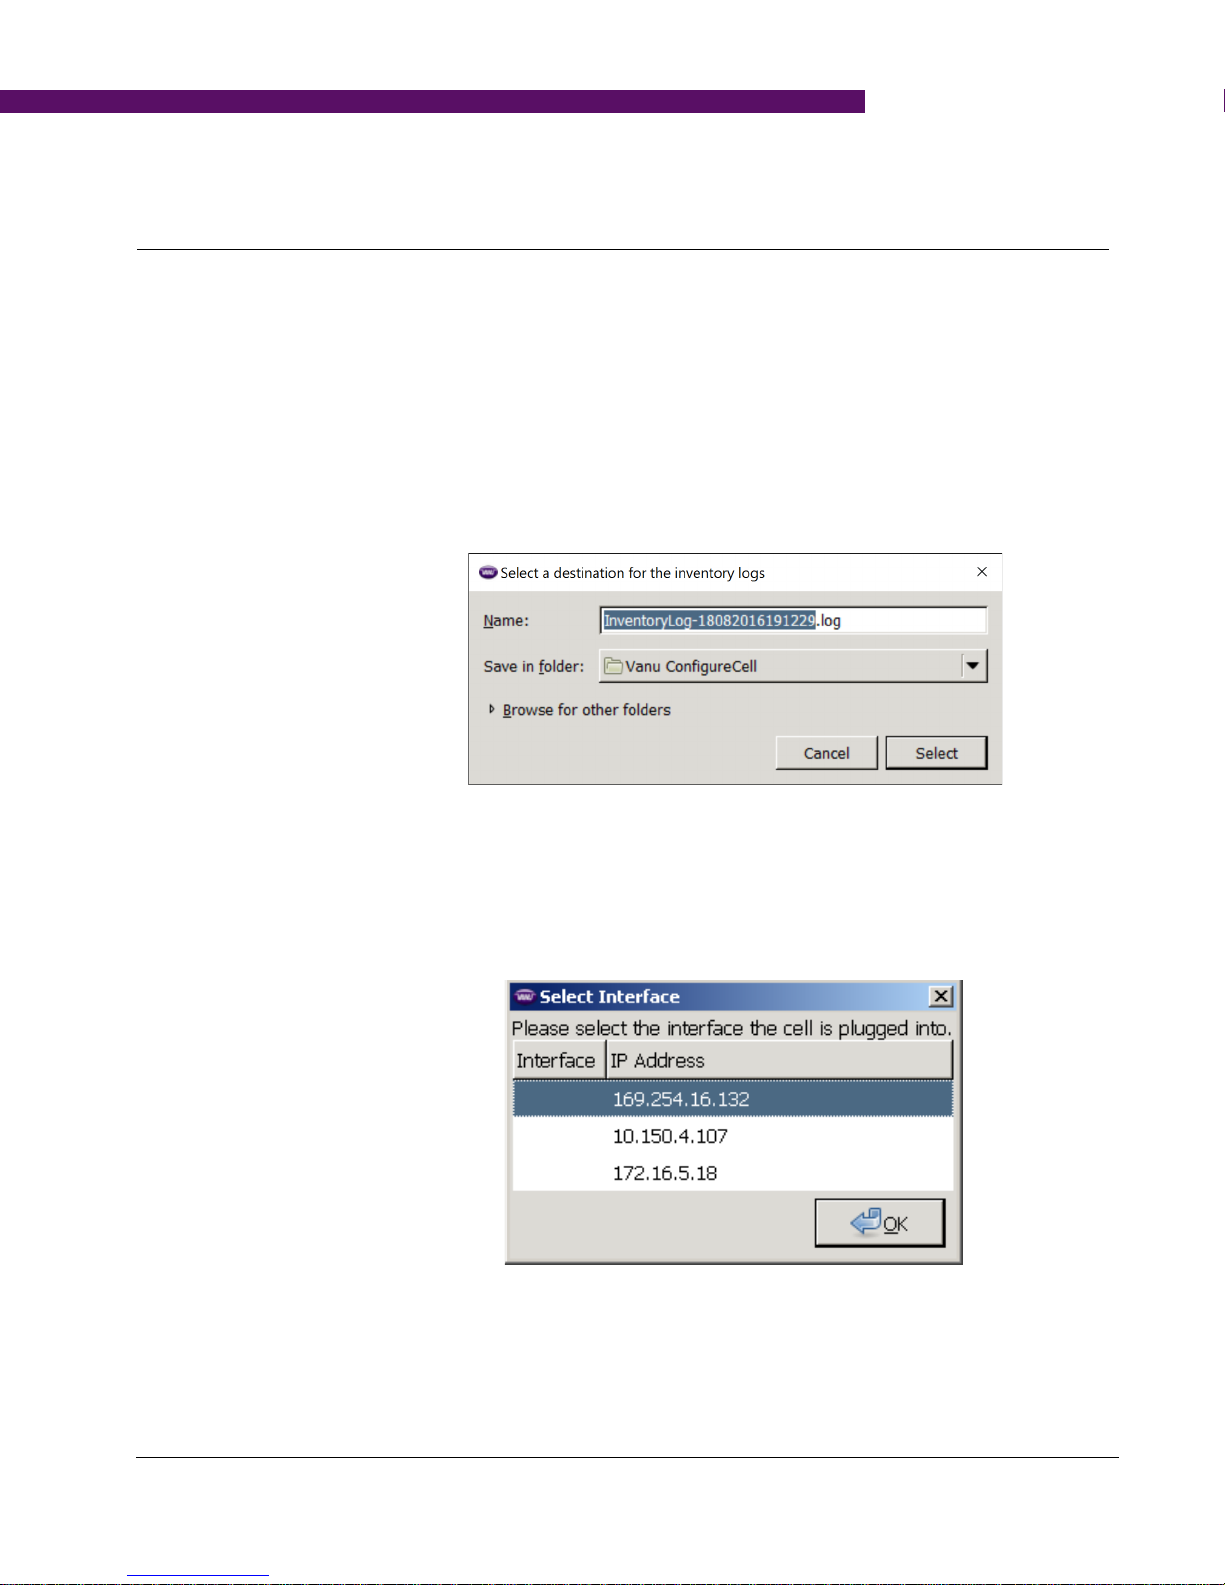
The Vanu Select destination for the inventory logs screen displays (
Figure 3-3. Select Destination for Inventory Logs Screen
3. Click Select.
The Select Interface screen displays (
Figure 3-4. Select Interface Screen
Figure 3-4
).
Figure 3-3
).
4. Select the temporary IP address of the CompactRAN.
5. Click OK.
12 Vanu CompactRAN CDMA/GSM Base Station Hardware Installation Guide
Page 23
Setting Up the CompactRAN
. . . . .
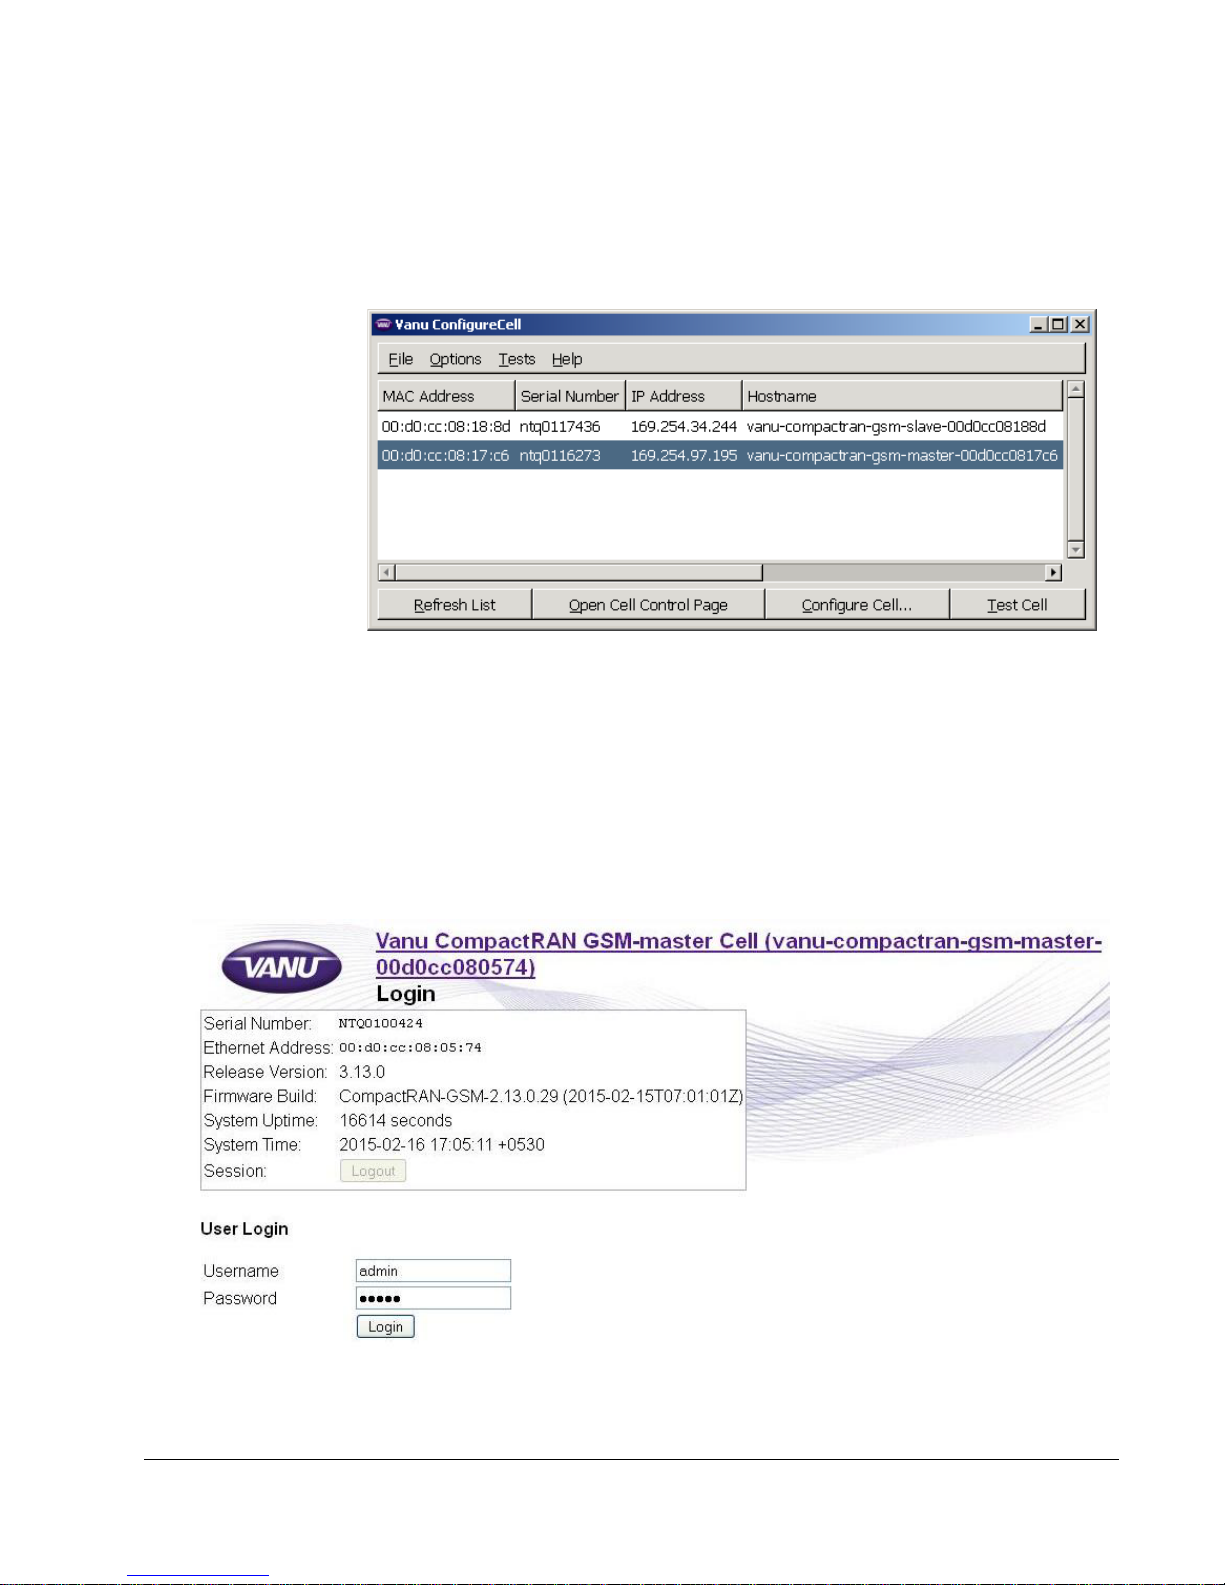
The Vanu ConfigureCell screen displays (
Figure 3-5. Vanu ConfigureCell Tool
6. Select the CompactRAN that you are verifying.
7. Click Open Cell Control Page.
Figure 3-5
).
The login screen displays (
Figure 3-6. Login Screen
Figure 3-6
).
13
Page 24
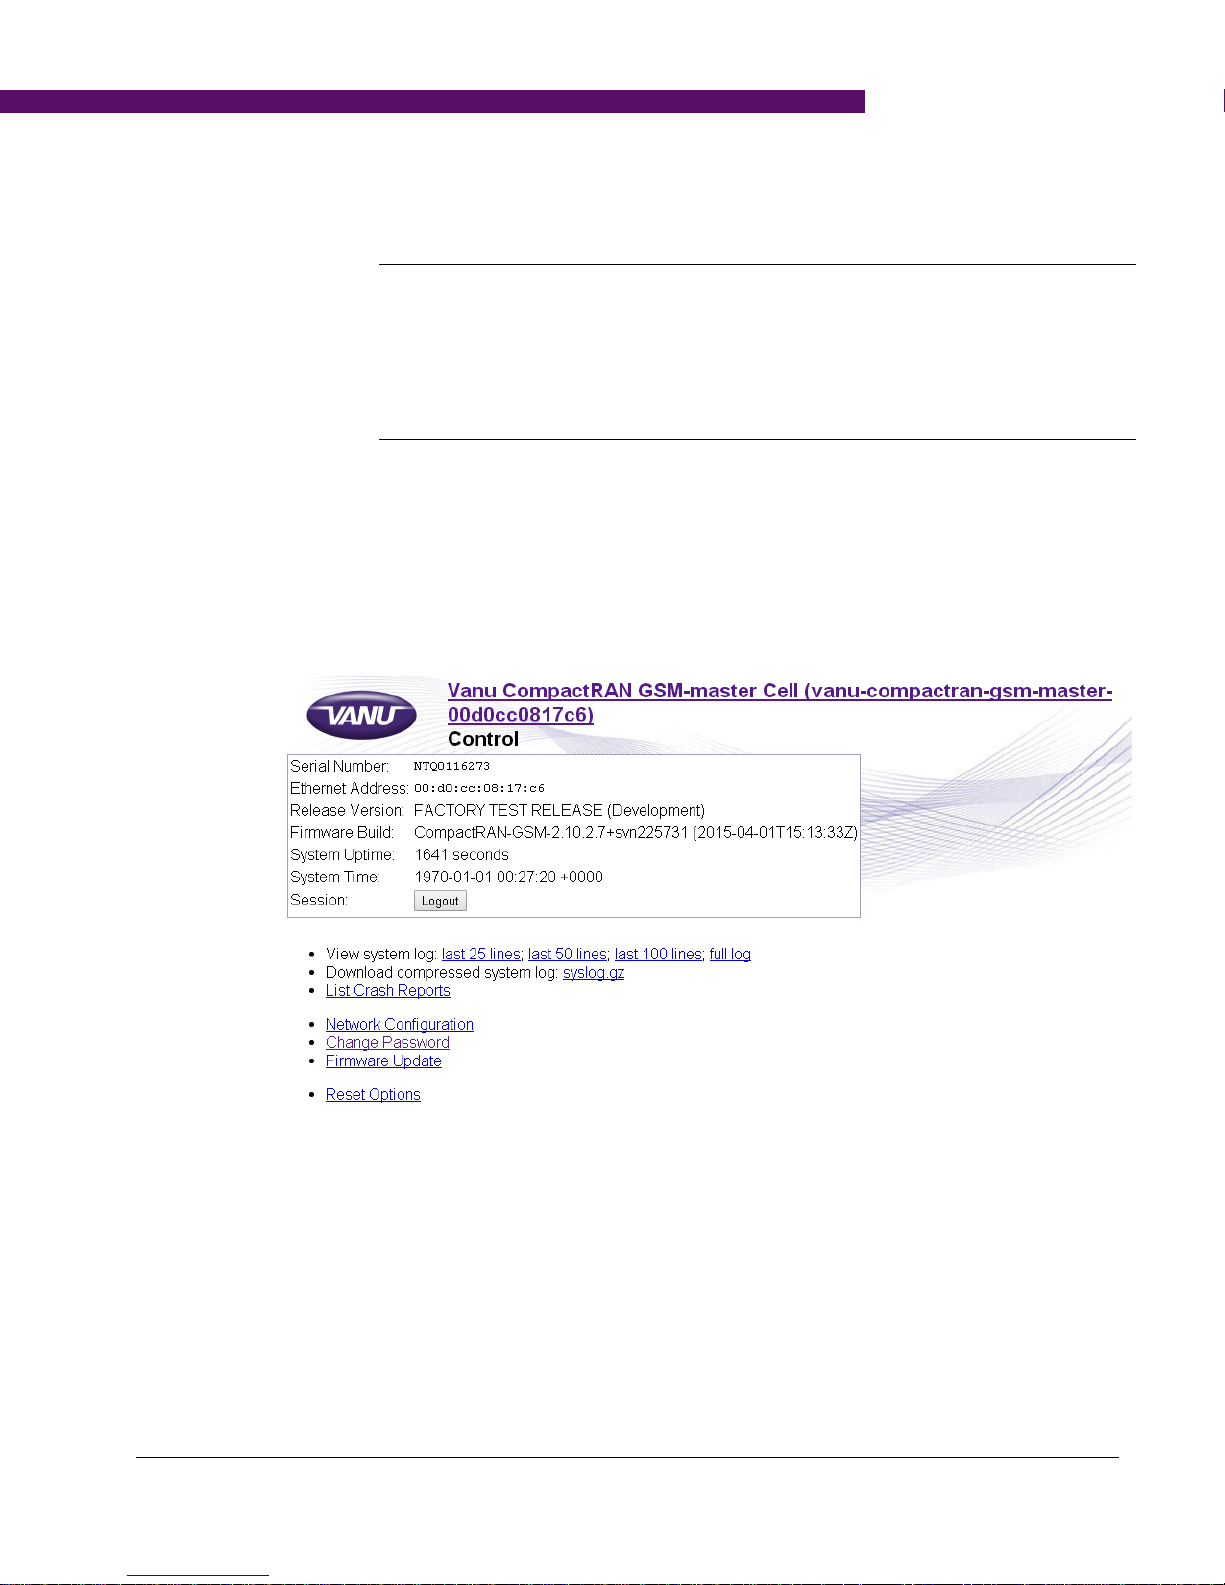
8. Enter the Username.
Note: If you are logging in for the first time, the default Username is admin. The
default Password is admin,
You are then prompted to change the Password. Refer to
Password
. Refer to
Restrictive Password Requirements
on the password policy.
9. Enter the Password.
10. Click Login.
The Vanu CompactRAN Control screen displays. (
Figure 3-7. Control Screen
Changing the
for more information
Figure 3-7
).
11. Click Network Configuration.
14 Vanu CompactRAN CDMA/GSM Base Station Hardware Installation Guide
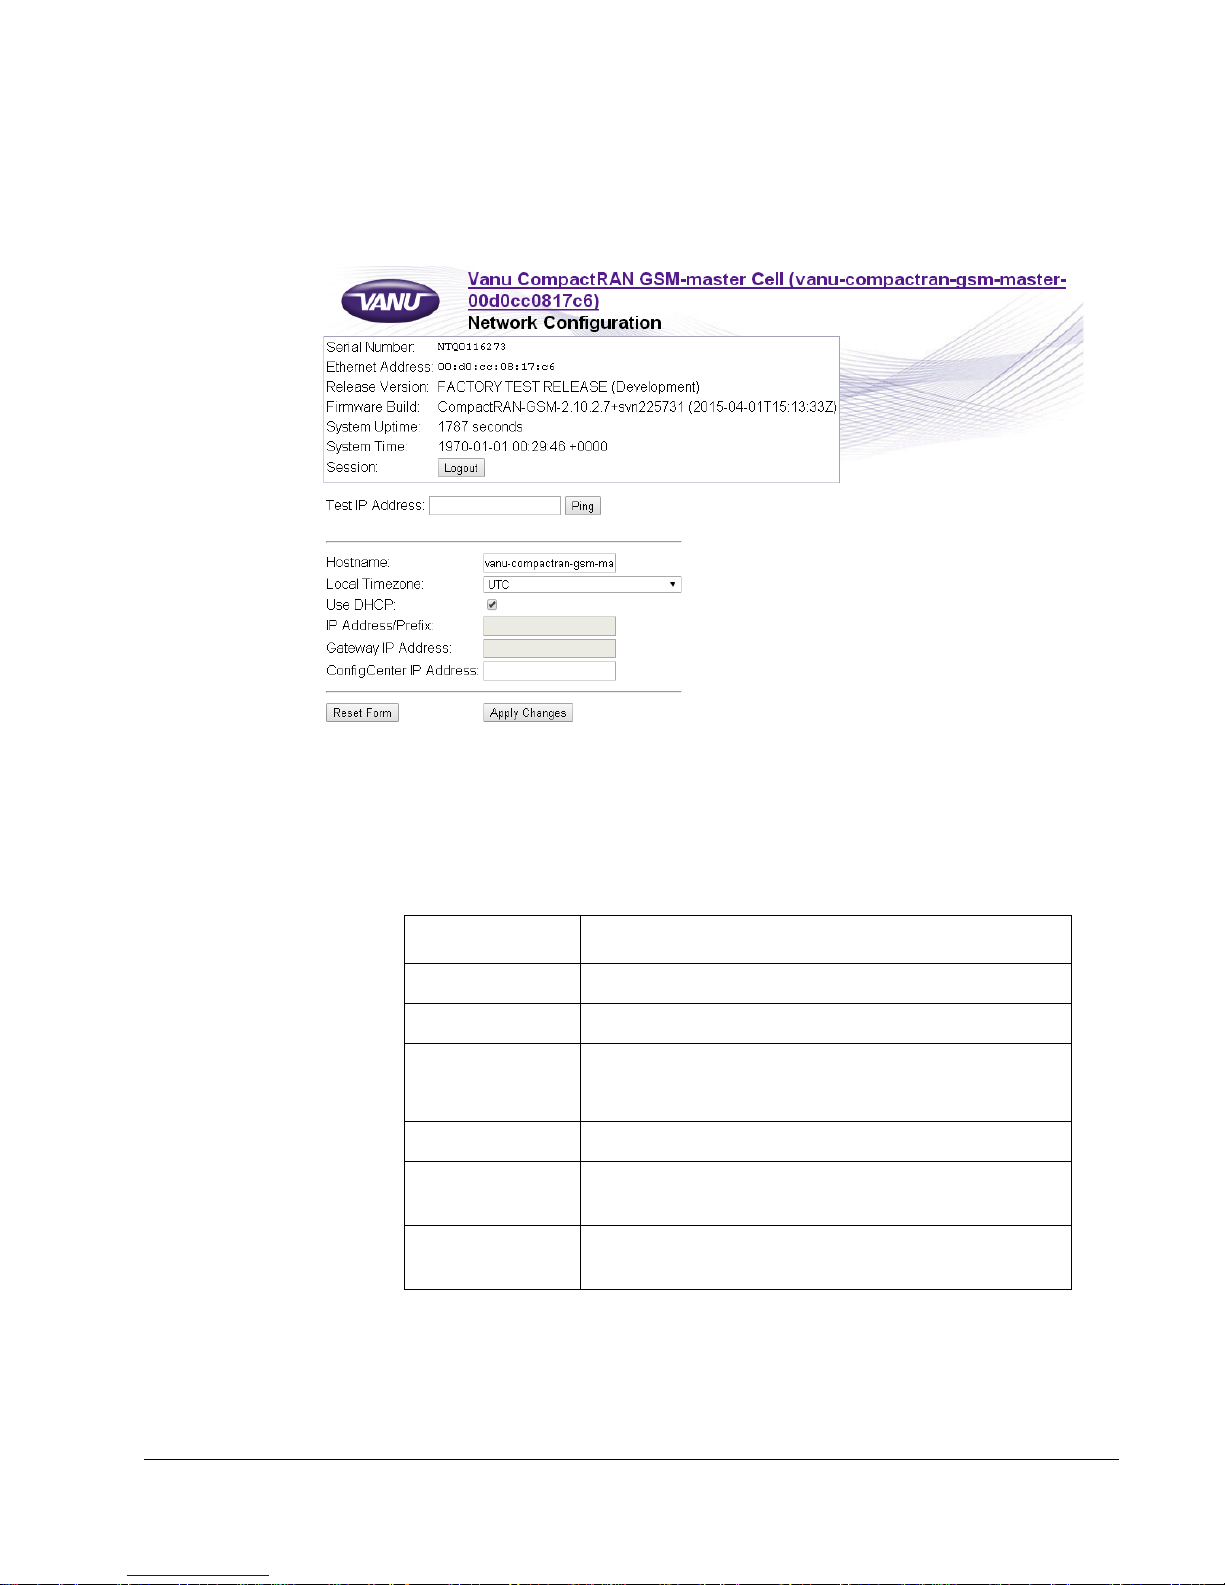
The Vanu CompactRAN Configuration screen displays (
Figure 3-8
).
Page 25
Setting Up the CompactRAN
Figure 3-8. Vanu Network Configuration Screen
. . . . .
12. Enter the following information (
Table 3-1. Network Configuration Information
Field Description
Host Name Enter the host name.
Local Time Zone Select the time zone from the drop-down list.
Use DHCP Select to enable DHCP.
Table 3-1
):
Note: It is recommended that you enable Use DHCP.
IP Address/Prefix Enter the IP address and prefix for the CompactRAN.
Gateway IP
Address
ConfigCenter IP
Address
Enter the Gateway IP address.
Enter the ConfigCenter IP address the ConfigCenter IP
address.
13. Click Apply Changes.
14. Disconnect the CompactRAN from the installer laptop Ethernet.
15
Page 26

Click to return to Control screen.
Changing the Password
The section provides information for changing the ConfigureCell tool password.
Complete the following steps to change the password:
1. Click Change Password (
Figure 3-7
The Change password screen displays (
Figure 3-9. Change Password Screen
2. Enter your Username.
).
Figure 3-9
).
3. Select the Password Policy. Options are:
- Restrictions - Refer to
- Permissive - Password is case-sensitive.
4. Enter the Current Password.
5. Enter the New Password. Refer to the
more information.
6. Re-enter the New Password.
7. Click Change Password.
16 Vanu CompactRAN CDMA/GSM Base Station Hardware Installation Guide
Restrictive Password Requirements
.
Restrictive Password Requirements
for
Page 27

Restrictive Password Requirements
The following list provides the password requirements:
• The password must contain the following:
- Upper case character
- Lower case character
- Special character
- Numerical character
- At least eight characters long. For example, Vanu@123 is a valid password.
• The account locks out for 60 minutes when you enter the wrong password 5
consecutive times.
The last five passwords may not be reused. The password history is enforced.
Setting Up the CompactRAN
. . . . .
17
Page 28

18 Vanu CompactRAN CDMA/GSM Base Station Hardware Installation Guide
Page 29

I
. . . . .
. . . . . . . . . . . . . . . . . . . . . . . . . . . . . . . . . . .. . . . . . . . . . . . . . . . . . . . . . . . . . . . . . . . . . .
. . . . .
NSTALLING
B
ASE
S
TATION
THE
This chapter provides the information necessary to install the CompactRAN CDMA/
GSM base station in the field.
C
OMPACT
4
RAN CDMA/GSM
Before installing the CompactRAN CDMA/GSM base station, make sure you have:
• Installed the server software and ConfigCenter. Refer to the
Installation Guide.
• Set up the power source
• Set up the Ethernet source
Caution: Do NOT disassemble the CompactRAN CDMA/GSM
base station casings. Contact
for any hardware issues.
WARNING: Read
the CompactRAN CDMA/GSM base station. Failure to
follow the warnings and cautions may result in bodily
injury or damage to the CompactRAN CDMA/GSM
base station equipment.
Installation Warnings
Vanu Technical Support
before beginning to install
Vanu Software
19
Page 30
REGULATORY INFORMATION
This section provides the regulatory information:
• The CompactRAN GSM/CDMA base station Model V2-CR-GC-19-02 is
compliant with FCC Title 47 Part 24
• Changes or modifications not expressly approved by Vanu Inc. may void the
user’s authority to operate this equipment.
INSTALLATION WARNINGS
Note: These notices will be provided in both English and French when the product is
marketed or sold in Canada.
Make sure you heed the following installation warning to ensure a safe installation.
WARNING: The operator/administrator of the system must obtain
authorization to operate a transmitter in accordance
with FCC regulations. It is the responsibility of the
operator to ensure they have all required
authorizations.
WARNING: The CompactRAN GSM/CDMA Base station installation
should be performed by trained personnel only.
WARNING: Because of the weight of some of the CompactRAN
GSM/CDMA Base station, the installation should be
performed by TWO trained installers.
20 Vanu CompactRAN CDMA/GSM Base Station Hardware Installation Guide
Page 31

Installation Warnings
WARNING: The CompactRAN GSM/CDMA base station must be
installed in accordance with all applicable national
electrical codes.
WARNING: Make sure to avoid power lines when installing the
CompactRAN GSM/CDMA base station. When
installing the CompactRAN GSM/CDMA base station in
an outdoor location, you should use a lightening
protector for all indoor components, for example,
Ethernet and power connections. This will protect the
equipment if the CompactRAN GSM/CDMA base
station is struck by lightening. It is recommended that
the lightening protector be installed where the
Ethernet and power cables enter the building. Follow
the installation instructions provided with the
lightening protection device.
. . . . .
WARNING: All third-party equipment, like the lightning protection,
should include a grounding cable if needed
WARNING: The CompactRAN GSM/CDMA base station is intended
to be installed outdoors. In accordance with EN 62311
and related standards, humans should be more than 2
m (6.6 ft) away from the CompactRAN GSM/CDMA
base station and its transmit antenna during
operation.
WARNING: When attaching the CompactRAN GSM/CDMA base
station to a pole, make sure the pole is part of a
conductive structure that is grounded OR attach a
grounding cable to the mounting bracket
21
Page 32
WARNING: When attaching the CompactRAN GSM/CDMA base
station to a wall, make sure a grounding cable is
attached to the mounting bracket.
WARNING: Do NOT connect any equipment to the power outlet if
the power cable, power outlet, or equipment is
damaged.
Caution: Do not allow food or drink near any of the associated
equipment.
Caution: Do NOT disassemble the CompactRAN GSM/CDMA
base station. Contact
hardware issues.
Vanu Technical Support
for any
22 Vanu CompactRAN CDMA/GSM Base Station Hardware Installation Guide
Page 33
CompactRAN CDMA/GSM Base Station Visual Checks
Lock
Terminals
A/C Connectors
Power Switch
COMPACTRAN CDMA/GSM BASE STAT ION VISUAL CHECKS
Before installing the CompactRAN GSM/CDMA base station, perform the following
visual checks:
. . . . .
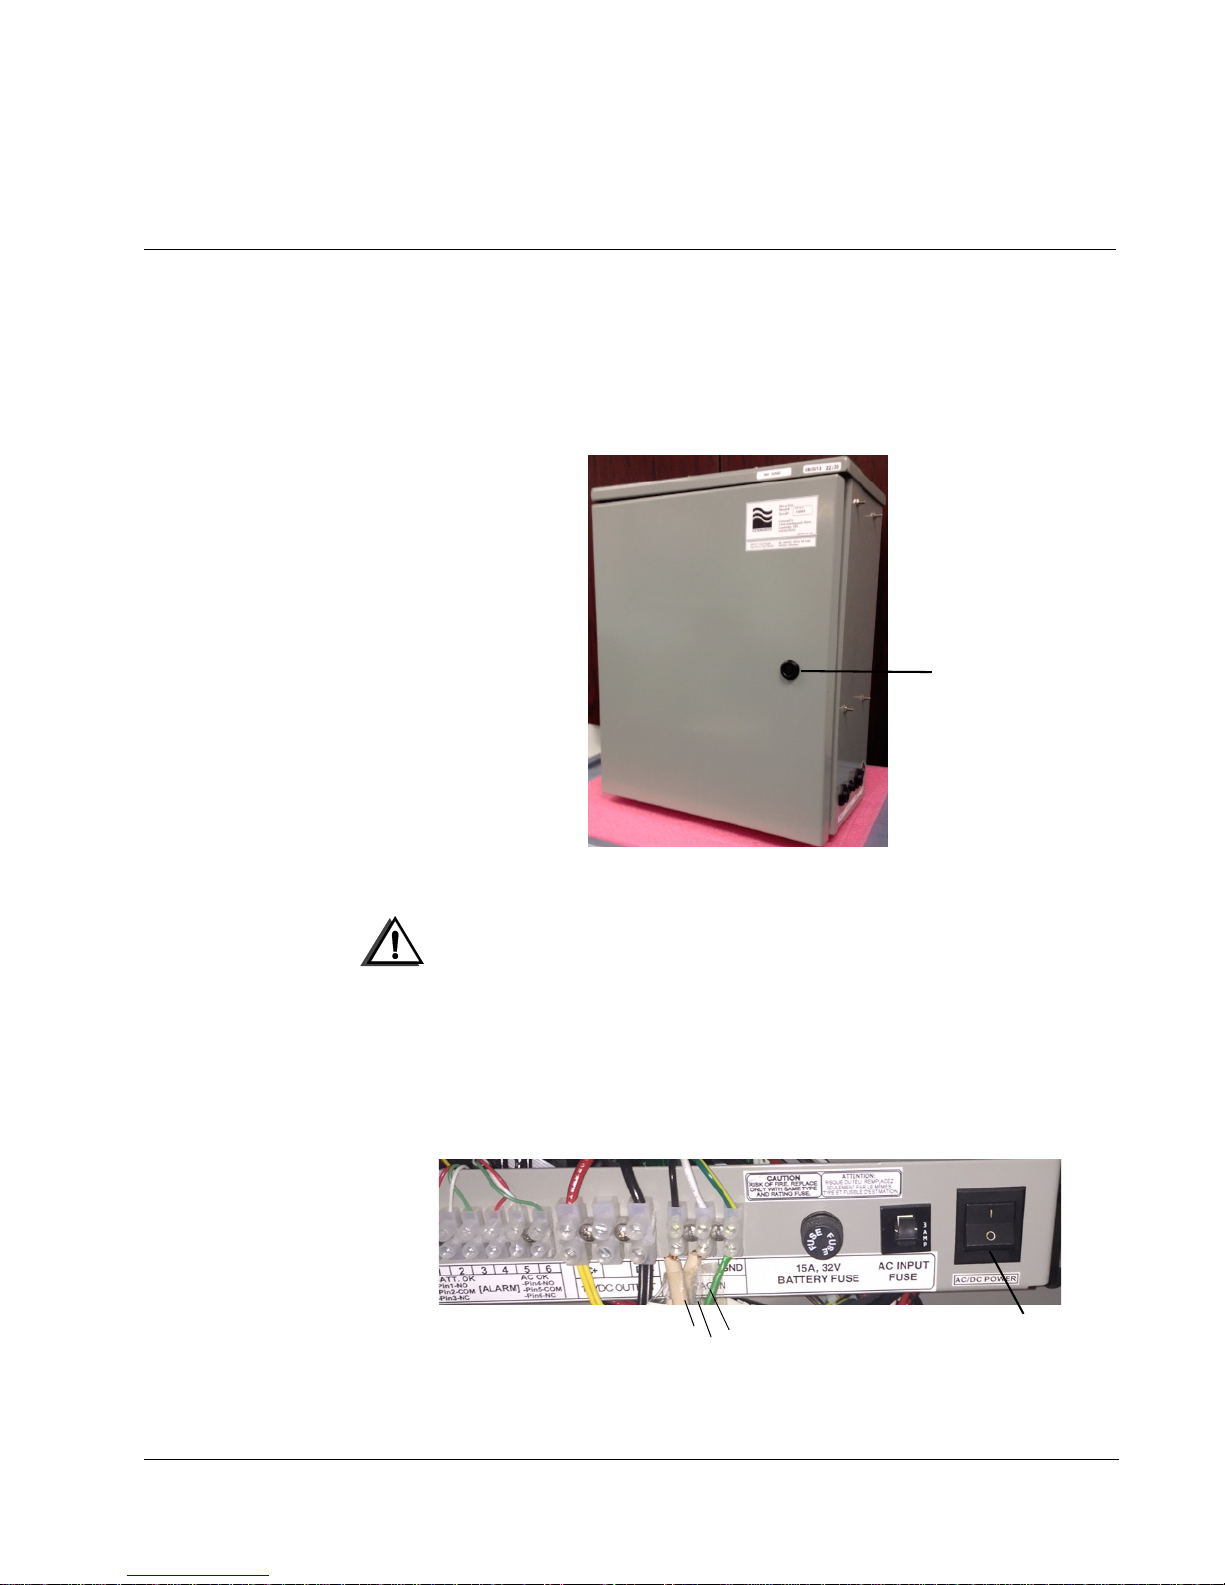
1. Use the 7/16 in socket to open the lock of the Service Enclosure (
Figure 4-1. Service Enclosure
Figure 4-1
).
2. Connect the AC cable from the power source to the AC terminals (
Caution: Make sure the AC power is OFF (
Figure 4-2. Terminals and AC Connectors
Figure 4-2
).
Figure 4-2
).
23
Page 34
Power Switch
Modem is installed here
3. Turn on the AC power source.
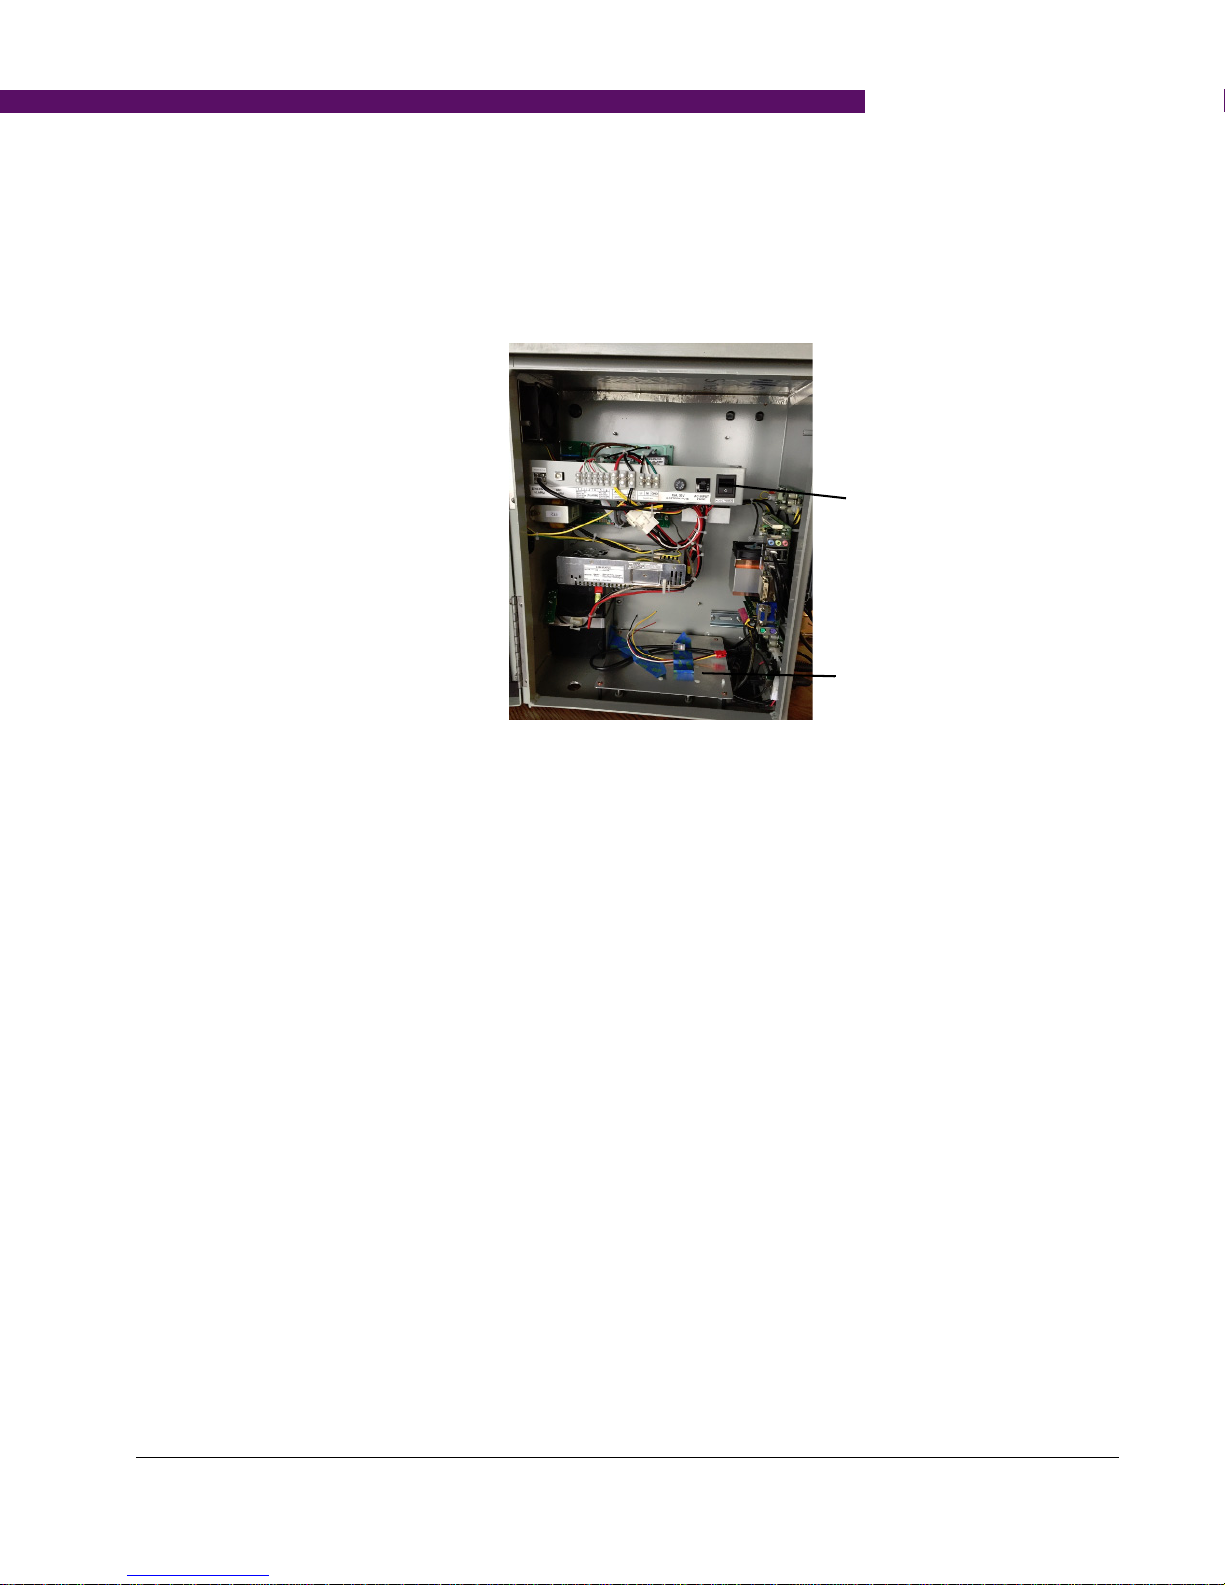
4. Turn on power to the CompactRAN GSM/CDMA base station (
Figure 4-3. Service Enclosure (Opened)
5. Check continuity of terminals 2 and 3 using digital multi-meter (
Open indicates a battery alarm.
Figure 4-3
Figure 4-2
).
).
6. Check continuity of terminals 5 and 6 (
Figure 4-2
).
Open indicates AC failure.
7. Check the 12 VDC bus voltage.
On the battery alone, it can range from 6 to 12 VDC. With AC power supplied,
it should be slightly above 12 VDC.
8. Make sure the Green LED on the top 12 VDC supply board is lit.
9. Check SBC fan operation to make sure it is powered up.
24 Vanu CompactRAN CDMA/GSM Base Station Hardware Installation Guide
Page 35
CompactRAN CDMA/GSM Base Station Visual Checks
Ethernet Cable
Figure 4-4. Ethernet Cable
. . . . .
10. Install the backhaul modem on the shelf and connect power to it BEFORE you
connect the Ethernet cable
Figure 4-3
).
(
The Service Enclosure has a lower shelf for holding and powering a backhaul
modem (25 Watts maximum)
There is a replaceable 3A low-voltage fuse, and several voltages are provided
for different modem types:
• BLACK is ground
• WHITE is 12 VDC
• YELLOW is 18 VDC
• RED is 5 VDC
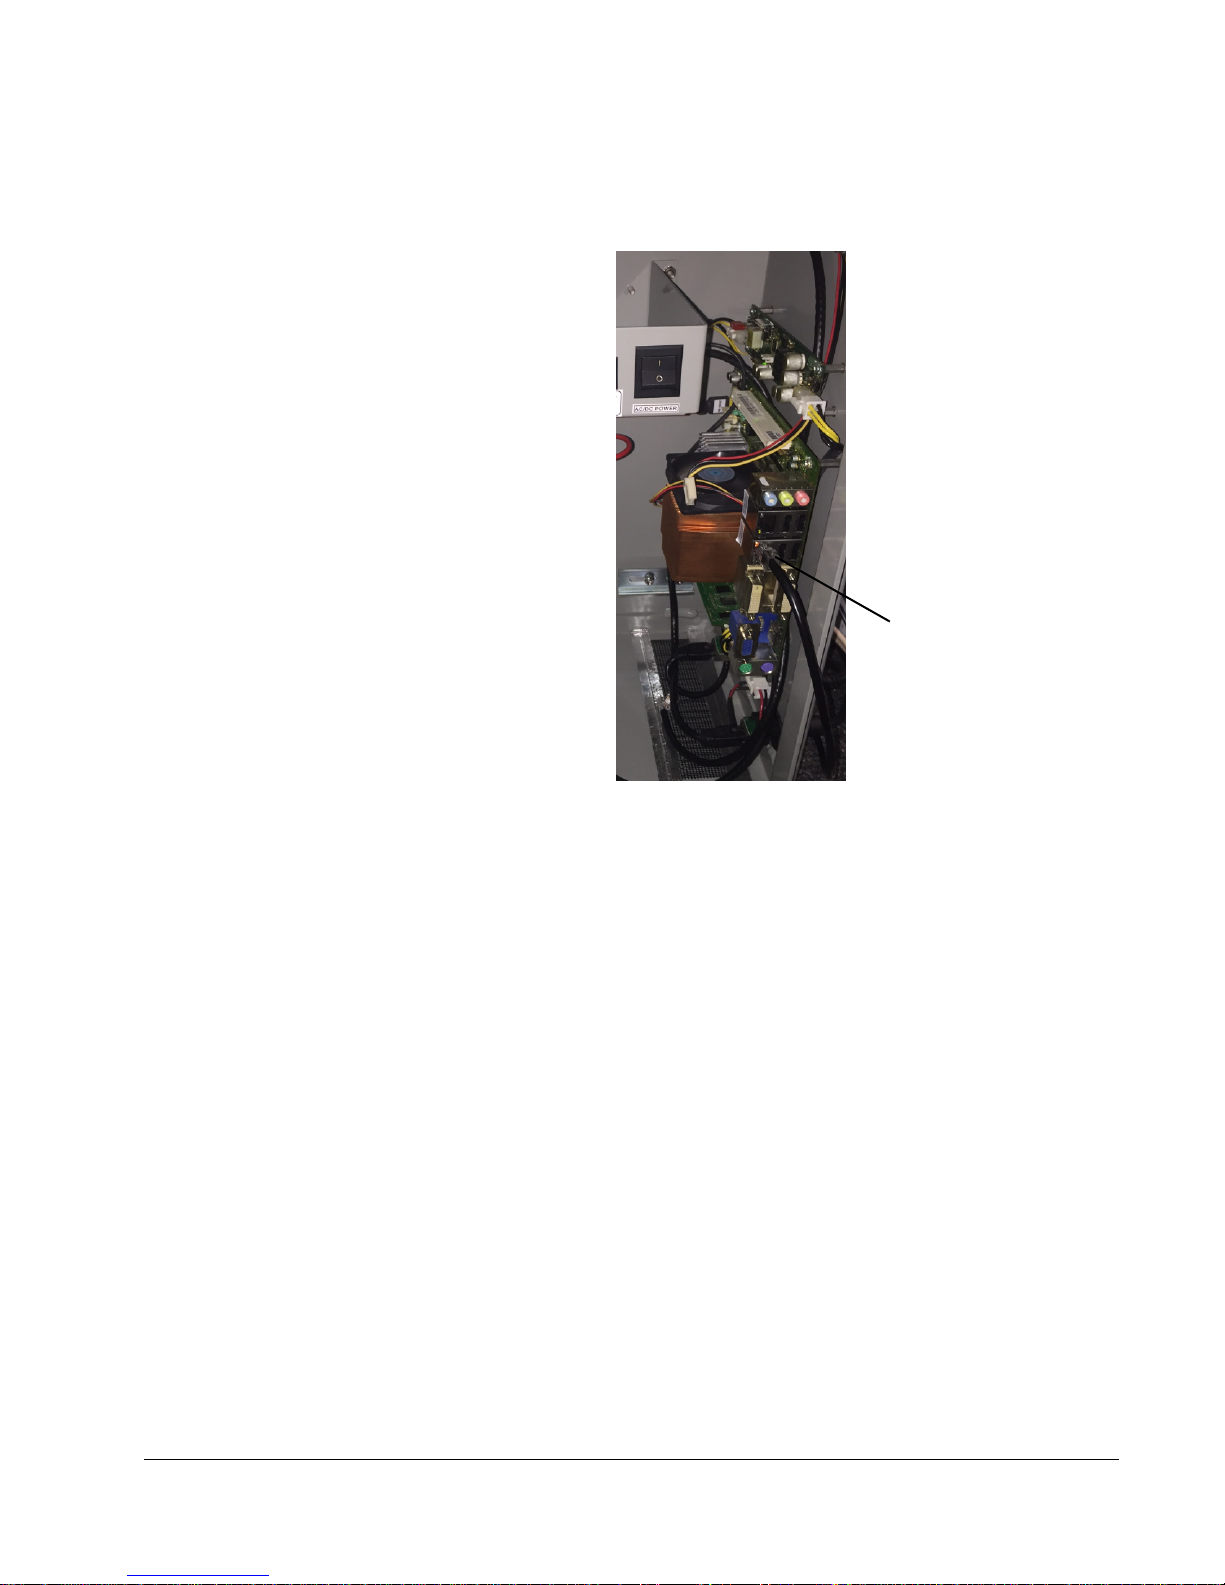
11. Connect the backhaul modem to one of the LAN ports inside the Service
Enclosure using a Cat 5e Ethernet cable (
Figure 4-4
).
12. Make sure the green LED on the bottom 24 VDC supply board is lit.
13. Turn off the power to the Service Enclosure (
Figure 4-3
14. Close the Service Enclosure and lock it with the 7/16 in socket (
).
Figure 4-1
).
25
Page 36
Mounting Holes
Bottom of
Bracket
Top of
Bracket
INSTALLING THE COMPACTRAN CDMA/GSM BASE STATIO N
Caution: Refer to
CompactRAN GSM/CDMA base station.
Installation Warnings
before installing the
WARNING: If you are installing the CompactRAN GSM/CDMA base
station to a wall, make sure there are no electrical
cables behind the wall.
Complete the following steps to attach the CompactRAN GSM/CDMA base station to
the pole or wall:
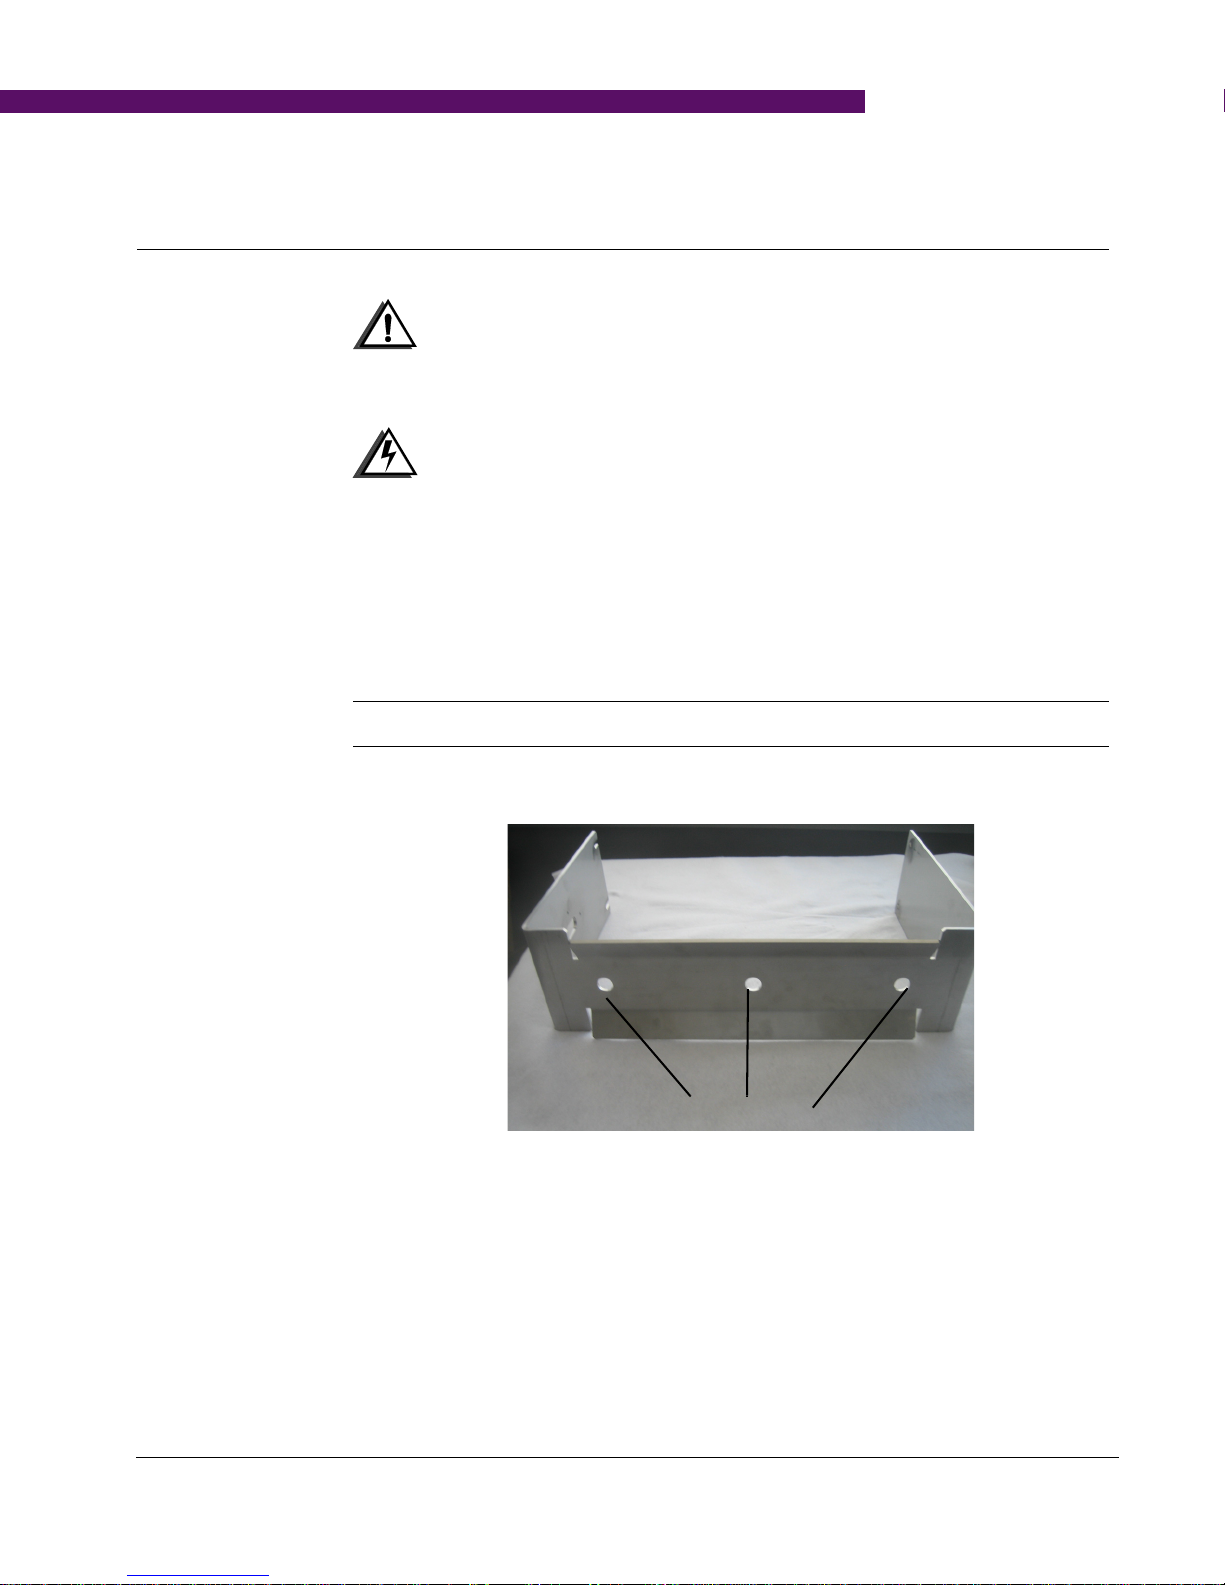
1. Align the mounting bracket on the pole or wall (
Figure 4-7
).
Note: Make sure it is level.
Figure 4-5. Mounting Bracket
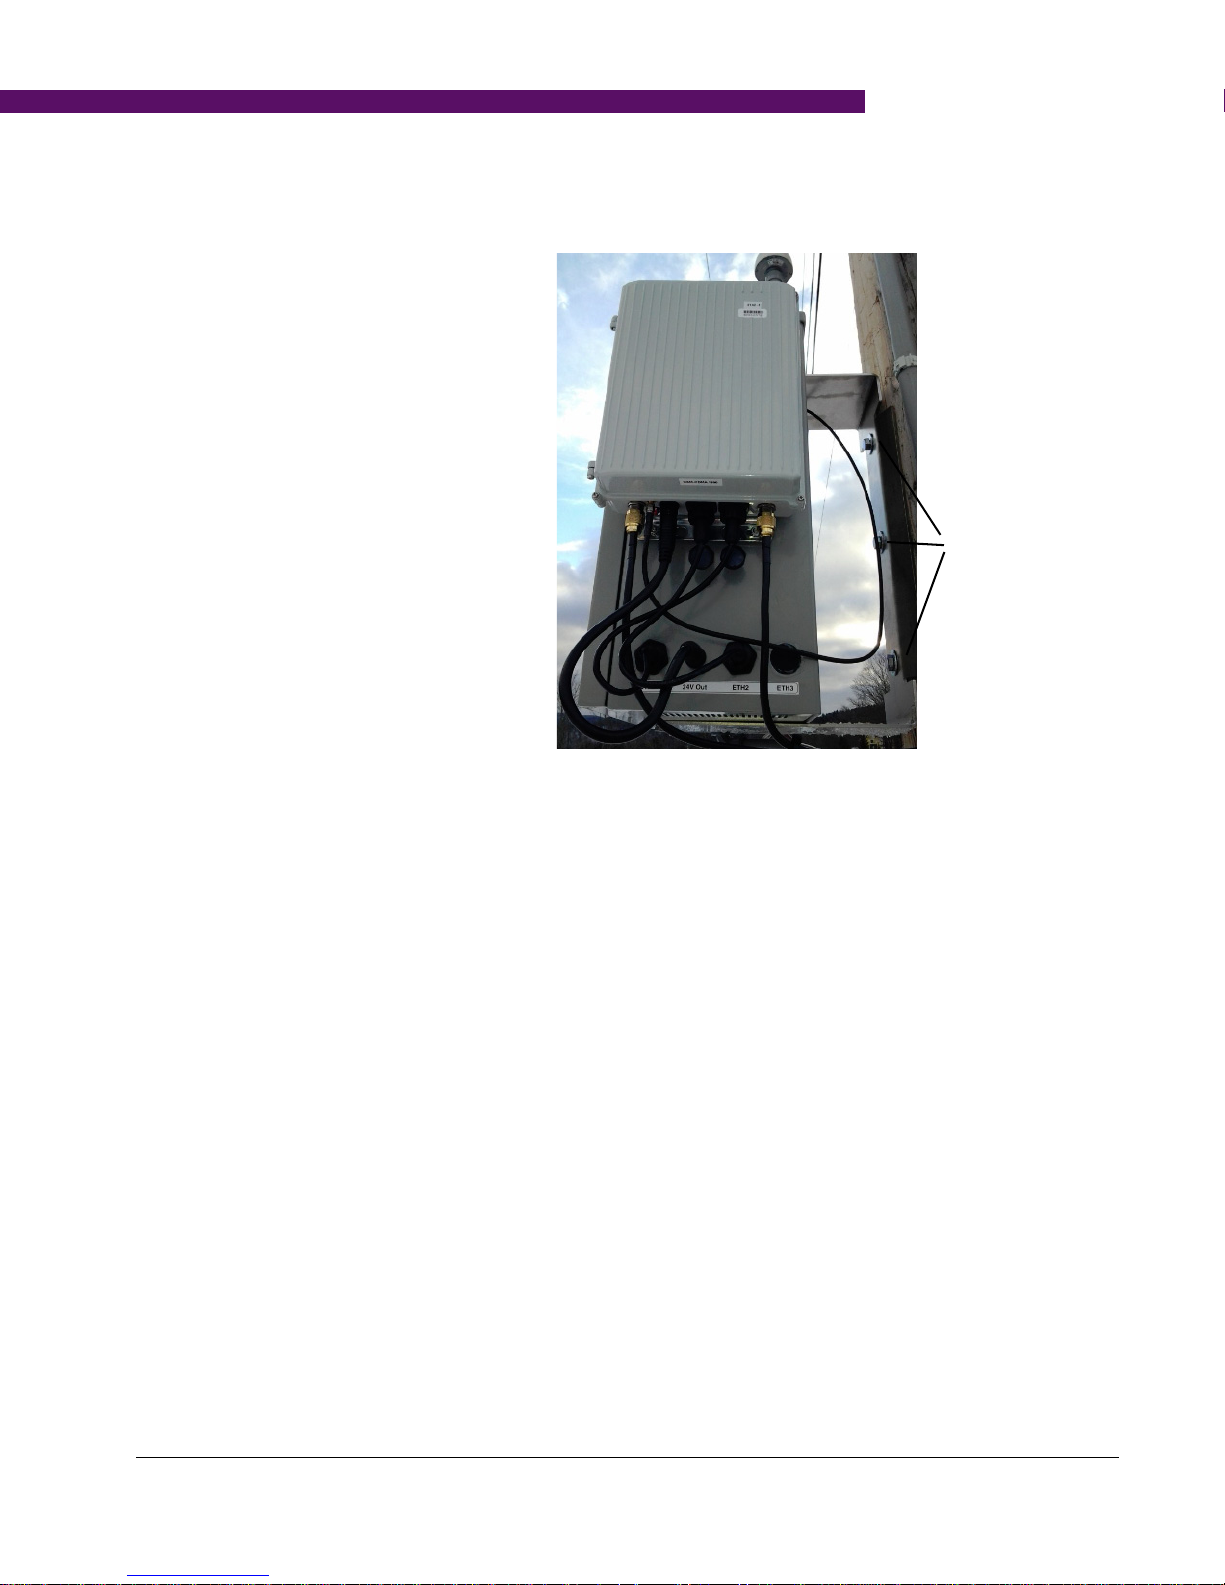
2. Secure the mounting bracket with the three (3) Hex Head 5/8” Lag Screws, 4”
long.
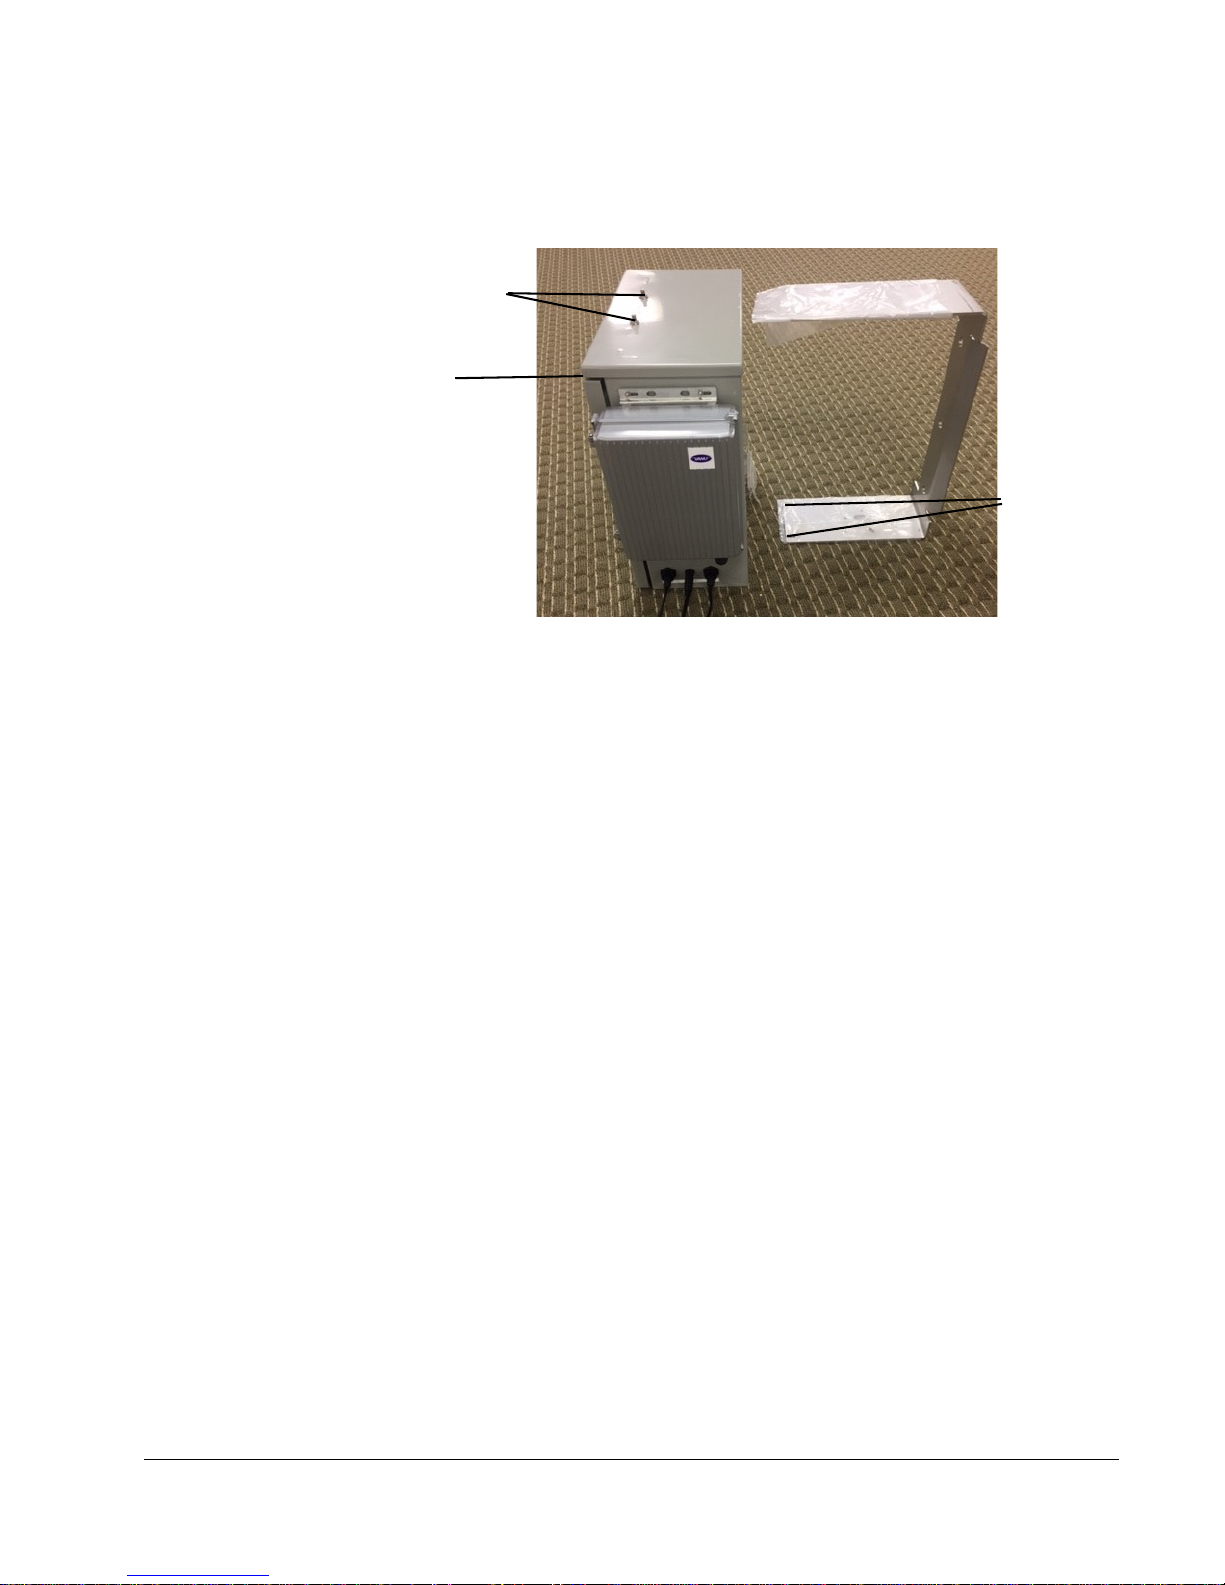
3. Remove the nuts from the screw posts on top of the CompactRAN
CDMA/GSM base station (
26 Vanu CompactRAN CDMA/GSM Base Station Hardware Installation Guide
Figure 4-6
).
Page 37
Installing the CompactRAN CDMA/GSM Base Station
Front of
Screw Posts/Nuts
Screw Holes
Figure 4-6. Attaching the Bracket to the Service Enclosure
4. Slide the CompactRAN CDMA/GSM base station onto the mounting bracket.
. . . . .
Align the screw holes on the bottom of the CompactRAN CDMA/GSM base
station with the bracket screw holes.
5. Align screw posts on the top of the CompactRAN CDMA/GSM base station
with the slots on the top of the mounting bracket.
6. Secure the bottom of the CompactRAN CDMA/GSM base station with the
screws.
7. Replace and tighten the nuts on the screw posts on the top of the CompactRAN
CDMA/GSM base station (
Figure 4-7
shows the CompactRAN CDMA/GSM base station installed on a pole.
Figure 4-6
).
27
Page 38
Mounting Screws
Figure 4-7. CompactRAN CDMA/GSM Base Station Installed
28 Vanu CompactRAN CDMA/GSM Base Station Hardware Installation Guide
Page 39
CONNECTING TO THE NETWORK
Status LED
TX Antenna RX Antenna
GPS Antenna
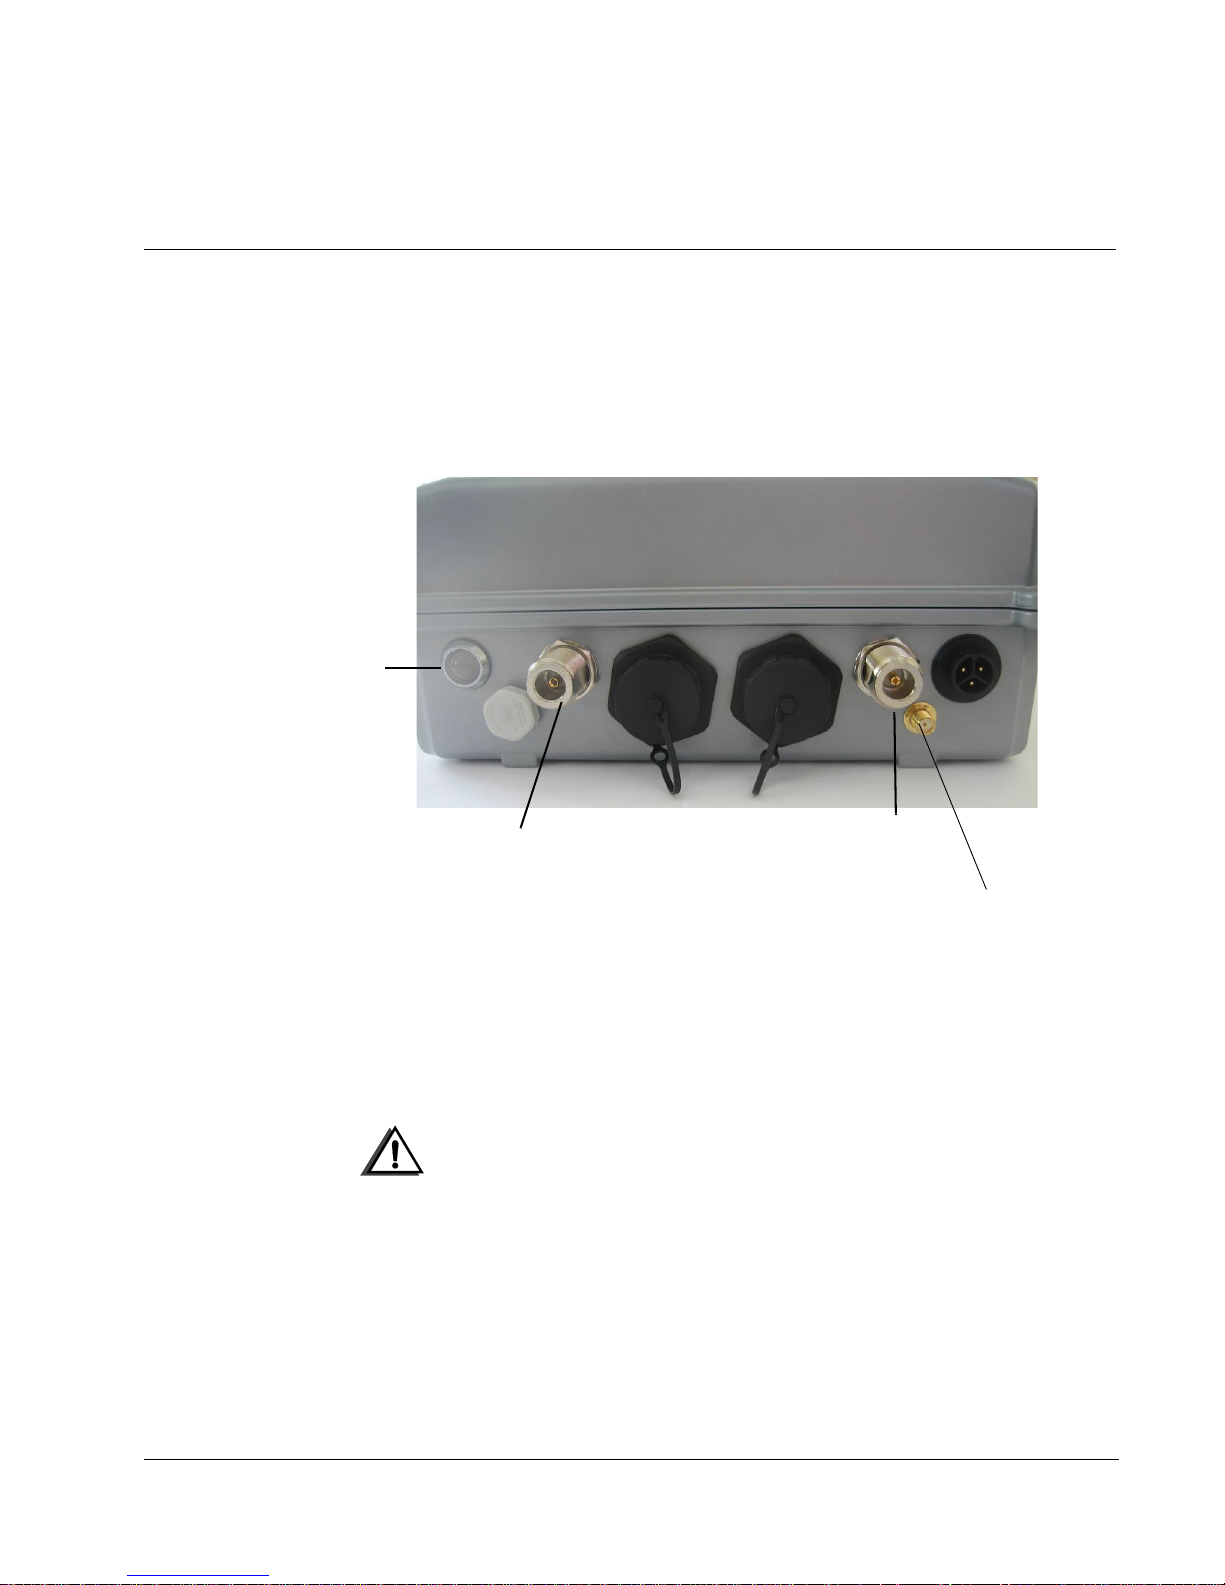
After installing the CompactRAN GSM/CDMA base station on the pole wall, you
need to connect the GPS, RX and TX antennas to the CompactRAN GSM/CDMA
base station (
station to the power supply and the network.
Figure 4-8
Figure 4-8. CompactRAN Antenna Connectors
Connecting to the Network
. . . . .
) and then connect the CompactRAN GSM/CDMA base
1. Connect the TX antenna.
2. Connect the RX antenna.
3. Connect the GPS antenna.
4. Connect the backhaul using the modem inside the Service Enclosure.
5. Connect to the power source.
6. Open Service Enclosure and turn on the power switch (
Caution: The antennas should be connected before the Service
Enclosure is powered on; otherwise, damage may
result.
Figure 4-1
).
29
Page 40

7. Close and lock the Service Enclosure.
COMPACTRAN LEDS
The LED on the CompactRAN (
Figure 4-8
) should light. Refer to
Table 4-1
status information.
Table 4-1. LED Status
LED State Check:
Solid Red Preprovisioned - Indicates connectivity to core network and the
CompactRAN cell needs to be provisioned.
Slow Flashing
Red
Fast Flashing
Red
Solid Orange The CompactRAN encountered an error contacting or working with
Slow Flashing
between
Orange and
Red
Fast Flashing
between
Orange and
Red
The CompactRAN’s VPN connection is not up. The LED alternates
between Off and Red every second.
The CompactRAN has no backhaul (No IP on the Ethernet connection).
The LED alternates between Off and Red four times a second.
ConfigCenter.
The CompactRAN’s GPS has no lock. The LED alternates between
Orange and Red every second.
The CompactRAN’s Auxiliary Interface is down (CDMA or second
TRX, depending on hardware options). The LED alternates between
Orange and Red four times a second.
for LED
Solid Green All waveforms are functioning. Primary GSM TRX and Secondary
Slow Flashing
Green
Fast Flashing
Green
30 Vanu CompactRAN CDMA/GSM Base Station Hardware Installation Guide
TRX, or Primary GSM TRX and CDMA (depending on hardware
options).
This indicates the CompactRAN waveforms are initializing. It is trying
to connect to ConfigCenter, performing a firmware update, or snapshot
activation. The LED alternates between Off and Green every second.
One or more waveforms or TRX are not functioning. The LED alternates
between Off and Green four times a second.
Page 41

. . . . .
. . . . . . . . . . . . . . . . . . . . . . . . . . . . . . . . . . .. . . . . . . . . . . . . . . . . . . . . . . . . . . . . . . . . . .
. . . . .
A
DDITIONAL
I
This section provides troubleshooting information. It contains the following sections:
NFORMATION
Antenna Information
•
•
Verifying the Firmware
5
•
Disposing of Equipment
ANTENNA INFORMATION
This section provides additional information about the antennas.
Connecting the Antenna
The antennas should be connected before the CompactRAN CDMA/GSM base station
is put into service; otherwise, damage may result.
Antenna Notes
• The required TX/RX antenna isolation is 45dB at 900MHz, and 35dB at
1800MHz. A lesser isolation may lower the RX sensitivity.
• Two omnidirectional antennas mounted with horizontal separation is NOT
recommended
31
Page 42

• Two omnidirectional antennas mounted with vertical separation should provide
adequate isolation, however care must be taken to account for the proximity to
the mast structure.
• 8 dBi maximum gain is recommended for best trade-off between vertical beam
width and range.
VERIFYING THE FIRMWARE
Caution: It is RECOMMENDED that you use ConfigCenter to
update the firmware. Contact
before updating the firmware using the following
procedure.
Vanu Technical Support
Complete the following steps to update the CompactRAN firmware using the
ConfigureCell tool:
Note: Repeat these steps for each CompactRAN.
1. Start the CompactRAN Configure Cell tool.
Refer to
2. Select the CompactRAN you want to verify (
Setting Up the CompactRAN
.
Figure 3-5
).
3. Click Open Cell Control Page The Verify Firmware Version screen displays.
Figure 5-1
(
).
32 Vanu CompactRAN CDMA/GSM Base Station Hardware Installation Guide
Page 43
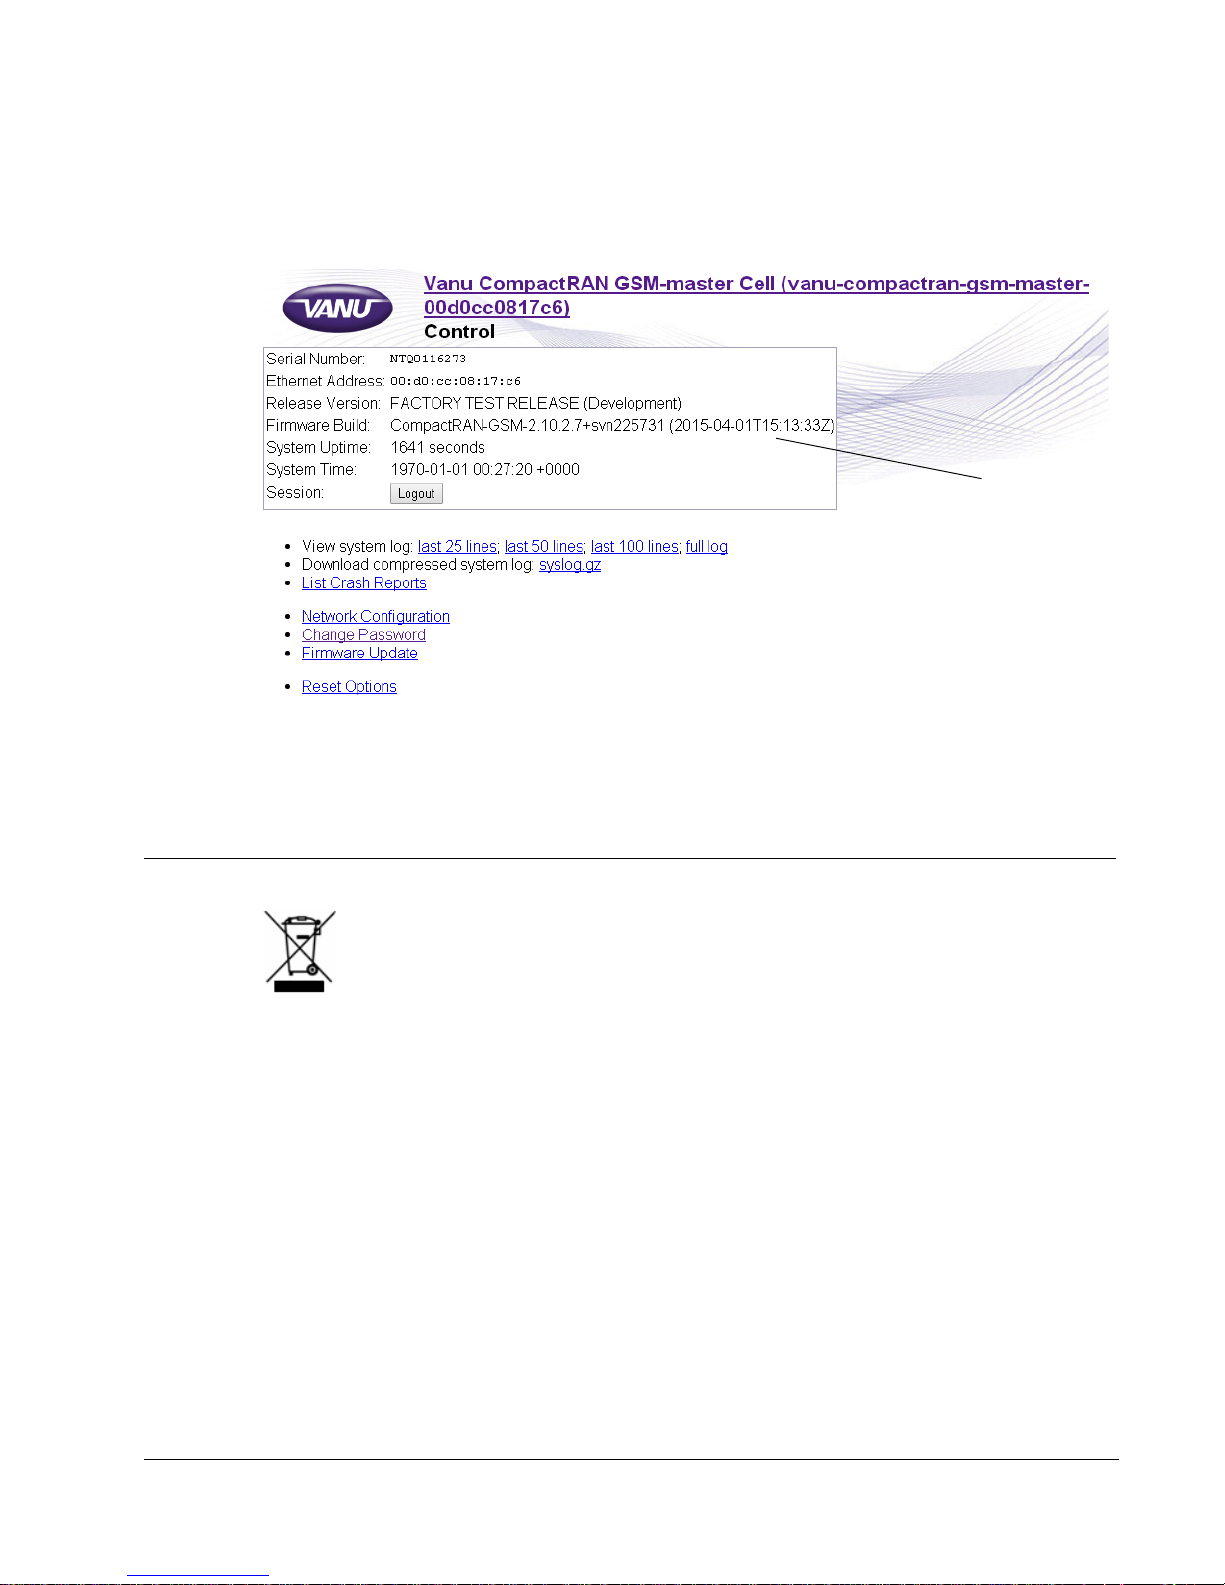
Figure 5-1. Verifying Firmware Version
Ver if y
Firmware Version
Disposing of Equipment
. . . . .
DISPOSING OF EQUIPMENT
When disposing of the equipment, the CompactRAN CDMA/GSM base station
should not be disposed of along with household waste at the end of life of the product.
It should be handed over to the appropriate collection point for recycling of electrical
and electronic equipment. For more detailed information about recycling, contact your
local or regional waste administration.
33
Page 44

34 Vanu CompactRAN CDMA/GSM Base Station Hardware Installation Guide
 Loading...