

Page 1
Van Raam BV
Aaltenseweg 56
7051 CM Varsseveld
The Netherlands
User manual
Versie 17.04
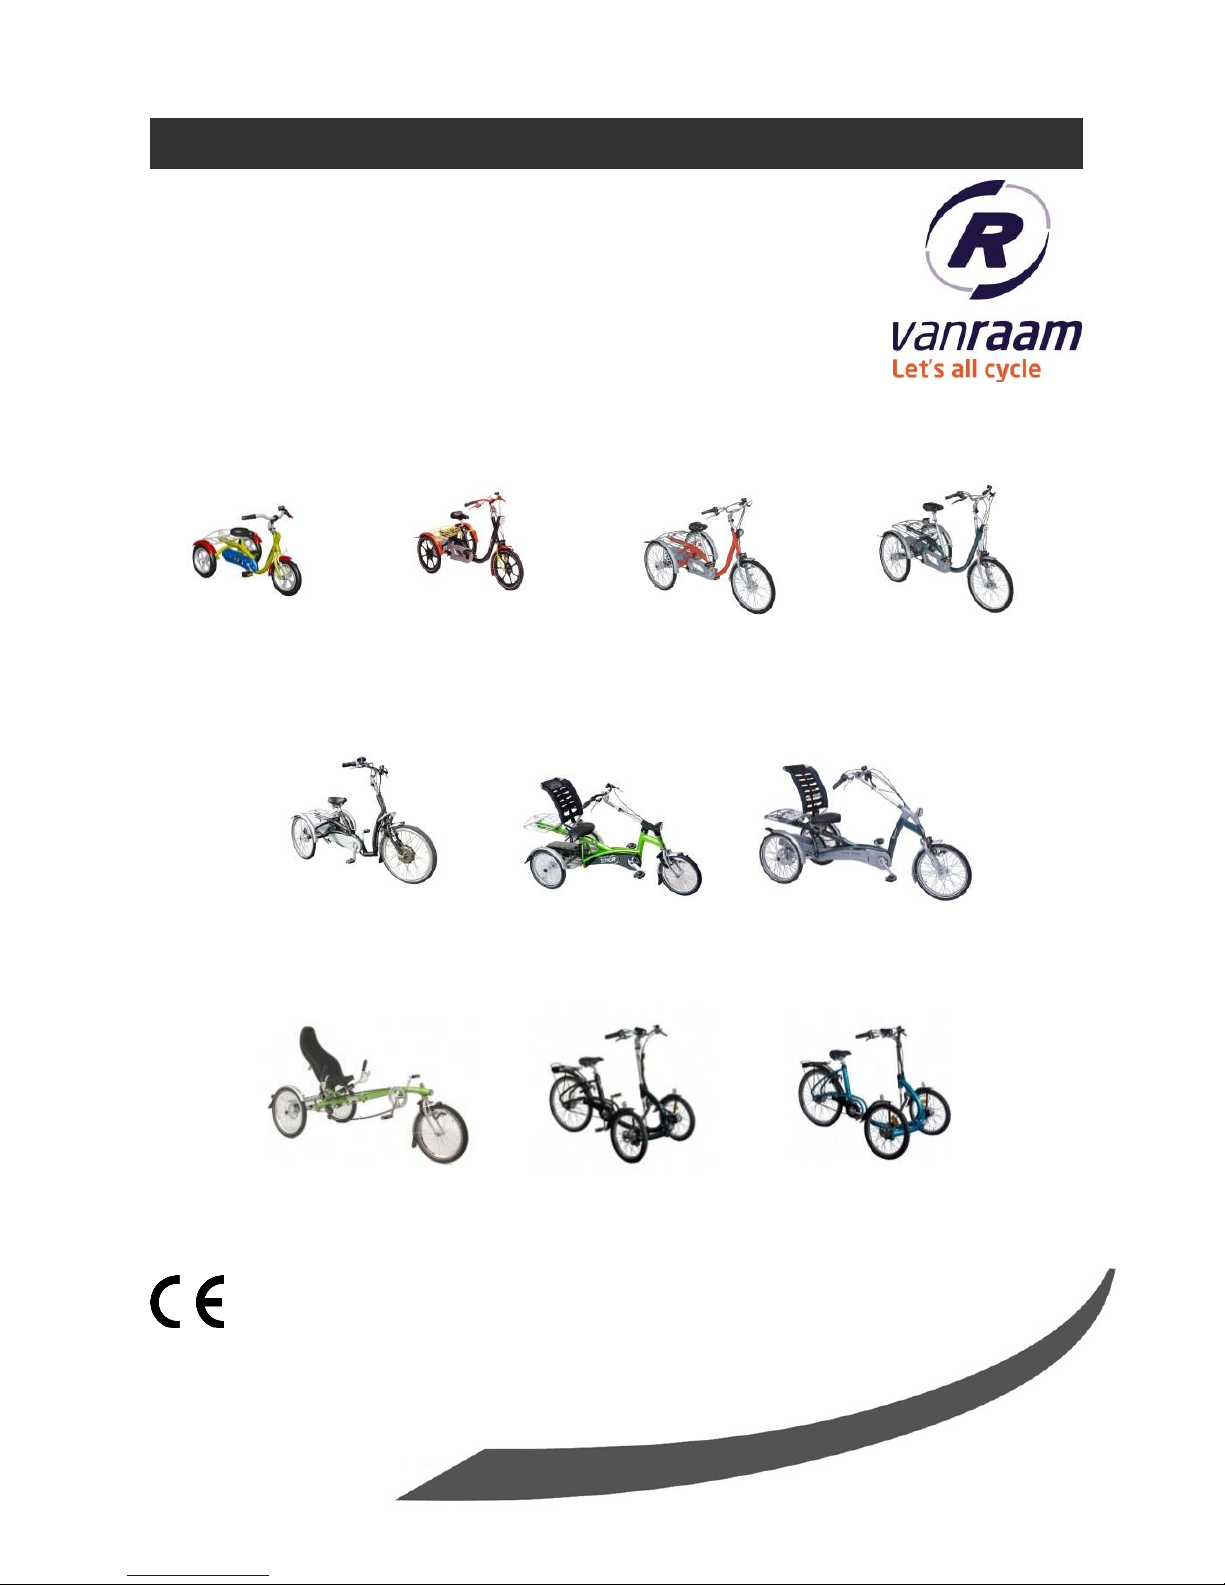
Maxi
Midi
Husky
Mini
Maxi Comfort
Easy Rider
Easy Rider Junior
Viktor
Viktoria
Easy Sport
Page 2
User manual
Tricycles 17.04
1
Table of content
Contact details manufacturer............................................................................................ 1
Conformity ......................................................................................................................... 1
Introduction ........................................................................................................................ 2
Delivery .............................................................................................................................. 2
Indication............................................................................................................................ 2
Intended usage .................................................................................................................. 2
Safety measures ............................................................................................................... 3
Adjustment of the tricycle.................................................................................................. 5
Before the first use ..........................................................................................................12
Electro system Silent.......................................................................................................17
Accessories .....................................................................................................................23
Technical details..............................................................................................................31
Maintenance and adjustments to be done by owner.....................................................32
Repairs and maintenance to be done by dealer............................................................33
Adjustments to be done by dealer ..................................................................................33
Disposal ...........................................................................................................................35
Handover/sale to a new owner .......................................................................................35
Guarantee ........................................................................................................................35
Frame number .................................................................................................................36
Form service, maintenance, modifications and warranty claims ..................................39
Contact details manufacturer
Van Raam BV
Aaltenseweg 56
7051 CM Varsseveld
The Netherlands
Tel. : +31 (0)315 257370
E-mail : [email protected]
Internet : www.vanraam.com
Conformity
Van Raam declares as manufacturer that the tricycles, as described in this manual,
are produced in accordance with the 93/42/EEG guidelines, risk category 1. All
products have been produced in accordance with the 2006/42/EG guidelines. The
declaration of conformity can be found on the Van Raam website.
Page 3
User manual
Tricycles 17.04
2
Introduction
This user manual provides important and necessary
information about the use of your tricycle. We ask you to
read this manual thoroughly before using the tricycle.
Always follow all the instructions given in this manual.
All safety and user aspects have to be made clear to
children and to people with limited powers of perception by
a responsible and supervising person.
Delivery
- Tricycle with packaging
- User manual(s)
- Possible chargers (depending on options)
- Spare key
Check the delivery immediately after receiving it. In case of damage or incomplete
delivery we ask you to contact your dealer immediately. Upon delivery you should fill
out the form “Form service, maintenance, modifications an warranty claims” in the
back of this manual.
Indication
Children or adults who cannot use tricycles or vehicles due to their handicap, are able
to ride these tricycles. The tricycles can be used by children or adults with neuromuscular disorders such as paralysis of the brain and muscular dystrophy. This also
applies to people suffering from co-ordination problems, loss of balance and limited
natural movements. If necessary, supervision may be desirable.
Intended usage
The tricycles are designed for normal use on level and solid ground. The usual
tricycle caution should always be taken into consideration. At the same time all safety
instructions as described in this manual should be complied with explicitly. Also the
local traffic rules should always be complied with.
The tricycles is meant for one person. The driver should be independently mobile and
may not have any serious visual or other impairments, which could adversely affect
the controlling of the tricycle.
All other use, including damage or physical injuries due to this, are not the
manufacturer's responsibility.
READ
CAREFULLY!
Page 4
User manual
Tricycles 17.04
3
Safety measures
Ensure the tricycle is in good condition each time before using it. Check
before each ride that the brakes are in order. Check the lighting and make
sure there is enough tyre pressure.
Regularly check if the wheels, the handlebars and the saddle are properly
fixed and also whether all screw joints are tight.
Only use the tricycle on a solid and level surface.
Make sure that wide trousers or lose hanging clothing don’t get caught in the
chain, spokes or pedals.
Do not use a pressure washer or a steam cleaner for the cleaning of the
tricycle.
Block the tricycle to stop it from moving when you are getting on or off the
tricycle. Do this by using the parking brake and holding the tricycle.
Always lock the tricycle when leaving it unattended.
Make sure that no dangerous speed develops when driving downhill and
entering tunnels. Brake on time and don’t ride faster than 30 kilometres per
hour.
In case of pregnancy, extra care is required owing to a higher risk of injury.
Do not put the tricycle in direct sunlight: the temperature of some parts could
reach above 41ºC resulting in possible hypersensitivity of the skin.
In case that the tricycle is equipped with the Silent electric motor system,
make sure that you get used to riding with electric support. Beware when
you turn on the system and make sure you don’t get startled by unexpected
behaviour because you turned on the electric support. Practice the reverse
function! Please be careful not to switch on the reverse function of the
electric motor inadvertently.
Extra attention is essential if a child is using the tricycle!
Never leave a child alone with the tricycle without supervision!
Always have the child wear a tricycle helmet! Make sure the helmet fits
correctly!
Page 5
User manual
Tricycles 17.04
4
Have the child wear visible reflective clothing, so they are visible to other
road users!
Warn the child to ensure that no dangerous speed develops while driving
downhill and entering tunnels. Brake on time.
It is advisable to fit a flag onto the tricycle that is visible above the child.
Load
The maximum load should not be exceeded. See information in the index of technical
details on page 31. By permitted load we mean the total load, including the load
on the luggage rack (or in the basket).
Make sure that the permitted load on the luggage rack and in the basket is not
exceeded. (maximum 20 kg). People may not be transported on the luggage rack or
in the basket!
Be aware that a basket full of luggage can influence the steering considerably. No
luggage that limits the use of the tricycle can be transported on the handlebars.
Damaged or worn out parts
The replacement and repair of parts (frame, forks, light, brakes, drive mechanism and
the handlebars) should always be performed by an authorised dealer. If not, the
guarantee ceases to be valid and you will be personally responsible in the event of
possible damage.
Specific safety parts should always be replaced by new parts!
Page 6
User manual
Tricycles 17.04
5
Adjustment of the tricycle
Before using the tricycle, adjust it to the measurements of the cyclist. This is of great
importance, especially the saddle and the handlebars.
If an optimal adjustment of the tricycle, as defined in the instructions, is not
possible, you can contact your dealer for a fitting solution.
The brakes are correctly adjusted and should only be adjusted by the dealer during
periodic maintenance.
Take care that fingers and limbs do not get trapped while adjusting the
tricycle.
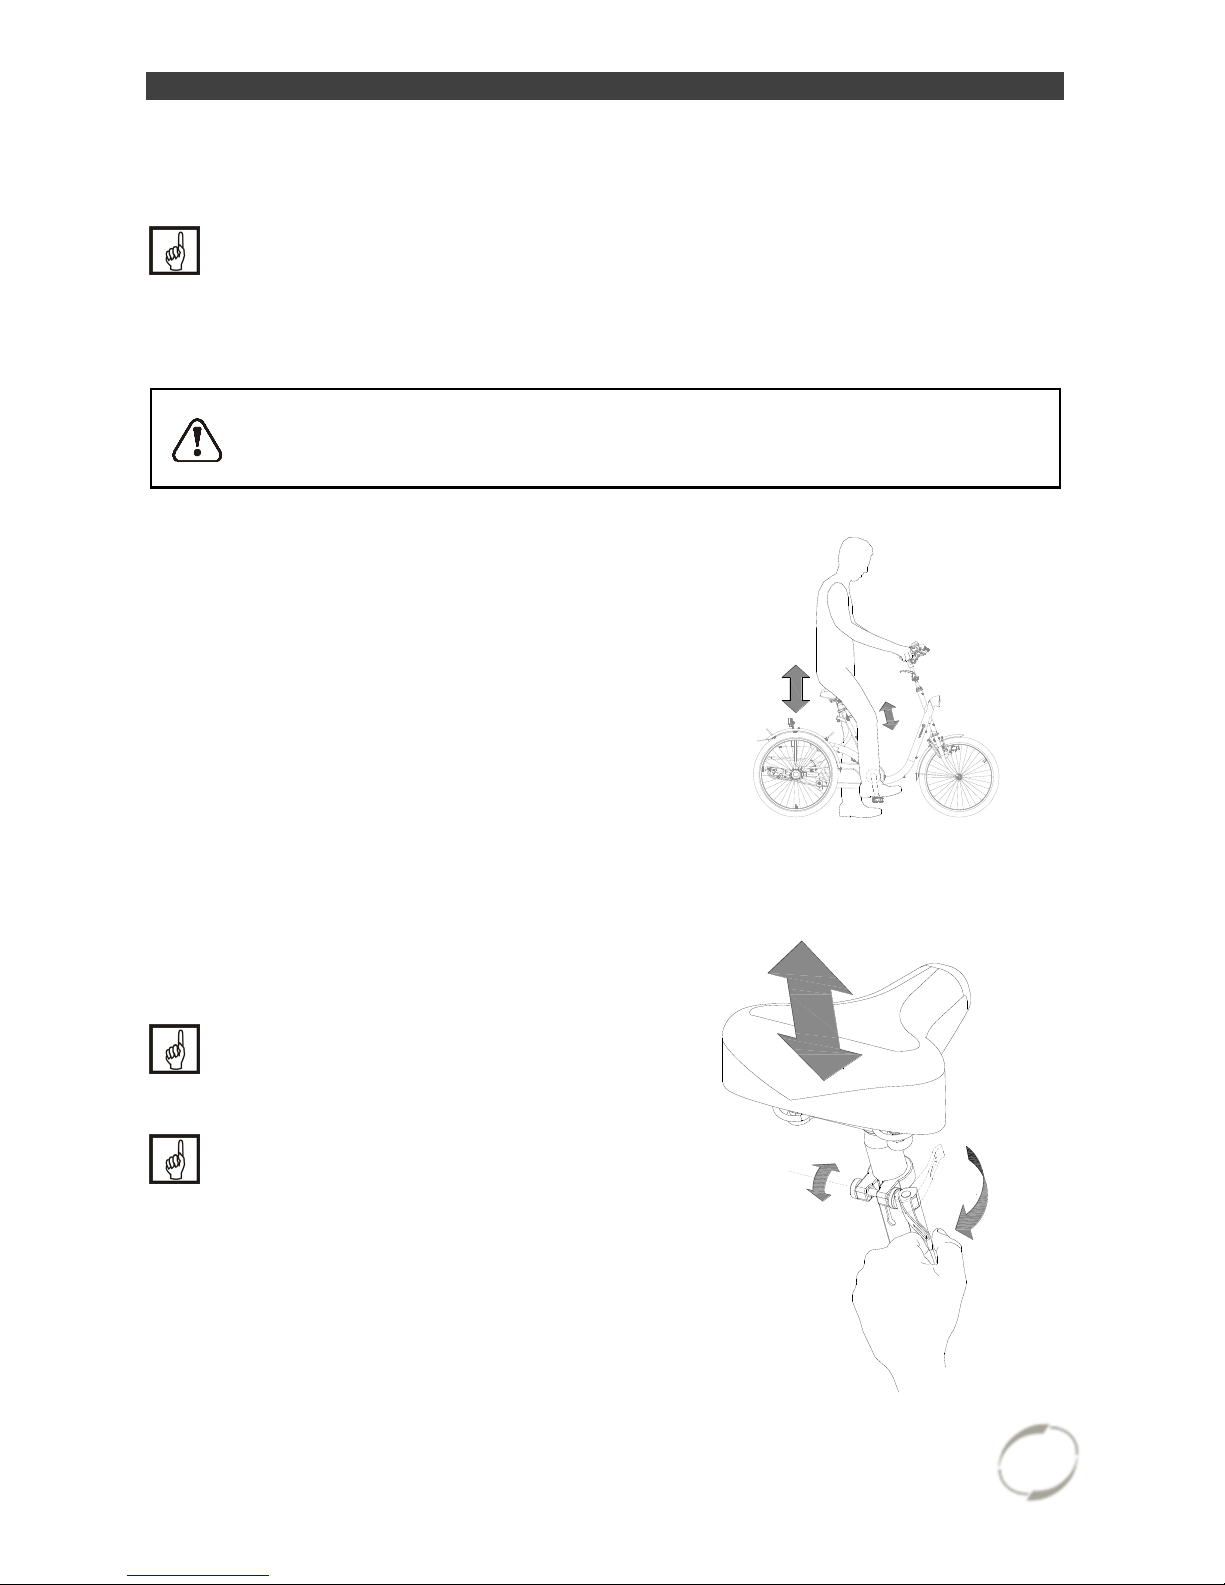
Saddle height (Husky, Mini, Midi, Maxi)
When the cyclist is sitting on the tricycle and
can put a foot on the pedal in the lowest
position, the saddle height is correct. Adjust
the saddle height in such a way that the leg is
stretched but relaxed in that position.
To adjust the saddle:
1. Open the quick-clamp [A].
2. Slide the saddle to the correct height.
3. Close the quick-clamp.
Make sure clothing cannot get
caught in the clamp!
If the clamp closes too easily, the
clamping force is too low. In this case,
open the clamp and tighten the nut [B]
a bit more. If a lot of force is necessary
to close the clamp, the nut should be
loosened slightly.
[B]
[A]
Page 7
User manual
Tricycles 17.04
6
MIN INSERT
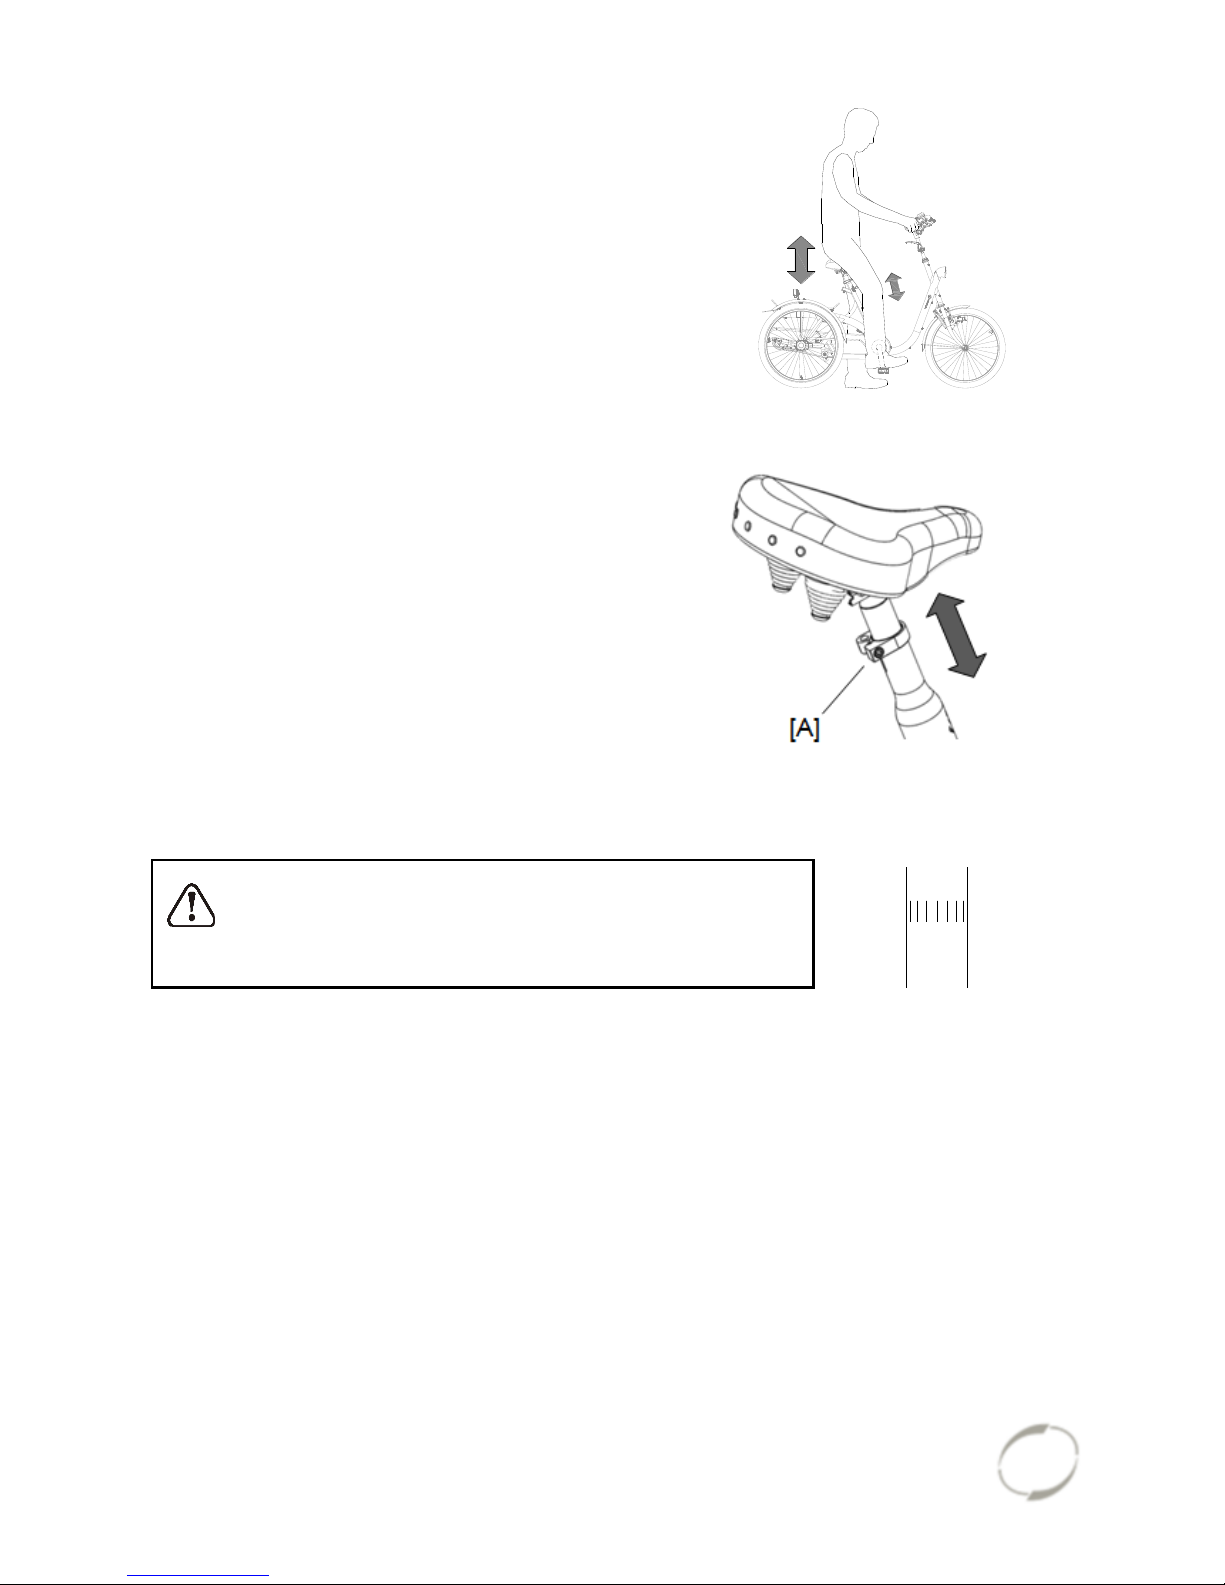
Saddle height (Maxi Comfort, Victoria, Victor)
When the cyclist is sitting on the tricycle and
can put a foot on the pedal in the lowest
position, the saddle height is correct. Adjust
the saddle height in such a way that the leg is
stretched but relaxed in that position.
To adjust the saddle:
1. Slightly loosen the screw [A] using an
Allen key.
2. Slide the saddle to the correct height.
3. Tighten the screw.
Do not pull out the saddle pin further than the
marking. The tube will not go into the shank deep
enough and will risk coming off. This can lead to
serious injuries.
Page 8
User manual
Tricycles 17.04
7
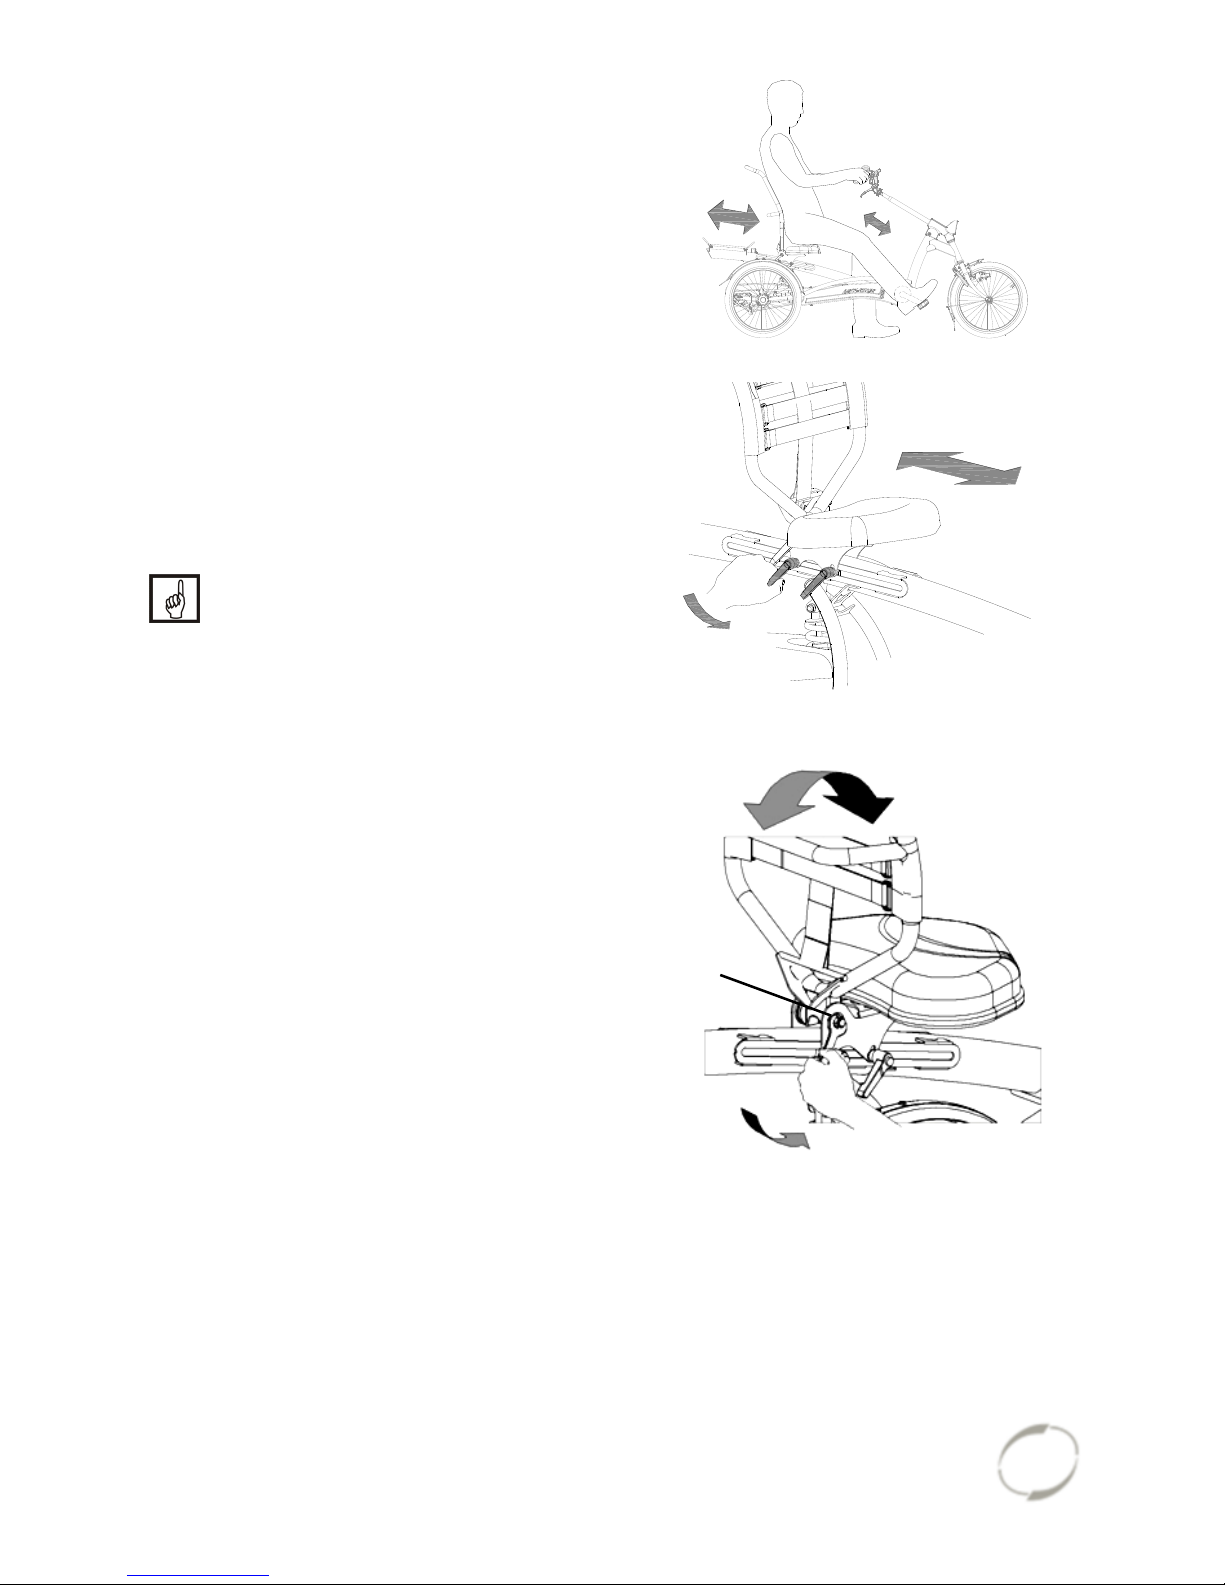
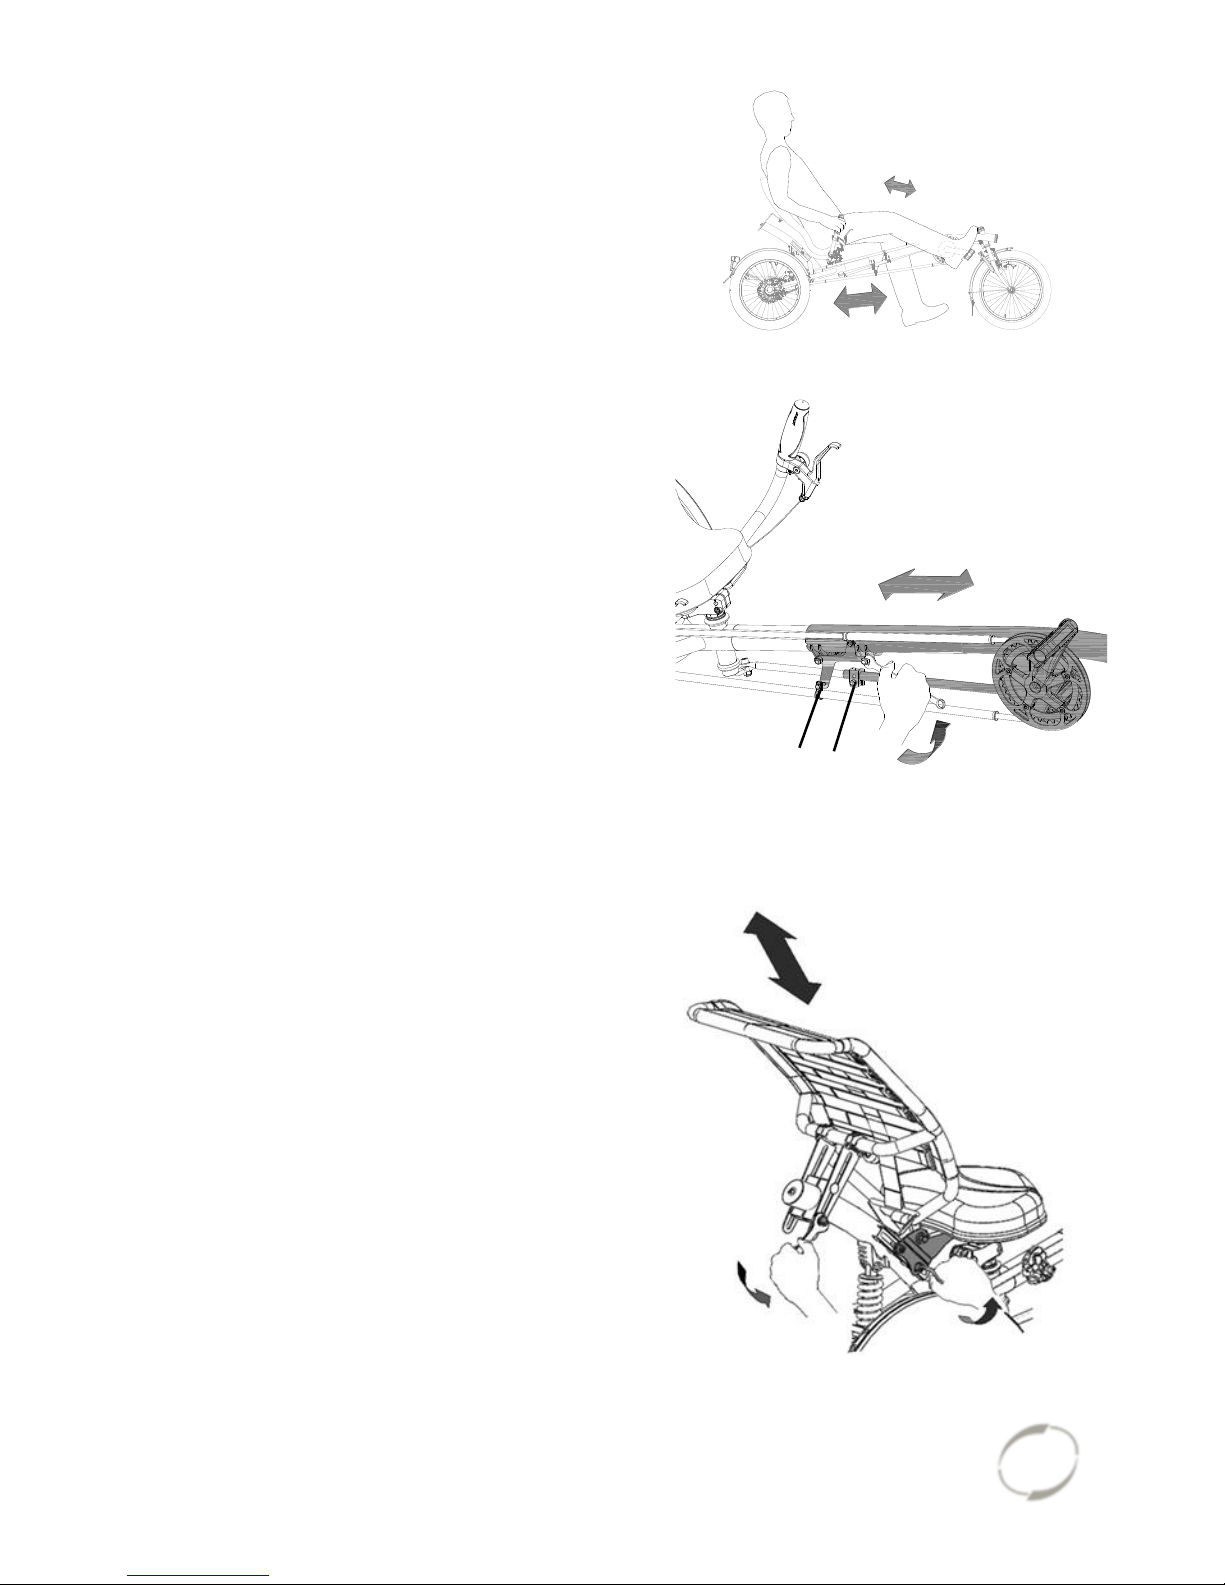
Saddle position (Easy Rider Junior, Easy Rider)
The saddle position is correctly adjusted when
the cyclist is sitting on the tricycle and puts a
foot on the pedal in the furthest position.
Adjust the saddle in such a way that the leg is
stretched but still relaxed.
To adjust the saddle:
1. Loosen the four quick release levers
slightly.
2. Slide the saddle to the correct position.
3. Tighten the four quick release levers again.
If the quick release levers are in each
other’s way, one can be pulled out
and turned away.
Position of the backrest (Easy Rider Junior,
Easy Rider)
The backrest can be adjusted to the desired
position. To do this:
1. Slightly loosen the nut [A] with a socket
wrench.
2. Put the backrest in the desired position.
3. Tighten the screw again.
[A]
Page 9
User manual
Tricycles 17.04
8
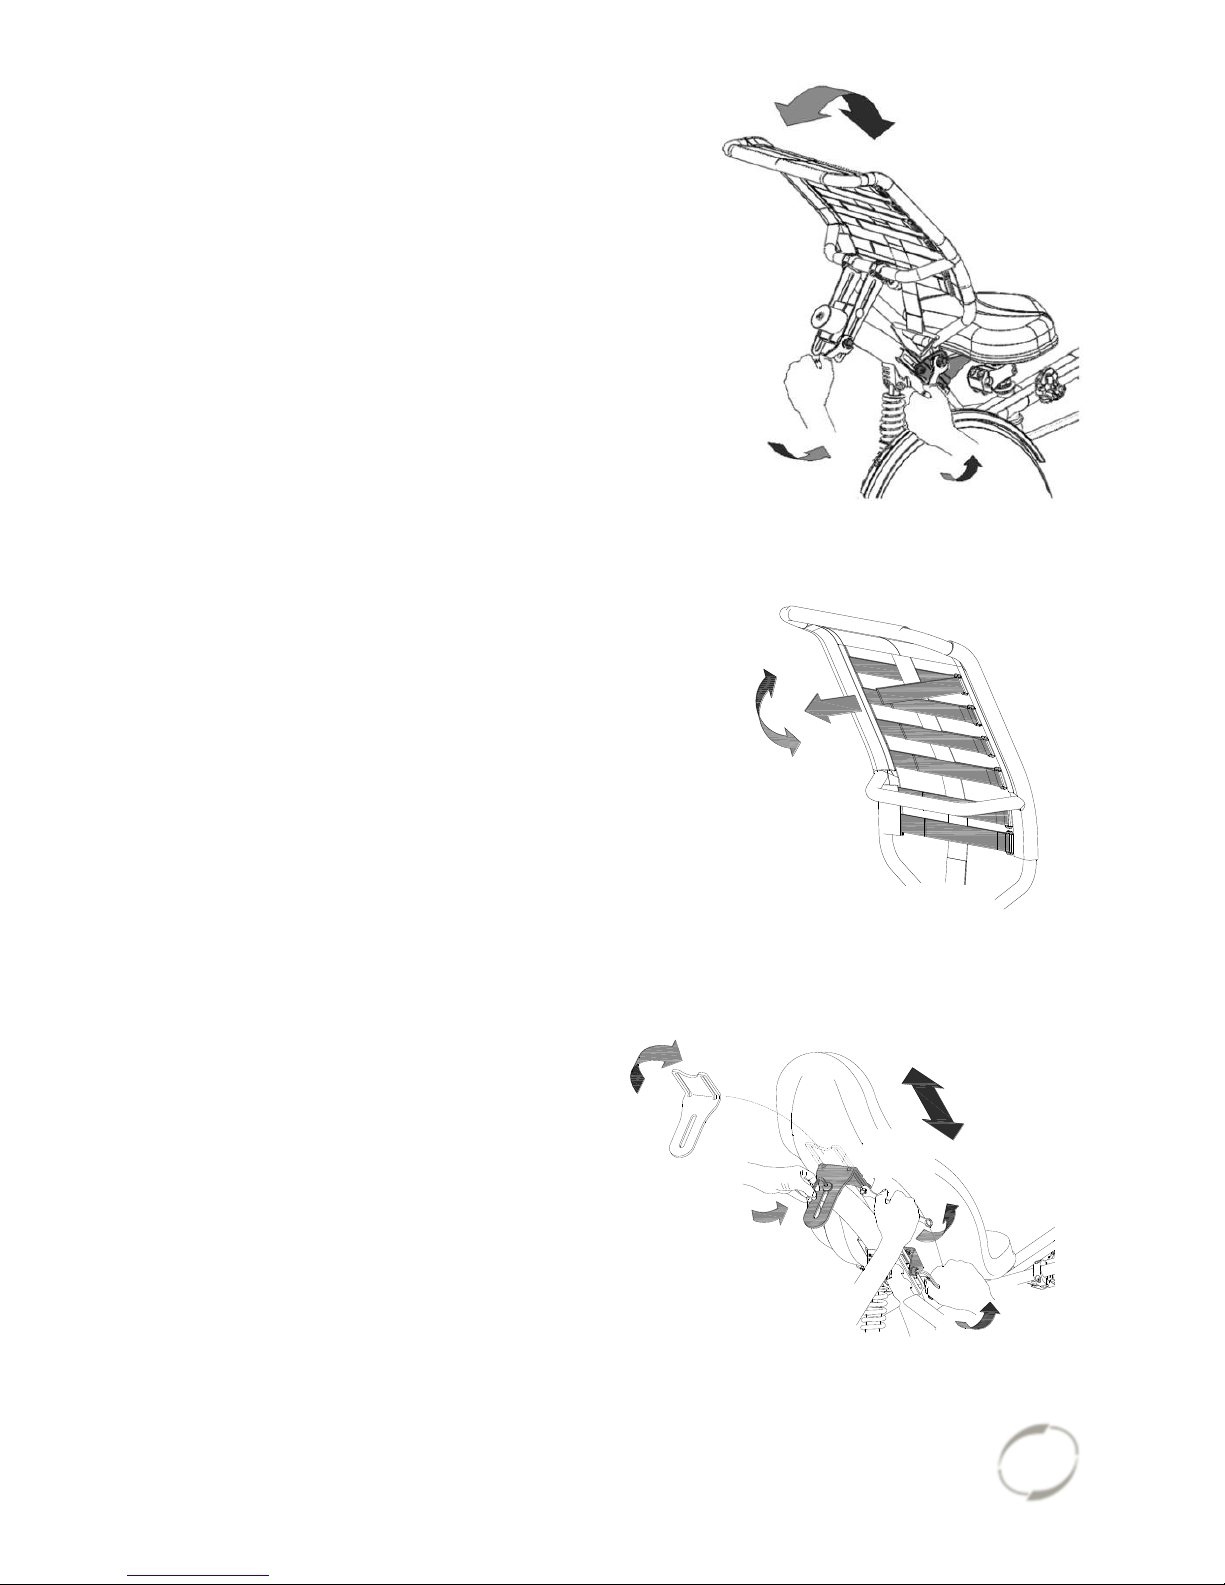
Saddle position and frame length (Easy Sport)
The saddle position is correctly adjusted if the
cyclist is sitting on the tricycle and puts one
foot in the furthest position. Adjust the saddle
position in such a way that the leg is stretched
but still relaxed.
The saddle position is adjusted by shifting
the frame length to the right distance.
Do this by:
1. Slightly loosen the two nuts of the
frame tube, the two nuts of the chain
brackets [A] and the nut of the
handlebars tube [B] with a socket
wrench.
2. Slide the frame to the correct length.
Also slide the brackets [A].
3. Make sure that the handlebars are
aligned with the front wheel. Then
tighten the five nuts again.
Saddle height (Easy Sport with comfortable chair)
The seat can be adjusted to the desired
height. Determine which is most comfortable
by using the bike.
To adjust the height:
1. Slightly loosen the four screws using an
Allen key.
2. Slightly loosen the two nuts with a socket
wrench.
3. Slide the seat to the desired height and
then tighten the screws and the nuts
again.
[B]
[A]
2.
3.
1.
Page 10
User manual
Tricycles 17.04
9
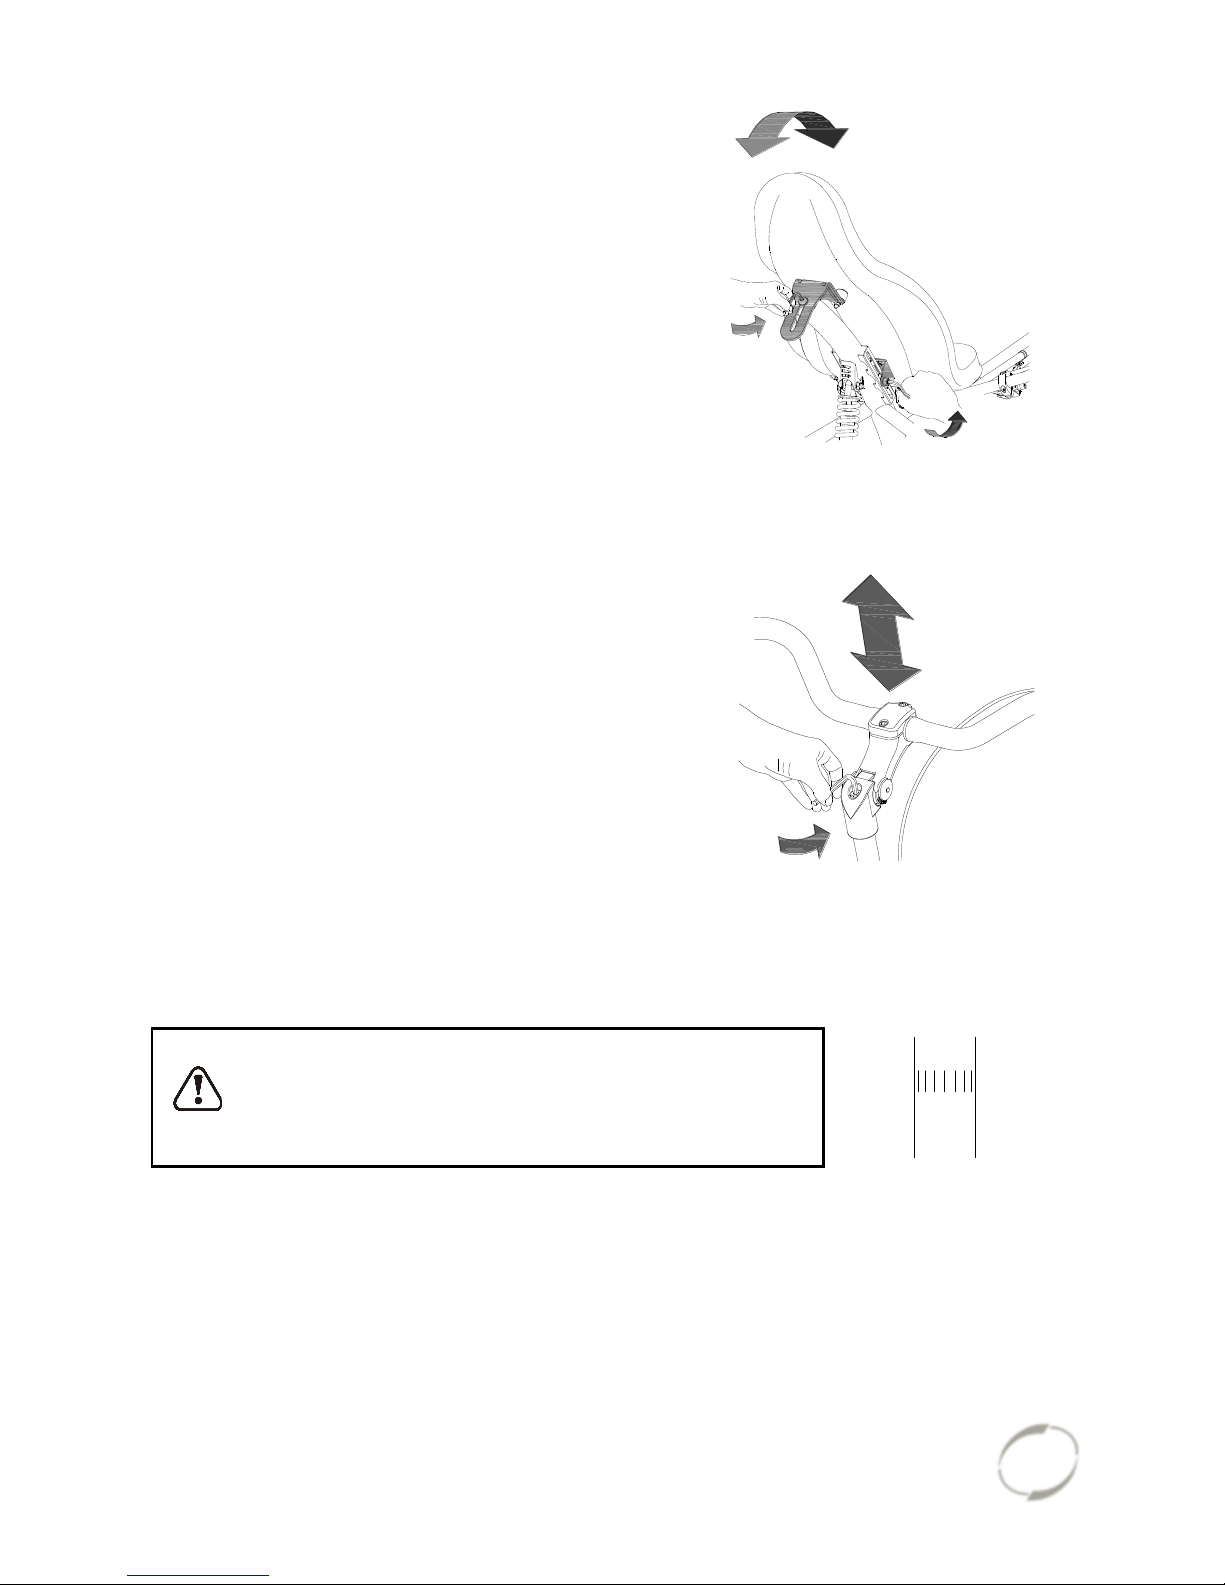
Position backrest (Easy Sport with comfortable chair)
The backrest can be adjusted to the desired
position. To do this:
1. Slightly loosen the three nuts.
2. Put the backrest in the desired position
and then tighten the nuts again.
Firmness backrest (Easy Rider Junior, Easy Rider,
Easy Sport)
To adjust the backrest to a looser or tighter
position:
1. Open the straps by loosening the velcro.
2. Tighten the straps or loosen them.
3. Fasten the velcro again.
Saddle height (Easy Sport with recumbent seat)
The saddle can be adjusted to the desired
height. Determine your own most
comfortable height by using the bike.
To adjust the height:
1. Slightly loosen the three screws using
an Allen key.
2. Slightly loosen the two nuts connected
to the backrest using a socket wrench.
3. Slide the saddle to the desired height
and then tighten the screws and nuts.
4. Beware: The bracket can be fitted in two
ways. By turning the bracket the saddle
can be adjusted to an extra high
position.
1.
2.
3.
4.
1.
2.
1.
Page 11
User manual
Tricycles 17.04
10
MIN INSERT
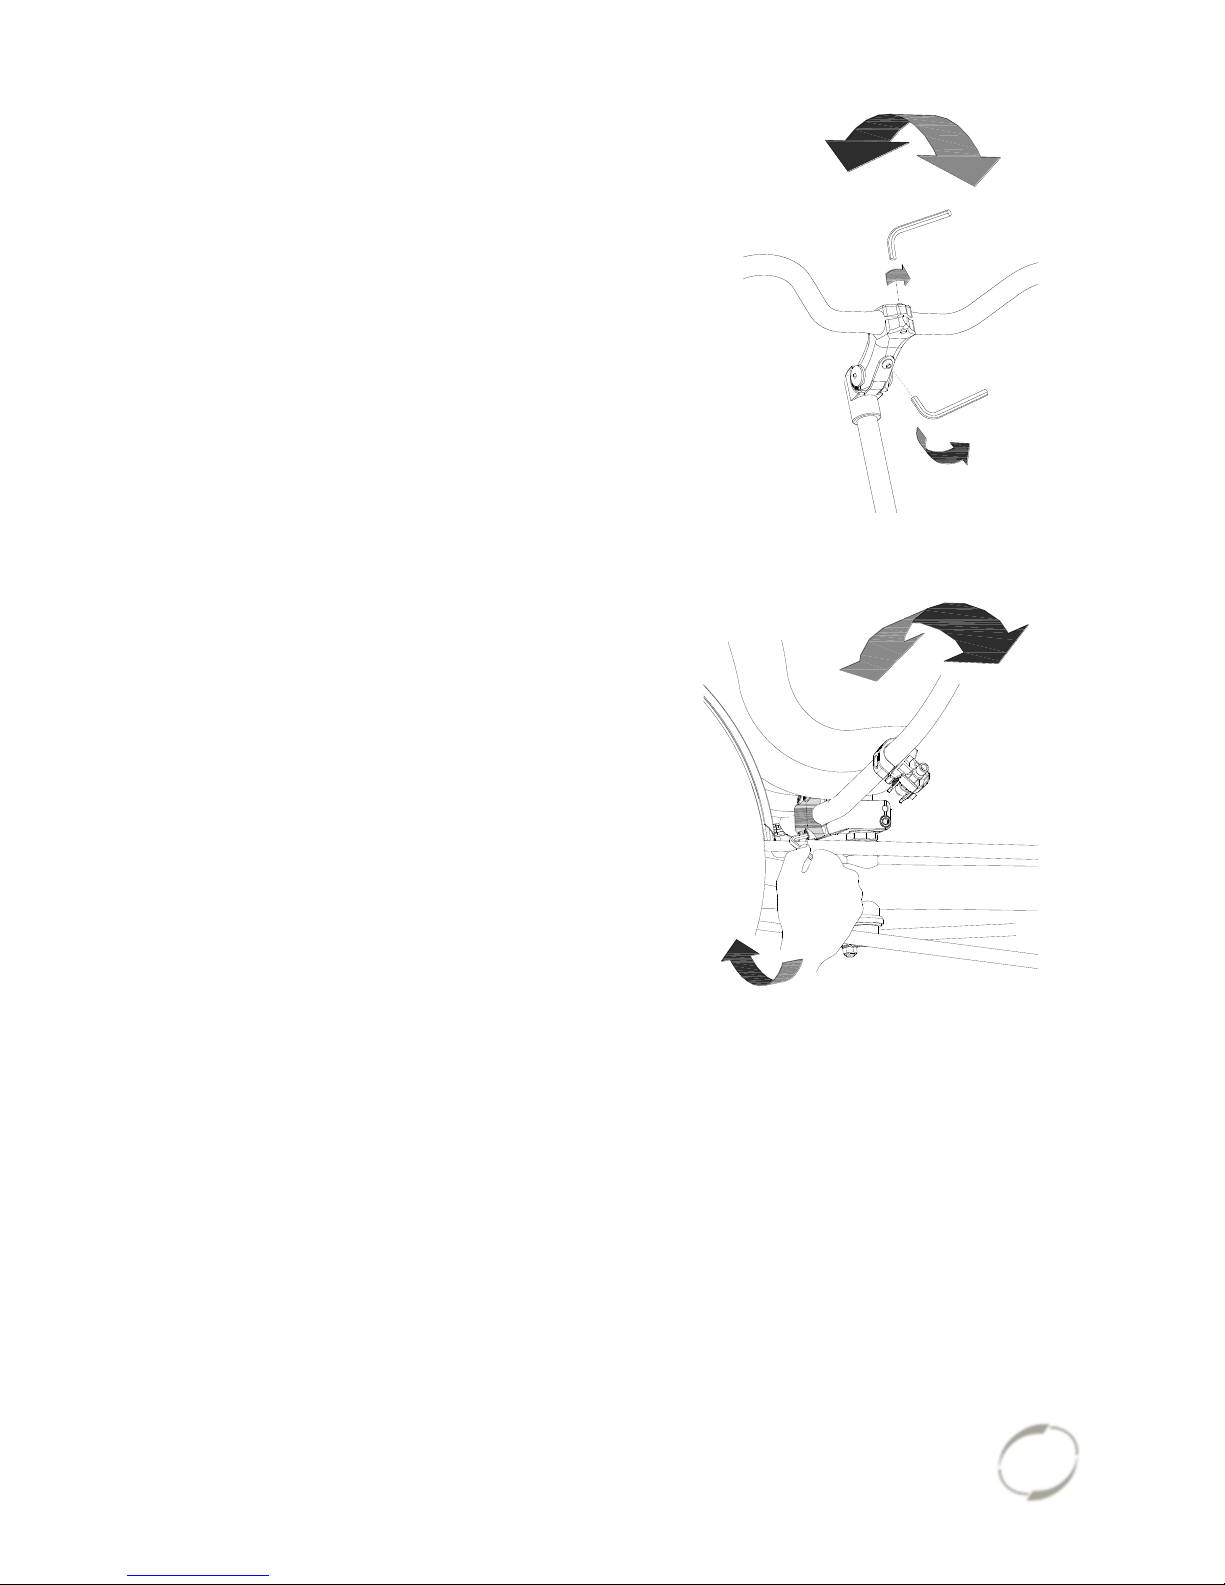
Position backrest (Easy Sport with recumbent
seat)
The backrest can be adjusted in the desired
position. To do this:
1. Slightly loosen the three screws with an
Allen key.
2. Put the backrest in the desired position
and then tighten the screws again.
Handlebars height (Husky, Mini, Midi, Maxi, Maxi
Comfort, Viktoria, Viktor, Easy Rider Junior, Easy
Rider)
The height of the handlebars affects the
comfort of the ride. It determines the pressure
on the hands and the position of the back.
Determine your own most comfortable height
by using the bike.
To adjust the handlebars:
1. Slightly loosen the screw by using an Allen
key.
2. Slide the handlebars to the correct height
and tighten the screw very firmly again.
Do not pull out the handlebars further than the
mark. Otherwise the tube will not be deep enough in
the shaft and will risk coming off, which can lead to
serious injuries.
1.
2.
1.
1.
2.
Page 12
User manual
Tricycles 17.04
11
Position handlebars (Midi, Maxi, Maxi Comfort,
Viktoria, Viktor, Easy Rider Junior, Easy Rider)
You can tilt the handlebars. This influences
the distance from the handlebars to the upper
body. Determine your own most comfortable
position by using the bike.
To tilt the handlebars:
1. Slightly loosen the screws [A] with an Allen
key.
2. Put the handlebars in the desired position
and then tighten the screws considerably.
3. Slightly loosen screw [B] with an Allen key,
put the handlebars in the correct
(horizontal) position and then tighten the
screw again.
Position handlebars (Easy Sport)
You can tilt the handlebars. Determine your
own most comfortable position by using the
bike.
To tilt the handlebars:
1. Slightly loosen the screws with an Allen
key.
2. Put the handlebars in the desired position
and then tighten the screws again
considerably.
3.
1.
[A]
[B]
2.
Page 13
User manual
Tricycles 17.04
12
off
on
auto
Before the first use
Parking brake
Always use the parking brake if you park the
tricycle and leave it behind.
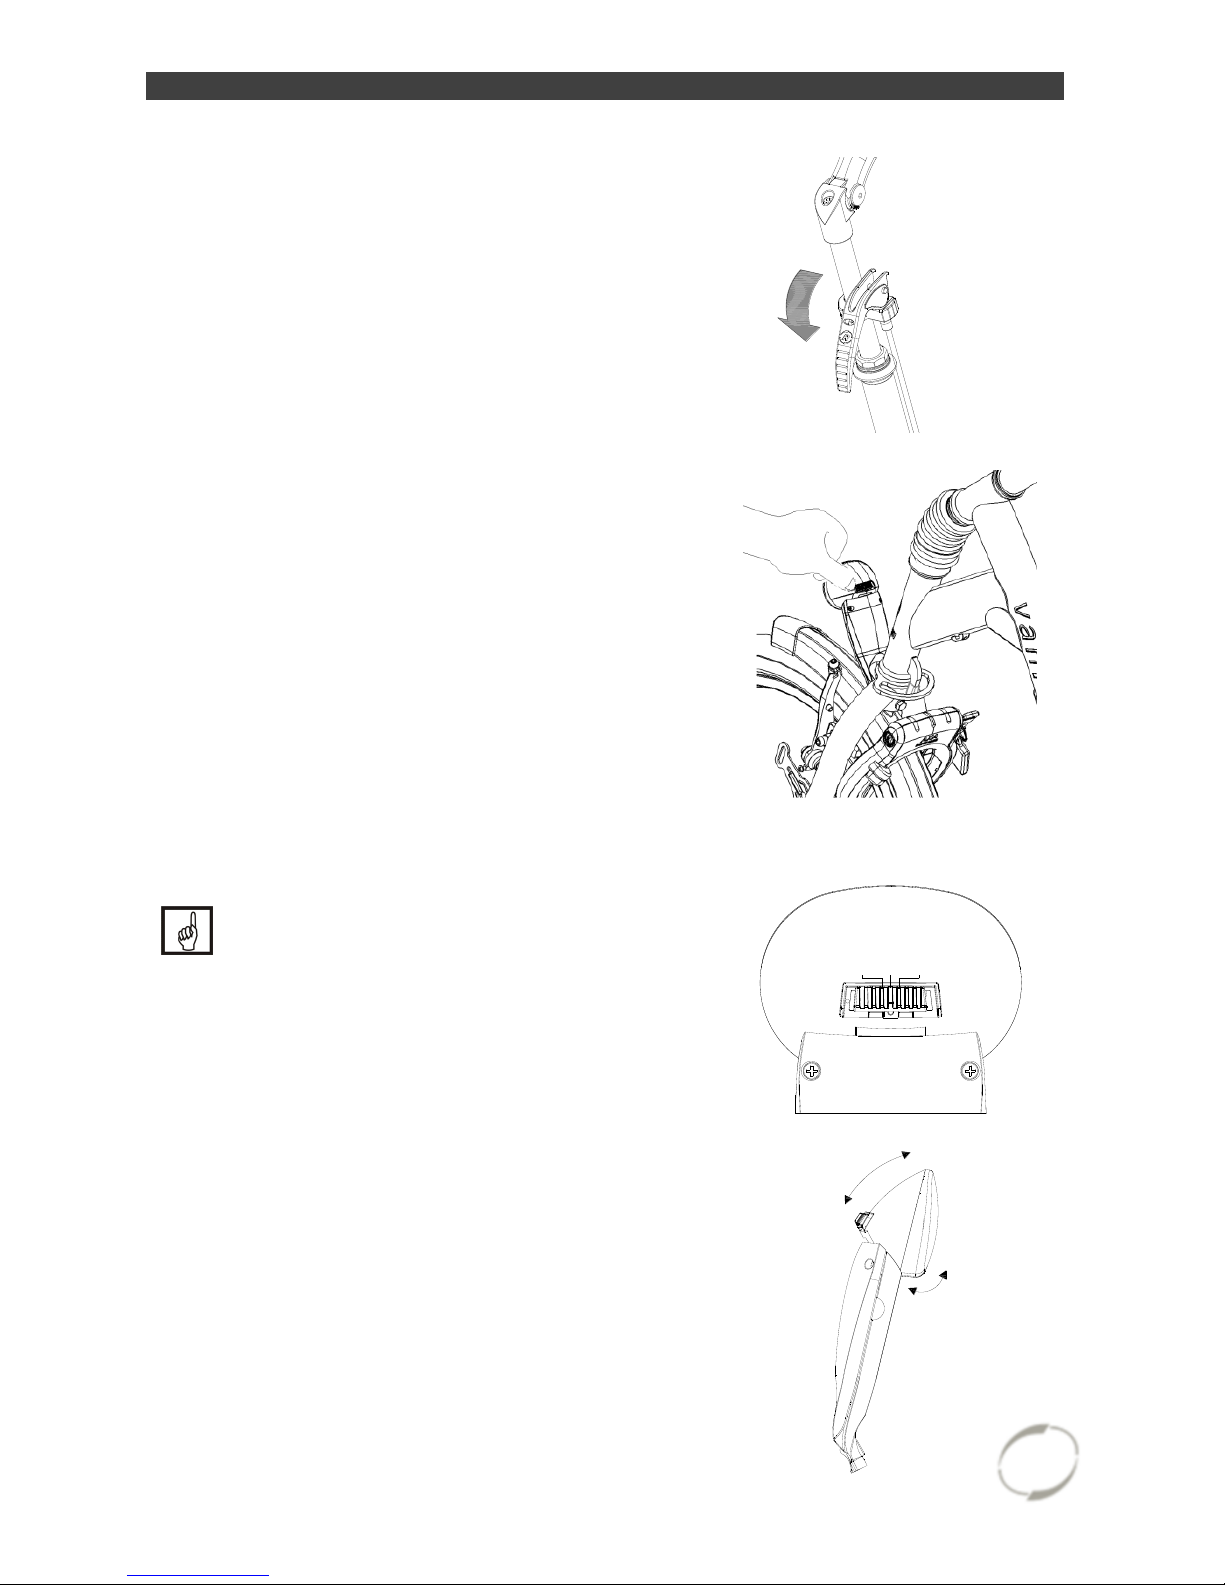
Lights
Headlight (Mini, Midi, Maxi, Maxi Comfort, Easy
Rider, Easy Rider Junior en Easy Sport)
The headlight has a switch (sliding switch)
with three positions: Off-Auto-On.
The headlight can be manually switched on or
off with the “On/Off” position.
In the “Auto” position, the headlight turns on
or off automatically with the help of light- and
movement sensors. When the tricycle stands
still for a while, the light will automatically turn
off.
The Husky has no lighting. We
recommend using the tricycle only
in daylight.
Adjusting the headlight
Set the angle of the headlight such that
the centre of the light beam falls
approximately ten meters ahead of the bike.
Page 14
User manual
Tricycles 17.04
13
off
on
auto
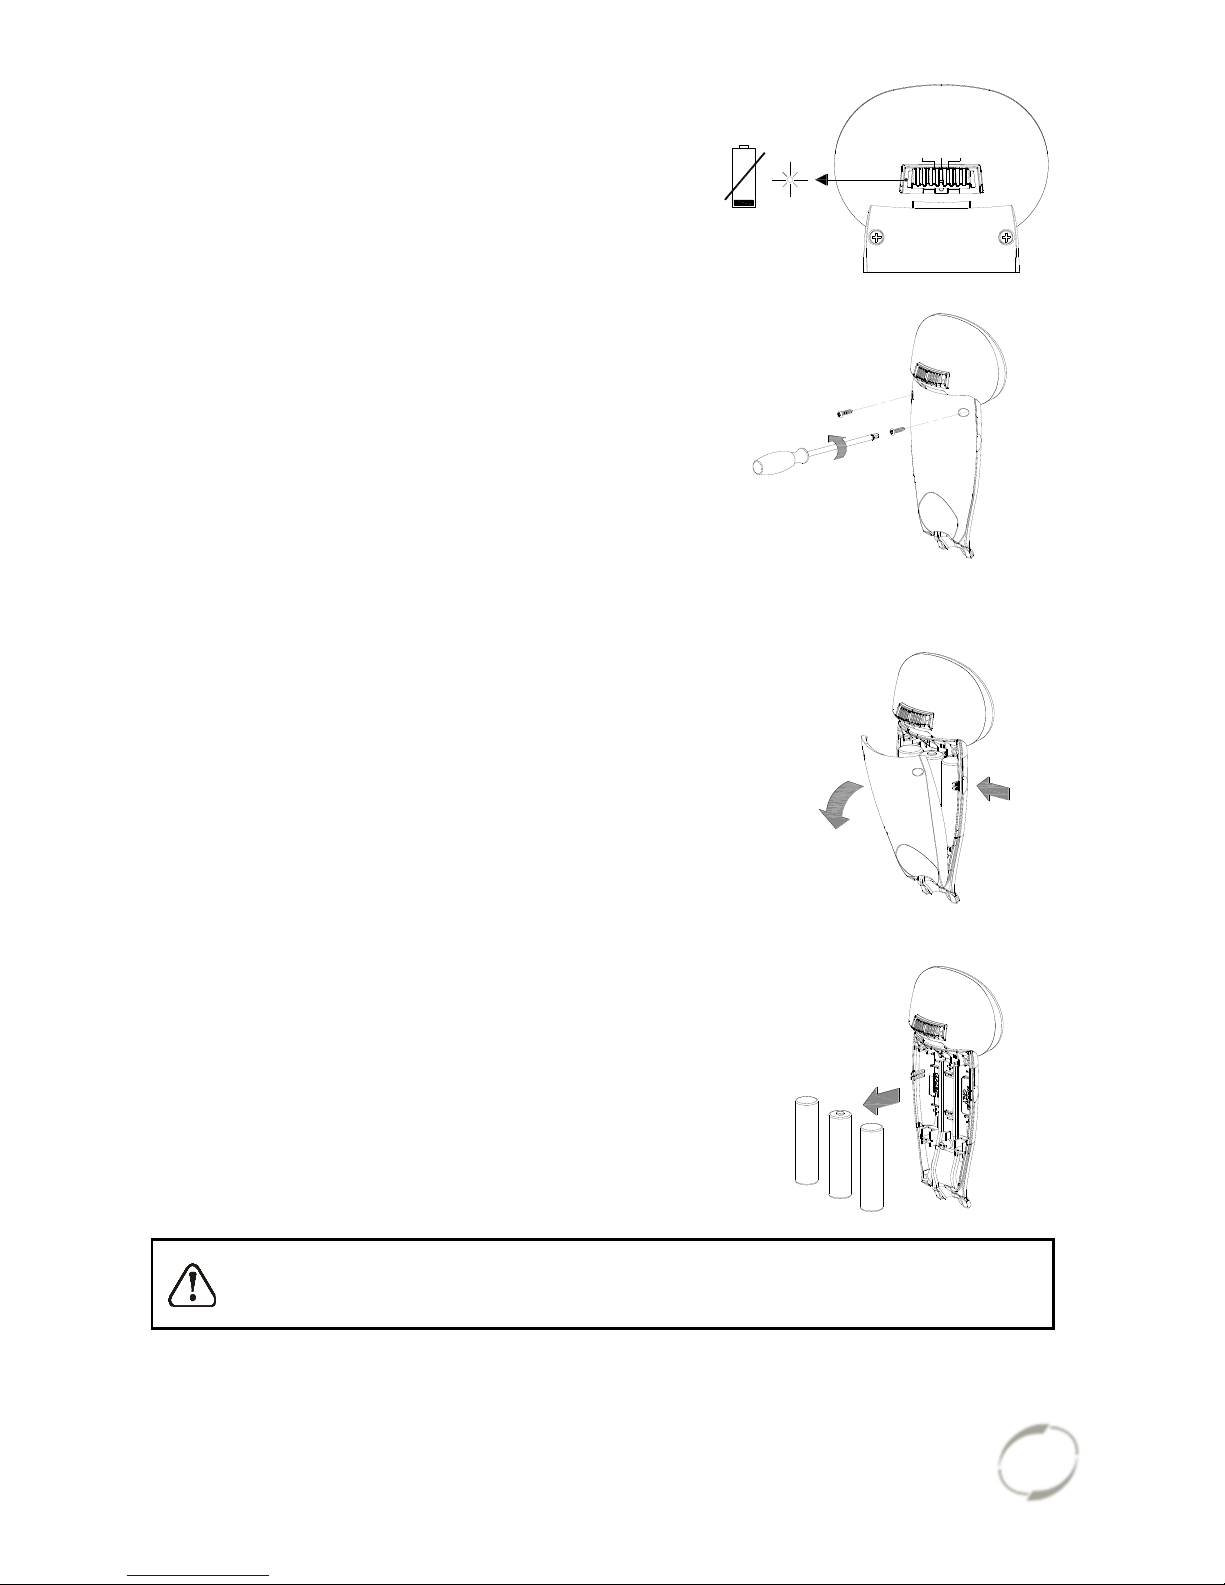
Replacing batteries
The headlight works on batteries. When the
batteries are almost empty, a red LED light
flashes on the headlight. Follow the next steps
to replace the batteries.
1. Remove the two screws at the back of the
front light.
2. Dismantle the rear cover by pressing with
the thumb and index finger at the cavity on
both sides of the front cover and pulling
the rear cover back.
3. Replace the alkaline batteries (1.5 V 1500 mA) and assemble the rear cover.
Only operate the lighting when stationary to avoid dangerous situations and
the risk of personal injury. Advice: use the lighting in automatic mode.
2.
+
-
-
+
+
-
3.
Page 15
User manual
Tricycles 17.04
14
1x = ON
2x = AUTO
3x = OFF
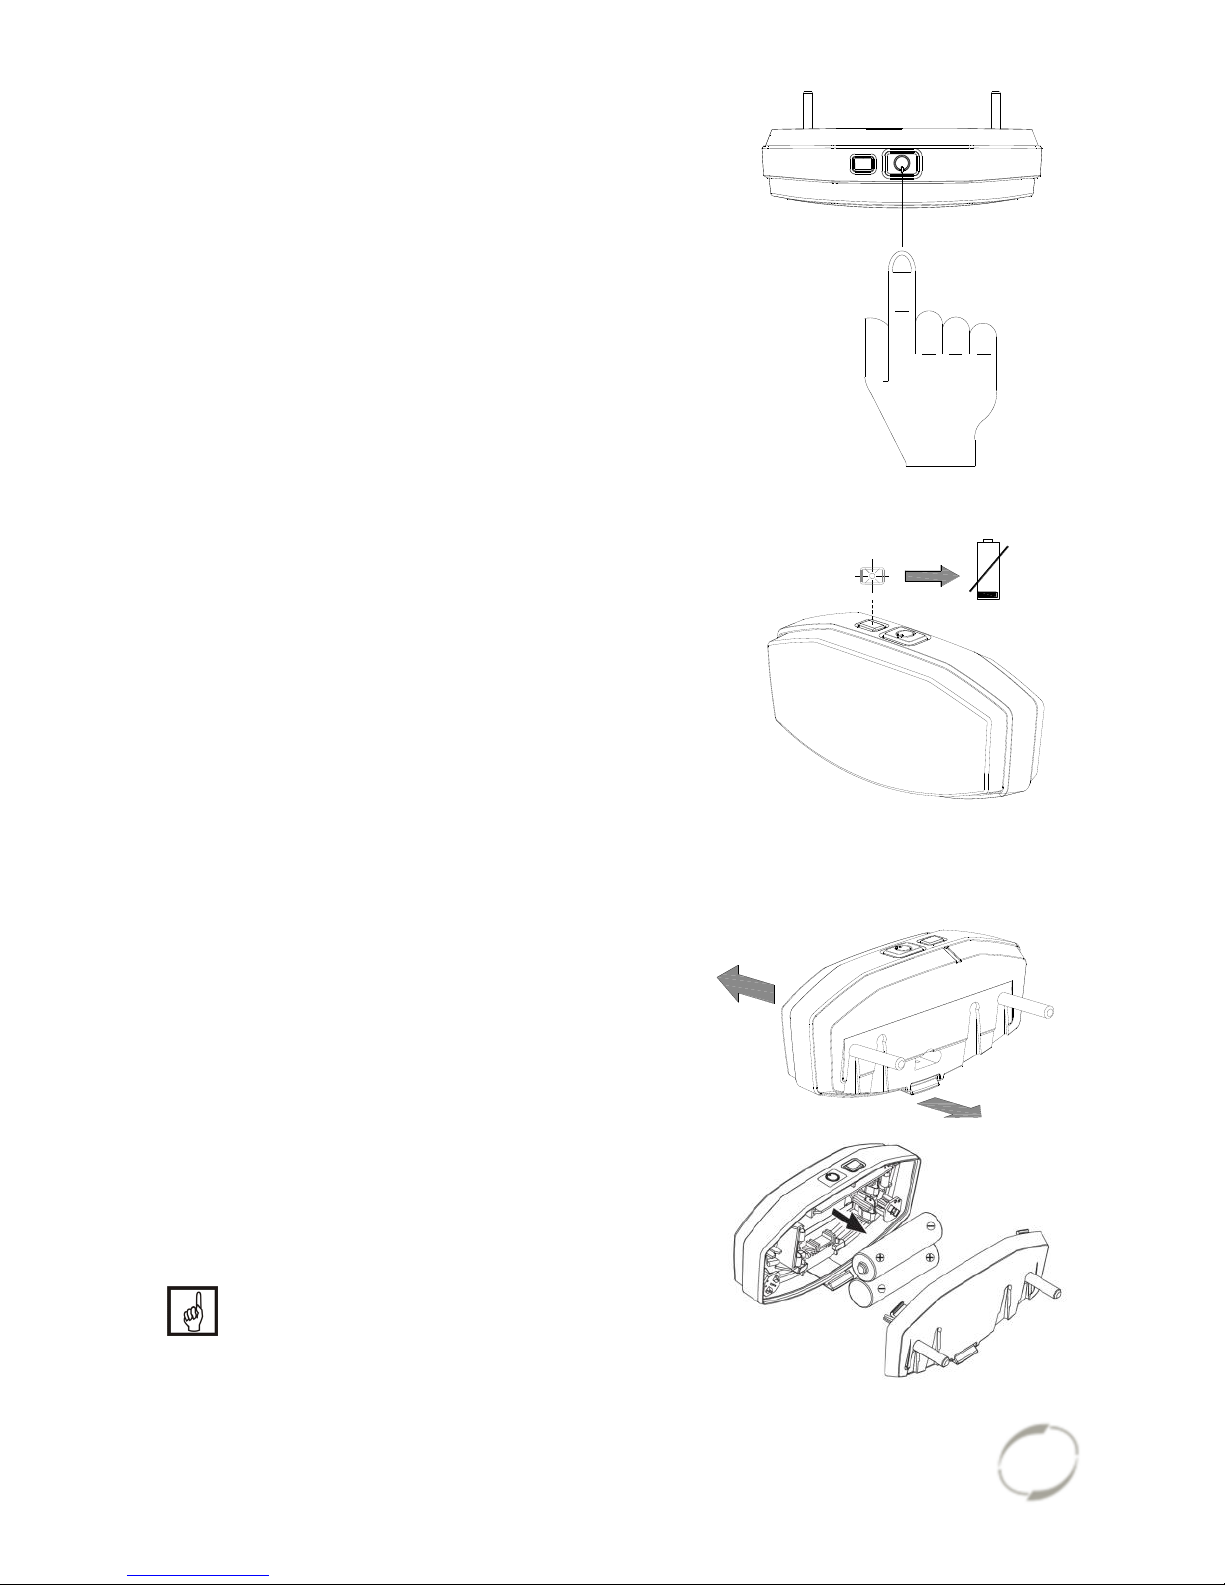
Rear light (Mini, Midi, Maxi, Maxi Comfort, Easy
Rider, Easy Rider Junior en Easy Sport)
The rear light has three options which you can
choose by pressing the button repeatedly:
On-Auto-Off.
The setting is as follows:
Press 1x: light is on
Press 2x: lighting is automatic
Press 3x: light is off
With the “On” or “Off“ mode, the rear light can
be manually switched on and off.
With the “Automatic” mode the rear light
automatically turns on and off with the help of
light and movement sensors. When the
tricycle stands still for a while, the light will
automatically turn off.
The rear light works on batteries. When the
batteries are almost empty, a red LED light
on the top starts flashing. To replace the
batteries, follow the next steps.
1. Dismantle the cover of the holder by
pressing in the lip at the bottom of the
light.
2. Replace the alkaline batteries
(1,5 V - 1500 mA) and assemble the
cover.
Batteries cause environmental pollution.
Follow the local regulations
during disposal.
2.
1.
Page 16
User manual
Tricycles 17.04
15
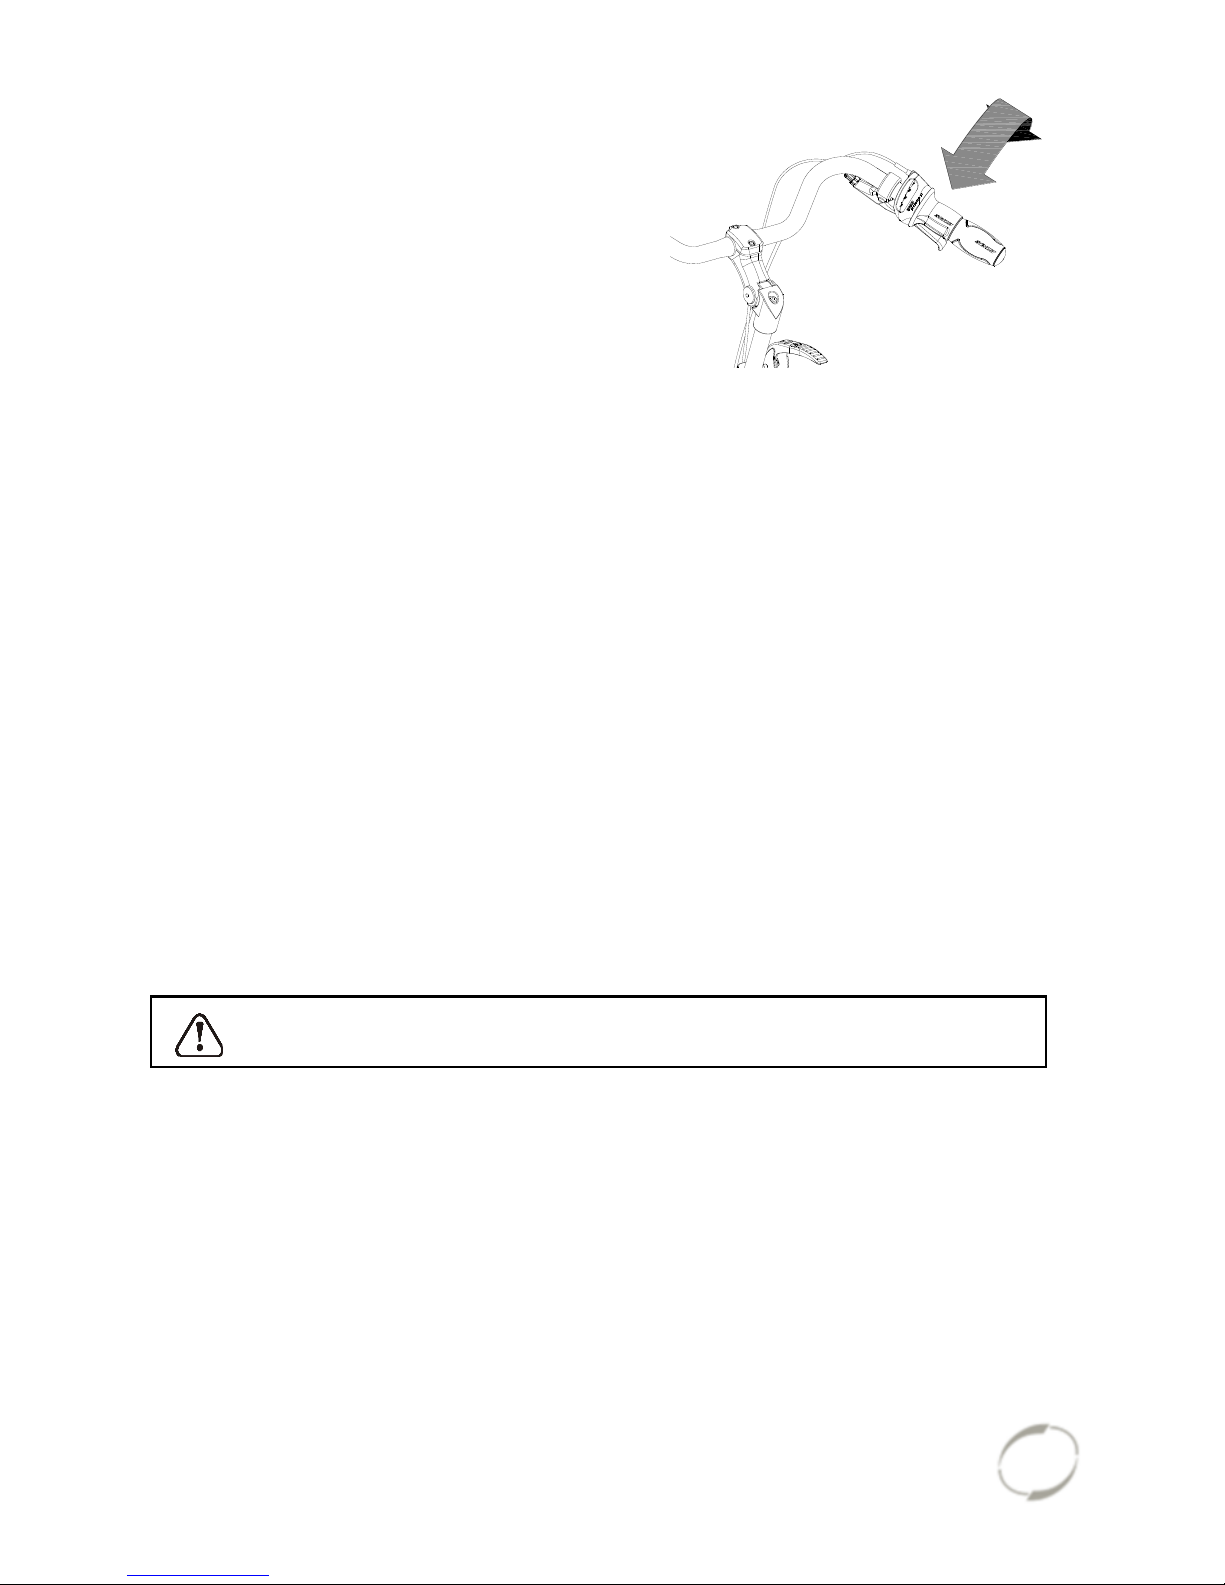
Gears
The tricycle has no gears or eight gears. The
gear is operated by turning the grip.
Do not use the pedals when turning the grip.
Check before every ride:
The brakes (including the parking brakes)
The tyre pressure (recommended: 3 bar)
The lights
That all parts are fitted properly
That the battery is adequately charged (depends on options)
Contact your dealer and stop using your tricycle as soon as you observe irregularities
during the check!
As with all mechanical parts, the tricycle is subject to wear tear and high loading. If a
component fails, it can lead to very dangerous situations. This can lead to damage or
injuries to the user of the tricycle. Any form of cracks, scratching or change in colour
in heavily loaded parts or a component indicates that the component must be
replaced.
Points of interest during cycling
After you have adjusted the tricycle to the measurements of the cyclist, you can start
using the bike.
The tricycle gives a very different ride experience than a bicycle!
Practice, in particular, with bends and braking, because a tricycle can react contrary
to what you would expect. It may happen that the back wheel comes off the ground
on the inside when going round a bend. To avoid this the rider leans towards the
inside of the bend with his body.
One of the brake levers (usually the right) operates the brake on the front wheel. This
deserves special caution, as a forceful braking could block the front wheel, which
could result in a fall. The driver should be familiar with controlled braking of the front
wheel!
Page 17
User manual
Tricycles 17.04
16
If there is an electric motor on a bike: you must train with the
acceleration function and reverse functions. Be careful that the
acceleration mode or reverse mode are not unintentionally started
while using the bike. For example, at traffic lights the reverse
function can accidentally be activated and the tricycle reverses.
High speeds in the bends, driving on rough ground, and sharp bends can
lead to the tricycle falling over!
Extra attention is essential if a child is using the tricycle or a person with
limited powers of perception is using the tricycle!
Before a child or an adult with limited powers of perception rides the tricycle
independently for the first time, they should practice first under your supervision (or
under the supervision of others).
Pay special attention to bends, because this can be a great source of danger. Also
explain that the widest part of the tricycle is situated behind the driver. Let them
practice passing several obstacles, to get a feel of the width of the tricycle!
Children or adults with limited powers of perception should always be made aware of
the possible dangers of using a tricycle.
Important safety points for the cyclist
Be very careful during the first ride.
When riding the tricycle hold both hands firmly on the handlebars and feet
on the pedals.
Test the riding style of the tricycle on rough ground at moderate speed. This
way the cyclist learns how to react to unexpected movements of the tricycle
and the handlebars during use.
Explore how the tilting movements of the tricycle react to body posture. Tilt
to the inside of the bend.
Small obstacles should be cycled over with appropriate speed.
Obstacles higher than five centimetre should be avoided.
Ensure that no dangerous speed develops while driving downhill and
entering tunnels. Brake on time.
Page 18
User manual
Tricycles 17.04
17
Electro system Silent
The Silent Electric motor system is a special developed support system by Van
Raam for the rehabilitation market. The system is characterized by:
1. A simplicity of operation
2. Individually adjustable support for cycling
3. Modern and efficient electronics
4. The powerful electric motors
5. High quality and safe batteries
6. Highly reliable system
The Silent system comes standard with a basic support mode individually
programmed for your bike. In most cases, it gives precise and smooth cycling
characteristics with a good compromise between support and radius of action.
In special cases, an individually tailor-made cycling program is necessary. You can
obtain information from the dealer about the possibilities of a customised cycling
program.
Functions:
The electric system has the following functions:
- Pedal support while cycling
- Start support
- Backwards pedalling with support
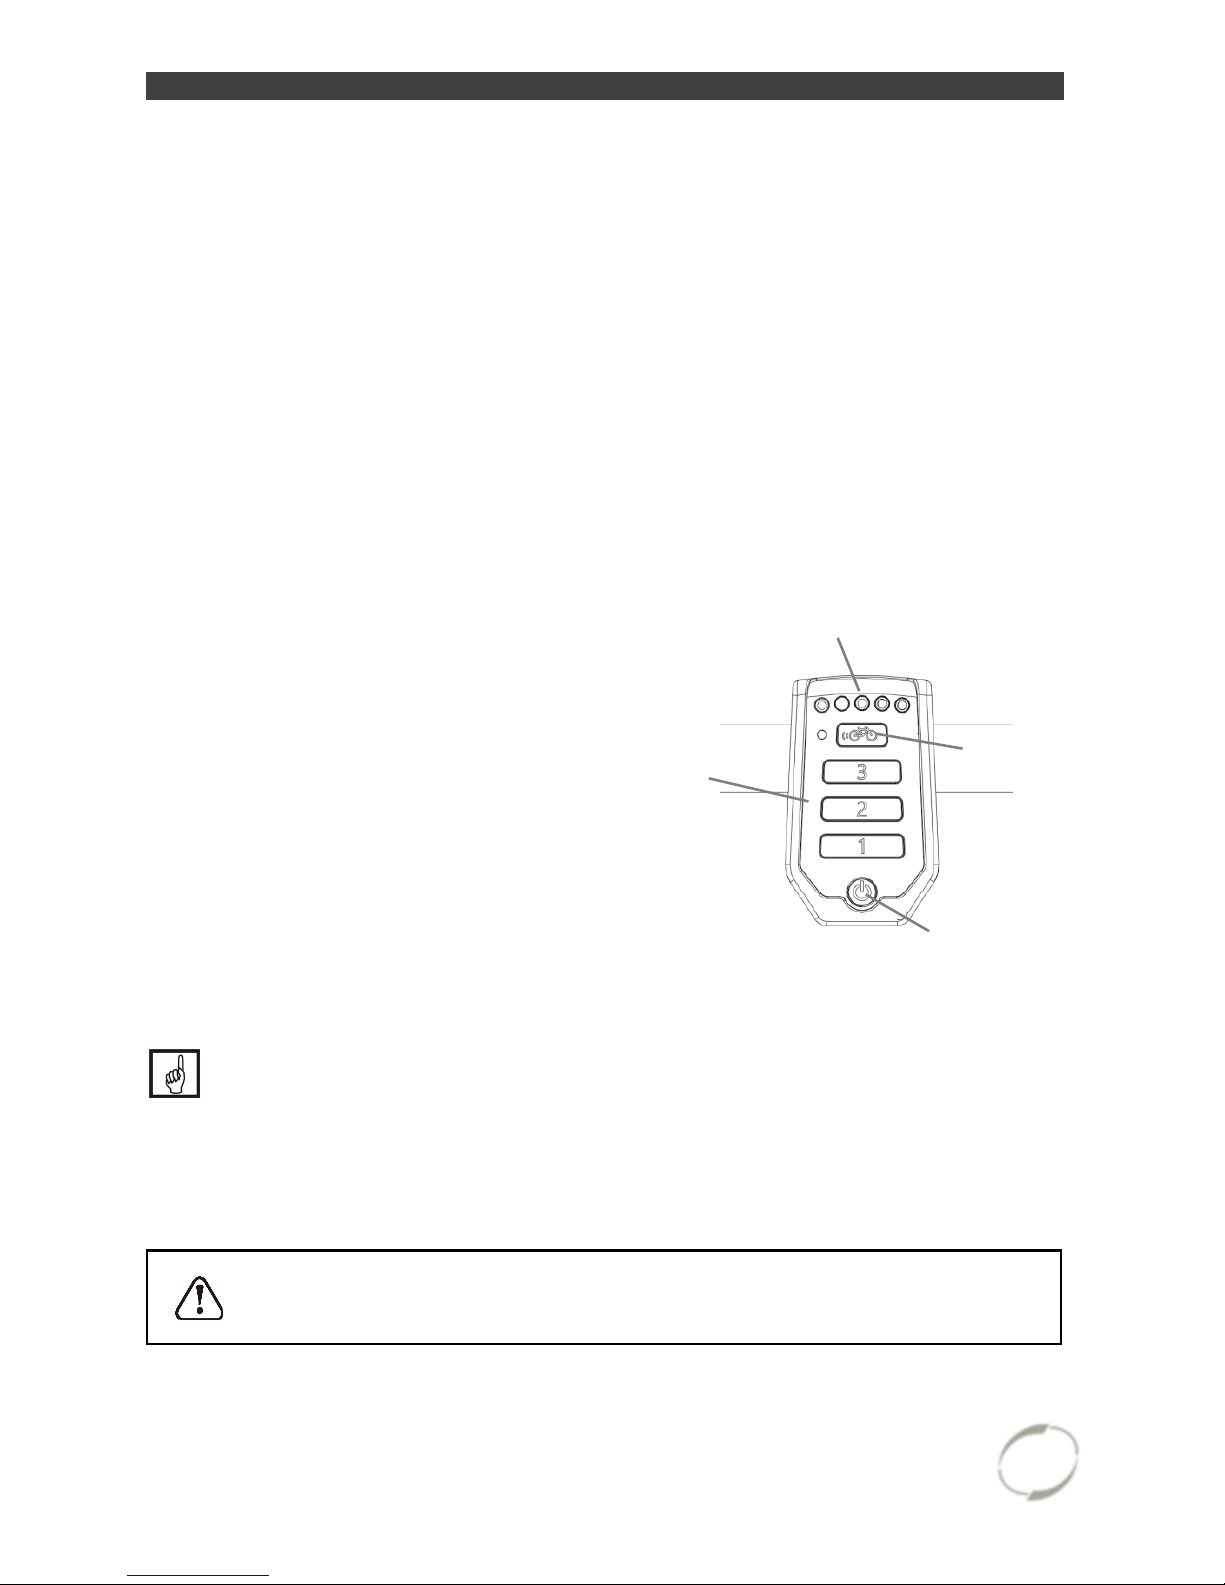
1. On/off button
Using the on/off button, the electrical system
can be switched on or off.
Switching on: Push the button briefly.
Switching off: Push the button for
two seconds.
After the system is turned on, the electric motor is active in level 1.
When the system is not used, it will automatically turn off after a certain time.
With the option “integrated lighting”, the lights will automatically switch on when you
turn on the electric motor system. You can switch the lights on and off by briefly
pressing the on/off button in this mode.
Always turn off the electrical system when you are getting off the bicycle.
Turn the electrical system on after you have taken up your riding position.
1. On/off button
3. Start assist
2. Degree of support
(1,2,3)
4. Battery indication lights
Page 19
User manual
Tricycles 17.04
18
2. Degree of support 1, 2 and 3
The desired support can be set by using one of the support levels 1, 2 or 3.
1. Light support, maximum range.
2. Average support, average range.
3. Maximum support, low range.
You can change the level while cycling.
3. Start assist
The Silent electric motor has a start support. This allows the driver to pull-away
without pedalling up to a speed of 6 km/h over five seconds. To accelerate, press the
start assist button and keep it pressed down. The function will only activate again,
when the support button has been pressed down again.
If you peddle normally, the function works for up to five seconds, each time the
button is pressed, up to maximum speed of the bicycle (20-25 km/h).
The start assist is used for:
Extra support when starting.
Extra support for cycling uphill.
Tip: when cycling a steep climb, you can use support in level 3 and push the
start assist repeatedly for five seconds to achieve maximum support.
4. Battery indication lights
The level of charge in the battery is given by five LED lights: four of these are green,
the one on the left can show either green or red, if charge is low.
The battery is almost empty if only the last red LED light is on. The battery needs to
be recharged or replaced by a (new) fully charged battery.
When the last red LED light flashes, the battery is empty and the motor will no longer
support while cycling. The integrated lighting continues to work.
Never leave the bicycle with an empty battery!
Note: charge the battery within one day.
Page 20
User manual
Tricycles 17.04
19
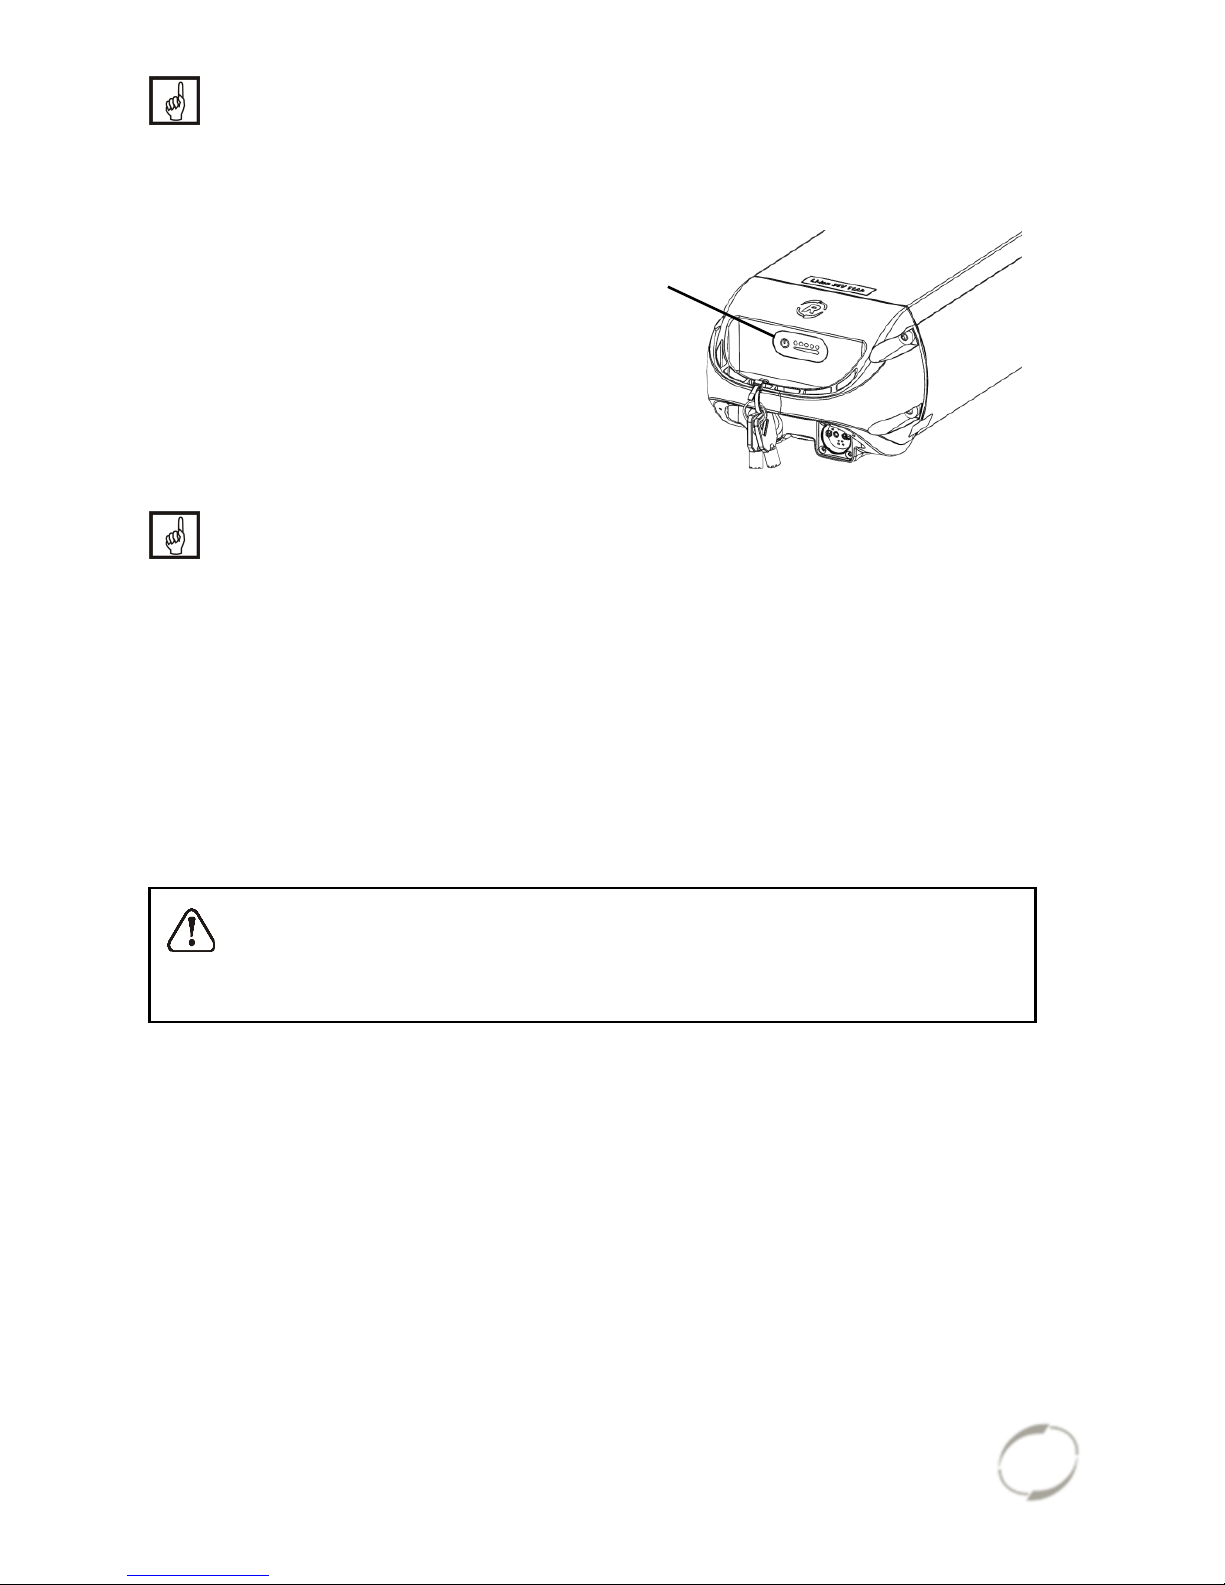
When the motor is not used for a while, the battery switches into the
sleeping mode. This is to protect the batteries. To activate it, you can press
the on/off button [A] on the battery and the indication lights will light up. You
also can connect the battery to the charger for a few seconds or cycle the
bike forwards (around 10 km/h) and push the on/off button to activate the
system.
If you push the bicycle, turn off the motor.
If your battery is equipped with a button and indicator lights, the charge-level in the
battery can be checked by pressing the button briefly. The five green lights indicate
the level of charge in your battery, the left one of these, if flashing, given the lowest
level. While charging the battery, these lights will also indicate how far the charging
has progressed.
Reverse mode
The reverse mode is activated by pedalling backwards from a standing position.
Within a few seconds the motor is activated and the tricycle cycles at a speed of
about 2 km/h backwards (when you start to pedal backwards).
Do not be startled by an unexpected reaction from the electrical
system. If you e.g. wait for the traffic light and you play with the pedals
by moving them backwards the reverse mode is activated and the
tricycle cycles backwards.
Bike application
The smart display is equipped with a Bluetooth connection. The Van Raam
application can connect with the bike and track your bike data. In addition, settings
can be changed while cycling. Once the smart display is ready to connect to the
smartphone, the on/off button briefly turns blue. More information about the Van
Raam application can be found on the Van Raam website.
Other functions
The smart display has an automatic dimming function. With an inbuilt light sensor the
lights of the display will automatically creating less distraction for the cyclist in darker
or more shadowy conditions.
[A]
Page 21
User manual
Tricycles 17.04
20
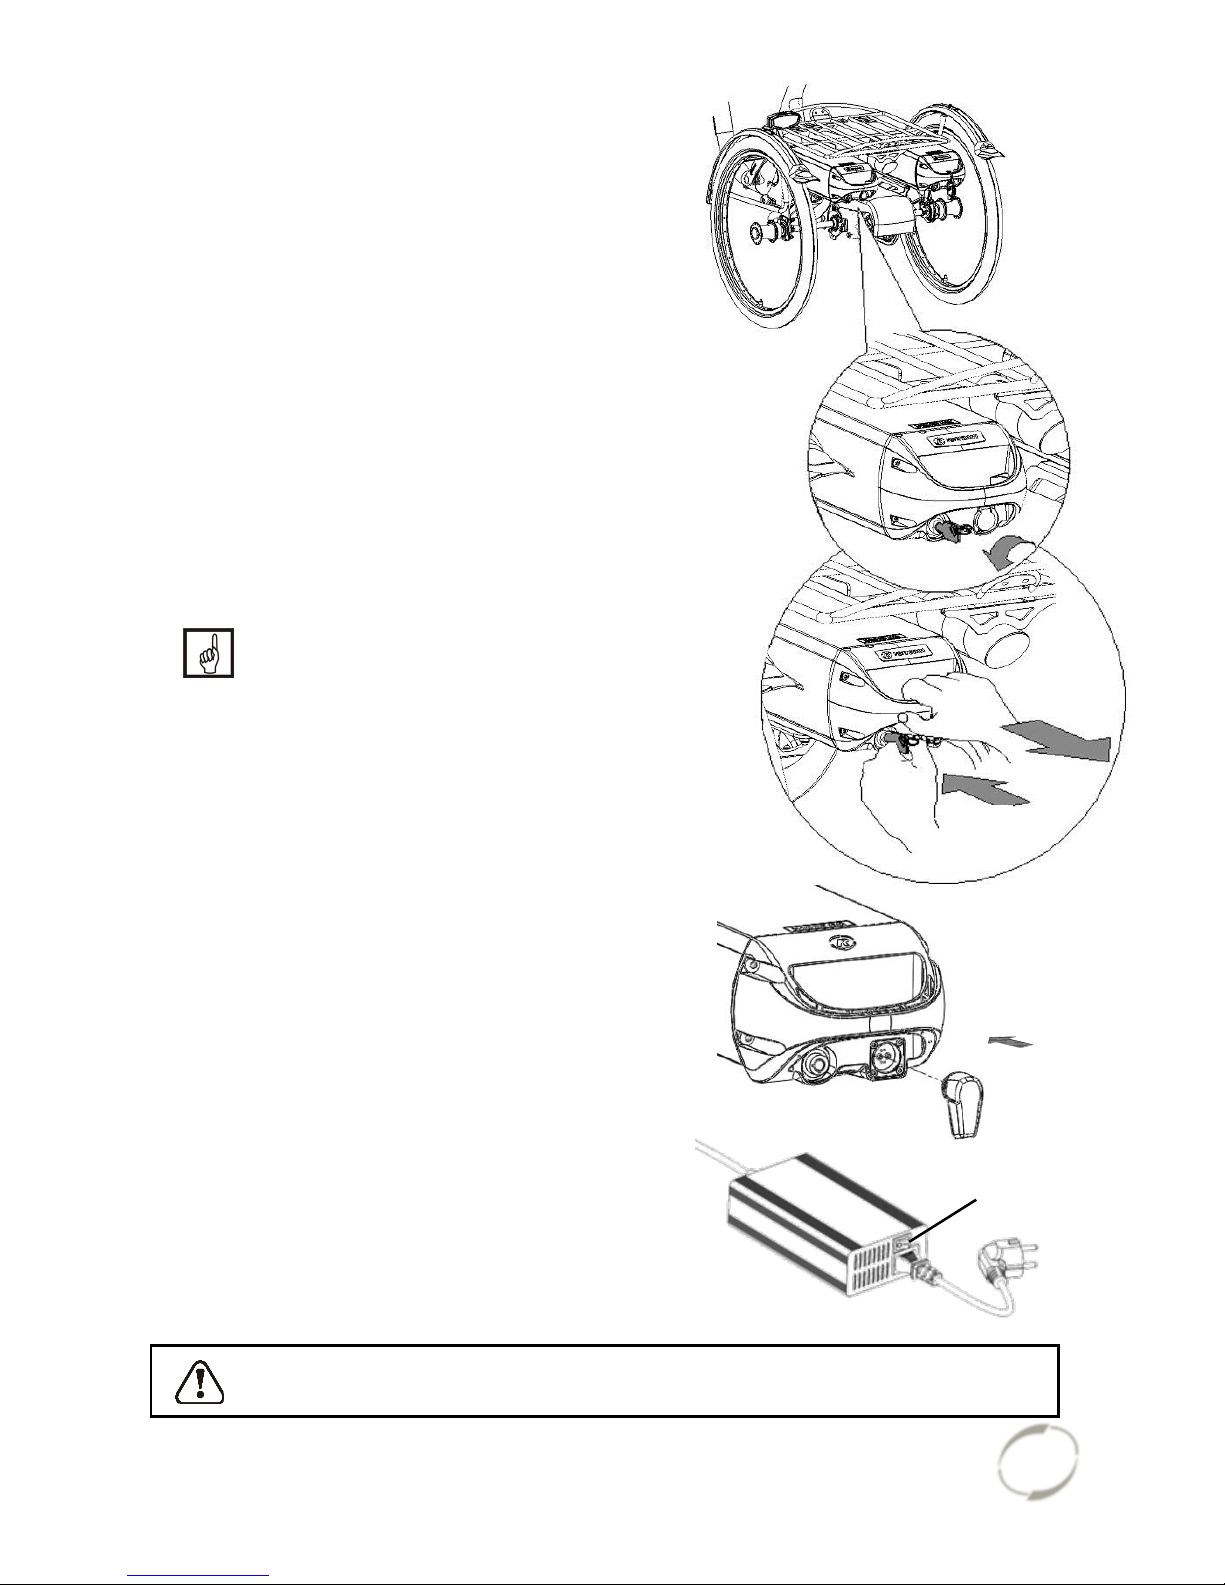
Charging the Battery
For the best performance and to prolong the
life of the battery, we recommend that you
charge the battery at home at room
temperature.
To charge the battery:
1. Unlock the battery by turning the key a
quarter.
2. Push down the lock while pulling the
battery with your other hand.
3. Take the battery pack inside. First
connect the charger to the plug-ensure
contact of the battery. The magnetic plug
of the charger directly connected properly
to the battery.
4. Then connect the charger plug into the
mains socket. Turn the switch [A] on. A
green LED light on the charger will start to
blink fast. Now the battery will recharge.
Beware! If the battery is not
connected properly, the green LED
light blinks slowly. In case of a poor
contact, the connector of the
charger needs to be cleaned.
5. Depending on the battery level, the
charging time is about 2,5 hours for a
battery of 11,2 Ah and 6 hours for a
battery of 24,8 Ah.
6. Once the battery is fully charged, the
green LED light stays on. First pull the
plug from the mains socket or turn the
switch [A] off.
7. Then pull the connector from the battery.
8. Put the battery back in the holder of the
cycle and close the lock.
If necessary, the battery can also be charged
directly on the cycle.
Do not wait until the battery is completely empty. It is better to top-up the
battery regularly.
3.
[A]
4.
1.
2.
Page 22
User manual
Tricycles 17.04
21
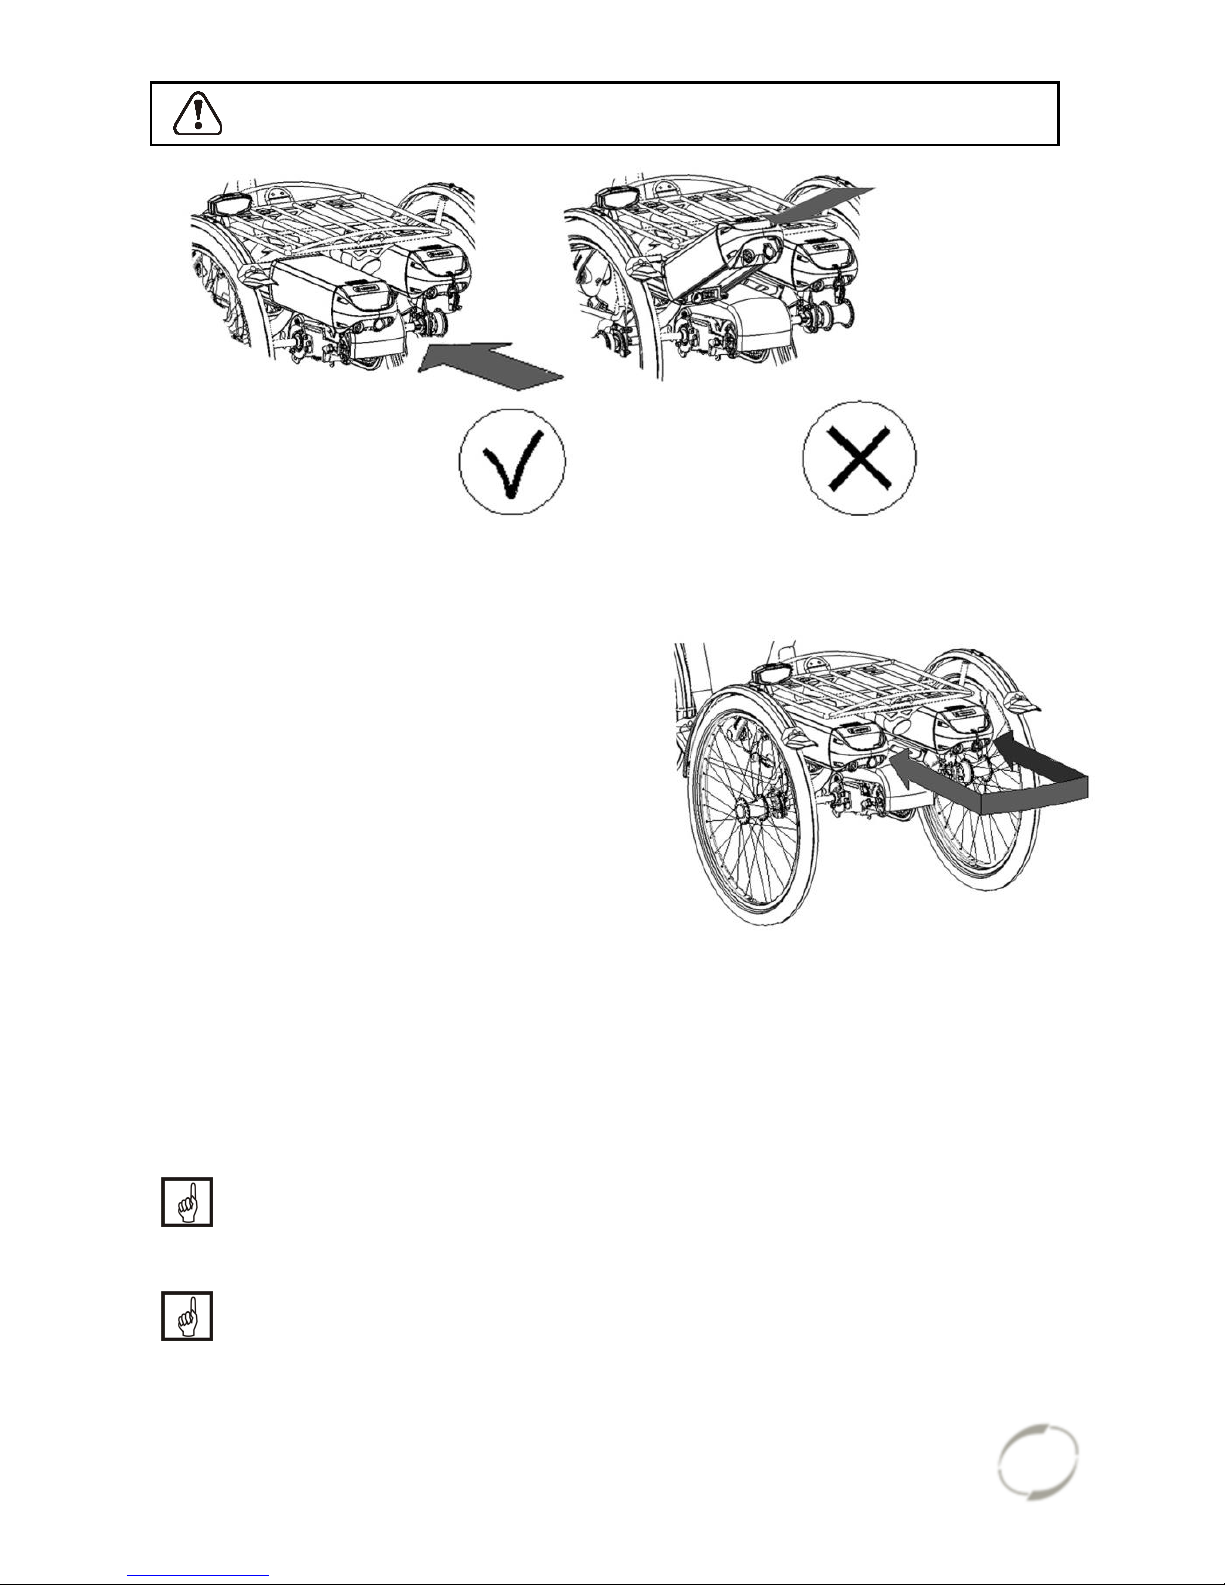
Ensure that the battery is always pushed straight into the holder.
Backup battery: (optional)
The bike can be supplied with a second
battery. When the first connected battery
is empty, switch over to the second
battery.
One of the battery holders is connected
to the system, you can recognize this
one because of the cables.
Switchable battery pack: (optional)
The bicycle may be fitted with a switchable
battery pack. Once the connected battery is
empty, you can swap the battery using a
switch. This switch is located either under the
seat, below the luggage rack or below one of
the two batteries.
One of the battery holders is connected to the system, you can recognize this one
because of the cables.
If desired, you can leave the second battery to charge when you are using the other.
Keep in mind that your bike provides less support when it’s cold (0ºC and
less) and the battery will discharge faster. Charging also takes more time at
lower temperatures.
The action radius depends on a lot of different factors and is strongly
influenced by: capacity and voltage of the battery, degree of support that is
used, temperature, wind speed, tyre pressure, cycling speed, weight of the
user and the luggage, use of gearing etcetera.
Page 23
User manual
Tricycles 17.04
22
Charging and maintenance tips for the battery
Every battery discharges automatically over time. This process is called selfdischarge. A battery that is empty and not charged, will self-discharge and
will be deep discharged. The battery can be permanently damaged during
this process. In case of deep discharge, the warranty will be void.
Please note that any battery will wear over time. The wearing process of the
battery is inevitable and depends on several factors, such as usage, number
of charge cycles and the ambient temperature. Even if the battery is not
used, its capacity will decrease. A worn battery can still be used, but please
bear in mind that its charge level may decrease.
Beware:
Never leave the bike with an empty battery! We advise you charge the battery as
soon as possible before it’s totally empty.
The best storage-charge of the battery is when three to five LED lights burn.
Check the battery every month in the winter. If fewer than three LED lights burn,
recharge the battery.
Preferably store and use the battery in environments of 5 to 20 degrees. Avoid
higher or lower temperatures.
Do not charge the battery in sunlight and make sure that the battery is not
charged at a temperature of less than 5 degrees.
Only use the charger indoors and in non-humid environments, the charger may
not get wet.
Only use the Van Raam supplied battery.
Only charge the battery with the supplied charger!
The battery housing ánd charger housing may never be opened! When there is a
problem, contact your dealer.
Don’t drop the battery, this can cause external and internal damage.
If your bicycle has a fault, the battery should be disconnected for the bicycle.
Problem solving
The system does not turn on:
1. Make sure that the battery is properly attached.
2. Check the status of the battery. If it is empty, recharge the battery.
3. Make sure the battery is active. If the battery is not used for a while, it will
shut itself down. The battery can be reactivated by recharging it briefly,
pushing and holding down the on/off button while cycling (less than 10km/h),
or on certain batteries by pushing the indicator button on the battery until the
indicator appears.
4. If the above action does not help, contact your dealer.
If the battery indicator LED lights on the display are flashing:
The motor may be overheated by continuous high load. For protection, the system
will reduce the support.
Page 24
User manual
Tricycles 17.04
23
1. The system is in temperature-protection. You can continue cycling with
reduced support.
2. After cooling down, the normal support and indication will restore
automatically.
If the support LED lights on the display are flashing:
This indicates motor failure. You will need to contact your dealer.
If a red LED light on the charger starts flashing, remove the plug form the mains
outlet and do not longer use the charger. In this case, contact your dealer.
Accessories
Depending on your order, you can use the accessories as described below.
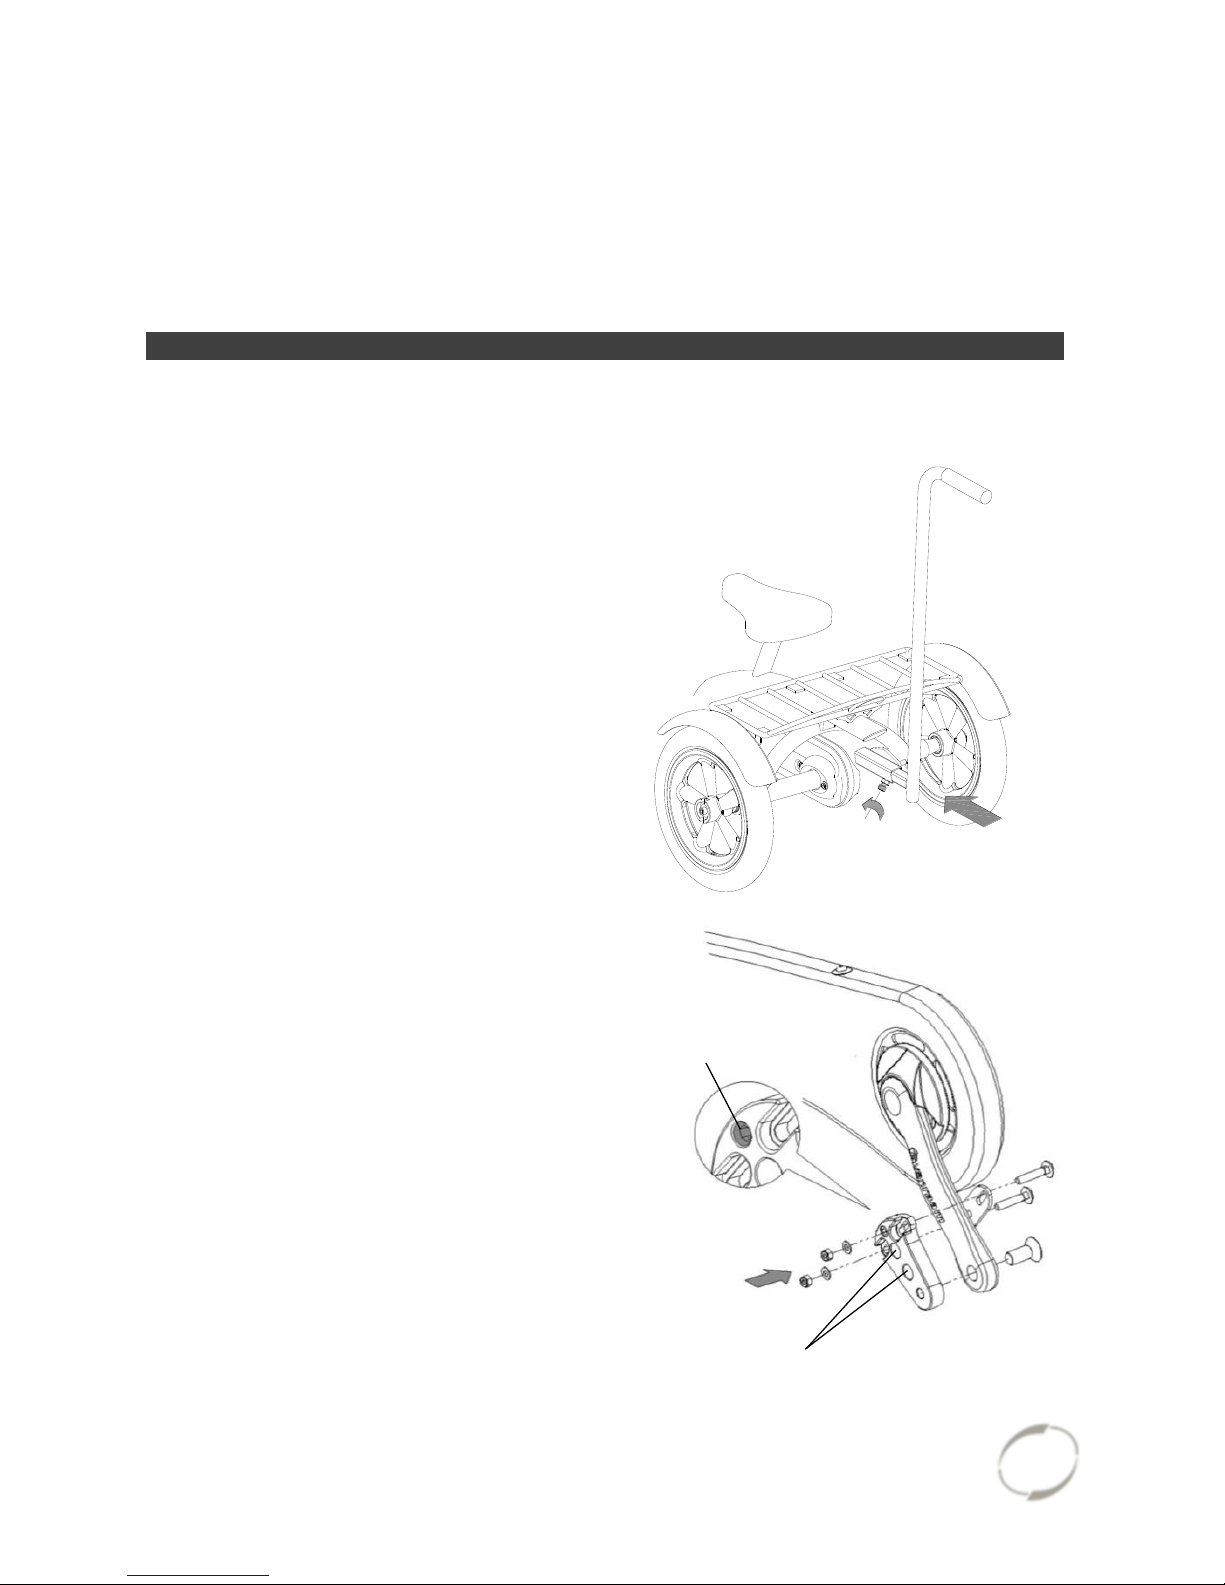
Push bar (Husky, Mini, Midi)
To fit the push bar:
1. Loosen the screw by using an Allen key.
2. Slide the push bar in the tube up to the
stop. Then tighten the screw again very
firmly by using the Allen key.
Crank shortener
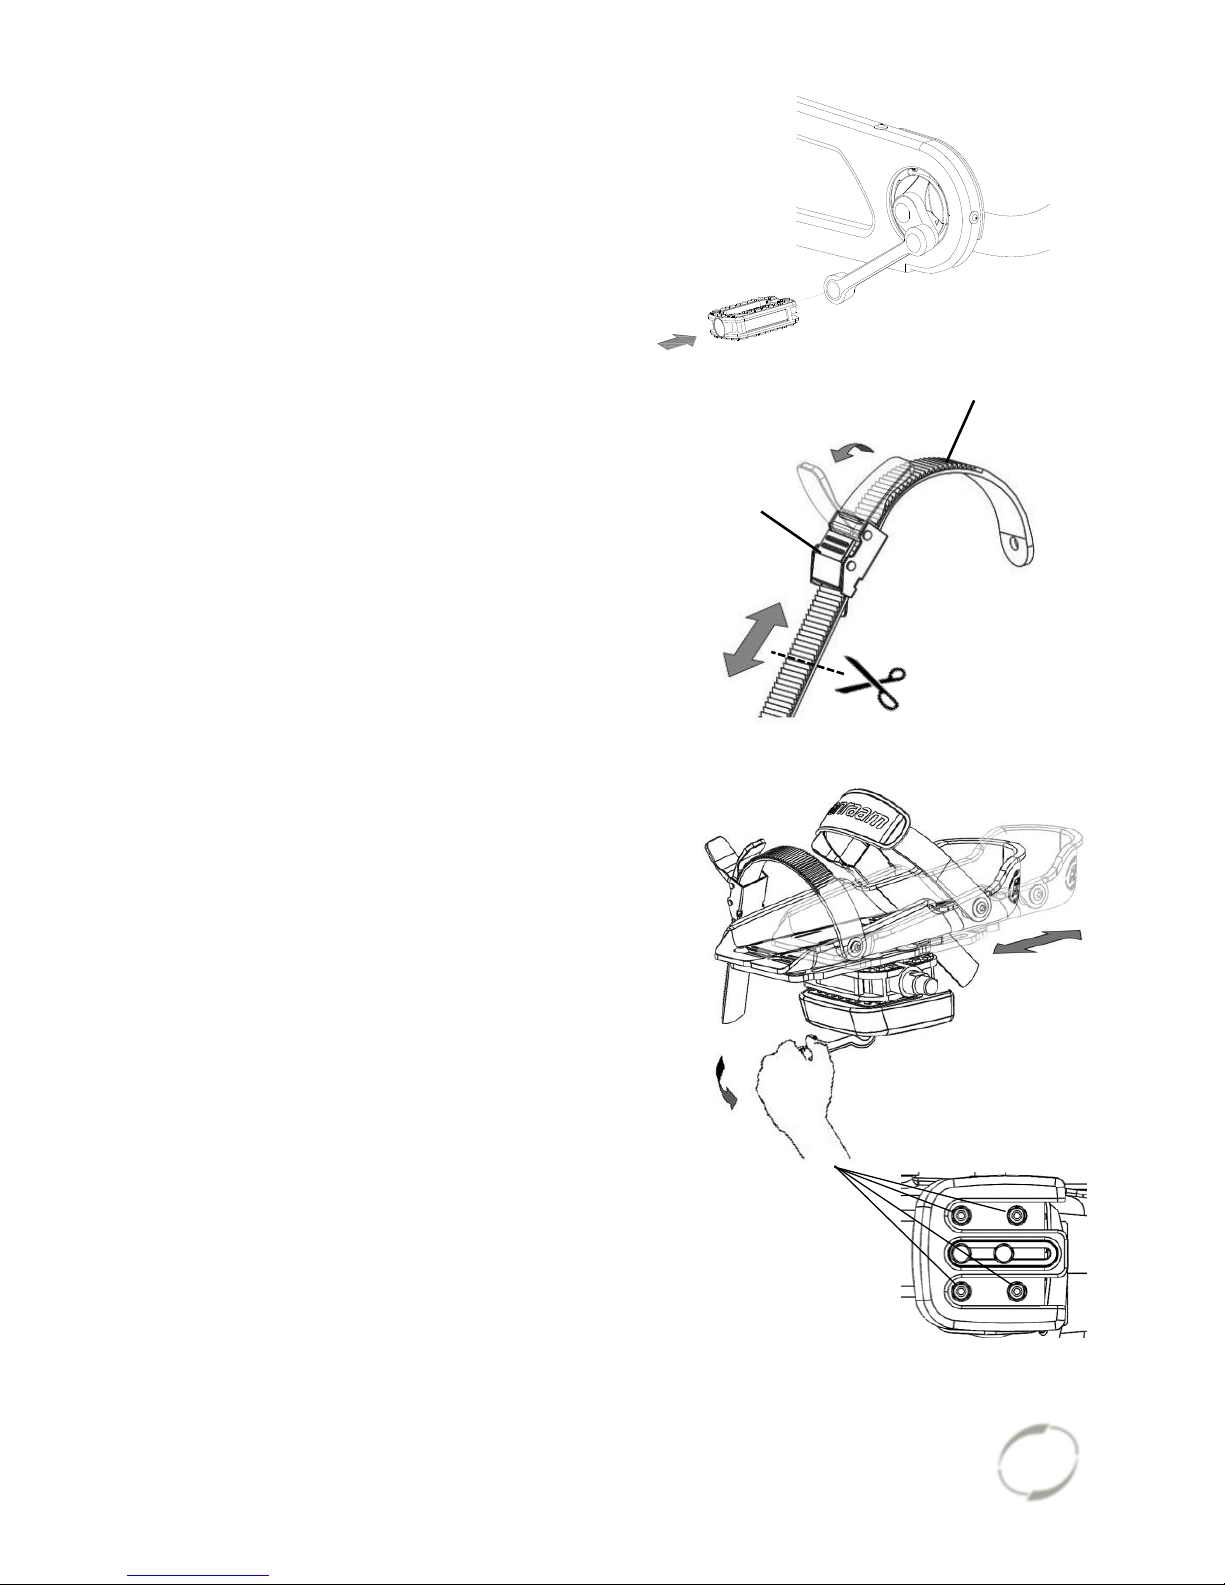
The crank shortener is fitted to the
crank, as illustrated. The pedal can
then be fitted into the crank shortener
at two positions.
With the Allen screw [A] the crank
shortener should be aligned with the
crank.
Two assembly points pedal
[A]
Page 25
User manual
Tricycles 17.04
24
Eccentric crank
The tricycle can be fitted with an eccentric
crank on the left and/or right side. The
illustration may differ from your crank,
because it is custom made.
Foot support
When using the foot support you can fix your
foot by sliding the two straps [A] in the quick
releases [B].
The quick release can be unlocked by pulling
the lip to the rear. Now the strap can be pulled
out.
You can cut the straps to size. The strap
should retain a length of at least five
centimetre.
The position of the foot support on the pedal is
adjustable in length. This allows you to pedal with
the ball of your foot for better thrust.
1. Slightly loosen the four nuts with a socket
wrench.
2. Slide the plate included the foot support
forwards or backwards into the desired
position. Then tighten the nuts again.
2.
1.
[A]
[B]
Page 26
User manual
Tricycles 17.04
25
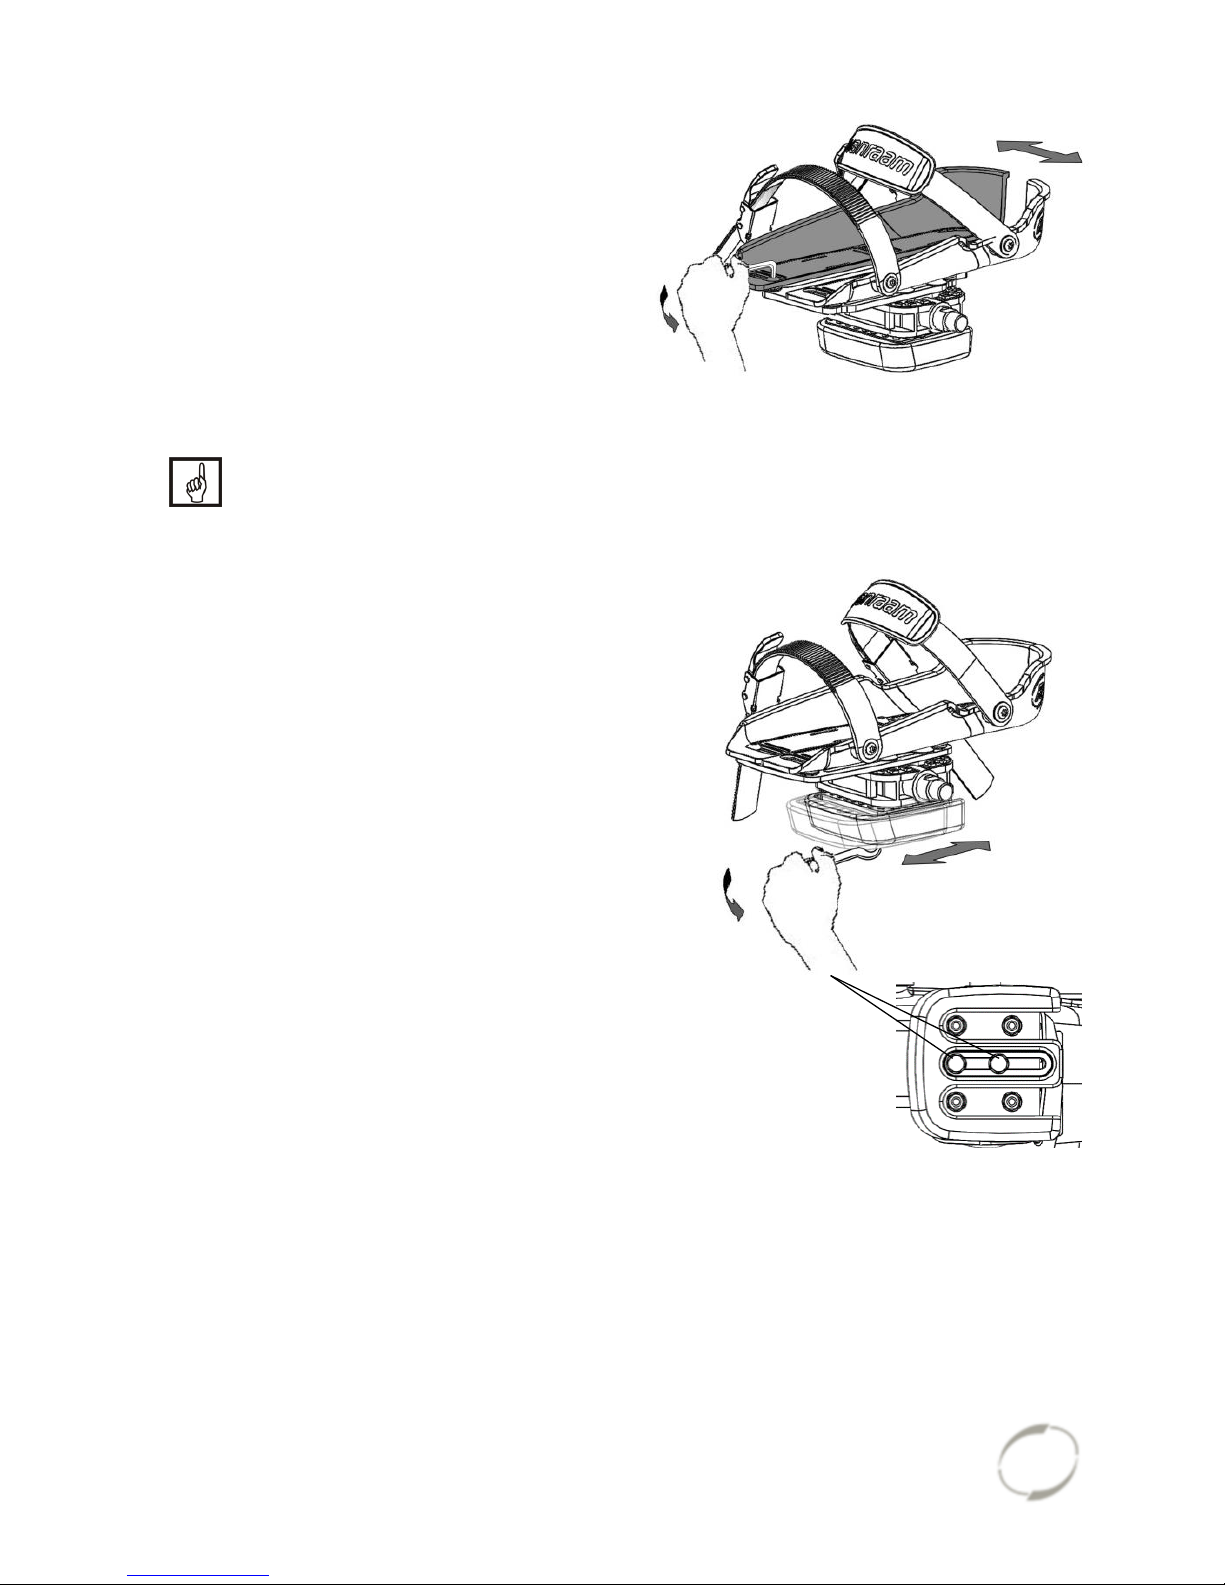
The foot support is also adjustable in width.
Only the outer half of the foot support can
be extended.
1. Slightly loosen the two screws with an
Allen key.
2. Slide the adjustable half of the foot
support to the desired position. Then
tighten the screws again.
With the axel pedal extender the foot
support can be extend further.
De foot support Fix20 is suitable for a foot of up to size 36. The foot support
Fix 25 is suitable for size 36 to size 48.
The foot support returns to its neutral position
when it is not used. The neutral position can
be altered by shifting the balancing block.
1. Slightly loosen the two screws with a
socket wrench.
2. Slide the balancing block to the desired
position. Then tighten the screws again.
2.
1.
1.
2.
Page 27
User manual
Tricycles 17.04
26
Lower leg support
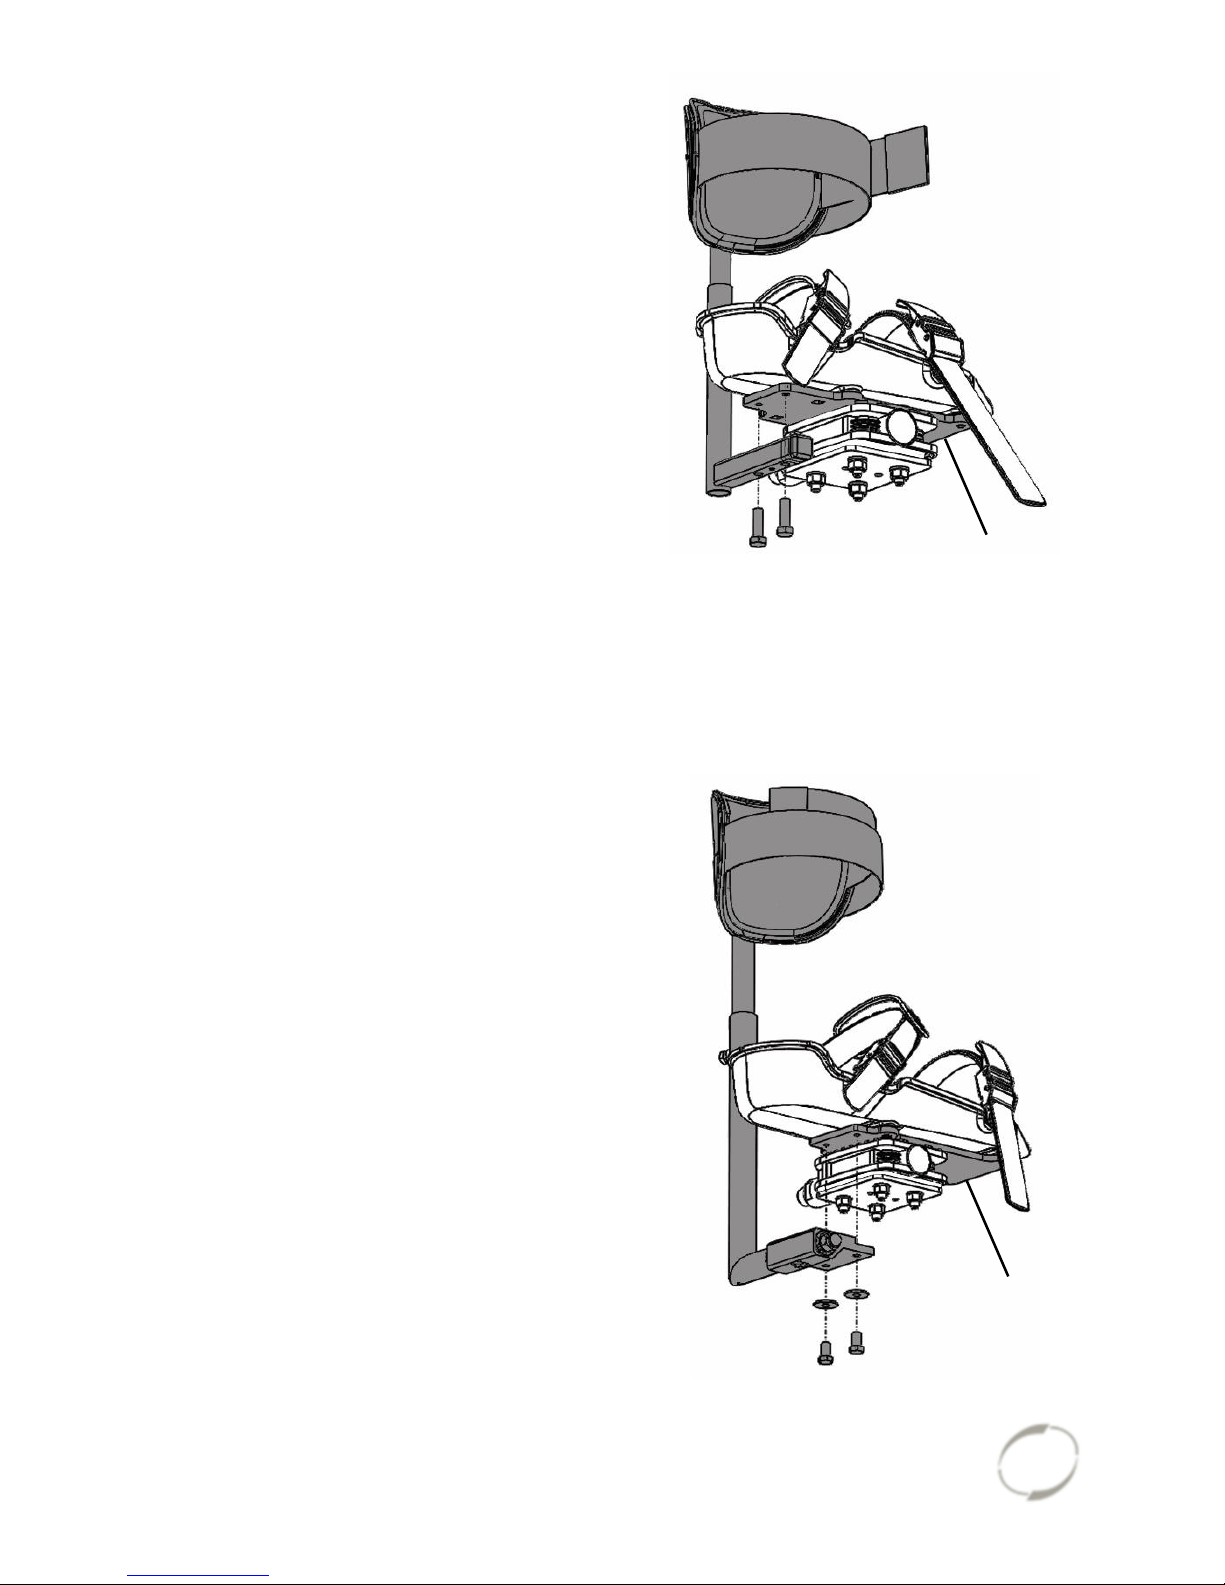
The balance block can no longer be used in
combination with this option. To assemble the
lower leg support:
1. First attach the lower leg support to the
metal plate [A]. The lower leg support is
attached to the inner side of the foot
support.
The image at the top shows Fix 20 with
lower leg support, the image below
shows Fix 25 with lower leg support.
1.
[A]
1.
[A]
Page 28
User manual
Tricycles 17.04
27
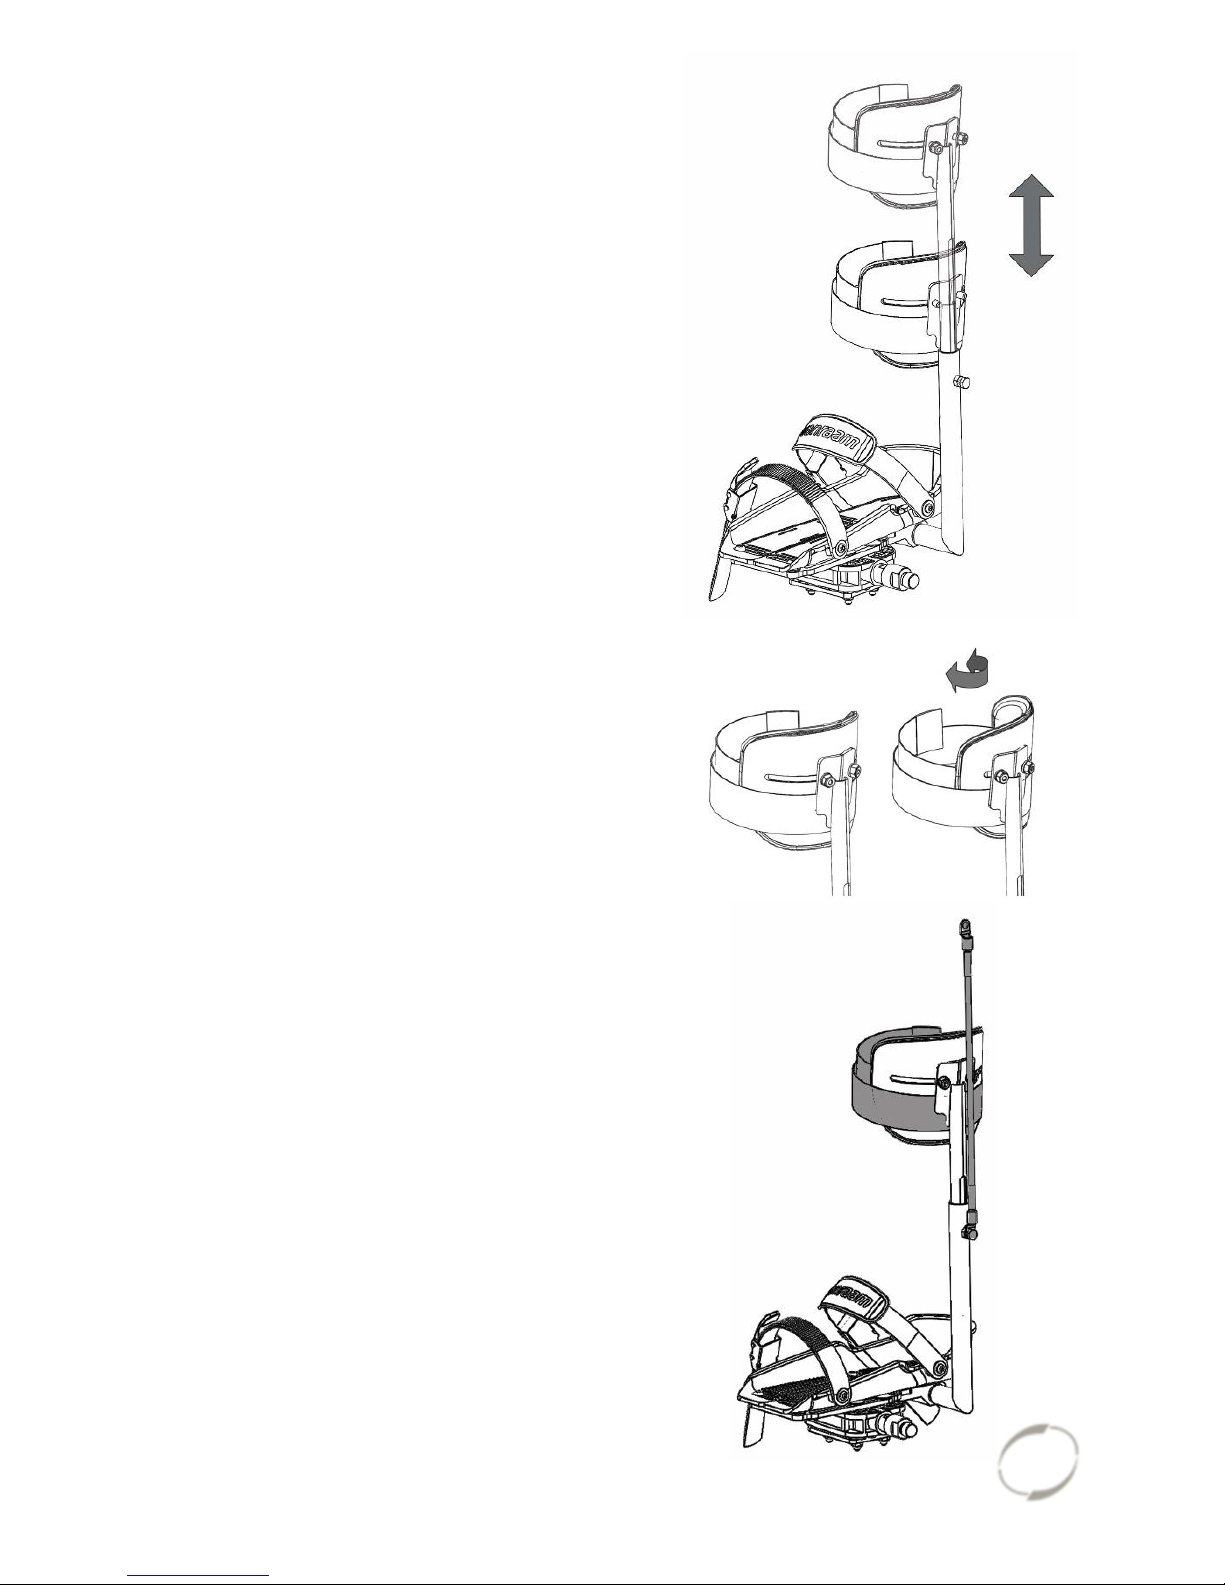
2. Adjust the height of the lower leg support
in such a way that it is aligned with the
lower leg of the rider.
3. The angle of the concave support is also
adjustable. Rotate the concave support is
is the desired position.
4. Fix the elastic on the frame, so the lower
leg support stays upright in its rest
position.
5. Use the velcro to sucure the lower leg of
the rider.
2.
3.
4.
5.
Page 29
User manual
Tricycles 17.04
28
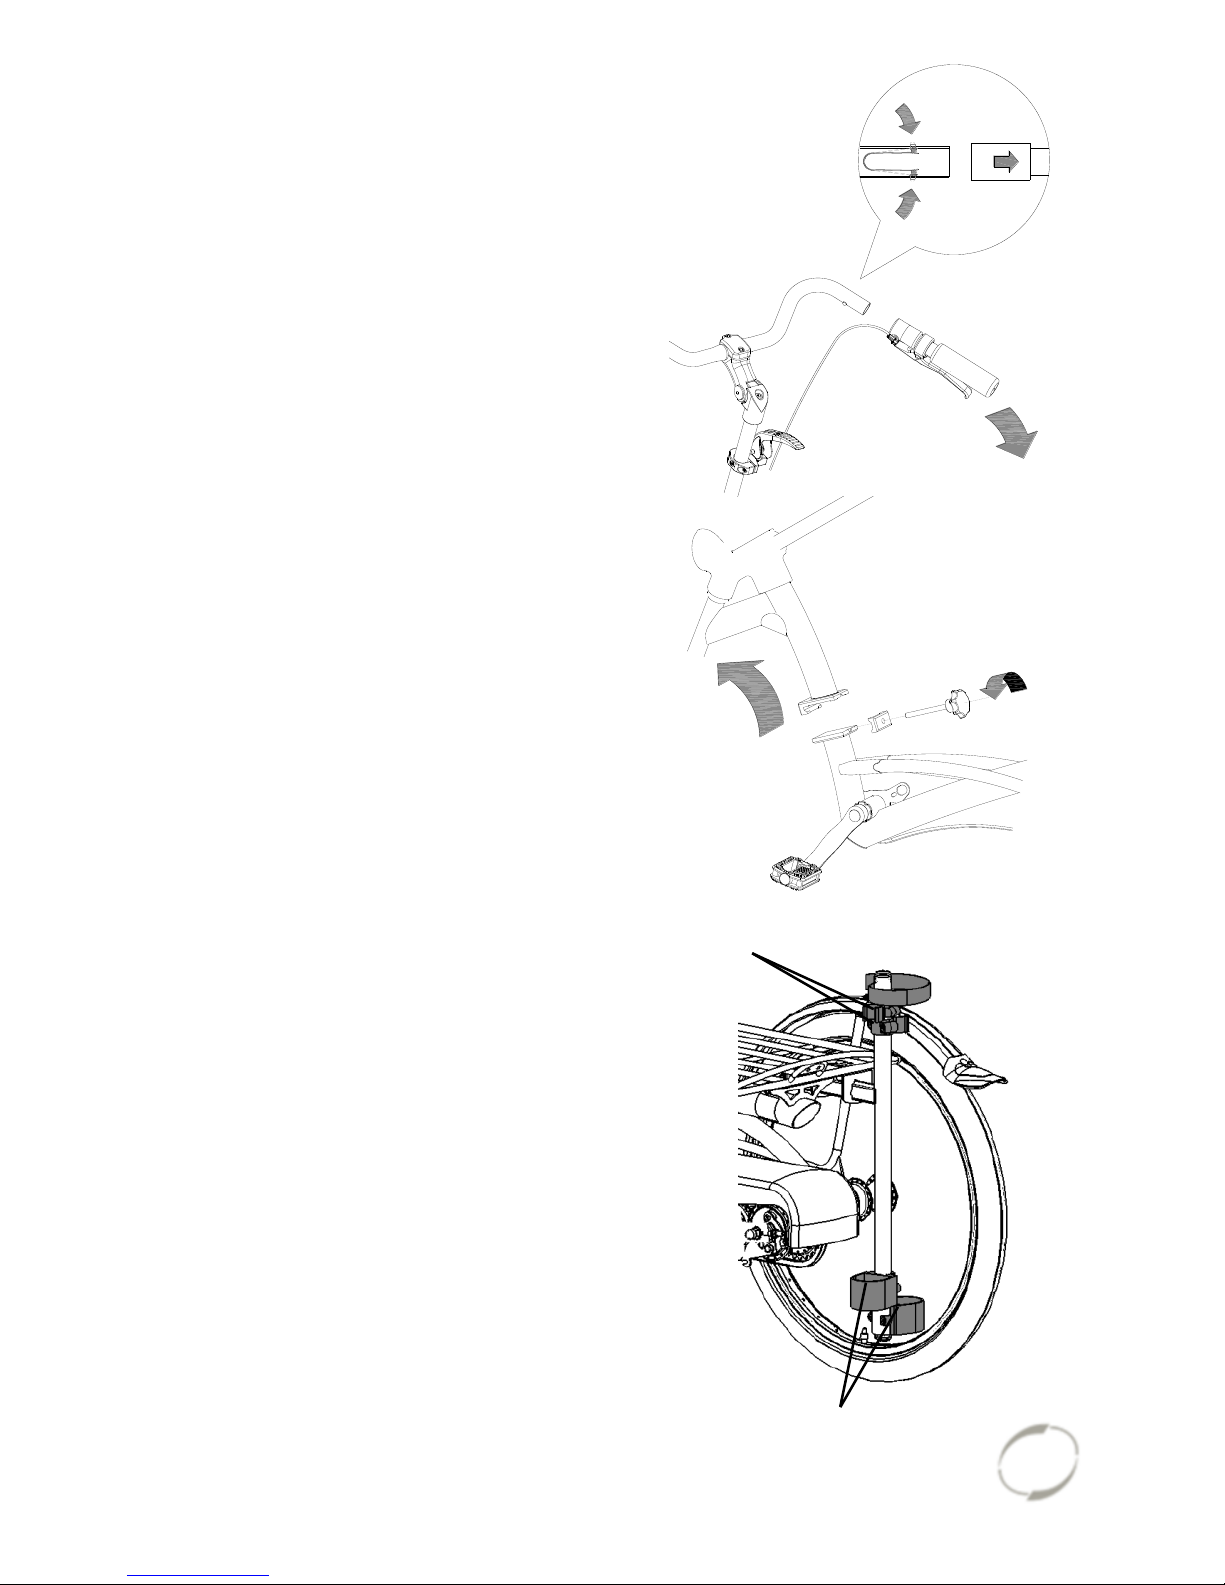
Dividable frame
The tricycle can be divided into two parts.
To divide the frame:
1. Use the parking brake.
2. Remove the grip from the handlebars.
Push the pellets of the small spring [A] so
that the grip can be removed from the
handlebars.
3. Loosen the knob.
4. Remove the front part out of the coupling.
To assemble the tricycle again, follow these
steps in reverse order.
Walking-stick holder
You can take two walking-sticks with you in
the stick holder. Place the walking-stick in the
holder at the bottom side [A] and then secure
the stick in the fastening device [B] at the top
side.
Always fasten the walking-stick(s) with the
Velcro band.
[A]
2.
4.
[B]
[A]
Page 30
User manual
Tricycles 17.04
29
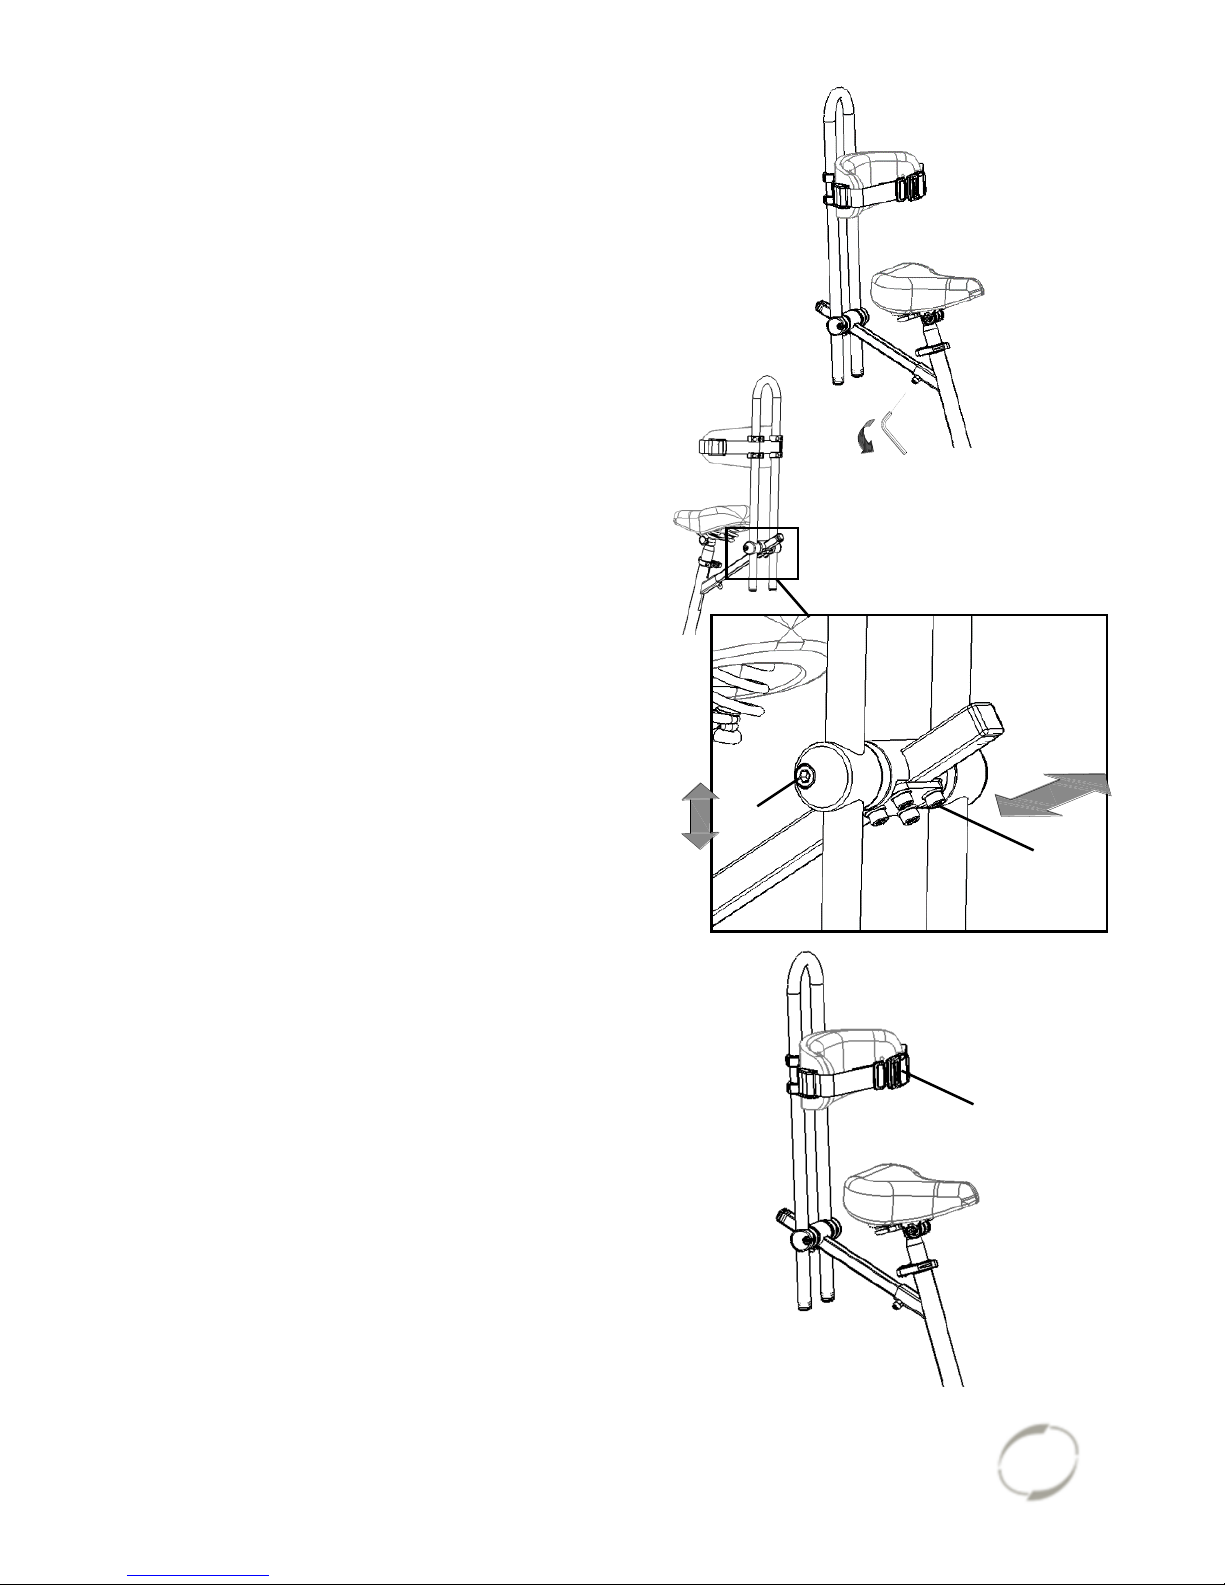
Back support
Fit the back support under the saddle with the
hexagon socket [A].
First adjust the right depth, by loosening four
nuts [B], putting the back support in the right
position and then tighten the nuts again.
Then adjust the right height by loosening the
two nuts [C], sliding the support in the correct
position and then tighten the nuts again.
The back support can be fitted with a belt [D].
Use the fastening device to open and close
the belt.
[A]
[D]
[B]
[C]
Page 31
User manual
Tricycles 17.04
30
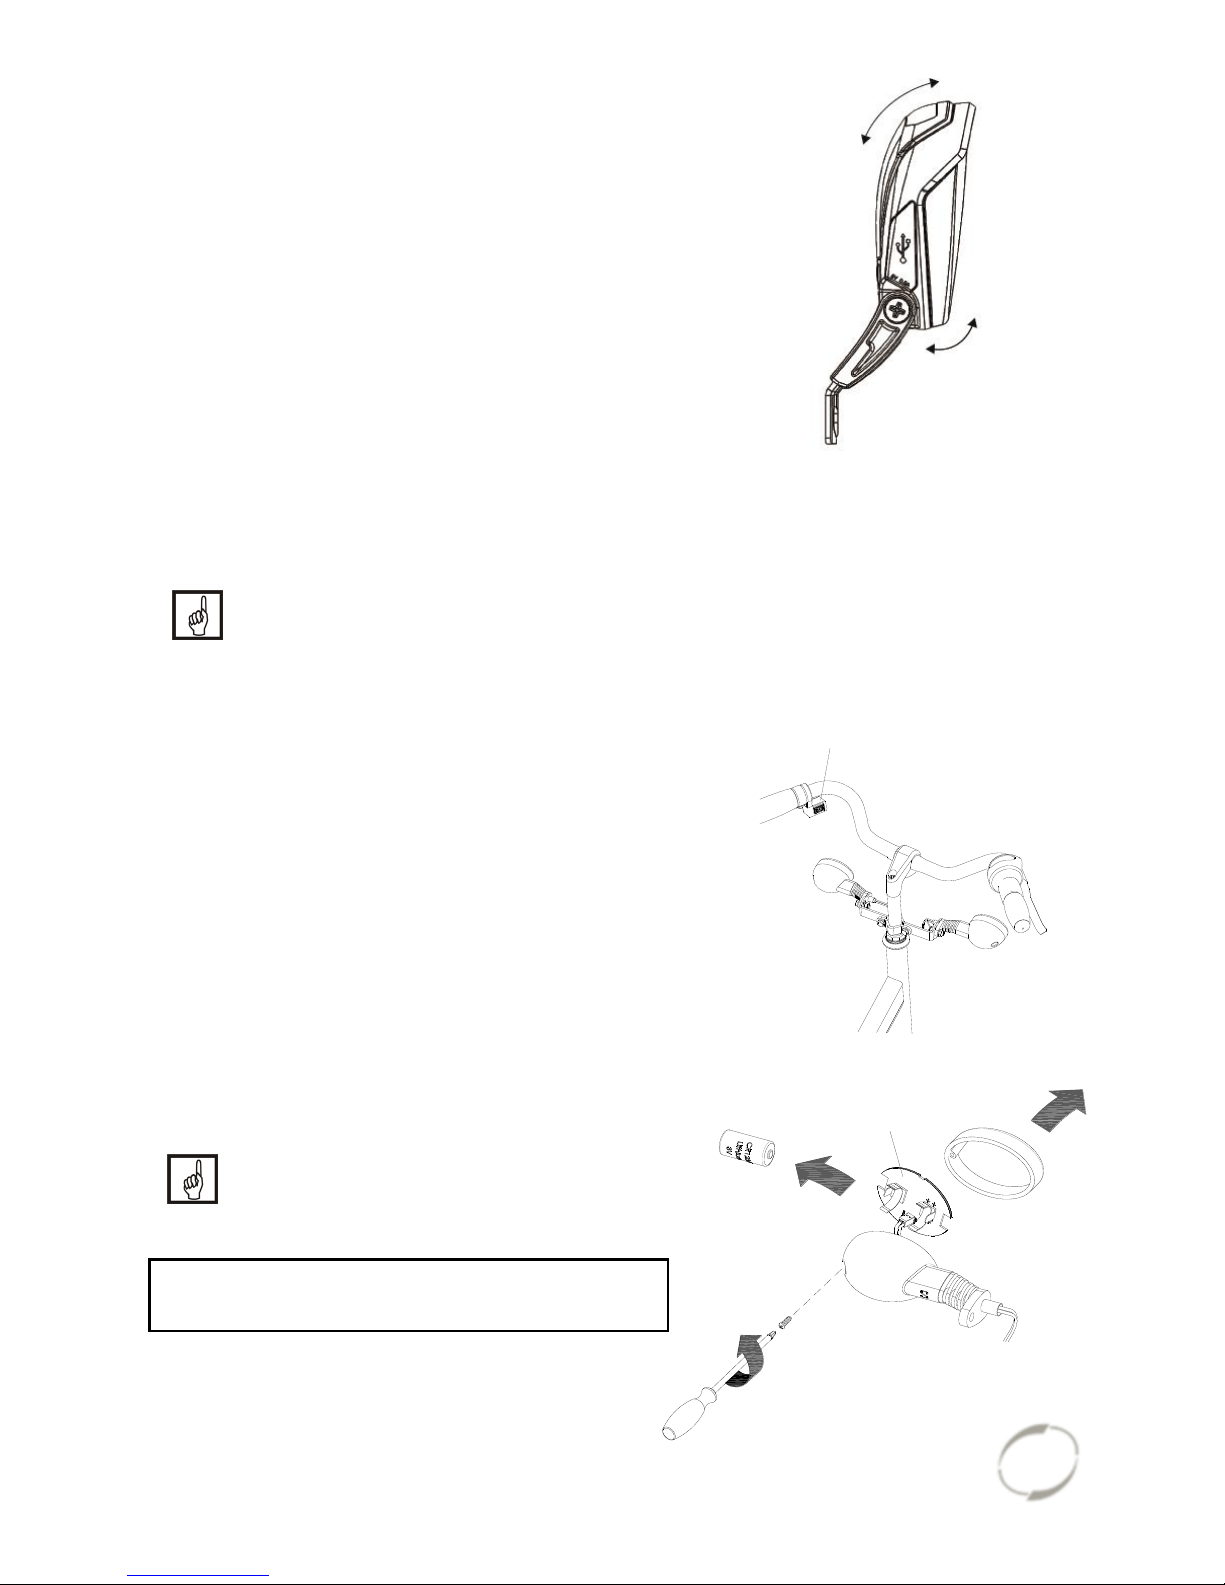
Intergrated lighting contol
The tricycle can be fitted with a different
headlight. This lighting is connected to the
electrical system.
Adjust the angle of the headlamp. Make sure
that the centre of the beam is approximately
ten meters in front of the bike.
The headlight switches automatically on when
the electrical system is activated. You can
manually activate and deactivate the lights
with a short press of the on/off button on the
display. If the electrical system is switched off,
the lighting turns off automatically.
Once the battery is low, the motor will no longer provide support for cycling. The
integrated lighting continues to work. However on the remaining charge.
The USB port, which is located on the headlight, has no function.
Flashing light system
To use the flashing lights press the switch [A]
to the left or right.
To turn off the indicators, move the switch to
the centre position.
The lights work on a battery.
To replace the batteries, turn the screw on the
cap and take the orange cap [B] away. Then
remove the PCB [C] from the holder. You can
now replace the battery [D] .
This is a 3-volt lithium battery, CR123A.
Batteries cause environmental
pollution. Follow the local regulations
during disposal.
Extra accessories are available at your dealer.
[C]
[B]
[D]
[A]
Page 32
User manual
Tricycles 17.04
31
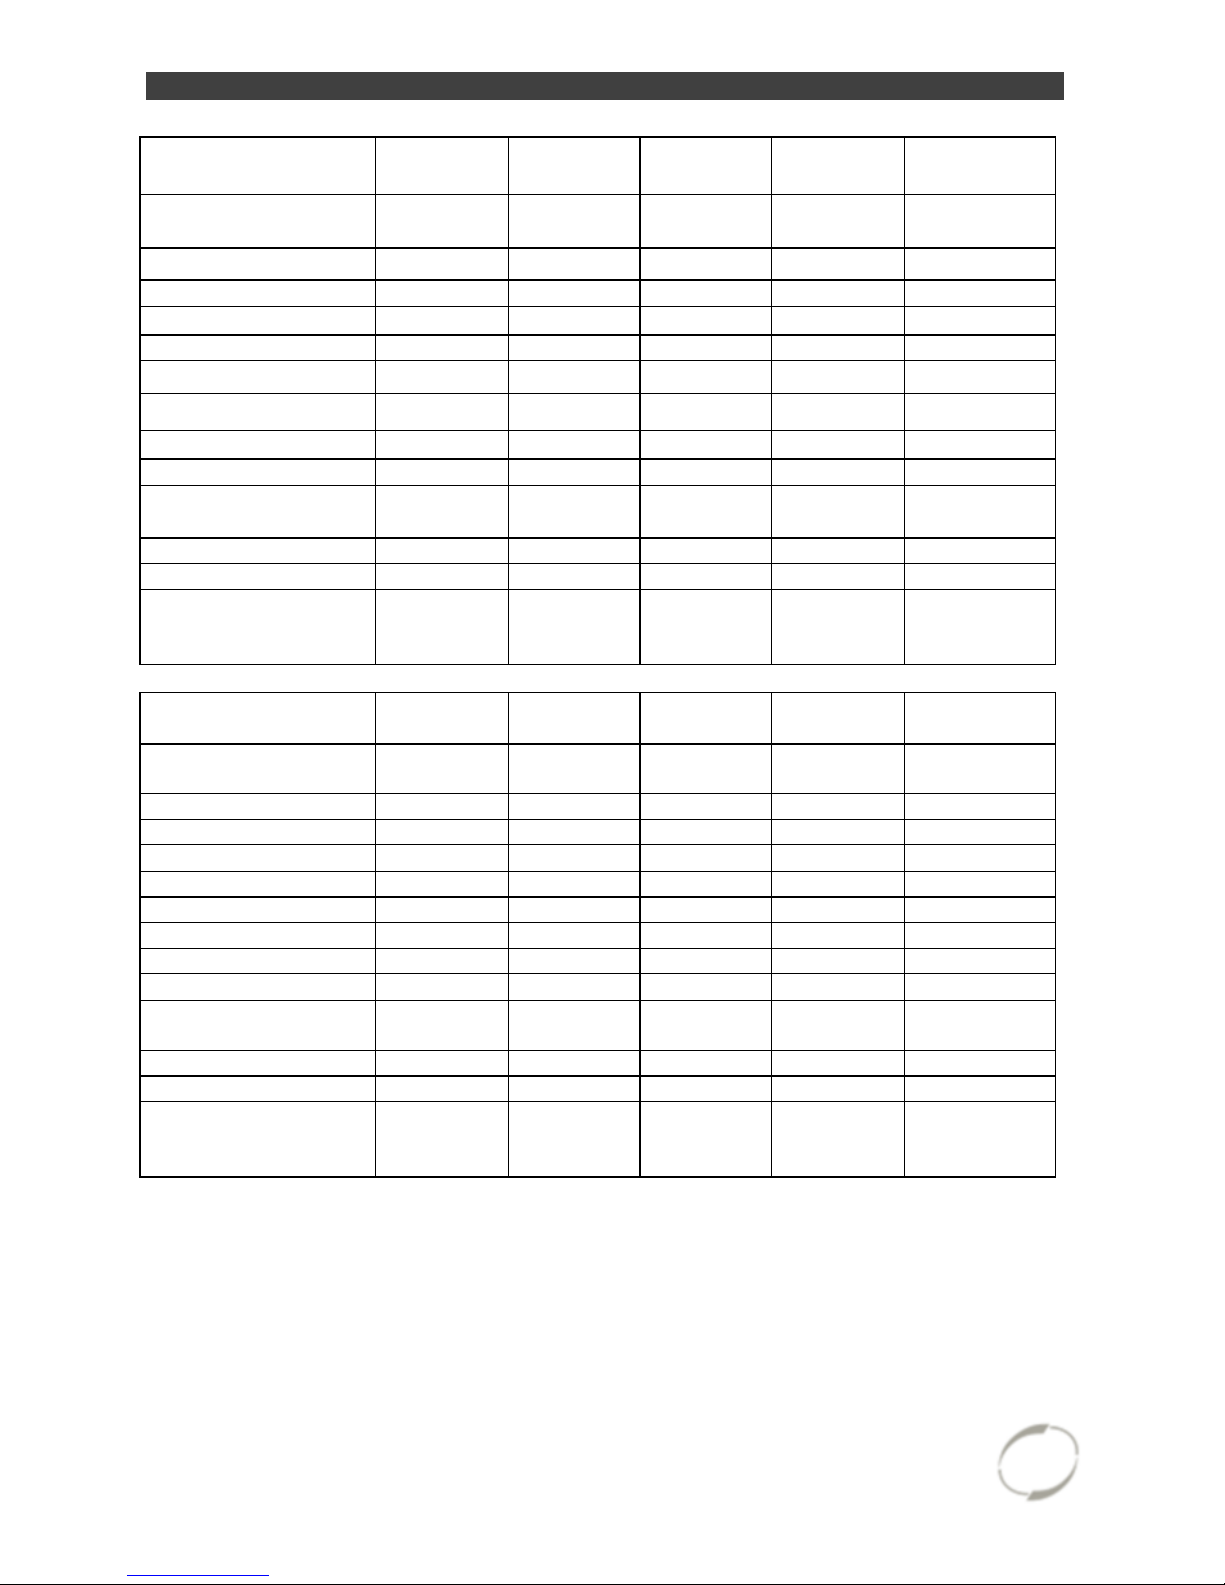
Technical details
Husky2
Mini3
Midi2
Maxi2
Maxi
Comfort
Length of inner leg
(cm)
35-47
47-59
66-80
80-95
67-82, 76-91¹,
85-100
Frame height (cm)
23
30
40
53
42 ,51¹, 60
Length (cm)
98
136
168
180
194
Width (cm)
59
60
75
75
75
Height (cm)
68
88
108
124
118
Weight (kg)
appr. 11
appr.. 21
appr. 27
appr. 29
appr. 32
Boarding height(cm)
12
20
25
28
23
Front wheel
12.5“
16“
20“
22“
24”
Back wheel
12.5“
16“
22“
24“
24”
Max. load luggage
rack/ basket (kg)
20
20
20
20
20
Max. weight user (kg)
65
65
90
120
120
Brakes, front
V brake
V brake
V brake
V brake
V brake
Brakes, back
Non or
V brake
V brake or
Back pedal
brake
V brake or
Back pedal
brake
V brake or
Back pedal
brake
V brake or
Back pedal
brake
Easy Rider
Junior
Easy Rider2
Easy Sport
Viktoria
Viktor
Length of inner leg
(cm)
47-73
69-95
65-105
63-76
76-96
Frame height (cm)
- - -
41
50
Length (cm)
175
210
195-225
152
173
Width (cm)
75
75
80
78
86
Height (cm)
102
116
104
- - Weight (kg)
appr. 34
38
52
18
16
Boarding height(cm)
35
20”
20“
18“
20“
Front wheel
16”
20”
20“
24“
26“
Back wheel
16”
ca. 43
ca. 31
ca. 30
ca. 30
Max. load luggage
rack/ basket (kg)
20
20
20
n.v.t.
n.v.t.
Max. weight user (kg)
80
120
120
90²
120²
Brakes, front
V brake
V brake
V brake
V brake
V brake
Brakes, back
V brake or
Back pedal
brake
V brake or
Back pedal
brake
V brake or
Back pedal
brake
V brake or
Back pedal
brake
V brake or
Back pedal
brake
¹ Standard
² Total max. load
Page 33
User manual
Tricycles 17.04
32
Maintenance and adjustments to be done by owner
Below you can find the instructions for maintenance and adjustments that you can do
yourself on a regular basis, which will keep your tricycle in top condition.
Cleaning
The frame of the tricycle can be cleaned with a damp cloth. For areas that are dirtier
you can use a mild detergent.
The wheels can be cleaned with a moist brush with plastic hairs (not a wire brush!).
The saddle, the grips and the backrest can be cleaned with mild soap and water.
Do not use a pressure washer or a steam cleaner!
The right lubricant
The chain should be cleaned and maintained at regular intervals (every three months
approximately). Only use special chain grease or Tevlon spray. This is the only way
to make sure that the chain will run smoothly, will stay water resistant and will not
rust.
1. Wipe the chain with a cloth.
2. Treat it with grease or spray.
3. Remove any excess lubricant with a rag.
Other parts should not be treated with a lubricant.
Inspection of the tricycle
It is recommended that the tricycle has a yearly inspection carried out by the dealer to
claim warranty. Please use the form “Form service, maintenance, modifications an
warranty claims” in the back of this manual. After 200 kilometres or after a period of
two months the tricycle should be inspected.
In the event of technical trouble or faults, the tricycle should be taken to the dealer for
repairs immediately.
The replacing of safety-related components (especially frame, brakes, lighting,
handlebars, front fork and actuation) should be performed by the dealer.
If you still decide you want to replace components yourself, you are responsible for
damage or harm due to incorrectly fitted components.
Only use original Van Raam spare parts, which you can buy at you dealer. If
requested the dealer will make the necessary information on repair and maintenance
available.
Page 34
User manual
Tricycles 17.04
33
Repairs and maintenance to be done by dealer
Check the brakes, the rims, lighting, the chain tension and the spokes. Also check the
tyre tread depth. This should be at least one millimetre. Worn out tyres or possible
faulty parts should be replaced. Also check the parking brake. With the parking brake
pulled up, the tricycle should not ride away with the cyclist.
Checking the rim
Due to the combined action of the brake and the rims, not only the brake lining but
also the condition of the rim is important. For this reason the rim should be checked at
regular intervals, for example when you inflate the tyres. The presence of fine cracks
in the spoke punches or deformation of the rim when there is higher air pressure,
indicate more serious wear and tear. In that case the rim should be replaced,
because it can lead to loss of brake function or even a crack in the rim, which can
lead to all kinds of dangerous consequences.
Repairs, maintenance and modifications should only be performed with original Van
Raam parts.
Adjustments to be done by dealer
The correct tension of the chain
The chain should not be too tight. It should hang loose. Without effort you should be
able to move the chain up and down, half a centimetre approximately.
Adjusting chain tension (Husky, Mini, Midi,
Maxi, Maxi Comfort, Easy Rider Junior, Easy Rider)
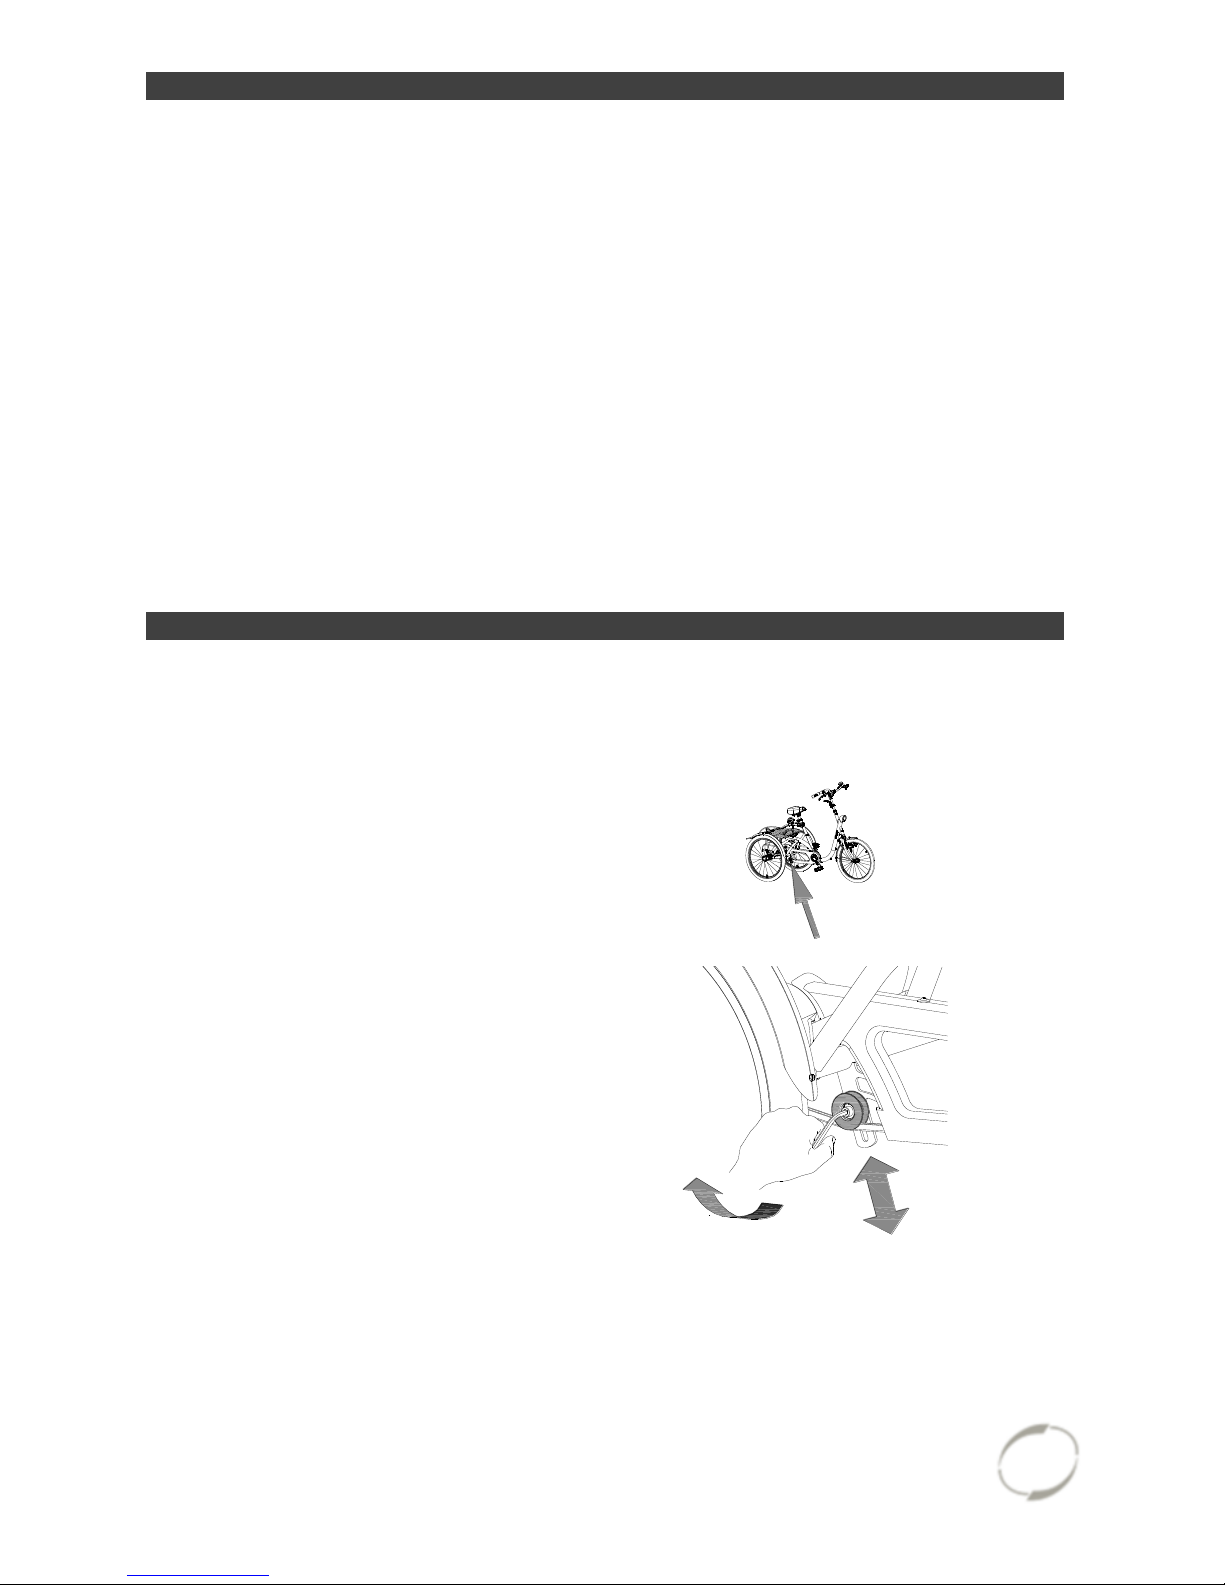
To keep the chain tension correct, a special
tensioning wheel is fitted on to the tricycle, as an
integrated chain tensioner.
1. Slightly loosen the screw. Hold the nut at
the back tight with a socket wrench to stop
the screw from slipping.
2. Shift the tensioning wheel in such a way
that the chain hangs loose, as described
above.
3. Tighten the screw again.
Page 35
User manual
Tricycles 17.04
34
Adjusting chain tension
(Viktoria, Viktor)
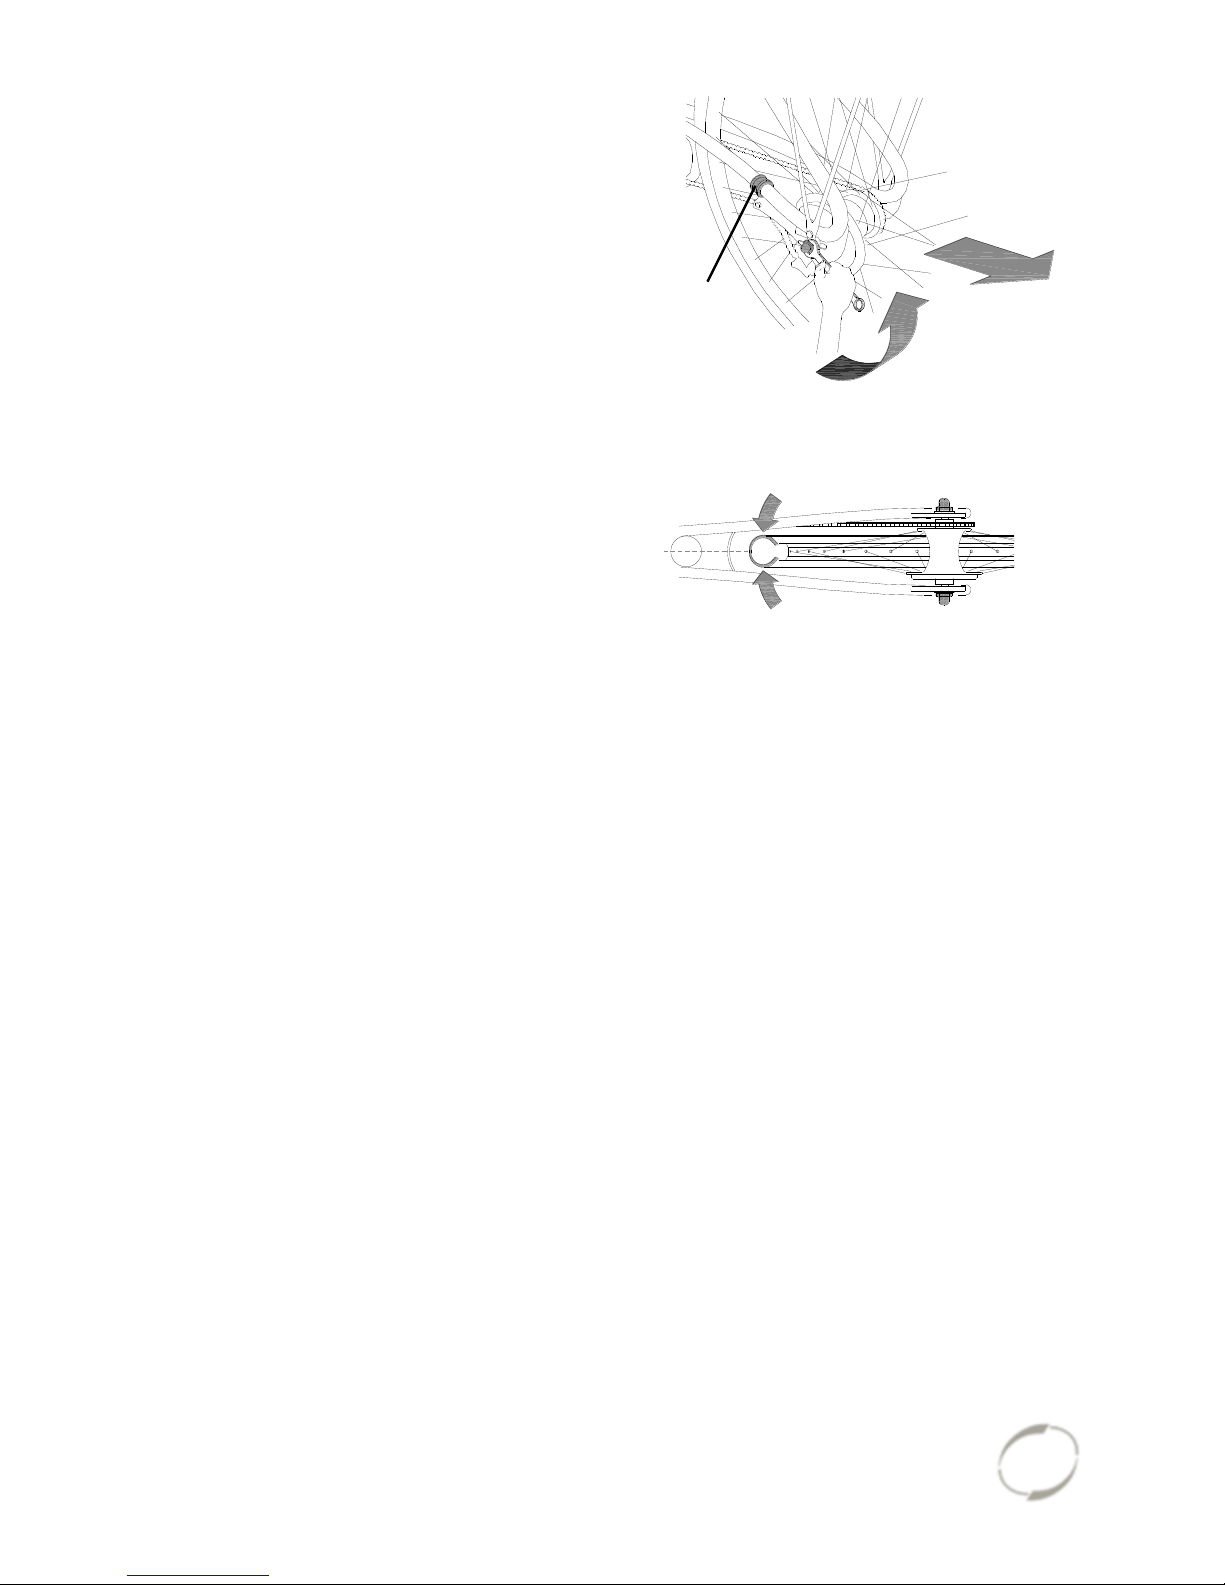
To keep the chain tension correct, the back
wheel axle is adjusted. Follow the instructions
below:
1. Slightly loosen the nuts of the back wheel
axle, so that the back wheel can move
backwards and forwards.
2. Slide the back wheel backwards, so that
the chain is hanging loose, as described
earlier. Also slide the bracket (A).
3. At the same time make sure that the wheel
is straight and positioned in the centre of
the frame, as illustrated. Not to the left or
to the right.
4. Slightly tighten the nuts.
5. Check whether the chain tension is correct
and whether the wheel is straight and in
the centre of the frame.
6. Tighten the nuts again.
1.
2.
1.
3.
3.
[A]
Page 36

User manual
Tricycles 17.04
35
Disposal
If you want to dispose your tricycle, contact your dealer. You can also contact the
local waste disposal company. They will dispose the tricycle according to the
regulations of your town.
Handover/sale to a new owner
When you hand over your tricycle to a new owner it is important that you also hand
over all necessary technical documentation and spare keys, so that the new owner
can use the tricycle safely.
Guarantee
The guarantee is valid for all faults in the product, which are proven to be caused by
material or manufacturing error.
We give a guarantee of five years on the frame and the front fork. For all accessories
and other parts (except wear parts) we provide a two year guarantee, as legally
regulated. The guarantee only applies by normal use and maintenance of the tricycle,
as described in this manual.
Beware!
The guarantee as well as the product liability in general expires if the instructions
stated in this manual are not followed. This is also the case if unauthorized
maintenance is carried out or if technical changes or additions are made with nonoriginal Van Raam parts without permission of Van Raam. The original CE
certification will become nul-and-void if modifications are done by third parties. The
absence of the certification can lead to problems in insuring your bike, and for any
loss or incurred.
Page 37
User manual
Tricycles 17.04
36
Frame number
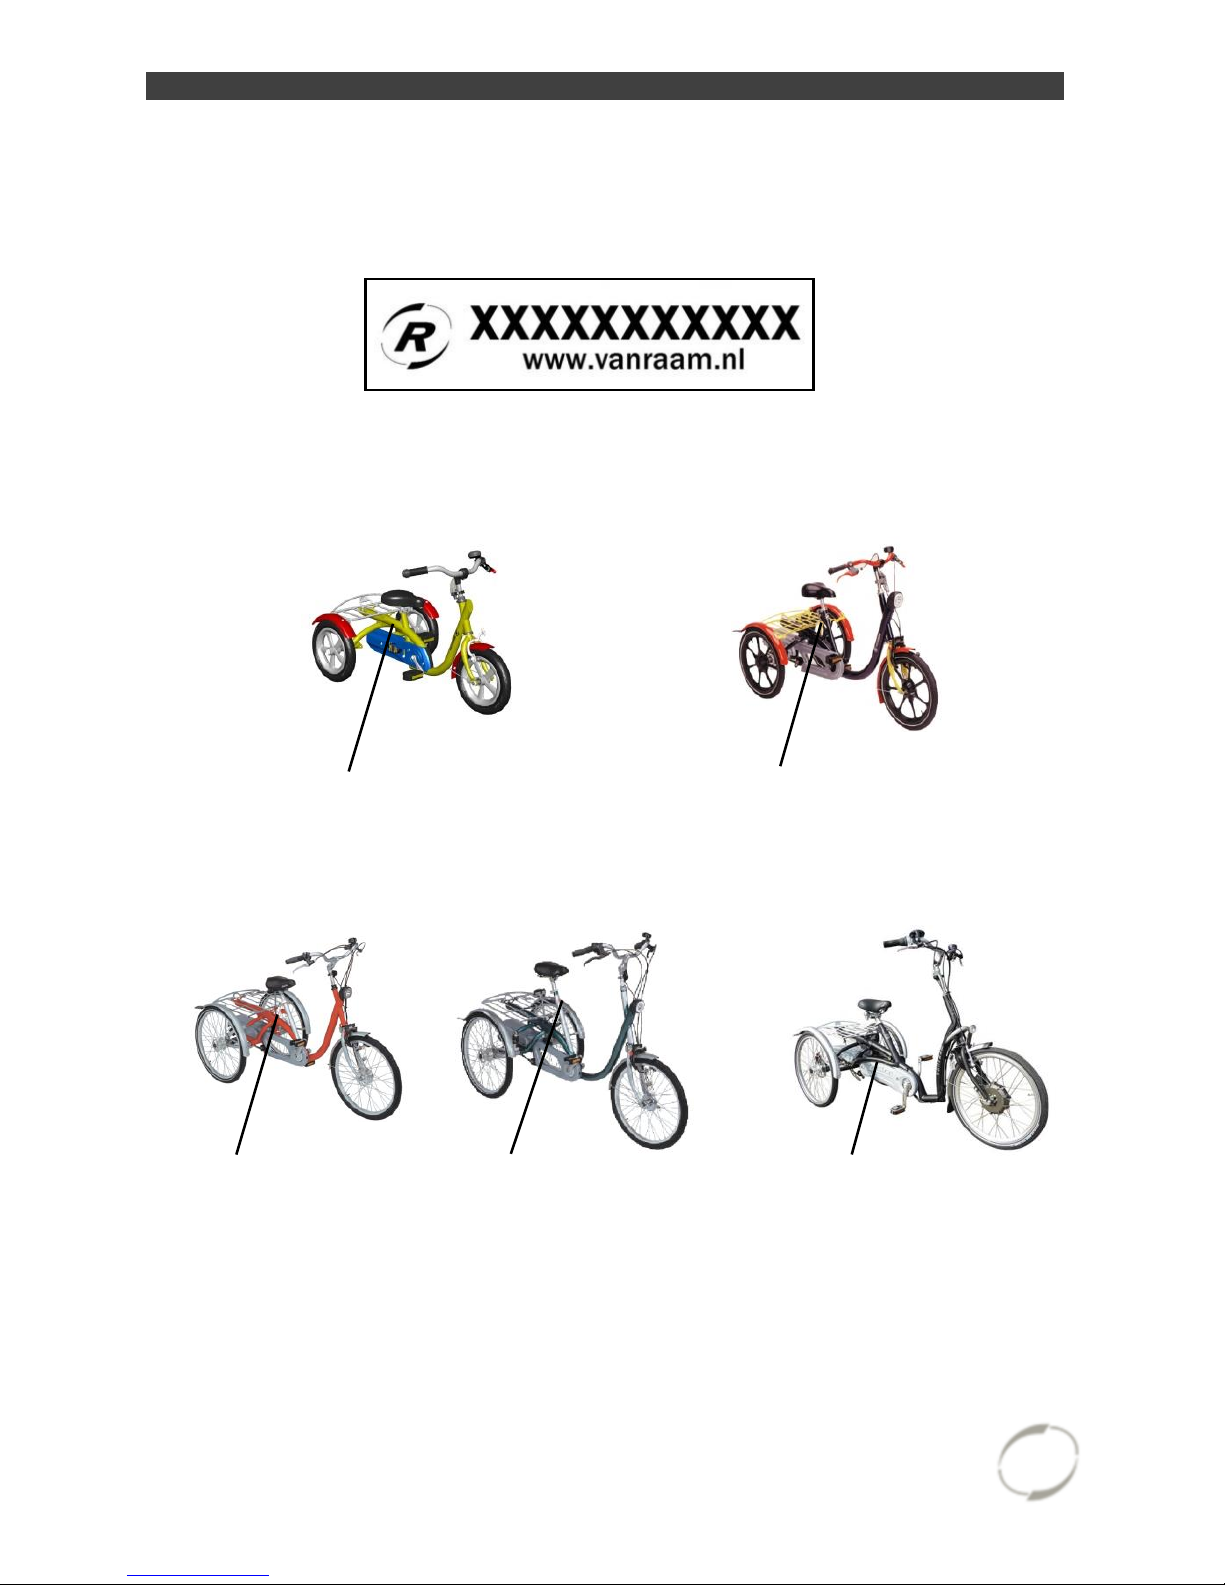
The frame number is printed on the sticker. This sticker is located on the frame, see
the images below. At the Viktoria and Viktor the frame number is stamped in the
frame, see the images below for the positions.
Example sticker:
Position sticker Husky, Mini, Midi, Maxi and Maxi Comfort:
Mini
Husky
on the frametube
Midi
Maxi
on the back of the
saddle tube
Maxi Comfort
on the frametube
on the back of the
saddle tube
on the back of the
saddle tube
Page 38
User manual
Tricycles 17.04
37
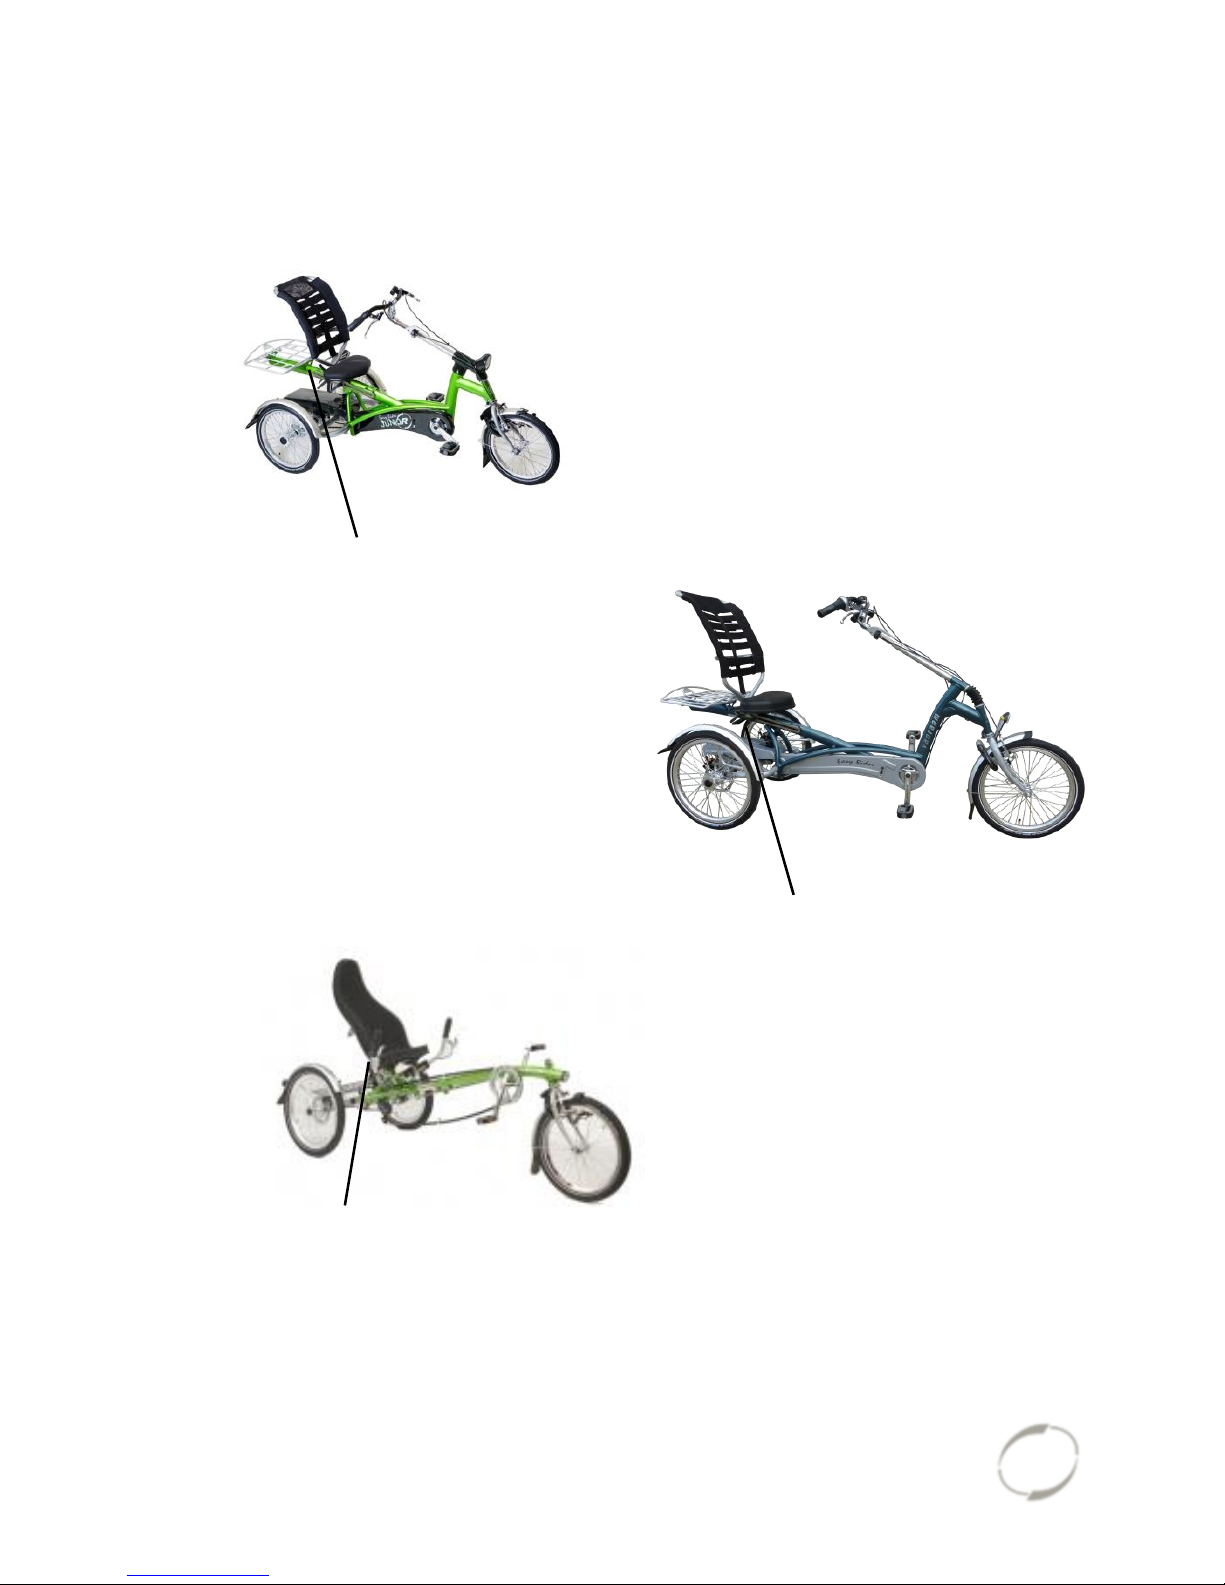
Position sticker Easy Rider Junior, Easy Rider and Easy Sport:
Easy Rider Junior
Easy Rider
Easy Sport
under the chair tube
on the frametube
on the frametube
Page 39
User manual
Tricycles 17.04
38
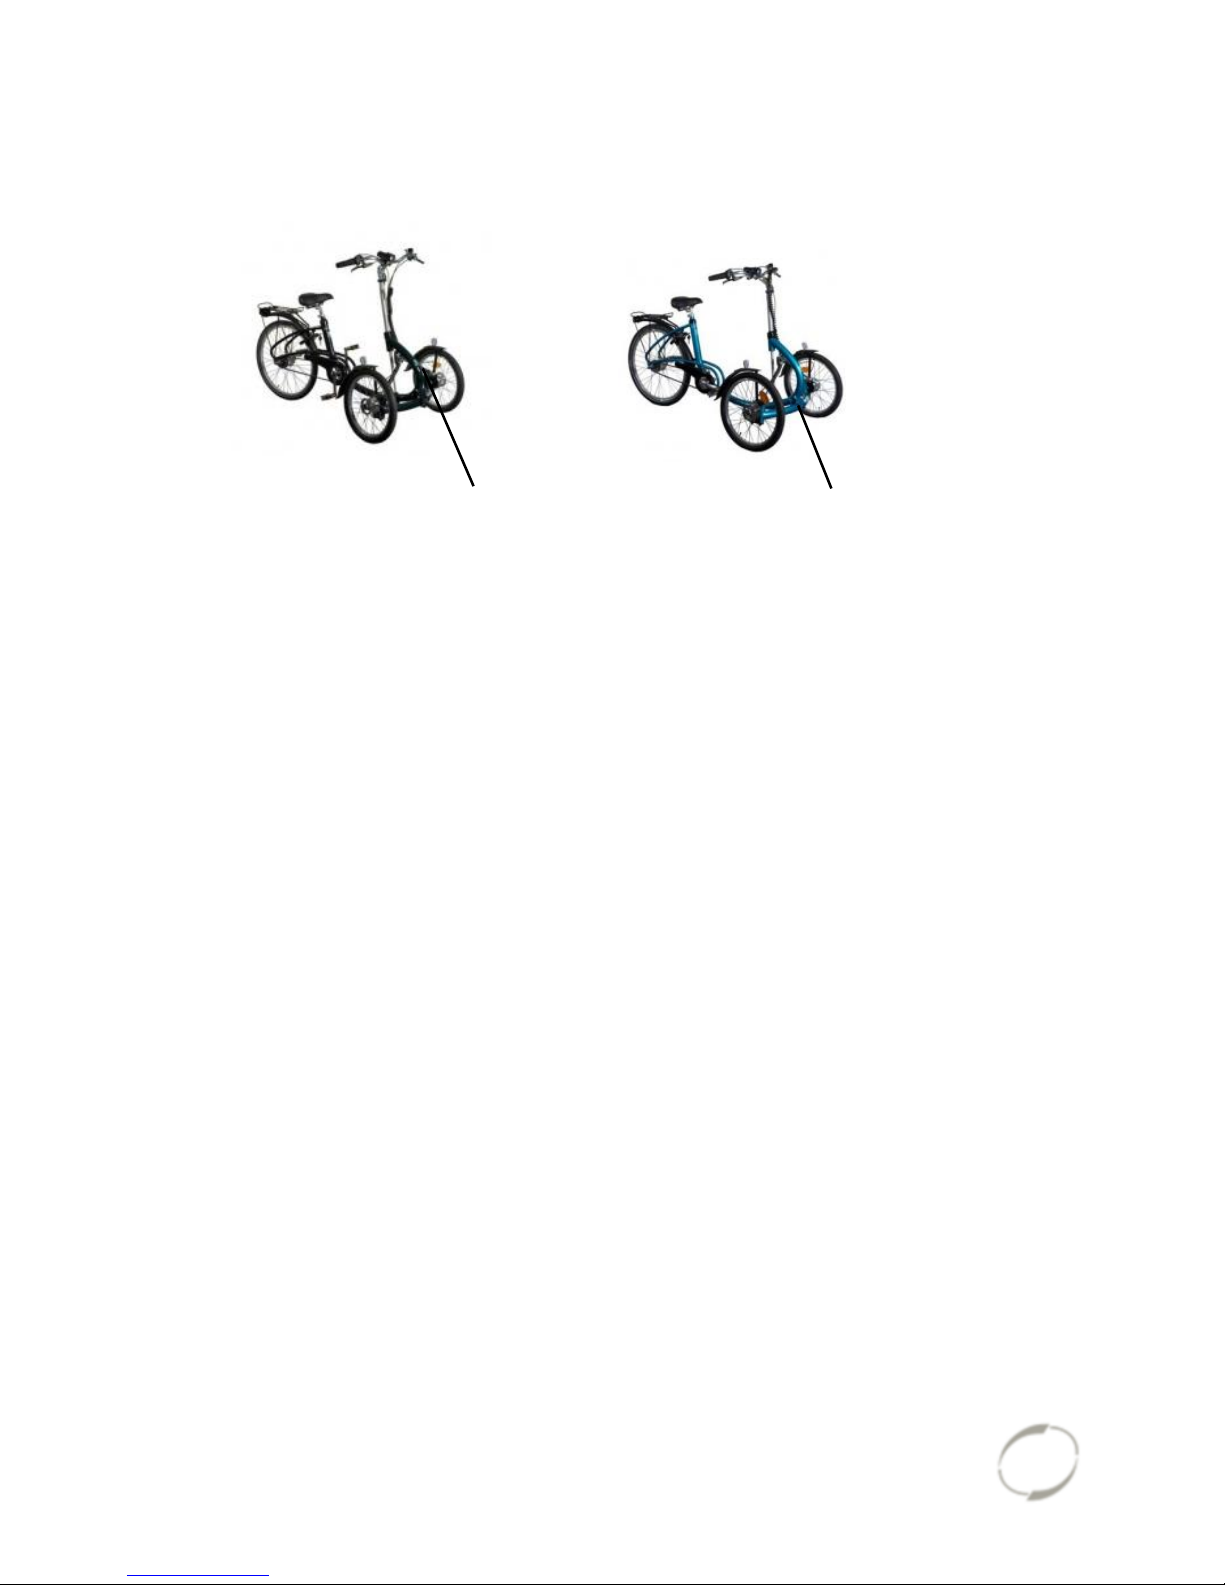
Positions of frame number, stamped in a plate on the frame (Viktoria and Viktor):
Viktoria
Viktor
in a plate in front
of the hinge plate
in a plate in front
of the hinge plate
Page 40
User manual
Tricycles 17.04
39
Form service, maintenance, modifications and warranty claims
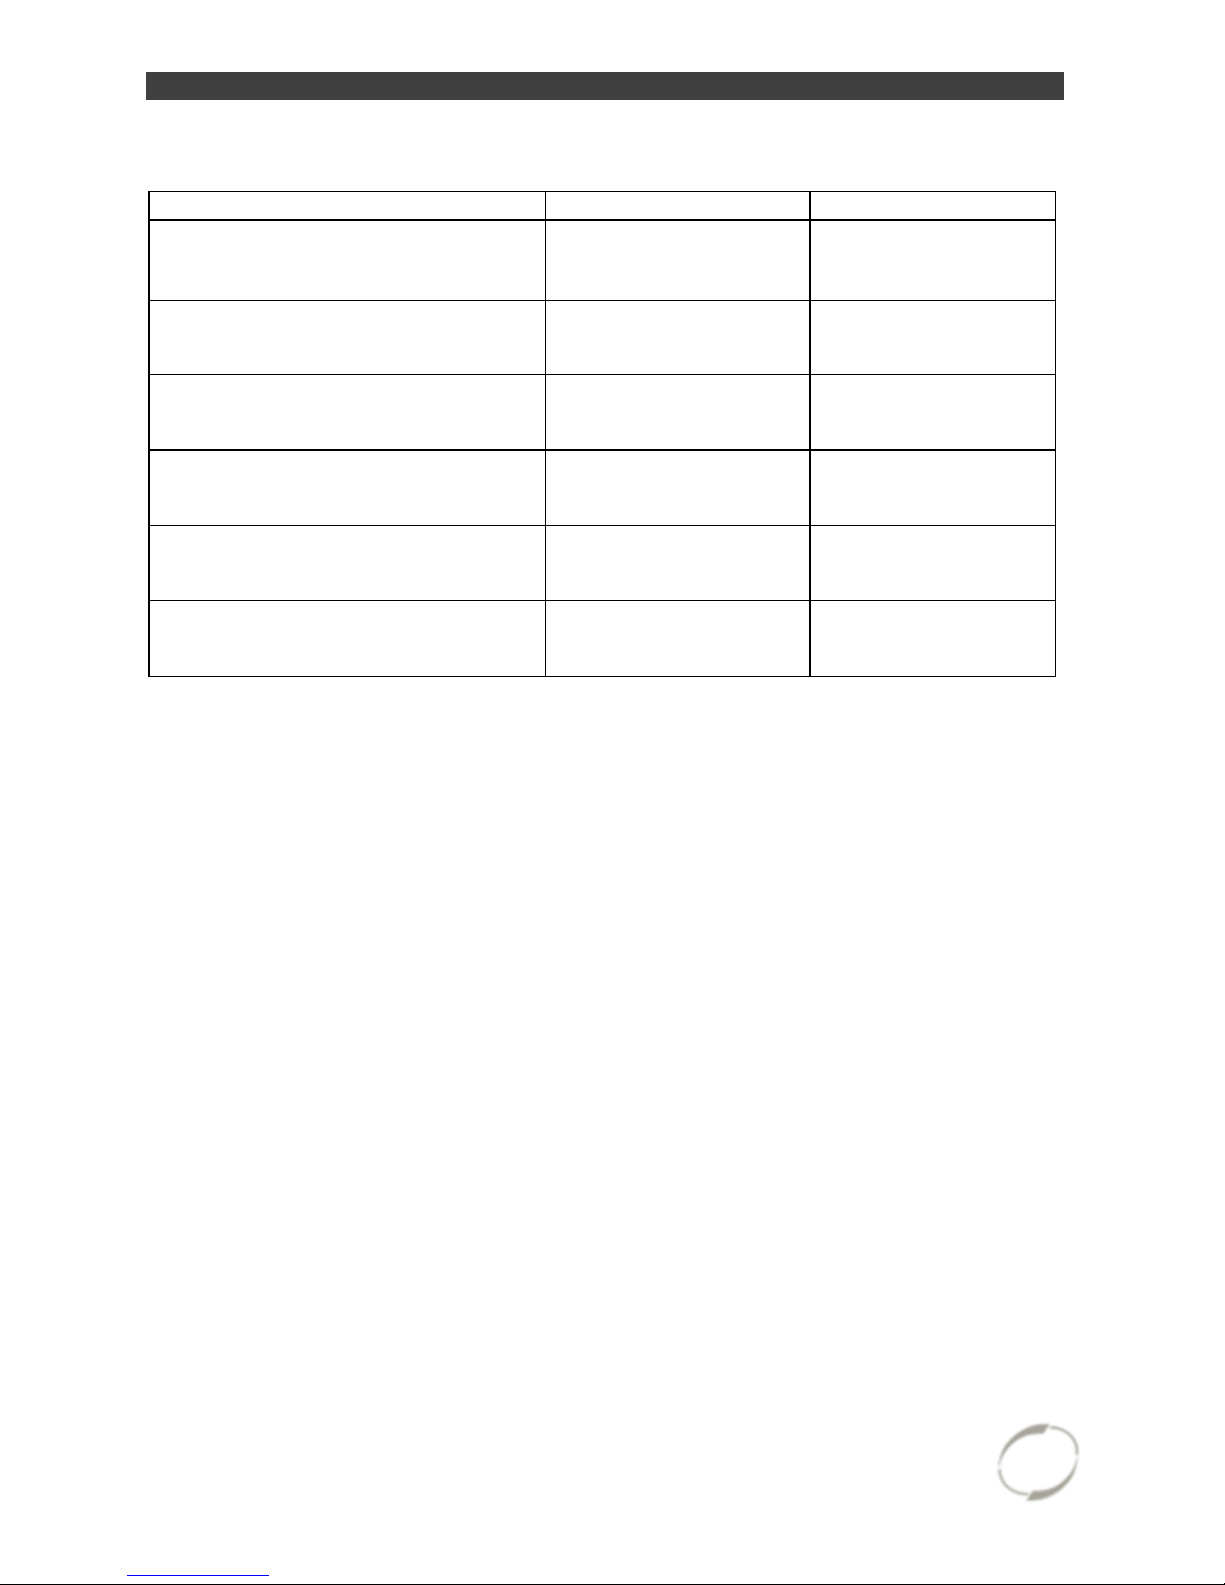
To maintain warranty on the Van Raam tricycle, follow this service schedule.
Service:
Carried out (date):
Signature dealer:
Service after the first 200 KM or
two months.
Service 1 year after delivery.
Service 2 year after delivery.
Service 3 year after delivery.
Service 4 year after delivery.
Service 5 year after delivery.
Even after five years, we advise you to give your bike annual service. Passing by the
service after five years will have no further effect on warranty claim because it expires
for certain parts after five years.
Modifications to the bike
The following items are changed to the bike:
Changed: Date: Carried out:
Beware! Please note that if changes are made by a non-authorized Van Raam dealer
or no original Van Raam parts or options are used, warranty may void.
Page 41

User manual
Tricycles 17.04
40
Here you have space to take notes or write down the maintenance on your bike:
Page 42

User manual
Tricycles 17.04
41
Here you have space to take notes or write down the maintenance on your bike:
Page 43

User manual
Tricycles 17.04
42
Here you have space to take notes or write down the maintenance on your bike:
Page 44
User manual
Tricycles 17.04
43
Delivery and service form
Congratulations on your purchase of your Van Raam tricycle. This bike is produced
with utmost care. To guarantee the quality as much as possible Van Raam produces
the cycles according to the ISO 9001: 2008 quality standards. Van Raam has been
certified by TÜV Rheinland Netherlands BV.
You will especially enjoy your Van Raam bike when the bike is adjusted to your
specifications and when the instructions in the user manual are followed. Pay special
attention on the service intervals who specified in the manual of the bike.
To claim warranty and service you should always fill out this form, at least at delivery
and service. This signed form declares that the end user had an instruction on the
operation of the tricycle, that the tricycle is adjusted to the specifications of the end
user and that the user manual is received.
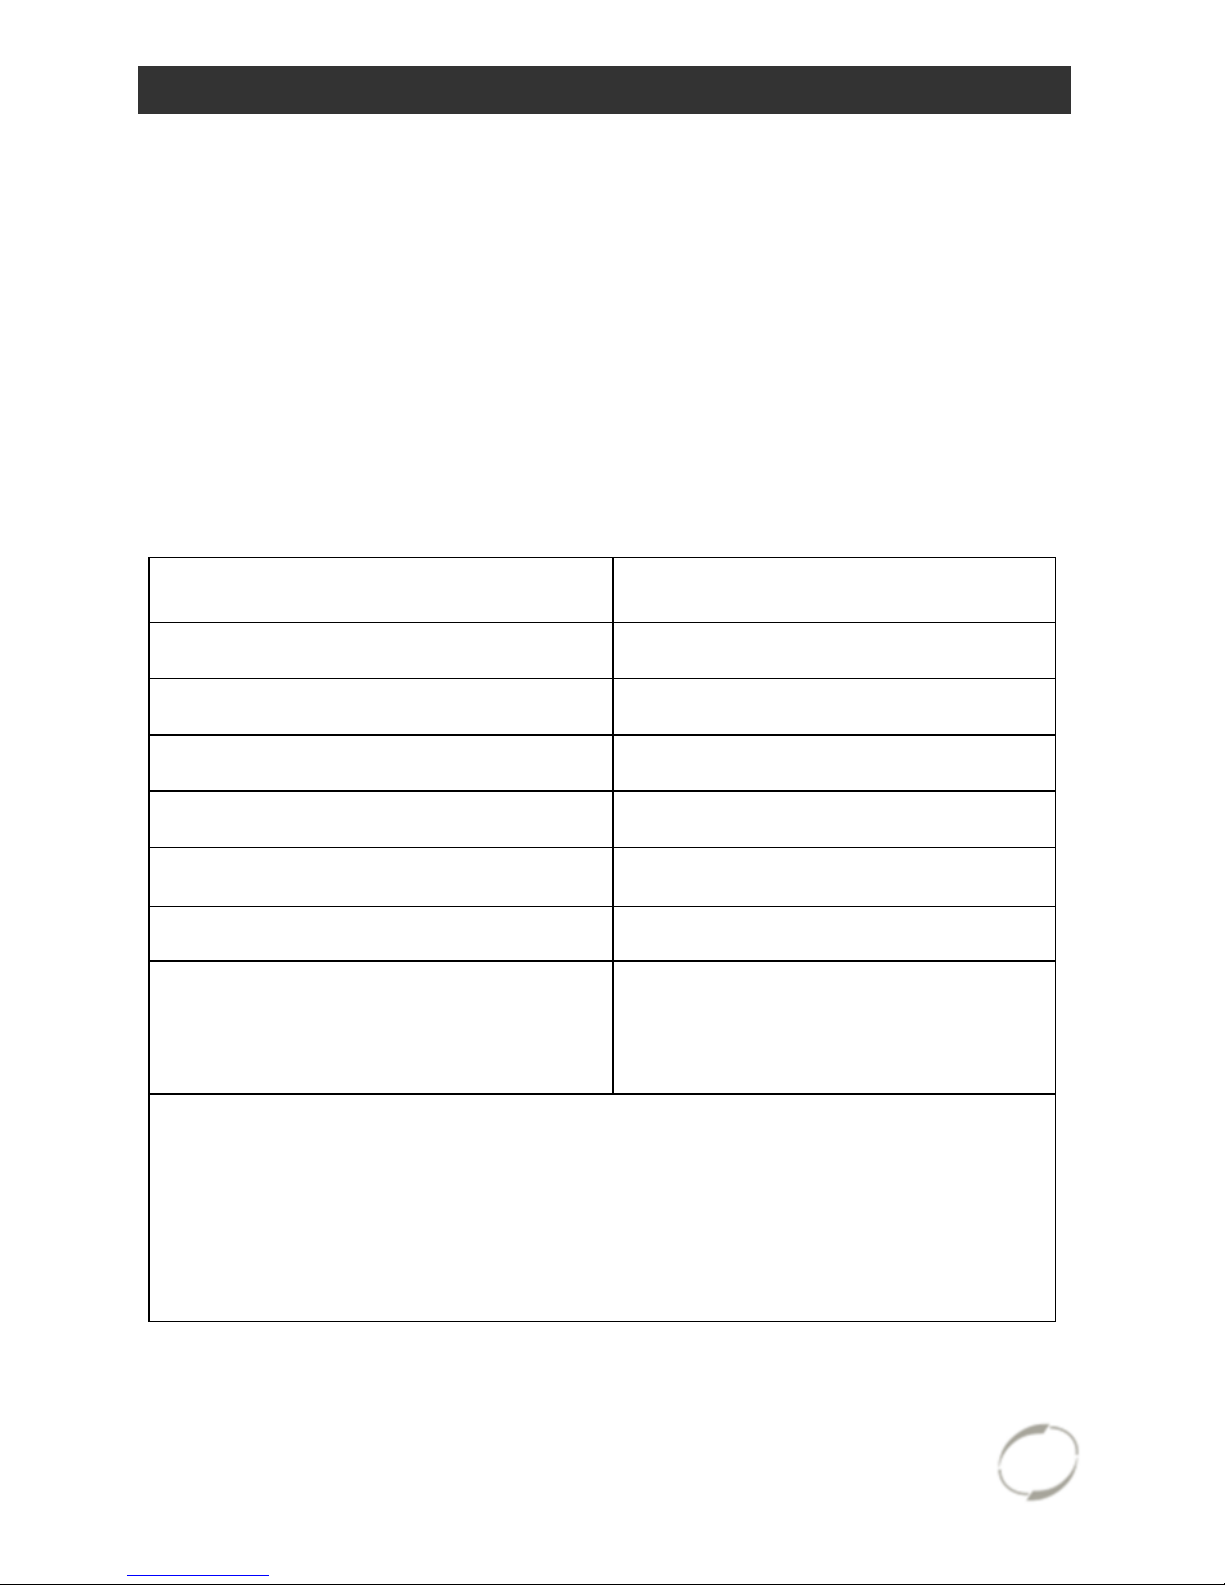
Fill out when the tricycle is delivered
Type Van Raam tricycle:
Frame number:
Key number:
Delivered to:
By dealer:
Place:
Date:
Signature user bike:
Signature dealer:
When available, stamp dealer:
 Loading...