


CT360
INSTRUCTION MANUAL

vM CT360 STEREO CD TRANSPORT
1
vM INSTRUCTION MANUAL
Thank you for having bought this Van Medevoort product.
We wish you many happy listening hours.
THE MANUAL
It is essential to consult this manual before operating your Van Medevoort product. The numbers in the
pictures correspond to the features of this product.
This manual contains everything you need to know to connect this product in addition to various user
options. We kindly ask you to read this manual thoroughly before powering up the unit.
The manufacturer accepts no responsibility for any misunderstanding and/or misinterpretation or the
consequences arising there from due to this instruction manual not being read correctly and followed
properly.
WARNINGS
- Never touch the power cord and/or the unit with moist or wet hands.
- Never expose the unit to rain or moisture.
- Never remove the casing. There are no user-serviceable parts inside.
- Do not poke or put anything inside the unit.
POWER
Every Van Medevoort product is optimized for your country’s electrical standards. e.g. 230V-50Hz or
115V-60Hz. This cannot be changed. Please check that your product is set to the correct voltage
setting BEFORE connecting to an AC power outlet. Any faulty connection will invalidate the warranty.
COPYRIGHT
In some countries it may be necessary for you to pay a fee for recording and/or playing music. Please
check with your country’s laws and regulations.
WARRANTY
For warranty information, contact your local vM distributor.
RETAIN YOUR PURCHASE RECEIPT
Your purchase receipt is your permanent record of a valuable purchase. It should be kept in a safe
place to be referred to as necessary for insurance purposes or when corresponding with vM.

vM CT360 STEREO CD TRANSPORT
2
BEFORE GETTING STARTED
IN GENERAL
When using your Van Medevoort product make sure that the following is observed:
- The cooling air vents are not covered
- The air can move freely around the product
- The product is sited on a vibration-free surface
- The product is not exposed to (very) high temperatures, cold, moist or dusty environments
- Do not expose the product to direct sunlight
- Do not expose the product to electrostatic discharges
- Never put any type of object directly on top of the product
When in doubt do consult your Van Medevoort dealer. If any object and/or water and/or moisture
should find its way into the unit, always disconnect the power cord by its plug, never by the cord itself.
When leaving for extended periods, e.g. holidays, we strongly recommend that you unplug all audio
equipment. This is also advisable when there is a thunderstorm or lightning.
CONNECTING
Before actually making any connections, always disconnect the power cord from the wall socket by its
plug, never by the cord itself, or switch the product OFF.
Always connect one source at a time and make sure that the output Left & Right channels are not
interchanged.
Make sure that the plug is fitted correctly. Otherwise, hum and/or noise may be apparent.
DO NOT forget to read the respective manuals of the products you wish to connect to this product,
BEFORE connecting.
POSITIONING
If this product is being used at the same time as e.g. a Computer and/or a TV-tuner, you may
experience various anomalies. When this is the case, please follow these instructions:
- Position the product as far away as possible from this type of item
- Make sure that the tuner interconnect is detached as far away as possible from all radio
and/or TV power cords.
- Usually these anomalies occur when a 300 Ohms cable is used. We advise you to change to
a well shielded 75 Ohms cable.
CE MARKING
The CT360 is in conformity with the EMC directive and low-voltage directive.
A NOTE ABOUT RECYCLING
This product’s packaging materials are recyclable and can be reused. This product and the
accessories packed together are the applicable product to the WEEE directive except batteries.
Please dispose of any materials in accordance with your local recycling regulations.
When discarding the unit, comply with your local rules or regulations.
Batteries should never be thrown away or incinerated but disposed of in accordance with your local
regulations concerning chemical wastes.

vM CT360 STEREO CD TRANSPORT
3
Controls
Precautions
Connections
Maintenance and advice
Technical Specifications
1 2 3 4 5 6
1. ON / OFF. Power switch for switching the mains on the CT360.
2. LED indication control. Fully red when switched ON, 50% red when in STANDBY mode
(selected with the Remote Control).
Above the LED you will find the Infra Red sensor for the Remote Control.
The functions are “stand-by”, repeat, scan, shuffle, time, but also direct track selection.
The vM Remote Control handset is standard supplied.
3. CD tray. Can be opened and closed with switch (7) or the RC (DISC)
4. Display, on which CD info appears like track number, time and control functions.
5. MCK LED. Indication control lights up with incoming Master Clock (MCK) from the connected
vM DAC via Q-Link.
6. Display LED. This LED indicates that the display light is switched off.

vM CT360 STEREO CD TRANSPORT
4
11 10 9
7 8
7. OPEN. Switch to open and close the CD tray.
In the display appears the actual status of the player.
8. PREV. / NEXT. To choose previous or next track.
9. STOP. Stops playing the CD.
10. PAUSE. Interrupts CD playing.
11. PLAY. Starts CD playing.

vM CT360 STEREO CD TRANSPORT
5
Controls
Precautions
Connections
Maintenance and advice
Technical Specifications
ONLY connect the transport to a (professionally installed) wall socket with earth or ground and the
corresponding voltage setting, as indicated on the back. Any faulty connection will invalidate the
warranty.
If it is necessary to replace the fuses, use only Slow fuse(s) with the exact same value. The fuse
holders are positioned inside the transport and should only be replaced by an authorized Van
Medevoort Service Center. There are no user serviceable parts inside.
The correct order for ON/OFF switching of the various products is as follows:
On: always first the source, then the pre-amplifier, followed by the power amplifier.
Off: always first the power amplifier, then the pre-amplifier, followed by the source.
With the Q-Link connection switch ON the DAC first (to produce the MCK) and second the
transport.
To prevent damage to your loudspeakers it is advisable, both at switching ON and OFF to turn the
volume control fully to the left. Fully anti-clockwise sets the volume at its lowest level. The same
applies when changing sources.
Do make sure that there is enough space in front of the transport in order to change CD’s safely.
Do not put any magnetic devices near or on top of the transport, e.g. floppy disks. This can cause
irreparable damage to such devices.
If you experience any problems, always contact your nearest authorized Van Medevoort Service
Centre.

vM CT360 STEREO CD TRANSPORT
6
Controls
Precautions
Connections
Maintenance and advice
Technical Specifications
12 13 14 15 16
12. Output digital OPTICAL. SPDif optical output TosLink.
13. Output digital RCA. SPDif output RCA.
14. Output digital XLR. AES / EBU balanced output.
15. Output digital Q-Link. Output to connect the CT360 via Q-Link for I2S connection to e.g. the
vM DA converters. There are four RCA connectors: for the DATA, MCK, LRCK en BCK. The
MCK is the master clock input, the other three are outputs. Connect these to the same
named connectors on the converter.
For best audio results, it is important to use four identical cables of good quality.
Take care to use the right signal direction of the cables!
Separate the MCK cable from the other three cables to reduce influence.
This Q-Link output will be operational when the MCK from the DAC is received.
16. IEC Power Chassis Connector. To be connected with the proper wall socket, which must be
earthed or grounded. Every Van Medevoort product is optimized for your country’s electrical
standards. e.g. 230V-50Hz or 115V-60Hz. This cannot be changed. Please check that your
product is set to the correct voltage setting BEFORE connecting to an AC power outlet.
Any faulty connection will invalidate the warranty.

vM CT360 STEREO CD TRANSPORT
7
Controls
Precautions
Connections
Maintenance and advice
Technical Specifications
The digital outputs are clocked for the different digital inputs.
By switching over between inputs, there can be a synchronicity moment occur where by the
transport stays in the mute mode. In that situation, the CT360 can be reset by switching off with the
power switch for approximately 10 seconds and then again to on.
The SPDif XLR, RCA and optical outputs are able to transmit digital stereo signals to converters
capable to receive 16bit/44.1kHz. This is the standard CD format.
The Q-Link outputs send the DATA, LRCK and BCK from the CD transport to the DAC. The MCK
master clock input must receive a frequency of 16.9344MHz from the DAC.
When this MCK is received, in the front display the indication LED (5) goes on.
All audio CD’s, CD-R’s and CD-RW’s can be played without a problem only when they are
produced following the Red Book protocol.
For your convenience you will find a red sticker, indicating the mains “phase”. The phase of your
electricity system can be determined with a voltage seeker.
The transport must only be cleaned with a cloth, impregnated with a Ph-neutral cleaning fluid. And
it must be mildly moist! NEVER use strong fluids and/or erasers. Before cleaning ALWAYS remove
the power cord from its wall socket, by its plug not by its cord.
The optimum operating temperature is reached after approx. several hours of continuous play.
Then it will be possible to start enjoying the superb van Medevoort audio qualities of this transport.
Test this time in your own setup.
We strongly recommend that you use a high quality interconnect cable. E.g. the renowned van
Medevoort Silver Cable. Also for the power cords.

vM CT360 STEREO CD TRANSPORT
8
Controls
Precautions
Connections
Maintenance and advice
Technical Specifications
cd mechanism
vM TEAC
conform
Red Book protocol
signal format
16 bit PCM – 44,1kHz
disc format
CD, CD-R, CD-RW
disc support
80 / 120mm (IEC908)
Q-Link MCK Clock input
16,9344 MHz
outputs / connections
4 / RCA, XLR + optical + Q-link
output SPDif and Q-Link
0.5 Volt p/p
output XLR
AES/EBU 4 Volt p/p
power supply
115-230 Volt / 50-60 Hz
dissipated power
5/15 Watt stand-by/on
housing
aluminium / steel
weight
10 kg
dimensions (incl. feet)
434x88(102)x390 mm (wxhxd)
finish
black (satin), front plate: silver / black
accessoires: Power Cable
Remote Control (no batteries included, size AAA)
options: vM SILVER CABLE
Van Medevoort Audio is the manufacturer of the complete Van Medevoort product line.
Next to the audiophile Van Medevoort Silver Cable Audio cables we can also supply you with various
high quality accessories. For more information, do consult your dealer or contact us at one of the
possibilities mentioned below.
Van Medevoort Audio
Maarssen, The Netherlands
Telephone : + 31 639 77 98 99
Website : www.vanmedevoortaudio.nl
Email : contact@vanmedevoortaudio.nl
Specifications are subject to change without prior notice.
Copyright © 2016 Van Medevoort Audio / The Netherlands
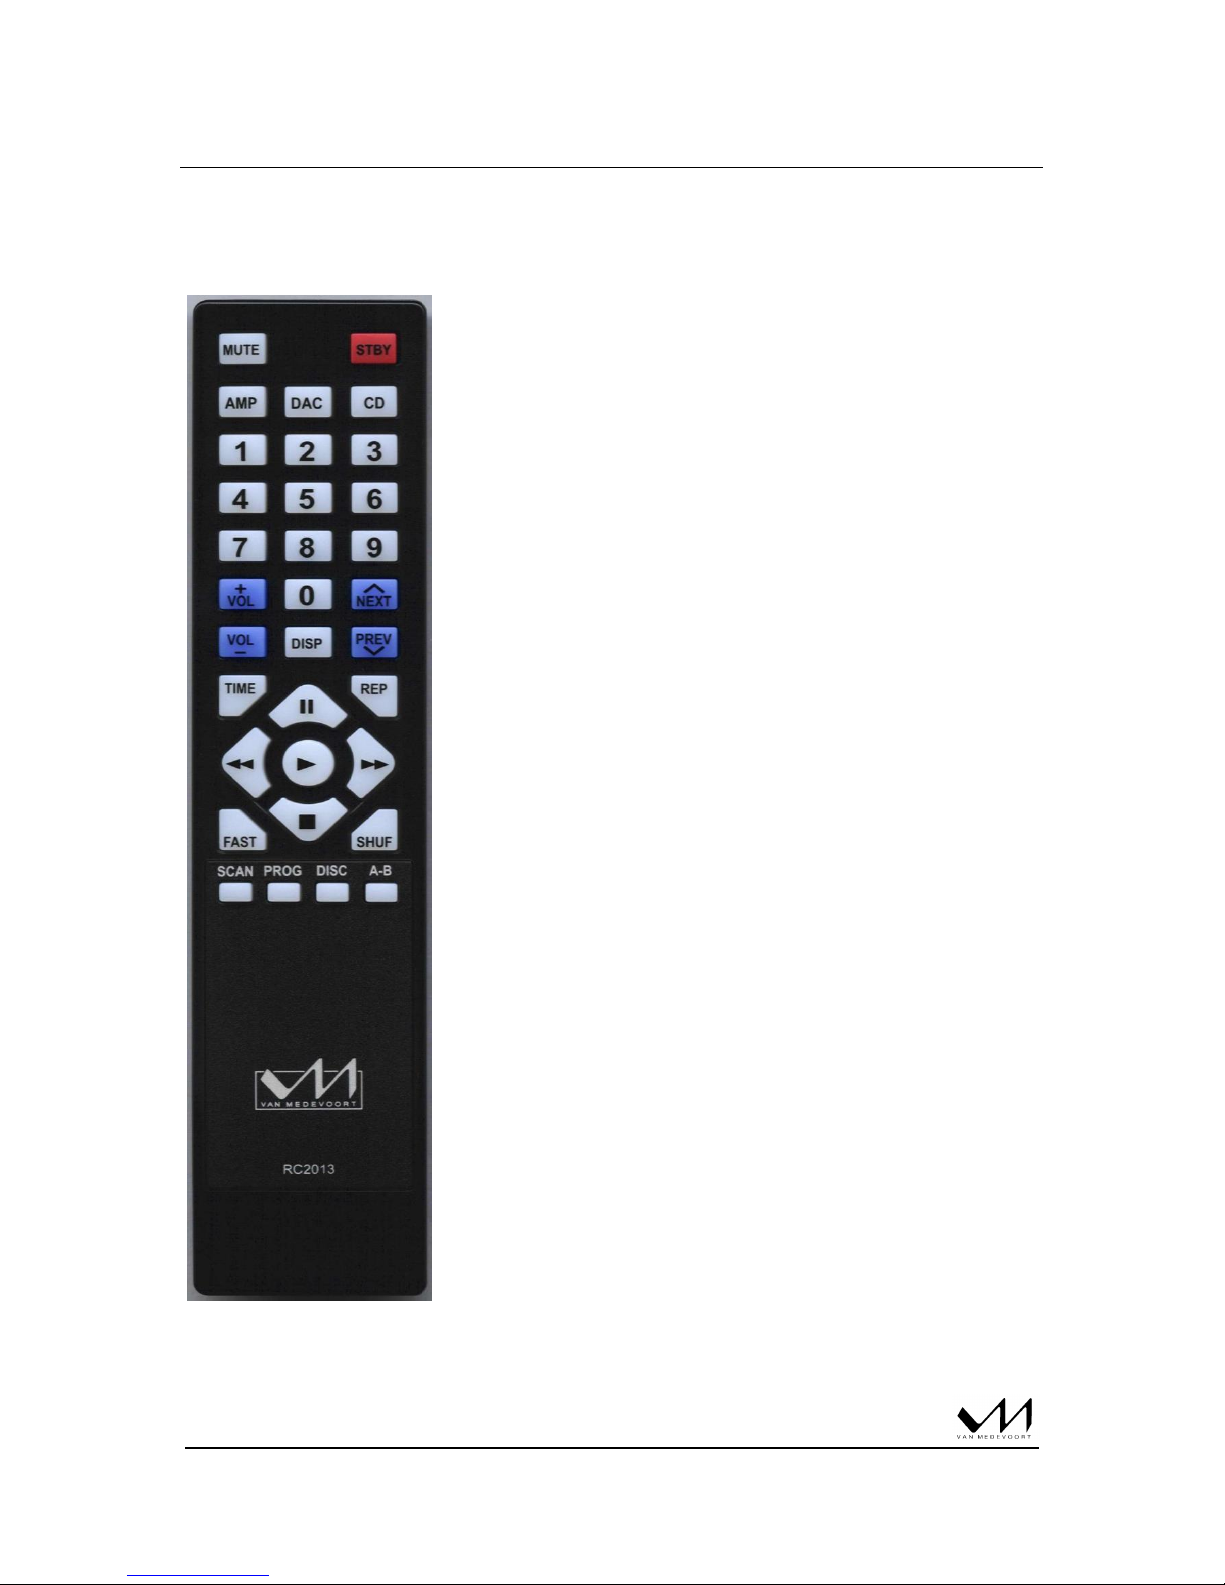
vM RC2013 – CD / CT
REMOTE CONTROL functions for AMP, CD / CT and DAC
STBY
MUTE
CD
1~0
NEXT
PREV
DISP
REP
TIME
PAUSE
FAST FORW.
PLAY
FAST BACK
STOP
SHUF
FAST
A-B
DISC
PROG
SCAN
VOL +
VOL --
To switch the power ON or in Stand By mode
Mute the vM amplifier when connected
Select first the device to control CD or CT
Use these buttons to select tracks directory
Skip button selects next track *
Skip button selects previous track *
To switch display on or off
Repeat, press once for track, twice for disc
To see track time played, remain and disc remain
To interrupt playing, to restart push PLAY *
Search fast through the track forward
Play a inserted CD *
Search fast through the track backward
Stop all functions *
Plays CD tracks in random sequence
To speed up the search functions back and forward
Button to determine repeat start and end points
Opens and close the disc tray *
To program selected tracks **
Scan skip to next track after 10 seconds
* function buttons also on front panel
** press PROG > 1th track number > PROG >
2nd track number > PROG > 3rd track
number > PROG > PLAY
Volume up on the connected vM amplifier
Volume down on the connected vM amplifier
Specifications are subject to change without prior notice.
Copyright © 2012-2016 Van Medevoort Audio / The Netherlands
 Loading...