

Page 1

Vanguard Managed Solutions
Vanguard 6500
PLUS
Installation Manual
Page 2

Notice
©2002 Vanguard Managed Solutions, LLC
575 West Street
Mansfield, Massachusetts 02048
(508) 261-4000
All rights reserved
Printed in U.S.A.
Restricted Rights Notification for U.S. Government Users
The software (including firmware) addressed in this manual is provided to the U.S.
Government under agreement which grants the government the minimum “restricted rights”
in the software, as defined in the Federal Acquisition Regulation (FAR) or the Defense
Federal Acquisition Regulation Supplement (DFARS), whichever is applicable.
If the software is procured for use by the Department of Defense, the following legend
applies:
Restricted Rights Legend
Use, duplication, or disclosure by the Government
is subject to restrictions as set forth in
subparagraph (c)(1)(ii) of the
Rights in Technical Data and Computer Software
clause at DFARS 252.227-7013.
If the software is procured for use by any U.S. Government entity other than the Department
of Defense, the following notice applies:
Notice
Notwithstanding any other lease or license agreement that may pertain to,
or accompany the delivery of, this computer software, the rights of the
Government regarding its use, reproduction, and disclosure are as set forth
in FAR 52.227-19(C).
Unpublished - rights reserved under the copyright laws of the United States.
Page 3

Notice (continued)
Proprietary Material
Information and software in this document are proprietary to Vanguard Managed Solutions
(or its Suppliers) and without the express prior permission of an officer of VanguardMS, may
not be copied, reproduced, disclosed to others, published, or used, in whole or in part, for any
purpose other than that for which it is being made available. Use of software described in this
document is subject to the terms and conditions of the VanguardMS Software License
Agreement.
This document is for information purposes only and is subject to change without notice.
Radio Frequency Interference Regulations
This equipment has been tested and found to comply with the limits for a Class A digital
device, pursuant to Part 15 of the FCC Rules. These limits are designed to provide reasonable
protection against interference when the equipment is operated in a commercial environment.
This equipment generates, uses, and can radiate radio frequency energy and, if not installed
and used in accordance with the instruction manual, may cause harmful interference to radio
communications.
Changes or modifications not expressly approved by VanguardMS could void the user's
authority to operate the equipment.
This Class A digital apparatus meets all requirements of the Canadian Interference-Causing
Equipment Regulations.
This is a Class A product. Operation of this equipment in a residential environment may
cause radio interference, in which case the user may be required to take adequate measures to
correct the interference at his/her own expense.
You can obtain the proper cables from VanguardMS.
Writer: Bob Nichols
Publication Specialist: Denise Skinner
Illustrator: Tim Kinch
Manual is current for Release 5.2 of VanguardMS’sOperating Network Software.
To comment on this manual, please send e-mail to LGEN031@vanguardms.com
Part No. T0002, Rev C
Publication Code: KP
First Printing: April 1996
Page 4

Page 5

About This Manual
Contents
Chapter 1. About the 6500
PLUS
Software Features ......................................................................................... 1-2
Hardware ...................................................................................................... 1-3
Enclosures and Backplanes ...................................................................... 1-4
6500PLUS Processor Cards ..................................................................... 1-6
PLUS
6500
Auxiliary Processor Cards ....................................................... 1-10
6500PLUS Asynchronous and Universal I/O Cards ................................ 1-11
6500PLUS Network Storage Option Card ............................................... 1-13
PLUS
6500
Token Ring Interface Module Option ..................................... 1-15
6500PLUS Integral DSU .......................................................................... 1-17
Chapter 2. Installation
Installing Standalone Units ........................................................................... 2-20
Replacing Processor Cards in Standalone Enclosures ............................. 2-22
Installing Nodes in Modulus Enclosures ...................................................... 2-28
Multiprocessor Nodes .............................................................................. 2-29
Replacing Master Processor of Multi-Processor Node ............................ 2-30
Adding a Secondary 6500
PLUS
Processor with FLASH .......................... 2-32
Installing/Replacing Processor Cards ...................................................... 2-35
Requirements for Installing a TRIM Card ............................................... 2-36
Installing and Connecting a TRIM Card .................................................. 2-45
Removing/Replacing TRIM Cards .......................................................... 2-48
Preparing Modulus Enclosures for RFI Suppression ............................... 2-49
Starting Up the Node .................................................................................... 2-53
Replacing Processor Card Components ....................................................... 2-54
Replacing DIMs ....................................................................................... 2-55
Installing SIMMs ..................................................................................... 2-59
Replacing FLASH Modules ..................................................................... 2-61
Replacing ID Modules ............................................................................. 2-63
Replacing PROM Chips ........................................................................... 2-64
Replacing the CMEM Chip ...................................................................... 2-65
DSU DIM Installation .................................................................................. 2-66
Configuring the 6500
PLUS
for DSU Operation ........................................ 2-68
DSU Input and Output Signaling ............................................................. 2-69
Troubleshooting DSU DIM Installation ................................................... 2-71
DSU DIM FCC Information .................................................................... 2-72
Power-Up Verification .................................................................................. 2-74
Setting Node to Default Configuration ......................................................... 2-76
i
Page 6

Contents (continued)
Chapter 2 Installation (Continued)
Installing Software Options .......................................................................... 2-77
Accessing Node Serial Number from Node Statistics ............................. 2-78
Enabling A Software Access Key ............................................................ 2-80
Installing New Software Options in an Existing Network ....................... 2-81
Enhanced LAN Option ............................................................................. 2-82
Appendix A. Cables
Appendix B. Specifications
Index
ii
Page 7

Overview
About This Manual
Introduction This manual describes features, hardware, specifications, and applications for the
PLUS
6500
.
Note
For information on operating system software and configuration, see the
Vanguard Basics Manual.
PLUS
Audience This manual is intended for operators of the 6500
How To Use This
The following table describes the contents of this manual.
.
Manual
This Chapter... Describes:
Chapter 1 6500
PLUS
hardware and software features, and FCC
and telephone company procedures and requirements.
Chapter 2 Installing the hardware on the 6500
PLUS
, powerup and
verification, and installation of software options.
Appendix A Cable pinouts for Ethernet and Token Ring.
Appendix B Product specifications.
PLUS
Downloading
Software
For operating software download procedures, refer to 6500
Procedures.
Downloading
i
Page 8
About This Manual (continued)
Special Notices The following notices emphasize certain information in the manual. Each serves a
special purpose and is displayed in the format shown:
special purpose and is displayed in the format shown:
Note
Note is used to emphasize any significant information.
Caution
Caution provides you with information that, if not followed, can result in damage to
software, hardware, or data.
Mise en garde
Une mise en garde vous fournit des informations qui, si elles ne sont pas observées,
peuvent se traduire par des dommages pour le logiciel, le matériel ou les données.
Vorsicht
Ein Vorsichtshinweis macht Sie darauf aufmerksam, daß Nichtbefolgung zu
Software-, Hardware- oder Datenschäden führen kann.
Software Revision
Level
Warning
Warning is the most serious notice, indicating that you can be physically hurt.
Avertissement
Un avertissement constitue le message le plus sérieux, indiquant que vous pouvez
subir des blessures corporelles.
Warnung
Eine Warnung ist der ernsthafteste Hinweis auf Körperverletzungsgefahr.
This manual describes Release 5.2 of the Operating Network Software.
ii
Page 9

Overview
Chapter 1
About the 6500
PLUS
Introduction The 6500
or over public data networks. A 6500
terminal port speeds of up to 38.4 kbps and network port speeds of up to 384 kbps.
PLUS
is a family of networking devices that can operate in private networks
PLUS
node can have from 6 to 54 ports, with
About the 6500
PLUS
1-1
Page 10

Software Features
Software Features
Introduction You can configure, administer, and troubleshoot a 6500
remote terminal acting as a control terminal. The terminal calls into the node's
Control Terminal Port (CTP), a software module that acts as the logical control
terminal port.
In addition, configurations can be saved and restored when a PC (with Kermit
protocol) is used as the local or remote control terminal.
Features and
Protocols
For a list of features and protocols supported by the 6500
Release Notice that came with the operating software.
PLUS
node from a local or
PLUS
refer to the Software
1-2 About the 6500
PLUS
Page 11

Hardware
Hardware
Introduction A 6500
PLUS
node consists of at least one processor card, one or more optional
support cards, and, optionally, a TRIM card. A node can be contained in a standalone
enclosure, which can support only a processor card, or in a Modulus nest enclosure,
which can support one or more processor cards and several support cards.
Card Types The 6500
PLUS
•6500
PLUS
includes the following types of cards:
processor cards
• Auxiliary processor cards
• Asynchronous I/O (AIO) card
• Universal I/O (UIO) card
• Network storage option (NSO) card
• Token Ring Interface Module (TRIM) card
Processor Cards The 6500
be modified as required. The 6500
PLUS
processor cards provide the basic functions of a 6500
PLUS
processor cards are necessary to run 6500
PLUS
node and can
PLUS
Release 3.10 and greater software.
Support Cards The AIO, UIO, and NSO cards work with the processor cards to provide additional
ports and data storage.
TRIM Card The TRIM card provides access to Token Ring local area networks and supports
IBM/IEEE 802.5-compatible LANs.
The 6500
PLUS
does not have a dedicated control terminal port. Instead, any
asynchronous PAD port can become a control terminal port when an attached
terminal calls the node's control terminal facility and the proper password is entered.
For more details, refer to the Vanguard ONS Basics Protocols Manual (T0106).
About the 6500
PLUS
1-3
Page 12
Hardware
Enclosures and Backplanes
Introduction The two types of enclosures for the 6500
• Standalone
• Modulus
Standalone
Enclosure
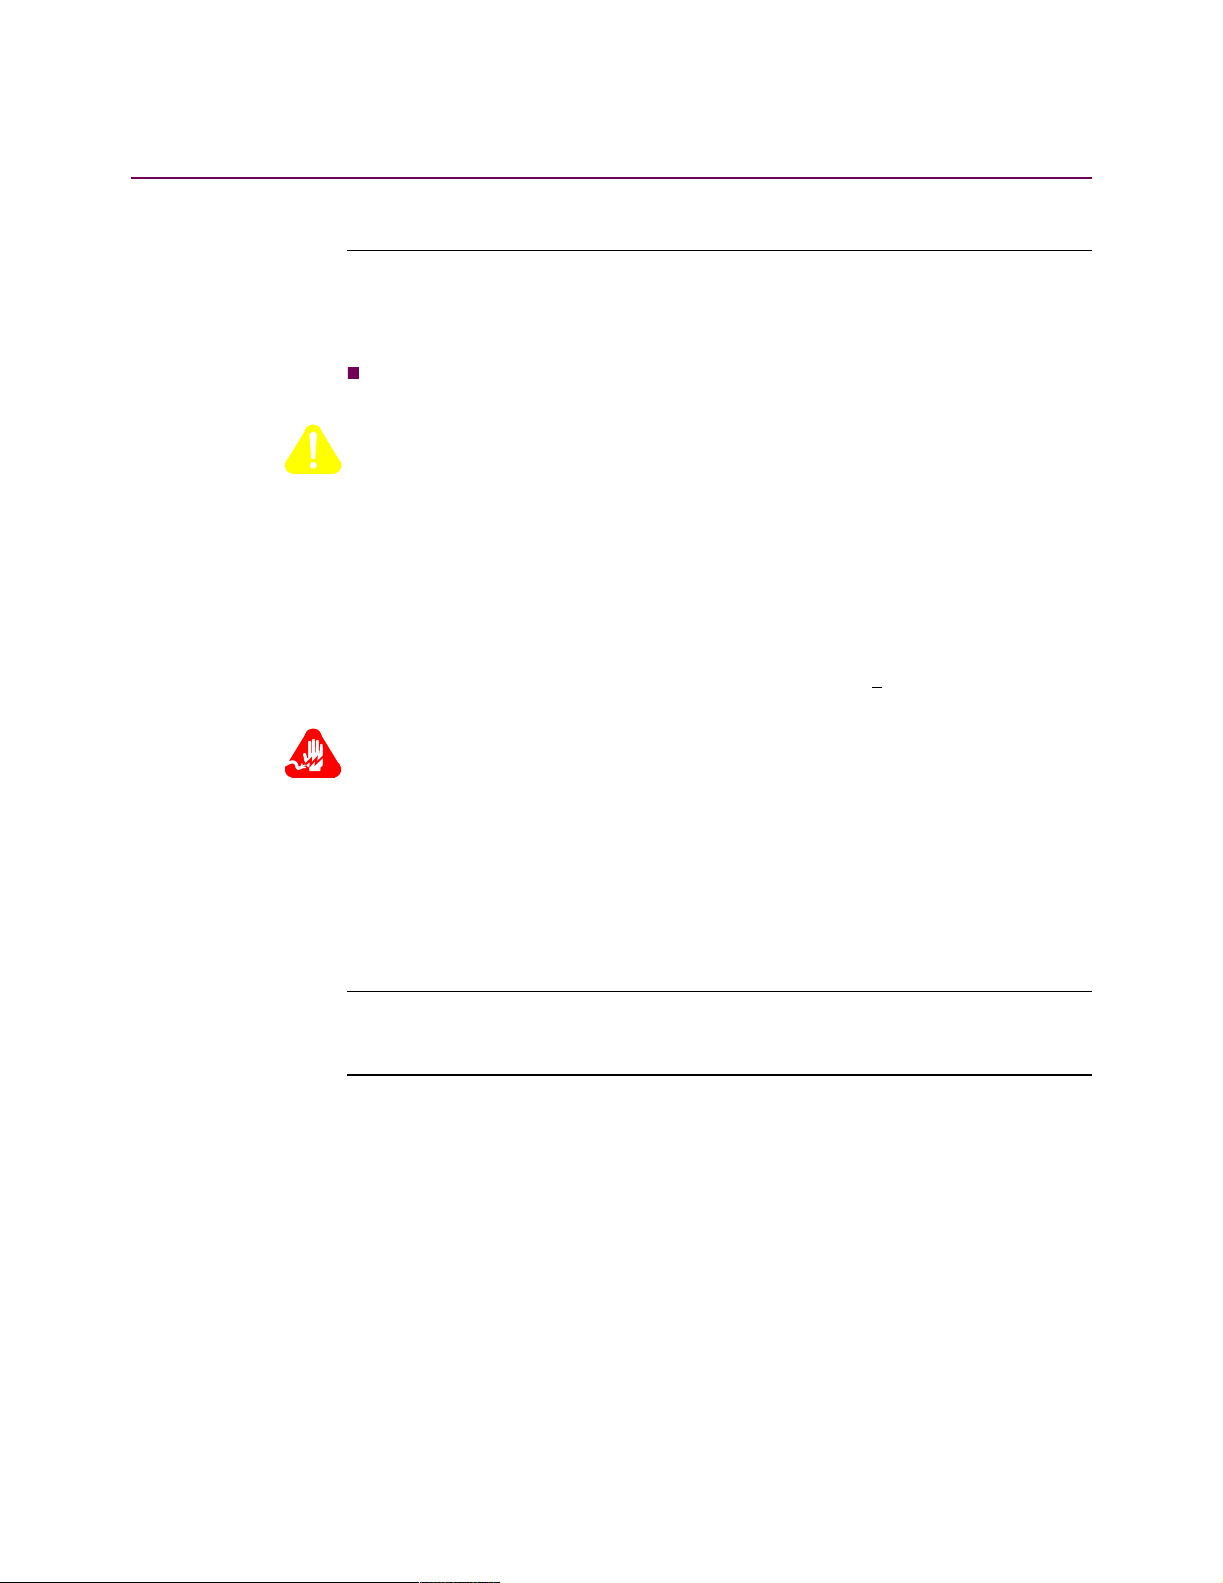
A standalone enclosure (Figure 1-1) holds just one card, which must be a processor
card. A standalone unit supports up to six X.25 or terminal ports depending on the
type of processor card installed.
Figure 1-1. 6500
PLUS
Standalone Enclosure
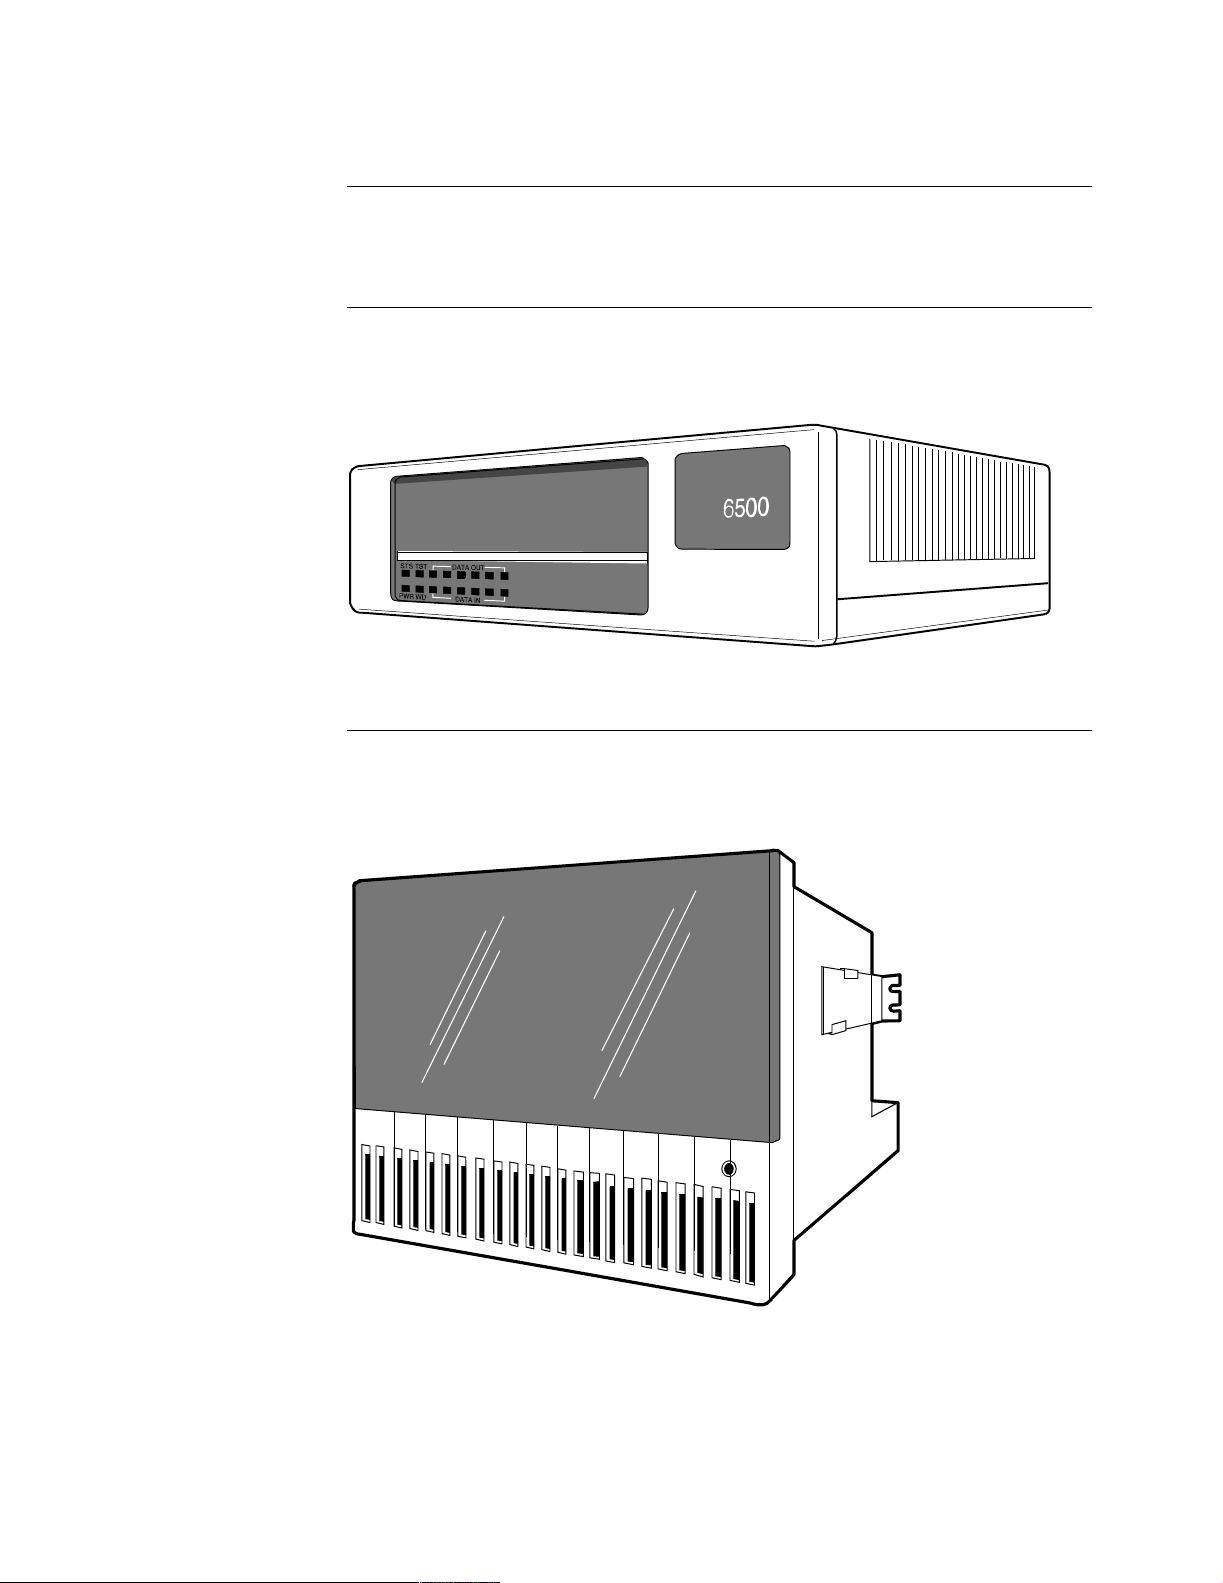
Modulus Enclosure The Modulus enclosure provides a 6500
processor cards and several support cards, such as auxiliary processor cards, I/O
cards, or NSO cards (Figure 1-2).
PLUS
are:
PLUS
node with space for one or more
Figure 1-2. Modulus 21 Enclosure
1-4 About the 6500
PLUS
Page 13

Hardware
Supports Other
VanguardMS
Products
Types of Modulus
Enclosures
A Modulus enclosure contains plug-in card versions of VanguardMS products,
including Network Access Products, providing common housing and power to
multiple products. A single Modulus enclosure can include, for example, 35xx DSU/
CSUs, 326x dial modems, or 33xx leased-line modems in addition to 65xx nodes.
There are four types of Modulus enclosures. The Modulus 8 and Modulus 18
enclosures are older models; the Modulus 9 and Modulus 21 enclosures are newer
models that are based on the Modulus 8/18 enclosures.
Modulus 8
PLUS
Modulus 8 has 8 slots, holds four 6500
product cards, and supports up to 24
ports. It is designed to be a desktop unit.
Modulus 18
PLUS
Modulus 18 has 18 slots, holds eight 6500
product cards, and supports up to 48
ports. It is designed to be installed in an industry-standard 19-inch rack.
Modulus 9
Modulus 9 has 9 slots, holds four 6500
PLUS
product cards, and supports up to 24
ports. It is designed as a desktop unit.
Modulus 21
Modulus 21 has 21 slots, holds nine 6500
PLUS
product cards, and supports up to 54
ports. It is designed to be installed in an industry-standard 19-inch rack.
Note
Two processor cards are needed to support 54 ports.
Backplanes To accommodate the variety of products that you can install in Modulus enclosures,
VanguardMS has a line of product-specific backplanes to carry the signal and data
flow between the cards and the external environment and to provide cable
connections to the product card. Backplanes connect to the 6500
PLUS
cards on the
inside of the enclosure. Both the Modulus 8/18 and the Modulus 9/21 enclosures
have 25-pin DB25 connectors on the outside. (Older versions of Modulus 9/21
enclosures/backplanes have 26-pin DB26 connectors).
You can mount more than one backplane in a Modulus 8/18 and Modulus 9/21
enclosure to form independent nodes, but signals between backplanes cannot be
physically bridged. In other words, you cannot bridge two 24-port backplanes to
form a single backplane.
For general information on setting up Modulus 8/18 enclosures and inserting
PLUS
6500
cards into the enclosures, refer to the Modulus Planning and Installation
Guide (Product Code 80300). For Modulus 9/21 enclosures, see the Modulus 9 and
21 Installation and Operation Guide (Part No. 09564, Rev B).
About the 6500
PLUS
1-5
Page 14

Hardware
6500
PLUS
Processor Cards
Introduction The 6500
node. There are three types of processor cards:
•6505
•6507
•6525
Description 6500
PLUS
in sockets U79 and U80. The processor card cannot operate without SIMMs.
Each processor card has six ports. You can password protect all ports on the
PLUS
6505
also configure processor cards from a locally or remotely connected terminal.
PLUS
6505
Asynchronous
Access Server
The 6505
is based on the 6505
• Use only one 6505
• Increase the maximum number of ports to 24 by adding up to three
asynchronous I/O (AIO) cards.
• Have only two network ports per node; these must be Ports 1 and 2 of the
processor card.
• Have a maximum number of 23 DTE ports per node.
PLUS
processor card provides the main processing power in a 6500
PLUS
Asynchronous Access Server
PLUS
Multifunctional Access Server
PLUS
Network Concentrator
PLUS
processor cards are shipped with Single Inline Memory Modules (SIMMs)
and 6507
PLUS
PLUS
cards and all asynchronous ports on the 6525
is an asynchronous packet assembler/disassembler (PAD). If your node
PLUS
processor card, you can:
PLUS
processor card in each node.
PLUS
. You can
PLUS
6507
Multifunctional
Access Server
Note
You can use UIO cards in 6505
PLUS
nodes if the UIO is configured only for PAD
ports.
The 6507
(PAD). If your node is based on the 6507
PLUS
is a multifunction/multiprotocol packet assembler/disassembler
• Have up to two 6507
PLUS
processor card, you can:
PLUS
processor cards in each node.
• Have a maximum number of 24 ports per node (combination of processor
cards, AIO, or UIO cards).
• Have a maximum number of 4 network ports per node.
• Have a maximum number of 23 DTE ports per node.
• Optionally, configure ports to operate with network protocols (Frame Relay,
MX.25, XDLC), or with synchronous protocols (BSC 3270, BSC 2780,
SDLC). Any port can be configured as an asynchronous PAD port or to
operate with optional synchronous protocols.
1-6 About the 6500
PLUS
Page 15

Hardware
PLUS
6525
Network
Concentrator
Port
Configurations
6505
6507
A 6525
PLUS
is a multifunction/multiprotocol packet assembler/disassembler (PAD)
and X.25 switch. If your node is based on the 6525, you can:
• Have up to nine 6525
• Have a maximum number of 54 ports per node (combination of processor
cards, AIO, or UIO cards).
• Have a maximum number of 54 network ports per node.
• Have a maximum number of 53 DTE ports per node.
• Configure any or all ports as X.25, MUX, or PAD ports because the 6525
allows switching on all six ports. Optionally, you can configure ports to
operate with synchronous protocols (SDLC, BSC2780/3270, and so on).
PLUS
A 6500
node contains only one type of processor card. For example, a single
node may include up to nine 6525
6525
PLUS
and 6507
PLUS
processor cards. The following table shows the port
configurations available for the different processor cards.
Card Maximum Processor
Cards Per Node
PLUS
PLUS
1 PAD 50 bps to 38.4 kbps 1, 2, 3, 4, 5, 6
2 PAD 50 bps to 38.4 kbps 1, 2, 3, 4, 5, 6
PLUS
processor cards in a node.
PLUS
processor cards, but it cannot contain a mix of
Port
Port Speed Port
Type
MUX 1200 bps to 80 kbps 1, 2
X.25 1200 bps to 80 kbps 1, 2
Number
PLUS
PLUS
6525
*On 6507
9 PAD 50 bps to 38.4 kbps 1, 2, 3, 4, 5, 6
PLUS
and 6525
PLUS
if configured as X.25 ports.
MUX 1200 bps to 80 kbps 1, 2, 3, 4, 5, 6
X.25 1200 bps to 128 kbps,
optionally to 384 kbps
1, 2, 3, 4, 5,
6*
MUX 1200 bps to 80 kbps 1, 2, 3, 4, 5, 6
X.25 1200 bps to 128 kbps,
optionally to 384 kbps
1, 2, 3, 4, 5,
6*
cards, Ports 3, 4, 5, and 6 have a maximum port speed of 80 kbps
About the 6500
PLUS
1-7
Page 16
Hardware
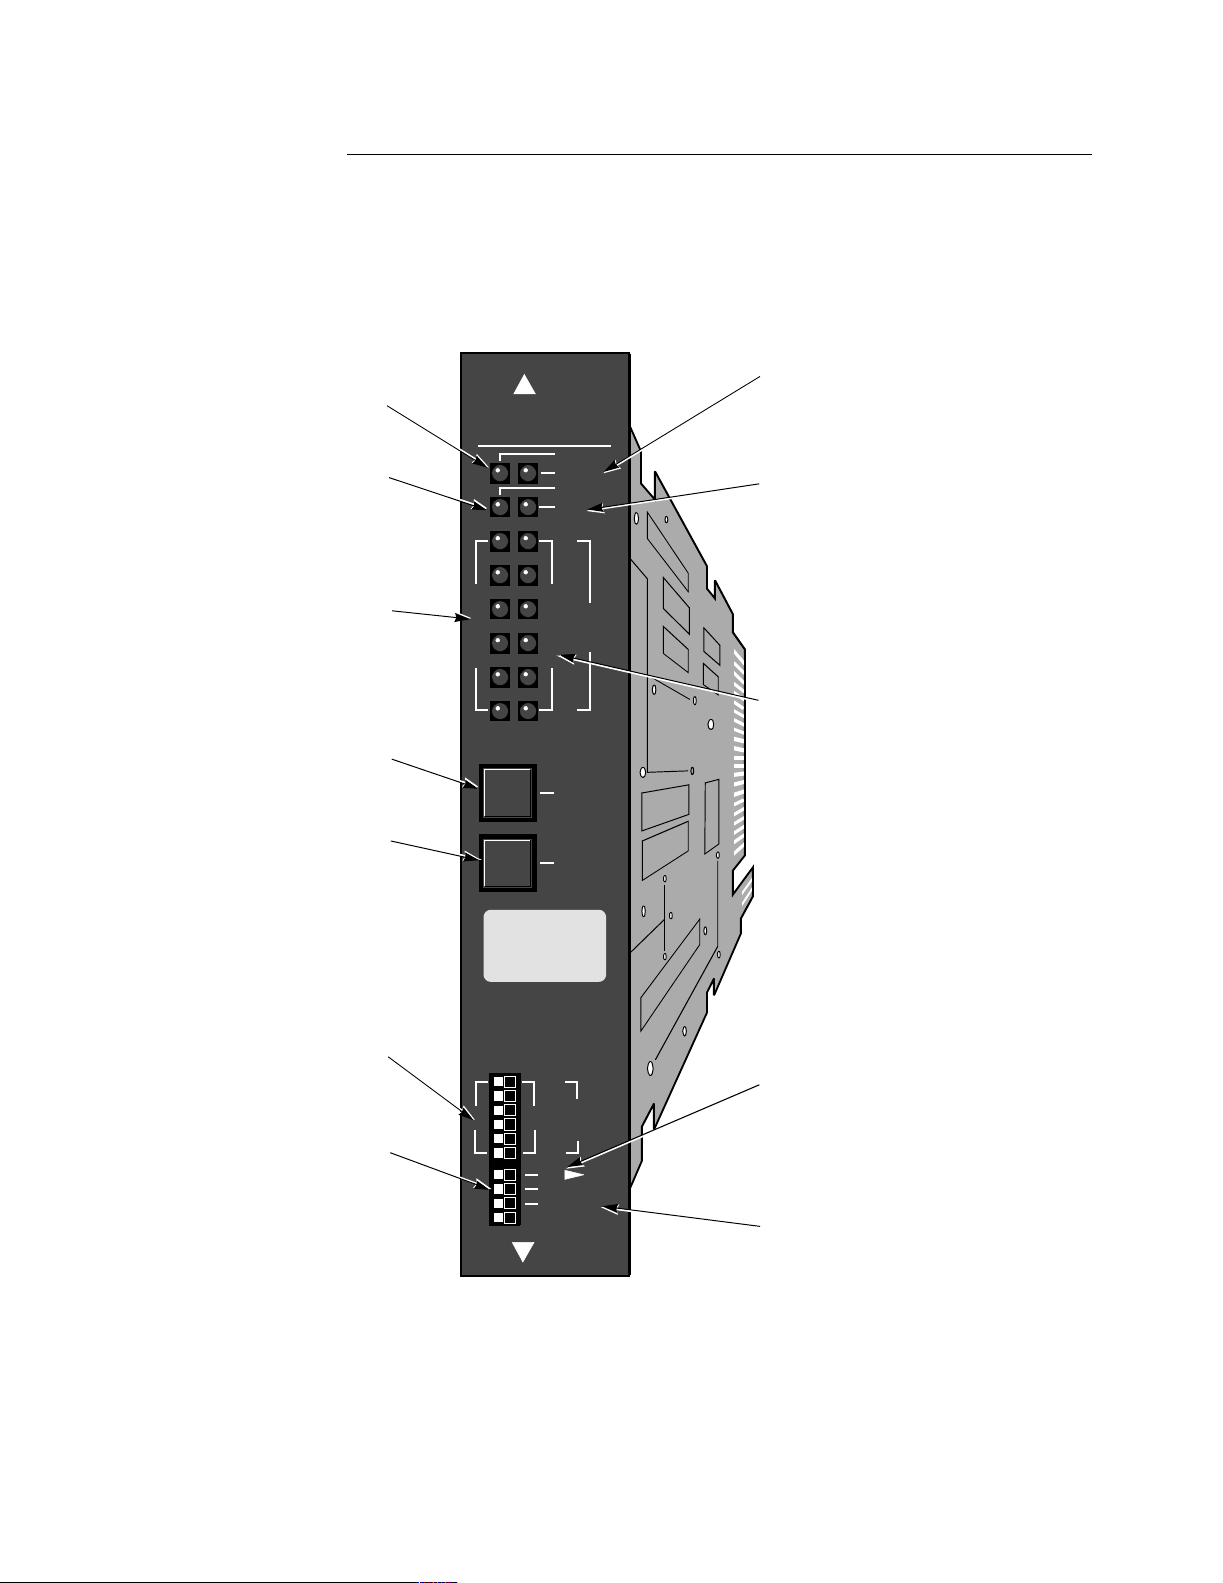
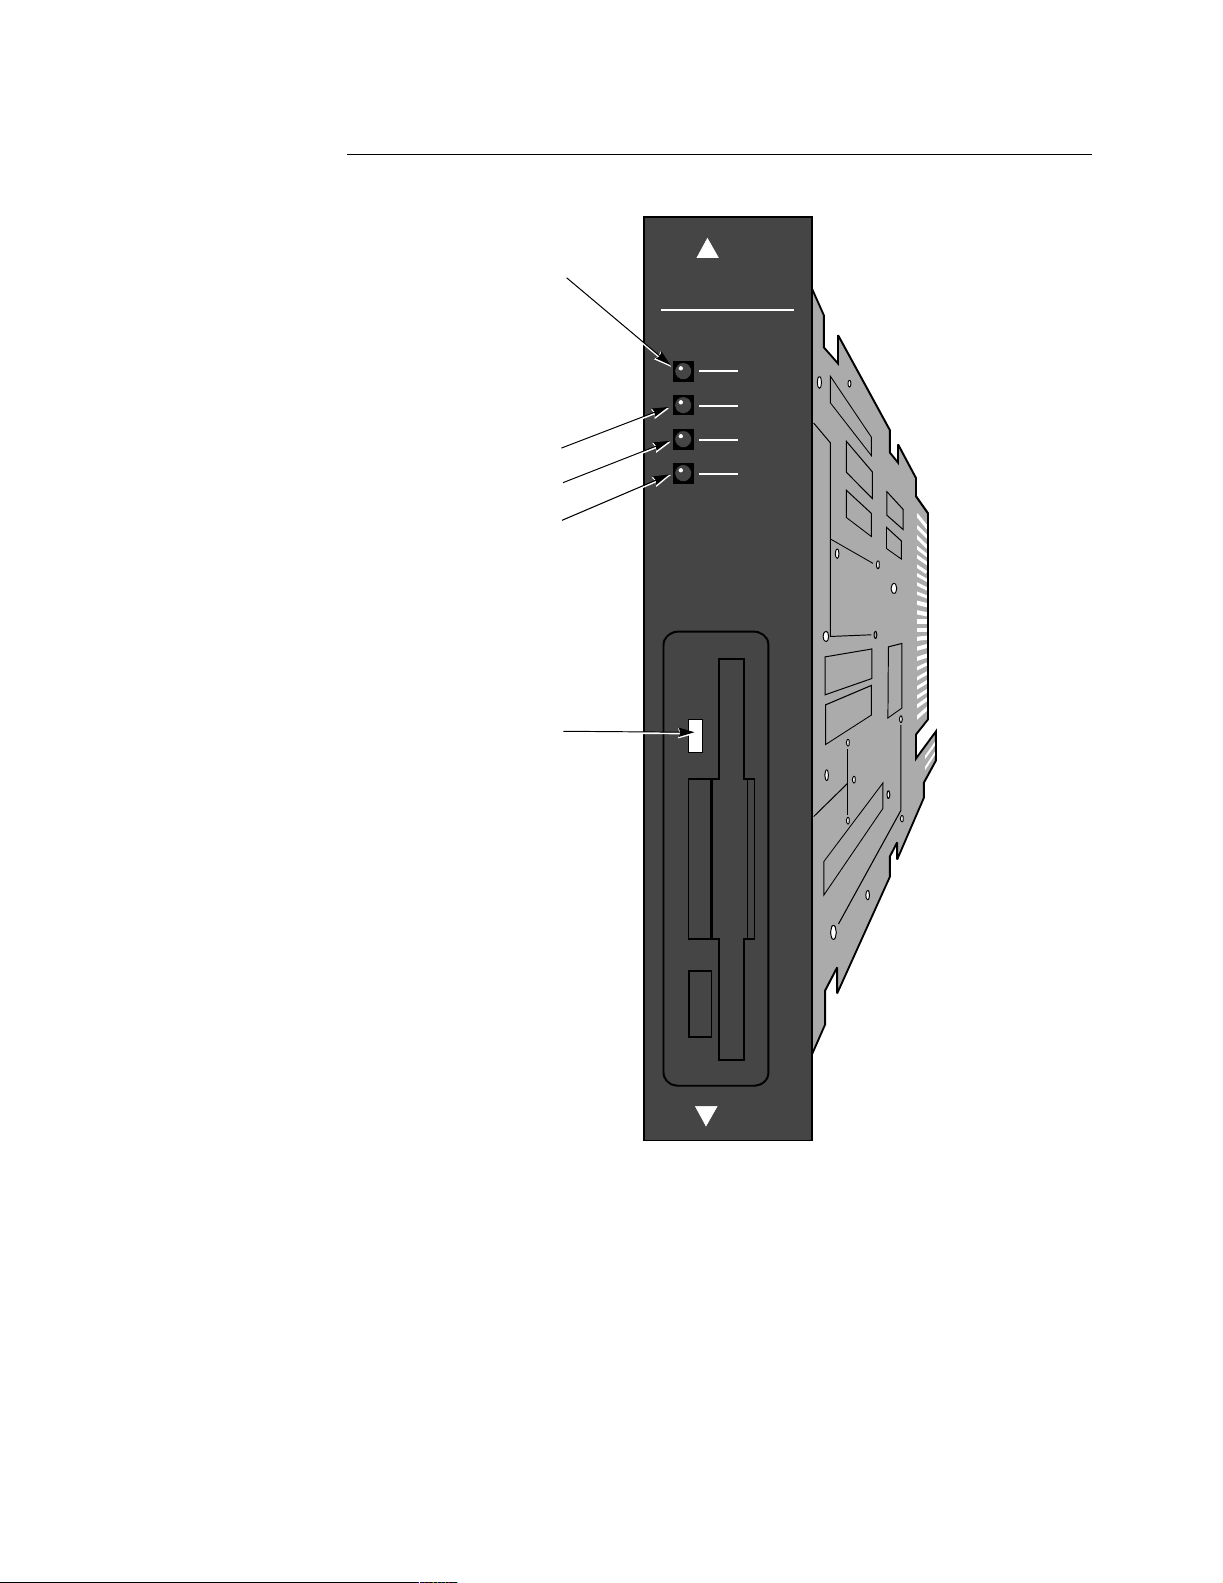
Processor Card Figure 1-3 shows the front panel display for the processor card. From the front panel,
you can reset the card, test the lights, and monitor data transmissions by observing
the lights.
Physically, the processor cards are identical. The ID Module of each processor card
(located in socket U40) is unique and provides the functions specific to each type of
processor card.
STATUS (Green)
POWER (Green)
On: Power on
Off: Power off
WATCHDOG (Red)
On: Processor failed to reset timer in
specified period, normally indicating
hardware or software failure.
(Press LAMP TEST to reset)
Off: Processor OK
DATA IN (Yellow)
On: Data entering port = SPACE
Off: Data entering port = MARK
RESET
Push button to initiate
hardware reset function.
6500 CPU PLUS
D
A
T
A
I
N
POWER
STATUS
WATCHDOG
TEST
1
2
D
A
3
T
A
O
U
4
T
5
6
RESET
P
O
R
T
On: Software running.
Off: Software not running (hardware fault).
Flashing: Software running and download
in progress.
TEST (Red)
Indicates status and result of test
affecting any part of the node. Tests
can be locally or remotely initiated.
On: Test failed.
Off: Normal condition.
Flashing: Test in progress.
DATA OUT (Yellow)
On: Data leaving port = SPACE
Off: Data leaving port = MARK
When switch is pressed, all lights
LAMP TEST
on front panel come on.
WATCHDOG light, if latched ON
due to previous failure, is cleared
when switch is released.
RI/TM
Set to RI position if port
is to emulate a dial modem;
otherwise, set to TM.
DIAG
Specifies how internal hardware
diagnostics will be implemented
when the node is powered on or reset.
Left: Diagnostics will run once.
Right: Diagnostics will run 10 times.
Figure 1-3. 6500
LAMP TEST
CAUTION
REMOVE LAN I/O CABLE,
REAR FASTENERS AND
FRONT FILLERS BEFORE
REMOVING THIS CARD.
1
2
P
R
I
3
T
M
4
5
6
CTP PT.6
DIAG.
DFLT NODE
P.C. 68700
LAN
COMPAT IBLE
O
R
T
CTP > PT 6
When set to left, port 6 is configured as defined
in node configuration. When set to right and node
is booted, port 6 becomes a default-configured
asynchronous port that can be used to call the
control terminal port facility.
DFLT NODE
To reset all configurable parameters to default
value, press RESET, set this switch to the right,
and press RESET again.
PLUS
Processor Card Front Panel
1-8 About the 6500
PLUS
Page 17

Hardware
Optional FLASH
Module
Optionally, a FLASH memory module can be attached to a processor card to provide
software distribution and software download capabilities. This optional daughtercard
contains up to 3 Mbytes of nonvolatile FLASH memory and is used for remote
software distribution and software download.
About the 6500
PLUS
1-9
Page 18

Hardware
6500
PLUS
Auxiliary Processor Cards
Introduction 6500
PLUS
nodes. They provide additional processing power, as well as six additional ports.
Description A 6500
a FLASH module, meaning that the card lacks software storage capabilities.
Optionally, you can purchase a FLASH module for a 6500
card for downloading software. The front panel is the same as the front panel of the
PLUS
6500
Note
You cannot use a 6500
card in a node and cannot install it in the lowest-numbered slot in the node.
The 6500
to increase node performance.
auxiliary processor cards increase throughput for 6507
PLUS
auxiliary processor card is a 6507
PLUS
or 6525
PLUS
PLUS
processor cards shown in Figure 1-3.
PLUS
auxiliary processor card as the primary processor
PLUS
auxiliary processor card is intended to be used for redundancy and
PLUS
and 6525
PLUS
processor card without
auxiliary processor
1-10 About the 6500
PLUS
Page 19

PLUS
6500
Asynchronous and Universal I/O Cards
Introduction Two types of I/O cards are:
• Asynchronous I/O (AIO)
• Universal I/O (UIO)
Hardware
AIO Card You can use an AIO card with all 6500
PLUS
processor cards. It provides six
asynchronous ports that can be configured as PAD ports. This card supports PAD
port speeds from 50 to 19200 bps and split speed operation (75 bps inbound and
1200 bps outbound) on all ports.
UIO Card You can use a UIO card with 6507
PLUS
and 6525
PLUS
cards. The UIO card provides
six asynchronous or synchronous ports. You can configure ports as X.25, MUX, or
PAD ports. Optionally, you can configure them to operate with synchronous access
protocols (SDLC, BSC3270, BSC2780/3780, and so on). This card supports PAD
port speeds from 50 to 19200 bps, and synchronous speeds from 1200 bps to 80
kbps.
Note
You can use UIO cards with 6505
PLUS
processors if you configure them only for
PAD ports.
Description The following table describes the characteristics of each card.
Card Type Works with... Port Types Split Speed
AIO • 6505
• 6507
• 6525
UIO • 6507
• 6525
• 6505
ports only
PLUS
PLUS
PLUS
PLUS
PLUS
PLUS
, if PAD
PAD Yes
•PAD
•MUX
•X.25
• optional
synchronous
protocols
No
About the 6500
PLUS
1-11
Page 20
Hardware
Front Panel Display Figure 1-4 shows the front panel display, which is the same for both types of I/O
cards.
.
6500 I/0
TEST (Red)
Indicates status and result of
test affecting any part of node. Tests
can be locally or remotely initiated.
On: Test failed
Off: Normal condition
Flashing: Test in progress
DATA OUT (Yellow)
On: Data leaving port = SPACE
Off: Data leaving port = MARK
On: Data entering port = SPACE
DATA IN (Yellow)
Off: Data entering port = MARK
TEST
1
2
D
A
T
A
I
N
D
A
3
T
P
A
O
O
R
U
T
4
T
5
6
Set to RI position if port
RI/TM
is to emulate a dial modem;
otherwise, set to TM.
Figure 1-4. 6500
R
I
PLUS
Universal I/O or Asynchronous I/O Card Front
1
2
P
3
T
O
M
R
4
T
5
6
P.C. 68904
Panel
1-12 About the 6500
PLUS
Page 21

6500
PLUS
Network Storage Option Card
Hardware
Introduction The 6500
support of large packet sizes.
NSO Card
Description
The NSO card has a 3.5-inch high-density floppy disk drive with a storage capacity
of 1.4 Mbytes (MS-DOS–formatted disks). The disk drive is used to download new
and optional software to the node. The card contains 1 Mbyte of DRAM, which can
be increased in 2-Mbyte increments to 5 Mbytes by inserting SIMMs.
The MEM lights on the front panel indicate the amount of NSO RAM used by the
system. A node with a lot of memory in the processor card may not use all the
memory in the NSO card. In this case, only some of the lights on the NSO card may
come on.
PLUS
network storage option (NSO) card expands basic node memory for
About the 6500
PLUS
1-13
Page 22
Hardware
NSO Card Figure 1-5 shows the NSO card.
Indicates status of internal tests.
TEST (Red)
On: Test failed
Off: Normal condition
Flashing: Test in progress
MEM (Yellow)
Indicates amount of memory
available on this card
MEM 1: 1 Mbyte RAM
MEM 3: 3 Mbyte RAM
MEM 5: 5 Mbyte RAM
DISK
On when disk is being accessed.
6500 NSO
TEST
MEM1
MEM3
MEM5
P.C. 68908
PLUS
Figure 1-5. 6500
Network Storage Option Card
1-14 About the 6500
PLUS
Page 23
Hardware
PLUS
6500
Token Ring Interface Module Option
Introduction The Token Ring Interface Module (TRIM) card is an option card that lets you route
LAN traffic through your network.
Features The TRIM card provides the following features:
• VanguardMS Periphery Routing
• One Token Ring LAN port operating over Shielded Twisted Pair (STP) or
Unshielded Twisted Pair (UTP) cable at 16 or 4 Mbps
• IBM-compatible Source Route Bridging support
• Support for up to 32 remote LAN bridge connections
• Capability for Frame Relay, X.25, MX.25, and/or XDLC network connections
for Token Ring LAN traffic
Description You can mount the TRIM card on 6507
PLUS
6505
cards) within a Modulus enclosure. The TRIM card is suitable only in a
PLUS
or 6525
PLUS
processor cards (not
Modulus enclosure. A single node can support just one TRIM card. Modulus 8 and
Modulus 9 enclosures can support one node containing a TRIM card. Modulus 18
and Modulus 21 enclosures can support a maximum of three nodes containing
TRIM cards.
The TRIM card provides one LAN port through its backplane; connection can be
made through either the unshielded twisted pair (UTP) or the shielded twisted pair
(STP) LAN connectors. All LAN configuration is performed through Control
Terminal Port (CTP) menus. See the Vanguard ONS Basics Protocols Manual
(T0106) for configuration information.
A PROM chip on the TRIM card provides the BIA (Burned In Address), the LAN
MAC address unique to that port. The BIA is the default value for the Port TMAC
Address (found in the Port configuration record).
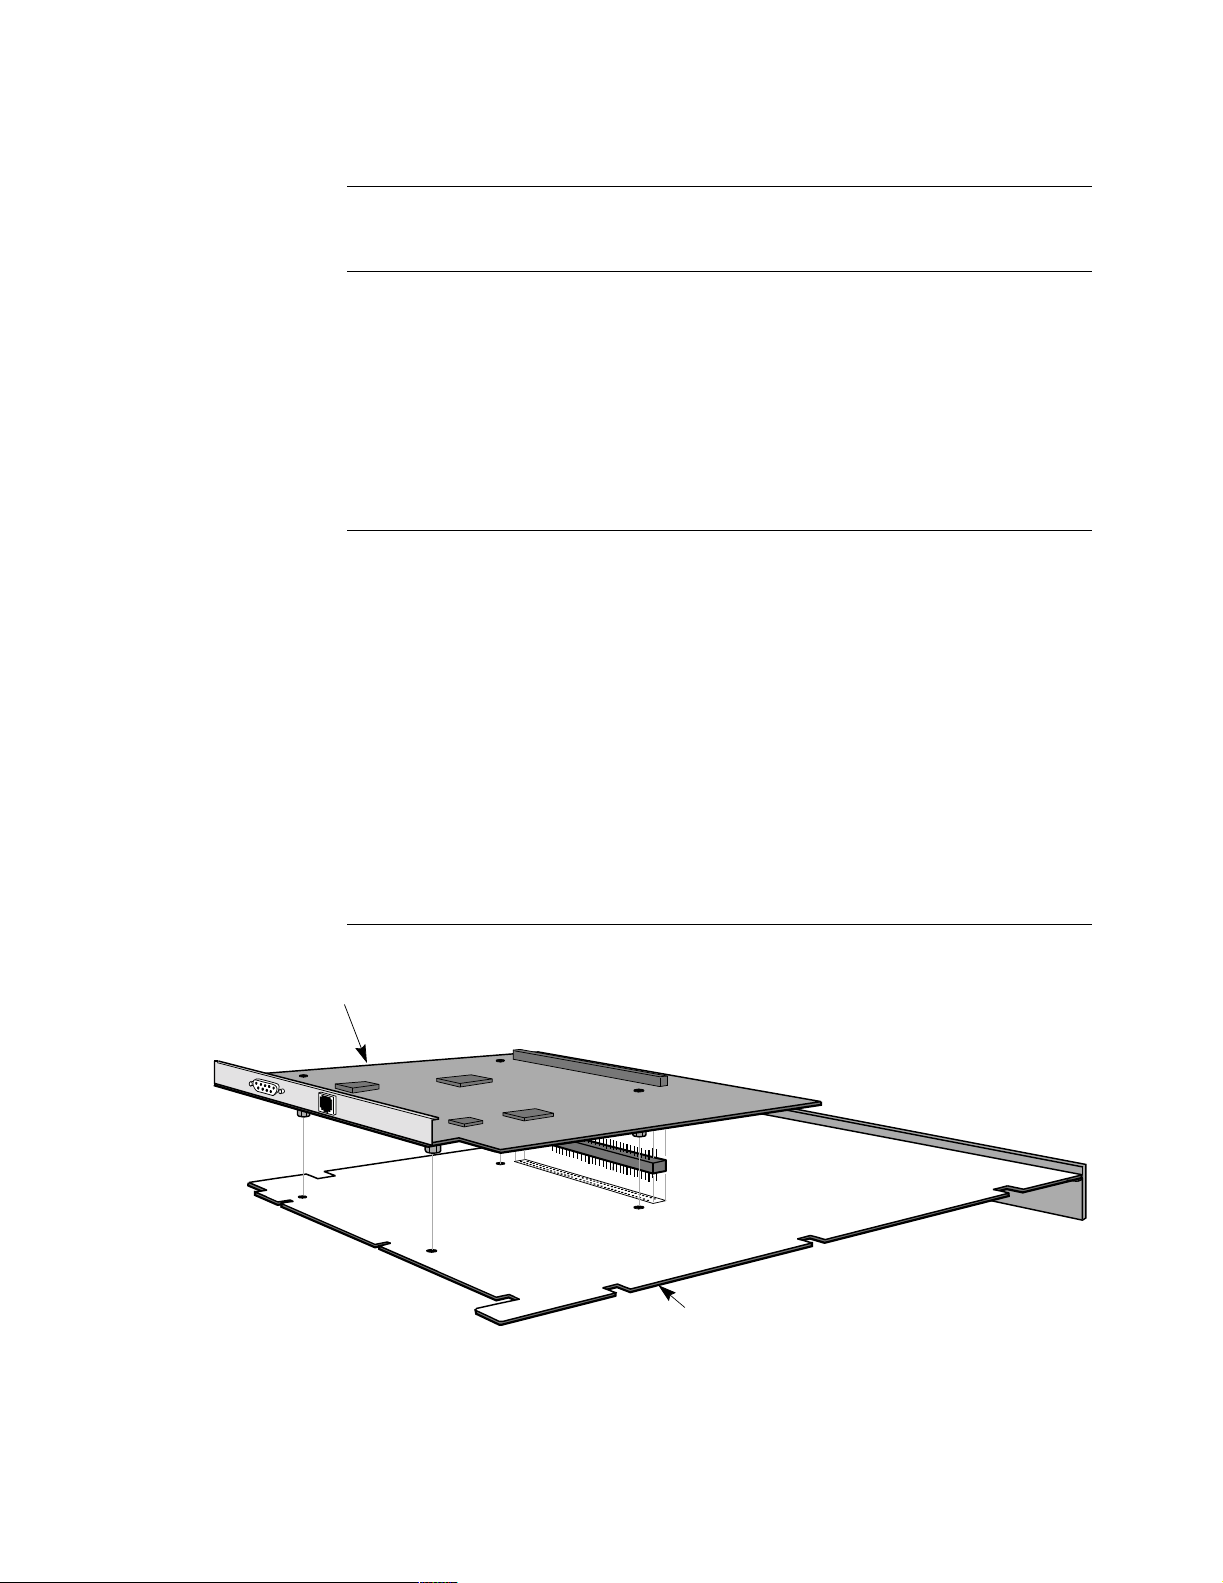
TRIM Card Figure 1-6 shows how the TRIM card is mounted on the processor card.
TRIM Card
About the 6500
Bottom of Card
Processor Plus Board
(Solder Side)
Figure 1-6. Token Ring Interface Module (TRIM) Card
PLUS
1-15
Page 24

Hardware
TRIM-Compatible
Processor Card
Upgrade
Not all 6500
PLUS
processor cards can support the TRIM card. A TRIM-compatible
processor card has a “LAN COMPATIBLE” marking on the lower front panel
(Figure 1-3). If your processor card does not have this marking, see your
VanguardMS Sales representative to order a LAN-capable processor card.
1-16 About the 6500
PLUS
Page 25
6500
PLUS
Integral DSU
Hardware
Introduction The 6500
PLUS
Integral DSU option is intended for use in installations
requiring connection to a DDS interface, conforming to AT&T 62310 or ANSI
T1E1.4/91-006, and running at a rate of 56 kbps. At present, this optional DSU
PLUS
interface is only available with VanguardMS 6500
enclosures using a 25-pin D
connector interface.
The DSU option normally uses clocking derived from the network interface, but may
also be configured to originate the clocking, thus providing the standard DSU and
CSU loopbacks. Installation of the DSU option requires a hardware and software
PLUS
product.
Hardware
Components
upgrade to the base 6500
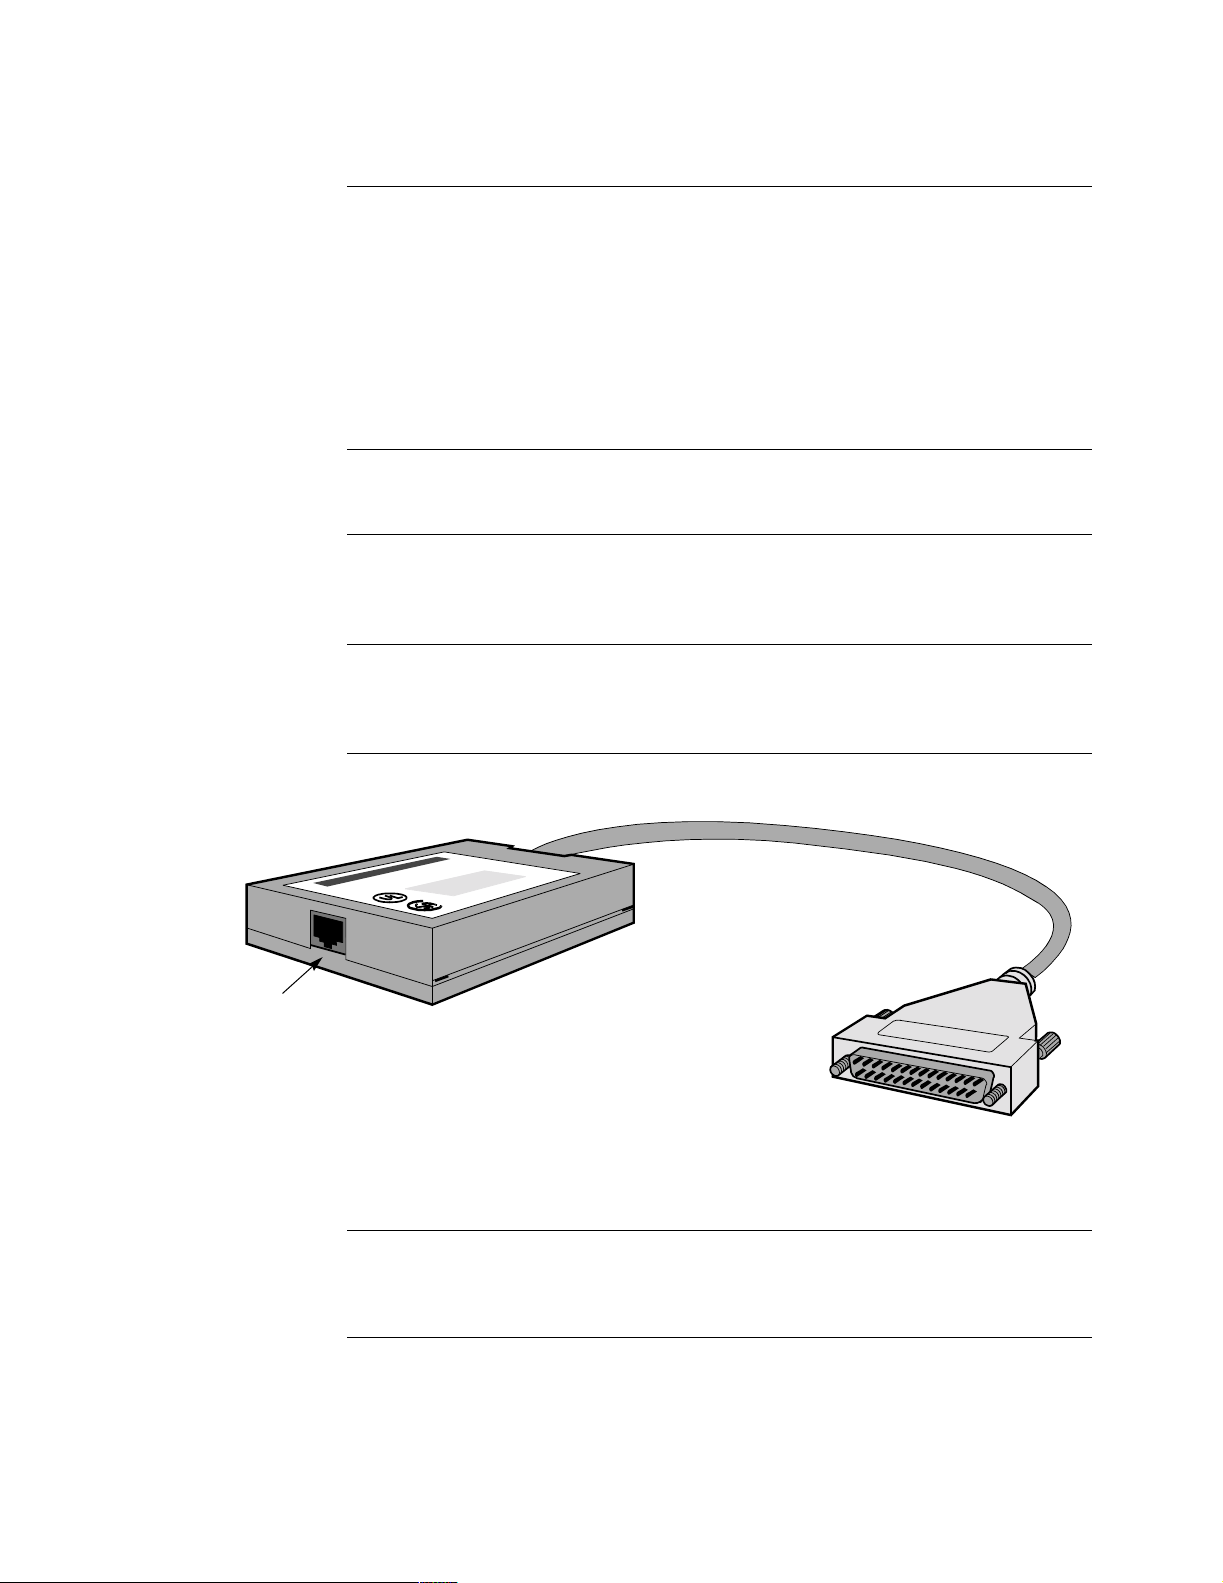
The DSU option consists of two hardware modules, the Data Interface Module
(DIM) and the External Interface Module (EIM).
DIM The DSU DIM is a small (approximately 1 in. x 3.5 in.) circuit card installed as a
PLUS
daughtercard onto the 6500
processor card. The DIM module provides the
proper power to the EIM and also performs the data translation functions.
EIM The EIM, shown in Figure 1-7, contains the telco interface circuitry portion of the
option.The EIM has an 18 in. cable with a 25-pin connection for interface with the
PLUS
6500
unit, and an RJ-48S jack for connection to the DDS line.
Example of an EIM Figure 1-7 shows the EIM.
18-inch Cable
RJ-48S Jack
DB25 Connector
Figure 1-7. External Interface Module (EIM)
DSU Interface The DIM and EIM modules work cooperatively to provide a DSU interface and must
be installed together for proper operation. These devices are only intended for use
with VanguardMS 6500
PLUS
equipment.
About the 6500
PLUS
1-17
Page 26

Page 27
Chapter 2
Installation
Overview
Introduction This chapter contains installation procedures for:
•6500
•6500
• Software options
This chapter also contains instructions for installing TRIM cards in Modulus
enclosures. For general information on setting up Modulus 8/18 enclosures and
inserting 6500
Installation Guide . For Modulus 9/21 enclosures, see the Modulus 9 and 21
Installation and Operation Guide.
Warning etc. The following special notices apply to all equipment handling procedures in this
chapter:
Be sure a power outlet is near the equipment and easily accessible.
PLUS
Series standalone enclosures
PLUS
processor card components
A description of the processor front panel LED power-up sequence and software upgrade procedures are also included.
PLUS
cards into the enclosures, refer to the Modulus Planning and
Warning
Only trained, qualified technicians should perform the installation and replacement
procedures in this chapter.
Caution
Ports that are capable of connecting to other apparatus are defined as SELV. To
ensure conformity with EN60950 — ensure that these ports are only connected to
ports of the same type on other apparatus.
PLUS
6500
discharge, which can damage components. Use proper handling and grounding
precautions whenever you handle a 6500
cards, DIMs, SIMMs, and FLASH modules are sensitive to static
PLUS
card.
Installation 2-19
Page 28
Installing Standalone Units
Installing Standalone Units
Introduction This section explains how to set up a 6500
receive the enclosure, it already contains a 6505
PLUS
standalone enclosure. When you
PLUS
, 6507
PLUS
, or 6525
PLUS
card.
Unpacking Before you unpack the 6500 standalone enclosure, check the outside of the package.
If the package is damaged, contact the shipping agent.
Site Preparation Install the standalone enclosure in a clean location free from shock, vibration, and
extremes of temperature and humidity. The site must meet the physical and
environmental requirements listed in Appendix B, Specifications. Be sure there is at
least 12 inches (30.5 cm) clearance at the rear of the unit for interface cabling and
ventilation.
Caution
Be sure that the standalone enclosure's air vents are uncovered. If the vents are
covered, the unit could overheat.
Example of
Standalone
Enclosure
Figure 2-1 shows a standalone enclosure.
Backplane
Processor Card with
6505, 6507, or
6525 ID Module
Clear Plastic Insulator
Power Supply
Screw
Door
Figure 2-1. Standalone Enclosure
2-20 Installation
Page 29
Installing Standalone Units
Installation
Procedure
The standalone enclosure already contains a 6505
PLUS
, 6507
PLUS
, or 6525
To install the unit, follow these steps:
Step Action Description/Result
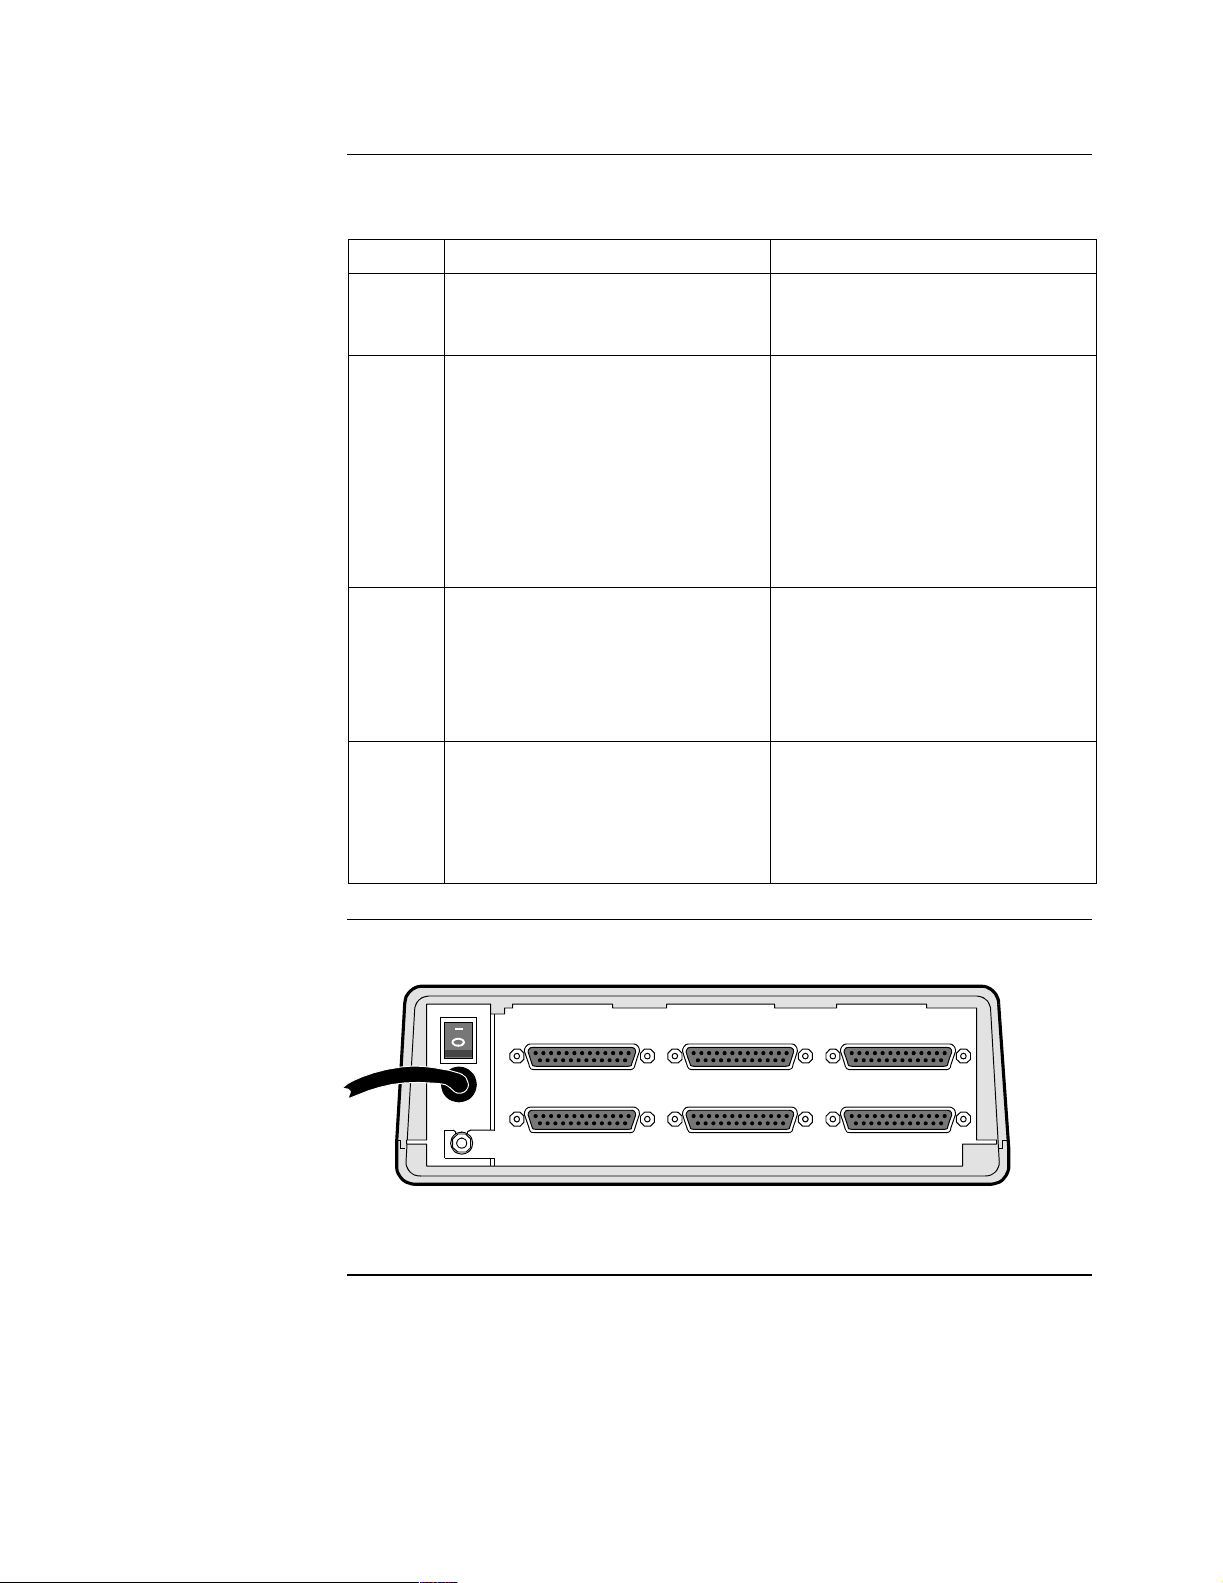
1 Place the unit at its designated site
and plug the power cord into a
The power cord is attached to the
back of the unit (Figure 2-2).
suitable primary power source.
2 Switch on the power, located at the
rear of the unit.
The front panel lights turn on
as described in the “Power-Up
Verification” section on
page 2-74.
After a few minutes, the green
STATUS light comes on to indicat e
the node is ready to process calls.
If this does not occur, call your
VanguardMS representative.
3 Configure the unit through the
Control Terminal Port (CTP)
menus.
To access the CTP, attach a
terminal to Port 6 with an EIA
232-D connector. Port 6’s default
settings are standard terminal port
values: 9600 baud, 8 data bits, 1
stop bit, no parity.
PLUS
card.
4 When the (*) prompt appears on
the terminal, type the following:
.
ctp <CR>
At the password prompt, press
<CR>
This is the default password value.
The Main menu appears. See the
Vanguard ONS Basics Protocols
Manual (T0106) for configuration
information.
Rear View Figure 2-2 shows the rear view of the standalone enclosure.
..
PORT 6 PORT 5 PORT 4
PORT 3 PORT 2 PORT 1
Figure 2-2. Rear View of Standalone Enclosure
Installation 2-21
Page 30

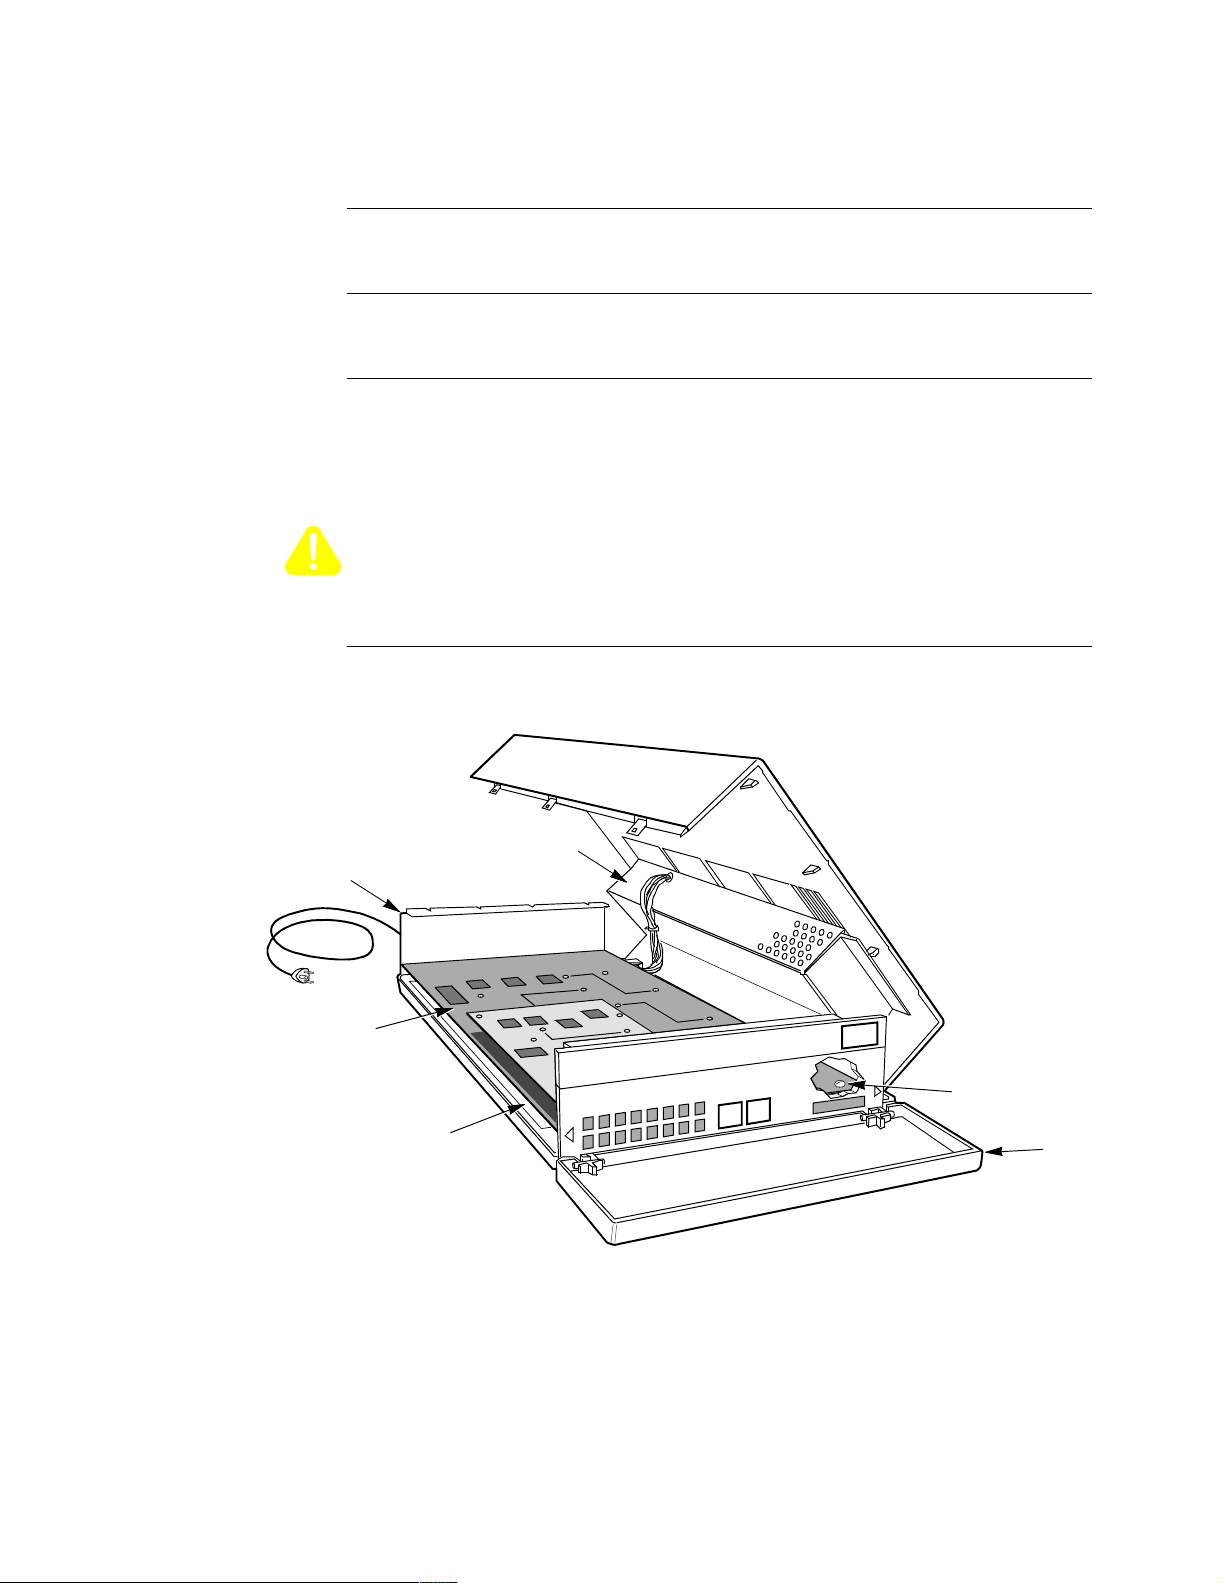
Installing Standalone Units
Replacing Processor Cards in Standalone Enclosures
Introduction This section describes how to replace a 6500
enclosure.
Warning
Before opening the enclosure, be sure that it is unplugged from the power source.
Caution
PLUS
Card Removal
Procedure
6500
damage components. Use proper handling and grounding precautions, including the
use of an anti-static grounding strap, whenever you handle a card.
To remove a processor card, follow these steps:
cards and their components are sensitive to static discharge, which can
Step Action
1 Open the front door of the enclosure and remove it by pressing down
on the hinges, as shown in Figure 2-3.
2 Turn over the enclosure so it is resting on its cover (Figure 2-4) and
locate the six locking tab slots (three on each side). There are four
locking clips (two in the front and two in the back) in the slots.
3 Using a small pair of pliers, remove the four locking clips from the
slots.
4 Using a small screwdriver or similar tool, press the locking tabs
inside the slots until they release (Figure 2-5).
PLUS
processor card in a standalone
5 On the rear panel above the power cable, loosen, but do not remove,
the locknut and washer.
6 Turn the enclosure over so it is upright. Tilt the cover clockwise
(when viewed from the rear) until you encounter resistance
(Figure 2-3).There is a cable connecting the power supply and the
backplane.
7 Reach into the enclosure and disconnect the power cable from the
backplane socket.
8 Remove the cover.
9 Using a screwdriver, remove the screw holding the card to the bottom
of the enclosure (Figure 2-6).
10 Lift the card and backplane out of the enclosure and carefully remove
the backplane from the card.
2-22 Installation
Page 31

Installing Standalone Units
Door Removal Figure 2-3 shows how to remove the door on the standalone enclosure.
Front Door
To remove door, separate mounting
tabs from base and remove.
Figure 2-3. Remove the Standalone Enclosure Door
Installation 2-23
Page 32

Installing Standalone Units
Enclosure Resting
on Cover
Squeeze
Figure 2-4 shows the bottom of the standalone enclosure.
Plastic Locking Clip
Locking Tab Slots
Locking Tab Slots
Figure 2-4. Bottom of Standalone Enclosure
2-24 Installation
Page 33

Locking Tabs Figure 2-5 shows how to release the tabs.
Installing Standalone Units
Figure 2-5. Using Screwdriver on Locking Tabs
Installation 2-25
Page 34

Installing Standalone Units
Retaining Screws Figure 2-6 shows the retaining screws on the processor card.
Front Spacer Panel
Retaining Screw
PLUS
6500
Processor Card
Backplane
Procedure to Add a
Replacement Card
Standalone Base
PLUS
Figure 2-6. 6500
Processor Card with Retaining Screw
Follow these steps to add a processor card to the standalone enclosure:
Step Action
1 Carefully insert the replacement card into the backplane's connector.
Be sure that the clear plastic insulator is in place, under the card.
When pressing the replacement card into the backplane connector,
use direct force. Wiggling the card may damage it.
The card's tabs and the backplane's connector are keyed, so you
cannot insert the card incorrectly.
2 From the old card, remove the spacer panel attached to the front
panel and mount it to the front panel of the new card (Figure 2-6).
3 Place the backplane and card into the bottom of the enclosure. Be
sure that the backplane and the card mounting hole are properly
aligned.
4 Secure the card to the enclosure using the retaining screw that held
the card to the bottom of the enclosure.
2-26 Installation
Page 35

Installing Standalone Units
Step Action
5 Take the enclosure cover and connect the power cable to the
backplane connector. Be sure to align the keyed pin on the cable to
the connector.
6 Align the enclosure cover and bottom, and press the two gently
together.
This requires alignment of the backplane and the locking tabs. Be
sure that the cables are not pinched between the enclosure and metal
parts. When all elements are correctly aligned, the locking tabs snap
into place.
7 Tighten the locknut and washer on the rear panel.
8 Insert the four locking clips into the slots.
9 Reinstall the door by gently pressing the hinge parts together.
After the card has been properly installed, reconnect the cables and
turn on the unit.
Installation 2-27
Page 36

Installing Nodes in Modulus Enclosures
Installing Nodes in Modulus Enclosures
Introduction Installing 6500
type of Modulus product card.
Additional
Information
For general information on setting up Modulus 8/18 enclosures, attaching product
backplanes, inserting cards, and attaching front and rear filler panels to the
enclosures, refer to the Modulus Planning and Installation Guide . For general
information about Modulus 9/21 enclosures, see the Modulus 9 and 21 Installation
and Operation Guide.
The following sections contain Modulus information specific to 6500
including multi-processor node information, TRIM card installation, and grounding
strap installation.
PLUS
cards into Modulus enclosures is the same as installing any other
PLUS
products,
2-28 Installation
Page 37

Multiprocessor Nodes
Installing Nodes in Modulus Enclosures
Introduction A node based on the 6507
one processor card to improve reliability and availability. The two processor cards
provide backup support to each other.
Multiprocessor
Node Example
Figure 2-7 shows a multiprocessor node where an enclosure is configured for two
PLUS
6507
Slot 1
Processor 1
or two 6525
Slot 2
Processor 2
PLUS
PLUS
or the 6525
cards.
Slot 3
Universal I/O 1
PLUS
processor card can contain more than
Slot 4
Universal I/O 2
Slot 5
Async I/O
Figure 2-7. Multiprocessor Node
Operation This is how a multiprocessor node operates under normal conditions, with both
processors working.
• Processor 1 handles the I/O interrupts from its own six on-board ports.
The processor card in the lowest-numbered slot is the master. In Figure 2-7,
Processor 1 is the master processor.
• Processor 2 handles its own on-board interrupts plus those from universal I/O
cards 1 and 2 and the asynchronous I/O card.
• If Processor 2 fails, the node restarts and Processor 2 is disabled. When a
processor card is disabled, interrupt requests generated by cards to the right
pass to the processor card on its left. While overall throughput is reduced,
links to the right of the failed processor are restored automatically.
Installation 2-29
Page 38

Installing Nodes in Modulus Enclosures
Replacing Master Processor of Multi-Processor Node
Introduction This section describes how to replace a failed master processor in a multiprocessor
node without losing your configuration.
Keeping the
Original Node
Configuration
Replacement of
Other Processor
Cards
Replace the Master
Processor
All processor cards in a node contain identical copies of CMEM. If the master
processor fails, you can keep the original node configuration and options if you:
• Replace the master processor with another processor card from the node
(preserving the configuration).
• Keep the ID Module of the original master, retaining the original SAKs for
the options you purchased.
To replace a processor card other than the master, remove the old processor card and
insert the new one. Be sure you use the correct type of ID Module (for example,
6505, 6507, or 6525). You do not have to change the configuration. When the node
starts up, the CMEM on the new processor card is loaded automatically with the
node configuration.
Note
All processor cards in a multiprocessor configuration must operate on the same
revision of software. If they do not have the same software revision, remove the
software from the failed processor card and exchange it with the software on the
spare card. All processor cards in a multiprocessor configuration must use the
same type of ID Modules—the node must be composed entirely of one type of
processor card (6505, or 6507, or 6525 cards).
Follow these steps to replace the master processor:
Caution
This procedure saves your configuration. If you do not use this procedure to replace
the master processor card, the default configuration is transferred to the other
processor cards in the node and you must reenter or download your configuration.
Step Action Result/Description
1 Remove the failed processor
card from the lowestnumbered slot in the node.
2 Exchange the ID Module and
the CMEM chip between the
failed master processor card
and the new processor card.
3 Install the new processor card
into the lowest-numbered slot.
4 Boot the node.
2-30 Installation
See the “Replacing ID Modules” section
on page 2-63 and “Replacing the
CMEM Chip” section on page 2-65 for
instructions. Return the failed card to
your VanguardMS Service representative.
This will now be the master processor.
Page 39

Installing Nodes in Modulus Enclosures
Installation 2-31
Page 40

Installing Nodes in Modulus Enclosures
Adding a Secondary 6500
Introduction When adding another 6500
cards are running the same software revision. 6500
PLUS
Processor with FLASH
PLUS
processor card to a node, be sure that all processor
PLUS
within a network may contain different revisions of software.
When To Add
Another Processor
with FLASH
Two situations in which you may add an additional 6500
FLASH memory to a node are when you want to:
• Maintain the current software revision
• Upgrade with software from the new 6500
PLUS
In both cases, the FLASH Enable Option is required.
These situations apply to the 6507
PLUS
and 6525
PLUS
nodes. A 6505
not support multiple processor cards.
Before You Begin Follow these steps to access the control terminal port:
Step Action Result/Description
1 Connect a terminal to a local PAD
port, and enter the following at the
(*) prompt:
.ctp <CR>
processor cards redistributed
PLUS
processor card with
processor card
PLUS
node does
2 Enter the password when you are
prompted.
The default password is <CR>.
After you enter the password, the
Main menu appears.
For more information about
accessing the CTP, see the
Vanguard ONS Basics Protocols
Manual (T0106).
2-32 Installation
Page 41

Installing Nodes in Modulus Enclosures
Maintaining the
Current Software
Revision
Follow these steps to add a processor card with FLASH memory to your node and
download the current software revision to the new processor’s FLASH memory:
Step Action
1 At the control terminal port, use the Node Statistics to confirm that the
node is running software from RAM and that FLASH is enabled.
If FLASH is disabled, enable FLASH by doing the following:
a) Select FLASH Memory from the Main menu
b) Select Enable FLASH.
2 Install the new processor card in any slot on the node to the right of the
master processor.
3 At the control terminal:
a) Select FLASH Memory from the Main menu.
b) Select Copy Software to FLASH.
It may take several minutes to load the software
4 After the software has been written to the FLASH, check the Node
Statistics to see that all FLASH cards in the node contain the same
revision of software.
Software
Distribution
When Software is
Unavailable
Generally, software distribution is managed from a central site. The Network
Manager configures and initiates software updates as required.
You can upgrade with software from the new processor card when the software is
unavailable elsewhere in the network by:
• Adding a secondary processor with FLASH memory to your node
• Making the software in the new processor’s FLASH the operating revision of
software in the node
• Retaining the node’s configuration and options
Installation 2-33
Page 42

Installing Nodes in Modulus Enclosures
Upgrading with
Software From the
New Processor
Card
Follow these steps to ensure that the node’s configuration is not lost. If you do not
follow this procedure, CMEM will be overwritten.
Step Action
1 At the control terminal, use the Node Statistics to confirm that the node
is running software from RAM and that FLASH is enabled.
If FLASH is disabled, enable FLASH by doing the following:
a) Select FLASH Memory from the Main menu
b) Select Enable FLASH.
2 Remove the master 6500
PLUS
processor card (in lowest-numbered slot).
3 Exchange the ID Module and CMEM chips between the master
6500
PLUS
processor card and the new 6500
PLUS
processor card.
See the “Replacing ID Modules” section on page 2-63 and “Replacing
the CMEM Chip” section on page 2-65 for instructions.
4 Install the new 6500
PLUS
processor card in the lowest-numbered slot
and install the former master processor card in the slot to the right.
5 At the control terminal, use the Node Statistics to confirm that the node
is running the new software.
If the new software is not running, the FLASH memory may not have
been enabled on the new processor card. Enable the FLASH memory
and cold boot the node to force loading from FLASH memory.
6 At the control terminal:
a) Select FLASH Memory from the Main menu.
b) Select Copy Software to FLASH.
2-34 Installation
Page 43

Installing/Replacing Processor Cards
Installing Nodes in Modulus Enclosures
Introduction You can insert and remove any 6500
nest without damage.
Caution
PLUS
Replacement
Procedure
Replacing a Card in
a Modulus 8/18
Enclosure
6500
damage components. Use proper handling and grounding precautions, including the
use of an anti-static grounding strap, whenever you handle a card.
After inserting or removing a card, press the Reset button on the 6500
card to restart the node. Reboot the node.
When replacing a card in a Modulus 8/18 enclosure, refer to the Modulus Planning
and Installation Guide. When replacing a card in a Modulus 9/21 enclosure, refer to
the Modulus 9 and 21 Installation and Operation Guide.
cards and their components are sensitive to static discharge, which can
PLUS
processor card from a powered-up Modulus
PLUS
processor
Installation 2-35
Page 44

Installing Nodes in Modulus Enclosures
Requirements for Installing a TRIM Card
Introduction This section describes the requirements for installing a TRIM card. TRIM cards are
suitable only in a Modulus enclosure and only with 6507
A 6500
PLUS
node can support only one TRIM card. Modulus 8 and Modulus 9
PLUS
and 6525
PLUS
cards.
enclosures can support just one node containing a TRIM card. Modulus 18 and 21
enclosures can support up to three nodes containing TRIM cards.
TRIM Card Upgrade
Kits
Product
The following product codes allow you to upgrade your system for LAN
compatibility:
Product Description
Code
68517 LAN Bridging Software Authorization Key
Accesses the LAN bridging software.
(SAK)
68505 TRIM Card Provides just the Token Ring Interface
Module card.
68506 6500
upgrade.
PLUS
LAN compatible processor card
Provides a LAN compatible 6500
processor card with TRIM card already
PLUS
attached.
68507 Modulus 9/21 12-port TRIM Package Includes a TRIM card, a Modulus 9/21 12-
port backplane, and front and rear filler panels.
68514 Modulus 18 RFI Suppression Screen Required for Modulus 18 installations.
68516 6500
PLUS
TRIM Installation Kit for Modulus
9/21 Enclosures
Provides the front and rear filler panels
needed when you install a TRIM card into
the Modulus 9/21 nest.
68518 6500
PLUS
TRIM Installation Kit for Modulus
8/18 Enclosures
Provides the front and rear filler panels used
when installing a TRIM card into the
Modulus 8/18 nest.
68520 Modulus 21 RFI Suppression Bar Required for Modulus 21 installations.
TRIM-Compatible
Processor Card
Not all 6500
supports a TRIM card has a “LAN COMPATIBLE” label on the lower front panel.
TRIM cards can be physically mounted on all 6500
PLUS
processor cards can support the TRIM card. A processor card that
PLUS
processor cards, but work
only with cards marked “LAN COMPATIBLE.” If your processor card does not
have this marking, see your VanguardMS sales representative to order a LANcapable processor card.
In multiple-CPU configurations, only the processor card supporting the TRIM card
needs to be LAN-compatible.
2-36 Installation
Page 45

Installing Nodes in Modulus Enclosures
Modulus 8/18 Nests The TRIM card has its own backplane and attaches to the solder side of the 6500
processor card. The TRIM card requires two Modulus slots. The TRIM filler panel
for Modulus 8/18 nests is two slots wide as shown in Figure 2-8.
65xx 18-Port Backplane
Rear View
Attach backplane using a
Phillips-head screwdriver.
Shielded
Twisted Pair
Unshielded
Twisted Pair
TRIM Card
Filler Panel for
Modulus 8/18
Use flat-head
screwdriver to
attach captive
hardware.
PLUS
Figure 2-8. TRIM Card Rear Filler Panel for Modulus 8/18 Enclosures
Installation 2-37
Page 46

Installing Nodes in Modulus Enclosures
Guidelines for
Installing a TRIM
Card in a Modulus
8/18
Consider the following if you install a TRIM card in a Modulus 8/18 enclosure:
Note
Before you add a TRIM card to an existing node, be sure the enclosure has room
for it as described above. To make space, you may need to rearrange cards and
backplanes, which requires a node shutdown first.
• A processor card with attached TRIM card requires four slots — two slots for
the TRIM card and two for the processor card.
• You can attach a TRIM card only to the processor card in the
lowest-numbered slot of a backplane (this is the master processor
in a multi-processor node).
• There must be two empty slots beside the backplane next to the
lowest-numbered processor card.
• The TRIM card rear filler panel covers the back of the two slots taken by the
TRIM card. This rear panel, which has a cutout for the LAN port connectors,
covers the TRIM card backplane (Figure 2-8). Two standard Modulus 8/18
front filler panels cover the front of the TRIM card’s slots (Figure 2-9).
• When installing in a Modulus 18 enclosure, a metal screen must be installed
onto the Modulus 18 door to meet FCC requirements. See the “Preparing
Modulus Enclosures for RFI Suppression” section on page 2-49.
2-38 Installation
Page 47

Installing Nodes in Modulus Enclosures
d
Modulus 18 Figure 2-9 shows the TRIM card spacing in a Modulus 18 enclosure.
Modulus 18-Slot Nest
Top View
Note: 6500
PLUS
installed in left-
most position in Modulus
18. The TRIM card requires
two slots for its backplane.
TRIM
Card
TRIM Card Filler Panel
123456 987101112
Slots
6500 No
e 18-Port Backplane
13 14 15 16 17 18
Modulus 8/18
Front
Processor Card
Filler Panels
TRIM Card Filler Panel
Slots
123456 987 101112131415161718
6500 Node 18-Port Backplane
Note: 6500
PLUS
installed to the
left or right of a product
backplane in Modulus 18.
The TRIM card requires
two slots for its backplane.
Front
Modulus 8/18 Filler Panel
Processor Card
TRIM
Card
Figure 2-9. TRIM Card Spacing in a Modulus 18 Enclosure
Installation 2-39
Page 48

Installing Nodes in Modulus Enclosures
Modulus 9/21 Nests The TRIM card has its own backplane and attaches to the solder side of the 6500
processor card. The TRIM card requires two Modulus slots. The TRIM filler panel
for Modulus 9/21 nests is one slot wide as shown in Figure 2-10.
Modulus 9 Rear View
TRIM Card
Filler Panel for
Modulus 9/21
Shielded
Twisted Pair
65xx
18-Port
Backplane
Unshielded
Twisted Pair
TRIM Card
Filler Panel for
Modulus 8/18
PLUS
Guidelines for
Installing a TRIM
Card in a Modulus
9/21 Enclosure
Use flat-head
screwdriver to
attach captive
hardware.
Figure 2-10. TRIM Card Rear Filler Panel for Modulus 9/21 Enclosures
Consider the following if you install a TRIM card in a Modulus 9/21 enclosure:
Note
Before you add a TRIM card to an existing node, be sure the enclosure has room
for it as described above. To make space, you may need to rearrange cards and
backplanes, which requires a node shutdown first.
• A processor card with attached TRIM card requires four slots — two slots
each for the TRIM card and the processor card.
• The TRIM card attaches only to the processor card in the lowest-numbered
slot of a backplane (this is the master processor in a multi-processor node).
• When installing in a Modulus 21, install a horizontal bar on the front door to
meet FCC requirements.
2-40 Installation
Page 49

Installing Nodes in Modulus Enclosures
• To install a node with a TRIM card in the left-most position of a nest, attach
the backplane at Slot 3 of the nest. Insert the TRIM/processor card into Slot 3.
The TRIM card takes up Slot 2 and Slot 1 (the width of the card does not
permit it to be installed in Slot 1). The TRIM card rear filler panel, which has
cutouts for the LAN port connectors, covers the backplane in Slot 2; a standard Modulus 9/21 rear filler panel covers the back of Slot 1. Two standard
Modulus 9/21 front filler panels cover Slots 1 and 2 at the front of the nest.
• If there is a product in the nest, such as a modem, that consists of a one-slot
wide product card plugged into a two slot-wide backplane, then one slot can
be saved when installing a TRIM. The modem product should be installed to
the left of the TRIM card.
• To install a node with a TRIM card next to another product backplane,
leave one slot empty between backplanes. Modulus 9/21 product backplanes
take one slot in addition to what their product cards take. For example, a 54port backplane takes up 19 slots, although its nine cards take up 18 slots (two
slots per card). The TRIM backplane fills the one slot between the two
backplanes. The TRIM card itself fills the one slot gap and one slot from the
adjacent backplane. Two standard Modulus 9/21 front filler panels cover the
front of the TRIM card’s slots in Modulus 9/21 enclosures (Figure 2-12). This
works only if a one-slot card is installed to the left of the node.
Installation 2-41
Page 50

Installing Nodes in Modulus Enclosures
TRIM Card in LeftMost Position
Figure 2-11 shows the TRIM card in the left-most position of the Modulus 21
enclosure.
Modulus 21-Slot Nest
Top View
Modulus 9/21
Filler Panel
TRIM
Card
Modulus 9/21 TRIM Card Filler Panel
123456 987 101112131415161718
Slots
6500 Node 54-Port Backplane
19 20 21
Front of Nest
Modulus 9/21 Filler Panels
Note: TRIM card installed in left-most position in Modulus 21.
The TRIM card requires two slots for its backplane.
Processor Card
Figure 2-11. TRIM Card In Left-most Position of Modulus 21 Enclosure
2-42 Installation
Page 51

Installing Nodes in Modulus Enclosures
TRIM Card
Between Two
Backplanes
Figure 2-12 shows A TRIM card between two backplanes in Modulus 21.
Modulus 21-Slot Nest
Top View
3360 Modem
Backplane
3360 Modem
Card
TRIM
Card
9/21Trim Card Filler Panel
123456 987101112
Slots
6500 Node 54-Port Backplane
13 14 15 16 17 18
19 20 21
3360 Modem
Front Panel
Modulus 9/21 Filler Panels
Front
Figure 2-12. TRIM Card Between Two Backplanes In Modulus 21
Backplane Support
for TRIM Cards
The following table lists the backplanes capable of supporting TRIM cards. Modulus
18 and 21 enclosures support a maximum of three TRIM cards, but the actual
number of nodes with TRIM cards depends on the sizes of the enclosures and
backplanes you choose.
Enclosure 6507
PLUS
6525
PLUS
Modulus 8 6-,12-, and 18-port backplanes 6-,12-, and 18-port backplanes
Modulus 18 6-,12-,18-, and 24-port backplanes 6-,12-,18-, 24-, 36- and 48-port
backplanes
Modulus 9 12- and 18-port backplanes 12- and 18-port backplanes
Modulus 21 12-,18-, and 24-port backplanes 12-,18-, 24-, 36-, and 54-port
backplanes
Installation 2-43
Page 52

Installing Nodes in Modulus Enclosures
2-44 Installation
Page 53

Installing Nodes in Modulus Enclosures
Installing and Connecting a TRIM Card
Introduction This section describes how to install a TRIM card in a 6500
Caution
PLUS
Steps for Installing
a TRIM Card
Attaching a TRIM
Card
6500
damage components. Use proper handling and grounding precautions, including the
use of an anti-static grounding strap, whenever you handle a card.
To install a TRIM card, perform the following steps:
1) Attach the TRIM card if it is not already attached when it arrives from the
2) Install the processor card into the modulus nest.
3) Connect the LAN cables.
Note
Depending on the product code you have ordered, your TRIM card may arrive
already attached to the processor card. If this is the case, skip to the next section,
“Installing and Connecting a TRIM Card.” Otherwise, follow these steps:
cards and their components are sensitive to static discharge, which can
factory.
In multiple-CPU configurations, only the processor card supporting the TRIM
card needs to be LAN-compatible.
PLUS
node.
Step Action
1 Follow the Modulus space considerations described in previous sections.
2 Attach the TRIM rear filler panel to the enclosure.
• If you are installing the TRIM card in a Modulus 8/18 enclosure,
use a Phillips-head screwdriver to attach the TRIM rear filler
panel to the backplane with the four screws provided
(Figure 2-8).
• If you are installing the TRIM card in a Modulus 9/21 enclosure,
use a flat-head screwdriver to attach the captive screws on the top
and bottom of the rear filler panel to the backplane (Figure 2-10).
Attach a standard Modulus rear filler panels as needed.
3 Attach the header pins to the TRIM card. Insert the header pins in the
socket so that the four pins without ferrite beads face the top of the
processor card (Figure 2-13).
The pins should seat firmly into the socket; do not bend them.
4 Turn the 6500
PLUS
processor card so that its solder side faces upward.
Insert the header pins into the socket on the processor card, being careful
not to bend the pins (Figure 2-13).
Be sure to support both the TRIM and processor cards while pressing
them together to avoid bending and thereby possibly damaging the
processor card.
5 On the component side of the processor card, screw the four fastener
screws into the standoffs on the TRIM card (Figure 2-13).
Installation 2-45
Page 54

Installing Nodes in Modulus Enclosures
Installing and
Connecting a TRIM
Card
Follow these steps to install and connect the TRIM card:
Step Action
PLUS
1 Insert the 6500
processor/TRIM card combination into the lowest-
numbered slot of the node backplane.
You can insert the processor/TRIM card combination in a powered-on
nest. However, power to other cards in the nest may be disturbed
because of the inrush of current to the TRIM card.
2 Using a flat-head screwdriver, attach the captive screws on the TRIM
rear panel to the TRIM card backplane (Figure 2-10).
3 Attach two Modulus front filler panels to the front of the slots filled by
the TRIM card.
4 The TRIM card supports only one LAN connection. Use either the
DB9 or the RJ45 connector to make the LAN connection, but do not
attach cables to both.
• If your LAN cable is an STP cable, attach it to the DB9
connector at the back of the TRIM card.
• If your LAN cable is a UTP cable, attach it to the RJ45
connector at the back of the TRIM card.
• If you are installing the TRIM card in a Modulus 21
enclosure, install the RFI suppression bar across the front
door of the enclosure. See the Preparing Modulus Enclosures
for RFI Suppression section.
• If you are installing a TRIM card in a Modulus 18 enclosure,
attach the RFI suppression screen to the inside of the front door.
See the “Preparing Modulus Enclosures for RFI Suppression”
section on page 2-49. The suppression screen replaces the
suppression bars.
2-46 Installation
Page 55

Installing Nodes in Modulus Enclosures
Attaching the TRIM
Card
Trim Card
Standoff
Fastener Screw
Place the 4
non-ferrite pins toward
top of processor card.
Figure 2-13 shows the attachment of the TRIM card to the processor card.
Trim Card
Interboard
Connector System
Header Pins
Bottom of Card
CPU Plus Board
(Solder Side)
Ferrite
Figure 2-13. Attaching the TRIM Card to the Processor Card
Attaching the
Cables
The LAN port is Port 55, regardless of how many active X.25, PAD, or MUX ports
are in your node. To configure the LAN port and for information about LAN
statistics, see the Vanguard ONS Basics Protocols Manual (T0106).
Installation 2-47
Page 56

Installing Nodes in Modulus Enclosures
Removing/Replacing TRIM Cards
Introduction This section describes the removal and replacement of TRIM cards.
Caution
6500 cards and their components are sensitive to static discharge, which can damage
components. Use proper handling and grounding precautions, including the use of an
anti-static grounding strap, whenever you handle a card.
Before Removing
TRIM Cards
Removing the
TRIM/Processor
Card
Before removing the TRIM card from the Modulus enclosure, disconnect the LAN
cable and detach the TRIM rear filler panel from the TRIM card backplane.
Failure to do so could damage the LAN cable or the TRIM card. The following
caution label on the processor card is a reminder:
“REMOVE LAN I/O CABLE, REAR FASTENERS AND FRONT FILLERS
BEFORE REMOVING THIS CARD.”
Follow these steps to remove the TRIM/processor card from the nest:
Step Action
1 Detach the LAN cable from the backplane.
2 Using a flat-head screwdriver, unscrew the captive hardware that
attaches the TRIM card rear filler panel to the TRIM card backplane.
3 Detach the two Modulus front filler panels that cover the TRIM card.
4 Pull out the TRIM/processor card. When detaching a TRIM card from
its processor card, follow the procedures in “Installing and Connecting
a TRIM Card” section on page 2-45 in reverse order.
• If you are removing or replacing a card in a Modulus 8/18
enclosure, refer to the Modulus Planning and Installation
Guide.
• If you are removing or replacing a card in a Modulus 9/21
enclosure, refer to the Modulus 9 and 21 Installation and
Operation Guide.
Updating LAN Port
MAC Address
2-48 Installation
The BIA (Burned In Address) is a unique LAN MAC address that is supplied by a
PROM chip on the TRIM card. The BIA is used as the LAN port MAC address if the
Port MAC Address parameter (in the Port configuration record) is set to a default
value of 00-00-00-00-00-00.
If you replace the TRIM card, reboot the node to reset the LAN port address to the
new BIA value contained on the replacement TRIM card. If, however, you want to
use the BIA address from the removed card, update the node configuration to ensure
that the older BIA address is used.
Page 57

Installing Nodes in Modulus Enclosures
Preparing Modulus Enclosures for RFI Suppression
Introduction To meet FCC requirements, the Modulus 18 and Modulus 21 enclosures require
special RFI suppression hardware. In the Modulus 18 enclosure, the RFI suppression
scheme differs depending on whether a TRIM card is installed in the unit.
Modulus 18 with
TRIM Card
Modulus 18 Door
(Inside View)
Figure 2-14 shows a Modulus 18 enclosure with a TRIM card. It also shows the
suppression screen that you need to install.
Snap tab into spring rods
on top and bottom of door.
Snap
Honeycomb Mesh RFI Screen
remaining tab
to door.
Figure 2-14. RFI Suppression Screen (Modulus 18 - with TRIM Card)
Installation 2-49
Page 58

Installing Nodes in Modulus Enclosures
Installing RFI
Suppression
Screen
Modulus 18: RFI
Suppression
without a TRIM
Card
If you have a Modulus 18 enclosure and at least one TRIM card, follow these steps
to install the RFI suppression screen shown in Figure 2-14, to meet FCC
requirements:
Step Action
1 Open the door of the enclosure. If the two RFI suppression straps
have been installed, as shown in Figure 2-15, remove them.
2 Place the screen flat against the inside of the door with the three
attachment points facing the inside of the door.
The edge with two attachment tabs aligns with the top and bottom
door hinges, as shown in Figure 2-14, and the single attachment tab
aligns with the inside of the door latch.
3 To install the screen, you can leave the door connected to the
enclosure. Swing the door open wide, and align the two tabs to the
top and bottom hinges. Press each point gently but firmly to make
solid connections. Then press the single tab to the door latch.
The screen is then in place.
PLUS
If you have a 6500
node in a Modulus 18 enclosure and there are no TRIM
cards, install two RFI (radio frequency interference) grounding straps to the front of
the enclosure (inside the front cover) as shown in Figure 2-15. These are needed to
meet FCC requirements. The straps are not needed if at least one TRIM card is
installed in the enclosure.
Note
If you have older model 6500 nodes (non-6500
PLUS
nodes) installed in Modulus
21 enclosures, you must install similar RFI straps in the Modulus 21 enclosure as
well.
2-50 Installation
Page 59

Installing Nodes in Modulus Enclosures
Modulus 18 With
No Trim Card
Figure 2-15 shows a Modulus 18 with no TRIM cards and the RFI suppression
straps.
3
Align the top of strap so that
screw hole is over bar,
insert the screw, and tighten.
Remove a screw from
1
the left and right power supplies.
Tighten the bottom
4
screw.
Align the bottom of the
2
strap so it is over the screw hole,
insert the screw, and finger tighten.
Figure 2-15. RFI Suppression Straps (Modulus 18 - No TRIM Card)
Installation 2-51
Page 60

Installing Nodes in Modulus Enclosures
Modulus 21 and
RFI Suppression
Bar
If you are installing a TRIM card in a Modulus 21 enclosure, add the RFI
suppression bar as shown in Figure 2-16. The bar is notched to fit across the inside of
the door.
Modulus 21 Door
(Inside View)
RFI Suppression Bar
This Side of Bar to
Face Inside of Door
Figure 2-16. RFI Suppression Bar (Modulus 21 Enclosure)
2-52 Installation
Page 61

Starting Up the Node
Starting Up the Node
Introduction After you install the node in the enclosure, you can start up the node.
Node Startup Follow these steps to start up the node:
Step Action Result/Description
1 Power up the Modulus enclosure
by connecting the power cord to a
suitable primary power source.
2 Configure the unit through the
control terminal port (CTP) menus.
3 When the (*) prompt appears on
the terminal, type the following:
.ctp <CR>
4 At the password prompt, enter
<CR>.
The front panel lights of the
processor card turn on as described
in the DSU DIM Installation
section.
After a few minutes, the green
STATUS light comes on to indicat e
the node is ready to process calls.
If this does not occur, call your
VanguardMS representative.
To access the CTP, attach a
terminal to Port 6. Port 6’s default
settings are standard terminal port
values: 9600 baud, 8 data bits, 1
stop bit, no parity.
This is the default password value.
The Main menu appears. See the
Vanguard ONS Basics Protocols
Manual (T0106) for configuration
information.
Installation 2-53
Page 62

Replacing Processor Card Components
Replacing Processor Card Components
Introduction You can upgrade and replace components on the 6500
PLUS
processor card. In both
standalone and Modulus enclosures, you can:
• Replace DIMs (data interface modules)
• Set jumpers on the port interface pins
• Install single in-line memory modules (SIMMs)
• Replace a FLASH module
• Replace the ID Module
• Replace PROMs
• Replace the CMEM chip
Processor Card Figure 2-17 shows the location of these components on a 6500
Note
The PROMs are located beneath the FLASH Module.
FLASH Module
PROM
(underneath FLASH Module)
SIMMs DIMs Port Interface Jumpers
Port 1
Port 2
PLUS
processor card.
U83
Trim
Card
ID Module
U40
Figure 2-17. 6500
CMEM Chip
PLUS
Processor Card
2-54 Installation
Page 63

Replacing DIMs
Replacing Processor Card Components
Introduction There are two Data Interface Modules (DIMs) on a 6500
PLUS
processor card.
Description Each DIM is a 64-pin, dual in-line module that can be repositioned so that Ports 1 or
2 act as either DCE or DTE ports. For most cases, the DIMs are positioned so the
ports act as DCEs. One DIM corresponds to Port 1 and the other to Port 2
PLUS
(Figure 2-18). While most 6500
processor cards contain EIA 232-D DIMs, you
can purchase DIMs that will support V.35, V.36, and X.21 interfaces.
Replacement
Procedure
Use the DIM Extraction Tool (58862-01) provided with the accessory kit to perform
the following procedure. Do not use a screwdriver or other tool that may damage the
components on the card.
Caution
PLUS
6500
damage components. Use proper handling and grounding precautions, including the
use of an anti-static grounding strap, whenever you handle a card.
cards and their components are sensitive to static discharge, which can
Step Action
1 Remove the TRIM card first if you are installing or replacing DIMs onto
a processor card that has an attached TRIM card.
Otherwise, there is no physical support to the processor card when you
insert the DIMs on the board.
2 Lift A DIM from its socket as shown in Figure 2-18, using the DIM
removal strap to lift out the DIM. Be sure that you do not bend the pins
during removal.
3 Insert the DIM into the other set of parallel sockets if you are moving the
DIM to another position.
4 Insert the new DIM into the original location if you are just replacing a
DIM. Be sure the pins are seated firmly in the sockets and are not bent.
5 Reattach the TRIM card to the processor card.
Installation 2-55
Page 64

Replacing Processor Card Components
Example of DIM
Removal
Figure 2-18 shows DIM removal.
Plastic DIM Removal Strap
Front Panel
New DIM
Installation
Port 1
Port 2
DCE
DTE
Figure 2-18. DIM Removal
PLUS
If you install a new type of DIM on the 6500
processor card, you may need to
change the jumpers on the port interface jumper pins. Figure 2-19 shows the location
of the pins on the card.
2-56 Installation
Page 65

Replacing Processor Card Components
Jumpers Figure 2-19 shows where the jumpers should be placed on the pins for various
applications and enclosures.
Port 1
Port 2
EIA 232 V.24
V.35, V.36, X.21 for Backplanes
with 26-Pin DB26 Connectors
V.35, V.36, X.21 for
Standalone and Backplanes
with 25-Pin DB25 Connectors
Figure 2-19. Jumpers on the Port Interface Pins
Installation 2-57
Page 66

Replacing Processor Card Components
Jumper Installation Figure 2-20 shows how to install the jumpers.
Figure 2-20. Installing Jumpers on the Port Interface Pins
2-58 Installation
Page 67

Installing SIMMs
Replacing Processor Card Components
Introduction The 6500
PLUS
processor card comes with 3 Mbytes of RAM on the card. You can add
additional RAM for a total of 5 Mbytes per 6500
shows the location of the SIMM slots on the 6500
Guidelines • Install SIMMs in pairs only.
• The 6500
PLUS
processor card is shipped with SIMMs in sockets U79 and U80.
Install additional SIMMs in sockets U81 and U82.
Installation
Follow these steps to install a SIMM:
Procedure
Caution
PLUS
6500
damage components. Use proper handling and grounding precautions, including the
use of an anti-static grounding strap, whenever you handle a card
cards and their components are sensitive to static discharge, which can
Step Action
1 Insert the SIMM at a slight angle as shown in Figure 2-21.
For proper operation, SIMMs must be in sockets U79 and U80
2 Press the SIMM into the socket.
Be sure it locks in place with the locking tab.
PLUS
processor card. Figure 2-17
PLUS
processor card.
SIMM Removal When removing a SIMM, pull against the side with the chips so it disengages from
the locking tabs.Then lift out the SIMM.
Installation 2-59
Page 68

Replacing Processor Card Components
Example of SIMM
Installation
Figure 2-21 shows how a SIMM is installed in a slot.
Insert SIMM into socket
at a slight angle.
Figure 2-21. SIMM Installation
2-60 Installation
Page 69

Replacing FLASH Modules
Replacing Processor Card Components
Introduction You can replace a FLASH module on a 6500
FLASH module is shown in Figure 2-17.
Caution
Use proper handling and grounding precautions, including the use of an anti-static
grounding strap, whenever you handle a card
Replacement
Procedure
Follow these steps to replace a FLASH module (see Figure 2-22):
Step Action
1 Remove the card from the nest or enclosure.
You might have to wiggle the card until the header pins disengage
from the socket on the card.
2a)Loosen and remove the four screws that hold the FLASH
module to the processor card.
b) Carefully lift the FLASH module from the 6500
card.
3 Using the old module as a guide, insert the header pins of the new
module.
4 Place the new module on the 6500
PLUS
processor card. The location of a
PLUS
processor
PLUS
processor card.
5 Insert the header pins into the socket. Seat the pins firmly into the
socket. Do not bend them.
6 Use four screws to secure the FLASH module to the 6500
PLUS
processor card as shown. Do not overtighten the screws.
Installation 2-61
Page 70

Replacing Processor Card Components
Installation
Example
Figure 2-22 shows an example of a FLASH module installation.
FLASH Module
Header
Pins
PROMs
Card Socket
Figure 2-22. Flash Module Installation
2-62 Installation
Page 71

Replacing ID Modules
Replacing Processor Card Components
Replace the ID
Module
Perform these steps to replace the ID Module:
Step Action
1 Remove the card from the nest or enclosure.
2 Locate the ID Module (Figure 2-17) and note the location of the
notch, which is toward the front of the card.
This will help you orient the new chip.
3 Using a standard chip-puller, remove the ID Module.
4 Insert the new ID Module into the socket. Be sure that the notch in
the chip is oriented toward the front of the card.
Installation 2-63
Page 72

Replacing Processor Card Components
Not
Replacing PROM Chips
Replace PROM
Chips
Follow these steps to replace a PROM chip:
Step Action
1 Remove the card from the nest or enclosure.
2 Loosen and remove the four screws that hold the FLASH module to
PLUS
the 6500
3 Carefully lift the FLASH module from the 6500
processor card (Figure 2-22).
PLUS
processor card.
You may have to wiggle the card until the header pins disengage
from the socket.
4 Locate the PROMs as shown in Figure 2-22. Note the location of the
notch on each chip and, using a standard chip-puller, remove the
PROMs.
This will help you orient the new chips.
e
Not all four PROM sockets may have PROMs.
5 Insert the new PROMs into the sockets. Be sure that they are oriented
the same way as the old chips.
6 Place the FLASH module on the 6500
PLUS
processor card. Insert the
header pins into the socket.
The pins should seat firmly into the socket, but be careful not to bend
the pins.
7 On the other side of the 6500
secure the FLASH module to the 6500
PLUS
processor card, use four screws to
PLUS
processor card.
Do not overtighten the screws or you may damage the 6500
processor card.
PLUS
2-64 Installation
Page 73

Replacing the CMEM Chip
Replacing Processor Card Components
Replace CMEM
Chips
Follow these steps to replace a CMEM chip:
Step Action
1 Remove the card from the nest or enclosure.
2 Locate the CMEM chip (Figure 2-17).
On the CMEM chip, note the location of the dot in the lower left
corner, which is toward the front of the card. This will help you orient
the new chip.
3 Using a standard chip-puller, remove the CMEM chip.
4 Insert the new CMEM chip into the socket. Be sure that the dot in the
chip is oriented toward the front of the card.
Installation 2-65
Page 74

DSU DIM Installation
DSU DIM Installation
Introduction The DSU DIM is designed to be installed in the DTE position only. The DSU
option will not operate if the DIM is installed in the DCE position.
You can install up to two DSUs per platform using both ports 1 and 2.
Example of
Installing the DSU
DIM
Figure 2-23 shows the DSU DIM installation.
DSU DIM
Front Panel
Port 1
DCE
DTE
DCE
DTE
Port 2
Figure 2-23. DIM Installation
2-66 Installation
Page 75

DSU DIM Installation
Installation
Procedure
Follow these steps to install the DSU DIM:
Step Action
1 Install the DSU DIM in the DTE position only (see Figure 2-23).
The DSU option does not operate if the DIM is installed in the DCE
position.
2 Set the jumpers properly.
This option requires the jumpers be set for the high speed 1 setting
(M1/HS). This is the same jumper location listed for the V.35, V.36,
and X.21 interfaces on standalone or Modulus 8/18 hardware.
3 Plug the EIM into the backplane connector corresponding to the DIM
port containing the DSU DIM (Port 1 or 2). Verify that the EIM is
only connected to a port that has a DSU DIM installed.
4 Tighten the connector mounting screws to provide proper grounding
and ensure signal integrity.
Caution
Be sure that the telco plug is disconnected before the EIM is disconnected from the
PLUS
6500
connected to the 6500
Software supporting the DSU option is necessary for the 6500
DSU hardware. The provided software requires an NSO or similar equipment to
(remotely) download the software, and a Flash card.
. Also, do not connect the telco plug to the EIM until the EIM has been
PLUS
.
PLUS
to recognize the
Control Terminal
Port
Installation 2-67
For configuration, reporting, and troubleshooting the CTP port must be used.
Network Management is not supported for the Integral DSU option.
Page 76

DSU DIM Installation
Configuring the 6500
PLUS
for DSU Operation
Configuration
Procedure
You use the CTP to configure the DSU. Follow these steps to configure the 6500
for DSU operation:
Step Action
1 Refer the Vanguard ONS Basics Protocols Manual (T0106). However,
you do not need to complete these configuration parameters:
•Clock Speed
• Connection Type
• Port Control
2 Configure the clock source parameter under port configuration as
follows:
• INT: Use this setting when providing clock to the network.
• EXT: Use this setting when using the network-provided clock
(usual mode for DSU operation).
PLUS
2-68 Installation
Page 77

DSU DIM Installation
DSU Input and Output Signaling
Introduction The input and output signaling information is useful as a debugging tool and replaces
the EIA summary information associated with other DIM types.
Input Signals This table describes the input signals.
NIS Not In Service—This signal is normally low (L). If no signal is
received, or the DSU option is in DSU Loopback mode, or if idle codes
are received, NIS is listed as high (H). This signal is used to determine if
the other end of the connection is available.
BPV Bipolar Violation—This signal is “H” during normal operation. When
the signal is “L,” it indicates that some type of bipolar violation was
received by the DSU option. The signal toggles during a DSU loopback
condition.
DL DSU Loopback—This signal is normally “H.” An “L” indicates that a
DSU loopback mode is entered.
C+ Positive Sealing Current*— This signal is “H” if the DC current on the
telephone company interface is not in the positive direction.
C- Negative Sealing Current* —This signal is “H” if the DC current on the
telephone company interface is not in the negative direction. An “L”
indicates that the DSU option has detected a negative “sealing” current
and is therefore performing a CSU loopback.
Note
When both C+ and C- are “H”, it indicates that no sealing current exists. This is
often the case when connected to other DSU type hardware. Normally, the signal
for C+ is “L” when connected to central office equipment (OCU hardware).
Output Signals Although you cannot directly access the output signals, they are manipulated by the
DSU option software and may be useful for informational purposes. The following
table describes the output signals.
RS Reset— This output resets the DSU option hardware. Its normal
operating state is “H.”
LL Local Loopback — When this signal is “L”, the DSU hardware is
locally looping data back to the 6520 hardware by way of the EIM.
CL CSU Loopback —When this signal is “L”, the DSU hardware is looping
the remote connection's receive to transmit.
IDL Idle —An “H” on this signal tells the DSU hardware to send idle bipolar
violations to the remote system.
CLK Clock Mode—The signal “H” denotes the use of the network clock. The
DSU option provides the clock when this signal is “L.”
You can view these signals using the control terminal Monitor menu item on the
Main menu within the CTP in the control terminal.
Installation 2-69
Page 78

DSU DIM Installation
Other Reporting
Differences
Example of
Diagnostics Menu
Other differences in control terminal output are:
• Detailed Port Statistics— show DSU input and output signaling as well as
note the installed DSU DIM
• Detailed Node Statistics— show DSU DIM installation
Figure 2-24 shows the Diagnostics menu within the CTP in the control terminal. You
use this menu to access the loopback options described in the next section.
Node: nodename Address (blank)Date: -------- Time: -----Menu: Diagnostics Path: (Main.12)
1. Local Loopback
2. V.54 Loopback 2
3. V.54 Loopback 3
4. Fatal Error Reports
5. Logged Alarms«
6. Startup Diagnostics
7. DSU Internal Loopback
8. DSU Internal and External Loopback
9. Start Delay Measurement
10. Stop Delay Measurement
11. Display Delay Summary
12. IP Ping
Control Terminal
Loopback Options
#Enter Selection:
Figure 2-24. Diagnostics Menu
The following table describes the control terminal loopback options.
DSU Internal Loopback This loopback mode does not affect the external
interface but it does loop the local transmit data back to
the receive data within the EIM. This test is useful for
verifying that the EIM is connected and is working
properly from a digital integrity perspective.
DSU Internal and
External loopback
This loopback mode performs the internal loopback
mentioned above along with looping the external
transmit to the external receive to allow manual testing
of the remote interface.
2-70 Installation
Page 79

Troubleshooting DSU DIM Installation
Introduction Some of the potential installation problems are listed below:
• Improper port connection of the EIM
• Improper telco interface connection
• DSU DIM not connected in DTE configuration
• Processor card jumpers not in HS1 mode
• DSU option software not operational
• DSU port clock source option not correct
• No signal from telco interface
DSU DIM Installation
CTP
Troubleshooting
The following information can be derived from the control terminal to aid in
troubleshooting.
Node Statistics Used to verify that the software is a version which contains
the DSU option modifications. It also shows if the DSU DIM
is recognized by the software.
Port Statistics Used to verify that data is being sent without error. Error
counts may denote an error in clocking mode configuration.
It also shows if the DSU DIM is recognized by the software.
Monitor Input/output signals can be used to determine if the DSU
option is in a loopback mode requested by the remote end.
This would be an explanation for the inability to send data.
Continuous bipolar violations would also indicate the remote
system is out of service.
DSU Internal
Loopback
Failure of this loopback mode would indicate that the EIM
module is not connected.
Installation 2-71
Page 80

DSU DIM Installation
DSU DIM FCC Information
Customer-Provided
Telephone
Equipment
FCC and Telephone
Company
Procedures and
Requirements
FCC regulations and telephone company procedures prohibit connection of
customer-provided equipment to telephone company-provided coin service (central
office-implemented systems). Connection to party lines is subject to state tariffs.
Occasionally, the telephone company may make changes in their equipment,
operations, or procedures. If these changes affect your equipment or service, the
telephone company will provide written notice so you can make the necessary
changes to maintain uninterrupted service.
Contact your telephone company if you have any questions about your telephone
line.
In some circumstances, the telephone company may ask you for information about
your equipment that is connected to the telephone line. Within the United States (at
the request of the telephone company), you should provide your equipment’s FCC
registration number. This number is located on the unit’s label.
Before the 6500
PLUS
DSU option can be connected to the network, the local
operating company must have the equipment’s registration number, and the proper
connections must be ordered.
To order the proper service, provide the telephone company with the following
information:
• USOC number of the required jack (shown below)
• Facility interface codes
• Service code
Regulations
Concerning
Electromagnetic
Radiation
Type of Interface USOC Jack
Connector
56-kbps digital
RJ48S 6.0F 04DU5-56
REN/Service
Code
Facility Interface
Code
interface
The Federal Communications Commission (FCC) of the United States of America
and the Industry and Science Canada (ISC), have published regulations which
govern the allowable limits of emanation of radio frequency energy of computing
devices and associated peripherals. These regulations are concerned with
interference to radio communications, such as radio and television. The regulations
require equipment for use in the United States or Canada to be labeled and to be
accompanied by the following notice:
This equipment has been tested and found to comply with the limits for a Class A
digital device, pursuant to Part 15 of the FCC Rules. These limits are designed to
provide reasonable protection against interference when equipment is operated in a
commercial environment. This equipment generates, uses, and can radiate radio
frequency energy and, if not installed and used in accordance with the instruction
manual, may cause interference to radio communications.
This digital apparatus does not exceed the Class A limits for radio noise emissions
from digital apparatus set out in the radio interference regulations of the ISC.
2-72 Installation
Page 81

DSU DIM Installation
Operation of this equipment in a residential area is likely to cause interference in
which case the user will be required to take adequate measures to correct the
interference.
This product was verified under test conditions that include use of shielded DTE
cable(s). Leased line cables with 1.5 turns through a ferrite cylinder were also used.
Use of different cables will invalidate verification and increase the risk of causing
interference to radio and TV reception.
You can obtain the proper cables from VanguardMS.
If this equipment causes interference to radio or television reception, which can be
determined by turning the equipment off and on, the user is encouraged to try to
correct the interference by one or more of the following measures:
• Reorienting the receiving antenna
• Relocating the equipment with respect to the receiver
• Moving the equipment away from the receiver
• Plugging the equipment into a different outlet so that the equipment and
receiver are on different circuits
If necessary, you should consult the dealer or an experienced radio/television
technician for additional circuits.
You may find the following booklet prepared by the FCC helpful: How to Identify
and Resolve Radio-TV Interference Problems. This booklet is available from
the U.S. Government Printing Office, Washington, D.C. 20402, Stock No.
004-000-00345-4.
If Problems Arise
Installing the DSU
DIM
If any of your equipment is not operating correctly, immediately remove it from the
telephone line before it harms your network. If the telephone company notes the
problem, they may temporarily disconnect your service. They will notify you in
advance of the disconnection, when possible. If advance is not feasible, you will be
notified as soon as possible. When you are notified, you will be given the chance to
correct the problem and be informed of your right to file a complaint with the FCC.
If your 6500 IFX needs repairs, they should be performed by VanguardMS or an
authorized representative of VanguardMS. For information, contact the VanguardMS
Customer Support Center at 1-800-544-0062.
Installation 2-73
Page 82

Power-Up Verification
Power-Up Verification
Introduction The front panel lights on the different 6500
These sections describe the light display when the enclosure is powered up.
Normal Sequence The following list describes what you see on the front panel if the power-up
sequence is performed correctly.
• POWER light comes on (processor and I/O cards).
• WATCHDOG light flashes briefly.
• TEST light flashes briefly.
• STATUS light comes on.
• PORT/DATA OUT lights come on and go off in sequence.
•If:
- You have an NSO card, one or more of the MEM (memory) lights come on.
- There is a disk in the drive, the drive light comes on as data is loaded into
the node.
This entire process may take a few minutes if an NSO card is loading data.
When the node passes the internal tests, the STATUS light (processor and I/O cards)
comes on. This indicates that the node is ready to process calls. You may also see
some of the port lights remain on depending on their configuration.
Checking the
Lights
If you want to make sure that all the lights are working, press the Lamp Test button
on the processor card. All the lights in the node momentarily come on.
PLUS
cards help you isolate a problem.
Failed Sequence The following describes what happens if the node does not come up.
Event Result/Description
If the TEST light comes on and remains
on, the node failed one or more of the
diagnostic tests.
Reboot the node by pressing the RESET
button.
If... Then...
The TEST light
comes on again
and this is the first
time the node is
turned on
Contact your VanguardMS
representative.
There is a hardware problem with the
card (processor and I/O cards).
This reruns the internal diagnostic tests.
Otherwise, check the Status and
Statistics menus.
Caution
Pressing the RESET button disrupts communication for the entire node.
If the WATCHDOG light on a processor card comes on and remains on, the card is
an auxiliary processor card. This card must be enabled from a control terminal.
2-74 Installation
Page 83

Power-Up Verification
Power-Up
Diagnostics
In the event of major problems that affect the entire node, you can reboot a node to
initiate the power-up diagnostics. After the power-up diagnostics are complete,
check the Statistics screens to see the results
PLUS
To initiate power-up diagnostics, press the RESET button on the 6500
processor
card's front panel or issue a cold Node Boot from the control terminal.
Installation 2-75
Page 84

Setting Node to Default Configuration
Setting Node to Default Configuration
Introduction You can set a node to the default configuration in two ways:
• Set the DFLT switch on the front panel
• Select the Default Node selection from the CTP Main menu
Defaulting the
Node
Follow these steps to default the node using the DFLT switch:
Step Action
1 Push the DFLT switch to the left and press the RESET button.
2 Push the DFLT switch to the right when the STATUS light turns
steady on and press the RESET button.
3 Push the DFLT switch back to the left when the STATUS light turns
steady on and press the RESET button.
When the STATUS light turns steady on, the node is set to default
values.
For more information about the Default Node menu option, see the
Vanguard ONS Basics Protocols Manual
2-76 Installation
Page 85

Installing Software Options
Installing Software Options
Introduction The 6500
PLUS
contains all the software options available for the current release of the
product. To access an option, however, you need to purchase the Software
Authorization Key (SAK) for that option. Each option has its own SAK and each
SAK can be used on only one specific node.
How to Get a SAK If you purchased the option with the 6500
sales representative will supply the SAK for the option on that card. To purchase an
option for an existing 6500 card, provide your VanguardMS ales representative with
the software serial number of the ID Module in the 6500
There are two ways to get the serial number:
• From a node that is already running, access the Node Statistics.
• From the Software Acknowledgment Sheet that ships with the hardware.
PLUS
processor card, your VanguardMS
PLUS
processor card.
Installation 2-77
Page 86

Installing Software Options
Not
Accessing Node Serial Number from Node Statistics
Access Serial
Number
Perform these steps to find the SAK serial number using the Node Statistics:
Step Action Result/Description
1 Access the CTP by entering the
following at the * prompt:
You are prompted to enter the
password.
.ctp <CR>
2 Enter the password. The default password is <CR>.
After you enter the password, the
Main menu appears.
3 From the Main menu, select
Status/Statistics.
4 Select Node Stat. The Node Statistics consists of
several screens. The 6500
processor's serial number is on
the third screen, as shown in
Figure 2-25.
e
Multi-CPU card serial numbers
appear on subsequent screens.
5a)Take this serial number and if
the card is a:
PLUS
6505
6507
6525
, add a -1 (dash 1)
PLUS,
add a -2 (dash 2)
PLUS
, add a -3 (dash 3)
PLUS
b) Give the serial number with
the dash number to the VanguardMS sales
representative.
2-78 Installation
Page 87

Node Stat Screen Figure 2-25 shows an example of the Node Stat screen.
Serial Number Needed for SAK
Node: Nodename Address: (blank) Date: -------- Time: ----- Detailed Node Statistics Page: 3 of 7
Board 1: Board Type: CPU+ Number of ports: 6 Status: Running
Serial #: 1806280
Memory Configuration:
EPROM: 1.0 MBytes DRAM: 1.0 MBytes
FLASH: 2.0 MBytes
Flash Memory:
Software: Used: 0
Port Configuration:
Port 0 DIM: EIA-232-D DCE
Port 1 DIM: EIA-232-D DCE
CPU Throughput: CPU utilization: 14%
Current Maximum
Characters/sec: 0 55
Packets/sec: 0 1
Buffer Usage: 33 (0%) 44 (1%) Available: 3978
Installing Software Options
Press any key to continue (ESC to exit ) ...
Figure 2-25. Serial Number on Node Stat Screen
Installation 2-79
Page 88

Installing Software Options
Not
Enabling A Software Access Key
Follow These
Steps...
Follow these steps to enter the number at the node's control terminal:
Step Action Result/Description
1 Access the CTP. One way to do
this is to connect a terminal to a
local PAD port (Port 6), and enter
the following at the * prompt:
.ctp <CR>
2 Enter the password. The default password is <CR>.
3 From the Main menu, select
Configure.
4 Select Software Key Table.
5 At the *Key Value prompt, enter
the SAK.
If... Then...
You change the
SAK number or
enter the wrong
one by mistake
The option is
disabled.
You are prompted to enter the
password.
After you enter the password, the
Main menu appears.
You make a
mistake entering
the SAK
6 Boot the node to implement the
option.
After you receive the printed version of the SAK, save a copy in a safe place in case
you have to enter it again.
Blank out the
entry by
pressing the
space bar and
enter the SAK
number again.
e
You need a separate SAK for each
node in which the option is to be
enabled.
2-80 Installation
Page 89

Installing Software Options
Installing New Software Options in an Existing Network
Install New
Software
Follow these steps if you are installing new software options in an existing network
and you want to get the serial number for a remote node at a central site:
Step Action
1 Place a call to the CTP at a remote node.
2 Log in to the remote node.
3 Access the Node Stats and get the serial number.
If you configure the key remotely, boot the node to activate the link.
The link will go down during the node boot.
Installation 2-81
Page 90

Installing Software Options
Enhanced LAN Option
Enhanced LAN
Option
What It Does for
the 6520 and
Vanguard 300
The Enhanced LAN Option is a Software Authorization Key (SAK) that enables IPX
Routing and AppleTalk features for the 6520 and Vanguard 300, and provides IP
Routing/SNMP for the 6500
PLUS
.
The Enhanced LAN Option enables IPX Routing and AppleTalk features for the
6520 and Vanguard 300, if present in the software image that is loaded.
IP Routing is now available in all base software packages. A SAK is no longer
required to enable this feature.
What It Does for
the 6500
PLUS
The Enhanced LAN Option provides a CSK IP Routing/SNMP for the 6500
This CSK enables the full IP Routing capability for SNMP management across a
PLUS
.
WAN link or Token Ring if present, with the use of the full router for Release 4.50
(configuration of the IP/Routing SAK is no longer required).
CSK Information The IP Routing/SNMP Customer Software Key (CSK) for the 6500
SG6CUJEQ6MYTGU4XRFKP
PLUS
product is:
If you already have the IP/Routing SAK configured, you do not have to configure the
new CSK.
Guidelines The Enhanced LAN Option is available for purchase as a SAK. You must install the
CSK for IP Routing/SNMP for the 6500
PLUS
on each node on which you want to
perform IP Routing/SNMP.
2-82 Installation
Page 91

Appendix A
Cables
Introduction The tables in this appendix describe the pinouts for ports on Standalone, Modulus
8/18, and Modulus 9/21 enclosures and include this information:
• Standalone, Modulus 8/18, and 9/21 enclosures: EIA 232-D signals with V.24
DIMs on the processor card
• Modulus 9/21 enclosures: V.35/V.36 signals with V.35/V.36 DIMs on the
processor card
• Modulus 9/21 enclosures: V.11 signals with X.21 DIMs on the processor card
• Standalone and Modulus 8/18 enclosures: V.35/V.36 signals with V.35/V.36
DIMs on the processor card
• Standalone and Modulus 8/18 enclosures: V.11 signals with X.21 DIMs on the
processor card
• Standalone and Modulus 8/18 enclosures: EIA 232-D crossover cable
• Token Ring LAN STP (shielded twisted pair) cable pinouts
• Token Ring LAN UTP (unshielded twisted pair) cable pinouts
The descriptions of EIA 232 pinouts apply to all 6500 cards. However, V.35, V.36,
and X.21 interfaces are available only on the first two ports on a 6500
card. For example, in a multi-processor node, Ports 1 and 2 on the first processor
card could be configured (with the DIMs and jumpers) for V.35, and Ports 7 and 8 on
the second processor card could also be configured (with the DIMs and jumpers)
for V.35.
PLUS
processor
The arrows in the tables indicate the direction of the port signal, as follow:
<-------------- indicates an input signal to the port
---------------> indicates an output signal from the port
Cables A-1
Page 92

EIA 232-D Signals (Standalone, Modulus 8/18, and 9/21 Enclosures)
Pin DCE
Position
Function/Signal
Name
Pin DTE
Position
Function/Signal
Name
1 --------------- Shield/Frame Ground 1 --------------- Shield/Frame Ground
2 <------------- TXD 2 -------------> TXD
3 -------------> RXD 3 <------------- RXD
4 <------------- RTS 4 -------------> RTS
5 -------------> CTS 5 <------------- CTS
6 -------------> DSR 6 <------------- DSR
7 --------------- Signal Ground 7 --------------- Signal Ground
8 --------------- DCD 8 <------------- DCD
14 <------------- DATA RESTRAINT 14 -------------> DATA RESTRAINT
15 -------------> TRANSMIT CLOCK
or V.54 Loop 3 *
16 -------------> STANDBY
INDICATOR
15 <------------- TRANSMIT
CLOCK
16 <------------- STANDBY
INDICATOR
17 -------------> RECEIVE CLOCK 17 <------------- RECEIVE CLOCK
18 <------------- EXTERNAL
RECEIVE CLOCK
18 -------------> EXTERNAL
RECEIVE CLOCK
or V.54 Loop 3 *
20 <------------- DTR 20 -------------> DTR
21 -------------> V.54 Loop 2 21 -------------> V.54 Loop 2
22 <-----------> RI/TM * 22 NC (No Connection)
24 <------------ EXTERNAL TRANS-
MIT CLOCK
24 -------------> EXTERNAL
TRANSMIT
CLOCK
25 <------------- TEST MODE 25 <------------- MAKE BUSY
* Pin assigned double function as follows:
Pin 15: Outputs TRANSMIT CLOCK if the port is configured for internal clocks. Otherwise it acts
as a V.54 Loop 3 signal when connected to a modem.
Pin 22: Used as the Ring Indicator output if the port is configured to emulate a dial modem. For this
to work properly, the RI/TM switch of the port must be set to RI. When the RI/TM switch is set to
TM, this pin acts as an input, and the TM output from the attached modem (pin 25 on the modem)
comes into the 6500 on this pin.
A-2 Cables
Page 93

V.35/V.36 (Modulus 9/21 Enclosures)
Pin DCE
Position
1 --------------- SHIELD/FRAME
2 <------------- TRANSMITTED
Function/
Signal Name
GROUND
DATA A
Pin DTE
Position
Function/
Signal Name
1 -------------- SHIELD/FRAME
GROUND
2 -------------> TRANSMITTED
DATA A
3 -------------> RECEIVED DATA A 3 <------------- RECEIVED DATA A
4 <------------- REQUEST TO SEND 4 -------------> REQUEST TO SEND
5 -------------> CLEAR TO SEND 5 <------------- CLEAR TO SEND
6 -------------> DATA SET READY 6 <------------- DATA SET READY
7 --------------- SIGNAL GROUND 7 --------------- SIGNAL GROUND
8 -------------> DATA CARRIER
DETECT
8 <------------- DATA CARRIER
DETECT
13 -------------> TRANSMIT CLOCK B13 <------------ TRANSMIT CLOCK
B
14 <------------- TRANSMITTED
DATA B
14 -------------> TRANSMITTED
DATA B
15 -------------> TRANSMIT CLOCK A15 <------------- TRANSMIT CLOCK
A
16 -------------> RECEIVED DATA B 16 <------------- RECEIVED DATA B
17 -------------> RECEIVE CLOCK A 17 <------------- RECEIVE CLOCK A
18 NC (No Connection) 18 -------------> LOOP 3
(V.36 ONLY).
19 -------------> RECEIVE CLOCK B 19 <------------- RECEIVE CLOCK B
20 <------------- DATA TERMINAL
READY
21 <------------- LOOP 2
(V.36 ONLY).
23 <------------- EXTERNAL
TRANSMIT CLOCK
B
24 <------------ EXTERNAL
TRANSMIT CLOCK
A
20 -------------> DATA TERMINAL
READY
21 -------------> LOOP 2
(V.36 ONLY).
23 -------------> EXTERNAL
TRANSMIT CLOCK
B
24 -------------> EXTERNAL
TRANSMIT CLOCK
A
25 NC (No Connection) 25 <------------ TEST MODE
(V.36 ONLY)
Cables A-3
Page 94

V.11 Signals (Modulus 9/21 Enclosures)
Pin DCE
Position
1 --------------- SHIELD/FRAME
2 <------------- T (A) TRANSMITTED
V.11 Function/Signal
Name
GROUND
DATA A
Pin DTE
Position
Function/Signal
Name
1 --------------- SHIELD/FRAME
GROUND
2 -------------> TRANSMITTED
DATA A
3 -------------> R (A) RECEIVED DATA A 3 <------------- RECEIVED DATA A
4 <------------ C (A) CONTROL A 4 -------------> CONTROL A
6 -------------> I (B) INDICATION B 6 <------------- INDICATION B
7 -------------- SIGNAL GROUND 7 --------------- SIGNAL GROUND
8 -------------> I (A) INDICATION A 8 <------------ INDICATION A
13 -------------> S (B) TRANSMIT CLOCK B13 <------------ TRANSMIT CLOCK
B
14 <------------ T (B) TRANSMITTED
DATA B
14 -------------> TRANSMITTED
DATA B
15 -------------> S (A) TRANSMIT CLOCK A15 <------------ TRANSMIT CLOCK
A
16 -------------> R (B) RECEIVED DATA B 16 <------------ RECEIVED DATA B
17 -------------> * RECEIVE CLOCK A 17 <------------- RECEIVE CLOCK A
19 -------------> * RECEIVE CLOCK B 19 <------------- RECEIVE CLOCK B
20 <------------- C (B) CONTROL B 20 -------------> CONTROL B
23 <------------- X (B) EXTERNAL
TRANSMIT CLOCK
B
24 <------------- X
(A)
EXTERNAL
TRANSMIT CLOCK
A
23 -------------> EXTERNAL
TRANSMIT CLOCK
B
24 -------------> EXTERNAL
TRANSMIT CLOCK
A
* These V.11 signals are not used in the X.21 standard.
A-4 Cables
Page 95

V.35/V.36 Signals (Standalone and Modulus 8/18 Enclosures)
Pin DCE
Position
1 --------------- SHIELD/FRAME
GROUND
Function/
Signal Name
Pin DTE
Position
Function/
Signal Name
1 --------------- SHIELD/FRAME
GROUND
2 <------------- TRANSMITTED DATA A 2 --------------> TRANSMITTED DATA A
3 -------------> RECEIVED DATA A 3 <------------- RECEIVED DATA A
4 <------------- REQUEST TO SEND 4 -------------> REQUEST TO SEND
5 -------------> CLEAR TO SEND 5 <------------- CLEAR TO SEND
6 -------------> DATA SET READY 6 <------------- DATA SET READY
7 --------------- SIGNAL GROUND 7 --------------- SIGNAL GROUND
8 -------------> DATA CARRIER DETECT 8 <------------- DATA CARRIER DETECT
13 -------------> TRANSMIT CLOCK B 13 <------------- TRANSMIT CLOCK B
14 <------------ TRANSMITTED DATA B 14 -------------> TRANSMITTED DATA B
15 -------------> TRANSMIT CLOCK A 15 <------------- TRANSMIT CLOCK A
16 -------------- RECEIVED DATA B 16 <------------- RECEIVED DATA B
17 -------------> RECEIVE CLOCK A 17 <------------- RECEIVE CLOCK A
18 -------------> RECEIVE CLOCK B 18 <------------- RECEIVE CLOCK B
19 -------------> RECEIVE CLOCK B 19 <------------- RECEIVE CLOCK B
20 <------------- DATA TERMINAL
READY
20 -------------> DATA TERMINAL
READY
21 -------------> TRANSMIT CLOCK B 21 <------------- TRANSMIT CLOCK B
22 <------------- EXTERNAL TRANSMIT
CLOCK B
24 <------------- EXTERNAL TRANSMIT
CLOCK A
22 -------------> EXTERNAL TRANSMIT
CLOCK B
24 -------------> EXTERNAL TRANSMIT
CLOCK A
25 NC (No Connection) 25 <------------- TEST MODE
(V.36 ONLY).
Cables A-5
Page 96

V.11 Signals (Standalone and Modulus 8/18 Enclosures)
Pin DCE
Position
1 -------------- SHIELD/FRAME
2 <------------ T
3 ------------> R
V.11 Function/Signal
Name
GROUND
TRANSMITTED
(A)
DATA A
RECEIVED DATA A 3 <------------ RECEIVED DATA A
Pi
n
DTE
Position
Function/Signal
Name
1 ------------- SHIELD/FRAME
GROUND
2 ------------- TRANSMITTED
DATA A
(A)
4 <------------ C
CONTROL A 4 -----------> CONTROL A
(A)
6 ------------> I (B) INDICATION B 6 <------------ INDICATION B
7 -------------- SIGNAL GROUND 7 -------------- SIGNAL GROUND
8 ------------> I (A) INDICATION A 8 <------------ INDICATION A
13 -----------> S
(B)
14 <----------- T
(B)
15 ------------> S
(A)
16 ------------> R
TRANSMIT CLOCK B13 <------------ TRANSMIT CLOCK
B
TRANSMITTED
DATA B
14 ------------> TRANSMITTED
DATA B
TRANSMIT CLOCK A15 <------------ TRANSMIT CLOCK
A
RECEIVED DATA B 16 <------------ RECEIVED DATA B
(B)
17 ------------> * RECEIVE CLOCK A 17 <------------ RECEIVE CLOCK A
18 ------------> * RECEIVE CLOCK B 18 <------------ RECEIVE CLOCK B
19 ------------> * RECEIVE CLOCK B 19 <------------ RECEIVE CLOCK B
20 <----------- C
CONTROL B 20 ------------> CONTROL B
(B)
21 ------------> S(B) TRANSMIT CLOCK B21 <------------ TRANSMIT CLOCK
B
22 <----------- X
(B)
24 <------------ X
(A)
EXTERNAL
TRANSMIT CLOCK
B
EXTERNAL
TRANSMIT CLOCK
A
22 ------------> EXTERNAL
TRANSMIT CLOCK
B
24 ------------> EXTERNAL
TRANSMIT CLOCK
A
*These V.11 signals are not used in the X.21 standard.
A-6 Cables
Page 97

P1 P2
11
23
32
48
514
620
77
84
14 5
15 18
17 24
18 15
20 6
22 25
24 17
25 22
16 21
21 16
Pin Function
1Receive+
6Receive–
5Transmit–
9Transmit+
NOTE: All other pins are reserved and
should remain unconnected.
Pin Function
4Receive+
5Receive–
3Transmit–
6Transmit+
NOTE: All other pins are reserved and
should remain unconnected.
Cables A-7
Page 98

Page 99

Appendix B
Specifications
Introduction This section describes the physical and environmental specifications and power
requirements for the enclosures.
Additional
Information
Physical
Characteristics
For more information about Modulus 8/18 enclosures, refer to the Modulus Planning
and Installation Guide (Product Code 80300). For Modulus 9/21 enclosures, see the
Modulus 9 and 21 Installation and Operation Guide (Part No. 09564, Rev. B).
Unit Dimensions
6500 Standalone Enclosure Height: 2.75 in. (6.99 cm)
Wid th: 8.54 in. (21.69 cm)
Depth: 16.00 in. (40.64 cm)
Weight: 5.00 lb (2.3 kg)
Modulus 8 Height: 14.0 in. (35.6 cm)
Width: 8.5 in. (21.6 cm)
Depth: 22.0 in. (55.9 cm)
Weight (Empty): 32 lb (14.5 kg)
Max Number of 6500 Product Cards: 4
Modulus 18 Height: 14.0 in. (35.6 cm)
Width: 19.0 in. (48.3 cm)
Depth: 22.0 in. (55.9 cm)
Weight (Empty): 40.5 lb (18.4 kg)
Max Number of 6500 Product Cards: 8
Modulus 9 Height: 14.5 in. (36.8 cm)
Width: 8.7 in. (22.1 cm)
Depth: 20.5 in. (52.1 cm)
Weight (Empty): 35 lb (15.9 kg)
Max Number of 6500 Product Cards: 4
Specifications B-1
Page 100

Power
Requirements
Unit (continued) Dimensions
Modulus 21 Height: 14.0 in. (35.6 cm)
Width:17.8 in. (45.2 cm)
Depth: 20.75 in. (52.7 cm)
Weight (Empty): 48 lb (21.8 kg)
Max Number of 6500 Series Product
Cards: 9
Standalone Enclosure 100-240 VAC nominal, 47 to 63 Hz
Modulus 8 100-120 VAC, 8.0 A, 50 to 60 Hz
220-240 VAC, 6.0A, 50 to 60 Hz
Modulus 9 100-120 VAC, 5.0A, 50 to 60 Hz
220-240 VAC, 3.0A, 50 to 60 Hz
Modulus 18 and Modulus 21 100-120 VAC, 10.0A maximum, 50 to
60 Hz
Environmental
Limits
220-240 VAC, 6.0A maximum, 50 to
60 Hz
Modulus 18, -48 VDC Power
Supply Module
Modulus 21, -48 VDC Power
-48 to -60 VDC, 10.0A maximum
-48 to -60 VDC, 15.0A maximum
Supply Module
Power Rating for 6500
PLUS
18.5
Processor Card with TRIM Card
PLUS
• All enclosures, 6500 CPU, 6500
processor, 6500 I/O cards: 0° C to 50° C
(32° F to 122° F)
• 6500 NSO card: 0° C to 45° C (32° F to 113° F)
• Storage Temperature: –40° C to 70° C (–40° F to 158° F)
• Relative Humidity: 5% to 90% (noncondensing)
B-2 Specifications
 Loading...