

Page 1
Operation Manual
1200MM Series
Covering Models: 1241MM & 1242MM
Microscopes
Printed in the USA No. VGMNL071708-1200MM
Page 2

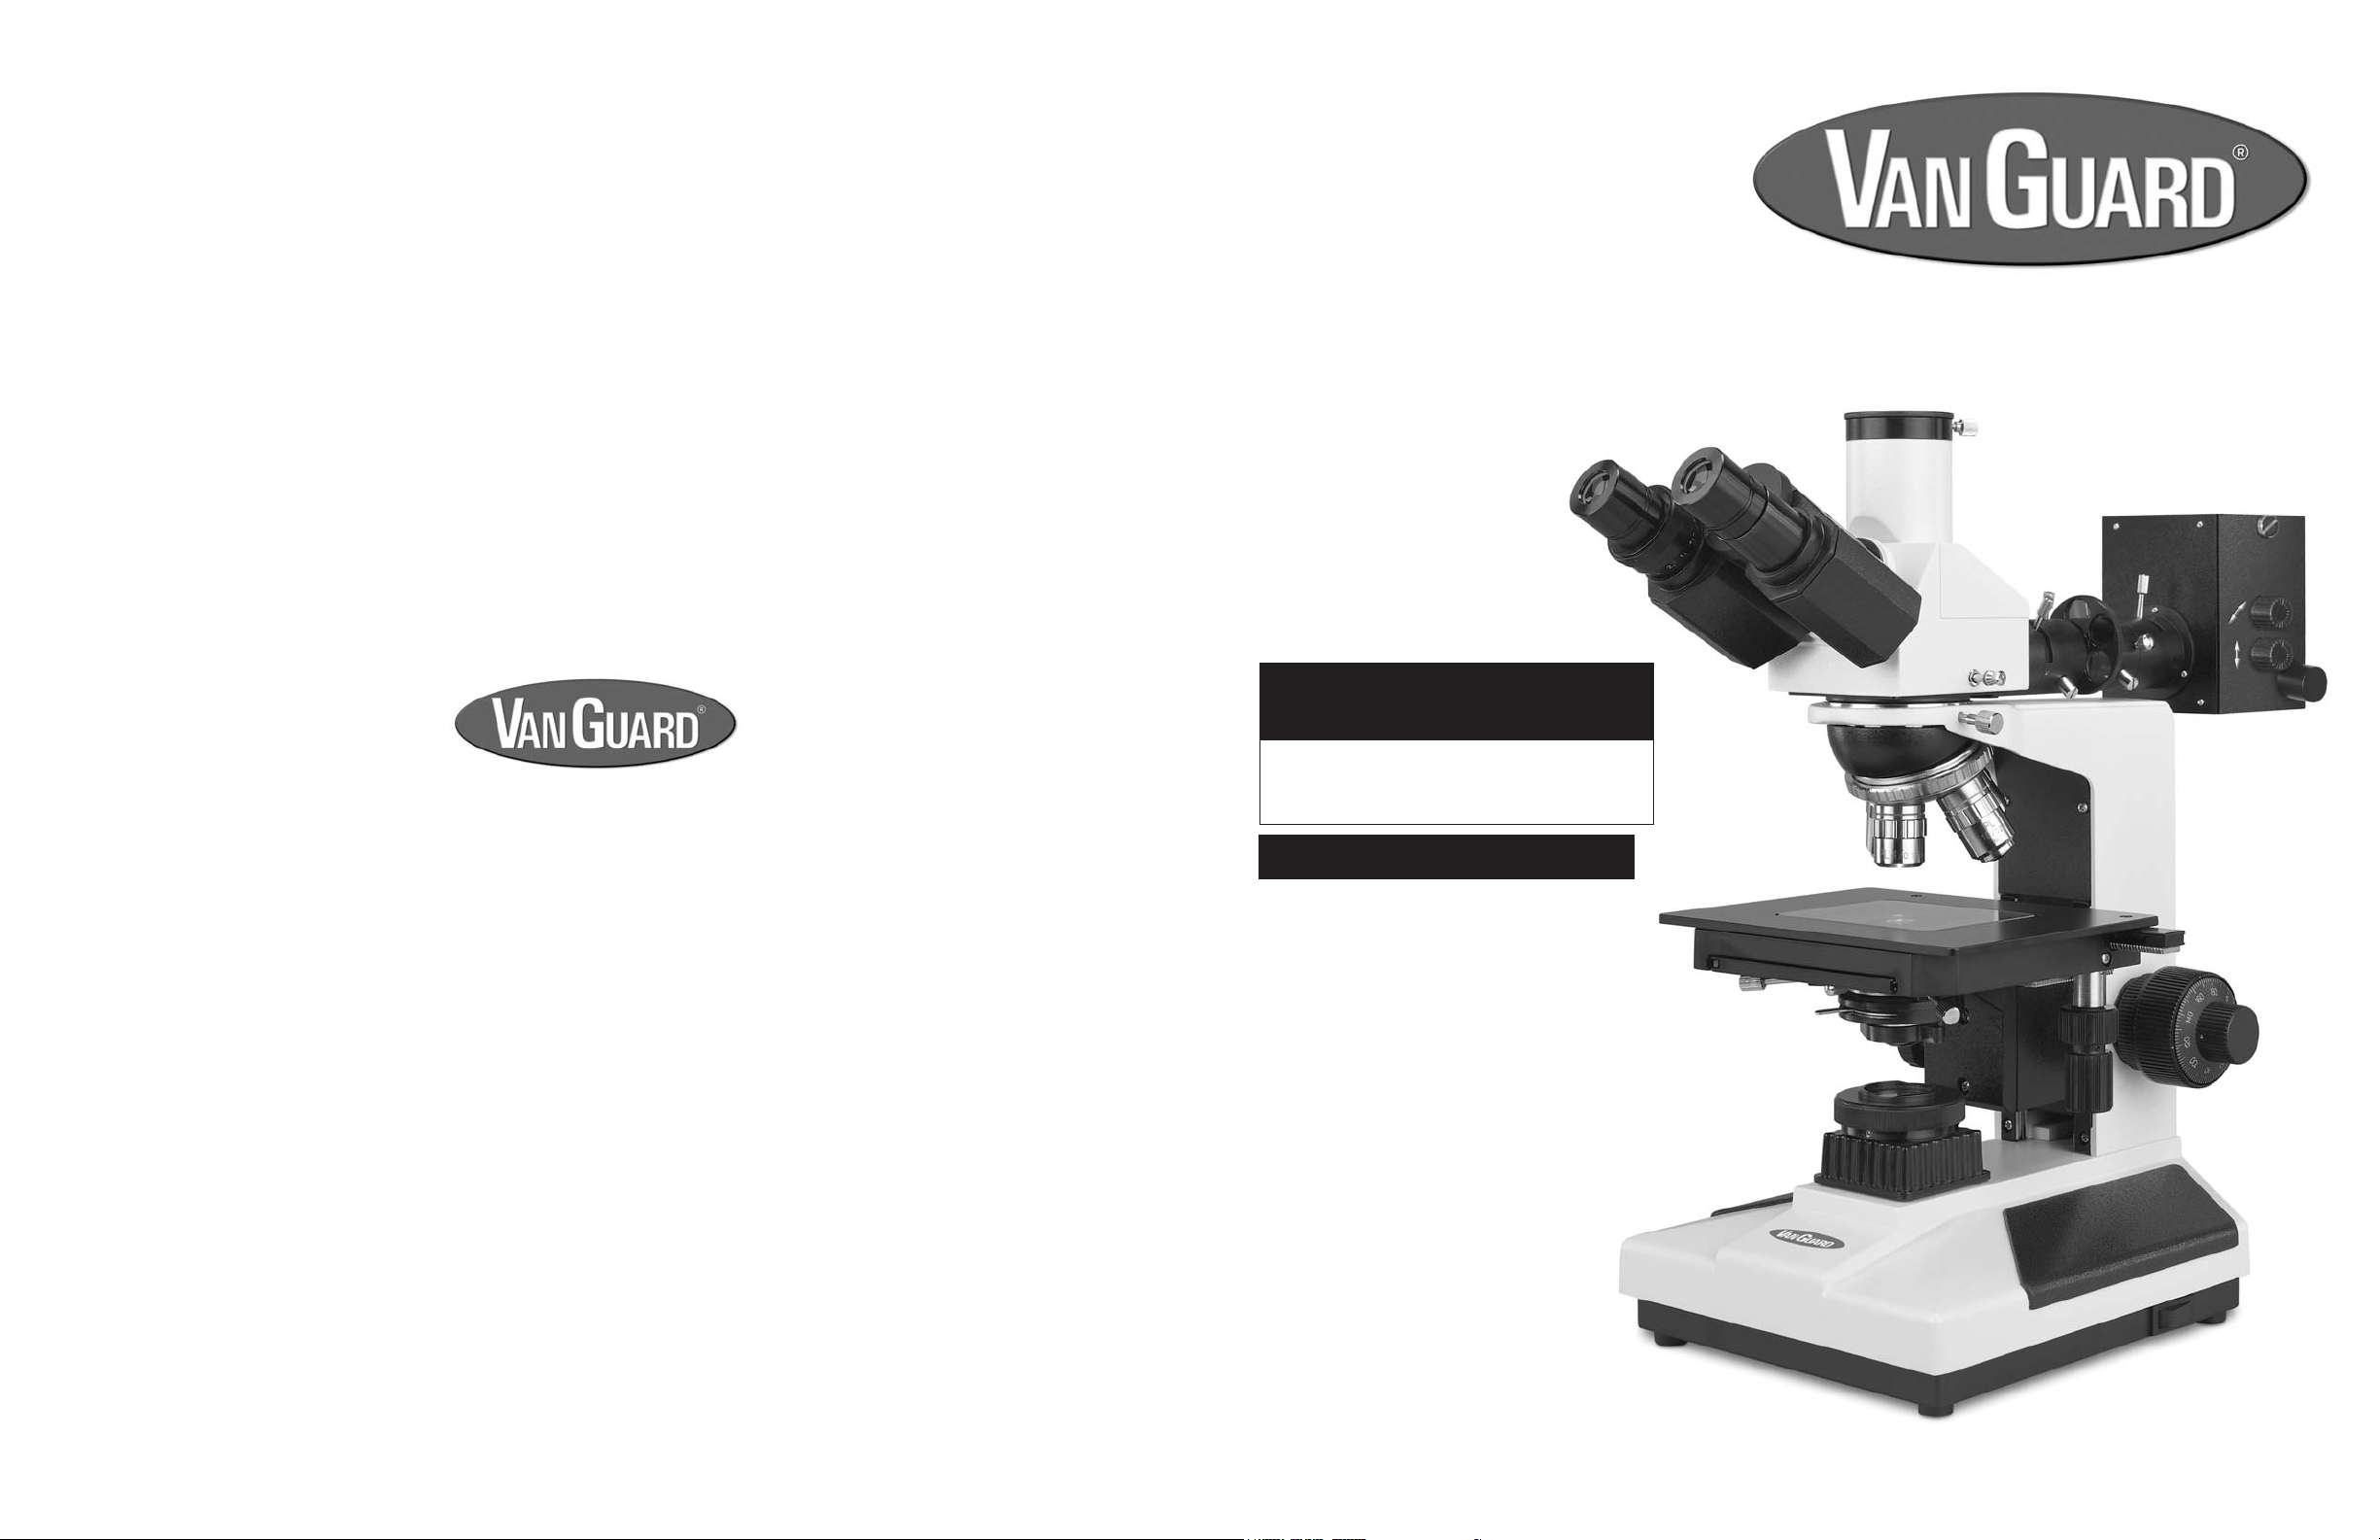
1200MM Series Parts
1200MM Information
Diopter
Adjustment
Mechanism
Interpupillary
Adjustment
Mechanism
Nosepiece
Eyepieces
Prism Slider
(unseen)
Trinocular Tube
Upper Illuminator
Aperture Iris
Diaphragm Lever
Polarizing
Analyzer
Upper
Illuminator
Filter Wheel
Upper Illuminator Field Iris
Diaphragm Adjustment Lever
(unseen)
Upper Illuminator
Focusing Lever
Illuminator Door
Set Screw
Lamp
Vertical
Adjustment
Lamp
Horizontal
Adjustment
Upper Illuminator
Housing
Model 1241MM
Trinocular Head (1 ea.)
Upper Illumination Housing (1 ea.)
Stand (1 ea.)
10X Eyepiece (2 ea.)
4X Plan LWD Objective (1 ea.)
10X Plan LWD Objective (1 ea.)
20X Plan LWD Objective (1 ea.)
40X Plan LWD Objective (1 ea.)
Replacement Lamp: 20W Halogen (Cat. No. 1200-20WHL)
Replacement Fuse: 0.5A, 250V (Cat. No. 1200-FS1)
Model 1242MM
Trinocular Head (1 ea.)
Upper Illumination Housing (1 ea.)
Lower Illumination Housing (1 ea.)
Stand (1 ea.)
10X Eyepiece (2 ea.)
4X Plan LWD Objective (1 ea.)
10X Plan LWD Objective (1 ea.)
20X Plan LWD Objective (1 ea.)
40X Plan LWD Objective (1 ea.)
Substage Polarizing Analyzer (1 ea.)
Dispersion Filter (1 ea.)
Blue Filter (1 ea.)
Maintenance
The eyepieces and objectives on VanGuard Microscopes are coated. They should never be wiped while dry as any dirt or dust will scratch the coating. The surfaces
should either be blown off with an air canister, or blown and cleaned with an air-bulb and camel-hair brush. It is recommended to then use a lens cleaner. Apply with
a cotton swab for a minimum of wetting, then wipe the surface clean with a quality lens tissue. Xylene, since it breaks down the bonding material holding the lenses,
should never be used as a cleaner. Periodically your VanGuard Microscope should be fully serviced by a qualified service technician.
Objectives
Mechanical
Stage
Substage Condenser
Centering Knobs
(1242MM only)
Condenser Iris
Diaphragm Lever
(1242MM only)
Substage Condenser
(1242MM only)
Substage
Adjustment
Knob
(1242MM only)
Substage Field
Iris Diaphragm
(1242MM only)
Variable
Illumination Control
(unseen)
Base
On/Off Power
Switch
(unseen)
Substage
Illuminator
(1242MM only)
Polarizer Slider:
Left Side (white) =
Polarizer Disengaged
Right Side (blue) =
Polarizer Engaged
Coarse/Fine
Focus Control
Drop-in
Filter Holder
(1242MM
only)
Illuminator
T oggle
Switch
(1242MM only)
For information about parts, accessories, or service -- contact your dealer directly
or contact VanGuard Microscopes at 1-800-423-8842.
2 7
Page 3

General Operation
General Operation
Lamp Replacement (Lower Illuminator) [MODEL 1242MM ONLY]
1
Before attempting to replace or remove the lamp, UNPLUG THE MICROSCOPE FROM ANY POWER SOURCE.
2
Replace the lamp by gently laying the microscope on its side and opening the trap door located on the bottom
of the base. Loosen the trap door set screw and swing the trap door open. Once the door is open, the lamp can
be removed simply by grasping the lamp and pulling it from its fixture. When replacing, insert the new lamp into the same
fixture. In addition, be careful not to touch the glass lamp envelope when replacing—use a tissue or other medium to
grasp the lamp. This will prevent the oils from your hand from reducing lamp life. Swing the trap door shut and secure with
the trap door set screw. Before using the microscope again, follow steps 1-3 on page 4.
Thank you for purchasing a VanGuard Microscope. With the user in mind, VanGuard Microscopes are built from modern
designs and should provide a lifetime of reliable performance. We recommend you read this entire manual carefully before
beginning to use the instrument.
Assembly
1
After removing the microscope parts from the protective foam packaging and checking it over for all components and
accessories (see page 7), you can begin assembly.
2
Place the stand on a stable counter top.
Place the head assembly on top of the stand so that the dovetail flange slides into place. Secure with the knurled head
3
set screw. NOTE: Do not release the head until it is firmly secured with the head set screw.
4
MODEL 1242MM ONLY: Attach the upper illuminator power supply to the back of the base. Tighten down with the set
screw.
5
Attach the upper illuminator housing to the trinocular head assembly. Tighten down with the set screw. Plug in the
upper illuminator housing to the back of the base.
6
Slide the eyepieces into the eyetubes.
7
After removing the objectives from their storage containers, individually install each one into the nosepiece by twisting
them clockwise into the threaded holes of the nosepiece.
8
MODEL 1242MM ONL Y: Slide the condenser into the silver condenser mount and secure in place by tightening the set
screw located on the front of the mount. Optionally, you may place the included dispersion (frosted) or blue filter inside
the swing-out filter holder located at the bottom of the condenser.
Upper Illumination
1
Connect the power cord to a suitable power supply; turn on the upper illuminator with the ON/OFF power switch located
on the lower left side of the instrument. If light does not come on, check to see that the variable illumination control,
located on the lower left side of the instrument, is on the highest setting. Also, try switching the illuminator toggle switch
located on the lower right side of the stand.
2
Remove one of the objectives from the nosepiece. Rotate the nosepiece so that the open position is in the light path.
Rotate the filter wheel to the “open” (no filter) setting. Verify that the field iris diaphragm is fully open. Set the aperture iris
diaphragm to roughly an 80% closed position. Verify that the left side (white) polarizer slider is pushed in.
3
Draw a “+” on a small, white piece of paper and place it onto the stage. Position the paper on the stage so that the “+” is
in the middle of the round light field. A clear image of the lamp filament should be seen reflecting off the paper. If not,
adjust the focusing lever until the image is clear. The lamp filament image should be in the center of the round field and
superimposed over the “+.” If not, rotate the lamp vertical and horizontal adjustments until the lamp filament image is
centered. Diffuse the upper light by shifting the focusing lever to the right.
4
Reinstall the objective that was removed in Step 2. Turn the nosepiece to the 4X objective setting. Looking through the
eyepieces, focus on the “+” on the white piece of paper on the stage. Set the field iris diaphragm to about 50% closed.
Close the aperture iris diaphragm completely. A small, light field in the middle of a larger, darker field should be seen
through the eyepieces. If what is seen resembles Figure 1A, alternately rotate the aperture iris diaphragm centering
knobs until the small, light field is centered as in Figure 1B.
6
3
Page 4

General Operation
Figure 1A Figure 1B Figure 1C Figure 1D
5
Fine tuning can be done by opening the aperture iris diaphragm until the light field almost fills the entire field. If what is
seen through the eyepieces resembles Figure 1C, alternately rotate the aperture iris diaphragm centering knobs until
the light field is centered as in Figure 1D. The upper illumination is now properly centered.
6
For normal operation, the filter wheel should be set so that the dispersion (frosted) filter is in the light path. This
filter disperses the light for much more even illumination across the field of view. The colored filters are often used when
applications or samples call for color contrasting.
7
The field iris diaphragm may need to be closed down to induce additional contrast onto a specimen. This is often
necessary, depending on the sample, for the higher power objectives.
8
For polarized light, push in the right side (blue) polarizer slider. Slide the polarizing analyzer to the fully up position. When
the polarizing analyzer is slid into position, the overall field of view should take on a much darker color. Certain colors/
shapes should brighten and contrast significantly against the darker field. Polarized light can be very useful for detecting
inconsistencies or defects on metal parts, circuit boards, wafers, etc.
General Operation
Focusing and Mechanical St age Mechanisms
1
Focus the image by turning the coarse/fine focus control knobs. The large knob is used for coarse adjustment, while the
smaller knob is used for fine adjustment. The coaxial arrangement allows for easy, precise adjustment without stage drift.
2
Turning the coarse/fine focus control will raise and lower the stage vertically. One complete turn of the fine focusing knob
will raise or lower the stage 0.3mm; the smallest graduation refers to 2μm of vertical movement. One complete turn of the
coarse focusing knob will raise or lower the stage 3.6mm. To ensure long life, always turn the focusing knobs slowly and
uniformly.
3
The focusing tension control knob is located just inside of the left-hand focus control knob. For tighter tension, turn the
control knob in a clockwise motion. For looser tension, turn the control knob in a counterclockwise motion.
4
The up-stop mechanism is located just inside of the right-hand focus control knob. It allows the user to set a maximum
point to which the stage can be raised to prevent damage to the objective and specimen. To set this point, turn the up-stop
mechanism in a counterclockwise motion, so that its tab is facing down. Raise or lower the stage, by turning the focus
control knobs, to the desired height. Once acheived, turn the up-stop mechanism in a clockwise motion, so that its tab is
facing up. Once gently tightened, the up-stop mechanism will not allow the stage to be raised higher than the set point.
5
The mechanical stage X-Y controls provide easy and accurate positioning of the sample. One complete turn of the
latitudinal (Y) control will move the specimen 34mm. One complete turn of the transverse (X) control will move the
specimen 20mm.
Substage (Lower) Illumination [MODEL 1242MM ONL Y]
1
Connect the power cord to a suitable power supply; turn on the substage illuminator with the ON/OFF power switch
located on the lower left side of the instrument. If light does not come on, check to see that the variable illumination control,
located on the lower left side of the instrument, is on the highest setting.
2
z Verify that the left side (white) polarizer slider is pushed in.
z Rotate the nosepiece until the 10X objective is in the light path.
z Raise the substage assembly fully by turning the substage adjustment knob counter-clockwise.
z Open the aperature iris diaphragm to the largest setting by using the aperature iris diaphragm adjustment lever which
extends from the condenser assembly.
z While looking into the microscope eyepieces, close the field iris diaphragm to the smallest setting by turning the
uppermost section of the substage illuminator counter-clockwise.
z Closing the iris in this manner will reduce the field so that a small white hexagon is visible within a black field (see Figure
1A). Focusing of the hexagon is performed by turning the coarse/fine focus controls. This white hexagon is the light which
is passing through the field iris and should be centered in the black field. If not, move it to the center (see Figure 1B) by
tightening and/or loosening the condenser centering knobs.
3
Fine tuning can be done by opening the field iris diaphragm until the white hexagon almost fills the entire field (see Figure
1C), and then readjusting (see Figure 1D). After centering the condenser open the field iris diaphragm slightly wider than the
field of view.
4
For polarized light, push in the right side (blue) polarizer slider. Place the included substage polarizing analyzer on top of
the field iris diaphragm. Rotate the polarizing analyzer until the overall field of view takes on a much darker color. Certain
colors/shapes should brighten and contrast significantly against the darker field.
Interpupillary and Diopter Adjustment
1
Interpupillary adjustment (the distance between eyepieces) is made through a “folding” action. This Seidentopf design
allows for a folding adjustment which is quickly and easily done for each user.
2
Diopter adjustment allows for proper optical correction based on each individual’s eyesight. This adjustment is easily
made and is recommended prior to each use by different users to prevent eyestrain.
Using the 40X objective and a sample slide (i.e. one with an easily focusable image), close your left eye and bring the image
3
into focus in your right eye with the coarse/fine focus control. Once the image is well-focused using only your right eye,
close your right eye and check the focus with your left. If the image is not perfectly focused, make fine adjustments with the
diopter adjustment mechanism located on the left eyetube. Once complete, the microscope is corrected for your vision.
Lamp Replacement (Upper Illuminator)
1
Before attempting to replace or remove the lamp, UNPLUG THE MICROSCOPE FROM ANY POWER SOURCE.
2
Remove the illuminator door by loosening the set screw and gently lifting the door up and outwards. The lamp can now be
removed simply by grasping the lamp and pulling it from its socket. When replacing, insert the new lamp into the same socket.
In addition, be careful not to touch the glass lamp envelope when replacing—use a tissue or other medium to grasp the lamp.
This will prevent the oils from your hand from reducing the lamp life. Reattach the illuminator door to the upper illuminator
housing . Be sure to center the lamp by following steps 1-5 on pages 3-4.
4
5
 Loading...