


1

2
The Vanderhall Laguna is NOT a car.
The Vanderhall Laguna complies with Federal Motor Vehicle Safety Standards (FMVSS) and regulations of the
United States Department of Transportation (DOT) applicable to motorcycles in the USA.
The Vanderhall Laguna vehicle does NOT comply with Federal Motor Vehicle Safety Standards (FMVSS) and
regulations of the United States Department of Transportation (DOT) applicable to passenger cars in the USA.

3
Introduction ................................................................ 4
Quick Overview ........................................................... 6
Keys and Doors ......................................................... 18
Seats and Restraints.................................................. 24
Instruments and Controls ......................................... 28
Lighting ..................................................................... 46
Bluetooth® Audio ...................................................... 49
Climate Controls ....................................................... 51
Driving and Operation .............................................. 53
Vehicle Care ............................................................. 66
Service and Maintenance ......................................... 99
Technical Data ........................................................ 108
Customer Information ............................................ 111
4
Introduction
The names, logos, emblems, slogans, vehicle
model name, and vehicle body designs
appearing in this manual including, but not
limited to, Vanderhall and Laguna are
trademarks of Vanderhall Motorworks.
Using this Manual
To quickly locate information about the
vehicle, use the Index in the back of the
manual. It is an alphabetical list of what is in
the manual and the page number where it
can be found.
Danger, Warning, and Caution
Warning messages found on vehicle labels
and in this manual describe hazards and
what to do to avoid or reduce them.
Danger
Danger indicates a hazard with a high
level of risk which will result in serious
injury or death
Warning
Warning indicates a hazard that could
result in injury or death
Caution
Caution indicates a hazard that could
result in property or vehicle damage

5
Symbols
Your Vanderhall Laguna has components
and labels that utilize symbols instead of
text. Symbols are often shown with text
describing the operation or information
related to a specific component, control,
message, gage, or indicator
: Shown when the owner manual
contains additional instructions or
information.
Vehicle symbol Chart
: Air Conditioning
: Antilock Brake System (ABS)
: Brake System Warning Light
: Charging System
: Cruise Control
: Do Not Puncture
: Do Not Service
: Engine Coolant Temperature
: Flame/Fire Prohibited
: Fuel Gauge
: Fuses
: Headlamp High/Low-Beam Changer
: Malfunction Indicator Lamp
: Oil Pressure
: POWER
: Traction Control
: Under Pressure
: Windshield Washer Fluid

6
Quick Overview
Instrument Panel
Instrument Panel Introduction 7
Introduction to vehicle features
Remote Keyless Entry System
Door Locks 9
Opening the Door 9
Seat Adjustment 10
Heated Seats 10
Safety Belts 10
Mirror Adjustments 11
Steering Wheel Adjustment 11
Windshield Wiper/Washer 11
Climate Control 12
Transmission 12
Starting the Engine 12
Vehicle Features
Stereo Bluetooth® Audio 13
Steering Wheel Controls 13
Cruise Control 14
Comfort/Sport Mode
Error! Bookmark not defined.
Driver Information
Center (DIC) 15
Power Outlet 15
Trunk 15
Hardtop 16
Performance and Maintenance
Traction Control 17
Engine Oil Life Monitor 17

7
1 2 3 4 5 6 7 8 9 10 11 12 13 14
15
Instrument Panel

8
1.Turn Signal Lever
2. Paddle Shift (Down)
3. Cruise Control Controls
4. Steering Wheel Adjustment
5. Horn
6. Steering Wheel Radio Controls
7. Paddle Shift (UP)
8. Windshield Wiper/ Washer
9. OBDII Port (Under Dash)
10. Climate Control
11. Emergency Flasher
12. Traction Control
13. 12 Volt Accessory Power Port
14. Air Vent
15. Instrument Cluster

9
Remote Keyless Entry System
The transmitter for the Remote Keyless
Entry system may work up to
60m (195 ft) away from the vehicle.
Pressing the release button will extend the
key blade which can be used for the
vehicles ignition.
Door Locks
To lock or unlock the doors from
outside the vehicle use the Remote Keyless
Entry Transmitter:
To unlock the vehicle press
Press to lock both doors
SEE KE YS 18 AND REM OTE KEYL ESS ENTR Y
SYSTEM OP ERATIO N 19.
Opening the Door from outside the
vehicle
To open the Door
1. Unlock the door using the Key
Fob (press )
2. Pull up on the Exterior door
handle
Opening the Door from outside the
vehicle
Pull Forward on the Interior door
handle
Exterior Door Handle
10
1. Cup Holder
2. Heated Seat Button
3. Seat Adjustment Handle
4. Interior Door Handel
5. Safety Belt Latch
Seat Adjustment
To adjust the seat
1. Pull the handle at the front of the
seat
2. Side the seat to the desired
position and release the handle
3. Try to move the seat back and
forth to ensure it is locked in
place
Heated Seats
To Turn on the heated seats press the
button. Three lights will appear on the
button indicating the heater is on High
Press a second time 2 lights will appear on
the button indicating Medium heat
Pressing the button a third time 1 light will
be illuminated indicating Low heat
Pressing the button a fourth time will turn
the Heated seats off
Safety Belts
Refer to the following sections for
important information on how to use safety
belts properly:
SAFETY BELT S 25.
HOW TO WEAR SA FETY BELTS PR OPERL Y 26.
1 2 3 4 5

11
Mirror Adjustment
The Mirrors are manually adjustable.
To adjust mirror:
1. Grasp mirror on the edge
2. Rotate to desired position
Steering Wheel Adjustment
To adjust the steering wheel:
1. Pull the lever down.
2. Move the steering wheel up,
down, forward, and backward.
3. Pull the lever up to lock the
steering wheel in place.
Do not adjust the steering wheel while
driving.
Windshield Wiper/Washer
INT : Move the lever up to INT for
intermittent wipes, then turn the INT
band up for more frequent wipes or down
for less frequent wipes.
OFF : Use to turn the wipers off.
1X : For a single wipe, briefly move the
wiper lever down. For several wipes, hold
the wiper lever down.
: Pull the windshield wiper lever
toward you to spray windshield washer
fluid and activate the wipers.
SEE WI NDSHI ELD WIPE R/WA SHER 30.

12
Climate Control
1. Temperature Control
2. Air vent selector
3. Fan Speed Control
4. Air Conditioning
Transmission
Manual Mode
This feature allows you to manually select
gears using the paddles located on the
back side of the steering wheel
1. Push the shift lever down
2. Pull the shift lever from
Drive (D) to Manual (M)
3. Pull the right hand lever to
up shift, or the left hand
lever to down shift
SEE MANUA L MOD E 59.
Starting the Engine
The vehicle has a Computer-Controlled
Cranking System. It assists in starting
the engine and protects components. If
the ignition key is turned to START and
then released when the engine begins
cranking, the engine will continue
cranking for a few seconds or until the
engine starts. If the engine does not
start and the key is held in START,
cranking will be stopped after 15
seconds to prevent damage. To
prevent gear damage, cranking is not
allowed if the engine is running. Engine
cranking can be stopped by turning the
ignition key to ACC/ACCESSORY or
LOCK/OFF.
SEE ST ART ING TH E ENG INE 55.
1 2 3 4

13
Vehicle Features
Stereo Bluetooth® Audio
The Bluetooth® system allows users with a
Bluetooth-enabled mobile device to play
audio over the vehicle speakers. The
Bluetooth-enabled mobile device must be
paired with the in-vehicle Bluetooth system
before it can be used.
SEE BLUET OOTH 50
Steering Wheel Controls
Audio steering wheel controls can be
adjusted at the steering wheel.
: Is non-functional
: Is non-functional
: Press up or down to go to the next
or previous Bluetooth audio file.
Press and hold up or down to fast forward
or reverse.
: Press + or – to increase or decrease
the volume.
SEE ST EER ING WH EEL CO NTROLS 50

14
Cruise Control
(ON/OFF): Press to turn the cruise
control system on and off. A white indicator
comes on in the instrument cluster when
cruise is turned on.
RES/+ (Resume/Accelerate): If there is a
set speed in memory, move the
thumbwheel up briefly to resume to that
speed or hold upward to accelerate. If
cruise control is already active, use to
increase vehicle speed.
SET/ − (Set/Coast): Move the thumbwheel
down briefly to set the speed and activate
cruise control. If cruise control is already
active, use to decrease speed.
(Cancel) : Press to disengage cruise
control without erasing the set speed from
memory.
SEE CR UIS E CONTROL 62.

15
Driver Information Center (DIC)
The DIC display is in the instrument cluster.
It shows the status of many vehicle
systems. The controls for the DIC are on the
turn signal lever
.
1. SET/CLR: Press to set or clear the menu
item displayed.
2. : Turn the band to scroll through the
menu items.
3. MENU: Press to display the DIC menus.
This button is also used to return to or exit
the last screen displayed on the DIC.
SEE DR IVER INF ORMAT ION CENT ER (DIC) 41.
Power Outlet
The accessory power outlets can be used to
plug in electrical equipment, such as a cell
phone. The vehicle has an accessory power
outlet in the accessory tray on the
passenger side of dash.
SEE POWER OUTLETS 31
Trunk
Trunk Release
To open the trunk press trunk release
button located between the driver and
passenger seats
The trunk will not release if the vehicle is
locked.
If the vehicle is locked pressing the
twice will unlock the trunk release allowing
access
Trunk Release Button

16
Hard Top
1. Front Security Strap
2. Hard Top Studs
3. Rear Straps
To Remove the Hardtop
1. Undo the Velcro and remove the
Rear Straps (3) from the around
the hard top support bar Undo
the Front Security Strap (1) and
pull free of the loop on the
windshield frame
2. Remove the hard top thumb
screws
3. Lift the hard top off of the vehicle
and hang it on the hard top wall
mount.
To Install the Hardtop
1. Place the pads on the rear of the
hard top on the support bars
2. Rotate the hard top down until
the Hard Top Studs (2) are
protruding through the
windshield post grommets
3. Install and tighten the hard top
thumb screws
4. Wrap the Rear Strap (3) around
the hard top support and thread
through the loop on the hard top.
Pull taught and secure the Velcro.
5. Thread the Front Security Strap
(1) through the windshield loop.
Pull taught and secure the Velcro
1 2 3

17
Performance and Maintenance
Traction Control
The Traction Control System (TCS) limits
wheel spin. The system is on when the
vehicle is started.
To turn off traction control, press
and release the TCS button on
the center console. The traction
off light illuminates. Press and
release the TCS button again
to turn traction control back on.
SEE TRACT ION CONTROL 61
Engine Oil Life Monitor
The engine oil life monitor calculates
engine oil life based on vehicle use and
displays the: %CHANGE message on the DIC
when it is necessary to change the engine
oil and filter. Remember, the oil life display
must be reset after each oil change. It will
not reset itself.
Resetting the Oil Life System
1. Press the MENU button to show
Remaining Oil Life on the display.
This display shows an estimate of
the oil’s remaining useful life. If
99% is displayed, that means that
99% of the current oil life
remains.
2. To reset the engine oil life
system, press the SET/CLR button
while the oil life display is active.
After a few seconds, there will be
a single chime and the oil life will
be reset to 100%.
Be careful not to reset the oil life display
accidentally at any time other than when
the oil has just been changed. It cannot be
reset accurately until the next oil change.
SEE ENGIN E OIL LIFE SYSTEM 72

18
Keys and Doors
Remote Keyless Entry System
Vehicle Locator/Panic Alarm 20
Programming Transmitters
to the Vehicle 20
Programming with a
Recognized Transmitter 20
Programming without a
Recognized Transmitter 20
Battery Replacement 21
Door Locks
Door Locks 21
Trunk
Trunk 21
Vehicle Security
Arming the Alarm 22
Disarming the System 22
How to Detect a
Tamper Condition 22
Immobilizer
Immobilizer Operation 22

19
Remote Keyless Entry System
Your Key ring, Ignition Key and Keyless
Entry Transmitter are designed to work
together
If a replacement or additional copy is
required contact the Vanderhall Service
Department
If the Key becomes difficult to insert or turn
in the ignition. Inspect the key grooves for
debris.
Pressing the release button will extend the
key blade. The key can be used for the
vehicles ignition.
If there is a decrease in the transmitters
operating range:
Try moving closer to the vehicle,
you may be out of range
Other vehicles or objects may be
blocking the signal.
Replace the transmitter's battery.
See “Battery Replacement”
section.
If the transmitter is still not
working correctly, contact
Vanderhall Service Department
(Lock): Press to lock both doors and the
trunk. The turn signal indicators will flash.
To indicate the vehicle is locked.
Pressing the button a second time will
produce the horn may sound and flash the
turn signal to indicate the vehicle is locked.
If the driver door is open when is
pressed, all doors lock except the driver
door.
If the passenger door is open when is
pressed, all doors lock.

20
(Unlock) : Press to unlock both doors.
The turn signal indicators flash, and the
headlights will come on to indicate
unlocking has occurred.
Pressing may also disarm the theftdeterrent system.
Vehicle Locator/Panic Alarm
Press and release one time to initiate
vehicle locator. The exterior lamps flash
and the horn chirps three times. Press and
hold for at least three seconds to sound
the panic alarm. The horn sounds and the
turn signals flash for 30 seconds until is
pressed again, or the key is placed in the
ignition and turned to ON/RUN.
Programming Transmitters to the
Vehicle
Only RKE transmitters programmed to this
vehicle will work. If a transmitter is lost or
stolen, a replacement can be purchased
and programmed through the Vanderhall
Service Department. When the
replacement transmitter is programmed to
this vehicle, all remaining transmitters must
also be reprogrammed. Any lost or stolen
transmitters will no longer work once the
new transmitter is programmed.
Programming with a Recognized
Transmitter
To program a new key:
1. Insert the original, already programmed
key in the ignition and turn the key to the
ON/ RUN position.
2. Turn the key to LOCK/OFF, and remove
the key.
3. Insert the new key to be programmed
and turn it to the ON/RUN position
The security light will turn off once the key
has been programmed.
Repeat Steps 1–3 if additional keys are to
be programmed. If a key is lost or damaged,
see your dealer to have a new key made.
Programming without a Recognized
Transmitter
Program a new key to the vehicle when a
recognized key is not available. If there are
no currently recognized keys available,
follow this procedure to program the first
key. This procedure will take approximately
30 minutes to complete for the first key.
The vehicle must be off and all of the keys
you wish to program must be with you.
1. Insert the new vehicle key into the
ignition.
2. Turn to ON/RUN. The security light will
come on.

21
3. Wait 10 minutes until the security light
turns off.
4. Turn the ignition to LOCK/OFF.
5. Repeat Steps 2–4 two more times. After
the third time, turn to ON/RUN; the key is
learned and all previously known keys will
no longer work with the vehicle.
Remaining keys can be learned by following
the procedure in “Programming with a
Recognized Transmitter.”
Battery Replacement
The battery is not rechargeable. To
replace the battery:
1. Press the button on the transmitter to
extend the key
2. Remove the battery cover by prying with
a finger.
3. Remove the old battery.
4. Insert the new battery, positive side
facing up. Replace with a CR2032 or
equivalent battery.
5. Snap the battery cover back on to the
transmitter.
Door Locks
To unlock or lock the doors from the
outside of the vehicle. Using the Remote
Keyless Entry fob press the (Lock)
button to lock or the (Unlock) to
unlock.
Trunk
To open the trunk press trunk release
button located between the driver and
passenger seats
The trunk will not release if the vehicle is
locked.
If the vehicle is locked pressing the
twice will unlock the trunk release allowing
access
When closing the trunk, close from the
center and ensure it is fully latched.
Caution
When replacing the battery, do not
touch any of the circuitry on the
transmitter. Static from your body
could damage the transmitter.

22
Vehicle Security
This Vehicle is equipped with a theft
deterrent alarm; however this does not
make the vehicle impossible to steal.
Arming the Alarm
1. Close both doors, the trunk and
hood.
2. Lock the vehicle with the RKE
transmitter.
3. After 30 seconds the alarm
system will arm. Pressing on
the RKE transmitter a second
time will bypass the 30-second
delay and immediately arm the
alarm system.
If the driver door is opened without first
unlocking with the RKE transmitter, the
horn will chirp and the lights will flash to
indicate pre-alarm. If the vehicle is not
started, or the door is not unlocked by
pressing on the RKE transmitter during
the 10-second pre-alarm, the alarm will be
activated.
If a door, the hood, or the trunk is opened
without first unlocking with the RKE
transmitter, the turn signals will flash and
the horn will sound for about 30 seconds.
The alarm system will then re-arm to
monitor for the next unauthorized event.
Disarming the System
To disarm the system, either unlock the
doors using the RKE transmitter, or start
the vehicle with a recognized transmitter in
the vehicle.
To avoid setting off the alarm by accident:
Press on the RKE transmitter.
Start the vehicle.
To avoid setting off the alarm by accident:
Lock the vehicle after all
occupants have left the vehicle
and all doors are closed.
Always unlock a door with the
RKE transmitter.
Do not reach over the door and
pull the interior door handle
How to Detect a Tamper Condition
If is pressed on the transmitter and the
horn chirps and the lights flash three times,
an alarm occurred previously while the
alarm system was armed.
Immobilizer
Immobilizer Operation
This vehicle has a passive theft-deterrent
system. The system does not have to be
manually armed or disarmed The vehicle is
automatically immobilized when the key is
removed from the ignition. The system is
automatically disarmed when the vehicle is
started with the correct key. The key uses a
transponder that matches an immobilizer
control unit in the vehicle and
automatically disarms the system. Only an
authorized key starts the vehicle. The
vehicle may not start if the key is damaged.

23
The security light in the instrument cluster
comes on if there is a problem with arming
or disarming the theft-deterrent system.
When trying to start the vehicle, the
security light comes on briefly when the
ignition is turned on.
If the engine does not start and the security
light stays on, there is a problem with the
system. Turn the ignition off and try again.
If the engine still does not start, and the
key appears to be undamaged or the light
continues to stay on, try another ignition
key. If the engine does not start with the
other key, the vehicle needs service. If the
vehicle does start, the first key may be
damaged. See your dealer who can service
the theft-deterrent system and have a new
key made.
Do not leave the key or device that disarms
or deactivates the theft-deterrent system in
the vehicle.

24
Seats and Restraints
Seats
Seat Adjustment 24
Heated Seats 24
Safety Belts
Why safety Belts Work 26
How to wear safety
belts properly 26
Securing Lap and
shoulder Belt 27
Unlatching Lap and
Shoulder Belt 27
Seats
Seat Adjustment
Warning
You can lose control of the vehicle if you
try to adjust a driver seat while the
vehicle is moving. Adjust the driver seat
only when the vehicle is not moving.
To adjust the seat:
1. Pull up on the handle at the front of the
seat.
2. Slide the seat to the desired position and
release the handle.
3. Try to move the seat back and forth to be
sure it is locked in place.
Heated Seats
Warning
If you cannot feel temperature change
or pain to the skin, the seat heater may
cause burns. To reduce the risk of burns,
people with such a condition should use
care when using the seat heater,
especially for long periods of time. Do
not place anything on the seat that
insulates against heat, such as a blanket,
cushion, cover, or similar item. This may
cause the seat heater to overheat. An
overheated seat heater may cause a
burn or may damage the seat.

25
To Turn on the heated seats press the
button. Three lights will appear on the
button indicating the heater is on High
Press a second time 2 lights will appear on
the button indicating Medium heat
Pressing the button a third time 1 light will
be illuminated indicating Low heat
Pressing the button a fourth time will turn
the Heated seats off
Safety Belts
This section of the manual describes how to
use safety belts properly. It also describes
some things not to do with safety belts.
Warning
Do not let anyone ride where a safety
belt cannot be worn properly. In a crash,
if you or your passenger(s) are not
wearing safety belts, injuries can be
much worse than if you are wearing
safety belts. You can be seriously injured
or killed by hitting things inside the
vehicle harder or by being ejected from
the vehicle. In addition, anyone who is
not buckled up can strike other
passengers in the vehicle.
It is extremely dangerous to ride in a
cargo area, inside or outside of a
(Continued)
Warning
Vehicle. In a collision, passengers riding
in these areas are more likely to be
seriously injured or killed. Do not allow
passengers to ride in any area of the
vehicle that is not equipped with seats
and safety belts.
Always wear a safety belt, and check
that all passenger(s) are restrained
properly too.

26
Why Safety Belts Work
When riding in a vehicle, you travel as fast
as the vehicle does. If the vehicle stops
suddenly, you keep going until something
stops you. It could be the windshield, the
instrument panel, or the safety belts!
When you wear a safety belt, you and the
vehicle slow down together. There is more
time to stop because you stop over a longer
distance and, when worn properly, your
strongest bones take the forces from the
safety belts. That is why wearing safety
belts make such good sense.
How to Wear Safety Belts Properly
This section is only for people of adult size.
Follow those rules for everyone's
protection.
It is very important for all occupants to
buckle up. Statistics show that unbelted
people are hurt more often in crashes than
those who are wearing safety belts. There
are important things to know about
wearing a safety belt properly
Sit up straight and always keep
your feet on the floor in front of
you.
Always use the correct buckle for
your seating position.
Wear the lap part of the belt low
and snug on the hips, just
touching the thighs. In a crash,
this applies force to the strong
pelvic bones and you would be
less likely to slide under the lap
belt. If you slid under it, the belt
would apply force on your
abdomen. This could cause
serious or even fatal injuries.
Wear the shoulder belt over the shoulder
and across the chest. These parts of the
body are best able to take belt restraining
forces. The shoulder belt locks if there is a
sudden stop or crash.

27
Warning
You can be seriously injured, or even
killed, by not wearing your safety belt
properly.
Never allow the lap or
shoulder belt to become loose
or twisted.
Never wear the shoulder belt
under both arms or behind
your back.
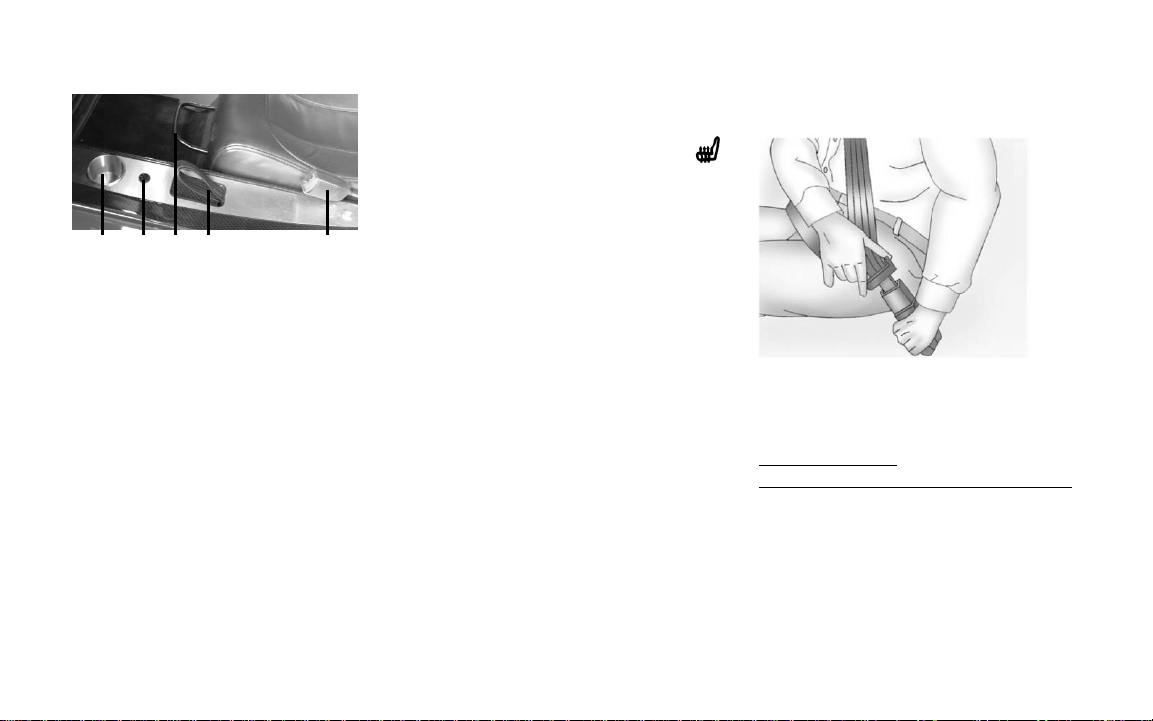
Securing Lap-Shoulder Belt
Both Driver and Passenger seats have a lapshoulder belt. The following instructions
explain how to wear a lap-shoulder belt
properly.
1. Sit up straight
2. Grasp the latch plate and pull the
belt across your body. Do not
allow the belt to become twisted
3. If you pull rapidly the belt may
lock. If this occurs allow the belt
to retract slightly then continue
pulling the belt across your body
more slowly.
4. Push the latch plate in to the
buckle until a click is heard
5. Pull on the latch plate to ensure it
is secure.
6. To make the Lap Belt tight, pull
up on the shoulder belt
Unlatching Lap and Shoulder Belt
To unlatch the belt, press the red button on
the buckle, the belt will return to its stowed
position.

28
Instruments and Controls
Controls
Steering Wheel Adjustment 29
Steering Wheel Controls 29
Horn 29
Windshield Wiper/Washer 30
Power Outlets 31
Warning Lights, Gauges,
and Indicators
Instrument Cluster 32
Speedometer 33
Odometer 33
Trip Odometer 33
Tachometer 33
Fuel Gauge 33
Charging System 34
Malfunction Indicator Lamp
(Check Engine Light) 34
Emissions Inspection and
Maintaince Programs 35
Service Vehicle Soon Light 36
Owner’s Manual Indicator 36
Brake System Warning Light 36
Antilock Brake System
(ABS) Warning Light 37
Power Steering Warning Light 37
Traction Off Light 38
Traction Control System
(TSC) Light 38
Engine Coolant Temperature
Warning Light 39
Engine Oil Pressure Light 39
Low Fuel Warning Light 40
Immobilizer Light 40
Reduced Engine Power Light 40
High- Beam On Light 40
Daytime Running Lamps (DRL)
Indicator Light 41
Lamps On Reminder 41
Cruise Control Light 41
Door Ajar Light 41
DIC Operation and Displays
Information Displays
Driver Information Center (DIC) 41
DIC Buttons 42
DIC Menu Items 42
Units 42
Language 42
Remaining Oil Life 42
Vehicle Messages 43
Engine Oil Messages 43
Trip computer
Average Speed 44
Fuel Range 44
Average Fuel Economy 44
Timer 45

29
Controls
Steering Wheel Adjustment
To adjust the steering wheel:
1. Pull the lever down.
2. Move the steering wheel up,
down, forward, and backward.
3. Pull the lever up to lock the
steering wheel in place.
Do not adjust the steering wheel while
driving.
Steering Wheel Controls
Audio steering wheel controls can be
adjusted at the steering wheel.
: Is non-functional
: Is non-functional
: Press up or down to go to the next
or previous audio file on a Bluetooth paired
device.
Press and hold up or down to fast forward
or reverse.
: Press + or – to increase or decrease
the volume.
Horn
Press the Steering Wheel Pad to sound the
horn

30
Windshield Wiper/Washer
The Windshield wiper/washer lever is
located on the right of the steering wheel
Move the lever to one of the following
positions
HI : use for fast wiping
Lo : use for slow wiping
INT : use for intermittent wipes, then turn
the INT band up for more frequent
wipes or down for less frequent wipes.
OFF : Use to turn the wipers off.
1X (Mist): For a single wipe, briefly move
the wiper lever down. For several wipes,
hold the wiper lever down.
: Pull the windshield wiper lever
toward you to spray windshield washer
fluid and activate the wipers.
Wiper Parking
If the wiper lever is in HI,LO or INT when
the ignition is turned off the wipers will
stop immediately
If the windshield wiper lever is then moved
to OFF before the driver door is opened or
within 10 minutes, the wipers will restart
and move to the base of the windshield.
If the ignition is put in OFF while the wipers
are performing wipes due to windshield
washing, the wipers continue to run until
they reach the base of the windshield.
(Windshield Washer) : Pull the
windshield wiper lever toward you to spray
windshield washer fluid and activate the
wipers. The wipers will continue until the
lever is released or the maximum wash
time is reached. When the windshield
wiper lever is released, additional wipes
may occur depending on how long the
windshield washer had been activated. SEE
WASH ER FLUID 79 for information on
filling the windshield washer fluid reservoir.

31
Power Outlets
The accessory power outlets can be used to
plug in electrical equipment, such as a cell
phone. The vehicle has an accessory power
outlet in the accessory tray on the
passenger side of dash.
Remove the cover to access and replace
when not in use.
Warning
Power is always supplied to the outlets.
Do not leave electrical equipment
plugged in when the vehicle is not in use
because the vehicle could catch fire and
cause injury or death.
Caution
Leaving electrical equipment plugged in
for an extended period of time while the
vehicle is off will drain the battery.
Always unplug electrical equipment
when not in use and do not plug in
equipment that exceeds the maximum
20 amp rating.
Certain accessory power plugs may not be
compatible with the accessory power outlet
and could overload vehicle or adapter
fuses. If a problem is experienced, contact
Vanderhall Service.
When adding electrical equipment, be sure
to follow the proper installation
instructions included with the equipment.
Warning Lights, Gauges, and
Indicators
Warning lights and gauges can signal that
something is wrong before it becomes
serious enough to cause an expensive
repair or replacement. Paying attention to
the warning lights and gauges could
prevent injury.
Some warning lights come on briefly when
the engine is started to indicate they are
working. When one of the warning lights
comes on and stays on while driving, or
when one of the gauges shows there may
be a problem, check the section that
explains what to do. Waiting to do repairs
can be costly and even dangerous.

32
Instrument Cluster

33
Speedometer
The speedometer shows the vehicle's
speed in either kilometers per hour (km/h)
or miles per hour (mph).
Odometer
The odometer shows how far the vehicle
has been driven, in either kilometers or
miles.
Trip Odometer
The trip odometer shows how far the
vehicle has been driven since the trip
odometer was last reset.
Press the trip odometer reset stem on the
cluster to switch between the odometer
and trip odometer. To reset the trip
odometer to zero, press and hold the trip
odometer reset stem while the trip
odometer is displayed. Be careful not to
reset the engine oil life monitor
accidentally.
Tachometer
The tachometer displays the engine
speed in revolutions per minute (rpm).
Fuel Gauge
The fuel gauge indicates about how much
fuel is left when the ignition is turned to
ON/RUN. When the tank nears empty, the
low fuel warning light will come on. There is
still a little fuel left, but the vehicle's fuel
tank should be filled soon. SEE LOW FUE L
WARNING LIGHT 40 for more information.

34
Charging System Light
This light will come on briefly when the
ignition is turned on, and the engine is not
running, as a check to show it is working.
It should go out when the engine is started.
If it stays on, or comes on while driving,
there may be a problem with the electrical
charging system. Contact the Vanderhall
Service department. Driving while this light
is on could drain the battery. If a short
distance must be driven with the light on,
turn off all accessories, such as the radio
and air conditioner, to help reduce the
drain on the battery.
Malfunction Indicator Lamp (Check
Engine Light)
This light is part of the vehicle’s emission
control on-board diagnostic system. If this
light is on while the engine is running, a
malfunction has been detected and the
vehicle may require service. The light
should come on to show that it is working
when the ignition is in ON/RUN with the
engine not running. SEE IGNITI ON POSITIONS
54.
Malfunctions are often indicated by the
system before any problem is noticeable.
Being aware of the light and seeking service
promptly when it comes on may prevent
damage
Caution
If the vehicle is driven continually with
this light on, the emission control
system may not work as well, the fuel
economy may be lower, and the vehicle
may not run smoothly. This could lead
to costly repairs.
Caution
Modifications to the engine,
transmission, exhaust, intake, or fuel
system, or the use of replacement tires
that do not meet the original tire
specifications, can cause this light to
come on. This could lead to costly
repairs. This could also affect the
vehicle’s ability to pass an Emissions
Inspection/ Maintenance test.

35
If the light is flashing: A malfunction has
been detected that could damage the
emission control system and increase
vehicle emissions. Diagnosis and service
may be required.
To help prevent damage, reduce vehicle
speed and avoid hard accelerations and
uphill grades.
If the light continues to flash, find a safe
place to park. Turn the vehicle off and wait
at least 10 seconds before restarting the
engine. If the light is still flashing, follow the
previous guidelines and see your dealer for
service as soon as possible.
If the light is on steady: A malfunction
has been detected. Diagnosis and service
may be required.
Check the following:
A loose or missing fuel cap may
cause the light to come on. SEE
FILL ING TH E TANK 64. A few
driving trips with the cap properly
installed may turn the light off.
Poor fuel quality can cause
inefficient engine operation and
poor drivability, which may go
away once the engine is warmed
up. If this occurs, change the fuel
brand. It may require at least one
full tank of the proper fuel to turn
the light off. SEE FU EL 64.
If the light remains on, see your dealer.
Emissions Inspection and Maintenance
Programs
If the vehicle requires an Emissions
Inspection/Maintenance test, the test
equipment will likely connect to the
vehicle's Data Link Connector (DLC).
The DLC is under the instrument panel to
the right of the steering wheel. Connecting
devices that are not used to perform an
Emissions Inspection/Maintenance test or
to service the vehicle may affect vehicle
operation. Contact Vanderhall Service if
assistance is needed

36
The vehicle may not pass inspection if:
The light is on when the engine is
running.
The light does not come on when
the ignition is in ON/RUN with the
engine not running.
Critical emission control systems
have not been completely
diagnosed. If this happens, the
vehicle would not be ready for
inspection and might require
several days of routine driving
before the system is ready for
inspection. This can happen if the
12-volt battery has recently been
replaced or run down, or if the
vehicle has been recently
serviced.
Contact Vanderhall Service if the vehicle
will not pass or cannot be made ready for
the test.
Service Vehicle Soon Light
For vehicles with this light, it comes on if a
condition exists that may require the
vehicle to be taken in for service.
If the light comes on, contact Vanderhall
Service as soon as possible.
Owner Manual Indicator
This symbol is shown when you need to see
the owner manual for additional
instructions or information.
Brake System Warning Light
The vehicle brake system consists of two
hydraulic circuits. If one circuit is not
working, the remaining circuit can still work
to stop the vehicle. For normal braking
performance, both circuits need to be
working If the warning light comes on,
there is a brake problem. Have the brake
system inspected right away.
Warning
The brake system might not be working
properly if the brake system warning
light is on. Driving with the brake system
warning light on can lead to a crash. If
the light is still on after the vehicle has
been pulled off the road and carefully
stopped, have the vehicle towed for
service.

37
This light should come on briefly when the
ignition is turned to ON. If it does not come
on then, have it fixed so it will be ready to
warn if there is a problem.
When the ignition is on, the brake system
warning light will also come on when the
parking brake is set. The light will stay on if
the parking brake does not fully release. If
it stays on after the parking brake is fully
released, it means there is a brake
problem.
If the light comes on while driving, carefully
pull off the road and stop. The pedal may
be harder to push or may go closer to the
floor. It may take longer to stop. If the light
is still on, have the vehicle towed for
service. SEE TOWING THE VEHI CL E 98
Antilock Brake System (ABS) Warning
Light
This light comes on briefly when the engine
is started.
If the light stays on, turn the ignition to
LOCK/OFF or if the light comes on, stop as
soon as possible and turn the ignition off.
Then start the engine again to reset the
system. If the light still stays on, or comes
on again while driving, the vehicle needs
service. Contact Vanderhall Service. If the
regular brake system warning light is not
on, the brakes will still work, but the
antilock brakes will not work. If the regular
brake system warning light is also on, the
antilock brakes will not work and there is a
problem with the regular brakes. SEE BR AKE
SYSTEM WARN ING LIGH T 36.
The ABS warning light will come on briefly
when the ignition is turned to ON/RUN.
This is normal. If the light does not come on
then, have it fixed so it will be ready to
warn if there is a problem.
Power Steering Warning Light
This light comes on briefly when the
ignition is turned to ON/RUN as a check to
show it is working. If it does not come on
contact Vanderhall Service.
If this light stays on, or comes on while
driving, the system may not be working. If
this happens, contact Vanderhall Service.

38
Traction off Light
This light comes on briefly while starting
the engine. If it does not, have the vehicle
serviced by your dealer. If the system is
working normally, the indicator light then
turns off.
The traction off light comes on when the
Traction Control System (TCS) has been
turned off by pressing and releasing the
TCSbutton.
If the TCS is off, wheel spin is not limited.
Adjust driving accordingly.
SEE TRACT ION CONTROL/ELECTRONIC ST ABILITY
CONTROL 61.
Traction Control System (TCS) Light
The Traction Control System (TCS)
indicator/warning light comes on briefly
when the engine is started.
If the light does not come on, contact
Vanderhall Service. If the system is working
normally, the indicator light turns off.
If the light is on and not flashing, the TCS,
may have been disabled.
If the indicator/warning light is on and
flashing, the TCS system is actively working.
SEE TRACT ION CONTROL/ELECTRON IC ST ABILITY
CONTROL 61.

39
Engine Coolant Temperature Warning
Light
This light comes on briefly while starting
the vehicle.
If it does not, contact Vanderhall Service. If
the system is working normally the
indicator light goes off.
Caution
The engine coolant temperature
warning light indicates that the vehicle
has overheated. Driving with this light
on can damage the engine and it may
not be covered by the vehicle warranty.
SEE ENGIN E OVER HE ATING 78.
The engine coolant temperature warning
light will come on when the engine has
overheated. If this happens, pull over and
turn off the engine as soon as possible.
SEE ENGIN E OVER HE ATING 78.
Engine Oil Pressure Light
Caution
Lack of proper engine oil maintenance
can damage the engine. Driving with the
engine oil low can also damage the
engine. Check the oil level as soon as
possible. Add oil if required, but if the oil
level is within the operating range and
the oil pressure is still low, contact
Vanderhall Service. Always follow the
maintenance schedule for changing
engine oil.
This light should come on briefly as the
engine is started. If it does not come on,
contact Vanderhall Service. If the light
comes on and stays on, it means that oil is
not flowing through the engine properly.
The vehicle could be low on oil and might
have some other system problem contact
Vanderhall Service.

40
Low Fuel Warning Light
This light comes on for a few seconds when
the ignition is turned on as a check to
indicate it is working. If it does not come
on, have it fixed. This light comes on when
the vehicle is low on fuel. To turn the light
off, add fuel to the fuel tank.
SEE FILLI NG THE TANK 64
Immobilizer Light
The immobilizer light should come on
briefly as the engine is started. If it does not
come on, there may be an issue with the
system, contact Vanderhall Service. If the
system is working normally, the indicator
light turns off. If the light stays on and the
engine does not start, there could be a
problem with the immobilizer system. SEE
IMMOBILIZER OP ERATIO N 22.
Reduced Engine Power Light
The reduced engine power light should
come on briefly as the engine is started. If it
does not come on, contact Vanderhall
Service.
This light, along with the malfunction
indicator lamp, displays when a noticeable
reduction in the vehicle's performance
occurs.
The vehicle can be driven at a reduced
speed when the reduced engine power
light is on but acceleration and speed might
be reduced. If this light stays on, contact
Vanderhall Service as soon as possible for
diagnosis and repair.
High-Beam On Light
This light comes on when the high-beam
headlamps are in use. SEE HE ADLAM P
HIGH /LOW-BEAM CHANGER 46.

41
Daytime Running Lamps (DRL)
Indicator Light
This light turns on whenever the Daytime
Running Lamps are in use.
Lamps on Reminder
This light comes on when the exterior
lamps are in use. SEE EXTERIOR LA MP
CONTRO LS 46.
Cruise Control Light
For vehicles with cruise control, the cruise
control light is white when the cruise
control is armed, and turns green when the
cruise control is set and active.
The light turns off when the cruise control
is turned off. SEE CR UI SE CONTR OL 62.
Door Ajar Light
This light comes on when a door is
open or not securely latched. Before
driving, check that both doors are fully
closed.
Information Displays
Driver Information Center (DIC)
The DIC displays information about your
vehicle. It also displays warning messages if
a system problem is detected. SEE VE HIC LE
MESSAG ES 43. All messages appear in the
DIC display in the instrument cluster.
DIC Operation and Displays
The DIC has different displays which can be
accessed by using the DIC buttons on the
turn signal lever on the left side of the
steering wheel. The DIC displays trip, fuel,
and warning messages if a system problem
is detected. SEE TR IP CO MPU TER 44 A ND
VEHICL E MES SAG ES 43.

42
DIC Buttons
1. SET/CLR: Press to set or clear the
menu item displayed. This is not
used to reset the trip odometer.
To reset the trip odometer, use
the reset button on the
tachometer in the instrument
cluster.
2. (Band): Turn the band to
scroll through the menu items.
3. MENU: Press to display the DIC
menus. This button is also used to
return to or exit the last screen
displayed on the DIC.
DIC Menu Items
Press MENU to view the DIC menus. Some
items display in the upper display area,
some in the lower display area, and others
use both the upper and lower display areas.
Use to scroll through the menu items.
Not all items are available on every vehicle.
The following is a list of all possible
menu items:
Units
Language
Tire Learn
Remaining Oil Life
Units
This menu is only available while the
vehicle is stationary. Press SET/CLR while
the unit display is active and move to
change units when UNIT SET is displayed.
Press SET/ CLR to confirm the setting. You
will have to select 1, 2, or 3 for the unit
display. 1 is Imperial units, 2 is US units,
and 3 is metric units. This will
change the displays on the cluster and DIC
to the type of measurements you select.
Language
This menu is only available while the
vehicle is stationary. Press SET/CLR while
the language display is active and move w x
to change the language of the displays
when LANG SET is displayed. You will have
to select 1 or 2 for the language display. 1 is
Alphabet and 2 is Arabic Numeral. Press
SET/ CLR to confirm the setting.
Remaining Oil Life
This menu is only available while the
vehicle is stationary. This display shows an
estimate of the oil's remaining useful life. If
99 % is displayed, that means 99% of
the current oil life remains.
When the remaining oil life is low, the
% CHANGE message will appear on
the display. The oil should be changed as
soon as possible. SEE EN GINE OIL 71.

43
In addition to the engine oil life system
monitoring the oil life, additional
maintenance is recommended in the
Maintenance Schedule. SEE MAINTENANC E
SCHEDULE 101.
Remember, the oil life display must be
reset after each oil change. It will not reset
itself. Also, be careful not to reset the oil
life display accidentally at any time other
than when the oil has just been changed. It
cannot be reset accurately until the next oil
change. To reset the engine oil life system,
press the SET/CLR button while the oil life
display is active. SEE ENGIN E OIL LI FE SYSTEM
71.
Vehicle Messages
DIC messages display when the status of
the vehicle has changed and action may be
needed to correct the condition. Multiple
messages appear one after another.
Press any of the DIC buttons on the turn
signal lever to acknowledge and clear them
from the display. More urgent messages
cannot be cleared from the DIC display. All
messages should be taken seriously.
Clearing messages will not correct the
problem. Vehicle messages appear as code
numbers.
25 : Left Front Turn Signal Failure
26 : Left Rear Turn Signal Failure
27 : Right Front Turn Signal Failure
28 : Right Rear Turn Signal Failure
52 : Change Timing Belt
84 : Engine Power Is Reduced
89 : Service Vehicle Soon
Engine Oil Messages
% CHANGE
This message displays when the engine oil
needs to be changed. When changing the
engine oil, be sure to reset the Oil Life
System. SEE ENGIN E OIL LIFE SYSTE M 72,
ENGINE OIL 71, AND MAINT ENANC E
SCHEDULE 101

44
Trip Computer
The trip computer is located in the Driver
Information Center (DIC). It provides the
driver with driving information such as
average speed, fuel range, average fuel
economy, and a timer.
1. SET/CLR: Press to set or clear the
menu item displayed. This is not
used to reset the trip odometer.
To reset the trip odometer, use
the reset button on the
tachometer in the instrument
cluster.
2. (Band): Turn the band to
scroll through the menu items.
3. MENU: Press to display the DIC
menus. This button is also used to
return to or exit the last screen
displayed on the DIC.
To operate the trip computer, turn band on
the turn signal lever.
The following is a list of the trip computer
items”
. Average Speed
. Fuel Range
. Average Fuel Economy
. Timer
Some items can be reset by pressing the
SET/CLR button.
Average Speed
Metric
English
This display shows the average speed. To
reset the average speed to zero, press and
hold the SET/ CLR button while the average
speed is displayed.
Fuel Range
This displays the approximate distance the
vehicle can be driven without refueling. The
fuel range estimate is based on an average
of the vehicle's fuel economy and recent
driving style as well as the amount of fuel
remaining in the fuel tank.
Average Fuel Economy
Metric English

45
This display shows the approximate
average liters per 100 kilometers (L/ 100
km) or miles per gallon (mpg).
This number is calculated based on the
number of L/100 km (mpg) recorded since
the last time this menu item was reset. This
number reflects only the approximate
average fuel economy that the vehicle has
right now, and will change as driving
conditions change. To reset the average
fuel economy, press and hold the SET/ CLR
button while the average fuel economy is
displayed.
Timer
This display can be used as a timer. To
start/stop the timer, press SET/ CLR while
the timer is displayed. The display will show
the amount of time that has passed since
the timer was last reset, not including time
the ignition is off. The timer will record up
to 99:59 hours, after which the display will
return to zero. To reset the timer to zero,
press and hold SET/CLR.

46
Lighting
Exterior Lighting
Headlamps 46
Headlamp High/
Low-Beam Changer 46
Momentary High Beams 46
Hazard Warning Flash 47
Turn And Lane Change
Signals 48
Lighting Features
Battery Load Management 48
Battery Power Protection 48
Exterior Lighting
Battery Saver 48
Exterior Lighting
Headlamps
The Headlamps are turned on automatically
at normal brightness when the vehicle is
running.
Headlamp High/ Low-Beam Changer
(Headlamp High/Low-Beam Changer)
: Push the turn signal lever away from you
to turn the high beams on. Push the lever
again or pull the lever toward you to return
to low beams.
This indicator light turns on in the
instrument cluster when the high-beam
headlamps are on.
Momentary High Beams
To momentary activate the high beams;
pull the turn signal lever all the way toward
you. The release it.

47
Hazard Warning Flashers
(Hazard Warning Flasher) :
Press and momentarily hold this button to
make the front and rear turn signal lamps
flash on and off. This warns others that you
are having trouble. Press and momentarily
hold again to turn the flashers off.
Turn and Lane-Change Signals
Move the lever all the way up or down to
signal a turn.
An arrow on the instrument cluster will
flash in the direction of the turn or lane
change.
Raise or lower the lever until the arrow
starts to flash to signal a lane change. Hold
it there until the lane change is completed.
If the lever is briefly pressed and released,
the turn signal flashes three times.
The lever returns to its neutral position
when it is released.
If after signaling a turn or lane change the
arrow flashes rapidly or does not come on a
fuse may have failed. SEE FU SES AND CIRCUIT
BREAKE RS 85
Turn Signal On Chime
If the turn signal is left on for more than 1.2
km (0.75 mi), a chime will sound at each
flash of the turn signal. To turn the chime
off, move the turn signal lever to the
neutral position.

48
Lighting Features
Battery Load Management
The vehicle has Electric Power
Management (EPM) that estimates the
battery's temperature and state of charge.
It then adjusts the voltage for best
performance and extended life of the
battery.
When the battery's state of charge is low,
the voltage is raised slightly too quickly
bring the charge back up. When the state
of charge is high, the voltage is lowered
slightly to prevent overcharging. If the
vehicle has a voltmeter gauge or a voltage
display on the Driver Information Center
(DIC), you may see the voltage move up or
down. This is normal. If there is a problem,
an alert will be displayed.
The battery can be discharged at idle if the
electrical loads are very high. This is true
for all vehicles. This is because the
alternator
may not be spinning fast enough at idle to
produce all the power needed for very high
electrical loads.
A high electrical load occurs when several of
the following are on, such as: headlamps,
high beams, climate control fan at high
speed, heated seats, engine cooling fans,
and loads plugged into accessory power
outlets.
EPM works to prevent excessive discharge
of the battery. It does this by balancing the
generator's output and the vehicle's
electrical needs. It can increase engine idle
speed to generate more power, whenever
needed. It can temporarily reduce the
power demands of some accessories.
Normally, these actions occur in steps or
levels, without being noticeable. In rare
cases at the highest levels of corrective
action, this action may be noticeable to the
driver.
Battery Power Protection
The battery saver feature is designed to
protect the vehicle's battery.
If some interior lamps are left on and the
ignition is turned off, the battery rundown
protection system automatically turns the
lamp off after some time.
Exterior Lighting Battery Saver
The exterior lamps turn off about 10
minutes after the ignition is turned off, if
the parking lamps or headlamps have been
manually left on. This protects against
draining the battery. To restart the 10minute timer, turn the exterior lamp
control to the off position and then back to
the parking lamp or headlamp position.
To keep the lamps on for more than 10
minutes, the ignition must be in the
ACC/ACCESSORY or ON/RUN position.

49
Bluetooth® Audio
Blue Tooth Audio
Introduction 50
Pairing Devices 50
Steering Wheel Controls 50

50
Bluetooth Audio
Introduction
The vehicle is equipped with a Bluetooth®
receiver that can be used for playing audio
tracks.
Warning
Taking your eyes off the road for too
long or too often while using any radio
feature can cause a crash. You or others
could be injured or killed. Do not give
extended attention to the radio controls
or Bluetooth audio devices while
driving. Limit your glances at the vehicle
displays and focus your attention on
driving.
Pairing Devices
Pairing an Audio device with:
Turn the Ignition Switch to
Accessory or Run
SEE IGNIT ION PO SITION S 54
Using a Bluetooth audio device
connect to “StreamBlue”
See your cell phone manufacturer's user
guide for Bluetooth functions before
pairing the cell phone.
The Audio system can be controlled with
the Steering Wheel controls adjusted at the
steering wheel.
Steering Wheel Controls
: Is non-functional
: Is non-functional
: Press up or down to go to the next
or previous Bluetooth audio file.
Press and hold up or down to fast forward
or reverse.
: Press + or – to increase or decrease
the volume.

51
Climate Controls
Climate Control Systems
Climate Control Interface 51
Air Vents 52
Heated Seats 52
Climate Control Systems
The climate control systems control the
heating, cooling, and ventilation for the
vehicle.
1. Temperature Control
2. Air Conditioning
3. Fan Control
4. Non-Functional
5. Non-Functional
6. Air Delivery Mode Control
Climate Control Interface
Temperature Control : Turn clockwise or
counterclockwise to increase or decrease
the temperature.
(Fan Control) : Turn clockwise or
counterclockwise to increase or decrease
the fan speed. Turning the fan control to 0
turns the fan off.
Air Delivery Mode Control: Turn clockwise
or counterclockwise to change the current
airflow mode. Select from the following air
delivery modes:
(Vent): Air is directed to the dash vents.
(Bi-Level): Air is divided between the
floor and the dash vents
(Floor): Air is directed to the floor
outlets.
1 2 3 4 5 6

52
(Defog): This mode clears the windows
of fog or moisture. Air is directed to the
floor, and windshield.
(Defrost): This mode clears the
windshield of fog or frost more quickly. Air
is directed to the windshield.
(Air Conditioning) : to use the
system. Turn to the desired speed. Press
to turn the air conditioning on and off.
When is pressed, an indicator light
comes on to show that the air conditioning
is on.
Air Vents
Use the air vents located in the center and
on the side of the dash to direct the airflow.
Move the slats on the center air vents to
direct airflow. Turn the knobs on the side
air vents counterclockwise or clockwise to
open or close off the airflow
Heated Seats
The Controls for the heated seats are
located on the driver and passenger doorsill
To Turn on the heated seats press the
button. Three lights will appear on the
button indicating the heater is on High
Press a second time 2 lights will appear on
the button indicating Medium heat
Pressing the button a third time 1 light will
be illuminated indicating Low heat
Pressing the button a fourth time will turn
the Heated seats off

53
Driving and Operation
Starting and Operation
New Vehicle Break-In 54
Ignition Positions 54
Starting the Engine 55
Transmission
Automatic Transmission 58
Manual Mode 59
Brakes
Antilock Brake
System (ABS) 60
Parking Brake 60
Vehicle Control Systems
Traction Control 61
Cruise Control
Cruise Control 62
Fuel
Fuel 64
Prohibited Fuels 64
Filling the Tank 64

54
Starting and Operation
New Vehicle Break-In
Caution
The vehicle does not need an elaborate
break-in. But it will perform better in the
long run if you follow these guidelines:
Do not drive at a constant
speed, fast or slow, for the
first 805 km (500 mi). Do not
make full-throttle starts.
Avoid making hard stops for
the first 322 km (200 mi) or so.
During this time the new
brake linings are not yet
broken in. Hard stops with
new linings can cause
premature wear and sooner
replacement. This breaking-in
guideline should be followed
every time you get new brake
linings.
Ignition Positions
The ignition switch has four different
positions.
To shift out of P (Park), the ignition must be
in ON/RUN and the brake pedal applied.
0 (STOPPING THE ENGINE/LOCK/ OFF) :
When the vehicle is stopped, turn the
ignition switch to LOCK/ OFF to turn the
engine off.
This position locks the ignition, steering
wheel and transmission.
Do not turn the engine off when the vehicle
is moving. This will cause a loss of power
assist in the brake and steering systems
If the vehicle must be shut off in an
emergency:
1. Brake using a firm and steady
pressure. Do not pump the brakes
repeatedly. This may deplete
power assist, requiring increased
brake pedal force.
2. Shift the vehicle to N (Neutral).
This can be done while the
vehicle is moving. After shifting to
N (Neutral) firmly apply the
brakes and steer the vehicle to a
safe location.
3. Come to a complete stop. Shift to
P (Park). Turn the ignition to
LOCK/OFF.
4. Set the parking brake. SEE
PARKIN G BRAKE 60.

55
If the vehicle cannot be pulled over, and
must be shut off while driving, turn the
ignition to ACC/ ACCESSORY.
Warning
Turning off the vehicle while moving
may cause loss of power assist in the
brake and steering systems. While
driving, only shut the vehicle off in an
emergency.
Caution
Using a tool to force the key to turn in
the ignition could cause damage to the
switch or break the key. Use the correct
key, make sure it is all the way in, and
turn it only with your hand. If the key
cannot be turned by hand, see your
dealer.
1 (ACC/ACCESSORY): This is the position in
which things like the radio and the
windshield wipers can be operated when
the engine is off.
2 (ON/RUN): This position can be used to
operate the electrical accessories and to
display some instrument cluster warning
and indicator lights. This position can also
be used for service and diagnostics, and to
verify the proper operation of the
malfunction indicator lamp as may be
required for emission inspection purposes.
The switch stays in this position when the
engine is running.
If you leave the key in the ACC/ ACCESSORY
or ON/RUN position with the engine off,
the battery could be drained. You may not
be able to start the vehicle if the battery is
allowed to drain for an extended period of
time.
3 (START): This is the position that starts
the engine. When the engine starts, release
the key. The ignition switch returns to
ON/RUN for driving.
A warning tone will sound when the driver
door is opened, the ignition is in
ACC/ACCESSORY or LOCK/ OFF, and the key
is in the ignition. If the ignition becomes
difficult to turn, SEE KEYS 18.
Starting the Engine
Move the shift lever to P (Park) or N
(Neutral). To restart the engine when the
vehicle is already moving, use N (Neutral)
only.

56
Caution
Do not try to shift to P (Park) if the
vehicle is moving. If you do, you could
damage the transmission. Shift to P
(Park) only when the vehicle is stopped.
Retained Accessory Power (RAP)
These vehicle accessories may be used for
up to 10 minutes after the engine is turned
off:
. Heated Seats
. Power Outlet
Shifting out of Park
This vehicle is equipped with a shift lock
control. The shift lock control is designed
to:
Prevent ignition key removal
unless the shift lever is in P (Park)
Prevent movement of the shift
lever out of P (Park) unless the
ignition is in ON/RUN and the
brake pedal is applied.
The shift lock control is always functional
except in the case of an uncharged or low
voltage (less than 9-volt) battery. If the
vehicle has an uncharged
Battery or a battery with low voltage, try
charging or jump starting the battery. See
Jump Starting – North America 0 287.
To shift out of P (Park):
1. Apply the brake pedal.
2. Turn the ignition to ON/RUN.
3. Press down on the shift lever
4. Move the shift lever to the
desired position.

57
Shifting Into Park
1. Hold the brake pedal down and
set the parking brake. SEE
PARKIN G BRA KE 60.
2. Move the shift lever into P (Park)
by pressing down on the shift
lever and pushing the lever all the
way toward the front of the
vehicle.
3. Turn the ignition key to
LOCK/OFF.
Remove the key and take it with you. If you
can leave the vehicle with the ignition key
in your hand, the vehicle is in P (Park).
Torque Lock
If you are parking on a hill and you do not
shift the transmission into P (Park)
properly, the weight of the vehicle may put
too much force on the parking pawl in the
transmission. You may find it difficult to
pull the shift lever out of P (Park). This is
called “torque lock.” To prevent torque
lock, set the parking brake and then shift
into P (Park) properly before you leave the
driver seat. To find out how, see “Shifting
Into Park” previously in this section.
When you are ready to drive, move the
shift lever out of P (Park) before you
release the parking brake.
If torque lock does occur, you may need to
push yours a little uphill to take some of
the pressure from the parking pawl in the
transmission, so you can pull the shift lever
out of P (Park).

58
Transmission
Automatic Transmission
P (Park): In Park the front wheels are
locked. Use this position when starting the
engine or exiting the vehicle, because it will
prevent the vehicle from moving.
The vehicle has a shift lock out. You must
fully apply the brake pedal then press the
shift lever down before you can move from
P (Park) while the ignition key is in
ON/RUN.
Warning
It is dangerous to get out of the vehicle
if the shift lever is not fully in P (Park)
and the parking brake firmly set. As the
vehicle could roll.
Do not leave the vehicle when the
engine is running. The vehicle could
move suddenly, injuring you or others.
To be sure the vehicle will not move
always set the parking brake and move
the shift lever to P (Park).
R (Reverse): Use this gear to back up.
Caution
Shifting to R (Reverse) while the vehicle
is moving forward could damage the
transmission. Shift to R (Reverse) only
after the vehicle is stopped.
N (Neutral): In this position, the engine is
isolated from the front wheels. To restart
the engine when the vehicle is already
moving, use N (Neutral) only.
Use N (Neutral) if the vehicle is being
towed.
D (Drive) : This position is for normal
driving.

59
M (Manual Mode): This position allows you
to change gears similar to a manual
transmission
Manual Mode
To use this feature:
1. Move the shift lever from D
(Drive) rearward to M(Manual
Mode).
While driving in manual mode,
the transmission will remain in
the driver selected gear. When
coming to a stop in the manual
position, the vehicle will
automatically shift into 1 (First)
gear.
2. Pull the right hand lever located
behind the steering wheel to up
shift, or the left hand lever to
down shift
The Driver Information Center (DIC) in the
instrument cluster will change from the
currently displayed message to the letter
“M,” for Manual position, and a number
indicating the current gear.
While using manual mode, the transmission
will have firmer shifting and sportier
performance. This setting can be used for
sport driving.
The transmission will only allow you to shift
into gears appropriate for the current
vehicle speed and engine revolutions per
minute (rpm):
The transmission will not
automatically shift to the next
higher gear if the vehicle speed or
engine rpm is too low.
The transmission will not allow
shifting to the next lower gear if
the vehicle speed or engine rpm
is too high.

60
Brakes
Antilock Brake System (ABS)
This vehicle has ABS, a system that helps
prevent a braking skid.
When the vehicle begins to drive, the ABS
will perform a self-check. A momentary
motor or clicking noise might be heard
during the test, and it might even be
noticed that the brake pedal moves a little.
This is normal.
If there is a problem with ABS, this warning
light stays on. SEE AN TIL OCK BRAK E SYSTEM
(ABS) W AR NIN G LIGHT 37.
The ABS system monitors wheel speed and
braking pressure at each wheel. If while
braking the system senses a wheel is about
to stop rolling the computer will work each
brake, while the driver maintains braking
pressure
ABS can change the brake pressure to each
wheel, as required, faster than any driver
could. This can help you steer around the
obstacles while braking hard.
Remember: ABS does not change the time
needed to get a foot up to the brake pedal
or always decrease stopping distance. If
you get too close to the vehicle in front of
you, there will not be enough time to apply
the brakes if that vehicle suddenly slows or
stops. Always leave enough room up ahead
to stop, even with ABS.
Using ABS
Do not pump the brakes. Just hold the
brake pedal down firmly and let ABS work.
You may hear the ABS pump or motor
operating and feel the brake pedal pulsate.
This is normal.
Braking in Emergencies
ABS allows you to steer and brake at the
same time. In many emergencies, steering
can help more than even the very best
braking.
Parking Brake

61
To set the parking brake, hold the brake
pedal down and pull up on the parking
brake lever. If the ignition is on, the brake
system warning light will come on. See
Brake System Warning Light 0 102.
To release the parking brake, hold the
brake pedal down. Pull the parking brake
lever up until you can press the release
button. Hold the release button in as you
move the brake lever all the way down.
Caution
Driving with the parking brake on can
overheat the brake system and cause
premature wear or damage to brake
system parts. Make sure that the
parking brake is fully released and the
brake warning light is off before driving.
Vehicle Control Systems
Traction Control
System Operation
The vehicle has a Traction Control System
(TCS) which is designed to limit wheel slip.
TCS activates if it senses that any of the
drive wheels are spinning or beginning to
lose traction. When this happens, TCS
applies the brakes to the spinning wheels
and reduces engine power to limit wheel
spin.
If cruise control is being used and the TCS
becomes active, the cruise control system
will disengage. Cruise control may be
turned back on when road conditions allow.
The TCS systems come on automatically
when the vehicle is started and begins to
move. The systems may be heard or felt
while they are operating or while
performing diagnostic checks,
This is normal and does not mean there is a
problem with the vehicle.
Turning the System Off and On
The TSC button is located on the passenger
side of the dash
To turn off TCS, press and release the
button. The traction off light displays in
the instrument cluster.
To turn TCS on again, press and release the
button. The traction off light
displayed in the instrument cluster will turn
off.
If TCS is limiting wheel spin when the
button is pressed, the system will not turn
off until the wheels stop spinning.

62
Cruise Control
Cruise Control
This vehicle is equipped with a cruise
control system. The system will allow the
vehicle to maintain a speed of about
25MPH (40 km/h) or more. Without the
driver keeping their foot on the accelerator
pedal.
If the vehicles Traction Control System
(TSC) begins limiting wheel slip the cruise
control will disengage.
If the brakes are applied, the cruise control
system will disengage.
(On/Off) : Press to turn the cruise
control system on and off. A white indicator
comes on in the instrument cluster when
cruise is turned on.
RES/+ (Resume/Accelerate): If there is a
set speed in memory, move the
thumbwheel up briefly to resume to that
speed or hold upward to accelerate. If
cruise control is already active, use to
increase vehicle speed.
SET/ − (Set/Coast): Move the thumbwheel
down briefly to set the speed and activate
cruise control. If cruise control is already
active, use to decrease speed.
(Cancel) : Press to disengage cruise
control without erasing the set speed from
memory.
Setting Cruise Control
To set cruise control:
1. Press to turn the cruise
system on.
2. Bring the vehicle to the speed
desired.
3. Move the thumbwheel down to
SET/- and release it.
4. Take your foot off the accelerator
pedal.
The cruise control indicator on the
instrument cluster turns green after cruise
control has been set to the desired speed.
SEE IN STR UM ENT CLUST ER 32.

63
Resuming a Set Speed
If the cruise control is set at a desired
speed and then the brakes are applied or
is pressed, the cruise control is
disengaged without erasing the set speed
from memory
Once the vehicle reaches about 25 mph
(40 km/h) or more, move the thumbwheel
up toward RES/+ briefly. The vehicle
returns to the previous set speed.
Increasing Speed While Using Cruise
Control
If the cruise control system is already
activated:
Push the thumbwheel upward
(RES/+) and hold it until the
desired speed is reached, then
release the thumbwheel.
To increase the vehicle speed in
small increments, move the
thumbwheel upward (RES/+)
briefly and then release it. For
each press, the vehicle goes
about 1 mph (1.6 km/h) faster.
Reducing Speed While Using Cruise
Control
If the cruise control system is already
activated:
Press the thumbwheel downward
(SET/−) and hold it until the
desired lower speed is reached,
then release the thumbwheel.
To decrease the vehicle speed in
smaller increments, move the
thumbwheel downward (SET/−)
briefly and then release it. For
each press, the vehicle goes
about 1 mph (1.6 km/h) slower.
Pressing the Accelerator while using
Cruise Control
Use the accelerator pedal to increase the
vehicle speed. When you take your foot off
the pedal, the vehicle will slow down to the
previous set cruise control speed.
To override cruise control, briefly moving
the thumbwheel downward (SET/-) will set
the cruise control to the current vehicle
speed.

64
Fuel
Use of the recommended fuel is an
important part of the proper maintenance
of this vehicle. Use regular unleaded
gasoline with a posted octane rating of 91
or higher. Do not use gasoline with an
octane rating below 91, as it may
cause engine damage and will lower
fuel economy
Prohibited Fuels
Gasolines containing oxygenates such as
ethers and ethanol, as well as reformulated
gasolines, are available in some cities. If
these gasolines comply with the previously
described specification, then they are
acceptable to use. However, E85 (85%
ethanol) and other fuels containing more
than 15% ethanol must not be used in this
vehicle
Caution
Do not use fuel containing methanol. It
can corrode metal parts in the fuel
system and also damage plastic and
rubber parts.
Some gasolines, mainly high octane racing
gasolines, can contain an octane-enhancing
additive called methylcyclopentadienyl
manganese tricarbonyl (MMT). Do not use
gasolines and/or fuel additives with MMT
as they can reduce spark plug life and affect
emission control system performance. The
malfunction indicator lamp may turn on. If
this occurs, contact Vanderhall Service.
Filling the Tank
Warning
Fuel vapors and fuel fires burn violently
and can cause injury or death.
To help avoid injuries to you
and others, read and follow all
the instructions on the fuel
pump island.
Turn off the engine when
refueling.
Keep sparks, flames, and
smoking materials away from
fuel.
Do not leave the fuel pump
unattended.
Do not use a cell phone while
refueling.
Do not reenter the vehicle
while pumping fuel.
Keep children away from the
fuel pump and never let
children pump fuel.

65
Warning (Continued)
Fuel can spray out if the fuel
cap is opened too quickly. This
spray can happen if the tank is
nearly full, and is more likely
in hot weather. Open the fuel
cap slowly and wait for any
hiss noise to stop then
unscrew the cap all the way.
The Fuel fill is located in the trunk lid,
To remove the fuel cap, turn it slowly
counterclockwise. The fuel cap has a spring
in it; if the cap is released too soon, it will
spring back to the right.
When filling the vehicle keep the flow from
the fuel nozzle slow. Typically squeezing
the lever halfway works best to prevent
overflow
Do not use the automatic fuel flow shutoff
feature on many nozzles, as this can lead to
fuel spillage
Be careful not to spill fuel. Do not top off or
overfill the tank. Wait a few seconds after
you have finished pumping before
removing the nozzle.
Warning
Overfilling the fuel tank may cause:
Vehicle performance issues,
including engine stalling and
damage to the fuel system.
Fuel spills.
Potential fuel fires
Clean fuel from painted surfaces as soon as
possible. SEE “WASH ING THE VEHICLE” IN
EXT ERIOR CARE 93.
When replacing the fuel cap, turn it
clockwise until it clicks. Ensure the cap is
fully installed. The diagnostic system can
determine if the fuel cap has been left off
or improperly installed. Allowing fuel to
evaporate into the atmosphere. SEE
MAL FUN CTION INDICAT OR LAMP (CH ECK ENGINE
LIGHT) 34.

66
Vehicle Care
General Information
California Proposition
65 Warning 67
California Perchlorate
Materials Requirement 67
Accessories and
Modifications 67
Vehicle Checks
Hood 67
Engine Compartment
Overview 69
Engine Oil 71
Engine Oil Life System 72
Automatic Transmission
Fluid 74
Engine Air Filter 74
Engine Coolant 75
Engine Overheating 78
Washer Fluid 79
Brakes 80
Brake Fluid 80
Battery 82
Vehicle Storage 83
Wiper Blade Replacement 83
Exterior Lighting
Headlight Aiming 84
Bulb Replacement 84
Electrical System
Electrical System Overload 85
Fuses and Circuit Breakers 85
Engine Compartment
Fuse Block 86
Instrument Panel
Fuse Block 88
Wheels and Tires
Tires 89
Tire Pressure 90
Tire Inspection 91
Buying New Tires 91
Jump Starting
Jump Starting 92
Appearance Care
Exterior Care 93
Interior Care 96

67
General Information
For service and parts contact Vanderhall
service for the highest quality
replacement parts.
California Proposition 65 Warning
WARNING: Most motor vehicles,
including this one, contain and/or emit
chemicals known to the State of
California to cause cancer and birth
defects or other reproductive harm.
Engine exhaust, many parts and systems,
many fluids, and some component wear
by-products contain and/or emit these
chemicals.
California Perchlorate Materials
Requirements
Certain types of automotive
Applications such as lithium batteries
contained in Remote Keyless Entry
transmitters, may contain perchlorate
materials. Special handling may be necessary.
For additional information, see
www.dtsc.ca.gov/hazardouswaste/perchlorate
Accessories and Modifications
Adding non-dealer accessories or making
modifications to the vehicle can affect vehicle
performance and safety, including such things
as braking, stability, ride and handling,
emissions systems, aerodynamics, durability,
and electronic systems like antilock brakes,
traction control, and stability control. These
accessories or modifications could even cause
malfunction or damage
Vehicle Checks
Hood
To open the hood:
1. Pull the hood release handle
inside the vehicle. It is located
on the lower left side of the
dash

68
1. Go to the front of the vehicle
and move the secondary hood
release lever upward.
2. Lift the hood and locate the
hood prop at the rear right of
the hood. Push the knob back
until it stops. Slowly lower the
hood while ensuring the hood
prop is holding the hood up.
To close the hood:
1. Before closing the hood, be sure
all filler caps are on properly.
Then, lift the hood to relieve
pressure on the hood prop.
Remove the hood prop grasp
the knob on the hood prop and
pull toward the front of the
vehicle.
Slowly lower the hood and
watch to ensure the hood
prop is folding
2. Lower the hood to within 12 in
(30 cm) above the vehicle and
drop the hood.
Ensure the hood has fully latched before
driving. If not repeat the process

69
1 2 45 6
8
9
3 7 10
Engine Compartment Overview

70
1. Windshield Wiper Fluid Reservoir
2. Engine Oil Fill Cap
3. Engine Oil Dipstick
4. Engine Air Filter
5. Hood Stay
6. Brake Fluid Reservoir
7. Positive Jump Start Post
8. Fuse box
9. Negative Jump start Post
10. Engine Coolant Surge Tank and
Pressure Cap

71
Engine Oil
To ensure proper engine performance and
long life, careful attention must be paid to
engine oil. Following these simple, but
important steps will help protect your
investment:
Always use engine oil approved to
the proper specification and of
the proper viscosity grade. See
“Selecting the Right Engine Oil” in
this section.
Check the engine oil level
regularly and maintain the proper
oil level. See “Checking Engine
Oil” and “When to Add Engine
Oil” in this section.
Change the engine oil at the
appropriate time. SEE ENGIN E OIL
LIFE SYST EM 72.
Always dispose of engine oil
properly. See “What to Do with
Used Oil” in this section
If the engine oil pressure light comes on,
check the engine oil level right away. The
oil pressure light is on the instrument
cluster. SEE ENGINE OIL PRESSUR E LIGHT
39. Check the engine oil level regularly;
this is an added reminder.
Checking Engine Oil
It is a good idea to check the engine oil
level at each fuel fill. In order to get an
accurate reading, the oil must be warm and
the vehicle must be on level ground. The
engine oil dipstick handle is a loop. SEE
ENGINE COMPART MENT OVERVIEW 69 for
the location of the engine oil dipstick.
1. If the engine has been running
recently, turn off the engine and
allow several minutes for the oil
to drain back into the oil pan.
Checking the oil level too soon
after engine shutoff will not
provide an accurate oil level
reading.
Warning
The engine oil dipstick handle may be
hot; it could burn you. Use a towel or
glove to touch the dipstick handle.
2. Pull out the dipstick and wipe it
with a clean paper towel or cloth,
then push it back in all the way.
Remove it again, keeping the tip
down, and check the level.

72
When to Add Engine Oil
If the oil is below the minimum mark on the
dipstick, add 1 qt (1 L) of the recommended
oil and then recheck the level. See
“Selecting the Right Engine Oil” in this
section for an explanation of what kind of
oil to use. For engine oil crankcase capacity,
SEE CAPACITIES AND SPEC IFICATIO NS 109.
SEE ENGIN E COMPARTMENT OVER VIE W 69 for
the location of the engine oil fill cap.
Add enough oil to put the level somewhere
in the proper operating range. Push the
dipstick all the way back in when through.
Caution
Do not add too much oil. Oil levels
above or below the acceptable
operating range shown on the dipstick
are harmful to the engine. If you find
that you have an oil level above the
operating range, i.e., the engine has so
much oil that the oil level gets above the
upper mark that shows the proper
operating range, the engine could be
damaged. You should drain out the
excess oil or limit driving of the vehicle
and seek a service professional to
remove the excess amount of oil.
Selecting the Right Engine Oil
Selecting the Right Engine oil depends on
getting the correct viscosity grade. SEE
RECOMM ENDED FLUIDS AND LUBRIC ANTS
106.
Viscosity Grade
Use SAE 5W-30 viscosity grade engine oil.
Engine Oil Additives/Engine Oil
Flushes
Do not add anything to the oil. Engine oil
system flushes are not recommended and
could cause engine damage.
Engine Oil Life System When to Change
Engine Oil
This vehicle has a computer system that
indicates when to change the engine oil
and filter. This is based on a combination of
factors which include engine revolutions,
engine temperature, and miles driven.
Based on driving conditions, the mileage at
which an oil change is indicated can vary
considerably. For the oil life system to work
properly, the system must be reset every
time the oil is changed.

73
When the system has calculated that oil life
has been diminished, it indicates that an oil
change is necessary. A %CHANGE
message in the DIC comes on. SEE VEHIC LE
MESSAG ES 43
Change the oil as soon as possible within
the next 600 mi (1 000 km). It is possible
that, if driving under the best conditions,
the oil life system might indicate that an oil
change is not necessary for up to a year.
The engine oil and filter must be changed at
least once a year and, at this time, the
system must be reset. Your dealer has
trained service people who will perform this
work and reset the system. It is also
important to check the oil regularly over the
course of an oil drain interval and keep it at
the proper level.
If the system is ever reset accidentally, the
oil must be changed at 3,000 mi (5 000 km)
since the last oil change. Remember to
reset the oil life system whenever the oil is
changed.
How to Reset the Engine Oil Life System
Reset the system whenever the engine oil
is changed so that the system can calculate
the next engine oil change. To reset the
system:
1. Press the MENU button to show
Remaining Oil Life on the display.
This display shows an estimate of
the oil’s remaining useful life. If
99% is displayed, that means that
99% of the current oil life
remains.
2. To reset the engine oil life
system, press the SET/CLR button
while the oil life display is active.
After a few seconds, there will be
a single chime and the oil life will
be reset to 100%.
Be careful not to reset the oil life display
accidentally at any time other than after
the oil is changed. It cannot be reset
accurately. If the %CHANGE message
in the DIC comes back on when the vehicle
is started, the engine oil life system has not
reset. Repeat the procedure.

74
Automatic Transmission Fluid
How to Check Automatic Transmission
Fluid
It is not necessary to check the transmission
fluid level. A transmission fluid leak is the
only reason for fluid loss. If a leak occurs,
contact Vanderhall Service as soon as
possible.
There is a special procedure for checking
and changing the transmission fluid.
Because this procedure is difficult, you
should have this done by a professional.
Change the fluid at the intervals listed in
MAINTE NAN CE SC HEDUL E 101, and be sure
to use the fluid listed in RECOMM ENDED
FLUIDS AND LUB RICANT S 106.
Engine Air Filter
The engine air filter is located at the center
rear of the engine compartment. SEE
ENGINE COMPART MENT OVERVIEW 69
When to Inspect the Engine Air
Cleaner/Filter
For intervals on changing and inspecting
the engine air filter, SEE MA INT EN ANC E
SCHEDULE 101
How to Inspect and clean the Engine
Air Filter
Do not start the engine or have the engine
running with the engine air filter housing
open. Remove the engine air filter. Lightly
tap and shake the engine air filter (away
from the vehicle), to release loose dust and
dirt. Inspect the engine air filter for
damage, replace if damage is found. The
Air filter can be cleaned and recharged
however, do not clean the air filter housing
with water or compressed air.
To remove the air filter:
1. Grasp the filter and lift it out of
the filter houseing
To install the air filter
1. carefully press the filter in to the
housing untill it is fully seated.
To clean and recharge the air filter
1. Remove the airfilter
2. Liberally spray Filter Cleaner onto
both sides of filter and allow to
soak for 10 minutes to loosen the
dirt. Do not allow cleaner to dry
on air filter
3. Rinse the air filter with cool low-
pressure water applied from the
inside of the filter in order to

75
flush the dirt out of the filter.
Continue to rinse the filter until all
traces of cleaner are gone. It may
be necessary to repeat steps 2
and 3
4. After rinsing your filter, gently
shake off the excess water and
only allow filter to dry naturally.
Do not apply oil until the air filter
is completely dry.
5. Spray the oil evenly along the
crown of each pleat holding
nozzle about 3" away. Allow oil to
wick for approximately 20
minutes. Touch up any light areas
on either side of the filter until
there is a uniform red color at all
areas.
6. Reinstall the Airfilter
Contact Vanderhall Service for a cleaning kit
Engine Coolant
The cooling system in the vehicle is filled
with DEX-COOL engine coolant. This
coolant is designed to remain in the vehicle
for 5 years or 150,000 mi (240 000 km),
whichever occurs first.
The following explains the cooling system
and how to check and add coolant when it
is low. If there is a problem with engine
overheating, SEE EN GINE OVERHEAT ING 78.
Use a 50/50 mixture of clean drinkable
water and DEX-COOL coolant. This mixture:
Gives freezing protection down
to -34 °F (−37 °C), outside
temperature.
Gives boiling protection up to 265
°F (129 °C ), engine temperature.
Protects against rust and
corrosion.
Will not damage aluminum parts.
Helps keep the proper engine
temperature.
Warning
Adding only plain water or some other
liquid to the cooling system can be
dangerous. Plain water and other
liquids, can boil before the proper
coolant mixture will. The coolant
warning system is set for the proper
coolant mixture. With plain water or the
wrong mixture, the engine could get too
hot but you would not get the overheat
warning. The engine could catch fire and
you or others could be burned. Use a
50/ 50 mixture of clean, drinkable water
and DEX-COOL coolant.

76
Caution
If improper coolant mixture, inhibitors,
or additives are used in the vehicle
cooling system, the engine could
overheat and be damaged. Too much
water in the mixture can freeze and
crack engine cooling parts. Use only the
proper mixture of engine coolant for the
cooling system. SEE RE COM ME NDED FLUID S
AND LU BRICA NTS 106.
Checking Coolant
The vehicle must be on a level surface when
checking the coolant level
It is normal to see coolant moving in the
upper coolant hose return line when the
engine is running.
If the engine has been recently running
even for a short time. The coolant in the
cooling system could be very hot and under
pressure. Allow the engine to cool
completely before attempting to open the
surge tank
If coolant is visible but the coolant level is
not at or above the mark pointed to, add a
50/50 mixture of clean drinkable water and
DEX-COOL coolant.
If no coolant is visible in the coolant surge
tank, add coolant as follows:
How to Add Coolant to the Coolant
Surge Tank
Caution
This vehicle has a specific coolant fill
procedure. Failure to follow this
procedure could cause the engine to
overheat and be severely damaged.
If no coolant is visible in the coolant surge
tank, or it is visible but the level is not at
the indicated level mark. Add a 50/ 50
mixture of clean, drinkable water and DEXCOOL coolant to the coolant surge tank.
Before attempting to open the surge tank
be sure the cooling system, including the
coolant surge tank pressure cap, is cool to
the touch.
Warning
You could be badly burned by steam and
scalding liquids blowing out of the
system. Never turn the cap when the
cooling system, including the surge tank
pressure cap, is hot. Wait for the cooling
system and surge tank pressure cap to
cool before doing any work.
Coolant contains ethylene glycol and it
can burn if spilled on hot engine parts.
Do not allow coolant to spill on hot
engine parts you could be badly burned.

77
Warning
Adding only plain water or some other
liquid to the cooling system can be
dangerous. Plain water and other
liquids, can boil before the proper
coolant mixture will. The coolant
warning system is set for the proper
coolant mixture. With plain water or the
wrong mixture, the engine could get too
hot but you would not get the overheat
warning. The engine could catch fire and
you or others could be burned. Use a
50/ 50 mixture of clean, drinkable water
and DEX-COOL coolant.
Caution
In cold weather, water in the cooling
system can freeze and crack the engine,
and cooling system parts. Use the
recommended coolant and the proper
coolant mixture,even when the vehicle
is in storage.
1. When the cooling system is cool
to the touch Remove the coolant
surge tank pressure cap.
Turn the pressure cap
counterclockwise slowly about
one-quarter of a turn. If you hear
a hiss, wait for the hiss to stop.
This will allow any pressure in the
system be vented out the
discharge hose.
2. Fill the coolant surge tank to the
indicated level mark with the
proper DEX-COOL coolant
mixture.
3. With the coolant surge tank
pressure cap off, start the engine
and let it run until you can feel
the upper radiator hose getting
hot. Keep your hands clear of the
engine cooling fan.
The coolant level inside the
coolant surge tank may drop
below the level mark while the
engine is running. If the level
does drop, add more of the
proper DEX-COOL coolant

78
mixture to the coolant surge tank
until the level reaches the
indicated level mark.
4. Replace the pressure cap tightly.
Check the level in the coolant surge tank
when the cooling system has cooled down.
If the coolant is not at the proper level,
repeat Steps 1– 3 and reinstall the pressure
cap. If the coolant still is not at the proper
level when the system cools down again,
contact Vanderhall Service.
Caution
Ensure the pressure cap is fully tightned.
If it is not coolant loss and engine
damage may occur.
Engine Overheating
The vehicle has an indicator to warn of the
engine overheating.
If the decision is made not to lift the hood
when this warning appears, get service
help right away.
Caution
Running the engine while it is
overheating could cause engine damage
or a fire. Pull the vehicle over as soon as
it can be safely done
If Steam Is Coming from the Engine
Compartment
Warning
Steam from an overheated engine can
burn you badly, even if you just open
the hood. Stay away from the engine if
you see or hear steam coming from it.
Just turn it off and get everyone away
from the vehicle until it cools down.
Wait until there is no sign of steam or
coolant before you open the hood.
If you keep driving when the engine is
overheated, the liquids in it can catch
fire. You or others could be badly
burned. Stop the engine if it overheats,
and get out of the vehicle until the
engine is cool.

79
If No Steam Is Coming from the Engine
Compartment
If the engine overheat warning is displayed
but no steam is evident, the problem may
not be very serious. Sometimes the engine
can overheat when the vehicle:
Climbs a long hill on a hot day.
Stops after high-speed driving.
If the overheat warning is displayed with no
sign of steam:
1. Turn the air conditioning off.
2. Turn the heater on to the highest
temperature and to the highest
fan speed.
3. When it is safe to do so, pull off
the road, shift to P (Park) and let
the engine idle for about 3
minutes.
If the overheat warning is no longer
present, the vehicle can be driven.
However drive the vehicle gentaly for
about 10 minutes. If the warning does not
come back on, the vehicle can be driven
normally. Have the cooling system checked
for proper fill and function.
If the warning is still displayed, turn off the
engine and wait fot it to cool down.
If the warning continues, pull over, stop,
and park the vehicle right away.
Washer Fluid
What to Use
When the vehicle needs windshield washer
fluid, and the vehicle will be operated or
stored in an area where the temperature
may fall below freezing, use a fluid that has
protection against freezing.
Adding Washer Fluid
Open the cap with the washer symbol on it.
Add washer fluid until the tank is full. SEE
ENGINE COMPART MENT OVERV IEW 69 for
reservoir location.
Caution
Do not use washer fluid that contains
any type of water repellent coating. This
can cause the wiper blades to chatter or
skip.
Fill the washer fluid tank only threequarters full when it is very cold or the
vehicle is going into storage. This allows
for fluid expansion if freezing occurs,
which could damage the tank if it is
completely full.

80
Brakes
Disc brake pads have built-in wear
indicators that make a high-pitched warning
sound when the brake pads need to be
replaced. The sound can come and go or it
maybe heard all the time when the vehicle
is moving.
Warning
The brake wear warning sound means
that soon the brakes will not work well.
When the brake wear warning sound is
heard, have the vehicle serviced.
Failure to replace the brake pads could
lead to a crash or costly brake system
repairs.
Some driving conditions or climates can
cause a brake squeal when the brakes are
first applied or lightly applied. This may be
noticed the first few stops after storeing
the vehicle. This does not mean something
is wrong with the brakes.
Brake Pedal Travel
The following conditions could indicate
barke service is required. Contact
Vanderhall Service if:
The brake pedal does not return
to normal height
There is a rapid increase in pedal
travel
The pedal lacks firmness.
Replacing Brake System Parts
The brakes may not work properly, or with
the same performance if un-approved parts
are used or parts are improperly installed.
Always replace brake system parts with
new, approved replacement parts. And
ensure the work is done by qualified
mechanics.
Brake Fluid
The brake master cylinder reservoir is filled
with DOT 3 brake fluid as indicated on the
reservoir cap. SEE ENGIN E COMPAR TMENT
OVERVI EW 69 for the location of the
reservoir.
There are only two reasons why the brake
fluid level in the reservoir might be low:
Normal brake pad wear. This will
be corrected when new pads are
installed, and is not an indication
that the system needs repair.

81
A fluid leak in the brake hydraulic
system. Have the brake hydraulic
system repaired. With a leak in
the system the brakes will not
preform well.
Always clean the brake fluid reservoir cap
and the area around the cap before
removing it.
Do not top off the brake fluid. If fluid is
added when the pads are worn, there will
be too much fluid when new brake pads are
installed.
Warning
If too much brake fluid is added, it may
spill on the engine and burn, if the
engine is hot enough. Potentially
burning you or other and damageing the
vehicle. Brake fluid should only be
added when when work is done on the
brake hydraulic system.
When the brake fluid falls to a low level,
the brake warning light will come on. SE E
BRAKE SYSTEM WARN ING LIGH T 36.
Brake fluid absorbs water over time.
Replace brake fluid at the specified
intervals to maintain optimal brake
preformance. SEE MAINTENA NCE SCH EDU LE
101.
What to Add
Use only DOT 3 brake fluid from a clean,
sealed container. SEE RECOMME NDE D FLU IDS
AND LU BRICANTS 106.
Warning
Using the wrong or contaminated brake
fluid could result in damage to the brake
system. This could lead to the loss of
braking and possible injury. Always use
the proper brake fluid from a clean
sealed container, and clean the cap and
area around the brake resivor before
opening.
Caution
Brake fluid will damage painted
surfaces. Immediately wash any area
that brake fluid is spilled on.

82
Battery
The battery is located in its own
compartment. This compartment can be
accessed by:
Sliding the passenger seat all the way
forward.
Removing the backrest carpet.
Removing the battery compartment
door there are 4 10mm bolts securing
the door.
The original equipment battery is
maintenance free. Do not remove the cap
and do not add fluid.
Refer to the replacement number shown
on the original battery label when a new
battery is needed.
Warning
WARNING: Battery posts, terminals, and
related accessories contain lead and
lead compounds, chemicals known to
the State of California to cause cancer
and birth defects or other reproductive
harm. Batteries also contain other
chemicals known to the State of
California to cause cancer. WASH
HANDS AFTER HANDLING. SEE
CAL IFORNIA PRO PO SIT ION 65 WAR NING 67
Warning
Batteries have acid that can burn you
and gas that can explode. You can be
badly hurt if you are not careful. See
Jump Starting - 0 287 for tips on working
around a battery without getting hurt.

83
Vehicle Storage
When the vehicle is going to be stored for
an extended period of time it is important
to disconnect the battery or use a trickle
charger to prevent the battery from
discharging
To disconnect the battery, remove the
battery compartment door see Battery in
this section. Disconnect the negative (-)
battery cable
Wiper Blade Replacement
Windshield wiper blades should be
inspected for wear or cracking. SEE TH E
MAINTE NAN CE SC HEDUL E 101 for more
information. Replacement blades come in
different types and are removed in
different ways. For proper windshield
wiper blade length and type, SEE
MAINTE NAN CE REPLACEMENT PAR TS 107.
To replace the windshield wiper blade:
1. Pull the windshield wiper
assembly away from the
windshield.
2. Squeeze the tabs on each side of
the wiper blade assembly and
rotate the hood up
3. Push the wiper blade down
toward the windshield. Exposing
the J hook on the wiper arm.
4. Pull the wiper blade up and free
of the wiper arm.
5. Insert the J hook in to the new
wiper blade pulling up to ensure
the J hook is seated.
6. Rotate the hood down until a
click is heard
7. Carefully lower the wiper bald
back on to the windshield

84
Exterior Lighting
Headlamp Aiming
Headlamp aim has been preset and should
need no further adjustment. If the vehicle is
damaged in a crash, the headlamp aim may
be affected. If adjustment to the headlamps
is necessary, contact Vanderhall Service
Bulb Replacement
The vehicles exterior lamps including
headlight, turn signals, and license plate are
LED and are not serviceable. Should a lamp
fail contact Vanderhall Service for a
replacement

85
Electrical System
Electrical System Overload
The vehicle has fuses and circuit breakers to
protect against an electrical system
overload.
When the current electrical load is too
heavy, the circuit breaker opens and closes,
protecting the circuit until the current load
returns to normal or the problem is fixed.
This greatly reduces the chance of circuit
overload and fire caused by electrical
problems.
Fuses and circuit breakers protect power
devices in the vehicle.
Replace a bad fuse with a new one of the
identical size and rating.
If there is a problem on the road and a fuse
needs to be replaced, the same amperage
fuse can be borrowed. Choose some
feature of the vehicle that is not needed to
use and replace it as soon as possible.
Headlamp Wiring
An electrical overload may cause the lamps
to go on and off, or in some cases to
remain off. Have the headlamp wiring
checked right away if the lamps go on and
off or remain off.
Windshield Wipers
If the wiper motor overheats, the
windshield wipers will stop until the motor
cools and will then restart. If the overload
occurs on a regular basis contact
Vanderhall Service
Fuses and Circuit Breakers
The wiring circuits in the vehicle are
protected from short circuits by a
combination of fuses, circuit breakers, and
fusible thermal links. This greatly reduces
the chance of fires caused by electrical
problems.
Look at the silver-colored band inside the
fuse. If the band is broken or melted,
replace the fuse. Be sure you replace a bad
fuse with a new one of the identical size
and rating.
Fuses of the same amperage can be
temporarily borrowed from another fuse
location, if a fuse goes out. Replace the
fuse as soon as you can.

86
Engine Compartment Fuse Block
The engine compartment fuse block is on
the driver side of the vehicle.
Caution
Liquid on any vehicle electrical
component may damage it. Always keep
the covers on electrical components.
To access the fuses, press the clips
together, and lift the cover. To reinstall the
cover, push the cover until it is secure.
Mini
Fuses
Usage
1
Antilock Brake System Valve
2
Not Used
4
Not Used
5
Regulated Voltage Control
6
Antilock Brake System Fluid
7
Not Used
8
Not Used
10
Not Used
12
Not Used
13
Heated Seats
14
Fuel System Control Module 1
15
Flex Fuel
16
Washer
17
Fuel Pump
18
Engine Control Module 5
19
Fuel System Control Module 2
20
Transmission Control Module 1

87
Mini
Fuses
Usage
21
Engine Control Module 1
22
Coil
23
Engine Control Module 4
24
Engine Control Module 3
25
Engine Control Module 2
26
Injector/Ignition Coil
27
Engine Control Module
28
Air Conditioning Compressor
Clutch
29
Transmission Control Module
30
Horn
31
Not Used
32
Left High Beam
33
Right High Beam
Spare
Spare
J-Case
Fuses
Usage
1
Antilock Brake System Pump
2
Wiper
3
Blower
4
Run/Crank IEC
6
Cooling Fan K5
7
Cooling Fan K4
8
EVP 9 Start
Relay
Usage
RLY 1
Front Wiper Control Relay
RLY 2
Front Wiper Speed Relay
RLY 3
Not Used
RLY 4
Run/Crank Relay
RLY 6
Fuel Pump Relay
RLY 7
Cooling Fan K2 Relay
RLY 8
Cooling Fan K3 High Current
Relay
RLY 9
Powertrain Relay
RLY 10
Start High Current Relay
RLY 11
Air Conditioning Compressor
Clutch Relay
RLY 12
High-Beam Relay
RLY 13
Cooling Fan K1 Relay

88
Instrument Panel Fuse Block
The instrument Panel Fuse Block is located
under the dash against the firewall
Number
Usage
1
DLIS
2
Data Link Connector
3
Not Used
4
Not Used
5
Spare
6
Body Control Module 8
7
Body Control Module 7
8
Body Control Module 6
9
Body Control Module 5
10
Body Control Module 4
11
Body Control Module 3
12
Body Control Module 2
13
Body Control Module 1
14
Instrument Cluster
15
Not Used
16
Not Used
17
Not Used
18
Audio
19
Not Used
20
Not Used

89
Number
Usage
21
Not Used
22
Heating, Ventilation, Air
Conditioning
23
HDLP ALC
24
Not Used
25
Instrument Cluster
26
Run/Crank
27
Run Relay
28
Trunk Release
29
Not Used
30
Horn clock Spring
31
Heating, Ventilation, and
Air Conditioning
32
Spare
33
Not Used
34
Accessary Power
35
Spare
36
Not Used
37
Not Used
38
RAP/ACCY
39
Not Used
40
Not Used
Number
Usage
41
PTC2
42
PTC1
33
Battery connector
Wheels and Tires
Tires
This vehicle comes with high performance
R compound. These tires have a special
tread and compound that are optimized for
dry road performance. This compound will
have decreased performance in cold or wet
weather. For additional information refer
to the tire manufacturer.
Warning
Poorly maintained and improperly used
tires are dangerous.
(Continued)
Warning
Underinflated tires pose a danger
and could result in a crash causing
serious injury. Check all tires
frequently to maintain the
recommended pressure. Tire
pressure should be checked when
the tires are cold.
Overinflated tires are more likely to
be cut, punctured, or broken by a
sudden impact — such as when
hitting a pothole. Keep tires at the
recommended pressure.
Worn or old tires can cause a crash.
If the tread is badly worn, replace
them.
Replace any tires that have been
damaged by impacts with potholes,
curbs, etc.
Improperly repaired tires can cause
a crash. Only the dealer or an
authorized tire service center
should repair, replace, dismount,
and mount the tires.

90
Recommended Inflation Pressure:
Vehicle manufacturer's recommended tire
inflation pressure as shown on the tire
placard see Tire Pressure in this section.
Tire Pressure
Tires need the correct amount of air
pressure to operate effectively.
Caution
Neither tire under inflation nor over
inflation is good. Underinflated tires, or
tires that do not have enough air, can
result in:
Tire overloading and overheating
which could lead to a blowout.
Premature or irregular wear.
Poor handling.
Reduced fuel economy.
Overinflated tires, or tires that have too
much air, can
result in:
(Continued)
Caution
Unusual wear.
Poor handling.
Rough ride.
Needless damage from road hazards.
The Tire and Loading Information label on
the vehicle indicates the original
equipment tires and the correct cold tire
inflation pressures. The recommended
pressure will give the best vehicle handling
and ride comfort
When to Check
Check the tires once a month or more.
How to Check
Use a good quality pocket-type gauge to
check tire pressure. Proper tire inflation
cannot be determined by looking at the
tire. Check the tire inflation pressure when
the tires are cold, meaning the vehicle has
not been driven for at least three hours or
no more than 1.6 km (1 mi).
Remove the valve cap from the tire valve
stem. Press the tire gauge firmly onto the
valve to get a pressure measurement. If the
cold tire inflation pressure matches the
recommended pressure on the Tire and
Loading Information label, no further
adjustment is necessary. If the inflation
pressure is low, add air until the
recommended pressure is reached. If the
inflation pressure is high, press on the
metal stem in the center of the tire valve to
release air.
Recheck the tire pressure with the tire
gauge. Put the valve caps back on the valve
stems to keep out dirt and moisture and
prevent leaks.

91
Tire Inspection
We recommend that the tires be inspected
for signs of wear or damage at least once a
month.
Replace the tire if:
The indicators at three or more places
around the tire can be seen.
There is cord or fabric showing through
the tire's rubber.
The tread or sidewall is cracked, cut, or
snagged deep enough to show cord or
fabric.
The tire has a bump, bulge, or split.
The tire has a puncture, cut, or other
damage that cannot be repaired well
because of the size or location of the
damage.
When It Is Time for New Tires
Factors such as maintenance, temperatures,
driving speeds, vehicle loading, and road
conditions affect the wear rate of the tires.
Treadwear indicators are one way to tell
when it is time for new tires. Treadwear
indicators appear when the tires have only
1.6mm (1/16 in) or less of tread remaining.
The rubber in tires ages over time. Multiple
factors including temperatures, loading
conditions, and inflation pressure
maintenance affect how fast aging takes
place. Vanderhall recommends that tires be
replaced after six years, regardless of tread
wear. The tire manufacture date is the last
four digits of the DOT Tire Identification
Number (TIN) which is molded into one
side of the tire sidewall. The first two digits
represent the week (01–52) and the last
two digits, the year. For example, the third
week of the year 2010 would have a fourdigit DOT date of 0310
Buying New Tires
Vanderhall has developed and matched
specific tires for the vehicle. The original
equipment tires installed were designed to
meet specific Tire Performance Criteria
Specification (TPC Spec) system rating.
When replacement tires are needed,
Vanderhall strongly recommends buying
the same manufacture and model tire as
the original.

92
Jump Starting
Jump Starting
For more information about the vehicle
battery, SEE BATTERY82.
If the battery has run down, try to use
another vehicle and some jumper cables to
start your vehicle. Be sure to use the
following steps to do it safely.
Caution
Ignoring these steps could result in
costly damage to the vehicle. Trying to
start the vehicle by pushing or pulling it
will not work, and it could damage the
vehicle.
Negative Positive
See Engine Compartment 70
2. Connect the Negative Post of the
discharged vehicle to the
Negative Post of the Good
battery
3. Connect the Positive Post of the
discharged vehicle to the Positive
Post of the Good battery
The jump start positive post and negative
post are on the battery of the vehicle
providing the jump start.
The positive jump start connection for the
discharged vehicle is under a trim cover.
Open the cover to expose the terminal.
1. Check the other vehicle. It must
have a 12-volt battery with a
negative ground system.
2. Position the two vehicles so that
they are not touching.
3. Set the parking brake firmly and
put the shift lever in P (Park) SEE
SHIF TING INT O PARK 57
Caution
If any accessories are left on or plugged
in during the jump starting procedure,
they could be damaged. Whenever
possible, turn off or unplug all
accessories connected to either vehicle
before jump starting.

93
4. Turn the ignition to LOCK/OFF. Turn off
all lights and accessories in both
vehicles, except the hazard warning
flashers if needed.
5. Connect one end of the red positive (+)
cable to the positive (+) terminal on
the discharged battery.
6. Connect the other end of the red
positive (+) cable to the positive (+)
terminal of the good battery.
7. Connect one end of the black negative
(–) cable to the negative (–) terminal of
the good battery
8. Connect the other end of the black
negative (–) cable to the negative (–)
post for the discharged battery
9. Start the engine in the vehicle with the
good battery and run the engine at idle
speed for at least four minutes.
10. Disconnect the jumper cables in the
reverse order (Step 8-5)
11. Try to start the vehicle that had the
dead battery. If it will not start after a
few tries, it probably needs service.
Warning
An electric fan can start up even when
the engine is not running and can injure
you. Keep hands, clothing, and tools
away from any under hood electric fan.
Appearance Care
Exterior Care
Washing the Vehicle
To preserve the vehicle's finish, wash it
often and out of direct sunlight.
Caution
Do not use petroleum-based, acidic, or
abrasive cleaning agents as they can
damage the vehicle's paint, metal, or
carbon parts. Follow all manufacturer
directions regarding correct product
usage, necessary safety precautions,
and appropriate disposal of any vehicle
care product.
The symbol is on any underhood
compartment electrical center that should
not be power washed.
Rinse the vehicle well, before washing to
remove and loosen road grit and bugs.

94
Hand wash the vehicle using a non-abrasive
cleaner marked safe for painted surfaces.
Rinse the area immediately with cool clean
water.
Do not allow cleaning agents to dry on the
surface, they could stain. Dry the finish with
a soft, clean chamois or an all-cotton towel
to avoid surface scratches and water
spotting.
Finish Care
Foreign materials such as calcium chloride
and other salts, ice melting agents, road oil
and tar, tree sap, bird droppings, chemicals
from industrial chimneys, etc., can damage
the vehicle's finish if they remain on painted
surfaces. Wash the vehicle or affected areas
often to prevent damage
Occasional hand waxing or mild polishing
should be done to remove residue from the
paint finish.
To keep the paint finish looking new, keep
the vehicle garaged or covered whenever
possible.
Cleaning Exterior Lamps and Emblems
Use only lukewarm or cold water, a soft
cloth, and an automotive soap to clean
exterior lamps and emblems. Follow
instructions under "Washing the Vehicle"
previously in this section.
Exterior lighting lenses are made of plastic.
Do not clean or wipe them when dry as
they may scratch and haze.
Do not use any of the following on the
lenses :
Abrasive or caustic agents.
Washer fluids and other cleaning
agents in higher concentrations than
suggested by the manufacturer.
Solvents, alcohols, fuels, or other
harsh cleaners.
Air Intakes
Clear debris from the air intakes, located at
the bottom of the hood near the hinges
Windshield and Wiper Blades
Clean the outside of the windshield with
glass cleaner.
Clean rubber blades using a lint-free cloth
soaked a mild detergent.
Replace the wiper blades if they are worn
or damaged
SEE WI PER BLAD E REPLACEM ENT 83

95
Weatherstrips
Apply Dielectric silicone grease on weatherstrips to make them last longer, seal better,
and not stick or squeak. Lubricate
weatherstrips a least once a year. Hot, dry
climates may require more frequent
application. Black marks from rubber
material on painted surfaces can be
removed by rubbing with a clean cloth. SEE
RECOMM ENDED FLUIDS AND LUBRIC ANTS
106.
Tires
Use a stiff brush with tire cleaner to clean
the tires.
Caution
Using petroleum-based tire dressing
products on the vehicle may damage
the paint finish and/ or tires. When
applying a tire dressing, always wipe off
any overspray from all painted surfaces
on the vehicle.
Wheels
Use a soft, clean cloth with mild soap and
water to clean the wheels. After rinsing
thoroughly with clean water, dry with a
soft, clean towel. A wax may then be
applied.
Brake System
Visually inspect brake lines and hoses for
proper hook-up, binding, leaks, cracks,
chafing, etc. Inspect disc brake pads for
wear and rotors for surface condition.
Inspect other brake parts, calipers, parking
brake, master cylinder, brake fluid
reservoir, vacuum pipes, electric vacuum
pump including vent hose, if equipped.
Caution
To avoid surface damage, do not use
strong soaps, chemicals, abrasive
polishes, cleaners, brushes, or cleaners
that contain acid
Steering, Suspension, and Chassis
Components
Visually inspect steering, suspension, and
chassis components for damaged, loose, or
missing parts or signs of wear at least once
a year. Inspect power steering for proper
hook-up, binding, leaks, cracks, chafing,
etc.
Visually check constant velocity joint boots
and axle seals for leaks.
Body Component Lubrication
Lubricate all hood hinges, trunk hinges, and
door hindges. Applying silicone grease on
weatherstrips with a clean cloth will make
them last longer, seal better, and not stick
or squeak.
Carbon Body Panel Damage
If the vehicle is damaged contact
Vanderhall Service for replacement parts.

96
Finish Damage
Quickly repair minor chips and scratches
with touch-up materials available from
Vanderhall Service to avoid further damage.
Larger areas of finish damage can be
corrected in a body and paint shop. Contact
Vanderhall Service prior to getting repairs.
Interior Care
To prevent dirt particle abrasions, regularly
clean the vehicle's interior. Immediately
remove any soils.
Use a soft bristle brush to remove dust from
knobs and crevices on the dash. Using a
mild soap solution, immediately remove
hand lotions, sunscreen, and insect
repellent from all interior surfaces or
permanent damage may result.
Use cleaners specifically designed for the
surfaces being cleaned to prevent
permanent damage. Apply all cleaners
directly to the cleaning cloth. Do not spray
cleaners on any switches or controls.
Remove cleaners quickly.
Before using cleaners, read and follow all
safety instructions on the label.
To prevent damage, do not clean the
interior using the following cleaners or
techniques:
Never use a razor or any other sharp
object to remove soil from any interior
surface.
Never use a brush with stiff bristles.
Never rub any surface aggressively or
with too much pressure.
Do not use laundry detergents or
dishwashing soaps with degreasers.
For liquid cleaners, use approximately
20 drops per 3.8 L (1 gal) of water.
A concentrated soap solution will
create streaks and attract dirt. Do not
use solutions that contain strong or
caustic soap.
Do not heavily saturate the upholstery
when cleaning
Do not use solvents or cleaners
containing solvents.

97
Interior Glass
To clean, use a terry cloth fabric dampened
with water. Wipe droplets left behind with a
clean dry cloth. If necessary, use a
commercial glass cleaner after cleaning with
plain water.
Cleaning the windshield with water during
the first three to six months of ownership
will reduce tendency to fog.
Speaker Covers
Vacuum around a speaker cover gently, so
that the speaker will not be damaged. Clean
spots with water and mild soap on a damp
soft cloth
Interior Trim
Coated moldings should be cleaned.
When lightly soiled, wipe with a
sponge or soft, lint-free cloth
dampened with water.
When heavily soiled, use warm soapy
water.
Fabric/Carpet/Leather
Start by vacuuming the surface using a soft
brush attachment. If a rotating vacuum
brush attachment is being used, only use it
on the floor carpet. Before cleaning, gently
remove as much of the soil as possible:
Gently blot liquids with a paper towel.
Continue blotting until no more soil
can be removed.
For solid soils, remove as much as
possible prior to vacuuming.
To clean:
1. Saturate a clean, lint-free
colorfast cloth with water.
Microfiber cloth is recommended
to prevent lint transfer to the
fabric or carpet.
2. Remove excess moisture by
gently wringing until water does
not drip from the cleaning cloth.
3. Start on the outside edge of the
soil and gently rub toward the
center. Fold the cleaning cloth to
a clean area frequently to
prevent forcing the soil in to the
fabric.
4. Continue gently rubbing the
soiled area until there is no
longer any color transfer from
the soil to the cleaning cloth.
5. If the soil is not completely
removed, use a mild soap
solution followed only by plain
water.
If the soil is not completely removed, it
may be necessary to use a commercial
upholstery cleaner or spot lifter. Test a
small hidden area for colorfastness before
using commercial upholstery cleaner or
spot lifter. If ring formation occurs, clean
the entire fabric or carpet. After cleaning,
use a paper towel to blot excess moisture.

98
Caution
Soaking or saturating leather may cause
permanent damage. Wipe excess
moisture from these surfaces after
cleaning and allow them to dry naturally.
Never use heat, steam, or spot
removers. Do not use cleaners that
contain silicone or wax-based products.
Cleaners containing these solvents can
permanently change the appearance and
feel of leather and are not
recommended.
Towing the Vehicle
Caution
Incorrectly towing a disabled vehicle
may cause damage. Do not lash or hook
to suspension components. Use the
proper straps around the tires to secure
the vehicle.
Have the vehicle towed on a flatbed car
carrier. A wheel lift tow truck could
damage the vehicle. Consult a professional
towing service if the disabled vehicle must
be towed.

99
Service and Maintenance
Maintenance Schedule
Owner checks 99
Engine Oil Change 100
Maintenance schedule 101
Additional Maintenance
Battery 103
Belt 103
Brakes 103
Fluids 103
Hoses 103
Lamps 103
Shocks 105
Tires 105
Vehicle care 105
Wheel Alignment 105
Windshield 105
Wiperblades 105
Recommended Fluids
Recommended Fluids
And lubricants 106
General Information
Your vehicle is an investment. This section
describes the required maintenance for the
vehicle. Follow this schedule to help
protect against major repair expenses
resulting from neglect or inadequate
maintenance. It may also help to maintain
the value of the vehicle if it is sold. It is the
responsibility of the owner to have all
required maintenance performed.
Caution
Damage caused by improper
maintenance can lead to costly repairs.
Maintenance intervals, checks,
inspections, recommended fluids, and
lubricants are important to keep the
vehicle in good working condition.
Maintenance Schedule
Owner Checks and Services
At Each Fuel Stop
Check the engine oil level. SEE ENGIN E
OIL 71.
Once a Month
Check the tire inflation pressures. SEE
TIRE PRESSURE 90.
Inspect the tires for wear. SEE TIRE
INSP ECTION 91.
Check the windshield washer fluid
level. See Washer Fluid 0 237.

100
Engine Oil Change
When a %CHANGE message displays
in the DIC, have the engine oil and filter
changed within the next 1 000 km/600 mi.
If driven under the best conditions, the
engine oil life system may not indicate the
need for vehicle service for up to a year.
The engine oil and filter must be changed at
least once a year and the oil life system
must be reset. Your trained dealer
technician can perform this work. If the
engine oil life system is reset accidentally,
service the vehicle within 5 000 km/ 3,000
mi since the last service. Reset the oil life
system when the oil is changed. See Engine
Oil Life System 0 228.
 Loading...