

Vanco D2.1 User Manual
Beale Street Audio
D2.1
Digital 2.1 Channel Amplifier
User Guide
2
• Explanation of Graphical Symbols
The lightning flash with arrowhead symbol, within an equilateral triangle, is
intended to alert you to the presence of uninsulated “dangerous voltage” within
the product’s enclosure that may be of sufficient magnitude to constitute a risk of
electric shock to persons.
The exclamation point within an equilateral triangle is intended to alert you to the
presence of important operating and maintenance (servicing) instructions in the
literature accompanying the product.
APPLICABLE FOR USA, CANADA OR WHERE
APPROVED FOR USAGE
CAUTION: TO PREVENT ELECTRIC SHOCK,
MATCH WIDE BLADE PLUG TO WIDE SLOT,
INSERT FULLY.
ATTENTION: POUR EVITER LES CHOCS
ELECTRIQUES, INTRODUIRE LA LAME
LA PLUS LARGE DE LA FICHE DANS LA
BORNE CORRESPONDANTE DE LA PRISE ET
POUSSER JUSQU AU FOND.
RISK OF ELECTRIC SHOCK
DO NOT OPEN
RISQUE DE CHOQUE ÉLECTRIQUE
N'OUVREZ PAS
CAUTION: To reduce the risk of electric shock, do not remove cover (or back).
No user-serviceable parts inside. Refer servicing to qualified service personnel.
1. Read these instructions.
2. Keep these instructions.
3. Heed all warnings.
4. Follow all instructions.
5. Do not use this apparatus near water.
6. Clean only with a dry cloth.
7. Do not block any ventilation openings. Install in accordance with the manufacturer’s instructions.
8. Do not install near any heat sources such as radiators, heat registers, stoves, or other apparatus (including amplifiers) that produce heat.
9. Do not defeat the safety purpose of the polarized or grounding-type plug. A polarized plug has two blades with one wider than the other. A grounding-type plug has
two blades and a third grounding prong. The wide blade or the third prong are provided for your safety. If the provided plug does not fit into your outlet, consult an
electrician for replacement of the obsolete outlet.
10. Protect the power cord from being walked on or pinched particularly at plugs, convenience receptacles, and the point where they exit from the apparatus.
11. Only use attachments/accessories specified by the manufacturer.
12. Use only with the cart, stand, tripod, bracket, or table specified by the manufacturer, or sold with the apparatus. When a cart is used, use caution when moving the
cart/apparatus combination to avoid injury from tip-over.
13. Unplug this apparatus during lightning storms or when unused for long periods of time.
14. Refer all servicing to qualified service personnel. Servicing is required when the apparatus has been damaged in any way, such as power-supply cord or plug is
damaged, liquid has been spilled or objects have fallen into the apparatus, the apparatus has been exposed to rain or moisture, does not operate normally, or has been
dropped.
15. The apparatus shall not be exposed to dripping or splashing and that no objects filled with liquids, such as vases, shall be placed on the apparatus.
16. CAUTION: Servicing instructions are for use by qualified service personnel only. To reduce the risk of electric shock, do not perform any servicing other than that
contained in the operating instructions unless you are qualified to do so.
17. WARNING: To reduce the risk of fire or electric shock, do not expose this apparatus to rain or moisture.
18. Where an appliance coupler is used as the disconnect device, the disconnect device shall remain readily operable.
19. CAUTION: Danger of explosion if battery is incorrectly replaced. Replace only with the same or equivalent type.
PORTABLE CART WARNING
Important Safety Instructions

3
Table of Contents
Important Safety Instructions ..................................................................................................2
Introduction ................................................................................................................................ 4
Features ......................................................................................................................................................... 5
What’s Included ........................................................................................................................................... 5
D2.1 Inputs & Outputs ............................................................................................................... 6
D2.1 Side Vents .......................................................................................................................... 7
D2.1 IR Remote .......................................................................................................................... 8
Installation ................................................................................................................................. 9
Shelf Mount .................................................................................................................................................. 9
Wall Mount ....................................................................................................................................................9
Connections .............................................................................................................................. 10
Optical In (TV Audio Connection) ......................................................................................................... 11
Sub Out (Bxa100 Subwoofer Amp Connection) .............................................................................. 11
L- L+ R- R+ (Speaker Connections) ..................................................................................................... 11
Line In (Auxiliary Audio Source) ............................................................................................................ 11
Receiver In (Bluetooth Audio Streaming & Amplifier Setup) ....................................................... 11
Ac Power Terminal (100-240V-50/60Hz 2.5A) .............................................................................. 11
Operation .................................................................................................................................. 12
On/Off ......................................................................................................................................................... 12
Volume ........................................................................................................................................................ 12
Mute ............................................................................................................................................................. 12
Eq .................................................................................................................................................................. 12
Source Select ............................................................................................................................................. 12
Beale Street Audio Bluetooth Module .................................................................................... 13
Pairing A Bluetooth Device ................................................................................................................... 13
Bluetooth Transport Functions ............................................................................................................ 13
IR Learning ............................................................................................................................... 14
To Enter Learning Mode ......................................................................................................................... 14
Power .......................................................................................................................................................... 14
Volume Up .................................................................................................................................................. 14
Volume Down ............................................................................................................................................ 14
Mute ............................................................................................................................................................. 14
Input Select ................................................................................................................................................ 15
To Exit Learning Mode ............................................................................................................................ 15
To Clear All Learned Commands .......................................................................................................... 15
Factory Reset ........................................................................................................................... 15
Specifications ........................................................................................................................... 16
Audio ............................................................................................................................................................ 16
General ........................................................................................................................................................ 16
Limited Warranty ..................................................................................................................... 17

4
Introduction
Congratulations and thank you for purchasing the Beale Street Audio D2.1, Digital 2.1 Channel
Audio Amplifier!
The compact size and advanced design of the D2.1 deliver a whole lot more than just great,
powerful, clear audio in a small package. The D2.1 delivers a true 50 Watts at 8 Ohms, making
it the perfect companion for all Beale Street Audio in ceiling and in wall speakers. Though we’d
rather you use our speakers, the D2.1 will also team up nicely with other branded speakers...
when those situations are just unavoidable.
Are you a bass freak? If so, the D2.1 has a line level subwoofer output that can be used to
drive a Beale Street Audio subwoofer amplifier and subwoofer for additional bass extension
and presence. (Of course, if you have to, you can use other branded amps and subs, but
c’mon...Get Beale!)
Beyond all of the great audio amplification and subwoofer flexibility, are the other great
features that make the D2.1 so powerful. Let’s start with three audio inputs, including stereo
line level, Digital Optical, (Toslink) and a special Bluetooth® Audio Streaming input. All three
inputs are auto-sensing so the D2.1 can be configured to automatically turn ON based upon
setup options, making system control as easy as pressing a play button or turning on a TV.
The D2.1 also features IR control from the D2.1 IR Remote for source select, volume, mute,
EQ, sub level and night mode. Even though the D2.1 is auto-sensing, we have also provided IR
control of power ON/OFF, for applications where manual power is preferable. The built-in IR
eye increases installation location options in that by using an IR control system, the D2.1 can
be hidden away in a cabinet or closet and still be controlled via remote control.
Got Bluetooth? Good...so do we! The Beale Street Audio DBT-Taylor Bluetooth Programming
Module with A2DP will interface with most current Bluetooth devices such as smartphones,
tablets and other Bluetooth devices for Bluetooth Audio Streaming. The D2.1 features a
special port for the DBT-Taylor that not only acts as a Bluetooth Audio Streaming input, but
also outputs play/ pause, track forward/reverse, and scan forward/reverse commands to
compatible Android or iOS tablets that feature the AVRCP Bluetooth Profile for IR control,
when triggered by the D2.1 IR Remote! (See Bluetooth Requirements, next page.)
So let’s see...compact size, big power, sub out, three audio inputs, auto-sensing, IR control of
the amp and a Bluetooth tablet, wow, that’s a whole lot of stuff right?
Well there’s more...like Taylor App...the D2.1 setup app.
Taylor App communicates with the D2.1 via the DBT-Taylor Programming Module. The App
allows access to and control of typical functions like volume, balance, sub level and source
select...but there’s more to it than that. Like the ability to create, store and recall different
amp setup configurations. Max output limiting. Select and set custom EQ settings that can
then be selected with the IR Remote. Auto-sense ON/OFF configurations. Configurable sub/
LFE selection, variable crossover, slope, phase and a variable high-pass setting for main
speaker low frequency cutoff for fine tuning main speaker/sub out configuration.
So yes, the best things do come in small packages.
Please read and follow the instructions in this User Guide to assure you are getting the most
from your new Beale Street Audio D2.1 Digital 2.1 Channel Amplifier.

5
Features
• Compact size...fits almost anywhere
• Cool, efficient digital design
• Stereo Audio Line Level Input (RCA)
• Digital Optical Audio Input (Toslink)
• Bluetooth Compatible (with optional DBT-Taylor Programming Module, available separately)
• Line Level Subwoofer Output (RCA)
• 5VDC power supply output for Beale Street Audio Accessories
• 10 Band Graphic EQ
• Adjustable High-Pass or full range speaker settings
• Adjustable Subwoofer Crossover, Slope and Phase settings
• Anti-clipping Output Limiter
• Bluetooth playback control via IR Remote Control
What’s Included
1 - D2.1 Amplifier
1 - AC Power Cord
1 - User Guide
Bluetooth Requirements
Bluetooth Audio Streaming
Bluetooth requirements for Bluetooth Audio Streaming with the DBT-Taylor Programming
Module:
• Bluetooth Profiles (Bluetooth source) - A2DP for Bluetooth Audio Streaming; AVRCP for
control of compatible Android or iOS tablet(s).
Taylor App (Setup App)
Bluetooth requirements for running the Taylor App (Setup App) with the DBT-Taylor
Programming Module:
• Android/iOS tablet requirements: Tablets only (Android requires 7” or larger screen).
• Taylor App does not run on smartphones.
• Bluetooth version (tablet) - v4.0 or better to run Taylor App.
6
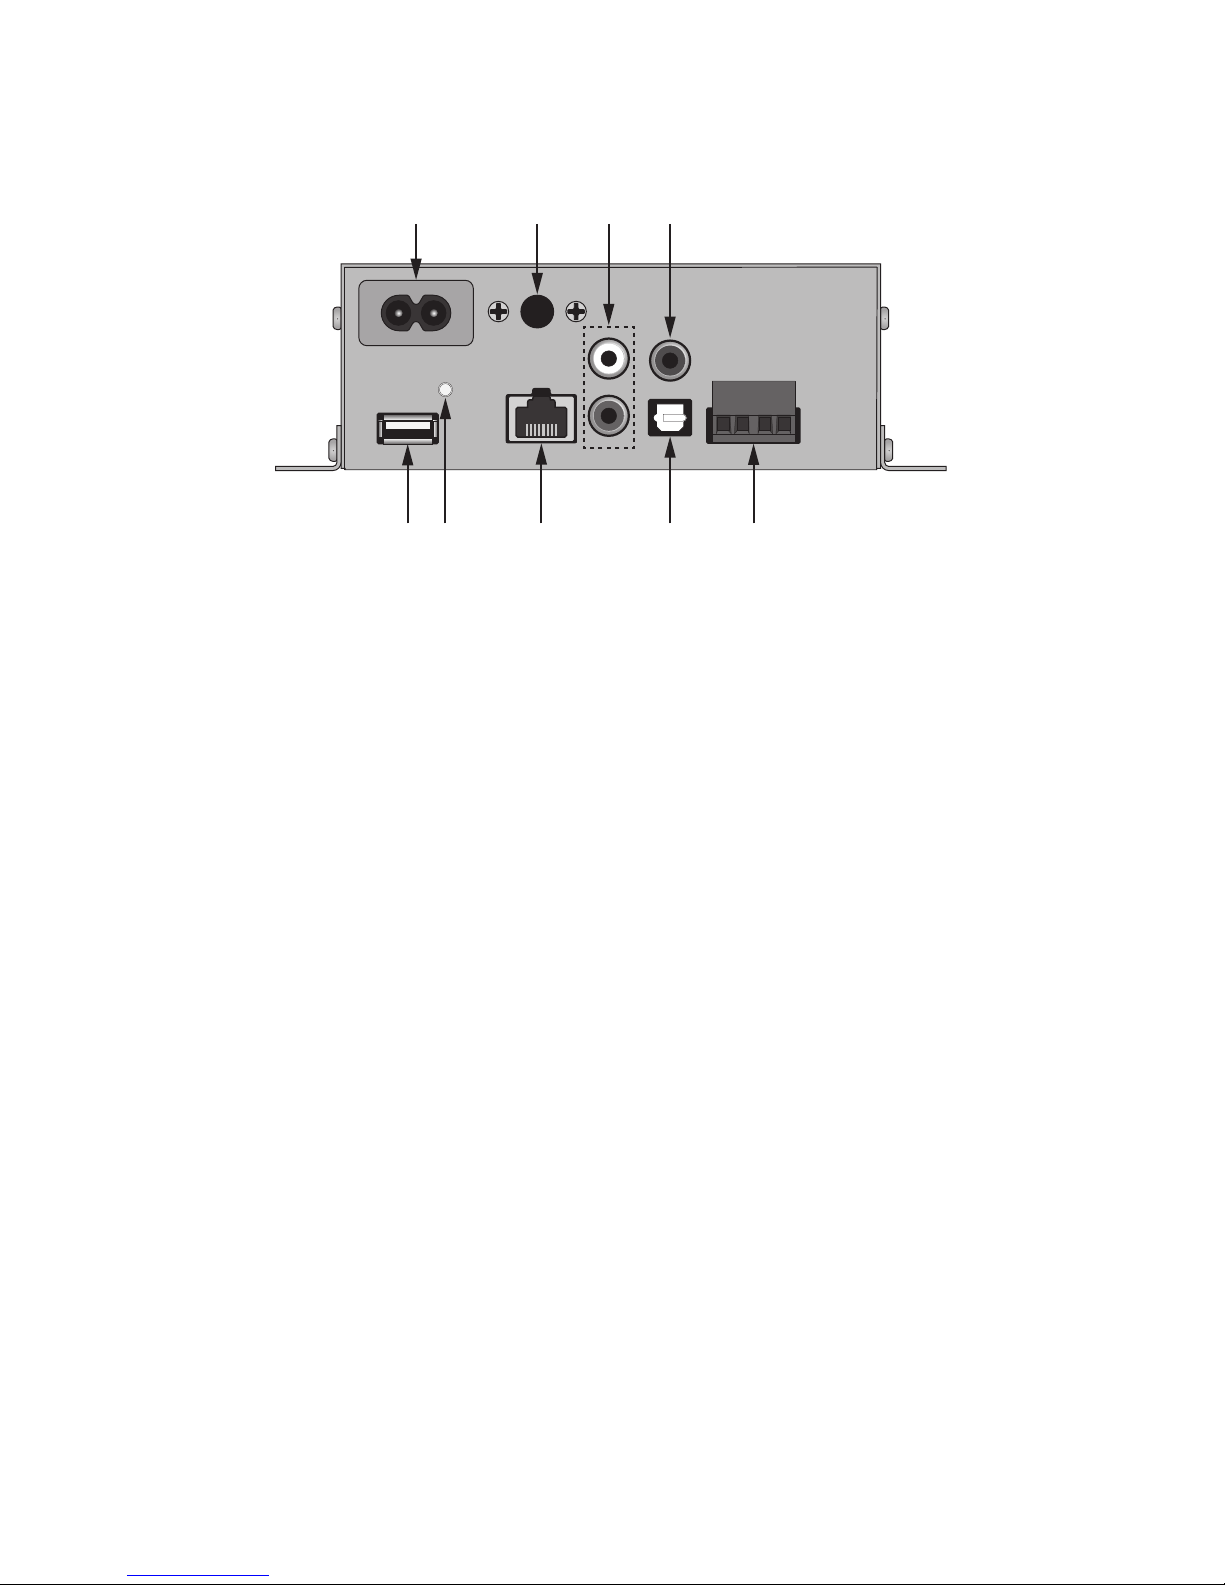
D2.1 Inputs & Outputs
These connectors connect things to the D2.1...some actually do some other stuff too...
100-240V-50/60Hz 2.5A
STATUS
RECEIVER
IN
LINE IN
L
R
SUB OUT
OPTICAL IN
L- L+ R- R+
USB
1 3 4
56789
2
1. AC POWER TERMINAL (100-240V-50/60Hz 2.5A) - Universal power connector.
Automatically selects AC power mode (110VAC/220VAC) when connected to AC power.
After all connections have been made, connect the supplied AC Power Cord to an
unswitched AC power outlet.
2. IR SENSOR - IR sensor ‘sees’ the IR commands from the D2.1 IR Remote, or other properly
configured programmable remote to control D2.1 Power, Volume, EQ Input, etc.
3. LINE IN (L&R) - Two RCA jacks. Analog audio sensing input. The D2.1 can be configured to
turn ON when an audio signal is present on these jacks. (See section: Operation/ON/OFF.)
The amp will turn OFF when no audio input has been sensed for fifteen minutes. Using a
stereo RCA cable with gold ends, connect to the L&R line level audio output on a source to
be played though the D2.1. If the source has variable output be sure to lower the volume
on the source prior to turning the source and amp on the avoid unintentional damage to
the D2.1 and/or speakers. Set source to an appropriate output level during audio level
setup.
4. SUB OUT - One RCA jack. Outputs line level low frequency content to a powered
subwoofer. Using a mono RCA cable, connect to the Sub IN or LFE jack on a powered
subwoofer.
5. SPEAKER TERMINALS - Four-position plug-in screw terminal. Outputs speaker level
audio to left and right channel speakers or a sound bar. Using 16AWG (min) speaker
wire, connect to the appropriate speaker terminals on a sound bar or left and right
speakers. Before connecting the speaker wire to the amp, twist the ends of the speaker
wire so there are no loose ends that can cause shorts. Observe proper polarity. Confirm
connections.
 Loading...