


ROTARY SCREW AIR COMPRESSOR
OPERATOR’S MANUAL & PARTS LIST
NOTE
This publication contains the
latest information available at
the time of preparation. Every
effort has been made to ensure
accuracy. However, Vanair
Manufacturing, Inc. takes no
responsibility for errors or
consequential damages
caused by reliance on the
information contained herein.
Vanair Manufacturing, Inc.
reserves the right to make
design change modifications
or improvements without prior
notification.
NOTE
Use only Vanai r Vanguard™
Premium Synthetic Oil and
Genuine Vana ir P ar ts. Inspect
and replace damaged
components before operation.
Substituting non-Vanguard™
Oil or non-genuine Vanair filter
components WILL VOID THE
COMPRESSOR WARRANTY!
Vanair Manufacturing, Inc.
10896 West 300 North
Michigan City, IN 46360
Phone: (219) 879-5100
(800) 526-8817
Service Fax: (219) 879-5335
Parts Fax: (219) 879-5340
Sales Fax: (219) 879-5800
www.vanair.com
Read this manual before
installing, operating or
servicing this equipment.
Failure to comply with the
operation and maintenance
instructions in this manual
WILL VOID THE EQUIPMENT
WARRANTY.
NOTE
Making unauthorized
modifications to the system
components WILL VOID THE
WARRANTY!
Always inform Vanair
Manufacturing, Inc., befo re
beginning any changes to the
Viper Diesel system.
KEEP THE MANUAL
WITH THE VEHICLE
©2014 Vanair Manufacturing, Inc.
All rights reserved.
P/N: 090058-OP_r0
Effective Date:
August-2014

WARRANTY: VIPER SERIES AIR COMPRESSORS
The rotary screw compressor unit is warranted for life when adhering to the prescribed maintenance schedule.
The hydraulic motor on the hydraulic Viper is warranted for two (2) years. This warranty does not cover damage
caused by accident, misuse or negligence. If a compressor unit is disassembled the warranty is void. Any
disassembly of major components must be approved by Vanair to avoid voiding of warranty. All other parts
including the compressor unit shaft seal are warranted for twelve (12) months subject to the same conditions
mentioned previously. Any and all such claims for warranty consideration must be coordinated prior to work being
performed through the Warranty-Service Department at the address below. Do not return parts without prior
authorization.
Warranty is limited to the supply of replacement part s failing within the warranty period. Credit for labor required to
refit replacement parts is NOT included. All warranted pa rts ar e to be shipped PREPAID to V ANAIR. Replacement
parts will be shipped back to the customer by VANAIR via ground shipment. Cost to expedite delivery of
replacement parts will be incurred by customer.
Warranty will commence upon receipt of the Warranty Registration Card. If the Warranty Registration Card is not
received within six (6) months, the warranty commencement date shall be thirty (30) days from the date of
shipment from VANAIR. Records of warranty adherence are the responsibility of end user.
This statement of warranty is expressly in lieu of and disclaims all other express warranties, implied warranties of
merchantability and fitness for a particular purpose and all other implied warranties which extend beyond the
description on the face hereof. In no event shall Vanair be responsible for special, indirect, incidental,
consequential or punitive damages of any kind, including without limitation, lost profits or other monetary loss,
whether or not any such matters or causes are within Vanair's control or due to negligence or other fault of Vanair,
its agents, affiliates, employees or representatives.
This warranty shall be void and VANAIR shall have no resp onsibili ty to repair, replace or repay the purchase price
of defective or damaged parts resulting from the use of or repair of replacement parts or fluids not of VANAIR'S
manufacture or from buyer's failure to store, install, maintain and operate the compressor according to the
recommendations contained in the Manual.
All claims under the Warranty shall be made by con tacting VANAIR Warranty-Service Department.
Please note that engines are warranted separately by the engine manufacturer. Consult engine manual.
Register Your Warranty Online at www.vanair.com under the Support Tab!
Or Call: (800) 526-8817 • Fax: (219) 879-5800
Mail to: 10896 W 300 North • Michigan City, IN 46360
Effective February 11, 2013

DIESEL VIPER TABLE OF CONTENTS
TABLE OF
CONTENTS
WARRANTY ............................................... BEHIND COVER
TABLE OF CONTENTS...................................................... I
WARRANTY CLAIMS PROCEDURE ................................V
CLAIMS PROCESS FOR WARRANTED PARTS..................................................................................... V
PROCEDURE........................................................................................................................................... V
SECTION 1: SAFETY .....................................................1
1.1 GENERAL INFORMATION......................................................................................................1
1.2
1.3
1.4
DANGERS, WARNINGS, CAUTIONS AND NOTES...............................................................1
SUMMARY OF DANGERS, WARNINGS CAUTIONS AND NOTES.......................................1
1.3.1
1.3.2
1.3.3
1.3.4
DANGERS .......................................................................................................................................................1
WARNINGS......................................................................................................................................................1
CAUTIONS.......................................................................................................................................................2
SAFETY DECALS............................................................................................................................................3
DISPOSING OF MACHINE FLUIDS .......................................................................................3
SECTION 2: SPECIFICATIONS..........................................5
TABLE 2A: SPECIFICATIONS FOR VIPER DIESEL ROTARY SCREW COMPRESSOR........................5
SECTION 3: INSTALLATION..............................................7
3.1 MACHINE PACKAGE RECEIPT/INSPECTION............................................................................7
3.2 INSTALLATION INSTRUCTIONS.... ... ... .... .......................................... ... ......................................7
3.3 INSTRUMENT PANEL RELOCATION .........................................................................................8
FIGURE 3-1: DIMENSION DIAGRAM - PART 1 OF 2..............................................................................8
FIGURE 3-1: DIMENSION DIAGRAM - PART 2 OF 2..............................................................................9
VANAIR MANUFACTURING, INC.
(800) 526-8817 • www.vanair.com
090058-OP_r0 (AUGUST-2014) PAGE - I

TABLE OF CONTENTS DIESEL VIPER
SECTION 4: OPERATION................................................ 11
FIGURE 4-1: MAIN MACHINE COMPONENT LOCATIONS................................................................. 10
4.1 GENERAL INFORMATION..........................................................................................................11
4.2 INSTRUMENTATION..................................................................................................................11
4.2.1 DIGITAL DISPLAY SCREEN ................................................................................................................................11
4.2.2 SCROLL SELECTOR ROCKER SWITCH...........................................................................................................11
4.2.3 ON AND STOP SELECTION KEY SWITCH........................................................................................................11
4.3 INITIAL START-UP PROCEDURE..............................................................................................11
4.4 SHUTDOWN PROCEDURE ...................................................................................................... 12
4.5 SUBSEQUENT START-UP PROCEDURE ................................................................................ 12
4.6 CONTROLLER GUIDE............................................................................................................... 12
4.6.1 HOME SCREEN..................................................................................................................................................13
4.6.2 SPLASH SCREEN ..............................................................................................................................................13
4.6.3 ADJUSTING USER SETTINGS.......................................................................................................................... 13
4.6.3.1 PARAMETERS.............................................................................................................13
4.6.3.2 AUTO SHUTDOWN............................. ... ... .... ... ... ....................................... ... ... ... .... .. 13
4.6.3.3 AUTO CRANK............... .... ... ... ... ....................................... ... ... .... ... ............................. 13
4.6.3.4 SLEEP STATE TIMER ................................................................................................13
4.6.4 SETTING PRESSURE.........................................................................................................................................13
4.6.5 SAFETY...............................................................................................................................................................13
4.6.6 SERVICE INTERVALS ........................................................................................................................................14
4.7 OPERATING CONDITIONS....................................................................................................... 14
4.8 EXTREME CONDITIONS...........................................................................................................14
SECTION 5: MAINTENANCE...........................................15
5.1 GENERAL INFORMATION ........................................................................................................ 15
5.2 ROUTINE MAINTENANCE SCHEDULE............................. ... .... ... .......................................... ... 15
5.3A MAINTENANCE SCHEDULE TABLE - COMPRESSOR INTERVALS....................................... 17
5.3B MAINTENANCE SCHEDULE TABLE - ENGINE INTERVALS................................................... 18
5.4 REPLACEMENT PARTS . .... ... ... ... .... ..........................................................................................21
5.5 PARTS REPLACEMENT AND ADJUSTMENT PROCEDURES............ .... ... ... ... .... ... ... ... ... .... ... 21
5.5.1 ADJUSTING THE ENGINE SPEED.....................................................................................................................21
5.6 SERVICING THE SYSTEM FUSES AND CIRCUIT BREAKER ................................................ 21
5.7 STORAGE AND INTERMITTENT USE .. ... .......................................... ... .... ... ... ... .... ... ................ 21
5.7.1 INTERMITTENT USE................................................................................................................................................22
5.7.2 LONG TERM STORAGE ..........................................................................................................................................22
PAGE - II 090058-OP_r0 (AUGUST-2014)
VANAIR MANUFACTURING, INC.
(800) 526-8817 • www.vanair.com

DIESEL VIPER TABLE OF CONTENTS
SECTION 6: TROUBLESHOOTING .................................23
6.1 GENERAL INFORMATION.........................................................................................................23
6.2 TROUBLESHOOTING GUIDE....................................................................................................24
6.3 EXTREME CONDITION OPERATION........................................................................................28
6.3.1 HIGH MOISTURE CONDITION: EMULSIFICATION OF OIL IN
ROTARY SCREW COMPRESSOR SYSTEMS....................................................................................................28
TABLE 6.3A HIGH MOISTURE CONDITION OPERATION....................................................... 29
6.3.2 COLD WEATHER OPERATION...........................................................................................................................29
TABLE 6.3B COLD WEATHER OPERATION............................................................................30
6.3.3 HIGH TEMPERATURE OPERATION...................................................................................................................30
TABLE 6.3C HIGH TEMPERATURE OPERATION.................................................................... 31
6.3.4 HIGH DUST CONTENT OPERATION..................................................................................................................31
TABLE 6.3D HIGH DUST CONTENT OPERATION................................................................... 31
6.3.5 HIGH ALTITUDE OPERATION.............................................................................................................................32
SECTION 7: ILLUSTRATED PARTS LIST.......................33
7.1 PARTS ORDERING PROCEDURE............................................................................................33
TABLE 7A: RECOMMENDED SPARE PARTS LIST.................... .... ......................................... .... ... ... ... .34
TABLE 7B: MACHINE OPTIONS LIST ....................................................................................................34
TABLE 7C: MAINTENANCE TRACKING LOG.................... ... ... ... .... ... ... ... ... .... ... ... ... .... ... ... ... .................35
7.2 COMPRESSOR REPLACEMENT PARTS ................................................................................36
7.3 AIREND AND ATT ......................................................................................................................38
7.4 ENGINE AND DRIVE PARTS (1 OF 2).......................................................................................40
7.4 ENGINE AND DRIVE PARTS (2 OF 2).......................................................................................42
7.5 COOLING SYSTEM (PART 1 OF 2)...........................................................................................44
7.5 COOLING SYSTEM (PART 2 OF 2)...........................................................................................46
7.6 CANOPY AND FRAME PARTS....... ... ... .... ... ... ... .... ... ... ..............................................................48
7.7 COMPRESSOR THERMAL CONTROL .....................................................................................50
7.8 INSTRUMENT PANEL................................................................................................................50
7.9 ELECTRICAL SYSTEM..............................................................................................................52
7.10 FUEL TANK ASSEMBLY............................................................................................................54
7.11A DECALS (LOCATION)........................... .... ...................................... .... ... ... ... .... ... .......................56
7.11B DECALS (IDENTIFICATION)........... ... ... .... ...................................... .... ... ... ... .... ... .......................57
7.11C DECALS (PART NUMBERS).............. ... .... ... ... ... .... ... ... ... .... ... .......................................... ... ... ....58
7.12 WIRING DIAGRAM.....................................................................................................................59
7.13 SCHEMATIC FLOW DIAGRAM..................................................................................................60
7.14 HOSE INSTALLATION GUIDE....................................................................................................61
VANAIR MANUFACTURING, INC.
(800) 526-8817 • www.vanair.com
090058-OP_r0 (AUGUST-2014) PAGE - III

TABLE OF CONTENTS DIESEL VIPER
BLANK PAGE
PAGE - IV 090058-OP_r0 (AUGUST-2014)
VANAIR MANUFACTURING, INC.
(800) 526-8817 • www.vanair.com

VIPER DIESEL WARRANTY PROCEDURE
WARRANTY CLAIMS
PROCEDURE
CLAIMS PROCESS FOR
WARRANTED VANAIR PARTS
This process must be used by owners of
®
Vanair
warranted item needs repair or replacement
under the terms of the purchase warranty.
Do not return items to Vanair without prior
authorization from the Vanair Warranty
Administrator.
PROCEDURE:
When a customer needs assistance in
troubleshooting a system and/or returning
parts, follow the steps below.
1. Locate the machine’s serial number:
The machine package serial number plate is
located inside the machine com partment on
the floor near to the engine air filter mounting
location (see Figure W-1).
The engine and the compressor also have
individual serial numbers respectively (see
Figure W-1). For engine warranty issues,
consult the Engine Operator’s Manual for
the engine’s limited warranty details. For
particular compressor unit issues, the
compressor serial number may be needed.
In any case, engine and/or compressor
issues can be confirmed using the machin e
serial number as found in Figure W-1.
2. Have a list of the symptoms/condition/
malfunctions along with any applicable
temperature and pressure readings, and
also the number of operational hours
available:
Note that the above information will also
need to be included on the Return Material
equipment in situations where a
Authorization Form (per Step #6); this form
is necessary for warranty processing if the
warranty claim is deemed valid by the
service case review.
3. Contact the Vanair
by phone (1-219-879-5100) to speak with
a Service Technician.
4. Vanair Service will troubleshoot the
problem based on the information
provided by the customer, and attempt to
return the unit to service as quickly as
possible.
5. If the unit cannot be returned to service,
and Vanair determines this matter is a
warranty issue, the Service Technician
will assign an RMA (Return Material
Authorization) number that will provide
for the return of the item to Vanair for
analysis and a final determination as to
the item’s warranty status.
®
Service Department
NOTE
The RMA number must be placed on the
outside of the package being returned.
6. Warranty Claims are solicited via a
Return Material Authorization (RMA)
Form. This form can be obtained via
download from the web site, or requested
directly from the Vanair Service
Department:
Once a current form has been obtained,
follow the instructions given on the form to fill
in the information needed. This form is used
for the purpose of soliciting a warranty case.
All of the field information except for the
bottom section block fields, which includes
VANAIR MANUFACTURING, INC.
(800) 526-8817 • www.vanair.com
090058-OP_r0 (AUGUST-2014) PAGE - V

WARRANTY PROCEDURE VIPER DIESEL
800-526-881 7
260940
MODEL NUMBER
SERIAL NU MBER
MAXIMUM PR ESSURE
COMPRESSOR INPUT R PM
www.v ana ir.c om
Machine Serial Number
Engine Serial Number
Compressor Unit
Serial Number
Disposition of Goods, Notifications and
Additional Notes, will be required.
Customers have 30 days after the RMA
number is issued to return the item. If the
part is not returned within this period, the
RMA is void and any claims will be denied.
Before sending a warranty part to a
customer, Vanair
card number to cover the cost of the part and
shipping. After the part is analyzed and
deemed to be covered under warranty,
Figure W-1: Machine Serial Number Location
NOTE
All labor claims or invoices must be
approved by the Vanair Warranty
Administrator prior to starting repair work
along with the cost of the repair . All p aper
work associated with the returned item
and warranty repair cost must reference
the RMA number issued against the part,
and be forwarded to Vanair within 30 days
of the completion of work.
®
will need a P.O. or credit
Vanair will issue credit to the customer. All
parts eligible for warranty must have the
RMA number on the invoice at the time of
purchase.
No items can be returned “freight collect”.
Freight costs will be addressed at the time
the claim is closed. The customer pays any
additional costs for warranty parts delivered
through expedited services (i.e., Next Day,
Second Day).
VANAIR WILL NEVER ACCEPT ANY
INVOICES FOR PARTS RETURNED: ANY
P ARTS RETURNED VIA INVOICE WILL BE
RETURNED FREIGHT COLLECT: NO
PARTS ARE TO BE RETURNED FREIGHT
COLLECT!
Vanair Mfg., Inc. strives to continuously
improve its customer service. Please forward
any questions, comments, or suggestions to
Vanair Service:
Phone: 219-879-5100, ext. 400 or toll free
Email: warranty@vanair.com
844-VANSERV (826-7378)
PAGE - VI 090058-OP_r0 (AUGUST-2014)
VANAIR MANUFACTURING, INC.
(800) 526-8817 • www.vanair.com

VIPER DIESEL SECTION 1: SAFETY
SECTION 1:
SAFETY
1.1 GENERAL INFORMATION
IMPORTANT
Read this manual before operating or
servicing the Viper Diesel compressor
system. Failure to do could result in
damage equipment, bodily injury, or
death
The products provided by Vanair
Manufacturing, Inc., are designed and
manufactured for safe operation and
maintenance. But it is ultimately the
responsibility of the users and maintainers
for safe use of this equipment. Part of this
responsibility is to read and be familiar with
the contents of this manual before operation
or performing maintenance action s.
harm. When you see the international
warning symbol, pay extremely careful
attention, and follow the given instructions
or indications to avoid any possible hazard.
1.3 SUMMARY OF WARNINGS, CAUTIONS AND NOTES
These boxed inserts are placed throughout
this manual in the sections where they apply.
This subsection is a general summary of
their contents.
®
1.3.1 DANGERS
• Keep tools or other conductive objects away
from live electrical parts.
• Never touch electrical wires or components
while the machine is operating. They can be
sources of electrical shock.
1.3.2 WARNINGS
1.2 DANGERS, WARNINGS, CAUTIONS AND NOTES
These boxes are labeled clearly with the title
block listing either Danger, Warning,
Caution, or other non-safety issue. They
draw attention to specific issues that are
pertinent to the safe and correct operation of
the machine.
The symbols shown and defined in Section
1: Safety are used throughout this manual
and on the machine to call attention to, and
identify, possible hazards.
The international warning symbol (shown
below) is used on all decals, labels and signs
that concern information pertaining to bodily
VANAIR MANUFACTURING, INC.
(800) 526-8817 • www.vanair.com
090058-OP_r0 (AUGUST-2014) PAGE - 1
• DO NOT EVER use this compressor as a
breathing air source. Vanair Manufacturing
Inc., disclaims any and all liabilities for
damage or loss due to fatalities, personal
injuries resulting from the use of a Vanair
compressor to supply breathing air.
• DO NOT perform any modifications to this
equipment without prior factory approval.
• DO NOT install this compressor in a
confined space that lacks proper
ventilation and airflow; breathing and
cooling air circulation must not be
compromised.
• DO NOT operate the compressor or any of
its systems if there is a known unsafe
condition. Disable the equipment by
disconnecting it from its power source.
Install a lock-out tag to identify the

SECTION1: SAFETY VIPER DIESEL
equipment as inoperable to other
personnel.
• DO NOT operate the compressor with
any by-pass or other safety systems
disconnected or rendered inoperative.
• DO NOT operate the equipment while
you are under the influence of alcohol or
drugs.
• DO NOT operate the equipment while
you are feeling ill.
• DO NOT attempt to service the
equipment while it is operating.
• Before performing maintenance or
replacing parts, relieve the entire system
pressure by opening a service valve
which will vent all pressure to the
atmosphere: remove all electrical power.
• DO NOT use the compressor for
purposes other than for which it is
intended. High pressure air can cause
serious and even fatal injuries.
• DO NOT operate the compressor
outside of its specified pressure and
speed ratings. (See Section 2:
Specifications or refer to the equipment
data plate.)
•DO NOT use flammable solvents or
cleaners for cleaning the compressor or
it parts.
• DO NOT operate the compressor in
areas where flammable, toxic, or
corrosive fumes, or other damaging
substance can be ingested by the
compressor intakes.
• Keep arms, hands, hair and other body
parts, and clothing away from fans, drive
shafts, and other moving parts.
• DO NOT wear jewelry, unbuttoned cuffs,
ties, or loose-fitting clothing when you are
working near moving/rotating parts.
• ALWAYS confine long hair when working
near moving/rotating parts.
• NEVER operate the equipment while
wearing a headset to listen to music or the
radio.
• Wear personal protective equipment
such as gloves, work shoes, and eye
and hearing protection as required for
the task at hand.
• DO NOT operate the compressor with
any guards removed or damaged, or
other safety devices inoperative.
• DO NOT operate the compressor in
enclosed or confined spaces where
ventilation is restricted or closed-off.
• Ensure that hoses connected to se rvice
valves are fitted with correctly sized and
rated flow limiting devices which comply
with applicable codes. Pressurized
broken or disconnected hoses c an whip
causing injuries or damage.
• Over speed is hazardous! NEVER
tamper with the governor components or
settings to increase the maximum
speed. Severe personal injury and
equipment damage can result if
operated at speeds above the maximum.
• DO NOT use tools, hoses, or equipment
that have maximum ratings below that of
this compressor .
• Keep metal tools, and other conductive
objects away from live electrical
components.
• Before performing maintenance or repair
operations on the compressor, ensure
that all power has been removed and
been locked out to prevent accidental
application.
• DO NOT assume that because the
compressor is in a STOPPED condition
that power has been removed.
• Use this compressor only to compress
atmospheric air. Use of this equipment
as a booster pump and/or to compress
any other gaseous or aerosol substance
constitutes improper use. It can also
cause damage or injuries. Such misuse
will also void the warranty.
• Install, operate, and maintain this
equipment in full compliance with all
applicable OSHA, other Federal, state,
local codes, standards, and regulations.
• When lifting objects, be aware of proper
lifting techniques to avoid injury.
• ALWAYS read and follow safety related
precautions found on containers of
hazardous substances.
• DO NOT play with compressed air. It can
cause serious injury.
1.3.3 CAUTIONS
• Check all safety devices for proper
operation on a routine basis.
• Ensure that no tools, rags, or other
objects are left on compressor drive
systems or near intakes.
PAGE - 2 090058-OP_r0 (AUGUST-2014)
VANAIR MANUFACTURING, INC.
(800) 526-8817 • www.vanair.com

VIPER DIESEL SECTION 1: SAFETY
• Keep the equipment clean when
performing maintenance or service
actions. Cover openings to prevent
contamination.
• DO NOT operate the compressor if
cooling air is not available (fan/cooler not
operating) or if lubricant levels are below
their specified minimum levels.
• Ensure all plugs, hoses, connectors,
covers, and other parts removed for
maintenance actions are replaced
before applying power to the
compressor.
• Avoid touching hot surfaces and
components.
• Ensure that electrical wiring, terminals;
hoses and fittings are kept in serviceable
condition through routine inspections
and maintenance. Replace any
damaged or worn components.
• DO NOT install safety devices and/or
replacement parts other than authorized
®
Vanair
• Keep personnel out of line with, and
away from discharge opening of valves,
hoses and tools.
• Immediately clean up any lubricant or
spills.
replacement parts.
hazard to operators or service personne l. All
pertinent decals listed in Section 7.11A,
Decal Locations are located near a
component, which is subject to respect in
terms of safety precautions. Always heed the
information noted on the safety decals.
WARNING
DO NOT REMOVE OR COVER ANY
SAFETY DECAL. Replace any safety
decal that becomes damaged or illegible.
1.4 DISPOSING OF MACHINE FLUIDS
Always dispose of machine fluids under the
guidance of all applicable local, regional and/
or federal law.
®
Vanair
For additional information, consult the
container label of the fluid in question.
encourages recycling when allowed.
1.3.4 SAFETY DECALS
Safety decals are placed onto, or located
near, system components that can present a
VANAIR MANUFACTURING, INC.
(800) 526-8817 • www.vanair.com
090058-OP_r0 (AUGUST-2014) PAGE - 3

SECTION 1: SAFETY VIPER DIESEL
BLANK PAGE
PAGE - 4 090058-OP_r0 (AUGUST-2014)
VANAIR MANUFACTURING, INC.
(800) 526-8817 • www.vanair.com

VIPER DIESEL SECTION 2: SPECIFICATIONS
SECTION 2:
SPECIFICATIONS
TABLE 2A: SPECIFICATIONS FOR VIPER DIESEL ROTARY SCREW COMPRESSOR
GENERAL SYSTEM
INFORMATION
ENGINE
Engine Speed
Engine Oil Capacity Four (4) Quarts 15W40 (Refer to Engi ne Operator’s Manual fo r Extreme
Fuel Consumption 1.25 GPH at Full Engine Speed / Load Nine (9) Hour Runtime (one
Fuel Tank Capacity Nine (9) Gallons
Fuel Type
Operating Temperature Limits
COMPRESSOR Single Stage, Oil Injected Rotary Screw
Model 80 CFM / 100 PSIG
Inlet Control Electric
Diesel 25HP
Idle Speed: 2200 RPM
Conditions)
gallon/hour @ 60% Duty Cycle)
Diesel Fuel
+10 °F (-7°C) to 120 °F (49 °C)
70 CFM / 125 PSIG
60 CFM / 150 PSIG
High Altitude: 70 CFM / 100 PSIG
I
II
SPECIFICATION
// Full Speed: 3600 RPM
III
Air Filter Pleated Paper, Dry Typ e
Table continued on next page
I
For specification and requirements regarding the Kubota® 25 HP Diesel Engine, refer to the Engine Operator’s
Manual. IMPORTANT: Do not adj ust the engine speed without first consulting the Vanair
(refer to Section 5.5.1).
II
Vanair recommends: Diesel Fuel Speci fica tion Type and Sulfur Content % (ppm) used must be compliant with all
applicable emission regulations for the area in which the engine is operated.
Engine manufacturer recommends a fuel sulfur content of less than 0.10% (1000 ppm). For fuels with a high sulfur
content 0.50% (5000 ppm) to 1.0% (10000 ppm) a more frequent engine oil and oil filter change schedule is needed
(approximately half). DO NOT USE fuels with a sulfur content greater than 1.0% (10000 ppm). For additional
information on fuel for this engine, consult Section 6.3 (Extreme Condition Operation), and the Engine Operator’s
Manual.
III
With cold weather option kit temperature range expands to: -40 °F (-40 °C). Refer to Section 7, Table 7B for options
list.
NOTE: Specifications are subject to change without notice.
VANAIR MANUFACTURING, INC.
(800) 526-8817 • www.vanair.com
090058-OP_r0 (AUGUST-2014) PAGE - 5
®
Service Department
SECTION 2: SPECIFICATIONS VIPER DIESEL
TABLE 2A: SPECIFICATIONS FOR VIPER DIESEL ROTARY SCREW COMPRESSOR (cont.)
GENERAL SYSTEM
SPECIFICATION
INFORMATION
COMPRESSOR (specifications continued from previous page)
Oil Filter Spin-on Style
Oil Capacity / Type Air End - 3 Quarts // Machine - 4 Quarts (1 gallon) (Vanguard™
Premium Synthetic Oil)
Safety Relief Valve Setting 200 PSIG
Operating Pressure Range 75-100 (Maximum) PSI; Pressure setting is set at factory to 100 PSI, but
may be adjusted downward accordingly.
Electrical System 12 VDC
Cooling System Air to Oil Heat Exchanger
Instrumentation Display Run Hours, Fuel Level, Compressor Temperature, Pressure, RPM
I
For specification and requirements regarding the Kubota® 25 HP Diesel Engine, refer to the Engine Operator ’s
Manual. IMPORTANT: Do not adjust the engine speed without first consulting the Vanair
(refer to Section 5.5.1).
II
Vanair recommends: Diesel Fuel Specification Type and Sulfur Content % (ppm) used must be compliant with all
applicable emission regulations for the area in which the engine is operated.
Engine manufacturer recommends a fuel sulfur content of less than 0.10% (1000 ppm). For fuels with a high sulfur
content 0.50% (5000 ppm) to 1.0% (10000 ppm) a more frequent engine oil and oil filter change schedule is needed
(approximately half). DO NOT USE fuels with a sulfur content greater than 1.0% (10000 ppm). For additional
information on fuel for this engine, consult Section 6.3 (Extreme Condition Operation), and the Engine Operator’s
Manual.
®
Service Department
III
With cold weather option kit temperature range expands to: -40 °F (-40 °C). Refer to Section 7, Table 7B for options
list.
NOTE: Specifications are subject to change without notice.
PAGE - 6 090058-OP_r0 (AUGUST-2014)
VANAIR MANUFACTURING, INC.
(800) 526-8817 • www.vanair.com

VIPER DIESEL SECTION 3: INSTALLATION
SECTION 3:
INSTALLATION
3.1 MACHINE PACKAGE RECEIPT/INSPECTION
Upon receipt of the machine package,
inspect the exterior of the shipping crate for
signs of shipping/transit damage. Any
damage should be reported immediately to
the shipping company. Open the lid and
inspect the component parts and supports to
ensure that there has been no internal
movements of assemblies or components
which may have caused damage. To install
the Viper Diesel Compressor System, refer
to the following sections.
NOTE
Contact Vanair® at
(219) 879-5100 / (800) 526-8817
Service Fax: (219) 879-5335
www.vanair.com
to report missing items, incorrect part
numbers, or other discrepancies.
3.2 INSTALLATION INSTRUCTIONS
DANGER
DO NOT install in enclosed spaces.
WARNING
ELECTRICAL HAZARD! Be sure the
battery is disconnected before starting
the installation.
NOTE
In order to prevent accidental damage to
vehicle components (fuel tanks, lines,
brake lines, wiring harnesses), note their
location before drilling any holes.
Refer to Figure 3-1 (parts 1 and 2), and the
following procedure:
1. Position the machine so that there is no
restriction of cooling air through the
enclosure (minimum of 12 inches from
front access side; minimum of six
inches from rear side. Cooling air
enters the enclosure through the front
and rear panels, passes through the
cooler, and exits through vents in the
end shroud.
2. Ensure that adequate height and
clearance exists to allow for the hood to
open (minimum of 49.9 inches from
mounting surface), and a clear passage
for service allowance to the
maintenance access panel located at
the back.
3. Mounting surface or support should be
adequate for the weight of the machine
and should be level for normal operation.
Mounting holes for four (4) 1/2” hold
down bolts are provided. Refer to
Section 7, Illustrations and Parts Lists
for additional installation and system
schematic drawings.
4. Service connections are conveniently
grouped at the end of the unit in the
base frame.
5. Electrical connections (system
designed for 12VDC negative ground).
Ensure all supply hoses and electrical wiring
are correctly specified, adequately supported
and do not touch or rest on any sharp edges.
Wiring should be protected with split loom to
prevent corrosion and consequently, loose
due to down time.
VANAIR MANUFACTURING, INC.
(800) 526-8817 • www.vanair.com
090058-OP_r0 (AUGUST-2014) PAGE - 7

SECTION 3: INSTALLATION VIPER DIESEL
NOTE
The dimensions listed in this diagram are
the minimum required clearance
distances needed for properly cooling the
machine. Additional clearance room may
be desired for easier access for control
and/or maintenance functions.
050848_r1_1of2
DISCLAIMER
If machine package is to be mounted
within a confined space such as beneath a
canopy, the unit must have a minimum of
eight (8) inch clearances on the front and
back sides for ventilation.
3.3 INSTRUMENT PANEL RELOCATION
The Viper Diesel compressor allows for the
instrument panel to be remote mounted if it
better-suits the vehicle’s mounting allowance
space or the compressor’s functions. The
optional extension harness must be used for
remote panel installation (see Table 7B).
Please note that if relocating the panel, you
should re-apply any zip ties that were cut to
re-establish the cable wire to the new
location. Tying the wire at intervals may be
needed to secure the panel cable away from
moving objects or sharp edges during
operation.
PAGE - 8 090058-OP_r0 (AUGUST-2014)
Figure 3-1: Dimension Diagram - Part 1 of 2
VANAIR MANUFACTURING, INC.
(800) 526-8817 • www.vanair.com

VIPER DIESEL SECTION 3: INSTALLATION
050848_r1_2of2
NOTE
The dimensions listed in this
diagram are the minimum
required clearance distances
needed for properly cooling the
machine. Additional clearance
room may be desired for easier
access for control and/or
maintenance functions.
VANAIR MANUFACTURING, INC.
(800) 526-8817 • www.vanair.com
Figure 3-1: Dimension Diagram - Part 2 of 2
090058-OP_r0 (AUGUST-2014) PAGE - 9

SECTION 4: OPERATION VIPER DIESEL
B
C
F
E
D
G
H
A
T
S
Q
P
Y
Z
X
K
L
M
N
J
V
W
U
AA
R
KEY DESCRIPTION KEY DESCRIPTION KEY DESCRIPTION
A BATTERY K LIFTING BAIL U ENGINE OIL DRAIN OUTLET/TUBE
B DIESEL FUEL PORT CAP L ENGINE OIL FILL PORT CAP V ENGINE AIR FILTER (HOUSING)
C COMPRESSOR UNIT M COOLER ASSEMBLY - ENGINE
D COMPRESSOR AIR INLET N COOLER ASSEMBLY / COM-
E PRESSURE RELIEF VALVE P ENGINE OIL FILTER Y COMPRESSOR OIL LEVEL SIGHT
W INLET VALVE SOLENOID
RADIATOR
X COMPRESSOR OIL DRAIN OUTLET/
PRESSOR OIL COOLER
TUBE
GLASS
F COMPRESSOR OIL FILTER Q RADIATOR FILL PORT Z COMPRESSOR OIL FILL PORT
G COMPRESSOR AIR FILTER
R COOLING FAN ASSEMBLY AA ENGINE OIL LEVEL/ DIPSTICK
(HOUSING)
H COMPRESSOR AIR/OIL
S COOLANT RECOVERY TANK
SEPARATOR
J ENGINE EXHAUST MUFFLER T RADIATOR DRAIN VALVE
I
There is an oil dipstick indicator locat ed on either side of the engine.
INDICATOR
I
Figure 4-1: Main Machine Component Locations
PAGE - 10 090058-OP_r0 (AUGUST-2014)
VANAIR MANUFACTURING, INC.
(800) 526-8817 • www.vanair.com

VIPER DIESEL SECTION 4: OPERATION
SECTION 4:
OPERATION
4.1 GENERAL INFORMATION
Refer to Figure 4-1. The Vanair® Viper
Diesel compressor has a comprehensive
array of controls and indicators for optimum
machine performance. Understanding the
correct operation of the system will help to
distinguish between a properly functioning
system and a system that may be indicating
the beginning of a malfunction. The
information in the Operation Section will help
the operator to recognize and interpret the
readings to assure that the system is
performing optimally.
NOTE
Before starting the Vanair Viper Diesel
compressor, read this section
thoroughly and familiarize yourself with
the controls and indicators - their
purpose, location and use.
NOTE
If start-up and shut-do wn procedures are
not followed, damage to the system and
its components may occur.
4.2 INSTRUMENTATION
Refer to Figure 4-2. The standard
instrument panel for the Viper Diesel
compressor features a digital display sc reen
with scrolling and operational rocker
switches.
4.2.1 DIGITAL DISPLAY SCREEN
The air pressure readout monitors service air
pressure and incorporates an over-pressure
shutdown function.
4.2.2 SCROLL SELECTOR ROCKER SWITCH
The scroll selector rocker switch allows the
operator to navigate through the settings and
displays related to the machine’s functions
during operation.
4.2.3 ON AND STOP SELECTION KEY
SWITCH
The ON AND STOP selection key switch is
used to turn the machine on and off.
4.3 INITIAL START-UP
PROCEDURE
The following procedure should be used to
make the initial start-up of the compressor.
1. Position the compressor on a level
surface so that proper amounts of
liquid can be added, if required.
2. Check engine and compressor oil levels
and add oil, if necessary.
3. Fill fuel tank.
4. Connect air hose/piping to discharge.
5. Press and hold Start button for one (1)
second to turn on display.
6. Press and hold Start button a second
time for one (1) second to start Engine
cranking sequence.
7. Allow the machine to sufficiently warm-up
before operating.
VANAIR MANUFACTURING, INC.
(800) 526-8817 • www.vanair.com
090058-OP_r0 (AUGUST-2014) PAGE - 11

SECTION 4: OPERATION VIPER DIESEL
A B C
KEY DESCRIPTION
A INS TRU MENT PANEL MODULAR DIS-
PLAY SCREEN: Di splay con ta ins fou r lines,
20 characters/line.
B SCROLL SELECTOR ROCKER SWITCH
C ON/START AND STOP SELECTION
ROCKER SWITCH
8. After the initial run, shut down machine
allow it to depressurize and top off
compressor oil sump, as required.
Inspect for any leaks, and tighten any
loose fittings.
4.4 SHUTDOWN PROCEDURE
1. Allow engine to run at idle for
approximately sixty (60) seconds.
2. Press the STOP button; NOTE: Allow the
compressor to blow down prior to re-
starting.
IMPORTANT
In case of emergency where immediate
shutdown is required, this procedure is
not necessary.
Press the STOP button immediately.
4.5 SUBSEQUENT START-UP PROCEDURE
On subsequent starts, follow the procedure
PAGE - 12 090058-OP_r0 (AUGUST-2014)
explained below:
Figure 4-2: Controller Panel
1. Check engine and compressor oils
and add oil, if necessary.
2. Fill the fuel tank.
3. Press and hold Start button for one (1)
second to turn on display.
4. Press and hold Start button a second
time for one (1) second to start Engine
cranking sequence.
5. Allow the machine to warm up
sufficiently before operating.
WARNING
Engage stop button prior to opening
panel or servicing machine. Engine can
start at any time in Auto mode.
4.6 CONTROLLER GUIDE
Refer to Figure 4-2 for controller panel
display features. The electronic controller
supplied in the Diesel Viper package has
been designed to work in conjunction with
the linear actuator that operates the speed
control. When used properly, they will reduce
fuel consumption, remind the user when
periodic service is due, extend the useful life
VANAIR MANUFACTURING, INC.
(800) 526-8817 • www.vanair.com

VIPER DIESEL SECTION 4: OPERATION
of the package, and help diagnose any
problems that may arise during the life of the
compressor system.
4.6.1 HOME SCREEN
The home screen displays the basic
information required during each state the
package can exist in. Before startup, it
displays fuel level and a message that helps
instruct the user how to start the engine.
While the engine is in its cranking sequence,
it displays a message describing what it is
doing (glow plugs, warm-up period, etc.).
During regular operation, it displays engine
RPM, compressor pressure and
temperature, fuel level, and hours of
operation. After shutdown, it displays the
blowdown timer required to elapse before
engine can be restarted.
4.6.2 SPLASH SCREEN
When the display first turns on, it displays the
manufacturer information, software version,
current hours, and serial number of the
machine. To access this screen after the
display goes to the home screen, press the
Up or Down button while at the home screen
and it can be accessed like the adjustable
parameters.
2. Press ON/START to select a parameter
to adjust.
3. Use the Up and Down buttons to cycle
between available settings.
4. Press ON/START to confirm the
parameter setting. This will return view
access to the home screen.
4.6.3.2 AUTO SHUTDOWN
When enabled, auto shutdown will turn off
the compressor package until air demand is
needed again.
4.6.3.3 AUTO CRANK
When enabled (ON/OFF , default to ON), auto
crank will apply the appropriate length of
glow plugs, crank the engine until it starts,
and allow for a brief warm-up period before
making air. When off, manual crank by
depressing ON/OFF switch.
4.6.3.4 SLEEP STATE TIMER
The sleep state timer is the length of time
that the package can be “asleep” before it
will turn off completely to reduce battery draw
and reduce the possibility of accidental
restart when no one is around.
4.6.4 SETTING PRESSURE
4.6.3 ADJUSTING USER SETTINGS
The Diesel Viper controller has several
settings that can be adjusted to suit each
user's specific requirements. The following
parameters can be adjusted as follows:
4.6.3.1 PARAMETERS
Parameter Name
Auto Shutdown (min.) 0-30 (1) 5
Auto Crank On/Off On
Sleep State Timer (min.) 0-15 (5) 10
1. After the display is turned on, from the
home screen press the Up or Down
buttons on the control panel to toggle
between each parameter.
VANAIR MANUFACTURING, INC.
(800) 526-8817 • www.vanair.com
Setting Limits
(Increment)
Default
090058-OP_r0 (AUGUST-2014) PAGE - 13
Refer to Section 2, Specifications for
pressure range. When the machine is
running, the Up and Down buttons adjust the
pressure set point.
4.6.5 SAFETY
The controller is designed with the user's
safety in mind. There are several safety
conditions that must be met to run the
compressor package. The pressure
transducer and temperature thermistor on
the compressor must be plugged in and
functional for the package to run. The
alternator connector must be plugged in for
the package to run. The hood must remain
closed until after the engine has started. If
any unsafe condition is present before the
package is started or during it s opera tion, the
controller will alert the user with a message

SECTION 4: OPERATION VIPER DIESEL
on the display. Once the problem is
corrected, the message can be cleared by
holding the Up button.
4.6.6 SERVICE INTERVALS
The controller will remind the user of periodic
service intervals. Once the package has
been serviced, the message can be cleared
by holding the Up button.
4.7 OPERATING CONDITIONS
1. Operate only in well-ventilated areas.
Exhaust fumes can be lethal.
2. Ensure there are no obstructions on
cooling air intakes at both ends of the
machine.
3. Do not leave anything resting on top of
the machine. Hot engine exhaust and
cooling air will generate high heat.
4. Be sure to leave sufficient room around
the machine for cooling air. See Figure
3-1.
5. Operate machine with top cover closed to
avoid engine exhaust fumes and heat
from being deflected.
6. Refer to specifications for operating
parameters, speeds, etc.
4.8 EXTREME CONDITIONS
When operating in extreme cold or hot
conditions, in the presence of high humidity,
or at a high altitude, extra attention should be
given to any indication that could lead to a
serious problem. Preventative safeguards
exist that can minimize the possibility of
malfunctions that are prone to occur under
certain ambient conditions. Refer to Section
6.3, Extreme Condition Operation, for
additional information on variable ambient
operating conditions, and adjustment
adaptations that can be made accordingly.
PAGE - 14 090058-OP_r0 (AUGUST-2014)
VANAIR MANUFACTURING, INC.
(800) 526-8817 • www.vanair.com

VIPER DIESEL SECTION 5: MAINTENANCE
KEY DESCRIPTION
A COMPRESSOR FILL CAP
B FILL CAP BLEED VENT GROOVE: Open/crack
cap slightly to allow bleed vent to relieve air
pressure before removing cap.
C OIL FILL LEVEL: Full indication is the center of
the sight glass.
Figure 5-1: Compressor Pressure Relief Check
A
B
C
WARNING
DO NOT remove caps, plugs and/or other
components when compressor is running or
pressurized. Stop compressor and de-
pressurize system prior to maintenance of
system. Relieve the entire system pressure
by opening the air tank drain/vent valve, if
equipped, which will vent all pressure to the
atmosphere.
Wear personal protective equipment such as
gloves, work boots, and eye and hearing
protection as required for the task at hand.
Refer to Figure 5-1. Open fill cap SLOWLY
(contents under pressure ) to mak e s ure all
pressure has been relieved.
MAINTENANCE
5.1 GENERAL INFORMATION
A strict maintenance program is the key to
long life for the Viper Series Compressor
System package. Below is a program that,
when adhered to, should keep the package
in top operating condition. Refer to Table
5.3A, Table 5.3B, and Section 5.5, Parts
Replacement and Adjustment Procedures
for detailed descriptions of specific
compressor system components. Refer to
Table 7A in Section 7 for part order
information.
WARNING
To avoid accidental system start-ups
during periods of maintenance,
disconnect the positive (+) cable to the
battery terminal, and place the wire
aside, or tape the contact end so that it
cannot accidentally contact the battery
post.
SECTION 5:
Operating the machine package in a
severe environment requires more
frequent service interval s.
5.2 ROUTINE MAINTENANCE SCHEDULE
Vanair® Manufacturing, Inc. considers the
maintenance schedule given in Section 5.3,
Maintenance Schedule Table (5.3A for
compressor; 5.3B for engine), to be part of
VANAIR MANUFACTURING, INC.
(800) 526-8817 • www.vanair.com
the warranty agreement with the customer.
This maintenance regimen must be followed
in order to protect the warranty of the
machine package.
NOTE
090058-OP_r0 (AUGUST-2014) PAGE - 15

SECTION 5: MAINTENANCE VIPER DIESEL
NOTE
Follow the prescribed periodic
maintenance (PM) schedule as
recommended. Perform the required PM
schedule at recommended intervals.
Failure to follow this prescribed periodic
maintenance at the recommended
intervals will impair the package safety,
performance characteristics, shorten the
package’s life, and will negatively affect
the warranty coverage
of the package.
Vanair® Manufacturing, Inc. especially
requires that a consistent service regimen be
established for engine oil changes, and
engine and compressor air filter servicing.
The following schedule is designed so that
many of the other maintenance tasks are
completed when the engine and compressor
air filters are serviced, and the engine oil is
changed.
WARNING
Follow all applicable safety
recommendations as outlined in Section
1: Safety of this manual.
Please take a moment to acquaint yourself
with the service schedule presented in
Section 5.3 (5.3A for compressor; 5.3B for
engine) to assist the customer in
establishing a maintenance routine log.
For assistance in obtaining routine
maintenance or replacement parts, consult
Section 7.1, Parts Ordering Procedure,
and Table 7A: Recommended Spare Parts
List.
PAGE - 16 090058-OP_r0 (AUGUST-2014)
VANAIR MANUFACTURING, INC.
(800) 526-8817 • www.vanair.com

VIPER DIESEL SECTION 5: MAINTENANCE
NOTE
ACTION TO TAKE
If working in dusty or dirty conditions, reduce the
recommended time intervals between servicing by
half for engine and compressor oil change, and
engine and compressor filter servicing.
SCHEDULE
Hours
MAINTENANCE
DAILY
Hours
PERIOD
BREAK-IN
(2) years
Hours or Two
Every 1000
(1) year
Hours or One
Every 500
Every 100
First 50
Refer to Figure 5-1 to determine proper oil level, which is
equal to the center of the sight glass. Add as necessary.
• •
Ensure that all connections and fittings, including tubing and
electrical connections, are snugly fastened without being
twisted or compromised by extreme bending or contact with
sharp corners or surfaces. Zip-tie any loose length of fitting if
it appears to have a tendency to shift or cause wear while
machine is in operation.
Visually review the entire machine being mindful of any
evidence of abnormal wear, including pooled oil, frayed or
rubbed connection piping, loose fasteners or hardware, l eaks,
etc.
Order oil and oil filter element replacement kits. Refer to
Table 7A: Recommended Spare Parts for reorder number.
Order air filter replacement element.Refer to Table 7A:
Recommended Spare Parts for reorder number.
Use low pressure wash down on exterior.
Order separator/coalescer replacement element. Refer to
Table 7A: Recommended Spare Parts for reorder number.
•
•
•
•
• •
• •
WARNING
Before performing maintenance:
5.3A MAINTENANCE SCHEDULE TABLE - COMPRESSOR INTERVALS
VANAIR MANUFACTURING, INC.
(800) 526-8817 • www.vanair.com
Shut down machine, relieve all system pres-
ing maintenance.
Section of this manual.
Always clearly tag the start-up instrumenta-
sure and lock out all power , as per the Safety
tion against accidental system start-up s dur-
Check oil level
KEY TASK DESCRIPTION
090058-OP_r0 (AUGUST-2014) PAGE - 17
Check line fittings and electrical
connections
1
2
System inspection
Change compressor oil and filter
3
Change air filter element
(check every 100 hours)
Clean cooler
(check every 100 hours)
Change separator element
4
5
6
7

SECTION 5: MAINTENANCE VIPER DIESEL
NOTE
and engine and compressor filter servicing.
by half for engine and compressor oil change,
recommended time intervals between servicing
If working in dusty or dirty conditions, reduce the
years
Every two (2)
Every 500 Hours
Consult the Engine Operator’s Manual for engine oil
specification. Consult Table 7A: Recommended Spare
Parts List for replacement kit or part order number.
Ensure that all fuel hose connections and fittings are
free of any telltale signs of leaking and well connected.
Zip-tie any loose length of hose fitting if it appears to
have a tendency to shift or contact an abrasive surface
while machine is in operation.
Consult the Engine Operator’s Manual for procedure on
changing the engine air filter element. Should the
element need to be replaced, refer to Table 7A:
Recommended Spare Parts List for replacement kit or
part order number. Consult the Engine Operator’s
Manual for procedure on cleaning the engine fuel filter.
Tighten if necessary. Consult the Engine Operator’s
Manual for fan belt information.
Consult the Engine Operator’s Manual for procedure on
changing the engine oil filter, and manufacturer’s
recommended oil usage.
Ensure that the intake hose is properly fastened and
free from any compromises such as tears or holes.
or One (1) Year
Every 50 Hours
MAINTENANCE SCHEDULE
PERIOD
BREAK-IN
Daily
First 50 Hours
Every 400 Hours
Every 200 Hours
Every 100 Hours
•
••
• •
•• •
•
•
WARNING
5.3B MAINTENANCE SCHEDULE TABLE - ENGINE INTERVALS
negative (-) battery cable.
Shut down machine, relieve all
Before performing maintenance:
system pressure and lock out all power,
For lock-out/tag-out disconnect the
as per the Safety Section of this manual.
KEY TASK DESCRIPTION ACTION TO TAKE
Change engine oil.
1
PAGE - 18 090058-OP_r0 (AUGUST-2014)
Check fuel lines and clamps
2
Check engine air filter element
(replace if necessary), and fuel filter
3
bowl (clean if necessary).
Check alternator belt tightness
Change oil filter
4
5
VANAIR MANUFACTURING, INC.
(800) 526-8817 • www.vanair.com
Check air intake hose
6

VIPER DIESEL SECTION 5: MAINTENANCE
Continued on next page
NOTE
and engine and compressor filter servicing.
by half for engine and compressor oil change,
recommended time intervals between servicing
If working in dusty or dirty conditions, reduce the
years
Every two (2)
Ensure that the radiator hoses and clamp bands are
intact, in good working order and fastened correctly. If
hoses are showing signs of wear (cracking, stretching,
etc.), replace hoses (refer to Section 7.14, Hose
Installation Guide for assistance when replacing
damaged hoses).
Consult the Engine Operator’s Manual for procedure on
replacing the engine fuel filter element. Refer to Table
7A: Recommended Spare Parts List for replacement
kit or part order number.
Consult the Engine Operator’s Manual for procedure on
cleaning the radiator water jacket.
Consult the Engine Operator’s Manual for procedure on
replacing the engine fan belt. Refer to Table 7A:
Recommended Spare Parts List for replacement kit or
part order number.
Consult the Engine Operator’s Manual for procedure on
changing the engine air filter. Refer to Table 7A:
Recommended Spare Parts List for replacement kit or
part order number.
or One (1) Year
Every 50 Hours
MAINTENANCE SCHEDULE
PERIOD
BREAK-IN
Daily
First 50 Hours
Every 500 Hours
Every 400 Hours
Every 200 Hours
Every 100 Hours
I
•
•
•
•
WARNING
Shut down machine, relieve all
Before performing maintenance:
5.3B MAINTENANCE SCHEDULE TABLE - ENGINE INTERVALS
VANAIR MANUFACTURING, INC.
(800) 526-8817 • www.vanair.com
system pressure and lock out all power,
negative (-) battery cable.
For lock-out/tag-out disconnect the
as per the Safety Section of this manual.
KEY TASK DESCRIPTION ACTION TO TAKE
Check radiator hoses and clamp
bands
7
Replace fuel filter element
8
Flush cooling system
Replace fan belt
9
10
Replace air filter element
11
Every 200 hours or six (6) months.
I
090058-OP_r0 (AUGUST-2014) PAGE - 19

SECTION 5: MAINTENANCE VIPER DIESEL
Continued on next page
NOTE
and engine and compressor filter servicing.
by half for engine and compressor oil change,
recommended time intervals between servicing
If working in dusty or dirty conditions, reduce the
years
Every two (2)
Every 500 Hours
Replace the radiator hoses and clamp bands. Refer to
Section 7.14, Hose Installation Guide for assistance
when replacing worn or damaged hoses. Refer t o Table
7A: Recommended Spare Parts List for replacement
kit or part order number.
Due to shipping regulations pertaining to lead acid bat-
teries, Vanair recommends procuring a replacement bat-
tery from a localized source. Two possible replacement
•
•
Replace the fuel hose and clamp bands. Refer to
Section 7.14, Hose Installation Guide for assistance
when replacing worn or damaged tubing. Refer to Table
7A: Recommended Spare Parts List for replacement
kit or part order number.
Consult the Engine Operator’s Manual for procedure on
changing the radiator coolant. Follow Engine Operator’s
models include: BatteriesPlus® no. SLi96R, and NAPA
battery no. BAT 7590.
II
Manual recommendations for coolant type to use.
•
or One (1) Year
Every 50 Hours
MAINTENANCE SCHEDULE
PERIOD
BREAK-IN
Daily
First 50 Hours
Every 400 Hours
Every 200 Hours
Every 100 Hours
•
Service Department.
®
WARNING
negative (-) battery cable.
Shut down machine, relieve all
5.3B MAINTENANCE SCHEDULE TABLE - ENGINE INTERVALS
Before performing maintenance:
system pressure and lock out all power,
as per the Safety Section of this manual.
For lock-out/tag-out disconnect the
KEY TASK DESCRIPTION ACTION TO TAKE
PAGE - 20 090058-OP_r0 (AUGUST-2014)
Replace radiator hoses and clamp
bands
12
Replace battery
13
Inspect fuel lines and clamps
14
Change radiator coolant
15
VANAIR MANUFACTURING, INC.
(800) 526-8817 • www.vanair.com
Consult the Vanair
II

VIPER DIESEL SECTION 5: MAINTENANCE
KEY DESCRIPTION
A 50 AMP CIRCUIT BREAKER - AUTO RESET
B ENGINE STARTER (Location reference)
C ENGINE OIL FILTER (Location reference)
Figure 5-2: 50A Circuit Breaker Location
AC B
5.4 REPLACEMENT PARTS
Replacement parts should be purchased
®
through your local Vanair
where the Viper Diesel Air Compressor
System was purchased. If, for any reason,
parts are not available in this manner, they
can be purchased through Vanair directly.
NOTE
For assistance when ordering new
replacement parts, consult Section 7.1,
Parts Ordering Procedure, and Table 7A:
Recommended Spare Parts List.
NOTE
If additional spare parts are being stored
for future use, make certain that they are
stored in proper cont ainers that a llow for
protection against contamination, and
kept in a clean area of moderate
temperature reading. For information on
storing the machine package for periods
of non-use, consult Section 5.7.2, Long
Term Storage.
representative or
NOTE
Do not tamper with the RPM setting to
increase the maximum engine speed.
Overspeed is hazardous and will void the
engine warranty.
5.6 SERVICING THE SYSTEM FUSES AND CIRCUIT BREAKER
Consult Section 7.9, Electrical System,
(FUSE LAYOUT diagram insert) to
determine the location of the specific fuses.
Refer to Figure 5-2 for reference location of
the 50A circuit breaker.
NOTE
Refer to the Engine Operator’s Manual for
detailed maintenance and replacement
procedures for the engine.
5.7 STORAGE AND
INTERMITTENT USE
VANAIR MANUFACTURING, INC.
10896 West 300 North
Michigan City, IN 46360
Telephone: (800) 526-8817
(219) 879-5100
Service Fax: (219) 879-5335
Parts Fax: (219) 879-5340
Sales Fax: (219) 879-5800
www.vanair.com
5.5 PARTS REPLACEMENT AND ADJUSTMENT PROCEDURES
5.5.1 ADJUSTING THE ENGINE SPEED
The Viper Diesel was designed in such a
way that the governor speeds should not
need to be adjusted. Should the unit operate
VANAIR MANUFACTURING, INC.
(800) 526-8817 • www.vanair.com
outside of specified speeds, consult the
090058-OP_r0 (AUGUST-2014) PAGE - 21

SECTION 5: MAINTENANCE VIPER DIESEL
5.7.1 INTERMITTENT USE
If the unit is not used very regularly always
treat the fuel with a fuel stabilizer.
Check all belts and hoses for signs of
deterioration such as visible surface cracks,
stiffness or discoloration.
5.7.2 LONG TERM STORAGE
Disconnect the battery cable that is
connected to the negative (-) side of the
battery.
Cover the unit with a tarp or plastic to
prevent the accumulation of dust, but le ave
the bottom open for air circulation.
Fill the fuel tank with fuel and fuel stabilizer
to prevent moisture build-up in the tank.
PAGE - 22 090058-OP_r0 (AUGUST-2014)
VANAIR MANUFACTURING, INC.
(800) 526-8817 • www.vanair.com

VIPER DIESEL SECTION 6: TROUBLESHOOTING
Figure 6-1: Machine Serial Plate Location
NOTE
When contacting the Vanair Service
Department, please have machine serial
number on hand to quickly expedite
service. See below for machine serial plate
location.
NOTE
Machine serial number also displays on
instrument panel at start-up, on the hours
screen.
TROUBLESHOOTING
6.1 GENERAL INFORMATION
The information contained in this section has
been compiled from years’ worth of inform ation gathered from the field. It contains symptoms and usual causes for the most common
types of problems that may occur. All available data concerning the trouble should be
systematically analyzed before undertaking
any repairs or component replacement.
A visual inspection is worth performing for
almost all problems and may avoid unnecessary additional damage to the machine. The
procedures which can be performed in the
least amount of time and with the least
amount of removal or disassembly of parts
should be performed first.
SECTION 6:
WARNING
Before starting, performing maintenance,
or replacing parts, relieve the entire
system pressure by opening a service
valve, which will vent all pressure to the
atmosphere.
Although Vanair
tions that may occur during the operation life
of the machine package, the Troubleshooting
Guide may not cover all possible situations.
Be aware that additional troubleshooting
information may be found in other sources,
such as the Engine Operator’s Manual.
Should the situation remain unresolved after
exhausting available sources, contact the
Vanair Service Department at:
Phone: 800-526-8817 (toll free)
Phone: 219-879-5100
Fax: 219-879-5335
®
strives to anticipate situa-
VANAIR MANUFACTURING, INC.
(800) 526-8817 • www.vanair.com
090058-OP_r0 (AUGUST-2014) PAGE - 23

SECTION 6: TROUBLESHOOTING VIPER DIESEL
6.2 TROUBLESHOOTING GUIDE
Fault/Malfunction Possible Cause Corrective Action
Machine does not start
Fault:
Freq Sensor Error, Machine Will
Not Run
Engine will not crank Faulty battery connection. Check for proper battery connections and
Engine will not start Low fuel and/or oil supply Check fuel gauge. Replenish as necessary.
Controller is not receiving input from
alternator connector
ENGINE
Battery out of power Recharge or replace battery.
Control module fuse blown Check fuse; refer to Section 7.9.
Machine hood shutdown safety switch
prevents start-up of engine
Faulty starter or starter solenoid Replace.
Faulty 50A circuit breaker Replace.
Check connection/continuity.
During extremely cold weather, use of
heater pads is required to get engine to spin
fast enough to generate a usable signal. If
no heater pads are installed, change crank
sequence to Manual Crank (refer to Section
4.6.3.1, Parameters).
battery charge.
Close hood panel or check if roof switch is
faulty.
Consult the Engine Operator’s Manual for
additional information on engine
maintenance.
Pinched fuel line Replace or reroute if necessary.
Plugged fuel filter(s) Replace if necessary. Refer to the Engine
Low battery voltage Recharge or replace if necessary.
Plugged engine air filter Replace engine air filter. Refer to Engine
Defective oil pressure switch Check continuity, and replace if necessary.
Defective engine temperature switch Check continuity, and replace if necessary.
Poor ground connection Check and clean/renew connection.
Improper Control Operation:
Engine does not speed up
Speed control actuator stuck Lubricate; replace speed control actuator if
Engine speed control lever stuck Free lever and lubricate if necessary.
PAGE - 24 090058-OP_r0 (AUGUST-2014)
Operator’s Manual for additional information
on engine maintenance.
Loose connections; tighten connections.
Dirty connections; clean connections.
Operator’s Manual.
necessary.
Continued on next page
VANAIR MANUFACTURING, INC.
(800) 526-8817 • www.vanair.com

VIPER DIESEL SECTION 6: TROUBLESHOOTING
6.2 TROUBLESHOOTING GUIDE
Fault/Malfunction Possible Cause Corrective Action
ENGINE (CONTINUED)
Improper Control Operation:
Engine does not speed up
(continued)
Improper Control Operation:
Engine does not slow down
Engine stops during operation
Fault:
Engine High Temp Shutdown
Engine stops during operation
Fault:
Low Engine Oil Pressure
Fuel filter partly plugged Replace fuel filter. Refer the Engine
Operator’s Manual.
Auxiliary fuel pump may be needed for
remote fuel tank.
Speed control actuator stuck Lubricate; replace speed control actuator if
necessary.
Engine speed control lever stuck Free lever and lubricate if necessary. Refer
to Engine Operator’s Manual.
Faulty pressure tranducers Check and replace, if necessary.
Located too close to obstruction Move further from obstruction.
Engine radiator plugged Clear debris/dirt from engine radiator.
Fault with engine cooling system Consult Engine Operator’s Manual.
Ambient temperature too high Consult Section 6.3.3, High Temperature
Operation.
Faulty temperature switch Replace.
Low oil level Check engine oil level; replenish as
necessary. Consult the Engine Operator’s
Manual for additional information on engine
maintenance.
Engine shutdown switch activated Confirm that access door is properly in
place. Replace faulty engine shutdown
switch.
Faulty oil pressure switch Replace.
Engine oil filter plugged Replace engine oil filter. Refer to the Engine
Operator’s Manual.
Gradual loss of engine power Contaminated fuel Drain and replace fuel supply.
Engine air filter contaminated Check air filter. Replace if necessary (refer
to the Engine Operator’s Manual).
Fuel filter(s) contaminated Check fuel filters. Refer to the Engine
Operator’s Manual for additional information
on engine maintenance.
Low fuel level Add fuel.
Overload Reduce load; check load use, and reduce
Continued on next page
VANAIR MANUFACTURING, INC.
(800) 526-8817 • www.vanair.com
090058-OP_r0 (AUGUST-2014) PAGE - 25

SECTION 6: TROUBLESHOOTING VIPER DIESEL
6.2 TROUBLESHOOTING GUIDE
Fault/Malfunction Possible Cause Corrective Action
ENGINE (CONTINUED)
Gradual loss of engine power
(continued)
For additional information concerning an engine problem, consult the Engine Operator’s Manual.
Compressor overheats
Fault:
Compressor High Temp
Shutdown
Compressor will not build up
pressure
Engine not warmed up Allow engine to warm up.
COMPRESSOR
Low compressor oil level Check oil level and refill to proper level if
necessary (ensure machine is parked on a
level surface).
Obstructed cooler fins Clear/clean if required.
Insufficient air flow over cooler Check for obstructions (frame, body, etc.) to
cooling air flow.
Defective temperature thermistor Check sensor; replace if necessary.
Compressor oil filter plugged Replace compressor oil filter.
Defective compressor thermal valve Replace valve.
Low compressor oil level Check oil level and refill to proper level if
necessary (ensure machine is parked on a
level surface).
Unload solenoid valve defective Replace solenoid valve.
Air demand too high Check for leaks and take corrective action.
Check air tools for wear, damage, or
malfunctions. Replace or repair.
Compressor capacity too low to
accommodate demand
Compressor air filter plugged Check air filter. Replace if necessary.
Engine does not speed up: input RPM
too slow
Engine speed control lever stuck Free lever and lubricate if necessary.
Service valve is open Close service valve.
Pressure transducer is malfunctioning Replace as necessary.
Inlet valve fails to open
Inlet valve frozen shut
Leak in air control line Check for leaks and take corrective action.
PAGE - 26 090058-OP_r0 (AUGUST-2014)
Substitute larger capacity compressor
system.
Check engine speed control actuator.
Consult the Engine Operator’s Manual.
Check for proper operation with an auxiliary
air source. Replace if necessary.
Repair/replace inlet valve.
Repair/replace inlet valve.
Continued on next page
VANAIR MANUFACTURING, INC.
(800) 526-8817 • www.vanair.com

VIPER DIESEL SECTION 6: TROUBLESHOOTING
6.2 TROUBLESHOOTING GUIDE
Fault/Malfunction Possible Cause Corrective Action
COMPRESSOR (CONTINUED)
Compressor system overpressures
Fault:
Compressor High Press
Shutdown or safety relief valve
No service air output (See also
Compressor will not build up
pressure)
Unload solenoid valve defective Replace solenoid valve.
Restricted or plugged bleed orifice Clean if soiled; if ice is present, clear and
remove.
Damaged/kinked control line Check line for damage (wear, kinks, etc.).
Re-route, re-tie or replace if necessary.
Control line connections are not properly seated/poor connection quality
Inlet valve poppet not seating correctly. Valve will need to be dis-assembled to
Inlet valve piston is stuck in open position.
Compressor shaft seal is leaking Replace shaft seal with available kit.
Pressure transducer is malfunctioning Check transducer for proper operation;
Defective safety valve Replace safety valve.
Plugged coalescer Replace coalescer element.
If equipped, OSHA valve/velocity fuse,
not functioning properly
Minimum pressure/check valve is
malfunctioning
Check lines for proper seating/ensure line
ends have been cut cleanly and are square
(DO NOT use wire cutters: use a loom cutting tool or a clean, sharp razor blade).
check; consult with Service Department.
Check for proper operation with an auxiliary
air source—replace or rebuild inlet valve.
replace if necessary and check controls.
Reset or replace OSHA valve.
Rebuild or replace check valve.
Low service air output (See also
Compressor will not build up
pressure)
Compressor stalls Idle speed is set too low Adjust idle speed; consult factory.
Excess amount of oil in air
discharge
VANAIR MANUFACTURING, INC.
(800) 526-8817 • www.vanair.com
Clogged compressor air filter Check air filter. Replace if necessary.
Solenoid valve sending continuous
signal to inlet valve
Incorrect compressor speed Adjust engine speed. Refer to Section
Minimum pressure/check valve is
malfunctioning
Machine not on level surface Move machine to level surface.
Rebuild or replace solenoid valve if
defective.
5.5.1, Adjusting the Engine Speed.
Rebuild or replace check valve.
Continued on next page
090058-OP_r0 (AUGUST-2014) PAGE - 27

SECTION 6: TROUBLESHOOTING VIPER DIESEL
6.2 TROUBLESHOOTING GUIDE
Fault/Malfunction Possible Cause Corrective Action
COMPRESSOR (CONTINUED)
Excess amount of oil in air
discharge (continued)
Excessive moisture in the
compressed air
System oil appears to be cloudy or
milky
Compressor oil level too high The correct oil level is is to the center of the
Scavenger system not operating Inspect scavenger line for obstructions or
Coalescer element plugged or
damaged
Moisture accumulating in air tank Drain water from air tank (if applicable to
Excessive moisture in system oil;
defective thermal valve
6.3 EXTREME CONDITION OPERATION
When operating in extreme cold or hot
conditions, in the presence of high humidity,
or at a high altitude, extra attention should be
given to any indication that could lead to a
serious problem. Engine power and
compressor air output will be reduced at high
altitude or hot ambient temperatures.
Machine review and maintenance check
schedules should be more frequent than the
normal suggestions given in the
Maintenance Schedule Tables (Table
5.3A, and Table 5.3B in Section 5).
sightglass.
leaks. Replace if necessary.
Replace the coalescer element.
installation).
Check/replace thermal valve. Consult
factory for assistance.
6.3.1 HIGH MOISTURE CONDITION: EMULSIFICATION OF OIL IN ROTARY SCREW COMPRESSOR SYSTEMS
Consult the information in Table 6.3A for
preventative and/or repair measures. If
machine is operating in a high moisture
environment, water contamination may
persists after following the regular
preventative maintenance schedule and
standard operating procedures.
Become acquainted with the situationadjusted operation approaches given in this
section before operating the power system
package in any type of extreme ambient
condition. For additional operation
information consult the Engine Operator’s
Manual, or visit the engine manufacturer’s
web site given in that manual.
PAGE - 28 090058-OP_r0 (AUGUST-2014)
VANAIR MANUFACTURING, INC.
(800) 526-8817 • www.vanair.com

VIPER DIESEL SECTION 6: TROUBLESHOOTING
TABLE 6.3A HIGH MOISTURE CONDITION OPERATION
Symptom Cause Prevention / Corrective Action
Emulsification of oil in compressor system:
• Compressor oil is milky white
in color
• Compressor oil is broken
down and lacks lubricity.
• Compressor oil may develop
solid chunks or clumps
Operating the compressor system
for short periods of time:
• Short cycling prevents the temperature of the oil from attaining a
high enough temperature capable of vaporizing the moisture
droplets.
Operating the compressor system
unloaded without air flow from the
service line for long periods of
time:
• This can keep the oil temperature
from getting hot enough to vaporize the moisture droplets, preventing the moisture from being
able to escape the system. Additionally, there is no path for the
moisture to escape the system.
The thermal valve is faulty and
activating the cooling fan too
soon:
• This prevents the oil from attaining a high enough temperature
capable of vaporizing the moisture droplets.
The air filter is saturated with
water:
• This forces moisture to be
ingested by the compressor.
Any of the above causes will be
exacerbated in especially humid
environments.
RECOMMENDED CHANGES:
If the problem is not corrected by standard
operating practices and regular preventative
maintenance, consider the following:
• Raise the average temperature of the compressor oil.
• Change the operating procedure to allow
for the compressor oil temperature to
reach 180 °F before discharging any air. If
the compressor isn't discharging any air,
it's not ingesting any potentially humid air.
It will build pressure upon initial startup, but
then it will run closed and allow it to heat
up.
REPAIR/MAINTENANCE:
Refer to Section 5 of the Operator's Manual
for inspection, cleaning, and repair instructions.
1. Once the com presso r oil becom es emul sified, it must be replaced along with the
oil filter. Depending on the severity ,
other parts might also need to be
replaced.
2. Check that the separator element is in
good, working condition.
3. Check that the scavenge line is working
properly.
If the system is badly contaminated, Vanair
recommends a lube flush that will help clean
out any remaining contamination throughout
the system. Consult Vanair Service Department for lube flush instructions.
Check the moisture drain frequently on the air
tank reservoir, to alleviate moisture build-up.
®
6.3.2 COLD WEATHER OPERATION
Consult the information in Table 6.3B for
preventative and/or repair measures. The
Diesel Viper’s 25HP engine runs on diesel
fuel, which can be more difficult to start in
cold weather. Once the engine is started, the
air density becomes larger and the intake
VANAIR MANUFACTURING, INC.
(800) 526-8817 • www.vanair.com
090058-OP_r0 (AUGUST-2014) PAGE - 29
efficiency also becomes higher. More output
can be expected in cold areas. When the
temperature is very low, extra care must be
taken regarding fuel and oil changes in their
viscosity, freezing of water contained in the
piping, or of water adhering on the filter.
Diesel fuel may gel at very cold
temperatures.

SECTION 6: TROUBLESHOOTING VIPER DIESEL
TABLE 6.3B COLD WEATHER OPERATION
Symptom Cause Prevention / Corrective Action
Water freezes in the fuel line
Lubrication oil viscosity
increases
Diesel fuel turns to a gel-like
consistency at temperatures
around 0°F (-18°C)
WATER
Water in the fuel can freeze at temperatures below 32°F (0°C), blocking fuel lines.
At an extremely cold temperature,
the viscosity of lubrication oil may
increase and the torque of starter
may exceed its permissible value,
hindering proper starting.
GELLING
The diesel forms wax crystals wh en
the temperatures drop below 15°F
(-9°C).
As it gets colder, these wax crystals
turn to gel. This thicker substance
cannot pass the fuel filter, so the
engine may run intermittently, or
may not start at all.
• Park the vehicle or equipment indoors
when not in use.
• Use a block heater or glow plugs.
• Maintain the battery; this will make it easier
to start a diesel engine in cold weather.
• In below zero temperatures a fuel line
deicer product may need to be used.
• Check the fuel filter regularly to insure that
it contains no water.
• Vanguard™ Premium Synthetic Oil is suitable for use from -40°F to 110°F
(-40°C to 43°C).
• For additional engine precautions, consult
the Engine Operator’s Manual.
• Vanair® recommends installation of the
cold weather heater option kit. Consult
Vanair for details.
• Keep the fuel tank full to prevent condensation from forming inside the tank and
lessen the chances of water getting in the
fuel line.
• The standard recommendation of 15W-40
engine oil is suitable for temperatures
down to -4°F (-20°C). If temperatures are
consistently below 30°F (-1°C), it is recommended that 5W-30 oil be used. If temperatures are below -25°F (-32°C), a highperformance, fully synthetic oil, such as
AMSOIL 5W-30 should be used which is
suitable to temperatures of -55°F (-48°C).
6.3.3 HIGH TEMPERATURE OPERATION
the Engine Operator’s Manual for fuel,
lubrication oil and cooling requirements und er
Consult the information in Table 6.3C for
preventative and/or repair measures. Reduce
load duty cycle to less than 60% when
operating in ambient temperatures above
104°F (40°C).
Extra care should be taken to keep the
engine and air compressor clean and to not
extreme temperatures.
When operating the machine in high
temperature areas, precautions should be
taken to prevent overheating. At the
minimum, all coolers, including air passage
ways around the coolers, should be free of
debris and dirt. The fan, driven by the engine,
restrict the air flow around the unit. Consult
PAGE - 30 090058-OP_r0 (AUGUST-2014)
VANAIR MANUFACTURING, INC.
(800) 526-8817 • www.vanair.com

VIPER DIESEL SECTION 6: TROUBLESHOOTING
is designed to run continuously to assure a
constant flow of cooling air.
performance, which can directly effect some
machine function capacity outputs.
The operator should be aware that high
temperatures can influence engine
TABLE 6.3C HIGH TEMPERATURE OPERATION
Symptom Cause Prevention / Corrective Action
Overheating/high
compartment temperatures
Diminished engine
performance
High ambient temperatures, confined spaces, soundproof cases
and other reasons. Among these
the most important factor is the
temperature of the intake and
cooling air.
• Extra care should be taken to keep the engine and
air compressor clean and to not restrict the air flow
around the unit.
• Consult the Engine Operator’s Manual for fuel,
lubrication oil and cooling requirements under
extreme temperatures.
• At the minimum, all coolers, including air passage
ways around the coolers, should be free of debris
and dirt. The fan, driven by the engine, is designed
to run continuously to assure a constant flow of
cooling air.
The operator should be aware that high temperatures
can influence engine performance, which can directly
effect some machine function capacity outputs.
6.3.4 HIGH DUST CONTENT OPERATION
the machine is to be used in continuously
dusty environments, special care must be
Consult the information in Table 6.3D for
preventative and/or repair measures. When
taken with the engine’s air cleaner and
radiator.
TABLE 6.3D HIGH DUST CONTENT OPERATION
Symptom Cause Prevention / Corrective Action
Overheating
System contamination
Stalling
Machine components exposed to
frequent or constant dust interaction, can result in diminished system performance, or machine
cessation.
• The intake air must be cleaned with the air
cleaner—inspect the air filter frequently for dust
build-up and replace as needed.
• Ensure that the radiator and oil cooler fins are
kept clean to prevent overheating.
• If the machine is not being used for an extended
period of time, an additional precaution, such as
covering the machine with a tarp, will help to keep
the inside of the machine free of dust particle
accumulation.
• For extreme cases of high dust content environments, machine fluids may need to be replaced at
more frequent intervals. Adjust maintenance
schedule accordingly.
VANAIR MANUFACTURING, INC.
(800) 526-8817 • www.vanair.com
090058-OP_r0 (AUGUST-2014) PAGE - 31

SECTION 6: TROUBLESHOOTING VIPER DIESEL
6.3.5 HIGH ALTITUDE OPERATION
Engine horsepower will decrease by 3.5% for
every 1,000 feet over 6,000 feet increase in
altitude. At high altitude overall unit
performance will deteriorate, and care will
need to be taken not to overload the engine.
PAGE - 32 090058-OP_r0 (AUGUST-2014)
VANAIR MANUFACTURING, INC.
(800) 526-8817 • www.vanair.com

VIPER DIESEL SECTION 7: ILLUSTRATED PARTS LIST
NOTE
Machine serial number also displays on
instrument panel at start-up, on the hours
screen.
SECTION 7:
ILLUSTRATED PARTS LIST
7.1 PARTS ORDERING PROCEDURE
Part orders should be placed through the distributor from
whom the unit was purchased. If for any reason parts
cannot be obtained in this manner, contact the factory
directly at the address or phone numbers below.
When ordering parts always indicate the Serial Number
of the machine package. This can be obtained form the
Bill of Lading for the machine package, or from the
compressor unit serial number plate. See Figure 7-1 for
location of machine package serial plate. Consult Table
7A: Recommended Spare Parts List on the next page
for a listing of replacement parts.
VANAIR MANUFACTURING, INC.
10896 West 300 North
Michigan City, IN 46360
Telephone: (800) 526-8817
(219) 879-5100
Service Fax: (219) 879-5335
Parts Fax: (219) 879-5340
Sales Fax: (219) 879-5800
www.vanair.com
VANAIR MANUFACTURING, INC.
(800) 526-8817 • www.vanair.com
Figure 7-1: Machine Package Serial Number Plate Location
090058-OP_r0 (AUGUST-2014) PAGE - 33
SECTION 7: ILLUSTRATED PARTS LIST VIPER DIESEL
TABLE 7A: RECOMMENDED SPARE PARTS LIST
KEY NO. PART NUMBER DESCRIPTION QTY
ROUTINE/SCHEDULED MAINTENANCE ITEMS
1 264626-1GAL
Vanguard Premium Oil (One [1] Gallon)
I
1
2 273080 Element, Compressor Coalescing Air/Oil Separator Spin-on Style 1
3 266801 Element, Compressor Oil Filter 1
4 273673 Element, Compressor Air Filter 1
5 270764 Element, Engine Air Filter Replacement 1
6 RC77662 Filter, Engine Fuel 1
7 269136 Filter, Engine Oil 1
KIT (FULL) MAINTENANCE ITEMS
8 KIT1154 Kit, Maintenance for Engine Filters 1
9 KIT1212 Kit, Maintenance for Compressor - Initial 50 Hours 1
10 KIT1213 Kit, Maintenance for Compressor - Annual / 500 hours 1
NON-ROUTINE MAINTENANCE ITEMS
11 EN270451-007
Belt, Engine Replacement
II
1
12 267306 Breaker, Circuit Replacement 1
13 260246 Relay, NO/NC Weatherproof with Resistor 1
14 263532 Fuse, A to 5A Tan 1
15 264316 Fuse, A to 25A Clear 1
16 264695 Fuse, Block 4-Way ATC 1
17 267880 Fuse, ATC 20A Yellow 1
18
III
Battery, Replacement 1
19 Consult Factory Kit, Shaft Seal 1
I
Use only Vanair® Vanguard™ Premium Synthetic Oil and Genuine Vanair Parts. Inspect and replace damaged components
before operation. Substituting non-Vanguard™ Oil or non-genuine Vanair filter components WILL VOID THE COMPRESSOR
WARRANTY!
II
This belt replaces the engine alternator belt only. For full engine belt coverage, consult factory.
III
Due to shipping regulations pertaining to lead acid bat teries, Vanair recommends procuring a replacement battery from a
localized source. Two possible replacement models include: BatteriesPlus® no. SLi96R, and NAPA battery no. BAT 7590.
PLEASE NOTE: WHEN ORDERING PARTS, INDICATE MACHINE SERIAL NUMBER.
TABLE 7B: MACHINE OPTIONS LIST
KEY NO. PART NUMBER DESCRIPTION QTY
1 032894 Aftercooler 12VDC 1
2 032895 Cold Weather 12VDC Pad 1
3 032905 Cold Weather 120VAC Pad 1
4 032939 Heater, Engine Block 120VAC 1
5 032896-030, 032896-060, 032896-120 Remote Control Module 1
6 032901 Bolt-on Fork Pockets 1
PLEASE NOTE: WHEN ORDERING PARTS, INDICATE MACHINE SERIAL NUMBER.
IMPORTANT
If additional spare parts are being stored for future use,
ensure that they are stored in proper containers that allow
for protection against contamination, and kept in a cl e an
area of moderate temperatur e reading. Fo r informat ion on
storing the machine package for periods of non-use,
Use only approved Vanair® Vanguard™ Premium Synthetic
Oil and Genuine Vanair Parts. Inspect and replace damaged
components before operation. Substituting non-Vanguard
Oil or non-genuine Vanair filter components will VOID THE
IMPORTANT
COMPRESSOR WARRANTY!
consult Section 5.7.2, Long Term Storage.
PAGE - 34 090058-OP_r0 (AUGUST-2014)
VANAIR MANUFACTURING, INC.
(800) 526-8817 • www.vanair.com

VIPER DIESEL SECTION 7: ILLUSTRATED PARTS LIST
TABLE 7C: MAINTENANCE TRACKING LOG
DATE DESCRIPTION OF MAINTENANCE PART(S) REPLACED
VANAIR MANUFACTURING, INC.
(800) 526-8817 • www.vanair.com
090058-OP_r0 (AUGUST-2014) PAGE - 35

SECTION 7: ILLUSTRATED PARTS LIST VIPER DIESEL
3
2
8
4
5
9
5
4
6
7
14
18
13
17
17
16
17
15
10
11
12
15
1
2
17
15
13
17
7.2 COMPRESSOR REPLACEMENT PARTS
6010148ID_r3
PAGE - 36 090058-OP_r0 (AUGUST-2014)
VANAIR MANUFACTURING, INC.
(800) 526-8817 • www.vanair.com

VIPER DIESEL SECTION 7: ILLUSTRATED PARTS LIST
7.2 COMPRESSOR REPLACEMENT PARTS
ITEM DESCRIPTION PART NUMBER QTY
1 DECAL, VANGUARD OIL FILL CAP 1” 263533-2 1
2 CLAMP, HOSE SUPPORT 1.50 ID 263812 1
3 CAP, JIC 5/8 264322-004 1
4 WASHER, SNUBBING RUBBER MOUNT 264829 4
5 MOUNT, RUBBER ARMOR PLATED 200# GREEN 272442 2
6 HOUSING, D902 AL W/STARTER COVER VM180 273483 1
7 HUB, COUPLING, 1.125 DIA. BORE 273559 1
8 HOSE, COMPRESSOR DRAIN (PART OF KIT 273968) 273968-001 1
9 SUPPORT, AIREND VA DIESEL VIPER 273970 1
10 AIREND & ATT, DIESEL VIPER 6180000 1
11 AIREND & ATT, VSE075GDSS240 6180001 1
12 AIREND & ATT, VSE075GDSS215 6180005 1
13 NUT, HEX LOCKING 3/8-16 825506-198 3
14 CAPSCREW, HEX GR8 5/16-18 x 1-1/4 829405-125 4
15 CAPSCREW, HEX GR8 3/8-16 x 1-3/4 829406-175 3
16 CAPSCREW, HEX GR8 1/2-13 x 3 829408-300 2
17 WASHER, FLAT 3/8 838206-071 6
18 WASHER, LOCK 5/16 838505-078 4
PLEASE NOTE: WHEN ORDERING PARTS, INDICATE MACHINE SERIAL NUMBER.
COMMONLY REPLACED PARTS
ITEM DESCRIPTION PART NUMBER QTY
A ELEMENT, COALESCING
(SEPARATOR)
B ELEMENT, OIL FILTER 266801 1
C ELEMENT, AIR FILTER 273673 1
D VANGUARD OIL 264626-1GAL 1
273080
1
VANAIR MANUFACTURING, INC.
(800) 526-8817 • www.vanair.com
090058-OP_r0 (AUGUST-2014) PAGE - 37

SECTION 7: ILLUSTRATED PARTS LIST VIPER DIESEL
6180000ID_r4
9
7
8
1
2
5
3
5
6
4
29
11
13
14
16
30
31
32
17
12
27
18
19
33
28
15
26
23
20
22
25
24
36
21
34
35
37
10
7.3 AIREND AND ATT
PAGE - 38 090058-OP_r0 (AUGUST-2014)
VANAIR MANUFACTURING, INC.
(800) 526-8817 • www.vanair.com

VIPER DIESEL SECTION 7: ILLUSTRATED PARTS LIST
7.3 AIREND AND ATT
ITEM DESCRIPTION
1 CAP, OIL FILL W/VENT 1-5/16” 048063 1 20 VALVE, MIN PRESS INTERNAL
2 SIGHTGLASS, O-RING TMBD
1-5/16”
3 CONNECTOR, O-RING 1/4 SAE
x 1/4 JIC
4 CONNECTOR, #10 MSAE x #10
MJIC
5 ELBOW, 90 DEG #10 MJIC x
MSAE
6 ELBOW, 1/4T x 1/8P PUSH-ON 261309 1 25 ADAPTER, AIR/OIL
7 ELBOW, 90 DEG PUSH-ON
1/4T x 1/4P
8 TUBING, PLASTIC 1/4 WHITE 261322 1 27 HOSE, ASSY 0.25 x 18 JIC SWV
9 ADAPTER, FEMALE PIPE x
BSPP 1/4
10 VALVE, RELIEF 200 PSI 1/4
NPT MALE
11
CLAMP, HOSE #28
12 FILTER, OIL 6” TANK 266801 1 31 AIREND ASSY,
THERMISTOR, TEMP. 1/2 NPT 266844 1 32 AIREND ASSY,
13
14 PLUG, PIPE HEX SOCKET 1/8”
NPT
RANSDUCER, PRESSURE 267363 1 34 O-RING, VITON .941 OD x .070 826502-019 1
15 T
16 PLUG, PIPE 1/2 NPT HOLLOW
HEX
17 PLUG, SAE O-RING HOLLOW
HEX #16
18 CONNECTOR, OIL FILTER
VANIR ENCAPS
19 ORIFICE, STRAINER 0.030 #6
MSAE x #4 MJIC
PART
NUMBER
260097-610 1 21 REGULATOR, INTAKE 85/150
260387-103 1 22 O-RING, VITON 1/16 DIA x
260387-109 1 23 MANIFOLD, AIR/OIL VMI80 272920 1
260403-106 2 24 SEPARATOR, AIR/OIL SPIN ON
261310 1 26 CAPSCREW, HX SOC 5/16-18 x
263748-004 1 28 ELBOW, 45 DEG MSAE #14 x
264232 1 29 FILTER, AIR 90 CFM 2” 273672 1
265560
267258 1
267942 1
268081-010
270037
271054
QTY
ITEM DESCRIPTION
PARTS VMI80
ADHD
1.176 ID
106CFM
SEPARATOR M42 x M39
3
STR x JIC SWV90
MJIC #14 w 1/8 FNPT
1
1 36 WASHER, FLAT 5/16 838205-071 4
1 37 WASHER, LOCK 5/16 838505-078 4
1
30 AIREND ASSY,
VSE075GDSS193
VSE075GDSS240
VSE075GDSS215
33 O-RING, VITON .691 OD x .070
CAPSCREW, FERRY HD 5/16-
35
18 x 1
PLEASE NOTE: WHEN ORDERING PARTS, INDICATE MACHINE SERIAL NUMBER.
PART
NUMBER
271079
271701
272689 1
273080 1
273081 1
273239 3
273247 1
273583 1
6170000 1
6170001
6170004
826502-015
828405-100 4
QTY
1
1
1
1
1
VANAIR MANUFACTURING, INC.
(800) 526-8817 • www.vanair.com
090058-OP_r0 (AUGUST-2014) PAGE - 39

SECTION 7: ILLUSTRATED PARTS LIST VIPER DIESEL
60
60
60
56
NOTES:
4. CAN USE 9V BATTERY TO EXTEND/
RETRACTACTUATOR.
7. SEE CLOSE UP VIEW FORACTUATOR
MOUNTING TO THROTTLE LINKAGE.
3
5
3
23
44
45 52 54 43 52 16 12 52 41
24 47 20 40
32 46
52
5553
26
42
22
4
9
6
4
8
50
36
48
47
39
51
49
25
1
29
33
30
27
28
34
38
13
33
4837
7.4 ENGINE AND DRIVE PARTS (PART 1 OF 2)
PAGE - 40 090058-OP_r0 (AUGUST-2014)
6100108ID_r1_1of2
VANAIR MANUFACTURING, INC.
(800) 526-8817 • www.vanair.com

VIPER DIESEL SECTION 7: ILLUSTRATED PARTS LIST
7.4 ENGINE AND DRIVE PARTS (PART 1 OF 2)
ITEM DESCRIPTION PART
1 WASHER, NYLON FLAT 1/4 262704 3 33 NUT, HEX LOCKING 1/4-20 825504-145 2
2 CLAMP, EXHAUST 1-1/2 262906-150 2 34 NUT, HEX LOCKING #10-32 825702-083 2
3 WASHER, SNUBBING RUBBER
MOUNT
4 CLAMP, HOSE #28 265560 2 36 CAPSCREW, HEX GR5 1/4-20 x 1 829104-100 2
5 STRAP, GROUND 8” W/ 3/8
HOLES
6 FILTER, AIR 6” 90 DEG 269660 1 38 CAPSCREW, HEX GR5 1/4-20 x 1-1/2 829104-150 1
GASKET, MUFFLER REPLC
7
KUBOTA D902
8 HOSE, FLEX 1-3/4” I.D. 270698 1.5
9 BRACKET, THROTTLE ADJ 272019 1 41 CAPSCREW, S.H. M8x1.25 x 20mm 829308-020 1
10 GUARD, FAN 272074 1 42 CAPSCREW, S.H. M8x1.25 x 30mm 829308-030 5
11 ELBOW, EXHAUST 272127 1 43 CAPSCREW, S.H. M8x1.25 x 40mm 829308-040 2
12 SPACER, COMPRESSOR 272158 1 44 CAPSCREW, S.H. M8x1.25 x 45mm 829308-045 1
13 ACUTATOR, LINEAR 2”
STROKE, 30#, 12V
14 FAN, 15.50” DIA PUSHER 272165 1 46 CAPSCREW, HEX GR8 1/2-13 x 3 829408-300 2
15 SPACER, FAN 272166 1 47 SCREW, SER WASH 5/16-18 x 1 829705-100 8
16 BRACKET, MUFFLER 272168 1 48 WASHER, FLAT 1/4 838204-071 4
17 EXHAUST, ENGINE OUT 272174 1 49 WASHER, FLAT 5/16 838205-071 4
18 ELBOW, EXHAUST OUT BACK 272211 1 50 WASHER, LOCK 1/4 838504-062 2
19 BRACKET, ENGINE STARTER
SIDE
20 BRACKET, ENGINE THROTTLE
SIDE
21 SUPPORT, ENGINE FRONT 272230 1 53 WASHER, LOCK METRIC M10 838810-220 12
22 FLANGE, COUPLING D902 272265 1 54 WASHER, FLAT METRIC M8 838909-180 2
23 MOUNT, RUBBER ARMOR
PLATED 200 GREEN
24 SUPPORT, ENGINE REAR 272516 1 56 HOSE, FUEL LINE 5/16” 842315-031 2.0
25 SUPPORT, TOWER 272553 1 57 EXHAUST, KUBOTA (INCL. W/
26 CAPSCREW, HEX 10 MM 1.25 x
25 MM
27 BRACKET, THROTTLE
EXTENSION
28 SPRING, EXTENSION
THROTTLE
29 BRACKET, ACTUATOR ROD 273307 1 61 DRAIN, ENGINE OIL FI273012 1
30 CAPSCREW, S.H. 10-32 x 1/2
ZINC
31 HOSE, ENGINE DRAIN 274253 1 63 HEADER WRAP, HIGH TEMP 2” WIDE PR81122 32
32 NUT, HEX 5/16-18 825205-273 6 64 OIL, DIESEL 15W-40 SE271475 4.0
NUMBER
264829 4 35 CAPSCREW, HEX 8mm 1.25 x 40 828008-040 3
267498 1 37 CAPSCREW, HEX GR5 1/4-20 x 1-1/4 829104-125 1
269961 1 39 CAPSCREW, HEX GR5 5/16-18 x 1 829105-100 4
272160 1 45 CAPSCREW, S.H. M8x1.25 x 50mm 829308-050 2
272228 1 51 WASHER, LOCK 5/16 838505-078 8
272229 1 52 WASHER, LOCK METRIC M8 838808-200 9
272442 2 55 WASHER, FLAT METRIC M10 838910-220 12
272864 12 58 ENGINE DIESEL, 25 HP, HZ SHAFT EN270451 1
273300 1 59 U-BOLT, 3/8-16 x 3-1/2 WD x 5-1/16 FA270399 2
273302 1 60 CLAMP, HOSE, T-BOLT STYLE, 13mm SSFA38355 4
273310 2 62 TIES, THERMAL STAINLESS HA42205 4
PLEASE NOTE: WHEN ORDERING PARTS, INDICATE MACHINE SERIAL NUMBER.
QTY ITEM DESCRIPTION PART
NUMBER
40 CAPSCREW, HEX GR5 5/16-18 x 1-1/4 829105-125 6
FT
EN270396 1
ENGINE)
QTY
FT.
FT.
QT
COMMON REPLACEMENT PARTS
ITEM DESCRIPTION PART NUMBER
A ELEMENT, AIR FILTER 270764
B ELEMENT, FUEL FILTER RC77662
C ELEMENT, OIL FILTER 269136
VANAIR MANUFACTURING, INC.
(800) 526-8817 • www.vanair.com
090058-OP_r0 (AUGUST-2014) PAGE - 41

SECTION 7: ILLUSTRATED PARTS LIST VIPER DIESEL
3
3
7
2
35
52
14
10 15
31
21
47
23
46
40
32
26
53
55
61
11
58
32
51
40
57
59
17
18
19
NOTES:
4. CAN USE 9V BATTERY TO EXTEND/
RETRACT ACTUATOR
7. SEE CLOSE UP VIEW FOR ACTUATOR
MOUNTING TO THROTTLE LINKAGE.
12. CONCAVE SIDE OF FAN BLADE FACES
AWAY FROM ENGINE.
17. TORQUE: 221 IN-LBS.
7.4 ENGINE AND DRIVE PARTS (PART 2 OF 2)
PAGE - 42 090058-OP_r0 (AUGUST-2014)
6100108ID_r1_2of2
VANAIR MANUFACTURING, INC.
(800) 526-8817 • www.vanair.com

VIPER DIESEL SECTION 7: ILLUSTRATED PARTS LIST
7.4 ENGINE AND DRIVE PARTS (PART 2 OF 2)
ITEM DESCRIPTION PART
1 WASHER, NYLON FLAT 1/4 262704 3 33 NUT, HEX LOCKING 1/4-20 825504-145 2
2 CLAMP, EXHAUST 1-1/2 262906-150 2 34 NUT, HEX LOCKING #10-32 825702-083 2
3 WASHER, SNUBBING RUBBER
MOUNT
4 CLAMP, HOSE #28 265560 2 36 CAPSCREW, HEX GR5 1/4-20 x 1 829104-100 2
5 STRAP, GROUND 8” W/ 3/8
HOLES
6 FILTER, AIR 6” 90 DEG 269660 1 38 CAPSCREW, HEX GR5 1/4-20 x 1-1/2 829104-150 1
GASKET, MUFFLER REPLC
7
KUBOTA D902
8 HOSE, FLEX 1-3/4” I.D. 270698 1.5
9 BRACKET, THROTTLE ADJ 272019 1 41 CAPSCREW, S.H. M8x1.25 x 20mm 829308-020 1
10 GUARD, FAN 272074 1 42 CAPSCREW, S.H. M8x1.25 x 30mm 829308-030 5
11 ELBOW, EXHAUST 272127 1 43 CAPSCREW, S.H. M8x1.25 x 40mm 829308-040 2
12 SPACER, COMPRESSOR 272158 1 44 CAPSCREW, S.H. M8x1.25 x 45mm 829308-045 1
13 ACUTATOR, LINEAR 2”
STROKE, 30#, 12V
14 FAN, 15.50” DIA PUSHER 272165 1 46 CAPSCREW, HEX GR8 1/2-13 x 3 829408-300 2
15 SPACER, FAN 272166 1 47 SCREW, SER WASH 5/16-18 x 1 829705-100 8
16 BRACKET, MUFFLER 272168 1 48 WASHER, FLAT 1/4 838204-071 4
17 EXHAUST, ENGINE OUT 272174 1 49 WASHER, FLAT 5/16 838205-071 4
18 ELBOW, EXHAUST OUT BACK 272211 1 50 WASHER, LOCK 1/4 838504-062 2
19 BRACKET, ENGINE STARTER
SIDE
20 BRACKET, ENGINE THROTTLE
SIDE
21 SUPPORT, ENGINE FRONT 272230 1 53 WASHER, LOCK METRIC M10 838810-220 12
22 FLANGE, COUPLING D902 272265 1 54 WASHER, FLAT METRIC M8 838909-180 2
23 MOUNT, RUBBER ARMOR
PLATED 200 GREEN
24 SUPPORT, ENGINE REAR 272516 1 56 HOSE, FUEL LINE 5/16” 842315-031 2.0
25 SUPPORT, TOWER 272553 1 57 EXHAUST, KUBOTA (INCL. W/
26 CAPSCREW, HEX 10 MM 1.25 x
25 MM
27 BRACKET, THROTTLE
EXTENSION
28 SPRING, EXTENSION
THROTTLE
29 BRACKET, ACTUATOR ROD 273307 1 61 DRAIN, ENGINE OIL FI273012 1
30 CAPSCREW, S.H. 10-32 x 1/2
ZINC
31 HOSE, ENGINE DRAIN 274253 1 63 HEADER WRAP, HIGH TEMP 2” WIDE PR81122 32
32 NUT, HEX 5/16-18 825205-273 6 64 OIL, DIESEL 15W-40 SE271475 4.0
NUMBER
264829 4 35 CAPSCREW, HEX 8mm 1.25 x 40 828008-040 3
267498 1 37 CAPSCREW, HEX GR5 1/4-20 x 1-1/4 829104-125 1
269961 1 39 CAPSCREW, HEX GR5 5/16-18 x 1 829105-100 4
272160 1 45 CAPSCREW, S.H. M8x1.25 x 50mm 829308-050 2
272228 1 51 WASHER, LOCK 5/16 838505-078 8
272229 1 52 WASHER, LOCK METRIC M8 838808-200 9
272442 2 55 WASHER, FLAT METRIC M10 838910-220 12
272864 12 58 ENGINE DIESEL, 25 HP, HZ SHAFT EN270451 1
273300 1 59 U-BOLT, 3/8-16 x 3-1/2 WD x 5-1/16 FA270399 2
273302 1 60 CLAMP, HOSE, T-BOLT STYLE, 13mm SSFA38355 4
273310 2 62 TIES, THERMAL STAINLESS HA42205 4
QTY ITEM DESCRIPTION PART
40 CAPSCREW, HEX GR5 5/16-18 x 1-1/4 829105-125 6
FT
ENGINE)
NUMBER
EN270396 1
PLEASE NOTE: WHEN ORDERING PARTS, INDICATE MACHINE SERIAL NUMBER.
QTY
FT.
FT.
QT
VANAIR MANUFACTURING, INC.
(800) 526-8817 • www.vanair.com
COMMON REPLACEMENT PARTS
ITEM DESCRIPTION PART NUMBER
A ELEMENT, AIR FILTER 270764
B ELEMENT, FUEL FILTER RC77662
C ELEMENT, OIL FILTER 269136
090058-OP_r0 (AUGUST-2014) PAGE - 43

SECTION 7: ILLUSTRATED PARTS LIST VIPER DIESEL
2
5
5
4
3
8
1
9
7
22
21
13
12
18
19
18
16
20
17
18
22
18
18
15
NOTES:
3. WIRE GUARD IS INSTALLED ON ENGINE
ASSEMBLYAND MOUNTS TO COOLER
SHROUD WHEN BOTH COMPONENTS
ARE SET IN PLACE.
4. HOSE SUPPLIED WITH COOLANT
RECOVERY TANK.
7.5 COOLING SYSTEM (PART 1 OF 2)
PAGE - 44 090058-OP_r0 (AUGUST-2014)
6020127ID_r0_1of2
VANAIR MANUFACTURING, INC.
(800) 526-8817 • www.vanair.com

VIPER DIESEL SECTION 7: ILLUSTRATED PARTS LIST
7.5 COOLING SYSTEM (PART 1 OF 2)
ITEM DESCRIPTION PART NUMBER QTY
1 CONNECTOR, #12 MSAE x #10 MJIC 260387-110 1
2 ELBOW, 90 DEG #10 MJIC x #12 MSAE 260403-131 1
3 NUT, HEX #6-32 KEPS 261595-632 2
4 CLAMP, HOSE SUPPORT .50 261837 1
5 CLAMP, EXHAUST 1-1/2 262906-150 2
6 SEAL, RUBBER “D” TRIM-LOK 1” x 1” 264138 1.375 ft
7 COOLER, ENGINE/COMPRESSOR 270843 1
8 SHROUD, COOLER 272169 1
9 BRACKET, COOLER SUPPORT BACK SIDE 272171 1
10 BRACKET, COOLANT TANK MTG BOTTOM 272172 1
11 BRACKET, COOLANT TANK MTG CLIP 272173 1
12 BRACKET, COOLER / EXHAUST SUPPORT 272797 1
13 ** HOSE, RADIATOR TOP 272816ID 1
14 ** HOSE, RADIATOR BOTTOM 272817ID 1
15 BRACKET BELT GUARD 272996 1
16 BRACKET, HOOD SWITCH 273289 1
17 NUT, HEX FLANGE 5/16-18 825305-283 4
18 SCREW, SER WASH 5/16-18 x 0.75 829704-075 17
19 SCREW, MACHINE #6-32 x 1 831600-100 2
20 SWITCH, HOOD SAFETY NO/NC 15A-125V. AC CO81774 1
21 CLAMP, HOSE, #20, 1.75DIA. FA47720 4
22 GASKET, SEAL AND TRIM PR35734 5.063 ft
** Made from EN271127.
PLEASE NOTE: WHEN ORDERING PARTS, INDICATE MACHINE SERIAL NUMBER.
VANAIR MANUFACTURING, INC.
(800) 526-8817 • www.vanair.com
090058-OP_r0 (AUGUST-2014) PAGE - 45

SECTION 7: ILLUSTRATED PARTS LIST VIPER DIESEL
21
10
18
18
18
12
11
1814
21
NOTES:
3. WIRE GUARD IS INSTALLED ON ENGINE
ASSEMBLYAND MOUNTS TO COOLER
SHROUD WHEN BOTH COMPONENTS
ARE SET IN PLACE.
4. HOSE SUPPLIED WITH COOLANT
RECOVERY TANK.
7.5 COOLING SYSTEM (PART 2 OF 2)
PAGE - 46 090058-OP_r0 (AUGUST-2014)
6020127ID_r0_2of2
VANAIR MANUFACTURING, INC.
(800) 526-8817 • www.vanair.com

VIPER DIESEL SECTION 7: ILLUSTRATED PARTS LIST
7.5 COOLING SYSTEM (PART 2 OF 2)
ITEM DESCRIPTION PART NUMBER QTY
1 CONNECTOR, #12 MSAE x #10 MJIC 260387-110 1
2 ELBOW, 90 DEG #10 MJIC x #12 MSAE 260403-131 1
3 NUT, HEX #6-32 KEPS 261595-632 2
4 CLAMP, HOSE SUPPORT .50 261837 1
5 CLAMP, EXHAUST 1-1/2 262906-150 2
6 SEAL, RUBBER “D” TRIM-LOK 1” x 1” 264138 1.375 ft
7 COOLER, ENGINE/COMPRESSOR 270843 1
8 SHROUD, COOLER 272169 1
9 BRACKET, COOLER SUPPORT BACK SIDE 272171 1
10 BRACKET, COOLANT TANK MTG BOTTOM 272172 1
11 BRACKET, COOLANT TANK MTG CLIP 272173 1
12 BRACKET, COOLER / EXHAUST SUPPORT 272797 1
13 ** HOSE, RADIATOR TOP 272816ID 1
14 ** HOSE, RADIATOR BOTTOM 272817ID 1
15 BRACKET BELT GUARD 272996 1
16 BRACKET, HOOD SWITCH 273289 1
17 NUT, HEX FLANGE 5/16-18 825305-283 4
18 SCREW, SER WASH 5/16-18 x 0.75 829704-075 17
19 SCREW, MACHINE #6-32 x 1 831600-100 2
20 SWITCH, HOOD SAFETY NO/NC 15A-125V. AC CO81774 1
21 CLAMP, HOSE, #20, 1.75DIA. FA47720 4
22 GASKET, SEAL AND TRIM PR35734 5.063 ft
** Made from EN271127.
PLEASE NOTE: WHEN ORDERING PARTS, INDICATE MACHINE SERIAL NUMBER.
VANAIR MANUFACTURING, INC.
(800) 526-8817 • www.vanair.com
090058-OP_r0 (AUGUST-2014) PAGE - 47

SECTION 7: ILLUSTRATED PARTS LIST VIPER DIESEL
4
3
3
4
4
3
34
3
4
7
9
2
8
7
30
32
13
19
27
31
26
23
15
32
14
10
22
32
32
22
23
18
32
28
29
11
5
212524
3
12
28
29
32
16
20
32
1
17
7.6 CANOPY AND FRAME PARTS
PAGE - 48 090058-OP_r0 (AUGUST-2014)
6030086ID_r4
VANAIR MANUFACTURING, INC.
(800) 526-8817 • www.vanair.com

VIPER DIESEL SECTION 7: ILLUSTRATED PARTS LIST
7.6 CANOPY AND FRAME PARTS
ITEM DESCRIPTION PART NUMBER QTY
1 BULKHEAD, 90 DEG. 3/4 250006-058 1
2 TRIM-LOK, 1/8 GROOVE 261228 1 FT
3 WASHER, NYLON 5/16-18 262943 22
4 SCREW, TRUSS HD 5/16-18 x 3/4 SS 262945 18
5 CLAMP, HOSE SUPPORT 1.50 ID 263812 1
6 SEAL, RUBBER “D” TRIM-LOK 1” x 1” 264138 3.375 FT
7 LATCH, SENTRY PANEL 267124 4
8 HOOD, CANOPY 272250 1
9 PANEL, OPEN SIDE 272253 1
10 DOOR, FRONT ACCESS 272257 1
11 INSULATION, ACOUSTICAL FOAM, HOOD 272713-001 1
12 INSULATION, ACOUSTICAL FOAM, BAFFLE 272713-002 1
13 INSULATION, HEAT SHIELD 272713-006 1
14 PANEL, REMOVABLE BATTERY ACCESS DIESEL VIPER VANAIR 273468 1
15 PLATFORM, VIPER DIESEL VANAIR 273469 1
16 BAFFLE, SHROUD 273709 1
17 HOSE, AIR OUT LOWER 273968-008 1
18 PANEL, REAR SIDE 274299 1
19 PLATE, OIL FILTER ACCESS 274302 1
20 NUT, HEX LOCKING 1/4-20 825504-145 4
21 CAPSCREW, HEX GR5 1/4-20 x 1 829104-100 1
22 SCREW, SER WASHER 5/15-18 x 0.75 829705-075 6
23 WASHER, LOCK INTERNAL 1” 837414-100 2
24 WASHER, FLAT 1/4 838204-071 1
25 WASHER, LOCK 1/4 838504-062 1
26 BULKHEAD, 3/4 FN PT x #12 MJIC 862012-075 1
27 NUT, LOCK M6 x 1.0 PITCH FA55272 8
28 STUD, BALL, .39 DIA. x .55LG. FA58724 4
29 GAS SPRING, 6 STROKE, 20# HA72205 2
30 HINGE, 2” x 2”, BLACK HA88014 2
31 PLUG, PLASTIC, 1-3/8 DIA., RIBBED BLACK PR273179 1
32 GASKET, SEAL AND TRIM PR35734 24.022 FT
PLEASE NOTE: WHEN ORDERING PARTS, INDICATE MACHINE SERIAL NUMBER.
VANAIR MANUFACTURING, INC.
(800) 526-8817 • www.vanair.com
090058-OP_r0 (AUGUST-2014) PAGE - 49

SECTION 7: ILLUSTRATED PARTS LIST VIPER DIESEL
6
9
6
9
5
8
1
2
7
7
4
3
OPTIONAL
LOCATION
7.7 COMPRESSOR THERMAL CONTROL
6120191ID_r1
7.8 INSTRUMENT PANEL
6040049ID_r1
PAGE - 50 090058-OP_r0 (AUGUST-2014)
VANAIR MANUFACTURING, INC.
(800) 526-8817 • www.vanair.com

VIPER DIESEL SECTION 7: ILLUSTRATED PARTS LIST
7.7 COMPRESSOR THERMAL CONTROL
ITEM DESCRIPTION PART NUMBER QTY
1 CONNECTOR, #12 MSAE x #10 MSAE 260387-110 1
2 ELBOW, 90 DEG #10 MJIC x #12 MSAE 260403-131 1
3 TEE, JIC/JIC/SAE 5/8 x 3/4 263749-009 1
4
5 BRACKET, SUPPORT THERMAL VALVE 273548 1
6 NUT, HEX LOCKING 1/4-20 825504-145 2
7 CAPSCREW, HEX GR5 1/4-20 x 3 829104-300 2
8 SCREW, SER WASH 5/16-18 x 0.75 829705-075 2
9 WASHER, FLAT 1/4 823204-071 2
VALVE, THERMAL 180 DEGREE ALUM BODY 3/4 SAE
FPE
PLEASE NOTE: WHEN ORDERING PARTS, INDICATE MACHINE SERIAL NUMBER.
273480 1
7.8 INSTRUMENT PANEL
ITEM DESCRIPTION PART NUMBER QTY
1 WASHER, NYLON 5/16-18 262943 8
2 SCREW, TRUSS HD 5/16-18 x 3/4 SS 262945 8
3 MODULE, CONTROL AUTO SPD CTRL 272527 1
4 PLATE, COVER INST. OPENING 272535 1
PLEASE NOTE: WHEN ORDERING PARTS, INDICATE MACHINE SERIAL NUMBER.
VANAIR MANUFACTURING, INC.
(800) 526-8817 • www.vanair.com
090058-OP_r0 (AUGUST-2014) PAGE - 51
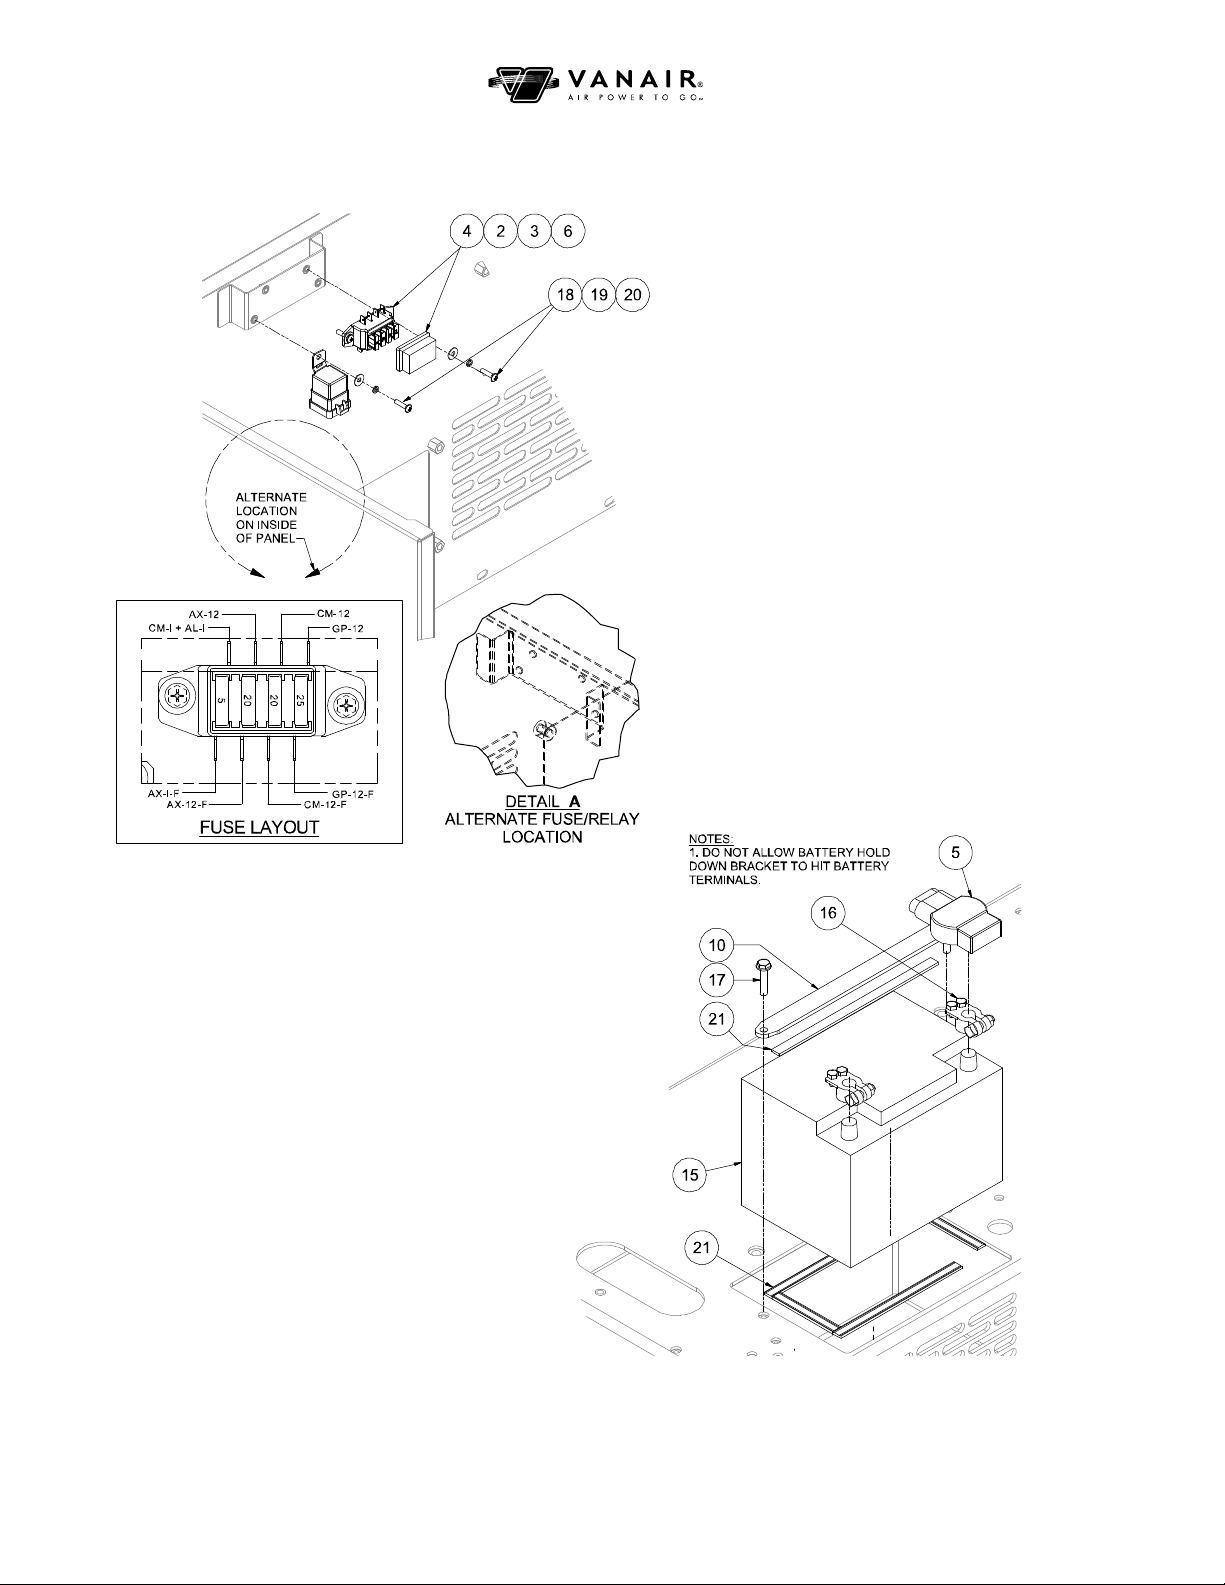
SECTION 7: ILLUSTRATED PARTS LIST VIPER DIESEL
A
7.9 ELECTRICAL SYSTEM
PAGE - 52 090058-OP_r0 (AUGUST-2014)
6060080ID_r9
VANAIR MANUFACTURING, INC.
(800) 526-8817 • www.vanair.com

VIPER DIESEL SECTION 7: ILLUSTRATED PARTS LIST
7.9 ELECTRICAL SYSTEM
ITEM DESCRIPTION PART NUMBER QTY
1 RELAY, NO/NC WEATHERPROOF w/RESISTOR 260246 1
2 FUSE, ATO 5 AMP TAN 263532 1
3 FUSE, ATO 25 AMP CLEAR 264316 1
4 FUSE, BLOCK 4-WAY ATC 264695 1
5 INSULATOR, BATTERY TERM RED 466 267208 1
6 FUSE, ATC 20 AMP YELLOW 267880 2
7 WEDGELOCK, W4S 268907 1
8 PLUG, SEALING 269055 4
9 CONNECTOR, DTP06-4S 269415 1
10 BRACKET, BATTERY HOLD DOWN 272213 1
11 WD, DIESEL VIPER 272618 1
12 HARNESS, DIESEL VIPER 272621 1
13 CABLE, BATT E RY NEGAT IVE 272735 1
14 CABLE, BATT E RY POSITIVE 272736 1
15 * BAT TERY, 12V LEAD-ACID AUTOMOTIVE 600 CCA 273937 1
16 TERMINAL, BATTERY POST 273940 2
17 SCREW, SER WASH 5/16-18 x 1.5 829705-150 2
18 SCREW, MACHINE #10-32 x 3/4 831702-075 3
19 WASHER, FLAT #10 838202-045 3
20 WASHER, LOCK #10 838502-047 3
21 GASKET, SEAL AND TRIM PR35734 2.740 ft
PLEASE NOTE: WHEN ORDERING PARTS, INDICATE MACHINE SERIAL NUMBER.
* NOTE
See page 34 (Key No. 18) for battery
recommendations.
VANAIR MANUFACTURING, INC.
(800) 526-8817 • www.vanair.com
090058-OP_r0 (AUGUST-2014) PAGE - 53

SECTION 7: ILLUSTRATED PARTS LIST VIPER DIESEL
3
4
5
7
6
9
1
2
8
6
17
12
17
14
13
22
18
19
10
21
11
16
20
18
15
18
22
18
7.10 FUEL TANK ASSEMBLY
6140011ID_r6
PAGE - 54 090058-OP_r0 (AUGUST-2014)
VANAIR MANUFACTURING, INC.
(800) 526-8817 • www.vanair.com

VIPER DIESEL SECTION 7: ILLUSTRATED PARTS LIST
7.10 FUEL TANK ASSEMBLY
ITEM DESCRIPTION PART NUMBER QTY
1 WASHER, NYLON FLAT 1/4 262704 1
2 SCREW, TRUSS HD 1/4-20UNC x 3/4 LG S.S. 262953 4
3 TERMINAL, DEUTSCH 0462-201-16141 263582 2
4 PLUG, DEUTSCH DT06-2S 268902 1
5 WEDGELOCK, DEUTSCH W2S 268903 1
6 CLAMP, HOSE, #24, 1”-2” DIA. 270493 2
7 TANK, FUEL 9 GALLON 272236 1
8 NECK, FUEL FILL DIESEL TETHERED, NO VENT 272855 1
9 SUPPORT, FUEL NECK 272865 1
10 NUT, NEX FLANGE 5/16-18 825305-283 4
11 SCREW, SER WASH 1/4-20 x 0.75 829704-075 3
12 HOSE, FUEL LINE 5/16” x 18” LG. 842315-031 1.5 FT
13 TUBE, FUEL PICK UP A1270398 1
14 SENDER UNIT, FUEL LEVEL, 5.50 LG CO22750 1
15 VALVE, CHECK INLINE 3/16 TUBING CO273306 1
16 SCREW, PHILLIPS PAN HEAD #10-32 x 1/2” LG. SS FA33542 1
17 CLAMP, HOSE, T-BOLT STYLE, 13mm SS FA38355 2
18 CLAMP, HOSE, T-BOLT STYLE, 10M FA91153 4
19 PUSH-ON, MALE ADAPTER, 1/4 MALE x 3/16 PUSH FI92363 1
20 CAP, DIESEL VENTED TETHERED HA271677 1
21 HOSE, 1-1/2 DIA. FUEL x 12-1/2” LONG TU269928 1.04 FT
22 HOSE, 3/16 DIA. HT, FUEL x 30 LG. TU28641 2.5 FT
PLEASE NOTE: WHEN ORDERING PARTS, INDICATE MACHINE SERIAL NUMBER.
VANAIR MANUFACTURING, INC.
(800) 526-8817 • www.vanair.com
090058-OP_r0 (AUGUST-2014) PAGE - 55

SECTION 7: ILLUSTRATED PARTS LIST VIPER DIESEL
3
1
9
8
7
4
7
7
5
6
2
8
7
17
12
13
14
22
16
12
18
15
10
11
19
19
20
21
15
7.11A DECALS (LOCATION)
WARNING
DO NOT REMOVE OR COVER ANY
PAGE - 56 090058-OP_r0 (AUGUST-2014)
SAFETY DECAL. Replace any safety
decal that becomes damaged or illegible.
6110029ID_r1
VANAIR MANUFACTURING, INC.
(800) 526-8817 • www.vanair.com

VIPER DIESEL SECTION 7: ILLUSTRATED PARTS LIST
ENGINE OIL
DRAIN
1
DIESEL
ONLY
2
COMPRESSOR
FLUID DRAIN
3
800-526-8817
PSIG
260940
MODEL NUMBER
SERIAL NUMBER
MAXIMUM PRESSURE
COMPRESSOR INPUT RPM
www.vanai r.com
4
5
6
7
8
9
10
11
18
21
19 & 20
12
13
14
15
16
17
7.11B DECALS (IDENTIFICATION)
WARNING
DO NOT REMOVE OR COVER ANY
SAFETY DECAL. Replace any safety
decal that becomes damaged or illegible.
6110029ID_r1
VANAIR MANUFACTURING, INC.
(800) 526-8817 • www.vanair.com
090058-OP_r0 (AUGUST-2014) PAGE - 57

SECTION 7: ILLUSTRATED PARTS LIST VIPER DIESEL
7.11C DECALS (PART NUMBERS)
ITEM DESCRIPTION PART NUMBER QTY
1
2
3
4
5
6
7
8
9
10
11
12
13
14
15
16
17
18
19
20
21
22
DECAL, ENGINE OIL DRAIN 1
DECAL, DIESEL FUEL ONLY 1
DECAL, COMPRESSOR OIL DRAIN 1
PLATE, SERIAL VANAIR 260940 1
DECAL, CONNECT AIR HOSE 261885 1
DECAL, DO NOT USE AIR 261886 1
DECAL, HOT PARTS 264372 3
DECAL, ROTATING PARTS 264374 2
DECAL, SULFURIC ACID 264375 1
DECAL, CARBON MONOXIDE 264376 2
DECAL, EXPLOSIVE FUEL 264377 1
DECAL, WARNING PLUGS 264378 2
DECAL, WARNING FAN GUARD 264383 1
DECAL, WARNING ELECTRIC TAMPER 271510 1
DECAL, CAUTION AUTO-START 272041 3
DECAL, READ MANUAL 272424 2
DECAL, ROTARY SCREW OIL 272501 1
DECAL, WIRING DIAGRAM 272672 1
DECAL, VIPER DIESEL LARGE 272850-001 2
DECAL, VIPER DIESEL SMALL 272850-002 1
DECAL, QUICK START GUIDE 273312 2
DECAL, MAINTENANCE VANAIR DIESEL VIPER 274130 1
PLEASE NOTE: WHEN ORDERING PARTS, INDICATE MACHINE SERIAL NUMBER.
PAGE - 58 090058-OP_r0 (AUGUST-2014)
VANAIR MANUFACTURING, INC.
(800) 526-8817 • www.vanair.com

VIPER DIESEL SECTION 7: ILLUSTRATED PARTS LIST
7.12 WIRING DIAGRAM
VANAIR MANUFACTURING, INC.
(800) 526-8817 • www.vanair.com
272618_r8
090058-OP_r0 (AUGUST-2014) PAGE - 59
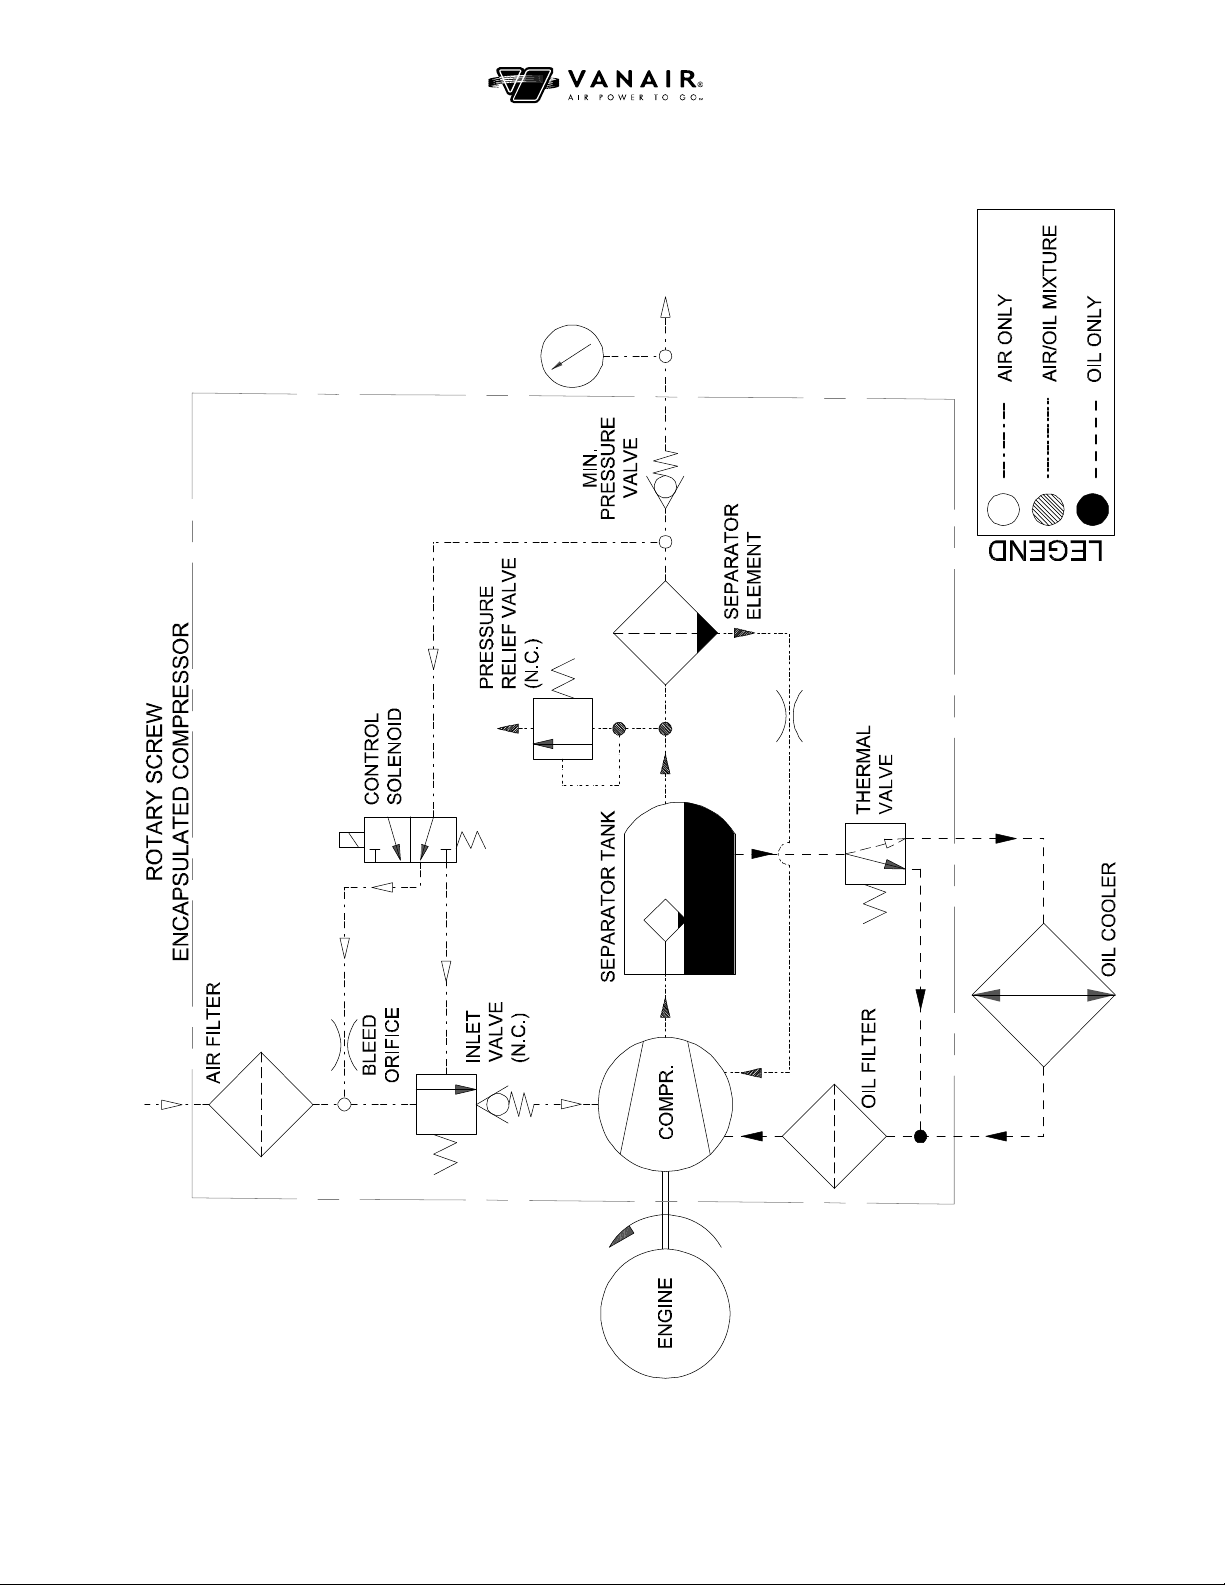
SECTION 7: ILLUSTRATED PARTS LIST VIPER DIESEL
7.13 SCHEMATIC FLOW DIAGRAM
PAGE - 60 090058-OP_r0 (AUGUST-2014)
273387_r2
VANAIR MANUFACTURING, INC.
(800) 526-8817 • www.vanair.com

VIPER DIESEL SECTION 7: ILLUSTRATED PARTS LIST
7.14 HOSE INSTALLATION GUIDE
1. Hose is weakened when installed in twisted
position. Pressure in twisted hose tends to
loosen fitting connections. Design so that
machine motion produces bending rather than
twisting.
2. Ample bend radius should be provided to
avoid collapsing of line and restriction of flow.
3. Exceeding minimum bend radius will greatly
reduce hose assembly life.
5. When hose assembly is installed in a flexing
application, remember that metal hose fittings
are not part of the flexible portion. Allow
ample free length for flexing.
4. Use elbows or other adapters as necessary to
eliminate excess hose length and to insure
neater installation for easier maintenance.
6. When properly routing, u se clamps to secure
the hose in its proper position.
VANAIR MANUFACTURING, INC.
(800) 526-8817 • www.vanair.com
090058-OP_r0 (AUGUST-2014) PAGE - 61

SECTION 8: ILLUSTRATED PARTS LIST VIPER DIESEL
BLANK PAGE
PAGE - 62 090058-OP_r0 (AUGUST-2014)
VANAIR MANUFACTURING, INC.
(800) 526-8817 • www.vanair.com

Vanair Manufacturing, Inc.
10896 West 300 North
Michigan City, IN 46360
Phone: (219) 879-5100
(800) 526-8817
Service Fax: (219) 879-5335
Parts Fax: (219) 879-5340
Sales Fax: (219) 879-5800
www.vanair.com
Printed in the U.S.A.
Specifications Subject to Change
Without Prior Notice
050847 050850
050848 051294
050849
AUGUST-2014
 Loading...