

Page 1
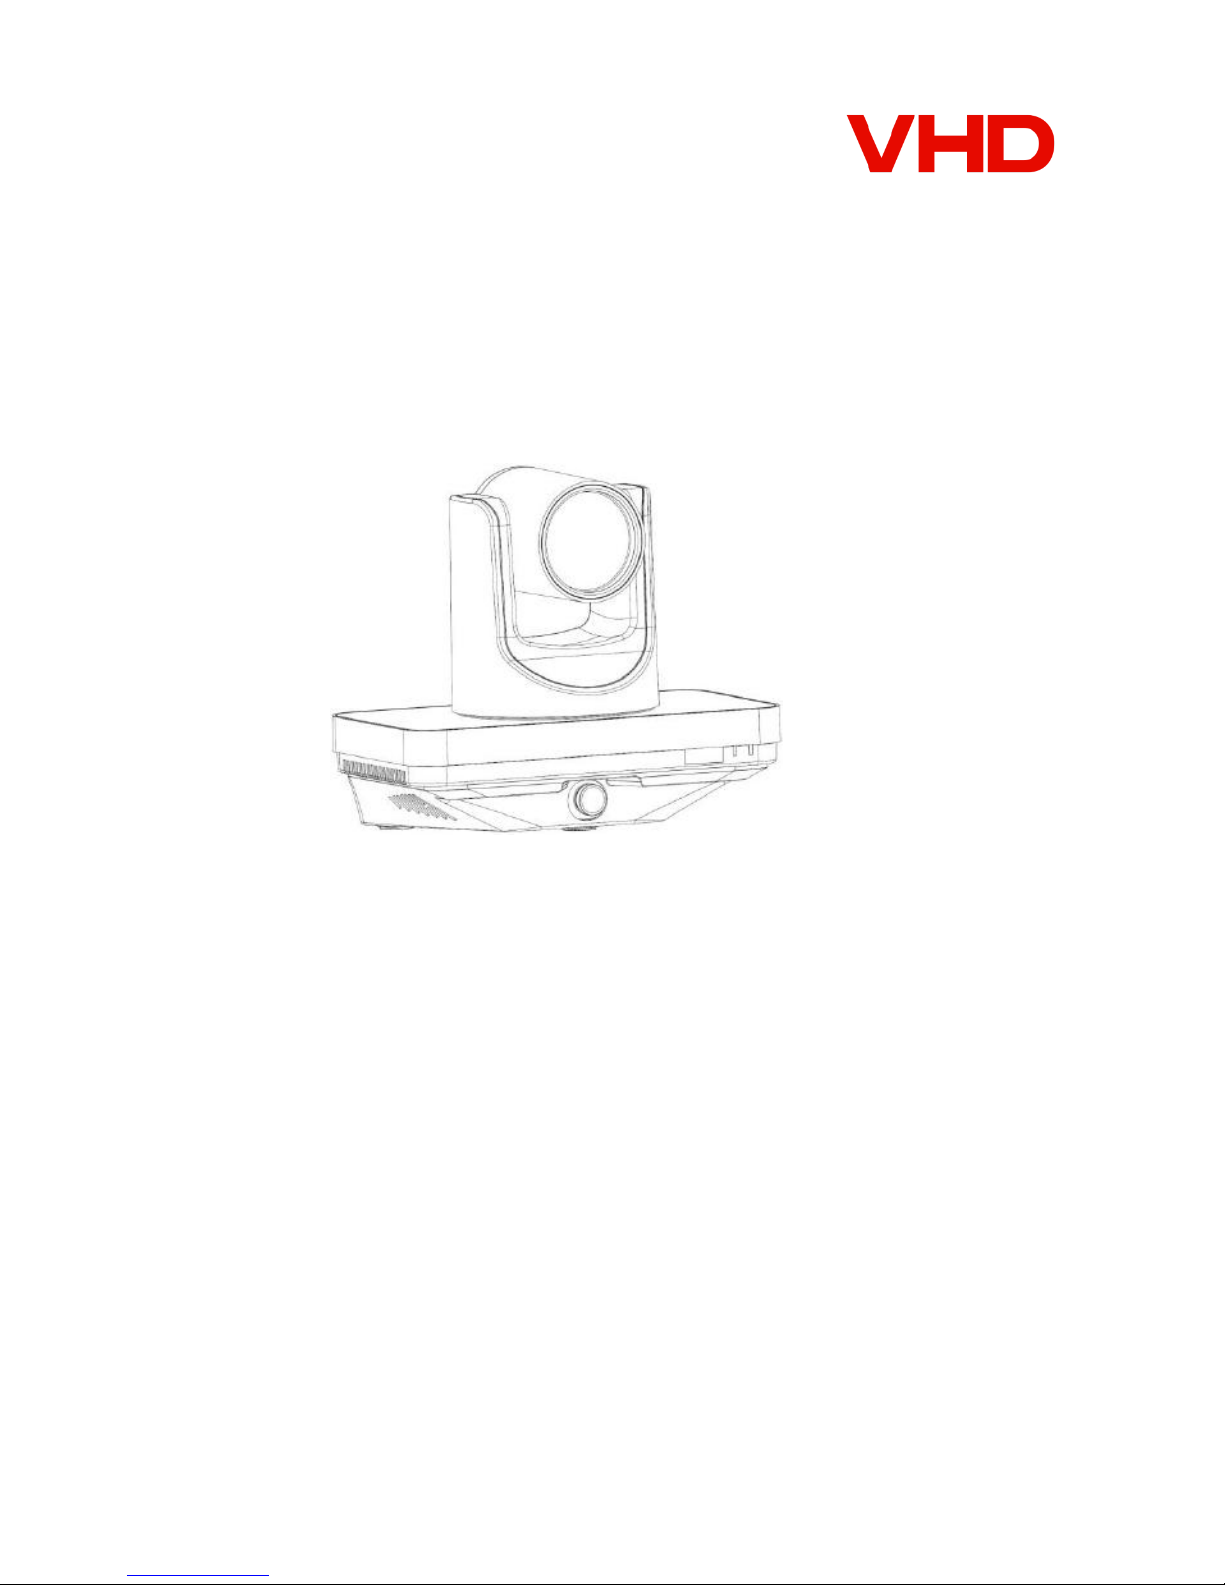
VHD-V800
User manual V1.2
ValueHD Corporation
Copyright:
All contents of this manual, the copyright belongs to ValueHD Corporation, without the
permission of the Company, shall not be arbitrary imitation, copy, family copy or translation.
This manual does not have any form of warranty, position, or other implication. The product
specifications and information mentioned in this manual are for informational purposes only
and are subject to change without notice.
Page 2
ValueHD Corporation
1
Preface:
Thank you for using the company's integrated high-definition intelligent teaching tracking camera.
This manual details the general principles and methods of the functions of the camera, the
installation and operation of the camera. Before installing and using the user, please read in detail.
important:
In order to prevent this product or any other product connected to it from being
damaged, this product can only be used within the specified range:
WARNING: To prevent fire or electric shock, do not subject the unit to rain or
moisture
Note
This is a Class A product. In the home environment, this product may cause radio interference, in
this case, the user needs to take appropriate measures.
防止触电
•不要打开机壳;只能由合
格的技术人员去执行安装
和维修
温湿度合适
•不要在超出限定温度、湿
度或电源规格的状态下使
用
小心擦洗
•清洗摄像机镜头时,请使
用干的软布擦拭,如污垢
严重时,请使用中性清洁
剂轻轻擦拭。
•不要用强烈的或带有腐蚀
性的清洁剂,以免镜头划
伤,影响图像效果
To prevent electric shock
Do not open the case; only by
qualified technical staff to perform the
installation and maintenance
The temperature is right
Do not use it beyond the defined
temperature, humidity, or power
supply specifications
Carefully scrub
When cleaning the camera lens, wipe it
with a dry soft cloth. If the dirt is severe,
wipe it with a mild detergent.
Do not use a strong or corrosive
cleaning agent, so as not to scratch the
lens, affecting the image effect.
Page 3

ValueHD Corporation
2
List
Note .................................................................................................................. 3
Product Feature .......................................... Fejl! Bogmærke er ikke defineret.
Product Spec .............................................. Fejl! Bogmærke er ikke defineret.
Standard Accessories ................................. Fejl! Bogmærke er ikke defineret.
Remote Control .......................................... Fejl! Bogmærke er ikke defineret.
Host ............................................................ Fejl! Bogmærke er ikke defineret.
Rotation Switch Setting ............................. Fejl! Bogmærke er ikke defineret.
Quick Installation ...................................... Fejl! Bogmærke er ikke defineret.
Auto Tracking ............................................ Fejl! Bogmærke er ikke defineret.
Network Function ...................................... Fejl! Bogmærke er ikke defineret.
Menu Setting.............................................. Fejl! Bogmærke er ikke defineret.
RS-232 interface ............................................................................................. 42
Dimension Figure ...................................... Fejl! Bogmærke er ikke defineret.
Protocol List .............................................. Fejl! Bogmærke er ikke defineret.
Maintenance&Troubleshooting ................. Fejl! Bogmærke er ikke defineret.
Page 4
ValueHD Corporation
3
Precautions
Electrical safety
The installation and use of this product must strictly comply with local electrical safety standards.
Carefully transport
Transport, storage and installation process to prevent heavy pressure, severe vibration, soak
damage to the product.
Power polarity
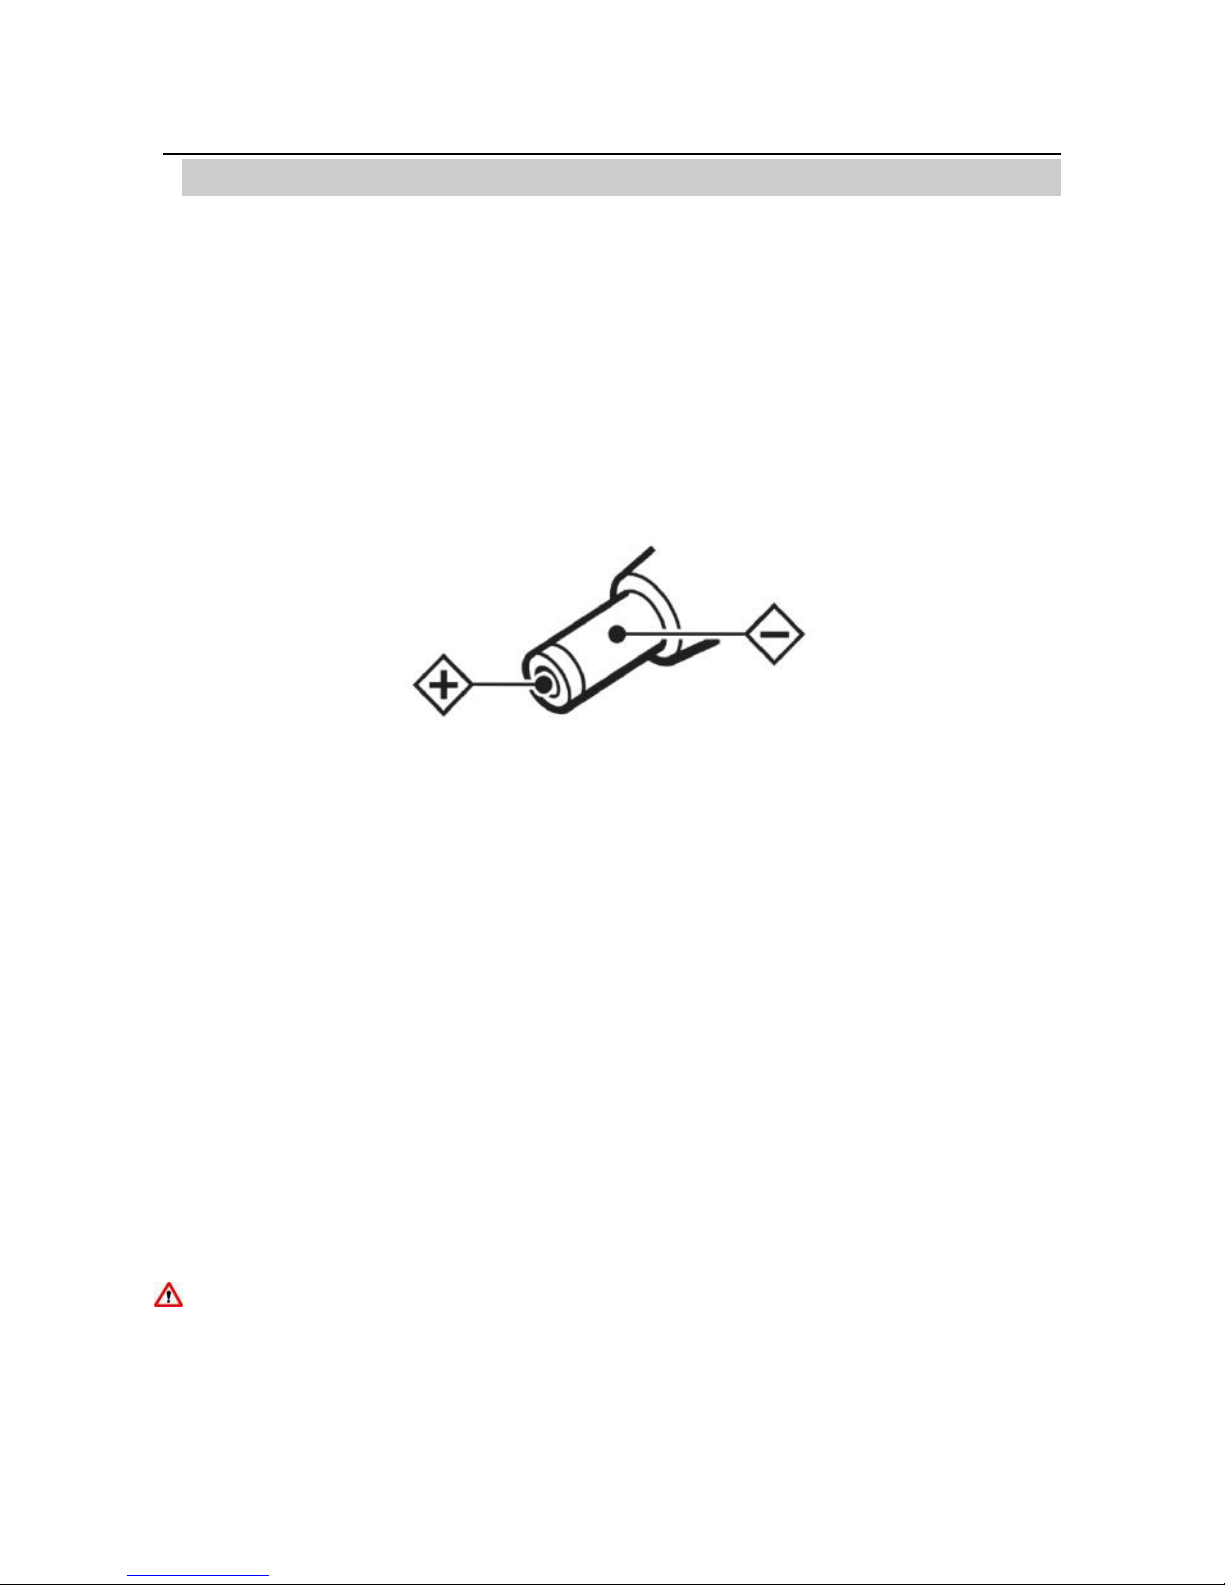
This product uses DC +12 V power supply, the maximum current of 2.5A, power plug polarity as
shown below.
Careful installation
Do not catch the camera head to move the camera. Do not use the hand to rotate the camera's head,
otherwise it may cause the machine
Mechanical failure.
This product should be placed on a smooth desktop or other level, the product can not be tilted to
install;
The product is made of organic material, is strictly prohibited and may cause corrosion of the shell
of a variety of liquid, gas or solid material contact;
The installation should ensure that there is no obstacle in the scope of rotation.
Do not power on until you have completed all installation.
Do not disassemble
This product does not have the user to repair the parts, due to user damage caused by demolition
does not belong to the scope of warranty.
Attention
Electromagnetic fields at specific frequencies may affect the image of the unit!
Page 5

ValueHD Corporation
4
Product Feature
Integrated design
Integrated design, can also output 5 high-definition 1080P (close-up machine 3, panoramic machine
2) video. Students track with
Lens can be replaced
Panorama lens can be replaced, compatible with C / CS interface lens, easy to cope with different sizes
of classroom needs.
Lens angle adjustable
Panorama machine lens angle can be adjusted up and down (-25 ° ~ +15 °), greatly facilitate the
installation and commissioning.
Efficient tracking
Built-in leading image recognition and tracking algorithm, without any auxiliary positioning camera
or tracking the host can be achieved with a smooth natural Track effect.
Video style consistent
Panorama machine and close-up machine using the same image processing program to ensure that the
two image output brightness, color, style, etc. consistent.
Configuration is simple
Simple tracking configuration, directly through the network port configuration, only need to configure
the general parameters to complete, substantial savings in engineering debugging time with cost.
72.5 ° wide-angle lens + 32x digital zoom
The close-up camera features a 72.5 ° high-quality ultra-wide focus lens with an optical zoom of 12x
and supports 32x digital zoom (optional).
H.265 encoding
Support H.265 encoding video conferencing camera, can achieve full HD 1080p ultra-low bandwidth
transmission.
1080P Full HD
Using a new generation of Panasonic 1 / 2.7 inch, 2.07 million effective pixels of high-quality HD
CMOS sensor, can achieve the largest
1920x1080 high-resolution high-quality images.
Ultra frame rate
1080P output frame rate up to 60fps
Page 6

ValueHD Corporation
5
Ultra frame rate
1080P output frame rate up to 60fps
AAC audio coding
Features AAC audio encoding, better sound quality, less bandwidth.
Local storage
Close-up machine to support the local storage function, no NVR can be realized U disk local direct
recording tracking video.
Low illumination
Ultra-high noise ratio of the new CMOS image sensor can effectively reduce the low noise in the case
of image noise, while the application of 2D
And 3D noise reduction algorithm, significantly reducing the image noise, even ultra-low light
conditions, still keep the screen clean and clear, the image signal to noise ratio up to 55dB or more.
Page 7
ValueHD Corporation
6
Product Spec
Product Model
VHD-V800
Product Name
Integration of high - definition intelligent teaching tracking camera
Auto Tracking Camera
Video System
HD: 1080p/60, 1080p/50, 1080i/60, 1080i/50, 1080p/30, 1080p/25, 720p/60,
720p/50, 720p/30, 720p/25
Senser
1/2.7 inch, CMOS, Effective Pixels:2.07 Million
Scanning
Progressive
Lens
12x, f3.5mm ~ 42.3mm, F1.8 ~ F2.8
Digital Zoom
32x (Optional)
Low Light
0.5Lux @ (F1.8, AGC ON)
Shutter
1/30s ~ 1/10000s
White Balance
Automatic, indoor, outdoor, one-button, manual
Backlight
Support
Digital noise
reduction
2D&3DDigital noise reduction
Video S/N
≥55dB
Horizontal Angle
View
72.5° ~ 6.9°
Vertical Angle View
44.8° ~ 3.9°
Horizontal Rotation
Range
±170°
Vertical Rotation
Range
-30° ~ +90°
Pan Speed Range
1.7° ~ 100°/s
Tilt Speed Range
1.7° ~ 69.9°/s
H&V Flip
Support
Image Freeze
Support
Local Storage
Support
Preset Number
255
Page 8
ValueHD Corporation
7
Preset Accuray
0.1°
Panorama camera
Video System
1080p/60, 1080p/50, 1080i/60, 1080i/50, 1080p/30, 1080p/25, 720p/60,
720p/50
Senser
1/2.7 inch, CMOS, Effective Pixels:2.07 Million
Scanning
Scanning
Lens
12x, f3.5mm ~ 42.3mm, F1.8 ~ F2.8
Automatic iris
DC
Low Light
0.05 Lux @ (F1.8, AGC ON)
Shutter
1/30s ~ 1/10000s
White Balance
Auto,3000K/Indoor,4000K,5000K/Outdoor,6500K-1,6500K-2,6500K-3,One
Push, Manual
Day&Night Mode
ICR
Digital noise
reduction
2D, 3D Digital noise reduction
BLC
Support
Image Freeze
Support
Ceiling Installation
Support
Newwork Feature
Video Compression
H.265 / H.264 / MJEPG
Video Stream
Main Stream, Sub Stream
Main Stream
Resolution
1920x1080,1280x720,1024x576,960x540,640x480,640x360
Sub Stream
Resolution
1280x720,1024x576,720x576(50Hz support), 720x480(60Hz
support),720x408,
640x360,480x270,320x240,320x180
Video Bit Rate
32Kbps ~20480Kbps
Bit Rate Control
Variable bit rate, fixed bit rate
Frame Rate
50Hz: 1fps ~ 50fps, 60Hz: 1fps ~ 60fps
Audio Compression
AAC
Page 9
ValueHD Corporation
8
Audio Bit Rate
96Kbps, 128Kbps, 256Kbps
Support Protocols
TCP/IP, HTTP, RTSP, RTMP, Onvif, DHCP, 组播等
Input/Output Interface
HD Output
1xHDMI: Version 1.3
2x3G-SDI: BNC type, 800mVp-p, 75Ω, Along to SMPTE 424M
standard
Network Interface
2xRJ45: 10M/100M Ethernet Interface
Audio Interface
1-ch: 3.5mm Audio Interface, Line In
USB
1xUSB2.0: Type A female jack
Communication Interface
1xRS232 In: 8pin Min DIN, Max Distance: 30m, Protocol:
VISCA/Pelco-D/Pelco-P (for close-up camera)
1xRS232 Out: 8pin Min DIN, Max Distance: 30m, VISCA
network use only(for close-up camera)
1xRS232 Out: 8pin Min DIN, Max Distance: 30m, use for control
close-up camera(for panorama camera)
1xRS485: 2pin Phoenix Port, Max Distance: 1200m, Protocol:
VISCA/Pelco-D/Pelco-P(for close-up camera)
Power Jack
JEITA type (DC IN 12V)
Generic Specification
Input Voltage
DC 12V
Current Consumption
1.5A (Max)
Operating Temperature
-10°C ~ 40°C (14°F ~ 104°F)
Storage Temperature
-40°C ~ 60°C (-40°F ~ 140°F)
Power Consumption
18W (Max)
MTBF
>30000h
Size
240mm x 144mm x 200mm
Net Weight
2.0Kg
Page 10
ValueHD Corporation
9
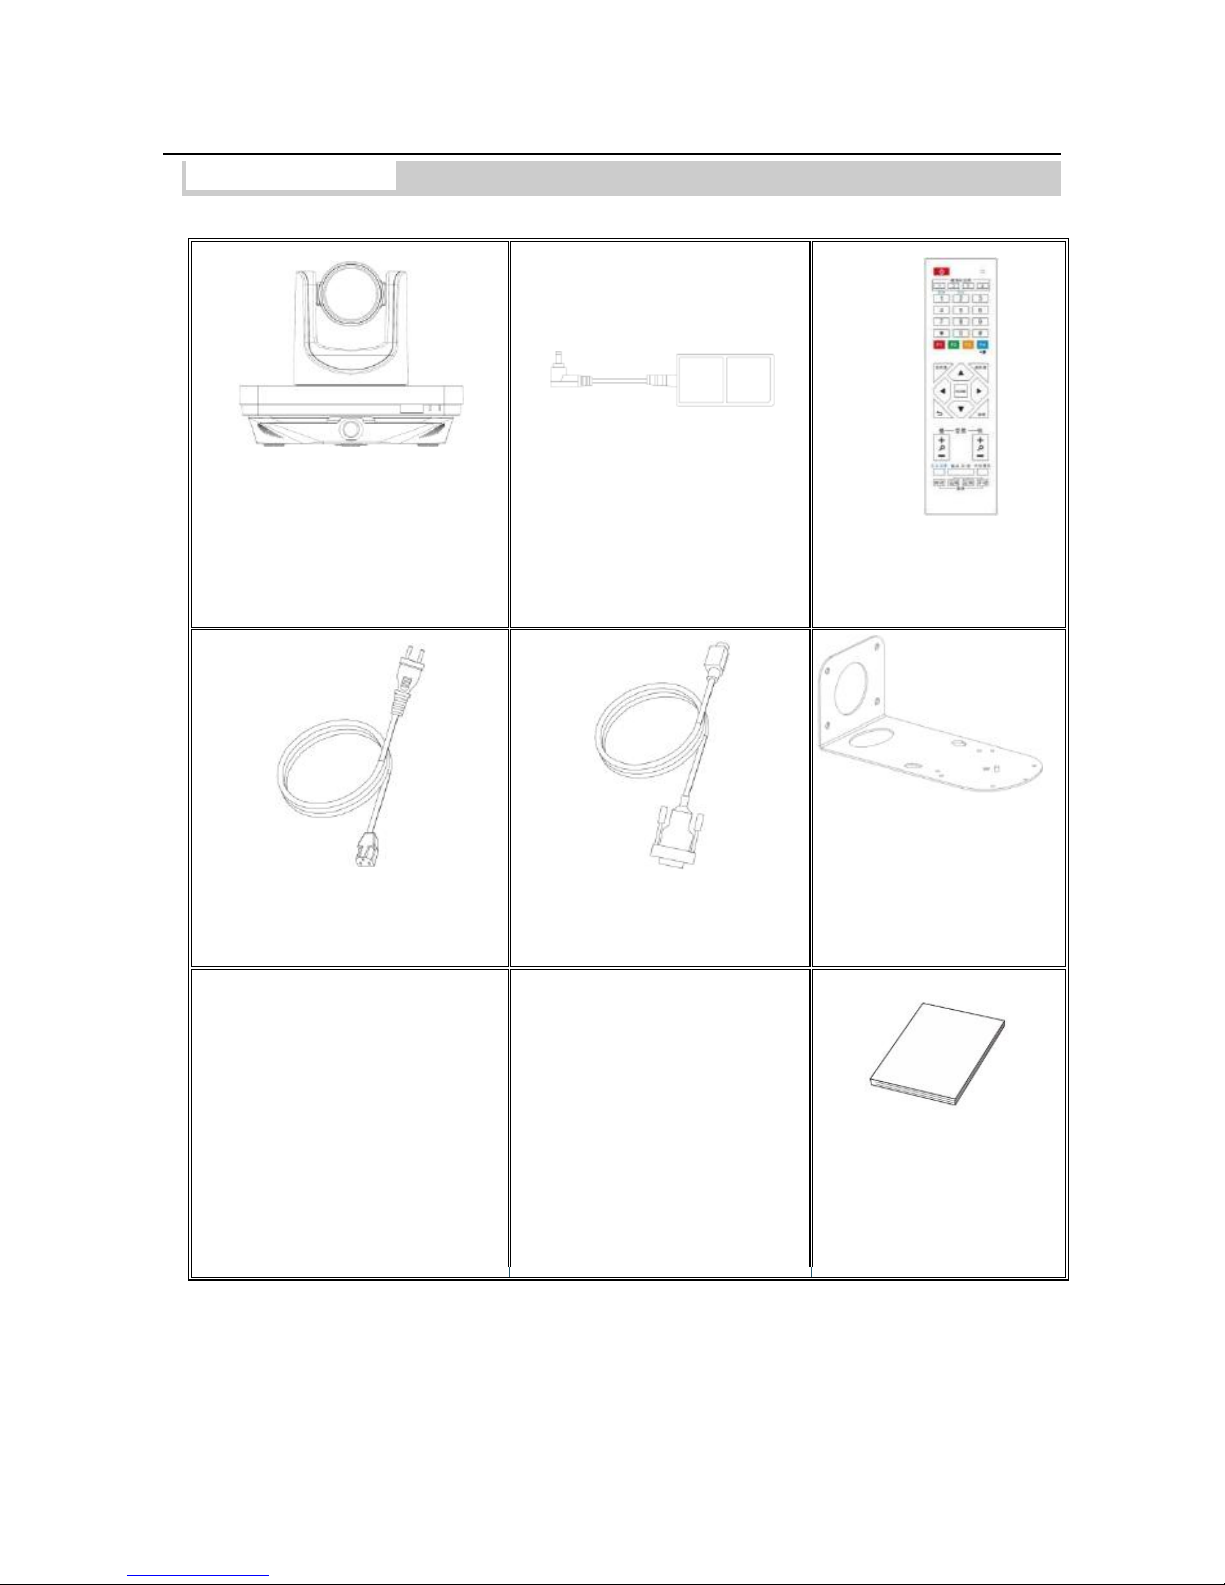
Standard accessories
When opening the package, check and confirm all attachments that should be provided
V800 integrated HD intelligent
teaching tracking camera x1
Power adapter, camera power
supply x1
Remote control, control
camera x1
AC power extension cord, camera
power supply x1
RS232 serial cable, connecting the
camera and computer x1
Wall mount, fixed tracking
machine x1
1/4 inch screw, fixed tracking
machine x1
Allen wrench, adjust the
panoramic lens x1
User Manual, Quick
Installation Guide x1
Cable description
1, this product does not contain cable, 3.5mm audio cable, RS-485 cable, HD-SDI cable, HDMI cable,
USB cable, please buy it, please refer to the description of the type of cable.
2, the power cord can only extend the 220V end, can not extend 12v DC side.
Page 11
ValueHD Corporation
10
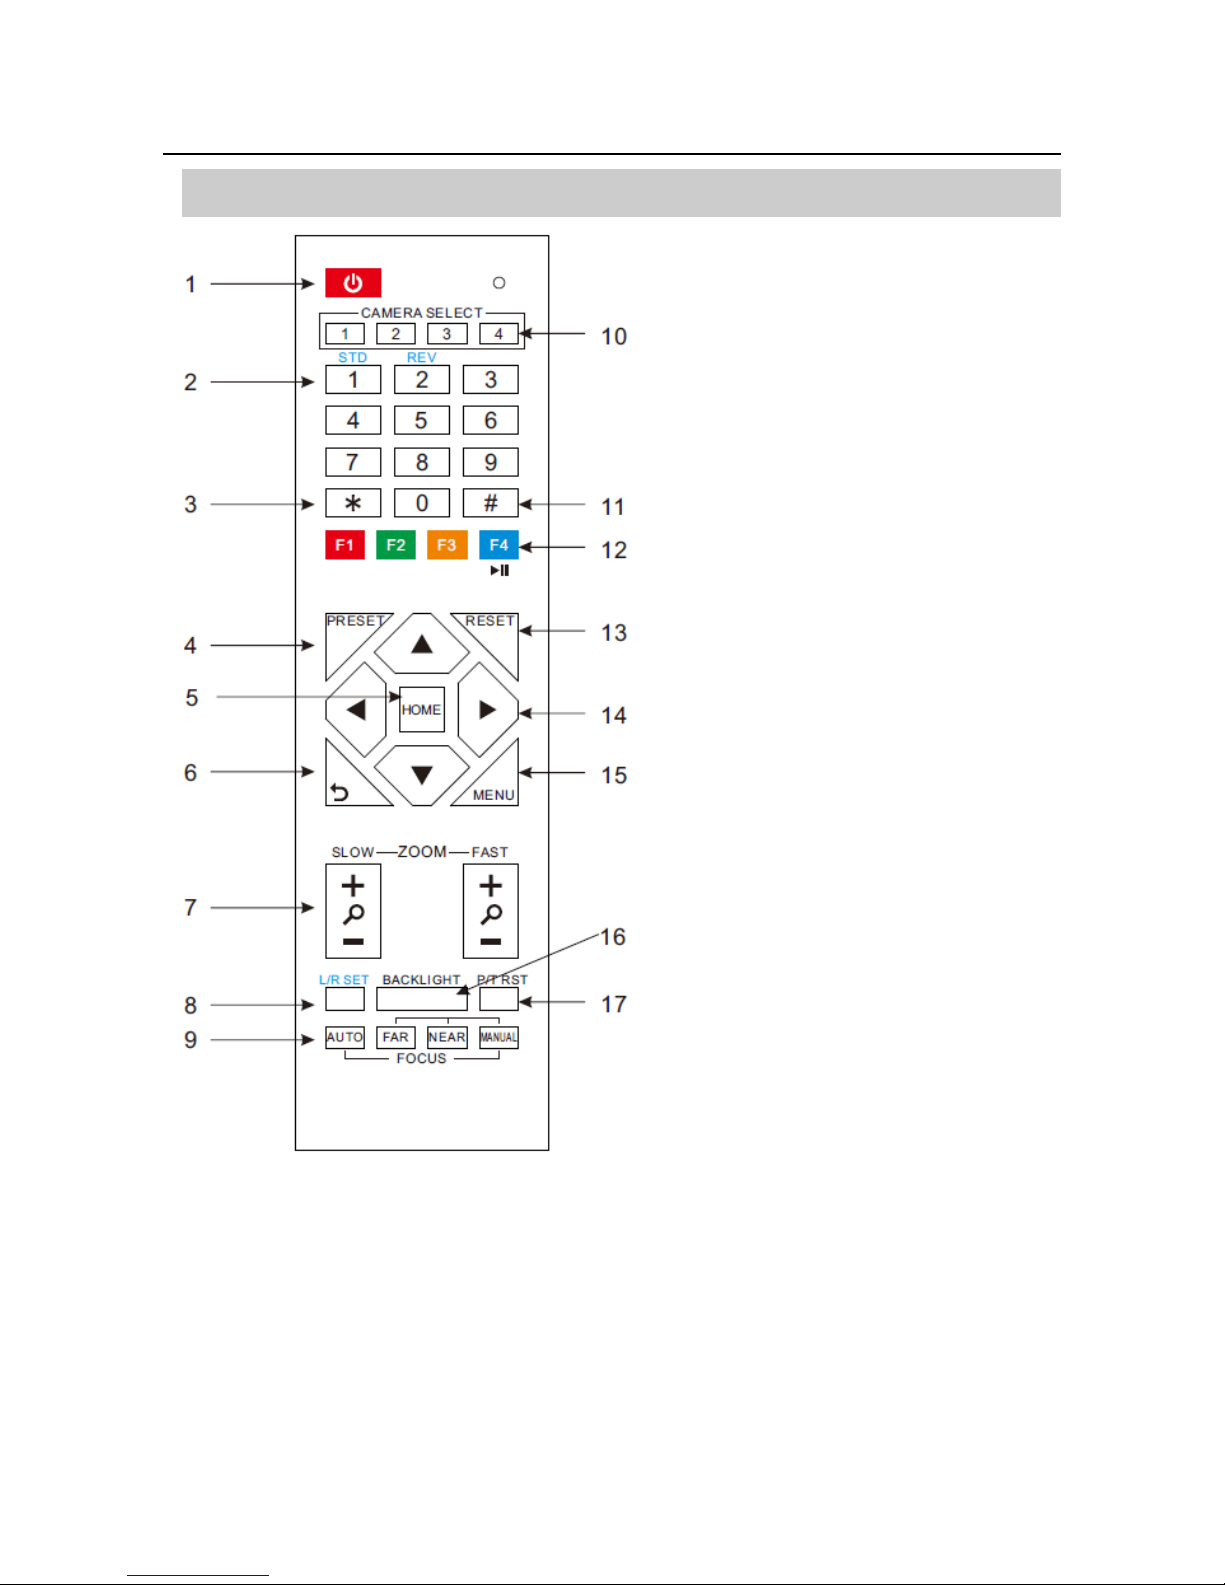
Remote Control
1. Standby button
Press the camera to enter standby mode and
press the camera again to turn it on again.。
2、Number button
Set Preset or Call Preset
3、* button
Use with other buttons
4, set the preset position
Set Preset: Save a preset bit
Set Preset + Numeric Keys (0-9): Set a
preset corresponding to the number keys
5、PTZ control keys 【HOME】
Press the head back to the middle
Position
6、return button
Press the OSD menu to return to the
previous menu.
7、 zoom key
Zoom slow: slow the lens wide angle [+] or
pull the narrow angle [-]
8、 set the left and right keys
PTZ left and right steering set to use, with the number 1 key and the number 2 key with the set PTZ
direction according to the requirements of
the PTZ system to the left or right.
Left and right keys +1 (standard): set the PTZ steering and PTZ control in the same direction
Left and right set key +2 (reverse): Set the pan / tilt and pan / tilt control keys in the opposite direction
9, focus button
Focusing on the use
【Auto】 button to switch the camera focus mode to auto focus
【Manual】 key to switch the camera focus mode to manual focus
Page 12

ValueHD Corporation
11
In manual focus mode, you can focus on close
objects by pressing [far] to focus on distant objects
or [proximal].
10, the camera selection key
Select the camera you want to control
11、# button
Use with other button
12. infrared remote control address selection key
【*】+【#】+【F1】:Address 1
【*】+【#】+【F2】:Address 2
【*】+【#】+【F3】:Address 3
【*】+【#】+【F4】:Address 4
13, clear the preset button
Preset Cancel: Clears a preset bit
Clear Preset + Numeric Key (0-9): Cancel the
corresponding Preset or: [*] + [#] + [Clear Preset]
key: Cancel all presets
14, PTZ control keys
Press the PTZ to move in the direction indicated by
the arrow. Press the [HOME] key to return to the
middle position.
15, The menu button
Press to enter or exit the OSD menu.
16, Backlight compensation key
Backlight ON / OFF: On / Off backlight
compensation (cyclic)
(Note: only in the exposure mode is automatically
under the effective)
Note: If the subject has a light source behind it, the
subject will become dark. In this case, press the
backlight ON / OFF button. To cancel this function,
press the backlight ON / OFF key again.
17, PTZ reset button
Press the head after the start of self-test
18, image freeze function
Manual freeze:Press the remote control [F4]
button after the image freeze function is turned on,
the upper left corner of the image shows "image
freeze" characters, characters appear automatically
disappear after 5 seconds. If you want to release the
freeze again press the 【 F4 】 key to return to
normal, the upper left corner of the image shows
"release image freeze" characters, characters
appear automatically disappear after 5 seconds.
Image is frozen when the preset bit is called:
When the Preset bit is set by the OSD menu, when
the function is turned on and the preset bit is called,
the screen will stay before the preset position until
the camera points to the preset After the preset
position, the screen can be switched to the preset
screen
19, shortcut keys set
[*] + [#] + [1]: Display OSD menu in English
[*] + [#] + [3]: Display OSD menu in Chinese
[*] + [#] + [4]: Show IP address
[*] + [#] + [6]: Quickly restore the default settings
[*] + [#] + [8]: Show the camera version
[*] + [#] + [9]: Quickly set mount mode (flip /
normal)
HOST
Page 13
ValueHD Corporation
12
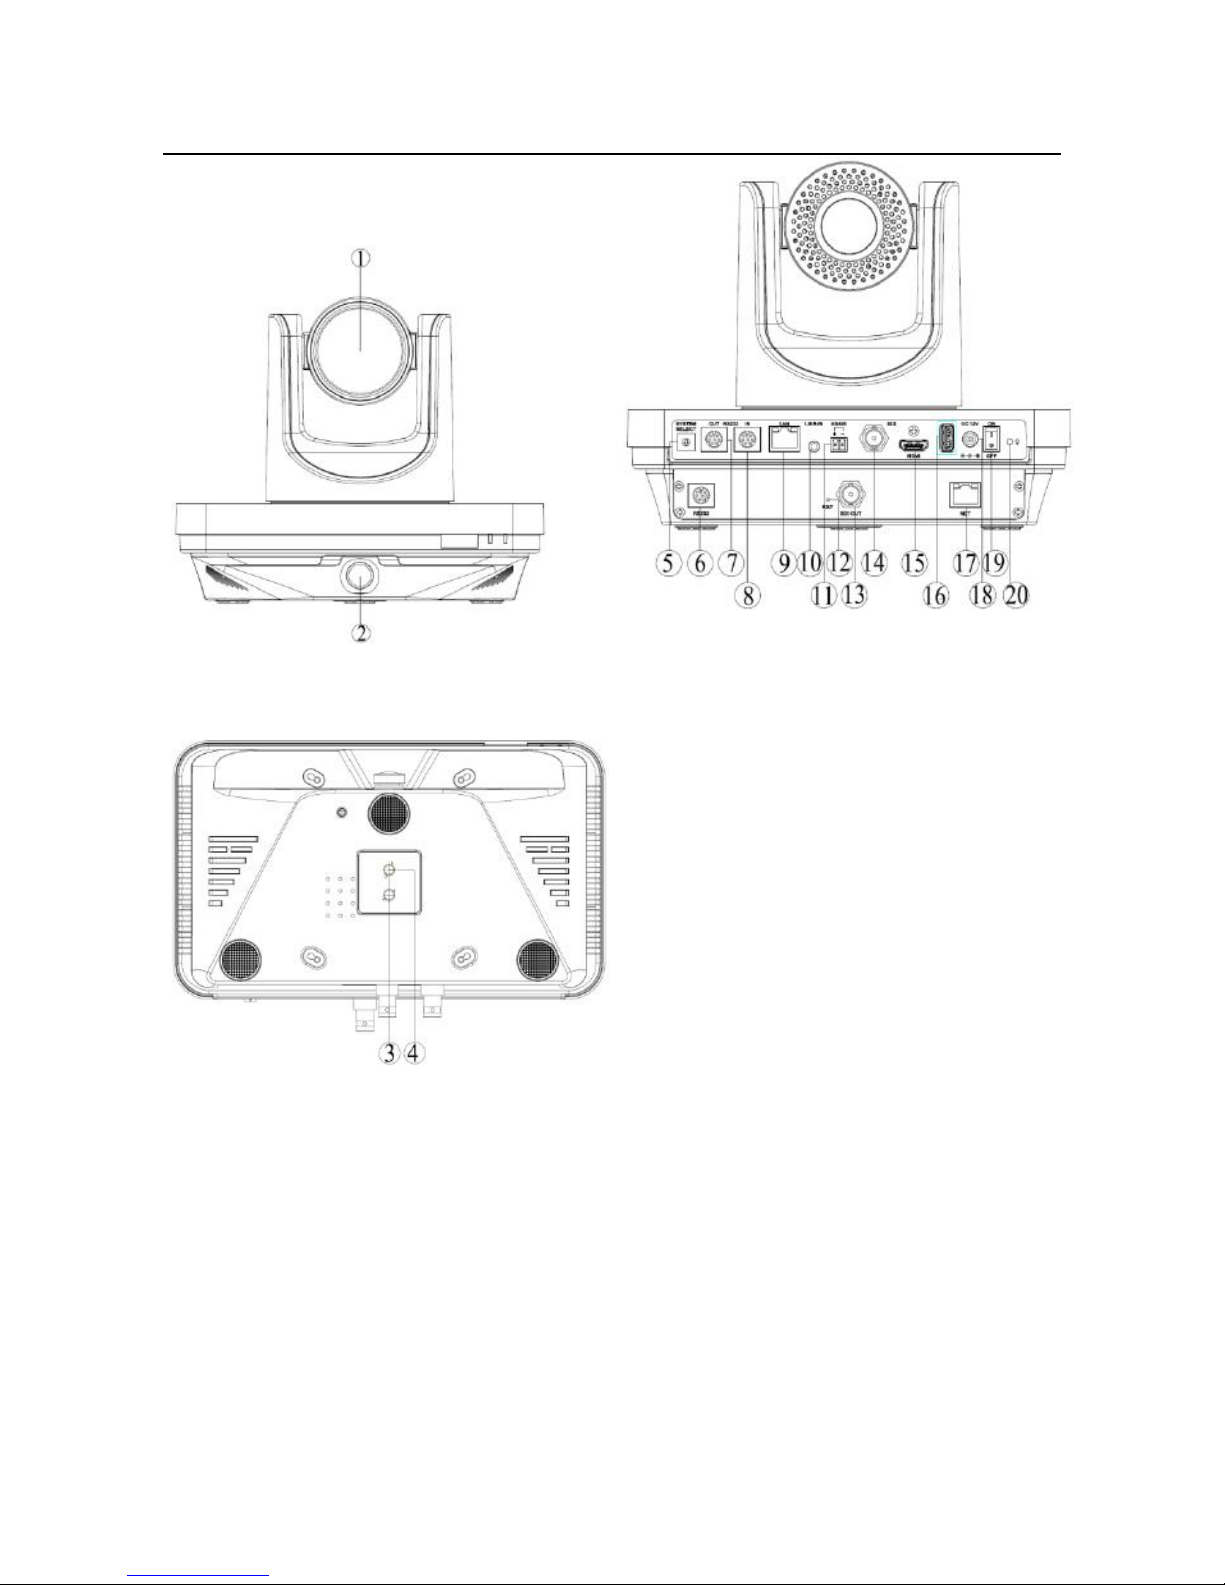
Introduction to Host
Interface
1、Close-up machine
2、Panorama machine
3、Install the positioning hole
4、Install screw holes
5、The video system selects the rotary switch
6、RS232 OUT interface
7、RS232 OUT interface
8、RS232 IN interface
9、LAN Network interface
10、LINE-IN interface
11、RS485 interface
12、Reset
13、SDI OUT interface
14、SDI interface
15、HDMI interface
16、USB2.0 interface
17、NET network interface
18、power interface
19、power switch
20、power indicator
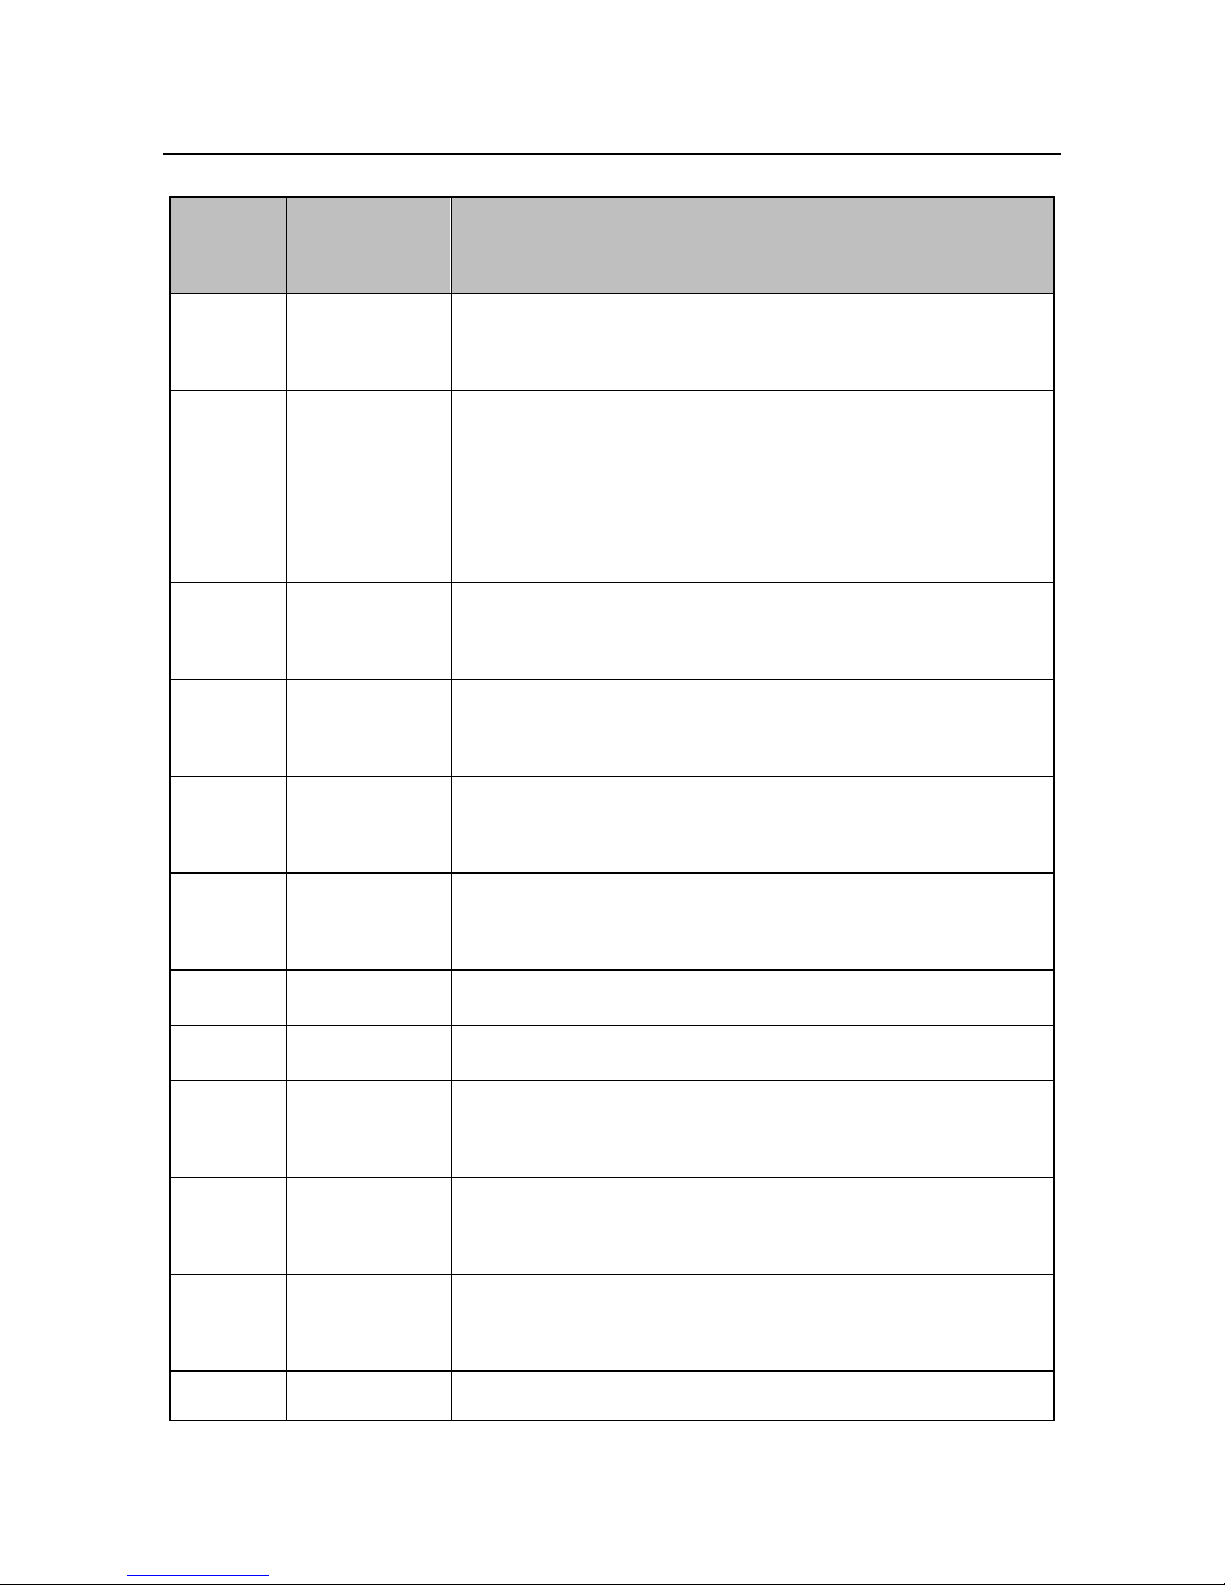
Introduction to host interface function
Page 14
ValueHD Corporation
13
Interface
NO.
Interface
name
Function
5
SYSTEM
SELECT
Camera video output system selection
6
RS232 OUT
Use RS232 cable for communication between the camera and the
recording and broadcasting host, the camera can output the director
command, but also can receive the control command from the
recording and broadcasting host
7
RS232 OUT
Use an RS232 cable to connect your camcorder to a camcorder or
computer for cascading
8
RS232 IN
Use an RS232 cable to connect your camcorder to a camcorder or
computer for cascading
9
LAN
Connect the camera to the network using the network cable to
connect the camera to the network
10
LINE-IN
3.5mm audio input interface, used to connect the computer, mobile
phones and other voice input source, to receive sound
11
RS485
Not supported (customize)
12
RST
Reset button for resetting the panorama
13
SDI OUT
Use the SDI cable to connect the HD TV to the camera SDI output
connector
14
SDI
Use the SDI cable to connect the HD TV to the camera SDI output
connector
15
HDMI
Use an HDMI cable to connect the HD TV to the HDMI output
connector of your camcorder
16
USB2.0
For external USB devices
Page 15

ValueHD Corporation
14
17
NET
Network interface, providing a network connection for the camera
18
DC 12V
Connect the power adapter to provide a 12V power supply for the
camera
Page 16
ValueHD Corporation
15
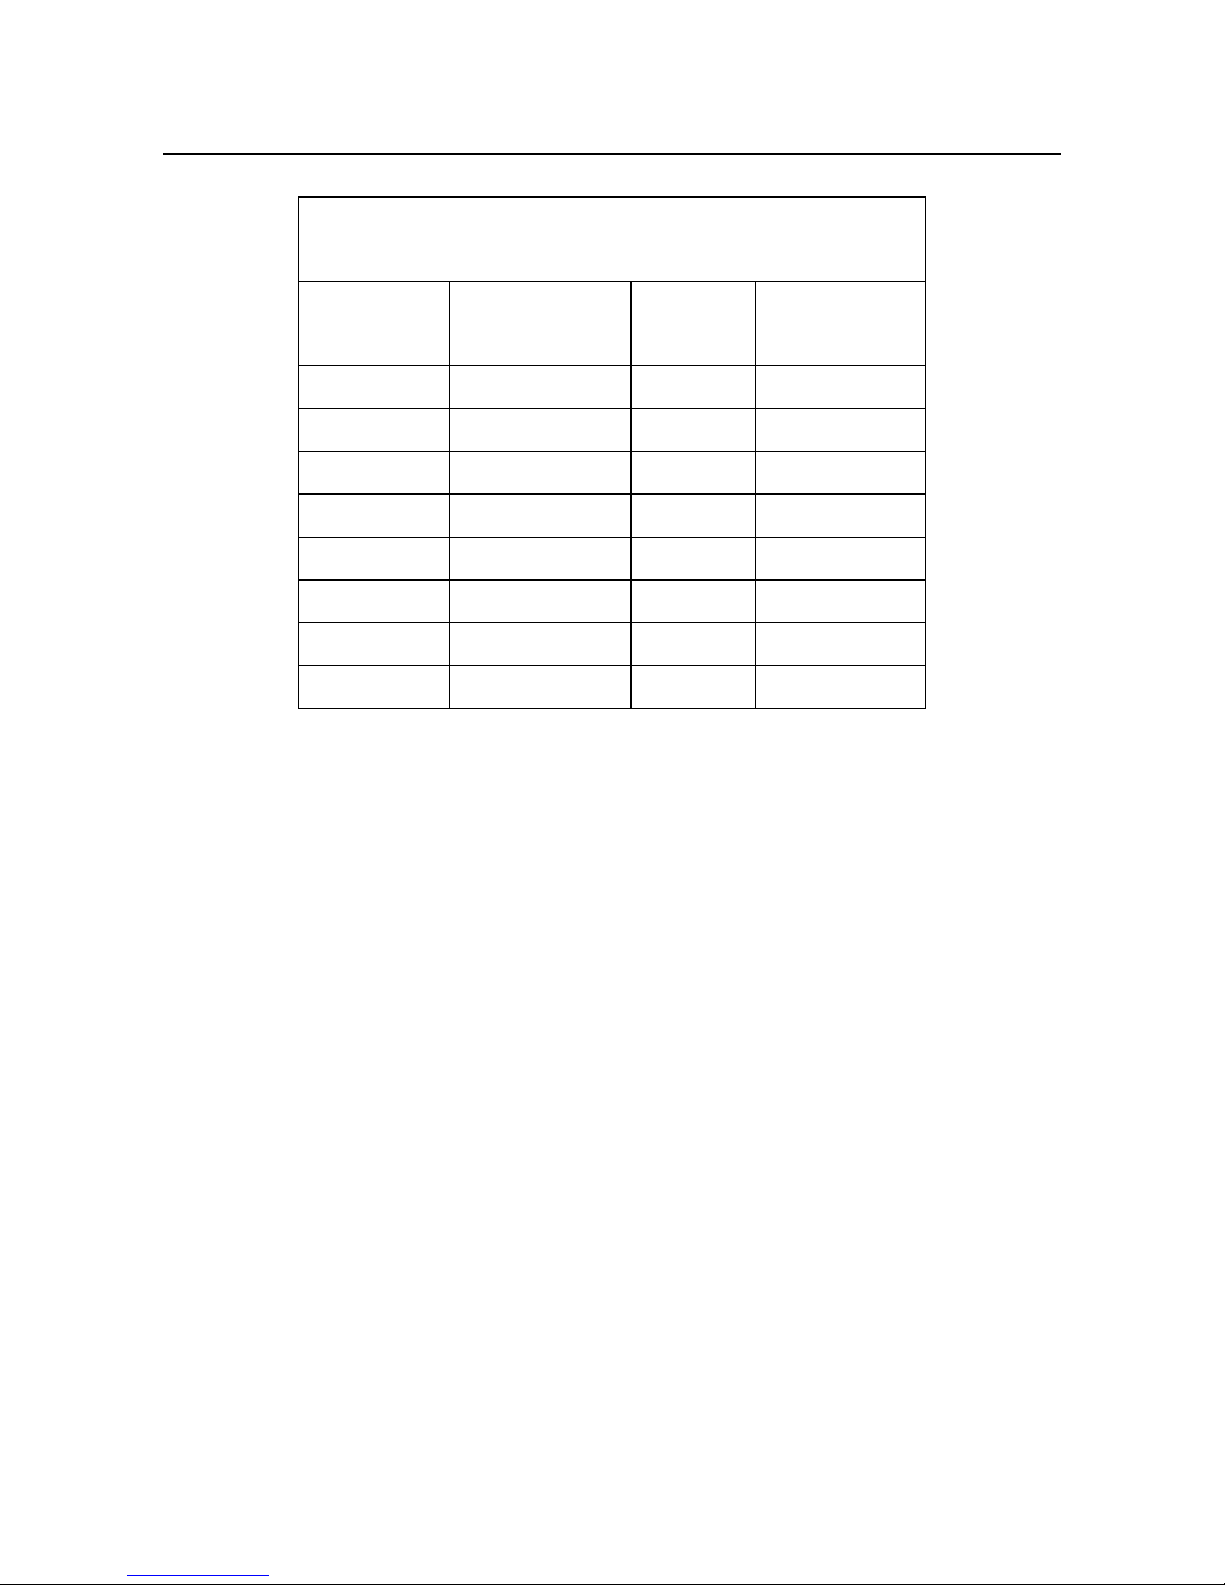
The setting of video system
The sixteen rotary switches are used to set the format of the output
video for the video port (video format).VIDEO SYSTEM
Switch
position
Video format
Switch
position
Video format
0
1080p60
8
720p30
1
1080p50
9
720p25
2
1080i60
A
-
3
1080i50
B - 4
720p60
C - 5
720p50
D - 6
1080p30
E - 7
1080p25
F
-
Note:
a. After switching the standard dialing, need to restart the camera to take effect.
b.720 p30 and 720 p25 only valid when HDMI output.
Page 17
ValueHD Corporation
16
Quick installation
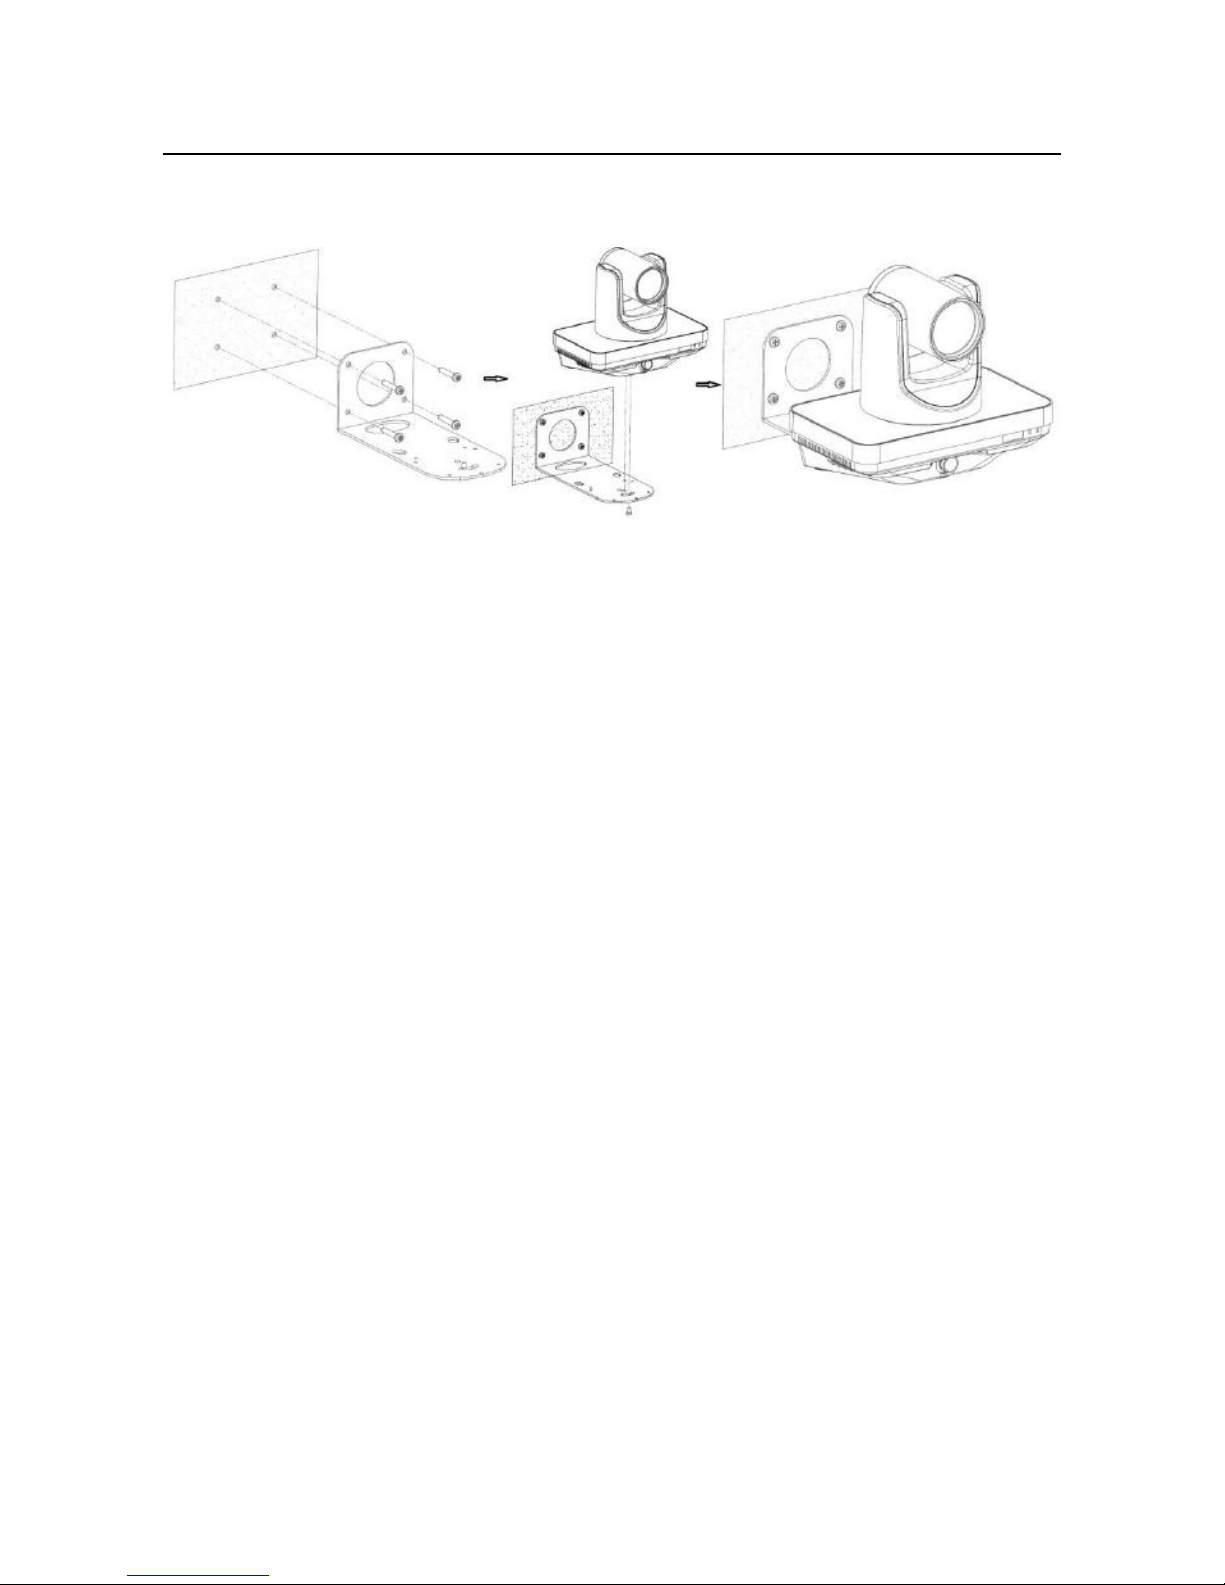
Wall installation
Step 1: Four holes on the wall that correspond to the size and position of the wall mounts, and the
wall mounts are fixed to the walls
Step 2: Place the alignment holes of the camera at the mounting brackets on the wall mounts
Step 3: Rotate the camera at the appropriate angle and fasten the camera's fastening screws to secure
the camera
Note!
Be sure to install it firmly to ensure that the wall mount and the camera will not fall off;
wall support and wall bearing capacity to reach more than 5Kg
Page 18
ValueHD Corporation
17
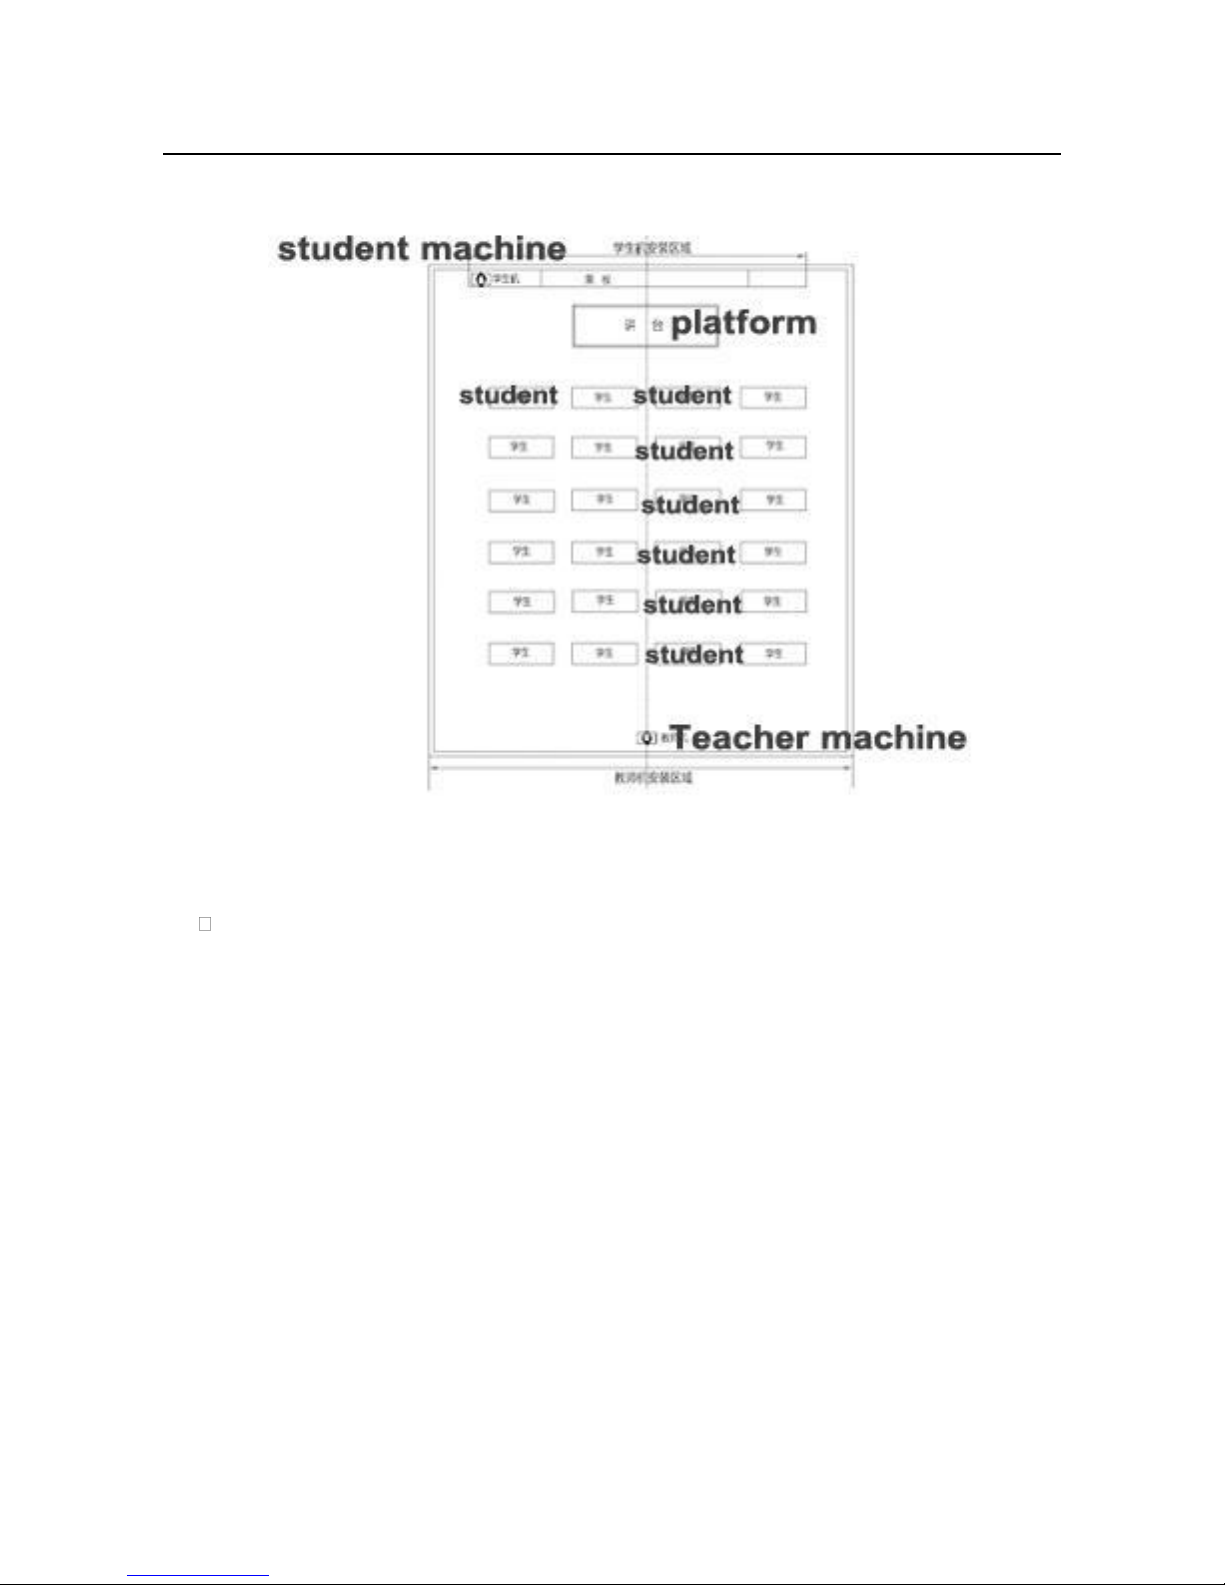
Live camera installation location
Description:
Teacher installed close to the classroom axis, height of 2.2 meters;
student machine installed in the classroom before any position, height of 2.2 meters, installed in the
recommended location.
Camera system connection
Page 19
ValueHD Corporation
18
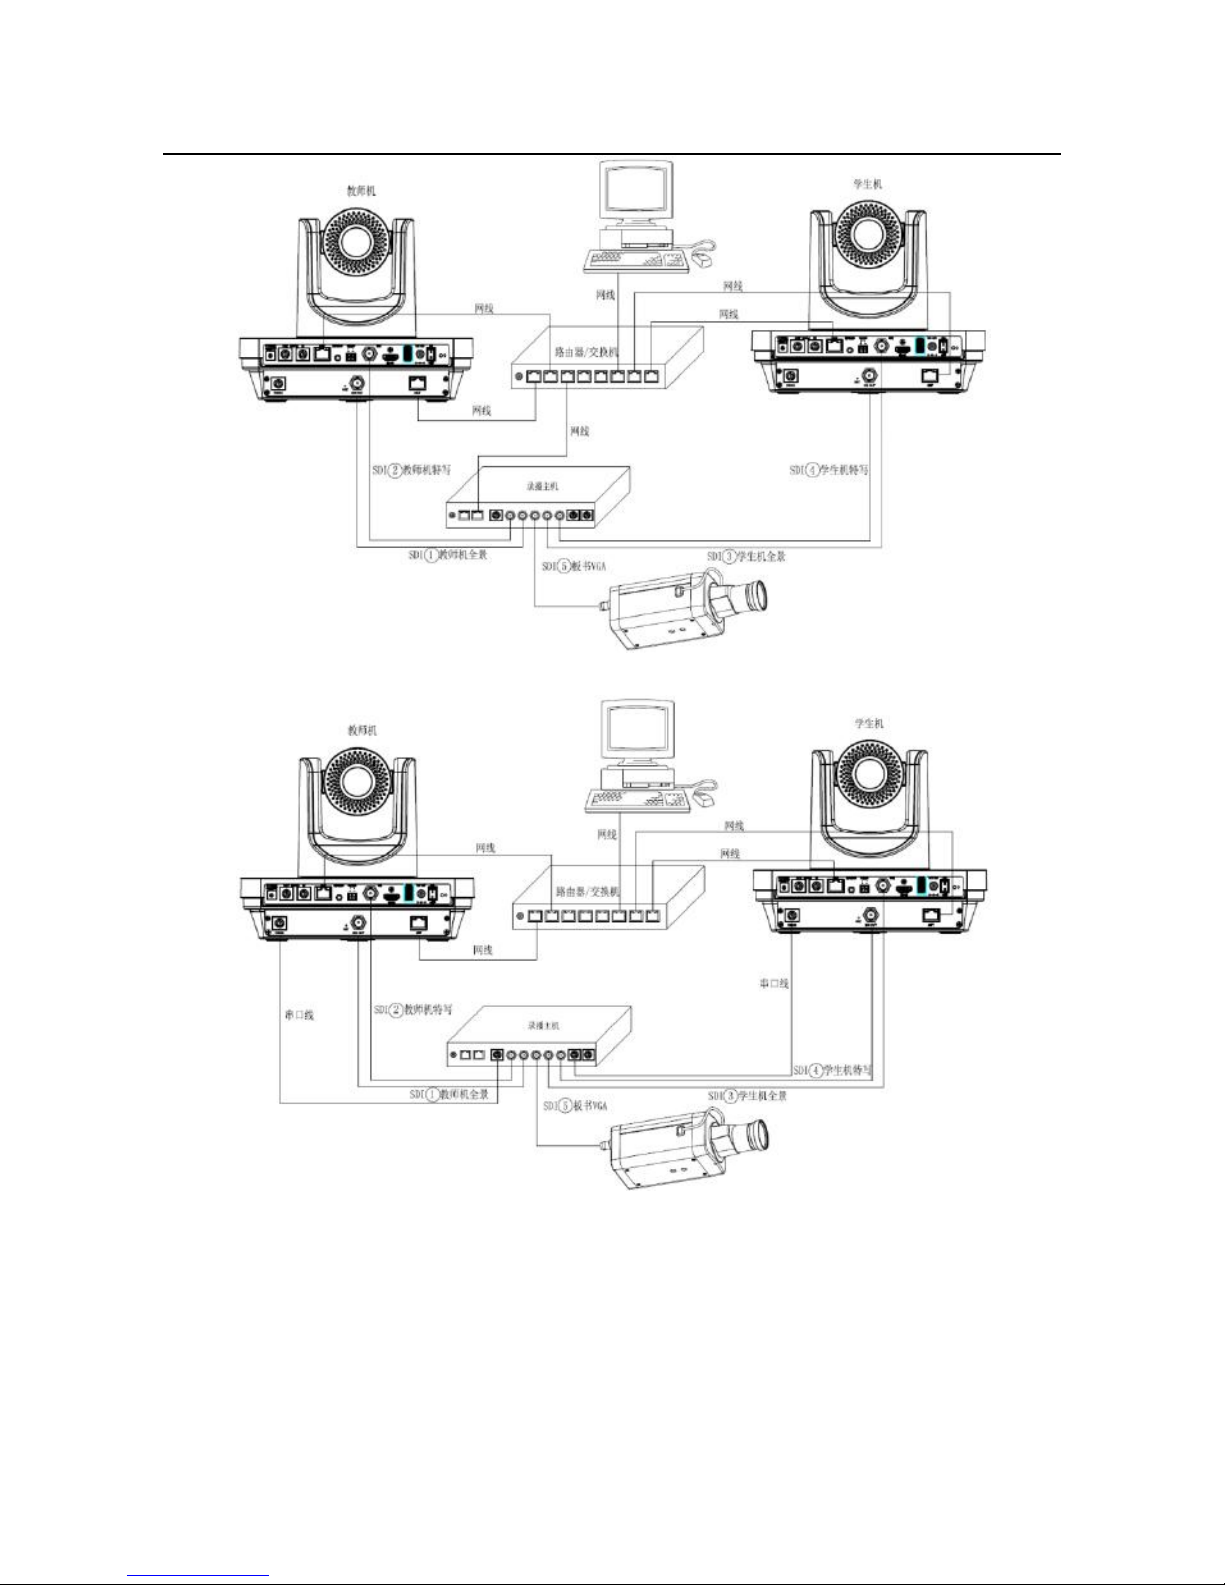
Network mode system connection diagram
Serial port system connection diagram
Description:
Teacher mode, student machine, board computer, video recorder between the network mode and serial
mode support, network mode support protocol: UDP, TCP; serial mode baud rate: 9600
Teacher machine panorama / teacher tracking, student machine panorama / student machine tracking,
blackboard tracking, a total of 5 SDI video signal and video recording host connection
Page 20

ValueHD Corporation
19
Teacher machine / student machine / board computer can be sent to track the process of the state code
or switch code to the recording and broadcasting host, recording and broadcasting host according to
the instructions received video switching action
teacher machine / student machine / board computer, guide parameters are tracked through the
configuration tool configuration
camera software tracking tool
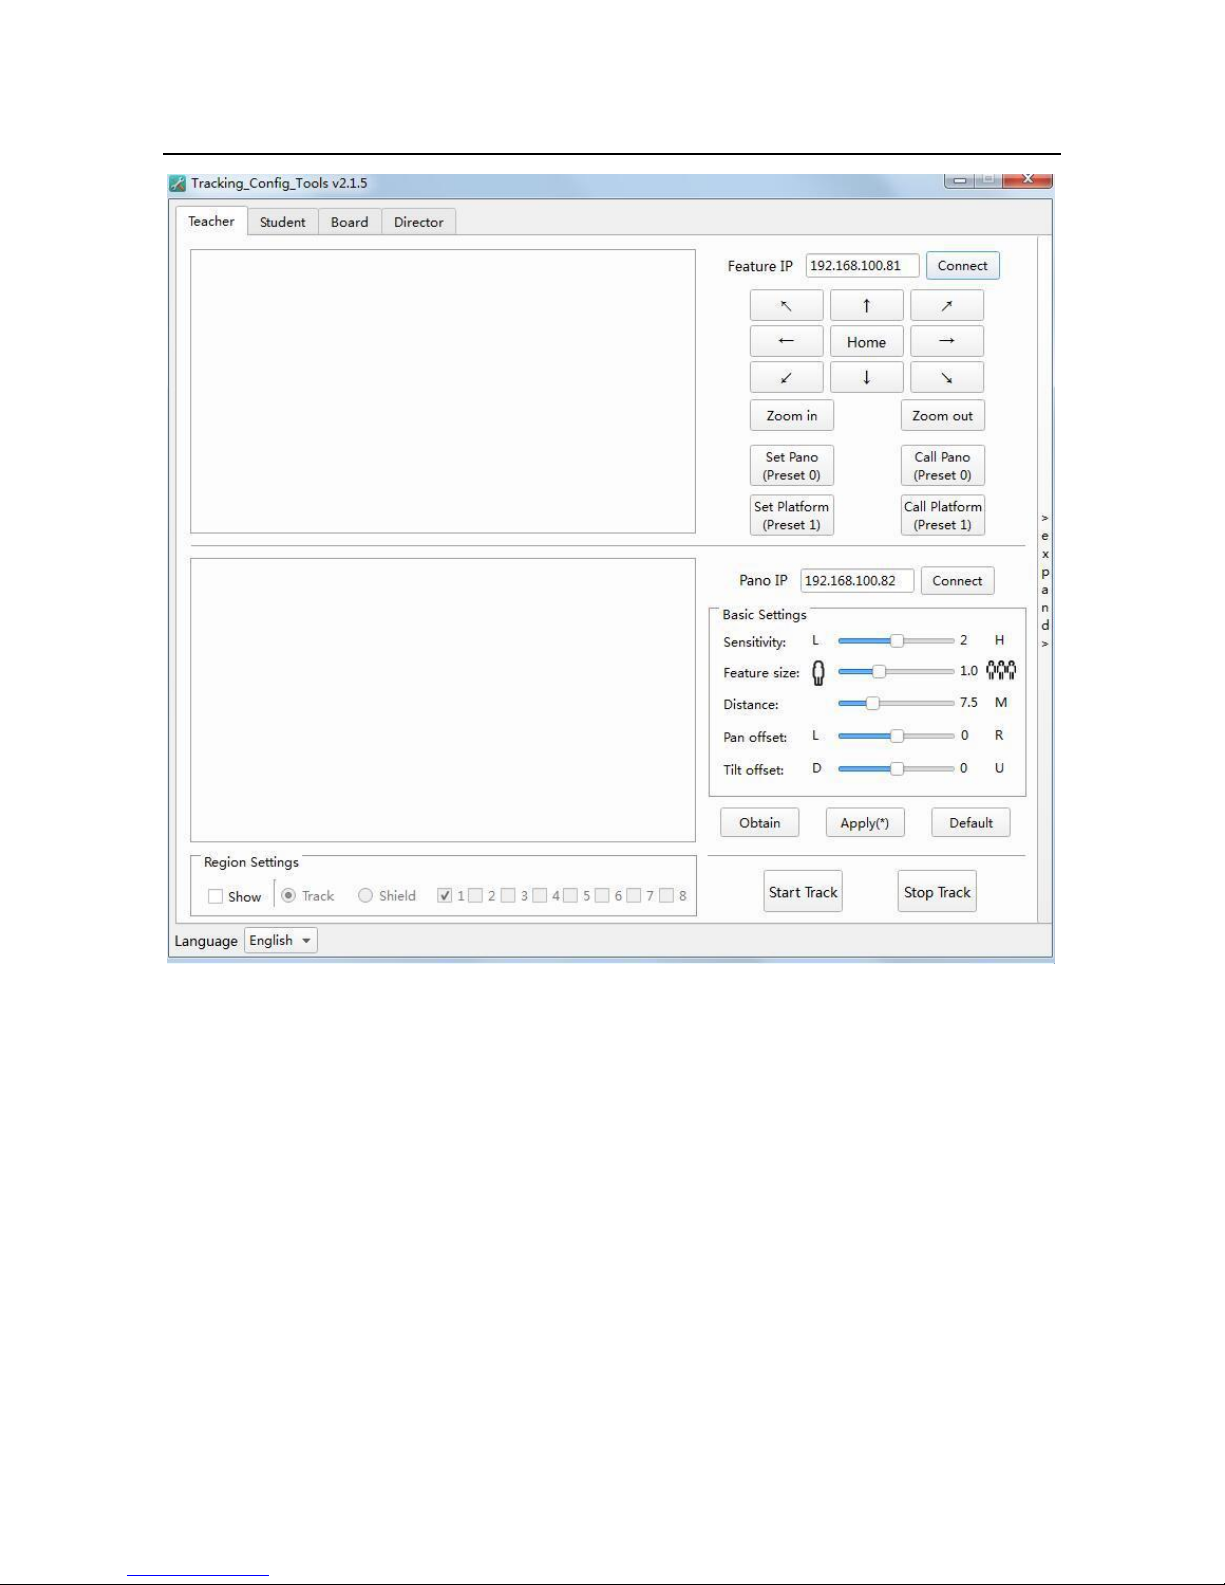
The tracking tool interface is as follows:
Description::
Teacher mode, student machine, board computer, video recorder between the network mode and serial
mode support, network mode support protocol: UDP, TCP; serial mode baud rate: 9600
Teacher machine panorama / teacher tracking, student machine panorama / student machine tracking,
blackboard tracking, a total of 5 SDI video signal and video recording host connection
Teacher machine / student machine / board computer can be sent to track the process of the state code
or switch code to the recording and broadcasting host, recording and broadcasting host according to
the instructions received video switching action
Teacher machine / student machine / board computer, guide parameters are tracked through the
configuration tool configuration
Camera software tracking tool
The tracking tool interface is as follows:
Page 21
ValueHD Corporation
20
Page 22
ValueHD Corporation
21
Tracking Function
1 Tracking Configuration
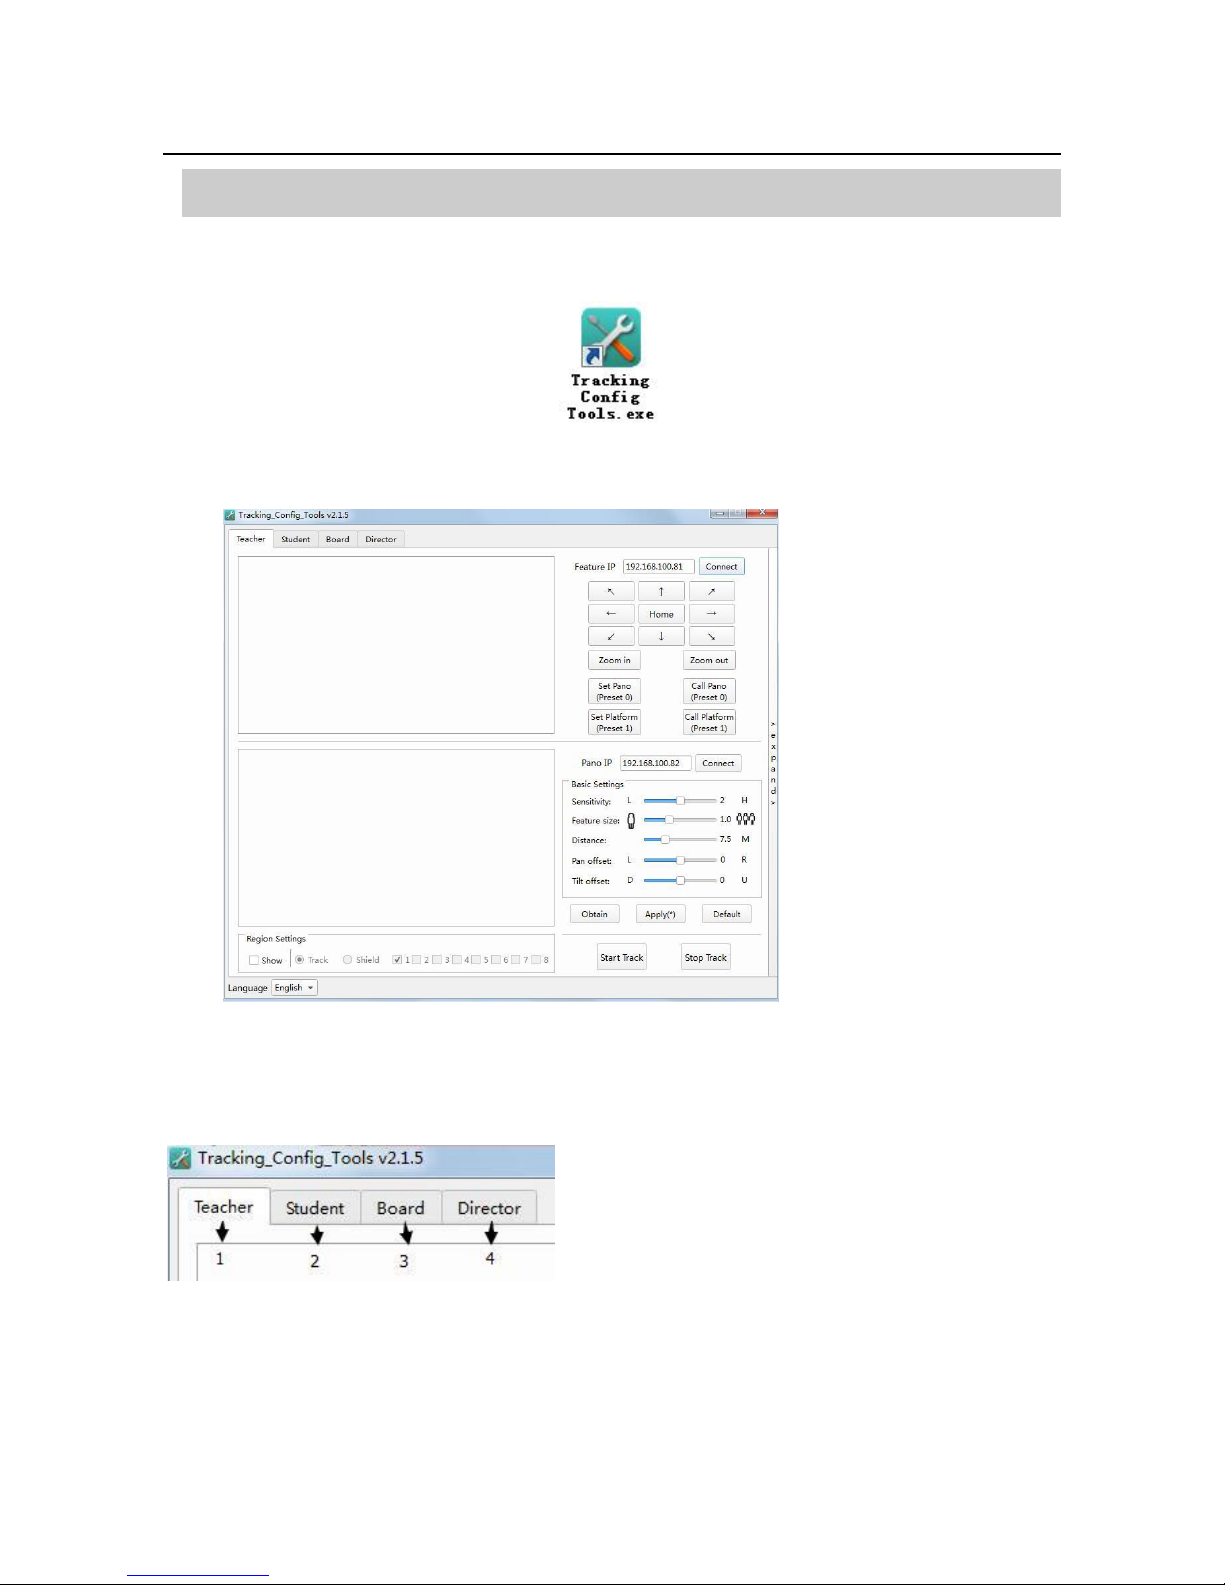
1.1 Tracking Configuration Tool:
Free installation, mouse double click, you can open the tracking configuration tool.
1.2 Tracking Configuration Interface:
2 Tracking parameter configuration
2.1 Tracking parameter configuration selection
1) Teacher-side tracking interface selection
Enter the teacher-side tracking configuration interface
2) Student side tracking interface selection
Go to the student side tracking configuration interface
Page 23
ValueHD Corporation
22
3) Board-side tracking interface selection
Go to the board-edge tracking configuration interface Targeting interface selection
4) Targeting interface selection
Go to the director-side configuration interface
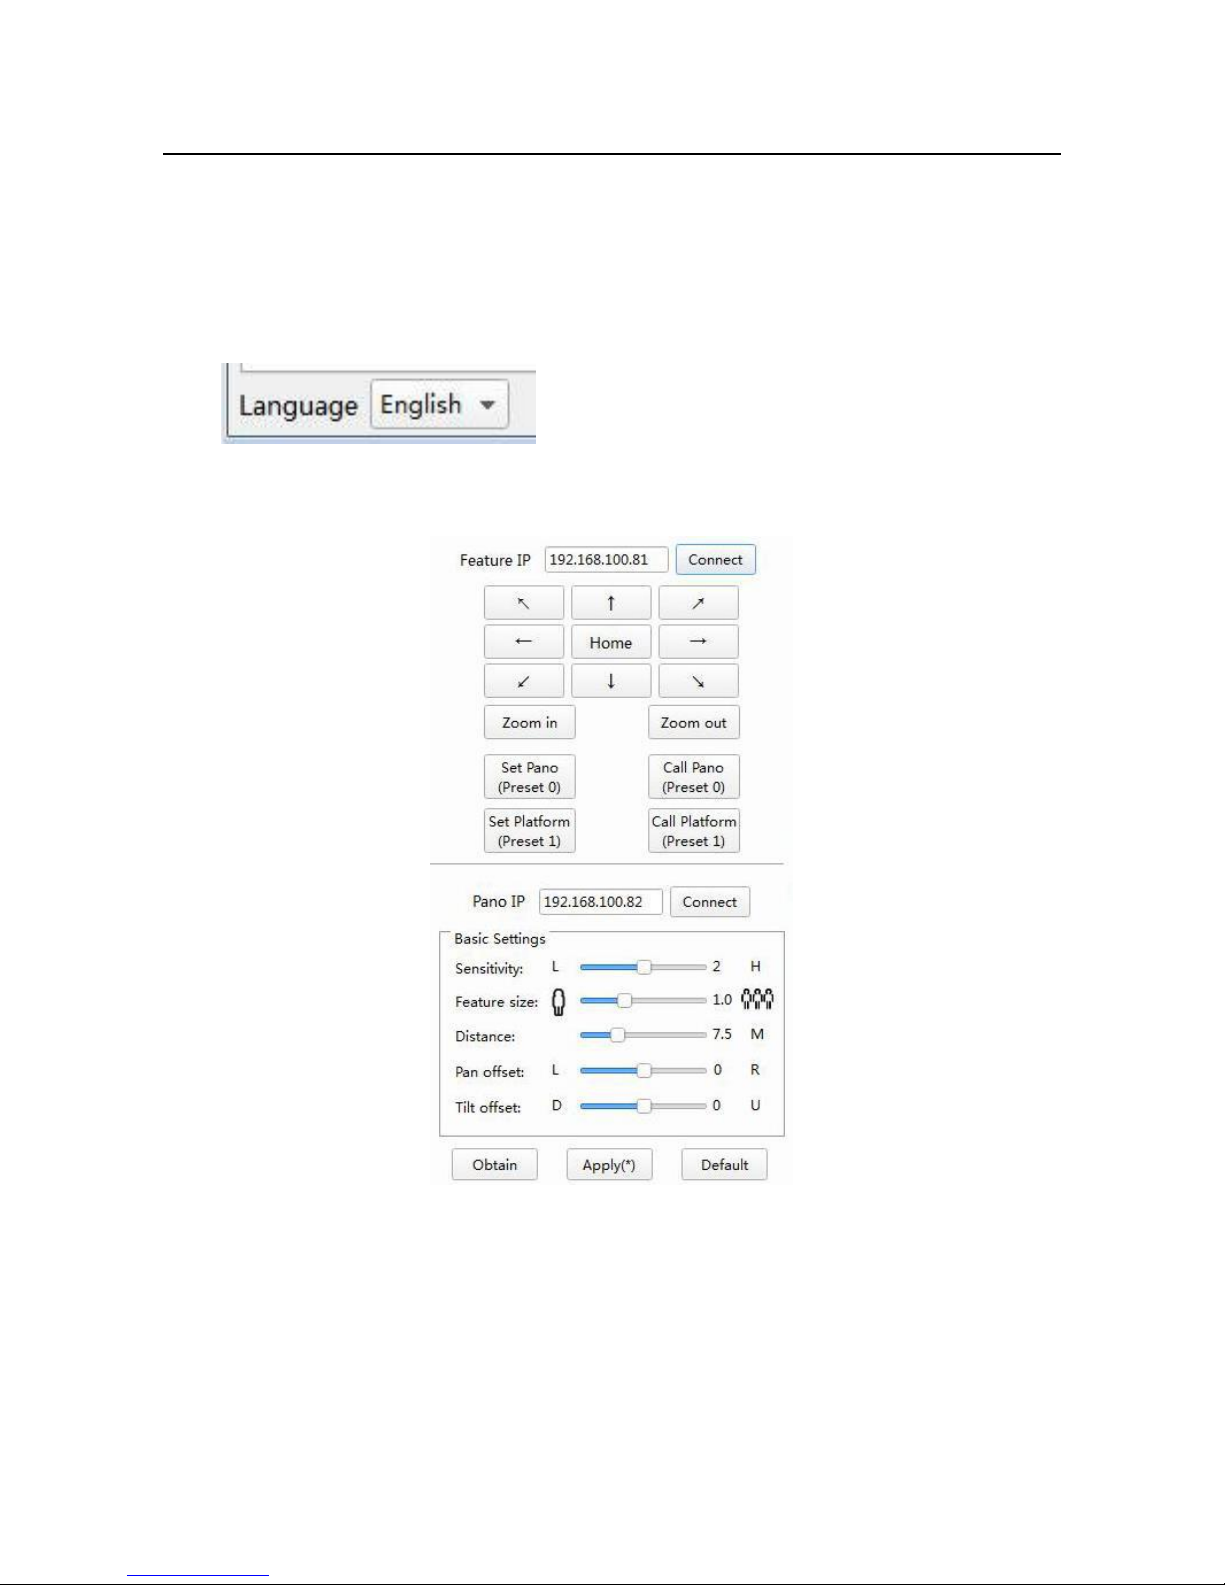
2.2 Language selection
Choice of Chinese or English
2.3 Teacher-side tracking parameter configuration
1) Teacher side close-up machine IP address
Enter the IP address of the teacher's special machine and click [Connect] to preview the image
2) Teacher side special set
(Top, bottom, left, right, top left, top right, bottom left, bottom right, home position rotation).
Pull closer to the camera lens
Pull away the camera lens away
Page 24

ValueHD Corporation
23
Set the panorama bit: Trim pan, that is, preset 0, set the preset 0 with the remote control.
Call the panorama: Call the Trim Scene.
Set the station bit: close-up station, that is, preset 1, the remote control can be used to set the preset
1.
Call the station bit: call the special machine station.
3) Teacher side panorama machine IP address
Enter the IP address of the teacher's panorama machine and click [Connect] to preview the image
4) Teacher-side basic parameter configuration
Tracking sensitivity: set the trigger to trigger the action range and tracking response speed, optional
range 0 to 4, the default value of 2;
Tracking Screen Size: Sets the viewing angle range of the close-up tracking screen. The setting range
is 0.5 ~ 2.0, the default value is 1.0;
Distance from the podium: the distance between the teacher's camera and the podium, the range: 3.0
~ 20.0, the default value of 6 meters;
Horizontal calibration: optional range: -200 ~ +200, negative left to calibration, positive alignment
to the right, default: 0;
Vertical calibration: optional range: -200 ~ +200, negative down calibration, positive up alignment,
default: 0;
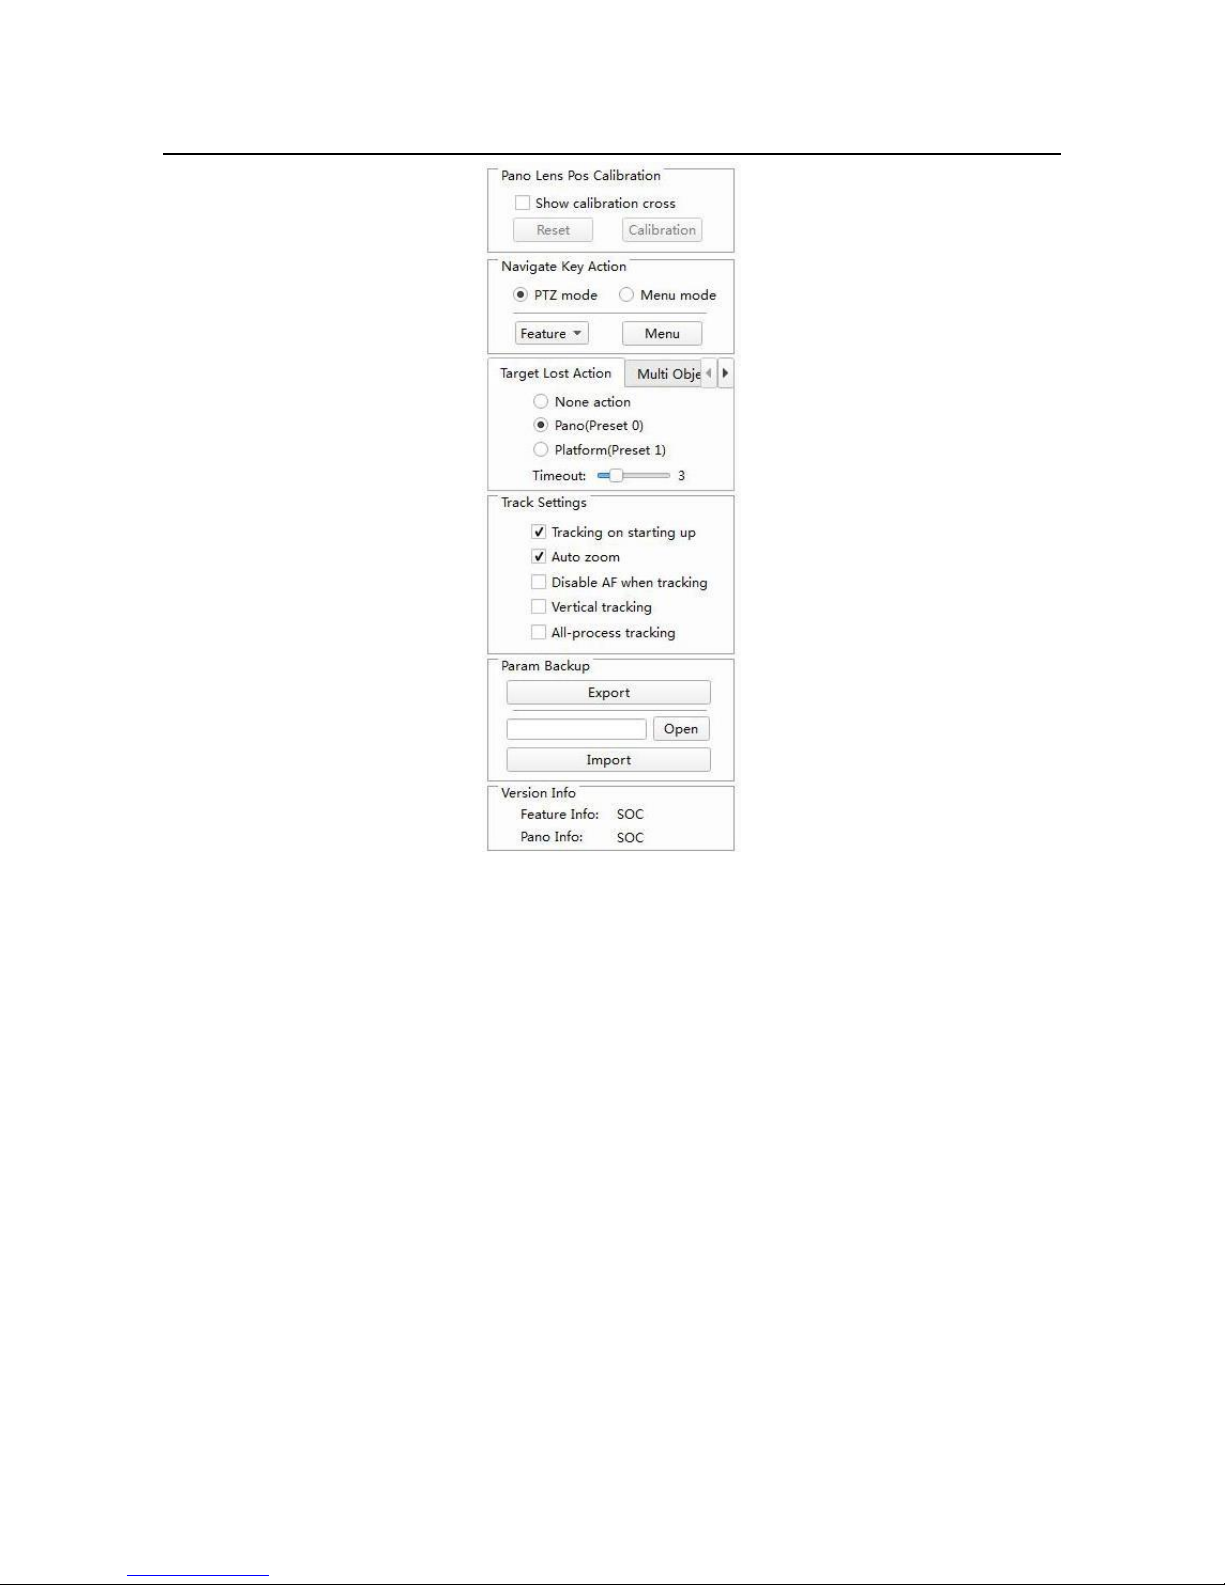
5) Teacher-side advanced parameter configuration
Click the sidebar, and click "Expand" to enter the advanced parameter configuration options
Page 25
ValueHD Corporation
24
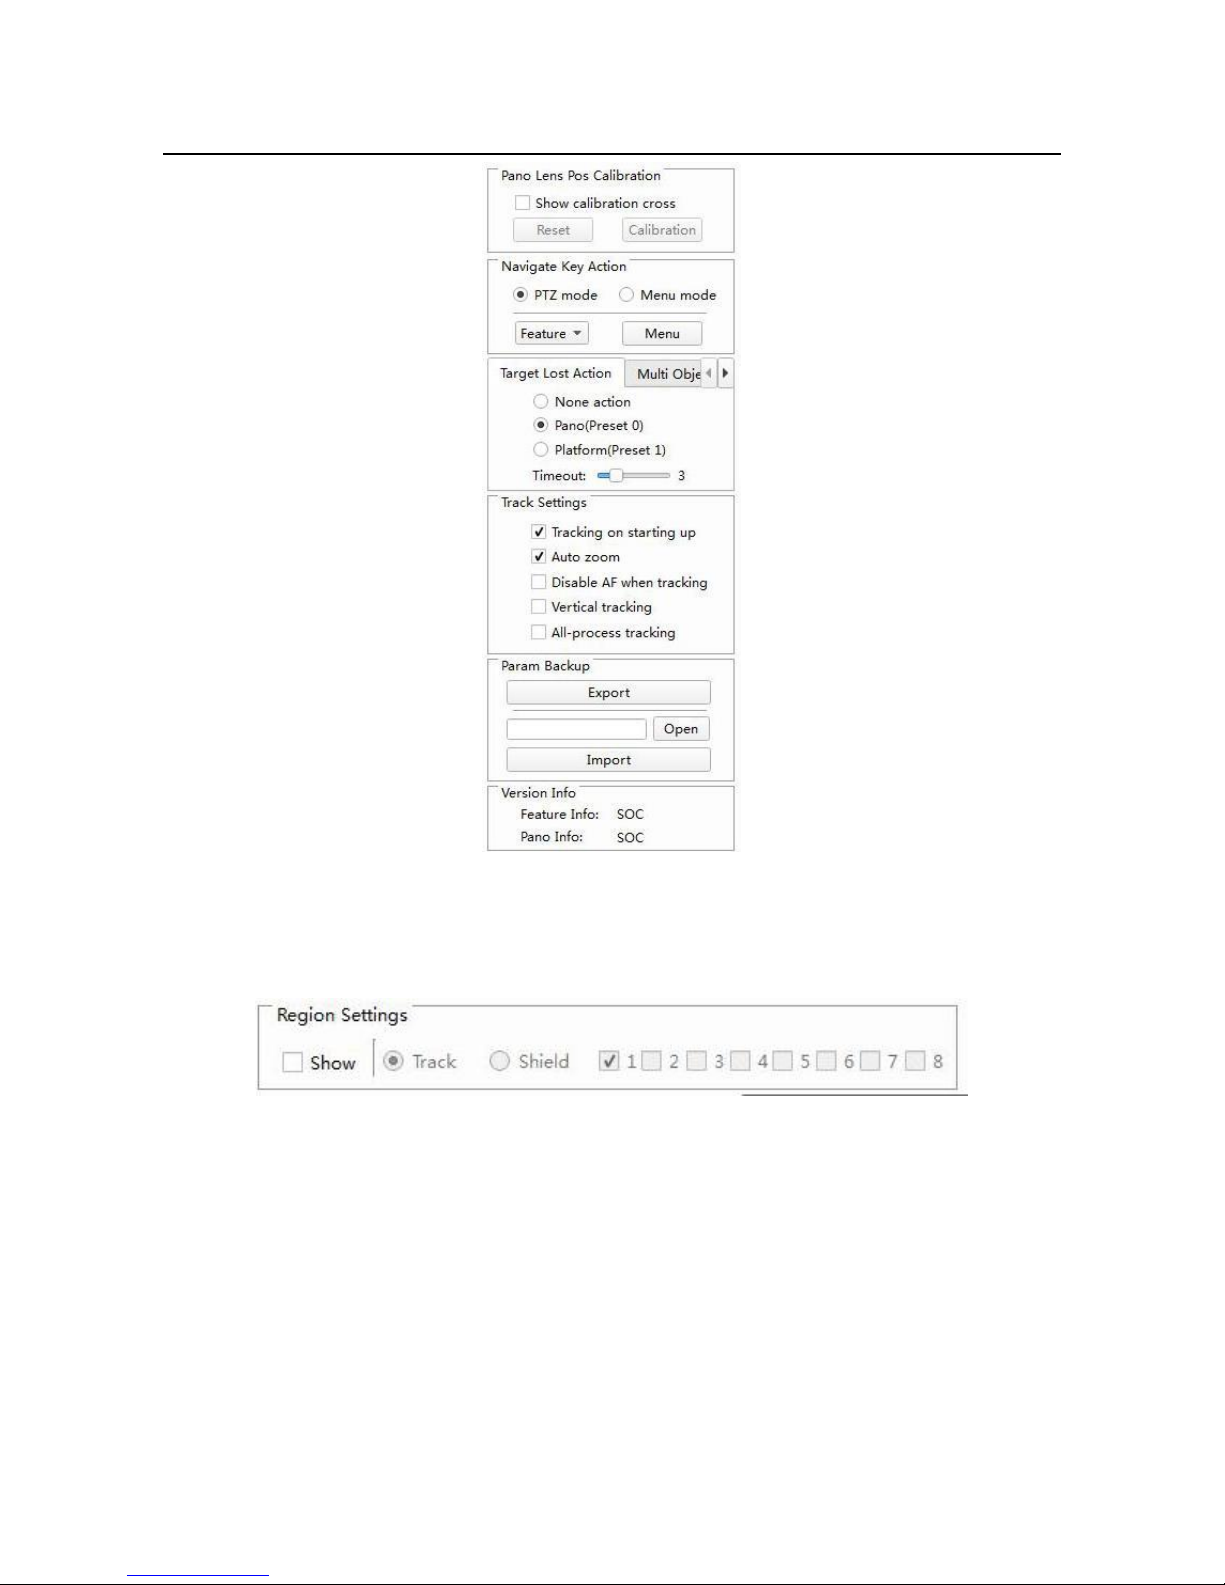
Panorama lens position calibration: Check the "Show Verification Cross", the Close-up /
Panorama preview image display the check icon, and control it up and down by the PTZ to ensure that
the center of the image is coincident with the center of the panorama image, and then click [Check] To
achieve the panorama lens calibration; click [reset], can return to the current calibration location.。
Navigation key function:You can select PTZ mode or menu mode. In the menu mode, select [Close]
or [Panorama], and click the [Menu] button, you can set the special machine's OSD menu; in PTZ mode,
you can manually control the PTZ.
Target lost action:Set the action of the special feature after the loss of the target, you can choose:
no action, the panorama (preset 0), station bit (preset 1);
Timeout time range: 0-15s, default: 3s.
Tracking settings:Set the teacher side of the special machine's work mode, you can choose: boot
tracking, auto zoom, tracking, non-focus, vertical movement, tracking five working mode.
Parameter backup: Used to import and export the configuration parameters of the writer,
simplifying the configuration tasks for the same scene.
Page 26
ValueHD Corporation
25
Version Information:Displays the version information of the writer and panorama.
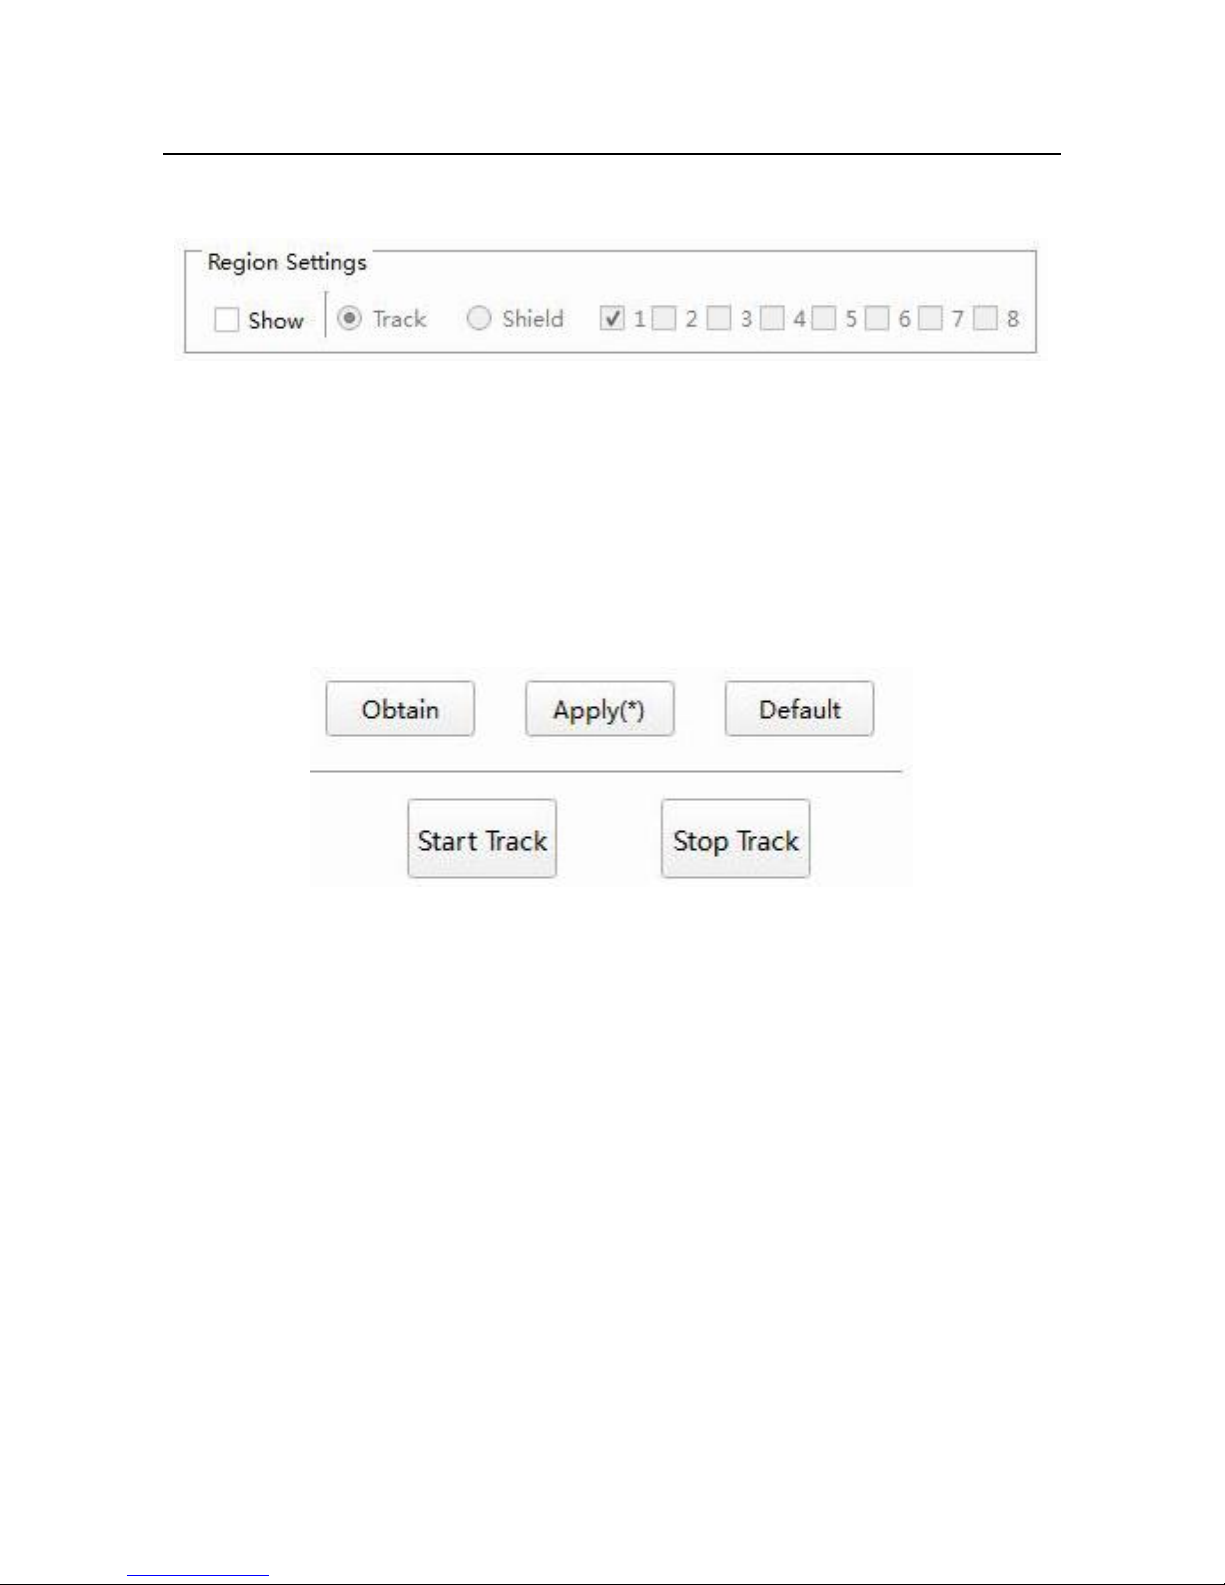
6) Set the shield area
Click [Display] to display the current configuration tracking area and mask area in the preview
image.
Select the [tracking area], the left mouse button click on the preview image, drag any direction, set the
tracking area;
Select the "shield area", check the "√" open the mask to enable, to complete the mask settings; cancel "√"
close the mask to enable, and hide the shield area; shield area support 8;
7) Turn on tracking
Click 【Application (*)】, display as 【Application】, the configuration parameters take effect!
Click 【Get】 to get the current camera configuration parameters;
Click [Default] to restore the default configuration parameters;
Click 【Open Tracking】, the camera enters the automatic tracking state, you can turn off the tracking
configuration tool;
Click [stop tracking], the camera enters the stop tracking state, you can configure the tracking parameters;
2.4 Student side tracking parameter configuration
Page 27
ValueHD Corporation
26
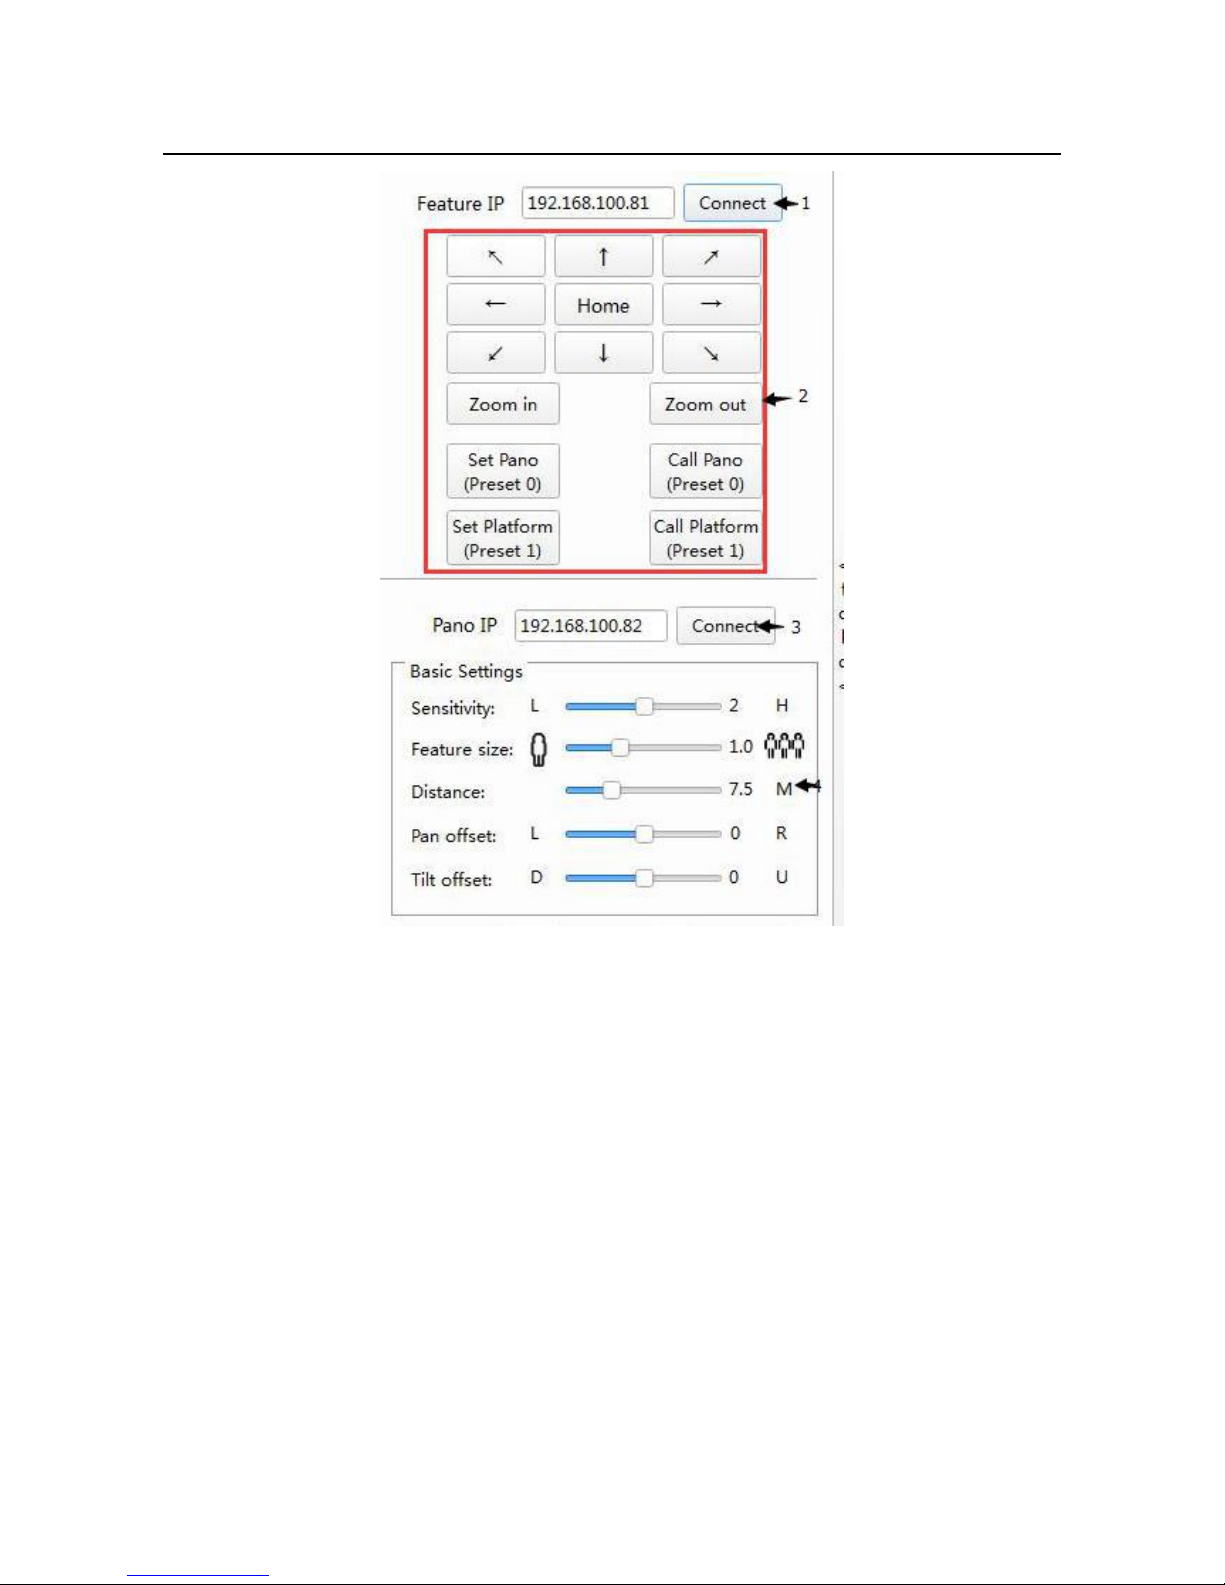
1) Student side tracking parameter configuration
Refer to the teacher side configuration
2) Student side close-up settings
Refer to the teacher side configuration
3) Student end panorama IP address
Refer to the teacher side configuration
4) Student side basic parameter configuration
Camera mounting height:Student camera distance from the ground vertical height, set the range:
1.0 ~ 5.0, the default value of 2.2 meters;
For other parameters please refer to the teacher side configuration;
5) Student advanced parameter configuration
Click the sidebar, and click "Expand" to enter the advanced parameter configuration options
Page 28
ValueHD Corporation
27
Tracking settings:Set the student side of the camera's work mode, select: boot tracking
For other parameters please refer to the teacher side configuration
6) Set the shield area
Student cameras do not need to set the tracking area, outside the shield area belongs to the tracking
area.
Click [Display] to display the currently configured tracking area and mask area in the preview image.
Select the "masked area", check the "√" open mask area enable, select the mask area to be set; cancel "√"
close the mask to enable, and hide the shield area location; shield area support 4.
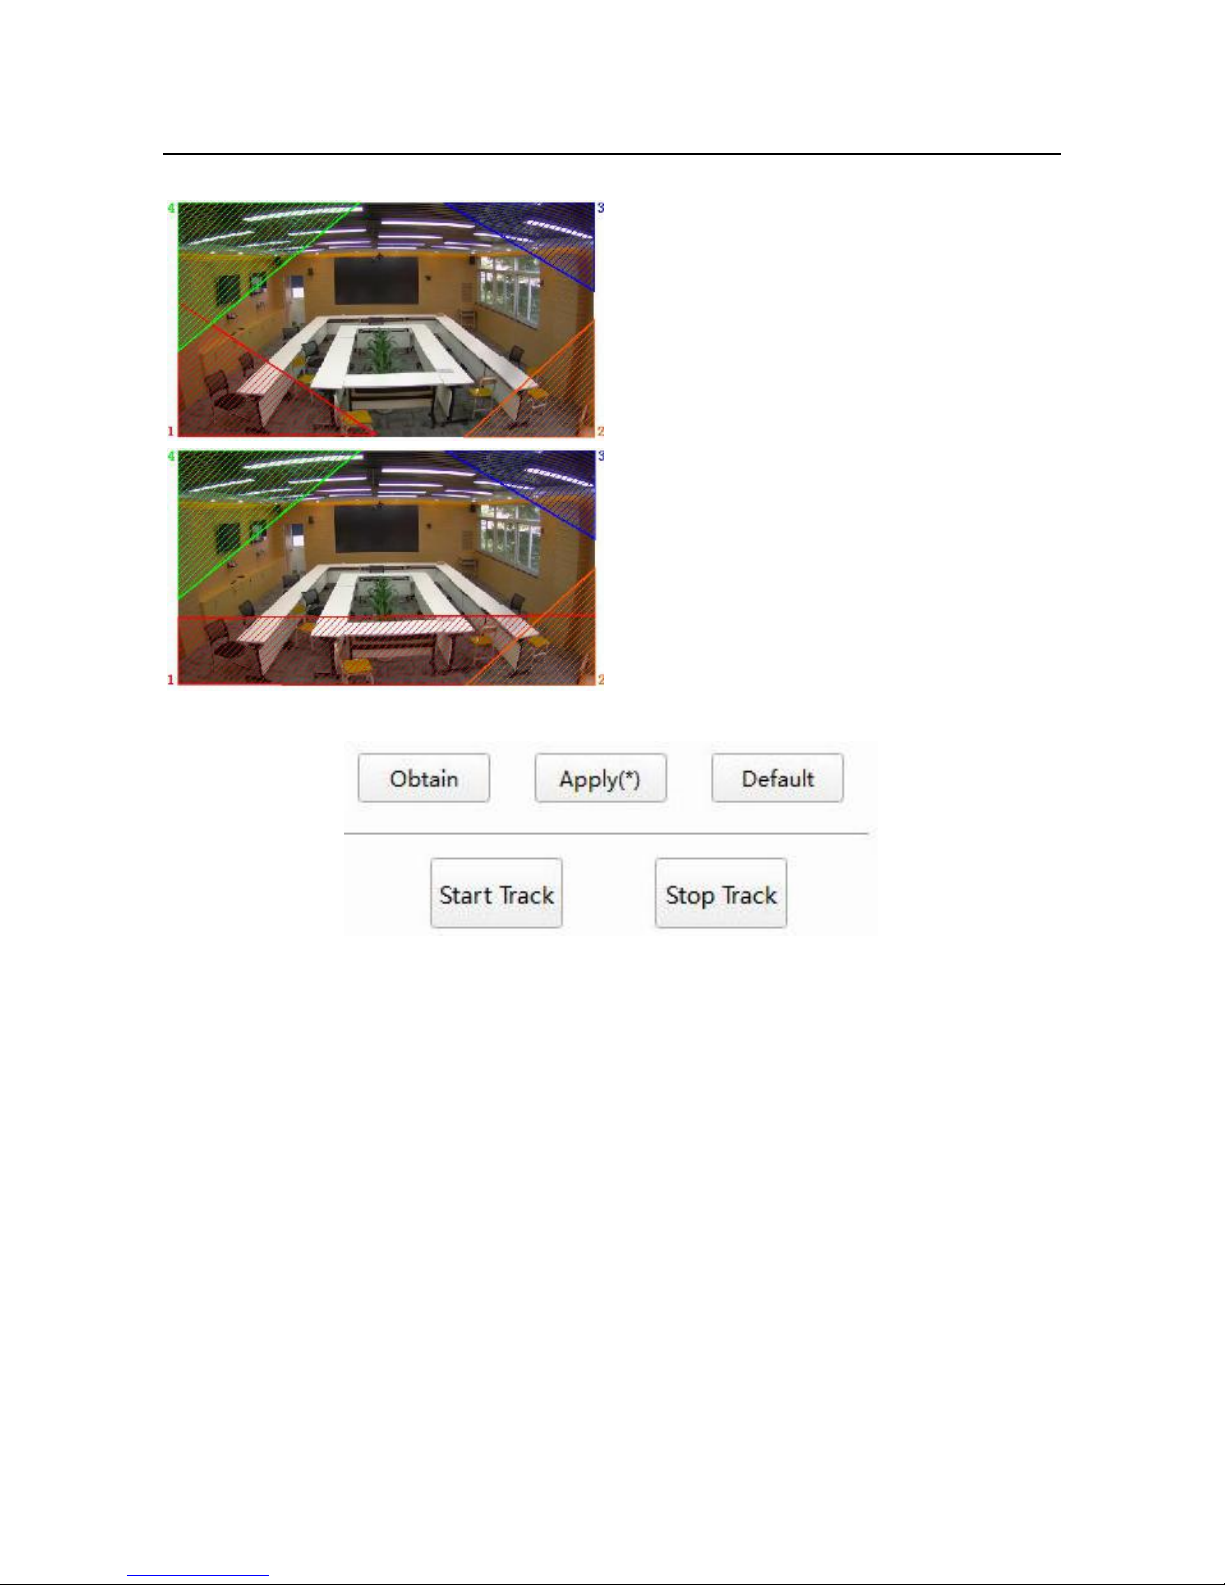
Student side shield area setting method:The shield area is used to shield the edge of the screen
interference source, four shield area number fixed. For example, the starting point of the masked area 1
is located at the left margin of the mask number 1, and the end point is located in the counter-clockwise
Page 29
ValueHD Corporation
28
neighborhood or on the boundary, as shown in the following figure:
7) Turn on tracking
Click 【Application (*)】, display as 【Application】, the configuration parameters take effect!
Click 【Get】 to get the current camera configuration parameters;
Click [Default] to restore the default configuration parameters;
Click 【Open Tracking】, the camera enters the automatic tracking state, you can turn off the tracking
configuration tool;
Click [stop tracking], the camera enters the stop tracking state, you can configure the tracking parameters;
2.5 Board-side tracking parameter settings
Page 30
ValueHD Corporation
29
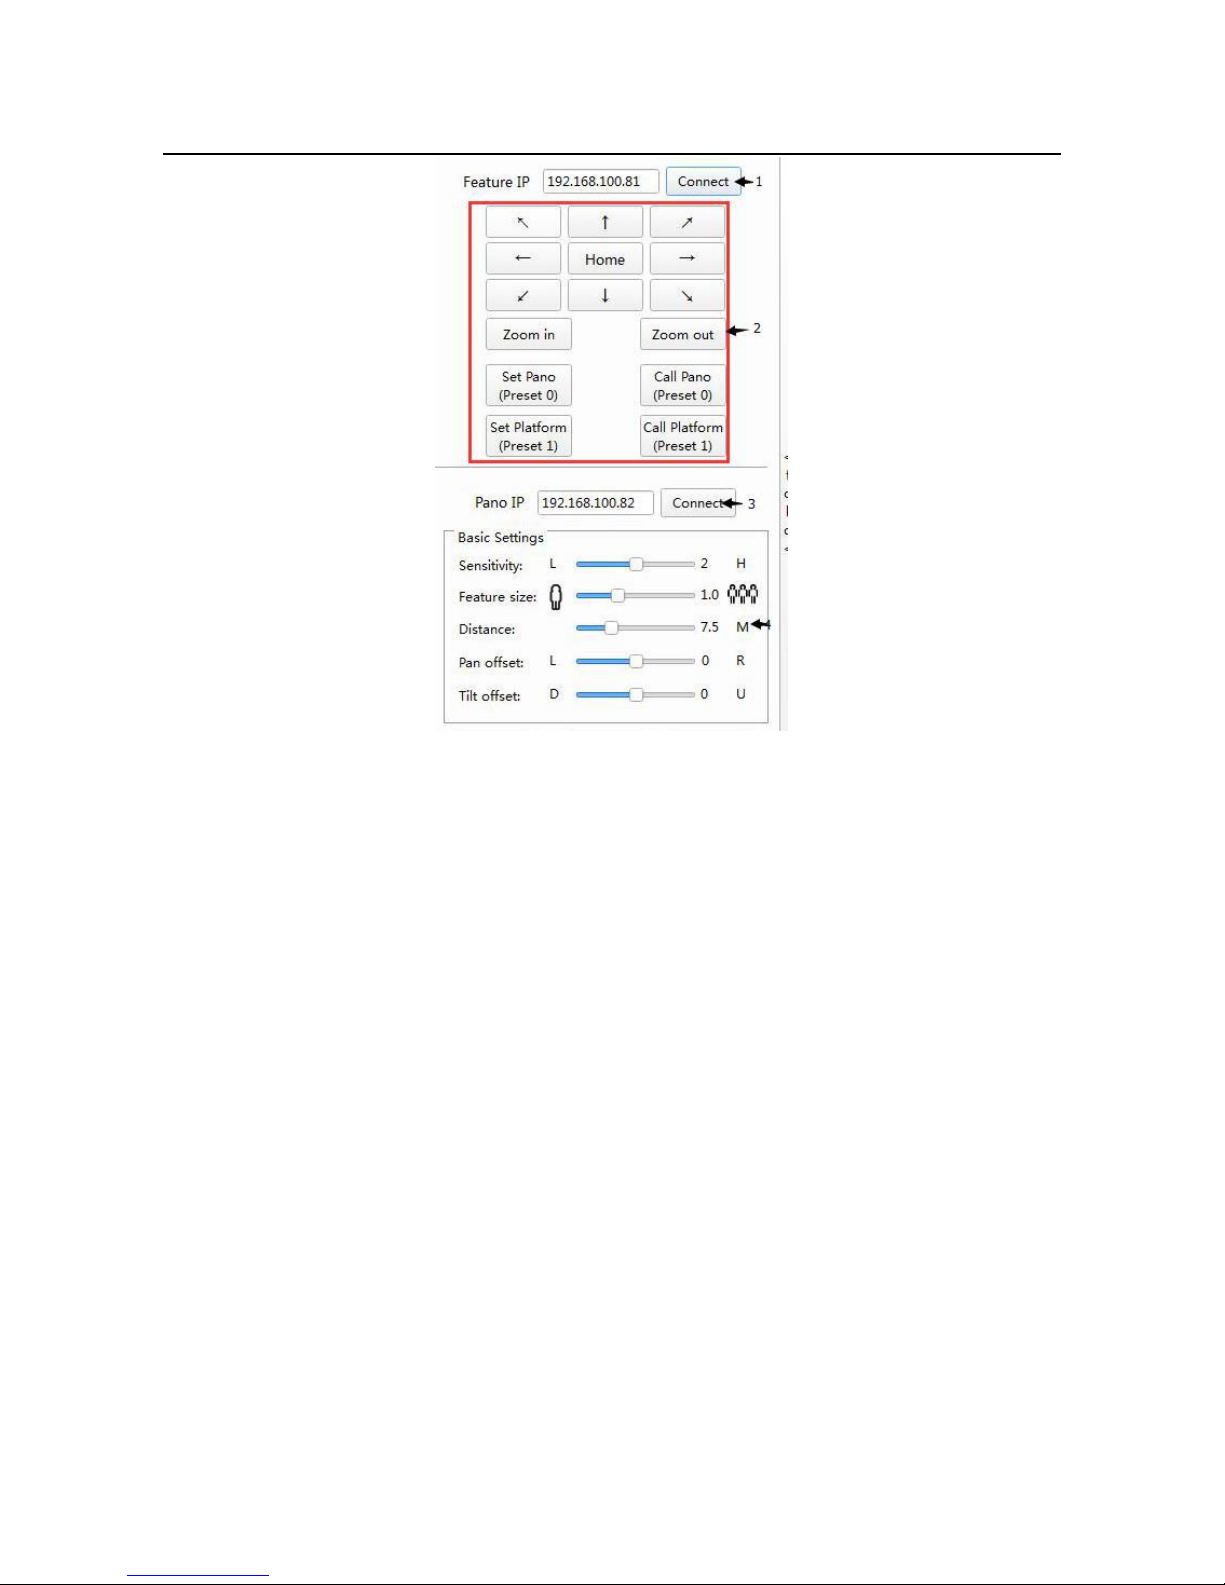
1) Board-side close-up machine IP address
Board-side close-up machine IP address
2) Board-side close-up machine settings
Refer to the teacher side configuration
3) Panorama Panorama IP address
Panorama IP address
4) the basic parameters of the board configuration
Tracking sensitivity:Detection of the sensitivity of the blackboard action, set the range: 0 ~ 4, the
default value of 0;
Timeout: Loss of blackboard action, the delay time after the response;
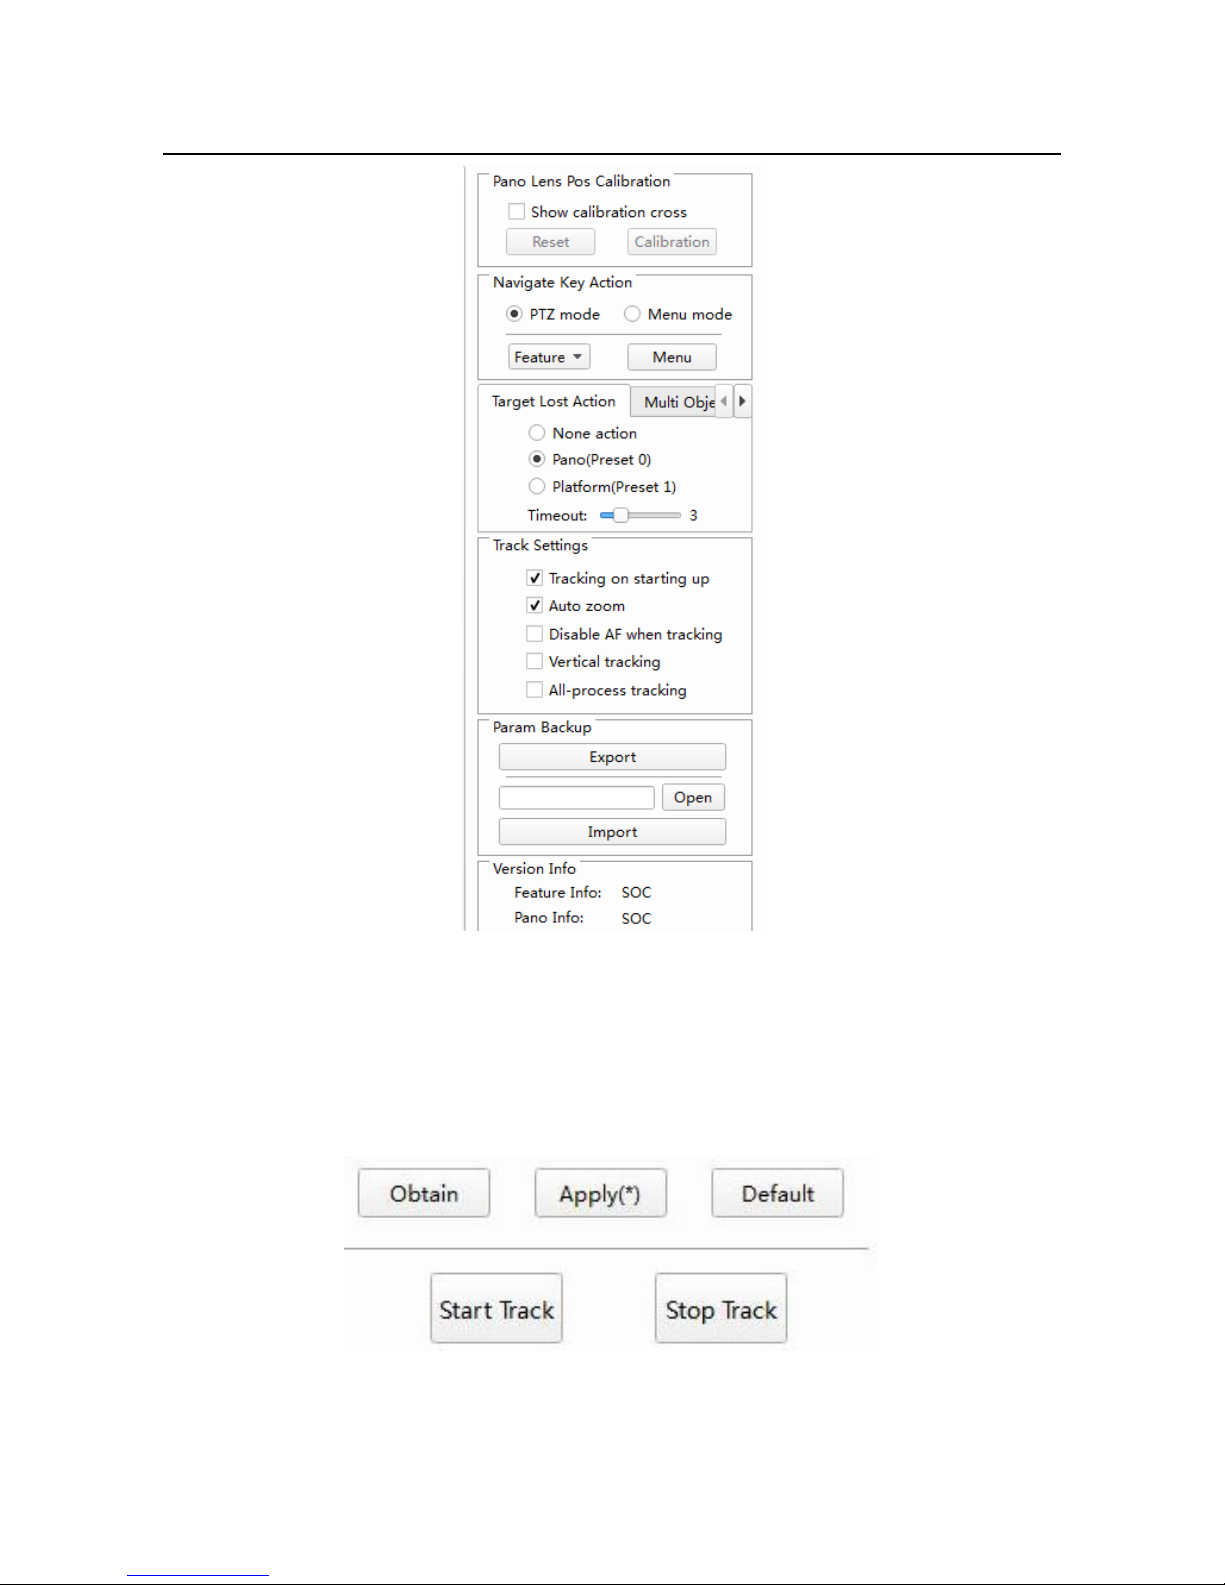
5) Bookboard advanced parameter configuration
Click the sidebar, and click "Expand" to enter the advanced parameter configuration options
Page 31
ValueHD Corporation
30
Board-side enable:Check the "√", open the panel to enable;
Other parameters please refer to the teacher side configuration;
6) Set the shield area
Refer to the teacher side configuration
7) Turn on tracking
Click 【Application (*)】, display as 【Application】, the configuration parameters take effect!
Click 【Get】 to get the current camera configuration parameters;
Page 32
ValueHD Corporation
31
Click [Default] to restore the default configuration parameters;
Click 【Open Tracking】, the camera enters the automatic tracking state, you can turn off the tracking
configuration tool;
Click [stop tracking], the camera enters the stop tracking state, you can configure the tracking parameters;
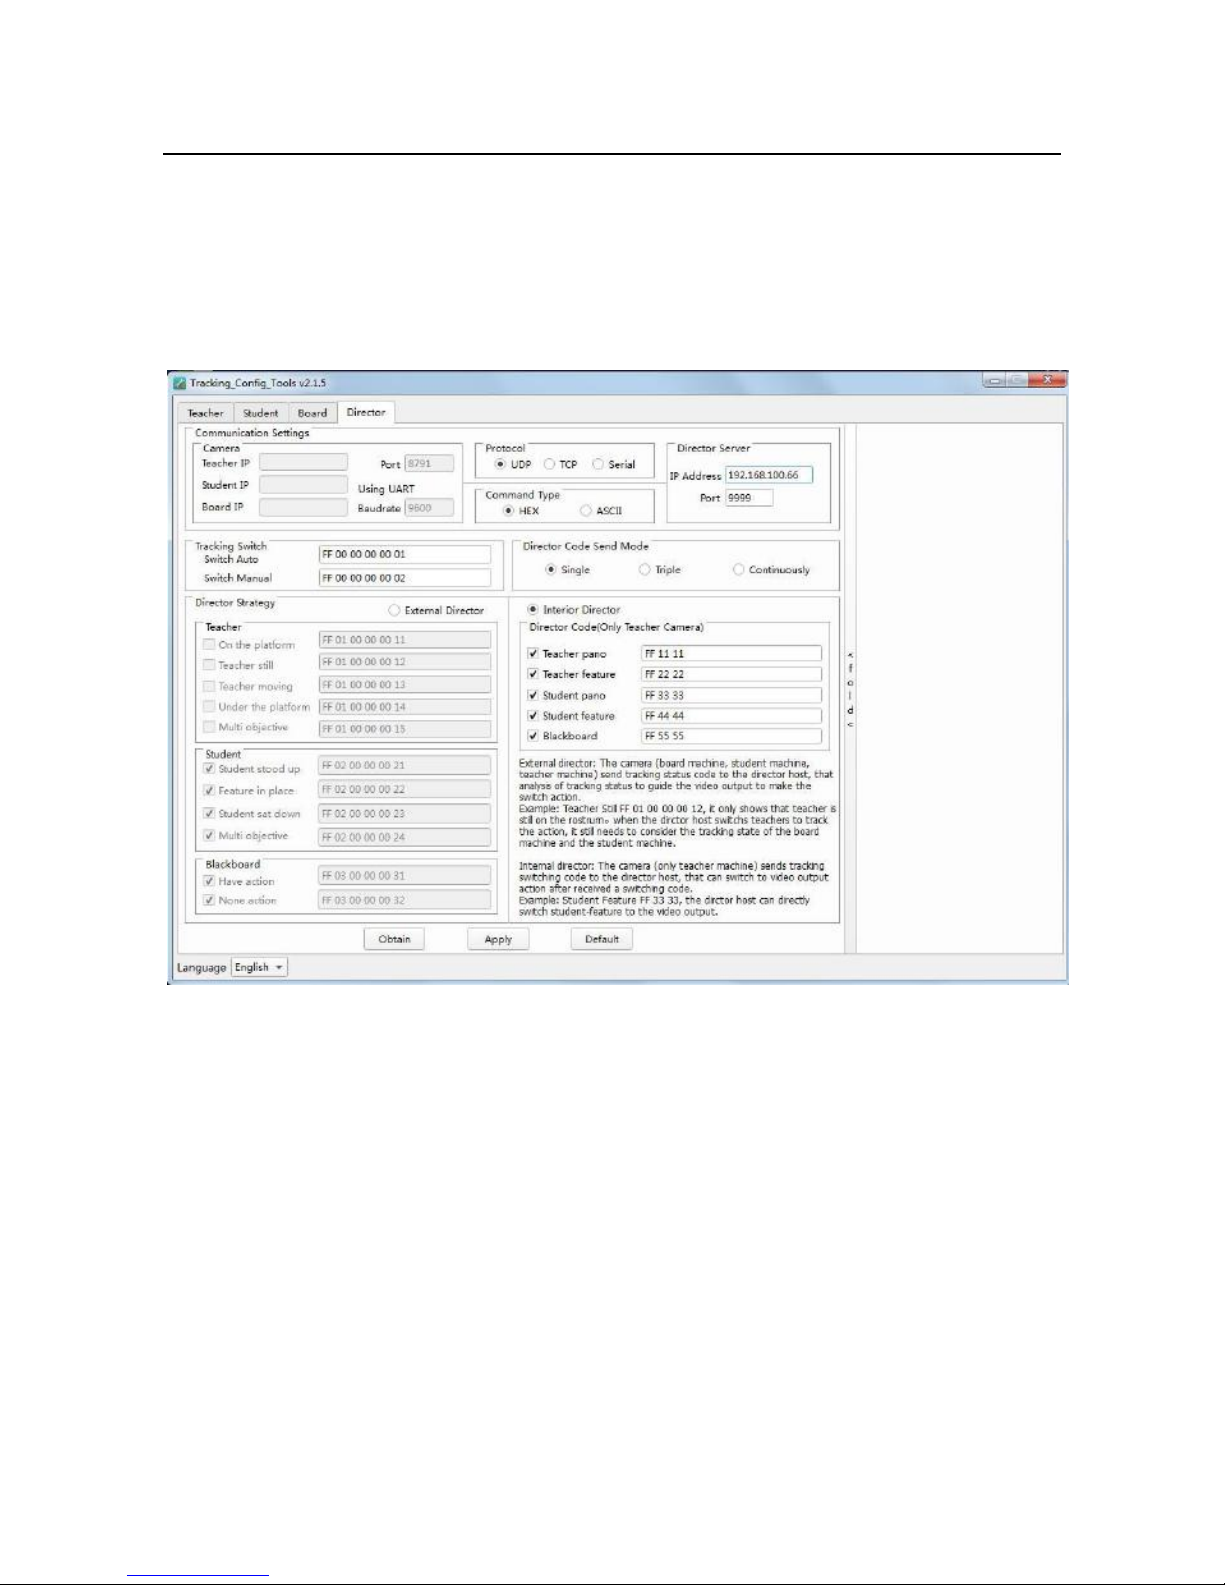
8) Director-side tracking parameter settings
The communication terminal is used to configure the communication parameters between the teacher
and the host computer, Command and so on.
1) Communication settings
Camera communication address setting
Teacher address:Show the IP address of the teacher-side panorama machine, can not be
modified.
Student address:Show the IP address of the student side panorama machine, can not be
modified.
Bookboard address:The IP address of the Panorama machine can not be modified.
Port:When the communication protocol chooses UDP, it receives the port number of the master
control command. The default value is 8791, which can not be changed.
Page 33

ValueHD Corporation
32
Baud rate:Communication protocol Select the serial port, the serial port baud rate is 9600K bps,
can not be modified.
Protocol:Camera and recording and broadcasting host communication between the serial port or
network, need to select UDP, TCP and a serial port, the default selection: UDP.
Instruction format:The communication command format between the camera and the master
station supports the choice of hexadecimal or string format, and all status codes are set freely. The
default format is hexadecimal.
Broadcasting server:Used to configure the IP address of the master host and the port number of
the receiving command. Address Default: 192.168.100.200, port default: 3456.
Tracking switch
Switch automatically: the camera receives the [Switch Auto] command, the tracking mode
switches to automatic, default: ff 00 00 00 00 01, can be modified.
Switch manual: the camera receives the [switch manual] command, the tracking mode is switched
to manual, the default value: ff 00 00 00 00 02, can be modified.
Broadcasting code send mode
Select the number of times to send the guide code, selectable: only send once, repeat three times,
continue to send.
Broadcasting strategy
You can choose [external broadcasting] and [internal broadcasting] one of them, the default is
[internal broadcasting].
Outside Broadcasting:There are two states (there is action, no action), student machine has four
states (students standing, close-up in place, the students have three kinds of status, Students sit down,
multi-target), the teacher machine has five states (on the podium, still, move, the next podium, multi-
target), recording and broadcasting host needs to receive the status of the three cameras to guide, for
example, when the teacher on the rostrum When switching to the teacher close-up picture, the teacher
when the platform to switch to the student panorama picture; when the student close-up when the switch
to the student close-up screen, when the student multi-target switch to the student panorama picture.
Internal broadcasting:Teacher camera will receive the current state of the blackboard, students,
teachers, and from high to low priority to the recording and broadcasting host to send the switch code,
recording and broadcasting host to receive the switch code directly after the instructions can be directed
to the screen, The recording and broadcasting host does not need to judge the current status. That is, the
Page 34
ValueHD Corporation
33
first blackboard when there is action, send a blackboard to switch code, blackboard no action, to
determine whether there is action in the student area, and finally judge the teacher action. For example,
when the teacher is not in the platform area or is moving, send the teacher panorama switch code, the
teacher in the podium area and still, send the teacher special code, if the student stands up, first send
students panoramic switch code, students close the machine in place, send students Close-up of the
code, the students sit down or stand out (30s-60s) and return to the teacher's picture.
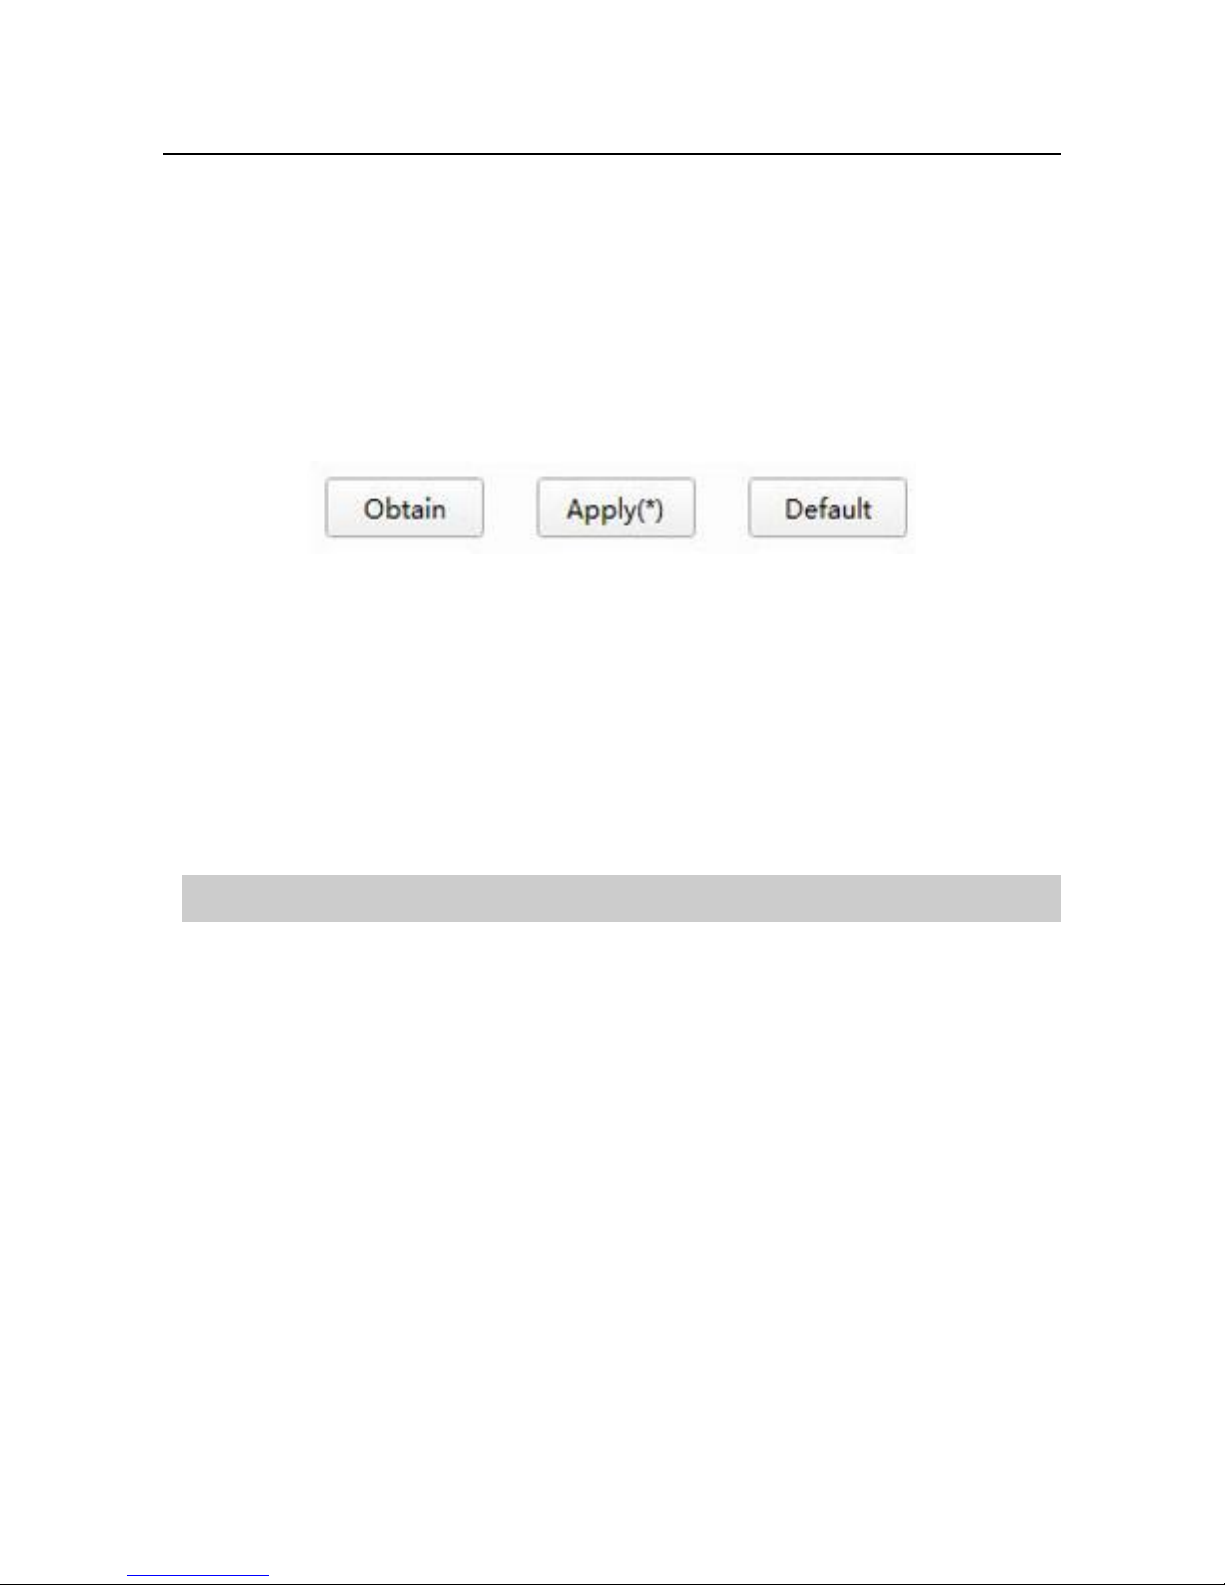
2) Apply configuration parameters
Click 【Application (*)】, display as 【Application】, the configuration parameters take effect!
Click 【Get】 to get the current configuration parameters
Click [Default] to restore the default configuration parameters;
prompt!
Set the parameters of the pilot side, select [Get] to obtain the current parameters, [Application] to make
the settings take effect, [default] to restore the default value.
Network Function
This description mainly introduces the special machine network, panoramic machine network
description is not introduced.
1. Go to the web interface
View the camera IP:
Cable and computer connection, I can use the camera to upgrade the software to find the machine IP.
(For software, please contact the manufacturer to obtain)
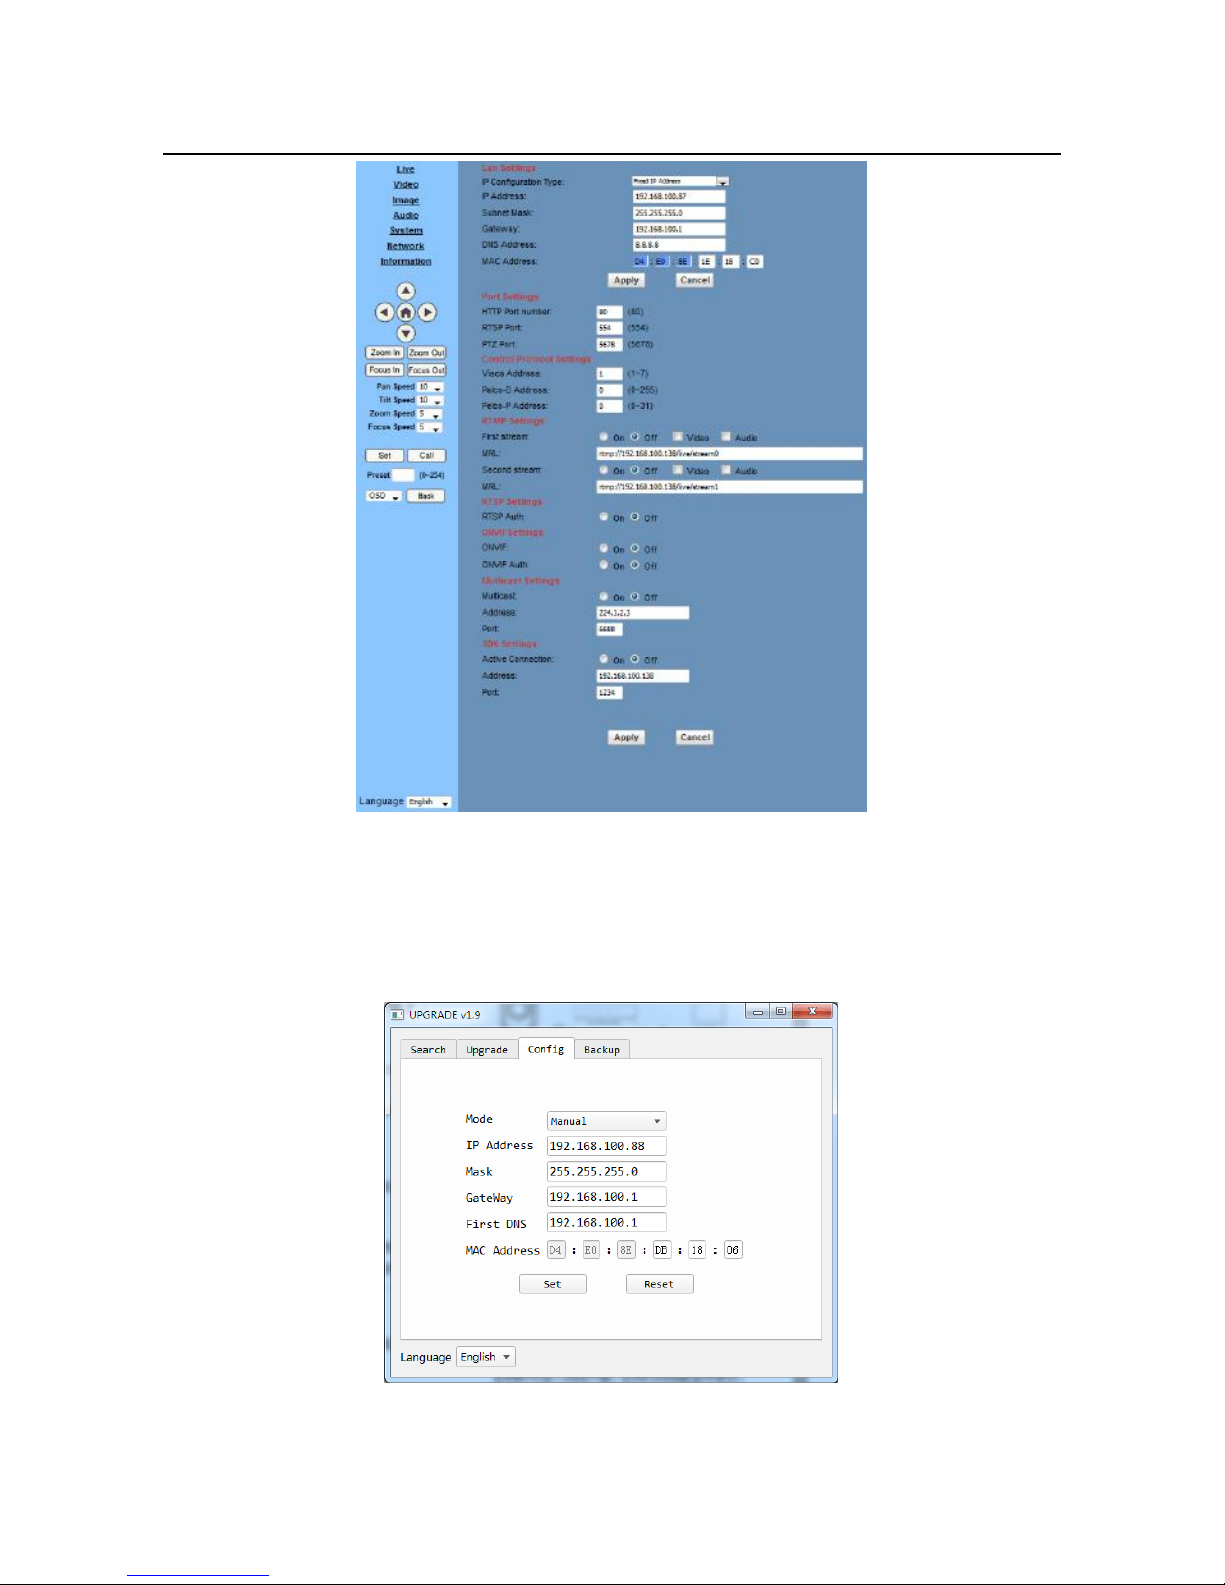
In the browser input camera IP, fill in the user name and password, you can enter the network interface.
2. To change the camera IP, there are two ways:
Method 1: Change the web page configuration item, click Apply, and then restart the camera
Page 35
ValueHD Corporation
34
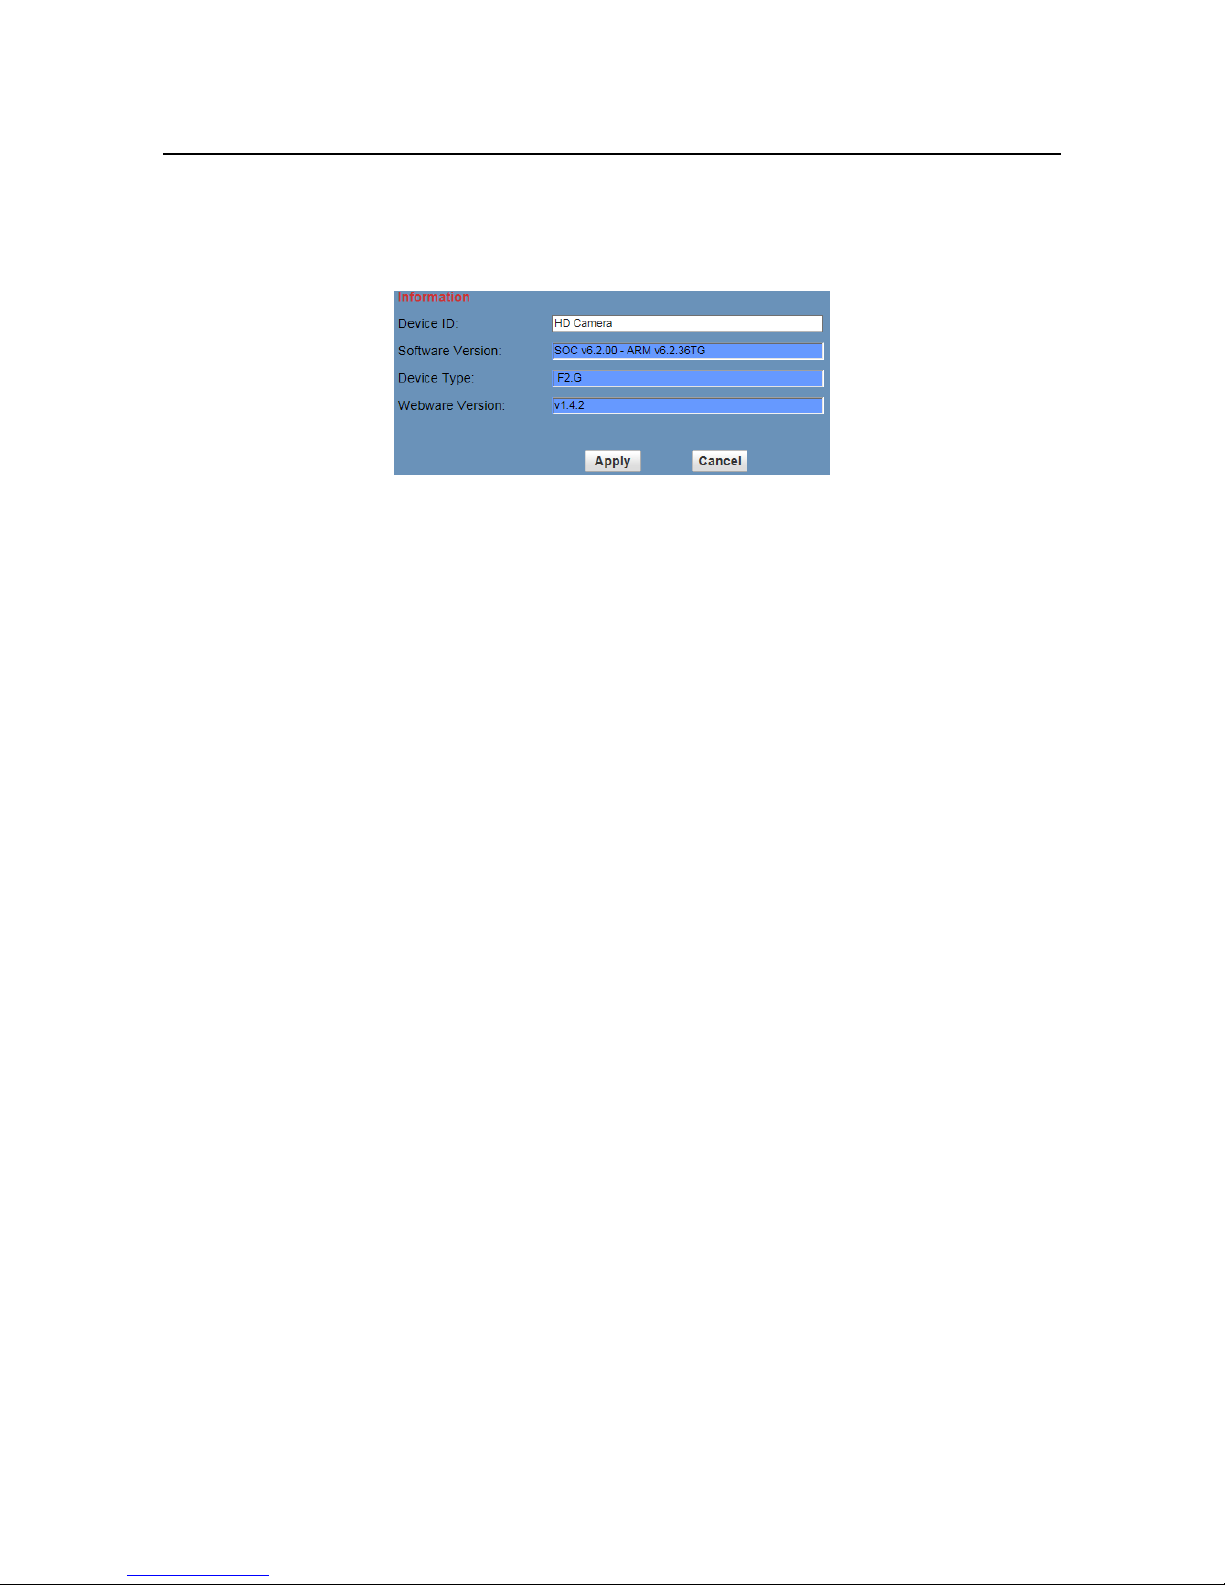
Method 2: In the Division I camera upgrade software configuration items to modify, and then click
Settings:
3. After changing the camera IP need to restart the camera,
Page 36
ValueHD Corporation
35
There are two ways:
Method 1: Manual power off
Method 2: Click on the page system configuration item to restart (for remote)
Operation tips
Teacher machine factory default IP:
1、Close-up machine 192.168.100.81
2、Panorama machine 192.168.100.82
Student machine factory default IP:
1、Close-up machine 192.168.100.91
2、Panorama machine 192.168.100.92
Network upgrade program download instructions.
For camera upgrade procedures, please contact the manufacturer.
Page 37

ValueHD Corporation
36
Menu settings
This description mainly describes the special
machine menu, panoramic machine menu only to
explain the difference.
1. Main menu
Press the {MENU} key in the normal image to
display the menu contents, and use the scroll arrow
cursor (hereinafter referred to as the cursor) to point
to the selected item. Press the [HOME] key to enter
the corresponding submenu.
Attention:
Communication settings, P / T / Z: Panorama
machine without this menu
Message: The writer has no such menu
2. EXPOSURE
Move the cursor to the Exposure item in the
main menu and press [home] button, EXPOSURE
menu appears, as shown in the following figure.
Exposure Mode: Can be set: Auto, Manual,
Shutter Priority, Aperture Priority, Brightness
Priority
Exposure Compensation: Can be set: On, Off.
(Valid only in automatic mode)
Compensation level: can be set items: -7 ~ 7.
(Valid only when exposure compensation is on)
Backlight: Can be set: On, Off. (Valid only in
automatic mode)
Brightness: Can be set: 0 ~ 17 (only valid in
brightness priority mode)
Menu
exposure
Colour
Image
P / T / Z
Noise suppression
Set up
Communication settings
Restore Defaults
[Home] Confirm
[Meun] Exit
Exposure
Mode auto
Exposure compensation off
Backlight off
Gain limit
Anti-flicker 50Hz
Metering average
Dynamic range 2
Select the option
Modify
[Menu] return
Page 38

ValueHD Corporation
37
Gain Limit: Can be set: 0 ~ 15. (Valid only in
auto, aperture and brightness modes)
Anti-flicker: can be set items: off, 50Hz, 60Hz.
(Valid only for automatic and brightness priority)
Aperture: Can be set: F1.8, F2.0, F2.4, F2.8,
F3.4, F4.0, F4.8, F5.6, F6.8, F8.0, F9.6, F11.0, off.
(Valid only for manual and aperture priority)
Shutter: 1 / 30,1 / 60,1 / 90,1 / 100,1 / 125,1 /
180,1 / 250,1 / 350,1 / 500,1 / 725,1 / 1000, 1 /
1500,1 / 2000,1 / 3000,1 / 4000,1 / 6000,1 / 10000.
(Valid only for manual and shutter priority)
Metering: can be set items: average, center,
bottom, top (panoramic machine without this)
Dynamic range: dynamic range strength, can
be set items: 0 ~ 8.
Lens aperture: can be set items: manual, DC
(close-up machine without this menu)
3. Colour
Move the cursor to "Color" in the main menu
and press the [HOME] key to enter the color page,
as shown in the following figure.
White balance mode (close-up machine): can
be set items: automatic, indoor, outdoor, one-button,
manual
White balance mode (panoramic machine):
can be set: automatic, 3000K / indoor, 4000K,
5000K / outdoor, 6500K-1, 6500k-2,6500K-3, onebutton, manual
Red Gain: Can be set: 0 ~ 255. (Valid only in
manual mode)
Blue Gain: Can be set: 0 ~ 255. (Valid only in
manual mode)
Red fine: Can be set: -10 ~ 10 (valid only in
white balance sensitivity low mode)
Blue Trim: Can be set: -10 ~ 10 (valid only in
white balance sensitivity low mode)
Saturation: can be set: 60% to 200%.
Hue: Can be set: 0 ~ 14
Colour
White balance mode is automatic
Red fine tune +2
Blue fine 0
Saturation 100%
Hue 7
White balance is low sensitivity
Select the option
Modify
[Menu] Return
Page 39

ValueHD Corporation
38
White Balance Sensitivity: Can be set: High,
Medium, Low
4. Image
Move the cursor to "Image" in the main menu
and press the [HOME] key to enter the image page,
as shown in the following figure.
Brightness: Can be set: 0 ~ 14
Contrast: Can be set: 0 ~ 14
Sharpness: Can be set: Auto, 0 ~ 15
Horizontal Flip: Can be set: On, Off
Vertical Flip: Can be set: On, Off
Black and white mode: can be set: open, off
Gamma: Can be set: Default,
0.45,0.5,0.56,0.63
Style: Can be set items: standard, clear, bright,
soft, 5S
Distortion correction: can be set items: open,
off (close-up machine without this menu)
Note:
1080p60 and 1080p50 do not support
distortion correction.
5.P/T/Z(Only have a special machine)
Move the cursor to "P / T / Z" in the main menu and
press the [HOME] key to enter the image page as
shown in the following figure.
Depth of field ratio: can be set items: open, off.
Focus area: Can be set: Top, center, bottom.
Focus Sensitivity: Can be set: Low, Normal,
High.
Image
Brightness 7
Contrast 7
Sharpness 2
Horizontal flip off
Vertical flip off
Black and white mode off
Gamma acquiescence
Style clear
Select the option
Modify
[Menu] Return
P/T/Z
Depth of field ratio open
Focus the center of the area
Focus sensitivity High
Set the around Standard
Show information on
Imagen frozen off
Digital zoom off
Select the option
Modify
[Menu] Return
Page 40

ValueHD Corporation
39
Left and right settings: can be set items:
standard, reverse.
Adjust the image when the setting is frozen:
Can be set: On, off.
Display information: Can be set: On, Off.
Digital zoom: settable items: off, 2x, 4x, 8x,
16x.
6. Noise suppression
Move the cursor to "Noise Suppression" in the main
menu and press the [HOME] key to enter the Noise
Suppression page, as shown in the following figure.
NR2D-Level: 2D noise reduction. Optional
items: Off, Auto, 1 ~ 5
NR3D-Level: 3D noise reduction. Optional
items: Off, 1 ~ 8
D-HotPixel: Dynamic bad points, Optional
items: Off, 1 ~ 5(Close-up machine has no that
option)
7. SETUP
Move the cursor to the Setup item in the main
menu and press [home] button, SETUP menu
appears, as shown in the following figure.
Language: Can be set: Chinese, English,
Russian.
DVI mode: Can be set: DVI, HDMI
(Panorama machine without this menu)
Lens: Can be set: Type 1, Type 2
The Panorama Setup page is shown in the
following figure:
Noise suppression
2DNoise reduction 3
3DNoise reductio 3
Dynamic bad points off
Select the option
Modify
[Menu] Return
Setting
Language Chinese
DVI mode DVI
Lens Type 2
Select the option
Modify
[Menu] Return
Page 41
ValueHD Corporation
40
Protocol: Can be set: Auto, VISCA, PELCO-
D,
PELCO-P.
VISCA Address: Can be set: 1 ~ 7 (close-up
machine without this menu)
Video format: Can be set: 1080P25, 1080P30,
1080P50,1080P60,1080I50,1080I60,720P50,720P
60 (close-up machine without this menu)
Electronic head: can be set items: open, off
(close-up machine without this menu)
V address fixed: can be set items: off, open.
When the "On" is selected, the 88 30 01 FF
command does not work (Panorama does not have
this menu)
Networking mode: Set the serial control mode
of the serial port control. You can set items: series,
parallel (no panorama machine)
Tracking mode: can be set items: teachers,
students (close-up machine without this menu)
8. Communication settings (only Zoon)
Move the cursor to "Communication Settings" in
the main menu and press the [HOME] key to enter
the setup page, as shown in the following figure.
Protocol: Can be set: Auto, VISCA, PELCO-
D,
PELCO-P.
V address: according to the agreement to set,
automatic, VISCA under
Can be set items: 1 ~ 7.
P_D Address: PELCO-D can be set under the
items: 0 ~ 254.
P_P Address: PELCO-P can be set under the
items: 0 ~ 31.
Baud rate: can be set items: 2400,4800, 9600
Setting
Language Chinese
Protocol VISCA
VISCA address 1
Baud rate 9600
Video format 1080P30
Tracking model teacher
Return
Communication settings
Protocol VISCA
V address 1
V address fixed off
Networking mode Series
Baud rate 9600
Select the option
Modify
[Menu] Return
Page 42

ValueHD Corporation
41
9. Information(Only the panorama has)
In the main menu, move the cursor to "Info" and press the
[HOME] key to enter the information page, as shown in the
following.
10. Reset
In the main menu, move the cursor to "Restore
Default" and press the [HOME] key to enter the
Restore Default page, as shown in the following
figure
Restore Default: Confirm Restore factory
settings, set items: Yes, No, Note: Press 【HOME】
key to confirm.
Note:
Restore factory settings will restore all
parameters, including remote control address and
serial port address
Information
Version 6.2.11
Model H2.V
Date 2016-12-29
IP 192.168.100.51
Gateway 192.168.100.1
Subnet mask 255.255.255.0
Return
Restore Defaults
Restore Default? No
Modify
[Home] Confirmation
[Menu] return
Page 43
ValueHD Corporation
42
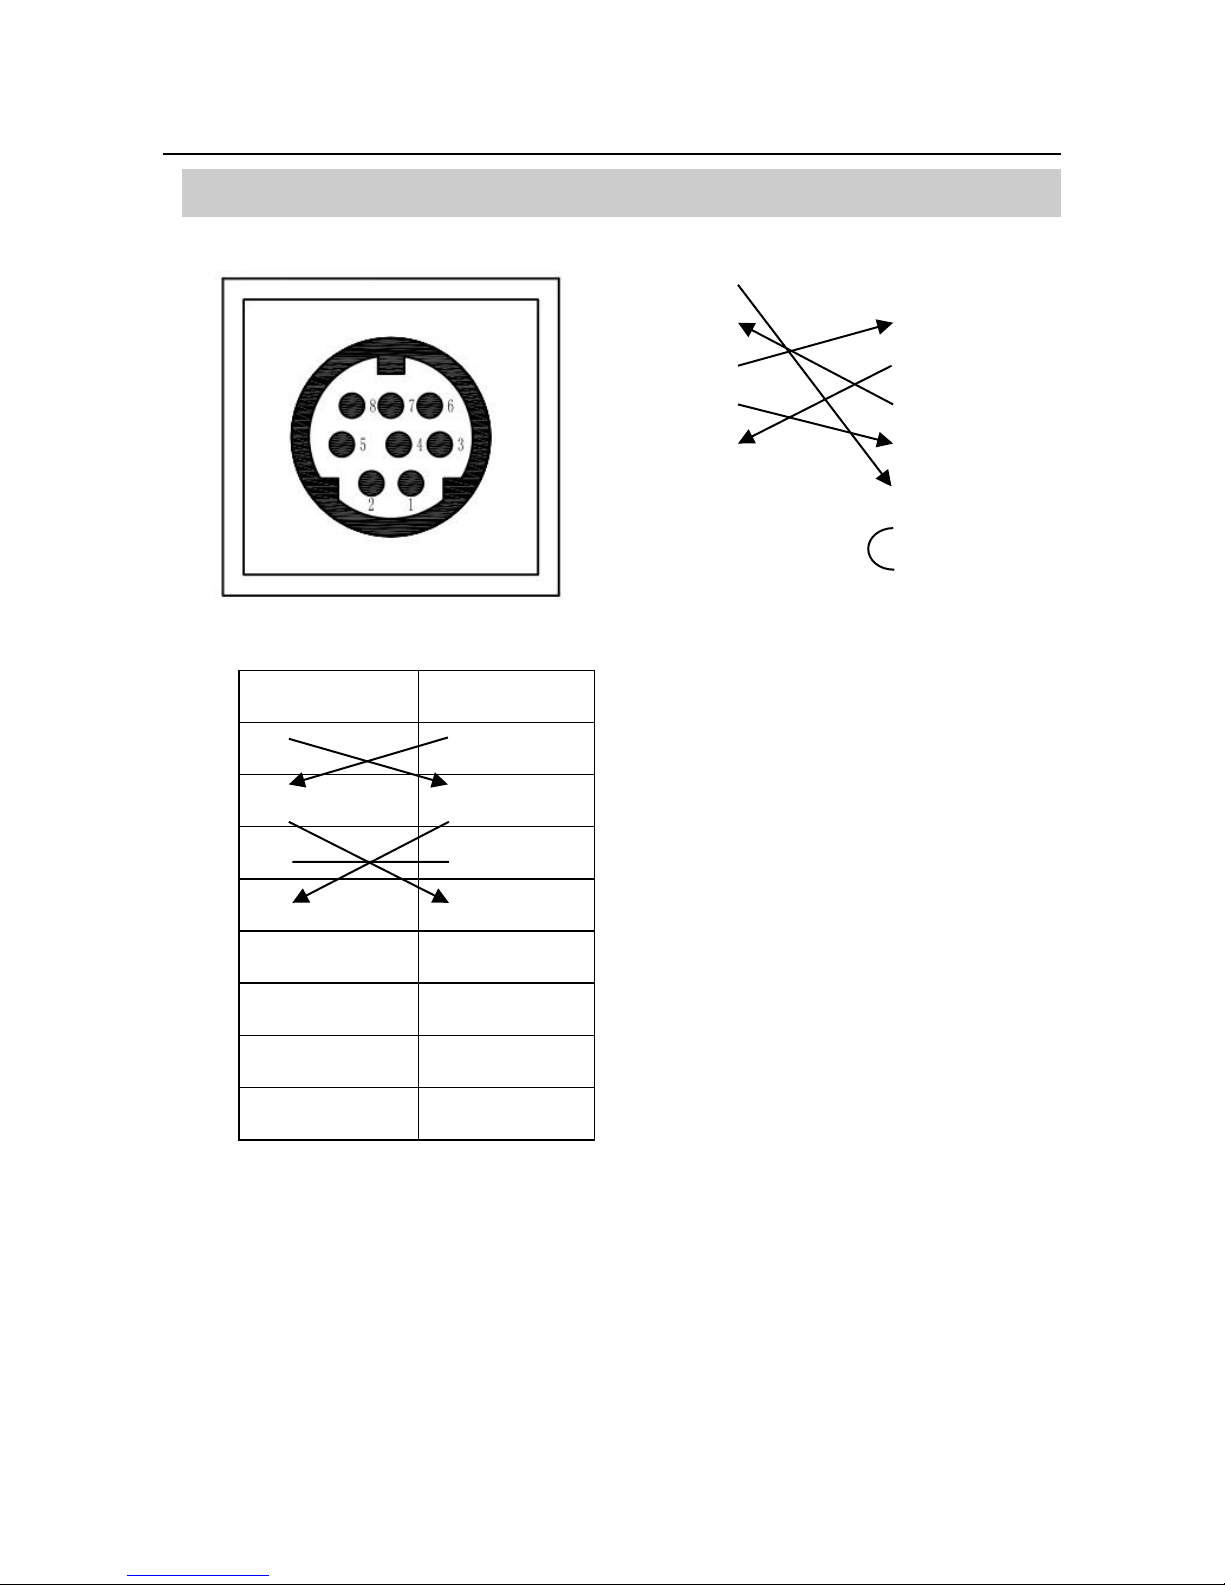
RS-232 Interface
Camera Windows DB-9
1. DTR 1.CD
2. DSR 2.RXD
3. TXD 3.TXD
4. GND 4.DTR
5. RXD 5.GND
6. GND 6.DSR
7. IR OUT 7.RTS
8. NC 8.CTS
9. RI
Camera Mini DIN
1. DTR 1.DTR
2. DSR 2.DSR
3. TXD 3.TXD
4. GND 4.GND
5. RXD 5.RXD
6. GND 6.GND
7. IR OUT 7.NC
8. NC 8.NC
No.
Function
1
DTR
2
DSR
3
TXD
4
GND
5
RXD
6
GND
7
IR OUT
8
NC
Page 44
ValueHD Corporation
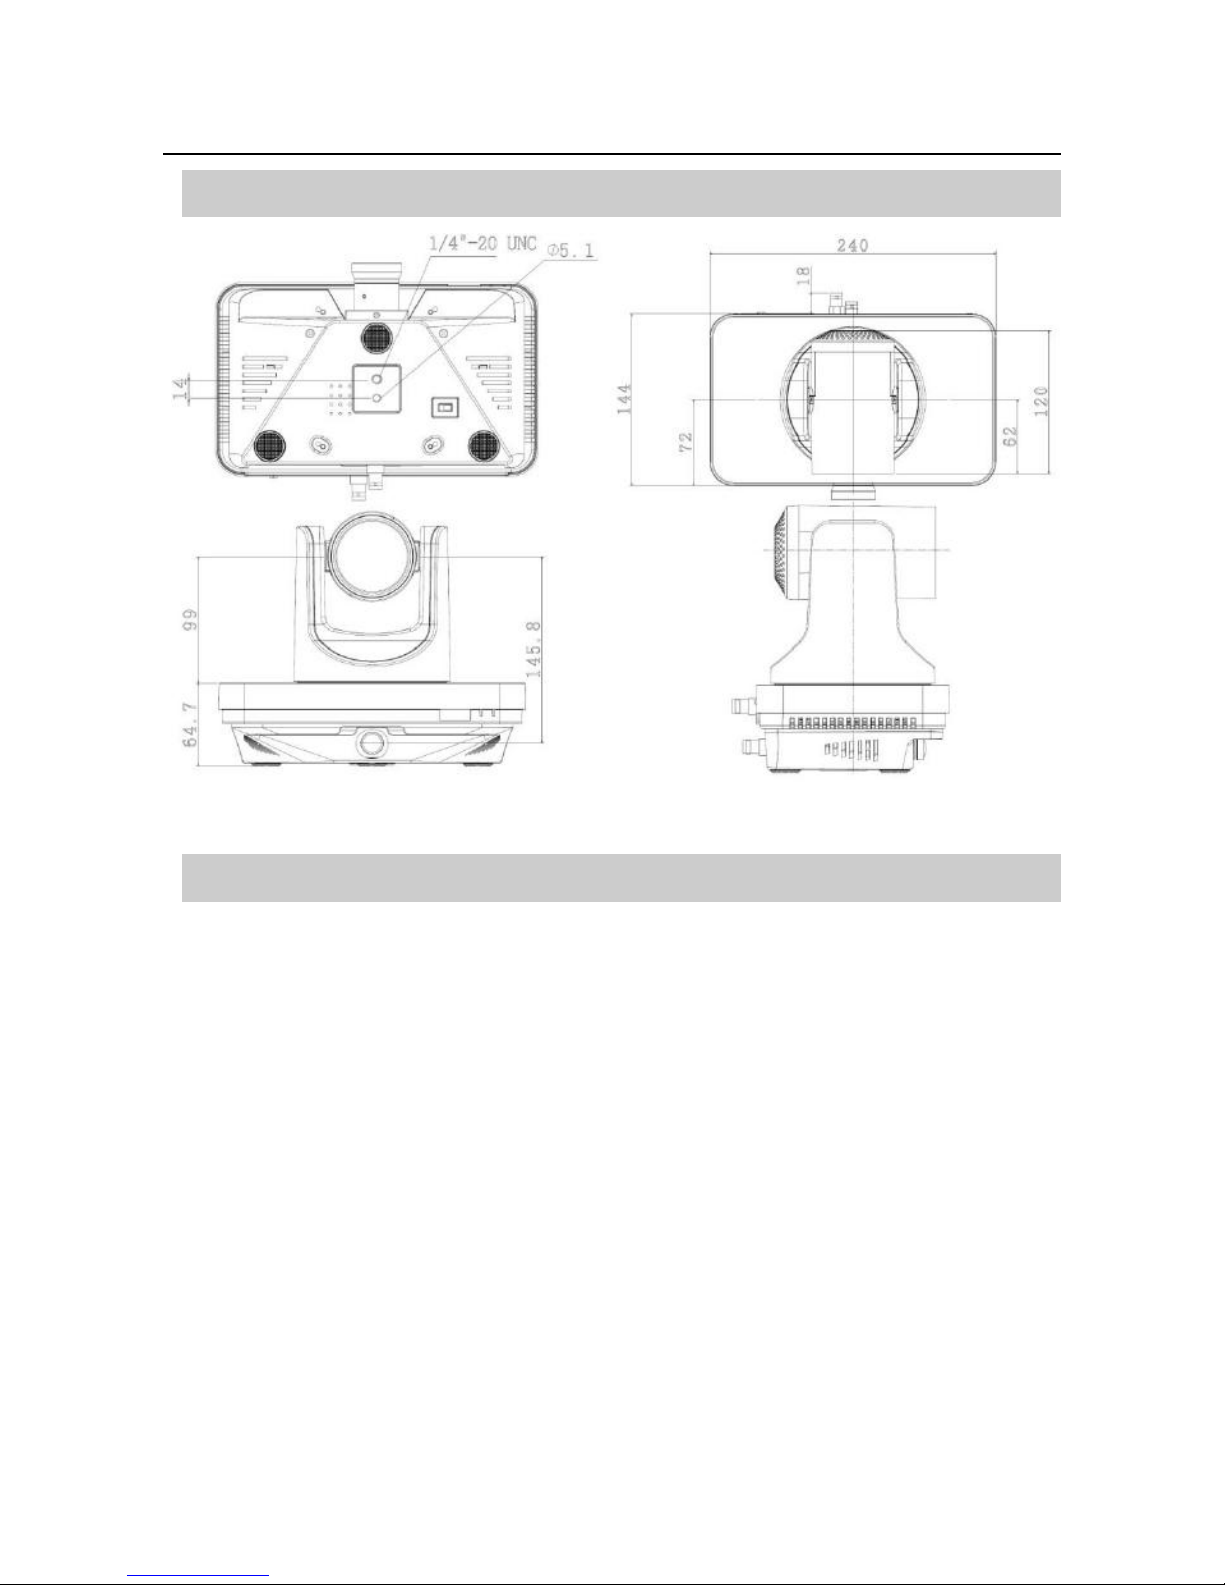
Size
Protocol list
Note: The serial port of the camera follows the standard VISCA / Pelco-D / Pelco-P protocol. For
secondary development, the camera can be controlled according to the standard protocol. To provide a
detailed list of VISCA / Pelco-D / Pelco-P protocol, Please contact the manufacturer to obtain.
Page 45

ValueHD Corporation
Maintenance and Troubleshooting
The maintenance of the camera
If the camcorder is not used for a long time, disconnect the power switch after use and disconnect
the AC adapter from the AC outlet
When removing dust from the camera case, use a soft cloth or tissue
When cleaning the camera lens, please use a dry soft cloth to wipe, such as dirt is serious, please
use a mild detergent gently wipe.
Do not use strong or corrosive cleaning agents to avoid lens scratches, affect image effects
Avoid using in the following environments
The camera should avoid shooting particularly bright objects such as sunshine, light and so on
Do not operate the camera in an unstable lighting environment, otherwise the image will flash
Do not use around radio facilities that can transmit large amounts of power, such as: TV stations
or radio transmitters, etc.
Fault phenomena and treatment
Image failure
The display shows no image
1、The display shows no image;
2、Closed power switch camera is a normal self-test;
3、Check the video platform, the TV cable is connected to normal;
When the camera lens has a maximum magnification, the image is jittery
1、Is the camera mounting position secure
2、Whether there is a vibrating machine or object next to the camera。
[tracking configuration tool] no video image display
1、Use the PC to access the network to test whether the network access to work properly, first
remove the cable failure, PC virus caused by network failure, until you can ping with each other
through the PC;
2、Disconnect the camera from the network, connect the camera and the PC separately, and
reset the IP address according to the appropriate recommended operation.
3、Check the server's IP address and subnet mask address and gateway settings;
4、MAC address conflict;
5、The Web port is occupied by other devices。
Page 46

ValueHD Corporation
Sound failure
No sound
1、Please check the host's audio connection
2、Please check the IP Camera audio parameter settings, whether the monitoring function is
enabled
Tracking fault
Teacher Side
Tracking location is not accurate, always biased in one direction
1, to repeat the panoramic lens position calibration;
2, set the level of calibration, vertical calibration;
3, set the station position;
Tracking instability, when not with the time
1. Re-check the tracking area, shielding area, to ensure that the teacher's head is located in the
tracking area;
Small range of mobile tracking
1.May be appropriate to reduce the tracking sensitivity;
Tracking screen is not ideal
1、Change the tracking screen size;
No track, video output in the menu parameters
1、Make sure to exit the menu mode of the tracking camera;
Student side
Tracking location is not accurate, always biased in one direction
1、Repeat the panorama position calibration;
2、Set the horizontal calibration, vertical calibration;
Raising hands and other actions prone to misjudgment
1、May be appropriate to reduce the tracking sensitivity;
Track to interference sources, such as curtains
1、Set the mask area;
No track, video output in the menu parameters
1、Make sure to exit the menu mode of the tracking camera;
Control failure
Page 47

ValueHD Corporation
Remote control cannot control
1、Replace the new remote control battery;
2、Is the camera connected correctly?。
Serial port cannot control and communication
1、Is the camera connected correctly?;
2、Check that the control cable is well connected。
Network fluent, but cannot control
1、Check whether the network is on the same network segment;
2、Check if the IP camera has been duplicated;
ValueHD Corporation
Add: 3F No.2 Honghui Industrial Park, Xin’an Street, Bao’an District,
Shenzhen, China.
Zip code:518055
Website: www.valuehd.com.cn
Tel:400-099-1206/ 0755-86644431
Copyright ©ValueHD Corporation 2016. Keep all right.
 Loading...