

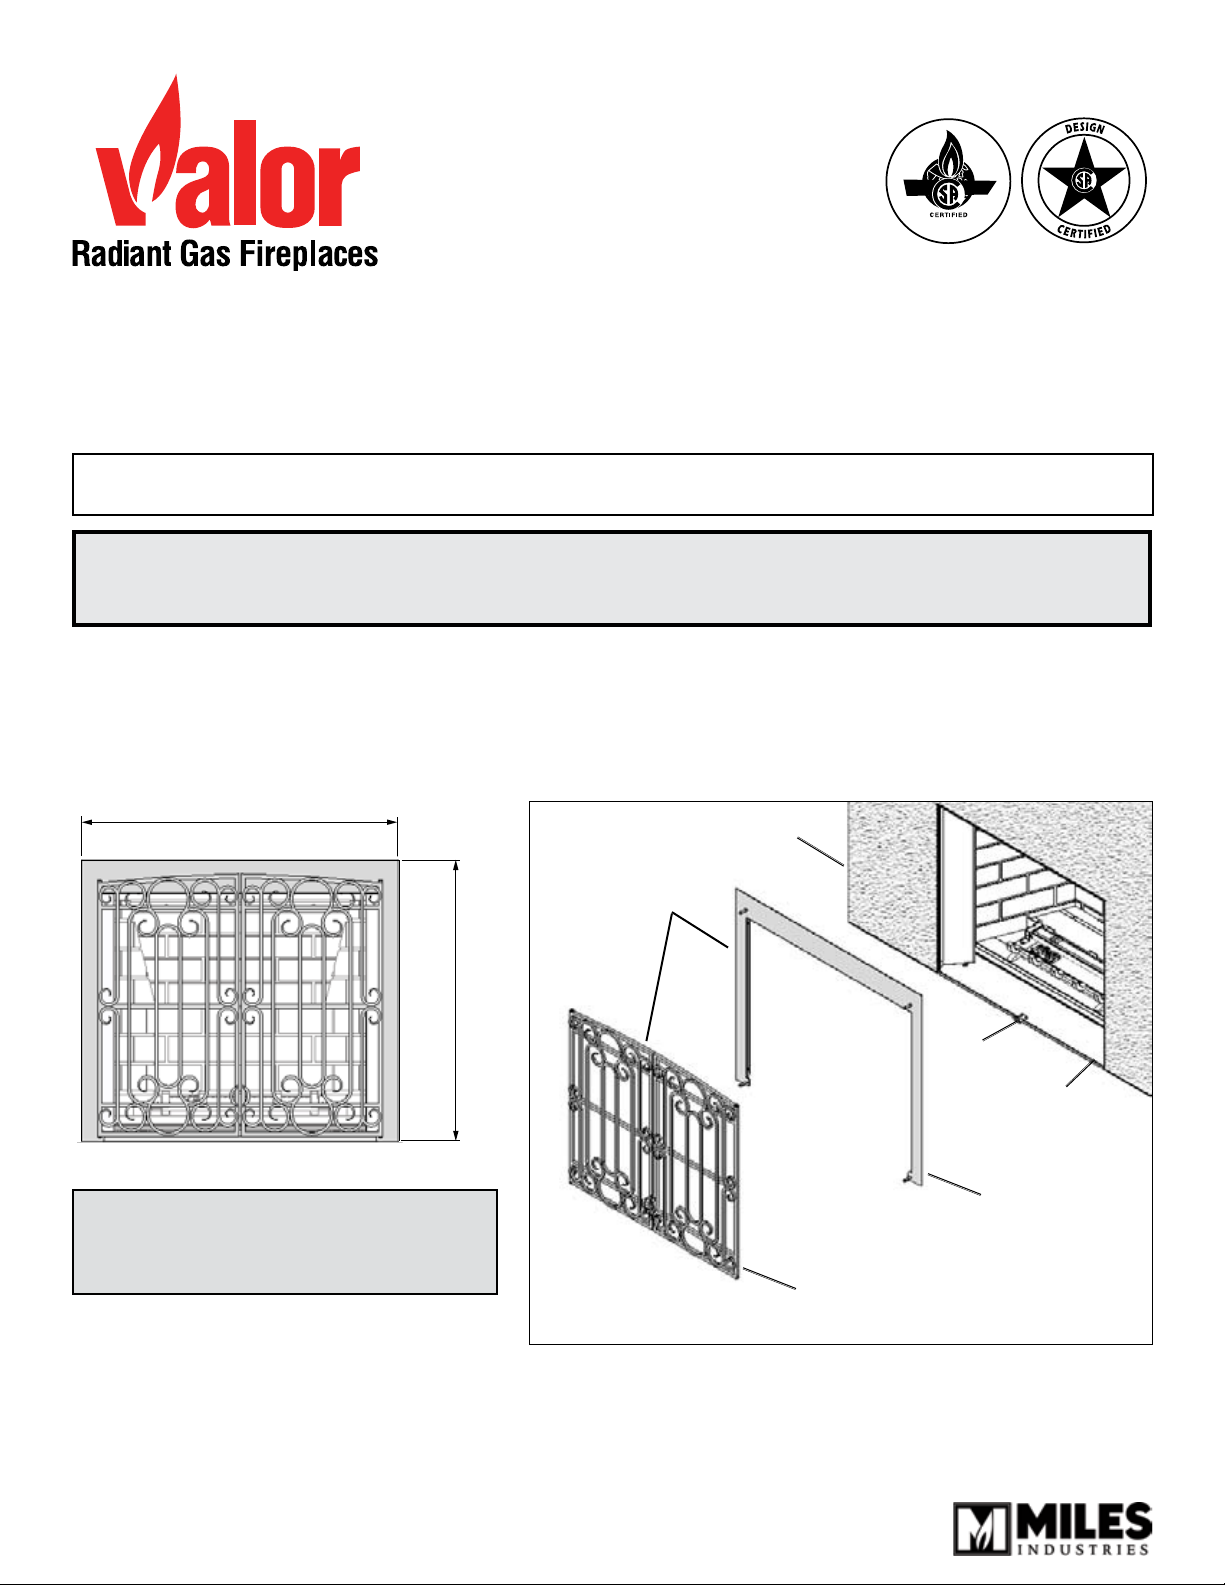
31-3/4”
35-3/4”
1210DKA Alhambra Door Kit
INSTALLATION INSTRUCTIONS
CSA approved for use with Valor Model 1200 Heater ONLY
Note: This kit must be installed or serviced by a qualied installer, service agency or gas supplier.
These instructions are to be used in conjunction with the main installation instructions for the 1200.
NOTE: To install the kit’s backing plate, the surface of the nished hearth or oor must be at
the same level as the bottom of the heater. Please be aware that the backing plate mounting
can ONLY accommodate 1/2” wall thickness.
The 1210DKA Alhambra Door Kit may be tted to the Valor model 1200 heater, either at the time the heater is installed
or retrotted afterwards (provided existing wall and hearth nish allow—see Note above). Installation of the Alhambra
doors affect mantle clearances, framing dimensions, or other specications listed in the heater installation manual—see
installation manual packed with the heater. The 1210DKA Alhambra Doors may also be installed with optional
614CVI, 615CVI Cast Surrounds, 616STK, 617STK Stone Trim Kits (see installation instructions with each kit).
Wall Finish
1210DKA Alhambra
Door Kit
(incl. magnet bracket)
Magnet
Bracket
NOTE: The bottom of the plate is ush
Backing Plate
with the bottom of the heater. Bottom
of the heater MUST be ush with or
higher than the nished hearth.
Alhambra Doors
Overview
Mantel or Shelf Clearances
For Mantel of Shelf Clearances, see the Installation manual provided with the 1200DV Ventana engine.
4001303-01
© Copyright Miles Industries Ltd., 2007.
1200 Heater
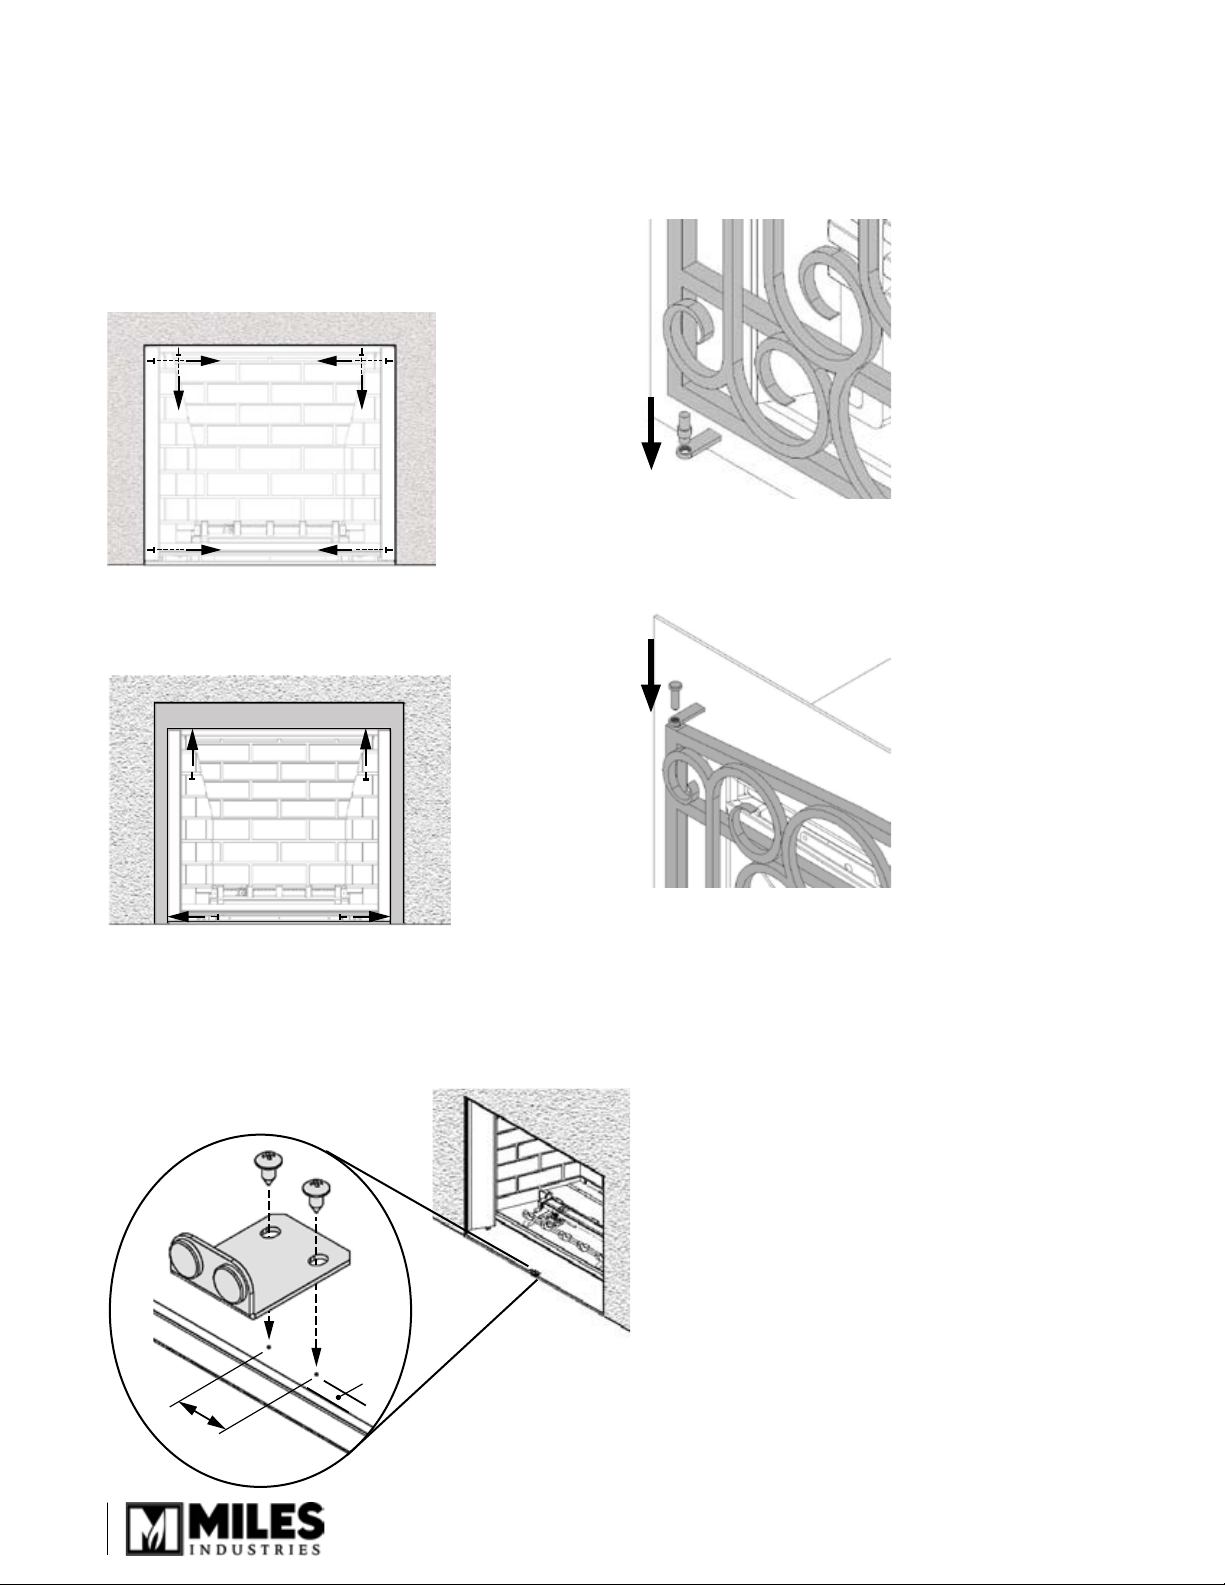
3/8”
3/4”
Installation
Install heater as per installation instructions.
1.
Finish wall up to the outside edge of the rebox
front opening. Allow for height of nished hearth
or backing plate will not install. Make sure that
the wall nish is no thicker than 1/2”.
Remove the 6 screws retaining the top and
2.
side black strips surrounding the opening of the
rebox, as shown.
Install the backing plate with the four screws
3.
provided, xing it at the top and on each side,
as shown.
Insert one hinge pin, long side up, in one of the bottom
6.
hinge brackets on the backing plate.
Drop the bottom of one door onto the hinge pin.
7.
Align the top of the door under the upper hinge bracket.
8.
Drop the top hinge pin through the bracket, in the door
frame. Repeat with the other door.
In the middle of the replace’s black sheet metal
4.
front plinth, drill through the two dimples with an
1/8” bit.
Fix the magnet bracket to the black sheet metal
5.
front plinth with the two screws provided.
2
© Copyright Miles Industries Ltd., 2007.

Repair Parts List
1
2
3
4
4
4
4
4
}
1 4001300 Backing Plate Assembly
2 4001083CP LH Door
3 4001084CP RH Door
4 4001418 Hardware Pack
190–2255 Dollarton Highway, North Vancouver, BC, CANADA. V7H 3B1
Designed and manufactured by / for
Miles Industries Ltd.
Tel.: 604-984-3496 Fax: 604-984-0246
www.milesreplaces.com
© Copyright Miles Industries Ltd., 2007.
3

31-3/4”
35-3/4”
1210DKA Portes Alhambra
DIRECTIVES D’INSTALLATION
Homologuée par la CSA pour utilisation exclusive avec le foyer Valor 1200
Note : Ce kit doit être installé et maintenu par un installateur qualié, une agence de service
certiée ou un fournisseur de gaz. Ces directives doivent être utilisées conjointement avec les
directives d’installation fournies avec le foyer 1200.
NOTE : Pour installer la plaque de soutien de ce kit, la base du foyer doit être égale à la
surface de la nition du plancher ou de la marche devant le foyer. Également, veuillez
noter que la plaque de soutien de ce kit NE PEUT être installée sur un mur d’une épaisseur
supérieure à 1/2”.
Les Portes Alhambra 1210DKA peuvent être installées sur le foyer Valor 1200, soit au moment de l’installation du foyer,
soit plus tard (en autant que la nition du mur et de l’âtre le permettent—voir Note ci-haut). L’installation des Portes
Alhambra affecte les dégagements du manteau de cheminée, les dimensions d’encadrement ou autres particularités
listées dans le guide d’installation du foyer—voir le guide fourni avec le foyer. Les Portes Alhambra 1210DKA peuvent
être installées avec l’Arche de fonte 614CVI, la Bordure de fonte 615CVI, la Bordure de pierre 616STK ou l’Arche
de pierre 617STK (voir directives d’installation séparées, fournies avec chaque kit).
Mur ni
Portes Alhambra
1210DKA
(incl. fermoir magnétique)
Fermoir
magnétique
Foyer 1200
NOTE : Le bas de la plaque est égal
Plaque de soutien
au bas du foyer. Le bas du foyer DOIT
être au même niveau ou supérieur à la
surface du plancher ni devant le foyer.
Portes Alhambra
Concept
Dégagements pour manteau ou tablette
Pour connaître les dégagements relatifs à l’installation d’un manteau de cheminée ou d’une tablette, consultez le
guide d’installation fourni avec le foyer 1200DV.
4
© Droits d’auteur Miles Industries Ltd., 2007.

Installation
3/8”
3/4”
Installez le foyer selon les instructions
1.
d’installation. Terminez la nition du mur
jusqu’au périmèetre de l’ouverture du foyer.
Tenez compte de la hauteur de la nition
du plancher devant le foyer pour permettre
l’installation de la plaque de soutien. Assurez-
vous que le mur ni n’est pas plus épais que
1/2”.
Enlevez les 6 vis retenant les bandes de métal
2.
noires du haut et des côtés de l’ouverture du
foyer, tel qu’indiqué.
Insérez un goujon dans une des charnières au bas de
6.
la plaque de soutien, le côté le plus long sur le dessus.
Déposez le bas de la porte sur le goujon.
7.
Alignez le haut de la porte sous la charnière du haut
8.
de la plaque de soutien. Déposez le goujon du haut à
travers la charnière dans la porte. Répétez avec l’autre
porte.
Installez la plaque de soutien, la xant avec 4
3.
vis au haut et de chaque côté, tel qu’indiqué.
Perforez les deux petites bosses au centre de
4.
la plinthe de métal noire à l’avant de la boîte de
foyer à l’aide d’une mèche de 1/8”.
Fixez le fermoir magnétique à la
5.
plinthe, tel qu’indiqué.
© Droits d’auteur Miles Industries Ltd., 2007.
5

Liste de pièces
1
2
3
4
4
4
4
4
}
1 4001300 Plaque de soutien
2 4001083CP Porte gauche
3 4001084CP Porte droite
4 4001418 Quincaillerie
190–2255 Dollarton Highway, North Vancouver, C.-B., CANADA. V7H 3B1
Conçues et fabriquées par / pour
Miles Industries Ltd.
Tél. : 604-984-3496 Téléc. : 604-984-0246
www.milesreplaces.com
6
© Droits d’auteur Miles Industries Ltd., 2007.
 Loading...