

Valor NVG-606W Owner's Manual
- M U LTIMEDIA
Thank
manual
all the
After
future
you
for
clear
and
featuresofyour
you
have
reference.
--------
your
choosing
easy
to follow.Ifyou
new
finished
our
unit
for
reading
product.
takeafew
maximum
the
instructions,
Contents
We hope you will find
minutestolook
enjoyment.
please keep
the
instructionsinthis
through
this
it,
manual
you'll
in a
learn
safe
user
how
place
_
to use
for
Preparation'
Features
Tools
and
WARNING·
Disconnecting
Controls
Button
The
Key
Remote
TFT
Operating
Audio
System
General
Video·
ASP(Audio
Language
Tuner(FM/AM)Operation
Tuner
Switch
Select
Auto
Manual
Control
Front
Remote
Monitor
Disc
Insertion/Ejection
Rear
Camera
Image
Parking
Power
Playing
Volume
Control
Rear
Output·
System
Mute·
Standby·
Setup
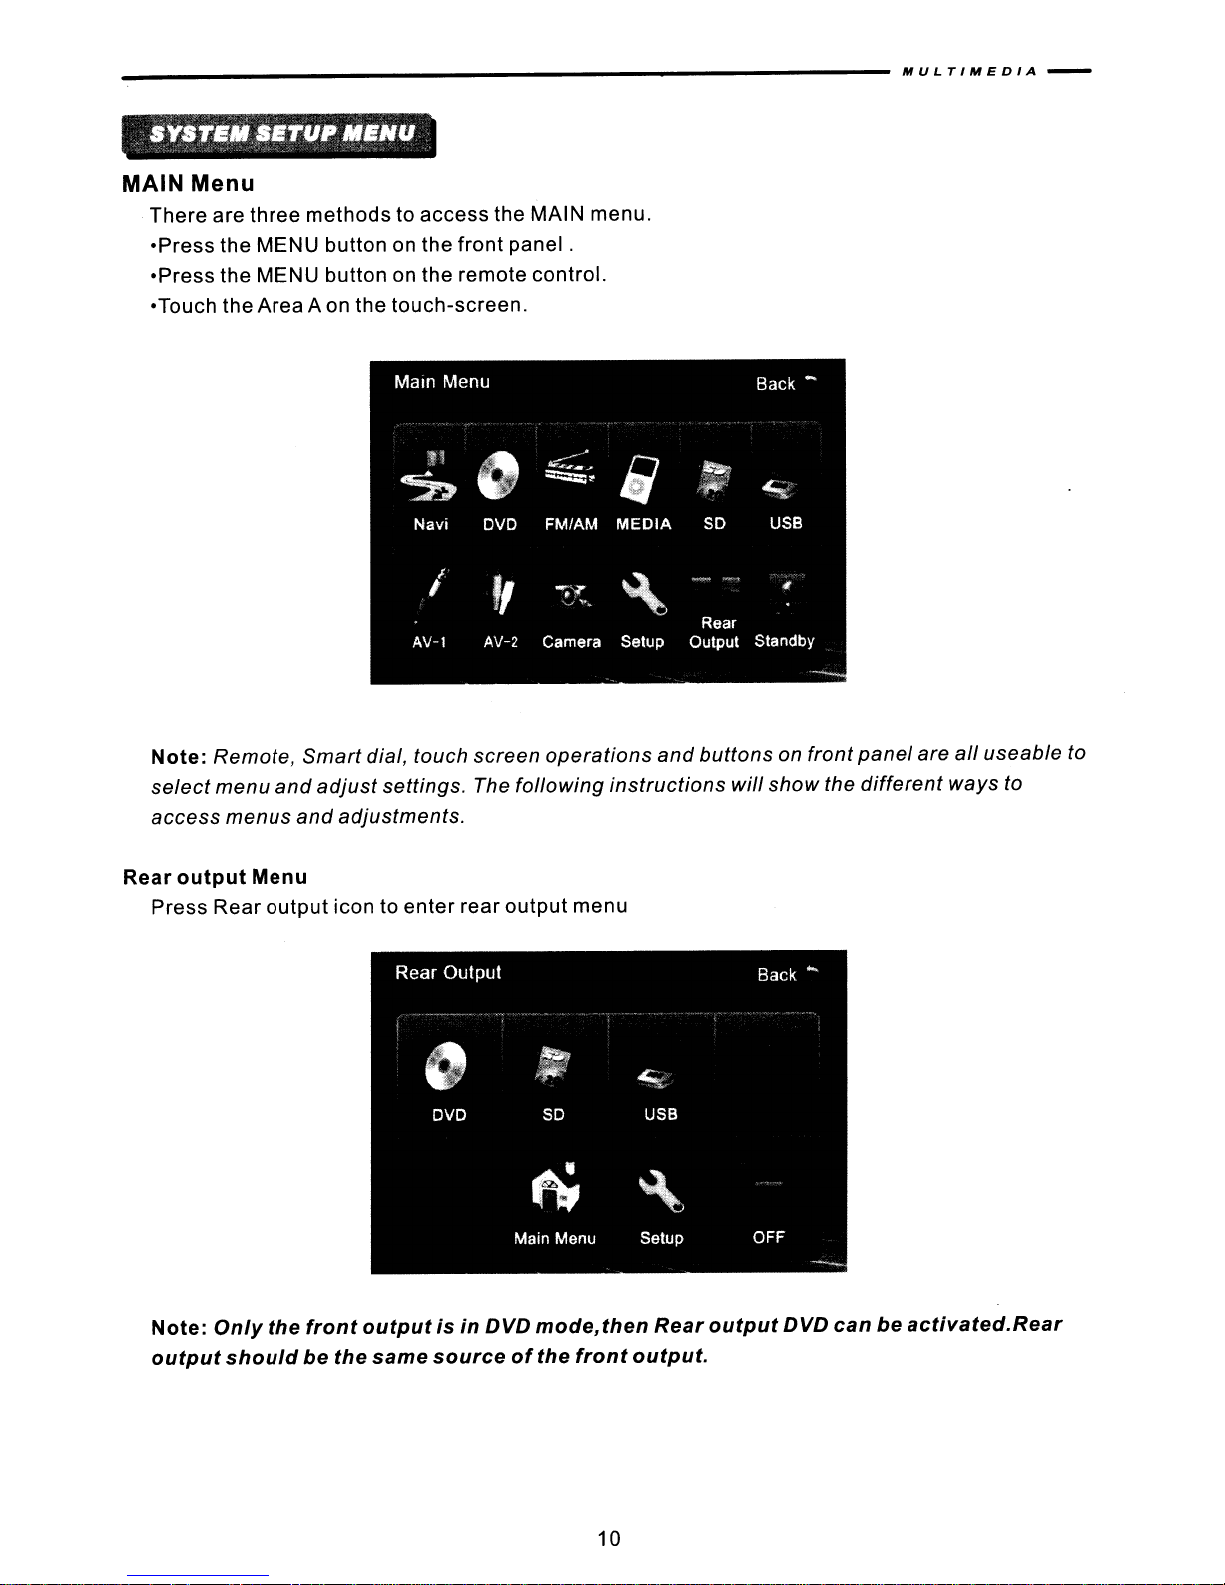
MAIN
Menu·
Rear
Output
Screen
TFT
Tuning·
..
...
Supplies
....
the
and
Indicators
Operation·
AreasOfTouch
.....
Control
Operation
Mode .
Settings·
Brake
Instructions·
On /
Source
Adjustment
Reset
Setting·
Setup
menu·
Display·
to Radio
FM/AM
Tuning·
Inhibit
Off·
Selection·
Menu·
..
.
.
Menu·
....
menu·
Menu
Signal
Tuner
Band·
..
....
....
..
Processing)
...
Battery
.....
.
.
...
..
Screen·
.
.
Source
Configuration
.
.
Menu·
·1
. 1
. 1
·1
·2
·3
·3
·4
·5
·5
·7
·7
·7
·7
·7
·8
·8
·8
·8
·8
·9
·9
·9
·9
·10
·10
·10
.
11
.
11
·13
·14
·15
·17
·17
·17
·17
·17
·17
______________________________
M U L
TIMEDIA
-
Using Preset
Auto Store (AS) . • . . . .
Program Scan (PS) . . . .
DX and Loc Stations Seeking
Stations'
. . . . . • . .
(LOC)'
. . . . . . . . . . . .
•.........
·18
·18
·18
DVO Player Operation' . . . . . . . . . . . . . . 19
Insert/Eject
Disc·
Reset the Loading
Accessing DVD
. . . . . . . . . . . . . . . .
Mechanism'
Mode·
. . . . • . .
. . . . . . . . . . . .
...•.
·19
..
·19
Using the Touch Screen Controls 19
Controlling Playback . . . . . . . . .
Accessing the DVD
Menu·
. . . . . . . . . . . . . . . . . . . . . . . . . .
Moving Through Chapters . . . . . . . . . . . . . . . . . . . . . . . . . . .
Fast Forward/Fast Reverse . . . . . . . . . . . . . . . . • . . . . . . .
Selecting 2-Channel or 5-ChannelAudio
Playback'
. . . . . . . . . ·21
GOTO Search . . . . . . . . . . . . . . . . . . . . . . . . . . . . . . . .
Direct Chapter/ Track
Selection'
. . . . . . . . . . . . . . . . . . . .
ViewinganAlternate Picture Angle (DVD Only) . . . . . .
Zooming'
Multi-Language Discs (DVD
Playback
General Disc
CO/MP3/WMA/JPEG
CD Player User
MP3/WMA
. . . . . . . . . . . . . . . . . . . . . . . . . . . . . . . . .
Information'
Information'
Operation'
Interface'
Discs·
. . . . . . .
Only)'
. . . . . . • . • . . . . . . . . . . . . . . . .
. . . . . . . . . . . . . . . . . • . .
. . . . . . . . . . .
............•....................
..
. . . . . . . . . . .
..
JPEG Discs' . . . . . . . . . . . . . .
USB
Operation'
Accessing USB
. . . . . . . . . . . . . .
Mode·
. . . . . . . . . . • . . . . .
USB Instructions' . . . . . . . . . . . . . . . . . . . . . . .
SO
Operation·
Accessing SD
SD
Instructions . . . . . . . . . . . . . .
Navigation
Accessing
. . . . . . . .
Mode'
Operation'
Navigation·
. . . . . . .
. . . . . . . . . . ·31
. . . . . . . . . . . . . . . . . . . . ·31
•....
.
.
·20
·20
..
·21
·21
·22
·23
·23
·23
·23
·23
·24
·26
·26
·27
·28
·29
·29
·29
·30
·30
·30
Navigation Operation . . . . . . . . . . . . . . . . . . . . . . . • . . . . . ·31
an
Listening to
Troubleshooting'
Specifications . . . . . . . . . . . . . . . . . . . . . . . . . . . . . .
Enclosed Accessories
Audio program while using/viewing the Navigation . . . . . . . ·31
. . . . . . . . . . . . . . . . . . . . . . . . . . . . . . . . . . . . .
·32
·37
list·
. . . . . . . . . . . . . . . . . . . .
·39
18
19
NOTE:
1.
certain description in the
2.
Some picturesoricons in the book
3.
Specifications subject to change without notice.
book
may
differ
may
from the actualunit.
differ
from actual display.
- M
UL
TIMEOIA
-------------
PREPARATION
Please read allofthe instructions below before beginning yourinstallation. We recommend that
you have
your
unit installed byan experienced
car
navigation system
installer.
Features
-Double DIN size, all-in-one highly integrated
-Built-in
-Built-in
-High resolution 6.5"(16:9)
-Built-in
-Front
-Smart
-All
-Powerful
DVD Player, automotive specification
ISS FM/AM Tuner,
1FT
color
45W X 4
and rear
output
output
amplifier.
function with easyoperation.
Touch-screen operation
functions
can be operated byRemote Controls.
Graphic
User
Interface and software update ability.
monitor, contrast and brightness adjustment
entertainment
slot
loading mechanism
system
Tools and Supplies
We
suggest
- Torx type, flat-head and Philips screwdrivers
- Wire cutters and strippers
- Tools to remove existing radio (screwdriver, socketwrench setorother
- Electrical tape
- Crimping tool
- Volt meter/test light
Crimp
-
- 18
gauge
- 16- 18 gauge speakerwire
Heatshrink
-
- Soldering iron and solder
using these tools and supplies to install the unit.
connections
wire
for
powerconnections
tubing
tools)
_
WARNING
1.
Onlyconnect the unit
2.
Never
install
this unit where operation
3.Toreduce the risk
use the video
4.
Never
please
consult
5.Toprevent
6.
Never
7.Toprevent
8.
Do
not
fuse
may
display
disassembleoradjustthe unitwithout the assistance
your
injury
use
irregular
damage to the mechanism inside this unit,
change the fuse on the
cause damagetothe unit and resultin a fire.
to
a 12-voltnegative
of
a traffic accident(except when using for rear view video camera)
function while driving the vehicle. This maybe in violationoflocal
local
car
from shockorfire,
discs, the
ground
and
viewing
stereo specialtyshop.
never
only
recommended disc size is a 12cm rounddisc.
power
expose this unit to moistureorwater.
wire without
1
system.
could
interfere with safe driving conditions.
of
avoid
impact to the TFTmonitor.
professional
a professional.
For
guidance. Using an
never
laws.
details,
improper
______________________________
MUL
riMEOIA
Disconnecting the Battery
To
prevent a short circuit, turn offthe ignition and remove the negative (-) battery cable priorto
starting the installation.
NOTE:
computer, do notdisconnect the batterycable.
memorymay be lost. Under these conditions, use extra caution during installation to avoid
causing
NOTE:
If
the unit is to be installedin a
car
equipped with an on-board driveornavigation
If
the cable is disconnected, the computer
a short circuit.
It
is especiallyimportantthatyou read the WARNINGS in this
manual.
-
2

-
III
U L
TIME
DIA
------------------
_
CONTROLS
AND
Button Operation
1.EJECT
Press once
2.S0
SLOT
3.USB PORT
4.POWER
Rotary
Press to power on when the
Press and hold to
Short
Rotary
Rotary
5.Menu
Press to
6.Navi
Press to
7.Front
a.RESET
9.Touch screen TFT
10.Remote
11.0isc
Red is with
Light green is without disc
12.0isc
for
disc
insertion/ejection.
OFFIVOLlSmart
encoder
volume control.
power
press while unit off to
encoder
encoder
enter
enter
to browse mode
to browse mode while in NAVI mode,and press to
main menu,press again back to previous mode
navigation
AUX-IN Jack
sensor
indicative LED
disc
slot
INDICATORS
dial
machine
off
while
unit
enter
EO setting
while
mode,Press
11
10;
9
is in power
12
off
estate.
is on.
in main menu,and pressto
enter
chosed mode
enter
chosed mode
again backto previous mode while in Navi mode
3
_______________________________
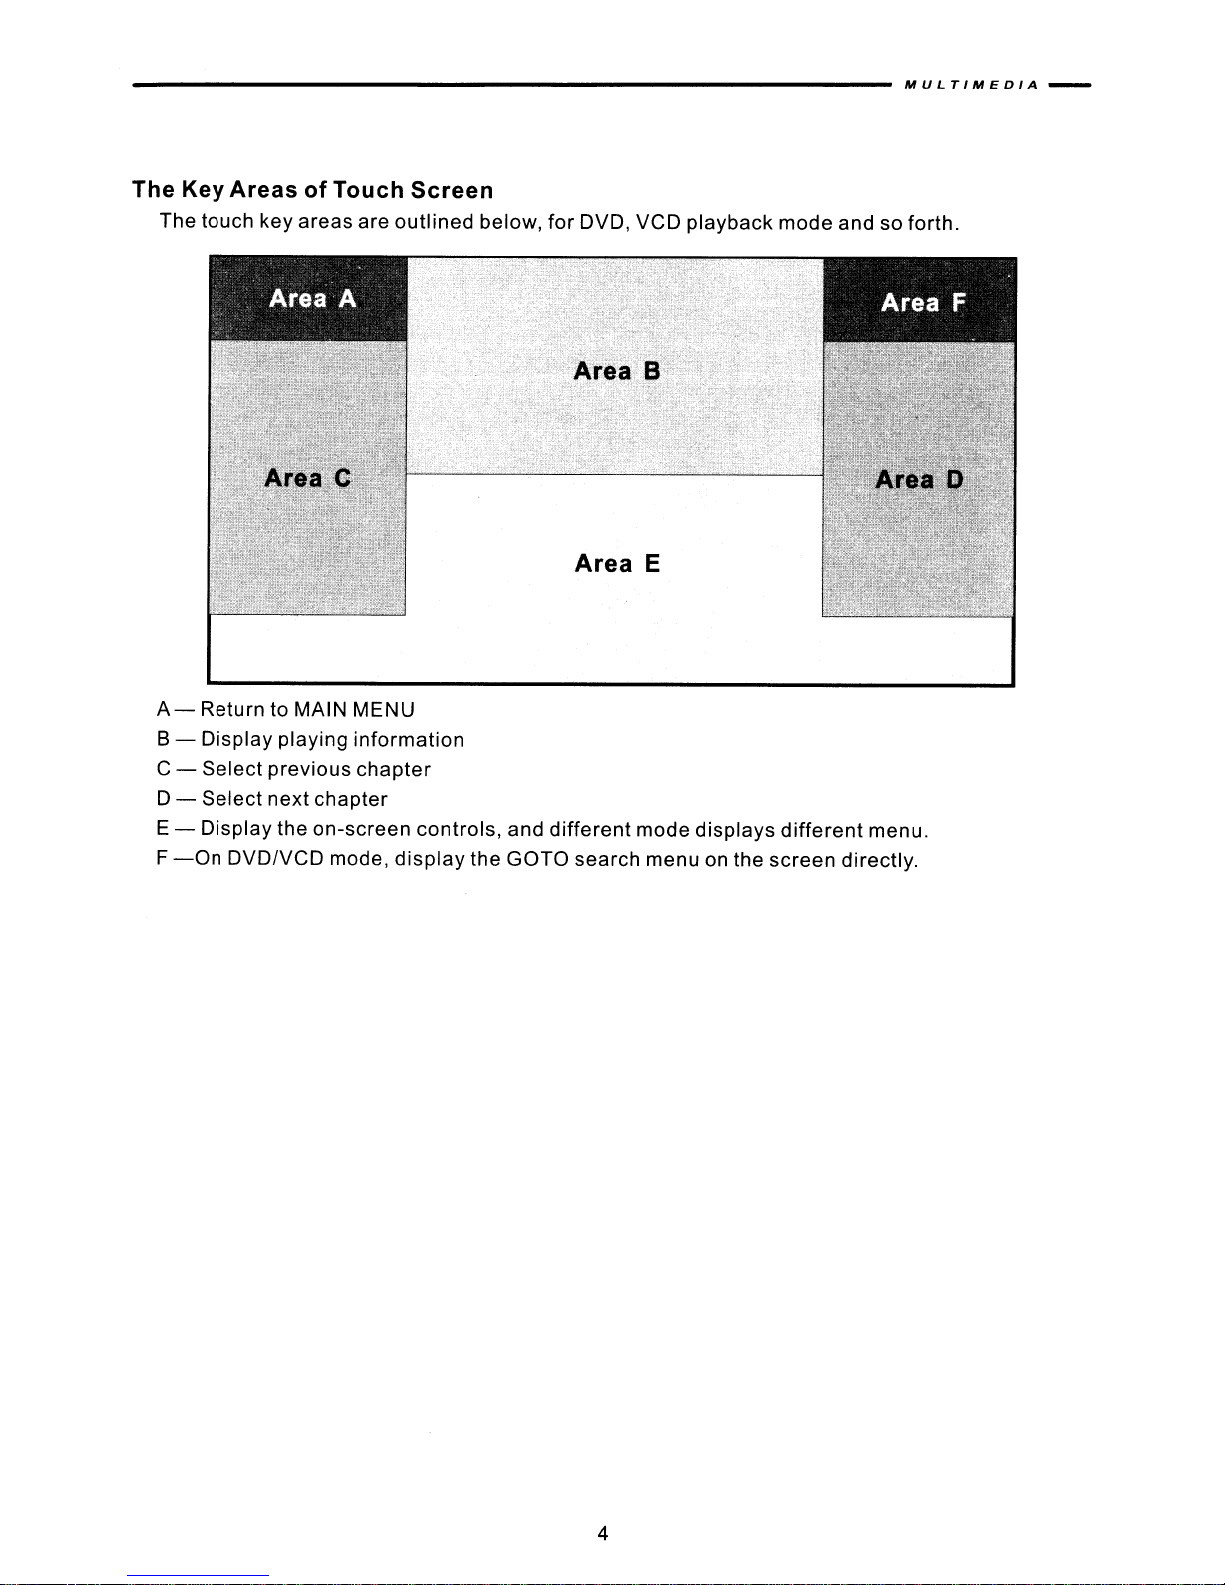
The Key AreasofTouch Screen
The touch key areas are
outlined
below,
for
DVD,
VCD
playback
mode
M U L
and so forth.
TIM
ED
IA
-
A-
Return to MAIN MENU
B -
C -
D E F
Display
Select
Select
Display
-On
playing
previous
next
the
DVDIVCD
information
chapter
chapter
on-screen
mode,
controls,
display
and
Area
different
E
mode
displays
the GOTO search menu on the
different
screen
menu.
directly.
4

- M U L
TIM
E DIA---------------------
_
Front
Remote
Control
Name
Power
Open
Mute
SRC
Numeric
VOLup
VOL
Information
GOTO
Stop/Band
Select
ESC
Menu
Picture
RepeatA-B
OK
Direction buttons 17
button
down
search
,Ref#'
4
6
8
9
10
11
12
13
14
15
16
.
Sj9r1~1
1
2
3
(!)
~
l(JX
SRC
1
6 7
234
890
5
VOL+
7
VOLINFO
-I--
-,
BAND
SEL
ESC
MENU
PIC
A-B
OK
....
.....
··":;u·';:E·'.,.·~:,:;:,
Turn
the
Disc
insertion/ejection.
Toggle
Select
5
Directly
stationincurrent
Increase
Decrease
Display
Position
Select
Stop
Enter
Exit
Enter
Adjust
Set
Startorpause
T
Up/down/left/righttoselect
on/off
playing
playing
FM/AM
playback
the
the
current
the
the
start
...•
".
power
access
the
search
pointAand
on/off
audio
volume
the
audio
main
parameterofTFT
output
mode
certain
band
volume
information
functiononVCDIDVD
bandonTuner
settings
menu
menuofsystem
end
playback,
Function
chapter/track/preset
mode
mode
settings
point
B to
confirm
items
repeat
the
for
continually
settings
setting
5

MULTIMEDIA
-
Title
Root
Repeat
Next
Previous
Fast Reverse
Fast Forward 24
Audio
Zoom
Angle
SUB Title
20
22
23
·25
26
27
28
18
19
21
TITLE
ROOT
CJ
~
..
~
AUDIO
ZOOM
ANGLE
SUS-T
Also can activate and disable SCAN mode while playing CD
Enter the main menuofthe disc
Turn on PSC while playing VCD
Repeat
Select the
Search an
frequencyontuner
Select the
Search an
frequencyontuner
Fast reverse the disc content
Fast forward the disc content
Change the
Zooming
Play in
Language
playback
next
available
previous
available
audio
in/out
different
selection
for
current
chapter/track
radio station by increasing
mode
chapter/track
radio station by ecreasing tuning
mode
language for disc playback
on an image
angle for a scene
for subtitle
chapter
for playback
forllayback
(if
it is
applicable)
tuning
6

- M U LTIM E D
Disc
Insertion/Ejection
Press
front
the
( IAI ) button on the
panel
for
IA
---------------
disc
insertion/ejection.
front
remote control or
press
the (
...
) button on the
_
Rear
Camera Mode
When the vehicle is placed in
the
TFT
monitor
will
automatically
Image Settings
Video
The
Adjustable
While
"SHARPNESS"
mode.
Parameter
1.
Press
2.
Press the (
to
3.
Press the PIC button on the
NOTE: There
Settings.
Output
table
Format
below shows the
Video Output Format
*CVBS--
Parameters
in RGB mode, the
"COLOR"
Adjustment
Enter
Picture
Quality
the PIC button on the remote.
Set
Parameters:
<4
/~)
buttons
adjust
Exit
the selected
Picture
Quality
must
be a video
"Reverse",
switch
video
output
;,;;
.......
~
...
FM/AM TUNER
DVD
NAVI
AUXIN
CAMERA
Composite
only
parameter
"CONTRAST"
Procedure
Setting mode:
on the
feature
Setting
remoteorrotate the
to the
Mode:
remote.
signal
and an optional
to the camera
format
Video
that can be
"BRIGHTNESS"
desired
present
setting.
on the
rear
cameraisconnectedtothe
input
source.
for
each source.
...•
Video Output Format
RGB Mode
RGB Mode
RGB Mode
CVBS Mode
CVBS Mode
Base band Signal
adjustedisbrightness
and
"TINT
SMART
DIAL
AUXorCAMERA
unit,
(BRIGHT).Toaccess
"you
mustbein
CVBS
clockwise/counterclockwise
inputtoadjust
the
above
Parking
1.
When
will
2.
Parking
Brake
the "PARKING"
display
video
brake
Inhibit
cableisconnected
only
when the
functionisoverridden
3. When the "parking brake
background,
accident.
Please
preventing
Rear video
see
"INSTALLATION
the
screens
vehicle
inhibit"
driver
is active, the
from
are
not
SECTION"
to the brake switch, the
is stopped and the
when the
video
front
watching
video
affected.
for
installation.
7
parking
display
brake
on the
is applied.
sourceissettoCAMERA.
monitor
while
displays
"Caution"
drivingtoreduce
TFT
monitor
with
blue
the riskofa traffic
______________________________
M U L
TIMED
IA
-
Power
OnIOff
Press the POWER
button (
Press and hold the
on the remote to power
<!)
IVOL
)on the remote.
POWERIVOL
button to turn the
off
Playing Source Selection
Press the MENU Button on the
the remote to change among
2,CAMERA(rear
the TFT display.
AUXIN
An external
RCA
CAMERA
"CAMERA" mode is
install a rear view video camera,
output
Mode
connector)
Mode
cable.
NOTE:Ifyou have
If
you
have
view
audio/video
to the "AUX-IN".
only
not
not
inserted
video
device
available
connected
a SOinto to the unit, SO
unit
on. You can also turn on the
button on the
the
unit.
front
panel and use Smartdial to
available
camera), NAVI,USB and
can be
playing sources: TUNER, Disc,
connected
when the camera is connected and when
connect
the
CAMERA
front
a device to the unit, the source can
panel orpress
SD
Card.
to this
will
unit
video
not
be available.
the
select;orthe
The
playing
via
RCA
input
cabletothe
not
unit
by pressing the
POWER
AUX
cables(Front
button
(SRC)
IN 1, AUX-IN
mode
backing
button on
is displayed on
jackorrear
up.
rear
view camera
be selected. Example:
(
<!)
)
To
Volume
To
the VOL +/ VOL- buttons on the remote control. The volume ranges
Audio
TheAudio Control
characteristicsofyour
measurements.Toget
the
of
Adjustment
increaseordecrease
Control Menu
feature
settings for the
the
cabin equalizer.
speakers
the
volume
allows
vehicle, which
the best
you to
possible
as well.
level,
turn the POWERIVOLon
easily
vary
Proper
adjust
depending
sound
quality
settingofthe Fader and
your
audio
on the typeofvehicle
from
Accessing the Audio Control Menu
Press the
control to
Selecting an Audio Feature
Press the (
panel once to
POWERIVOL
display
....
the "Audio" menu.
/~)
buttons
selectaaudio
button
on the
feature
on the
for
front
panelorpress the
Adjustment
remoteorpress the
to be adjusted.
POWERIVOL
Adjusting an Audio Feature
Press the (~/ • )
clockwise/counterclockwisetoadjust
buttons
on the
remoteorrotate the
the
selected
feature to the
POWERIVOL
the
from
systemtomeet
your
new
(SEL)
button
buttononthe
desired
front
"0" to "40".
system,
Balance
on the remote
setting.
panelorpress
the
acoustical
and its
be sure to
boosts
the
front
adjust
effects
8
-
MULTIMEDIA
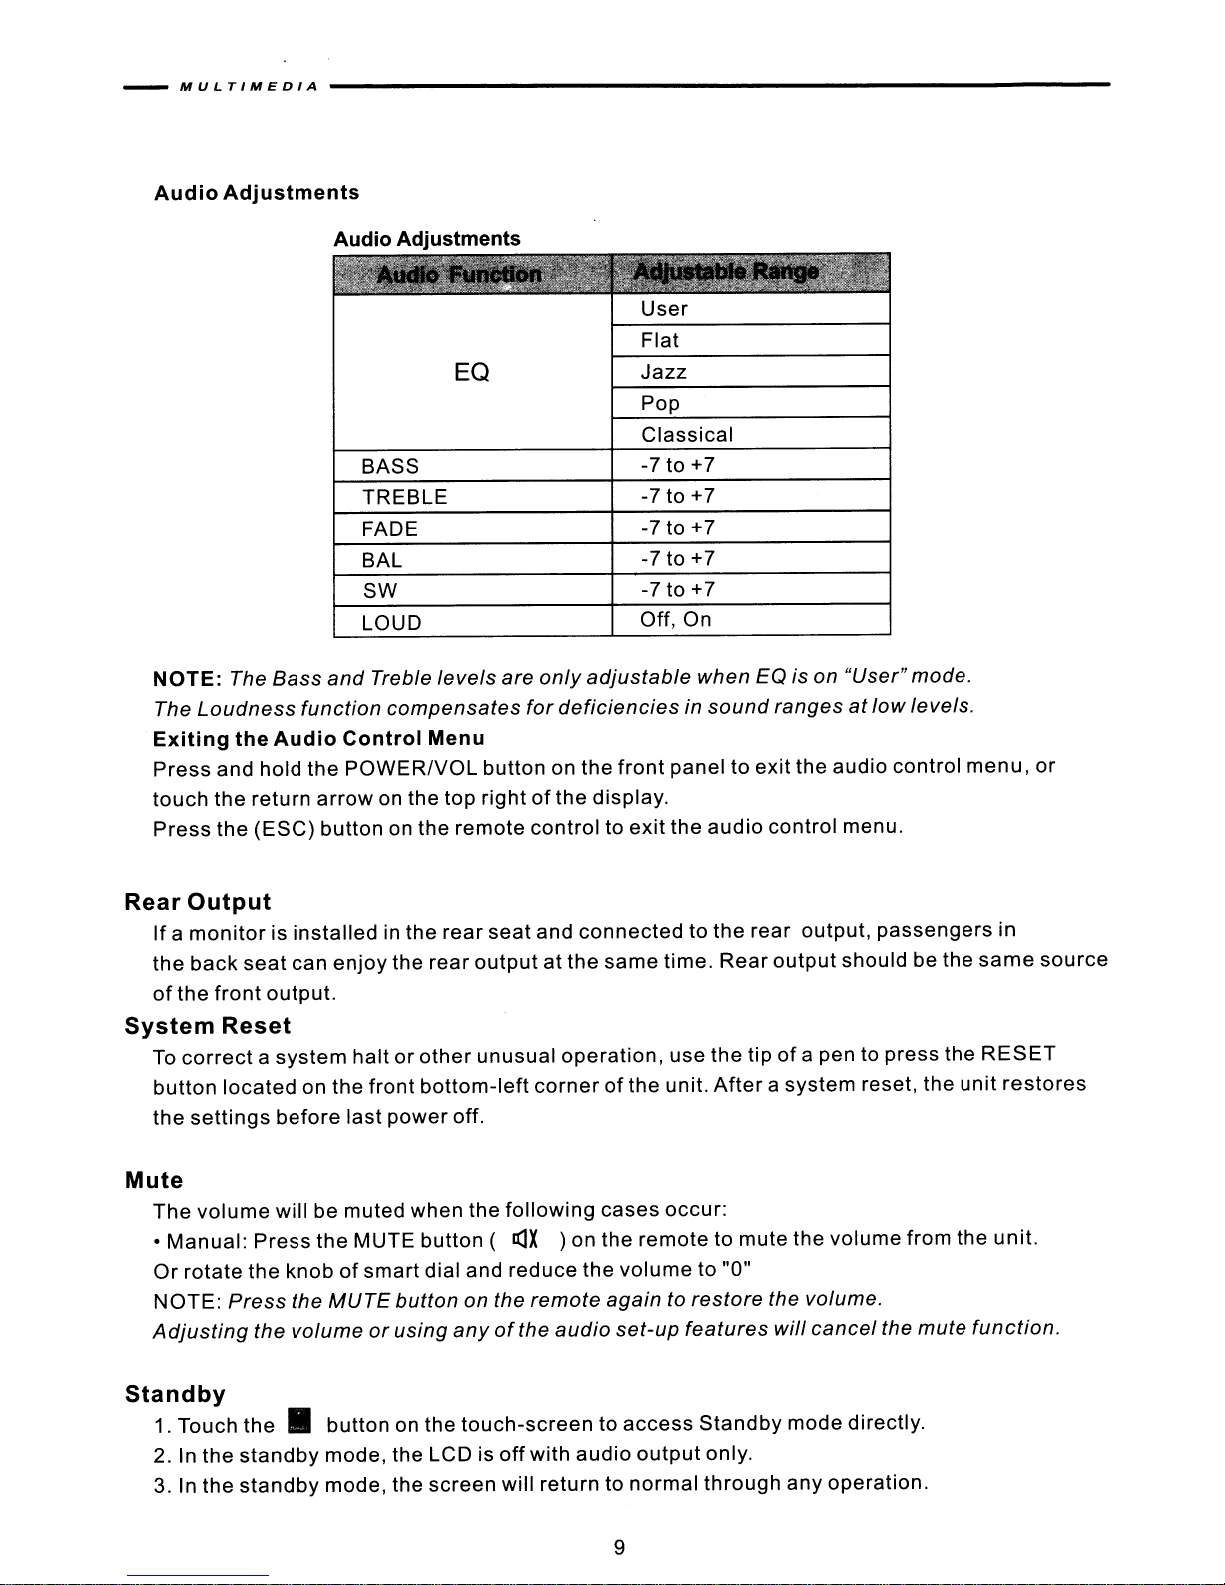
Audio
NOTE:
The
Loudness
Exiting
Press
touch
Press
Adjustments
The
Bass
function
the
Audio
and hold
the
the
return
(ESC)
the
arrow
button
Audio Adjustments
EO
BASS
TREBLE
FADE
BAL
SW
LOUD
and
Treble
Control
POWERIVOL
on the top
levels
compensates
Menu
button on
rightofthe display.
on the
remote
Off, On
are
only
adjustable
for
deficienciesinsound
the
front
controltoexit
User
Flat
Jazz
Pop
Classical
-7 to +7
+7
-7 to
-7 to +7
-7 to +7
-7 to +7
when EQ is on
paneltoexit
the
audio
"User"
rangesatlow
the
audio
control menu.
mode.
levels.
control
menu,
or
Rear
System
Output
Ifamonitorisinstalled
the
back
seat
can
of
the
front
output.
Reset
To
correctasystem
button
the
locatedonthe
settings
before
Mute
The
volume
•
Manual:
Or
rotate
NOTE:
Adjusting
will be muted when the
Press
the
knobofsmart
Press
the
the
volumeorusing
Standby
1. Touch
2. In
3. In the
the
the
•
standby
standby
in the
enjoy
the
MUTE
button
mode,
mode,
the
haltorother
front
last
power
MUTE button (
button
on the
the LCD is
the
rear
seat
and
connectedtothe
rear
outputatthe
unusual
bottom-left
off.
dial and reduce
on the
anyofthe
touch-screentoaccess
off
screen
will return to
operation,
cornerofthe unit.
following
a:JX
) on
the
remote
audio
with
audio
same
time.
Rear
use
the
Afterasystem
cases
the
occur:
remotetomute the
volumeto"0"
againtorestore
set-up
output
normal
features
Standby
only.
through
rear
output,
output
tipofa pen to
the volume.
will
should be the
volume
cancel
mode
any
operation.
directly.
passengers
press
reset, the
the mute
the
from the
in
same
RESET
unit
restores
unit.
function.
source
9
_______________________________
MULTIME
DIA-
S'YSTBIf,'SBTUP
" '
MAIN
Menu
There
'Press
·Press
·Touch the Area A on the touch-screen.
are three
the MENU button on the
the MENU button on the remote control.
MeNU
methods
to access the MAIN menu.
Mam Menu
11
~
Navi
I
I
AV-l
front
0
OVO
AV-2
panel.
"
"
a;::;::.,
==:,.
FMfAM
-;'r
-../
~.
Camera
~
Iii
MEDIA
~
Setup
SO
Rear
Output
Back
,,,
..
USB
"
Standby
...
Note:
select
access
Rear
output
Press Rear
Note:
output
Remote,
menu
menus
Menu
output
Only
the
should
and
Smart
adjust
and
adjustments.
icon to
front
outputisin
be
the
dial, touch screen
settings. The fol/owing
enter
rear
Rear Output
,"
0
DVD
operations
output
~
rF
SO
~
Main Menu
DVD
mode,then
same
sourceofthe
instructions
menu
front
output.
and
~
USB
Setup
"
Rear
buttonsonfront
will
show
the
Back
...
OFF
output
DVD
canbeactivated.
panel
are aI/ useable to
different
ways to
Rear
10
- M U L
TfM
E DfA-------
_
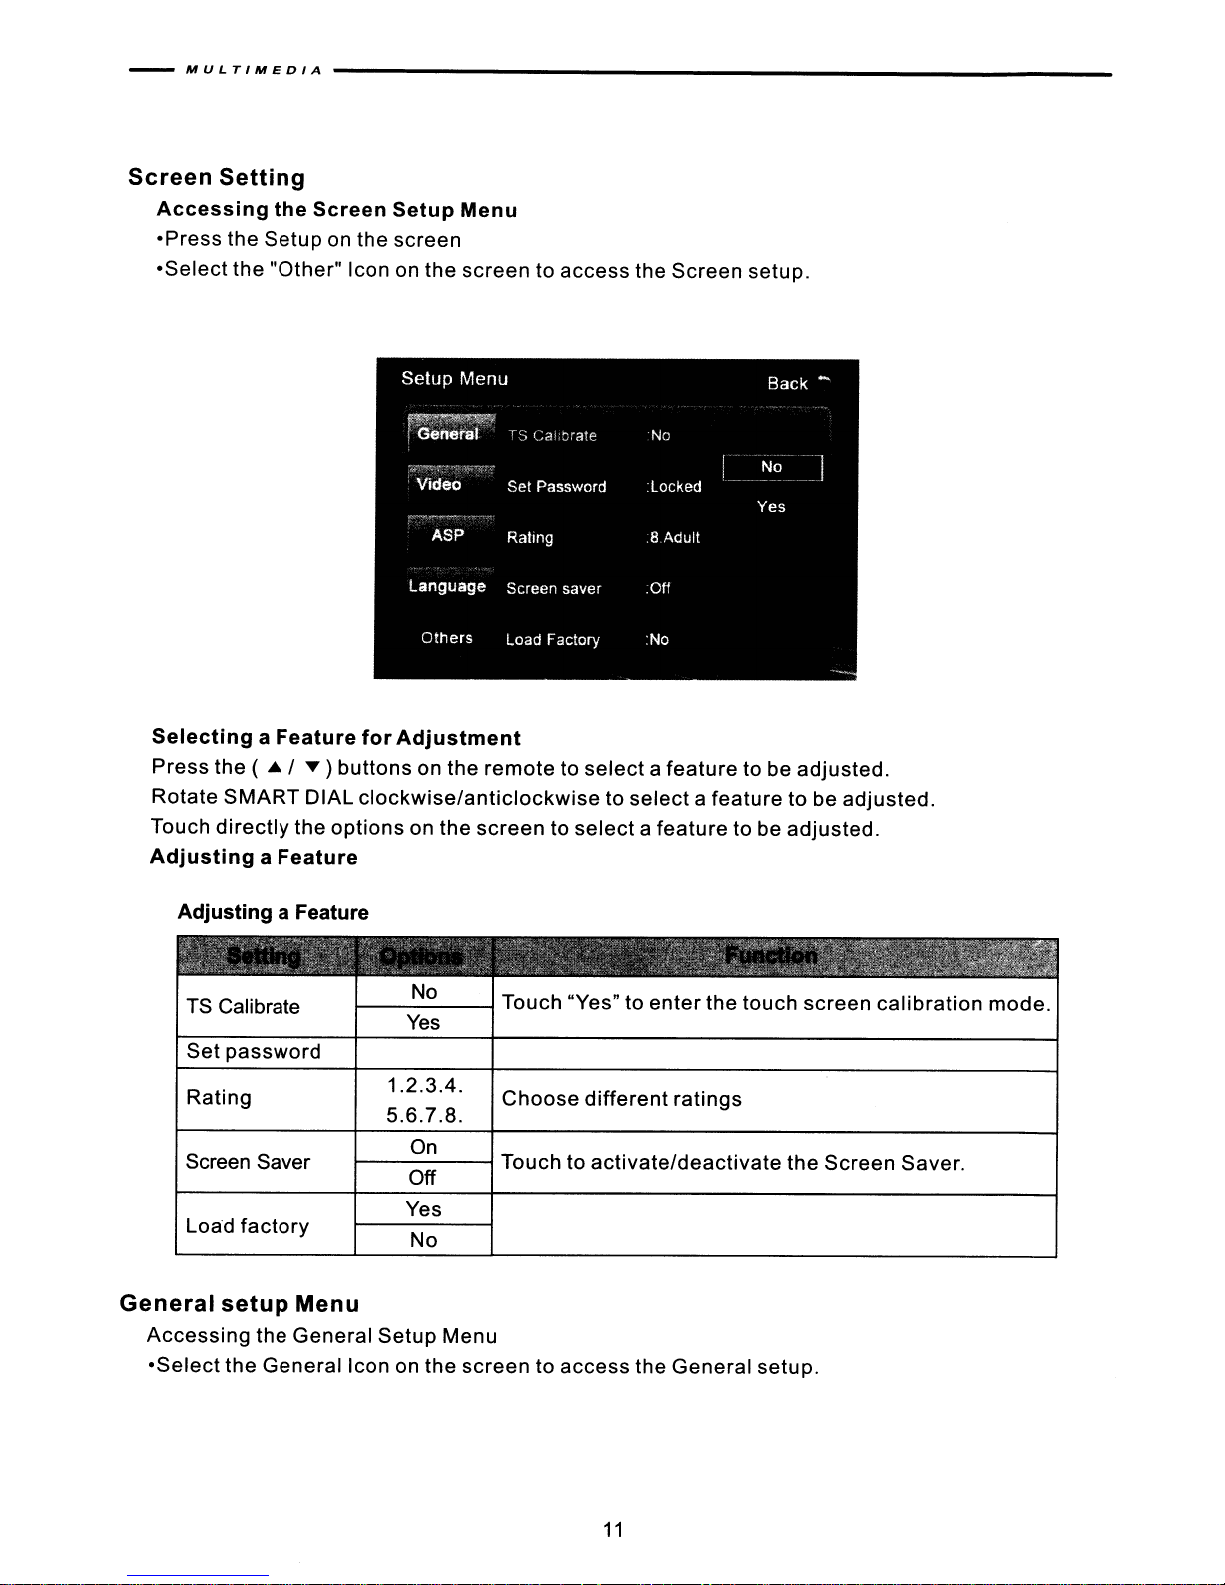
Screen
Accessing
·Press
·Select
Setting
the
the
Setup
the
"Other"
SelectingaFeature
Press
Rotate
Touch
the ( • /
SMART
directly
AdjustingaFeature
Screen
on the
Setup
screen
Icon on the
for
Adjustment
...)buttonsonthe
DIAL
clockwise/anticlockwisetoselectafeature
the
optionsonthe
Menu
screentoaccess
the
Screen
remotetoselectafeaturetobe
screentoselectafeature
setup.
to be
adjusted.
to be
adjusted.
adjusted.
Adjusting
TS Calibrate
Set
Rating
Screen Saver
Load
General
Accessing
·Select
a Feature
password
factory
setup
the
Menu
the
General
General
o
N
1--
__
__
_
Yes
1.2.3.4.
5.6.7.8.
On
1--------1
Off
Yes
No
Setup
Icon on the
--1
Touch "Yes" to
Choose
Touch to
Menu
screentoaccess
enter
the
touch
different
ratings
activate/deactivate
the
General
the
setup.
screen
Screen
calibration
Saver.
mode.
11

MULTIMEDIA
-
Selecting a Feature
Setup Menu
General
Language
for
Adjustment
Others
Radio
ClocK
Clock Mode
Antenna
Ver:
USA
0203
24Hr
Off
I
I.
S-Amer1
S-Amer2
Europe
Back -
USA
¥
Press the direction buttons on the remote control ortouch the option directly on the screen to
select the feature to be adjusted.
Adjusting a Feature
1.
Enter the option field for the feature you want to adjustbypressing the (OK) button on the
or
remote
by pressing the SMART DIAL button. A submenu appears in a second row with the
selected option.
2. Select a new value by pressing the direction button.
3.
Confirm your selection by pressing (OK) buttonorpressing the SMART DIAL button. The new
value setup is complete.
Adjusting the Clock
1.
Access the "Clock" setting under the General Setup menu.
2. Press the direction button on the remote to move the cursor to the "Hour" or "Min" position,
and press the (OK) button. you also can touch the "Hour" or "Min" position directly.
3.
The numeric keypad will pop up.
4. Press the numeric button on the remote control or touch the
numeric
keypad on the screen to
adjust the hour or minutes.
5.
Press the (OK) button on the remote control or on the keypadofthe screen to confirm setup.
Return to normal playback
The system will
the setup menu 20 seconds
automatically
after
return the previous playback mode
the last operation.
that
it was in before accessing
12
-
MULTIMEDIA
-;:.--
~
r:··~
~:.:
.....
~>'.,-
:'''.~;;~;
. "
.....
<
"
:
-.,:
.
USA
S-America1
S-America2
Radio
Europe
Korea
China
Arabia
Clock (HH:MM)
Clock Mode
12Hr
24Hr
Antenna
On
Off
Version
" .
,;::
.......
""zPi~~~'
;c.
":4:.'.';"-:;"':.,';.,;.::::...
',-'.,<'}i.,
~'>".'
":,'
"
oi':,~,,;~,'z"i;;J}''''''c~~~.~~
~:~':t~;
...
:.A
.....
~r.,-<:r"";
Y_
_
:,'·n.:"',-
":;'.,..;:
....
'-,f
•••
~;(~~~
~<.~••it.~"""~
~~,~
~
~~~~~'t.~
Select the appropriate setting based on
the countryinwhich you reside,
See "Adjusting the clock" to learn how to set the clock.
Clock displays 12 hourtime using
AM
and
PM
Clock displays 24 hour time up to 23:59
Version
display
~
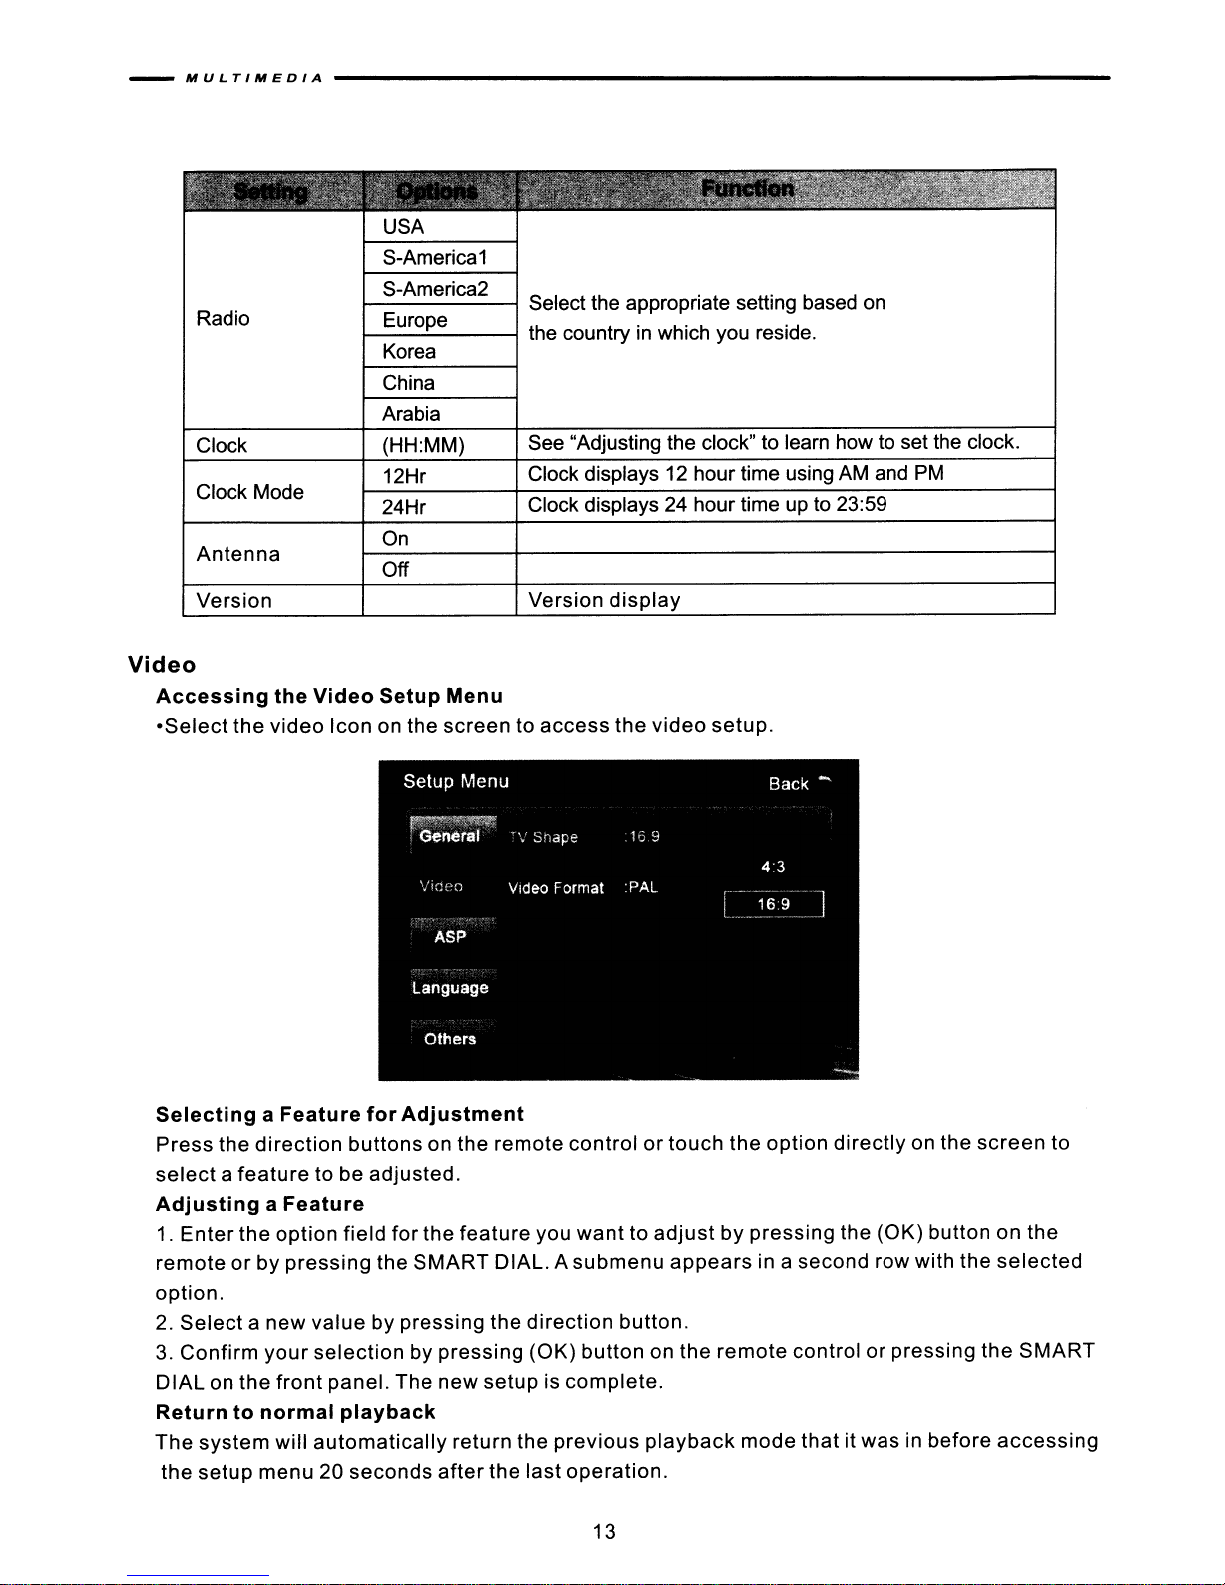
Video
Accessing
·Select
SelectingaFeature
Press
selectafeature
AdjustingaFeature
1.
Enter
remoteorby
option.
2.
Selectanew
3.
Confirm
DIALonthe
Return to
The
system
the
setup
the
the
video
the
direction
the
option
pressing
your
front
normal
will
menu20seconds
Video
to be
valuebypressing
Setup Menu
Icononthe
for
Adjustment
buttonsonthe
adjusted.
field
for
the
the
SMART
screentoaccess
remote
feature
DIAL. A
the
selectionbypressing
panel.
The
new
setupiscomplete.
playback
automatically
return
after
the
controlortouch
you
wanttoadjustbypressing
submenu
direction
(OK)
buttononthe
the
previous
last
operation.
the
video
button.
playback
setup.
the
appears
remote
option
directlyonthe
the
in a
second
controlorpressing
mode
thatitwasinbefore
(OK)
buttononthe
row with
screen
the
selected
the
accessing
to
SMART
13
______________________________
M U L
TIM
E DIA-
TV
Shape
16:9
4:3
Video
ASP(Audio
Auto
format
NTSC
PAL
Signal Processing)
The video
the
current
The video output is
The video output is in the standard PAL
Configuration
output
disc.
Menu
is switched
in
the standard NTSC
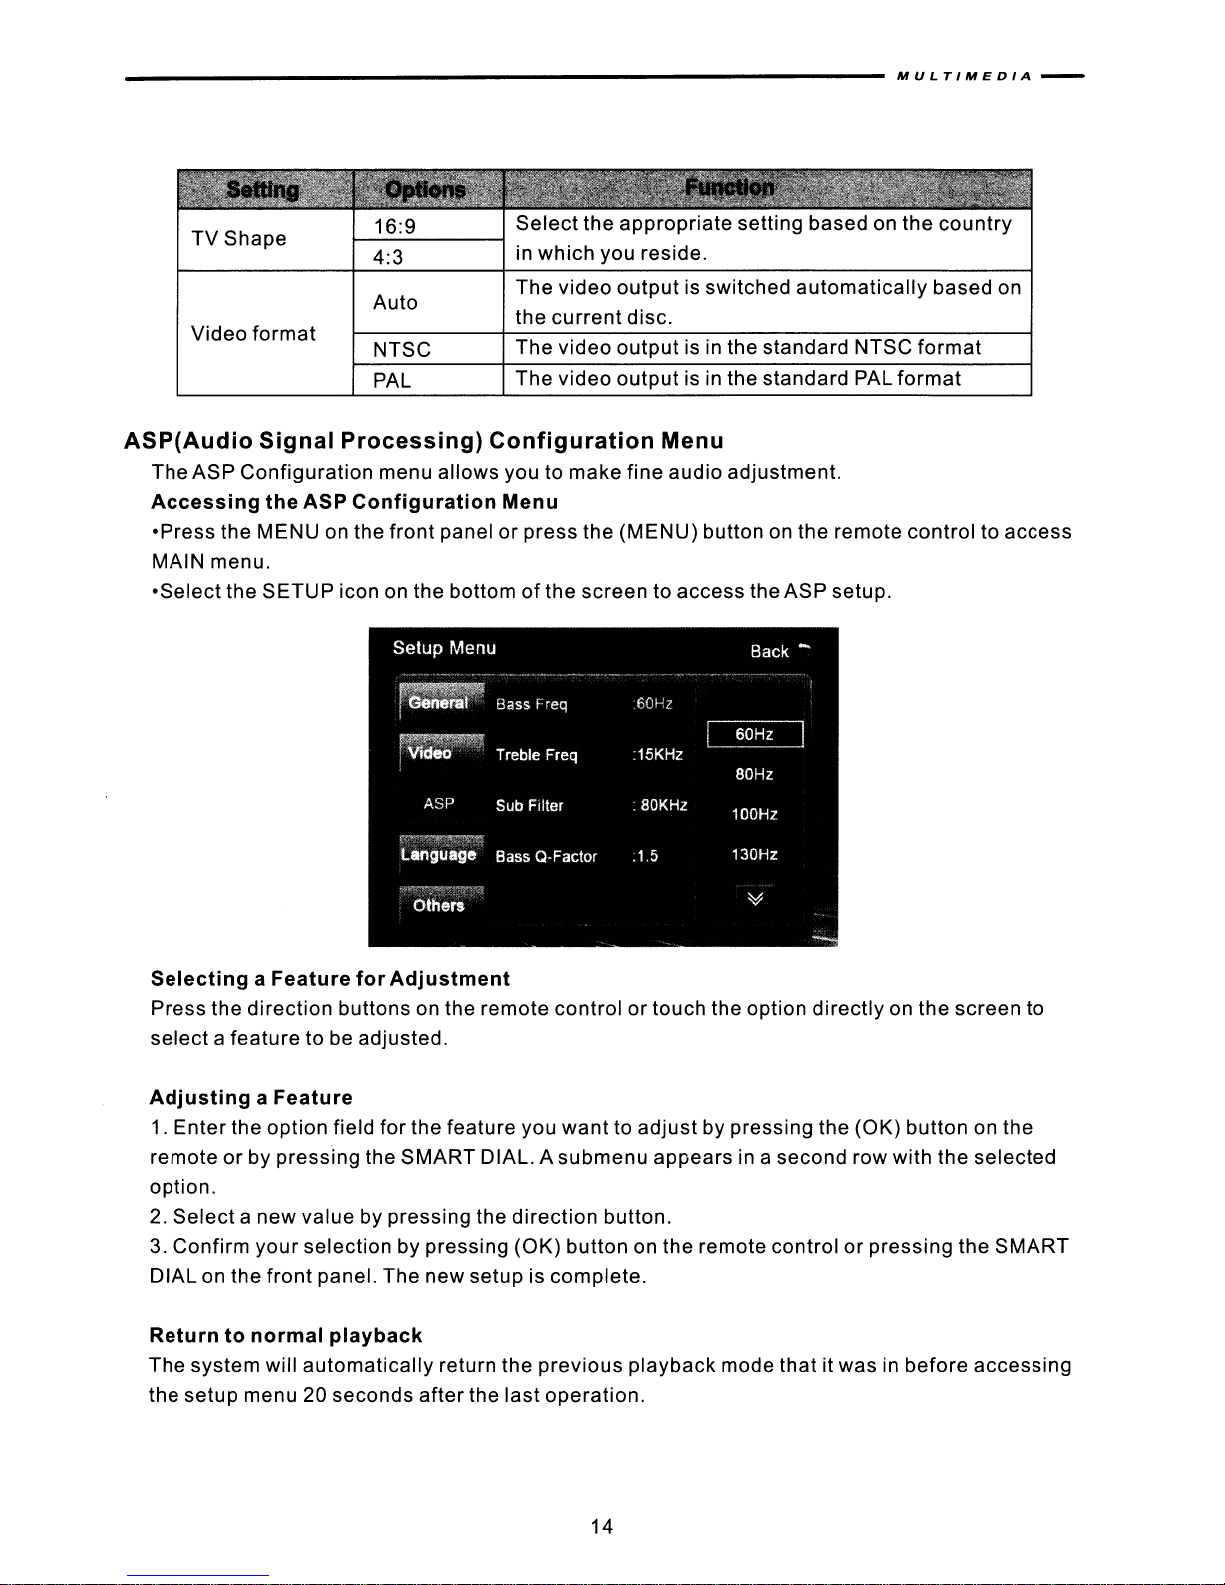
The ASP Configuration menu allows you to makefine audio adjustment.
Accessing the ASP Configuration Menu
·Press
the MENU on the front panel or press the (MENU) buttononthe remote control to access
MAIN menu.
·Select
the SETUP icon on the bottomofthe screen to access the ASP setup.
automatically
format
based on
format
Selecting a Feature for Adjustment
Press the direction buttons on the remote control
select
a feature to be adjusted.
Adjusting a Feature
1. Enterthe option field for the feature you want to
remote
or
by pressing the SMART DIAL. A submenu appears in a second row with the selected
option.
2. Select a new value by pressing the
3. Confirm
DIAL on the
your
selection by pressing (OK) button on the remote controlorpressing the SMART
front
panel. The new setup is complete.
direction
button.
Return to normal playback
The system will
automatically
the setup menu 20 seconds
return the previous playback mode that it was in before accessing
after
the last operation.
14
or
touch the option directlyon the screen to
adjust
by pressing the (OK) button on the
-
MULTIMEDIA
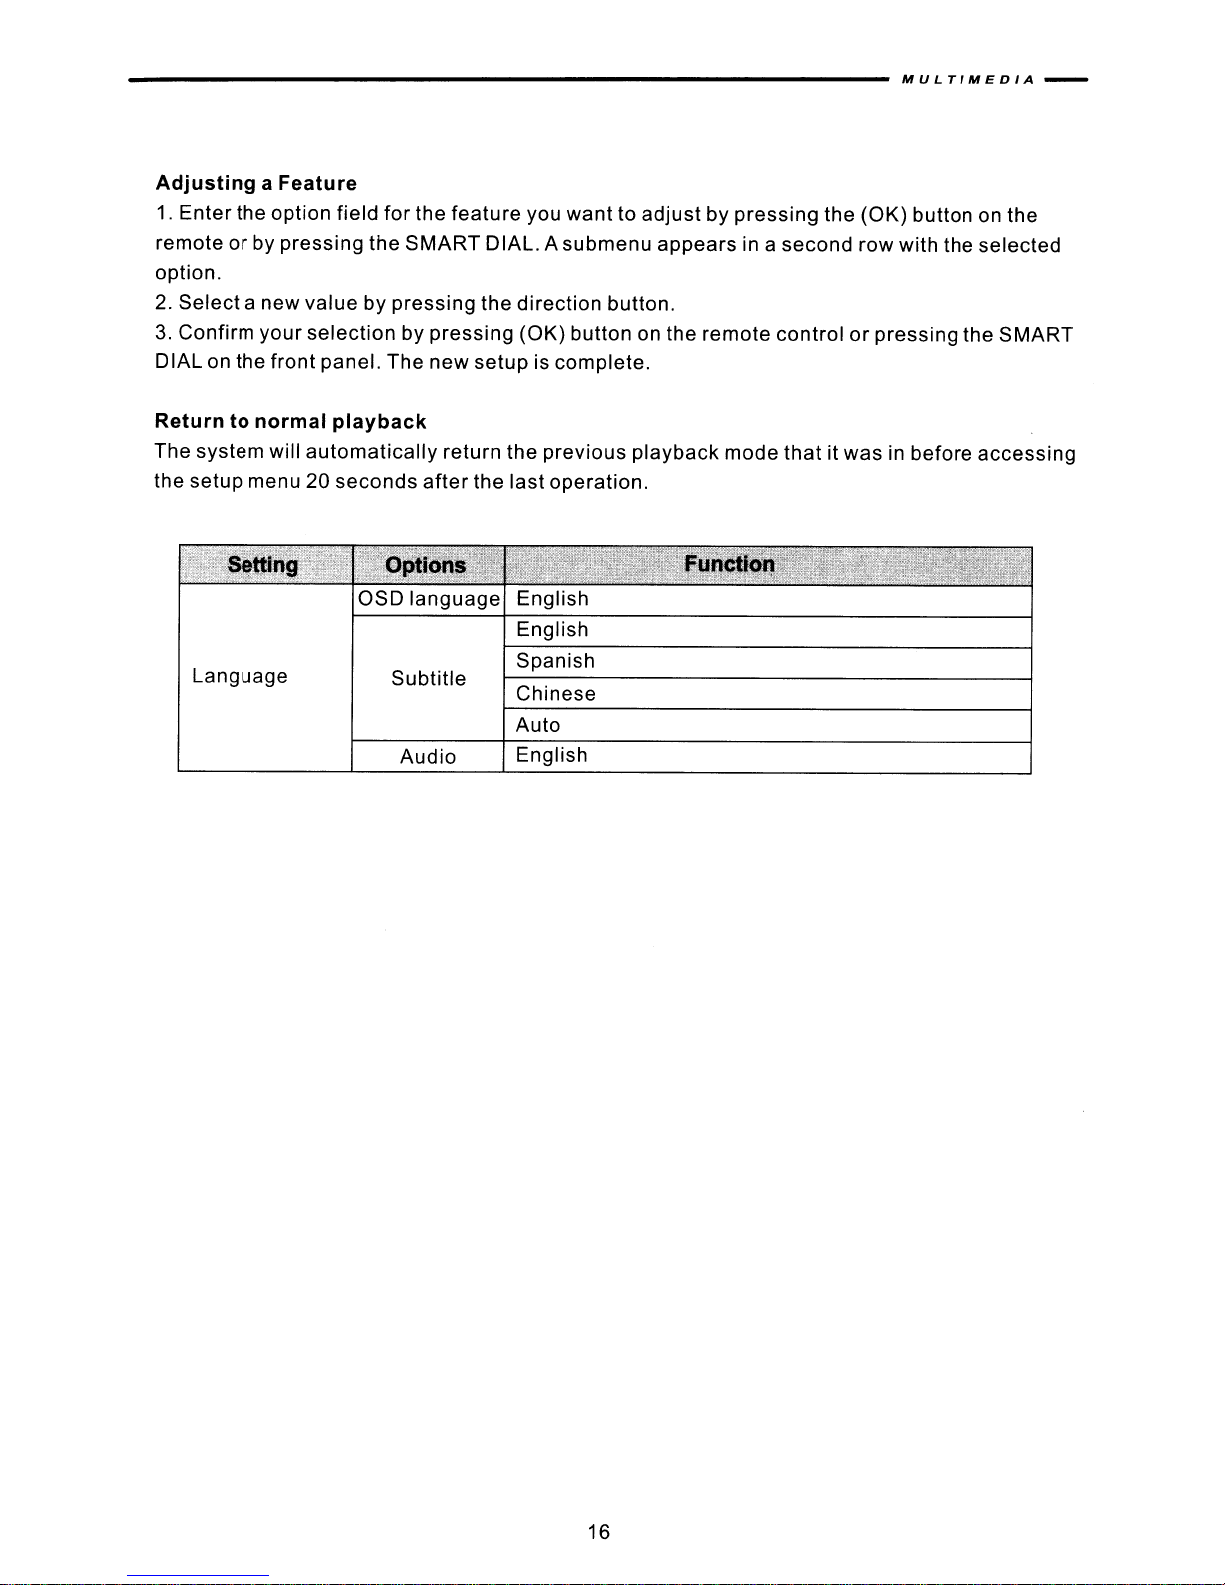
Language
Accessing
'Press
MAIN menu.
'Select
the MENU on the
the
Menu
the
SETUP
1---------1
1---------1
ASP
Configuration
icon on the
front
panelorpress
bottomofthe screen to access the ASP
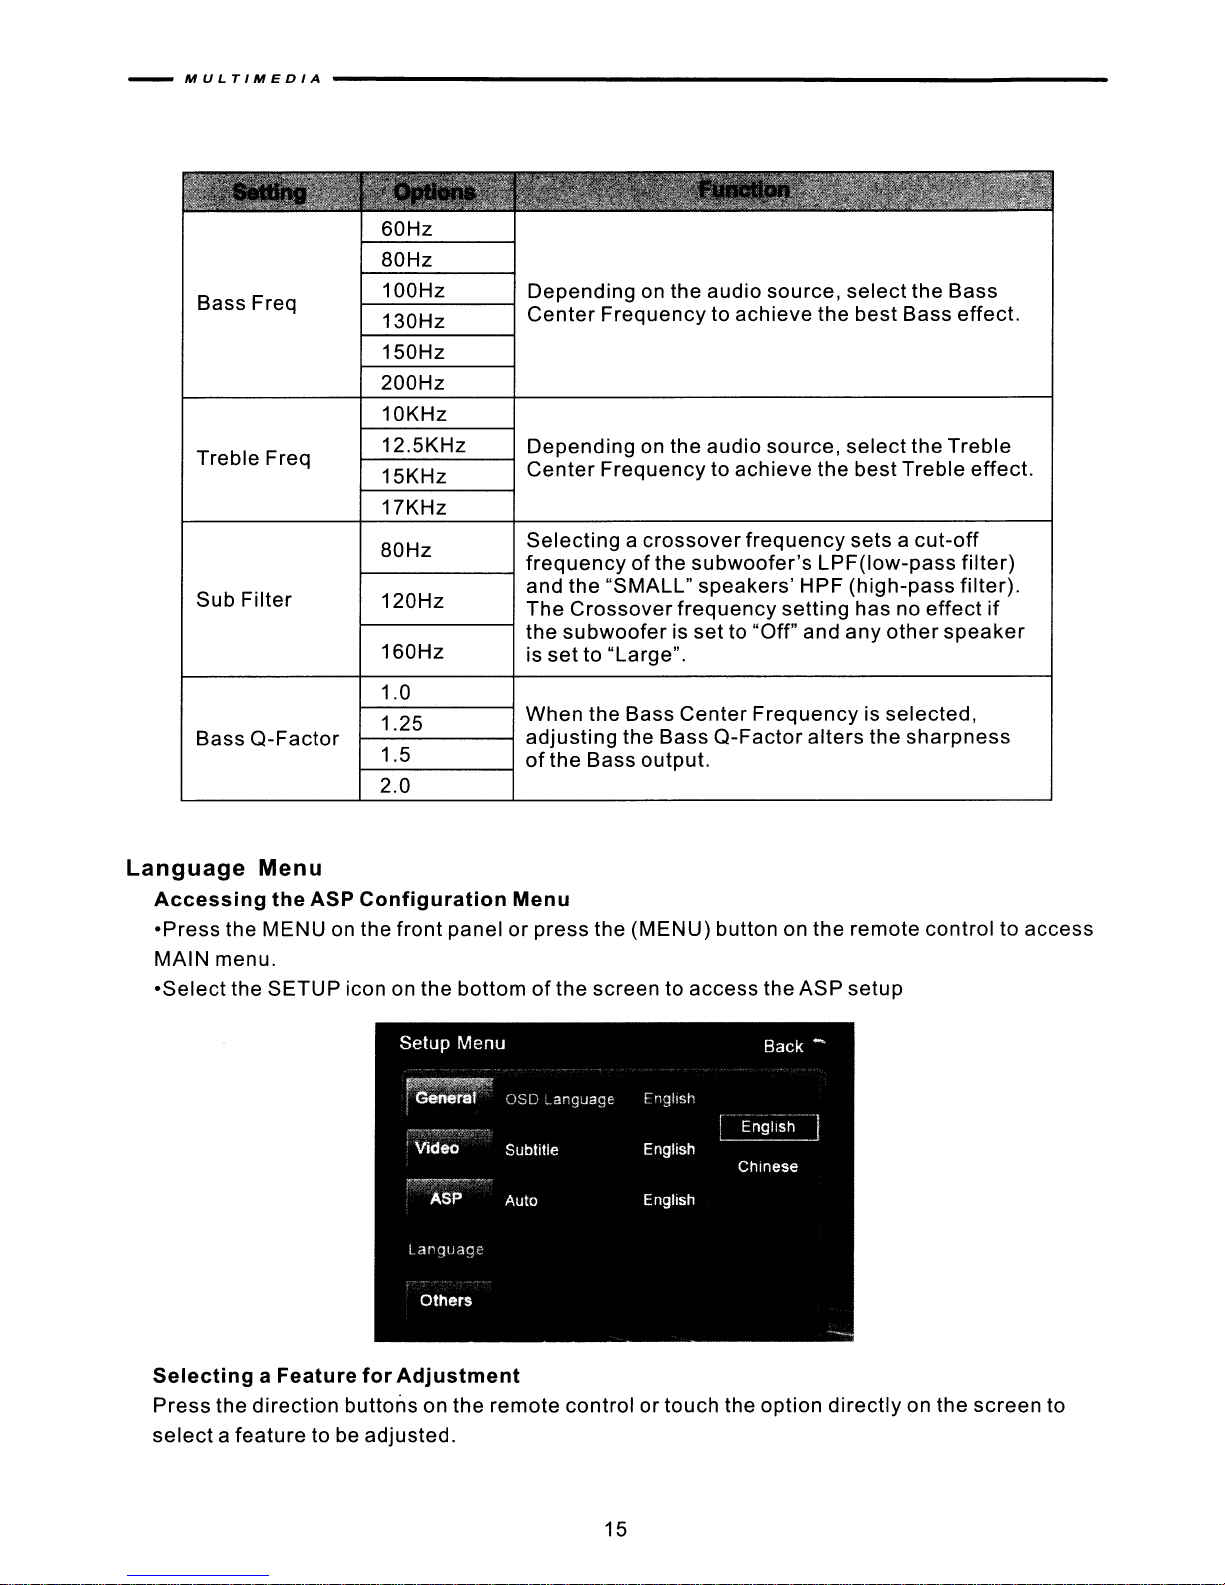
Depending
Center
Depending
Center
Menu
on the audio
source,
Frequencytoachieve
on the
audio
source,
Frequencytoachieve
the
(MENU)
button on
the
the
the
select
best
select
best
remote
setup
the
Bass
Bass
effect.
the
Treble
Treble
effect.
controltoaccess
Selecting
Press
selectafeature
the
direction
a Feature
to be adjusted.
for
Adjustment
buttons on the
remote
controlortouch
15
the
option
directlyonthe
screen
to
_______________________________
Adjusting a Feature
1.
Enter the option field for the
remoteorby pressing the
feature
SMART
you want to
DIAL. Asubmenu appears in a second row with the selected
option.
2.
Select a new value by pressing the direction button.
3.
Confirm your
DIAL on the front panel. The
selection
by pressing (OK) button on the remote
new
setup
is complete.
adjustbypressing
controlorpressing the SMART
M U LrlMED
IA
the (OK) button on the
-
Return to normal
The system will
automatically
the setup menu 20
Language
playback
seconds
OSD
Subtitle
Audio
return the previous playback mode
after
the
last
operation.
language
English
English
Spanish
Chinese
Auto
English
thatitwasinbefore
accessing
16
-
MULTIMEDIA
TUNER(FMIAM}
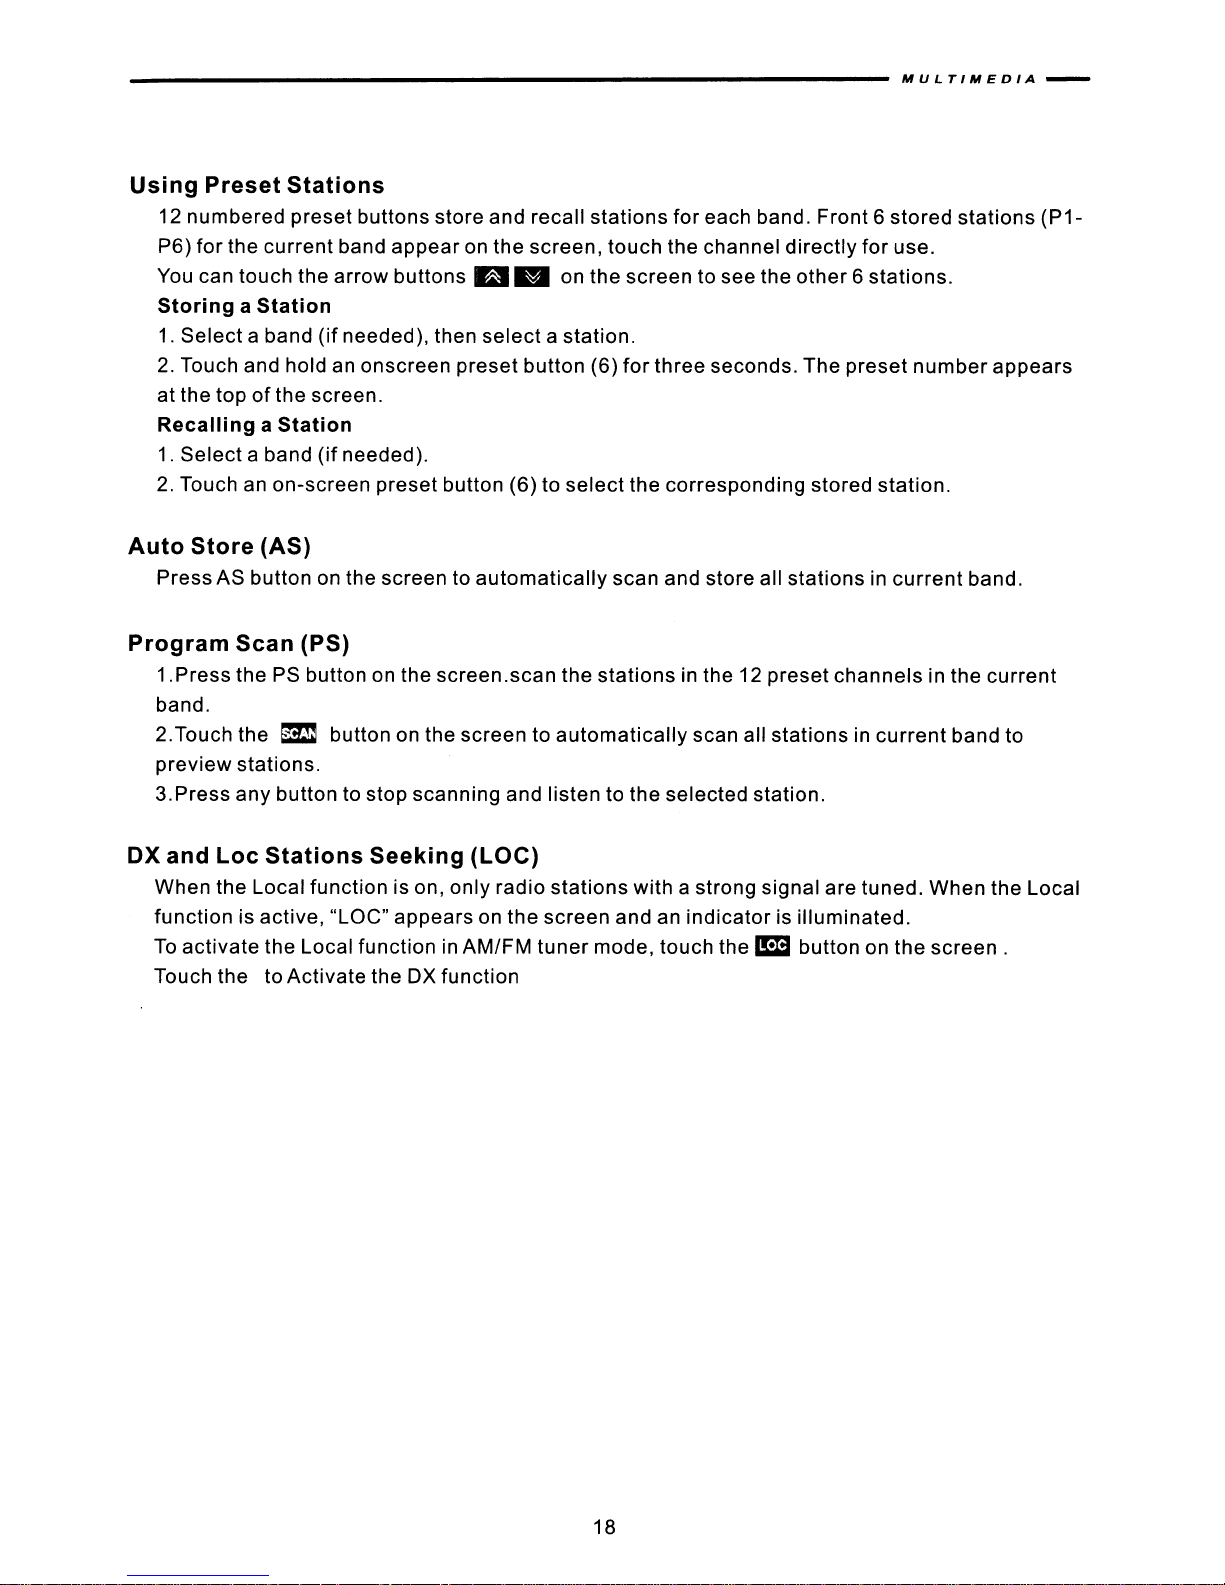
Tuner
TFT
Display
1.1m:
2.11:1:
3.1:11 : Touch to
4.
5.1:1
6.
7.
8. m
9.11!!I!I1
Touchtochange
Touchtoseek
a:
Touch to
: Touch to
m:
Touchtoactivate/deactivate
m:
Auto
:Program
:Touchtodisplay
OPERATION
seek
tune
tuneuponce
store
scan
TUNER
among
down.
up.
down
the
..
I4i4
EQ
r};\
':]
DISP
the
once
a step.
numeric
..
l
)
(lt
P·C1
P-C2
P-03
AS
a step.
875
888
97 1
PS
following
Scan
keypadonthe
...
MHz
MHz
MHz
t/r
SCAN
bands:
Mode
ST
FM-1 101.6 MHz
.
OX
ld
-
FM-1,
screen
09:30
LOC
FM-2,
AM
A
'07
FM-3
and AM.
SwitchtoRadio
Press
Select
Touch
change
Auto
Press
next
searching.
Press
the
searching.
Manual
Press
frequency
Press
frequency
SRConremote
FM/AM
the
W
among
Tuning
the
button
available
the
button
next
available
Tuning
the
..
one
the
...
one
Tuner
Band
channelbyincreasing
stepata time.
stepata time.
source
controlorFM/AM
buttononthe
the
following
(
~
) on
(
~
) on
channelbydecreasing
buttononthe
buttononthe
screen,orpress
bands: FM-1, FM-2,
remote
the
remote
remote
icon on
controlortouch
the
tuning
remote
controlortouch
the
controlortouch
controlortouch
TFTtoswitch
the
BAND
FM-3
the 1:11
frequency.
tuning
frequency.
the
the_
button
and AM.
Press
the
l1:li
1:1
a
to the
button
Tuner
(
B~~D
the button again to
button on
Press
buttontoincrease
buttontodecrease
) on
on the
the
source.
the
screentoseek
the
button
remote
screentoseek
control
the
stop
againtostop
the
tuning
the
tuning
to
17
_______________________________
Using Preset Stations
12 numbered preset buttons store and recall
P6)
for
the current band appearon the screen, touch the channel
You
can touch the arrow buttons mm on the screen to see the
Storing a Station
1.
Select a band
2. Touch and hold an onscreen preset button (6)
at the topofthe screen.
Recalling a Station
1. Select a band
2. Touch an on-screen preset button (6)to
(if
needed), then
(if
needed).
select
a station.
stations
select
M U L
for
each band. Front 6 stored stations (P1-
directly
other
for
three
seconds. The preset
the corresponding stored station.
for use.
6 stations.
number
TIMEDIA
-
appears
Auto
Store (AS)
Press AS button on the screen to
automatically
scan and store all stations in
current
band.
Program Scan (PS)
1.Press the PS button on the screen.scan the
band.
2.Touch the
preview stations.
3.Press any button to stop scanning and listen to the selected station.
OX
and Loc Stations Seeking (LOC)
When the Local function is on, only radio stations with a strong signal are tuned. When the Local
function is active, "LOC" appears on the screen and an indicator is illuminated.
To
activate the Local function in AM/FM
Touch the to Activate the DX function
m button on the screen to
stations
automatically
tuner
mode, touch the
in the 12 preset channels in the
scan all stations in
1m
button on the
current
band to
screen.
current
18

- M U LTIM E 0IA---------------
DVD
PLAYER
OPERATION
_
NOTE:
the
screen
will
When
parking
displays
operate
Insert/Eject
InsertingaDisc
When
NOTE:IfParental
code
You
NOTE:
Ejecting
Press
at
Reset
If
the
inserting
mustbeentered
cannot
CD-R/RW, DVD-R/RW,
a Disc
the
button
the
same
the
Loading
the
disc
loads
unittoreset
properly
brake
caution
normally.
installed,
is applied.Ifyou
information
DVD
video
cannotbedisplayed
attempttoplaya
with a
blue
Disc
a DVD disc, DVD
Lock
(Rating) is
and/or
insertadiscifthereisalreadyadisc
~
on the
time.
modeisentered
activated
the
disc
mustbeauthorized
DVD+R/RWs
unittoeject
the
and
will
disc.
Mechanism
abnormallyordoes
the
loading
mechanism.
not
play
function
The
discisejected
DVD
while the
background.
and
disc
the
disc
insertedisnot
(see "RATING
in the
unitorif
not
play
unless
The
unit
properly,
on the
vehicle
Rear
video
play begins.
the
power
the
recording
automatically
press
and
and hold the
normal
main
TFT
screen
is moving,
screens,ifapplicable,
authorized,
(Parental
is off.
revertstoTuner
operation
Lock)
sessionisclosed.
button
resumes.
the
the
unless
TFT
4-digit
Menu").
mode
..
on
Accessing
To
switch
oronthe
Using
the
DVD
Mode
to DVD mode when a
remote
Touch
control till DVD
Screen
Controls
discisalready
appearsatthe
inserted,
topofthe screen.
press
the SRC button on
the
front
panel
19
_______________________________
M U LTfME0fA
-
1.Touch to
2.Touch to
3.Touch to
4.Touchtofast
5.Touch to
6.Touch to
B
wherever
7.Touch to
8.Touch to
9.Touch to
Controlling
Stopping
Touch
stop
controltoresume
Pausing
Touch
Repeat
Press
accordingtothe
o
o
o
NOTE:
PBC
For
VCD
Press
is on,
NOTE: When
available.
random,
Sectional
Use
o
point
o
repeated
o
play.
DVD
DVD:
VCD
MP3:
VCD
the
Press
Press
Press
the
Playback
the
Playback
the
Repeat
(PBC
Repeat
For
(Play
with
playback.
the
(ROOT)
playback
scan,orsearch
A-B
the
(A)ofthe
the
section.
the
Play/Pause
stop
fast
reverse
forward
repeat
repeat
you
switch
display
return
playback
from
want
among
Sub-title
to DVD
A to B.
to end,
LEFT,
main
Select
then,
RIGHT
menu
Playback
Playback
stop
button
play;
touch
play/pause
Repeat
following:
Title,
Off):
Single,
VCD
play, the
back
play
starts
pac
Repeat
Repeat
functiontodefineaspecific
RepeatA-B
repeated
RepeatA-B
Repeat
a on the
the
disk
play.
button
button
Repeat
Repeat
Repeat
Control)
back
functionality,
button
from
is
activated,
and
direct
Function
button
button
The
selected
A-B
button
play/pause
E:4I
m on the
Chapter,
Single,
repeat
(VCD Only)
on the
track
playback
section.
Repeat
Folder,
functionisnot
remote
oneofthe
fast
track
(A-B)
(
A-B)
(A-B)
portionofthe
(
A-B)
the
repeat
DVD
displays
and
screenorpress
button
on
the
screentosuspendorresume
screenoron
Repeat
Off
Repeat
play
controltotoggle
forward,
selection
automatically
areaofa
on
the
again
againtocancel
pointAwherever
STEREO.
12m
Off
Off
availableifPBC
back
control
play
list.
slow
are
not
screenoron
once
DVD
from
A to B
the
(
B~~D
on
the
screenorthe
the
remote
(PBC)
the
playback,
available.
deactivates
disctorepeat.
the
you
reach
will
now
repeat
the
A-B
you
wanttostart
continually.
)
buttononthe
(OK)
controltoalter
is on.
provides
PBC
and
previous/next
When pacis
additional
function
pac.
remote
the
section
controltoset
desired
continuously.
setting
remote
button
disc
play.
repeat
"On"I"Off".
activated,
end
point
track
and
and
the
control
on the
mode
controls
Once
are
selecting
the
start
(B)ofthe
stop
repeat
point
to
remote
for
PBC
Accessing
1.You can
the
DVD Menu
touch
the
areaF,and then
touch
the
20
Il!!§j
buttontorecall
the
main
DVD
menu.
- MULTIMEDIA
----------------
_
2.Use the
arrow
buttons on the remote to
select
a title from the menu.
3.Press the (TITLE) button on the remote control to select a
4.Press
the (OK) button on
the
remote controlortouch the item
selection and begin playback.
Moving
Press the (
Press the (
Touch the right side
screen to move to the
Fast
Press the (
forward. Keep pressing
Through
~
) button on the remote control to advance to the next
I+lI )button on the remote control to move to the previous
Forward/Fast
~
) button on the remote control
Chapters
of
the
screentoadvance
previous
Reverse
or
touching
to the next chapter,ortouch
chapter.
or
touch the a
and releasing the button to increase the rate from "2X" to
"4X", "8X", and "16X".
Press the
reverse. Keep pressing
(...
) button on the remote controlortouch the .ofarea E on the screen to fast
or
touching
and releasing the button to
"4X", "8X", and "16X".
different
title
directlytoconfirm
chapter
chapter
of
area E on the screen to fast
increase
the rate from "2X" to
for
playback.
your
on the DVD.
on the DVD.
the left sideofthe
21
________________________________
M U L
TIMEDIA
-
GOTO
During
specific
1.
Press
2.
Press
•
For
•
For
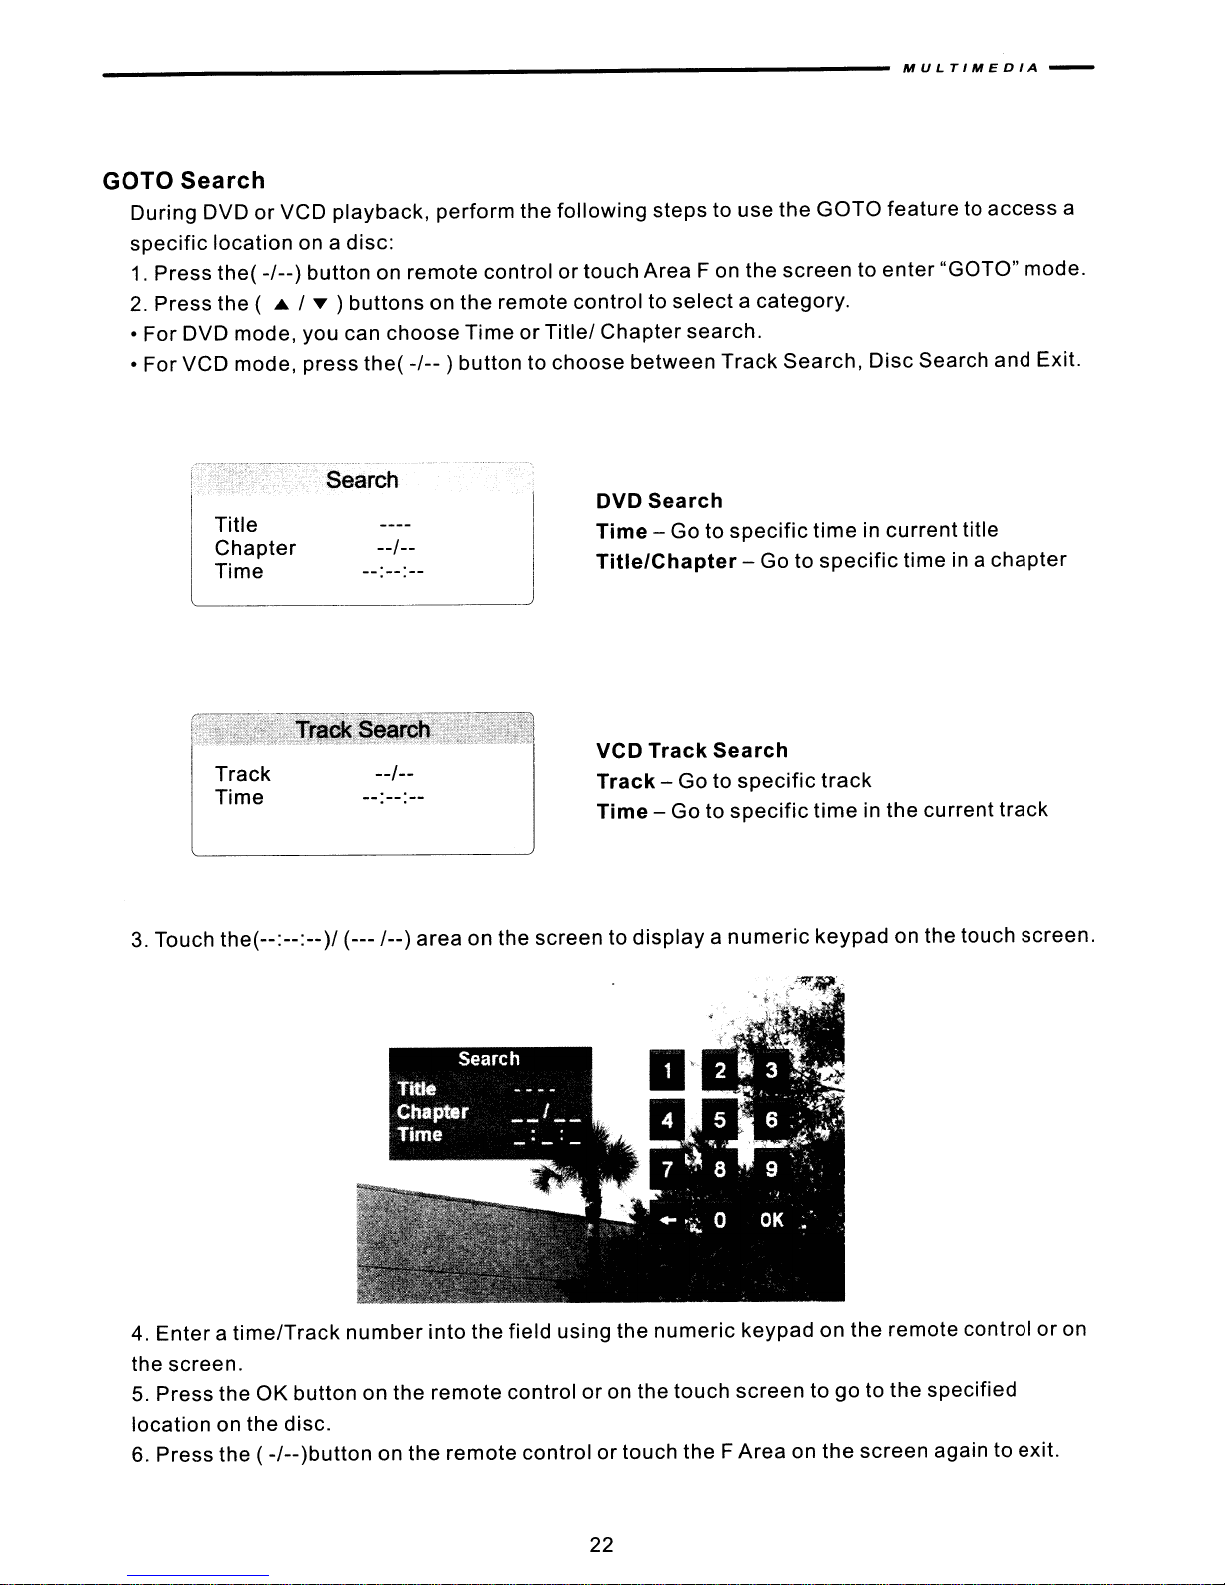
Search
DVDorVCD
location
the(
the (
DVD
mode,
VCD
mode,
Title
Chapter
Time
Track
Time
playback,
on a disc:
-/--)
buttononremote
....
/ T )
buttonsonthe
you can
press
the(
choose
-/--
--/--
--/--
perform
the
following
controlortouch Area F on
remote control to
TimeorTitle/
) button to
Chapter
choose
DVD
Time - Go to
Title/Chapter
VCD Track
Track Time - Go to
steps
to use
the
selectacategory
search.
between
Track
Search
specific
- Go to
Search
Gotospecific
specific
the
GOTO
featuretoaccess
screentoenter
.
Search,
Disc
timeincurrent
specific
time in a
track
time
in the
a
"GOTO" mode.
Search and Exit.
title
chapter
current
track
3.
Touch
4.
Enteratime/Track
the(--:--:--)/
the screen.
5.
Press
the
OK
locationonthe
6.
Press
the
(-/--)button
(---
/--)
number
buttononthe
disc.
on
area
into
remote
the
on the
the
remote
screentodisplayanumeric
field using the
control or on
controlortouch
numeric
the
touch
the
F Area on
keypad
keypadonthe
on the touch screen.
remote controloron
screentogotothe
the
screen
specified
again to exit.
22
- M U L
TIME
0
IA
----------
_
Direct
Viewing an
Chapter
During DVD, VCD and CD playback, you can use the
access a
Some DVDs
recorded with
available
track
I Track Selection
directly.
Alternate
contain
multiple
anglesofthe
scenes
Picture Angle (DVD Only)
that have been shot
angles, press the
on-screen
image.
(ANGLE)
Zooming
Press the
the
following
ZOOM
options:
button on the remote control to
"Q1","Q2", "Q3", and "OFF".
Multi-Language Discs (DVD Only)
Changing
Ifyou are
remote
NOTE:
between
Changing
Ifyou are
on the
also can
Audio
watchingadisc
controltochoose
During
Left
Subtitle
watchingadisc
remote
touch
Language
VCD playback,
Channel,
Language
control to choose the language in
area
E,
recorded in multiple
a language. You also can touch areaE,and then touch the
press
Right
Channel,
recorded in multiple
and then touch the lID
the (AUDIO)
and
Stereo.
numeric
simultaneously
button on the remote control to toggle
enlarge
languages,
button
languages
which
button.
you would like the
keypad on the remote control to
from
different
and pan
press
on the remote
with subtitles, press the (SUBT) button
through
the
(AUDIO)
the video image using
buttononthe
control
subtitles
angles. For
am
to choose
to appear. You
discs
button.
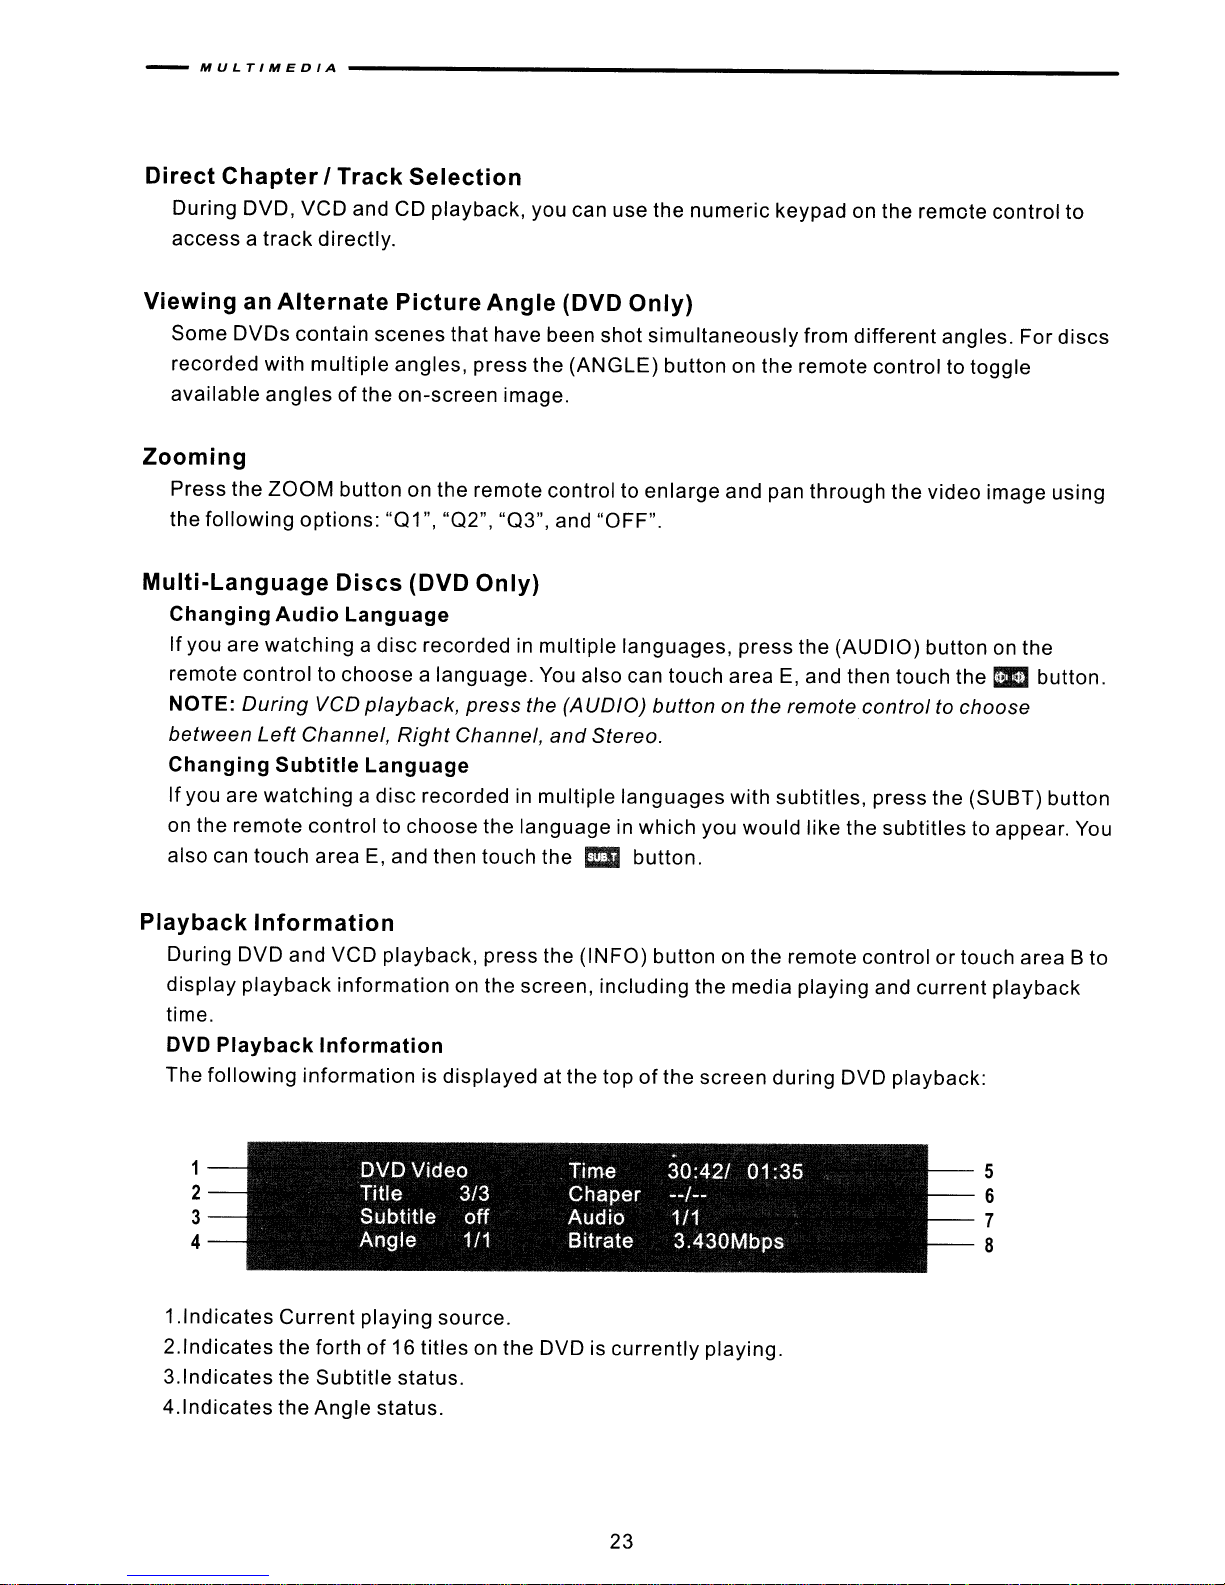
Playback Information
During DVD and VCD playback, press the (INFO) button on the remote controlortouch area B to
display
time.
DVD
The
playback
Playback
following
information
Information
informationisdisplayed
on the screen, including the media playing and
current
at the topofthe screen during DVD playback:
playback
.
1
2
3
4
1.lndicates
2.lndicates
3.lndicates
4.lndicates
DVD
Video
Title 3/3
Subtitle
Angle
Current
the forthof16 titles on the DVD is
the
the Angle status.
playing
Subtitle
status.
off
1/1
source.
Time
Chaper
Audio
Bitrate
30:421
_./_.
1/1
3.430Mbps
currently
01
playing.
:35
5
6
7
8
23
______________________________
M U L
TIME
0
IA
-
5.lndicates
6.lndicates
7.lndicates
8.lndicates
General
the
playback
the
firstof20
EQ
setting
the
Bitrate.
Disc
~
Information
VIDEO
2rE
disc
(DIGITAL
VlDEOl
disc
DIGITAL
AI.JDtD
I TEXT I
timeofthe
chapters
(or
decoding
Single side single layer (DVD-5)
Single side double layer (DVD-9)
Double side single layer (DVD-10)
Double side double layer (DVD-18)
Single side single layer (VCD)
Single side single layer
current
on
the
mode
title.
DVDiscurrently
when
listening
playing.
to a
DVD
surround
(MPEG 2 Method)
133 minutes
242 minutes
266 minutes
484 minutes
(MPEG 1 Method)
74 minutes
74 minutes
sound).
Disc
Symbols
@))
Numberofvoice languages recorded.
The number inside the icon indicates the number languages
on the disc (maximumof8).
Numberofsubtitle languages available on the disc
(maximumof32).
Numberofangles provided (maximumof9).
Aspect ratios available. "LB" stands for Letter Box and "PS"
stands for Pan/Scan. In the example on the left, the 16:9 video
can be converted to Letter Box video.
24
- M U L
TIME
DIA
-------
Indicates the region code where the disc can be played.
1:
• Region
• Region
USA, Canada, East Pacific Ocean Islands
2:
Japan, Western Europe, Northern Europe, Egypt,
South Africa, Middle East
3:
• Region
Taiwan, Hong Kong, South Korea, Thailand,
Indonesia, South-East Asia
• Region
4:
Australia, New Zealand, Middle and South
America, South Pacific Ocean Islands! Oceania
• Region
5:
Russia, Mongolia, India, MiddleAsia, Eastern
Europe, North Korea, North Africa, North-WestAsia
• Region 6: Mainland China
• ALL: All regions
_
25
_______________________________
M U L
TIM
ED
IA
-
CDI"P3IWItfAIJPEG
Instructions
Forward/Fast
Please
The
file
• ISO
9660-file
•
ISO
9660-file
•
Joliet
If
the
fileorfolder
displayedorplayed
CD
Player
see
the
naming
- 64
User
for
Reverse,
characters
OPERATION
Insert/Eject,
DVD
Player
formats
name:12characters,
name:31characters,
name
back
Play/Pause,
Scan,
Operation
listed
does
not
correctly.
and
below
conform
Interface
DISC CD C:JDA
...
l+ll
EO
..
Ic}»
..
..
Ie}
..
DISP
Stopping
Random
Play
section
are
compatible
file
extension:3characters
file
extension:3characters
to ISO
~
~
"I
"I
2
"I
3 unchained melogy
.\
4
~
Sealed with a k A
great
pretender
:erp~ess
are
for
information
9660
'~va!t2
Playback,
the
with
Track
same
for
about
this
unit:
file
system
09:30
4120 03:26
Selection,
DVD,
these
CD and MP3
Fast
topics.
standards,itmay
AM
~
operation.
not be
1.
2. :
3.
4. m
5.
6.
7.
8.
9. m :Touch to
controltotoggle
1
11. m:Touch to
m
D:
EI:
O.I!!I:
:Previous
Next
track
:Play
:Previous
:Next
page
Touch to
: Touch to
Touchtofast
Touch to
track
page
displayofTFT
displayofTFT
stop
disc
fast
backward
forward
activate/deactivate
the
scan
activate/deactivate
activate/deactivate
12.1§!§1: Touchtodisplay
keypadtoaccessatrack
playback
current
current
function
the
numeric
directly.
•
track
track
Scan
"on/off"
Repeat
Random
keypad
§
SCAN
And you can
Single
Mode
Mode
on the
screen
CJ
press
:x:
and
the
(Title)
then
button
you can
on the
use
the
remote
numeric
26

-
MULTIMEDIA
Playing CD Files
After
inserting a CD disc, files will playinthe sequenceofthe directory. In playing back, you can
press the
Fast
Touch the
numeric
backward/fast
button on the remote control or touch a track on the onscreen directly to play.
or
11:I
forward
on the screen to Fast backward orfast forward play.
MP3/WMA Discs
This player
DVD+R/RW and DVD-R/RW. For CD-RW discs, please make sure they are formatted using the
full method and not the quick method to prevent improperdisc operation. Use the following
settings when compressing audio data
• Transfer
• Sampling Frequency:
When recording MP3 up to the maximum disc capacity, disable
on an empty
allows
Bit
you to playback MP3/WMA files recorded on CDROM, CD-R, CD-RW,
Rate: 320kbps
disc
up to maximum disc capacity, use the "Disc at once" setting.
48kHz
for
your MP3 disc:
additional
writing. For recording
The touch keys for
1.
Ell: Touch to display previous folder
2.
a:
Touch to display
Playing
After
playing back, you can press the numeric buttononthe remote control or touch the a track
to play.
Change
Touch the D or
MP3/WMA
inserting a
Directory/Folder
MP3/WMA
next
Files
MP3/WMA
rJI
on the screen to navigate through the directories/folders.
CDIDVD playbackare described below.
folder
disc, files will playinthe sequenceofthe directories/folders.
In
directly
Previous/Next Page
m
or
Touch the
m on the screen to navigate through the pages/files.
27
 Loading...