

Page 1
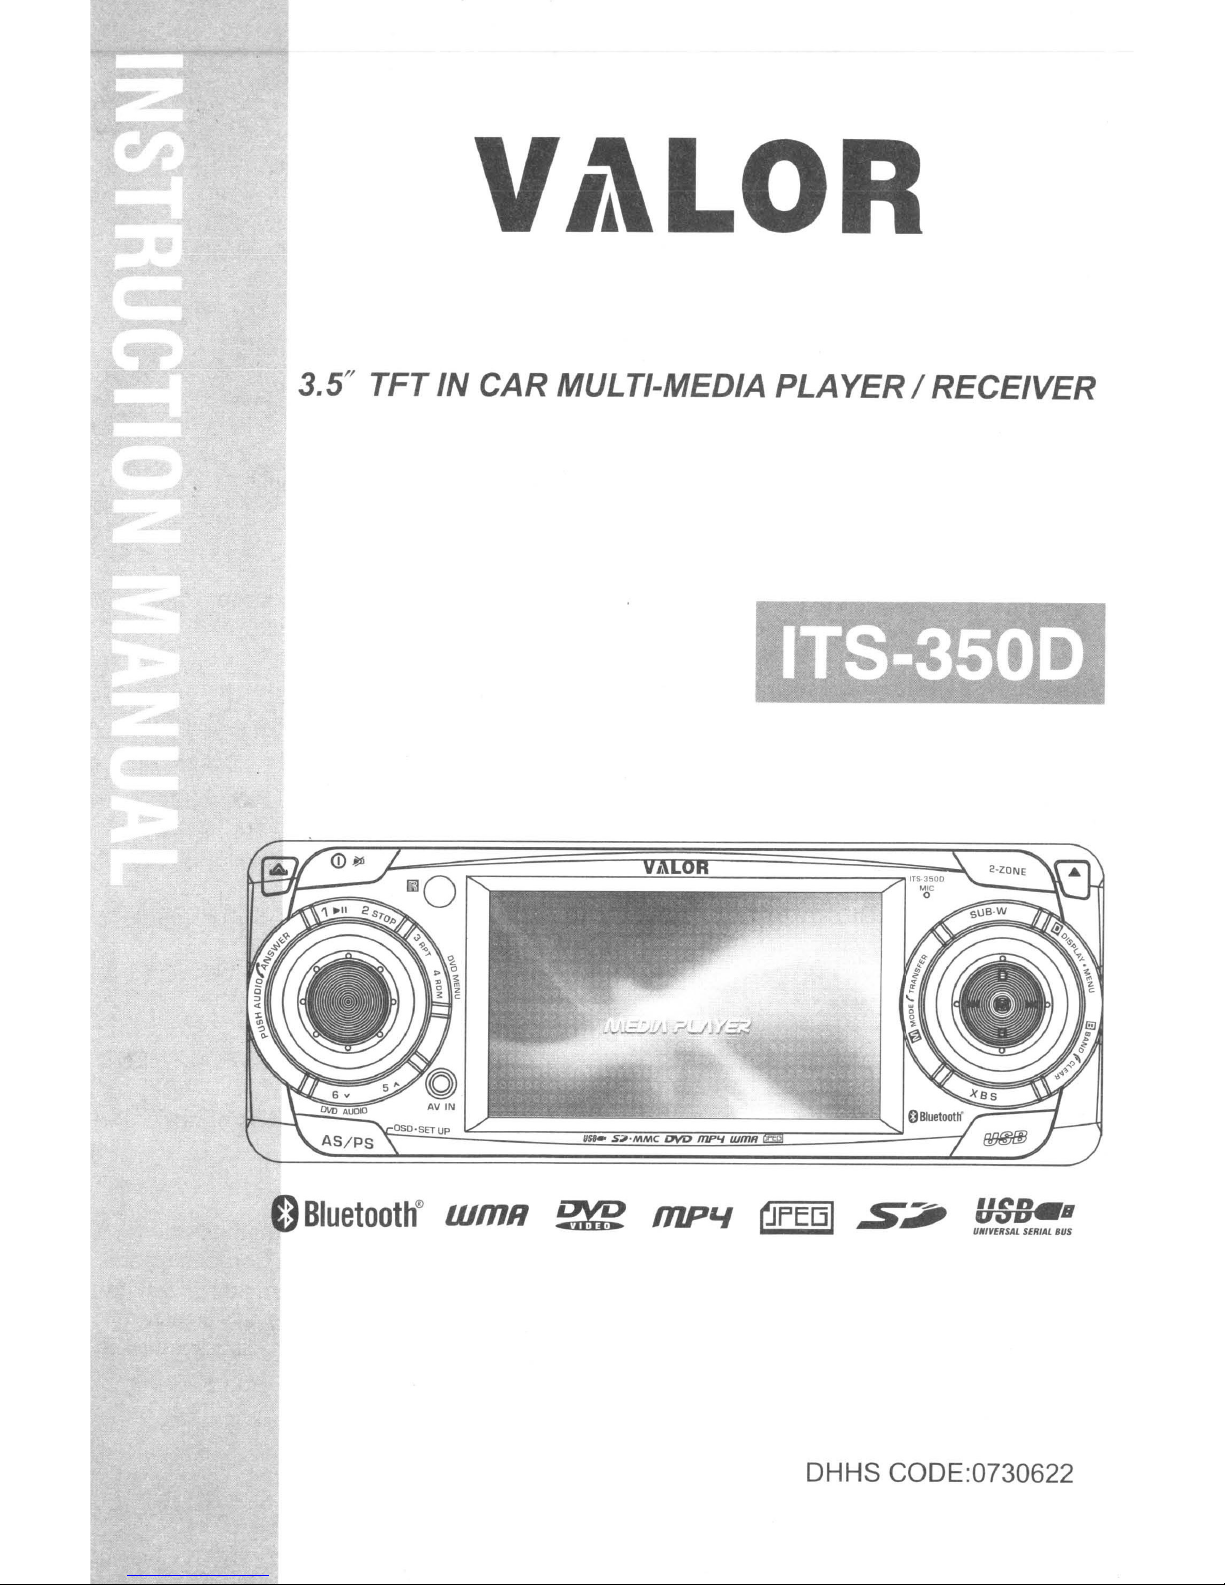
3.5
H
TFT IN CAR MULTI-MEDIA PLAYER / RECEIVER
:
Bluetooth®
LUmR
~
mP'-I
~FE(JI
S2i'
DHHS CODE:0730622
"t:.-n.
UiJU
U","ERSAL SERIAL BUS
B
Page 2
1.
SAFETY
When Driving
Keep the volume level
When Car Washing
Do not expose the product to water or excessive mOisture. This could cause electrical shorts,
fire or other damage.
ill
Caution:
In
order to avoid any accident, the driver must not watch video while driving. This unit
designedtonot
engage the 'parking brake' before watching moving video
When Parked
Parkingindirect sunlight can produce very high temperatures inside your vehicle. Give the
interior a chance to cool
Use the Proper Power Supply
This productisdesigned to operate with a 12 volt
regular system
INFORMATION
low
enough to be aware of the road and traffic conditions.
allow watching moving video while driving. Park
down
in
a North American car).
before starting playback.
DC,
negative
your
ground
is
car in a safe place and
battery system (the
Protect the Disc Mechanism
Avoid inserting any foreign objects into the slot of this player. Failure to follow this may cause
malfunction or permanent damage due to the precise mechanism of this unit.
CAUTION:
THIS MOBILE
VISIBLE/INVISIBLE LASER BEAM WHICH COULD CAUSE HAZARDOUS RADIATION
EXPOSED DIRECTLY.
INSTRUCTED.
USE OF CONTROLS
THOSE SPECIFIED HEREIN
DO NOT OPEN COVERS AND DO NOT
QUALIFIED TECHNiC!Af'J.
WARNING:
•
TO
REDUCE THE RISK
TO
RAIN
• TO REDUCE THE RiSK OF
USE ONLY THE RECOMMENDED ACCESSORIES.
• THIS DEVICE
This product incorporates copyright protection technology that is protected by method claims of
certain U.S. Patents and other intellectual property rights owned
otner rights owners. Use
Macrovision Corporation, and
otherwise authorized by Macrovision Corporation. Reverse engineering or disassembly
prohibited.
DVD
OR
MOISTURE.
IS
PLAYER
BE
SURE TO OPERATE THE MOBILE DVD PLAYER CORRECTLY AS
OR
ADJUSTMENTS
MAY
OF
INTENDED
of
IS
A CLASS I LASER PRODUCT. THIS UNIT USES A
OR
PERFORMANCE
RESULTINHAZARDOUS RADIATION EXPOSURE.
REPAIR
FIRE
OR
ELECTRIC SHOCK, DO NOT EXPOSE THIS EQUIPMENT
FIRE
OR
ELECTRIC SHOCK, AND ANNOYING INTERFERENCE.
FOR
CONTINUOUS OPERATION.
this copyright protection
is
intended for horne and other limited viewing uses onlyunless
BY
YOURSELF PLEASE REFER SERVICING TO A
OR
PROCEDURES OTHER THAN
by
Macrovision Corporation and
technology
must be authorized by
IF
is
E-2
Page 3
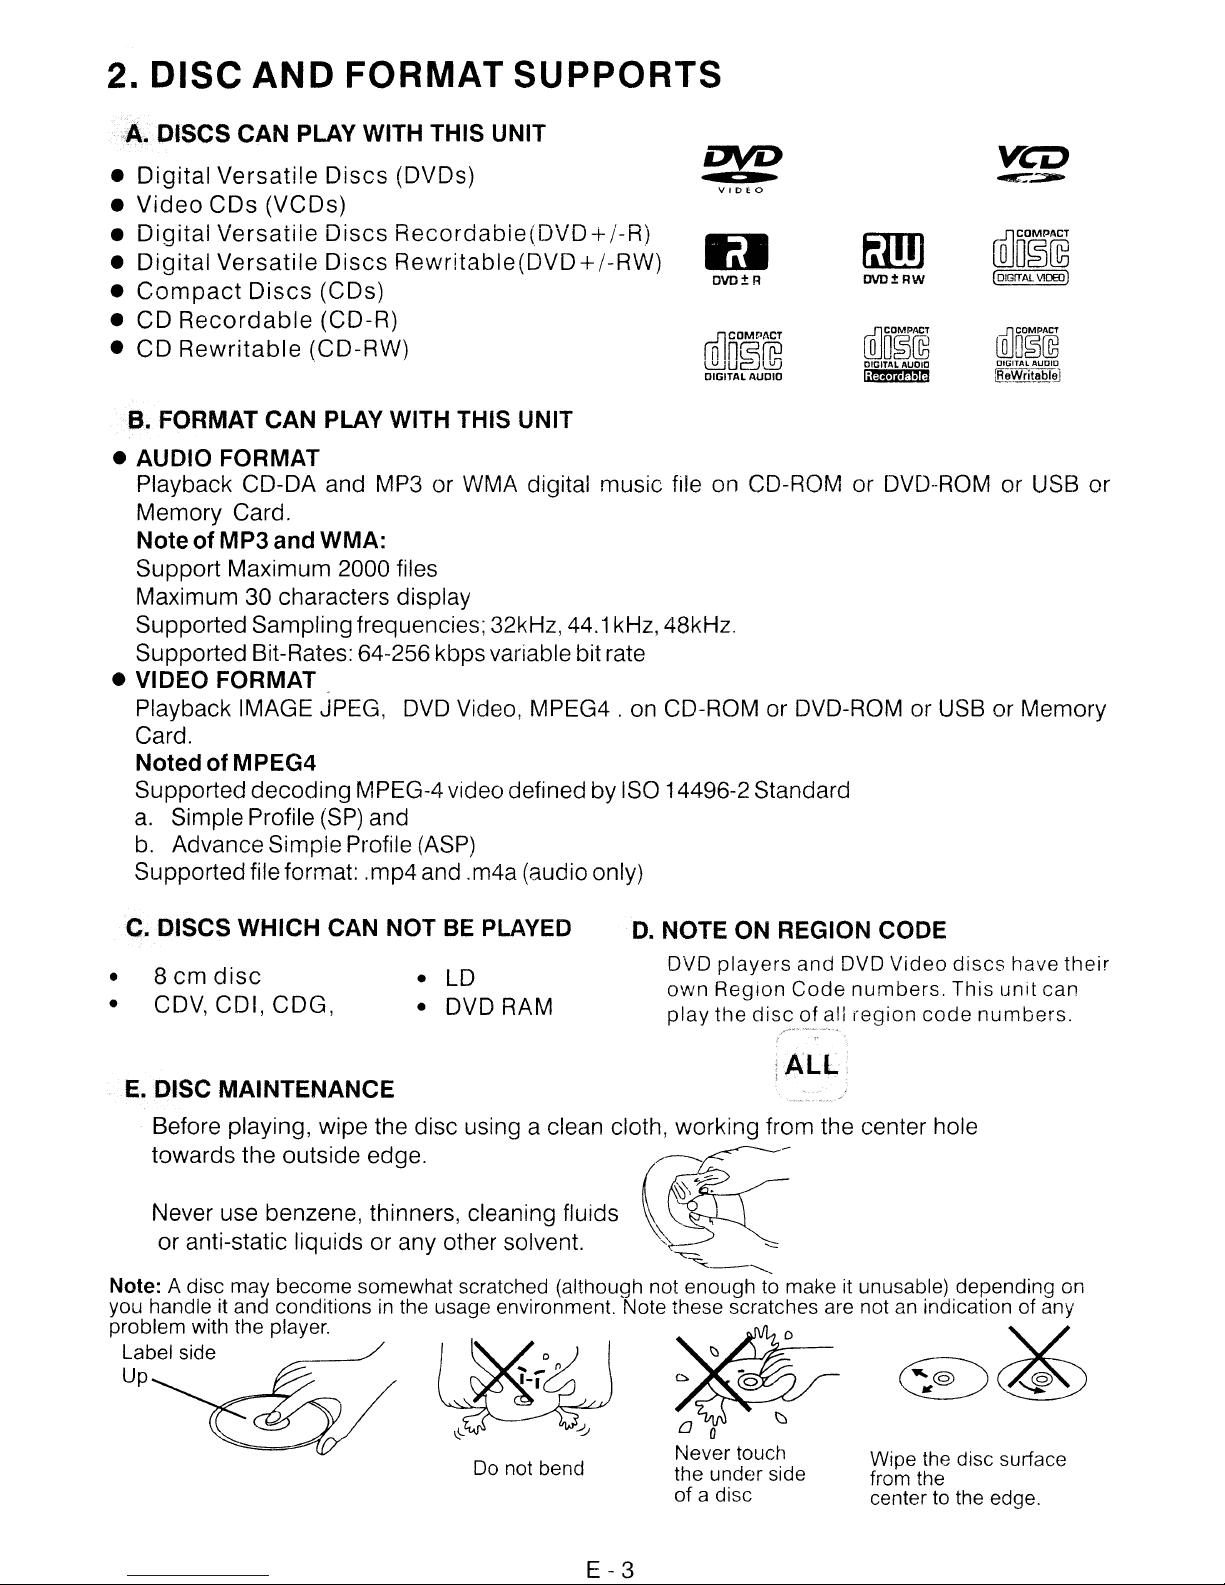
2.
DISC
A.
DISCS CAN PLAY WITH THIS UNIT
Digital
•
•
Video
Digital
•
•
Digital
•
Compact
• CD
•
Recordable
CD
Rewritable
B.
FORMAT CAN PLAY WITH THIS UNIT
AND
Versatile
CDs
(VCDs)
Versatile
Versatile
Discs
FORMAT
Discs
Discs
Discs
(CDs)
(CD-R)
(CD-RW)
(DVDs)
Recordabie(DVD+/-R)
Rewritable(DVD+/-RW)
SUPPORTS
D\ID
IU
n{lCOMD/lCT
~u
DIGITAL
v I D f 0
OVO±R
n
n~fGi
l."-J
AUDIO
• AUDIO FORMAT
Playback CD-DA and MP3 or
WMA
digital music file on CD-ROM or DVD-ROM or USB or
Memory Card.
Note of MP3and WMA:
Support Maximum 2000 files
Maximum 30 characters display
Supported Sampling frequencies; 32kHz,
44.1
kHz, 48kHz.
Supported Bit-Rates: 64-256 kbps variable bit rate
• VIDEO FORMAT
Playback IMAGE JPEG,
DVD
Video, MPEG4 . on CD-ROM or DVD-ROM or USB or Memory
Card.
Noted of MPEG4
Supported decoding MPEG-4video defined by ISO 14496-2 Standard
a.
Simple Profile
b.
Advance Simple Profile
(SP)
and
(ASP)
Supportedfile format: .mp4 and .m4a (audio only)
fillJ]
OVD±RW
[Q]O§(lli
DIGITAL AUDIO
lii44.i;.t;1""
veo
~~
illlD~~
(
DiGIT
AL
\~OEO)
WD~~
DIGITAL AUDIO
~_Writabl~
C. DISCS WHICH CAN NOT
• 8
•
cm
CDV,
disc
CDI, CDG,
BE
PLAYED
LD
•
• DVD RAM
D.
NOTE ON REGION CODE
DVD
own
play
players
Region
the
and
Code
discofall
DVD
numbers.
region
Video
code
discs
This
numbers.
have
unit
their
can
ALL,
E.
DISC MAINTENANCE
Before playing, wipe the disc using a clean cloth, working from the center hole
towards the outside edge.
Never use benzene, thinners, cleaning fluids .
or anti-static liquids or any other solvent.
Note: A disc may become somewhat scratched (although not enough to make it unusable) depending on
you handle it and conditions in the usage environment. Note these scratches are not
problem with the player.
Label side
Up
Do
not bend
~
I\)\~
,'.
~-
o 0
Never touch
the under side
of
a disc
"-'
..........
an
indication of any
~
~
~
Wipe the disc surface
from the
center to the edge.
~
E-3
Page 4

3. INSTALLATION
• Before finally installing the unit,
up
properlyand the unitand system work properly.
• Use only the parts included with the unit to ensure proper installation. The use
parts can causemalfunctions.
• Consult with your nearest dealer if installation requires the drilling of holes or other
modificationsofthe vehicle.
• Install the unit where it
a suddenstop, like an
does
emergency
• ii installation angle exceeds 30° from horizontal, the unit
performance.
• Avoid installing the unit where it would be subject to high temperature, such as from direct
air,
sunlight, or from hot
vibration.
• Be sure
to
removethefront panel before installingtheunit.
from heater,
connect
notgetin the driver's way and
stop.
the wiring temporarilyand
LJ
or
where it would be
cannot
3D"
make
injurethe passenger ifthere
might
subject
sure it is all connected
of
unauthorized
not give its
to dust dirt or excessive
optimum
DIN FRONT/REAR-MOUNT
This unit can be property installed eitherfrom "Front" (conventional DIN Front-mount) or
Rear-mount installation, utilizing threaded screw holes at the sidesofthe unit chassis). For details,
referto thefollowing illustrated installation methodsAand
B.
"Rear"(DI~~
is
DIN FRONT-MOUNT (Method A)
Installation the unit
1.
Dashboard
2.
Holder
After inserting the half sleeve into the
dashboard, select the appropriate tab
according
dashboard material and bend them
inwards
3.
Screw
1.
Dashboard
2.
Nut (5mm)
3.
Spring washer
4.
Screw (4X12mm)
5.
Screw
6.
Support
Be sure to use the
the back of the unit in place. The strap can
be bent by hand to the desired angle.
7.
Plain washer
to the thicknessofthe
to
secure the holder in place.
Strap
support
strap to secure
E-4
Page 5
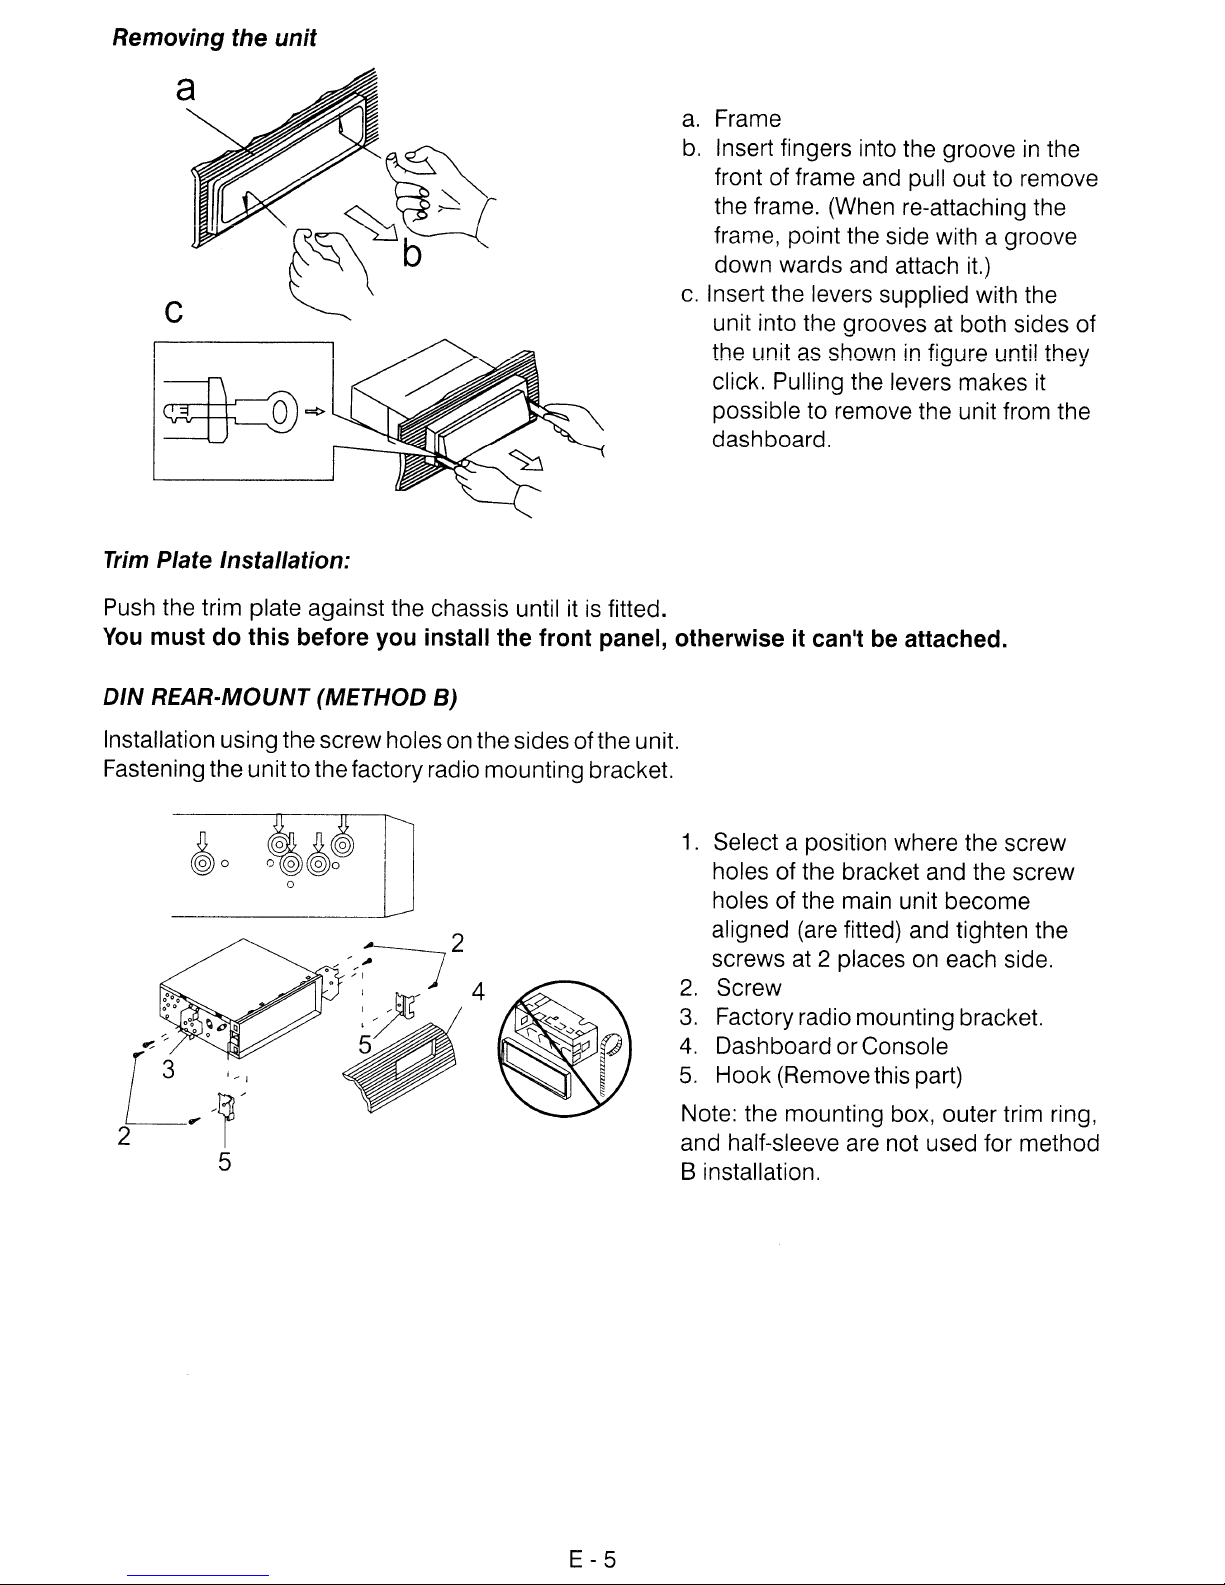
Removing the unit
Trim
Plate Installation:
a.
Frame
b.
Insert fingers into the grooveinthe
front of frame and pull out to remove
the frame. (When re-attaching the
frame, point the side with a groove
down wards and attach it.)
c.
Insert the levers supplied with the
unit into the grooves at both sides of
the unit as shown
click. Pulling the levers makes
possible to remove the unit from the
dashboard.
in
figure until they
it
Push the trim plate against the chassis untilitis
You
must do this before you install the front panel, otherwiseitcan't be attached.
DIN
REAR·MOUNT (METHOD B)
Installation usingthescrewholes on the sides
Fastening the
unitto
thefactoryradio mounting bracket.
~o
fitted.
ofthe
unit.
1.
Select a position where the screw
holes of the bracket and the screw
holes of the main unit become
aligned (are fitted) and tighten the
screws at 2 places on each side.
2.
Screw
3.
Factory radio mounting bracket.
4.
Dashboard or Console
5.
Hook (Removethis part)
Note: the mounting box, outer trim ring,
and half-sleeve are not used for method
8 installation.
E-5
Page 6
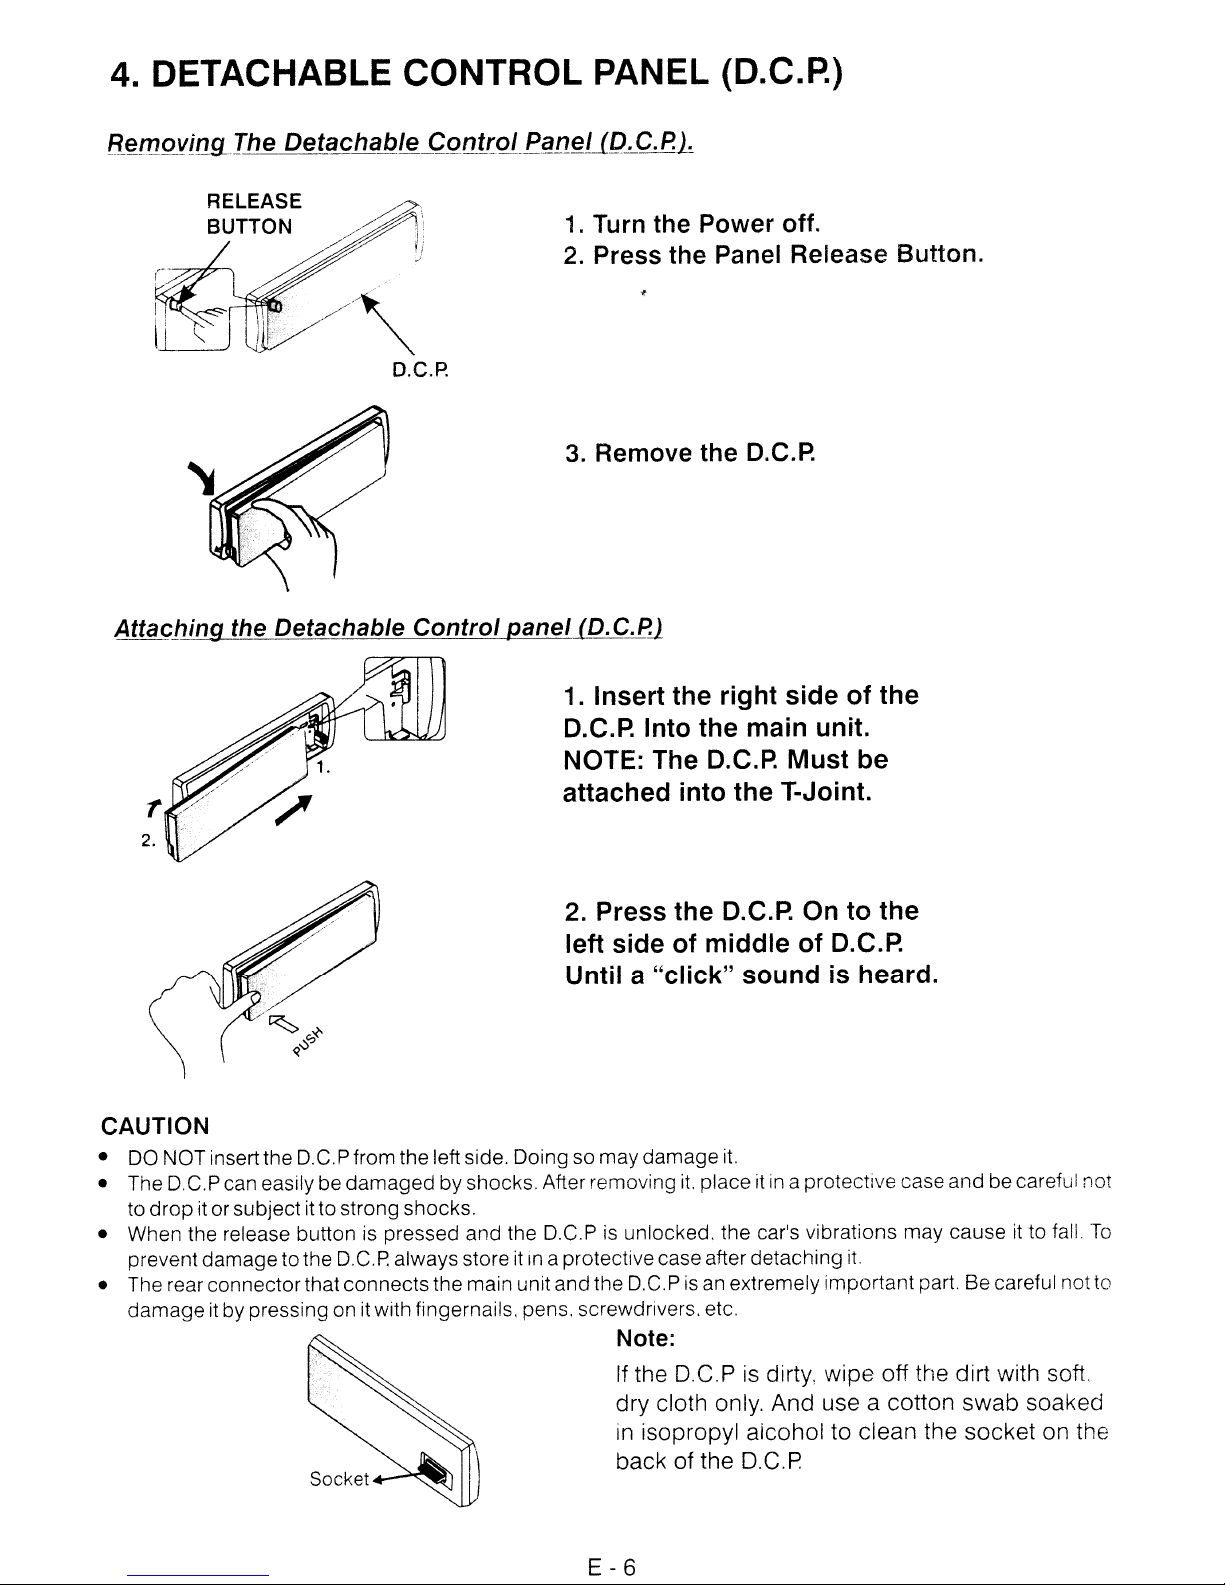
4. DETACHABLE CONTROL PANEL (D.C.R)
Retr19}!i!19-
The
Detachable
RELEASE
BUTTON
Control
P~nel
(D.C.P.l
1.
Turn
2.
Press the Panel Release Button.
3.
Remove the
Attaching the Detachable Control panel (D.C.P]
1. Insert the right side of the
D.C.P. Into the main unit.
NOTE: The D.C.P. Must be
r
2.
attached into the T-Joint.
the Power off.
D.C.P.
2. Press the
left side of middle of
Until a "click" sound
D.C.P..
On to the
D.C.P..
is
heard.
CAUTION
• DO NOT inserttheD.C.
• The D.C.P can easilybe
dropitorsubject itto strong shocks.
to
• When the release button is pressed and the D.C.P
prevent damage tothe
• The rearconnector thatconnects themain unit andthe D.C.Pisan extremely importantpart. Be careful not to
damageitby pressing onit with fingernails, pens. screwdrivers. etc.
Pfrom theleft side. Doing so
damaged
DC.P
by shocks. After removing
always storeitin
a protectivecase after detaching
may
damage
is
unlocked, the car's vibrations may causeitto fall.
it.
it.
placeitin
a protectivecase and be careful not
it.
To
Note:
If the D.C.P is dirty, wipe off the dirt with soft,
dry
cloth only. And use a cotton
in
isopropyl aicohol to clean the
back of the D.C,P
swab
socket
soaked
on the
E-6
Page 7
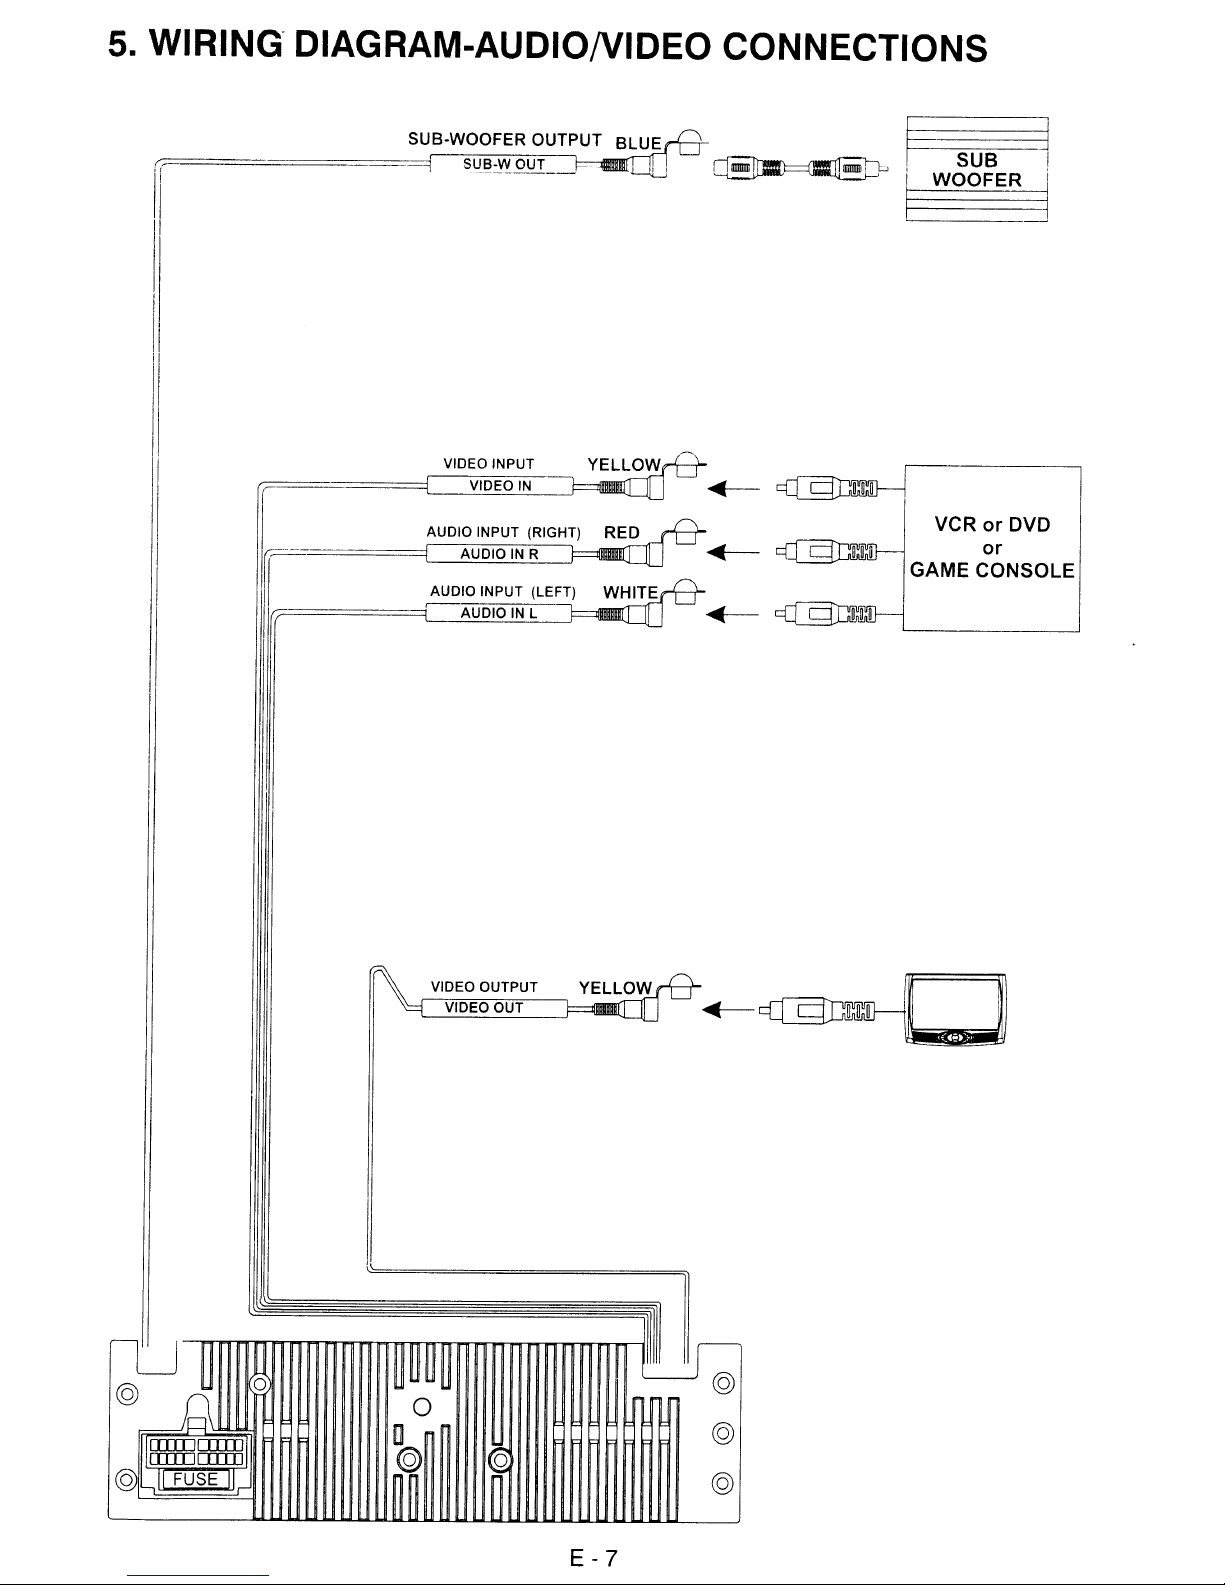
5.
WIRING"
DIAGRAM-AUDIONIDEO CONNECTIONS
t=
====-=====_S=~:lB_.WSi~J8~~~IC~)if~T~_TP~
1
(;1
\
I
I
~
I SUB I
i
WOOFER
]
i
I
II
I
===-==-===i=C_~VI~DE~O..'..':'lIN_~
r=
r----
1rr=====C:::~AU~D~IOQ}INITL=
VIDEO INPUT
AUDIO INPUT (RIGHT)
AUDIOINR
AUDIO INPUT (LEFT)
YELLOWrFt
RED
-
~
VCRorDVD
~
~
GAME
or
CONSOLE
I
I
l,
I
nnnnnnnnnnnnnnnnnn
VIDEO OUTPUT
OUT
VIDEO
11III1
@
@
E-7
Page 8

6. WIRING DIAGRAM POWER / SPEAKERS
20·PIN
AUDIOiPOWER
HARNESS
Figure
(See
1 )
AMP
Tape
bare end of wire.
LEFT FRONT
~-
WHITE-BLACK
in~~:J11
l4
WHITELF+
LEFT REAR
;';:',
GREEN-BLACK
, U JII
v+
GREEN LR+
LF-
LR
- J I'
'~
~
1CeD,--========~====B=r=a=ke=sw~:h
BLUE
I
POWER
ANTENNA
:
AMPLIFIER
BLACK
GROUND
'=='-
__
YELLOW
~VOLTS
!
CONSTANT:
+12
~=",-i
...:'S~W~IT~C:..':H'.:E:::D_b====~
I
REMOTE:
---.J====~~
1
RED
VOLTS U
ConnecttoParking Brake.
2.5m extension wire
Power Antenna
Connect to
If not used, Tape bare end
Ground
..t
Connect to
unpainted metal part
Memory / Battery
Connect to battery
that is always live. The radio will
this wire is
o~
Pin View
Accessory /
Connect to existing radio wireorradio
~-'-----------,-----'-~
power
antennaoramplifier,
ground
terminalorclean
of
or12volt
not
connected,
Ignition
of
wire.
chassis.
power
20 PIN AUDIO I POWER HARNESS
20
PIN HARNESS PIN CHART
f-'--P:,:IN-'----t-=::='Wc:,I:.::R;::E'-CC:::0:o.;L=:O""R-'--_+:::=c:-:=-=-=':-:=-':'=::-:7=:==='--
1 GREY f BLACK
2
GREY
3
VIOLET
4
RIGHT FRONT
II
t:G:R:E:Y'~BLA::C:K:R:F:-
II'
GREY
RF~
I
I
VIOLET-BLACKRR-
RIGHT REAR
VIOLET RR+ - W
~
- I I
+
A1
VIOLET/BLACK
5 PINK I
f--6=-----t-=G:.::R:::E'=E-:-:N--:-:::-:-:--:::-c:,--_-+~::::-~':':::'--=:::-=':::-:-::=__':-'-.L
7
GREEN;
8
RED
9 BLACK
10
RED
11
WHITE
12
WHITE / BLACK
13
BLUEIWHITE
14
BLUE I
~j1~5:::~~Y;E~LL~O~W~::::::::::::::::::::::::::::::t~~~~~~:~~::~~:::::::::::::::::::::::::::=---_l,
16
BLACK
17
WHITE
18
RED
19 BLACK
20
WHITE
BLACK
~
Ground
not
source
work
fuse.
if
Figure
__
~
~
1
i
E-8
Page 9
7.PANEL OPEN/CLOSE OPERATION
This unit is equipped with the most advanced full logic motorized slide
enjoy this advance technology with just a single press of the "OPEN" button Please read
carefully the following operation instruction before operating the unit.
OPEN
Press the Open button to slide down (open) a closed panel or to slide
panel.
LOADING A
When tlle panel is in the slide down position, the disc slot becomes accessibie.
Insert a CD through the disc slot, the CD will be automatically loaded and the panel will also
close automatically & playback will begin.
If
EJECTING A CD
Press Open button to slide down the panel, if a CD is loaded,
No further key press is needed.
If the ejected CD
the panel will automatically slide
Warning:
the panel by using Open button is prevented unless the disc is removed or reloaded.
I CLOSE THE PANEL:
CD
no
CDisinserted, press Open button again to slideup(close) the panel.
it
will be ejected automatically.
is
not being removed, after 10 seconds it will be reloaded automatically. And
up
after disc has been reloaded.
If the ejected disc remains in the slot, the Open button will not function, so closing
down
up
system.
(close) an opened
You
can
CAUTION:
A)
Please always use the "OPEN" button to slide
slide up or down the front panel manually, this will cause serious
the slide down mechanism, and this will void the warranty.
B)
Please
attach the front panel when the panel is
permanent damage to the unit & panel. Only attachordetach the front panel when the panel
is
in
the slide
do
not try to
up
position.
detach!
remove the front panel (bypressing the detach
in
up!
down
the slide down position. This may cause serious &
the front panel. Please never try to
& permanent damage to
button)
or
E-9
Page 10
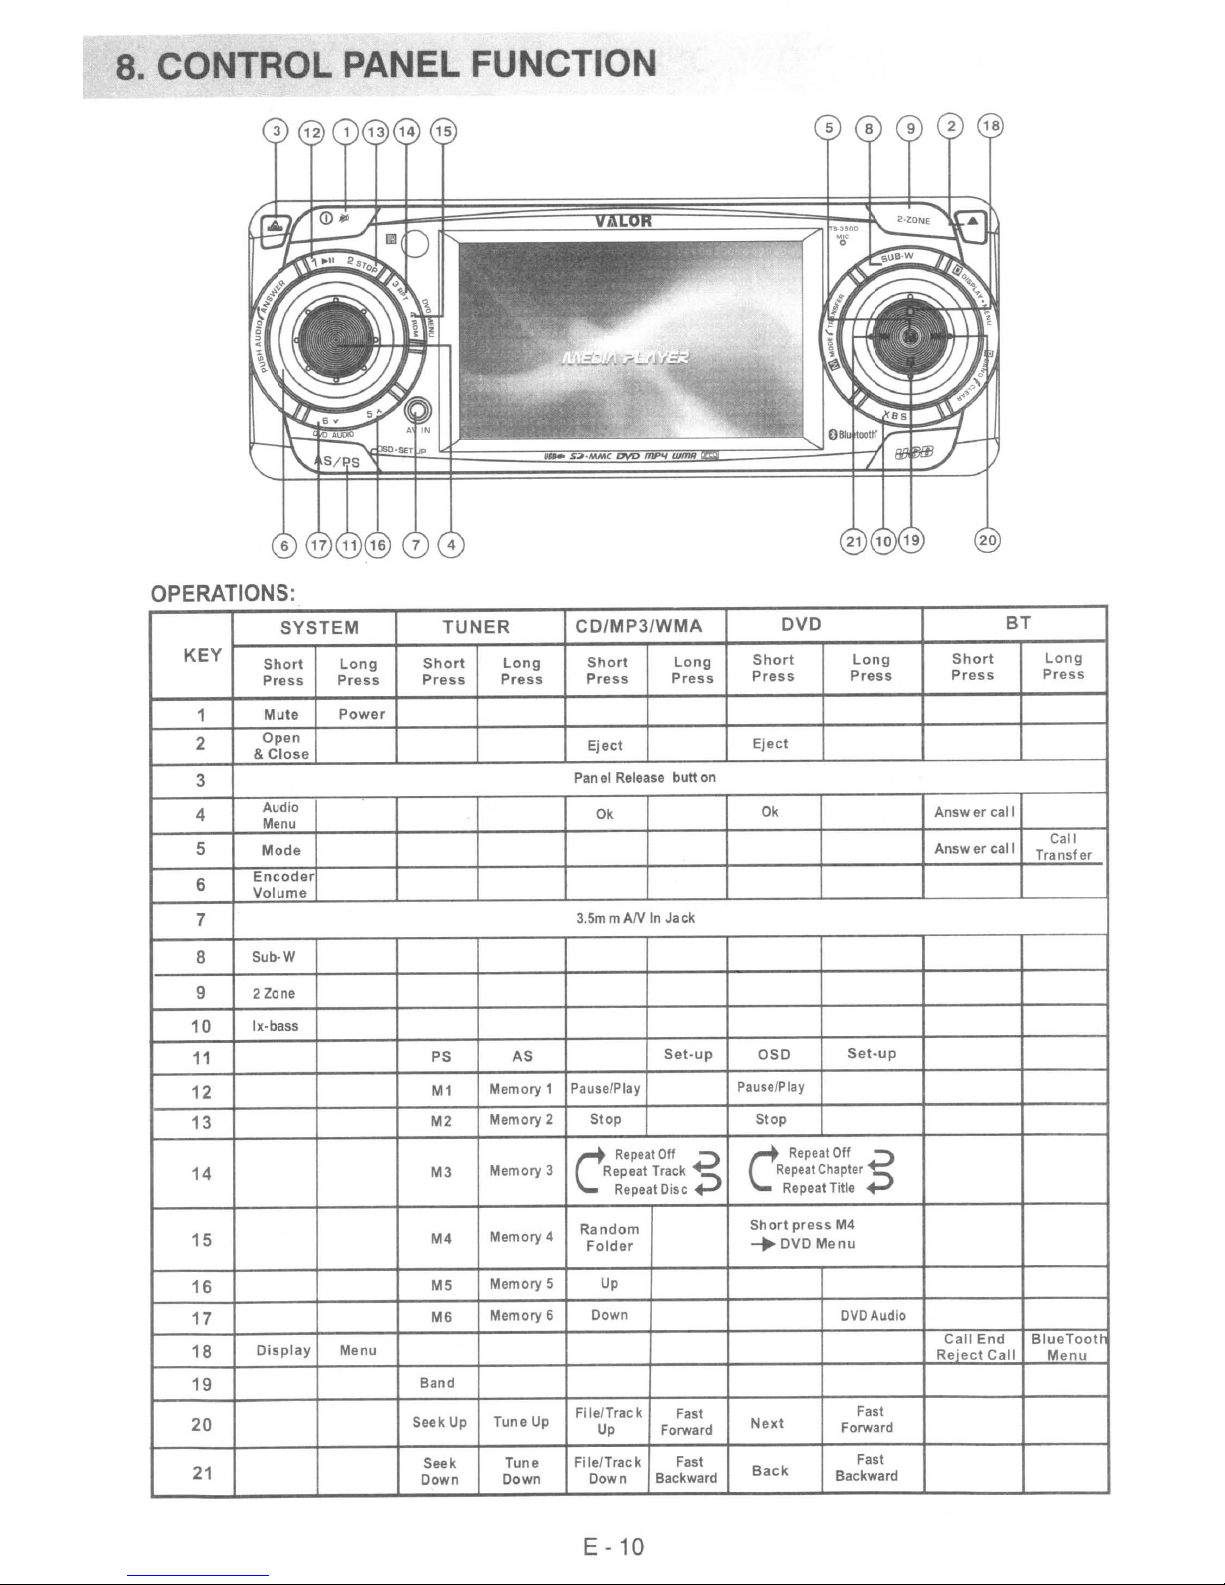
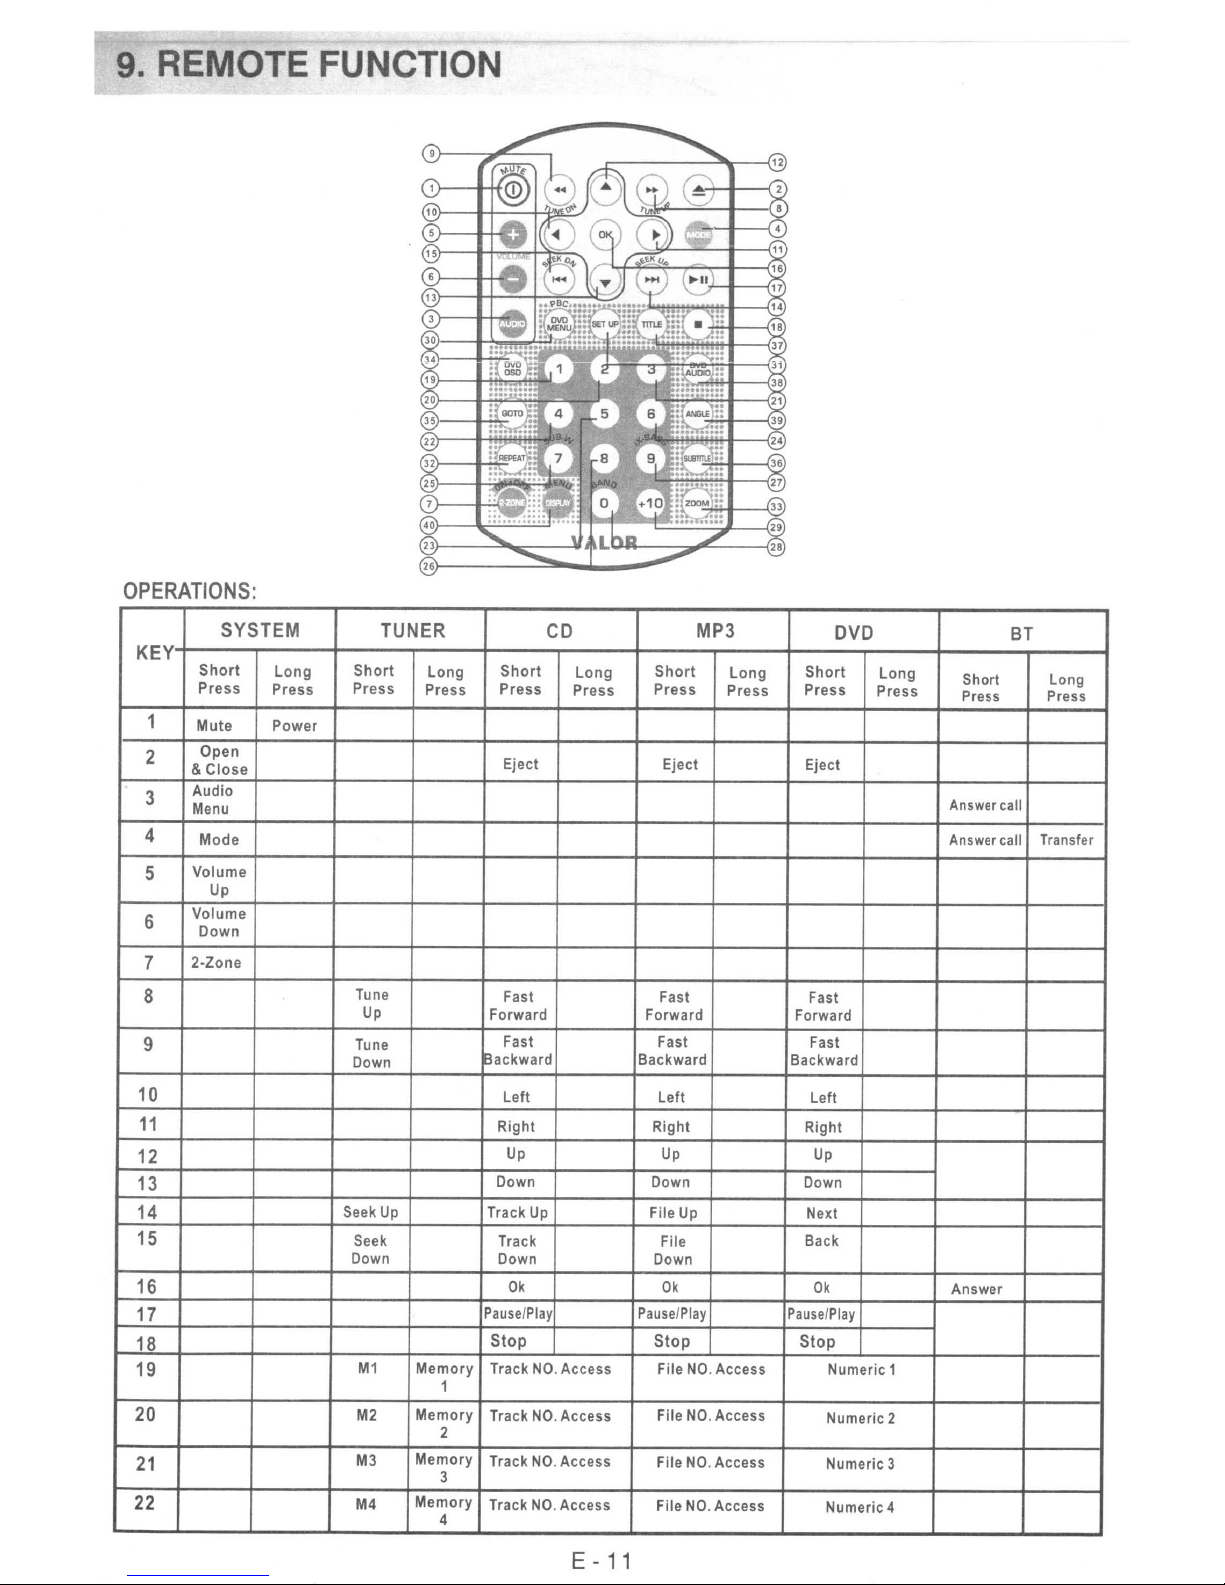
8.
CO TROL
OPERATIONS:
KEY
1
2
3
4
5
6
7
PA
ELFU
SYSTEM TUNER
Short
Press
Mute
Open
&
Close
Audio
Menu
Mode
Encoder
Volume
Long
Press
Power
Short
Press
Long
Press
CTIO
CD/MP3/WMA
Short
Press
Eject
Pan el Release
Ok
3.5mmANInJack
Long
Press
button
Short
Press
Eject
Ok
DVD
Long
Press
Short
Press
Answer
Answer
call
call
BT
Long
Press
Call
Transfer
Sub-W
8
9 2 Zone
10
lx-bass
11
12
13
14
15
16
17
18
Display
19
20
21
Menu
PS
M1
M2
M3
M4
M5
M6
Band
Seek Up
Seek
Down
AS
Memory 1
Memory 2
Memory 3
Memory 4
Memory 5
Memory 6 Down
Tune Up
Tune
Down
Pause/Play
Stop
C
Repeat Track
Random
Folder
Up
Fi
le/Track
Up
File/Track
Down
Set-up
Repeat
Off
Repeat Disc
Forward
Backward
Fast
Fast
;:>
~
OSD
Pause/Play
Stop
C
Repeat
Repeat
Repeat Title
Short
-.
DVD
Next
Back
press
Set-up
Off S
Chapter
M4
Menu
DVDAudio
Fast
Forward
Fast
Backward
Call
Reiect
End
Call
BlueTooth
Menu
E - 10
Page 11
9. REMOTE
OPERATIONS:
FU
KEY
1
2
3
4
5
6
7
8
9
10
11
12
13
14
15
16
17
18
19
20
21
22
SYSTEM
Short
Press
Mute
Open
Close
&
Audio
Menu
Mode
Volume
Up
Volume
Down
2·Zone
Long
Press
Power
TUNER
Short
Press
Tune
Up
Tune
Down
Seek
Seek
Down Down
M1
M2
M3
M4
Long
Press
Up
Memory
Memory
2
Memory
3
Memory
4
Short
Press
Eject
Fast Fast Fast
Forward Forward
Fast
~ackward
left
Right Right
Down Down
Track Up File Up
Track File
Pause/Play
Stop Stop
Track
1
Track
Track
Track
CD
Long
Press
Up Up
Ok
NO.
Access
NO.
Access
NO.
Access
NO.
Access
Short
Press
Eject Eject
Fast Fast
Backward
left
Down
Ok
Pause/Play
File
File
File
File
MP3
NO.
NO.
NO.
NO.
Long
Press
Access
Access
Access
Access
DVD
Short
Press
Forward
Backward
Left
Right
Up
Down
Next
Back
Ok
Pause/Play
Stop
Numeric 1
Numeric 2
Numeric 3
Numeric 4
Long
Press
BT
Short
Press Press
Answer call
Answer call
Answer
Transfer
Long
E -
11
Page 12
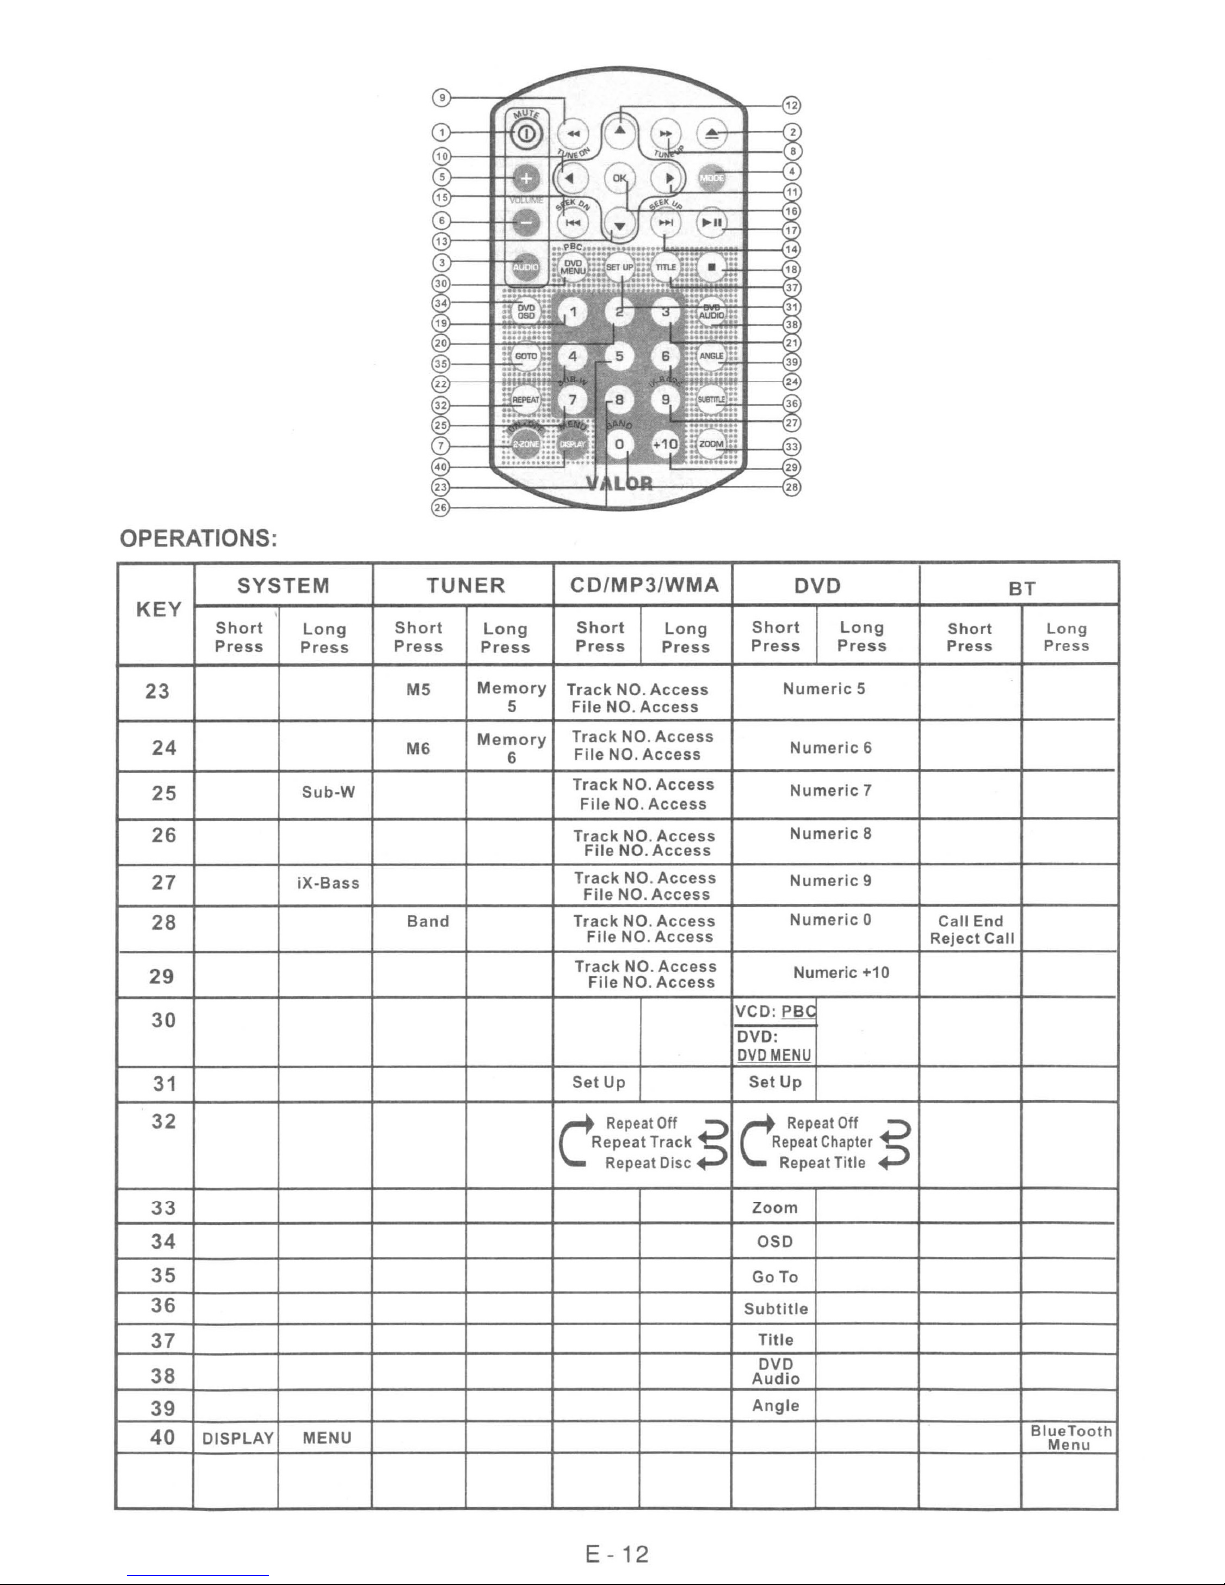
OPERATIONS:
KEY
23
24
25
26
27
28
29
30
31
32
SYSTEM
Short
Press
Long
Press
Sub-W
iX-Bass
TUNER
Short
Press
M5
M6
Band
Long
Press
Memory
5
Memory
6
CD/MP3/WMA
Short
Press
Track
File
Track
File
Track
File
Track
File
Track
File
Track
File
Track
File
Set
Up
CRepealOff ;:J
Repeat Track
Long
Press
NO.
Access
NO.
Access
NO.
Access
NO.
Access
NO.
Access
NO.
Access
NO.
Access
NO.
Access
NO.
Access
NO.
Access
NO.
Access
NO.
Access
NO.
Access
NO.
Access
Repeat Disc Repeat Title
Short
Press Press
VCD:~
DVD:
DVD
Set
CRepealOff
;::J
DVD
Numeric
Numeric
Numeric
Numeric
Numeric
Numeric
Numeric +10
MENU
Up
Repeat
Chapter
Long
5
6
7
8
9
0
15
Short
Press
Call End
Reject
BT
Long
Press
Call
33
34
35
36
37
38
39
DISPLAY
40
MENU
E - 12
Zoom
OSD
GoTo
Subtitle
Title
DVD
Audio
Angle
BlueTooth
Menu
Page 13
10. BASIC OPERATIONS
3) PANEL RELEASE BUTTON (REL)
Press this buttonto remove the control panel.
11-
POWER ON/OFF BUTTON
Long press the POWER button or Short Press any other button on the front ofthe unit (except
the Open/Eject) to turn On the unit. Long press the POWER button to turn Off the unit.
Jill
1) MUTE
Short Press the MUTE button to mute the audio output, and "Mute" will appear on the
display. Press the mute button again to restore the audio output to the previous level.
8) SUB-WOOFER (SUB-Wl
Press the SUB-W button to activate the Sub-woofer function On, and "Sub-woofer" will
appear on the LCD display for 3 seconds. press the SUB-W button again to turn off the
Sub-woofer function.
~
iJtD
ill
iX-BASS BUTTOJ"
Press the iX-Bass button to turn on the IX-Bass function, and "iX-Bass" will appearinthe
LCD display for 3 seconds. Press the iX-Bass button again to turn off the IX-Bass function
~
BUTTONJMUTf1
Please refer tothe related descriptionin"Audio Operation of Sub-woofer"
for details operation of the Sub-woofer
The Subwoofer Level and Low Pass Filter control will only appearinthe Audio Menu
only if the Subwoofer function
(iX-Bassj
Please refer to the related description
operation ofiX-Bass control!
is
currently activated 'On".
control!
in
"Audio Operation of iX-Bass" for details
iJtD
~
MODE BUTTON (MODE)
Short Press the MODE button to select a different mode of operation as indicated on the
display panel. Available modes include
S)
ENCODER VOLUME BUTTON
To
To
is adjusted, the volume level is shown on the display panel as a number ranging from 00
(lowest) to 46 (highest).
The IX-Bass Boost Level control will only appearinthe Audio Menu only if the iX-Bass
is
function
increasethe volume, rotate the volume control knob clockwise.
decrease the volume, rotate the volume control knob counter clockwise. When the volume
currently activated 'On".
Tuner,
DVD,
USB Card(SD/MMC Card) AV In.
E -
13
Page 14
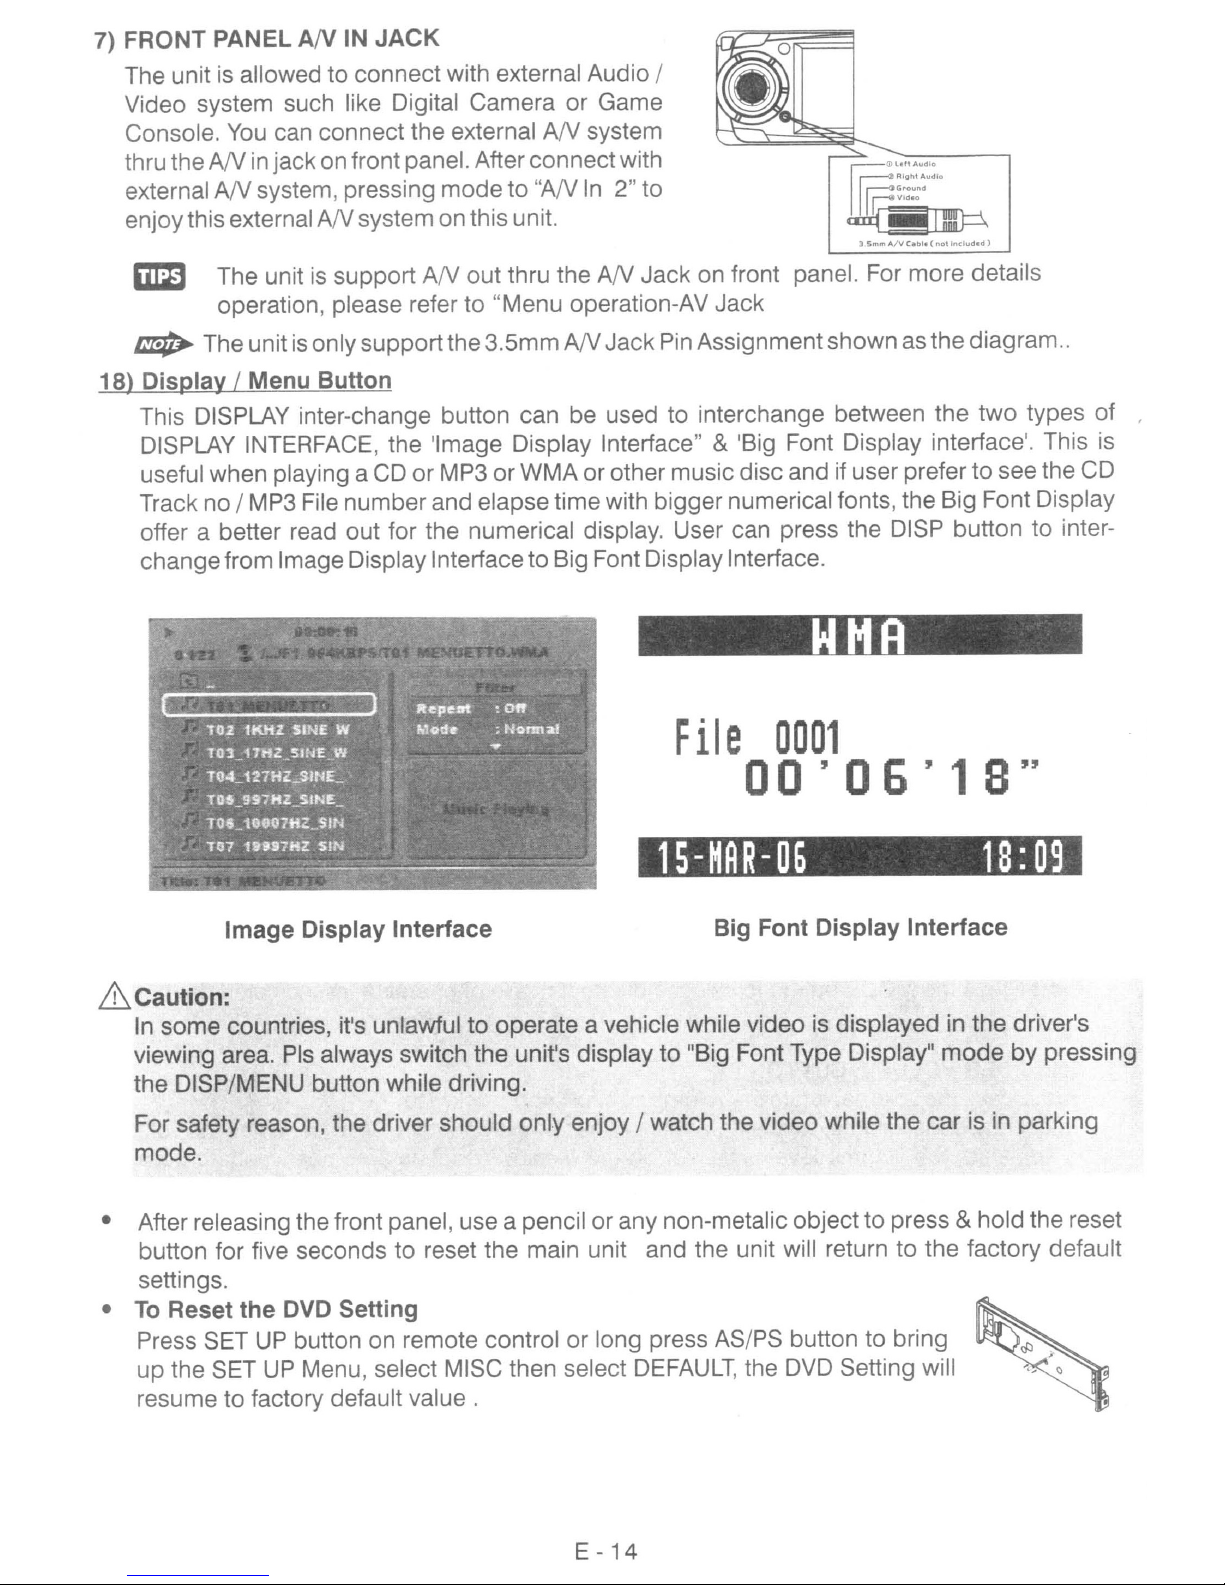
7) FRONT PANEL
The unitisallowed to connect with external Audio /
Video system such like Digital Camera or Game
Console.
thru the
external
enjoythis external
You
ANinjackon front panel. After connectwith
AN
AN
IN
JACK
can connect the external
system, pressing mode
AN
system on this unit.
to
AN
"AN
In
system
2" to
r::::GrOund
I~Vld.O
rr§
~
~
3
5mm
a>l'"AUdl'
Right
Audio
A/V
C~bl.
(not
Included)
~
~
18)
Display
This DISPLAY inter-change button can be used to interchange between the two types of ,
DISPLAY INTERFACE, the 'Image Display Interface"
useful when playing a
Track no / MP3 File number and elapse time with bigger numerical fonts, the Big Font Display
offer a better read out for the numerical display. User can press the DISP button to interchangefrom Image Display Interfaceto Big Font DisplayInterface.
The unitissupport
operation, please refer to "Menu operation-AV Jack
The unitisonly supportthe3.5mm
/ Menu
Button
AN
out thru the
AN
Jack on front panel. For more details
AN
JackPin Assignmentshown as the diagram
& 'Big Font Display interface'. This is
CD
or MP3 orWMAor other music disc and if user prefer to see the CD
File
0001
00
' 0 6 ' 1 S "
..
15-HAR-06
Image
&Caution:
In
some countries, itls unlawful to operate a vehicle while video is displayed in the driver's
viewing area. Pis always switch the
the DISP/MENU button while driving.
For safety reason, the driver should only enjoy / watch the video while the car is in parking
mode.
• After releasing the front panel, use a pencil or any non-metalic object
button for five seconds to reset the main unit and the unit will return to the factory default
settings.
To
•
Reset
Press SET
up the SET
resume to factory default
the
Display
DVD Setting
UP
button on remote control or long press AS/PS button to bring
UP
Menu, select MISC then select
Interface
value.
unifs
Big Font
display to "Big Font Type Display"
DEFAULT,
the
Display
DVD
Setting will
Interface
to
press & hold the reset
18:09
mode
by pressing
E -
14
Page 15
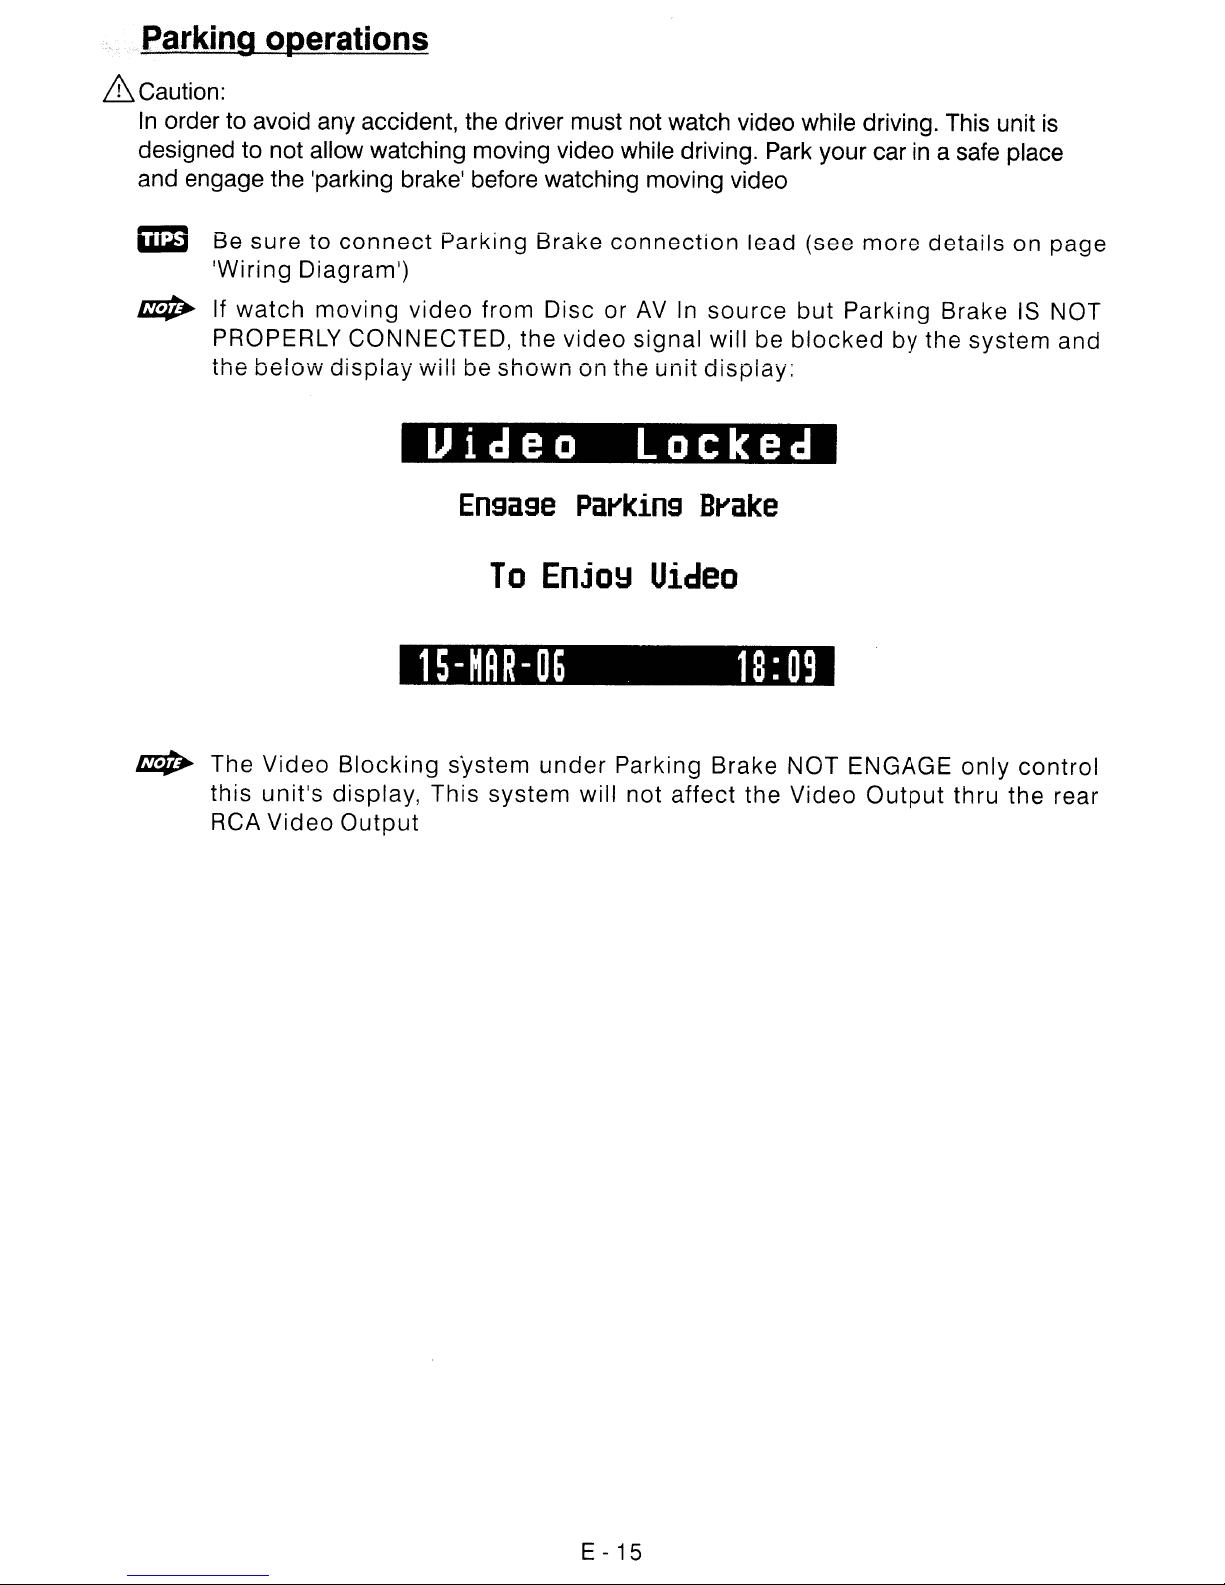
Parkin~erations
&Caution:
In
order to avoid any accident, the driver must not watch video while driving. This unit
designed to not allow watching moving video while driving.
and engage the 'parking brake' before watching moving video
Park
your carina safe place
is
&::imi
~
~
Be
sure to
'Wiring Diagram')
If
watch
PROPERLY CONNECTED, the
the
below
The
Video
this unit's display, This system will not affect the Video
Video
RCA
connect
moving
display
Blocking
Output
Parking Brake
video
will be
from Disc or
video
shown
on the unit
Uideo
Ensase
To
Parkins
EnjoY
15-HAR-06
system
under
connection
AV
In
signal will be
lead (see
source
display:
but
blocked
locked
Brake
Uideo
18:09
Parking Brake NOT ENGAGE
more
Parking Brake
Output
details
by the system and
only
thru the rear
on page
IS
NOT
control
E - 15
Page 16
Menu operations
18) MENU FUNCTION LIST (MENU)
Press & hold the DISPLAY/ MENU button for more than 3 seconds to access into the
menu. User can navigate thru the menu items by pressing the DISPLAY/ MENU button
repeatedly, or by pressing the Tuning Up or Tuning Down Buttons to move to the next
orevious menu item. Once the desired menu item appears on the display, user can adjust
that option by using the Encoder
adjusted as described below:
paring
This featureisused to pairing the unit's Blue tooth system to your mobile phone or other
Blue tooth device. Under the MENU "Pairing"
activating the Pairing.
Vol
Knob within 5 seconds. The menu items can be
mode
then press Audio button to start
or
Tips
Pis refer to BLUE TOOTH HAND
"PAIRING".
FREE
Operation (egarding the details operation of
Re-connection/Dis-c9Jlnection
This featureisallows to Re-connect or Dis-connect to the paired mobile phone or Blue tooth
device by manually. Under the Menu- "RECONNECTION"mode, Rotate the encoder to
navigate thru "RECONNECTION" and ·'DISCONNECTION". After selected the
connection then press Audio button to start activating the connection mode.
mode
for
Incoming call ringing volume (PHONE VOL)
The unit can preset the Ringing volume level for any incoming call. The defauit RINGING
VOLUME LEVEL VALUE
is
"25". Rotate the encoder knob to adjust from Min 00 to Max 46.
Angle
The
panel
vol
knobtoselect
usertoadjust&obtain
viewing
angleofthe
the
most
appropriate
the
optimum
display
viewing
can
be
viewing
adjusted
angle.
angle
by
Thisisuseful
inside
the
rotating
vehicle.
the
for
encoder
Contrast
The contrast level of the TFT display is set at "CONTRAST 10"
Encoder
Vol
Knob to adjust the contrast level from 00 to 50.
by
default. User can use the
Bright
The brightness level of the
Encoder Vol Knob to adjust the brightness level from 00 to 50.
TFT
displayisset at "BRIGHT 20" by default. User call use the
CoLor
The color level of the TFT display is set at "COLOR 30"
Vol
Knob to adjust the color level from 00 to 50.
by
default. User can use the Encoder
Date Sel
Once in Date Set mode, User can use the Encoder
Year.
Short press the AUDIO button to confirm the entry and move to the next entry.
Vol
Knob to adjust the Date /
['v1onth
Clock
The time of the clockisset to 12:00 by default. User can adjust the time by rotate the
Encoder Vol knob clockwise to adjust the minute and rotate the Encoder
clockwise to adjust the hour.
IJme
"12H"isthe default setting. User can use the Encoder
between "12 Hours"
FOJm
& "24 Hours"
E - 16
Vol
knob anti-
Vol
Knob to choose the Time Format
Page 17
8Y_.l~ck
The panel
"OUT'. Once
of the Audio I Video Signal of this unit's Built-in
I:iID
Parking
This optionisusefulifuser FORGOT that the "PARKING WIRE"isnot properly connected.
There will he no Video output
Brake Switch. The LCD will display "PARKING
can use the Voiume Up or Down buHon to turn "PARKiNG" to "OFF" within the 5 seconds time
out. Once "Parking"
regardless even
Tuner Set
AV
Jackisdefaultas"AV
"OUT'isselected, the panel
This
AV
Out selectionisuseful for user hy simply plug
TFT system without any extra installation.
if
tile Parking
is
changed to "Off", the TFT monitor will display the video signal
if
the Parking
WireisNOTCONNECTED!
In"
source. User can use the Encoder
AV
jackischanged
WireisNOT
On"
Vol
Knob to select
as
an
AV
OUTPUT
DVD
player.
ancJ
connect to any external
PROPERLY
and will stay on the LCD for 5 seconds. User
CONNECTED to the Hand
(AV
OUT)
User can use the Encoder
This feature
during automatic tuning. "Distance"
broader range
tuning, rotate the Encoder
Iun_er
User can use the Encoder
for the area this unit
Beep Tone
The beep tone feature allows the selection of
pressed. "BEEP TONE On"isthe default setting. Rotate the Encoder
"BEEP TONE Off" option
Programmable Turn-on
This option allows the adjustment of the volume level of the radio will automatically assume
when turning on. "VOL
level, use the Encoder
Rear Speaker On/Off.(Rear
Rear speakerisset to 'ON' by default.IfOFFisselected, the rear speaker's audio output will
be TURNED
doesn't need Rear Speakers sounds output through rear speakers. Select "ON" to reactivate
the rear speakers sound output
Area
is
used to designate the strength of the signals at which the radio will stop
of
signals.
OFF.
This functionisuseful while listening with the HEADPHONE and user
Vol
Knob to select between Local or Distance mode.
is
the default setting, allowing the radio to stop at a
To
set the unit to select only strong local stations during automatic
Vol
Knob button until "Local" appears on the display.
Vol
Knob to select the frequency spacing which is most appropriate
is
used in, U.S.A. South America, Europe or Oirt. (Russia Band)
an
audible beep tone when a button
Vol
Knob to select the
VolumtiVOL
PGM
12"isthe default setting.
Vol
Knob to select "VOLUME LEVEL' within 5 seconds.
SpJU
PGM)
To
program a specific turn on volume
is
~
Inter Amplifier On/Off(lnter
:rhisisa option selection for user to turn the unit's built-in Amplifier system on or off. "OFF"
is
user
: When the Rear Speakeris'OFF', the Audio Function, 'FADER', will not be functional
Amm
the default setting. This optionisuseful for userifconnected to
do
not want audio output of the built-in amplifier system.
E - 17
an
external Amplifier &the
Page 18
11.
DUAL ZONE OPERATION
"2-Zone" Dual A/V Zone Multi Entertainment Operation:
This unitisequipped
user
would
Rear Speakers
speakers
in the rear seat
different Video sources. For example, on the front in-dash Built-In TFT screen can display the
video from the
Movie
liketo selectdifferent
and
rear
Game
or
other
AN
with the
and
TFT Screens. For example, user can selecttolistentoTuner
speaker
or
inside the Car, the Dual
Console
source. The detail operation as follow:
most
advance "Dual
modes
for DVD movie. And ifthe userhas
and the other screen in the rear seat can display video from DVD
ofthe
AN
Audio
AN
and Video (AV)
Zone function
Zone"
feature. This function is useful if the
output
Oneormore
allow
sourcefor Front and
music
TFTscreensinstalled
the users
to
enjoy TWO
for front
On/Off operation
• "Off" is the default setting.
• Long press the "2-Zone" button on the control panel
Dual
Zone
To
Select Front / Rear
•
Once
F-Zone
OnorOff. The "2-Zone" will
AV
Sources
"ON"isselected, Short Press the "AUDIO" button repeatedlytochange
(Front)
and
the R-Zone (Rear) sources.
appear
on the LCD after Dual Zone is selected "on".
or
remote
control to switch between
between the
• If Front
buttontonavigate
Tuner>
•
If
Rear
button
Tuner>
•
If
no
To
operates function of Front / Rear Sources
• The Front Panel & Remote control,isdefaultedtocontrol
operation.
• When DUAL ZONE is
Source
• The LCD will
the desired operation
• The LCD will automatically switch back to the Front
Panel
The default setting when Dual Zone
• When DUAL
• The default
• The default Volume level is "12" for both Front
Level set as VOL PGM Level set in the Menu)
• The LCD
• When Dual Zone is "ON",
FUNCTION ARE: Bass / Treble/ Middle/ Balance/
The default setting when Dual Zoneisin
• The default
when DUAL ZONE
selected DVD
Audio
Zone
Zone
to navigate
selection is being
& Rear Source. Press the
and
"F-Zone" is selected, user have 10
through
DVD >AV-In are available for selection for Front AV Output.
"R-Zone" is selected, user have 10
through
DVD > AV-In are availableforselectionfor Rear AV
turned
display
Remote
ZONEisturned
source/mode
display
the Rear Source
now
is defaultedtodisplaythe Front Mode.
different modes:
different modes:
made
on
is resumed to operate for Front Source's function again.
within 5 seconds, the unit will resumetothe pervious
"ON", the
the Rear Source's function
on, the audio
for Front ZONEisTuner & for Rear ZONE is "DVD"
some
ofthe AUDIO FUNCTION WILL NOT BE FUNCTIONAL. THESE
mode
is
Mode
button repeatedlytochange
mode
"ON"
output
secondstouse the Volume UP / DOWN
secondstouse the Volume UP / DOWN
buttonisused to
for 10
seconds.
on
Source
will
be
& Rear ZONE
Fader!
"OFF" mode
audio
Output
output
IS
for
Front ZONE & Tuner for Rear ZONE.
for all 4 speakers
reverts to what the user selected for the FRONT Zone source
"OFF". For example: When the DUAL
becomes
"DVD"
Once
mode.
Output
the
FRONT source's function /
change
User has 10
the Front PanelorRemote
after 10 seconds. And the Front
muted
Sub-woofer
for
audio
Zoneis"ON",
DUAL ZONEisturned "OFF".
between the Front
between Front and
secondstomake
about
output. (or the Volume
/ iX-bass
1 second.
user has
mode.
E -
18
Page 19

12. AUDIO OPERATION
Audio Menu
Short Press "AUDIO" button to access the Audio Menu. User can navigate thru the Audio Menu
items by pressing the / "AUDIO" button repeatedly, or by pressing the Tuning Up or Tuning Down
Button. Once the desired menu
encoder vloume knob within 5 seconds. The following menu items can be adjustedasdescribed
above. The unit will automaticallyexit the Audio Menu afterfive seconds ofinactivity.
SUBWOOFER
• Sub-woofer (Level)
User has 5 seconds to use the encoder volume knob to adjust the Sub-woofer lever from '00' to
'12'.
~
~
• Sub-woofer Low Pass Filter (LPFl
The Sub-woofer level controlisonly applicable if the unitisequipped with the optional subwoofer lineout, and onlyif the unit
The Sub-woofer level control option will only appearinthe Audio Menu if the "Sub-woofer"
function is activated "ON" by pressingthe "Sub-w" button on control panel.
User has 5 seconds to use the encoder volume knob to select the 4 different Low Pass filter
Flat, 80Hz, 120Hz or 160Hz.
item
appears
is
on
the display, adjust that option
connected toan optional sub-woofer speaker.
by
using the
~
The Sub-woofer
LPF
controlisonly applicable if the unitisequipped with the optional sub-
wooferlineout, and onlyifthe unitisconnectedto an optional sub-woofer speaker.
~
The Sub-woofer
is
activatedbypressing the "Sub-w" button on control panel.
LPF
option will only appearinthe Audio Menu if the "Sub-woofer" function
X-BASS
User has 5 seconds to use the encoder volume knob to select the 3 different Bass Boost
level: Low, Mid, or High.
BASS
• BASS LEVEL(Level)
User has 5 seconds to use the encoder volume knob to adjust the desired Bass level range
-6to+6.
from
• BASS-CFQ(C~
User has 5 seconds to use the encoder volume knob to adjust the desired Bass Center
to
Frequency
• BASS-Q: (BassQ)
User has 5 seconds to use the encoder vlolume knob to adjust the desired Bass Quality
Factor to 2N, 1
Figure 1 shows the Bass Quality factor (Curve characteristics) of each step.
60Hz, 80Hz, 100Hz, or 200Hz.
N,
1W or
2W.
150
.-----~-----,------r--_,
12.5
r---~1'--Ili!r-----t------t-----i
10.0
r---HH-_+I*\-----t------t-----i
7.5
r---++H-_+---TJr\rr----t------t-----i
5.0
Level
(dB)
r-"'<::-f-H-f~_+___'I~.....__--t------t-----i
25
1----7£-,.<A~-__+-____"<__¥<_"..__--+-------+-----i
0.0
r::::::~--____t_---=::~~----l-_1
100
Frequency (Hz)
100.0
E - 19
10K
~
1O.0K
Figure 1
Page 20

MJOD~_~
•
Midgl~
'I
l'vHctcllg~~FQJCErq}
User
(=';enter
It
MjQgle-.Q..JMici-Q)
User has 5
Factor
J~~'l~Jl
r
has
5
seCOr1ejs
from -6
has5seconds
Frequencyto500Hz
to
seconds
2N.
11~,
to
+6
1Wor2W.
to
to
use
use
use
;1iP
1Kr-!z.
the
enccdE:~r
the
encoder
15KHz.or2.5KHz
encoder
volume
r
vlo
r1e
tc
aeJjust
knob
knobtoadjust
to 3cJjust
the
TrW
(:1eS
deSired
l
red
Mldd!e
Middle
QU2,iii:
H;:;,rlCJF
1
Fiaure
2
- ,
shows
the
rriddle
Quai:t\!
•
I
Level
(dB)
TREBLE
_._
•.
_-_._-
•
II"?.bJ~j..L&v~D
User
has 5
from
-6
•
Tr~l:>t~
User
has 5
frequency
secondstouse
to+6.
.cJ:Q
(Fr~g)
secondstouse
to
1or<Hz.
12.5KHz.
fa:.~10!'
the
eneodr
the
encoder
15KHz, or 17,5KHz.
(Cl:tv8
Frequency
volume
volume
characteristics;)ofeach
(Hzj
---------.
knobtoadjust
knobtoadjust
ster.j.
Figure 2
the
deSired Treble leve: 'cFlge
the
desired
Treble
ceru:,
BALANCE
~-----~---
User
has 5
right
and
balance
secondstouse
left
speakers
behveen
the
from
right
FADER
User has 5
speakers
rem
between
secondstouse
from
R12
the
front
and
(fuH
rear
the
encoder
R12 (full right) to L12 (full left). "COO"
and
left
encoder
rear)toF12 !fUll front)
speakers.
volume
speakers.
volume
E -
knobtoadjust
knobtoadjust
"COO"
20
the
represents
tile
Balance
represents
Fader
between
between
an
equal
an
equal
the
balance
trw
front
Page 21

13. TUNER OPERATION
19)
BAND
Press BAND to change between
BUTTON (BAND)
FM
bandsand AM(MW) bands.
20&21)TUNING UP/DOWN BUTTON
Manual
Press the
Tuning
Up
Tuning(~)
or Down Tuning
(~/~)
(~)button
for more than 3 seconds to move the
radio frequency number up or down by one step.
~JJto
Seek
Press the Up Tuning (
TJJJ}jng
~
)or Down Tuning (
~
)button for less than 3 secondstomove to
next station automatically.
12-17)PRESET
STATIONS BUTTONS
Six numbered preset buttonsstoreand recall stationsfor each band.
11
)AUTOMATICALLY STORE / PRESET SCAN (AS/PS)
Automaticallyselect6strongstations and store them in the current band. Select a band (if
needed). Press AS/PS button for more than three seconds. The new stations replace stations
alreadystoredin thatband.
Preset
Scan
Scan stations stored in the current band. Select a band (if needed). Press AS/PS button for less
than 3 seconds. The unit will pause for ten seconds at each preset station. Press AS/PS button
is
again to stopscanning when the desired station
reached.
STEREO
The unit will automatically pick up a stereo signal when available. Wheninstereo mode, the
ST
icon appearsin the display. When no stereo signalisavailable, the unit will automatically revert
to
mono
operation, and no icon will be displayed.
E -
21
Page 22

14.BLUE TOOTH HAND FREE OPERATION
User Guide For Blue Tooth Operation
1.
When user use our Blue tooth HEAD UNIT, please make sure the
does
/
2.
mobile
instruction.
Batteryis fully charged when
3.
Phone was Switched On to ensure
4.
5.Toachieve the best performance, please always keep the Mobile Phone within 3 metersofthe
Head unit.
6.
7.
Head unit.
8.
Blue Tooth
operating with this Head Unit, as
Power Saving
9.
function" was switched "ON".
10.
meter
11. If user want to Dis-connect the Head unit with the Mobile Phone, please switch "OFF" Blue
Tooth connectivity on the Mobile Phone,or
the bluetooth connectivity manually. ( please refer to the user manual, section "dis-connection
of the bluetooth system for details instruction. )
support
Before you start to use
phone first. Please refer to
Please always try pairing the
"BT60" is this unit device
Please always keep a clear path between the Mobile Phone & the Head unit.
Never
Some
Before user make
put
brand ofMobilePhone like
To
ensure the best conversation quality / performance, please always keep talking within 1
of
the Head Unit.
Blue tooth functions (Headset or Handsfree profiles or both)
our
Bluetooth HEAD
To
ensure the bestreception
making
Mobile
model
any metal
mode
Mode
objectorany
is switched on. PLEASE
is switched on.
Outgoing
callorIncoming
the
for
the Pairing or Re-connection.
Phone with Head unit after a few minutes of the Mobile
the
best pairing result.
number
obstacle
Sony
some
abnormal
UNIT,
user manual, section "PAIRING" for detail "PAIRING"
Pairing or Re-connection, please
whichisdisplayed on the
Ericsson may have "PowerSavingMode"selectionwhen
DO
go
to the system menu, "dis-connect" to
please
between the pathofthe Mobile Phone & the
make
NOT Switches ON Power saving
communal
call, make sure the
behavior will happen occasionaliy if
sure
mobile
mobile
complete
mobile
phone
make
phone's "Blue Tooth
you use must
pairing with your
surethe Phone
phone.
Mode
disconnect
when
12.
Some
Incoming
Mobile Phones like
standard Ring-tone
13. When
below "30"inordertoachieve the best sound quality.
unwanted echo inside the
14.Ifthe Bluetooth related operationisnot performing normally, like cannot make pairing, cannot
making
detaching the panel from the main unit and waiting for about 1 min. Then re-attach the panel to the
& retry the Bluetooth operation again. Or user can
unit
button behind the panel.
~
Mobile Phones can
Ringing Tone will
Sony
of
the Head unit.
in
telephone mode, during talking, itishighly recommended to set the volume
an
outgoing call, User can try to make a
By
pressing the
RESET
support
be
same
Ericsson
car,
and this unwanted echo may feedback into the microphone.
button all the stored memory will resume to factory default
"IN BAND RING TONE", such as Nokia.Insuch case, the
as the original Ring-toneofthe Mobile Phone. But
do
not
support
this feature. The Ring-tone will be using the
As
if the volumeistoo high,itmay create
SOFT-RESET
RESET
of the Bluetooth module by removing /
the whole unit by pressing the
some
to
RESET
E - 22
Page 23

Bluetooth Mobile Phone Compatibility List
This unit can support bluetooth specification v1.2 or higher, and compatible with bluetooth profiles
such as handsfree or headset profiles. however the functionality may be limited due to some phones'
own dedicated interfacing specification.
is
This list
mobile phone available
in
out
mentioned
1.
Sony Ericsson
only updated to the time this listisbeing printed. This list gives an example of bluetooth
on
the market, if your bluetooth mobile phoneisnot on the list, please try it
practice or try your phone at the local dealer or consult with the local dealerincaseitis
in
the list.
not
I I
Features
Caller
10
Pairing
Ringing
Talking
Dialing
Pairing
Pairing cancel
In·Band Ring
Talk
Reject
Audio Transfer
Volume up/down
Hang up
Audio Transfer
Volume up/down
Redial last call
Tone
,
,
\",
'\
"':
\"'~~
\~>.,
Z600
(Advance)
../
../
../
X
../
/
../
../
../
../
../
../
...
. I
I
I iii '
.ilc
\'
\\
\:~.,
Z600
(Save
mode)
../
../
../
X
../
../
../
../
../
../
../
X
~
~
L
'"
....
~
;,•,L
~
~-,
:;~J'
-
.'
T630
(Advance)
../
../
../ ../
X
../
../
../
../
../
../
../ ../
../
i.;-.,;, .;"
fl
'~~
~I
,1....,;'
T630
(Save
mode)
../
../
X
../
../
../
../
../
../
X
~'~;",,"
~<5f
.
~
i
'!,'
t
' '
I
-
"-:
or:'
•
,,::"
v
K700i
../
../
../
X
../
/
../
../
../
../
../
../
""
...
',,;-
\.
) .
.----'
S700i
../
../
../
X
../
/
../
../
../
../
../
-,
.'"
I
Z800i
Features
Caller ID
Pairing
I--:..:pa:::.:iri::l!ngc----+--~V;~--+--..!:V;-::---+--~V;-::--+----:!V;~--+--....!V;~-+------j
Pairing cancel V V V V V
In·Band Ring Tone X X X X
Ringing
Talk
Reject
Audio Transfer
Volume up/down
Hang up
Audio Transfer
Volume up/down
Redial last call
W800i
W550i
(Advance)
E - 23
W550i
(Save
mode)
W810i
../
Page 24

2.
Nokia
I
I
Features
Caller
Pairing
Ringing
Talking
Dialing
ID
Pairing
Pairing cancel
In·Sand
Reject
Audio Transfer
Volume up,'down
Hang
Audio Transfer
Volume
Redial last
Ring
Talk
up
up/down
Tone
call
I
I
F
, .
) }
8910
../
../
../
../
../
../
../
../
../
../
J'
../ ../
..
-
'~11
. e
. ,
J
, '
,-.
~
0',.
e
6600
../
../
../
../
../
../
../
../
../
../
J'
";P'
':\~ii;
I
I
6230
../
../
../
../
../
../
../
../
../
../
../
../
~-'-~
-
-
I
-
-
[--;
_"'~~J
N90
../
../
../
../
y'"
../
y"
../
../
../
../
../
Fe<:
,.
....
:..11
...
I
I
7600
../
../
../
../
../
../
../
../
y"
../
J
../
,1."\
~.
"
t
.,
t
~
I
I !
,'"
.
..;;;,.
'r:
;~:
- .
I
In
.
. "',._•
.....:...::-c.'
N91
../
../
../
../
y"
y"
../
../
v'
y"
-/
../
.
..
-
.
Features
Caller ID
I
Pairing
I
Ringing
I
Talking
Dialing
Pairing
Pairing cancei
In-Band
Ring
Talk
Reject
Audio Transfer
Volume
up'down
Hang
Audio Transfer
Volume
up/down
Redial last call
...
-
.......
~.:~
~<!
7380
v'
v'
../
v'
v'
v'
v'
v'
v'
v'
v'
v'
~)
l
.
.
I
--1
,.
(~
I,
6111
../
../
../
Tone
up
../
../
v'
../
../
y"
v'
../
../
,
,
I
'''.,I~;'''''\;
!;
.tJ~
~f--
'_-::':-'='::':'-'
6230i
.
~.
.
,:;
v'
v'
v'
v'
../
v'
../
v'
v'
v'
J
v'
E - 24
Page 25

3.
Motorola
j:I,
;"
,
-,
..
-:.
....
Features
Caller
10
__
p~a~ir~ing!L-
l-
Pairing
4.
Pairing cancel V V V V V V
In-Band Ring
Audio Transfer
Volume
Audio
Volume
Redial las!call
Panasonic & Sharp
__
Tone
Talk
Reject
upidown
Hang up
Transfer
up/down
-+-
V600
-,/
__
-=--,,----_-+
/'
-/
E398
..:v.---,--
/'
-/
__
+-
__
V501
../~
__+-__
/'
-/
V3
--.:..---;--_-+
/'
-/
V80
-/..!.....::__-+-
.
/'
-/
V3X
__
-/~:__--j
/'
-/
I
Panasonic X88
Features
Caller
ID
Pairing
~_..:p~a~ir~inJ1.g
Pairing cancel V
In-Band Ring Tone X X X
Ringing
Talk
Reject
Audio
Transfer
Volume
up/down
Hang
up
Audio
Transfer
Volume up/down
Redial last call
~
__
v'~,..-_-+
__
GX-T15
~-/~
__
-/
+
GX-T71
-/~
__
v'
+
~
+------"1
E-25
Page 26

5.
Siemens&BenQ
Features
Caller
10
Pairing
Ringing
Talking
Dialing
Pairing
Pairing cancel
In·Band
Ring Tone
Talk
Reject
Audio Transfer
Volume up/down
Hang
up
Audio Transfer
Volume up/down
Redial last call
555 588
../
-/
../
../
../
../
../
../
-/
../
../
../
../
../
../
../
../
../
../
../
../
../
../
../
6.
Dopod&MIO
Features
Caller
10
Pairing
Ringing
Talking
Dialing
Pairing
Pairing cancel
In·Band Ring Tone
Reject
Audio Transfer
Volume up/down
Hang up
Audio
Volume up/down
Redial last call
Talk
Transfer
&
Blackberry
,
..
t¥'1
-~
...
-
818
../
../
../
X
../
-/
../
../
-/
../
../
../
,
............
.
=~~
i'---f
~
l
....
-".,
-~jh;]i."
565
../
../
../
X
../
../
../
../
-/
../
../
../
1!8
.,
I.i.
,..,
:~·~_E
-
A700
../
../
../
X
../
../
V
../
../
V
V V
../
_~·~_.~)zr:!i
.
'1,·
...
I"
_.
'"
'-'
•
.'
-
B"
".
8700
../
../
../
../
../
../
../
../
../
../
../
'.
E -
26
Page 27

7.
Samsung &
LG
Features
Caller
Pairing
Ringing
Talking
Dialing
10
Pairing
Pairing cancel
In·Band Ring Tone
Talk
Reject
Audio Transfer
Volume up/down
Hang up
Audio Transfer
Volume up/down
Redial last call
0508
V'
V'
X
V'
V'
V'
V'
V'
X X
0528
V'
V'
V'
X
V'
V'
V'
V'
KG320
V'
V'
V'
V'
V'
V'
E - 27
Page 28

Blue Tooth Hand Free Panel Function Key
Matrix
Panel Function Button
1
2
3
4
AUDIO
BAND
Short Press
MODE
Long Press
MENU
Answer Incoming call
Reject Incoming call
Answer Incoming call
Transfer Phone Conversation backward to
Mobile Phone
Pairing / Re-Connection etc
Note: See Menu operation for
Blue Tooth Hand Free Function
more
details.
E - 28
Page 29

PAIRING
Pairing The Blue Tooth System Between User's Mobile Phone & The Unit
• Access into MENU - PAIRING
~
• Once the PARING? is appearing on the LCD Display, press the AUDIO button to activate
~
•
• Select the Blue Tooth set up on the Mobile Phone
~
• "BT60" should appear in the pairing list on the mobile phone. User need to select "BT60"
• If the pairingissuccessful, the display will
• If the pairing failed, PARING FAIL! will
EJ4>.
Pis see MENU Operation for
the Pairing mode.
Keep the mobilephonewithin 2 meterfrom the unitwhen making the pairing.
To
terminate the pairing, you can press the "CLEAR(BAND)" button at any time.
Please refertothe instruction manual of your mobile
tooth set
and then
will switch back
During the Pairing, oniy Power, CLEAR(BAND)
function keys are disabled
up
and blue tooth on/ off, and bluetooth pairing.
input
the password "1234".
to
the previous
mode
& non-operational during the pairing mode.
to activates the operation of
more
mode
details of how to access into MENU
show
be
flashing on the Display for 3 seconds. And the unit
automatically.
PARING
'volume
Pairing.
phone
OK!
on
how
to enter into the blue
and Mobile Phone Name.
+/- & Mute are functional, other
mode.
Re-ConnectionOfThe Blue Tooth System
The unitiswith built -in Auto-Reconnection function.Insome conditions, user need to
reconnect manually. For example like the following.
If
The Mobile Phoneisoutofrange.( 2 meters away from the Head unit) Under the
•
condition of lost connection when the user
an incoming call or userisunder
the Head Unit and
• If user wants Audio Transfer back from Mobile Phone to Head unit.
manually.
The unit can be re-connected by the following methods.
• Access into MENU
~
•
~
~
Pis see MENU Operation for
Once
manual Re-Connect mode.
the RECONNECT
1.Keep the mobile
2.The manual re-connectisonly function with the Mobile Phone has already been
paired with the unit before.
come
backtoHead unit.
RECONNECT
is
display on the
phone
conversation on the Mobile Phone 2 meters away from
mode
more
within 2 Meter from the unit when
come
to activate the manual RE-Connection.
details of how to access into MENU mode.
LCD,
back to the unit. At the same time.
It
needs to re-connect
press the AUDIO buttontoactivate the
making
the connection.
tr1ere
is
• The LCD Display will displayed
• If the re-connection
will switch back to the previous
• If the re-connection failed, the LCD Display will display
switch back
to
is
successful, the LCD Display will display RECONNECT . And the unit
the previous
RECONNECT ... during the
mode
mode
automatically.
automatically.
E - 29
connecting
REC~A~~~CT
period.
OK!
And the unit will
Page 30

The unit will be Auto Re-Connection by following
operation.
• Every time turn the ignition key from off to on ,the unit will Auto re-connect with the mobile
phone one.
Dis-CQnnectio"-_Qf
tb~jJlue
Tooth
System
The unit have a option function for user to disconnect the Blue tooth system with the unit.
The unit can be Dis-connected by the following methods.
• Access into MENU - RECONNECT mode, then rotate the encoder volume knob to select
the "DISCONNECTION"mode.
~
• Once
Please see MENU operation for more details of how to access into MENU mode.
the"
DISCONNECT"
is
display on the LCD, press the AUDIO button to activate the
manual Dis-Connect mode.
• The LCD Display will
displayed"
• If the Dis-Connection is successful, the LCD Display will
unit will switch back to the previous
DISCONNECT
mode
automatically.
•..
" during the Dis-connecting period.
display"
DISCONNECT
OK
I
".
And the
INCOMING CALL
ANSWERING AN INCOMING CALL
• When there is an incoming call, the LCD Display will display the phone number If the
incoming call has no Phone Number, the LCD will
display"
press the "PHONE(AUDIO)" button or "MODE" button to answer / accept the call.
CALL
ANSWER
?
II
User can
~
The audio outputofthe present
mode
will be muted and the ringing tones will be heard,
if an incoming call is not being answered.
• User can use the volume up/down to adjust the volume level.
•
To
end the conversation, press the "CLEAR(BAND)" button. The unit will switch back to the
~
previous
An incoming call under stand
mode
automatically and release the mute of the previous mode at the same time.
by
mode
(Ignition on & Power Off) The system will
automatically switch on the head unit.
~
While there is an Incoming call or under talking mode, the Panel Open/Eject key is disactivated.
Rejecting
An
Incoming Call
• User can press "CLEAR(BAND)" button to reject the incoming call.
~
The audio
outputofthe present
mode
will be muted and the ringing tones will be heard
if an incoming call is not being answered. After pressing the "CLEAR"(BAND) button,
the mute
of
the present mode will be released.
E - 30
Page 31

OUTGOING
•
Use
the mobile phone which paired with this unit to making
• During the talking mode, the
• User can use the volume up/down to adjust the volume level.
To
•
end the conversation, press the "CLEAR(BAND)"
CALL
LCD
Display will
display"
TALKING ... "
button.
an
outgoing call.
The unit will switch back to
the previous mode automatically. The mute of the previous mode will be released
same time.
if
• During the talking mode,
conversation even if the Ignition
press "CLEAR(BAND)" button to switch off the unit.
the Ignitionisbeing turned off, the unit will keep the
is
Switched
off.
After finished the conversation, User can
CALL TRANSFER
TO AUDIO TRANSFER FROM HEAD UNIT BACK TO THE MOBILE PHONE
• During the talking mode, user can
3 seconds to transfer the audio from the unit back to the mobile phone for privacy reason.
The
LCD
Display will CALL TRANSFEAI
~
~
After the "Transfer" buttonispressed, the mute of the present mode will
the same time.
Depending on different type of Mobile Phone, the time need for activating the CALL
TRANSFER mode
pressed the "TRANSFER" button for audio transfer back or forth through Unit to mobile
phone.
is
different. Like Nokia Mobile Phone usually takes 3-5 seconds after
LONG
press the "TRANSFER"(MODE) button more than
be
released
at
the
at
HIGHLIGHT FEATURES
• Incoming call ringing volume
Preset the Ringing volume level for any incoming call.
~
Pis
see "MENU"- "PHONE
VOL'
for details operation.
E -
31
Page 32

When aDISCorUSBorMEMORYCARD is inserted into the player, thefollowing picture will appear
onthe TFT monitor.
CD Audio Disc MP3IWMA Musfc Files
SELECTIINGA
Press the TRACK/FILE
advance to the next track on the CD, The selected track
and Hold TRACKUP
TRACK/
(~)
FILE
TO
PALY
UP
(
~
)orTRACK /FILE DOWN (t+I) button
number
or
TRACK DOWN (t+I) buttonfor morethan
will
for
less than one second to
appear
one
secondtofast forward or
fast backwordthrough the disc. Playbackstartswhen thebuttonis released.
~
MP3/WMA
When the last track/file playback completed, the unit will automatically enter into 'STOP'
mode. User can
FILE/FOLOER
press
play button to start the playback again
SEARCHING
wheninthe 'STOP' mode.
on the display. Press
1.
When a DISC
or
USBorMEMORY CARDisinserted into the player, The first music file
contained on the device will automatically start playback.
2.
Use the cursor
'Up'
keys on the remote, to select a folder and press 'OK', the folder is
opened and the content will be displayed.
3.
Use cursor 'Up'or'Down'
play the selected file.
103
Information
The player can display ID3 information (Name, Album, Artist, Copyright---) .Ifthis information is
not available then display
company
scrolling atthe bottom ofthe TFTscreen (onlyonthe externallyconnectedTFT screen).
to navigate between the file list and press 'OK' to confirm to
information(i.e. name etc.) Extended information will be
32
E -
Page 33

CD/ P3/WMA Operation - Remote Control
To
operates
CD
function through the following keys on the remote control.
17.
Play/ Pause
18.
Stop
8.
Fast Forward
9.
Fast Backward
14.
Next
15.
Back
19-29.
32.
Repeat
10-13.
16.
35.
Up/Down/Left/Right sursor button
OK button
Goto
Numeric buttons
17) PAUSE/ PLAY BUTTON
1.
Press
PAUSE
to pause playback (still mode). The sound from the discismuted during
(~II/
M1)
still mode.
2.
18)
STOP(.)
1.
2.
3.
14)
NEXT(~)
Press
Press STOP to stop playback and show the logo screen. The player memorizes the
location where playback
Press
VCD
Pressing
PLAY
PLAY
1.1,
to resume normal playback.
is
stopped.
to resume playback from the location where playbackisstopped
VCD
2.0 and audio CD).
STOP
twiceisresume playback from the beginning of the disc.
Press NEXT to skip forward to the beginning of the next chapter.
15)
BACK(~)
Press BACK to skip backward to the beginning of the previous chapter.
8-9)FASTFORWARD&FASTBACKWARD(~or~)
1.
Press
a new speed
2.
Press
3.
Press FAST BACKWARD to fast reverse through the disc. Each time the button
pressed, a new speed
4.
Press
FAST
PLAY
PLAY
FORWARD
(2X,
4X,
to fast forward through the disc. Each time the buttonispressed,
8Xor20X)isselected.
to resume normal playback.
(2X,
4X,
ax
or
20X)isselected.
to resume normal playback.
(DVD,
is
..
19-29)
1.
2. Use when
The fast forward/backward speed may differ depending upon the disc.
NUMERIC
When
use
when
Goto
function,etc
playback
BUTTONS
CD/MP3/WMA use
function
playback
need
DVD
numeric
which
need
for
track
SelectionorInput,
numeric
number
SelectionorInput, like in the
E - 33
or File
like in the
number
direct
Goto
function,etc.
access
and
Page 34

32 REPEAT
Press
REPEAT
button lessthan3secondstoactivates the repeatfunction.
1. The
2. The
3.
4. Press again to " Repeat Off".
first
press
Song/File.
second
Folder.
The third press is " Repeat All", This istorepeat play the
is "
press
Repeat
is "
Repeat
Single",
Folder",
Thisisto
Thisisto
=This player can repeat play selected pointtopoint.
keep
on
repeat
repeat
play
whole
playing
the
file
disc.
the
under
current
current
UnderaCD/MP3/WMA File
pointwantto
'A-B
10-13)UP/DOWN/LEFT/RIGHT
Use to move
16)OK
7) RANDOM BUTTON
35)
BUTTON
Use this
Press RANDOM button less than 3 seconds is "shuffle play" all songs on the disc. to disable all
file" shuffle play", press RANDOM button lessthan3seconds.
GOTO BUTTON
1.
Under
the desire
cursor
buttontoconfirm
CD
disc
track
repeat play.
up/down/left/right.
playing
number
is
playing, use cursor key access to " Rep A-B", field to selectthe
the
selection.
mode
for
playback.
BUTTON
press
(A
/ T /
GOTO, Then use
~/~)
numeric
buttonstodirect
access
2.
Under MP3/WMA
direct
accesstothe
music
desire
file
playing
playback
mode, press GOTO the use
time.
E - 34
numeric
buttons
to
Page 35

COl P3/WMA Operation - Control Panel
The following function are available operates through the control panel.
TRACK/FILE
Press the TRACK/FILE
advance to the next track on the CD, The selected track
and Hold TRACK
fast reverse
UP
through
UP
(
~
(~)
)orTRACK /FILE DOWN
or
TRACK DOWN
(~)
buttonfor morethan
(~)
button for less than
number
will appear on the display. Press
one
thedisc. Playbackstartswhen thebuttonisreleased.
one
second
secondtofastforward
to
or
FILE/FOLDER SEARCHING
When the MP3/WMA music file is playback, the M5(16) and M6(17) is use as UP/DOWN cursor
navigatethru
iiIita
~......,..-~-
~
once navigate to the
"AUDIO" button as 'OK' keyto access intotheselected folder.
When the last track playback completed, the unit will automatically enter into 'STOP'
mode. User can press play button
the
Folder/File list.
top
levelofthe
folder, and before the 3
to
start
the
CD playback again
seconds
when
time
out
in the 'STOP'
to press the
mode.
(1
~II
12) PAUSE/ PLAY BUTTON
1.
Press PAUSE to pause playback (still mode). The sound
)
from
the
disc
is muted
during
still mode.
2.
Press PLAY to resume normal playback.
to
13)STOP
1.
BUTTON (2 STOP)
Press STOP to stop playback and
location where playback is stopped.
2.
Press PLAY to resume playback from the location where
VCD 1
3.
Pressing STOP twice is r.esume playback from the
.1
, VCD 2.0 and audio CD).
14)REPEAT BUTTON (3 RPT)
Press REPEAT button lessthan 3
show
the
logo
screen. The player memorizes the
playbackisstopped
beginningofthe disc.
secondstoactivatesthe repeatfunction.
E -
35
(DVD,
Page 36

1.
The
first
press
Song/File.
2.
The
second
Folder.
3. The
4.
third
press
Press againto" Repeat Off".
is
Repeat
press
is "
is I Repeat All", This istorepeat
Single",
Repeat
Thisisto
Folder",
keep
Thisisto
play
on
repeat
repeat
the whole
play
playing
the
file
disc.
the
under
current
current
Eim1
This playercan repeat playselected pointto point.
is
Undera CD/MP3/WMA File
A-B pointwantto repeat play.
playing, use cursor key access
to"
Rep A-B", field to select the
15)RANDOM BUTTON(4ROM)
Press RANDOM button less than 3secondsis "shuffle play" all songs on the disc.Todisableall
songs "shuffle play", press RANDOM button less than 3seconds.
E -
36
Page 37

16. DVD OPERATIO
D 0 era ion • Remote control
2) EJECT BUTTON (~)
Pressthe EJECTbutton to ejectthedisc or loadingthe disc.
17)PLAY/PAUSE
1. Press
2.
Press
VCD only).
3.
Press
18) STOP( • )
(~II)
PAUSE
PAUSE
PLAY
to pause playback.
to single step forward to the next picture in the video (DVD and
to resume normal playback.
1. Press STOP to stop playback and show the logo screen. The player memorizes the
is
(2X,
(2X,
stopped.
BACK
4X,
ax
4X,
ax
FORWARD(
or 20X)isselected.
or 20X)isselected.
is
~or~)
disabled.Todisable current file "repeat play",
(DVD,
is
location where playback
2.
Press
VCD 1.1, VCD 2.0 and audio CD).
3.
Pressing STOP twice is resume playback from the beginning of the disc.
8&9)
14)
15)
32)REPEAT
FAST
1. Press FAST FORWARD to fast forward through the disc. Each time the button
pressed, a new speed
2.
Press
3.
Press
pressed, a new speed
4.
Press
..
NEXT(~)
Press NEXT to skip forward to the beginning ofthe next chapter.
BACK(~)
Press BACK to skip backward to the beginning of the previous chapter.
Press REPEAT button less than 3 seconds to "repeat play" the current file. And keep on repeat
Playing the current file until the "repeat play"
press
PLAY
FORWARD&
PLAY
FAST
PLAY
The fast forward/backward speed may differ depending upon the disc.
REPEAT
to resume playback from the location where playbackisstopped
FAST
to resume normal playback.
BACKWARD to fast reverse through the disc. Each time the button
to resume normal playback.
button lessthan3 seconds
is
E-37
Page 38

10-13)
U 100
/l
1 IGH BUTTO
Usethese buttonstomovecursorup/down/left/right.
16)
OK
Use
this
buttontoconfirm
the
selection.
19-29)
1.
2.
30A) eve rJlENU
1.
2.
3.
NUMERIC
When
use when
When
Goto
Press
playback
playback
function,etc
DVO
Press direction buttons to highlight a selected menu entry.
Press OK or
chapter or title, the disc will play from the selected spot.
30B). PBC (Play
1.
Press
OVD
PSC must be enabled for menu navigation.
2.
Press a number on the number pad to select a track to play(VCD 2.0 only).
3.
4.
34)050
Press OSD
this
discorfiles
Press
Press
OK
DVD
BUTTON
button
BUTTONS
CD/MP3/WMA use
function
DVD use when
need
numeric
for
track
SelectionorInput, like in the
function
numberorFile
need
numeric
MENU to invoke the menu screen included
PLAY
back
to select the highlighted entry.Ifthe highlighted entry indicates a
Control) (For
MENU to enable/disable
VCO
disc
PSC
only)
functionality with
to make the selection.
MENU for the main menu.
and the
information
display
on
the
type.
number
Selection or Input, like in the
on
the
DVD
VCO
TFT is
difference
direct
Goto
function,etc.
disc
2.0 discs.
access
(DVD
only).
according
and
to
1.
2.
DVD
VCD
Video:
E-38
Page 39

3.
4.
MPEG4
JPEG
35)
GOTO BUTTON
1.
Press GOTO button to pop up the search Menu. The
current playback
2.
Press the Up/Down cursor key
VCD):
track time search / disc time search.
• Select Track Time
time in
unitsofhours,
to
jumptoa
on
the remote to select the type of search: track search /
spot
minutes, and
on the
timeofthe
seconds
TFT
will display the following(e.g
current
(hh:mm:ss):
track
and
enter
the
• Select Disc Timetojumptoa
time in units,
minutes,
and
spot
seconds
E - 39
on the timeofthe
(hh:mm:ss):
whole
disc
and
enter
the
Page 40

33)
Press Ok
inputisoutofcontent,
3.
Press GOTO
ZOOM
1.
2.
BUTTON
Press ZOOM during play, scan, pause playstate.
Pressing the ZOOM button repeatedly increases the magnification level. Three
magnification levels are supported.
will
tvvice
palyback
the
disc
pres Ok will
to cancel search menu.
from
On
the
input
delete
all
content.
input
But
numbers.
when
each press of ZOOM, the OSD will flash the
following:
3.
Pressing Up/Down/Left/Right buttons causes the zoom point to shift, allowing the
zoomed image to be panned.
the
numeric
~
1)
Some discs may not respond to the zoom feature.
2)
Zooming does not work
3)
Zoom functionisavailable no matter if displayisopened.
on
subtitles or menu screens included
on
DVDs.
37) TITLE
1.
Press TITLE to bring up the Title Menu
is
option
2.
Press direction buttons to highlight selected Title Menu entry.
3.
Press OK or
available or not).
PLAY
to select the highlighted entry. If the highlighted entry
(DVD
only, dependent on the type of disciftitle
36) SUBTITLE
Press SUBTITLE during playback to turn on/off subtitles and to change the subtitles
only). The OSD indicates the current setting, giving the subtitle track number and the
language selected, for example:
~
1)
The first press will show the current subtitle setting selected; subsequent presses
toggle to the next subtitle setting.
(DVD
2)
Some DVDs display subtitles automatically and cannot be turned
subtitle function
is
set to
Off.
E - 40
Off,
evenifthe
Page 41

3)
During some scenes, the subtitles may not appear immediately.
4)
Some DVDs allow subtitle selections and turn subtitles on or off only via the disc
menu.
5)
When a playeristurned on or a disc is replaced, the Set Up returns to the default
setting.
6)
Subtitle functionisavailable no matter if display is opened.
38)DVD AUDIO
Press
DVD
AUDIO during playback to change the audio language(DVD/MPEG4 only). The
OSD indicates the current setting by giving the audio track number, language, audio type,
and number of channels. For example:
~
1)
The first press shows the current language selected; subsequent presses toggle
The next audio language
2)
Some DVDs allow audio selection change only via the disc menu.
3)
When the playeristurned on or a disc replaced, the player returns to the default
language.
39)
ANGLE
Press ANGLE while playing a scene recorded with multiple angles to change the angle
(DVD
only). The OSD indicates the current angle selected and the total available angles to
select, for example:
~
1)
The first press will show the current angle selected. Subsequent presses toggle to
the next angle.
2)
The front panel will light its angle icon when angle changes are available.
3)
Some DVDs allow angle changes only via the disc menu.
4)
When the playeristurned on or a disc is replaced, the player returns to the default
angle.
E -
41
Page 42

Once a DVD disc is inserted into the unit, the unit will automatically start the playback from the
in
beginning ofthe disc, and then the DVD MENU or ROOT or TITLE
theTFTmonitorand "ROOT" will be displayed on the
TFTofthe
the DVD disc will appear on
unit.
1m Under the DVD MENU or ROOT or TILTLE
of Track
Knob
12.PLAY/PAUSE
1.
Press PAUSE to pause playback.
2.
Press PAUSEtosingle step forward to the next pictureinthe video (DVD and
VCD only).
(6)
up/down
as UP / DOWN direction button, and Audio(4) as OK button.
(1
~II)
(20/
21) use as LEFT / RIGHT direction button, Encoder Volume
is
display on the TFT Monitor. The buttons
3. Press PLAY to resume normal playback.
13.STOP (2 STOP)
1.
Press STOP to stop playback and
location where playback is stopped.
2.
Press PLAY to resume playback from the location where playbackisstopped
VCD 1.1, VCD 2.0 and audio CD).
3.
Pressing STOP twiceisresume playback from the beginningofthe disc.
20.
NEXT(~)
Press NEXT to
BACK(~)
21.
Press BACK to skip backward to the beginningofthe previous chapter.
20/21. FAST FORWARD & FAST
1. Long press FAST FORWARD to fast forward through the disc. Each time the button is
pressed, a
2.
Press PLAY to resume normal playback.
3.
Long press FAST BACKWARD to fast reverse through the disc. Each time the button is
pressed, a
4.
Press PLAYtoresume normal playback.
14.REPEAT
(3 RPT)
skip
forward to the beginning of the next chapter.
BACK
new
new
speed
speed
(2X,
(2X,
4X,
4X,
ShON
FORWARD (
ax
or 16X) is selected.
ax
or 16X) is selected.
the
logo
screen. The player memorizes the
~
or
~
)
(DVD,
Press REPEAT button less than
Playing the current file until the "repeat play"
press REPEAT button lessthan
15. DVD MENU (4 ROM)
Press DVD MENU button less than
DVD
disc.
3 seconds to "repeat play" the current file. And keep on repeat
is
disabled.Todisable current file "repeat play",
3 seconds
3 seconds to invoke the DVD MENU
E -
42
or
ROOT on the
Page 43

• Under the
Track up / down (20 /
Knob ( 6 ) as
DVD
MENU or ROOT or
21)
UP
/ DOWN direction button, and Audio button ( 4 ) as
TILTLEisdisplay on the TFT Monitor. The button of
useasLEFT / RIGHT direction button, Encoder Volume
OK
button.
17.0VO AUDIO (6
Long press DVD AUDIO button during playback to change the audio language
The OSD indicates the current setting by giving the audio track number, language, audio
type, and number of channels. For example:
~
11.0S0
• The first press shows the current language selected; subsequent presses toggle
the next audio language
• Some DVDs allow audio selection change only via the disc menu.
• When a disc replaced, the Set Up returns to the default setting.
(AS/PS)
1. Short Press AS/PS once to display the amount of time played and tim remaining to be
played on the disc. For example, the OSD may display:
v)
(DVD
only).
2.
Short Press AS/PS a second time to additionally display the disc type, current chapter
(DVD)or track (VCD/SVCD, audio CD), and total number of chapters or tracks. Also
DVD
displayed (for
type/#
display:
• Short Press the AS/PS
and frame rate.
11.Set
~
• After pressing the "Set Up" button, the
up
While the DVD discisbeing played or under stop mode, the "SET UP" (AS/PS) button on the
control panel serve thefollowingfunction:
•
Long
Please refertothe related descriptionin"system Set Up"fordetailsoperation of "SetUp" !
User can use the following buttons to adjust the "Set Up" items shown
monitor as follow:
• Track Up / Down ( 20 /
items shown on the TFT Monitor.
• AUDIO button as ENTER to confirm the selected item shown on the TFT Monitor
of channels, subtitle language, and angle selection. For example, the OSD may
(AS/PS)
Press "SET UP" (AS/PS) button to bring up the System Setup Menu
only)isthe current title, total number of titles, audio language/
in
MPEG4 file will display the file name, MPEG4 version, file size
LCD
will display "Set Up" and keep on blinking.
on
the TFT
21
) buttonsasCursor Left / Right to navigate thru the Set Up
•
Encoder Volume Knob as Cursor to navigate thru the Set Up Items shown on the TFT
Monitor.
Eiml
ShortPress "SetUp" button again button to resume the DVD playback.
E -
43
Page 44

FILTER FUNCTION
If a DISC or USB or MEMORY CARD contained various categoriesoffiles. This "Filter" function
can hidden the files and notallowfor selection. during the File/Foldersearching.
1. The selection
2.
Use right allow keys to go
Use up/down keys to navigate thru the
categories need to be hidden. then press "OK" key to confirm, Use left key to exit the
filter function.
is
done among the 3 categories:a.Audio,b.Photo,c.Video
the"
Filter" field press "OK" keys to open the selection box.
E-
44
Page 45

18. PEG4 OPERATION
The unitissupport playback MPEG4 files, the details operationisexactly the same
CD/MP3/ WMA operation. The following are special functions pertaining to the playback of
MPEG4 File:
as
External Subtitle
External Subtitle settingisused for choosing the language domain, (only for MPEG4). After
select one language domain (alphabet), when playback a MPEG4 with external subtitle, the
subtitle display will use this language alphabet. if you find the displaying subtitle "alphabet" are
not correct. please make sure to select the correct external subtitle language domain. The
following language domains are available:
~
• Turkish =Include Albanian, Danish, Dutch, English, Finnish, French,
Gaelic, German, Italian, Kurdish (Latin), Norwegian,
Portuguese, Spanish, Swedish and Turkish.
• Central_European =Include Albanian, Croat, Czech, Dutch, English,
German, Hungarian,lrish, Polish, Romanian, Slovak,
Slovene and Sorbian.
Cyrillic'
•
Western European =Albanian, Breton, Catalan, Danish, Dutch, English, Faroese,
The MPEG4 Subtiltle selectionisappearinthe 'SET UP"
subtitle for the osd menu.
=Include Bulgarian, Belorussian, English, Macedonian,
Moldavian, Russian, Serbian and Ukrainian.
Finnish, French, Gaelic, German, Icelandic, Irish, Italian,
Norwegian, Portuguese, Spanish and Swedish.
menu>
language>
MPEG4
E-45
Page 46

19. SYSTEM SET UP MENU
The System Menu
harmony
Press the SET UP on
panel to invoke
Menu will be
opened
When the
with
displayed,
during
setup
allows
components
the
playback.
Menu is
the
Setup
the
usertoconfigures
to
which
remote
Menu.
and
invoked,
controlorLong press "AS/PS'
Pressing
the
setup
the
the
the
playerisconnected.
the System Menu
menu
OSD will
will be
display
player's
turned
the
behaviortowork
button
button
off.
Setup
following
on
during
menu
"buttons:"
in
the
front
the Setup,
can be
1. The 'Up/ Down' buttons can be used to select the category of settings which need to
changed. The page of setting for that category will
category.
2.
When the category changes are set, press 'Up/ Down' repeatedly to return to the text
buttons. Selecting the appropriate button and pressing 'OK' can change settings
different category.
Language
1.
Using the Up/Down buttons, move to the Language button. The player's Language settings
will appear:
Settings
be
displayed instantly once selected the
in
a
be
2.
Use the Right buttons to select the setting.
3.
Use the Up/ Down direction buttons to select the setting to be changed.
4.
Press Ok to cycle through each possible option or display a list of the available options.
When a list of options appears, press the Up/Down buttons to move among the displayed
options.
5.
Press Ok again to choose the option and change the setting.
E - 46
Page 47

6.
Press Ok (after cycling through the options) to change the displayed value of the next
available option and change the setting.
The following subsections explain the available options for each of the possible Language
setting.
1.
OSD Language
Selecting the OSD setting allows the user to select a preferred language for the
and messages. The following options are available:
• English
• French
• Espanol
• Deutsch
• Italian
• Portuguese
• Turkish
• Russian
= Menu/OSD is
= Menu/OSD is
= Menu/OSD
= Menu/OSD
= Menu/OSD is
in
English (factory default)
in
French
isinEspanol
isinDeutsch
in
Italian
= Menu/OSD is in Portuguese
= Menu/OSD is
= Menu/OSD is
in
Turkish
in
Russian
bSD
menu
..
Some DVDs may not include the pre-selected language.inthis case, the unit will
automatically displays menus
in
the disc's initial language setting.
Video Settings
1. Using the Up/Down buttons, move to the Video. The Player's Video settings will appear:
E -
47
Page 48

2. Use the Right utton
3. Use the Up/Down buttons to select the setting to be changed.
4. Press Ok to cycle through each possible option or display a list
of
options appears, press the Up/Down buttons to move among the displayed options.
5. Press Ok again to choose the option and change the setting.
6. Press Ok (after cycling through the options) to change the displayed value
available opions
The following subsections explain the available options for each
TV Aspect Ratio
Selecting the
VCD only). The following options are available:
TV
Aspect setting allows the user to select the aspect ratioofthe TV (DVD and
4:3
= Aspect ratio
16:9
= Aspect ratio
to
select the setting.
and
change the setting
the entire screen.
of
the options. When a list
of
the Video settings.
of
TV is 4:3.
of
TV is 16:9. Both widescreen and 4:3 contents will fill
of
the next
..
TV System (NTSC or PAL)
The Video setting allows the user
following options are available:
• Most widescreen DVDs will not allow pan & scan conversion. If 4:3
selected on these DVDs, letterboxing will be used instead .
• If 16:9 is selected and a 4:3 TV is connected, 16:9 content will appear distorted
during playback (objects look thin).
PS
is
to
select the TV standard (DVD and VCD/SVCD only). The
• NTSC
•
PAL
• AUTO
..
Playing
The OSD will indicate:(OSD)
=
TVisNTSC. PAL content is played at NTSC resolution and frame
rate (factory default).
= TV
is
= If the content is
output
PAL
DVDs with TV SYS settoNTSC is not allowed.
PAL.
NTSC content is played at
PAL,
the output is
is NTSC
PALtoNTSC error.
E -
48
PAL
resolution and frame rate.
PAL.
If the content is NTSC, the
Page 49

Rating Settings
1. Using the Up/Down buttons, move to "Rating", the Rating settings will appear:
2. Use the Right buttons to select the setting.
3. Use the Up/Down buttons to select the setting to be changed.
The following subsections explain how to change each of the
Parental Control Rating Selection
The Rating allows the user to have parental control feature of the player. Press the "OK"
button the below window will appear on the screen, to allow user to enter the password, will
pop
Once
appear.
entered
upawindow
let user set password:
the
correct
password,
press
"OK"
the
player1s
"correct
Rating settings.
password"
message
will
E - 49
Page 50

Press
Ok
totocycle
• Kid Safe = Only titles with a parental control setting of 1 are allowed to play
• G
•
PG
• PG-13
•
PG-R
• R
• NC-17
• Adult
through
the
available
options.
The
following
0 ti n
= Only titles with a parental control setting of 2 or less are allowed to play
= Only titles with a parental control setting of 3 or less are allowed to play
= Only titles ·with a parental control setting of 4 or less are allowed to Play
= Only titles with a parental control setting of 5 or less are allowed to play
= Only titles with a parental control setting of 6 or less are allowed to play
= Only titles with a parental control setting of 7 or less are allowed to play
= Allow any title to play (factory default).
Ie
available:
~
If
incorrect
will appear.
~
• The factory default password
• Parental control functions only available if the
Parental control does not work for VCD/SVCD/CVD or
Set password setting
User
can
set
new
up
the
"Enter
"Enter
New
Password"
Password"
confirm.
passwordisentered,
passwordinthe
window,
window
will
is
Set
enter
pop
the
8888
password
the
old
up,
Enter
below
"Incorrect
DVD
setting.
password.
the
new
Password"window
titleisencodedinits program.
CD
audio.
Goto"set",
Press
password,
Ok
press
twice,
press
Ok
then
Ok
to
to
pop
the
E-50
Page 51

1. Using the Up/Down buttons, move to the Misc. the Misc Rating settings will appear:
2.
Use the Right buttons to select the setting.
3.
Use
the Up/Down buttons to select the setting to be changed.
4.
Press Ok for each setting to cycle through the options and change the settings.
The following subsections will explain the available options for each of the Misc settings.
Use Default Settings
Press Ok,
pop
up
window"
No
Yes=Close
= Return
Use
to
Use
Setup
Default
Default
menu.
Setting",
Setting
there are
two
selections:
Yes/No.
E -
51
Page 52

20. MEMORY CARD OPERATION
The unit can support playback
MMC Memory
Inserting and Removing a
Card.
Detach the
Front Panel
Pis
read
SO
MP3/
below
WMA / JPEG / MPEG4 format which are stored into
before you starttheoperationof
or MMC card
Insert the Memory Card Push in till heard a "click"
with Label up side
Inserting the
on
the main unit
SO
or MMC card
Memory
Card
SO
and
Detach the
Front Panel
Pushintill heard a "click"
Removing the
SO
or MMC card
Remove the Memory Card
Mode changetoMEMORY CARD
After a SD or MMC card was inserted into the main unit card slot. Press
card mode. The unit will starts playing the files contained on the
the unit read the Memory Card successfully, the first file on the
start playback. Press Mode button repeatedly is allowing changing to other
tocard mode.
~
If no any Memory Card is inserted into the main unit card slot. Press
Automatically skip card mode.
Memory
File Playback Operation
All the
CD/MP3/WMA. Pis refer to'CD/MP3/WMAOperation'formoredetails.
SD
or MMC Memory Card playback operation function is same as the operation on
Mode
Memory
Card will automatically
button to select
Card. Once
modes
mode
or swich back
button will
E - 52
Page 53

21. USB OPERATION
The unit can
Memory
Function.
support
Stick.
playback MP3 / WMA I JPEG I MPEG4 format which are stored on the USB
Please read carefully the below instruction before you start the operationofUSB
Inserting and Removing USB Drive
,....
./
~,
. ,
M,n, USB
to
big USB
extenSion
cable
.
mode.
Always remove the
USB
stick before detach
the panel
mode
!
!
Under any other
automatically switches from the current
Once the unit read the USB Stick successfully, the first audio music file on the USB stick
Playback will Automatically start. Press
switch back to USB mode.
41ft
Inserting
~
"c:'
~~
CD~::::::::---::>
the
USB
stick
Mode change to USB HOST
mode
while inserting a USB Stick into the USB connector, the unit will
"-'"uu,,/'---I
A Warning:
Never Detach the Panel when a
USB stick was plug on the socket
mode
Mode
X~
to USB
button repeatedly to change to other
or
AWARNING:
Before removing the USB stick from the USB connector. Please always remembertoswitch off the
unit's power or switch to other
Stick while playing music file on the USB stick. It may damage the USB Stick and sometimes will
caused the unitsystemto lock up.
~
~
~
The unit can support playback Music Playerwhich have USB Interface. However
fast
changing
may not be compatible to all the Music Player and USB Stick especially those
Playerwhich require toinstall aprogramdriver.
About Music Flash Player with USB Interface, usually, the unit takes longer timeto read this
kind of player than normal USB Stick. Especially, if the Flash Player with built-in power
batterysometimestakes20-30 secondsto start
This unit is notcompatibleto any Portabletype Hard disk.
decodertechnology and different kindofhardware interface, this unit
File Playback Operation
All
the USB playback operationfunctionissameastheoperation onCD/MP3/WMA. Pis refer
to 'CO/MP3/WMAOperation' for moredetails.
mode
then remove out the USB Stick. Never try removing the USB
due
tothe
mayor
USBStick
up
the playback
/
E -53
Page 54

22. SPECIFICATION
.
,.
TFT Screen Section
Screen Size: 3.5"(Measured Diagonally)
Screen Type: TFT Liquid Crystal Display active matrix
Resolution: 960
DVD I CD Section
Compatible Disc/Format
Signal to Noise Ratio
DynamicRange
FrequencyResponse
Channel Separation
Video Section
ColorSystem
VideoOutput
Video Input
Audio Section
MaxOutputPower
Load Impedance (speakers)
Line out
Line outImpedance
level/load
(W)
x 324
(H)
See"
20Hzto 20Khz +/-3dB
Disc Note"for moredetailsdescription
>
90dB
.--
>
90dB
...-
2 Channel (Stereo)
NTSC/PAL
Composite 1.0Vp-p (+/- 0.2) 75 Composite1.0Vp-p (+/- 0.2) 75 -
40W
x4channels
40hms
400mV/1Okohm
2000hm
>60dB
load
@1
khz
ohm
ohm
Auxiliary Input Section
Frequencyresponse
InputMaximumVoltage
InputImpedance
Radio Section
FM
Frequency Range
UsableSensitivity
Stereo Separation
SIN
Ratio
AM or
Frequency Range
Usable Sensitivity
SIN Ratio
OperatingVoltage
Grounding System
Fuse:
OperatingTemperature:
UnitMounting Angle
MW
20Hzto 20KHz -3dB
1200mV
4.7kohm
87,5-107.9 MHz (200 kHz Space)
~
15dBatS/N30dB
25dBat 1KHz
50dB
530-1720
~
40dBat SIN 20dB
40dB
DC 11-14.4V
NegativeGround
15-Amp MiniATMType
0°
Ct050°
~
30°
(10kHz
C
Space)
E -
54
Page 55

23. TROUBLE SHOOTING
Before going through the check list. check wiring connection.Ifany of the problems persist
check
after
-,
-------------,--._---
, I
I Symptom I Cause
list has been made, consult your nearest service dealer.
I I
I Solution I
rhlo Dower IThe car ignition
I I
!
-
1---
,
Dis
c cannot be
ed or ejected
I load
I
I
I
L
sound
I No
--
~---
I The
operation keys
I
not work
!
do
The fuseisblown.
~ence
ofCDdisc inside
i the player.
IInserting the disc
Idirection.
ICompact disc
dirty or defective disc.
Temperature inside the car is
too high.
iCondensation.
Volume
Wiringisnot properly
connected.
-
The built-in microcomputer
Inot operating properly
Inoise.
isinminimum.
is
not on.
in
is
extremely
reverse
due
IIftt;
power
to the car
I
I Ignition key to 'ACC
sU.PPIYis
acce~sory.terminal,
properly connected I
switch the I
I
Replace the fuse.
Remove the disc in the player, then
a new one.
put
Insert the compact disc with the
label facing upward.
playa
Clean the disc or try to
I Cool off or until the ambient temperature
returns to normal.
Leave the player to off for an hour or so,
then try again.
Adjust volume to a desired level.
Check 'Niring connection.
Press the
is
IFront panel
to
its place
RESET
button.
is
not properly fixed into
new one.
l
-1
I
I
I
.....
I
I
Tt1e
nd skips.
~u
!
I
The radio does not The antenna cableisnot
installation angle
Imore than 30 degrees
. The
diSCISextremely dirt or
defective disc.
I work. Iconnected.
is
..
Adjust the installation angle to less
than 30 degrees.
, I
IClean the compact disc. Tilen try to
!
new one.
Insert the antenna cable firmly.
IThe radio station j
automatic selection IThe signals are too weak. Select a station manually.
does not work
I
~------+---------+---------~
I.
ERROR
I i
! Mechanism Error
! '
~our
Press
the eject button to correct the problem I
If
the error code does not disappear consult
nearest service
1-" ,
'I
DISC
Error I
L ._____
Maybe
disc
~side
dirty;' disc scratched
down.
~ePlace
I
the disc.
dealer.
playa
~
I
I
I
I
I
i
E
-55
Page 56

752-00SL76VL-01-00
Page 57

Inserting and Removing USB Drive
Inserting the USB stick
Mini USB
to
big USB
extension
cable
A Warning:
Never Detach the Panel when a
USB stick was plug on the socket
Mini USB to
big USB
extension cable
Always remove the USB stick before detach
Inserting
~=====/==;~====~)"~
.;
the panel
SO
r
0
/
MMC
card
Insert
!
SJ#
MMC
~
memorv
with
label
not
slot
insert
may
facing
Do
downordamage
card
card
upside
occur
up
to
S~
MMC\\
t
Page 58

VilLOR
ULTI
EDIA
Valor
Warranty
Validation
Dept
18061
Arenth
Ave
City
of
Industry
.
CA
91748
Place
Postage
Here
Page 59

V/\LOR
M U L
-r
J M E !J J .:\
VilLOR
Warranty
Validation
Card
~-----------------------j---------------1
Please
complete
all
fieldstovalidate
your
Valor
Multimedia
limited
warranty.
Remembertoincludeacopy
of
your
dated
sales
invoice.
Failuretoreturn
this
card
will
resultinwarranty
coverage
startingonthe
date
of
manufacture
basedonyour
serial
number.
Special
warranty
provisions
will
onlybehonoredifthis
card
is
returned
complete.
Limitationstowarranty
periods
and
exclusions
may
not
applytoyour
area
if
applicablebylaw.
Please
check
with
your
local
regulatory
offices
for
details
regarding
warranty
regulations
in
your
area.
i RETAILER NAME
RETAILER ADDRESS
RETAILER PHONE NUMBER
i
! PRODUCT PURCHASED
PRODUCT SERIAL NUMBER DATE
OF
PURCHASE
l
I
Why
did
you
chooseaValor
Multimedia
product?
ONE
YEAR
LIMITED
WARRANTY
Valor
Multimedia
hereby
warrantstothe
original
retail
purchaserofthis
product
that
should
this
productorany
part
thereof,
under
normal
use
and
conditions,be
proven
defectiveinmaterialorworkmanship
within
one
year
parts
and
labor
from
the
dateoforiginal
purchase.
Such
defect(s)
will
be
repairedorreplaced
with
reconditioned
product
(at
Valor
Multimedia's
option)
for
parts
and
repair
labor.
This
limited
warrantyisthe
purchaser's
exclusive
remedy
for
any
such
defect(s).
To
obtain
repairsorreplacement
within
the
termsofthis
warranty,
please
visit
www.valormultimedia.com
or
contactusat
18061
Arenth
Avenue;City
of
Industry,
CA
91748
(626)
581-8900.
Proofofwarranty
coverage
(i.e.-
dated
billofsale)
andavalid
serial
numberisrequired.
This
warranty
does
not
applytoany
productofpart
thereof
which,inthe
opinion
of
Valor
Multimedia,
has
sufferedorbeen
damaged
through
alteration,
improper
installation,
mishan
dling,
misuse,neglect,
accident,
or
by
removalordefacementofthe
factory
serial
number/bar
codelabel(s).
The
opinionofValor
Multimedia
with
respecttothis
matter
shallbefinalTHE
EXTENT
OF
VALOR
MULTIMEDIA'S
LIABILITY
UNDER
THIS
WARRANTY
ISLIMITED
TO
THE
REPAIR
OR
REPLACEMENT
PROVIDED
ABOVE
AND,
INNOEVENT,
SHALL
THE
COMPANY'S
LIABILITY
EXCEED
THE
PURCHASE
PRICE
PAIDBYPURCHASER
FOR
THE
PRODUCT.
, NAME
SHIPPING ADDRESS (NO
PO
BOXES)
STATE
i ZIP CODE
IDATE
,
CITY
PHONE NUMBER
o
Appearance
o Value
:::J
Features
o
Brand
Name
o
Other
Infurmatiun
gatheredisust:d
for
the
sole
purposeofproduct
registration.
Your
personal
information
will
not be
soldoroffered
for
telemarketingorcuntal:l
unless
you
request
it
THIS
WARRANTY
IS
IN
LIEU
OF
ALL
OTHER
EXPRESSED
WAR
RAN
TIE
S 0 RLlA
BIllTIE S.
ANY
IMPLIED
WAR
RANTIE
S,
INCLUDING
ANY
IMPLIED
WARRANTY
OF
MERCHANTABILITY,
SHALL
BE
LIMITED
TO
THE
DURATION
OF
THIS
WRITTEN
WARRANTY.
ANY
ACTION
FOR
BREACH
OF
ANY
WARRANTY
HEREUNDER,
INCLUDING
ANY
IMPLIED
WARRANTY
OF
MERCHANTABILITY,
MUST
BE
BROUGHT
WITHINAPERIOD
OF
18
MONTHS
FROM
THE
DATE OF
ORIGINAL
PURCHASE.INNO
CASE
SHALL
THE
COMPANY
BE
LIABLE
FOR
ANY
CONSEQUENTIAL
OR
INCIDENTAL
DAMAGES
FOR
BREACH
OF
THIS
OF
ANY
OTHER
WARRANTY
EXPRESSORIMPLIED
WHATSOEVER.
No
personorrepresentativeisauthorizedtoassume
for
Valor
Multimedia
any
liability
other
than
expressed
hereininconnection
with
the
saleofthis
product.
Some
jurisdictionsdonot
allow
limitationsonhow
longanimplied
warranty
lastsorthe
exclusionoflimitationofincidentalorconsequential
damagessothe
above
limitationsorexclusions
may
not
applytoyou.
This
warranty
gives
you
specific
legal
rights
and
you
may
also
have
other
rights,
which
vary
from
jurisdictiontojurisdiction.
How
was
your
product
acquired?
Where
will
this
productbeused"
How
long
have
you
owned
your
vehicle
O
Would
you
buy
another
Valor
product"
Would
you
recommendaValor
product
O
o
Gift
o
Internet
Retailer
o
Standard
Retailer
o
Specialty
Store
C
Mass
MerchantIDiscount
Retailer
C
Personal
Automobile
c RV
C
Commercial
Vehicle
:::J
Other
:::J
Brand
New
c < I
year
c
1-2years
c 3 - 5
years
c > 5
years
eYes
[]
No
DYes
D No
 Loading...