

Page 1
~~e
YALO~
.~
rr~~~Q~
:0
~STIMO~
\ •
~.SEEK.~~
~
locA
.;)
EO)
l(~@
.~O
DVD/VCD/CD/MP3/MP4
Player
with
FM/
AM
Tuner
L
MULTIMEDIA
Operating
Instructions
Page 2
Safety
Information
Contents
Safety
Information
1
Before
You
Begin
2
Installation
Guide
3
Anti-theft
System
4
Wire
Connection
5-6
LocationsofParts
(Main
Unit)
7
LocationsofParts
(Remote
Control)
8
General
Operation
9-10
ListeningtoRadio
11
Operations
Common
for
CD/MP3NCD/DVD/MP4
12
ListeningtoCD/MP3
13
Playing
DVDNIDEO
CD/MP4
14-16
Connecting
iPod
17
HowtoUse
BluetoothinYour
Car
Audio
18
CustomiZing
Audio/Video
Settings
19
DVD
Setup
20-25
Troubleshooting
26
Technical
Specifications
27
This
productisa
class1laser
product.
Useofcontrolsoradjustmentsorperformance
of
procedures
other
than
those
specified
herein
may
resultinhazardous
radiation
exposure.Donot
open
covers
anddonot
repair
yourself.
Refer
servicingtoqualified
personnel.
To
reduce
the
riskoffireorelectric
shock,donot
expose
this
producttorain
or
moisture.
•
playingadefectiveordustyCDcan
cause
dropoutsinsound.
•
hold
CDsasillustrated.
•DONOT
touch
the
unlabeled
side.
•DONOT
attach
any
seal,
labelordata
protection
sheettoeither
side
ofadisc.
•DONOT
exposeaCDtodirect
sunlightorexcessive
heat.
•
wipeadirtyCDfrom
the
center
outward
withacleaning
cloth.
•
never
use
solvents
suchasbenzineoralcohol.
•
this
unit
cannot
play
3-inch(8cm)CDs.
•
never
inserta3-inchCDcontainedinthe
adapteroran
irregularly
shaped
CD.
The
unit
may
notbeabletoeject
it,
resultingina
malfunction.
Wave
length:
CD:780nm
DVD:650nm
Laser
power:nohazardous
radiationisemitted
with
safety
protection.
Page 3
Before
You
Begin
.
componentstothis
unit,besure
components
are
compatible
with
the
same
video
systemorelse
images
will
notbecorrectly
reproduced.
When
you
are
watchingaDVD
and
attempttoperformanoperation,
it
may
notbeperformedbythe
programmingonthe
disc.
When
this
hap-
pens,
this
unit
indicatesonthe
screen.
Multi-audio
You
can
switch
between
multiple
audio
systems
recordedona
DVD
as
desired.
M.lti~angle····oc.
You
can
switch
between
multiple
viewing
anglesofa
scene
recorded
onaDVDasdesired.
;"'~Iti-~~lItiJte.·
'.
-o_·w
You
can
switch
between
multiple
subtitle
languages
recordedona
DVDasdesired.
FEA"'ES:
DVI)::¥kIeo
pla~tJ_lk
Itispossibletoplay
back
DVD
video,
DVD+-R,
DVD+-RW
and
DVD+-DL.
Vi~llsfeatul'inflcPIQ;_~Mtr'I,l):<IFl'c-'.'·····
Itispossibletoplay
back
Video
CDs
featuring
PSC
(playback
control).
PRECAU1'IONS
•
Keep
this
manual
handyasa
reference
for
operating
procedures
and
precautions.
•
Always
keep
the
volume
low
enoughsoyou
can
hear
sounds
outsideofthe
car.
•
Protect
this
product
from
moisture.
•Ifthe
batteryisdisconnectedordischarged,
the
preset
memory
will
be
erased
and
mustbereprogrammed.
eD,'a~
Music
CD/CD-R/CD-RW
playbackispossible.
~jll:PI-~.m
Itispossibletoplay
back
MP3
files
recordedonCD-ROM/CD-R/CD-RW.
Itispossibletoplay
back
MP4
files.
This
unitisPAUNTSC
system
compatible.
When
connecting
other
Page 4
Installation
Guide
•
Choose
the
mounting
location
carefullysothat
the
unit
will
not
interfere
with
the
normal
driving
functionsofthe
driver.
•
Avoid
installing
the
unit
whereitwouldbesubjecttohigh
tempera-
tures,
suchasfrom
direct
sunlightorhot
air
from
the
heater,
or
whereitwouldbesubjecttodust,
dirtorexcessive
vibration.
•
Use
only
the
supplied
mounting
hardware
forasafe
and
secure
installation.
•Besuretoremove
the
front
panel
before
installing
the
unit.
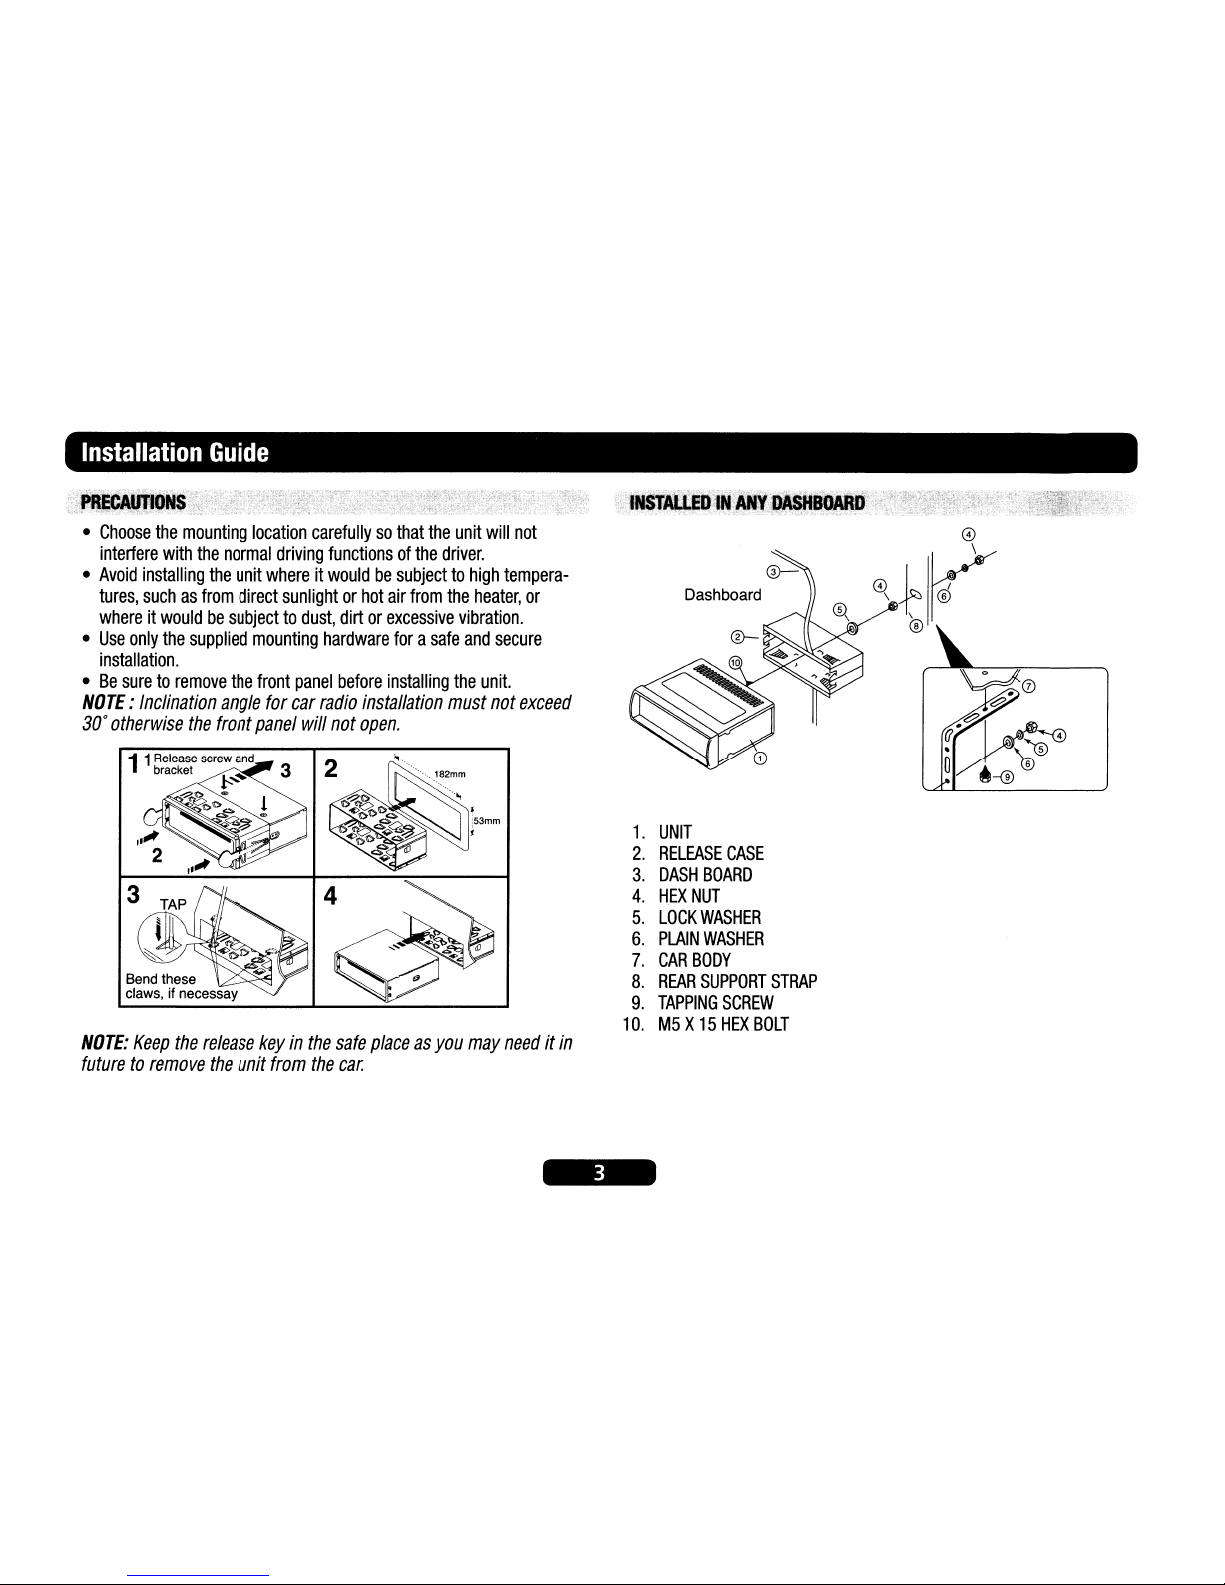
NOTE:
Inclination
angle
for
car
radio
installation
must
not
exceed
30°
otherwise
the
front
panel
will
not
open.
NOTE:
Keep
the
release
keyinthe
safe
placeasyou
may
needitin
futuretoremove
the
unit
from
the
car.
1.
UNIT
2.
RELEASE
CASE
3.
DASH
BOARD
4.
HEX
NUT
5.
LOCK
WASHER
6.
PLAIN
WASHER
7.
CAR
BODY
8.
REAR
SUPPORT
STRAP
9.
TAPPING
SCREW
10.M5X15HEX
BOLT
Page 5
Anti-theft
System
PREBAlJtlONS
Detaching
and
attaching
the
front
panel
The
front
panelofthis
unit
canbedetachedinordertoprevent
the
unit
from
being
stolen.
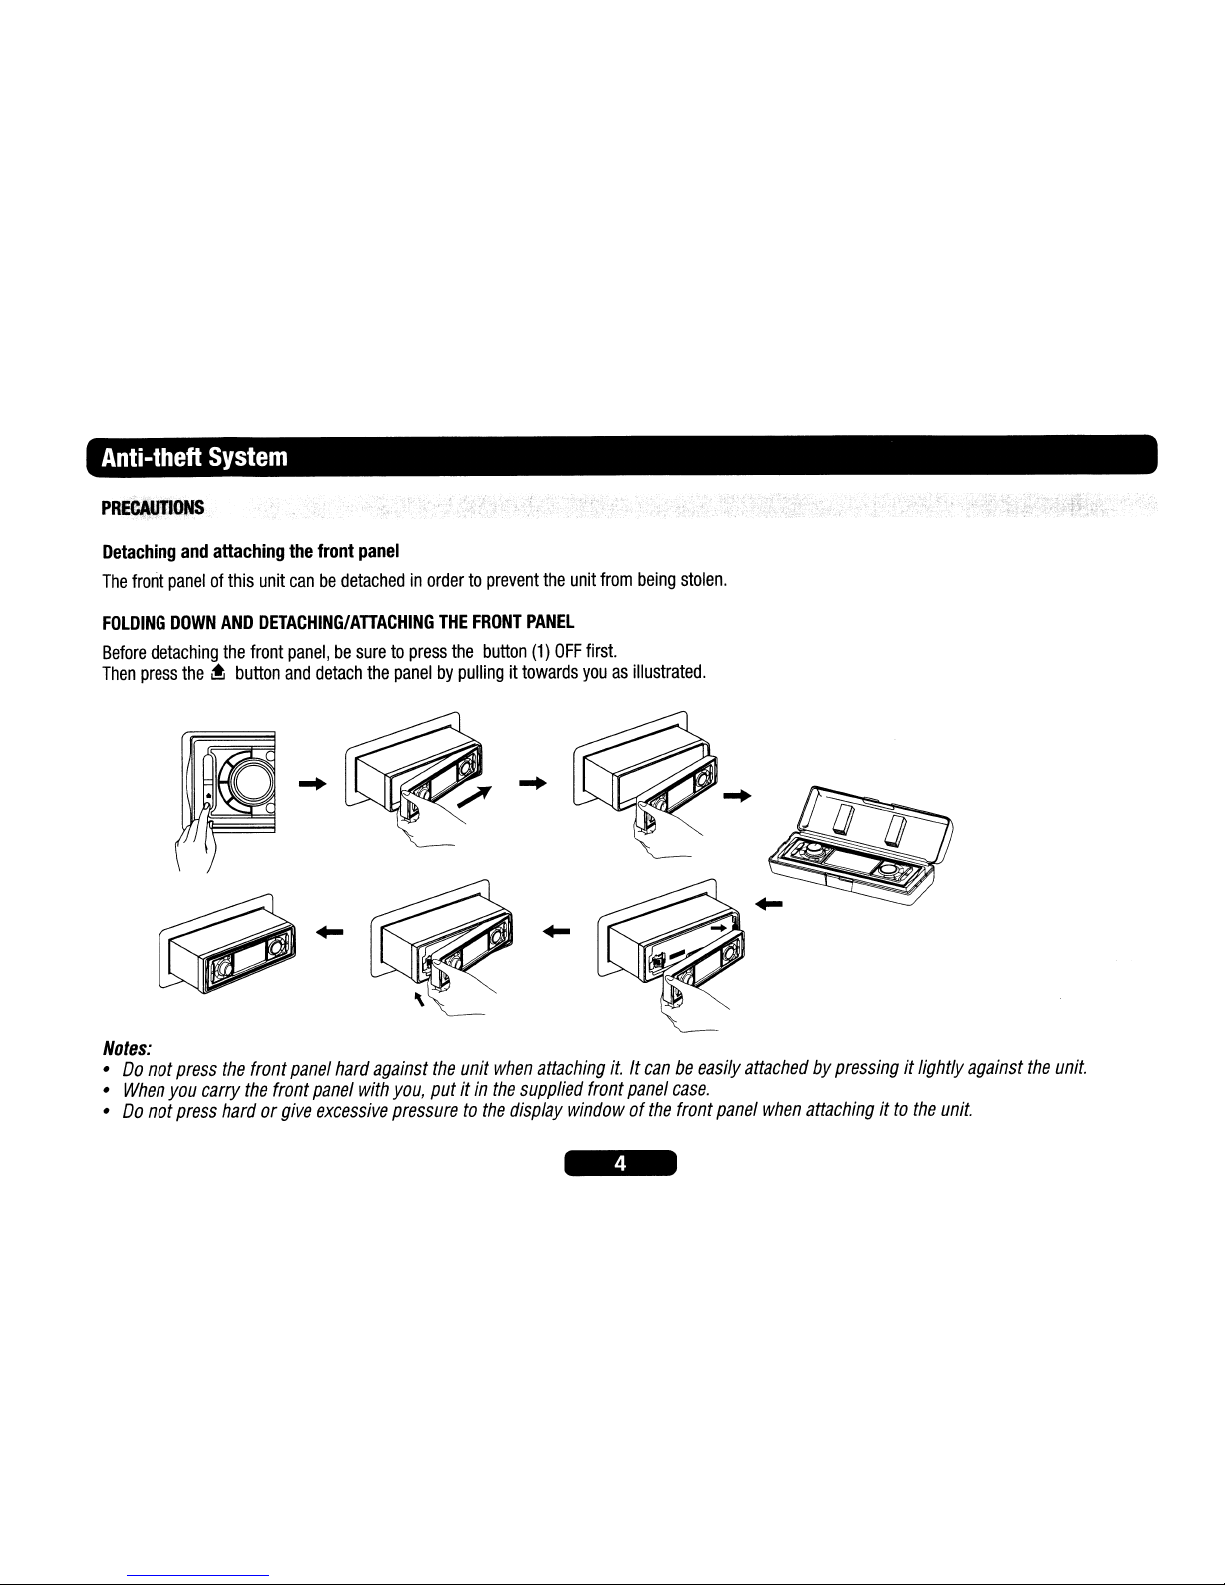
FOLDING
DOWN
AND
DETACHING/ATTACHING
THE
FRONT
PANEL
Before
detaching
the
front
panel,besuretopress
the
button
(1)
OFF
first.
Then
press
the~button
and
detach
the
panelbypullingittowards
youasillustrated
.
...
...
...
Notes:
•Donot
press
the
front
panel
hard
against
the
unit
when
attaching
it.Itcanbeeasily
attachedbypressingitlightly
against
the
unit.
•
When
you
carry
the
front
panel
with
you,
putitin
the
supplied
front
panel
case.
•Donot
press
hardorgive
excessive
pressuretothe
display
windowofthe
front
panel
when
attachingitto
the
unit.
Page 6
.:...
+-
~.
Wire
Connection
;\'.,.tOUTCONN¢roR.'.
DVD
Audio
Out
(GRAY)
Rear:
White
(L)
Red
(R)
Connect
this
wiretorear
seatANmonitor
systemtoenjoy
DVD
movie
Audio
Out
(Front):
White
(L)
Red
(R)
Audio
Out
(Rear):
White
(L)
Red
(R)
Audio
LineIn:
White
(L)
Red
(R)
Subwoofer:Orange
Video
Out
(Yellow):Yellow
(Plug)
ConnecttoexternalANsystemtodisplay
VideoIn(Black):Yellow
(Plug)
Connecttoexternal
Video
equipment
Rear
cameraIn(Black):Blue
(Plug)
Connecttorear
camera
output
iPod
Cable
(White)
Connnecttoportable
iPod
player
CONTROL
WIRE
Parking
(Gray)
:
Connect
this
wiretocar
hand
brake
system
Tel
mute
(Black)
:
Connecttomobile
phone
unit
When
receiving
calls,
audio
sound
willbemuted.
Reverse
(Red)
:
Connecttoback
rear
camera
During
back
gear
condition,
this
wire
shouldbeconnectedtohigh
voltage.
.
'DRiVlNG:~~~~
Dl$'lAf:~
:,
. -
j~t:~;
~
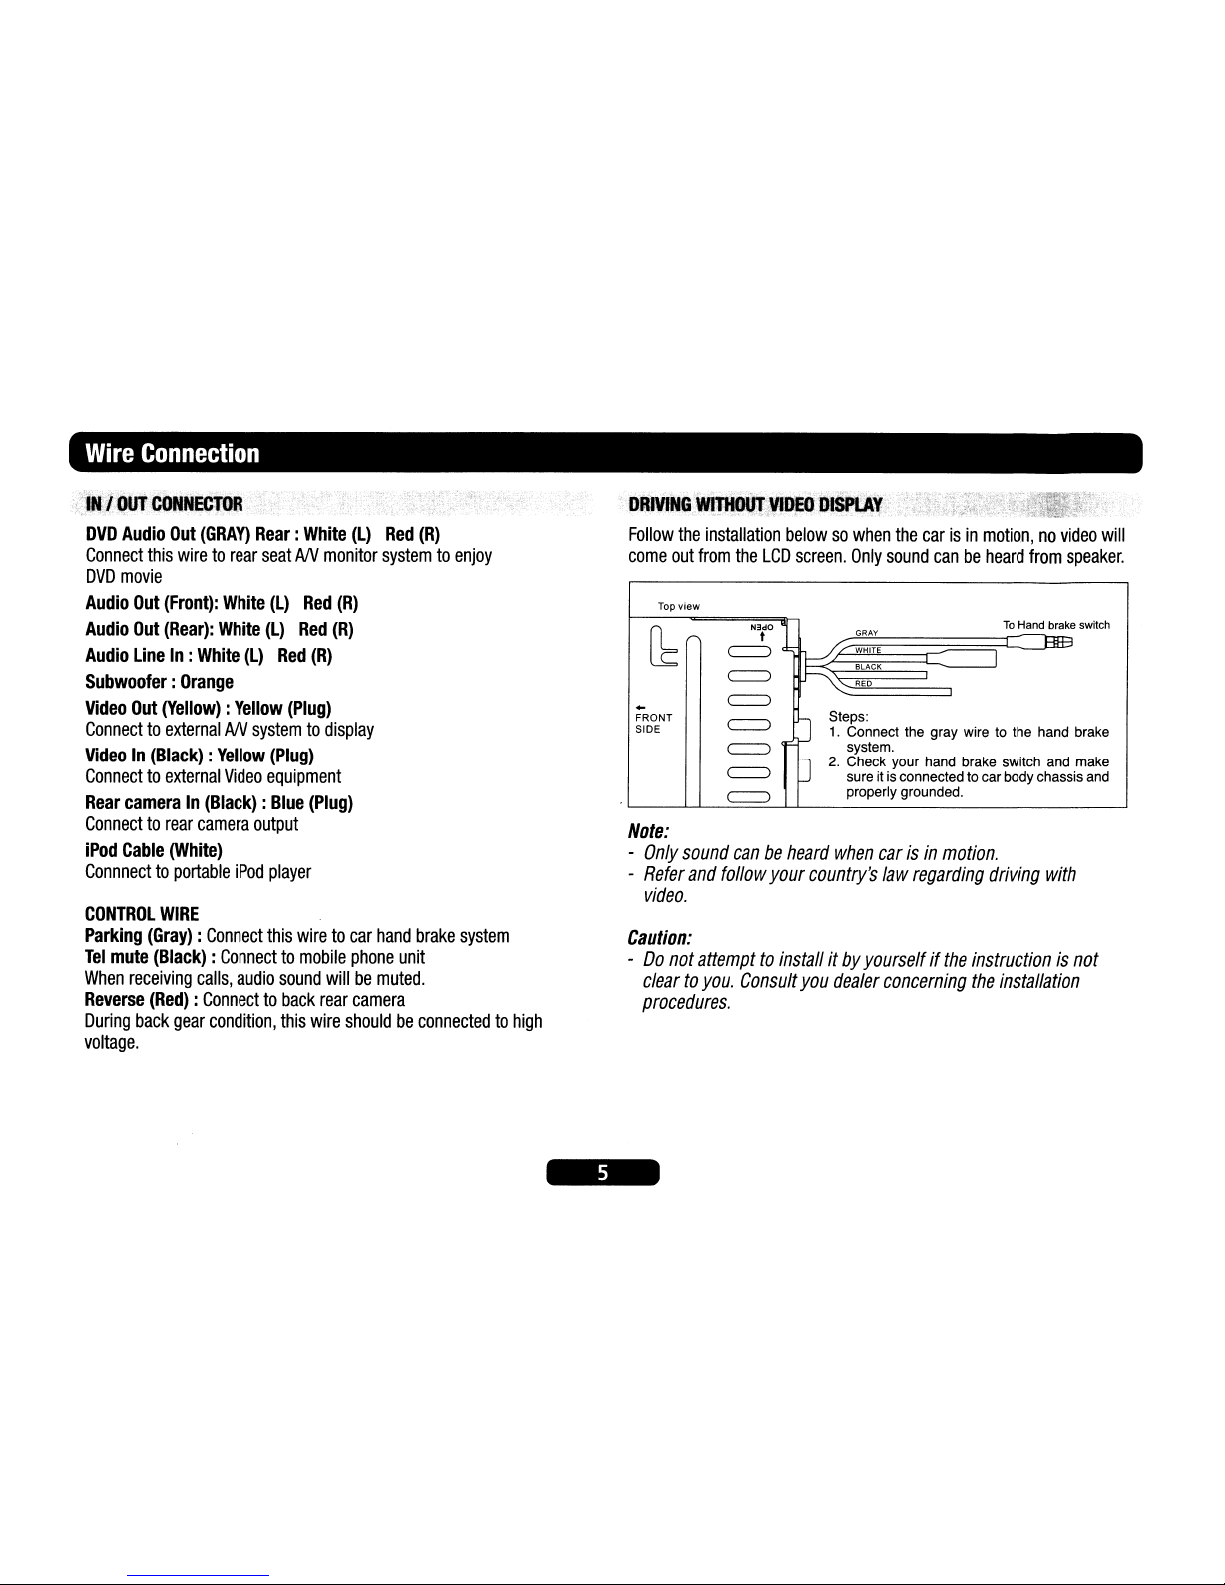
Follow
the
installation
belowsowhen
the
carisin
motion,novideo
will
come
out
from
the
LCD
screen.
Only
sound
canbeheard
from
speaker.
Top view
[b~
~l
To
Hand brake switch
GRAY
BIB
~
ww"
I
BLACK
c=::J
RED
..
c=::J
FRONT
c=::J
Steps:
SIDE
1.
Connect the gray wire to the hand brake
c=::J
system.
c=::J
J
2.
Check your hand brake switch and make
sure it is connected
to
car body chassis and
c=::J
properly grounded.
Note:
-
Only
sound
canbeheard
when
carisin
motion.
-
Refer
and
follow
your
country's
law
regarding
driving
with
video.
Caution:
-Donot
attempttoinstallitby
yourselfifthe
instructionisnot
cleartoyou.
Consult
you
dealer
concerning
the
installation
procedures.
Page 7
Wire
Connection
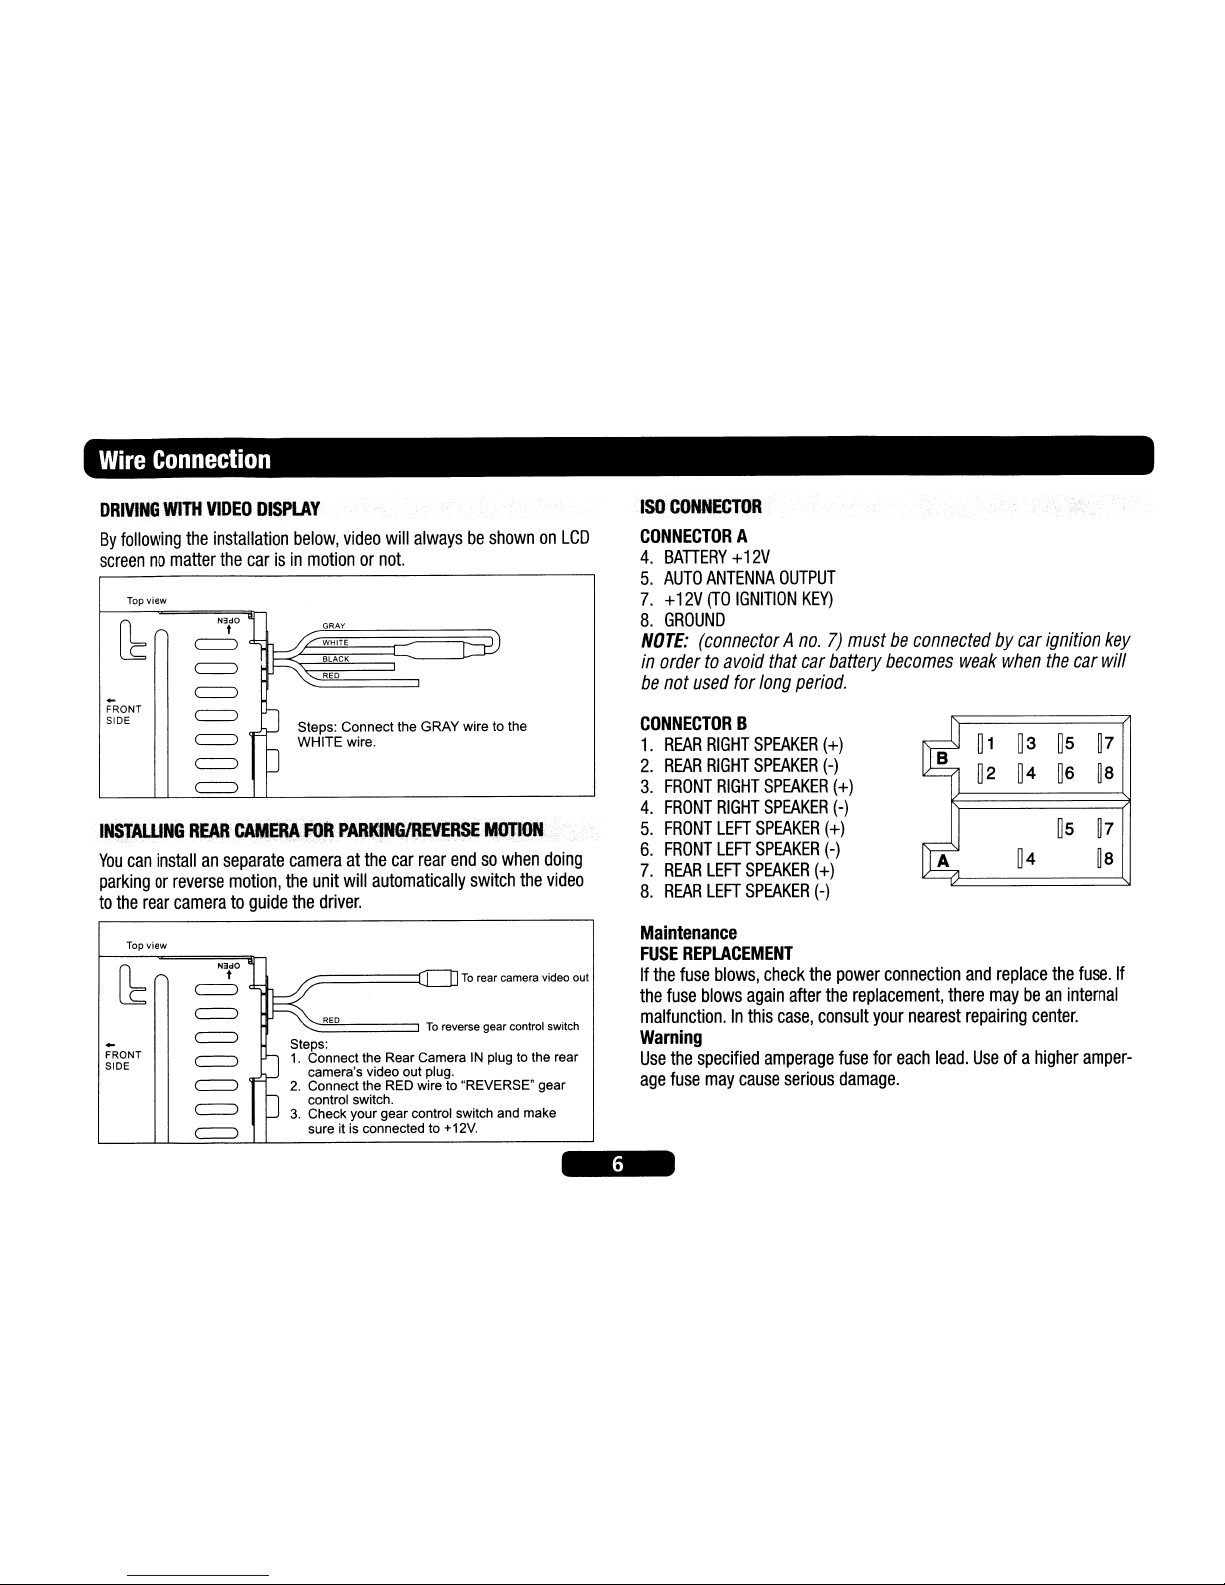
DRIVING
WITH
VIDEO
DISPLAY
By
following
the
installation
below,
video
will
alwaysbeshownonLCD
screennomatter
the
carisin
motionornot.
INSTALUNGREAR
CAft'EAAfOR
PARKlNGiREVERSEMQJION
You
can
installanseparate
cameraatthe
car
rear
endsowhen
doing
parkingorreverse
motion,
the
unit
will
automatically
switch
the
video
to
the
rear
cameratoguide
the
driver.
Top
view
~
FRONT
SIDE
~
1~
:::E
L:iD
1 BLACK
~..
'-:::::::RE:::D
====:::::::J
~
~
Steps: Connect the GRAY wire to the
~
WHITE wire.
~O
~
ISO
CONNECTOR
CONNECTOR
A
4.
BATIERY+12V
5.
AUTO
ANTENNA
OUTPUT
7.+12V
(TO
IGNITION
KEY)
8.
GROUND
NOTE:
(connectorAno.7)mustbeconnectedbycar
ignition
key
in
ordertoavoid
that
car
battery
becomes
weak
when
the
car
will
be
not
used
for
long
period.
CONNECTOR
B
1.
REAR
RIGHT
SPEAKER
(+)
~1~3
~5
~7
2.
REAR
RIGHT
SPEAKER
(-)
~2 ~4
~6
~8
3.
FRONT
RIGHT
SPEAKER
(+)
4.
FRONT
RIGHT
SPEAKER
(-)
5.
FRONT
LEFT
SPEAKER
(+)
~5
~7
6.
FRONT
LEFT
SPEAKER
(-)
A
~4
~8
7.
REAR
LEFT
SPEAKER
(+)
8.
REAR
LEFT
SPEAKER
(-)
Top view
[b~
~l
~
~"o
I II
To
rear camera video out
-
~
To
reverse gear control switch
~
~
Steps:
FRONT
~
1.
Connect the Rear CameraINplug to the rear
SIDE
camera's video out plug.
~
2.
Connect the RED wire to "REVERSE" gear
~
o control switch.
3.
Check your gear control switch and make
~
sure it is connected to +12V.
Maintenance
FUSE
REPLACEMENT
If
the
fuse
blows,
check
the
power
connection
and
replace
the
fuse.
If
the
fuse
blows
again
after
the
replacement,
there
maybean
internal
malfunction.Inthis
case,
consult
your
nearest
repairing
center.
Warning
Use
the
specified
amperage
fuse
for
each
lead.
Useofa
higher
amper-
age
fuse
may
cause
serious
damage.
Page 8
LocationsofParts
(Main
Unit)
15
=
~888B8HB8HU
8
26
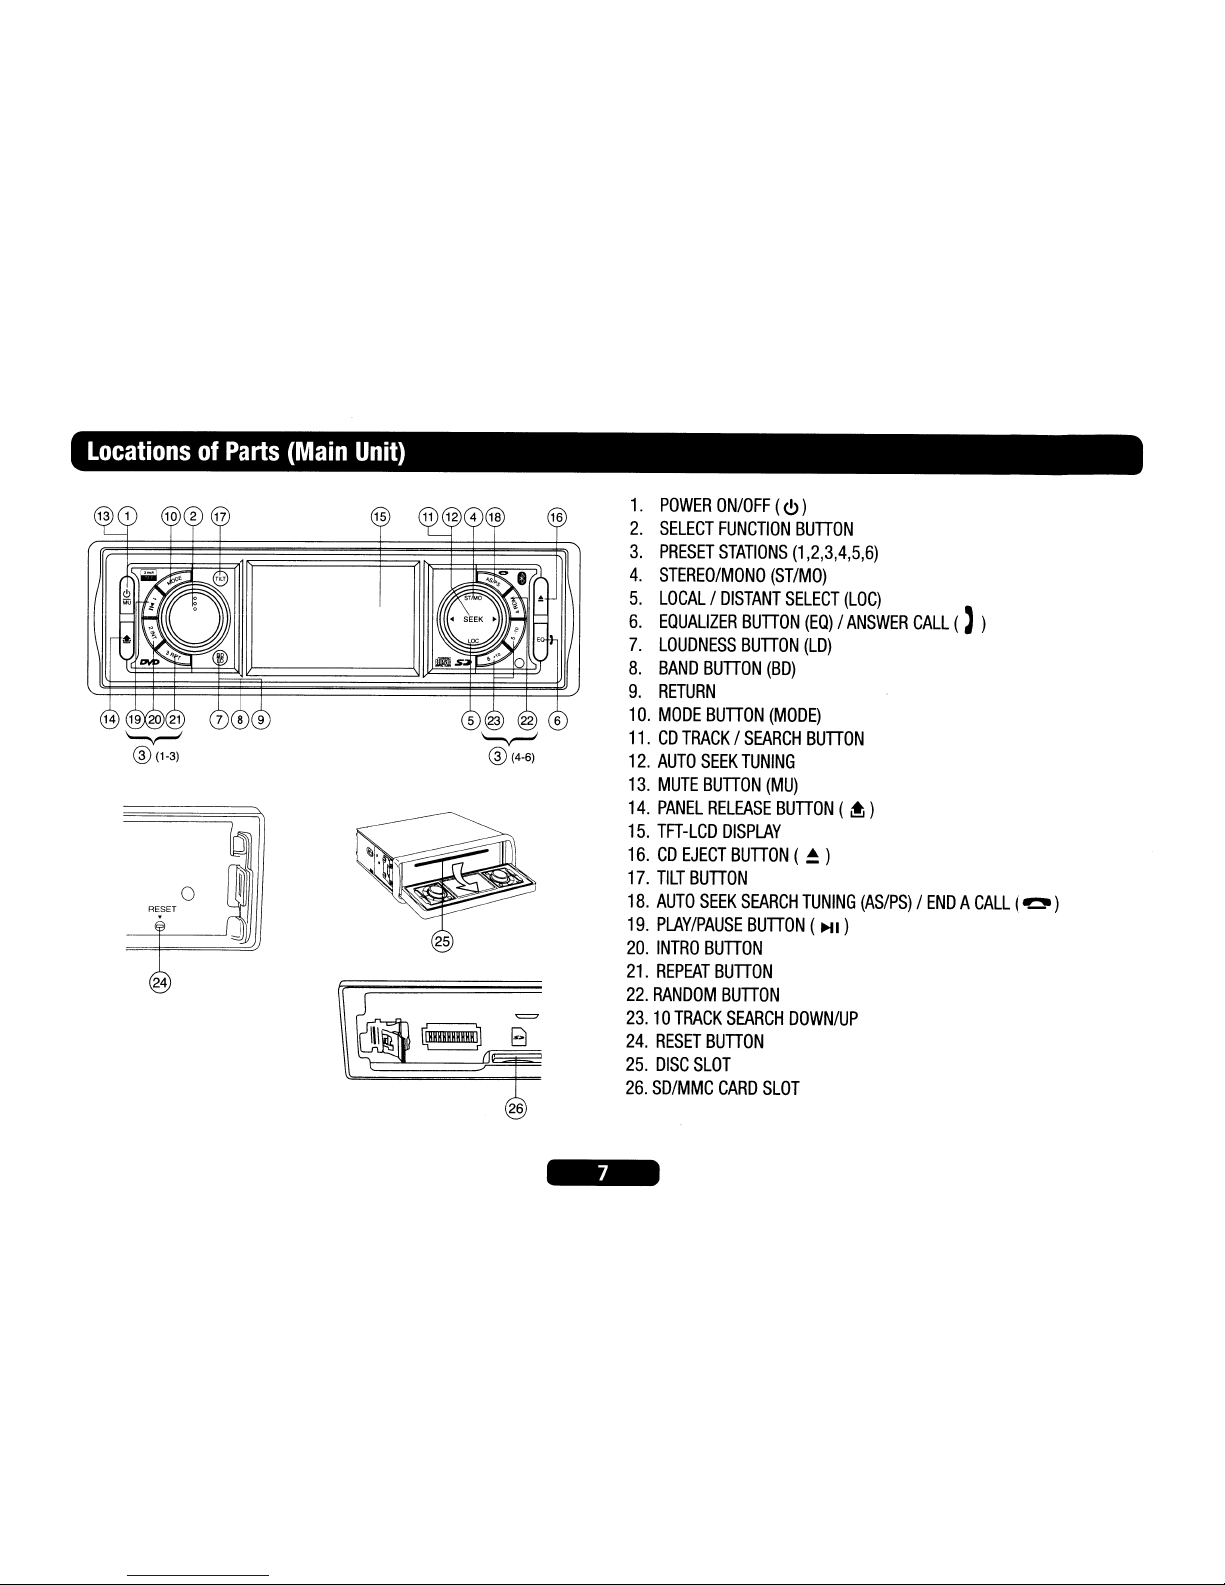
1.
POWER
ON/OFF
(
<!>
)
2.
SELECT
FUNCTION
BUTTON
3.
PRESET
STATIONS
(1,2,3,4,5,6)
4.
STEREO/MONO
(ST/MO)
5.
LOCAL/DISTANT
SELECT
(LOC)
6.
EQUALIZER
BUTTON
(EQ)/ANSWER
CALL
(, )
7.
LOUDNESS
BUTTON
(LD)
8.
BAND
BUTTON
(BD)
9.
RETURN
10.
MODE
BUTTON
(MODE)
11.CDTRACK/SEARCH
BUTTON
12.
AUTO
SEEK
TUNING
13.
MUTE
BUTTON
(MU)
14.
PANEL
RELEASE
BUTTON
( ~ )
15.
TFT-LCD
DISPLAY
16.CDEJECT
BUTTON
(~)
17.
TILT
BUTTON
18.
AUTO
SEEK
SEARCH
TUNING
(AS/PS)/ENDACALL
(~)
19.
PLAY/PAUSE
BUTTON
(
HI
)
20.
INTRO
BUTTON
21.
REPEAT
BUTTON
22.
RANDOM
BUTTON
23.10TRACK
SEARCH
DOWN/UP
24.
RESET
BUTTON
25.
DISC
SLOT
26.
SD/MMC
CARD
SLOT
Page 9
LocationsofParts
(Remote
Control)
9 15
19.
17 4
1 2 3 25
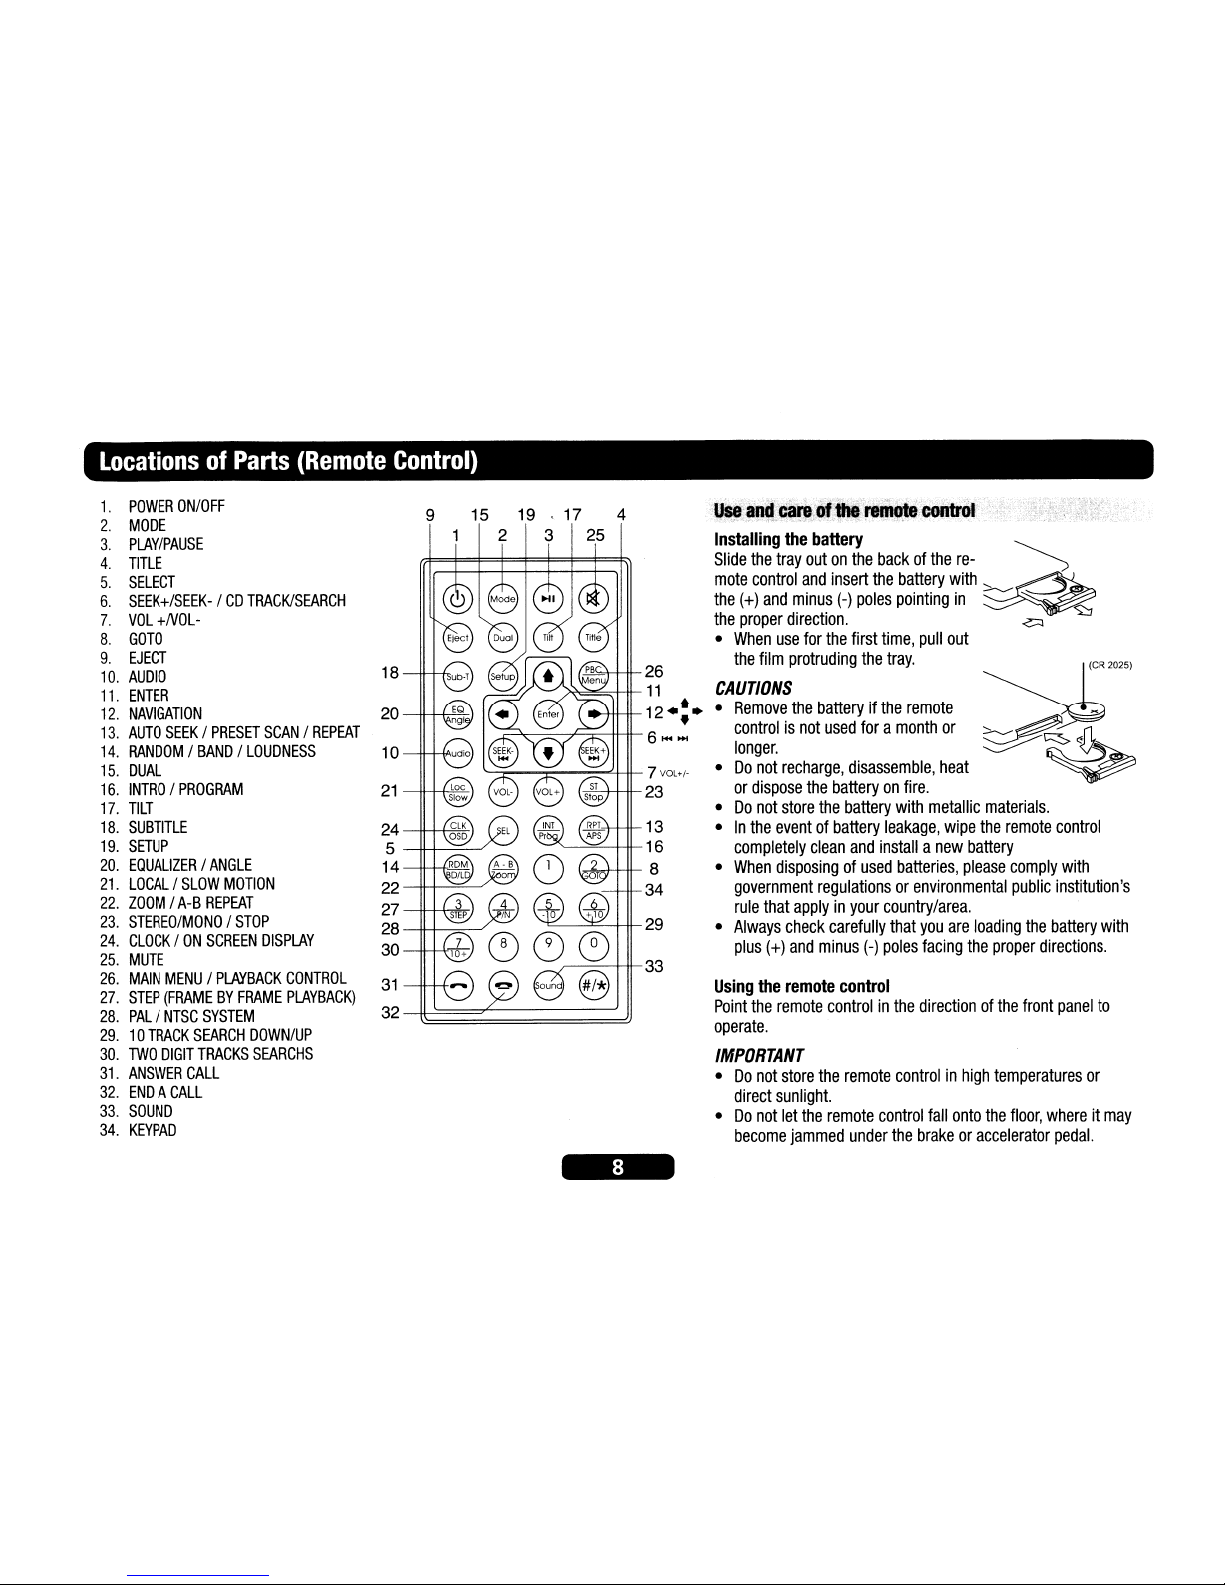
Using
the
remote
control
Point
the
remote
controlinthe
directionofthe
front
panel
to
operate.
IMPORTANT
•Donot
store
the
remote
controlinhigh
temperatures
or
direct
sunlight.
•Donot
let
the
remote
control
fall
onto
the
floor,
whereitmay
become
jammed
under
the
brakeoraccelerator
pedal.
1~++-I+-23
r----=--HI-
33
"""l:::.----==--Ht-
29
13
~'--=--H1-16
1~+H+-
8
--~34
ilJS8;and·~ar8l8fl.;remoteiC8QtrOl·······
'<;'/;',,/""-.'.;;,',
:'·-:·,,:;o.t,,":
C;-:-<':/.;':;/--',
':"
;: .;'::"<
-",,;"
';.:.'
" .;:,,";;
>-:.
,-:..:
~
Installing
the
battery
~
Slide
the
tray
outonthe
backofthe
re-
")
mote
control
and
insert
the
battery
with
:::::.-.......-~
the
(+)
and
minus
(-)
poles
pointing
in
~
the
proper
direction.
.c:::J
•
When
use
for
the
first
time,
pull
out
the
film
protruding
the
tray.
!k\--j~26
'l"".-o'>~~#-
11
CAUTIONS
...-Ht-tt-12..'.
•
Remove
the
batteryifthe
remote
-=~=---r---c:,=---+Ht-
•
controlisnot
used
foramonth
or
r-
6 ......
longer.
'--=F~""';;:;'-~4-+1-
7
VOL./-
•
Do
not
recharge,
disassemble,
heat
or
dispose
the
batteryonfire.
•Donot
store
the
battery
with
metallic
materials.
•Inthe
eventofbattery
leakage,
wipe
the
remote
control
completely
clean
and
installanew
battery
•
When
disposingofused
batteries,
please
comply
with
government
regulationsorenvironmental
public
institution's
rule
that
applyinyour
country/area.
•
Always
check
carefully
that
you
are
loading
the
battery
with
plus
(+)
and
minus
(-)
poles
facing
the
proper
directions.
31
32~~~;;;;;;;;;;;;;;;;;;;;;;;;;;;;;;;;;;;;;;;d
1a
---++-+-IA'
21
--II--J..+,~
I
24
----H-++,~
I
5
--II-+--=--"
14
------n---.--r-~
22
----H--+-=---./
27
--II-++,.¥,,-
J
28
--II-+-~-"
30
20
--II-++~I
1.
POWER
ON/OFF
2.
MODE
3.
PLAY/PAUSE
4.
TITLE
5.
SELECT
6.
SEEK+/SEEK-/CD
TRACK/SEARCH
7.
VOL
+NOL-
8.
GOTO
9.
EJECT
10.
AUDIO
11.
ENTER
12.
NAVIGATION
13.
AUTO
SEEK/PRESET
SCAN/REPEAT
14.
RANDOM/BAND/LOUDNESS
15.
DUAL
16.
INTRO/PROGRAM
17.
TILT
18.
SUBTITLE
19.
SETUP
20.
EQUALIZER/ANGLE
21.
LOCAL/SLOW
MOTION
22.
ZOOM/A-B
REPEAT
23.
STEREO/MONO/STOP
24.
CLOCK/ON
SCREEN
DISPLAY
25.
MUTE
26.
MAIN
MENU/PLAYBACK
CONTROL
27.
STEP
(FRAMEBYFRAME
PLAYBACK)
28.
PAL/NTSC
SYSTEM
29.10TRACK
SEARCH
DOWN/UP
30.
TWO
DIGIT
TRACKS
SEARCHS
31.
ANSWER
CALL
32.
ENDACALL
33.
SOUND
34.
KEYPAD
Page 10
Gerneral
Operations
Turning
the
unit
ON/OFF
(
<!.>
)
Press"
<!.>
"
buttontoturnonunit.Toturn
off,
press
and
hold
the
but-
ton
again.
selectingasource
(MODE)
Press
MODE
repeatedlytoswitch
between
TUNER,
CD/DVD,
SD/MMC,
BLUETOOTH
mode.
Equalizer
(EQ)
PressEOto
select
between
Flat-Class-
Rock-Pop
equalizer
modes.
Tilt
nit
feature
allows
youtocontrol
the
viewing
anglesofthe
screen.
•
Press
TILT
button
repeatedlytochoose
the
desired
tilt
angle.
You
can
also
press
and
hold
TILT
to
tilttomaximum
viewing
angle.
~
90.50
MHZ
:)
98.50
MHZ
~
106
50
MHZ
aa.50
MHZ
0
107
50
MHZ
89
50
MHZ
CLOCK
1.
Press
and
hold
CLK
buttononremote
control.
Hour
starts
blinking.
2.
Rotate
VOL
knobtoset
hour.
Press
CLK
knob,
minutes
starts
blink-
ing.
3.
Rotate
VOL
knobtoset
minutes.
Press
VOL
knobtosave.
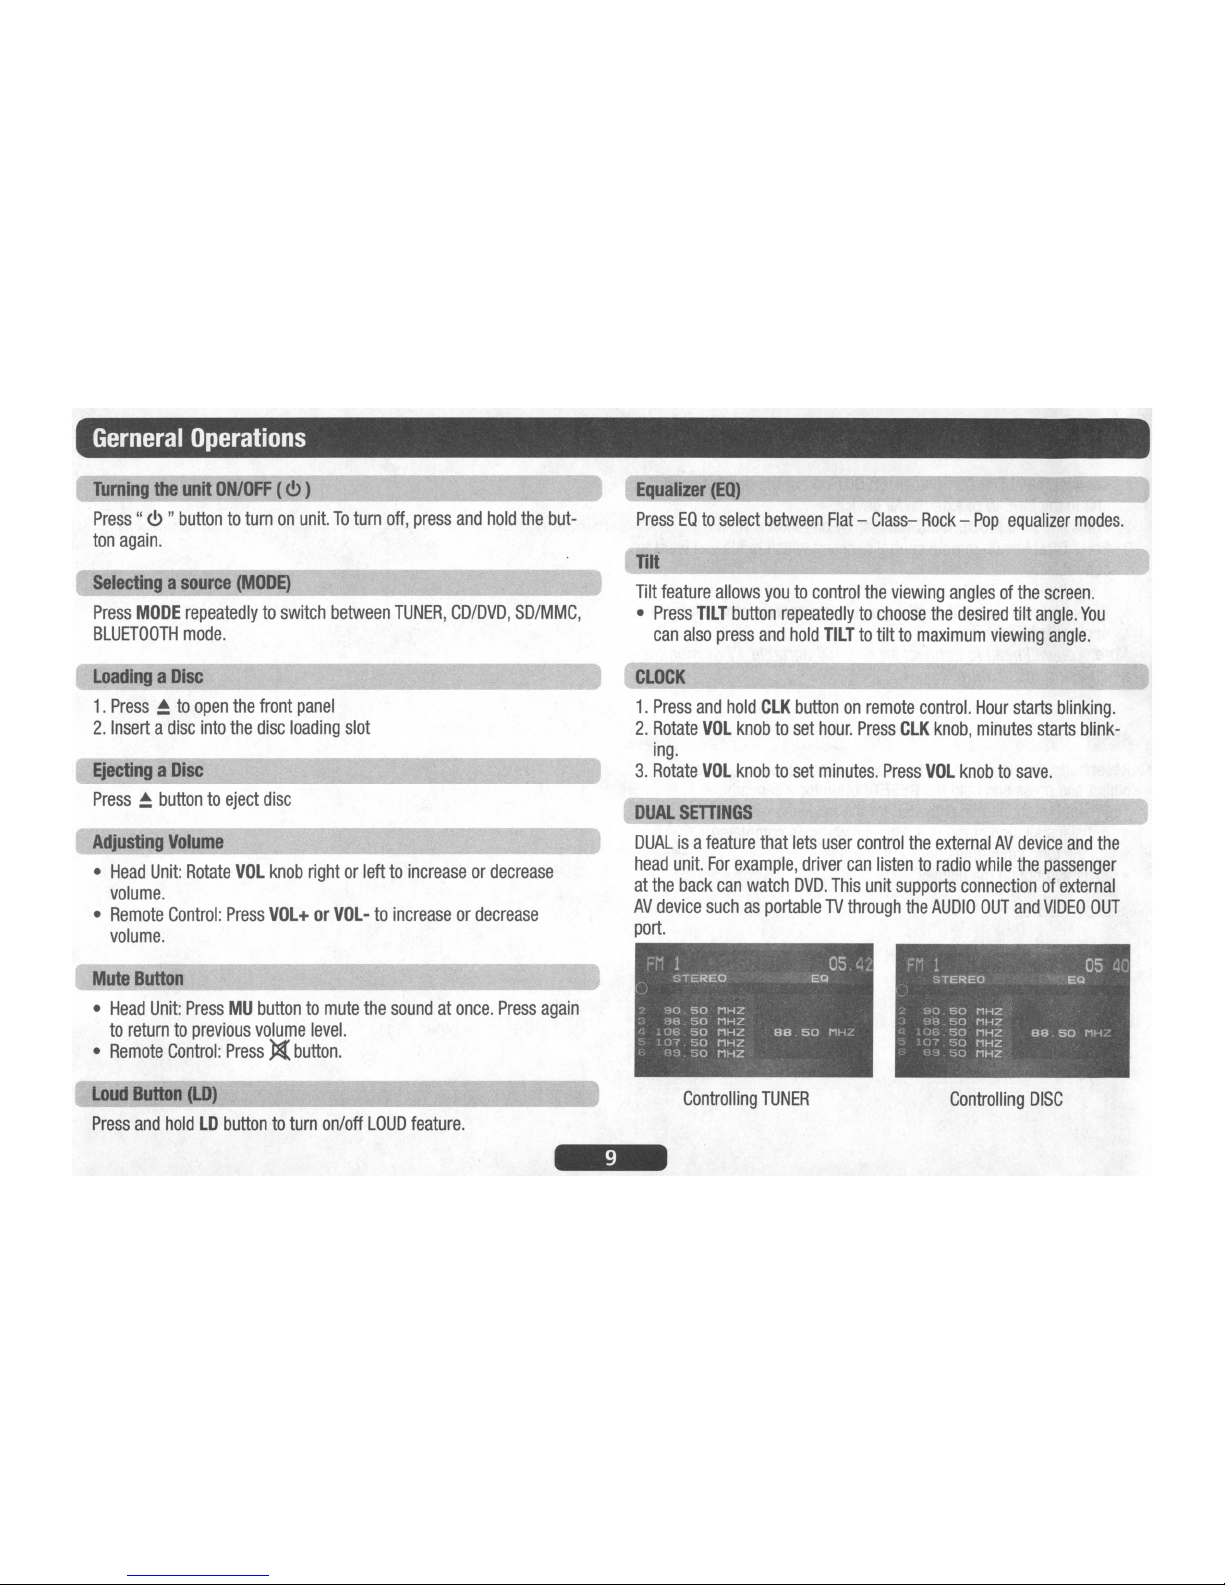
DUAL
SETIINGS
DUALisa
feature
that
lets
user
control
the
externalAVdevice
and
the
head
unit.
For
example,
driver
can
listentoradio
while
the
passenger
at
the
back
can
watch
DVD.
This
unit
supports
connectionofexternal
AV
device
suchasportableTVthrough
the
AUDIO
OUT
and
VIDEO
OUT
port.
05
ac
'~t:'EQ
FM
1
STEREO
Adjusting
Volume
•
Head
Unit:
Rotate
VOL
knob
rightorlefttoincreaseordecrease
volume.
•
Remote
Control:
Press
VOL+orVOL-
to
increaseordecrease
volume.
EjectingaDisc
Press~buttontoeject
disc
Mute
Button
•
Head
Unit:
PressMUbuttontomute
the
soundatonce.
Press
again
to
returntoprevious
volume
level.
•
Remote
Control:
Pressl(button.
LoadingaDisc
1.
Press~to
open
the
front
panel
2.
Insertadisc
into
the
disc
loading
slot
Loud
Button
(LD)
Press
and
holdLDbuttontoturn
on/off
LOUD
feature.
Controlling
TUNER
Controlling
DISC
Page 11

Gerneral
Operations
1.
Connect
the
AUDIO
OUT
and
VIDEO
OUT
portatthe
backofhead
unittothe
LINEINof
externalAVdevice.
2.
Press
and
hold
MODE.
DISC
will
displayontopofscreen.
3.
Press
Dual
keyonremote
controltoselect
which
mode
you
want
to
control.
T=
TUNER,D=DISC
4.
RefertoRadio
and
DVD
sectionsonhowtooperate
other
features
applicabletoeach
mode.
Note:
You
will
needtoconnectanexternal
portableTVor
monitor
when
using
this
feature.
REsEr
Reset
buttonisplacedonthe
housing.Toreset,
useasharp
point
object
and
press
and
hold
the
RESET
button
for2seconds.
The
reset
buttonistobeactivated
for
the
following
reason:
•
Initial
installationofthe
unit
when
all
wiringiscompleted.
•
All
the
function
buttons
does
not
operate.
•
Error
symbolonthe
display.
Page 12

ListeningtoRadio
Pressing
this
key
repeatedly
will
toggle
cyclically
between
each
band.
FM1---FM2---FM3---AM1
---AM2.
LOCAL
(Lac
Press
Loc
button
and
tuning
search
will
stop
onlyatstrong
stations.
Stereo
I
M;.;.o;;,;n.;.;:o~S;.I.-
__
PressSIbuttontoswitch
between
stereo
and
mono
sound
for
FM
radio
reception.
When
receptionofanFMstationisweak,
listening
quality
canbeimprovedbyswitchingtomono
sound.
Auto
seek/Preset
scan
AS/PSOL,)
__
Preset
Scan
(PS)-By
pressing
shortly,
the
radio
plays
each
preset
station
for5seconds.
Auto
Seek
(AS)-By
pressing
longer
than1sec,
auto
seekisactivated.
The6strongest
stations
are
preset
and
storedinthe
correspond-
ing
preset
number.
When
Auto
Seek
operationisfinished,
the
radio
executes
the
preset
scan.
Storing
and
Recalli;,;,;n~g
..;,,;Fre~gu_e;,;,;n_ci_es
_
If
you
press
anyofthe
NUMBER
(1-6)
you
can
easily
storeupto
six
broadcast
frequencies
for
later
recall
with
the
touchofa
button.
1.
Chooseadesired
BAND.
2.
When
you
findafrequency
that
you
wanttostoreinmemory,
press
a
NUMBER(1-6)
and
hold
until
the
preset
number
shows
and
lit
in
the
display.
3.
The
selected
radio
station
frequency
has
been
storedinmemory.
The
next
time
you
press
the
same
NUMBER
(1-6)
the
radio
station
frequencyisrecalled
from
memory.
Note:
Up
to18FM
/12AM
stations
canbestoredinthe
memory.
Currently Tuned StationPreset Memory Station 1-6
Band
(BD)
AutomaticorManual
tuning
SEEK
UP
~
I
SEEK
DN~)
When
pressed
short,
these
keys
are
operatedasMANUAL
tuning
mode.
When
pressed
longer
than1sec.,
they
are
operatedasSEEK
tuning
mode.
Page 13

Operations
Common
for
CD/MP3IVCD/DVD/MP4
-10
t.MI+to'~~:IJ;·;;:;);·Ji'·lJ;1:.:.;,\.'::1>J·\·ij;~tf:·:.I;1;f:il·Ij!.;h(,j:i·I·ij1ij·.:~
1.
Press
-10
buttontojump10tracks
backward
starting
from
currently
played
track.
2.
Press
+10
buttontojump10tracks
forward
starting
from
currently
played
track.
;;\Bili.~A."i~0J~~.,:,.i,il;i:;;1::·
••
·'·\;,j,·.~·;'.:;:B!;;j,;;'>(;;:·~.;i;,i:11;i~!;~11~i'iirij~;·
••.
··
During
playback,
press
...
or
~.
~
:
Presstostart
playback
from
the
beginningofthe
previous
chapter
or
track.
~
:
Presstostart
playback
from
the
beginningofthe
following
chapter
or
track.
During
playback,
press
HI
.
Press
againtoresume
playback.
:;~~'~R,.:,'~j.
This
feature
allows
youtoloop
playbackasectionofthe
movie
starting
from
PointAto
B.
1.
Press
theHIbuttontoplay
the
movie.
2.
Once
you
have
located
the
section
you
wishtoplaybackonloop
repeat,
press
and
hold
A-B
button.
You
will
see
"Rep-A"onthe
screen.
3.
Let
the
movie
playonuntil
you
have
reached
the
endofthe
section
you
wishtowatchoncontinuous
loop.
Once
you
have
reached
this
point,
press
and
hold
A-B
button
again.
"Rep-A-B"
will
appearonyour
screen.
Playback
will
now
start
from
Point
A-B.
4.Tostop
A-B
repeat
playback,
press
and
hold
A-B
button
once
more
until
"A-B
CANCEL"
disappears
and
normal
playback
resumes.
..JiiI
~i.J)i~(~jt~~~}:Jf::;c;1I;:~~j;::~~Y~k~i;~~f~tli,lJm;~,:~\~~.~~$~~:;!};;!~~;:
During
playback,
you
can
see
all
DVD
disc
information
and
current
play
settings.
Display
will
show
related
playback
time,
elapse
time,
title
number,
chapter
number
and
other
information.
1.
Press
OSO
on
the
remote
control
once.
Unit
will
display
the
play
time
and
the
disc
elapse
time.
2.
Pressitonce
more
and
all
other
settings
information
willbedisplayed.
sp~;~~~~rf_~".:<,
..
"~:
..
:
cS-':i\'·'·"
During
playback,
all
track
file
names
underafolder
willbedisplayed
on
the
screen
with
their
corresponding
track
number.
You
can
use
the
naviga-
tion
keypadonthe
remote
controltoaccess
the
file.
Tips:Toselect
track3,press
3.
To
select
13,
press
and
hold
10+
followby3.
To
select
23,
press
and
hold
10+(2times)
followby3.
Press
ROM
during
playbacktoplay
the
tracksinrandom/shuffle
order.
Pressitagaintocancel.
1.
Press
Stop
on
remote
control
during
playbacktostop
playback.
That
positionisstoredinmemory.
2.
Press~Ito
continue.
Playback
starts
from
the
positionatwhichitwas
stopped.
3.Topermanently
stop
playback,
press
Stop
button
twice.
~~~l~.~"~:""::';"
Note:
I+Il
or~on
remote
controlisthe
same
function
as~/
~
on
head
unit.
1.
During
playback,
press
and
hold'"
or~Unit
scansatthe
speedofx2
-x4-x8-
x20
2.Toresume
normal
playbackata
desired
point,
press
~I
.
Note:
No
sOllndisplayed
during
fast
forward/fast
reverse.
Page 14

Listening
to
CD/MP3
Searching
for
particular
track
using
GOTO
You
can
use
the
GOTO
functiontosearch
foradesired
track
number
or
particular
pointofa
tracktoplay.
1.
Press
and
hold
GOTO
on
the
remote
control
during
playback.
Time
and
track
number
search
appears.
2.
Enter
the
minutes
and
seconds
for
the
currently
played
trackifyou
wanttosearchbytime.
Press
Enter.
\
3.
Enter
track
numberifyou
wanttosearchbytracks.
Press
Enter.
Folder Name Track file names
Intra
Playback
Press
INT
during
playbacktoplay
the
first10secondsofeach
track.
Rep.eat
tracks
You
can
choose
between
repeat
playbackofa
single
trackorall
tracks.
1.
Press
RPT
on
the
remote
control
during
playback.
2.
Every
time
you
press
this
button,
the
unit
switchestothe
following
settings:
Repeat
1-
Repeat
the
current
playback
track.
Repeat
D1R
-
Repeat
all
the
tracks
under
the
currently
played
folder.
Repeat
All
-
Repeat
all
folders
and
tracks.
Program
Playback
You
can
set
which
trackstoplay
accordingtoyour
desired
sequence
using
the
PROG
function.
1.
Press
and
hold
Prog
buttononthe
remote
control.
2.
Enter
the
track
number
besides
the
memory
location.
3.
When
all
tracks
have
been
programmed,
select
PLAY
and
press
Enter.
Program
playback
will
start.
4.Toclear
all
program
entries,
press
Prog
and
select
CLEAR.
5.Tostop
program
playback,
press
Stop
button
twice.
--
.._••
~"-'-:I
••
_II.
NOO
I
0012
5
0001
g
lID
13
2
IS
10
14
3
1
II
15
4 8
12
18
PLAY
CLEAR
SD/MMC
Card
Input
1.
Power
off
head
unit.
2.
Press~buttontoopen
the
front
panel.
3.
Insert
the
SD/MMC
card
into
the
card
slot
(26).
@"""
liI
n
Ei
4.
Attach
front
panel
backtothe
head
unit.
Turn
II
~~~~~~::
on
unit,
press
MODE
buttontoSD/MMC
state
\l
26
Page 15

Playing
DVDNIDEO
~D/MP4
Playback,
1.
Insertadisc.
When
the
disc
offersamenu,
the
menuisdisplayed.
Whenadisc
already
inserted,
press
MODEtoswitchtodisc
mode.
2.OnDVDs
and
video
CDs
with
playback
control
(PSC),
menu
screens
may
appear
automatically.Ifthis
happens,
perform
the
operation
described
belowtostart
playback.
CAUTION:
Make
sure
that
the
VideoTVsystem
settingsisset
correctly
accordingtoyour
disc
your
playing.Ifyou
are
not
sure,
leaveitsetto"Auto".
Improper
setupofTV
system
might
cause
the
videotostop/skip/pause
playing
although
audio
might
continuetoplay
You
can
setup
videoTVsettings
using
the
SETUP
featureofthe
remote
control.
Referto"SETTINGUPTHE
DVD
PLAYER"
section.
1.ToturnONPSC
function,
press
PBC
on
the
remote
control.Toturn
OFF,
press
the
button
again.
Note:
Not
all
VCD/SVCD
disc
have
PBC
functions.
Re~
Playback
FORVCD
1.
Press
RPT
on
the
remote
control
during
playback.
2.
Every
time
you
press
this
button,
the
unit
switchestothe
following
settings:
Repeat
1-
Repeat
the
current
playback
track.
Repeat
All
-
Repeat
all
folders
and
tracks.
Off
-
Turn
repeat
function
OFF.
Note:
PBC
featureinVCD
disc
needstobe
STOPinordertouse
Repeat
playback
.
FOR
DVD
You
can
choose
between
repeat
playbackofa
titleorchapter.
1.
Press
RPT
on
the
remote
control
during
playback.
2.
Every
time
you
press
this
button,
the
unit
switchestothe
following
settings:
Repeat
Title
-
Repeat
the
current
playback
title.
(Press
and
hold
RPT
button)
Repeat
Chapter
-
Repeat
the
current
playback
chapter.
Repeat
Off
-
Turn
repeat
off.
-S$l~iI9.:pa~
~~ng_GOTO:·;,-.
You
can
use
the
GOlO
functiontosearch
foradesired
track
number
or
particular
pointofa
tracktoplay.
1.
Press
GOTO
on
the
remote
control
during
playback.
Time
and
track
number
search
appears.
.
-i.,.
•
DVD,:~,:·~.:,;})
"
Press. ,
',.
,•toselect
the
desired
item,
then
press
Enter.
VideoCDmenu
Use
the
number
keys
("0"to"9")toselect
the
desired
number,
then
press
Enter.
The
menu
screen
does
not
appear
when
the
PSC
function
is
turned
off.Inthis
case,
press
and
hold
buttontoturnonPSC
feature.
,~:_.~:~.)~;{:;r:~;i'~~~b';;i{!:,-:;}H;;~;i.'~t~l;;q·:~;~~.'~;f;:~·~;,"":
PSC
(Playback
Control)isa
feature
foundonVCD
2.0
and
SVCD
1.0.
PSC
allows
controlofthe
playbackofplay
items
and
the
possibility
of
interaction
with
the
user
through
the
remote
controlorsome
other
in-
put
device
available.Ifit's
on,
the
player
won't
auto
start
after
inserting
the
disc
becauseitwill
take
timetoselect
programondisc;ifit's
off,
the
player
will
auto
playback
the
programondisc
onebyone.
Page 16

Playing
DVDIVIDEO
CD/MP4
2.
Enter
the
minutes
and
seconds
for
the
currently
played
trackifyou
wanttosearchbytime.
Press
Enter.
3.
Enter
track
numberifyou
wanttosearchbytracks.
Press
Enter.
"CtJ~ngi~9
a.,dlolanguage
du,ingplayback
(Multi-audio)
DVDs
can
provide
audio
playback
with
different
languages
and
differ-
ent
systems
(Dolby
Digital,
DTS
etc.).
With
DVDs
featuring
multi-audio
recordings,
you
can
switch
between
languages/audio
systems
during
playback.
VCD
can
provide
different
audio
languages
usually
divided
into
left
and
right
channels.
1.Tochoose
different
audio,
simply
press
Audioonthe
remote
control
repeatedly
during
playback.
Note:
-
With
some
DVDs,
switching
between
languages/audio
systems
may
onlybepossible
usingamenu
display
-
You
can
also
switch
between
languages/audio
systems
using
SET-UP
MENU.
·t~iig.t_,~ijti~li"~~d~~.grl"~'.~':
.•"..
(Multi-subtitle) -
(OVO
only)
With
DVDs
featuring
multi-subtitle
recordings,
you
can
switch
between
subtitle
languages
during
playback.
1.
Press
Sub-Ton
the
remote
control
during
playback.
Press
repeat-
edly
until
the
supported
desired
subtitle
appears.
Note:
•
With
some
DVDs,
switching
between
subtitles
may
onlybepos-
sible
usingamenu
display
•
You
can
also
switch
between
subtitles
using
SET-UP
MENU.
Changing
.thevle\'lin9anljle·.PllYia~k'·(.~···
;r~·(DVDonlY).iltil
With
DVDs
featuring
multi-angle
(scenes
shot
from
multiple
angles)
recordings,
you
can
switch
among
viewing
angles
during
play-back.
1.
Press
and
hold
Angleonthe
remote
control
during
playbackofa
scene.
Title
(DVOtonly)
During
DVD
playback,
press
Titleonremote
controltoreturntoFIRST
title.
RetlJmto.R_tMehu(DVDOttIY),·
r·
'..
..,.
During
DVD
playback,
press
and
hold
MENUonhead
unitorremote
controltoreturntoroot
menu.
Note:
Some
DVD
may
not
contain
root
menu.
SIO\\fmotitJl'lplayiji~~>;
i..
..,
.
This
feature
lets
you
slow
down
playback.
1.
Press
Slowonthe
remote
control
during
playback.
2.
Pressingitrepeatedly
will
switch
youtothe
following
steps:
1/2-1/
3 - 1/4 - 1/5 - 1/6 - 1/7.
Note:
•Toresume
normal
playback,
press.
•
Thereisno
sound
during
slow
motion
playback.
•
With
some
disc,
slow
motion
maybeunclear
during
slow
mo-
tion
playback.
Page 17

Playing
DVDIVIDEO
CD/MP4
Zooming.,~During
Playback
. _ .
You
can
zoomininto
the
picture
during
playback.
1.
Press
Zoomonthe
remote
control
during
playback.
2.
Every
time
you
press
and
hold
this
button,
the
unit
will
zoom
2- 3
- 4 -
1/2-1/3-1/4
times
and
OFF.
Progra~f,~yback
.-.
You
can
set
which
trackstoplay
accordingtoyour
desired
sequence
using
the
PROG
function.
1.
Press
and
hold
Prog
buttononthe
remote
control.
2.
Enter
the
track
number
(for
VCD)ortitle
number
followedbychapter
number
(for
DVD)
besides
the
memory
location.
3.
When
all
tracks
have
been
programmed,
select
PLAY
and
press
Enter.
Program
playback
will
start.
4.Toclear
all
program
entries,
press
Prog
and
select
CLEAR.
5.Tostop
program
playback,
press
Stop
button
twice.
Fra~-by
..
fral11e
playback.
This
lets
you
move
ahead
one
frameata
time
during
playback.
1.
Each
time
you
press
and
hold
Step
buttononremote
control,
you
move
ahead
one
frame.
To
returntonormal
playback,
press
HI
.
P~
/'Nf5.G.(Pffl}:;
'0':
- ; ,
..
~
Press
and
hold
PIN
buttontoswitch
between
PAL,
NTSC,
AUTO
system.
1.
Press
PIN
buttononthe
remote
control
repeatedlytoselect
be-
tween
PAL,
NTSC,
AUTO
system.
Page 18

Connecting
iPod
You
can
connect
your
iPOD
portable
device
and
play
songs
from
the
car
stereo.
You
can
control
iPodbyconnectingitto
the
supplied
iPod
cable.
Note:
After
connection,
iPod
cannotbecontrolled
anymore,
all
controls
willbetransferredtothe
head
unit.
You
now
can
play
songsiniPOD
once
the
cableisproperly
connected.
1.
Connect
iPODtothe
supplied
iPOD
cable.
2.
Unit
automatically
detects
the
deviceitand
displays
the
iPOD
main
screen.
If
you
are
awareonhowtouse
iPOD,
the
waytouse
the
car
stereo
featureisbasically
just
the
same.
Take
noteofthe
equivalent
key
function
below.
Car Stereo
iPOD Functions
Rotate VOL knob
Rotate CLICK WHEEL Up/down category/file browsing
Press VOL knob
Press SELECT button Selecting a category/Play song
Press (BD/LD)Return
Press MENU button Return one level up
Car
Stereo
and
iPOD
equivalent
key
function
Note:
•
Please
refertoyour
iPOO
user's
manual
for
operating
instructions.
Page 19

HowtoUse
BluetoothinYour
Car
Audio
When
Bluetooth
devices
are
connected,
press
MODE
to
switchtoBT
(Blue-
tooth)
mode
and
then
press
MENU
buttononremote
control.
•
Connect
Last
-
Selecting
YES
will
automatically
connecttothe
last
suc-
cessfully
connected
device.
•
Disconnect
-
Selecting
YES
will
disconnect
the
current
active
connected
device.
•
Version
-
Selecttoview
the
Bluetooth
software
version
number.
•
AD2P
Connect
-
Selecting
YES
will
connect/disconnect
the
AD2P
play-
back
feature.
While
Bluetooth
devices
are
connected
and
thereisactive
phone
call,
you
can
switch
the
sound
from
your
mobile
phonetocar
stereo
and
vice
versa
by
pressing
the
SOUND
buttononremote
control.
Note:
Duetothe
vast
numberofBluetooth
mobile
phonesinthe
mar-
ket,
this
feature
might
notbefunctionalonsome
mobile
models.
Press
SOUND
buttononremote
controltoactive
voice
dial.
Note:
Before
performing
this
function,
make
sure
that
the
voice
dial
of
the
contact
you
wishtocallisalready
recorded
properly.
•
keys
# =
Press
* =
Press
and
hold
~;;~6_1J~]~~i'
...
;.1"
.~
;~•.~\
...
"!:
".':;)~1m~:fii~}'~~·~Y~i:'if;lni~JH*~1;,'~~;~~h"
1.Toansweracall,
press
the'
button.
2.
Once
you
have
finished
your
conversation,
press
the~button
to
hang
up.
,.t~~;N~.Hji·~8f;":X:;
press'
buttontodial
out
the
last
dialed
number.
HOW
~
·lI';fi!ttRIN.~~;;J~~;:ii:~~~~~~:~~rr'.1t?U~:1:Wf·:~f~v::~~]t~Mf
£W~:±~~;::;~
Before
you
can
dial
out
from
the
car
stereo,
you
must
first
perform
PAIR-
ING.
Pairingisa
procedure
usedtoconnect2Bluetooth
devices
together.
1.
Press
MODE
on
head
unittoswitchtoBT
(Bluetooth)
mode.
2.
Turnonthe
Bluetooth
featureofyour
mobile
phone.
Perform
"Add
Blue-
tooth
device"
from
your
mobile
phone.
The
mobile
will
search
for
any
Bluetooth
devices
within
the
range.
Select
"VALOR"
and
enter
Passkey:
"8888"toconnecttothe
car
audio.
(Please
refertothe
instruction
manualofyour
mobile
phone
for
Bluetooth
Pairing).
3.
After
successful
pairing,
connect
the
Bluetooth
functionofyour
mobile
with
the
car
stereo.
4.
Car
stereo's
screen
will
display
"Connected"
status.
Note:
•
"VALOR"isthe
Bluetooth
device
nameofthe
car
stereo.
Au
~.\
If
your
phoneis"A2DP"
format
compatible,
then
you
can
play
music
in
your
mobile
and
the
sound
willbetransferredtocar
head
unit.
1.
Make
sure
your
mobile
and
the
unitisproperly
paired
and
connected.
2.
Play
the
music
through
your
mobile
music
player
software.
3.
Press
MODE
repeatedly
untilBTmode
appearsinthe
display.
The
sound
willbetransferredtothe
head
unit.
4.
You
can
press
the
<Ill
or~buttononhead
unittoplay
next/previous
tracks
storedinmobile.
':
:~.~jJJ~;r~trj(:#1f~~r:·8;hl:~~~;·U:~;;;:'~.
Important:
Before
you
make
calls,
make
sure
that
the
devices
are
properly
paired
and
connected.
1.
Press
MODE
repeatedly
untilBTmode.
"
2.
Enter
the
phone
number
via
the
remote
control
keypad
and
press
I
button~o
dial
out.
3.
PressJbuttontoend
call.
Note:
Press~buttontoclear
when
entering
numbers.
Page 20

Customizing
AudioIVideo
Settings
.
AUDIO
SETUP
1.
Press
VOL
knobtoenter
AUDIO
setup.
Selected
item
willbehigh-
lighted.
You
can
set
BASS,
TREBLE,
BALANCE,
FADER,
SUBWOOFER.
2.
Press..or~buttontoselect
item.
Rotate
VOL
knobtomake
adjustments.
3.
Press
VOL
knobtoexit
settings.
N7--0--P7
N7--0--P7
L7--0--R7
R7--0--F7
OFF--ON
VIDEO
SETUP
1.
Press
and
hold
VOL
knobtoenter
VIDEO
setup.
Selected
item
will
be
highlighted.
You
can
set
BRIGHTNESS,
CONTRAST,
SATURATION,
HUE,
SHARPNESS.
2.
Press..or~buttontoselect
item.
Rotate
VOL
knobtomake
adjustments.
3.
Press
and
hold
VOL
knobtoexit
settings.
Note:
• N
means
Negative;Pmeans
Positive
•
Dependingonmodel's
feature,
some
items
may
not
show.
on
screen.
0--20
0--20
0--20
0--20
0--6
Page 21

ON
-~
DVD
SetupIDVD
System
Setup
You
can
flexibly
customize
the
unittosuit
your
preference.
You
can
set
the
language
and
other
video
and
audio
settingssowhen
playback
startsitwill
always
use
your
preferred
settings.
Important:
1.
Load
any
disc
into
the
unit
before
you
can
access
the
setup.
2.
Press
Setuponthe
remote
controltodisplay
setup
menuonthe
screen.
USE./.to
select
setupupitems:
SYSTEM-LANGUAGE-AUDIO-VIDEO-DIGITAL
t I
Use./•••
/.toselect
and
Entertoconfirm.
TV
System
Select
theTVsysteminthe
setting
menu.
Auto
Play
_
Select
ON/OFF
for
the
Disc
starts
automatically
play.
,..,-."":;.2'
.....
,.
SYSTEM SETUP
IITVJSYSTEM _
i
J1.WIl(.'
1:111.'-'·.
I.TV.LTYPF.
I
PASSWORD
RATING
DEFAULT
l'K
I
TlsETU~
Page 22

DVD
System
Setup
Setting
TV~~E.OP'e
_
SelectTVtypetowatch
wide
screen
movies.
4:3
Pan
Scan:
For
4:3
TV,
left
and
right
edges
willbecut.
4:3
Letter
Box:
For
4:3
TV,
black
bars
will
appearontop
and
bottom.
16:9:
For
16:9
wide
screen
TV.
Setting
Passw,;.;o;..rd,;....
-"
The
default
passwordis8888.
Setting
Rating
-"'--
The
ratingofthe
discisfrom1to
8:
with
the
most
limits
when
playing.
(8)
with
the
least
limits
when
playing.
Original
setting
:8
Note:
The
rating
canbeselected
only
under
the
password
unlocked
status,
and
the
limits
canbeworked
only
under
the
password
locked
status.
load
Default
If
this
itemisselected,
the
unit
will
returntooriginal
setting.
Page 23

DVD
Language
Setup
,
OSD
Language
setup
Selectonscreen
display
languageofthe
DVD.
Audio
Language
Select
audio
languageofthe
DVD
from
whichiscontainedinthe
DVD.
Subtitle
Language
_
Select
subtitle
languageofthe
DVD
from
whichiscontainedinthe
DVD.
Menu
Language
Select
menu
languageofthe
DVD
from
whichiscontainedinthe
DVD.
MPEG4
Language
Select
MPEG4
languageofthe
DVD
from
whichiscontainedinthe
DVD.
Page 24

DVD
Audio
Setup
Audio
out
Select
Audio
outputtoanalog.
Key
Selecttodifference
key
level.
Page 25

DVD
Video
Setup
Brightness
Set
the
brightnessofthe
video
output
with./•.
Contrast
Set
the
contrastofthe
video
output
with./•.
Hue
Set
the
hueofthe
video
output
with./•.
Saturation
Set
the
saturationofthe
video
output
with./•.
Sharpness
Set
the
sharpnessofthe
video
output
with./•.
Page 26

DVD
SpeakerIDigital
Setup
Downmix
Select
the
downmixtoLT/RT,
STEREOorVSS.
Output
Mode
Select
the
output
mode:
LINE
OUT:
Compress
the
input
siginal.
The
volumeissmall.
RF
REMOD:
The
volumeislarge
Dynamic
Range
When
you
select
the
compressed
modeas"line
out",
selectitto
adjust
the
compression
proportion
and
get
the
different
compressed
effect.
When
select
FULL,
the
audio
signalisminimum;
when
select
OFF,
the
audio
signalismaximum.
DUAL
MODE
Select
the
audio
channel
from
STEREO,
MONOL,MONORand
MIX
MONO.
Page 27

Troubleshooting
~
"
smoke'~,.,
elli:c~i,~i~t~;~t~l~q,~s~,~~tm~~~ely~()P,~!~g~~:~Fldcca.II'U,1e::s~~~~:,Wtl~re:~~.m1~o~~~.ed'~.
N~yer~try*Q;r~p~ti~~~njt:
••...
yourself
,~""",,:;~,:,,:~j§J~i1g~r~s't~:~q'so:;;,;:iti",:.',~,/:'~i;-i:;;':.'
',;,,'
:
,>",;.:
,'
...
;
")'1;::':"/:;>:'~;;'::':':~~:i:
,::::
;~;:;t::;;,:;:
,):.'::"
'~;::':r
:"yoc;.>
General:d];;'f~~':i"~:;:~'~~;':.'~
';'".
"i,;,"':;''''''
No
powerorno
sound
Car's
engine
switchisnot
on.
Turn
your
car's
keytoACCorON.
Cableisnot
correctly
connected.
Check
connection.
Fuseisburnt.
Replace
fuse.
Check
volumeormute
onIoff.
If
the
above
solutions
cannot
help,
Press
the
RESET
button.
~\~!ti
Discisinside
butnosound.
Discisupside
down.
Place
discinthe
correct
direction,and
the
label
side
up.
Discisdirtyordamaged.
Clean
discorchange
another
disc.
Disc
sound
skips,tone
qualityislow.
Discisdirtyordamaged.
CleanCDor
change
another
CD.
Sound
skips
duetovibration.
Mounting
angleisover
30°.
Adjust
mounting
angletoless
than
30°.
Unstable
mounting.
Mount
the
unit
securely
with
the
mounting
parts.
Noiseinbroadcasts
Stationistoo
far,orsignals
are
too
weak.
Select
other
stationsofhigher
signal
level.
Preset
station
lost
Battery
cableisnot
correctly
connected.
Connect
the
battery
cabletothe
terminal
thatisalways
live.
ERR
DISC
Discisdirty,
damagedorupside
down
Press~to
eject
the
disc.
Page 28

Technical
Specifications
>60dB
>50dB(1kHz)
20Hz-20kHz
'/;JIJIII"'~SEetlON<
.'
>+,:.;.
SignaltoNoise
Ratio
Channel
Separation
Frequency
Response
"B"I~~~<'
.'_.•.
LftIIIIQ,~"lr
':
Frequency
Modulation
TX-power
2.4-2.48GHz
PCM
+3dBm
2V
10k
Ohm
12VDC(1
0.8-15.6V
allowable)
4or8
Ohm
35Wx4CH
U~E~UJ:')
Output
Impedance
.:;:~.~,;;tf~~i;nit2;~::'
t~~·,::;ii~;r~!t:i(~;;~,;c:sfH;:;~~:'::Ii~~;:U:;;.~;:i:::;:
....
·:ij~~'"',.!~;i';m;1~ifl;;.::!.:.:;~
Power
Supply
Speaker
Impedance
Output
power
87.5-107.9
MHz
200
kHz
10.7
MHz
15
dBIJ
30
dB
50
dB
:;':_:J8tJt~·j):;;.:~~::l:,
Frequency
Range
Channel
Step
Intermediate
Frequency
Usable
sensitivity
Stereo
Separation
SignaltoNoise
Ratio
Frequency
range
Intermediate
frequency
Usable
sensitivity
530-1710
KHz
10.71
MHz
32
dB
Page 29

V,1LOR
MULTIMEDIA
18061 Arenth Avenue, CityofIndustry, CA91748, USA.
Tet:(888)58-VALOR (626 581-8900) Fax:(626)581-9980
www.valormultimedia.com
Page 30

iPod®
COMPATIBILITY WITH THIS UNIT
• The unit can be used with third generation and above Nano, Mini, Photo, and 5th GENERATION
iPod, all can be connected by using the proprietary direct connection cable.
• Photo and 5th GENERATION iPod® video/photo viewing
cannot be controlled via head unit HMI,
only from iPod front panel.
• While
in
audio mode the front panel controls on the iPod are nonfunctional when connected by
using the proprietary direct connection cable to the head unit.
• The unit can be used with the following iPod versions.
{Correct function
of
earlier versions cannot be guaranteed}
• Third generation iPod: Ver. 2.3
• Fourth generation iPod: Ver 3.0.2
• iPod photo: Ver.1.1
• iPod mini:
Ver.
1.3
• iPod nano:
Ver.
1.0
• For details about "iPod Software Update," refer to the iPod Instruction Manual.
Rev 10·19·07
Page 31
V,1LOR
MULTIMEDIA
Valor
Warranty
Validation
Dept
18061
ArenthAve
CityofIndustry.CA
91748
Place
Postage
Here
VilLOR
MULTIMEDIA
ONE
YEAR
LIMITED
WARRANTY
Page 32

Please
complete
all
fieldstovalidate
your
Valor
Multimedia
limited
warranty.
Remember
to include a
copy
of
your
dated
sales
invoice.
Failuretoreturn
this
card
will
resultinwarranty
coverage
starting
on the
date
of
manufacture
basedonyour
serial
number. Special
warranty
provisions
will
only
be honoredifthis
card
is
returned
complete.
Limitationstowarranty
periods
and
exclusions
may
not
applytoyour
area
if
applicable by law. Please check with your local regulatory offices for details regarding warranty regulations
in
your area.
RETAILER NAME
RETAILER ADDRESS
RETAILER PHONE NUMBER
PRODUCT
PURCHASED
PRODUCT
SERIAL NUMBER DATE OF
PURCHASE
NAME
DATE
SHIPPING ADDRESS
(NOPOBOXES)
CITY
STATE
I
ZIP
CODE
PHONE
NUMBER
V,1LOR
MULTIMEDIA
ONE
YEAR
LIMITED WARRANTY
Valor
Multimedia
hereby
warrantstothe
original
retail
purchaserofthis
product
that
should
this
productorany
part
thereof,
under
normal use and
conditions,be
proven
defectiveinmaterialorworkmanship
within
one
year
parts
and
labor
from
the
dateoforiginal
purchase.
Such
defect(s)
will
be
repairedorreplaced
with
reconditioned
product
(at
Valor
Multimedia's
option)
for
parts
and
repair
labor.
This
limited
warranty
is the
purchaser's
exclusive remedy for any such defect(s).
To
obtain
repairsorreplacement
within
the
termsofthis
warranty,
please
visit
www.valormultimedia.comorcontactusat
18061
Arenth
Avenue;City
ofIndustry,CA91748
(626)
581-8900.
Proofofwarranty
coverage
(i.e.-
dated billofsale) and a valid serial
number
is required.
This
warranty
does
not
applytoany
productofpart
thereof
which,inthe
opinionofValor
Multimedia,
has
sufferedorbeen
damaged
through
alteration,
improper
installation,
mishan
dling,
misuse,neglect,
accident,
or
by removalordefacementofthe factory serial
number/bar
codelabel(s). The
opinionofValor
Multimedia
with
respecttothis
matter
shallbefinalTHE
EXTENT
OF
VALOR
MULTIMEDIA'S
LIABILITY
UNDER
THIS
WARRANTYISLI
MITED
TO
THE
REPAIR
OR
REPLACEMENT
PROVIDED
ABOVE
AND,INNO
EVENT,
SHALL
THE
COMPANY'S
LIABILITY
EXCEED
THE
PURCHASE
PRICE
PAID BY
PURCHASER
FOR THE PRODUCT.
Warranty Validation Card
Why did you choose a Valor Multimedia product? o Appearance
o Value
o Features
o Brand Name
o Other
V,1LOR
MULTIMEDIA
PRJ\
\(
~
\lll!(
I Information gathered is used for the sole purpose
of
product
registration. Your personal information will not be
sold or offered for telemarketing
or
contact unless you request
it.
THIS
WARRANTY
ISINLIEU
OF
ALL
OTHER
EXPRESSED
WARRANTIES
OR
LIABILITIES.
ANY
IMPLIED
WARRANTIES,
INCLUDING
ANY
IMPLIED
WARRANTY
OF
MERCHANTABILITY,
SHALL
BE
LIMITED
TO
THE
DURATION
OF
THIS
WRITTEN
WARRANTY.
ANY
ACTION
FOR
BREACH
OF ANY
WARRANTY
HEREUNDER,
INCLUDING
ANY
IMPLIED
WARRANTY
OF
MERCHANTABILITY, MUST BE BROUGHT WITHIN A PERIOD OF
18
MONTHS FROM THE
DATE
OF ORIGINAL PURCHASE.INNO
CASE
SHALL
THE
COMPANY BE
LIABLE
FOR
ANY
CONSEQUENTIAL
OR
INCIDENTAL
DAMAGES
FOR
BREACHOFTHISOFANY
OTHER
WARRANTY EXPRESS OR IMPLIED WHATSOEVER.
No
personorrepresentativeisauthorizedtoassume
for Valor
Multimedia
any
liability
other
than
expressed
hereininconnection
with the
saleofthis
product. Some
jurisdictions
do not allow limitations on how long an implied
warranty
lastsorthe
exclusionoflimitationofincidentalorconsequential
damages
so the above .limitations or exclusions may not apply to you. This
warranty
gives
you specific legal rights and you may also have
other
rights,
which vary from jurisdiction to jurisdiction.
How was your product acquired?
Where will this product be used?
How long have you owned
your
vehicle?
Would you buy another Valor product?
Would you recommend a Valor product?
o Gift
o Internet Retailer
o Standard Retailer
o Specialty Store
o Mass Merchant/ Discount Retailer
o PersonalAutomobile
o
RV
o Commercial Vehicle
o Other
0
Brand New
0
< 1year
0
1-
2 years
0 3 - 5 years
0
> 5 years
0
Yes
0
No
0
Yes
0
No
 Loading...