

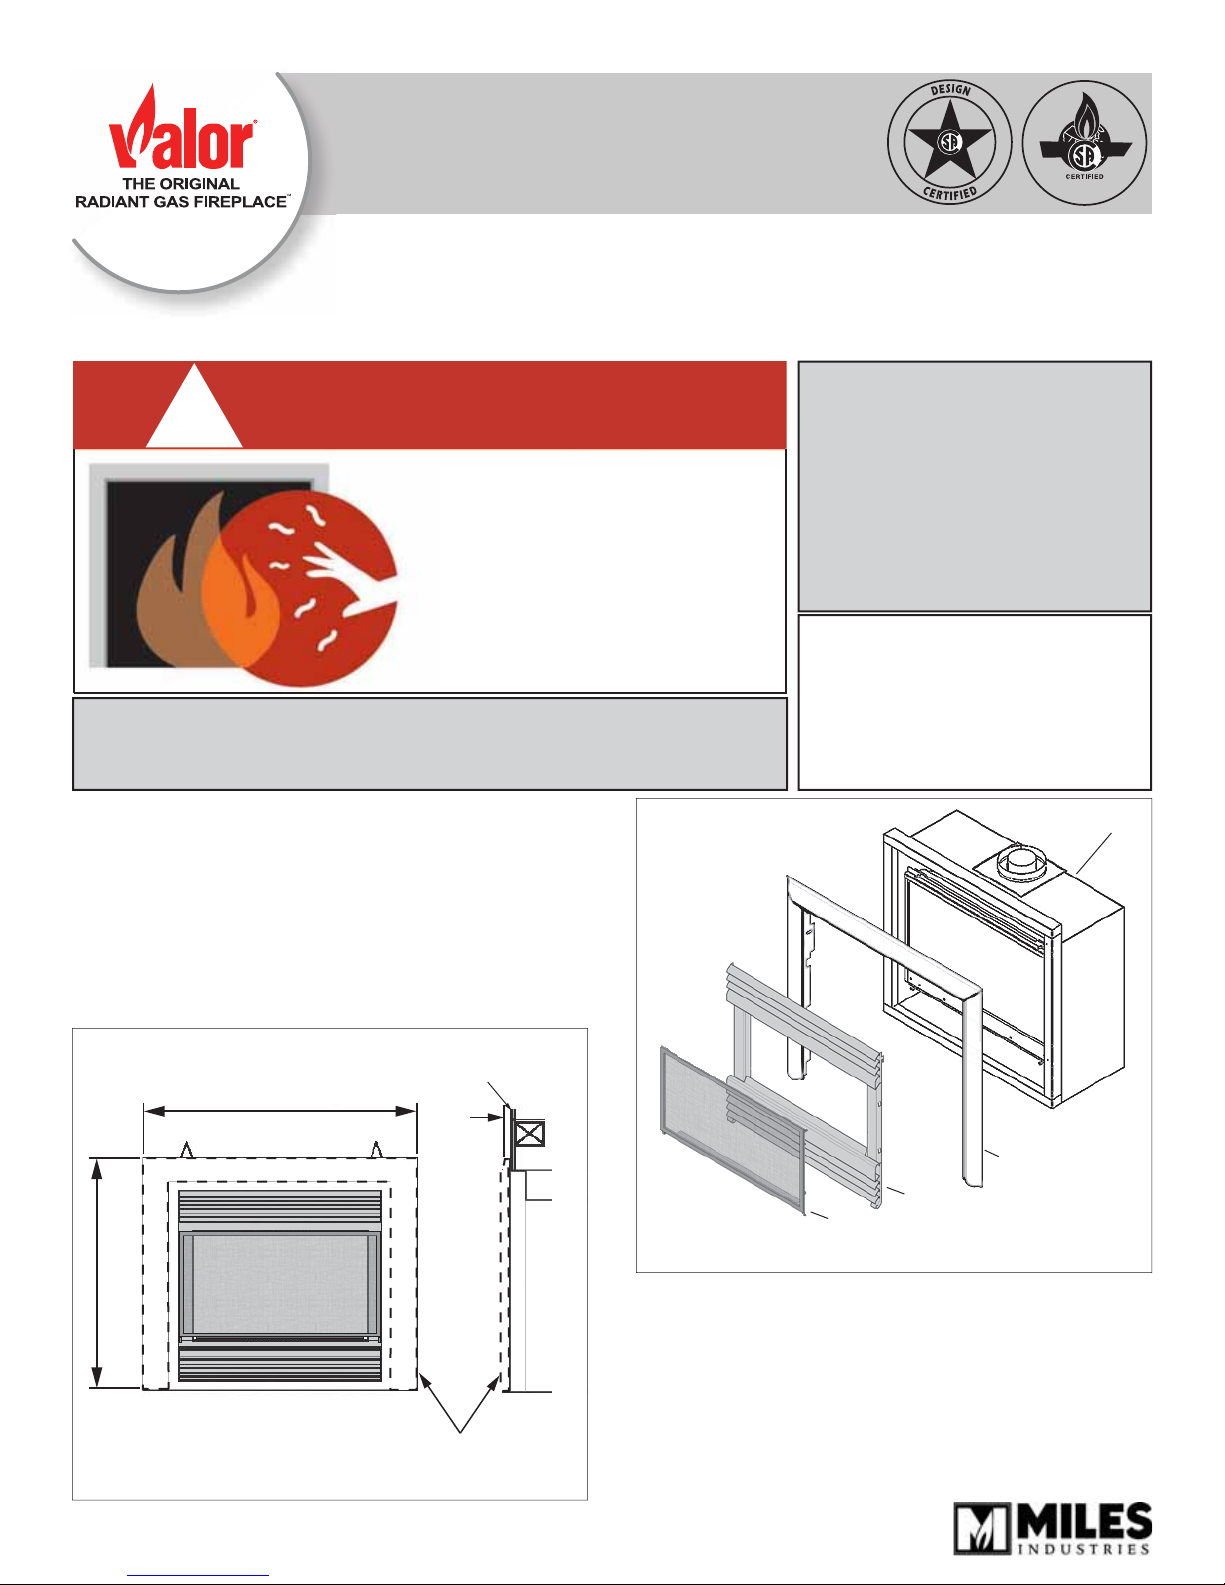
HORIZON
601 Standard Front
CSA approved for use with Valor Heaters Models 534 and 535 ONLY
Installation Instructions
INSTALLER
!
A barrier designed to reduce the risk of burns from the hot viewing
glass is provided with this appliance and shall be installed
for the protection of children and other at-risk individuals.
The 601SFB Standard Front in black or 601SVI
Standard Front in vintage iron are designed to be
used on their own or along with an outer surround trim
(supplied separately) on the 534 or 535 Valor Horizon
heaters.
The Standard Front fi ts within the heater’s black frame
and clips onto the mounting brackets inside the frame.
It is compatible with the 603FSK, 604FSK, 605FSK and
606FSK Trim Kits.
WARNING
HOT GLASS WILL
CAUSE BURNS.
DO NOT TOUCH GLASS
UNTIL COOLED.
NEVER ALLOW CHILDREN
TO TOUCH GLASS.
Finished wall
(See appliance
installation manual)
34-7/8” (887 mm)
3/4”
(19 mm)
Leave this manual
with the appliance.
CONSUMER
Retain this manual
for future reference.
Note: This kit must be installed
by a qualifi ed installer, service
agency or gas supplier. These
instructions are to be used in
conjunction with the fi replace
main installation instructions.
534 or 535
31-1/8” (780 mm)
601SFB or 601SVI
4001167-03
© Copyright Miles Industries Ltd., 2013
3 or 4-sided Trim
601 Standard Front
Barrier Screen
Overview (Heater and trim sold separately)
Outer Trim
Supplied
Separately
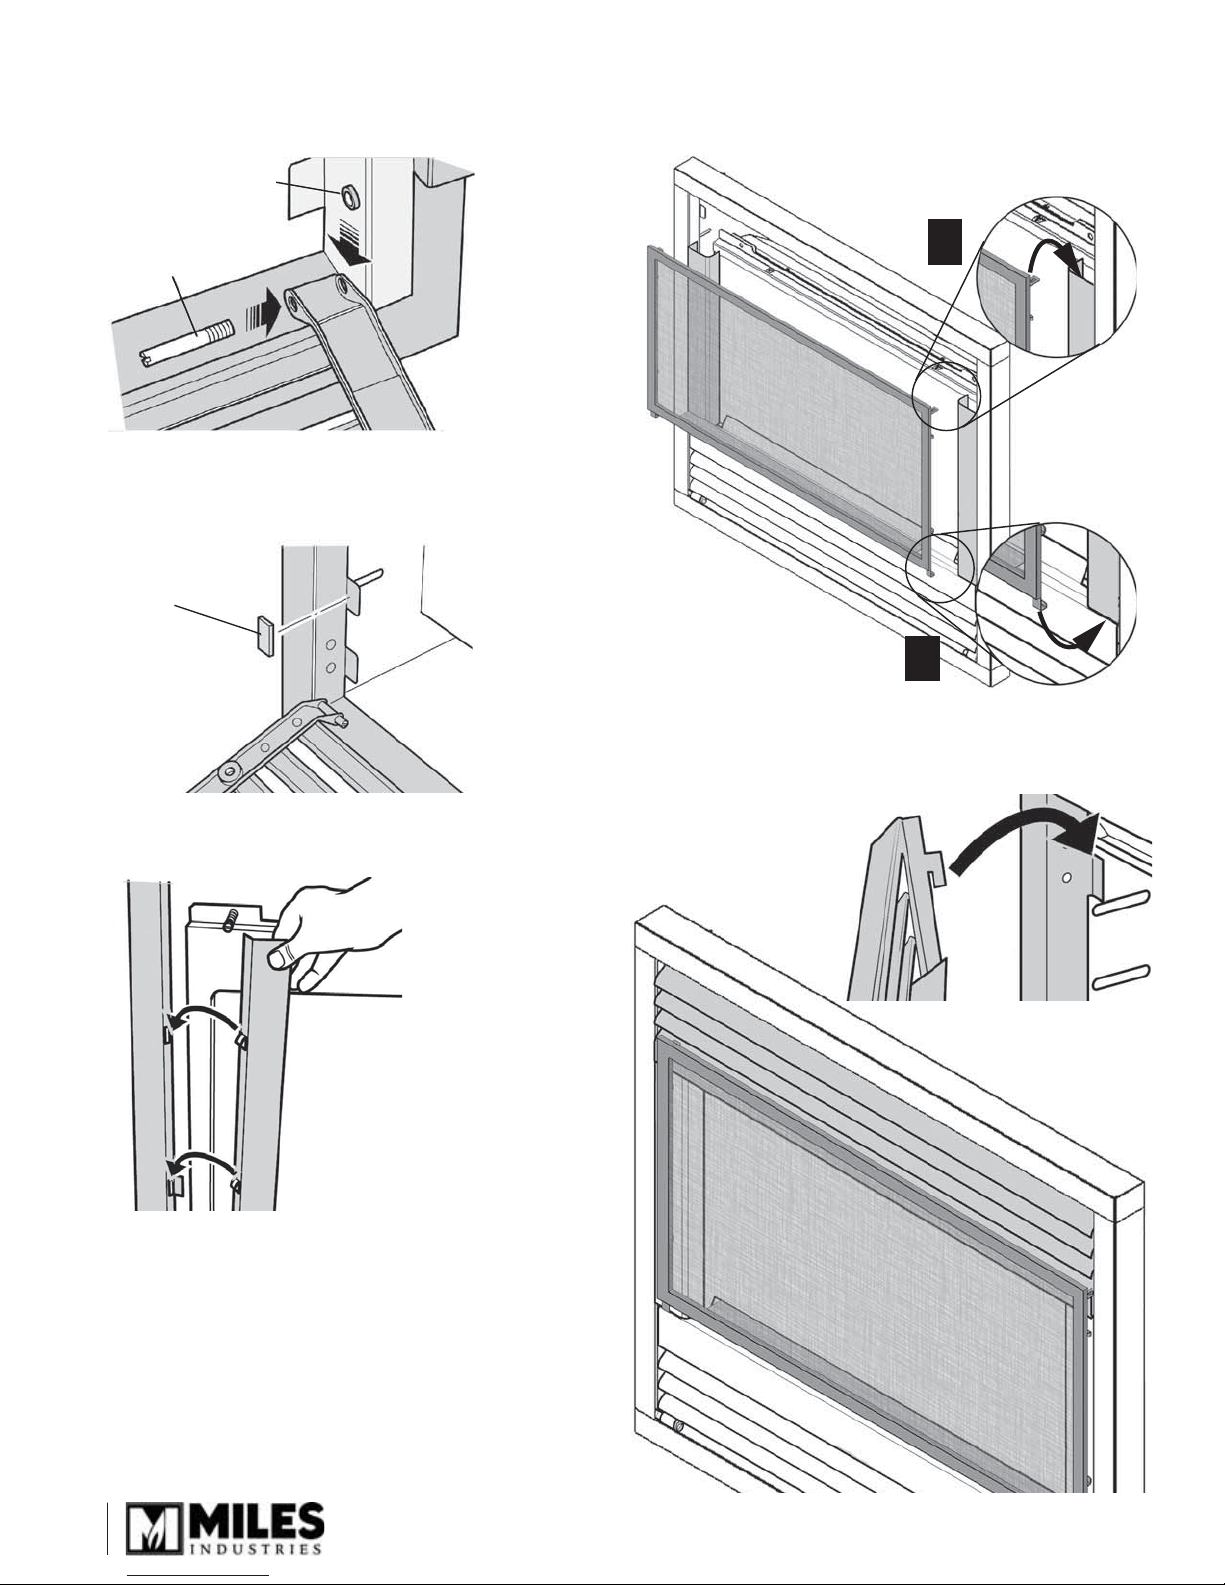
Installation
1. Fit the lower louver unit using the hinge studs and
hinge spacers.
Spacer
4. Fit the barrier screen hooking its bottom tabs to the
bottom of the side channels and snapping its top
tabs to the top of the side channels.
Hinge stud
2. Fix the two adhesive backed magnet counter plates
to the tabs at the fi rebox sides, which line up with
the magnets on the lower louver.
Magnet
counterplate
2
1
5. Slide the lower edge of the upper louver behind the
screen and attach the louver by hooking it over the
tabs near the top of the fi rebox sides.
3. Fit the two side channels by hooking into the
openings at the sides of the fi rebox.
2

Maintenance
DO NOT TOUCH THE BARRIER SCREEN OR
FIREPLACE WHILE THEY ARE HOT!
Let the
fi replace cool fi rst before cleaning it.
FOR SAFETY PURPOSE, ensure the barrier
screen is re-installed on the fi replace front after
maintenance if it has been removed.
WARNING
!
WARNING
DO NOT TOUCH THE BARRIER SCREEN OR
FIREPLACE WHILE THEY ARE HOT!
fi replace cool fi rst before cleaning it.
FOR SAFETY PURPOSE, ensure the barrier
screen is re-installed on the fi replace front after
maintenance if it has been removed.
To clean the front trim, use mild soap and water.
1. Unhook the upper louver.
2. Unhook the screen lifting the upper tabs off the side
channels and then freeing the bottom tabs.
3. Unhook the side channels.
4. Lower the bottom louver on its hinges.
5. Dust the screen with a soft brush.
If the barrier becomes damaged, the barrier shall
be replaced with the manufacturer’s barrier for this
appliance.
To clean the window and ceramics inside the fi rebox,
consult the Owner’s Information section of the
Installation and Owner’s Manual supplied with the
fi replace.
Let the
DO NOT CLEAN THE GLASS WINDOW WITH
AMMONIA!
Repair Parts List
# Description Part Number
Black
1 Upper louvre 040A576AZ 040A576VI
2 Lower louvre 3000430AZ 3000430VI
3 Right side channel 3000040AZ 3000040VI
4 Left side channel 3000038AZ 3000038VI
5 Magnet counterplates (2) 420K551 420K551
6 Finger grip 620B705 620B705
7 Hinge studs (2) 574469 574469
8 Hinge spacers (2) 574459 574459
9 Push on grip washers (2) 534419 534419
10 Barrier screen 4003550 4003550
Because our policy is one of constant development and improvement, details may vary slightly from those given in this publication.
Designed and Manufactured by / for
190 – 2255 Dollarton Highway, North Vancouver, B.C., CANADA V7H 3B1
Tel. 604-984-3496 Fax 604-984-0246
Vintage
Iron
Miles Industries Ltd.
www.valorfi replaces.com
1
4
3
6
2
7
10
8
9
5
3

®
LE PREMIER
FOYER À GAZ RADIANT
Homologué par la CSA pour utilisation avec les foyers Valor 534 et 535 SEULEMENT
!
Une grille de protection conçue pour réduire les risques de brûlures sur la vitre
chaude de la fenêtre est fournie avec cet appareil et doit être installée pour la
protection des enfants et autres individus à risques.
MC
HORIZON
Devanture standard 601
Directives d’installation
AVERTISSEMENT
UNE SURFACE VITRÉE CHAUDE PEUT
CAUSER DES BRÛLURES.
LAISSEZ REFROIDIR LA SURFACE VITRÉE
AVANT D’Y TOUCHER.
NE PERMETTEZ JAMAIS À UN ENFANT
DE TOUCHER LA SURFACE VITRÉE.
INSTALLATEUR : Laissez cette notice avec l’appareil.
CONSOMMATEUR : Conservez cette notice pour consultation ultérieure.
La Devanture standard noire 601SFB ou la Devanture
standard fi nie fer antique 601SVI sont conçues
pour être utilisées avec ou sans bordure (fournie
séparément) sur les foyers Valor Horizon 534 ou 535.
La Devanture standard s’accroche sur les languettes
à l’intérieur de la bordure noire du foyer. Elle est
compatible avec les Bordures à trois ou quatre côtés
603FSK, 604FSK, 605FSK et 606FSK.
Finition du mur (Voir le guide
d’installation du foyer)
34-7/8” (887 mm)
31-1/8” (780 mm)
601SFB ou 601SVI
3/4”
(19 mm)
Bordure vendue
séparément
Note : Cette devanture doit être installée par
un installateur qualifi ée, une agence de service
certifi ée ou un fournisseur de gaz. Ces instruc-
tions doivent être utilisées conjoin-tement avec
les instructions fournies avec le foyer.
534 ou 535
Bordure à 3
ou 4 côtés
Devanture standard 601
Grille de protection
Concept
(foyer et bordure vendus séparément)
4

Installation
1. Fixez le registre du bas à l’aide des chevilles et
cales de charnières fournies.
Cale
Cheville
2. Fixez les deux plaquettes magnétiques adhésives
aux languettes à la base de l’encadrement du foyer,
les alignant avec les aimants du registre.
Plaquette
magnétique
4. Installez la grille de protection en accrochant
d’abord les crochets du bas à la base des sections
des côtés; puis accrochez le haut de la grille en
poussant sur ses coins supérieurs pour que ses
languettes s’enclenchent aux bords supérieurs des
sections des côtés.
2
3. Installez les deux sections des côtés en les
accrochant dans l’encadrement du foyer.
1
5. Insérez le bord inférieur du registre du haut derrière
la grille puis accrochez le registre aux languettes
de l’encadrement du foyer.
© Tous droits réservés Miles Industries Ltd., 2013
5

Entretien
NE TOUCHEZ PAS LA GRILLE DE PROTECTION
OU LE FOYER LORSQU’ILS SONT CHAUDS!
Laissez le foyer refroidir avant de le nettoyer.
POUR DES RAISONS DE SÉCURITÉ,
assurez-vous que la grille de protection soit
réinstallée sur la devanture après l’entretien.
Pour nettoyer la devanture, utilisez une solution d’eau
et de savon doux.
1. Décrochez le registre du haut.
2. Décrochez la grille de protection en soulevant ses
languettes du haut puis en la décrochant.
3. Décrochez les sections des côtés.
4. Ouvrez le registre du bas.
5. Époussettez la grille à l’aide d’une brosse à poils
doux.
Si la grille est endommagée, elle doit être remplacée par la grille conçue par le manufacturier
pour cet appareil.
Pour nettoyer la fenêtre et l’intérieur de la boîte de
foyer, consultez la section Information à l’intention du
consommateur dans le Guide de l’installation et du
consommateur fourni avec le foyer.
NE NETTOYEZ PAS LA VITRE DE LA FENÊTRE
AVEC UN PRODUIT À BASE D’AMMONIAQUE!
AVERTISSEMENT
!
AVERTISSEMENT
NE TOUCHEZ PAS LA GRILLE DE PROTECTION
OU LE FOYER LORSQU’ILS SONT CHAUDS!
Laissez le foyer refroidir avant de le nettoyer.
POUR DES RAISONS DE SÉCURITÉ,
assurez-vous que la grille de protection soit
réinstallée sur la devanture après l’entretien.
Liste de pièces
# Description Numéro de pièce
Noir Fer antique
1 Registre du haut 040A576AZ 040A576VI
2 Registre du bas 3000430AZ 3000430VI
3 Section côté droit 3000040AZ 3000040VI
4 Section côté gauche 3000038AZ 3000038VI
5 Plaquettes magnétiques (2) 420K551 420K551
6 Poignée 620B705 620B705
7 Chevilles de charnière (2) 574469 574469
8 Cales de charnière (2) 574459 574459
9 Rondelles de blocage (2) 534419 534419
10 Grille de protection 4003550 4003550
Parce que nous favorisons une politique de développement continu, certains détails de la présente publication peuvent varier.
Conçue et fabriquée par / pour
Miles Industries Ltd.
190 – 2255 Dollarton Highway, North Vancouver, BC, CANADA V7H 3B1
Tél. 604-984-3496 Téléc. 604-984-0246
www.foyervalor.com
1
4
3
6
2
7
10
8
6
5
9
 Loading...