

Valor DD-806W Owner's Manual

DD-806W

Contents
Precautions···································································································1
On Safety·································································································1
Display Brightness······················································································1
DISC Care································································································1
Playable Discs···························································································1
DVD Region Management············································································2
Preparations··································································································3
Features···································································································3
Tools and Supplies·····················································································3
Warning···································································································3
Disconnecting the Battery·············································································3
Controls and Indicators···················································································5
Button Operation························································································5
Key Areas for the Touch Screen····································································6
Remote Control······························································································7
Remote Control Functions············································································7
TFT Monitor Operation····················································································9
Rear Camera Mode····················································································9
Screen Adjustment·····················································································9
Screen Adjustment Procedure·······································································9
Parking Brake····························································································9
Operating Instructions···················································································1 0
Setting Password······················································································10
Power On / Off·························································································10
Source Selection······················································································10
Volume Adjustment···················································································10
Equalizer Setting······················································································10
System Reset··························································································10
Mute······································································································11
Standby··································································································11
Setup Menu··································································································12
Main Menu······························································································12
Screen Setting·························································································12
Date Setting····························································································14
DVD Setting····························································································15
System Setting·························································································15
Steering Wheel Control Setting····································································16
Basic Settings··························································································17
Other Settings··························································································18
Tuner (AM/FM) Operation···············································································20
Tuner Display··························································································20
Switch to Radio/Tuner Source····································································20
Select AM/FM Band··················································································20
Auto Tuning·····························································································20
Manual Tuning·························································································20
Using Preset Stations················································································20
Saving a Station·······················································································20
Select a Station························································································20
Thank you for purchasing a Valor Multimedia unit. We hope you will find the instructions in this
user manual clear and easy to follow. If you take a few minutes to look through it, you will learn
how to use all the features of your new unit for your maximum enjoyment.
After you have finished reading the instructions, please keep this manual in a safe place for
future reference.
1

Auto Store (AS) ·······················································································21
Program Scan (PS) ··················································································21
DX and LOC Stations Signals······································································21
DVD Player Operation····················································································22
Insert/Eject Disc·······················································································22
Reset the Loading Mechanism·····································································22
Accessing DVD Source··············································································22
Using the Touch-Screen Controls·································································22
Controlling Playback··················································································23
Accessing the DVD Menu···········································································23
Moving Through Chapters··········································································23
Fast Forward/Fast Reverse·········································································23
GOTO Search··························································································23
Direct Chapter / Track Selection···································································24
Viewing an Alternate Picture Angle (DVD Only) ··············································24
Zooming·································································································24
Multi-Language Discs (DVD Only) ·······························································24
Playback Information·················································································25
General Disc Information············································································26
CD/MP3/WMA/JPEG Operation·······································································27
DISC User Interface··················································································27
MP3/WMA Disc························································································27
JPEG Disc······························································································28
FLASH DRIVE Operation················································································29
Accessing Flash Source·············································································29
Flash Drive Instructions··············································································29
Card Operation·····························································································30
Accessing CARD Source············································································30
CARD Instructions····················································································30
Bluetooth Operation······················································································31
Before Using the Bluetooth·········································································31
Bluetooth Indicator····················································································31
Accessing Bluetooth Source········································································31
Bluetooth User Interface·············································································31
Bluetooth Setup························································································31
A2DP·····································································································32
Paring····································································································32
Auto Connect···························································································32
Making a Phone Call·················································································33
Answering an Incoming Call········································································33
End a Call·······························································································33
Troubleshooting···························································································34
Specifications·······························································································38
Accessory List······························································································40
NOTE: 1. Certain description in the book may differ from the actual unit.
2. Some pictures or icons in the book may differ from actual display.
3. Specifications subject to change without notice.
2

To avoid the risk of injury or accident, read the following precautions before installing and
Precautions
Preventing Accidents
The video appears only after you park the car and set the parking brake.
When the car is in motion, the video will automatically prompt a ―Caution‖ screen for your
safety.
Do not watch the monitor while driving. You may cause a traffic accident if your attention
is distracted by the monitor.
CAUTION!!!
IT'S UNLAWFUL TO OPERATE A VEHICLE WHILE VIDEO IS DISPLAYED IN THE
DRIVERS VIEWING AREA.
ENGAGE EMERGENCY BRAKE TO ENJOY VIDEO
operating the unit.
On Safety
Comply with your local traffic rules and regulations.
While driving
You must not watch or operate the monitor. It may distract you and cause an accident.
Park your car in a safe place to watch and operate the unit.
While operating
Do not insert your fingers or foreign object into the unit’s loader while a CD/DVD is playing.
It may cause injury or damage to the unit. Keep small articles out of the reach of children.
Keep small articles out of the reach of children.
If your car was parked in direct sunlight this can result in a high increase in temperature inside
the car, please allow the unit to cool down before operating it.
Do not use the System Setup feature while driving, or perform any other function which could
divert your attention from the road.
When using the reverse back up camera:
When you drive, watch the surroundings carefully for your safety. Do not entirely depend
on the back camera.
When backing up you car, be sure to look back for your safety.
Damage Screen
Do not touch the liquid crystal fluid if the LCD is damaged or broken. The liquid crystal fluid
may be hazardous to your health or fatal. If the liquid crystal fluid from the LCD contacts your
body or clothing, wash it off with soap immediately.
Display Brightness
When the temperature of the unit falls (as in winter), the liquid crystal inside the screen will
become darker than usual. Normal brightness will return after using the monitor for a while.
DISC Care
Be careful not to splash juice or other soft drinks onto the unit or discs.
Make sure that discs are clean and free of dust.
Playable Discs
The following types of discs/files are compatible:
CD-ROM (ISO), CD-R, CD-RW, DVD+R/RW, DVD-R/RW
CD-DA, DVD Video
MP3 data
WMA data
JPG images
AVI format
3


Please read all of the instructions below before beginning your installation. We recommend that
Preparations
you have your unit installed by an experienced car audio/navigation system installer.
IMPORTANT NOTICE: It is very important that you read the WARNINGS and NOTES in this
manual to ensure correct installation and use of your unit.
Features
6.2" Digital TFT Display
DVD/DVD-R/DVD-RW/VCD/CD/CD-R/CD-RW Compatible
Touch-screen Control with Dynamic Graphic User Interface
Navigation Built-in (MINI SD Card)
Built-in 45W X 4 output amplifier, 4.1 channel surround sound output.
Bluetooth with A2DP & Handsfree
AM/FM Tuner with 48 Memory Presets
SD Card Slot on Front Panel , Support SDHC-up to 32GB
USB Port on Front Panel (2.0 High Speed)
Front and Rear Auxiliary
Back-up Camera Input
Steering Wheel Control Ready (Resistor Type)
Tools and Supplies
We suggest using these tools and supplies to install the unit.
• Torx type, flat-head and Philips screwdrivers
• Wire cutters and strippers
• Tools to remove existing radio (screwdriver, socket wrench set or other tools)
• Electrical tape
• Crimping tool
• Crimp connections
• Volt meter/test light
• 18 gauge wire for power connections
• 16 – 18 gauge speaker wire
• Heat shrink tubing
• Soldering iron and solder
Warning
1. Only connect the unit to a 12-volt negative ground system.
2. Never install this unit where operation and viewing could interfere with safe driving conditions.
3. To reduce the risk of a traffic accident (except when using the backup camera feature) never
use the video display function while driving the vehicle. This may be in violation of local laws.
4. Never disassemble or adjust the unit without the assistance of a professional. For details,
please consult your local car stereo/specialty shop.
5. To prevent injury from shock or fire, never expose this unit to moisture or water.
6. Never use irregular discs, the only recommended disc size is a 12cm round disc.
7. To prevent damage to the mechanism inside this unit, avoid dropping the unit.
8. To ensure the touch screen is functioning properly please avoid hard impact to the TFT
monitor.
9. Do not change the fuse on the power wire without professional guidance. Using an improper
fuse may cause damage to the unit and result in a fire.
Disconnecting the Battery
To prevent a short circuit, turn off the ignition and remove the negative (-) battery cable prior to
starting the installation.
5

NOTE: If the unit is to be installed in a car equipped with an on-board drive or navigation
computer, do not disconnect the battery cable. If the cable is disconnected, the computer
memory may be lost. Under these conditions, use extra caution during installation to avoid
causing a short circuit.
6

Button Operation
Controls and Indicators
Eject
Press to eject disc.
Reset
Menu
Press to enter MAIN menu, press again to return to previous source.
Source
Press to change the source.
Power Off/VOL
Press and hold to turn off the unit.
Press once to power on when the unit is turned off.
Short press while unit is on to mute the volume.
Rotate to adjust the volume.
SD Slot
Remote Sensor
Front Aux-in Jack
Touch screen TFT
Microphone
Disc Slot
7
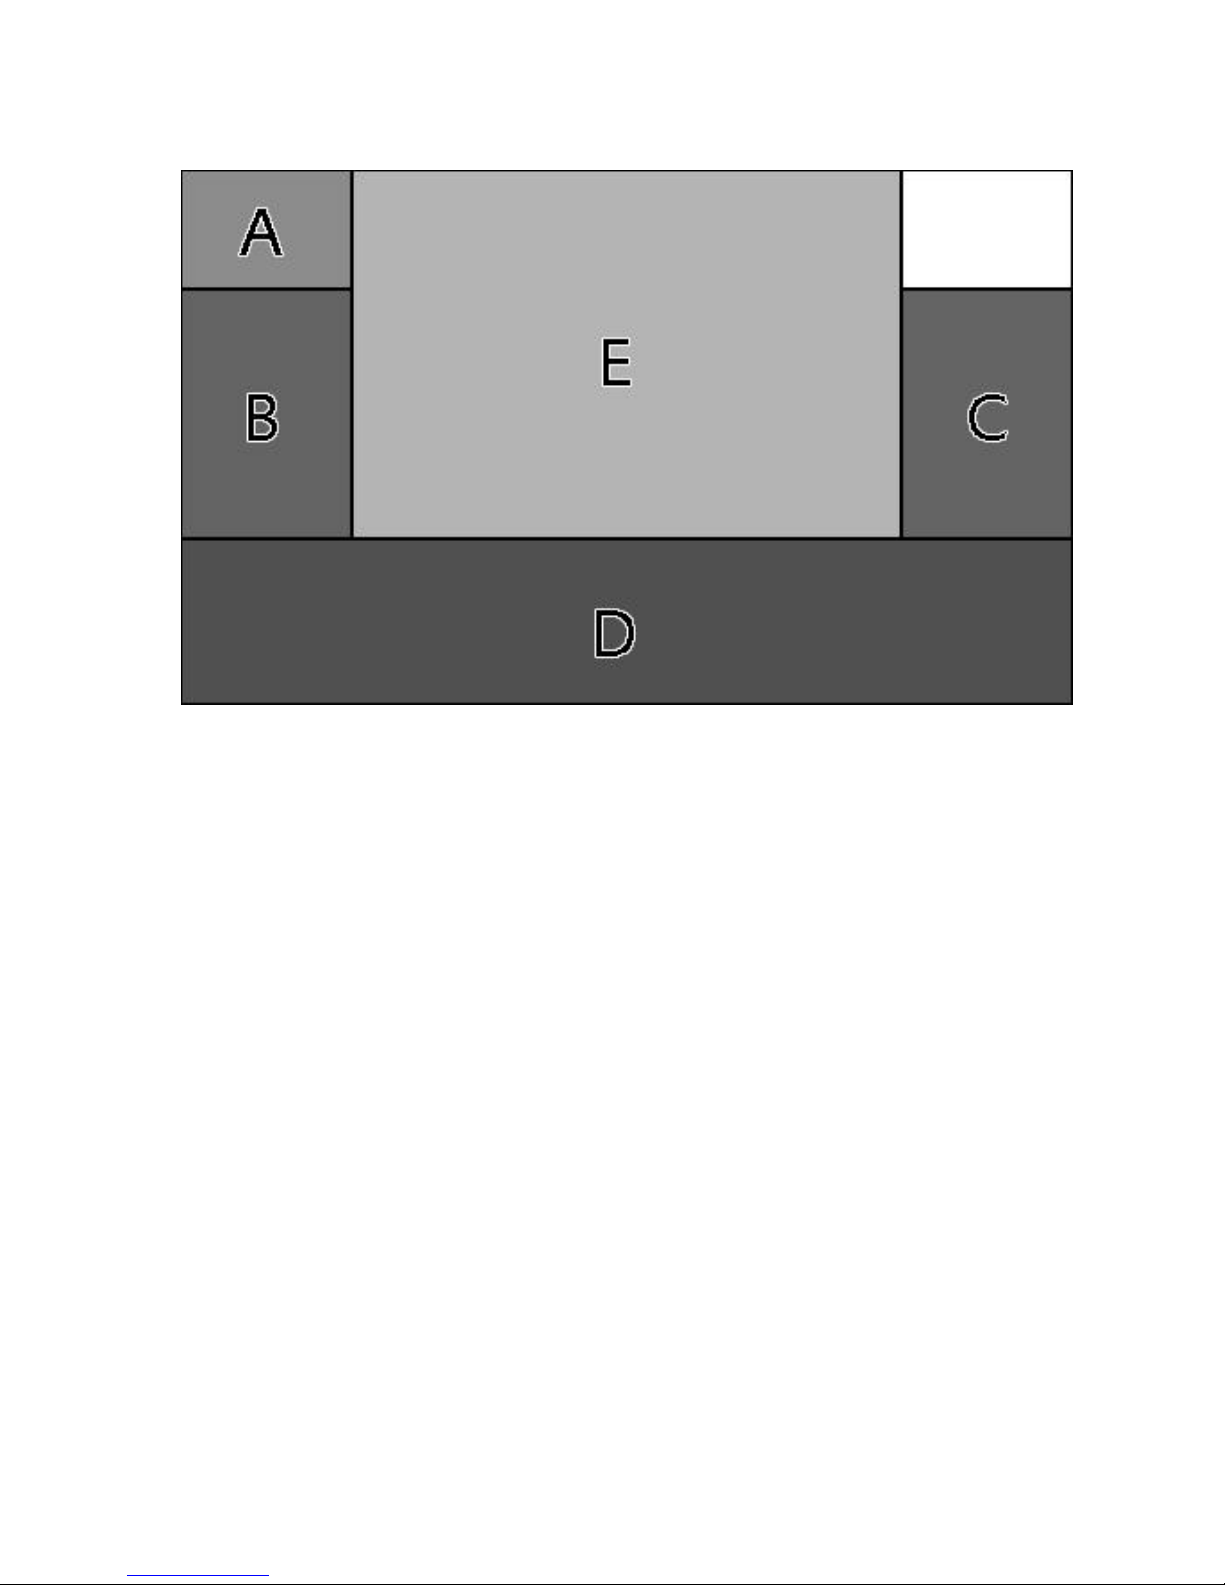
Key Areas for the Touch Screen
The key areas are outlined below, for DVD, VCD playback mode and so forth.
A — Return to MAIN MENU
B — Select previous chapter
C — Select next chapter
D — Display the on-screen controls, and different mode displays different menu.
E — Display playing information
8

Remote Control Functions
Name
Ref #
Signal
Function
Power
1
Turn the power on/off
Open
2
Eject Disc
Mute
3
Toggle on/off audio output
SRC
4
Select source
Numeric
button
5
1.2.3.4.5.
6.7.8.9.0
Directly access certain chapter / track / preset station in
current band
VOL up
6
Increase the volume
VOL down
7
Decrease the volume
Information
8
Display playing information
GOTO search
9
Position search function on VCD/DVD mode
Stop/Band
10
Select FM/AM band on Tuner mode
Stop playback
Select
11
Enter the audio settings
ESC
12
Exit the current menu
Menu
13
Enter the main menu of system
Picture
14
Adjust the Screen settings
Repeat AB
15
Set start point A and end point B to repeat continually
OK
16
Start or pause playback, confirm the settings
Direction
buttons
17
Up/down/left/right to select items for certain setting
Remote Control
9

Title
18
Go back to title while playing DVD
Root
19
Enter the main menu of the disc
Turn on PBC while playing DVD
Repeat
20
Repeat playback for current chapter
Next
21
Select the next chapter/track for playback
Search an available radio station by increasing tuning
frequency on tuner mode
Previous
22
Select the previous chapter/track for playback
Search an available radio station by decreasing tuning
frequency on tuner mode
Fast Reverse
23
Fast reverse the disc content
Fast Forward
24
Fast forward the disc content
Audio
25
Change the audio language for disc playback
Zoom
26
Zooming in/out on an image
Angle
27
Play in different angle for a scene(if it is applicable)
SUB Title
28
Language selection for subtitle
10

Rear Camera Mode
TFT Monitor Operation
When the vehicle is placed in "Reverse", and a rear camera is connected to the unit, the monitor
will automatically switch to the camera input source. Please make sure the reverse wire is
connected.
Screen Adjustment
―COLOR‖ ―CONTRAST‖ and ―BRIGHTNESS‖ can be adjusted.
Screen Adjustment Procedure
1. Enter the Screen adjustment mode:
Press the PIC button on the remote or go to main menu, then Set-up, then press Screen.
2. Select settings:
Press the ( / ) buttons on the remote or on the screen when in Set-up Screen, adjust the
selected feature to the desired setting.
3. To Exit do not press any button on the remote for 5 seconds or in Set-up Screen press
the top left corner to exit:
Parking Brake
1. When the vehicle is stopped and the parking brake is on, the ―PARKING Brake‖ wire must be
connected to the parking brake (-) switch in order for the monitor to display video.
2. The Parking brake does not apply when using the reverse backup camera feature.
3. When the ―parking brake‖ is off, the front monitor will display a ―Caution‖ with blue background,
preventing the driver from watching video while driving. This is for your safety and to reduce the
risk of a traffic accident.
Please see ―INSTALLATION SECTION‖ for installation on the parking brake wire.
11
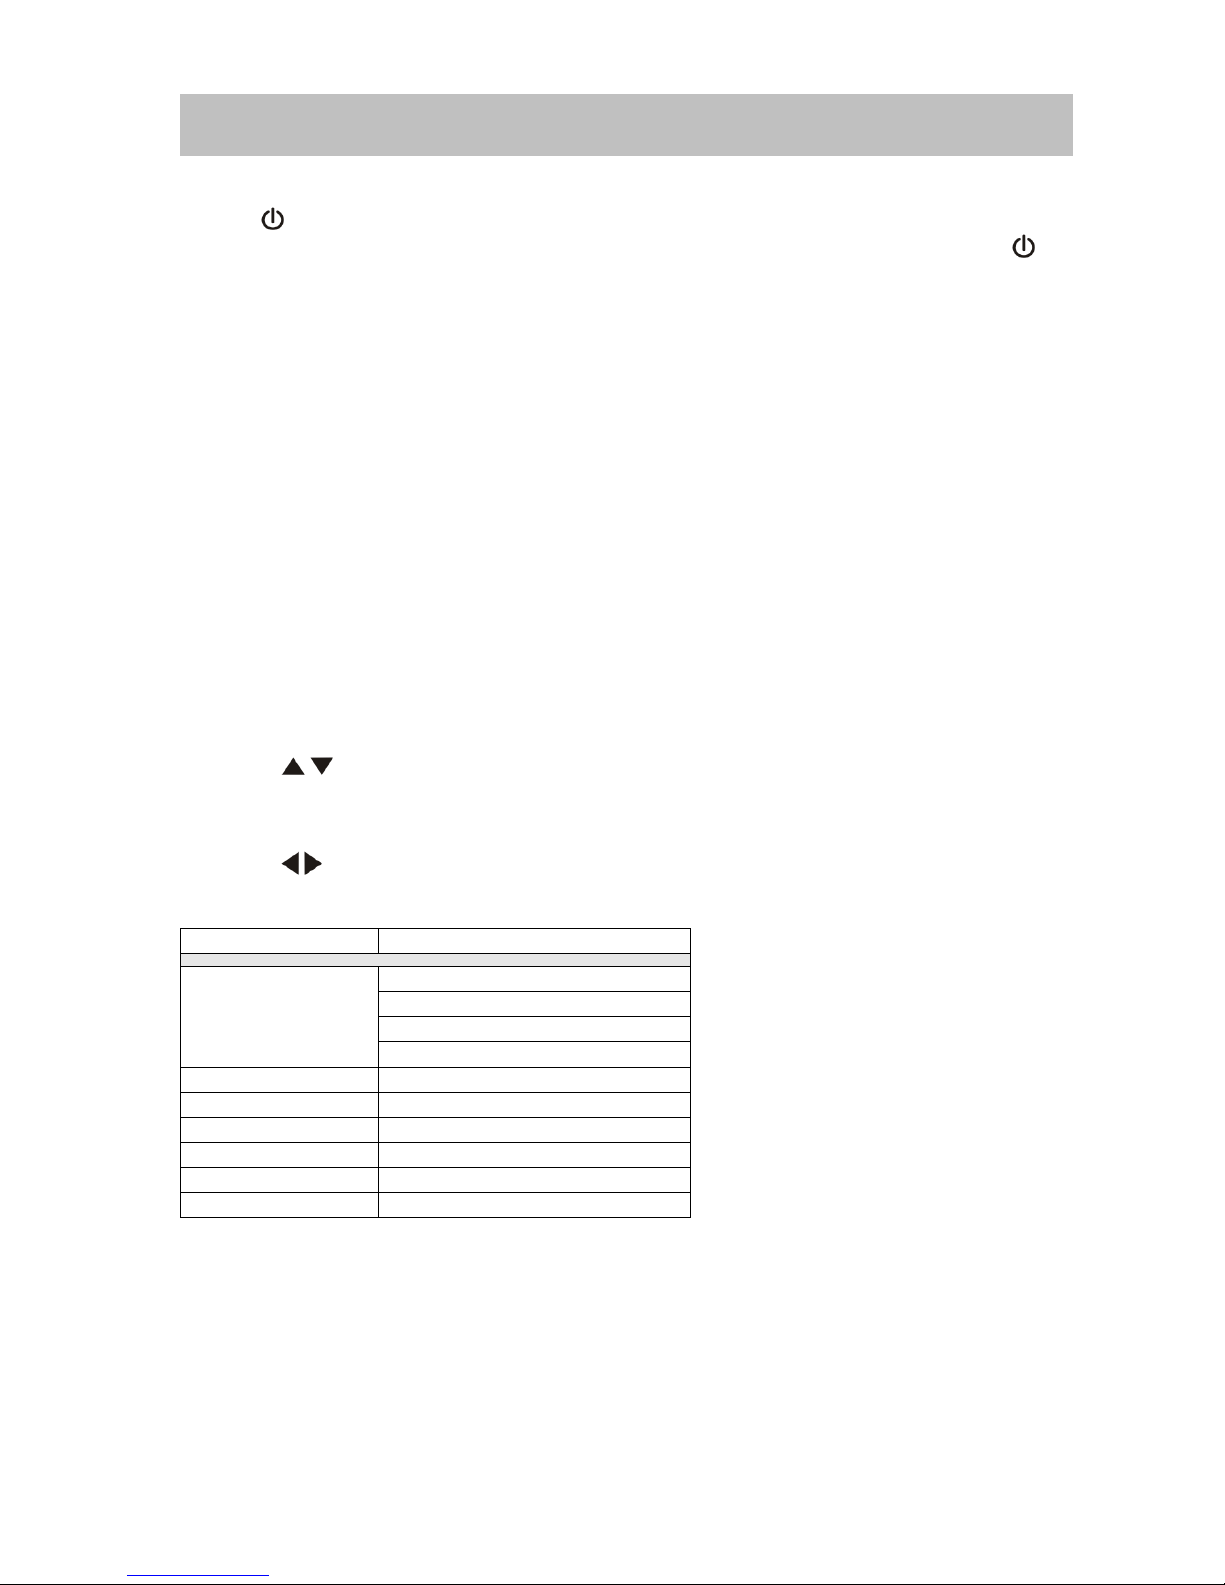
Power On / Off
Audio Function
Settings
EQ
USER
JAZZ
POP
ROCK
BASS
-7 to +7
TREBLE
-7 to +7
FADE
-7 to +7
BAL
-7 to +7
SW
-7 to +7
LOUDNESS
Off or ON
Operation Instructions
Press the POWER /VOL button to turn the unit on. You can also turn on the unit by pressing the
button ( ) on the remote.
Press and hold the POWER/VOL button on the front panel or press the POWER button ( )
on the remote to power off the unit.
Source Selection
Press the MENU Button on the front panel to change sources: TUNER, DISC, NAVI, CARD,
FLASH DRIVE, BT-TEL, F-AUX, R-AUX, SETUP, and STANDBY. The source is displayed on
the top left of the screen.
Volume Adjustment
To increase or decrease the volume level, turn the POWER/VOL knob on the front panel or
press the VOL+/ VOL- buttons on the remote control. The volume ranges from ―0‖ to ―40‖.
Equalizer Setting
The Equalizer Setting allows you to easily adjust your audio system to meet your sound needs.
To get the best possible sound quality from your new system, be sure to adjust the settings for
the speakers as well.
Accessing the EQ Settings
Press the (SEL ) button on the remote control or at the bottom of the menu the ―EQ‖ icon.
Selecting an EQ for Adjustment
Press the ( / ) buttons on the remote or press the icons on the front panel once to select an
audio setting to be adjusted.
Adjusting an Audio Setting
Press the ( / ) buttons on the remote or use the touch screen to adjust the selected feature.
EQ Settings
NOTE: The Bass and Treble levels are only adjustable when EQ is on ―User‖ mode.
The Loudness function increases the sound ranges from low levels to high levels.
Exiting the Equalizer Setting
Touch the return arrow on the top right of the screen.
Press the (SEL) button on the remote control to exit the Equalizer setting.
System Reset
To reset the system in case of a halt or other unusual operation, use the tip of a pen to press the
RESET button located on the front top-left corner of the unit. After the system resets, the unit will
12

restores the settings before it was last powered off.
Mute
The volume can be mute by the following:
1. Press the MUTE button ( ) on the remote to mute the volume from the unit.
2. Press the /VOL knob on the panel.
3. Turning the /VOL knob counter-clockwise on the panel to volume to "0".
NOTE: Press the MUTE button on the remote again to restore the volume.
Adjusting the volume or using any of the audio set-up features will cancel the mute function.
Standby
1. On the Main menu press the press the Standby icon.
2. In standby mode, the screen is turned off with audio output only.
3. In standby mode, touch the screen or press Menu/Navi button to return the screen to normal.
13
 Loading...