

Valor 922ECN, 922ECP Installation And Owner's Manual
by
Model 922ECN ( Nat Gas )
Model 922ECP ( LP Gas )
Open Front
Decorative Vented Gas Fireplace
(With Coals)
Installation and Owner’s Manual
INSTALLER: Leave this manual with the appliance.
CONSUMER: Retain this manual for future reference.
WARNING: If the information in these
instructions is not followed exactly, a
fire or explosion may result causing
property damage, personal injury or
loss of life.
- Do not store or use gasoline or other
flammable vapors and liquids in the vicinity
of this or any other appliance.
-WHAT TO DO IF YOU SMELL GAS
• Do not try to light any appliance.
• Do not touch any electrical switch: do not
use any phone in your building.
• Immediately call your gas supplier from a
neighbor’s phone. Follow the gas supplier’s
instructions.
• If you cannot reach your gas supplier, call
the fire department.
- Installation and service must be performed
by a qualified installer, service agency or
the gas supplier.
Manufactured by
MILES INDUSTRIES LTD.
British Columbia, Canada
Vous pouvez vous procurer un exemplaire en langue Française de cette brochure chez vo tre marchand.
PLEASE READ THIS MANUAL BEFORE
INSTALLING AND OPERATING THIS
HEATER.
This appliance may be installed in an
aftermarket permanently located,
manufactured (mobile) home, where not
prohibited by local codes.
This appliance is only for use with the type of
gas indicated on the rating plate. This
appliance is not convertible for use with
other gases, unless a certified kit is used.
This appliance is a domestic room-heating
appliance. It must not be used for any other
purpose such as drying clothes etc.
This appliance is suitable for installation in a
bedroom or bed sitting room.
Warning: This product must be installed by
a licensed plumber or gas fitter when
installed within the Commonwealth of
Massachusetts.
4000192/04

CONTENTS
1. SAFETY INFORMATION......................................................................................................... ................................................3
2. OPTIONS .......................... ........................................................... ............................................................................................4
3. GENERAL DATA.....................................................................................................................................................................4
4. LOCATION IN THE ROOM ( insert application )………………………………………………………………………………… 5
( Z.C Application )………………………………………………………………..………… 6
5. SUPPLY GAS ..................... ......................................................................................... ............................................................7
6. PACK CONTENTS .................................................................................... ...................................................... ........................7
7. APPLIANCE PREPARATION .................................................................................................................................................8
8. GAS SUPPLY INSTALLATION..................................... .................................................................................... ......................9
9. FIREBOX INSTALLATION................................................................. ...................................................... .............................10
10. REMOTE CONTROL INSTALLATION ........................................................................................................... ......................11
11.1 CERAMIC WALLS INSTALLATION.....................................................................................................................................12
11.2.CERAMIC COALS INSTALLATION .....................................................................................................................................13
12. ADORN CAST FRONT INSTALLATION……………………………………………………………………………….…………14
13. WINDSOR CAST ARCH FRONT INSTALLATION ..............................................................................................................15
14. OPERATION CHECKS..........................................................................................................................................................16
15. OWNERS INFORMATION............................................ ... .. ... .. ..... .. .. ... .. .. ..... .. ... .. .. ... .... ... .. .. ... ..... .. .......................... ...............17
Lighting instructions.................................................................................................. ..........................................................19
2 of 19

1. SAFETY INFORMATION
Due to high temperatures, the appliance should
be located out of traffic and away from furniture
and draperies.
Children and adults should be alerted to the
hazards of high surface temperature s and should
stay away to avoid burns or clothing ignition.
Young children should be carefully supervised
when they are in the same room as the appliance.
Clothing or other flammable material should not
be placed on or near the appliance.
The safety guard must be put back in place prior
to operating the appliance if it has been removed
for servicing or cleaning.
This appliance should be installed and repaired
by a qualified service person.
The appliance should be inspected before use and
at least annually by a professional service person.
More frequent cleaning may be required due to
excessive lint from carpeting, bedding material,
etc. It is imperative that control compartments;
burners and circulating air passageways of the
appliance are kept clean.
Keep curtains, clothing, furniture and other
flammable materials a safe distance from all
parts of the appliance
Keep the appliance area well clear and free from
combustible materials, gasoline and other
flammable vapours and liquids.
When operating your new fireplace for the first time, some vapors may be released due to the burning of curing compounds
used in the manufacture of the appliance. They may cause a slight odor and could cause the flames to be the full height of the
firebox, or even slightly highe r, for the first few hours of operation. It is also possible that these vapors co uld set off any
smoke detection alarms in the immediate vicinity. These vapors are quite normal on new appliances. We recommend
openning a window to vent the room. After a few hours use the vapors will have disappeared and the flames will be at their
normal height.
During the first hour of use the ceramic firebox walls may go a smoky color. This is not soot. It is a temporary effect lasting
only while the ceramic material becomes stabilized. The walls will revert to their initial color after your fire has been used for
one or two hours.
If any changes are made to the room construction
in the vicinity of the appliance after installation
(e.g. additional mantle etc.) make sure that the
changes conform to the installation requirements
in this manual.
Never attempt to burn paper or any other
material in the appliance.
This appliance must be properly connected to a
venting system. The venting system should be
checked periodically. Recent trends in home
improvement and new tighter construction
techniques have contributed to problems with
venting. If y ou suspect that your appliance is not
venting properly, do not operate. Seek expert
advice.
Do not use this appliance if any part has been
under water. Immediately call a qualified service
technician to inspect the appliance and to replace
any part of the control system and any gas
control, which has been under water.
Only trim kits supplied by the manufacturer shall
be used in the installation of this appliance.
Draft openings must not be covered or blocked
Should you encounter an operation problem, call
your dealer immediately. Do not try to repair the
unit as you may cause an injury or damage the
fireplace.
NOTE
3 of 19
2. OPTIONS
# 975 ZCK Zero Clearance Kit – for installation into com busti ble ty pe fram ing.
# 976 BRK Bedroom kit:
# 923 ACF Adorn Cast Front
# 539 or 549 Windsor Cast Ar ch front.
# 3336 Closure Plate
Includes optional thermostat hand set and wiring harness (for use in Canada only)
(also requires #540WDK Wire Dress Guard)
. For insert installations to cover up to 33” high x 36” wide
3. GENERAL DATA
This appliance is certified for use in Canada and the USA under the following standards :
ANSI Z21.50 – 2000 / CSA 2.22 –2000 , Vented Gas Fireplaces
Can/CGA 2.17 – M91 Gas Fired Appliances for use at High Altitudes.
This appliance must be installed in accordance with lo cal codes, if any, or in the absence of local codes follow the National Fuel
Gas Code ANSI Z223.1 or Canadian Installation Code CAN-1-B149. Only qualified licensed or trained personnel should
install the appliance.
3.1 Venting
This appliance must be connected to an approved venti ng sys tem.
922ECN 922ECP
Altitude (Ft) 0-4500
Input Max. (Btu/h) 20,500 19,000
Input Min (Btu/h) 12,000 12,500
Manifold pressure (in w.c.) 3.7 10.5
Max Supply pressure (in w.c) 10.5 13
Min. Supply pressure (in. w.c.) 5 11
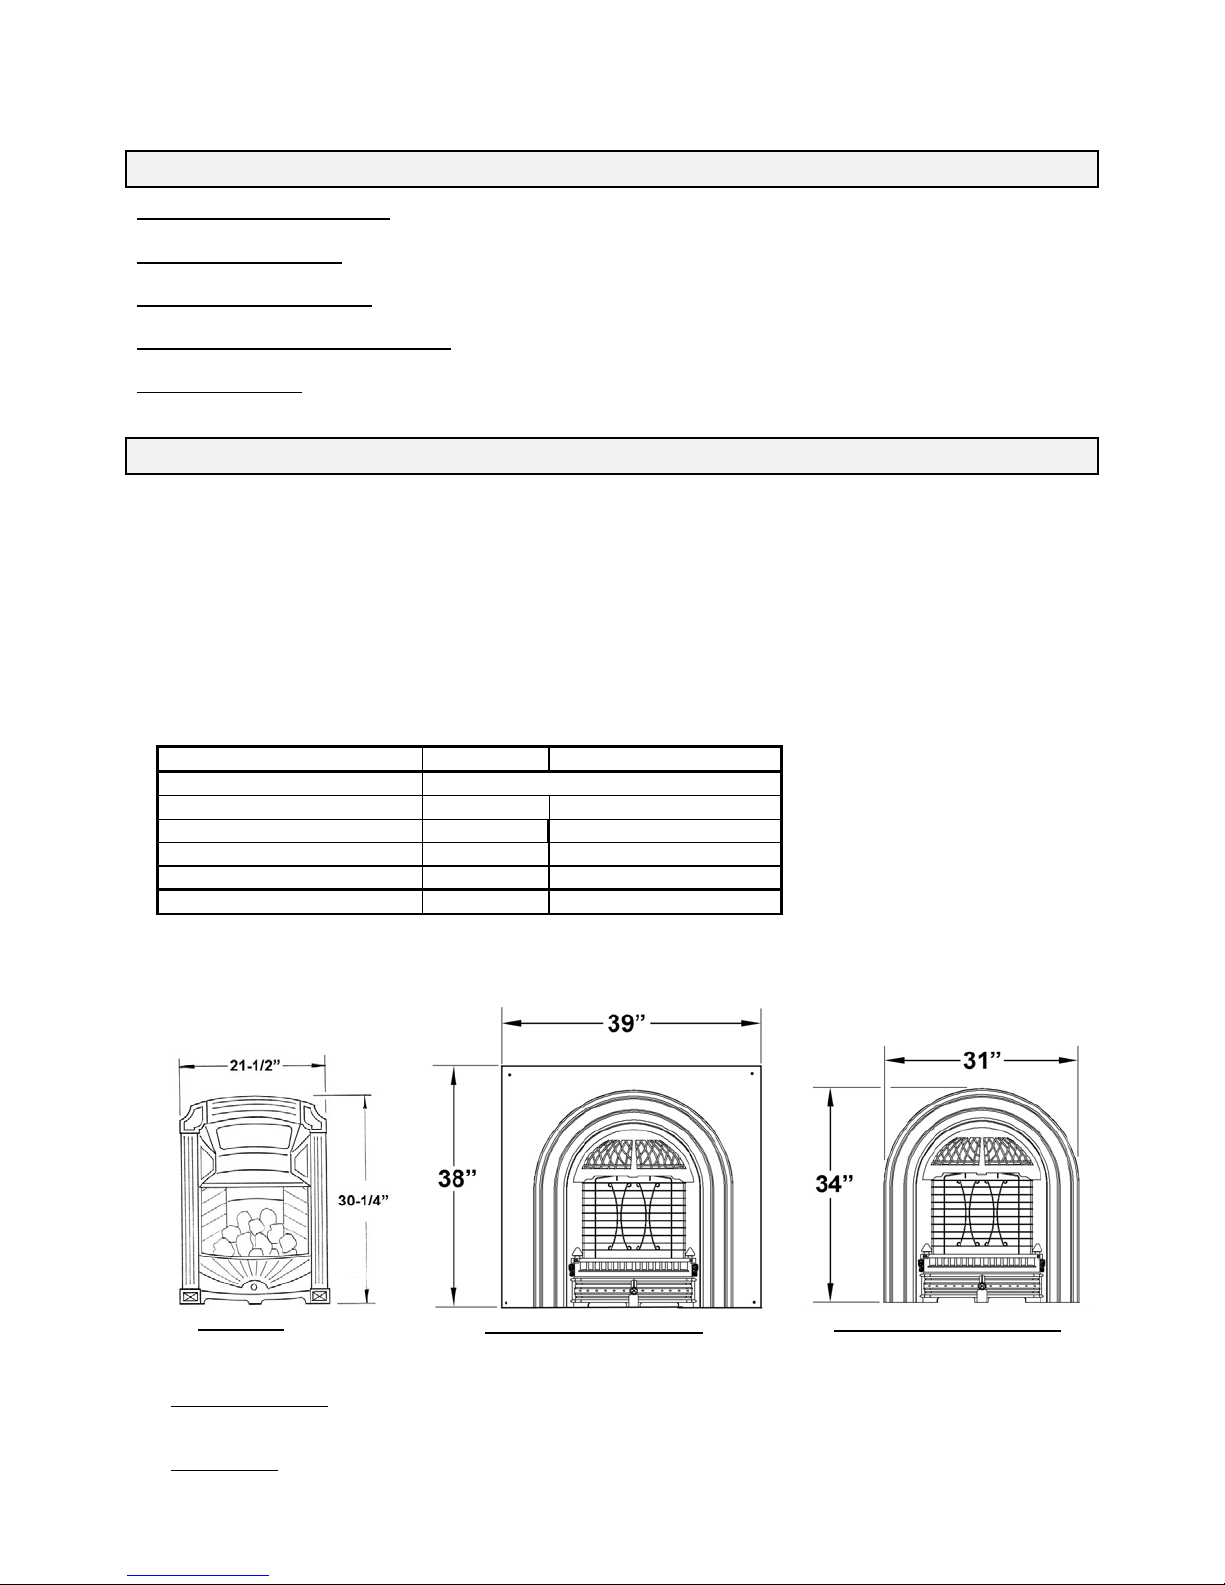
3.3 Choice of Cast Iron Front Trims
923 Adorn
Note : the 539/549 Fronts require a 540 WDK Wire Dress Guard with the 922 heater.
Cast Iron Tolerances
some variation in surface finish and flatness is to be expected. We have done our best to control and make allowance,
however some variation is inevitable.
Closure plates
Standard black 33” high x 36” wide closure plate with black aluminum extrusio n ed ge is availab le.
– Due to the nature of Cast Iron, dimensional consistency may vary from one unit to the next and
may be required for insert applications where cast fronts do not cover entire opening s.
539 Windsor Arch w/ Plate
4 of 19
3.2 Ratings
549 Windsor Arch w/o Plate
4. LOCATION IN THE ROOM
This appliance must not be connected to a chimney flue serving a separate solid-fuel burning appliance.
Note: The State of Massachusetts requires that any flue damper must be removed or permanently welded in the open position.
The appliance can be installed in the following constructions:
4.1
Solid fuel (Non-combustible) fireplaces
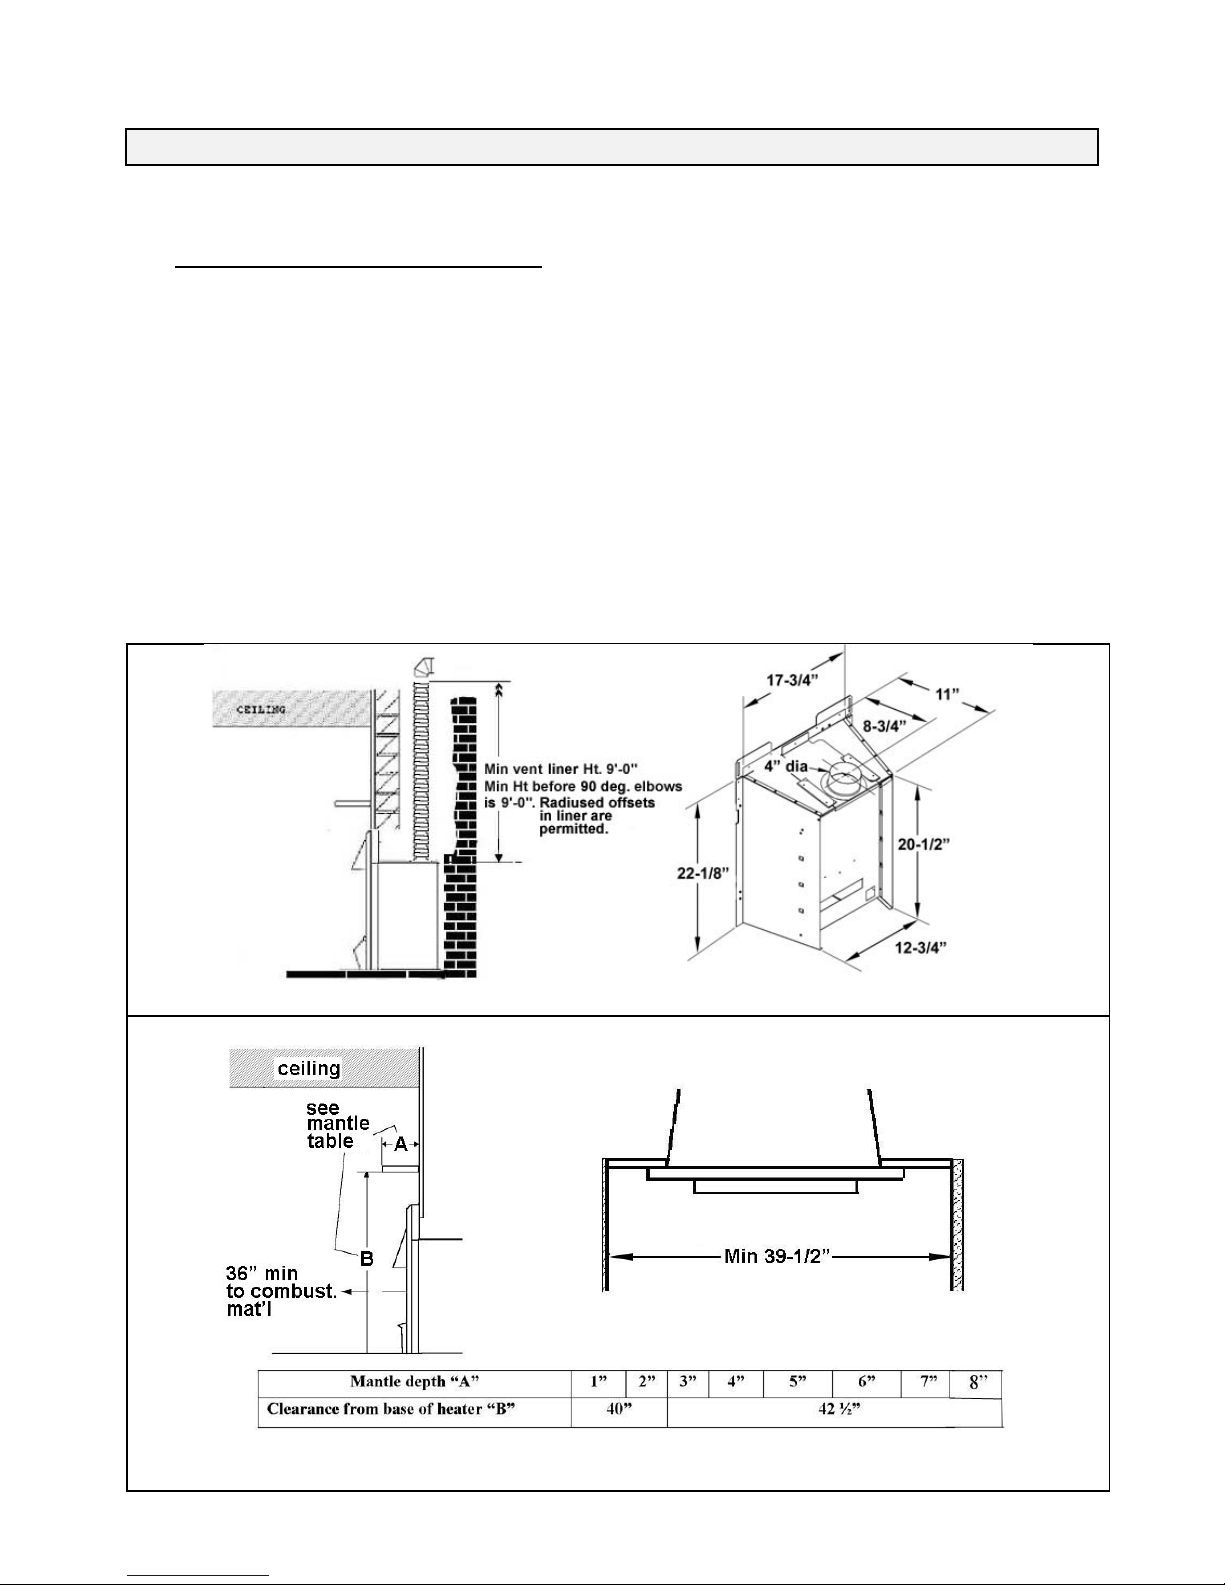
As supplied, this appliance can be installed as an inset in an existing solid fuel type fireplace with a chimney and 4" dia
liner (see fig.1).
The fireplace must be built in accordance with the national, state provincial or territorial building code recognised by the
authority having jurisdiction, or in the absence of such a code, in accordance with the National Building Code of Canada or
the National Fire Protection Association code in the USA The size of the fireplace recess must be sufficient to
accommodate the appliance as shown in fig.1.
If previously used with for burning solid-fuel, the chimney must be swept before installation of the appliance. Both
chimney and fireplace must be checked for soundness before installation of the appliance. The liner must be a type
approved by the enforcing authority and installed in accordance with the manufacturer's instructions.
The appliance must be installed on a floor, which is sufficiently flat and level to ensure stability. Some fireplace
constructions have a well in the floor at the back that may need to be filled in.
Though not mandatory, we recommend that carpet, soft vinyl or other combustible floor coverings are kept at least 16”
from the front of the appliance since these types of materials may be affected by the radiant heat output from this appliance.
The minimum clearances from any combustible constructions at the front of the appliance are shown in fig.2
The appliance must be connected to a vent that is a minimum of 9’-0” in height and must not have any 90 deg. elbows
within 9’-0” of the flue outlet of the unit (see fig. 1). Radiused offsets in the flue liner of less than 90 degrees are
permitted.
Fig 1 . Insert Box dimensions and insert venting
Fig. 2 Clearances to combustible materia ls in front of opening - All installations
5 of 19

4.2 Enclosures Constructed Using Combustible Materials ( Z.C Installations)
Optional # 975 ZCK zero clearance kit must be used when installing the
922 Fireplace into any application other than
solid fuel burning fireplace cavity and ch imney. Complete installation
instructions are packed with the 975 ZCK. See fig 2 for clearances in front
of appliance. The 975 ZCK is approved for installation directly o n
combustible type flooring such as plywood. Bottom of 975 must be installed
at top of finished hearth (including tile etc.) or the removable ashpan cover
will not rest at the proper height. Cast iron fronts must also rest on a secure
hearth or floor as the unit is not intended to carry the weight of the castings.
The 975 ZCK may be roughed-in, wall finishes applied , and the fireplace
installed at a later date or the fireplace and Z.C kit may be installed at the
same time.
975 ZCK Components
Framing Dimensions
as an insert into an approved
975 ZCK Wall Finish Details
975 ZCK Assembled
975 ZCK installed into Framing
6 of 19
 Loading...