

Valor 807 Installer And Owner Manual
5109269/02
INSTALLER AND OWNER GUIDE
This guide is intended to help you install and care for your Valor electric heater. Please
read carefully before installing and using your heater. However, if further information is
required, our Valor Technical Helpline will be pleased to help.
Telephone 08706 061 065 (National call rates apply in the United Kingdom)
In the Republic of Ireland call 0044 08706 061 065
Important: Please keep your guide in a safe place for future reference
© Valor Heating
Model 807
Electric Heater
Fitted with the following fascia
Adage
Victorian
or
Dream
Safety First.
Valor fires are CE Approved and designed to meet the appropriate British Standards and
Safety Marks.
Quality and Excellence.
At the heart of every Valor heater.
All Valor fires are manufactured to the highest standards of quality and excellence and
are manufactured under a BS EN ISO 9001 quality system accepted by the British
Standards Institute.
CUSTOMER CARE
Thank you for choosing Valor
All Valor heaters are designed to meet the most stringent quality, performance and
safety requirements to provide our customers with many years of trouble free service.
This guide aims to improve your understanding and appreciation of your new Valor
heater, by providing simple and informative instructions to enable you to install it and to
ensure that you benefit from the excellent performance and features it has to offer.
If you require further assistance, the Valor Technical Helpline will be pleased to help.
Please telephone 08706 061 065 (local rates apply in the United Kingdom)
FOR OTHER USEFUL TELEPHONE NUMBERS SEE THE LAST PAGE OF THIS GUIDE
Valor Heating, Erdington, Birmingham B24 9QP
www.valor.co.uk
Because our policy is one of constant development and improvement, details may vary slightly from those
given in this publication
Page 2
INSTALLER AND OWNER GUIDE

HANDLING AND UNPACKING
Before continuing any further with the installation of this heater please read the
following:
Unpacking Dream Heater.
This heater has a fascia which is heavy (13.35 kG).
To avoid damage it is packed in a separate box within the main box.
When unpacking it is important that the box containing the fascia is removed before the
main body of the heater. This is to prevent the main box tipping over and causing
damage or injury.
Important Safety Instructions.
! The lifting weight of the heater parts are listed below: -
Heater Heat engine (kG) Complete Fascia (kG) Spacer (kG)
Adage 6.8 2.16 2.2
Victorian 6.8 5.56 2.3
Dream 6.8 13.35 ---
!
One person should be sufficient to lift the heater. If for any reason this weight is
considered too heavy then obtain assistance.
!
When lifting always keep your back straight. Bend your legs and not your back.
! Avoid twisting at the waist. It is better to reposition your feet.
!
Avoid upper body/top heavy bending. Always bend from the knees rather than the
waist. Do not lean forward or sideways whilst handling the heater.
!
Always grip with the palm of the hand. Do not use the tips of fingers for support.
!
Always keep the heater as close to the body as possible. This will minimise the
cantilever action.
! Use gloves to provide additional grip.
! Always use assistance if required.
Always
! Always install the heater in accordance with this guide. If in doubt obtain
expert advice.
! Always make sure the electrical socket is accessible and located adjacent to, but
not above the heater.
! Always disconnect the heater from the electrical supply before carrying out
Page 3
INSTALLER AND OWNER GUIDE

cleaning, maintenance or replacing the light bulb.
! Always
make sure the heater is firmly secured to prevent it from being tipped over.
! Always use a fireguard when young children and infirm persons can come into
contact with the heater.
! Always use genuine Valor spares.
Never
! Never leave children unsupervised in a room where the heater is ON and
unguarded.
! Never obstruct or cover the fan outlet or force items into heater openings.
! Never install or use the heater anywhere where water is in use, i.e.
Bathrooms, Kitchens, Shower Rooms, Swimming Pools etc.
! Never use aerosols or steam cleaners on or around the heater.
! Never route the mains supply cable under carpet etc.
! Never install the heater close to curtains or combustible materials.
! Never use the heater to dry clothes etc.
! Never sit or stand on the heater.
FITTING THE HEATER
The installation of this heater requires a reasonable level of DIY skills.
Please read this guide thoroughly before commencing installation and if in doubt,
seek help from a competent person
Do I need any tools?
1. You will need two screwdrivers: -
1 off Pozidrive / Phillips / cross head
screwdriver. This should have a number 2 size
end. If you are unsure about the size of the end simply make sure that the end fits into
the screws supplied with the heater. If the end is too small then the end will spin and
damage the screw.
1 off Flat end
screwdriver. The end should fit into the slot head screws supplied with
the heater.
2. For drilling into brickwork you will need an electric hammer drill and appropriate
size drill bit for the wallplugs supplied (See figure 15).
Page 4
INSTALLER AND OWNER GUIDE

Where can I fit the heater?
This heater can be fitted into fireplaces or surrounds where the following dimensions
are available.
Width 390mm - 450 mm (15.35 inches - 17.72 inches)
Height 555mm - 590 mm (21.9 inches - 23.2 inches)
Depth At least 75mm (At least 3 inches)
There should be at least 30mm (1.2 inches) clearance between the top of the fascia and
anything such as a shelf, fireplace surround or mantel etc. This will allow the fascia to
be lifted off or removed during servicing. To check this gently place the fascia against
the surface to which it is to be fixed. Measure the distance from the top of the fascia.
Using the 75mm (3 inch) spacer kit supplied, the Adage and Victorian heaters can also
be used where a fireplace opening or fireplace surround opening are not available i.e. a
flat wall. The Dream heater does not have the 75mm (3 inch spacer) and cannot
be used
against flat walls.
Important Electrical Safety
The heater must not
be located in front of or under an electrical socket, the socket must
always be accessible in order to disconnect the heater from the electrical supply for
maintenance and cleaning.
Important! This heater must be earthed.
!
The heater is supplied with a 3 pin 13 Amp fused re-wireable plug with 1mm² 3 core
cable.
! The wires in the cable are coloured in accordance with the following code: -
Live =Brown Neutral = Blue Earth = Green /Yellow
! The mains supply must be safely routed from the heater to an electrical socket.
Page 5
INSTALLER AND OWNER GUIDE
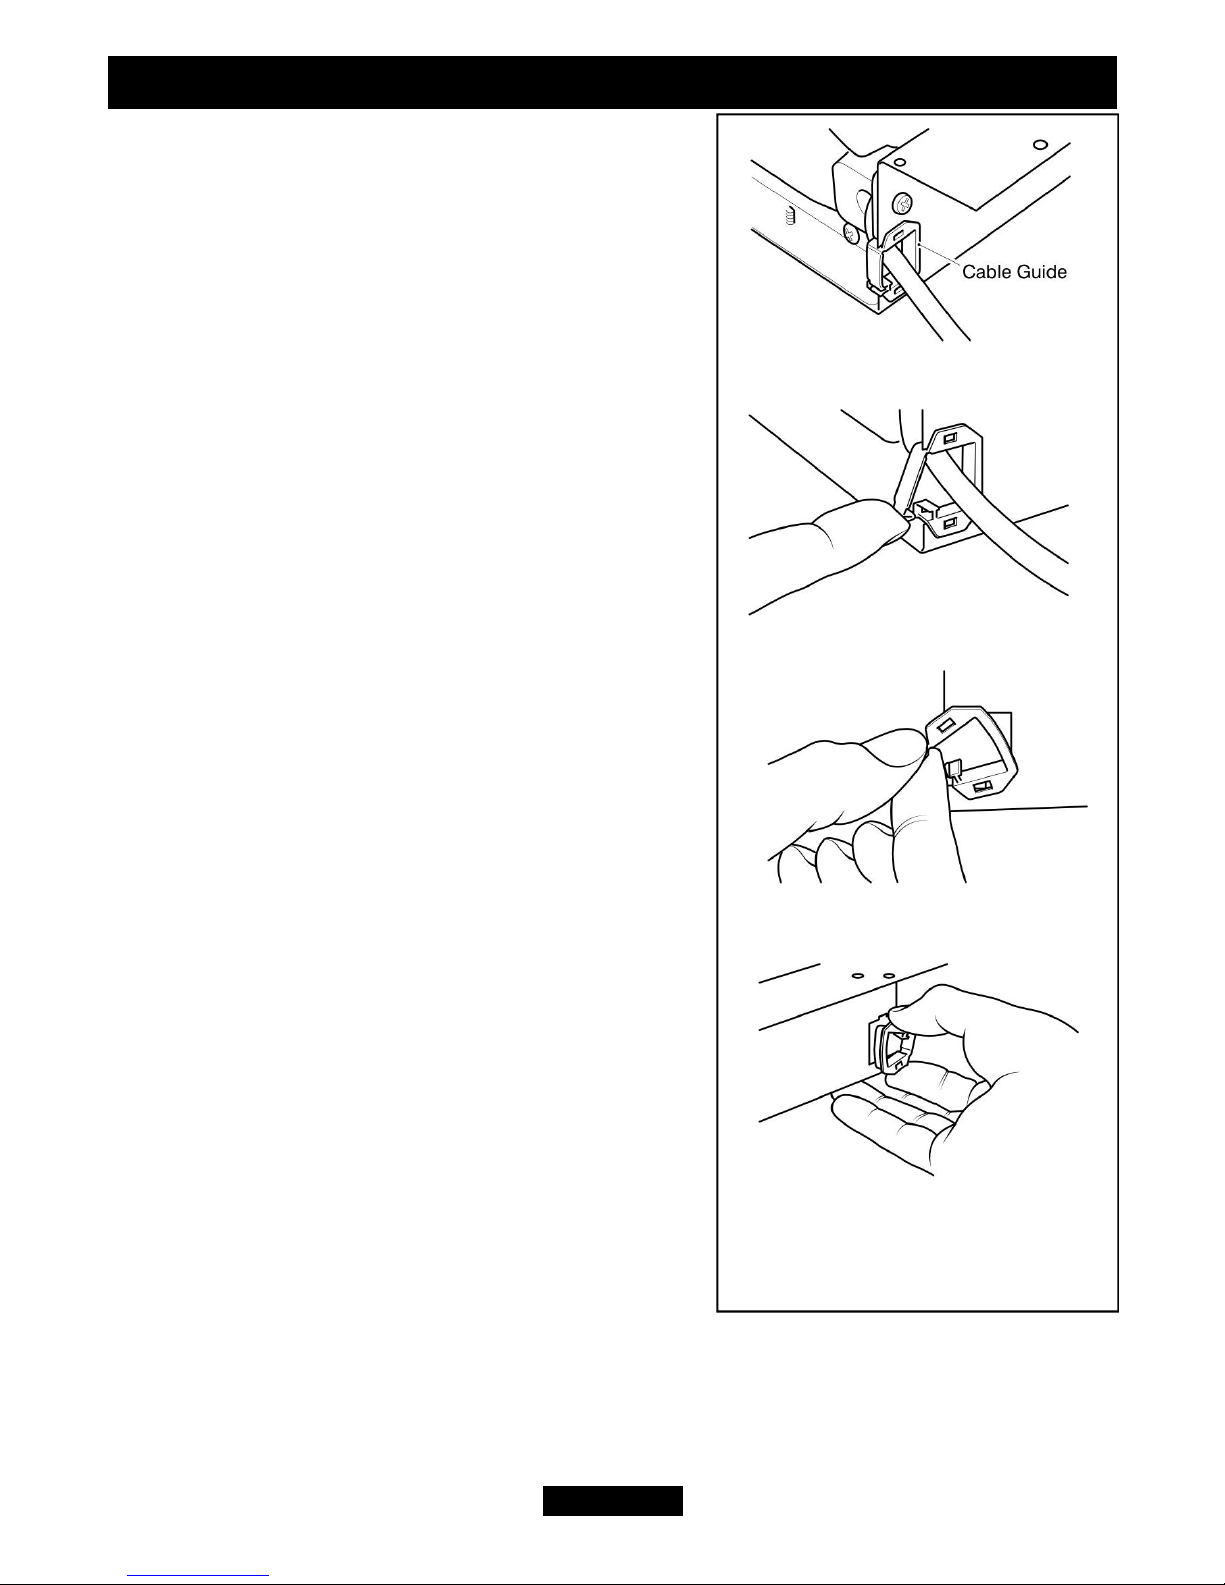
Moving the Cable Guide
At the base of the heater you will find an electric
cable which runs through a rectangular plastic cable
guide. As supplied the cable guide is fitted into the
rectangular cutout on the right side of the heater. If
required, the cable guide can be removed and put in
the rectangular slot in the centre or left hand side of
the heater. For removal and fitting please see below.
Removing the cable guide
1. Before removing the cable guide please note that
the wider part of the cable guide is on the outer edge
of the base (See figure 1- Item 1).
2. To remove the cable guide push and lift the tab on
the bottom of the cable guide. The bottom of the
cable guide will open (See figure 1- Item 2).
3. Lift the electric cable clear of the cable guide.
4. Hold the bottom of the cable guide close to the
heater then gently pull the cable guide away from
the rectangular slot (See figure 1- Item 3).
Fitting the cable guide.
When fitting the cable guide please remember that
the wider part of the cable guide has to be fitted
against the outer edge of the base (See figure 1- Item
1).
1. Gently pinch the sides of the cable guide (See
figure 1 - Item 4) and push the cable guide into the
required rectangular slot.
2. Place the electrical cable into the guide and close
the top of the cable guide.
If the mains cable is damaged, to avoid a hazard it
must be replaced by a Valor authorised service agent,
or similarly qualified person (See the last page of
this guide for useful telephone numbers).
All external wiring between the heater and the electrical supply shall comply with
current IEE regulations.
Page 6
INSTALLER AND OWNER GUIDE
Figure 1. Removing and
positioning the cable guide.
Item 1
Item 2
Item 3
Item 4
 Loading...