


1-16 in. FloodSafe® Inflow Preventer
Operation, Maintenance and
Installation Manual
INTRODUCTION .................................... 1
RECEIVING AND STORAGE ................ 1
DESCRIPTION OF OPERATION ........... 1
INSTALLATION ...................................... 2
CONSTRUCTION .................................. 2
MAINTENANCE ..................................... 3
TROUBLESHOOTING ........................... 3
DISASSEMBLY ...................................... 3
REASSEMBLY ....................................... 3
FIELD TESTING ..................................... 4
TEST REPORT ...................................... 5
PARTS AND SERVICE .......................... 6
WARRANTY ........................................... 6
Manual No.
FS-OM1-3
VAL-MATIC
905 Riverside Dr. ● Elmhurst, IL 60126
Phone (630) 941-7600 ● Fax (630) 941-8042
www.valmatic.com
®
VALVE AND MANUFACTURING CORP.
1-16 in. FloodSafe® Inflow Preventer
OPERATION, MAINTENANCE AND INSTALLATION
INTRODUCTION
This manual will provide you with the information to
properly install, maintain and ensure a long service
life for the FloodSafe
FloodSafe
release or air/vacuum valve to prevent cross
contamination of the potable water system due to
flooding and malicious tampering as described in
ASSE Standard 1063. The FloodSafe
with two float checks that are open during normal
pipeline operation to allow full airflow in both
directions. The float check(s) will rise and seal when
the surrounding atmosphere is filled with water.
®
is to be installed on the outlet of an air
RECEIVING AND STORAGE
Inspect the FloodSafe
shipment. Unload all devices carefully to the ground
without dropping. Remove all blocking material
inside of the metal basket.
The devices should remain boxed, clean and dry
until installed to prevent weather related damage.
For long term storage greater than six months, the
rubber seat should be coated with a thin film of FDA
approved grease such as Lubriko #CW-606. Do not
expose rubber seat to sunlight or ozone for any
extended period.
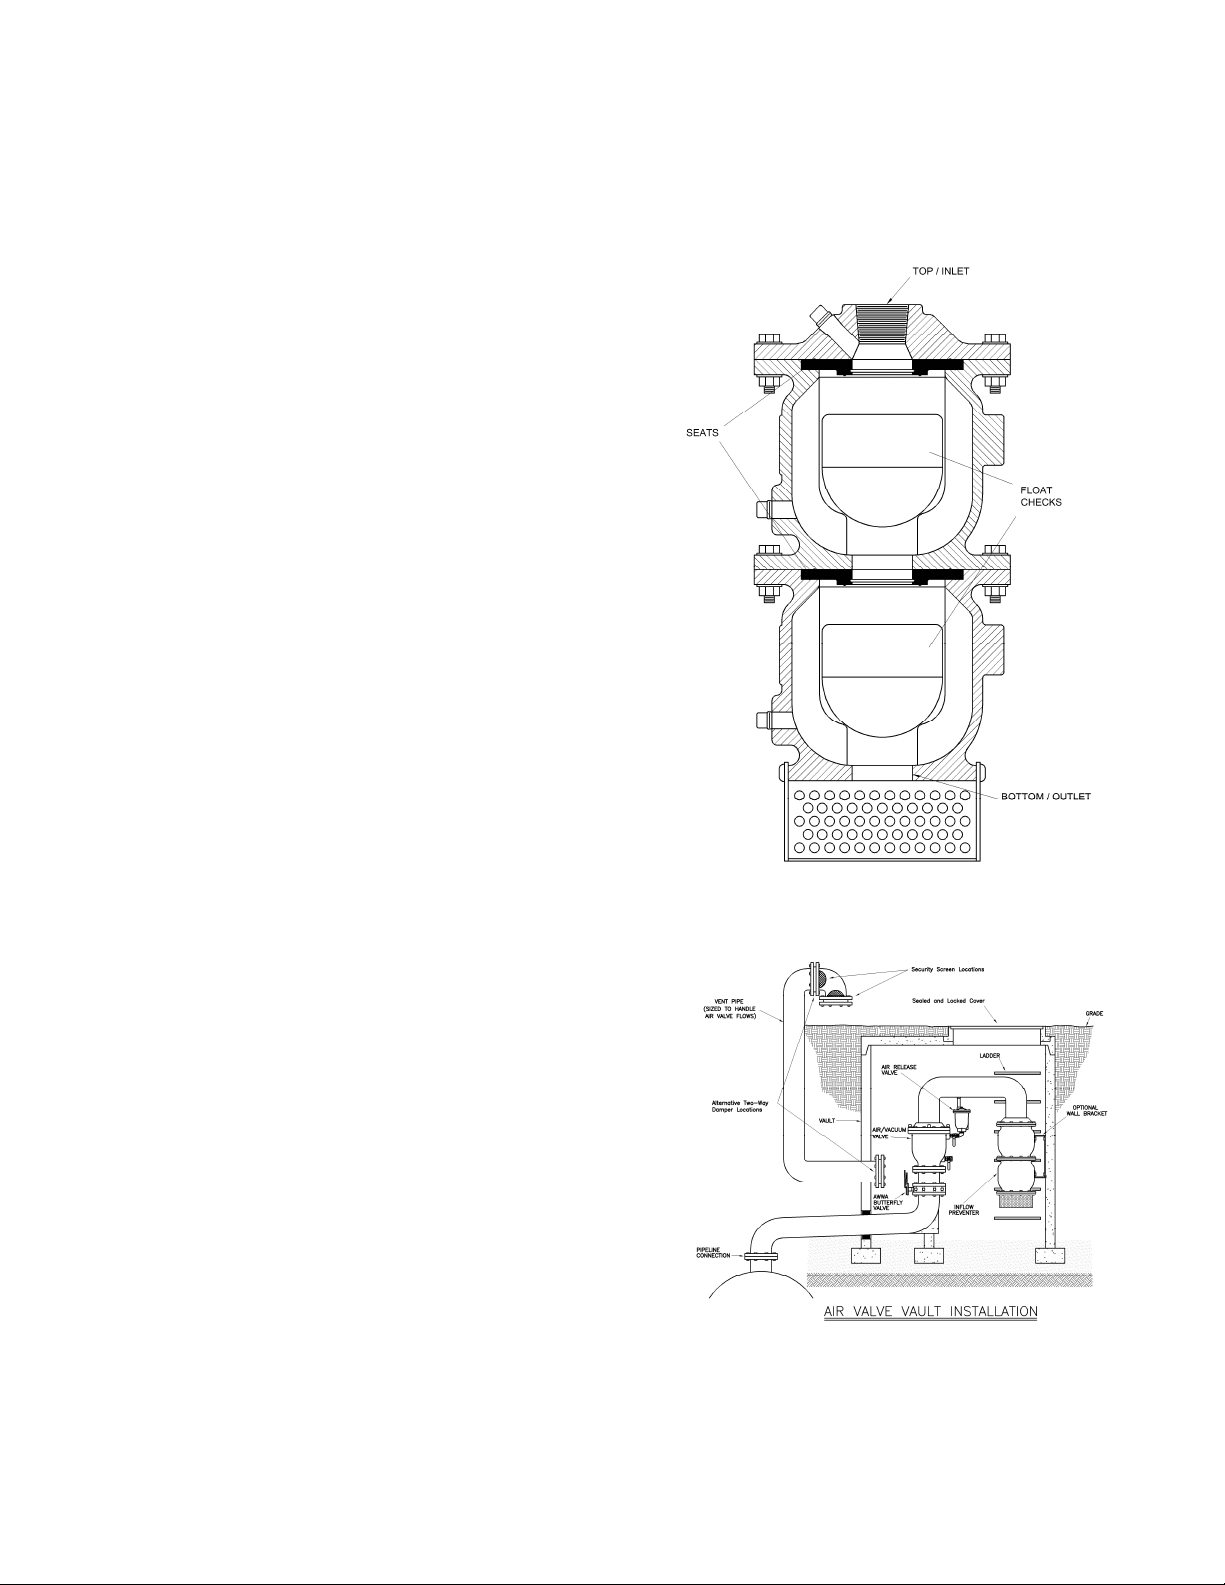
DESCRIPTION OF OPERATION
The FloodSafe
lower chamber and upper, redundant chamber. Both
chambers contain identical float checks that are
open during normal pipeline operation and allow full
airflow in both directions. If flooding occurs the
lower float check will rise, preventing floodwater from
reaching the outlet of the air valve and subsequently
the pipeline. If the lower float check fails the upper,
redundant float check will close preventing
floodwater from reaching the air valve. The basket
screen prevents debris from interfering with the
operation of the FloodSafe
®
inflow preventer is designed with a
®
inflow preventer. The
®
is designed
®
upon receipt for damage in
®
.
Figure 1. FloodSafe
Figure 2. Typical Installation
®
Inflow Preventer
1
INSTALLATION
Remove the packing from the top and bottom of
the FloodSafe
during shipping. Install the basket per step 6 in
the REASSEMBLY section on page 3. The
installation of the FloodSafe
proper operation. The FloodSafe
installed plumb in the vertical position with the
basket facing downward. Thread or bolt the
FloodSafe
standard connection practices. The bolting for 6"
and larger devices conforms to ANSI B16.1 for class
125# flanges. An optional mounting bracket (80)
may be used to mount the device to wall supports.
Flanged connections should only be mated with flatfaced pipe flanges equipped with full-face or ring
type resilient gaskets. The bolts should be tightened
in gradual steps using the crossover method.
Recommended torque values are given in Table 1.
The use of excessive bolt torque may damage
the device.
®
that is used to protect the floats
®
is important for its
®
to the outlet of an air valve using
CAUTION:
®
should be
Table 1. Flange Bolt Torques
FLOODSAFE® CONSTRUCTION
The standard FloodSafe
®
is constructed of ductile
iron. Stainless steel type 316 float checks are the
only moving elements and seal against a low
hardness resilient seat. The general details of
construction are illustrated in Figure 3 and identified
in Table 2.
Mounting Flange Bolts (ANSI B16.1 Class 125)
Device
Size
Bolt
Size
Recommended
Torque (ft-lbs)
Maximum
Torque (ft-lbs)
6 3/4" 30 150
8 3/4" 40 150
12 7/8” 45 200
16 1” 90 300
Figure 3. FloodSafe
®
Components
ITEM DESCRIPTION MATERIAL
1A, 1B Chamber Ductile Iron
2 Cover Ductile Iron
4A, 4B Seat Resilient
5A, 5B Float Check T316 Stainless Steel
7A, 7B Bolts, Nuts T316 Stainless Steel
8 Basket Retainer T316 Stainless Steel
12 Basket T304 Stainless Steel
14 Pipe Plug Carbon Steel
80* Mounting Bracket Carbon Steel
80A* Mounting Bolt T316 Stainless Steel
* Optional
Table 2. FloodSafe Parts List
2

MAINTENANCE
The FloodSafe
maintenance.
INSPECTION: The FloodSafe
debris by following the disassembly and reassembly
instructions. The seat may be checked for cracks or
tears. The float check may be inspected for
indentations or deep scratches on the top sealing
portion.
®
requires no scheduled lubrication or
®
may be checked for
TROUBLESHOOTING
Several problems and solutions are presented below
to assist you in troubleshooting the FloodSafe
efficient manner.
Air valve water discharge: It is normal for air
valves to discharge some water before closing.
Continuous leakage requires maintenance of
the adjacent air valve.
Leaks during field test: Clean and inspect the
resilient seats and the float checks.
®
in an
DISASSEMBLY
WARNING:
Close the isolation valve underneath the
adjacent air valve. Failure to close the isolation
valve may allow discharge of air into the
FloodSafe
Note: If the FloodSafe is connected to the optional
mounting bracket (80), the FloodSafe™ will need to
be removed from the bracket.
1. Remove the basket (12).
a) On sizes with side taps, use an allen wrench
b) On sizes without the side taps, use an open-
2. Remove the lower chamber (1B) by removing
the bolts (7A) and nuts (7B) joining the two
chamber halves.
The FloodSafe® chambers may be heavy.
Support the chambers when removing the
bolts in order to prevent bodily injury.
®
and cause bodily injury.
to loosen the screws holding the basket to
the lower chamber (1B). Rotate the basket
counterclockwise and pull the basket down
and away from the chamber.
end wrench to remove the bolts holding the
basket to the lower chamber flange.
CAUTION:
3. Remove the seat (4) by pulling it upward and out
of the chamber. Tilt the chamber to remove the
float check (5).
4. The upper chamber is removed in the same
manner as the lower chamber. Remove the
bolts joining the chamber and cover using care
to support the chamber. The seat and float
check can be removed in the same manner as
before.
REASSEMBLY
All parts must be clean. Worn or damaged parts
should be replaced during reassembly.
1. Install the float check (5A) into the chamber
(1A).
2. Insert the seat (4A) with the raised circular
surface facing down into the chamber (1A).
3. Connect the upper chamber (1A) to the cover (2)
with the bolts (7A) and nuts (7B) using the cross
over method. One washer is installed under the
head of the bolt and one underneath the nut.
4. Install the float check and seat into the lower
chamber per steps 1 and 2.
5. Connect the lower chamber (1B) to the upper
chamber (1A) by using the bolts (7A) and (7B).
One washer is installed under the head of the
bolt and one underneath the nut.
6. Install the basket (12) to the lower chamber (1B).
a) On sizes with the side taps, start the socket
head cap screws into the lower chamber
flange. Install the basket by pushing upward
and turning clockwise. Tighten the socket
head cap screws to secure the basket.
b) On sizes without the side bolts, install the
bolts through the bottom flange and into the
tapped holes on the basket screen. One
washer is used underneath the head of the
bolt.
3

FIELD TESTING THE FLOODSAFE
The FloodSafe® inflow preventer should be tested
after installation, and periodically thereafter as
recommended by the local authority having
jurisdiction, but at least annually.
For field testing, a testing kit available from the
manufacturer is required consisting of test cocks and
a test pipe that can be used for multiple installations.
ISOLATE DEVICE
1. Close the isolation valve under the adjacent air
valve with which the FloodSafe
2. Remove the three pipe plugs on the side of the
FloodSafe
with the test kit.
3. Remove the basket screen by loosening the
screws and twisting the screen. Clean the
basket if needed.
4. Block the bottom port with the expandable plug
provided in the kit. Open the three test cocks A,
B, and C.
®
and install the test cocks provided
Figure 4: Field Test Piping
®
is connected.
TEST LOWER CHAMBER
5. Connect the test pipe to test cock A in the lower
chamber as shown in Figure 4. A quickdisconnect coupling is provided to facilitate the
assembly.
6. Fill the clear test pipe and lower chamber with
clean water by pouring water into the test pipe
and maintain the water level above the
“Minimum Test Level” for 5 minutes while
observing test cock B for leakage. The water
level in the tube may drop due to leakage in the
fittings, bottom plug, or as air escapes between
the float and the seat (acceptable). The device
shall be rejected and repaired if water is
observed from test cock B during the 5 minute
test period.
TEST UPPER CHAMBER
7. Close test cock A. Move the test pipe up to the
upper chamber test cock B. A quick-disconnect
fitting under the clear pipe will aid in its removal.
8. Fill the clear test pipe and upper chamber with
clean water by pouring water into the test tube
and maintain the water level above the
“Minimum Test Level” for 5 minutes while
observing test cock C for leakage. The device
shall be rejected and repaired if water is
observed from test cock C during the 5 minute
test period.
9. If one of the initial tests fail and repairs are
made, a “Final Test” shall be conducted and
recorded. Repairs typically consist of removing
the chamber bolts and cleaning the float and
cleaning or replacing the rubber seat.
RETURN TO SERVICE
10. When the tests are complete, open test cock A
and drain the water and remove the test piping
and bottom plug. The test cocks may be left in
the device, but all three must to be closed.
11. Re-assemble the basket screen to the lower
chamber. Tighten the screen bolts.
12. IMPORTANT: Open the isolation valve underneath
the air valve that was closed in step 1.
4

FloodSafe® Inflow Preventer
TEST AND MAINTENANCE REPORT
OWNER: _________________________________________________________________________________
ADDRESS: ________________________________________________________________________________
LOCATION OF ASSEMBLY: __________________________________________________________________
MANUFACTURER: _________________________ MODEL NO: ____________________________________
YEAR OF MANUFACTURE: _______________________ SIZE: ____________________________________
PROCEDURE: See “FIELD TESTING THE FLOODSAFE” in the Instruction Manual.
1. Isolation Valve
Under Air Valve
□ leaked or
□ closed off tight
Record any maintenance
performed:
Inflow Preventer Basket
□ removed and cleaned
Bottom Plug
□ installed
NOTE: All repairs and final tests should be completed within five (5) working days.
COMMENTS: _______________________________________________________________________________
___________________________________________________________________________________________
I hereby certify that this data is accurate and reflects the proper maintenance of the assembly.
TESTER: _____________________________ CERT No. __________________ DATE: __________________
TIME: ___________________
THIS ASSEMBLY: □ Passed □ Failed
2. Inflow Preventer Test
Lower Chamber
□ test cocks OK or
□ test cocks replaced
□ open test cocks
□ Connect test pipe assembly
to test cock A.
□ Fill lower chamber and test
pipe with clean water.
Initial
Tests:
Repairs:
Final
Tests
(when
needed):
IMPORTANT:
□ Maintain water level above
“Minimum Test Level”
□ Observe test cock B for
leakage for 5 minutes.
Any sign of leakage from test
cock is cause for rejection.
□ Pass □ Fail
Record maintenance
performed:
If initial test failed, repeat 5
minute test. Any sign of
leakage from test cock B is
cause for rejection.
□ Pass □ Fail
□ After testing, reopen the isolation valve under the air valve.
3. Inflow Preventer Test
Upper Chamber
□ test cock OK or
□ test cock replaced
□ Connect test pipe assembly
to test cock B.
□ Fill upper chamber and test
pipe with clean water.
□ Maintain water level above
“Minimum Test Level”
□ Observe test cock C for
leakage for 5 minutes.
Any sign of leakage from test
cock is cause for rejection.
□ Pass □ Fail
Record maintenance
performed:
If initial test failed, repeat 5
minute test. Any sign of
leakage from test cock C is
cause for rejection.
□ Pass □ Fail
5

PARTS AND SERVICE
Parts and service are available from your local
representative or the factory. Make note of the
Valve Size and Model Number located on the valve
nameplate and contact:
Val-Matic Valve and Manufacturing Corp.
905 Riverside Drive
Elmhurst, IL 60126
Phone: (630) 941-7600
Fax: (630) 941-8042
www.valmatic.com
A sales representative will quote prices for parts or
arrange for service as needed.
LIMITED WARRANTY
All products are warranted to be free of defects in material and workmanship for a period of one year from the date
of shipment, subject to the limitations below.
If the purchaser believes a product is defective, the purchaser shall: (a) Notify the manufacturer, state the alleged
defect and request permission to return the product; (b) if permission is given, return the product with
transportation prepaid. If the product is accepted for return and found to be defective, the manufacturer will, at his
discretion, either repair or replace the product, f.o.b. factory, within 60 days of receipt, or refund the purchase
price. Other than to repair, replace or refund as described above, purchaser agrees that manufacturer shall not be
liable for any loss, costs, expenses or damages of any kind arising out of the product, its use, installation or
replacement, labeling, instructions, information or technical data of any kind, description of product use, sample or
model, warnings or lack of any of the foregoing. NO OTHER WARRANTIES, WRITTEN OR ORAL, EXPRESS
OR IMPLIED, INCLUDING THE WARRANTIES OF FITNESS FOR A PARTICULAR PURPOSE AND
MERCHANTABILITY, ARE MADE OR AUTHORIZED. NO AFFIRMATION OF FACT, PROMISE, DESCRIPTION
OF PRODUCT OF USE OR SAMPLE OR MODEL SHALL CREATE ANY WARRANTY FROM MANUFACTURER,
UNLESS SIGNED BY THE PRESIDENT OF THE MANUFACTURER. These products are not manufactured, sold
or intended for personal, family or household purposes.
®
VAL-MATIC
905 Riverside Dr. ● Elmhurst, IL 60126
Phone (630) 941-7600 ● Fax (630) 941-8042
www.valmatic.com
6
VALVE AND MANUFACTURING CORP.
 Loading...