

Page 1
Instruction Manual
Model Ref: VPLD-625
Cordless Hand Held
Vacuum Cleaner
VPLD-62526022016
Page 2

Index
Important Safety Information............................
Product Overview..............................................
Technical Information........................................
Before First Use................................................
Attaching the Battery to the Main Unit.............
Charging Your Vacuum Cleaner........................
Charging LED Light Indicators..........................
Fitting the Extension Tube and Accessories.....
Operation..........................................................
Emptying the Dust Container............................
Cleaning the Filters...........................................
Notes for Cleaning............................................
Troubleshooting................................................
User Maintenance.............................................
After Sales Support...........................................
Product Guarantee............................................
02
04
05
05
05
05
06
06
07
07
08
09
09
09
10
10
01
Thank you for choosing the ValetPro Cordless Hand Held Vacuum Cleaner. All
products brought to you by Giani are manufactured to the highest standards of
performance and safety.
Before use, please read this manual. It gives important instructions about safety, use
and maintenance of your appliance.
Remove all packaging material. You may wish to keep the packaging for future use
or storage for your appliance. Alternatively, dispose of accordingly.
Page 3

Important Safety Information
Please read all of the instructions before using this vacuum
cleaner and keep safe for future reference.
When using electrical appliances, basic precautions
should always be followed, including the following:
• This vacuum cleaner is for domestic use only. It should
not be used for commercial purposes.
• Do not use outdoors or on wet surfaces.
• Only use this appliance for its intended domestic use.
Giani Ltd will not accept any liability if the appliance is
subject to improper use, or failure to comply with these
instructions.
• Do not handle the charger or vacuum cleaner with wet
hands.
• This appliance can be used by children aged from 8
years and above and persons
with reduced physical, sensory or mental capabilities, or
lack of experience and knowledge, if they have been
given supervision or instruction concerning the use of
the appliance in a safe way and understand the hazards
involved.
• Children must not play with this appliance.
• Cleaning and user maintenance shall not be made by
children unless they are older than 8 and supervised.
• Keep the appliance and its cord out of reach of
children less than 8 years.
• This product is not a toy.
• Do not use the vacuum cleaner if any parts appear to be
faulty, missing or damaged.
• Do not use the vacuum cleaner if it has been dropped or
damaged in any way.
• Do not charge the appliance with a broken adaptor,
cable or plug. It must be
replaced or repaired by a qualified electrician in order to
avoid a hazard.
• Ensure all parts including the dust tank are securely
attached before using or moving the vacuum cleaner.
• When carrying out any cleaning of the appliance, pe
forming user maintenance or changing accessories,
make sure the appliance is switched off and the charger
unplugged from the mains supply.
02
Page 4

• Do not unplug the charger by pulling on the power cable.
To unplug, hold by the charger casing, not the cord.
• Unplug the charger from socket when not in use for
extended periods. Make sure the charger cable is
located so that it will not be stepped on, tripped over, or
otherwise subjected to damage.
• Do not stretch the charger cable or place the cable under
strain. Keep cable away from heated surfaces.
• Use of an extension cord with the appliance is not
recommended.
• Keep hair, loose clothing, fingers and all parts of the
body away from openings of
the vacuum cleaner.
• Do not use with any of the openings blocked; keep free
of dust, lint, hair and anything that may reduce airflow.
• Take extra care when vacuuming on the stairs.
• Do not use to pick up liquids.
• Do not use to pick up flammable or combustible
materials.
• Do not use to pick up hot or burning objects such as
cigarettes, matches or hot ashes.
• Do not use to pick up building materials such as plaster,
cement, brick dust etc. - this will damage the motor.
• Do not use the vacuum cleaner to pick up large, hard or
sharp objects such as glass, nails, screws, coins etc. This will damage the vacuum cleaner.
• Only use the attachments/accessories supplied with the
product or recommended by Giani.
• Do not use without the dust tank and filters in place.
• Ensure that the dust tank is emptied and the filters
cleaned regularly to maintain the performance of the
vacuum cleaner.
• Do not store in direct sunlight or high humidity
conditions.
03
This appliance has a safety thermal cut out. This will operate if the
battery becomes hot when charging or over charging. If this
happens, remove the appliance from the charger and allow the
battery to cool before operating the appliance.
Page 5
04
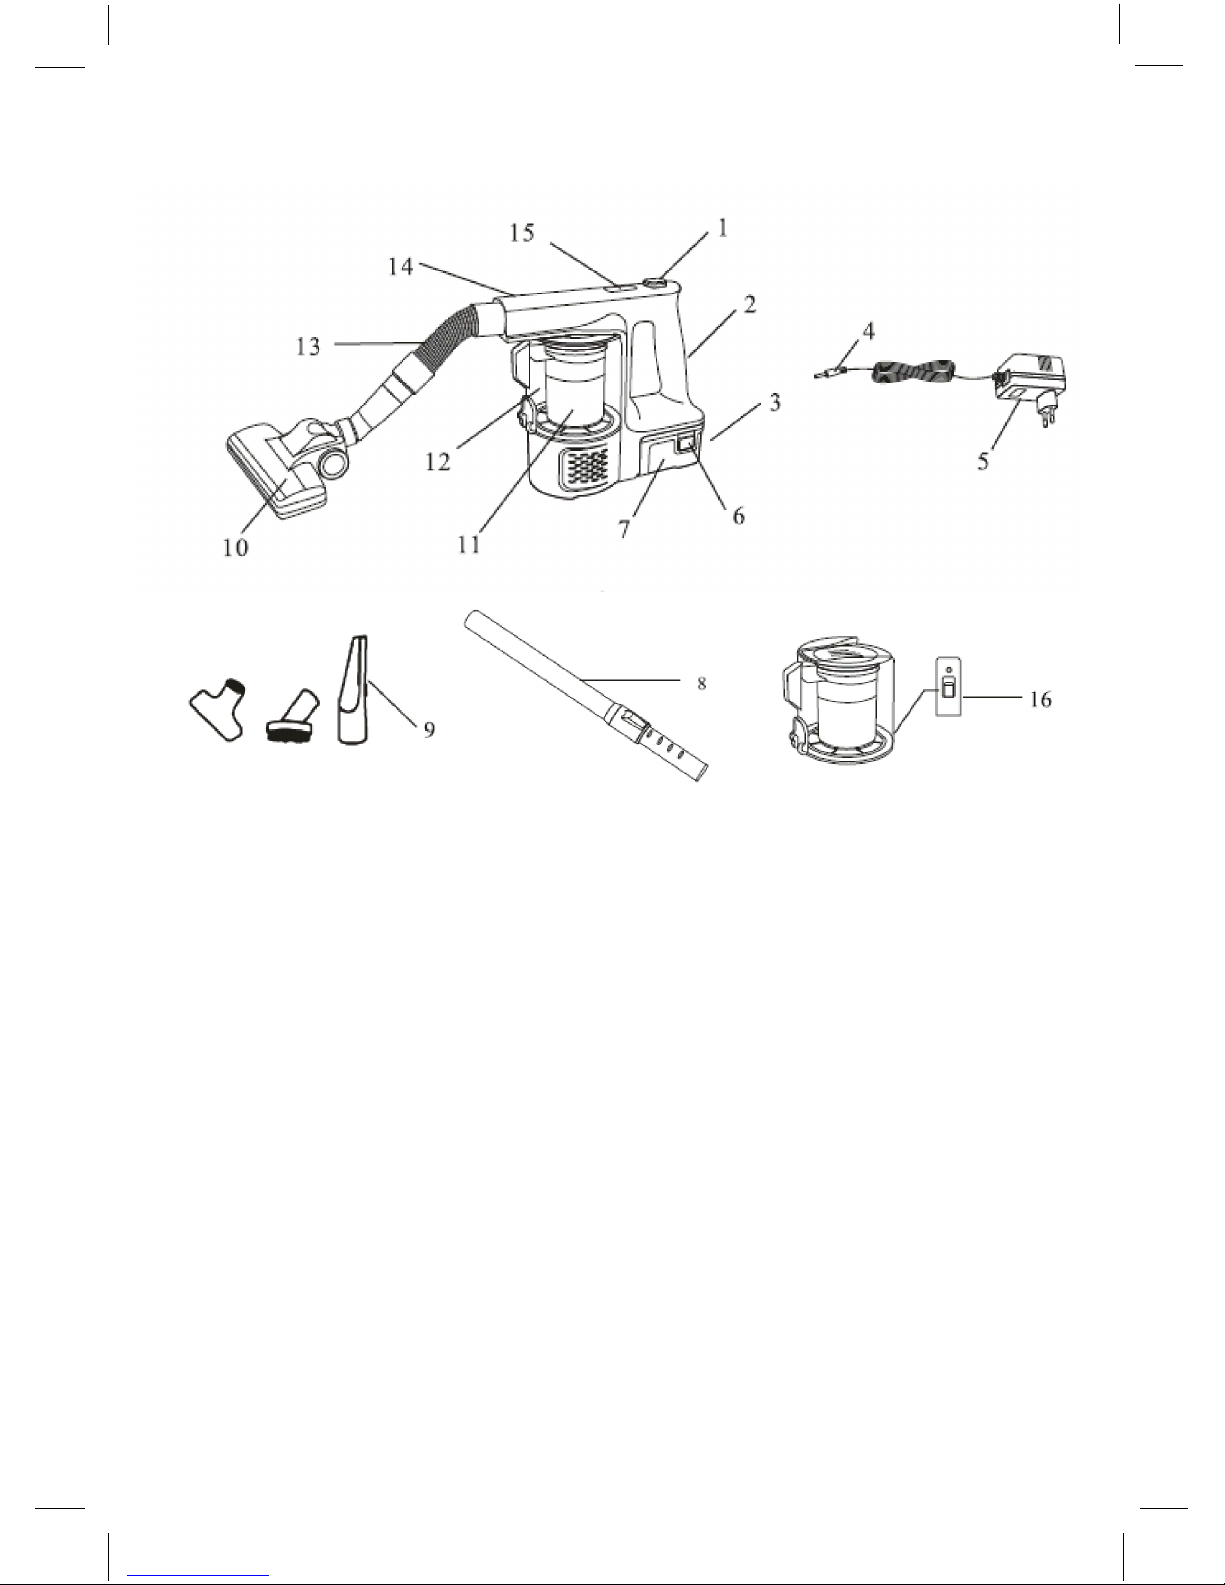
Product Overview
1 – On / Off Power Button
2 – Handle
3 – Charging Socket Connection
4 – DC End of Charger (to be inserted in charger socket connection)
5 – Charger Plug
6 – Battery Case Release Buttons
7 – Battery Case
8 – Aluminium Telescopic Extension Tube
9 – Accessory Tools (Crevice Tool, 2 x Brushes)
10 – Floor Brush
11 – Filter
12 – Dust Tank
13 – Flexible Hose
14 – Inlet
15 – LED Operational Light
16 – Dust Tank Release Button
Page 6
05
Technical Information
Before First Use
Before using your vacuum cleaner for the first time, ensure that you have received
all parts and wipe all parts with a soft damp cloth.
Always transport the vacuum in its original packaging so that it does not become
damaged.
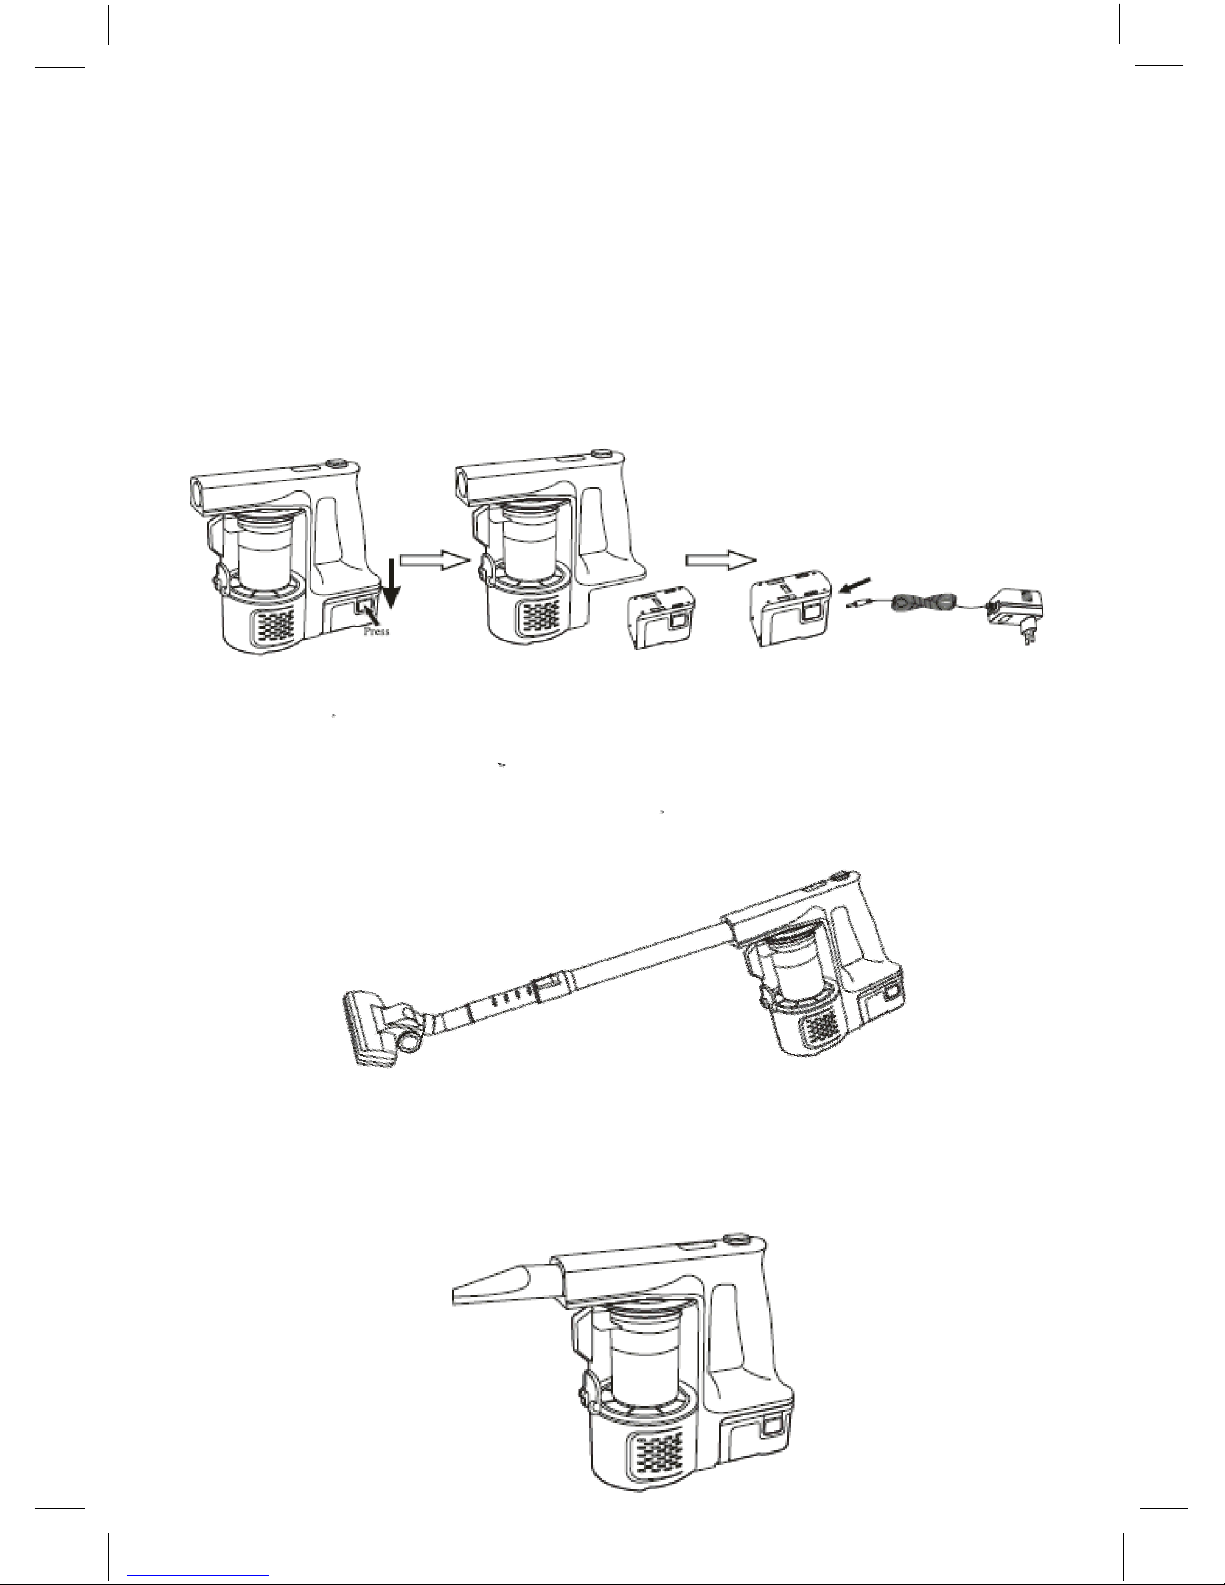
Attaching the Battery to the Main Unit
1. Remove the cover plate from the pin header of the main body.
2. Insert the square hole of the battery box into the pin header of the body, push the
battery box until it locks into place.
Charging Your Vacuum Cleaner
Before use, check if the battery capacity is full. If not, charge as follows:
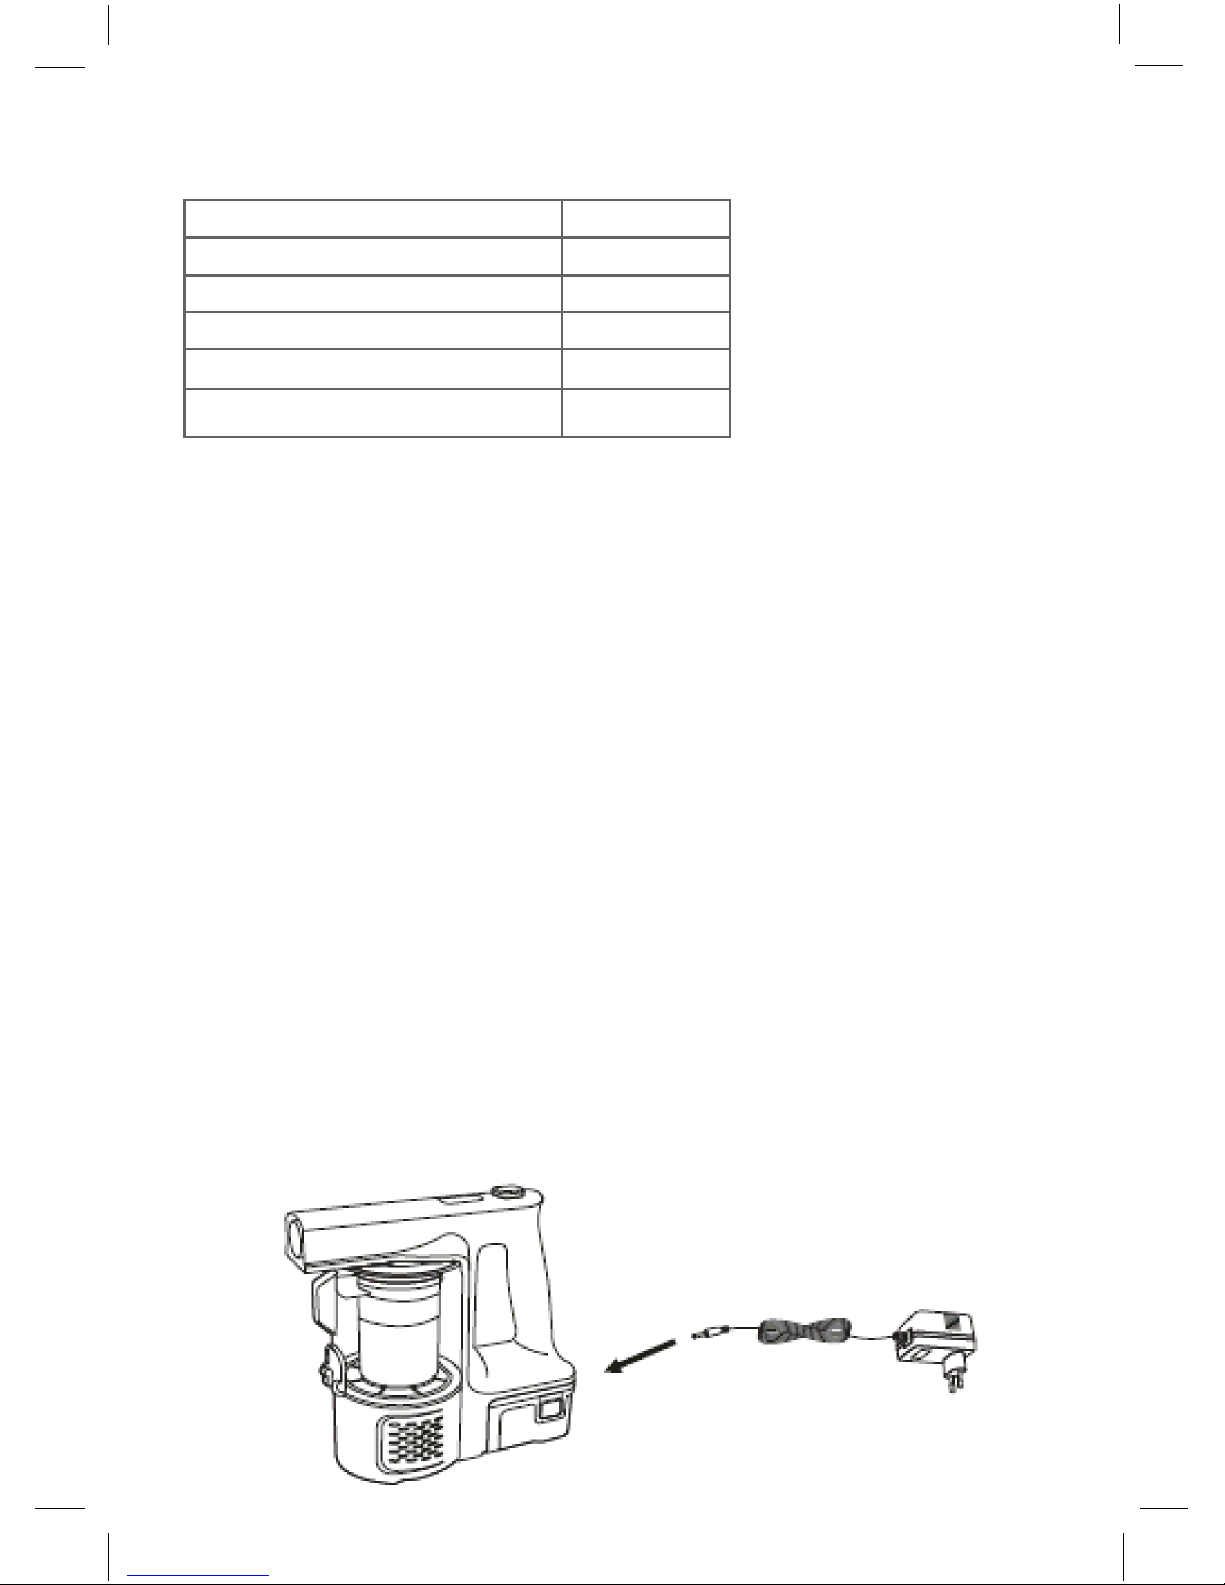
1. Insert the DC end of the charger into the charging socket connection at the rear
of the appliance, plug the other end of the charger into the main plug socket and
switch on the mains supply.
2. A green LED light will flash to show the battery is charging.
3. The battery will take 2-2.5 hours to fully charge.
Voltage 22.2vDC
Rechargeable Battery Capacity 2000 mAh
Wattage 140W
Motor Current 6.5A
Class III
Dust Tank Capacity 0.5L
Page 7
06
Charging LED Light Indicators
1. RED LIGHT: No Battery Charge Left – The unit needs to be fully charged
2. ONE GREEN LIGHT: Limited Battery Charge – The unit needs to be charged
3. TWO GREEN LIGHTS: Half Battery Charge.
4. THREE GREEN LIGHTS: The battery is fully charged.
NOTE: the battery case can be released from the vacuum cleaner and can be
charged separately. The battery will charge in the same time but there will be no
LED Light indicators to show the charging status.
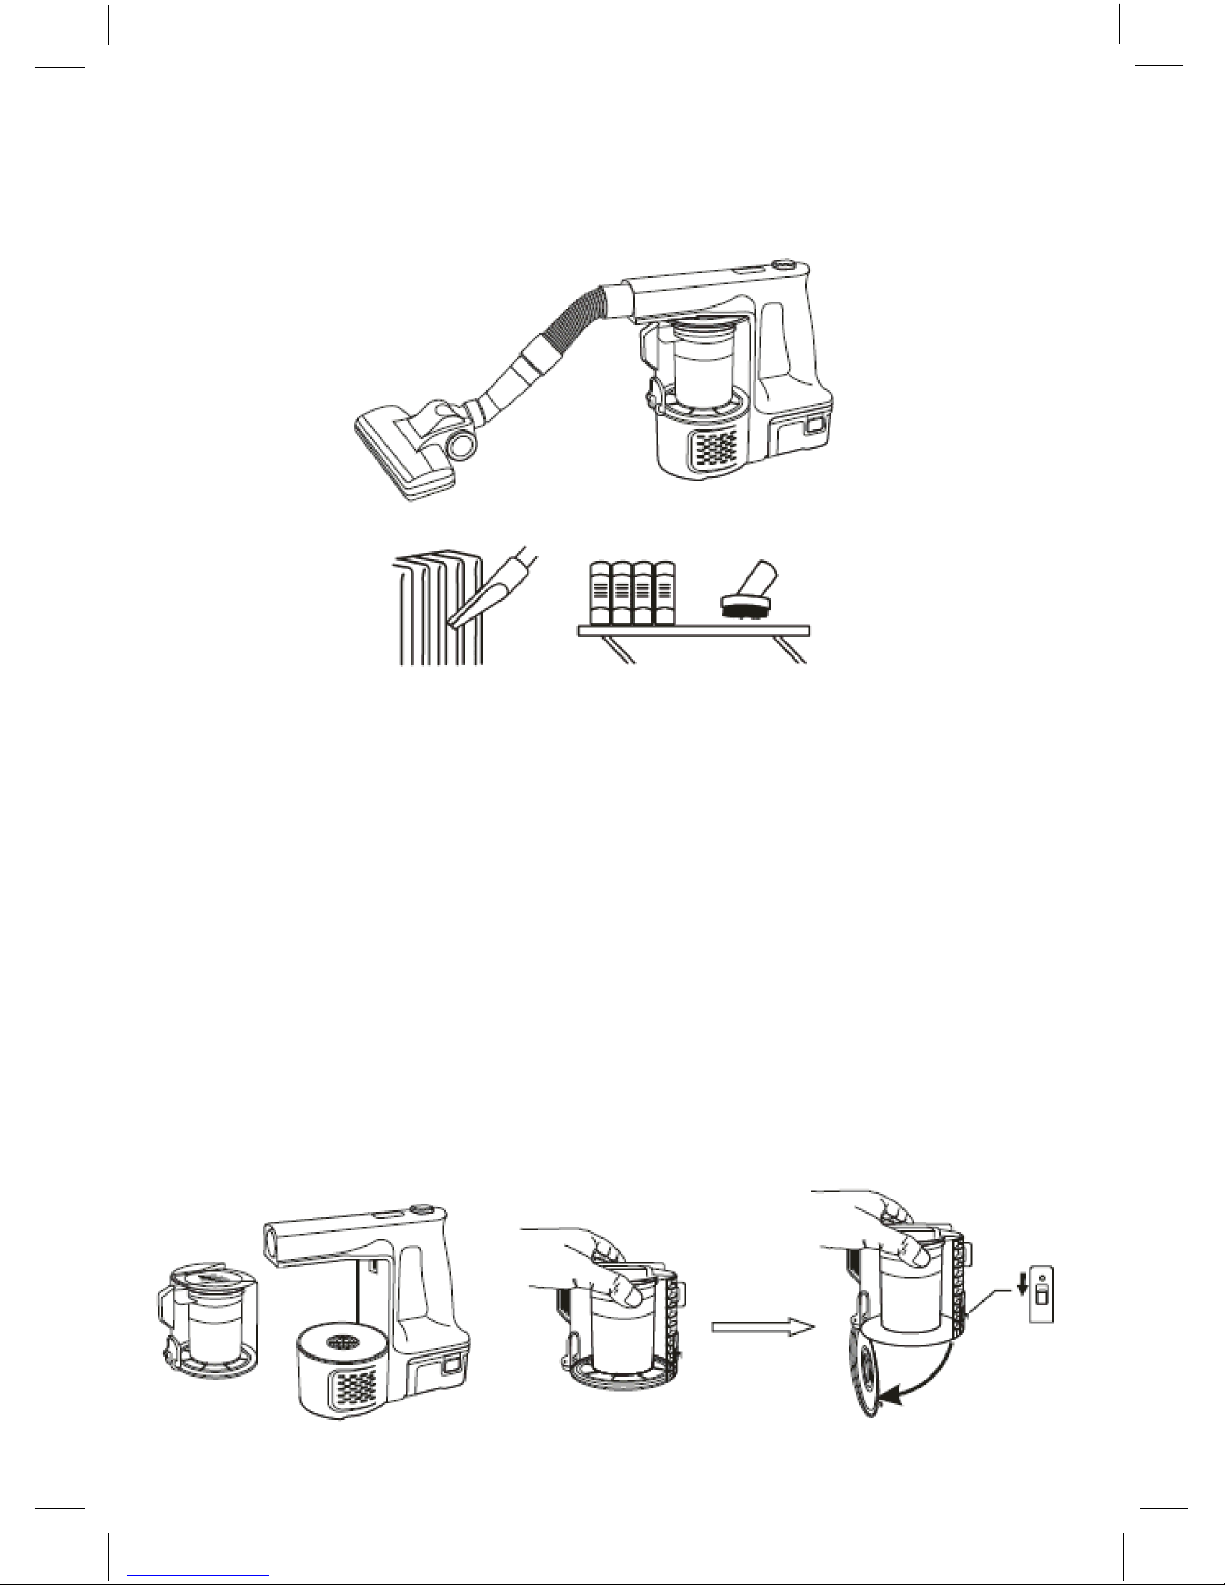
Fitting the Extension Tube and Accessories
1. Insert the corresponding end of the extension tube into the inlet of the appliance;
insert the other end into the floor brush head or other tool accessory.
The floor brush is perfect for vacuuming hard floors and carpets.
2. Attach the accessories in the same manner. You can attach to the end of the
extension tube or alternatively they can be attached to the main body inlet.
Page 8
07
The crevice tool is ideal for cleaning the side of sofas and difficult to reach areas.
3. Using the flexible hose – Attach to the inlet of the main unit. Connect the
accessory required to the other end.
The hose, nozzle and brushes are ideal for cleaning difficult to reach angles and
tight spaces.
Operation
Press the On/Off button to start cleaning.
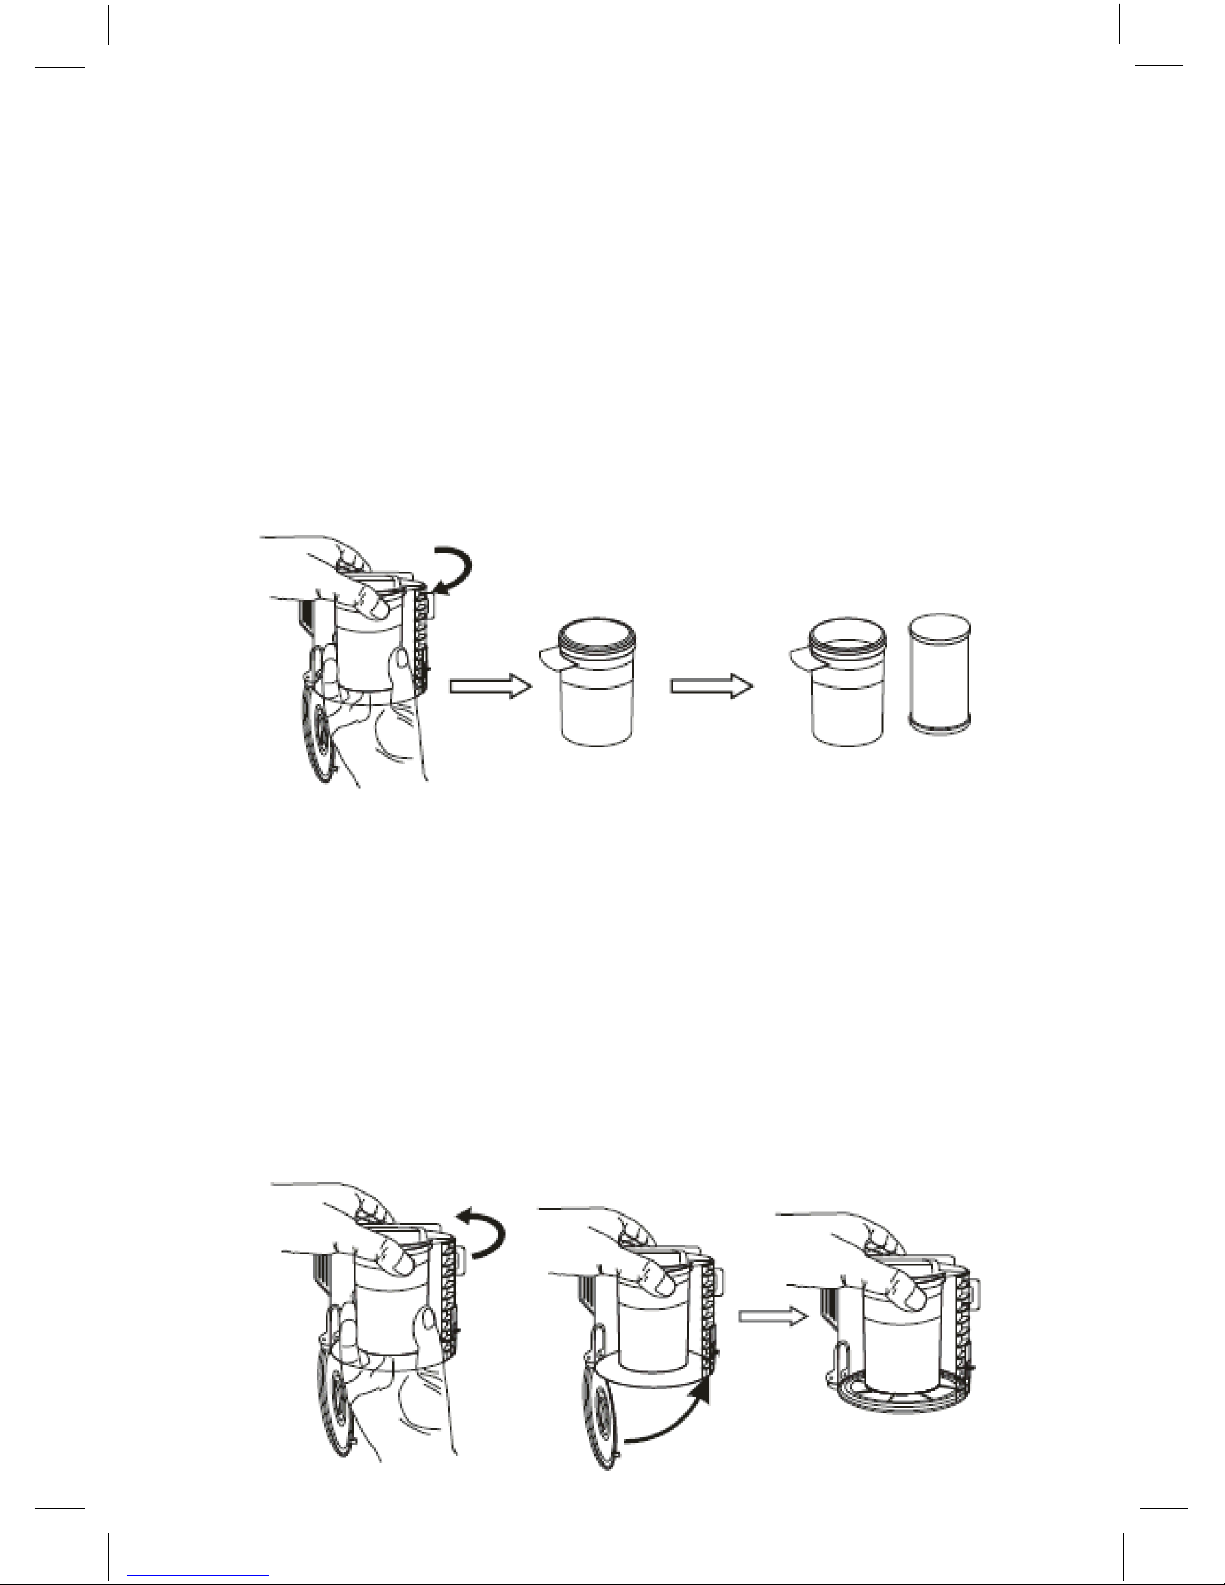
Emptying the Dust Tank
1. Turn the unit off.
2. Remove the dust tank from the main unit.
3. Hold the dust tank over a dustbin, press the release button to open the bottom
and release the dirt.
Page 9
08
Cleaning the Filters
To maintain the performance of the vacuum cleaner, ensure the filters are regularly
cleaned.
Never use the vacuum cleaner without the filters in place.
Never let the dirt level exceed the MAX level indicator.
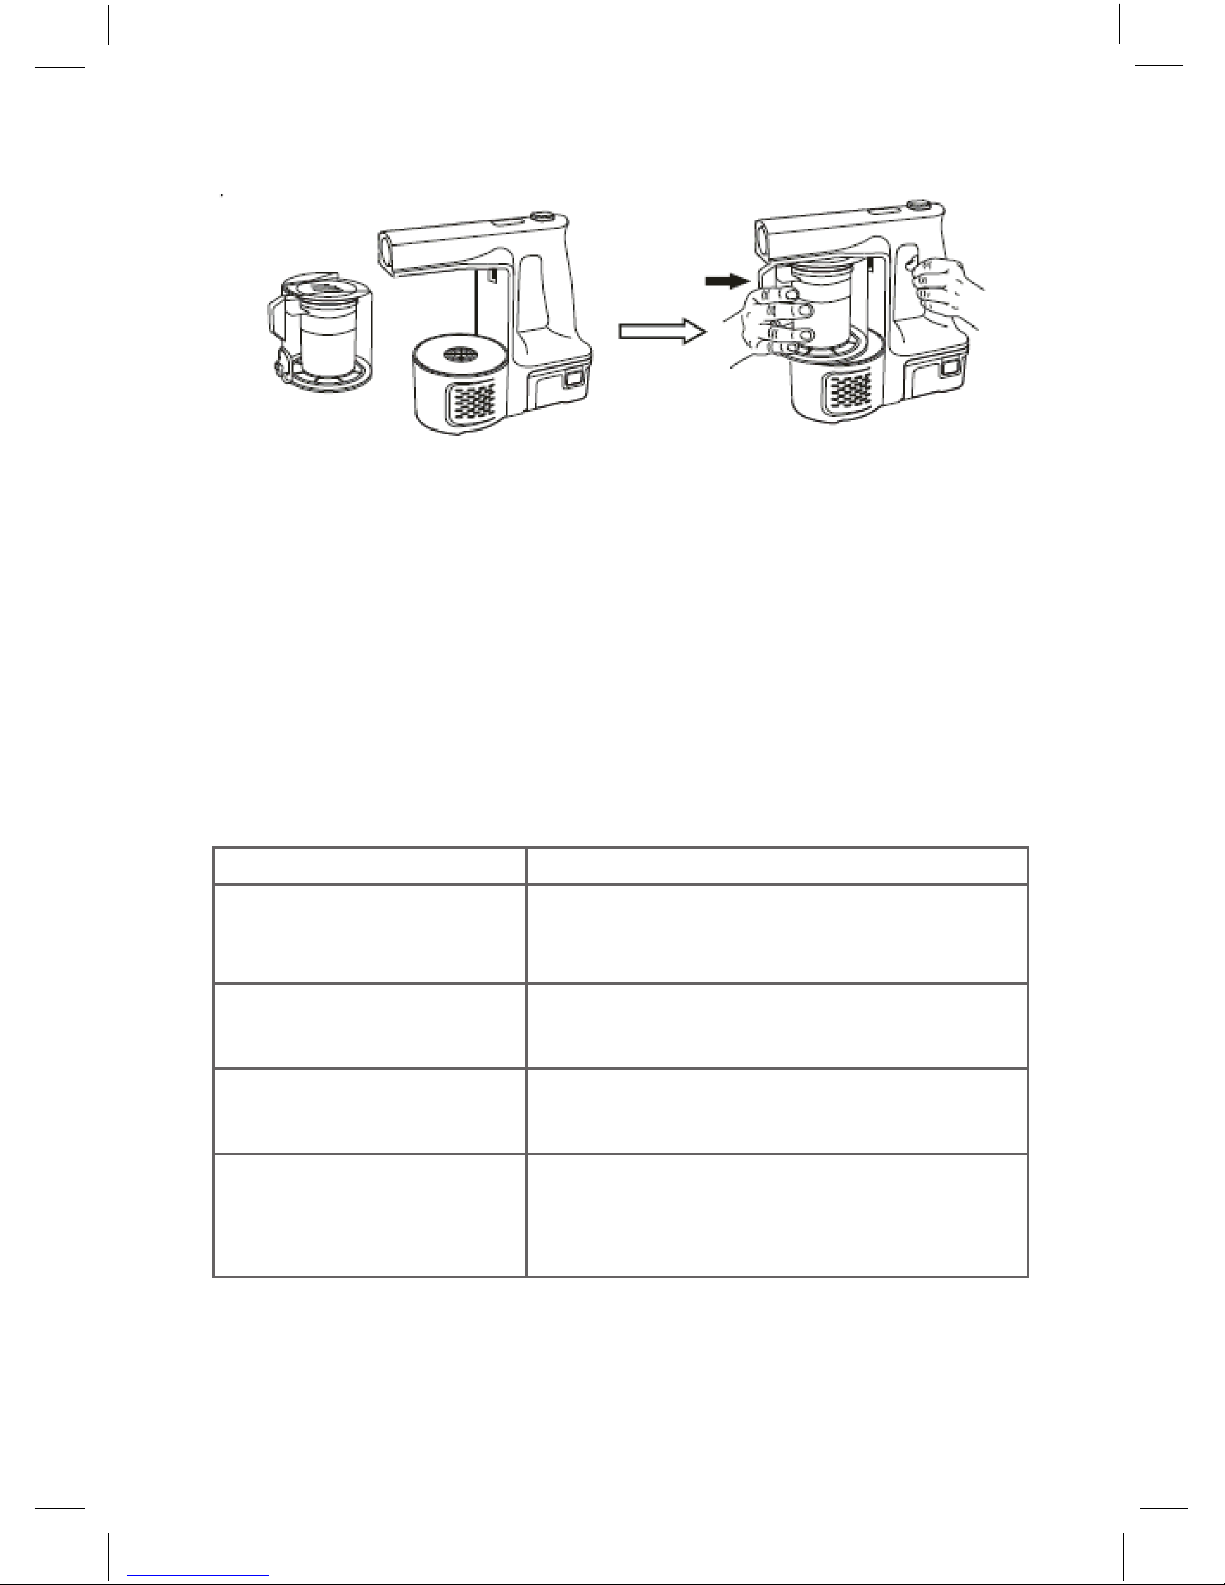
1. Turn off the vacuum cleaner and remove the battery.
2. Remove the dust tank and empty as described in ‘Emptying the Dust Tank’
3. Hold the net filter, rotate clockwise and remove the filter.
4. Remove the inside filter from the net filter.
5. Gently tap the filters against a dustbin to loosen dust and debris.
6. Rinse the filters under a running tap or clean with a soft sponge.
7. To avoid damage to your vacuum, ensure the filters are completely dry before
putting them back into the body of the vacuum. Leave filters to dry for 24 hours
after wet cleaning.
NOTE: Do not use hard brushes to clean the filters, this will damage them. Regular
cleaning of the filters is recommended.
8. After the filters have fully dried, refit the net and inner filter together. Lock by
rotating the net filter counter clockwise.
Page 10
09
9. Close the bottom of the dust tank, align the dust tank into position and lock into
the body of the vacuum cleaner.
Notes for Cleaning
• Filters MUST be cleaned regularly for best performance and to prevent your
vacuum from over-heating and damage being caused to the vacuum cleaner.
• Using wet or damp filters will cause serious damage to your vacuum cleaner,
ALWAYS make sure the filters are thoroughly dry before putting back into the
vacuum cleaner.
• Do not use a hair dryer to dry the filters.
Troubleshooting
Always turn off the appliance when performing user maintenance.
User Maintenance
• The charger plug MUST be removed from the power socket after charging.
• Beware of sharp objects when clearing blockages.
• To maximise the performance of your vacuum cleaner, clean the filters regularly.
• Store the vacuum cleaner and battery in a cool dry place.
Problem
Vacuum cleaner not working
Solution
1. Check LED indicator, if the battery is running
low, recharge.
2. Check if the inlet is blocked.
3. Check if the product is turned on at the switch.
Low suction
1. Check if the brush/hose is blocked. If so, clear
the blockage before proceeding.
2. Check the filtration. If blocked,clear.
Abnormal noise in motor
1. Stop using the vacuum immediately.
2. Check for blockages.
3. Clear the blockages before proceeding.
Unit will not charge
1. Check if the DC end is inserted correctly into the
vacuum.
2. Check the battery is fitted properly to the main unit.
3. Check the charger is connected to a switched on
mains supply.
Page 11

After Sales Support
If the power cord is damaged, it MUST be replaced by a qualified electrician.
If you need help using your Vacuum Cleaner, please contact Giani Ltd:-
Telephone: 0161 480 6204
Email: [email protected]
Website: www.gianiuk.co.uk
(replacement instruction manuals are available to download).
10
Product Guarantee (UK Only)
If your appliance ceases to function within 1 year from the date of purchase, the retailer
will replace it free of charge, provided:
This guarantee does not affect your statutory rights.
You have not misused, neglected or damaged it
It has not been modified (except by Giani Ltd)
It was not purchased second hand
It has not been used commercially
You have not fitted a plug incorrectly
You can supply proof of purchase, indicating the price you paid and where and when
the appliance was purchased.
2011/65/EU
IMPORTANT INFORMATION FOR CORRECT DISPOSAL OF THE APPLIANCE IN ACCORDANCE WITH
EC DIRECTIVE 2002/96/EC
At the end of its working life, the appliance must NOT be disposed of as urban waste.
It must be taken to a special local authority differentiated waste collection centre or to a dealer providing
this service.
Disposing of a household appliance separately avoids possible negative consequences for the
environment and health deriving from inappropriate disposal and enables the constituent materials to be
recovered to obtain significant savings in energy and resources. As a reminder of the need to dispose of
ousehold appliances separately, the product is marked with a crossed-out wheeled dustbin.
Page 12
2011/65/EU
 Loading...