

Page 1
Installation & Operation Manual
Premium Cyclonic Central Vacuum Systems
Page 2

NESS HEAD OFFICE
02 8825 9222
SALES - SERVICE - SPARES
1800 050 333
Central Vacuum
Intercom
Security
Automation
www.valet.com.au
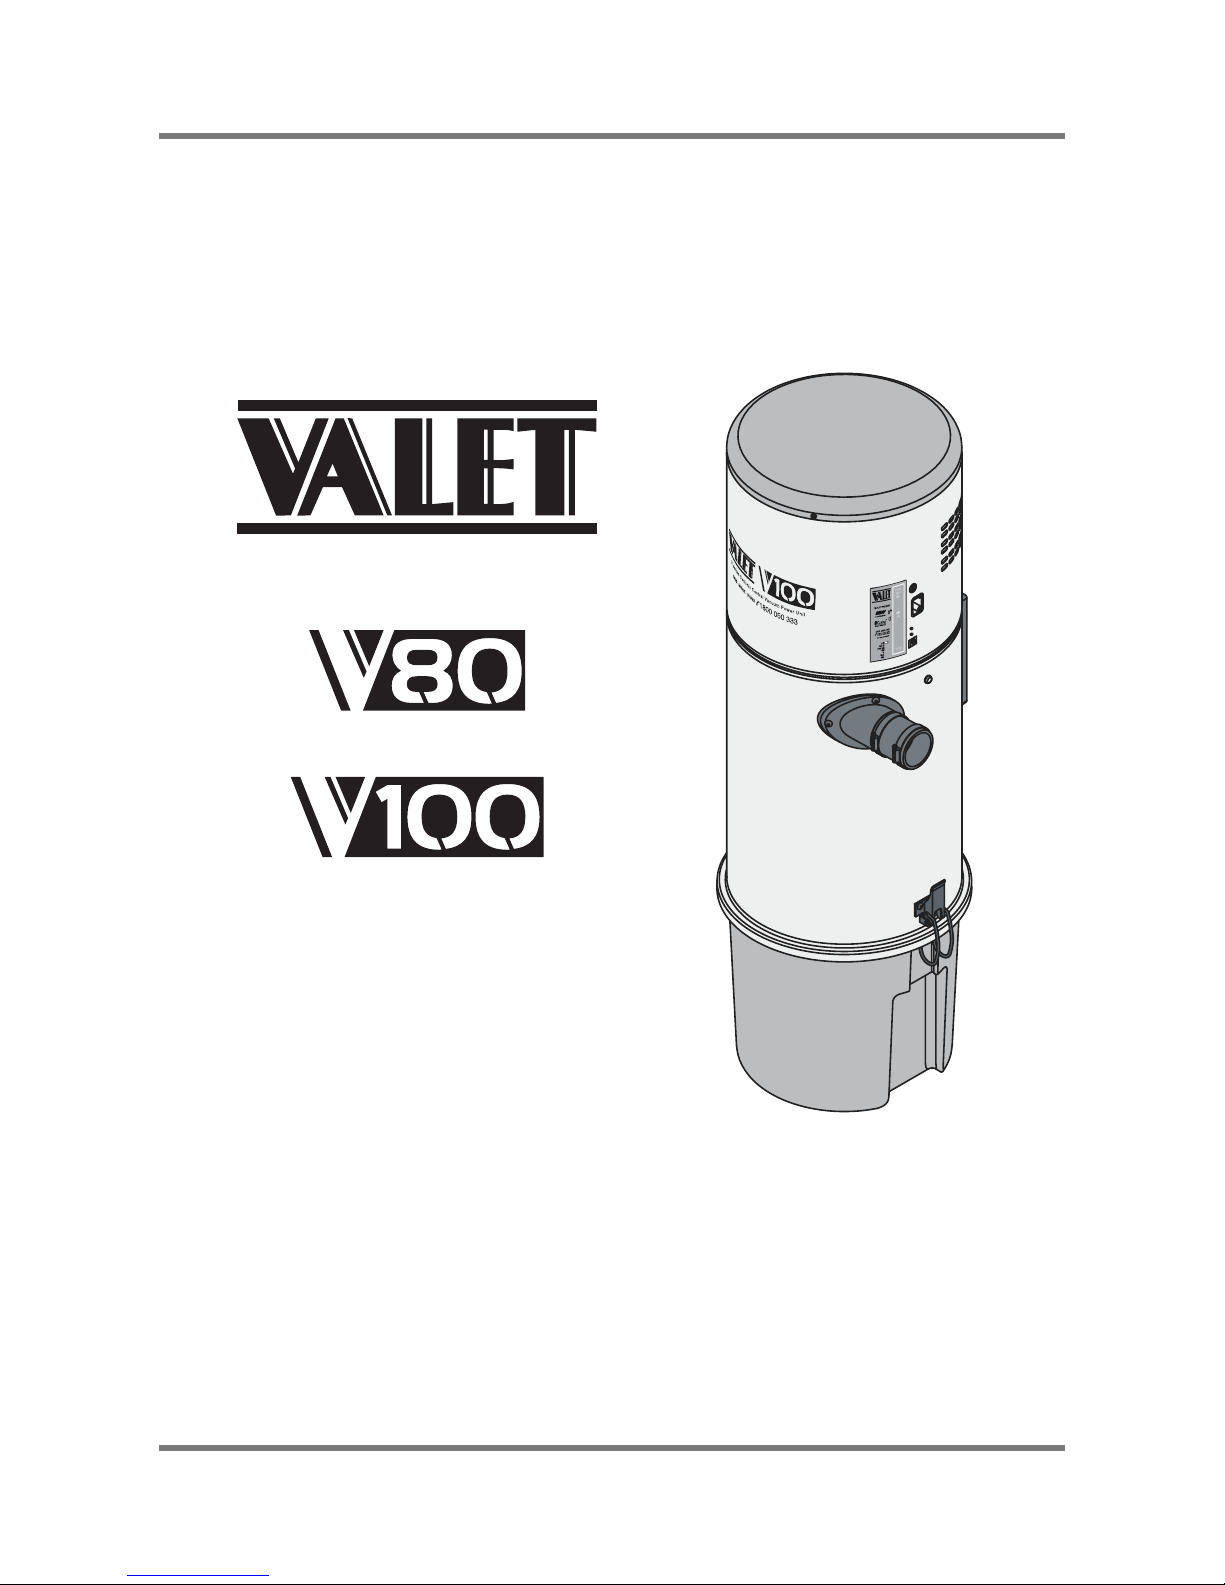
VALET V80/V100 PREMIUM CYCLONIC CENTRAL VACUUM
OWNER’S MANUAL
REV 1, October 2010
COPYRIGHT NOTICE
All rights reserved. No part of this publication may be reproduced, transmitted or stored in a retrieval system in any form or by any means,
electronic, mechanical, photocopying, recording, or otherwise, without the prior written permission of Ness.
Ness reserves the right to make changes to features and specifications at any time without prior notification in the interest of ongoing
product development and improvement.
© 2010 Ness Corporation Pty Ltd ABN 28 069 984 372
Page 3

Safety Instructions . . . . . . . . . . . . . . . . . . . . . . . . . . . . . . . . . . . . . . . . . . . . .4
Handling & Unpacking
. . . . . . . . . . . . . . . . . . . . . . . . . . . . . . . . . . . . . . . . . .5
Components
. . . . . . . . . . . . . . . . . . . . . . . . . . . . . . . . . . . . . . . . . . . . . . . . . .6
Installing the Power Unit
. . . . . . . . . . . . . . . . . . . . . . . . . . . . . . . . . . . . . . .7, 8
Connecting the PVC Pipe
. . . . . . . . . . . . . . . . . . . . . . . . . . . . . . . . . . . . . . . .9
Electrical
. . . . . . . . . . . . . . . . . . . . . . . . . . . . . . . . . . . . . . . . . . . . . . . . . . . .10
Start vacuuming
. . . . . . . . . . . . . . . . . . . . . . . . . . . . . . . . . . . . . . . . . . . . . .11
How to empty the dust container . . . . . . . . . . . . . . . . . . . . . . . . . . . . . . . . .12
How to clean the filter cartridge . . . . . . . . . . . . . . . . . . . . . . . . . . . . . . . . . .13
How to replace the filter cartridge . . . . . . . . . . . . . . . . . . . . . . . . . . . . . . . .14
Technical Specifications
. . . . . . . . . . . . . . . . . . . . . . . . . . . . . . . . . . . . . . . .15
Contents
3
Page 4

IMPORTANT SAFETY INSTRUCTIONS
Valet Vacuum Owners Manual
Intended only for Household and Light Commercial Use
BEFORE INSTALLATION OR OPERATION:
• Read the supplied manual and ensure correct installation and use of the product/s
• Empty the dust container regularly
• Check the condition of the filter cartridge regularly
• Do not install outside unless proper weather protection is in place
• Do not connect to a non grounded supply or a non approved supply
• Do not service the Power Unit unless it has been disconnected from the supply
• Do not use with a damaged electrical lead or plug
• Keep electrical lead away from heated or sharp objects
• Keep inflammable objects or liquids away from the Power Unit
• Do not place or store anything on top of the Power Unit
• Do not place or store anything that may restrict the air flow of the Power Unit
• Do not vent the Power Unit into a wall, a ceiling, or any enclosed space
• Do not vacuum any wet surfaces
• Do not vacuum any liquids, including any fuels
• Do not vacuum anything that is hot, burning or smoking
• Do not vacuum any ash, even it appears dormant
• Avoid vacuuming plaster dust or talcum powder, which can cause clogging of the filter
cartridge
• Do not obstruct, block or impede the hose or wall valve inlets
• Keep hair, all parts of the body and loose clothing away from the hose or wall inlets
• Do not use non recommended attachments or accessories
• Pay close attention to children while the system is being used
• Do not allow children to use the system as a toy
WARNING
IMPROPER USE MAY CAUSE FIRE,
ELECTRIC SHOCK OR INJURY
The Valet V80 and V100 power units have been designed to power central vacuum
systems for residential buildings.
The power unit is connected to the ducted piping serving the various rooms. Inlet
valves are installed in rooms in the house for plugging the vacuum hose and various
cleaning accessories.
The vacuum unit has been designed to remove dust and small solid material and must
not be used to vacuum liquids or hazardous materials.
4
Page 5
Warranty
Your central vacuum system has been engineered
for a long, trouble-free service life. Your power unit is
covered by a factory limited warranty that is enclosed
with these instructions.
Please read your limited warranty carefully. If your
owners manual came with a warranty card, fill it
out and return to iCentral. You should fill out your
registration card within ten (10) days of installation
and return to address listed on the card. Remember,
your warranty does not cover abuse or misuse of the
equipment.
You can also register your warranty online at
www.valet.com.au
Use of the manual
The instruction manual for use and maintenance is
an integral and essential part of the vacuum power
unit and must be handed over to the user. It must
be kept in a safe place and consulted carefully as
all of the warnings provide important instructions
for safety in the phases of installation, use and
maintenance.
Responsibility
The vacuum power unit must be used only for
the purpose for which it has been designed. Any
other use is considered improper use and is
therefore dangerous. The manufacturer accepts no
contractual or extra-contractual liability for damage
arising from a wrong installation or operation or
from the non-compliance with the manufacturer’s
instructions.
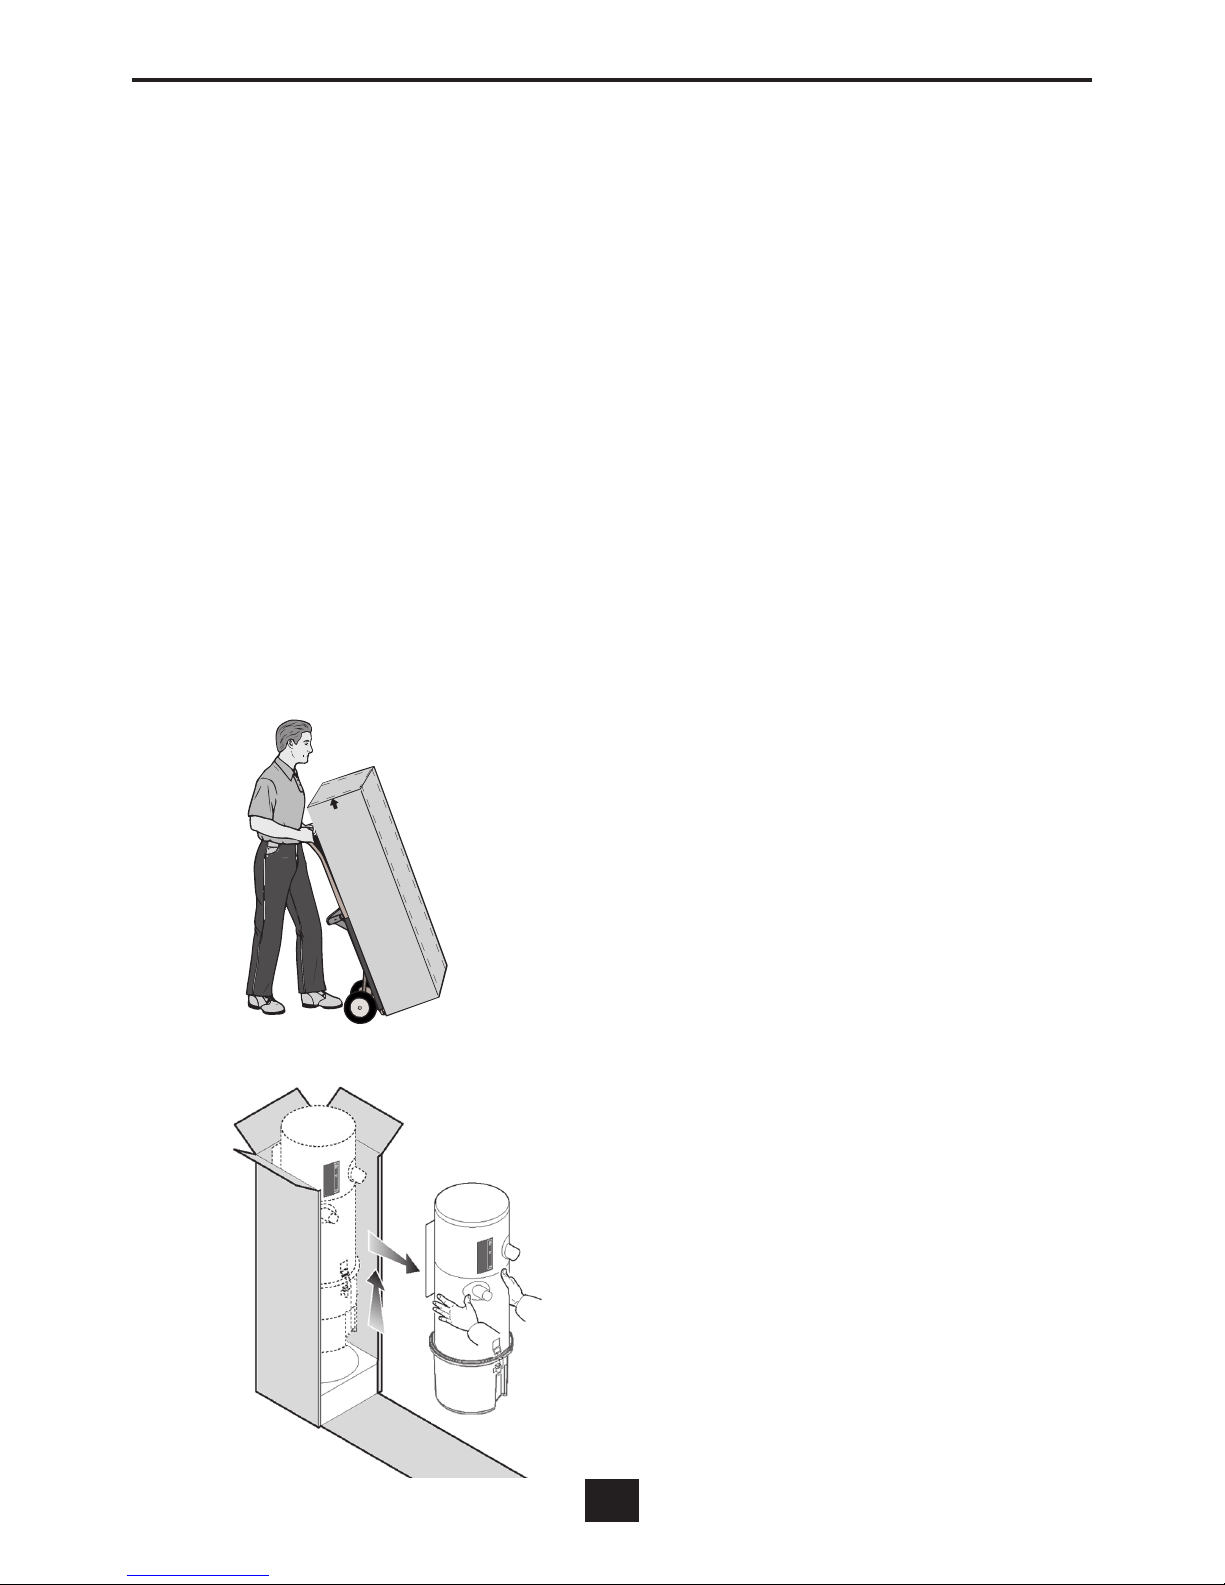
HANDLING & UNPACKING
Do not remove the unit from the packaging until
installation to prevent accidental damage.
Use suitable handling equipment.
Check that the product is not damaged and the
standard parts are contained in the dust container.
Introduction
Top
Bottom
5
Page 6

Components (V100)
Fuse
Power Input
Low voltage switch input
Sound-proof motor compartment
Air Exhaust
Wall bracket
Air intakes x 2
(for left or right hand installation)
Dust container hinges
Filter cartridge
Dust cone
Dust container
6
Page 7

Installing the Power Unit
Positioning
The power unit should be installed in service
rooms such as a store-room or garage and
protected against weather, humidity and sudden
changes of temperature.
The power unit is not designed for outdoor use
unless suitably protected.
The installation place shall be sufficiently spacious
and well lit to allow for a easy access to the
vacuum unit.
When installed indoors or in a semi-enclosed area
ensure the space is properly ventilated.
The power unit must be fixed to the wall at a
height that allows for an easy dismantling of the
dust container and the replacement of the filter
cartridge.
If Using a Wall Bracket
1A. Mount the bracket on the wall.
If Mounting Direct To The Wall
1B. Drill. Using a spirit level check that the
bracket is level
2. Release the locking lever.
7
Page 8

Installing the Power Unit
3. Remove the support from the guides.
4. Fit the vibration blocks to the support.
5A
. If using a wall bracket. Fix the
support to the wall bracket.
5B. If mounting directly to the wall.
Screw the support to the wall.
6. Remove the dust container.
7. Secure the Power Unit to the support.
8. Make sure the locking lever locks into
position.
9. Attach the dust container.
8
Page 9

Connecting the PVC Pipe
Installation with optional exhaust pipe
Suitable for installation in enclosed spaces.
Optional exhaust
vent adapter
Installation with natural exhaust
Suitable for outdoor (undercover) installations.
Exhaust
Air intakes.*
* Two air intakes are provided - for
left or right hand pipe entry. The
unused intake must blocked with
the cap provided.
Air intakes.*
* Two air intakes are provided - for
left or right hand pipe entry. The
unused intake must blocked with
the cap provided.
Exhaust
Optional muffler
9
Page 10

The electrical installation of the power unit must
be done by qualified electrical installers according
to local regulations.
The Manufacturer accepts no liability for
malfunction of the power unit or damage to
persons or property attributable to an incorrect
electrical connection.
Danger:
Do not touch the power unit with
wet or damp hands.
Keep non-authorised people and
children clear of the power unit.
Mains socket
Fuse
LED - Power ON
LED - Unit Running
Low voltage
switch input
Low voltage wiring
to inlet valves.
Standard 10A mains
power point.
Once the power unit has been connected to
the mains, check all vacuum sockets using
the flexible hose.
Final check
Electrical Connections
10
Page 11

Standard Hose operation
TO START - insert the hose into one of your
inlet valves.
TO STOP - remove the hose and hold the
flap open for a couple a seconds until the
motor stops.
Align the locating
tab on the hose cuff
between the guides
on the inlet valve.
TO START - insert the hose into one of your
inlet valves. Align the locating tab on the
hose cuff with the two guides on the inlet
valve.
If the hose is inserted correctly the power
unit will not start until you turn it on using
the switch on the hose handle.
TO STOP - turn off using the switch on the
hose handle then unplug the hose from the
inlet valve.
Switch Hose operation
ON/OFF
Start vacuuming
11
Page 12

Emptying the dust container
Before any maintenance job, turn off
the mains power at the power point.
Regular maintenance increases
the life span of the power unit and
ensures maximum performance.
Regularly check the system for leaks
or blockages.
1. Remove the dust container. 3. Empty the dust container.
2. Lift out the Dust Cone. 4. Replace the cone ensuring it is pointing
downwards and reassemble the dust
container paying attention to the seal
position.
Do not operate the power unit
without a filter cartridge. Not
observing this precaution may
result in serious damage to
the motor and will void the
manufacturer’s warranty.
Please wear a dust mask and
gloves
12
Page 13

Cleaning the filter cartridge
Please wear a dust mask and
gloves
1. Wash the cartridge with tap water taking
care not to damage the filter material.
2. Allow the cartridge to dry.
3. Check for damage and replace the
cartridge if necessary.
If the central vacuum system is used
regularly, check the filter cartridge at
least every 4 months.
- Remove the filter cartridge and wash
it with tap water. During washing pay
attention not to damage the filter
material.
If the filter is damaged during
cleaning the cartridge must be
replaced.
- After washing, allow the cartridge to
dry. Do not expose it to strong heat
sources.
Do not operate the power unit
without a filter cartridge. Not
observing this precaution may
result in serious damage to the
motor.
Use only genuine Valet spare parts.
13
Page 14

Replacing the filter cartridge
Please wear a dust mask and
gloves
Replace the filter cartridge every 2-3 years.
This interval is variable depending on how
often your central vacuum system is used.
Turn off the mains power at the
power point.
1. Remove the dust container. 3. Insert the new cartridge and tighten the
retaining nut by turning the cartridge until it
fits snugly in place.
2. Loosen the retaining nut and remove
the old cartridge.
4. Replace the cone ensuring it is pointing
downwards and reassemble the dust
container paying attention to the seal
position.
14
Page 15

Specifications
Voltage 240 VAC
Motor power 1510 Watts
Motor revolutions 42,200 RPM
Turbine stages
1
Vacuum socket voltage 12 V
Air flow
180 m³/h
Max vacuum 2,879 mmH
2
O
Filtering surface
0.4 m
2
Filter cartridge material Polyester
Dust container capacity
15 litres
Height 580 mm 900 mm
Diameter
280 mm
Weight
13 kg 16 kg
Construction Body Metal
Collection container Plastic
900
280
580
280
Technical
15
Page 16

 Loading...