

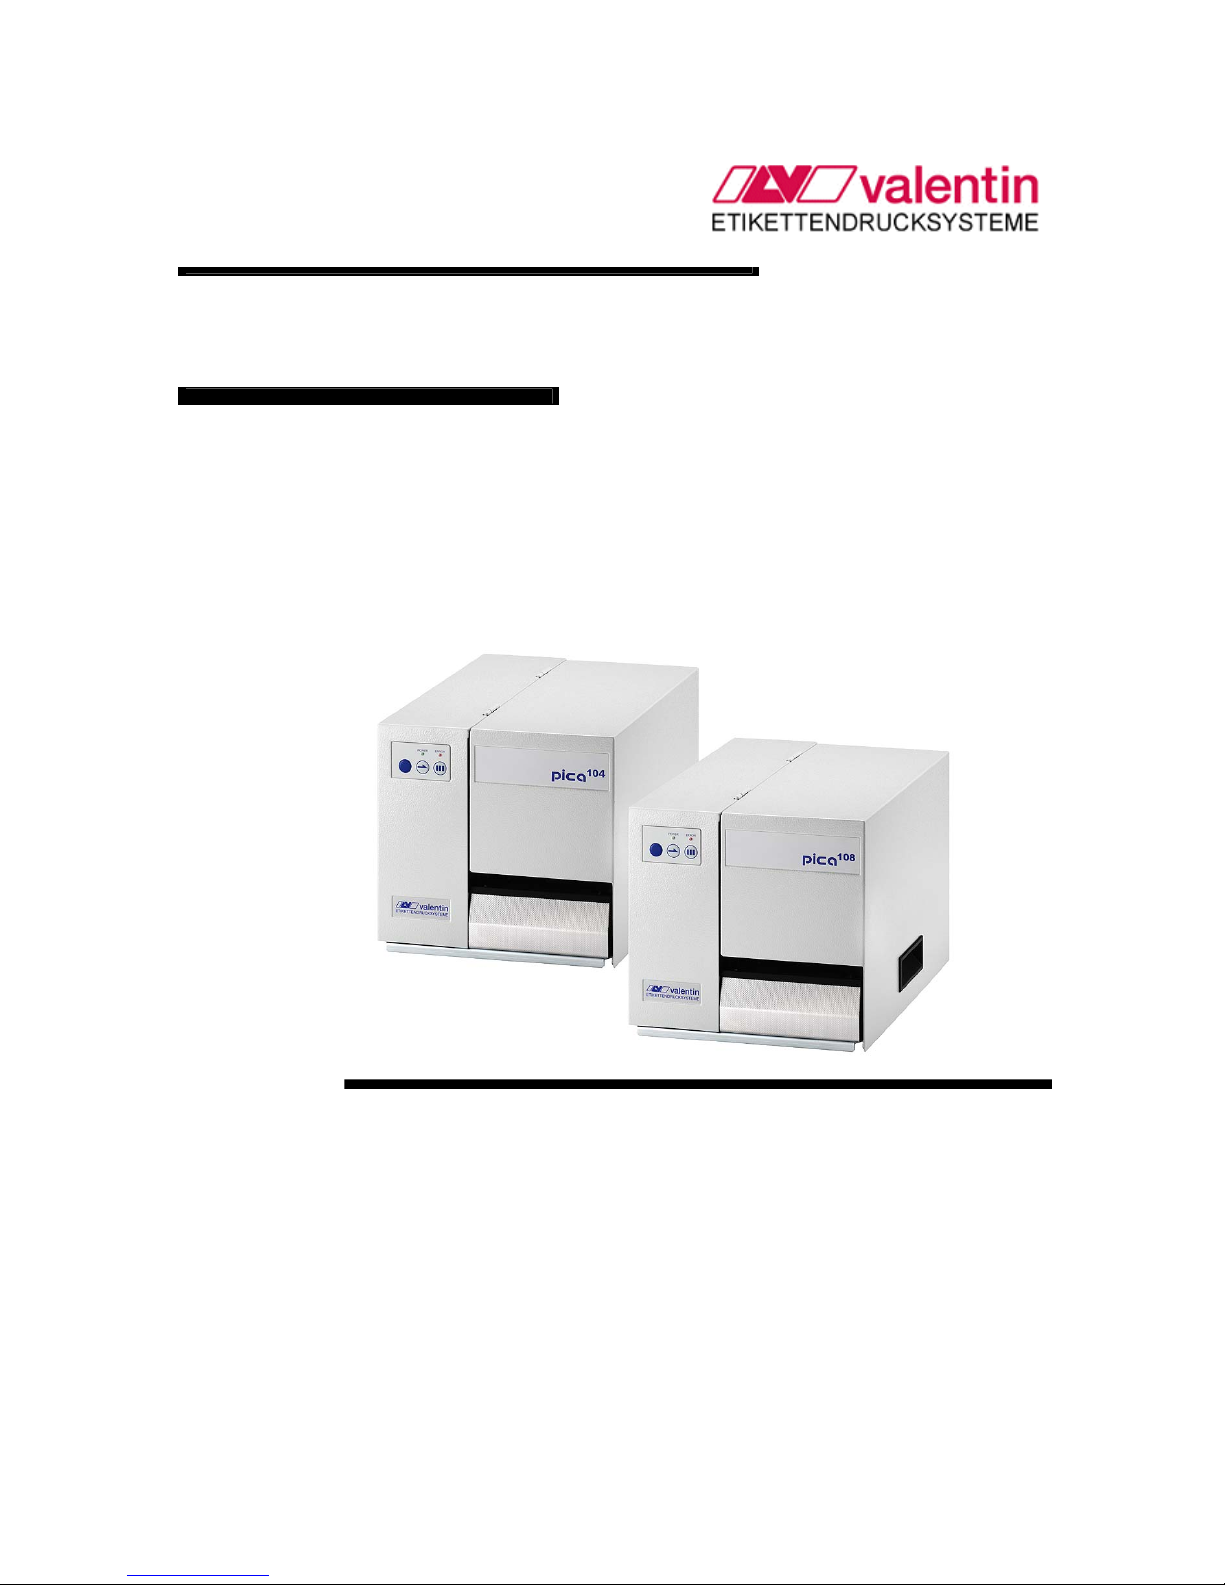
Operating manual – English
Thermal Transfer Printer
Pica Series
79.28.055 • May 2005
All rights reserved.
Carl Valentin GmbH • Neckarstraße 78 – 80 & 94 • 78056 Villingen-Schwenningen
support@valentin-carl.de • www.valentin-carl.de


Table of contents
1
PRINTER DRIVER INSTALLATION .......................................................................................1
Windows 95, Windows 98 and Windows Me ...........................................................................................................1
Windows NT ............................................................................................................................................................3
Windows 2000 Professional ....................................................................................................................................5
INITIAL OPERATION .............................................................................................................. 7
INSTALLATION.......................................................................................................................7
Printer rear...............................................................................................................................................................8
LOADING OF PRINT MATERIAL ...........................................................................................9
Loading of labels in standard mode.........................................................................................................................9
Loading of labels in rewinding mode .....................................................................................................................10
Loading of labels in cutter mode............................................................................................................................12
Loading of labels in peel-off mode.........................................................................................................................13
Loading of fan-fold material ...................................................................................................................................14
Loading of transfer ribbon......................................................................................................................................15
TECHNICAL DATA ...............................................................................................................16
TEAR-OFF ............................................................................................................................ 17
CLEANING OF CUTTER ......................................................................................................18
OPERATING AND DISPLAY ELEMENTS ............................................................................ 19
FUNCTIONS .........................................................................................................................20
Print .......................................................................................................................................................................20
Status print ............................................................................................................................................................20
Label feed..............................................................................................................................................................20
Saving ...................................................................................................................................................................20
REWINDING UNIT PR28 ...................................................................................................... 21

Table of contents
2
OPTIONS ..............................................................................................................................22
Dispenser operating modes...................................................................................................................................22
Cutter operating modes .........................................................................................................................................23
INPUT AND OUTPUT ........................................................................................................... 24
ERROR CORRECTION ........................................................................................................ 25
Error table..............................................................................................................................................................26
OPERATING CONDITIONS.................................................................................................. 31
Conditions for the place of installation ...................................................................................................................31
Installation of power supply ...................................................................................................................................31
Technical data of power supply .............................................................................................................................31
Stray radiation and immunity from disturbance......................................................................................................32
Connecting lines to external machines ..................................................................................................................32
Installation data lines .............................................................................................................................................32
Air convection ........................................................................................................................................................32
Limit values............................................................................................................................................................33
Guarantee .............................................................................................................................................................33
INDEX ................................................................................................................................... 35

Manual
1
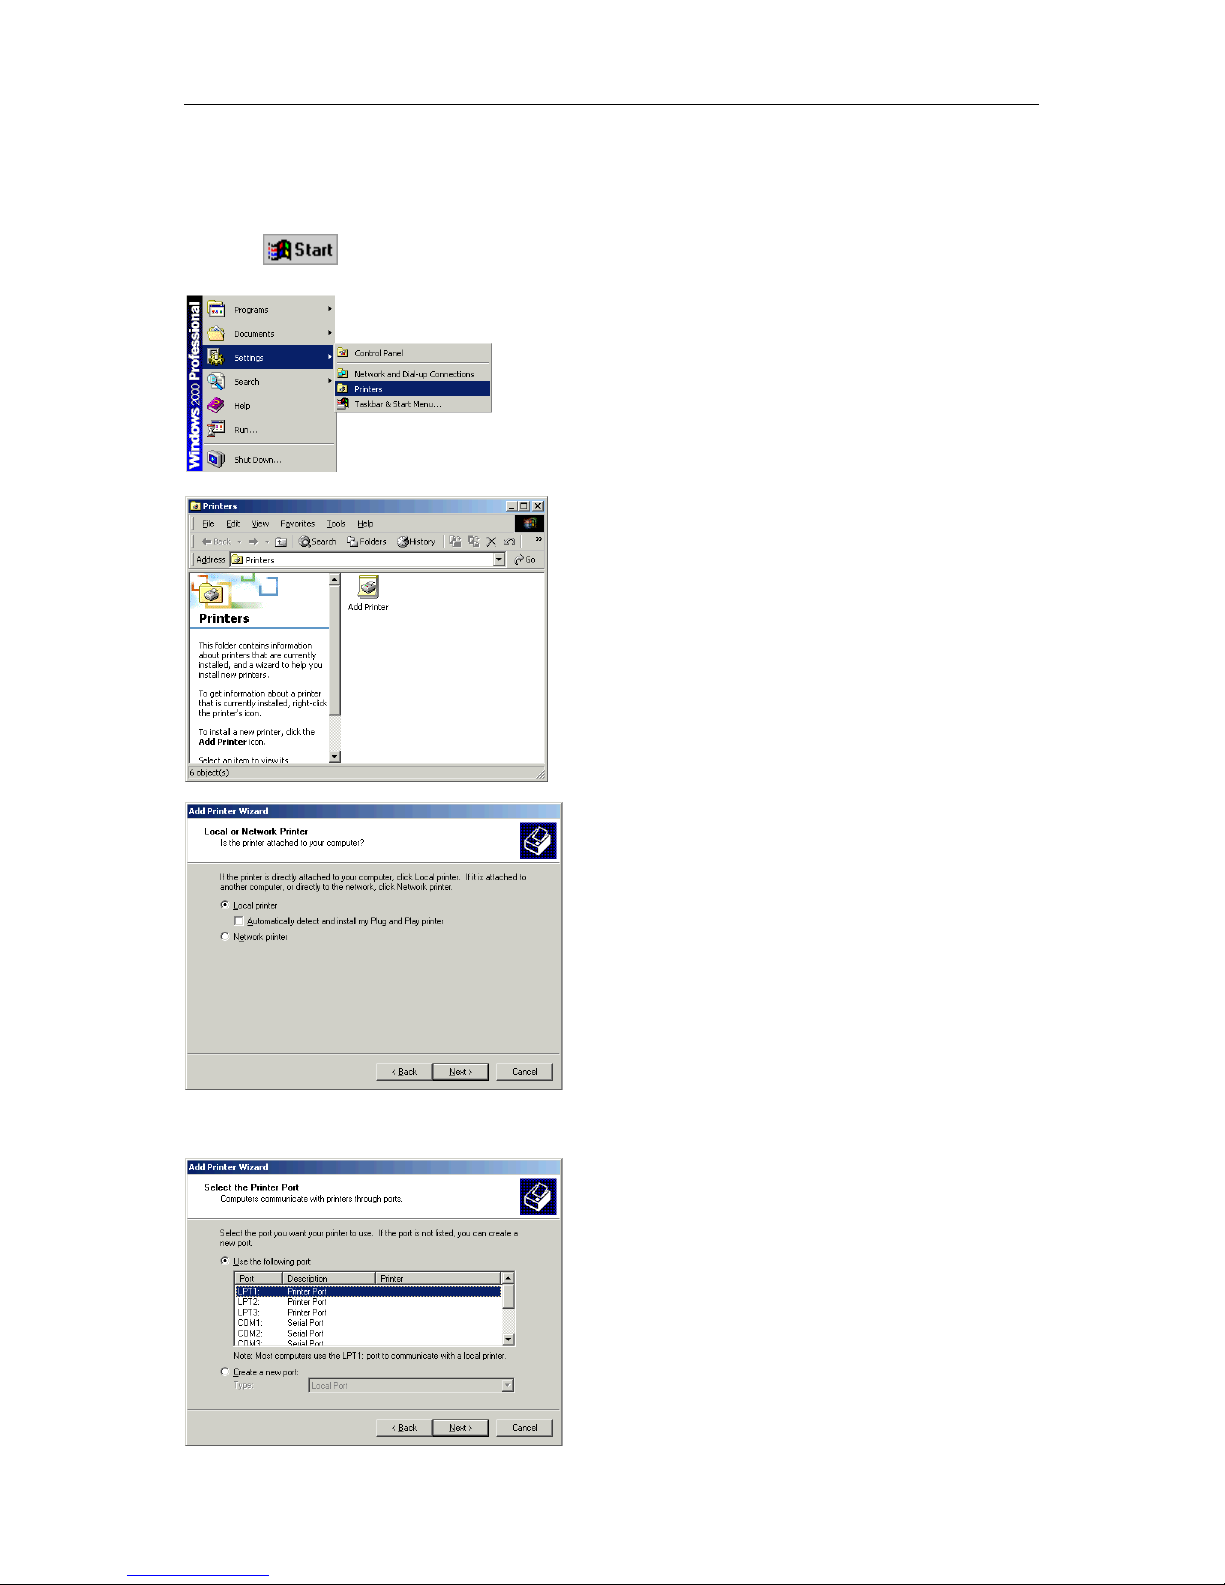
PRINTER DRIVER INSTALLATION
Windows 95, Windows 98 and Windows Me
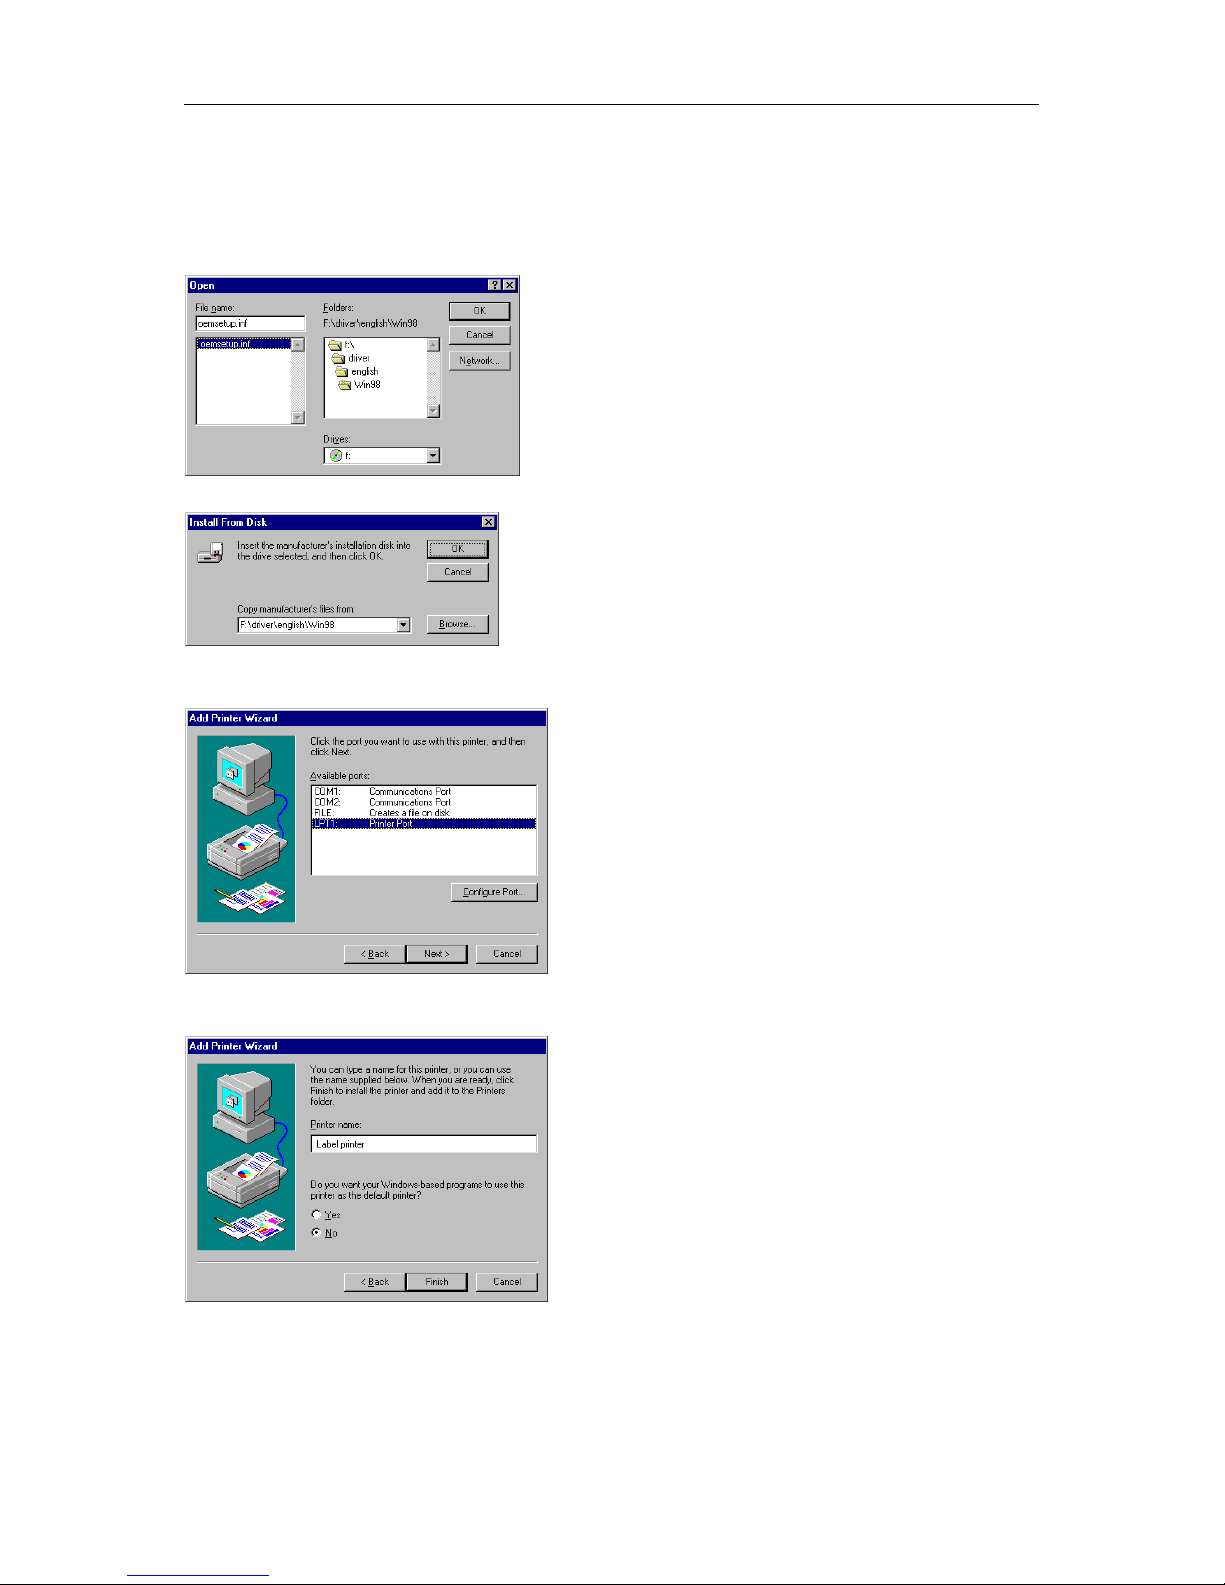
Start the computer and wait until the operating system is ready.
Click the
button.
Place the cursor first on Settings and then on Printers (see illustration below).
The following window appears:
Double click Add Printer and the first dialog of the Add Printer Wizard appears.
Click the Next button and the next dialog of the wizard appears.
Select either Local printer or Network printer and confirm your selection with Next.
Insert your installation CD and then click the Disk button.
Click the Browse button and the Open dialog box appears.
Select from the Drives field the drive which you are using.
Manual
2
Double click driver and then select one of the available languages.
At the moment you can either chose german or english.
Depending on your operating system select win95, win98 or winme.
The Open dialog box should appear as illustrated below.
Confirm the selection with OK and the following window appears.
Click again the OK button and select the desired printer from the list.
Confirm the selection with Next and the next page of the wizard appears.
Select from the list of Available ports the one which you desire.
Confirm the selection with Next and the next page of the wizard appears.
Click the Printer name field to enter another name as the already existing.
Confirm with Finish and the data is copied from the installation CD into the corresponding directory.
After this procedure the printer is add to the list of Available printers and the installation process is
finished.
Manual
3
Windows NT
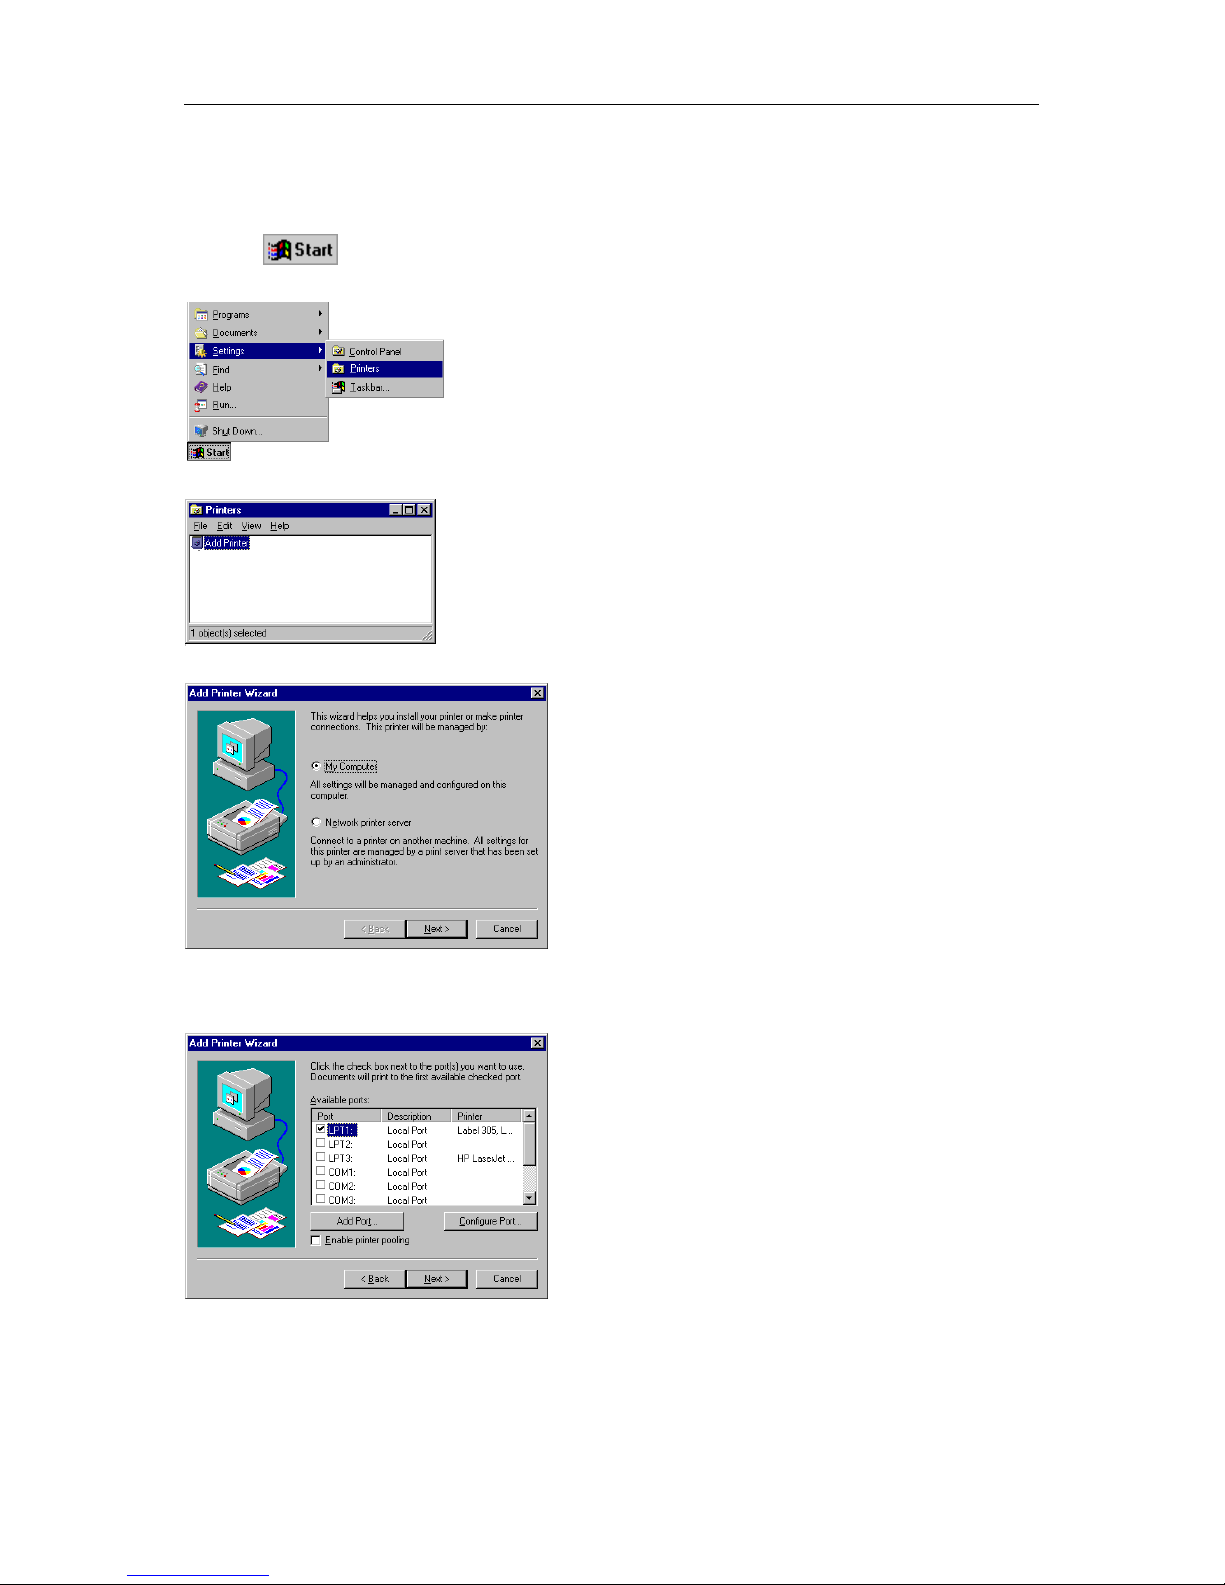
Start your computer and wait until the operating system is ready.
Click the
button.
Place the cursor first on Settings and then on Printers (see illustration below).
The following window appears:
Double click Add Printer and the first dialog of the Add Printer Wizard appears.
Select if the printer you want to install is a local printer (My Computer) or a network printer (Network
printer service).
Confirm your selection with Next and the next page of the wizard appears
Select from the list of Available ports the one which you desire and confirm the selection with Next.
Insert the installation CD and click the Disk button.
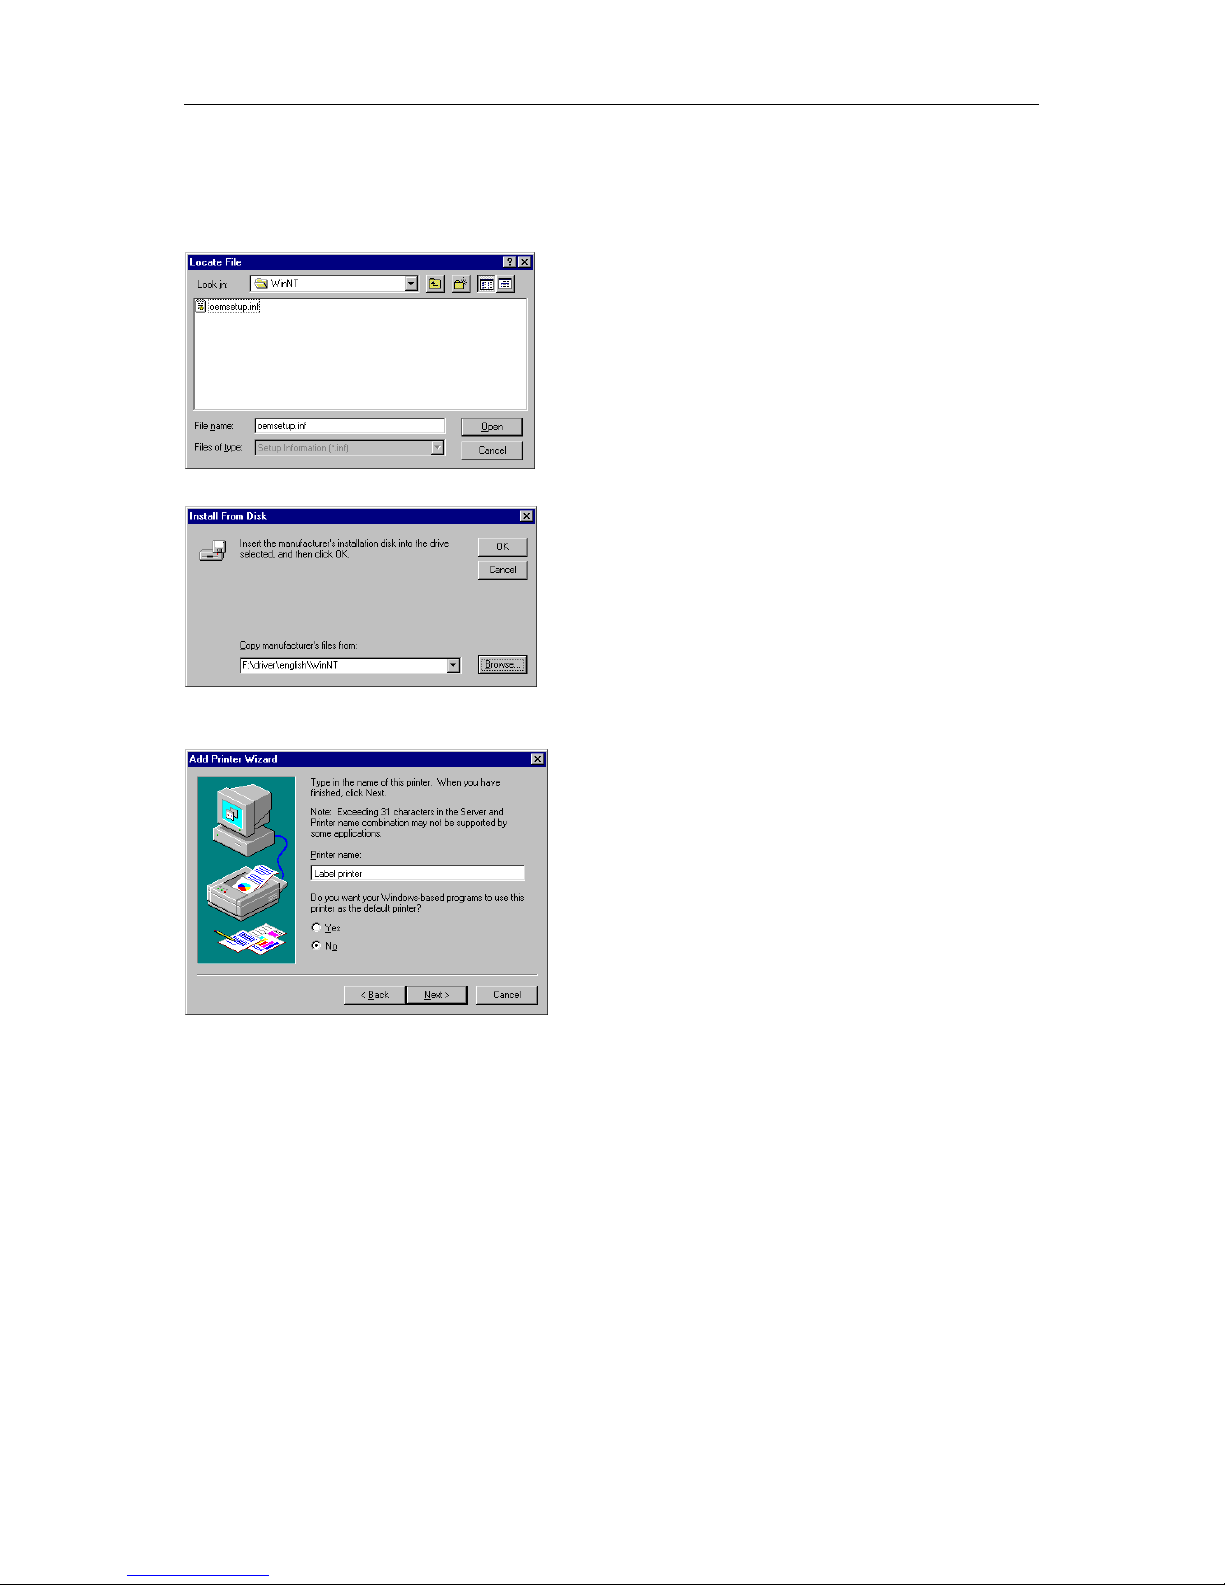
Click the Browse button and the Locate File dialog box appears.
Select from the Drives field the drive which you are using.
Manual
4
Double click driver and then select one of the available languages.
At the moment you can either chose german or english.
Select WinNT and the Locate File dialog should appear as illustrated below
Double click the oemsetup.inf file and the following dialog appears.
Click again the OK button and select the desired printer from the list.
Confirm the selection with Next and the next page of the wizard appears.
Click the Printer name field to enter an other name as the already existing.
Confirm with Finish and the data is copied from the installation CD into the corresponding directory.
After this procedure the printer is add to the list of Available printers and the installation process is
finished.
Manual
5
Windows 2000 Professional
Start your computer and wait until the operating system is ready.
Click the
button.
Place the cursor first on Settings and then on Printers (see illustration below).
Following dialog box appears:
Double click the Add Printer icon and the Add Printer Wizard appears.
Select either Local printer if you want to install a local printer or select Network printer if you want to
install the printer directly to the network.
Confirm your selection with Next and the next page of the Add Printer Wizard appears.
Manual
6
From the list of available ports, select the one you want the printer to use and confirm your selection
with Next. The next page of the Add Printer Wizard appears.
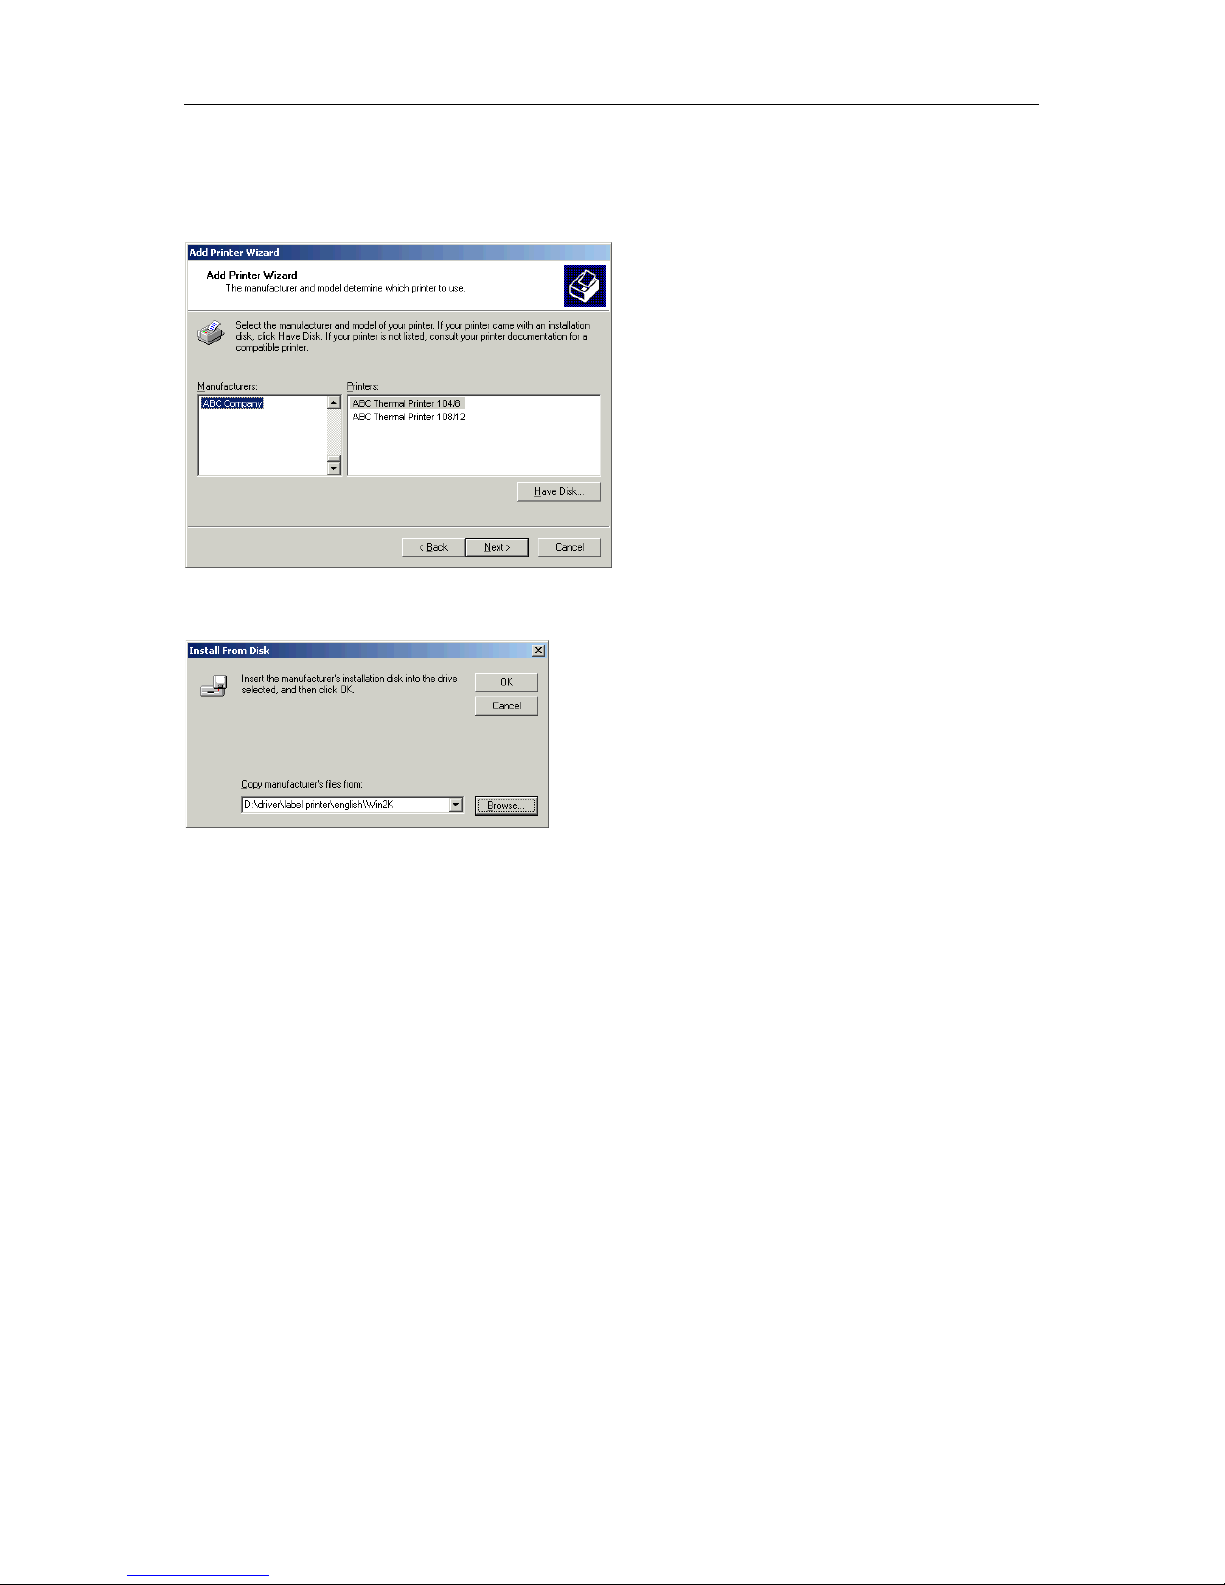
Insert the installation CD, then click the Have Disk button.
Click the Browse button and the Locate File dialog appears.
Double click the Driver folder, then select the desired printer.
After double clicking the desired printer you have the possibility to select one of the available
languages.
At this time you have the possibility either to select german or english.
Double click the Win2K (Windows 2000) folder.
Double click the *.inf file and you return to the Install From Disk dialog (see above).
Click the OK button and a list of available printers appears. Select the desired printer type and confirm
your selection with Next.
Click the Printer name field to enter another name as the already proposed one.
Follow the further instructions at the screen and data is copied from the installation CD into the
corresponding directory.
After termination of this procedure the printer is add to the list of Available printers and the
installation is finished.

Manual
7
INITIAL OPERATION
Turn on the power switch at the rear of the printer.
Load label material and if required transfer ribbon.
Start measuring by pressing the keys
and one after the other. Make sure that the printer is in
online mode (green LED lights up).
With the
key it is possible to change from online mode (green LED lights up) to offline mode
(green LED flashes).
Note: To guarantee a correct measuring at least two complete labels have to run through the
photocell (not when using continuous labels).
INSTALLATION
Note:
Before initial operation the operating conditions described at the end of this operating manual
have to be granted.
Please check the printer status immediately after the receipt, to be sure that nothing was damaged on
the route of transportation.
As the delivery is customized, please compare the supplied accessories with your order.
Note:
Keep the original packaging for possible later deliveries
Put the printer onto a suitable ground, avoiding exposure to bright sunlight.
Please avoid high humidity and dust environment and make sure that the printer is not used in dump
or wet area.
Our printers are exclusive for printing on labels, continuous paper and similar materials.
Operate the printer only with the original cable with safety contact.
Note:
When servicing or repairing, the power switch has to be turned off and the cable
disconnected.
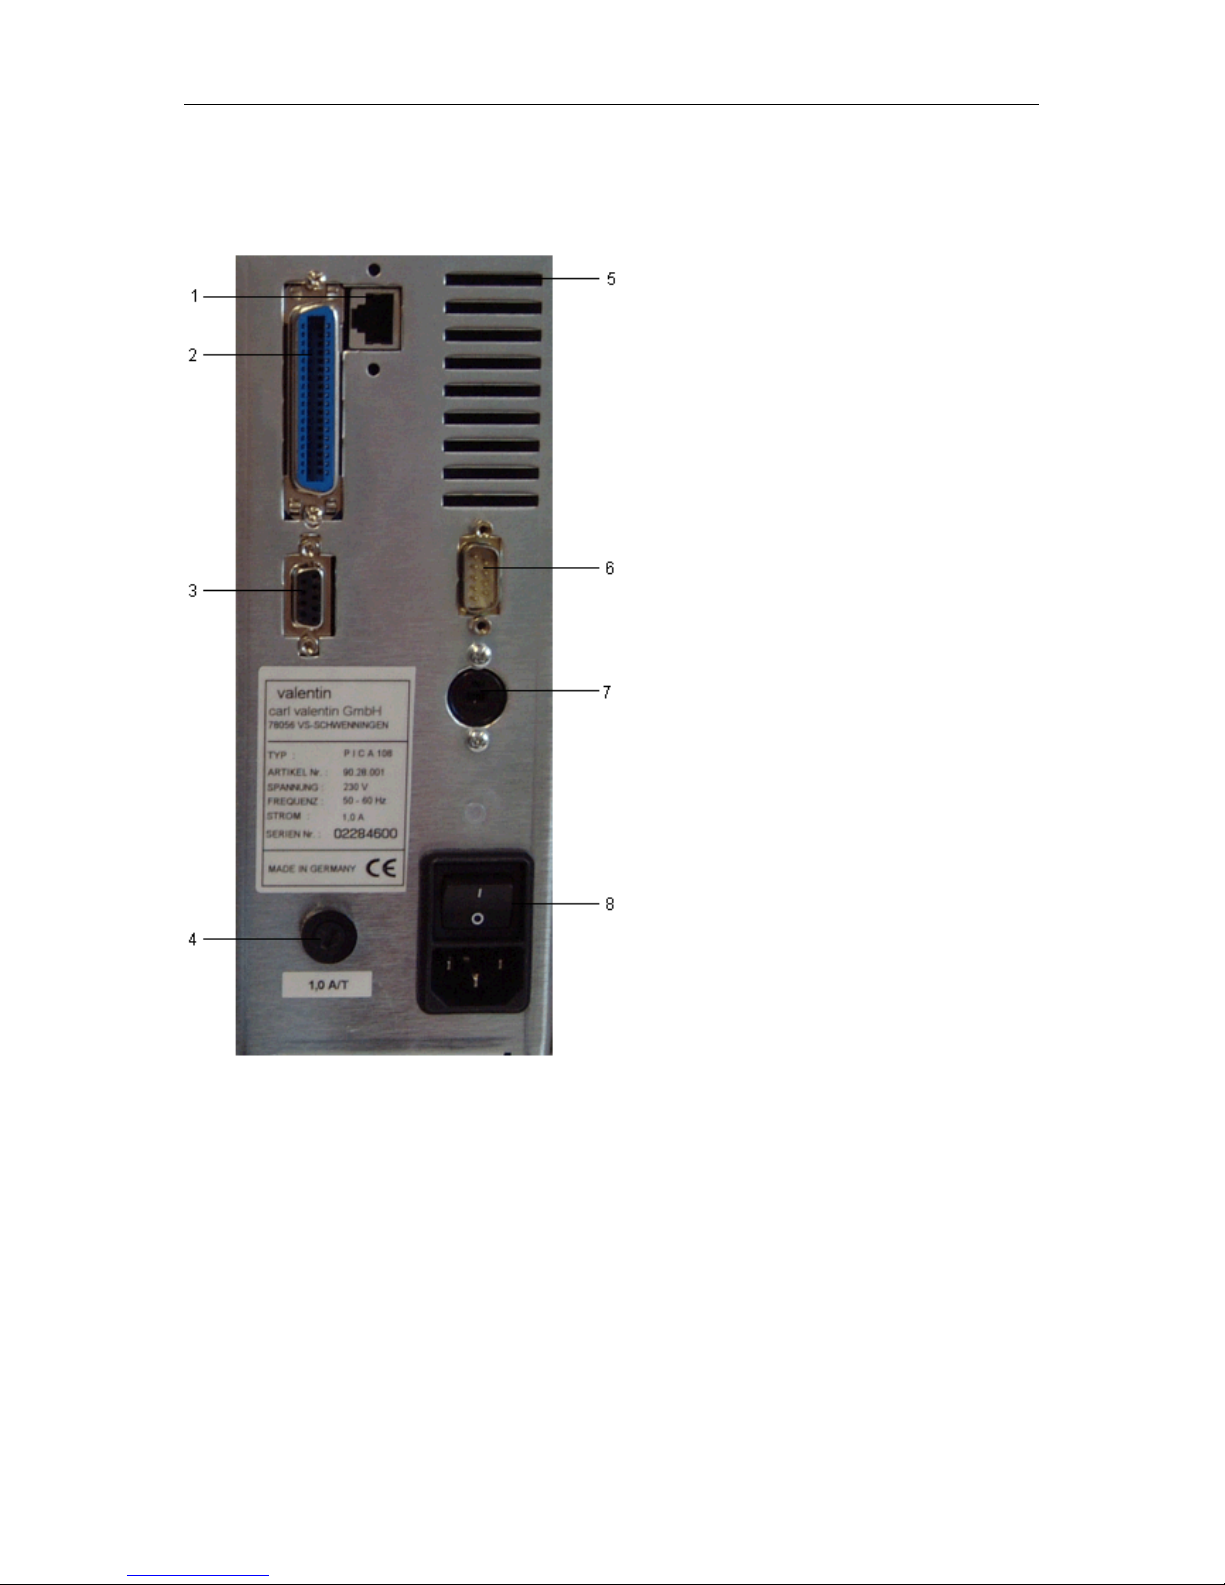
Connect the power line at the rear of the printer (see illustration below).
Connect the interface cable (RS-232) at the rear of the printer and lock it.
Make a connection to the computer at a free interface.
You can operate the printer via printer driver or via our label design software.
While creating connexions you have to switch off all devices (printer, PC, etc.) that you want to
connect. If you want to remove connexions you have to switch off the devices, tool.
Caution:
Not open printer cover in order to avoid electrical shock!
Manual
8
Printer rear
1 = Ethernet interface (option)
2 = Centronics interface
3 = Serial interface
4 = Primary fuse
5 = Slots for cooling system
6 = Input/Output (option)
7 = Connection for external unwinder
8 = Power supply with On/Off switch

Manual
9
LOADING OF PRINT MATERIAL
Loading of labels in standard mode
Open the printer cover.
Open printhead (A) by turning the lever (B) against clockwise direction.
Remove the outside label mounting plate (C).
Load the label roll (G) with inner winding onto the unwinding roll (D) and attach again the label
mounting plate (C).
Lead the label material (G) below the label guiding (E) and take care that the material runs through the
photocell (F).
To move the printhead (A) down, turn the lever (B) in clockwise direction until it locks.
Adjust the adjusting rings (H) of the label guiding to the width of material.
Close the printer cover.

Manual
10
Loading of labels in rewinding mode
Rewinder behind
Open the printer cover.
Open printhead (A) by turning the lever (B) against clockwise direction.
Remove the outside label mounting plate (C).
Load the label roll with inner winding onto the unwinding roll (D) and attach again the label mounting
plate (C).
Lead the label material (H) below the label guiding (E) and take care that the material runs through the
photocell (F).
Lead the supporting paper (I) between pressure roll and dispenser whip (G) to the rear.
Clamp the supporting paper (I) with the designated handle (H) at the rewinding roll (J).
To move the printhead (A) down, turn the lever (B) in clockwise direction until it locks.
Adjust the adjusting rings (K) of the label guiding to the width of material.
Close the printer cover.

Manual
11
Rewinder in front
Open the printer cover.
Open printhead (A) by turning the lever (B) against clockwise direction.
Remove the outside label mounting plate (C).
Load the label roll with inner winding onto the unwinding roll (D) and attach again the label mounting
plate (C).
Lead the label material (E) below the label guiding (F) and take care that the material runs through the
photocell (G).
Lead the supporting paper over the pressure roll (H) and clamp it with the designated handle at the
rewinding roll (J).
To move the printhead (A) down, turn the lever (B) in clockwise direction until it locks.
Adjust the adjusting rings (J) of the label guiding to the width of material.
Close the printer cover.

Manual
12
Loading of labels in cutter mode
Open the printer cover.
Open printhead (A) by turning the lever (B) against clockwise direction.
Remove the outside label mounting plate (C).
Load the label roll with inner winding onto the unwinding roll (D) and attack again the label mounting
plate (C).
Lead the label material (E) below the label guiding (F) and the printhead (A) and take care that the
labels run through the photocell (G).
Lead the label material between inserting angle (H) and cutter ledge.
To move the printhead (A) down, turn the lever (B) in clockwise direction until it locks.
Adjust the adjusting rings (I) of the label guiding to the width of material.
Close the printer cover.

Manual
13
Loading of labels in peel-off mode
Open the printer cover.
Open printhead (A) by turning the lever (B) against clockwise direction.
Remove the outside label mounting plate (C).
Load the label roll with inner winding onto the unwinding roll (D) and attach again the label mounting
plate (C).
Lead the label material (E) below the label guiding (F) and printhead (A) and take care that the labels
run through the photocell (G).
Move the axe first to the left side then lift the whip (H) to the bottom.
Strip some labels (E) from the supporting paper.
Lead the supporting paper (I) over the whip (J), then the transport roll (K) and the plastic roll (K).
Press again the whip (H) to the top.
Lead the supporting paper (I) to the outside of printer. In case of an existing rewinding unit clamp it
with the designated handle at the rewinding roll.
Close the printer cover.
We recommend a minimum label height of 15 mm.

Manual
14
Loading of fan-fold material
Open the printer cover.
Open printhead (A) by turning the lever (B) against clockwise direction.
Load the fan-fold material from the back in the corresponding guiding (F).
Lead the fan-fold material (C) through the photocell (E).
To move the printhead (A) down, turn the lever (B) into clockwise direction until it locks.
Close the printer cover.
Adjust the adjusting rings of the label guiding to the width of material.
Close the printer cover.

Manual
15
Loading of transfer ribbon
Note:
As for the electrostatic unloading the thin coating of the thermal printhead or other electronic
parts can be damaged, the transfer ribbon should be antistatic.
The use of wrong materials can lead to printer malfunctions and the guarantee can expire.
Note:
For the thermal transfer printing method it is necessary to load a ribbon, otherwise when
using the printer in direct thermal print it is not necessary to load a ribbon. The ribbons used
in the printer have to be at least the same width as the print media. In case the ribbon is
narrower than the print media, the printhead is partly unprotected and this could lead to early
wear and tear.
Open the printer cover.
Open printhead (A) by turning the lever (B) against clockwise direction.
Load the transfer ribbon roll with outer winding to the unwinding roll (D).
Make sure that you push the roll as far at it goes.
Place an empty ribbon roll on the rewinding roll (E).
Lead the transfer ribbon below the printhead (A).
Fix the ribbon with an adhesive tape in rotating direction at the rewinding roll (E).
To check the perfect run of the transfer ribbon, turn the rewinding roll (E) several times against
clockwise direction.
To move the printhead (A) down, turn the lever (B) in clockwise direction until it locks.
Close the printer cover.
Note:
Before loading a new transfer ribbon roll, we recommend to clean the printhead with
printhead and roll cleaner (97.20.002).

Manual
16
TECHNICAL DATA
Pica 104/8 Pica 108/12
Print
max. material width
min. label width
min. label height
print width
max. print height
resolution
print speed
printhead
110 mm
15 mm
6 mm
104 mm
750 mm (without Ethernet)
650 mm (with Ethernet
200 dpi
50-80 mm/s
Flat Type
110 mm
15 mm
6 mm
108 mm
500 mm (without Ethernet)
450 mm (with Ethernet
300 dpi
100 mm/s
Flat Type
Build-in fonts
free scalable fonts - Helvetica Bold and Roman,
Swiss light, Baskerville, Brush
Script, Monospace
pixel fonts
proportional fonts
6
6
6
6
Bar codes
EAN 8, EAN 13, EAN 128, EAN ADD ON, CODABAR,
Code 39, Code 39 extended, Code 93, Code 128, PZN Code,
Code 2/5 interleaved, Pharmacode, UPC A, UPC E,
Leitcode, Identcode
2D Bar codes
12 dot printer: CODABLOCK F, DataMatrix, MAXICODE, PDF417, QR Code
Composite bar codes
12 dot printer: GS1 DataBar Expanded, GS1 DataBar Limited, GS1
DataBar Omnidirectional, GS1 DataBar Stacked, GS1 DataBar Stacked
Omnidirectional, GS1 DataBar Truncated
Interfaces
serial RS-232, 2400...38400 Baud
parallel Centronics (SPP)
Ethernet/LAN internal 10/100 Base-T (Option)
USB (Option)
Transfer ribbon
core diameter
max. length
25,4 mm / 1"
300 m
Dimensions (mm)
width x height x depth 230 x 230 x x350
Weight
ca. 9 kg
Power requirements
Nominal voltage 230 V / 50-60 Hz - Fuse: 1 AT
115 V / 50-60 Hz - Fuse: 2 AT (option)
Power consumption max. 120 VA
Operating conditions
temperature 5 - 35°C
relative humidity max. 20 - 80 % (non-condensing)
Technical modifications are subject to change
Standard accessories
• CD ROM with Windows printer drivers for all operating systems as well as with the most important
manuals for printer and software
• Multi tasking operating systems
• Tear off
Options
• External rewinding unit
• Cutting unit (up to 110 mm material width)
• Dispensing unit (up to 110 mm material width)
• Input/Output

Manual
17
TEAR-OFF
In case the printer is not equipped with a cutter or a dispenser, then it has as default an integrated
tear-off edge.
After a print order you can lead the labels together with the supporting paper over the tear-off edge to
tear them off.
Standard labels are suitable when using the tear-off edge. Continuous labels are only limited to use as
the label adhesive can lead to contamination of the teething.
Using tear-off
• Unscrew the cover.
• Turn the cover at 180°.
• Screw on the cover again.
Attention:
The polished teething causes danger of injury.
To make sure that the labels after the print are positioned with the gap at the teething it is necessary
to set in the corresponding software the y-offset for the tear-off to approx. 17 mm.

Manual
18
CLEANING OF CUTTER
Caution:
Unplug the machine!
Danger of injury while working at the cutter!
Use a cotton stick (or similar) with special label remover (here available) and clean the cutter blade by
leading the stick from the left to the right side.
Repeat this procedure as long as the complete label material is removed.
Because of the fact that the cutter consists of two blades it is necessary to clean also the second
blade. Please follow the following steps:
Lead the screw driver (wide 3 mm) into the screw slit and turn it by 180° until you can see the second
cutter.
Repeat the cleaning procedure.

Manual
19
OPERATING AND DISPLAY ELEMENTS
LED signals of the printer
Green LED lights up Printer is in online mode
Green LED flashes Printer is in offline mode
Red LED lights up Error signal
Red LED flashes Stopped print order
Key Printer status Function
Online and Offline Mode Change from Online to Offline Mode
Online Mode Stop res. continue a print order
Offline Mode Label feed
Offline Mode Single cut (pressing long the key)
Error Print of error code
Offline Mode Test print (pressing short the key)
Offline Mode Status print (pressing long the key)
Offline Mode Error confirmation
Offline Mode Stop print order
+
Online Mode
Determine the label values (keep the
keys pressed one after the other)
+
Online Mode
Reset to default values (keep the
keys pressed > 10 sec. one after the
other)

Manual
20
FUNCTIONS
Print
Make sure before printing that the printer is in online mode.
Send the print order via serial or parallel interface.
After transmission of the corresponding data the label is printed automatically.
It is possible to discontinue and then again continue the print order by means of the
key.
In case of a stopped print order you can press the
key to print again the last printed label. This
is significant in case an error is occurred during a print order and the order of labels (e.g. counter) is
important.
Press the
key to cancel an already stopped print order and the key to continue a stopped
print order.
During a print order the printer is in online mode therefore it is possible to send data via interface at
the same time.
Status print
Press the key (> 2 sec.) to print the current printer settings and a sample label. Make sure that the
printer is in offline mode.
You can modify the printer settings via interface.
Label feed
For a feed by one label, press the key (< 2 sec.) but make sure that the printer is in offline
mode.
Saving
Saving of data such as text or graphic can be effected to the internal data memory. It is possible to
save data either by our label design software or by interface.
For detailed information, see the corresponding manual.

Manual
21
REWINDING UNIT PR28
1
It is possible to use the external rewinding unit PR28 for:
• rewinding the labels onto roll
• rewinding the supporting paper in dispensing mode
Rewind labels onto roll
The rewinding unit is mounted at the front side of the printer without the enclosed return pulley.
Rewind supporting paper
The rewinding unit PR28 is mounted at the back side of the printer with the enclosed return pulley.
Setting tension
By modifying the tension with help from the central screw (1) it is possible to adapt the rewinding unit
PR28 to different demands.
Please note that the modification of tension should result in minor print quality!
Loosen the screw: Reduce tension
Screw the screw: Increase tension
Reduce of tension results in a less tighten rewinding of supporting paper res. the label.
Increase of tension results in a more tightens rewinding of supporting paper res. the label.

Manual
22
OPTIONS
Dispenser operating modes
It is possible to select the desired operating mode either by corresponding printer driver or label
design software.
The printer supports the following operating modes:
Off
It is printed without the labels are dispensed.
I/O static:
The input signal is analyzed, i.e. it is printed as long as the signal exists. The printer prints the number
of prints which you entered at print start.
The set dispenser offset is not taken into consideration.
I/O static continuous:
For description of this operating mode please see I/O static.
Continuous means that it is printed as long as new data is transferred via interface.
The set dispenser offset is not taken into consideration.
I/O dynamic:
The external signal is analyzed dynamically, i.e. in case the printer is in 'waiting' mode then a single
label is printed at each signal change. After the print the set dispenser offset is taken into
consideration, i.e. this results to a backfeed.
I/O dynamic continuous:
For description of this operating mode please see I/O dynamic.
Continuous means that it is printed as long as new data is transferred via interface.
Photocell:
The printer is controlled via photocell. The printer prints automatically a label when the user tears off
the label at the tear-off edge. The print order is finished at the nominal number of labels.
Photocell continuous:
For description of this operating mode please see Photocell.
Continuous means that it is printed as long as new data is transferred via interface.

Manual
23
Cutter operating modes
It is possible to select the desired operating mode either via the corresponding printer driver or the
label design software.
The printer supports the following operating modes:
Off
It is printed without cutting the labels.
Without backfeed
A cut is effected after each printed label.
The selection of this operating mode is only useful if the upper part of the label does not contain
printable data.
With backfeed
A cut is effected after each printed label.
Interval with final cut
A cut is effected after a fixed number of labels which you have already selected at print start and
additionally at the end of the print order.
Interval without final cut
A cut is effected after a fixed number of labels which you have already selected at print start.
However, at the end of the print order no final cut is effected despite the set interval is at the end of the
print order at the same time.
Final cut
A cut is only effected at the end of the print order.
Single cut
Press the
key (> 2 sec.) to release a single cut. Make sure that the printer is in offline mode.

Manual
24
Input and Output
(9-term. DSUP pin)
This option is not part of the standard version and has to be ordered separately.
The signal output is lead via optical couplers.
In case a control output is active, then the corresponding output is to strain with a maximum current
of 20mA.
Pin equipment of 9-term DSUP pin:
Output Input

Manual
25
ERROR CORRECTION
In case an error occurs, the printer stops, i.e. the print order is interrupted.
Press the
key to print the error code and at the same time the corresponding text.
Recover the error, and then press the
key to bring the printer again into operation.
An active print order is now stopped. Press the
key to print again the last printed label.
This is significant in case an error is occurred during a print order and the order of labels (e.g. counter)
is important.
Press the
key to continue a print order or the key to cancel the print order.

Manual
26
Error table
Error No.
Possible causes Possible error correction
1 Line rises up completely or partly over the
upper edge of label.
Move line down (increase Y value).
Check rotation and font.
2 Line rises up completely or partly over the
bottom edge of label.
Move line up (decrease Y value)
Check rotation and font
3 One res. several characters of the text is
res. are not available in the selected font.
Change text.
Change font.
4 Selected code is not available. Check code type.
5 Selected position is not available. Check position.
6 Selected font is not available. Check font.
7 Selected font is not available. Check font.
8 Text cannot be fit in the selected field. Check field size.
9 While measuring no label was found.
Set label length is too large.
Restart measuring process.
Check label length.
10 During the print order the ribbon roll goes
empty.
Defect at the transfer ribbon photocell.
Change transfer ribbon.
Check transfer ribbon photocell
(Service Function).
11 Stop bit error. Check stop bits.
Check baudrate.
Check cable (printer and PC).
12 Parity error. Check parity.
Check baud rate.
Check cable (printer and PC).
13 Loss of data at serial interface (RS-232). Check baud rate.
Check cable (printer and PC).
14 Received line number is invalid at RS-232
and Centronics.
Check sent data.
Check connection PC - printer.

Manual
27
Error No.
Possible Causes Possible Error Rectification
15 Invalid length of received mask
statement.
Check sent data.
Check connection PC – printer.
16 Transferred mask statement invalid. Check set data.
Check connection PC – printer.
17 No end of data found. Check set data.
Check connection PC – printer.
18 One res. several characters of the text
is res. are not available in the selected
font.
Change text.
Change font.
19 Unknown transferred data record. Check sent data.
Check connection PC – printer.
20 For check digit control the entered res.
received check digit is wrong.
Calculate check digit anew.
Check code data.
21 Selected SC factor is invalid for EAN
res. UPC.
Check SC factor.
22 Entered digits for EAN res. UPC are
invalid
< 12; > 13.
Check number of digits.
23 Selected check digit calculation is not
available in the bar code.
Check calculation of check digit.
Check bar code type.
24 Selected zoom factor is not available. Check zoom factor.
25 Entered sign is not available. Check offset value.
26 Entered offset value is invalid. Check offset value.
27 Printhead temperature is too high.
Defective printhead sensing device.
Decrease the print strength.
Change printhead.
28 While cutting an error occurred – paper
jam
Check label run.
Check cutter run.
29 Entered data do not correspond to the
characters allowed by the application
identifier.
Check code data.
30 Selected application identifier is not
available in EAN 128.
Check code data.
31 Continuous label mode is set.
Printer has received command
statement via interface, number of
lines is < 2
Missing label length.
Deselect continuous mode or transfer
a dummy line with Y coordinates =
label length.

Manual
28
Error No.
Possible Causes Possible Error Rectification
32 Real Time Clock function is selected
but the battery is empty.
Defective RTC.
Change or recharge battery.
Change RTC component.
34 No print memory found. Check memory assembly on CPU.
35 At start of a print order the printhead is
up.
Move printhead down and start print
order anew.
36 BCD error.
Invalid format for the calculation of
Euro variable.
Check entered format.
37 BCD error.
Invalid format for the calculation of
Euro variable.
Check entered format.
38 BCD error.
Invalid format for the calculation of
Euro variable.
Check entered format.
39 Flash component error. Run a software update.
Change CPU.
40 Invalid length of the received
command statement.
Check sent data.
Check connection PC – printer.
42 Drive error Check the entered letter for drive.
43 Drive not formatted. Format your drive.
44 Invalid file name Check the file name (not allowed
special characters were possibly
used).
45 Path too long Select another path.
47 Directory not file Check the file name.
48 File already open Check if the file is already in use.
49 No file(s) Check the file name.
51 No more memory Check the remaining storage space.
Change the card.
Delete files which are no longer used.
52 Main directory full Delete files which are no longer used
from the main directory.

Manual
29
Error No.
Possible Causes Possible Error Rectification
53 Drive full Delete files which are no longer used
from the card.
54 File/directory exists Check the file name and rename it.
55 File too large
57 Invalid graphic file The selected file does not contain
graphic data.
Check the file name.
58 Directory not empty First of all delete all files from the
directory.
62 Printer is equipped with wrong FPGA. Set correct printer type.
Change FPGA.
67 Wrong definition of column width res.
number of columns.
Reduce the column width res. correct
the number of columns.
68 Connected bar code scanner signals a
device error.
Check the connection scanner/printer.
Check scanner (dirty).
69 Scanner error:
Bad print quality.
printhead completely soiled or
defective.
Print speed too high.
Increase contrast.
Clean or exchange printhead
(if necessary).
Reduce print speed.
70 Scanned data does not correspond to
the data which is to print.
Exchange printhead.
71 As page number either 0 or a number
> 9 is selected.
Select a number between 1 and 9.
72 JobPrint Page Selection not available
or wrong string.
Check defined pages.
73 Page is not defined. Check print definition.
74 Wrong format for customised entry. Check the format string.
75 Wrong format for date/time. Check format string.
77 Selection of print of several columns
and also mirror/rotate.
Impossible to select one of both
functions.
78 System file. Not possible.

Manual
30
Error No.
Possible Causes Possible Error Rectification
79 Faulty definition of shift times
(overlapping times).
Check definition of shift times.
80 RSS bar code error. Check definition and parameter of RSS
bar code.
81 RSS bar code error. Check sent data.
82 Printing creation was still active at print
start.
Reduce print speed.
Use printers' output signal for
synchronisation.
Use bitmap fonts to reduce generating
time.
83 RSS bar code error. Displace zero point sensors.
Check sensors in service functions
menu.
84 No font data available. Execute a software update.
87 RFID unit cannot recognise a label. Displace RFID unit or use an offset.
88 Error while checking programmed
data.
Faulty RFID label.
Check RFID definitions.
89 Error at programming the RFID label. Label positioning.
Faulty label.
90 Faulty or incomplete definition of RFID
data.
Check RFID data definitions.
91 Definition of label data does not
correspond with the used label.
Check storage partitioning of used
label type.
92 Error at programming the RFID label
(locked fields).
Check RFID data definitions.
Label was already programmed.
93 Error at programming the RFID label. Check RFID definitions.

Manual
31
OPERATING CONDITIONS
Before initial operation and during operation these operating conditions have to be observed to
guarantee save and interference-free service of our printers.
Therefore please carefully read these operating conditions.
In case of questions referring to the practical handling of these conditions please contact us or your
after-sales service station.
Transport and storage of our printers exclusively in original packing.
Installing and initial operation of printers only when the operating conditions are fulfilled.
Initial operation, programming, operation, cleaning and service of our printers only after careful study
of our manuals.
Operation only by specially trained persons.
Note:
We recommend to perform trainings regularly.
These indications are also valid for someone else's equipment supplied by us.
Only use original spare and exchange parts.
Conditions for the place of installation
The place of installation has to be plain and free of vibration. Currents of air to be avoided.
The printers have to be installed to ensure optimal operation and servicing.
Installation of power supply
The installation of the power supply to connect our printers has to be effected according to the
international rules and regulations, especially the recommendations of one of the three following
commissions:
• International Electronic Commission (IEC)
• European Commitee for Electrotechnical Standardization (CENELEC)
• Verband Deutscher Elektrotechniker (VDE)
Our printers are constructed according to VDE and have to be connected to a grounded conductor.
The power supply has to be equipped with a grounded conductor to eliminate internal interfering
voltage.
Technical data of power supply
Power line voltage and power line frequency: see type plate
Allowable tolerance of power line voltage: +6% to −10% of nominal value
Allowable tolerance of power line frequency: +2% to −2% of nominal value
Allowable distortion factor of power line voltage: <=5%
Anti-interference measures:
In case your net is inferred (e.g. by using thyristor controlled machines) anti-interference measures
have to be taken:
• Provide separate power supply for our printers.
• In case of problems please connect capacity-decoupled isolation transformer or similar
interference suppressor in front of our printers.

Manual
32
Stray radiation and immunity from disturbance
• Stray radiation according to:
DIN EN 50081-2
*DIN EN 55011 / 12.98
*DIN EN 55022 7 4.98
• Stray radiation according to EN 50082-2
Electromagnetic fields according to DIN EN 61000-4-3 / 8.97
Discharge of static electricity according to DIN EN 61000-4-2 / 3.96
Fast transient burst according to DIN EN 61000-4-4 / 3.96
Line connected disturbance, induced by high-frequent fields according to DIN EN 61000-4-4 / 9.97
Surge according to DIN EN 61000-4-5 / 9.96
Voltage interruption and voltage drop according to DIN EN 61000-4-11
*
Warning
This is a machine of the class A. This machine can cause radio interference at living areas. In
this case the operator can require to execute appropriate measures and arise for it.
Connecting lines to external machines
All connecting lines have to be guided in shielded lines. The shielding has to be connected on both
sides to the connector shell.
It is not allowed to guide lines parallel to power lines. If a parallel guiding cannot be avoided a distance
of at least 0,5 m has to be observed.
Temperature of lines between: −15 and +80 °C.
It is only allowed to connect devices which fulfil the request ‘Safety Extra Low Voltage‘ (SELV). These
are generally devices which are checked corresponding to EN 60950.
Installation data lines
Allowable lines
Shielded line: 4 x 2 x 0,14 mm² ( 4 x 2 x AWG 26)
6 x 2 x 0,14 mm² ( 6 x 2 x AWG 26)
12 x 2 x 0,14 mm² (12 x 2 x AWG 26)
Sending and receiving lines have to be twisted in pairs.
Max. line length: Interface V 24 (RS232C) - 15 m (with shield)
Centronics - 3 m (with shield)
Air convection
In order to avoid inadmissible heating free air convection has to be ensured.

Manual
33
Limit values
Protection according to IP: 20
Ambient temperature °C (operation): Min. +5 Max. +35
Ambient temperature °C (storage): Min. −20 Max. +60
Relative air humidity % (operation): Max. 80
Relative air humidity % (storage): Max. 80 (bedewing the printers not allowed)
Guarantee
We do not take any responsibility for damage caused by:
• Ignoring our operating conditions and operating manual.
• Incorrect electric installation of environment.
• Building alterations of our printers.
• Incorrect programming and operation.
• Not performed data protection.
• Using of not original spare parts and accessories.
• Natural wear and tear.
Note:
Improper handling is difficult to prove and therefore the producer does not grant guarantee for
the printhead.
When (re)installing or programming our printers please control the new settings by test running and
test printing. Herewith you avoid faulty results, reports and evaluation.
Only specially trained staff is allowed to operate the printers.
Control the correct handling of our products and repeat training.
We do not guarantee that all features described in this manual exist in all models. Caused by our
efforts to continue further development and improvement, technical data might change without notice.
By further developments or regulations of the country it is possible that illustrations and examples
shown in the manual are different from the delivered model.
Please pay attention to the information about admissible print media and the notes to the printer
maintenance, in order to avoid damages or premature wear.
We endeavoured to write this manual in an understandable form to give and you as much as possible
information. If you have any queries or if you discover errors, please inform us to give us the possibility
of improving our manual.


Index
35
INDEX
A
Air convection ................................................................................................................................................ 32
Allowable lines............................................................................................................................................... 32
Ambient temperature (operation)................................................................................................................... 33
Ambient temperature (storage)...................................................................................................................... 33
Anti-interference measures ........................................................................................................................... 31
C
Cleaning (cutter) ............................................................................................................................................ 18
Connecting lines (external machines)) .......................................................................................................... 32
D
Data lines Installation) ................................................................................................................................... 32
E
Error .............................................................................................................................................................. 25
Correction.................................................................................................................................................. 25
Error correction...................................................................................................................... 26, 27, 28, 29, 30
External machines (connecting lines) ............................................................................................................ 32
F
Functions
Label feed.................................................................................................................................................. 20
Saving ....................................................................................................................................................... 20
G
Guarantee ..................................................................................................................................................... 33
I
Immunity from Disturbance............................................................................................................................ 32
Initial operation ................................................................................................................................................ 7
Input/Output................................................................................................................................................... 24
Installation .......................................................................................................................................................7
Data lines................................................................................................................................................... 32
Power supply............................................................................................................................................. 31
L
Labels
Label feed.................................................................................................................................................. 20
Limit values
Air humidity................................................................................................................................................ 33
Protection ..................................................................................................................................................33
Temperaturer.............................................................................................................................................33
Loading material ............................................................................................................................................ 15
Cutter mode............................................................................................................................................... 12
Fan-fold material........................................................................................................................................ 14
Peel-off mode ............................................................................................................................................ 13
Rewinding mode........................................................................................................................................10
standard mode............................................................................................................................................. 9
Transfer ribbon .......................................................................................................................................... 15

Index
36
O
Operating conditions
Air convection ............................................................................................................................................ 32
Connecting lines to external machines ...................................................................................................... 32
Guarantee.................................................................................................................................................. 33
Important notes.......................................................................................................................................... 31
Installation of data lines ............................................................................................................................. 32
Installation of power supply ....................................................................................................................... 31
Limit values................................................................................................................................................ 33
Place of installation.................................................................................................................................... 31
Stray radiation and immunity from disturbance.......................................................................................... 32
Technical data of power supply ................................................................................................................. 31
Options
Cutter......................................................................................................................................................... 23
Dispenser ..................................................................................................................................................22
P
Place of installation (conditions) .................................................................................................................... 31
Power supply
Installation .................................................................................................................................................31
Technical data ........................................................................................................................................... 31
PR28 Rewinding unit ..................................................................................................................................... 21
Print
Print procedure .......................................................................................................................................... 20
Status print ................................................................................................................................................20
Printer driver installation
Windows 2000 ............................................................................................................................................. 5
Windows 95/98/Me ...................................................................................................................................... 1
Windows NT ................................................................................................................................................ 3
R
Rewinding unit PR28 ..................................................................................................................................... 21
S
Stray radiation ...............................................................................................................................................32
T
Tear-off..........................................................................................................................................................17
Temperature
Ambient (operation) ................................................................................................................................... 33
Ambient (storage) ...................................................................................................................................... 33
Lines..........................................................................................................................................................32
Tolerance
Power line frequency ................................................................................................................................. 31
Power line voltage ..................................................................................................................................... 31
 Loading...