

Page 1
Issue 3
V-9809 Vandal-Resistant Wall Enclosure Flexhorn
V-9880 Vandal-Resistant Flexhorn One-Way
V-9890 Vandal-Resistant Flexhorn Talkback
INSTALLATION GUIDE
DIMENSIONS/WEIGHT
10.00"H x 12.25"W x 4.00"D
(25.4cm H x 31.12cm W x 10.16cm D)
7.0 lbs. (3.2 kg) without Flexhorn (V-9809)
8.35 lbs. (3.8 kg) with Flexhorn (V-9880 and V-9890)
1 947669
Page 2
INSTALLATION
Valcom Support Services, On-Call House, Brookhill Close, Diggle, Oldham, OL3 5NH, UK
www.valcom.co.uk Email : sales@valcom.co.uk Tel : 01457 810 391
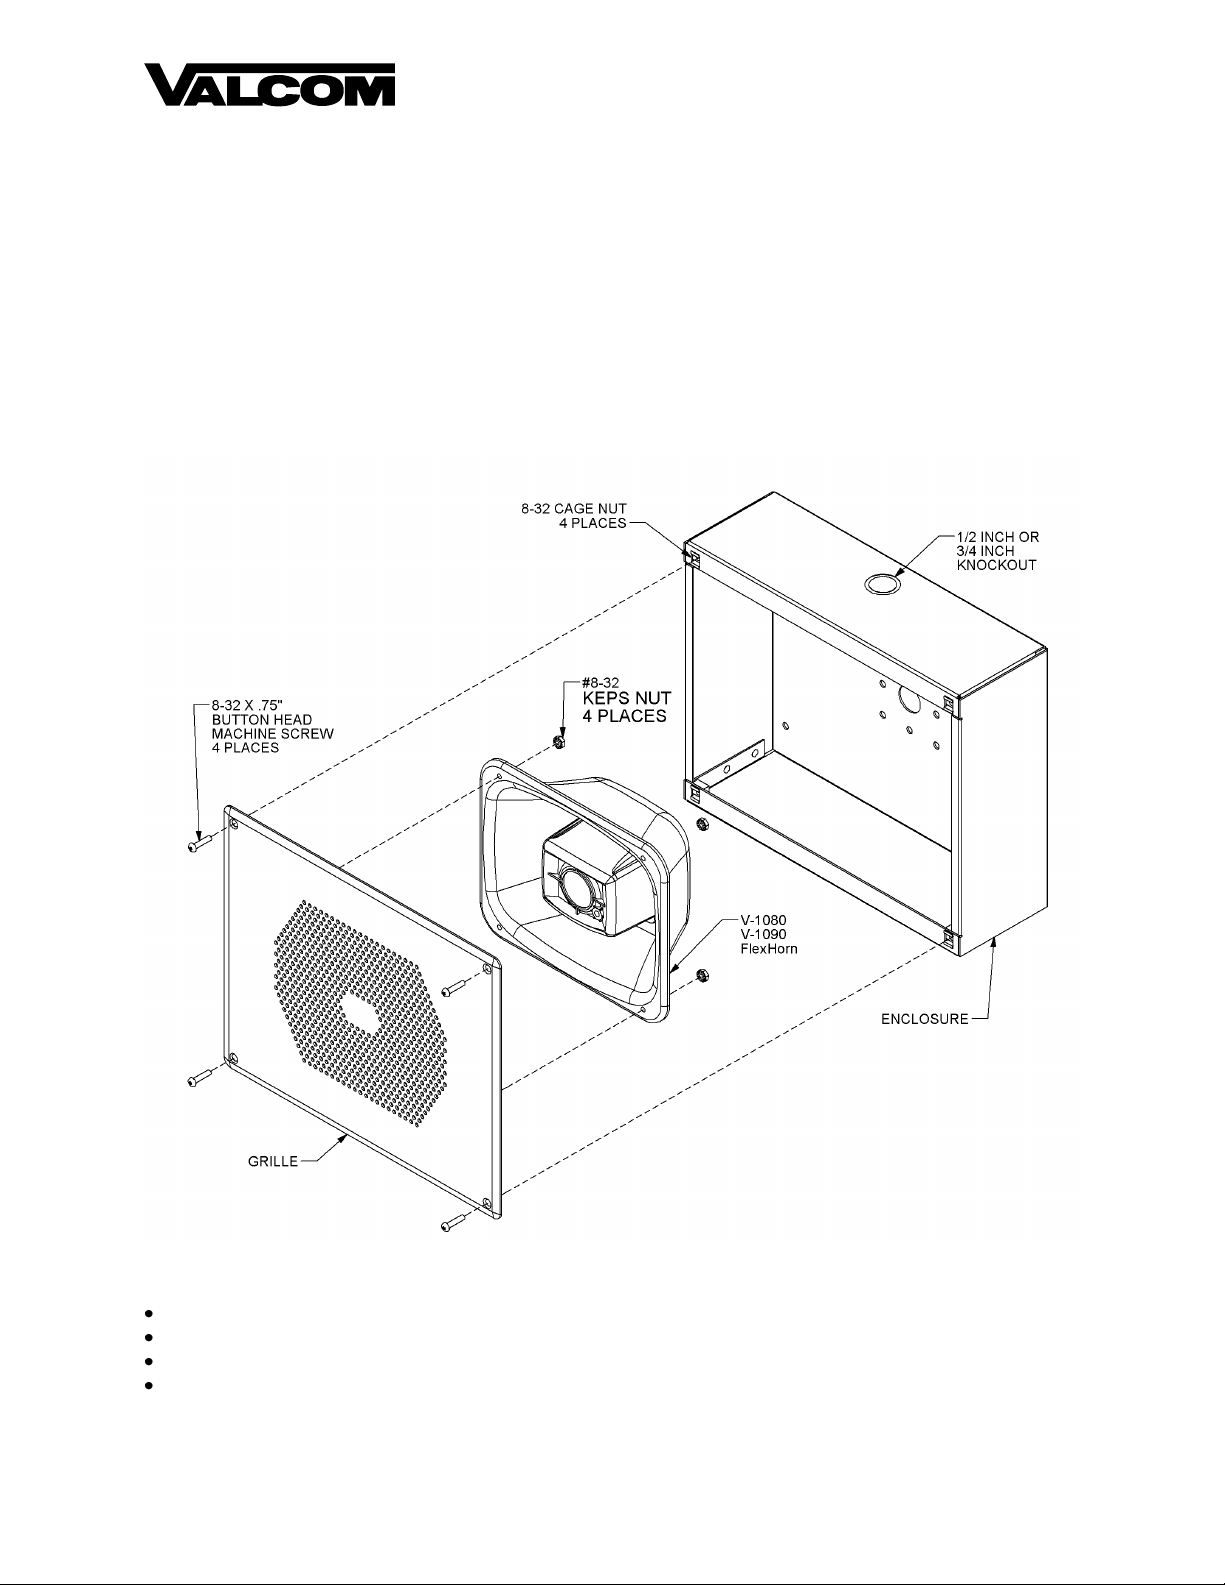
Remove the wall speaker enclosure from the
packing container. Using a Phillips screwdriver,
remove the two screws securing the grille to the
enclosure. Remove the grille and remove any
hardware packed inside the enclosure.
Pre-drilled 13/64” mounting holes in the back of
the enclosure are designed to fit a single gang,
double gang or octagon outlet box. If not
attaching to an outlet box, use the enclosure as
a template. Hold the enclosure in the desired
position on the wall and mark the location of
mounting holes. Depending on wall construction
type, prepare the mounting hole locations on the
wall to securely attach the enclosure.
Wiring may be inserted through the large hole in
the back of the enclosure, or through the
knockout hole in the top of the enclosure. Insert
audio wires and power wires (if needed) through
desired hole. Use mounting hardware (not
included) appropriate for the wall type to
securely mount the enclosure to the wall.
Model V-9809 does not include a speaker.
Mounting studs and nuts are provided on the
back of the grille assembly to securely attach
any Valcom V-1080 or V-1090 Flexhorn
speaker. Mounting holes must be drilled
through the Flexhorn housing before mounting
to the grille. Flexhorn speakers have a
mounting boss molded into the back of the
speaker flange at each corner. Drill a 7/32” hole
through the mounting boss. Remove the four
nuts from the studs, align speaker mounting
holes on the studs, then install and securely
tighten the nuts. NOTE: Volume control will
need to be set on the V-1080 before attaching
the Flexhorn to the grille assembly.
For model V-9880, connect the audio wires to
the Green (Tip/A) and Red (Ring/B) leads on the
Flexhorn speaker. Connect the power wires to
the White (-24VDC) and Black (GND) leads on
the Flexhorn speaker. The Flexhorn will have to
be removed from the grille assembly (remove
the four #8-32 KEPS nuts) to adjust the volume.
The volume control is accessible on the front of
the cone on the Flexhorn. After the volume is
adjusted, attach the Flexhorn to the grille
assembly.
For model V-9890, connect the audio wires to
the White (Tip/A) and Black (Ring/B) leads on
the Flexhorn speaker.
For model V-9809, make audio and power
connections as necessary for the type of
speaker used.
Align the grille/speaker assembly with the
enclosure. Install the four supplied tamperresistant screws through the grille into the
enclosure. Use the supplied security hex bit to
tighten the screws securely.
TECHNICAL ASSISTANCE
Assistance is available from the factory when
problems are encountered. Call (540) 563-2000
and press 1 for Technical Support or visit our
website at http://www.valcom.com.
Valcom equipment is not field repairable.
Valcom, Inc. maintains service facilities in
Roanoke, VA. Should repairs be necessary,
attach a tag to the unit clearly stating company
name, address, phone number, contact person
and the nature of the problem. Send the unit to:
Valcom, Inc.
Repair and Return Dept.
5614 Hollins Road
Roanoke, VA 24019-5056
2 947669
 Loading...